31 Set Up Preferences
This chapter contains these topics:
31.1 Setting Up Preferences (ECS)
JD Edwards World provides predefined preferences. Before you use preferences, you must perform some setup tasks to customize preferences for your specific business requirements. As your business grows and changes, you perform the same setup tasks to further customize preferences.
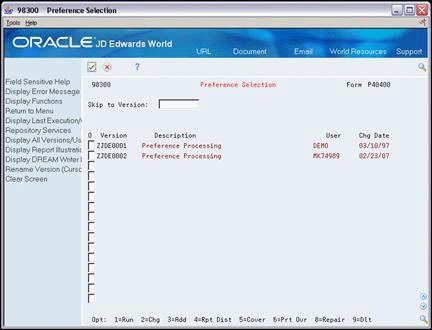
You must activate each preference that you want the system to use during processing. Preferences are activated within a DREAM Writer version of the Preference Processing program. The processing options contain a list on which you activate or deactivate each preference for processing by the system.
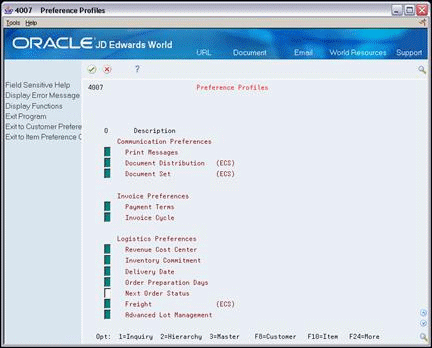
JD Edwards World displays all preferences in logical groups on the Preference Profiles form. You can use the Preference Master to define the order in which the preferences display. You can also use the Preference Master to activate or deactivate the display of the Effective Dates and Effective Quantity fields. When activated, these fields are displayed on the Preference Inquiry and Preference Profile Revisions form.
To save time while defining preferences, you can assign a customer or an item to a group. You can then define preferences once for a group rather than many times for several customers or items. For example, all customers for whom you apply the same payment terms could be grouped. Then, when you create payment term preferences, you can define one preference for the group.
For each preference type, you must define a hierarchy to indicate the order in which you want the system to apply preferences to sales orders.
31.2 Activating Preferences (ECS)
From ECS Sales Order Management (G4910), enter 27
From ECS Sales Order Advanced and Technical Ops (G491031), choose Preference Selection
You must activate each preference that you want the system to use during processing. Preferences are activated within a DREAM Writer version of the Preference Processing program. The processing options contain a list on which you activate or deactivate each preference for processing by the system.
You must set the processing options of the Sales Order Entry program to enable preference profile processing for all of the programs to which you want to apply preferences. The preferences you activate are used by the Sales Order Entry program as well as other programs, including Trip Creation and Maintenance, Customer Freight Calculation, and Supplier Freight Calculation.
Note:
To enable the Inventory Commitment preference, you must set a unique processing option in the Sales Order Entry program. This processing option is separate from the selection that enables all other preferences.Figure 31-1 Preference Selection (Activate) screen
Description of "Figure 31-1 Preference Selection (Activate) screen"
-
Choose the option to change the Preference Processing version you want to use.
-
Choose Processing Option Value(s) to display the Processing Options Revisions form.
Figure 31-2 Processing Options Revisions (1 of 2) screen
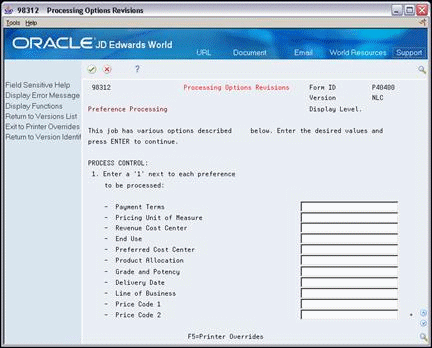
Description of "Figure 31-2 Processing Options Revisions (1 of 2) screen"
Figure 31-3 Processing Options Revisions (2 of 2) screen
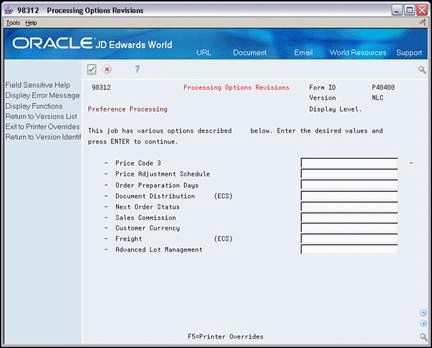
Description of "Figure 31-3 Processing Options Revisions (2 of 2) screen"
-
On Processing Options Revisions, choose each of the preferences you want to activate.
31.3 Setting Up the Preference Master (ECS)
From ECS Sales Order Management (G4910), enter 27
From ECS Sales Order Advanced and Technical Ops (G491031), choose Preference Profiles
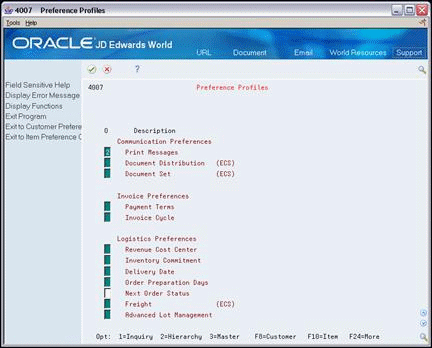
JD Edwards World displays all preferences in logical groups on the Preference Profiles form. You use the Preference Master to define the order in which the preferences display on the Preference Profiles form.
You also use the Preference Master to activate or deactivate the display of:
-
Individual preferences on the Preference Profiles form
-
The Effective Dates and Effective Quantity fields on the Preference Inquiry and Preference Maintenance forms
Complete the following tasks:
-
Define the order of preferences
-
Define the display of specific preferences
-
Define the display of specific preference fields
31.3.1 Defining the Order of Preferences (ECS)
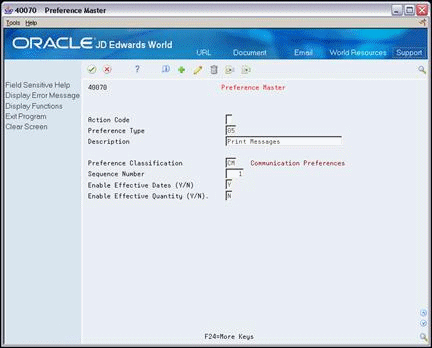
JD Edwards World displays all preferences in logical groups on the Preference Profiles form. You use the Preference Master to define the order in which the preferences display on the Preference Profiles form.
To define the order of preferences
-
Choose a preference.
-
On Preference Master, complete one or more of the following fields:
-
Description
-
Preference Classification
-
Sequence Number
-
31.3.2 Defining the Display of Specific Preferences (ECS)
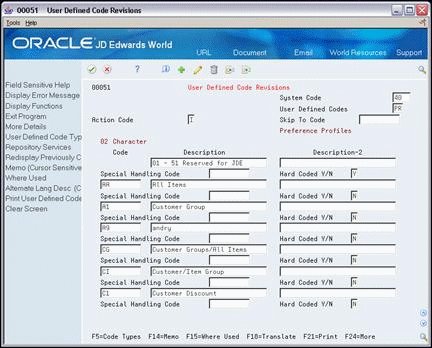
You use a special handling code to activate or deactivate the display of individual preferences on the Preference Profiles form. For example, to suppress the display of the Print Messages (ECS) preference, you can set the special handling code to 0. Then, when you access Preference Profiles, the system will not display the Print Messages (ECS) preference.
To define the display of specific preferences
On Preference Profiles
-
Choose a preference.
-
Access the Preference Master.
-
On the Preference Master form, use the Field Sensitive Help function on the Preference Type field to access the User Defined Codes Window.
Figure 31-6 User Defined Codes Window (Define Display) screen
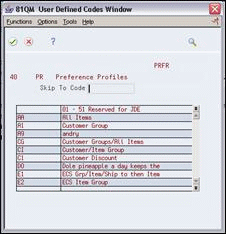
Description of "Figure 31-6 User Defined Codes Window (Define Display) screen"
-
On User Defined Codes Window, choose the User Defined Codes Maintenance function to access the User Defined Code Revisions form.
Figure 31-7 User Defined Code Revisions (Display of Preferences) screen
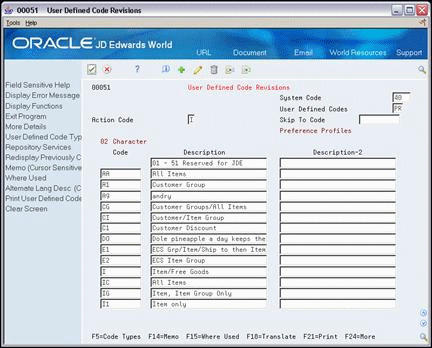
Description of "Figure 31-7 User Defined Code Revisions (Display of Preferences) screen"
-
On User Defined Code Revisions, access the fold area.
Figure 31-8 User Defined Code Revisions (Display of Preferences, Fold Area) screen
Description of "Figure 31-8 User Defined Code Revisions (Display of Preferences, Fold Area) screen"
-
-
Special Handling Code
-
31.3.2.1 What You Should Know About
| Topic | Description |
|---|---|
| Entering special handling codes | For preferences, a 1 in this field activates the display of the specific preference on the Preference Profiles form. Conversely, a 0 in this field deactivates the display of the specific preference on the Preference Profiles form. |
31.3.3 Defining the Display of Specific Preference Fields (ECS)
You can use the Preference Master form to activate or deactivate the display of the Effective Dates and Effective Quantity fields on the Preference Inquiry and Preference Maintenance forms.
If you activate the Effective Quantity field for a preference, no unit of measure conversions take place. Therefore, the system looks only for a preference with the same unit of measure as the unit of measure entered on the order.
For example, if you set up a preference with the unit of measure as LT (liters) and enter a sales order in gallons, the system will not select the preference because it does not convert the gallons to liters when searching preference records.
If you need the Effective Quantity fields active for a particular preference, you must create separate preferences for each unit of measure that can be used as the sales order transaction unit of measure.
To define the display of specific preference fields
On Preference Profiles
-
Choose a preference.
-
Access Preference Master.
-
On Preference Master, complete one or more of the following fields:
-
Enable Effective Dates
-
Enable Effective Quantity
-
31.4 Assigning Customers and Items to Groups (ECS)
From ECS Sales Order Management (G4910), enter 27
From ECS Sales Order Advanced and Technical Ops (G491031), choose Preference Profiles
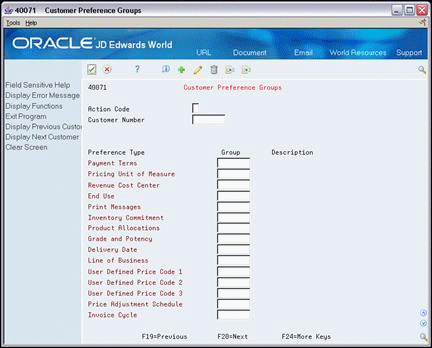
To save time while defining preferences, you can assign a customer or an item to a group. You can then define preferences once for a group rather than many times for several customers or items. For example, you can group all customers for whom you apply the same payments terms. Then, when you create payment term preferences, you can define one preference for the group.
Complete the following tasks:
-
Assign a customer to a customer group
-
Assign an item to an item group
31.4.1 Before You Begin
-
Set up user defined codes for the customer group and item group. See Work with User Defined Codes in the JD Edwards World Technical Foundation Guide.
31.4.2 Assigning a Customer to a Customer Group (ECS)
You can assign a customer to a customer group for any preference.
For example, you can identify some customers as preferred customers and create specific payment terms for them. To do this:
-
Set up a "Preferred" customer group UDC
-
Assign all preferred customers to this group
-
Create one Payment Terms (ECS) preference for the preferred customer group
You can assign any new preferred customers to the preferred customer group. The system automatically applies the Payment Terms (ECS) preference to all of the new customer's sales orders.
To assign a customer to a customer group
On Preference Profiles
-
Access Customer Preference Groups.
Figure 31-9 Customer Preference Groups screen
Description of "Figure 31-9 Customer Preference Groups screen"
-
On Customer Preference Groups, complete the following fields:
-
Customer Number
-
Group
-
31.4.3 Assigning an Item to an Item Group (ECS)
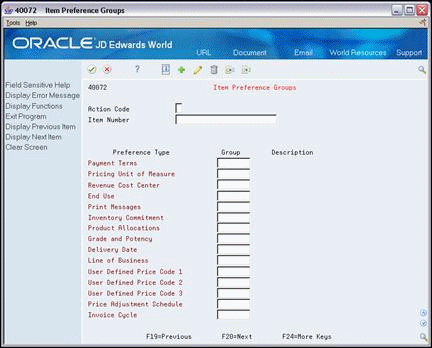
You can assign items to an item group for any preference.
For example, you might want to group like items to which the same Sales Commission (ECS) preference applies. To do this:
-
Set up a UDC that describes the items in this group
-
Assign all items to this group
-
Create one Sales Commission (ECS) preference for the item group
To assign an item to an item group
On Preference Profiles
-
Access Item Preference Groups.
Figure 31-10 Item Preference Groups screen
Description of "Figure 31-10 Item Preference Groups screen"
-
On Item Preference Groups, complete the following fields:
-
Item Number
-
Group
-
31.5 Arranging the Preference Hierarchy (ECS)
From ECS Sales Order Management (G4910), enter 27
From ECS Sales Order Advanced and Technical Ops (G491031), choose Preference Profiles
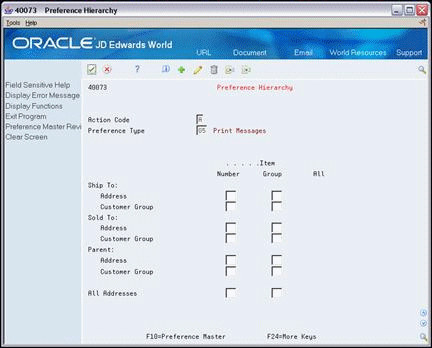
For each preference type, you must define a hierarchy to indicate the order in which you want the system to apply preferences to sales orders.
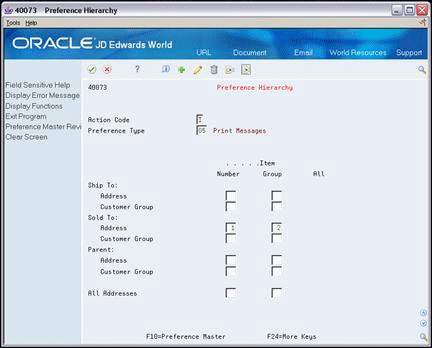
The Preference Hierarchy form contains rows identifying customers and customer groups and columns identifying items or item groups. You use the intersections of the rows and columns to enter your hierarchy sequence.
When the system searches for preference information, it starts with the hierarchy to determine the order in which to search preference information. The system begins with the intersection in which you entered 1 and searches for records defined for that customer and item combination. If no preference defined for that intersection is found, the system identifies the intersection in which you entered 2, and so forth.
Note:
JD Edwards World suggests that when you define hierarchies, you start with specific intersections, that is, item only and customer only, and work out to the broader groups.To arrange the preference hierarchy
Figure 31-11 Preference Profiles (Preference Heirarchy) screen
Description of "Figure 31-11 Preference Profiles (Preference Heirarchy) screen"
-
Choose a preference.
-
On Preference Hierarchy, type consecutive numbers to arrange the preference hierarchy for the specific preference.
31.5.1 Example: Preference Hierarchy for Payment Terms
Figure 31-13 Preference Heirarchy (Payment Terms) screen
Description of "Figure 31-13 Preference Heirarchy (Payment Terms) screen"
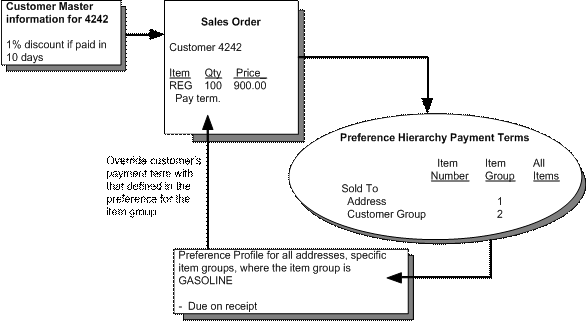
When you enter an order, the system determines from the hierarchy for this preference that it should search first for information for a single Sold To address/item group combination and, second, for a group of Sold To addresses/item group combinations.
Figure 31-14 Example Preference Hierarchy
Description of "Figure 31-14 Example Preference Hierarchy"
In this case, the system overrides the normal payment term for orders to that customer for items from the group with a due upon receipt payment term.
