64 Set Up Batch Approval/Post Security
This chapter contains the topic:
64.1 Setting Up Batch Approval/Post Security
From Master Directory (G), choose Hidden Selection 27
From Advanced & Technical Operations (G9), choose Security & System Admin
From Security & System Administration (G94), choose Security Officer
From Security Officer (G9401), choose Batch Approval/Post
Batch Approval/Post security restricts the approval and posting of batches to certain users. Security can be set up for General Ledger, Accounts Payable and Accounts Receivable systems. You set up a secured user and supervisor approval names:
Note:
It is important to complete all of these steps. If you skip any of the steps, Batch Approval/Post Security does not work.To set up Batch Approval/Post Security
-
On Batch Approval/Post, choose F5 to exit to the Batch Approval/Post Security Revisions program (P0024) to set up the approved and secured users.
Figure 64-1 Batch Approval/Post Security screen
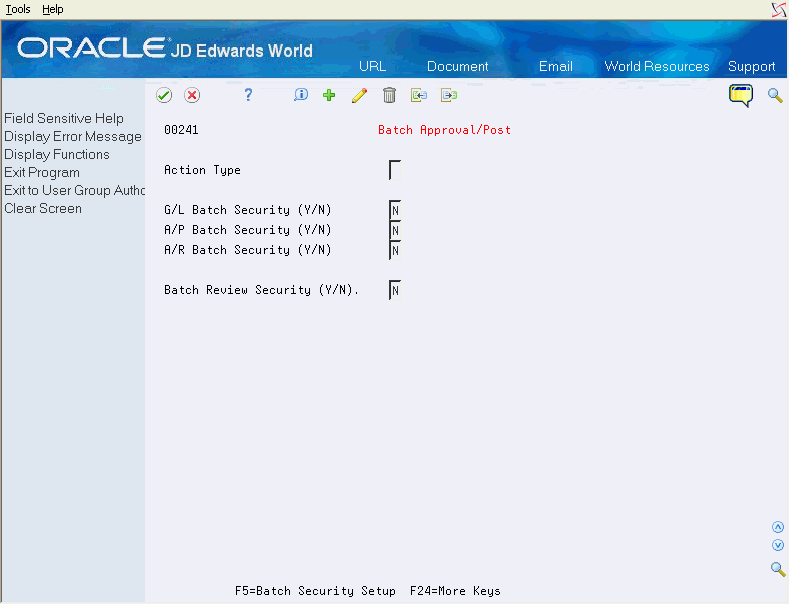
Description of "Figure 64-1 Batch Approval/Post Security screen"
-
On Batch Approval/Post Security, complete the following fields:
-
Approved by
Approved by user has authority to approve and post batches.
-
Secured User
Secured user does not have authority to approve or post batches.
Figure 64-2 Batch Approval/Post Security (Approved, Secured) screen
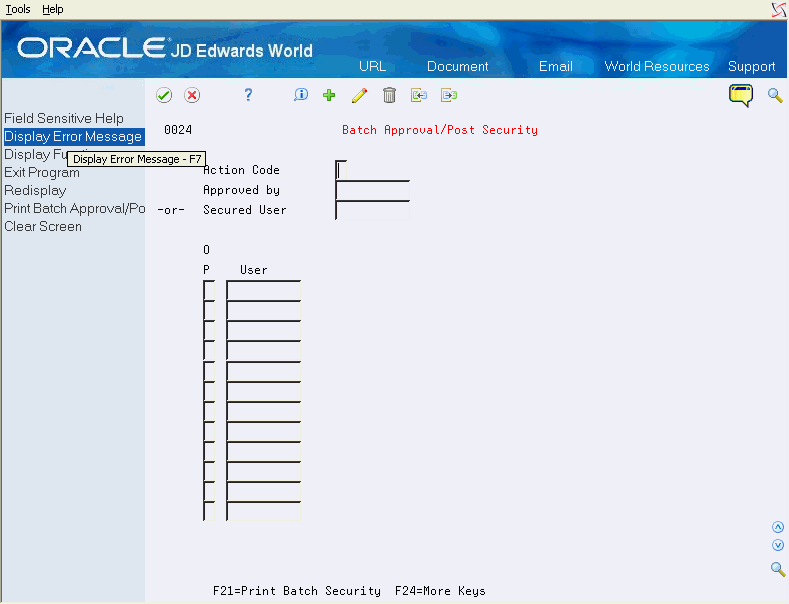
Description of "Figure 64-2 Batch Approval/Post Security (Approved, Secured) screen"
-
-
Enter user IDs in the User fields for those batches that the Approved by user can approve and post.
-
*ALL is valid if Approved By User has authority to all batches
-
Group profile or *PUBLIC is not valid.
-
-
You can select one of the following options for the Option field:
-
Option 1 - Memo: Use this option to enter free-form text with any notes, comments or explanations about the security record. If a memo exists for a record, the selection option field will display in reverse image.
-
Option 9 - Delete/Cancel: Use this option to delete a security record. Alternatively, a record can be deleted by blanking out all the fields on the subfile line.
Press F9 to display an inquiry again after an update.
To add new lines to an existing profile or program, inquire first. You may then enter 'C' in the Action Code field and enter new information on either the first available blank space or over an existing profile. If you enter 'C' in the Action Code field and enter information in the first available blank space, the system adds the record. If there is a 'C' in the Action Code field and you type over an existing record, that record's information is changed, including the key.
Use the 'D' action code cautiously. If you enter 'D' in the Action Code field after you have inquired into a profile or program, the system deletes all records in the subfile. To delete just one record in the subfile, enter 'C' in the Action Code field, scroll down and clear the ID in the line that has to be deleted, and press Enter. You can also delete a record by entering 9 in the subfile selection field of the line that has to be deleted.
-
-
Exit (F3) to the Batch Approval/Post screen.
-
Enter a Y or N for each of the batch security approval/post programs.
Figure 64-3 Batch Application/Post Security (Approval/Post) screen
Description of "Figure 64-3 Batch Application/Post Security (Approval/Post) screen"
-
Access the Constants and enter Y in the Management Approval of Input field for each system.
You can locate the Constants for each system on the following Setup menus:
-
General Accounting Constants (G0941)
-
Accounts Receivable Constants (G0341)
-
Accounts Payable Constants (G0441)
Figure 64-4 General Accounting Constants screen
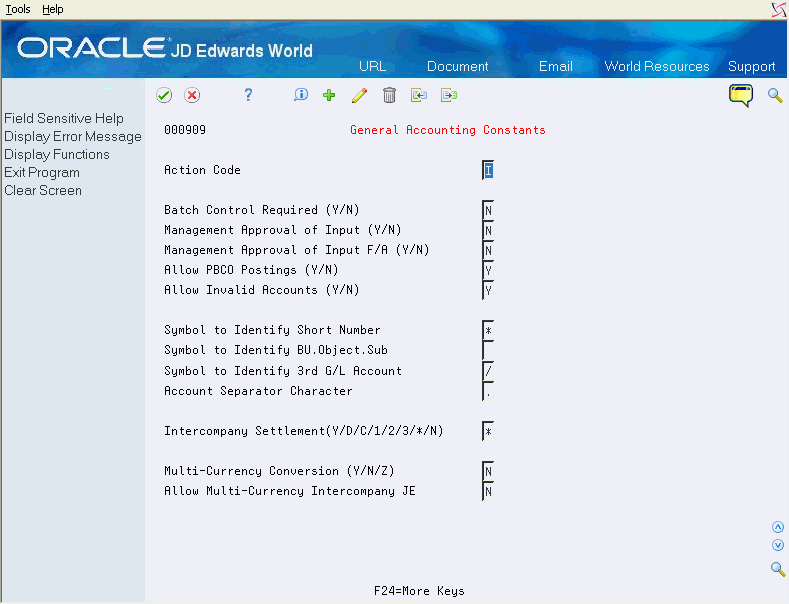
Description of "Figure 64-4 General Accounting Constants screen"
-