Configuring Large Language Model (LLM) REST Service
Overview
Oracle E-Business Suite Release 12.2.15 introduces features that generate text for specific business functions by invoking a Large Language Model (LLM).
Key Features
The LLM REST service provides the following key functionalities:
-
Invoke OCI AI Services to gain insights from EBS data.
-
Allow system administrators to configure prompts, data API, and configuration parameters.
-
Allow customization of prompts, data procedures, and configuration.
-
Implement context versioning with response metrics for refinement.
-
Use the data API to pass an additional prompt to the LLM.
-
Log LLM responses and track user actions (Accept, Reject, Regenerate).
-
Leverage Service Invocation Framework to support LLM REST service invocation.
High Level Architecture
The following diagram illustrates the high level architecture of the Oracle E-Business Suite REST service invocation using LLM:
Architecture Diagram for Oracle E-Business Suite REST Service Invocation Using LLM
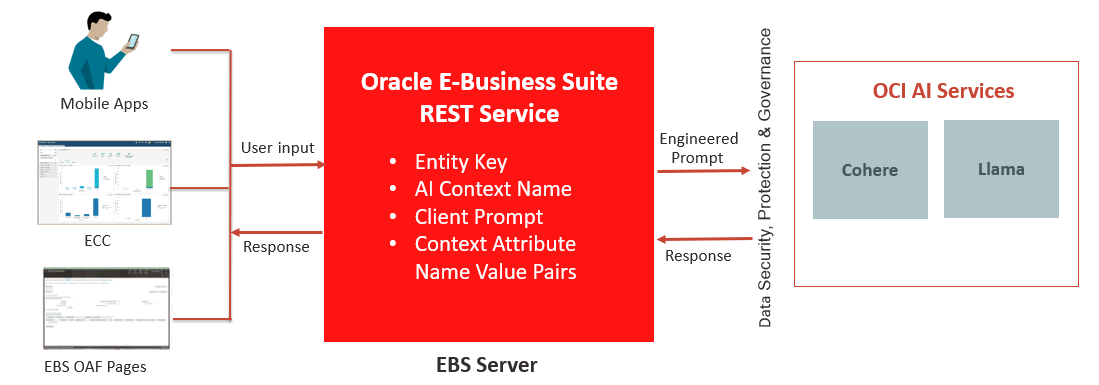
The preceding diagram depicts that when a user sends a request through an Oracle E-Business Suite application, the system reads data in Oracle E-Business Suite and calls AI Services in Oracle Cloud Infrastructure (OCI) for LLM to process the specific Oracle E-Business Suite data. The system returns generated data as a response to the application user. The user accepts, rejects, or edits the generated text if necessary before saving the transaction.
The OCI AI Services supporting Cohere and Llama models will allow users to configure the prompt and configuration parameters for Oracle E-Business Suite applications use cases. The OCI AI Services can point to one or more LLM instances.
Accessing the LLM Service User Interface
A system administrator can access the LLM service UI pages through a new responsibility called LLM Service Administrator to configure service accounts, instances, and contexts as required for LLM service invocation. The administrator can also monitor all LLM service invocations through LLM Service Monitor.
This appendix explains how to configure LLM service parameters and how to use LLM Service Monitor to track the LLM service invocation details. Specifically, it includes the following topics:
Additionally, this appendix includes the API information that invokes LLM REST services and provides the context feedback. See: LLM REST Service APIs.
Setting Up and Configuring LLM Service Parameters
A system administrator or a user who has the LLM Service Administrator responsibility can log in to Oracle E-Business Suite and access the LLM service UI pages to configure LLM service parameters. This section includes the following topics:
Configuring Service Accounts
To protect LLM service content and its associated infrastructure from unauthorized access, user authentication information is configured in a service account.
To configure service accounts for using LLM authorization parameters, select the LLM Service Administrator responsibility and then LLM Service Accounts from the navigation menu. The LLM Service Account Search page appears with existing service accounts listed in a table.
LLM Service Account Search Page
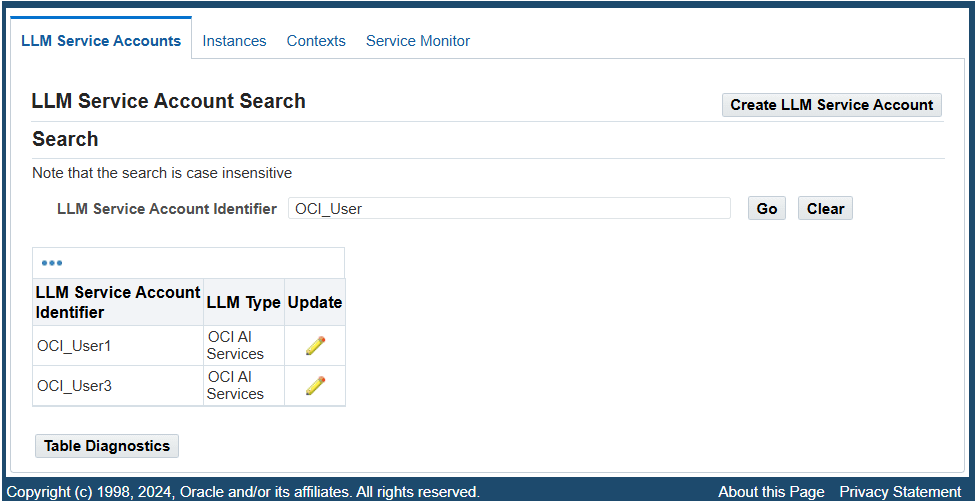
The system administrator can perform the following tasks in the LLM Service Account Search page:
Searching LLM Service Accounts
To locate desired LLM service accounts, enter an account identifier as the search value in the "LLM Service Account Identifier" field and then click Go. The accounts that match the account identifier value are retrieved and displayed in a table.
Creating and Updating LLM Service Accounts
In addition to searching existing service accounts from the LLM Service Account Search page, the system administrator can create a new service account and update an existing account if needed.
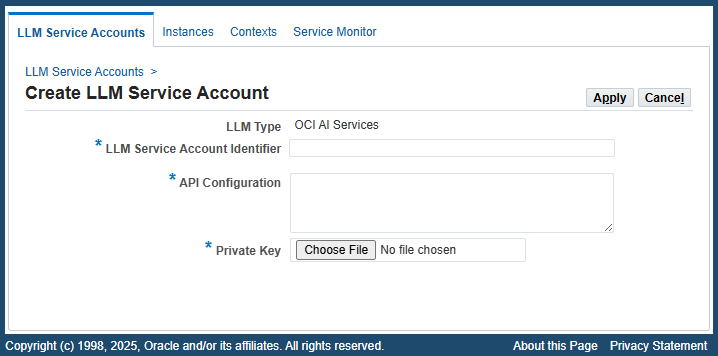
Creating a New LLM Service Account
To create a new LLM service account, click Create LLM Service Account. The Create LLM Service Account page appears. Enter the following fields to create an account with authorization parameters:
Create LLM Service Account Page
-
LLM Type: "OCI AI Services" is automatically displayed as the value in this read-only field.
-
LLM Service Account Identifier: Enter a unique identifier for this account, such as OCI_user1.
-
API Configuration: Enter the configuration information to authenticate the specified OCI user who will invoke LLM REST services.
Use the following steps to obtain the API configuration information:
-
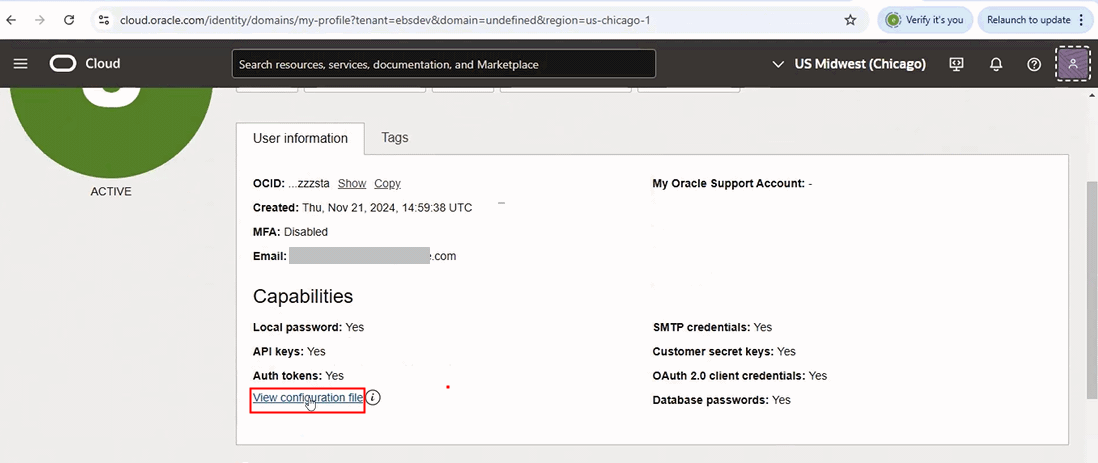
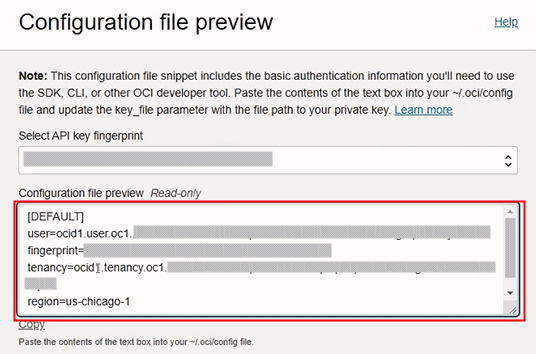
Log in to Oracle Cloud page (https://cloud.oracle.com). Choose Profile and then User Settings.
Under the User information tab, click the View configuration file link.
"View configuration file" Link is Highlighted
-
In the Configuration file preview page, copy the configuration information from the Configuration file preview field.
Copy the Highlighted Configuration Information
-
Paste the configuration information copied in step 2 to this API Configuration field.
-
-
Private Key: Click Choose File to upload the private key for user authorization.
Use the following steps to download and save the private key:
-
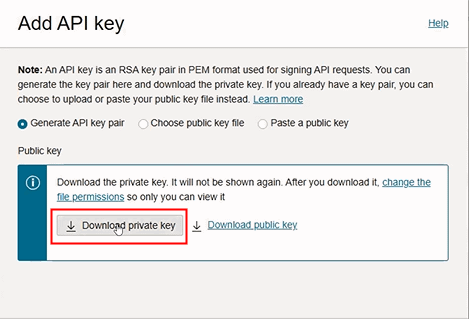
Log in to Oracle Cloud page (https://cloud.oracle.com). Choose Profile and then User Settings.
In the Resources region, choose the API keys link to display the API keys region.
"Add API key" Button in the API keys Region

-
Click Add API key to display the Add API key page.
-
Click Download private key. Save the downloaded private key.
"Download private key" Button is Highlighted in the Add API key Page
-
Click Apply to save your entry. The newly-created LLM service account is automatically added to the LLM service accounts list in the LLM Service Account Search page.
Updating an Existing LLM Service Account
Once a service account is created, a system administrator can modify the account information if needed.
To update an existing service account, click the Update icon in the LLM service account table. The Update LLM Service Account page appears. The administrator can update the values of the API Configuration and Update Private Key fields for the selected account.
Update LLM Service Account Page
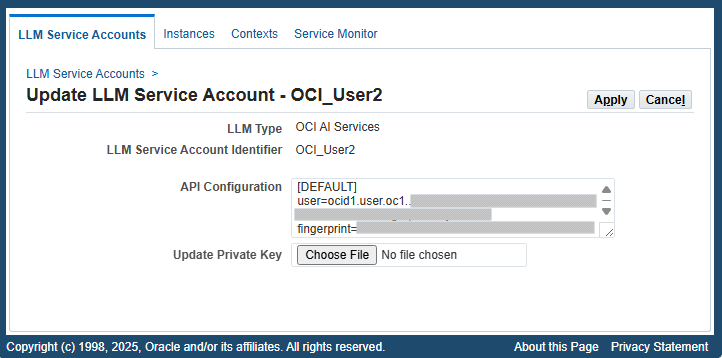
To view the API Configuration information in a larger text field, drag the triangle icon on the lower right corner of the text field to increase its height and width to display the full API configuration information.
Click Apply to save changes.
Configuring Instances
An instance defines an LLM service endpoint and configuration information.
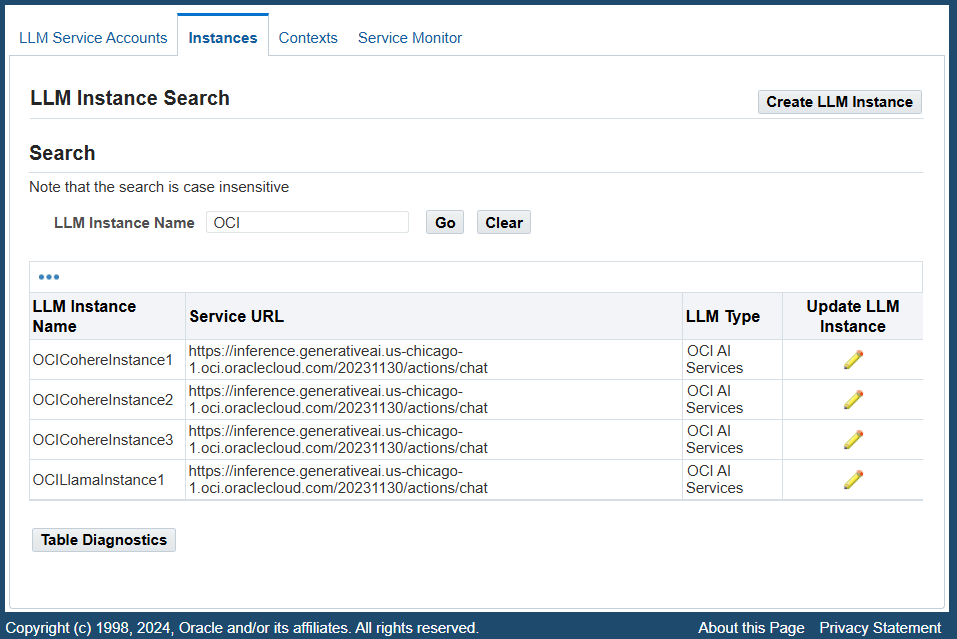
To configure LLM instances, log in to Oracle E-Business Suite as a user who has the LLM Service Administrator responsibility, then select Instances from the navigation menu. The LLM Instance Search page appears with existing instances shown in a table.
LLM Instance Search Page
Similar to the service accounts described earlier, a system administrator can perform the following tasks in the LLM Instance Search page:
Searching Instances
In the Search region, enter a search value in the "LLM Instance Name" field and then click Go. The instances that match the search value are retrieved in the search result table. Each instance listed in the table contains Instance Name, Service URL, and LLM Type information.
Creating and Updating Instances
The system administrator can create a new instance or update an existing instance from the LLM Instance Search page.
To create a new LLM instance, click Create LLM Instance in the LLM Instance Search page. The Create Service page appears.
Create Service Page
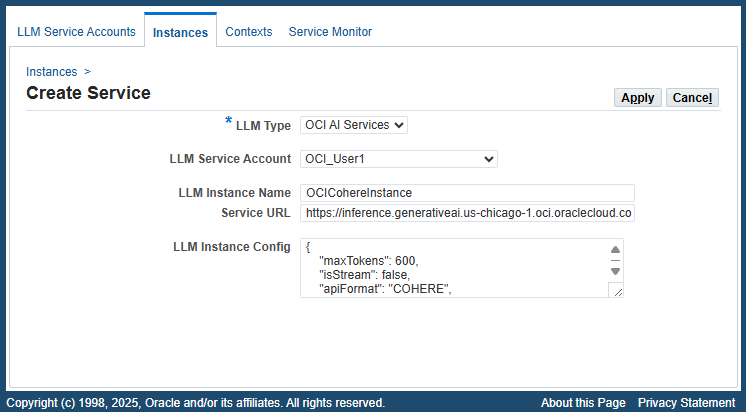
Enter the following fields to create a service:
-
LLM Type: Select a desired type from the list of values. For example, select "OCI AI Services".
-
LLM Service Account: Select a desired service account, such as
OCI_user1, to associate with this instance. -
LLM Instance Name: Enter a unique name for this instance, such as OCICohereInstance.
-
Service URL: Enter a service endpoint URL.
-
LLM Instance Config: Enter the instance configuration information for the LLM providers in JSON format. For example:
   {
    "maxTokens": 600,
    "isStream": false,
    "apiFormat": "COHERE",
    "frequencyPenalty": 1.0,
    "presencePenalty": 0,
    "temperature": 0.75,
    "topP": 0.7,
    "topK": 1,
    "compartmentId": "ocid1.compartment.oc1..xxxxxxxxxxxxxxxxxxxxxxxxxxxxxxxxxxxxxxxxxxxxxxxxxxxxxxxxxxxxx",
    "modelId": "cohere.command-r-08-2024",
    "servingType": "ON_DEMAND"
    }
Note that the CompartmentId and modelId properties can be obtained from the Oracle Cloud page.
Click Apply. The newly-created instance is automatically added to the instances list in the LLM Instance Search page.
From the instances table in the LLM Instance Search page, click the Update icon for a desired instance. The Update Service page appears. The system administrator can make appropriate changes for the selected instance.
Update Service Page

To view the LLM Instance Config field details, drag the triangle icon on the lower right corner of the text field to increase its height and width to display the full instance configuration information.
Click Apply to save changes.
Setting Up Context
Contexts are use cases for Oracle E-Business Suite products. After configuring service accounts and instances, a system administrator needs to create contexts with required parameters to constitute request messages for the defined instances. These parameters include prompt, data API, and instance configuration.
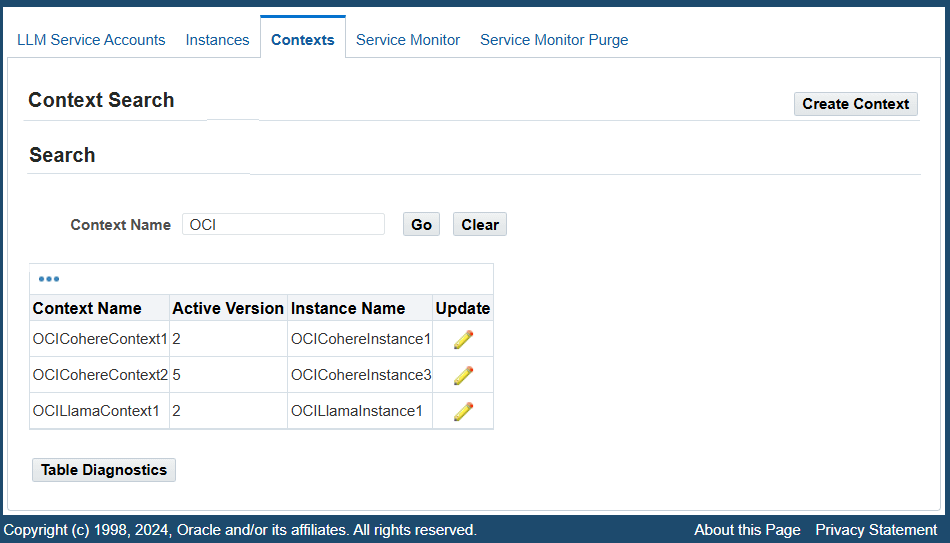
To access the Contexts page, select Contexts from the navigation menu after logging in to Oracle E-Business Suite as a user who has the LLM Service Administrator responsibility. The Context Search page appears with existing contexts shown in a table.
Context Search Page
A system administrator can perform the following tasks in this page:
Searching Contexts
In the Search region, enter a search value in the "Context Name" field and then click Go. The contexts that match the search value are retrieved and displayed in the search result table. Each context listed in the table contains the context name, active version, and instance name information.
Click the Update icon in the table to modify an existing context. See: Updating an Existing Context.
Creating and Updating Contexts
This section includes the following topics:
To create a new context, click Create Context in the Context Search page. The Create Context page appears.
Create Context Page
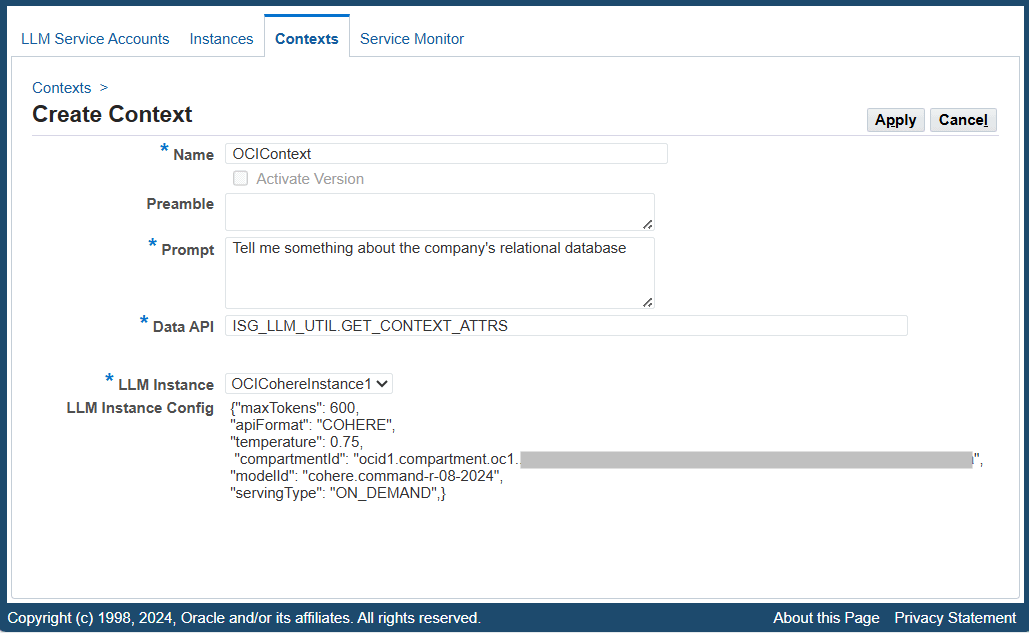
Enter the following fields to create a new context:
-
Name: Enter a unique name for this context.
The Activate Version checkbox is not enabled until this new context is created and available for modification later. See: Updating an Existing Context.
-
Preamble (Optional): Enter preamble information to set context for LLM. Currently the preamble is not used for "OCI AI Services".
-
Prompt: Enter the actual message or instructions to be sent as a payload of a request.
For example, "Tell me something about the company's relational database."
-
Data API: Enter a PL/SQL data API in the format of
<package_name>.<function_name>. The data API is meant for generating an additional prompt to be appended to the "Prompt" of the LLM request payload. For example, enter "ISG_LLM_UTIL.GET_CONTEXT_ATTRS".For more information about the PL/SQL data API, see Data API.
-
LLM Instance: Select a desired instance name to be associated with this context. Once an instance is selected, the associated instance configuration information is automatically populated in the next LLM Instance Config field.
-
LLM Instance Config: This field is automatically populated based on the selected LLM Instance. The administrator can modify the existing configuration if needed.
Click Apply to save the entry and return to the Search Context page.
The newly-created context is added to the contexts list with a version number assigned. The version number is incremented after each modification, provided the specific context-version combination has been used for invocations. A system administrator can activate a desired version of the context if necessary. For more information about activating a version, see Updating an Existing Context.
To improve or optimize response messages or generated text for a specific business function, a system administrator can update or fine-tune the configuration by modifying the prompt, API, or instance configuration for a given context.
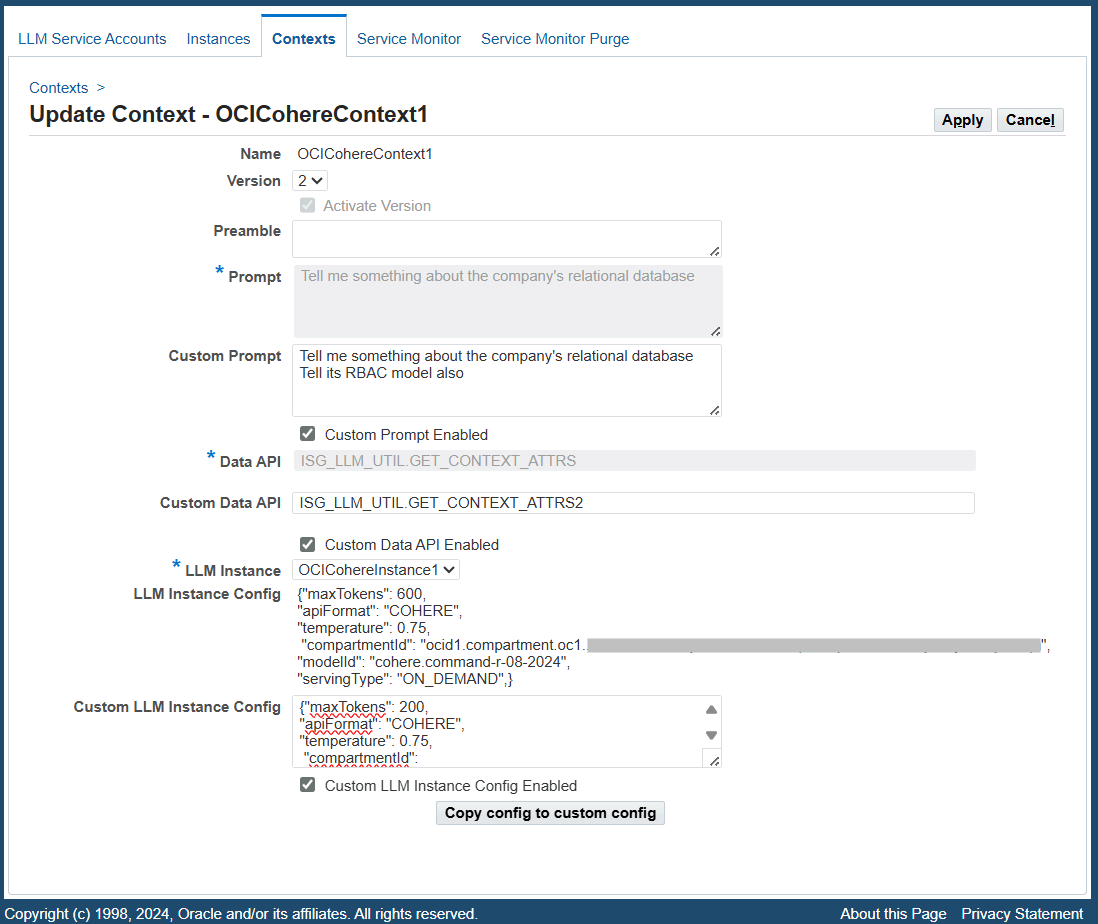
To update a context, click the Update icon in the context table. The Update Context page appears. The administrator can make appropriate changes for this selected context.
Update Context Page
-
Version: This field displays the latest version of the selected context and whether this version is active or not based on the read-only Activate Version checkbox. The administrator can change the default value in this field by selecting a desired version number from the list of values for the update.
To activate or deactivate a different version of a context, choose a desired version number first and then select or deselect the Activate Version checkbox. Note that there can only be one activated version for a context.
-
Preamble: Update this preamble information if desired.
-
Custom Prompt: Enter a new prompt or update the existing prompt if needed.
For example, "Tell me something about the company's relational database. Tell its RBAC model."
Select the Custom Prompt Enabled checkbox to enable the custom prompt entered here for the request.
-
Custom Data API: Enter a new data API if needed. For example, enter "ISG_LLM_UTIL.GET_CONTEXT_ATTRS2".
Select the Custom Data API Enabled checkbox to enable the custom data API (ISG_LLM_UTIL.GET_CONTEXT_ATTRS2) for use in the invocation.
-
LLM Instance: Select a different instance if needed. The associated instance configuration is automatically displayed in the LLM Instance Config field.
-
Custom LLM Instance Config: Enter the new configuration for the instance if needed. To quickly update the configuration, click Copy config to custom config to copy and paste the existing configuration to this field first, and then modify the parameter values if needed. For example, change the "maxTokens" value from 600 to 200 if desired.
Select the Custom LLM Instance Config Enabled checkbox to enable the new or custom LLM instance configuration.
Click Apply to save changes.
Once the update is complete successfully, if invocations already exist for the context, then its version number will be incremented by 1 and shown in the context table. The new version replaces the previous version to become the active version; the previous version becomes inactive. If there is no existing invocation for the context, the version number remains unchanged.
Monitoring and Managing LLM Service Invocation Through LLM Service Monitor
The LLM Service Monitor provides monitoring and auditing features for tracking all LLM service invocations. Information about each invocation—including its context, request and response messages, status, and user feedback—is captured in the LLM Service Monitor.
Accessing LLM Service Monitor for LLM Services
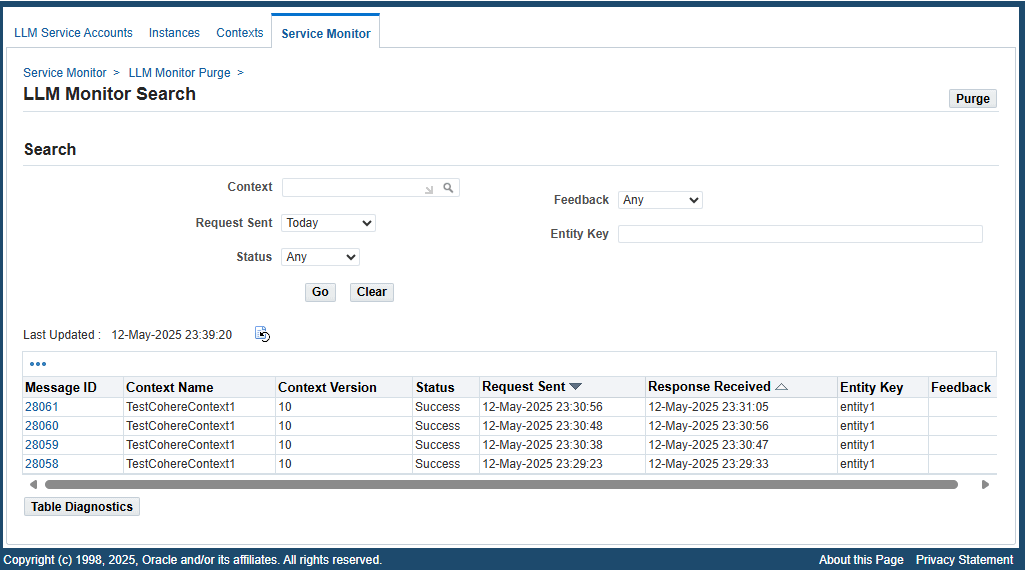
To access the LLM Service Monitor page for LLM services, select Service Monitor from the navigation menu after logging in to Oracle E-Business Suite as a user who has the LLM Service Administrator responsibility. This displays the LLM Monitor Search page where all LLM service invocations can be monitored.
LLM Monitor Search Page
A system administrator can perform the following activities through this page:
Searching Requests
To locate a desired request, perform a search by entering search criteria in the Search region of the LLM Monitor Search page. These criteria include context, request sent time, entity key, user feedback, and request status.
-
Context: Select a desired context name from the list of values.
-
Request Sent: Select a desired value from the list of values. It includes "Any Time", "Today", "This Week", "Last 2 Weeks", "Last 30 Days", "Last 60 Days", and "Last 90 Days". By default, "This Week" is selected.
Note: All the selection values listed here include the current day (today) except "Any Time". For example, "This Week" means the last 7 days, including the current day (today). "Any Time" means a blind search of requests sent regardless of the Request Sent date.
-
Status: Select a desired value from the list of values for your search. It includes "Any", "Failure", "In Process", "Received", and "Success". By default, "Any" is selected.
-
Feedback: Select a desired value from the list of values. It includes "Any", "Accept", "Regenerate", and "Reject". By default, "Any" is selected.
-
Entity Key: Enter a desired entity key for your search.
Click Go. All entries that match the search criteria will be retrieved and listed in a table.
From the search result table, the system administrator can click a desired Message ID link to view the request and response message details for the selected LLM service. See: Viewing Request and Response Details.
Viewing Request and Response Details
To view a desired LLM service invocation, click the Message ID link from the search result table. The Message page appears for the selected context.
Message Page
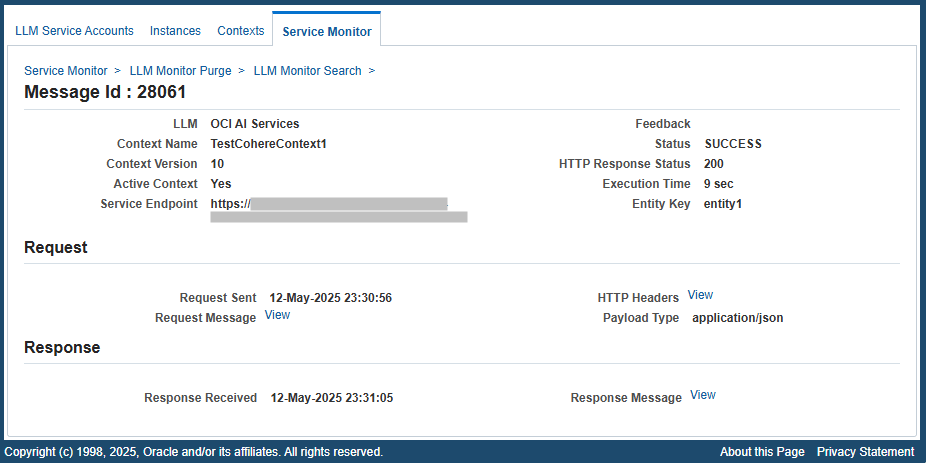
This page displays the invocation details, along with the Request region and Response region. If the request failed, then an additional Fault Details region will be displayed.
The invocation information includes the LLM Type, Context Name, Context Version, Active Context (Yes or No), Service Endpoint, Status, Entity Key, HTTP Response Status, Feedback, and Execution Time.
Fault Details Region (Conditional)
This region appears only if the request has a "Failure" status.
Fault Type: Depending on the nature of the fault, the value could be one of the following types:
-
Client Fault: Service exceptions returning 4xx series (such as 401) HTTP status codes are client-side faults.
-
Technical Fault: Service exceptions returning 5xx series (such as 500) HTTP status codes are technical faults.
Message: The fault code or the first 150 characters of the error message are shown.
Request Region
This region contains the LLM service invocation request information, including the request sent date and time, HTTP headers, request message, and payload type (JSON).
-
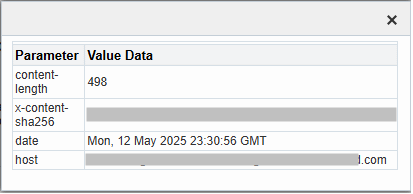
Click the HTTP Headers View link if it is available to view the HTTP Headers sent in the request.
A Sample HTTP Header Page
-
Click the Request Message View link if it is available to view the content in HTTP body sent as the request.
A Sample Request Message

Note that "Tell me something about the company's relational database" is the prompt entered in a context. "Attributes - Sample, Company - Oracle" is the additional message generated from the data API (ISG_LLM_UTIL.GET_CONTEXT_ATTRS) specified in a context.
Response Region
This region contains the LLM service invocation response information, including the response received date and time and the response message.
Click the Response Message View link if it is available to view the content in the HTTP body received as the response message.
For example, based on the request message described earlier in the Request region, the LLM service invocation returns the generated text about Oracle and its relational database as the response message.
Purging LLM Service Invocation Monitor Data
LLM Service Monitor provides the purge feature, allowing a system administrator to purge LLM service invocation messages that have been collected and stored in the Oracle E-Business Suite database for a period of time.
To purge desired invocation data, click Purge in the LLM Monitor Search page to launch the LLM Monitor Purge page.
LLM Monitor Purge Page

Enter the following purge parameters in the LLM Monitor Purge Data region:
-
Request Name: Specify the request name for your request.
-
Status: Specify a desired status from the drop-down menu for your request.
-
Start Date: Identify the start date of the date range for your purge.
-
End Date: Identify the end date of the date range for your purge.
Click Submit. Once the purge request has been submitted successfully, a request number will be automatically generated. LLM Service Monitor will purge all monitored LLM invocation data that match the purge criteria within a specified date range.
LLM REST Service APIs
Overview
This section describes the LLM REST Service APIs that are defined in the LLMInvocationUtils.java class. Information about the Data API is also included in this section.
LLMInvocationUtils.java
Description: The LLMInvocationUtils class is an LLM utility class. It invokes LLM REST services and also updates the context feedback. This utility class is located in the oracle.apps.fnd.wf.bes Java package.
Important: Java is case-sensitive, and all Java method names begin with a lowercase letter to follow Java naming conventions.
The following list shows the APIs in this LLMInvocationUtils class:
invokeLLMService
Syntax
public Map<String, String> invokeLLMService(String entityKey,

                                  String contextName,

                                  String clientPrompt,

                                  Map<String, String> contextAttrs) throws LLMInvocationException
Description
This API invokes an LLM REST service using the given parameters and returns the response. Specifically, it performs the following tasks:
-
Create a business event object with the event name
oracle.apps.fnd.isg.sif.llmand event key in the format of<entityKey>:<contextName>:<systemDate>. -
Set the given parameters as event properties.
-
Raise the event.
The subscription to this event will perform the following tasks:
-
Obtain the service account, instance, and context data from the database using the context name.
-
Prepare the request payload.
-
Invoke the LLM REST service.
-
Return the text property value of the response and message Id as name-value pairs.
-
Throw LLMInvocationException if there are any errors raised during the invocation.
-
Arguments (input)
| Parameter | Description |
|---|---|
| entity key | Primary key of the entity |
| contextName | Name of the context |
| clientPrompt | Prompt which can be sent from client |
| contextAttrs | The context attribute name-value pairs |
updateLLMContextFeedback
Syntax
public boolean updateLLMContextFeedback(int messageId,

                            String feedback) throws Exception
Description
This API updates the LLM Context Feedback for the given message Id. The valid feedback values are Accept, Reject, and Regenerate. It returns false if the feedback value is invalid and returns true if the feedback is updated successfully. It throws an exception for any other errors.
Arguments (input)
| Parameter | Description |
|---|---|
| messageId | Invocation message Id |
| feedback | Feedback value |
Data API
PL/SQL Syntax
function <api_name>(p_entity_key varchar2,

                    p_client_prompt in varchar2,

                    p_param_list in WF_PARAMETER_LIST_T) return VARCHAR2;
Description
This data API generates an additional prompt using the entity key, client prompt, and context attributes parameters.
<api_name> represents the name of the data API.
Arguments (input)
| Parameter | Description |
|---|---|
| p_entity_key | Primary key of the entity |
| p_client_prompt | Prompt which can be sent from a client |
| p_param_list | A list of context attribute name and value pairs |