Setting Up Oracle Alert
This chapter describes additional ways you can set up your Oracle Alert installation to meet your organization's exception-reporting needs.
This chapter covers the following topics:
- Setting Up Oracle Alert
- Specifying Oracle Alert Options
- Defining Boilerplate Message Text
- Defining Other Options for Oracle Alert
- Setting Up the :MAILID Implicit Input
- Defining Alerts for Custom Oracle E-Business Suite Applications
- Creating a Responsibility for Your Custom Application Alert Manager
- Oracle Alert Naming Conventions
- Registering Custom Applications
- Registering Application Installations
Setting Up Oracle Alert
Before you define an alert, you may want to review this section to make sure you have specified the necessary options to customize your Oracle Alert installation. This section describes:
Specifying Oracle Alert Options
You use the Oracle Alert Options form to define and maintain the options Oracle Alert uses when checking your alerts. This form contains tabbed regions that each contain multiple options you can set.
-
Message Elements - to specify the boilerplate text you want to appear in your message actions.
-
More Options - to specify other miscellaneous options for Oracle Alert.
The Mail Systems, Mail Server Options, and Response Processing tabbed regions are no longer used.
Note: Oracle Alert-specific options appear only in the Oracle Alert Options form. Profile options that are common to all Oracle E-Business Suite appear in the Personal Profile Values and System Profile Values forms. See: Common User Profile Options, Oracle E-Business Suite User's Guide. See: User Profiles and Profile Options in Oracle Application Object Library, Oracle E-Business Suite Setup Guide.
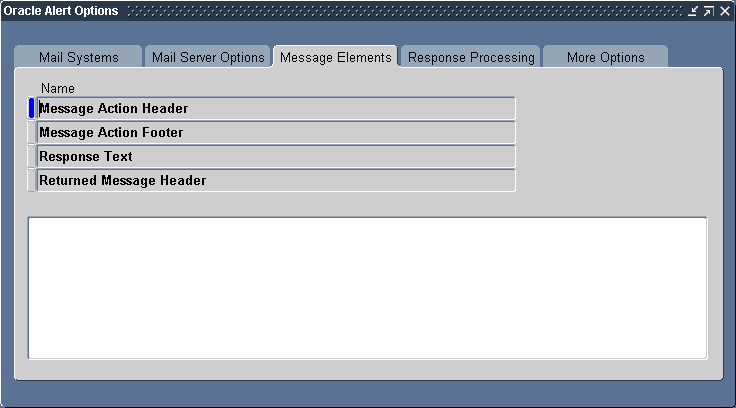
Defining Boilerplate Message Text
You can use the Message Elements tabbed region of the Oracle Alert Options form to define constant text that you want to appear in your message actions.
To define constant text in your message actions
-
Navigate to the Oracle Alert Options form.
-
Display the Message Elements tabbed region.
The Oracle Alert Options Window: Message Elements Tab
-
Select the message text option you want to specify constant text for. There are four message text options that you can edit:
-
Enter or edit the text for the selected option in the Text field below.
-
Save your changes.
Related Topics
Overview of Response Processing
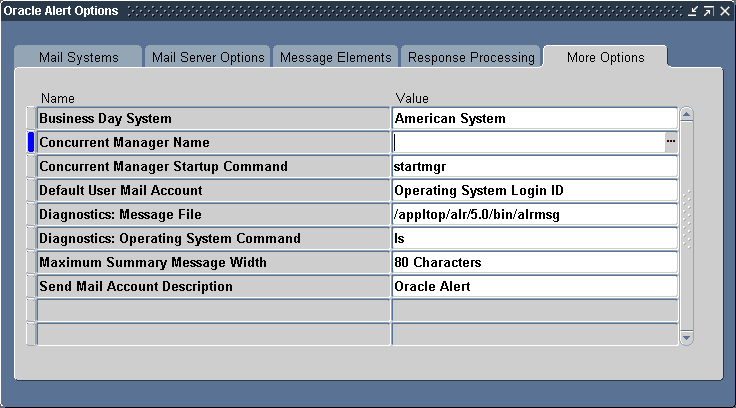
Defining Other Options for Oracle Alert
You can use the More Options tabbed region in the Oracle Alert Options form to define other miscellaneous options for your Oracle Alert installation.
To define other miscellaneous options
-
Navigate to the Oracle Alert Options form.
-
Display the More Options tabbed region.
The Oracle Alert Options Window: More Options Tab
-
Select the option whose value you want to specify or edit.
-
Enter the value for the option in the Value field.
-
There are eight miscellaneous options you can modify:
Setting Up the :MAILID Implicit Input
The :MAILID implicit input lets you access the electronic mail address of the application user who triggered an event alert. The value for :MAILID comes from the EMAIL_ADDRESS profile option. Before you can use the :MAILID input in your alerts, you must create and set the EMAIL_ADDRESS profile option and perform some additional setup steps.
If the EMAIL_ADDRESS profile option has not been created, or if its value is null, Oracle Alert uses the operating system user ID or the Application username of the user who triggered the event, depending on the value set for the Default User Mail Account option in the Oracle Alert Options form.
To set up the :MAILID implicit input
-
Navigate to the Oracle Alert Options form. In the More Options tabbed region, set the Default User Mail Account option to the default value you want, either Operating System Login ID or Application Username. See: Defining Other Options for Oracle Alert.
-
If you have multiple organizations defined in your Oracle Alert schema, ensure that you specify the organization against which each alert should run. Navigate to the Alert Details window for your alert, and in the Installations tabbed region, enter the operating unit you want for each Oracle ID. Delete any records in this region that do not have a valid Oracle ID and operating unit. See: Specifying Alert Details.
-
Create two new profile options named RESP_ID and EMAIL_ADDRESS. In the Application Developer responsibility, navigate to the Profiles window. Enter the following information to create the first profile option:
-
Name-RESP_ID
-
Application-Oracle Alert
-
User Profile Name-RESP ID
-
Description-Responsibility ID
Enter the following information to create the second profile option:
-
Name-EMAIL_ADDRESS
-
Application-Oracle Alert
-
User Profile Name-EMAIL ADDRESS
-
Description-User's email address
See: Defining New User Profile Options, Oracle E-Business Suite Developer's Guide.
-
-
Set the RESP_ID profile option at responsibility level for each responsibility from which you trigger event alerts. In the System Administrator responsibility, navigate to the System Profile Values window. Query the RESP_ID profile option at responsibility level for the responsibility you want, and set the profile option value to the responsibility ID.
You can query the FND_RESPONSIBILITY_TL table to find the responsibility ID for a responsibility. For example, to find the responsibility ID for the Alert Manager responsibility, use the following command:
 select responsibility_name, responsibility_id
                from fnd_responsibility_tl
                where responsibility_name like '%Alert%';
See: User Profiles and Profile Options in Oracle Application Object Library, Oracle E-Business Suite Setup Guide.
-
Set the EMAIL_ADDRESS profile option at user level for each user. In the System Administrator responsibility, navigate to the System Profile Values window. Query the EMAIL_ADDRESS profile option at user level, and set the profile option value to the user's email address.
See: User Profiles and Profile Options in Oracle Application Object Library, Oracle E-Business Suite Setup Guide.
Defining Alerts for Custom Oracle E-Business Suite Applications
Oracle Alert integrates fully with your custom Oracle E-Business Suite applications, so you have a quick and easy way to monitor the exceptions in your custom Oracle databases.
A custom application is an application that was not installed using AutoUpgrade or, any application that resides outside the database where Oracle Alert resides. For example, an Oracle E-Business Suite application that resides in a different database from Oracle Alert is considered a custom application. Using database links, Oracle Alert can monitor any custom application as if it resides in the same database as Oracle Alert.
To define a periodic alert for your custom application
-
Use SQL*Net to create a database link from the Oracle Alert database to the custom Oracle database:
 CREATE DATABASE LINK linkname
        CONNECT TO username IDENTIFIED BY password
        USING 'connect string';
Note: Replace'connect string' with a SQL*Net V1 connect string or a SQL*Net V2 alias. Refer to the SQL*Net User's Guide for your protocol for more information.
Here is an example if you are using SQL*Net V1:
CREATE DATABASE LINK CUSTOM_APPL
        CONNECT TO SCOTT IDENTIFIED BY TIGER
        USING 't:hqfin:CUSTOM_DB';
Note: If your custom application resides in the same database as Oracle Alert, you need not define a database link.
-
Optionally, you can create synonyms for each table in your custom application so that you can reference the table using the synonym instead of the table name and database link. That way, the users defining alerts and actions do not need to know the location of the custom application, just the table names.
-
Register your custom application with Oracle Alert so that it is available in the list of values for the Application field of the Alerts form. See: Registering Custom Applications.
-
Register your custom application's Oracle ID with Oracle Alert. See: Registering Application Installations.
-
Once you complete these steps you can define periodic alerts for your custom application. See: Creating a Periodic Alert.
To define an event alert for your custom application
If you want to create event alerts for your custom Oracle E-Business Suite applications, you need to complete the following steps.
Important: If you want to create event alerts for Oracle E-Business Suite applications that reside on another database, you must install Oracle Alert on that database.
-
Register your custom application with Oracle Alert so that it appears in the list of applications available in the Alerts form. See: Registering Custom Applications.
-
Register your custom application's Oracle ID with Oracle Alert. See: Registering Application Installations.
-
Use the Table Registration API to register the table(s) that you want Oracle Alert to monitor for inserts and updates.
-
Once you complete these steps you can define event alerts for your custom application. Oracle Alert creates the necessary insert or update database trigger in your custom application table for your event alert. See Creating an Event Alert.
Related Topics
Creating a Responsibility for Your Custom Application Alert Manager
Creating a Responsibility for Your Custom Application Alert Manager
Define a product specific responsibility for your custom application and assign this responsibility to the person who creates the alerts for the custom application. That way, only this person can define and maintain the alerts, actions, and response sets for your custom application. Your System Administrator can do this for you.
To create a responsibility for your custom application alert manager, connect an application-specific responsibility to the Oracle ID of the application, not to Oracle Alert's Oracle ID.
See: Oracle Application Object Library Security, Oracle E-Business Suite Security Guide.
Oracle Alert Naming Conventions
This section provides you with guidelines for naming your alerts, actions, action sets, escalation groups, and threshold groups. These guidelines help you give your alerts and alert components names that are unique, yet intuitive and easily understood by you and other Oracle Alert users.
General Naming Conventions
Follow these general naming conventions throughout Oracle Alert to take advantage of Oracle Alert's information search capabilities and list of values features.
Unique Initial Letters
Develop names with unique initial letters so you can autoreduce a list of values when entering names in fields that contain lists. Instead of naming two alerts Invoice Receipt Holds and Invoice Quantity Holds, choose names that adequately describe the alert but avoid the conflict of similar initial letters. Simply name them Receipt Holds and Quantity Holds. To select the Receipt Holds alert, you need to enter only one letter, R, to uniquely identify the alert and let Oracle Alert automatically enter the full name, Receipt Holds for you.
While avoiding similar initial letters is not always possible, the fewer characters you need to enter to establish a unique choice, the faster you can enter or query information. Entering action set names of Auditor and Administrator is easier than entering action set names of Payables Auditor and Payables Administrator. In the former case, you need only enter two characters, Au or Ad, to choose the correct action set.
Warning: Use characters other than the pound sign (#), the colon (:), or the percent sign (%) for your initial letter; as these characters are reserved for use in Enter Query mode.
Key Words
Develop names with memorable key words, or parts of words, somewhere in the name. For example, to take advantage of Oracle Alert's information search capabilities, you might describe all alerts that relate to invoices so that they have the word "invoice" somewhere in the name. Then, when you search for these alerts, you can simply enter your search criteria as "%invoice%" to retrieve all your alerts on invoices.
Alert-Specific Naming Conventions
Names
-
Capitalize the first letter of every word.
-
When naming an alert, do not use the word "Alert" in the name (e.g., New Employee Alert). If possible, use the name of the alert as the subject heading for any associated message actions.
Example: New Employee Notification
-
When naming an action set, do not use the words "Action" or "Set". Relate the name of the action set to either the types of actions or the type of recipients. Try to limit the name to one or two words
Example: Concurrent Requests
Purchasing Manager
-
When naming a distribution list, make it plural unless it will always refer to only one person.
Example: Collections Managers
Descriptions
-
Capitalize only the first letter of the first word.
-
When writing an alert description, make the first word a verb.
Example: Informs the appropriate staff of new employees
-
When writing a distribution list description, do not use the word "List". Instead, use the description to fully explain the use.
Example: Payroll managers at headquarters
Related Topics
Using a List of Values, Oracle E-Business Suite User's Guide
Registering Custom Applications
Use the AD Splicer (adsplice) utility to register custom applications. The AD Splicer utility is described in the Oracle E-Business Suite Setup Guide and Oracle E-Business Suite Maintenance Guide.
Registering Application Installations
If you wish to define alerts for a custom application, you need to register the installation of the custom application with Oracle E-Business Suite first. A custom application is any application that was not installed using AutoUpgrade and resides in the same database as Oracle Alert, or any application that resides in a database other than the one in which Oracle Alert is installed.
Before you can register an installation, you must first register your custom application. See: Registering Custom Applications.
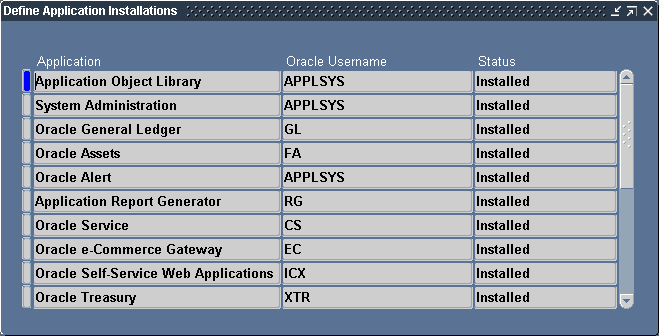
To register a custom application installation
Navigate to the Define Application Installations form.
The Define Application Installations Window
-
Choose from the list of values in the Application field, the name of the custom application installation you are registering.
-
Choose from the list of values in the Oracle Username field, the Oracle ID associated with this custom application.
If you are registering a custom application installation that resides in a different database, choose Oracle Alert's Oracle ID as the Oracle Username for your application installation.
-
Oracle Alert automatically displays Custom in the Status field.
-
Save your changes.