Configuring Rolling Data
This chapter describes how to roll selected data, saving a copy of the current version of that data.
This chapter covers the following topics:
About Rolling Data
It is often useful to be able to see older data and possibly compare it with the current data. In the case of forecasts, the Analytical Engine automatically saves older versions. If you need access to older versions of other data, however, you must explicitly instruct Demantra to save the data.
To do so, you use the Business Modeler to make a copy of the original data (usually a series) for later use. You define one or more rolling data profiles, each of which associates a source series (or a server expression) with a target series.
-
The target series must already exist.
-
The target series should usually be configured almost the same way as the source series (except for the hint message and so on). See "Creating a New Series Based on an Existing Series."
-
The target series must have an update field in the same table as the source series; see "Specifying Data Properties of a Series."
-
You can use any kind of series (numeric, date, or string), but the target and source series must be of the same type.
Then you configure a rolling data session, which specifies a set of rolling data profiles to run. The rolling data session specifies which profiles are active.
You can execute the active profiles from within the Business Modeler or from a workflow.
Creating or Modifying Rolling Data Profiles
To create or modify a rolling data profile
-
Log into the Business Modeler.
-
From the Configuration menu, select Configure Rolling Profiles.
The Rolling Data Profile Group wizard appears.

The screen displays a check mark next to the profile that you are editing.
-
Do one of the following:
-
To select an existing profile, click the profile in the Profiles list.
-
To create a new profile, click Insert.
-
To create or modify a Rolling Profile Group, click Configure Session. For details, see Creating Rolling Data Profile Groups.
-
-
If you choose to create a new rolling profile group, type a unique name and an optional description for the profile.
-
Click the Active Profile check box to activate the profile.
-
In the Source area, do one of the following:
-
Select a source series from the Series drop-down list.
Note: If the server expression for the series uses the round function, note that the rounding occurs before the data is rolled forward. In this case, you might have slight errors at aggregated levels.
-
Type a server expression into the Server Expression field. In this case, click Verify Expression to check the expression. The expression must be an aggregating SQL expression; see "Syntax of Server Expressions".
-
-
Specify the period association of this data source by selecting an option from Source's Period.
-
In the Target area, select a series from the Series Name drop-down box. Make sure that the target series is of the same data type as the source series or the source expression.
-
Click Save.
To delete a rolling data profile
-
Click the profile in the Profiles list.
-
Click Delete.
-
Click OK to confirm the deletion.
See also
"About Rolling Data"
Creating Rolling Data Profile Groups
Rolling profiles enable archiving or copying older data and comparing it with current data. (See About Rolling Data). Rolling Profile Groups facilitate data maintenance, by allowing you to organize profiles into business-relevant groups.
You define, modify, and delete rolling data profile groups in the Business Modeler.
Rolling profiles may belong to more than one profile group. Typically, the rolling data process is embedded in a forecast approval process, such as when running the Forecast Approval workflow. This workflow can be modified to include one or more Rolling Data Profile groups.
Defining Rolling Data Profile Groups
Rolling Profile Groups are configured using the Create/Modify Rolling Profile Groups wizard in the Business Modeler. From this wizard you can also update or delete existing profile groups. Deleting a Profile Group does not delete the rolling data profiles contained within the group. Instead, the profiles remain available for inclusion in other Rolling Data Profile Groups. If a Rolling Data Profile is deleted, that profile will also be deleted from any profile groups to which it belongs.
To define a rolling data profile group:
-
Log in to the Business Modeler.
-
From the Configuration menu, choose Configure Rolling Profile Groups.
The Create/Modify Rolling Profile Groups wizard appears.
-
Double-click the New Group folder.
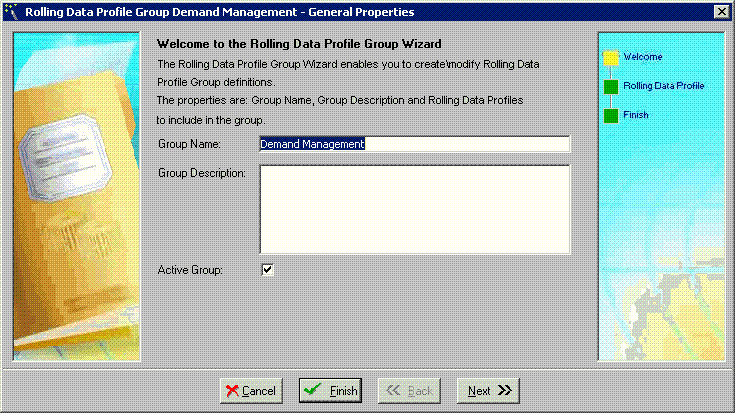
The General Properties page of the Create/Modify Rolling Profile Groups wizard appears.
-
Enter a name and description for the rolling profile group in the Group Name and Group Description fields. New group names must be unique.
-
To make this group active, ensure that the Active Group check box is enabled.
When you execute an active profile group, only the active profiles within the group are executed.
-
Click Next.
The Rolling Data Profiles page of the Create/Modify Rolling Profile Groups wizard appears.
-
Use the Rolling Data Profiles page to add or remove profiles from the group. Double-click a profile to move it between the Available and Selected Rolling Data Profiles column.
-
Groups may include profiles defined on multiple dimensions. For example, a group may include rolling profiles from both the sales_data and promotion_data dimensions.
Click Next.
-
Click Finish to complete the profile group creation process.