Managing Globalization
Overview of Globalization Support
This chapter describes some of the features of globalization (formerly internationalization) support in Oracle E-Business Suite. Topics covered in this chapter include language values used in user sessions, behavior of month name abbreviations, and multilingual external documents. In addition, the Oracle E-Business Suite windows for Languages, Natural Languages, and Territories are described.
For additional information on globalization concepts and features in Oracle E-Business Suite, see My Oracle Support Knowledge Documents 393861.1, "Oracle E-Business Suite Release 12 Globalization Guide", and 393320.1, "Oracle E-Business Suite Release 12 Internationalization Update Notes". Also see Oracle E-Business Suite Concepts Guide.
Language Values for User Sessions
Language Values for User Sessions using AppsLocalLogin.jsp
This section describes some of the options for the language for a user's session and other interactions with the system. For information on the language rule determination feature that provides flexibility in setting user session languages, see:Language Rule Determination.
Login Page Language
If the language is a licensed Oracle E-Business Suite language, the initial login page language is determined from one of the following sources, in the order shown:
-
A language value passed on the AppsLocalLogin.jsp URL
-
The language used in an earlier login session
-
The browser language
If the language is not a licensed Oracle E-Business Suite language, the initial login page is in the Oracle E-Business Suite base language.
Note: The default for Single Sign-On (SSO) SSO logins will fall back to browser language preferences, in order. The default for non-SSO logins will fall back to the base language if the first language preference is not available.
The user can change the login page language selection by choosing one of the other language name icons on the login page. The language name icons on the login page represent the active languages in the Oracle E-Business Suite installation. If the user selects an alternative language, the login page is refreshed in that alternative language. Logging in and logging back out will display a URL with the correct language value. The URL can be bookmarked.
Important: In Oracle E-Business Suite Release 11.5.10, the language name icons could be hidden by setting a Local Login Mask profile option. In Release 12, this profile option is no longer available. To hide the language name icons, use the Oracle Application Framework Personalization feature.
Login Page Language and Runtime Session Language
Users must ensure that the language used for the login page is the language they want to use for their Oracle E-Business Suite runtime session. The runtime session will start in the language used in the login page. After logging in, users can, if they wish, change the runtime session language from the Preferences screen. By default, the ICX:Language profile value is not used to determine the runtime session language when logging in through the login page. However, this behavior can be modified by setting the "Applications Override SSO Server Language" profile option.
ICX:Language Profile Option
The ICX:Language profile option is used for the following:
-
Default language to use for offline with other users on the system. For example, the language to use for an e-mail notification to be sent to a user on the system, and which may be read offline from the system.
-
Default language to use for other Oracle E-Business Suite login methods besides the login page. For example, the language to use for the session language when logged in through JDeveloper.
-
Session language when the "Applications Override SSO Server Language" profile option is set to "Override SSO Server Language".
The ICX:Language profile is normally not set at user level when a given user initially starts using Oracle E-Business Suite. Regardless of whether a value exists for the profile at user level, the language chosen on the login page (the runtime session value) is not automatically saved to the ICX:Language profile value for the user. The user can either specifically set a value for the ICX:Language profile at user level after logging in, or continue to inherit the value from the higher profile value levels. A value always exists for the ICX:Language profile at site level.
Preferences Page Language Support
The current values for the runtime session language and the saved ICX:Language profile value for the user are displayed on the Preferences page.
The following updates are allowed:
-
Change only the runtime session language
-
Change only the saved ICX:Language profile value for the user
-
Change both the runtime session and the ICX:Language profile values to either the same values or different values
Language Value from Login External to Oracle E-Business Suite
This section describes language value behavior when logging into Oracle E-Business Suite from non-Oracle E-Business Suite-based login systems.
For Oracle E-Business Suite, the language used in such a non-Oracle E-Business Suite system cannot be relied on to determine the runtime session language for the Oracle E-Business Suite session. That language may not be an Oracle E-Business Suite-supported active language, and it may not be the preferred language of the user for the runtime Oracle E-Business Suite session. Therefore, the ICX:Language profile value for the user determines the Oracle E-Business Suite runtime session for that user.
Once the Oracle E-Business Suite runtime session is initiated, the user can use the Preferences page to change the runtime session language for the session. The user can also choose to change his saved ICX:Language profile value.
For an Oracle E-Business Suite environment integrated with Oracle WebCenter or Oracle Portal, the Oracle E-Business Suite session will inherit the portal language if the session is launched from that portal. If the portal language is not supported or enabled in Oracle E-Business Suite, the Oracle E-Business Suite session language will fall back to the Oracle E-Business Suite base language.
Language Values for Oracle Workflow Notifications
Oracle Workflow email notifications use the user-level language set in the Preferences page and also stored in the ICX:Language profile option.
Date Formats in NLS Implementations
The storage space for month name abbreviations is limited to 3 bytes. For some language and character set combinations, the month name abbreviation requires more than 3 bytes. For this reason, when a language is used in which any month name abbreviation exceeds 3 bytes in the current character set, all month name abbreviations for that language are automatically replaced by numeric representations that conform to the 3-byte space limit.
The languages affected in a UTF8 implementation are: Albanian, Bulgarian, Canadian French, Croatian, Czech, German, Greek, Hungarian, Icelandic, Polish, Russian, Simplified Chinese, Slovak, Thai, Traditional Chinese, Turkish, and Vietnamese.
The languages affected in their local character sets are: Simplified Chinese, Thai, Traditional Chinese, and Vietnamese.
Support for Calendars
By default, the calendar in the Date Picker in an application shows the Gregorian calendar. However, users can change their calendar display by setting profile options as described below.
The Hijrah and Thai Buddhist calendars are supported for Oracle Forms-based and Oracle Application Framework applications, as well as Oracle Workflow notifications, Gantt charts and other graphs, Oracle XML Publisher reports, and Oracle Web Applications Desktop Integrator spreadsheets that use the Advanced Calendar component type. The support is added as an output (display) format only. Internal date object representation stays as for the Gregorian calendar. Concurrent processing and descriptive flexfields also support displaying dates in these calendars based on user preferences.
The following features are supported:
-
Users can choose a preferred calendar by setting the profile option FND: Forms User Calendar (FND_FORMS_USER_CALENDAR).
-
For the Hijrah calendar, users can display both Hijrah and Gregorian calendars by clicking on a button in the calendar window.
-
With the two calendars displayed, a user can pick a date from either the Hijrah or Gregorian calendar in Oracle Forms-based products.
-
The displayed Hijrah and Gregorian calendars are synchronized.
-
Initially, only the preferred calendar is displayed in the Date Picker.
-
-
Users can choose the first day of week in a Date Picker by setting the profile option FND: Calendar Week Start Day (FND_CALENDAR_WEEK_START_DAY).
-
Dates in a secondary calendar can be displayed as tooltip text in Oracle Forms-based products if the profile option FND: Tooltip Calendar (FND_TOOLTIP_CALENDAR).
FND: Forms User Calendar Profile Option
Users can set the FND: Forms User Calendar profile option to their preferred calendar. Valid values are:
-
Arabic Hijrah
-
English Hijrah
-
Gregorian
-
Thai Buddha
By default, the user calendar displays the Gregorian calendar, but if this profile option is set to another value, that calendar is used.
FND: Calendar Week Start Day Profile Option
Users in countries can set the FND: Calendar Week Start Day profile option to their preferred first day of the week (Sunday is the default first day of the week).
FND: Tooltip Calendar Profile Option
Users can set the FND: Tooltip Calendar profile option to a calendar other than the preferred calendar. Within the Date Picker, a given date will be displayed in this calendar's format as a tooltip.
Note: This feature applies to Oracle Forms-based products only.
Configuring Calendars
Oracle E-Business Suite supports three international calendars:
-
Arabic Hijrah
-
English Hijrah
-
Thai Buddha
Beginning with Release 12.2.7, Oracle E-Business Suite provides the Calendar Configuration File Editor to create and validate Hijrah calendars.
To learn more about calendar support in Oracle E-Business Suite, refer to: Hijrah and Thai Calendar Support in Oracle E-Business Suite Release 12.1 and 12.2, My Oracle Support Knowledge Document 807393.1. This section assumes you are familiar with Oracle E-Business Suite calendar support and international calendar configuration file format.
To use the Hijrah calendars, users usually define deviation information provided by government to make the Hijrah calendar legitimate to the local statutory. This setting needs to be maintained in three separate configuration files in three locations:
-
Oracle Database, in
<database Oracle Home>/nls/lxecal.nlt -
Oracle Forms, in
<Forms Oracle Home>/nls/lxecal.nlt -
Oracle Application Framework, in
<$JAVA_TOP>/oracle/apps/fnd/i18n/common/util/deviation.cfg
The Calendar Configuration File Editor, available under the System Administration responsibility, allows users to:
-
Create/edit/delete the configuration files though a graphical UI
-
Validate the configuration being edited to make sure there is no error
-
Import an existing configuration file from the client machine to edit the configuration
-
Export the configuration to client machine in two file formats (lxecal.nlt and deviation.cfg)
-
Save the configuration to the default server side location
-
Validate the existing configuration files contents
To validate existing configuration files, start from the Validate Configuration page, and choose the configuration file if it is not in the default location (a rare case). If there is a validation error, a user can navigate to the Edit Calendar page to correct the errors.
To define or edit a calendar configuration, start with the Edit Configuration page. You can import an existing file from this page.
Considerations in Editing a Calendar
Calendars can be created only when the calendar is supported by Oracle E-Business Suite and the calendar can have either calendar era or deviation data. Hijrah calendars are the only calendars that satisfy this condition currently.
Note that a non-supported calendar may be defined in a configuration file, even though Oracle E-Business Suite does not support that specific calendar; an example is the Japanese Imperial calendar. Also, even though a calendar does not support a calendar element, such a calendar element might be defined in a configuration file by mistake. For example, a Calendar Era might be defined in the Hijrah Calendar. For these exceptional cases, a "non-support" error icon appears in the Validation column in the Edit Calendars page.
If a calendar is not supported by Oracle E-Business Suite or a calendar element is not supported by the calendar, they can still be viewable and updatable. However, the Update Calendar page only allows you to view and delete them. This configuration tool does not delete such definitions automatically. You are strongly encouraged to delete those unsupported calendars and calendar elements from the definition.
There is no actual linkage to the existing configuration files. Creating, editing or deleting a calendar through this user interface does not change the contents of the actual configuration files.
You can use the Save function if all tiers are on the same host and there are no multiple application/database tiers (this is a rare case; an example of this would be a development or test instance).
You must export the configuration as configuration files and deploy them manually to the application and database tiers after the necessary edits are done.
The lxecal.nlt file must be compiled manually using the lxegen utility.
After deployment, the application tiers and databases must be restarted.
Recommendations
Use the Gregorian Calendar while using the calendar configuration editor to edit deviation data. If the Arabic Hijrah or English Hijrah calendar is used, the date of deviation start date/end date seen in each form may already be affected by the existing configuration file, which results in an inaccurate deviation definition.
Configuration changes made in this editor exist only in memory. Existing configuration files will not be updated until they are saved using the Save function. Refrain from moving outside of this tool before exporting or saving the configuration. The configuration being edited will be lost when moving outside the tool.
Editing a Calendar
Follow these steps to update a calendar. Note that only supported calendar types can be edited. You may only delete unsupported calendars; you may not edit their definitions here.
-
Log in as a user with the System Administration responsibility. Navigate to Calendar Configuration > Edit. The Edit Calendars page appears.
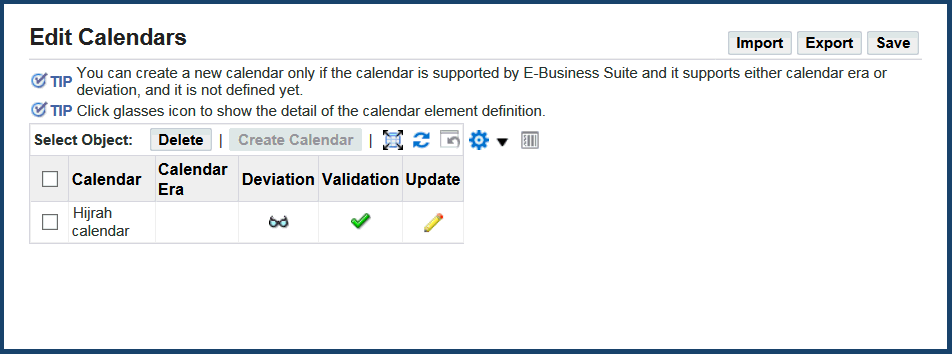
Any calendars currently defined are shown in the table.
Edit Calendars Page
-
For a Hijrah calendar in the table, select the Update icon.
-
Review your calendar. You can view the deviation by clicking on the eyeglasses icon. A check mark will indicate that the calendar was successfully validated. To make any changes, click the Update (pencil) icon.
-
You can then edit the Start Date, End Date, and Deviation Days for the rows in the table.
-
Click Apply.
-
If your calendar was successfully validated, then it will be shown with a check mark under Validation in the calendars table on the Edit Calendars page.
If you received any validation errors, go back and correct the errors before clicking Apply again.
-
Export or save the configuration.
Creating a Calendar
Follow these steps to create a Hijrah calendar.
Note: Currently, a Hijrah calendar is the only calendar that can be created.
-
Log in as a user with the System Administration responsibility. Navigate to Calendar Configuration > Edit. The Edit Calendars page appears.
Edit Calendars Page
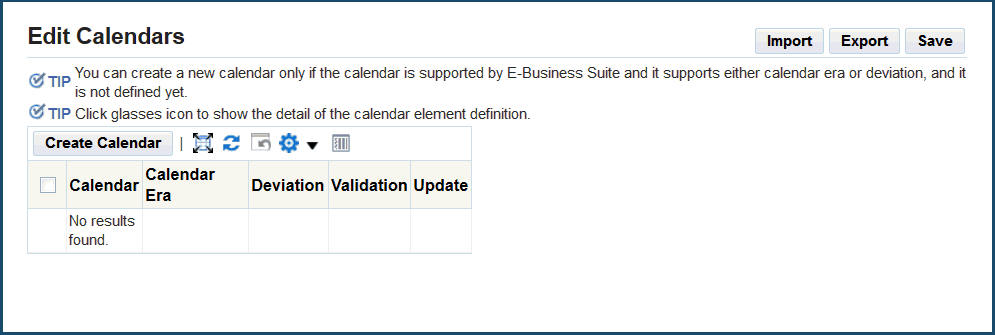
Note that once a calendar is defined for each supported calendar type, the Create Calendar button is disabled.
-
Select the Create Calendar button.
Create a Calendar Page
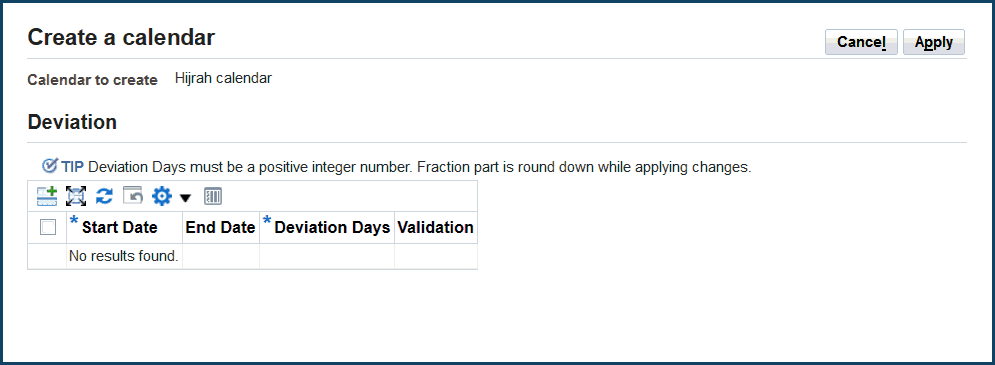
-
Click "Add Row" icon for Deviation, and add entries for Start Date, End Date, and Deviation Dates. Use the Date Picker to select your date values.
-
Click the Apply button. If your calendar is validated successfully, then the Edit Calendar page is shown again.
If there are any validation errors, you must correct them before applying your changes.
Once your changes are successfully applied, the Hijrah calendar you just created appears in the Calendars table.
-
Review your calendar. You can view the deviation by clicking on the eyeglasses icon. A check mark will indicate that the calendar was successfully validated. To make any changes, click the Update icon.
-
Export or save the configuration.
Deleting a Calendar
-
Navigate to Calendar Configuration > Edit. The Edit Calendars page appears.
-
Select the calendar to delete, and click the Delete button.
The selected calendar is deleted immediately.
Updating a Calendar
Navigate to Calendar Configuration > Edit. In the Edit Calendar page, click the Update icon for the calendar you wish to update.
-
In the Update Calendar page, make your update.
-
Click the Apply button to save your work.
Importing a Calendar
For this procedure, you should have your configuration files available in a local folder.
-
Navigate to Calendar Configuration > Edit. The Edit Calendars page appears.
-
Click the Import button. The Import File window appears.
-
Choose the configuration file to import.
The configuration file will be parsed based on the file extension. If the extension is .nlt file, then it will be parsed as lxecal.nlt file. If the extension is .cfg, then the file will be parsed as deviation.cfg file. If extension is neither of those, the importer tries both file parsers.
Check the "Overwrite current configuration" box to overwrite the configuration being currently edited. Otherwise, the imported file is merged to the configuration being edited.
If a parse error occurs, the import process will be canceled. The configuration being edited will be preserved.
-
Click the Import button.
-
The imported calendars should appear in the calendars table.
Exporting a Calendar
-
Navigate to Calendar Configuration > Edit. The Edit Calendars page appears.
-
Click the Export button.
Both the lxecal.nlt and deviation.cfg files are created based on the configuration being currently edited, and can be downloaded as a file called configFiles.zip.
-
Save the configFiles.zip file to a local folder.
-
Extract the contents of the configFiles.zip file. Verify that the expected configuration files exist and that their contents are correct.
Validating Calendars
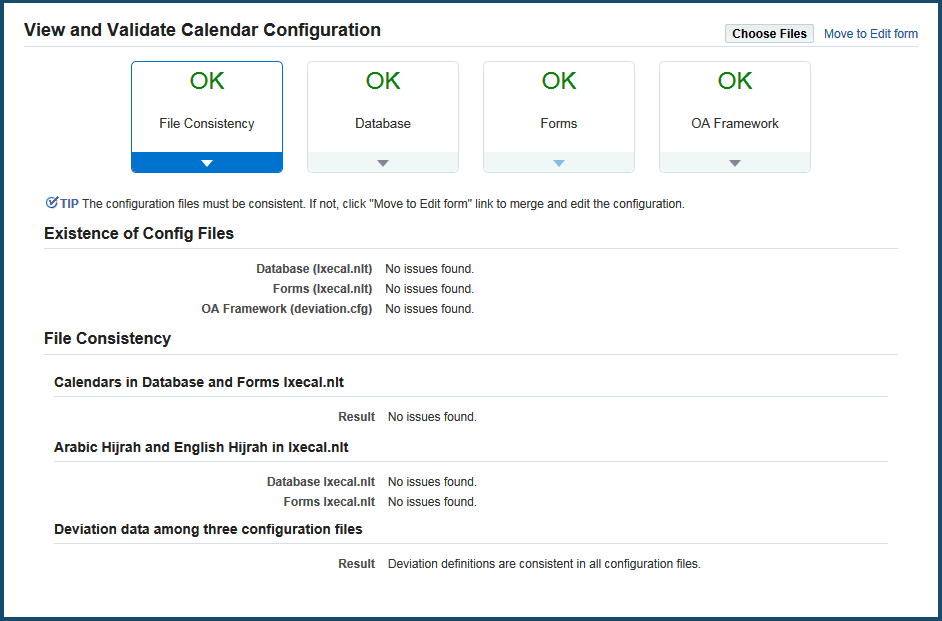
The View and Validate Calendar Configuration page is available from the System Administration responsibility > Calendar Configuration > Validate navigation path. By default, information on the current calendar configuration is shown.
View and Validate Calendar Configuration Page
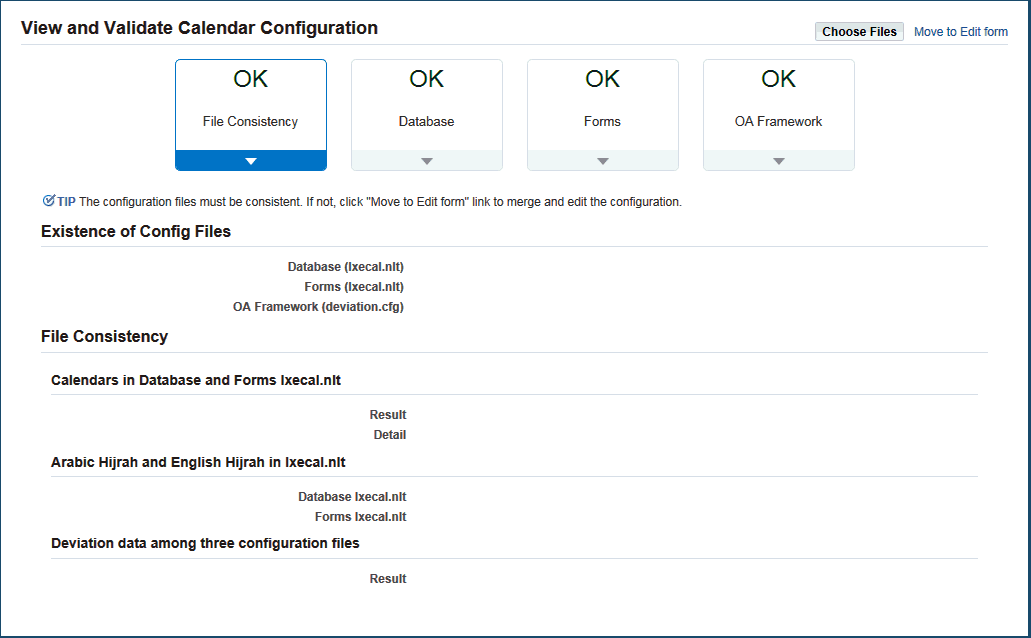
The File Consistency tile shows the validation result by comparing the files' contents. The Database, Forms, and OA Framework tiles show the validation result of each file's contents. All tiles must indicate OK for you to safely use the international calendars.
The following statuses are possible:
-
OK - In the File Consistency tile, this status means all validation checks were successful. In the Database, Forms, or OA Framework tile, either all calendar definitions in the configuration file are valid or no Database, Forms, or OA Framework configuration file exists.
-
Not Applicable - This status is applicable in the Database, Forms, and OA Framework tiles. It indicates if the configuration file associated with the tile does not exist, although the configuration files associated with other tiles exist.
-
Warning - This status is applicable in the Database, Forms, and OA Framework tiles. It indicates the configuration file exists for the technology stack but the content is empty.
-
Error - In the File Consistency tile, this status means a validation check has failed. In the Database, Forms, or OA Framework tile, this status indicates there is an invalid calendar element data or the file parsing failed for some reason.
If a parsing error occurs, the position of the parsing error is shown. The parsing operation stops and does not read the configuration file any further when a parsing error occurs. If there are multiple errors in a file, only the first parsing error encountered is shown.
The File Consistency tile has four validation regions:
-
The "Existence of Config Files" region shows if each configuration file exists or not. All files must exist or all files must not exist (meaning calendars are used without deviation/calendar era definitions).
-
The "Calendars in Database and Forms lxecal.nlt" is the comparison result of the calendar definitions in the lxecal.nlt file for the Database and Forms. The two calendar definitions must be same.
-
"Arabic Hijrah and English Hijrah in lxecal.nlt" is the comparison result of the Arabic Hijrah calendar and the English Hijrah calendar definition in a lxecal.nlt file. Two of them must exist or two of them must not exist in a configuration file in Oracle E-Business Suite.
-
"Deviation data among three configuration files" is the comparison result of the deviation data definition in the three configuration files. They must be the same.
In each of the Database, Forms, OA Framework tiles, the validation result of the calendar definition in the file is shown. The configuration file information, such as the file location and last update date, are also provided. A validation icon shows the detail of the validation result for each element. The validation icon in the header line shows the support status.
If there is invalid data, it is shown in the relevant calendar information region. Hover over the validation icon to see the actual issue.
You can click the Move to Edit form button to correct issues using the Edit Calendar page.
Validating Calendar Configuration Files from the Default Location
-
Log in as a user with the System Administration responsibility. Navigate to Calendar Configuration > Validate. The View and Validate Calendar Configuration page appears. By default, information on the current calendar configuration is shown.
View and Validate Calendar Configuration Page with Default Location Information
-
Files are read from the default location. The results, as described above, are shown.
Validating Calendar Configuration Files from A Non-Default Location
Follow these steps to validate configuration files located somewhere other than the default location.
-
Navigate to Calendar Configuration > Validate. The View and Validate Calendar Configuration page appears.
-
Select the Choose Files button.
Choose a Database Configuration File Page
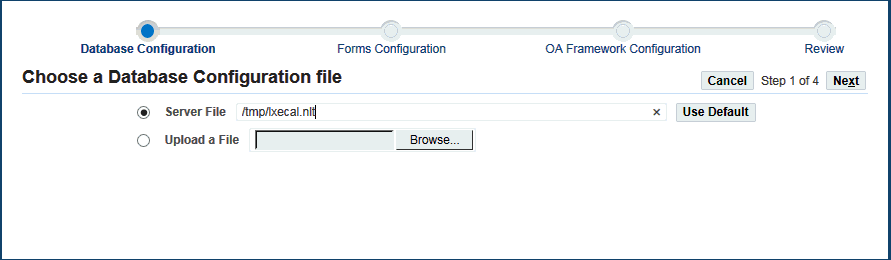
For each of the following types of files (Database, Forms, and Oracle Application Framework), you can choose a file on the application tier or choose to upload a client file. Application tier files must be specified by their fully qualified name. You can click Use Default to use the default configuration file.
-
Specify the database file to validate. Click Next.
-
Specify the Forms file to validate. Click Next.
-
Specify the Oracle Application Framework file to validate. Click Next.
-
On the Review page, review your choices and click Validate.
-
The validation results are shown.
-
For File Consistency, the validation results for the existence of the files and whether the files are consistent with each other is shown.
-
For the individual database, Forms, and Oracle Application Framework configuration files, the Deviation Data is shown.
-
Numeric Format Support
In addition to the decimal period (dot) and comma, the space ( ) and single quote (') characters are supported as number group separators. Users can choose these number group separators from the "Number Format" LOV in the Preferences Page.
Examples of formats that are supported are listed in the table below:
| Group Separator | Decimal Separator | Example |
|---|---|---|
| Comma | Period | 1, 000.00 |
| Period | Comma | 1.000,00 |
| Space | Comma | 1 000,00 |
| Single Quote | Period | 1'000.00 |
| Space | Period | 1 000.00 |
| Single Quote | Comma | 1'000,00 |
Note: The JTF applications support only the decimal period and comma as number group separators.
Lightweight MLS
The Lightweight MLS feature allows additional languages to be enabled without the need to apply the corresponding NLS patches. In releases prior to Release 12.1.3, it was necessary to apply the relevant NLS patches before additional languages could be used.
Lightweight MLS enables Oracle E-Business Suite to run multiple languages in the same system, with the various languages being employed by different users as desired. Such a system can simultaneously support a mixture of languages with full translation (NLS patches applied) and languages without translation (Lightweight MLS, with no NLS patches applied).
The Lightweight MLS feature provides the capability to enter and maintain language data through an English user interface; for example, setup data or customer data such as item or item description. In addition, users can set up custom reports or templates and then generate language reports with the language data. You can also move to a full translation at any time by applying the NLS patch for the relevant language.
For more information, refer to My Oracle Support Knowledge Document 1077709.1, Using Lightweight MLS With Oracle E-Business Suite.
Multilingual External Documents
Oracle E-Business Suite ships with a set of external documents, or those documents directed toward your customers and trading partners, for which we model the data multilingually. Any document for which the data model is multilingual can be submitted, through a single request, to run in one language or in any subset of the installed languages. Your Italian customer, for example, can receive invoices printed in Italian, while your Korean customer receives packing slips printed in Korean.
Oracle Shipping
-
Bill of Lading
-
Commercial Invoice
-
Pack Slip
Oracle Order Management
-
Price List
-
Sales Order Acknowledgment
Oracle Receivables
-
Dunning Letter Print
-
Print Statements
-
Transaction Print
Oracle Purchasing
-
Printed Change Order Report (Landscape)
-
Printed Change Order Report (Portrait)
-
Printed Purchase Order Report (Landscape)
-
Printed Purchase Order Report (Portrait)
-
Printed RFQ Report (Landscape)
-
Printed RFQ Report (Portrait)
-
Dispatch Purchase Order
Oracle Sourcing
-
Negotiation PDF
Oracle Payables
-
Invalid PO Supplier Notice
-
Prepayment Remittance Notice
-
Print Invoice Notice
-
Supplier Open Balance Letter
Oracle Human Capital Management (Human Resources)
-
Full Person Details
-
Full Applicant Details
-
Full Assignment Details
-
Full Work Details
Oracle Payroll
-
Check Writer
-
Deposit Advice
-
Third Party Checks
Translations Window
In windows with an enabled translation icon, users can click on the icon to bring up a Translations window to enter or update translated values for specific records in the database. See: Creating Translations for a Record, Oracle E-Business Suite User's Guide.
Users can enter translations for multiple languages at once in the Translations window. Translated values should be entered using the Translations window.
Users should be aware of which fields are allowed to be translated. Users can click on the translation icon to identify if a field is translatable. If a user types into a field that was not meant to be translated, the value in the source language will be overwritten, and the translated value will be the only entry for that field. All users will see the data in that language, and the value in the original language will be lost.
Currencies Window
For information on how to define currencies using this window, see: Defining Currencies, Oracle General Ledger User's Guide.
Languages Window
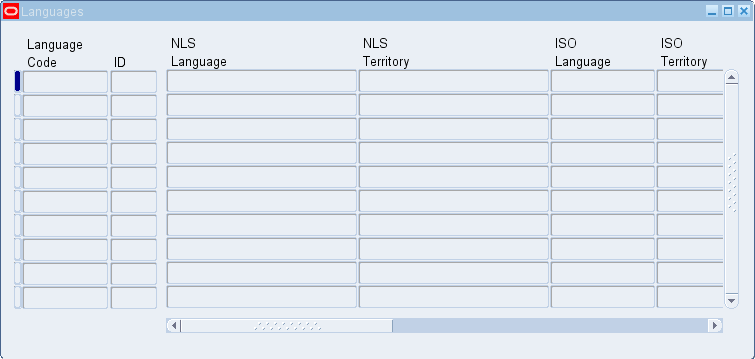
Use the Languages window to review information about the languages available for use in Oracle E-Business Suite.
Languages Record
Each record includes the Language Code, ID, NLS Language, NLS Territory, ISO Language, ISO Territory, Default Code Set, Installed flag, Local Date Language, UTF8 Date Language, and Description.
The columns Local Date Language and UTF8 Date Language are used in date rendering. For some languages, the length in bytes of the month short name is longer than the prepared buffer in a UTF8 database; for these languages, the UTF8 Date Language is used as the date language in UTF8 environments. In databases using other character sets, the Local Date Language is used.
Natural Languages Window
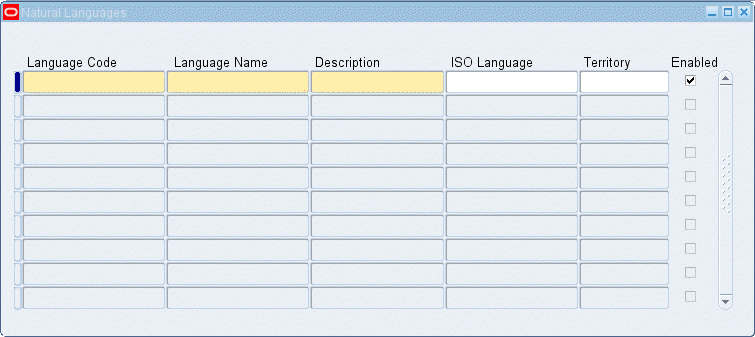
The Natural Languages window allows you to review information about the languages available for use in Oracle E-Business Suite.
The Natural Languages table allows you to associate the name of a language with another entity, such as a person or company.
-
You can add new languages in this window. Prefix the language code for new languages with an 'x'.
-
You can update the enabled status of seeded languages.
-
You cannot delete saved records.
Natural Languages Record
Each record includes the Language Code, Language Name, ISO Language, and Territory for each language.
You can use Oracle Applications Manager (OAM) License Manager to enable a licensed language..
Territories Window
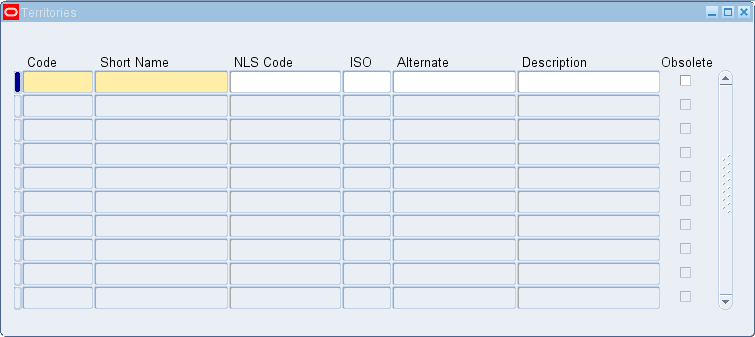
Use the Territories window to review and modify information for the country values used in Oracle E-Business Suite.
Territories Block
Each record includes the two-letter uppercase territory Code such as "US", the Short Name for the territory such as "United States", the NLS Code, the ISO numeric entity code, an Alternate territory code, and a longer description (Description), such as "United States of America".
Normally you would not want to update the seeded data that comes with your products, but you may wish to modify the way the country is represented in List of Values through out your applications.
You can update the description of the Territory to change the territory value displayed in List of Values used in Oracle E-Business Suite products.