Basic DBA Tasks
Overview of Oracle E-Business Suite DBA Duties
Oracle E-Business Suite database administration (DBA) combines the efforts of an Oracle E-Business Suite System Administrator and an ORACLE database administrator.
ORACLE Schemas
Installation of Oracle E-Business Suite includes the automatic addition of a number of schemas (sometimes called ORACLE schemas) to the database. For security, you should set carefully-chosen passwords for these schemas. For information about changing passwords, see: Oracle E-Business Suite Password Management.
These schemas can be categorized as follows:
-
Schemas that exist in every Oracle database, whether or not the database is used for Oracle E-Business Suite. Examples: SYS, SYSTEM.
-
A schema that is an analogue of the Oracle Database SYS and SYSTEM schemas, and designed for Oracle E-Business Suite applications database administration purposes. Example: EBS_SYSTEM.
-
A small set of critical core schemas used for specific purposes by Oracle E-Business Suite. For example, APPLSYSPUB, APPLSYS, APPS, APPS_NE.
-
A large set of schemas provided by individual Oracle E-Business Suite products, ranging (using product short names) from ABM through to ZX.
-
A small set of schemas that belong to optional database features or third party products. These fall into three sub-categories:
-
Schemas that are both used by and patched with Oracle E-Business Suite. For example, CTXSYS.
-
Schemas that are used by Oracle E-Business Suite but patched only with the database. For example, MDSYS.
-
Schemas that are not used by Oracle E-Business Suite. For example, SCOTT.
-
All these types of schema are used during runtime operations of Oracle E-Business Suite. The schemas of types 2, 3 and 4-1 above are accessed during initial installation and patching.
Note: None of the Oracle E-Business Suite schemas relate to a particular Oracle E-Business Suite user. The Oracle database schemas and passwords are used to connect to the database, while application usernames and passwords are used to access Oracle E-Business Suite.
Three passwords are especially significant in Oracle E-Business Suite schema usage, so should be chosen with particular care:
-
A password for APPLSYSPUB (also known as the GATEWAY user).
-
A password shared between APPLSYS, APPS, and APPS_NE.
-
A password for all the product-specific base schemas (type 3).
Registering an ORACLE Schema
The installation process automatically registers Oracle E-Business Suite ORACLE schemas.
You must register an ORACLE schema with Oracle E-Business Suite if you create a custom application using Oracle Application Object Library. See My Oracle Support article KB858105, Creating a Custom Application in Oracle E-Business Suite Release 12.2.
Reregistering ORACLE Schemas
You should also reregister ORACLE schemas associated with custom applications built using Oracle Application Object Library each time you upgrade Oracle Application Object Library.
Initialization Code
You can add in custom initialization SQL code to be executed when a database session starts up or when it is re-initialized. You specify this code using a profile option.
The code is executed by FND_GLOBAL.INITIALIZE and APPS_INITIALIZE immediately after initializing global variables, profiles, and the contents of client_info on session startup.
Profile Option Initialization SQL Statement - Custom
Using the profile option Initialization SQL Statement - Custom, you can add site-specific initialization code, such as optimizer settings. This profile value must be a valid SQL statement, or a PL/SQL block for more than one statement, that is to be executed once at the startup of every database session.
This profile option can be set at any level by the System Administrator, and is reserved for use by customers.
Profile Option Initialization SQL Statement - Oracle
This profile option is used by Oracle E-Business Suite. This profile option and its value settings are delivered as seed data, and must not be modified.
Resource Consumer Groups in Oracle E-Business Suite
The Database Resource Manager introduced in Oracle8i is used to allocate and manage resources among database users and applications.
Resource consumer groups and resource plans provide a method for specifying how to partition processing resources among different users. A resource consumer group defines a set of users who have similar resource usage requirements. An overall resource plan specifies how resources are distributed among the different resource consumer groups.
Oracle E-Business Suite allows the system administrator to assign individual Oracle E-Business Suite users to resource consumer groups. In addition, concurrent programs and concurrent managers can be assigned to resource consumer groups.
Note: These resource consumer groups apply to CPU resources only.
For additional information, see the Oracle database documentation.
Assigning Resource Consumer Groups
The system administrator can assign a user to a resource consumer group by setting the value of the user profile option FND:Resource Consumer Group for that particular user. The user can see this profile option but cannot update it.
The system administrator can assign a concurrent program to a resource consumer group in the Parameters window of the Define Concurrent Program form. See: Concurrent Programs Parameters Window, Oracle E-Business Suite Setup Guide.
The system administrator can assign a concurrent manager to a resource consumer group in the Define Concurrent Manager form. See: Concurrent Managers Window, Oracle E-Business Suite Setup Guide.
Hierarchy of Resource Consumer Group Assignments
Conflicts can arise between the resource consumer groups associated with a single session. For example, a concurrent manager assigned to one resource consumer group may run a concurrent program assigned to another. A similar situation arises when a user performs a transaction managed by a transaction manager that has a different resource consumer group than the user. To resolve such conflicts, Oracle E-Business Suite uses a hierarchy.
In the case of a concurrent program, the system first checks to see if the program has an assigned resource consumer group and if so, uses that. If not, the system checks the concurrent manager running the program and uses its resource consumer group. If the concurrent manager is not assigned to a resource consumer group the system uses the default group "Default_Consumer_Group".
In the case of a transaction manager running a transaction program, the system once again checks the resource consumer group assigned to the program, if any, and if there is none, checks the transaction manager. If the transaction manager has no assigned resource consumer group the system then checks the profile option value for the user whose session began the transaction. If there is no resource consumer group defined the system uses the default resource consumer group.
For a user running a form, the system first checks the profile option value for that user and uses that if it is defined. Otherwise the system uses the default resource consumer group.
Oracle E-Business Suite Password Management
The storage mode for Oracle E-Business Suite user passwords can be managed by using the Password Security Administration page introduced in Oracle E-Business Suite Release 12.2.15 and R12.ATG_PF.C.Delta.14, or on the command line.
Note: When possible, it is recommended to use the password management user interface (UI) to manage the Oracle E-Business Suite password storage mode. Keep in mind that command line utilities are still used for changing Oracle E-Business Suite user passwords. Changing user passwords cannot be done with the password management UI.
Password Security Administration Page
Introduced in Oracle E-Business Suite Release 12.2.15, the Password Security Administration page automates the migration of user passwords to a password hashing scheme, making it easier to manage.
Navigating the Password Security Administration Page
To access the Password Security Administration page, on the Oracle E-Business Suite home page:
-
Select the System Administration responsibility in the Navigator pane.
-
Select Password Administration.
The Password Security Administration page includes two tabs: Storage Mode and Diagnostics.
Password Security Administration Page
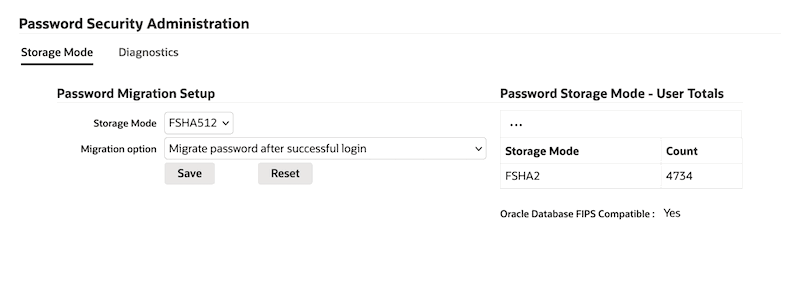
Storage Mode
The Storage Mode tab comprises the Password Migration Setup and Password Storage Mode - User Totals sections.
Password Migration Setup
In the Password Migration Setup section, select options from the Storage Mode and Migration Option drop-down lists.
Storage Mode is the desired secure hash algorithm selected for your system. As of Oracle E-Business Suite Release 12.2.15 or R12.ATG_PF.C.Delta.14, choose from the following available options in the drop-down list:
-
FSHA256
-
FSHA384
-
FSHA512
In the next drop-down list, select the Migration Option desired. These options are described in the following table.
| Option Value | Description |
|---|---|
| Migrate password after successful login | The existing password will be migrated to the mode specified after successful login. No password change is required when using this migration option. |
| Prompt user for password change upon next login | The migration to the selected password storage mode will happen after the user is prompted and completes the required password change. |
| Migrate password upon next user initiated password change | The migration to the selected storage mode will happen when the users complete the self-initiated password change. |
Once you have selected the storage mode and migration option, click Save to apply and implement your changes. To roll back an unsaved change, click Reset.
Note: Keep in mind the following:
-
There are no special steps required to migrate Oracle E-Business Suite database schemas (including APPS, APPLSYS, GUEST, and all product schemas).
-
You must log in as SYSADMIN to initiate the password migration for the SYSADMIN account.
Password Storage Mode - User Totals
The Password Storage Mode - User Totals section provides a table which lists currently utilized password storage modes and the number of accounts using those storage modes. This can include:
-
Advanced FSHA-2 password storage modes (which include FSHA256, FSHA384, and FSHA512)
-
Previous hashing modes (such as SHA-1 and SHA-2)
-
Legacy encryption modes (such as RC4)
After the User Totals table is a statement regarding whether your Oracle E-Business Suite environment is compatible with Oracle Database FIPS parameters.
If the listed storage modes in the table include modes which are not Oracle AI Database 26ai DB FIPS compatible, the statement will read "Oracle Database FIPS Compatible: No".
If the storage modes listed in the table are advanced FSHA-2 storage modes (such as FSHA256, FSHA384, or FSHA512), the statement beneath the table will read "Oracle Database FIPS Compatible: Yes". This means that the user password storage mode is compatible with Oracle AI Database 26ai DB FIPS configuration. For more information, see "Can I set Oracle Database FIPS parameters with Oracle E-Business Suite?" in My Oracle Support article KA1033, FAQ: Oracle E-Business Suite Security.
Note: Only FSHA-2 password storage modes (FSHA256, FSHA384, and FSHA512) are compatible with Oracle Database FIPS 140-2 configuration. If any non-FSHA-2 storage modes are used and Oracle Database FIPS parameters are configured, an Oracle E-Business Suite login attempt with a user account that is not yet migrated to an FSHA-2 storage mode will receive the following error: "Login failed. Please verify your login information or contact the system administrator." The user with the login failure will need to work with the system administrator to have their password reset or back out of the Oracle Database FIPS 140-2 configuration.
To check the password storage mode for all users, applications database administrators can also use the afckfips.sql script, located in $FND_TOP/patch/115/sql/, delivered with R12.ATG_PF.C.Delta.14. This script will provide the total number of user passwords that are one of the FSHA storage modes and the total number of user passwords with any other storage mode. The script will also list the current selected storage mode.
Diagnostics
The Diagnostics tab provides system information for troubleshooting purposes. It is intended for Oracle internal use only. You may be requested to provide information from the Diagnostics tab if you log an issue with Oracle Support.
Command Line Utilities for Password Management
Oracle E-Business Suite also provides two command line utilities, AFPASSWD and FNDCPASS, for setting Oracle E-Business Suite schema passwords. These utilities change the password registered in Oracle E-Business Suite tables and the schema password in the database. The utilities can also be used to change user passwords.
Additional Information: For more information regarding schemas that are managed by AFPASSWD and FNDCPASS, see Database Schemas Found in Oracle E-Business Suite, Oracle E-Business Suite Security Guide.
Several important considerations apply:
-
AFPASSWD and FNDCPASS are used to change the passwords for the APPLSYS, APPS, and APPS_NE accounts as well as for the Oracle E-Business Suite product accounts.
-
AFPASSWD and FNDCPASS are not used to change the password for EBS_SYSTEM, SYSTEM, SYS, or other Oracle database accounts. To change the passwords for these accounts, use the
ALTER USERSQL statement. For example:ALTER USER <username> IDENTIFIED BY <new_password> -
The Oracle E-Business Suite system must be shut down before you change the password for a system schema (APPLSYS, APPS, or APPS_NE).
-
It is recommended that you back up the FND_USER and FND_ORACLE_USERID tables before changing system passwords. Remove the backups after you have confirmed that the changes are successfully completed.
-
After changing a system schema password with either AFPASSWD or FNDCPASS, you should run AutoConfig to synchronize the application tier files.
-
If you are changing the APPLSYSPUB password using either AFPASSWD or FNDCPASS, you must change the value for the context variable
s_gwyuid_passand then run AutoConfig.
Note: FNDCPASS will continue to be shipped with Oracle E-Business Suite for use in changing passwords--you can switch to the AFPASSWD utility for this purpose at your discretion. However, note that as of Release 12.2.3, the USERMIGRATE mode of FNDCPASS is deprecated. You should now use AFPASSWD to migrate to a password hashing scheme.
My Oracle Support article KB282958, R12: New Feature: Enhance Security With Non-Reversible Hash Password FNDCPASS, lists the current patch for password handling. Check this document to ensure that you have applied the latest updates.
AFPASSWD Utility
In Oracle E-Business Suite Release 12.2.3 and later, you can use the AFPASSWD utility to migrate Oracle E-Business Suite user passwords to a non-reversible hash password scheme.
Note: In Oracle E-Business Suite Release 12.2.15, it is recommended to use the Password Security Administration Page to make migrating to a hashed password scheme easier to manage.
The AFPASSWD utility includes the following features:
-
AFPASSWD only prompts for passwords required for the current operation, allowing separation of duties between applications administrators and database administrators. This also improves interoperability with Oracle Database Vault. In contrast, the FNDCPASS utility currently requires specification of the user name and password for the APPS user as well as the user name and password for the EBS_SYSTEM user or SYSTEM user, depending on your codelevel. These FNDCPASS requirements prevent separation of duties between applications administrators and database administrators.
-
The only migration method supported with AFPASSWD is to migrate the password to the specified storage mode upon next user-initiated password change. No other method of migration is supported with AFPASSWD.
-
As AFPASSWD prompts for all required passwords, it avoids the security risk incurred by entering passwords on the command line for FNDCPASS.
-
When changing a password with AFPASSWD, the user is prompted to enter the new password twice to confirm.
-
If you have not already done so, you should use the AFPASSWD utility to migrate Oracle E-Business Suite user passwords to a non-reversible hash password scheme.
Note: You should always run AutoConfig after changing any system schema (APPLSYS, APPS, APPS_NE) password.
AFPASSWD Usage
The AFPASSWD command is used with the relevant command line options to perform the desired action.
AFPASSWD -h

AFPASSWD [-c <APPSUSER>[@<TWO_TASK>]] -f <FNDUSER>

AFPASSWD [-c <APPSUSER>[@<TWO_TASK>]] -o <ORAUSER>

AFPASSWD [-c <APPSUSER>[@<TWO_TASK>]] -a

AFPASSWD [-c <APPSUSER>[@<TWO_TASK>]] -l <ORAUSER> <TRUE|FALSE>

AFPASSWD [-c <APPSUSER>[@<TWO_TASK>]] -L <TRUE|FALSE>

AFPASSWD [-c <APPSUSER>[@<TWO_TASK>]] -s <APPLSYS>
These options have the following functions:
-
-h - Displays help.
-
-c <APPSUSER>[@<TWO_TASK>] - Specifies the connection string to use, the Oracle E-Business Suite user, and/or the value of TWO_TASK. This option can be use in combination with others. If it is not specified, default values from the environment will be used.
Note: The password will be prompted for, and should not be provided in the connection string.
-
-f <FNDUSER> - Changes the password for an Oracle E-Business Suite user. Specify the user name. A user name that contains spaces or special characters must be enclosed in double quotation marks; for example,
"JOHN SMITH"or"JOHN.DOE@EXAMPLE.COM". -
-o <ORAUSER> - Changes the password for an Oracle E-Business Suite database user. Specify the user name.
Note: This only applies to users listed in the FND_ORACLE_USERID table, not database users in general.
-
-a - Changes all Oracle passwords for schemas that are registered as base product schemas in the FND_ORACLE_USERID table (excluding the passwords of APPS, APPLSYS, and APPS_NE) to the same password, in the same way as the ALLORACLE mode does in FNDCPASS.
-
-l - Locks or unlocks an individual Oracle E-Business Suite database user (ORACLE_USER) (except required schemas). Specify
TRUEto lock orFALSEto unlock. -
-L - Locks or unlocks all Oracle E-Business Suite database users (except required schemas). Specify
TRUEto lock orFALSEto unlock. -
-s <APPLSYS> - Changes the password for the APPLSYS user, the APPS user, and the APPS_NE user. This requires the execution of AutoConfig on all tiers. After changing the APPLSYS password, you must also perform the steps listed in Important Additional Instructions to Update WLS Data Source.
Important Additional Instructions to Update WLS Data Source
Whenever you use AFPASSWD or FNDCPASS in SYSTEM mode to change the APPS or APPLSYS schema passwords, you must also perform the following actions.
Note: Using SYSTEM mode with either APPLSYS or APPS will simultaneously update both the APPLSYS and APPS schemas; The respective passwords are kept in sync by both AFPASSWD and FNDCPASS.
Important: Perform the following steps on the run file system of the primary node.
-
Shut down the application tier services using the
$INST_TOP/admin/scripts/adstpall.shscript. -
Change the APPLSYS password, as described for the utility you are using.
-
Start AdminServer using the
$INST_TOP/admin/scripts/adadminsrvctl.shscript. Do not start any other application tier services. -
Change the APPS password in WLS data source by running the the following script as shown:
$ perl $FND_TOP/patch/115/bin/txkManageDBConnectionPool.pl
When prompted, select "updateDSPassword" to change the APPS password in the WLS data source.
-
Start all the application tier services using the
$INST_TOP/admin/scripts/adstrtal.shscript. -
Verify the WLS data source changes as follows:
-
Log in to the WLS Administration Console.
-
In the Domain Structure tree, expand Services, then select Data Sources.
-
On the Summary of JDBC Data Sources page, select EBSDataSource.
-
On the Settings for EBSDataSource page, select Monitoring > Testing.
-
Select "oacore_server1".
-
Click Test DataSource.
-
Look for the message "Test of EBSDataSource on server oacore_server1 was successful".
-
Important: Steps 4, 5, and 6 are only applicable when using the "-s <APPLSYS>" option to change the APPLSYS, APPS, and APPS_NE passwords. They are not applicable when changing passwords for product schemas.
In the next prepare phase after the password change, adop will invoke EBS Domain Configuration to ensure that the WLS data source on the patch file system will be synchronized with the new APPS password.
Using AFPASSWD to Migrate to a Password Hashing Scheme
You can use AFPASSWD to migrate Oracle E-Business Suite user passwords to a password hashing scheme. The migration converts the passwords for local Oracle E-Business Suite users (that is, users stored in the FND_USER table) from their current encryption to a non-reversible password hashing scheme, thus making the passwords non-recoverable. This feature provides additional protections against brute forcing of hashes in case the password hashes in the database are compromised. You can select secure hash algorithms (FSHA-256, FSHA-384, and FSHA-512) based on the definitions provided by NIST FIPS 180-4 which are combined internally with the use of the PBKDF2 derivation function as defined by NIST 800-132 to make calculating the hashes computationally more difficult.
Note: The option to migrate to the secure hash algorithm (SHA) hash mode is deprecated in Oracle E-Business Suite Release 12.2.3 and later, and the option to migrate to the SHA-256, SHA-384, or SHA-512 hash modes is deprecated in Oracle E-Business Suite Release 12.2.15 and later. As of Release 12.2.15, you should now migrate only to FSHA-256, FSHA-384, or FSHA-512. However, if you previously migrated to one of the earlier hash modes, you can use AFPASSWD to perform another migration to one of the advanced hash modes.
Migration to a password hashing scheme is a one-way operation that cannot be undone without a system restore from backup. Up to and including Release 12.2.9, this migration is optional and is not implemented unless you manually execute it to take advantage of this feature. Oracle recommends that you do implement an advanced password hashing scheme to enhance Oracle E-Business Suite user password security.
Using an advanced hash algorithm adds a small delay to the login process for users due to the additional computation. Oracle recommends that you use advanced password hashing with the strongest secure hash algorithm that provides acceptable login performance.
Note: The AFPASSWD migration option does not affect existing password schemes for the following types of users:
-
Users whose passwords are managed externally in Oracle Directory Services
-
Users whose passwords are managed externally in a third-party LDAP directory, such as Microsoft Active Directory
-
Oracle E-Business Suite database users
Before migrating, back up your Oracle E-Business Suite instance so that you can restore it from the backup if necessary.
Also, before migrating, verify that you have upgraded all desktop clients to a version supported with Release 12.2 to ensure that these clients can continue to connect to your Oracle E-Business Suite instance. These clients include the following:
-
Oracle Collaboration Suite - See Oracle Collaboration Suite Installation Guide for your platform.
-
Oracle Configurator - See Oracle Configurator Installation Guide.
-
Oracle Discoverer - See the following My Oracle Support articles:
With July 2026 Critical Patch Update (CPU) (see My Oracle Support article KA1725, Oracle E-Business Suite Release 12.2 Critical Patch Update Availability Document (July 2026)), the AppsUserExport utility no longer exports the FND user passwords regardless of the password hash scheme when exporting Oracle E-Business Suite user information. For more information, refer to "Migrating Data between Oracle E-Business Suite and Oracle Directory Services" section in the following My Oracle Support articles when applicable:
-
KA1343, Integrating Oracle E-Business Suite Release 12.2 with Oracle Internet Directory 14c
-
KA1051, Integrating Oracle E-Business Suite Release 12.2 with Oracle Internet Directory 12c
-
KA1064, Integrating Oracle E-Business Suite Release 12.2 with Oracle Unified Directory 12c
To migrate Oracle E-Business Suite user passwords to a password hashing scheme, specify the AFPASSWD command with the following options.
Options with Remove Invalid Users OFF:
AFPASSWD [-c <APPSUSER>[@<TWO_TASK>]] -m <HASH-MODE>
Options with Remove Invalid Users ON:
AFPASSWD [-c <APPSUSER>[@<TWO_TASK>]] -M <HASH-MODE>
The options have the following functions:
-
-c <APPSUSER>[@<TWO_TASK>] - Specifies the connection string to use, the Oracle E-Business Suite user, and/or the value of TWO_TASK. This option can be use in combination with others. If it is not specified, default values from the environment will be used.
Note: The password will be prompted for, and should not be provided in the connection string.
-
-m <HASH-MODE> [MIGRATION] - Migrates records in the FND_USER table to hash mode using the specified algorithm. Specify the hash mode to use.
-
For Oracle E-Business Suite Release 12.2.15 and R12.ATG_PF.C.Delta.14, you can specify any of the following advanced hash algorithms for
<HASH-MODE>:-
FSHA256 -
FSHA384 -
FSHA512
Note: For
[MIGRATION],PARTIALis the default and only option for Oracle E-Business Suite Release 12.2.15 or R12.ATG_PF.C.Delta.14. A partial migration allows users with an earlier encryption mode to coexist with users creating new passwords with the selected advanced hash mode. Users on the earlier encryption mode can still log in, but subsequent password changes will switch these users to the selected advanced hash mode. -
-
For Oracle E-Business Suite Release 12.2.3 to Release 12.2.14, you can specify any of the following advanced hash algorithms for
<HASH-MODE>and migration types for[MIGRATION]:-
Advanced Hash Algorithms
-
SHA256 -
SHA384 -
SHA512
-
-
Migration Types
-
FULL- A full migration migrates all the records in the FND_USER table to the selected hash mode. If you do not specify a migration type, then a full migration is performed by default. -
BACKGROUND- A background migration migrates all the records in the FND_USER table to the selected advanced hash mode in the background as a concurrent program named Advanced Hash Migration (AFPASSWD_MIGRATION). -
PARTIAL- A partial migration allows users with an earlier encryption mode to coexist with users creating new passwords with the selected advanced hash mode. Users on the earlier encryption mode can still log in, but subsequent password changes will switch these users to the selected advanced hash mode.Note: Partial migration is used to change between advanced hash modes and should be performed only after a full or background migration. If you perform a partial migration first, use
-Pto subsequently run any full migration.If you are already using an advanced hash mode (SHA256, SHA384, or SHA512), then you can only migrate to another advanced hash mode, and you can only specify the migration type PARTIAL.
-
Note: The
SHAhash mode is deprecated in Release 12.2.15 or R12.ATG_PF.C.Delta.14 and later. Do not specifySHA,SHA256,SHA384, orSHA512as the hash mode for AFPASSWD; instead, specify one of the advanced FSHA-2 hash algorithms. -
-
-
-M - Performs the same function as
-mand marks any passwords that cannot be successfully migrated as invalid, which removes obsolete credentials for those users.
The AFPASSWD log file is written to the directory where AFPASSWD was executed. You should review this log file to verify the status of the migration.
If you prefer to use a different hash mode such as FSHA-384 or FSHA-512 instead of FSHA-256, then you can perform another partial migration to switch to that hash mode before you run the command to complete the migration. For example:
AFPASSWD -m [FSHA384|FSHA512]
FNDCPASS Utility
Important: Although still supported for backwards compatibility, FNDCPASS is a legacy tool. Entering passwords on the command line may be a security risk. Oracle recommends that you make the transition to its successor, AFPASSWD, as soon as you can, for which no passwords are entered on the command line.
The FNDCPASS utility can be used to change various types of passwords.
-
Type 2 - Passwords for schemas that are used by shared components of Oracle E-Business Suite (APPLSYS, APPS, APPS_NE); Also referred to as system passwords. This type does not include EBS_SYSTEM or database system administration accounts such as SYS or SYSTEM.
-
Type 3 - Passwords for schemas that are provided by individual products within Oracle E-Business Suite
Note: You should always run AutoConfig after changing any system (type 2) password.
To change the APPS, APPLSYS, and APPS_NE (type 2) schema password:
Here, all application tier services must first be shut down using the command $INST_TOP/admin/scripts/adstpall.sh. SYSTEM mode changes the APPS and APPS_NE passwords as well as the APPLSYS password, and thereby keeps them all synchronized.
Use this command to change passwords for schemas that are used by shared components of Oracle E-Business Suite:
FNDCPASS <logon> 0 Y <SYSTEM username>/<SYSTEM password>  SYSTEM \
        <username> <new_password>
Use the above command with the following arguments. When specifying the SYSTEM token, FNDCPASS expects the next arguments to be the APPLSYS user name and the new password.
| Variable | Description |
|---|---|
| <logon> | The Oracle user name.
Note: You can provide just the Oracle user name and FNDCPASS will prompt you for the password. Alternatively, you can provide the <username>/<password> pair. |
| <SYSTEM username>/<SYSTEM password> | The username and password for the SYSTEM DBA account. If your instance is on Release 12.2.11 or later, or if you have applied the Oracle E-Business Suite Release 12.2 Consolidated Patch for EBS System Schema Migration, then this account is EBS_SYSTEM. For earlier codelevels, this account is SYSTEM. |
| <username> | The APPLSYS user name. For example, 'applsys'. |
| <new_password> | The new password. |
This command does the following:
-
Verifies the current APPLSYS password.
-
Re-registers password in Oracle E-Business Suite.
-
Changes the APPLSYS, APPS_NE, and all APPS passwords (for multi-APPS schema installations) to the same password.
-
ALTER USER is executed to change the ORACLE password for the above ORACLE users.
For example, the following command changes the APPLSYS password:
FNDCPASS <APPS username> 0 Y <SYSTEM username>/<SYSTEM password> SYSTEM APPLSYS <new_password>
After changing the APPLSYS password, you must also perform the steps listed in Important Additional Instructions to Update WLS Data Source.
You will then need to run AutoConfig (adautocfg.sh) using <new_password> as the APPS password, and finally restart application tier services using the command $INST_TOP/admin/scripts/adstrtal.sh.
Tip: For assistance in resolving any issues, see My Oracle Support article KB301994, FNDCPASS Troubleshooting Guide For Login and Changing Applications Passwords.
To change an Oracle E-Business Suite schema password (type 3) (other than APPS/APPLSYS/APPS_NE):
Use this command to change the password of a schema provided by an individual product in Oracle E-Business Suite:
FNDCPASS <logon> 0 Y <SYSTEM username>/<SYSTEM password> ORACLE \
        <username> <new_password>
Use the above command with the following arguments. When specifying the ORACLE token, FNDCPASS expects the next arguments to be an ORACLE user name and the new password.
| Variable | Description |
|---|---|
| <logon> | The Oracle user name.
Note: You can provide just the Oracle user name, and the system will prompt you for the password. Alternatively you can provide the <username>/<password> pair. |
| <SYSTEM username>/<SYSTEM password> | The username and password for the SYSTEM DBA account. If your instance is on Release 12.2.11 or later, or if you have applied the Oracle E-Business Suite Release 12.2 Consolidated Patch for EBS System Schema Migration, then this account is EBS_SYSTEM. For earlier codelevels, this account is SYSTEM. |
| <username> | The Oracle user name. For example, 'GL'. |
| <new_password> | The new password. |
For example, the following command changes the GL user password:
FNDCPASS <APPS username> 0 Y <SYSTEM username>/<SYSTEM password> ORACLE GL <new_password>

ORACLE Password:
Note: The program prompts the user for the APPS password in the above example.
To change all ORACLE (type 3) schema passwords:
Use this command to change the passwords of all schemas provided by Oracle Application products that are registered as base product schemas in the FND_ORACLE_USERID table:
FNDCPASS <logon> 0 Y <SYSTEM username>/<SYSTEM password> ALLORACLE \
 <new_password>
Use the previous command with the following arguments. When specifying the ALLORACLE token, FNDCPASS expects the next argument to be the new password.
| Variable | Description |
|---|---|
| <logon> | The Oracle user name.
Note: You can provide just the Oracle user name, and the system will prompt you for the password. Alternatively you can provide the <username>/<password> pair. |
| <SYSTEM username>/<SYSTEM password> | The username and password for the SYSTEM DBA account. If your instance is on Release 12.2.11 or later, or if you have applied the Oracle E-Business Suite Release 12.2 Consolidated Patch for EBS System Schema Migration, then this account is EBS_SYSTEM. For earlier codelevels, this account is SYSTEM. |
| <new_password> | The new password. |
For example, the following command changes all ORACLE schema passwords:
FNDCPASS <APPS username> 0 Y <SYSTEM username>/<SYSTEM password> ALLORACLE <new_password>
ORACLE Password:
Note: The program prompts the user for the APPS password in the above example.
To change an Oracle E-Business Suite user's password:
You can use this command to change an individual Oracle E-Business Suite user's password:
FNDCPASS <logon> 0 Y <SYSTEM username>/<SYSTEM password> USER \
        <username> <new_password>
Use the above command with the following arguments. When specifying the USER token, FNDCPASS expects the next arguments to be an Oracle E-Business Suite user name and the new password.
| Variable | Description |
|---|---|
| <logon> | The Oracle user name.
Note: You can provide just the Oracle user name, and the system will prompt you for the password. Alternatively you can provide the <username>/<password> pair. |
| <SYSTEM username>/<SYSTEM password> | The username and password for the SYSTEM DBA account. If your instance is on Release 12.2.11 or later, or if you have applied the Oracle E-Business Suite Release 12.2 Consolidated Patch for EBS System Schema Migration, then this account is EBS_SYSTEM. For earlier codelevels, this account is SYSTEM. |
| <username> | The Oracle E-Business Suite user name. For example, 'VISION'. |
| <new_password> | The new password. |
For example, if you were changing the password for the user VISION, you would use the following command:
FNDCPASS <APPS username> 0 Y <SYSTEM username>/<SYSTEM password> USER VISION <new_password>
ORACLE Password:
Note: The system prompts the user for the APPS password in the above example.
FNDCPASS prompting for password if not provided
FNDCPASS prompts the user for the APPS user password if it is not given on the command line.
You can choose not to give the APPS password in the same command, as in the following example.
FNDCPASS APPS 0 Y <SYSTEM username>/<SYSTEM password> USER operations <password>
ORACLE Password:
Here the APPS password is not provided on the command line, but instead you are prompted for it.
Using Case-Sensitive Database Passwords
To help meet increasing and often mandatory requirements for complex passwords, Oracle E-Business Suite supports the use of Oracle Database case-sensitive passwords. This is in contrast to the earlier Oracle Application Library behavior of storing and validating all database passwords as uppercase, regardless of the case in which they are entered.
It is strongly recommended that you enable case-sensitive database passwords with your Oracle E-Business instance. Using mixed case enables more secure application schema passwords to be specified.
Overview
There are two possible situations:
Case sensitivity disabled (default in Oracle E-Business Suite instances on Oracle Database 11g, 12c, or 19c) - For new database accounts or changed database passwords, Oracle automatically records the case in which the password was originally specified and stores it as a hash value in the data dictionary table that holds user information. However, new or changed database account passwords will continue to not be case-sensitive unless and until the mixed-case feature is explicitly enabled.
Case sensitivity enabled - After the feature is enabled, database passwords created or changed since the upgrade to Oracle Database 11g or later will need to be entered in the case specified originally. Only database passwords that remain unchanged since the feature was enabled will continue to not be case-sensitive. The database stores a case-sensitive version of the password created or changed in Oracle Database 11g or later, whether the mixed-case feature is enabled or not. The case-sensitive version of the password is therefore ready for immediate use as soon as the feature is enabled.
For example:
-
When the initialization parameter SEC_CASE_SENSITIVE_LOGON is set to FALSE,
dogfood,DogFood, andDoGFooDare all the same password. -
When SEC_CASE_SENSITIVE_LOGON is set to TRUE,
dogfood,DogFood, andDoGFooDare 3 different passwords.
The case sensitivity capability for Oracle E-Business Suite database passwords is analogous to the way the SIGNON_PASSWORD_CASE profile is used to determine how new or changed Oracle E-Business Suite user passwords will be stored.
Enabling Case-Sensitive Database Passwords
Case sensitivity is controlled by the initialization parameter SEC_CASE_SENSITIVE_LOGON that was introduced in Oracle Database 11g. The default for Oracle E-Business Suite databases on Oracle Database 11g, 12c, or 19c is FALSE, which means that new, existing (pre-11g), and changed database passwords will all remain not case-sensitive.
Note: This parameter is no longer supported in Oracle Database versions later than 19c. You must use this parameter to enable case sensitivity before you upgrade to Oracle AI Database 26ai or later.
Prior to enabling case sensitivity, database passwords may be in an unknown case depending on the codelevel of your Oracle E-Business Suite instance when they were changed. This includes the APPS, APPLSYS, and APPS_NE passwords. Therefore, before you enable the Case Sensitivity feature, you must change the APPLSYS/APPS/APPS_NE password with the AFPASSWD or FNDCPASS tool, ensuring that you use all uppercase when typing the password values to force the passwords to be stored in uppercase. This will normalize your system to a known state prior to conversion to case-sensitive passwords for Oracle E-Business Suite database users. After changing the APPLSYS/APPS/APPS_NEW passwords, you should also change the passwords of the other schemas used in your Oracle E-Business Suite instance to be all uppercase as well.
To enable the Case Sensitivity feature, perform the following steps:
-
Set the Oracle Database initialization parameter SEC_CASE_SENSITIVE_LOGON to TRUE.
Note: The default for Oracle E-Business Suite databases is FALSE, which means that new, existing (pre-11g), and changed database passwords will remain not case-sensitive.
-
Shut down and restart the database. New and changed database passwords will now be case-sensitive.
-
Change the APPLSYS, APPS, and APPS_NE passwords to ensure that the database password is stored in the expected case. Use uppercase for the old password value on the first password change after setting the parameter.
For more information about using the Oracle E-Business Suite provided command line utilities, AFPASSWD and FNDCPASS, to change your passwords, see: Oracle E-Business Suite Password Management.
In addition, change any other Oracle E-Business Suite database passwords. Use all uppercase for the old password value on the first password change after setting the parameter.
Warning: Three failed login attempts with the APPS user will result in the APPS user account being locked. This is the default behavior of the Oracle Database user profile. Before running AFPASSWD or FNDCPASS with the APPS password, verify you have the correct APPS password by logging into SQL*Plus with the APPS user successfully.
After the APPS password is successfully changed by AFPASSWD or FNDCPASS, it is case-sensitive.
Warning: The APPLSYSPUB password is unique in that it must be maintained as an uppercase password. This means that if you opt to change the APPLSYSPUB password after enabling case sensitivity, you must enter the new password in all uppercase to preserve system functionality.
-
In Oracle Database 11g or 12c, ensure that the
sqlnet_ifile.orafile line SQLNET.ALLOWED_LOGON_VERSION_SERVER = 10, when you have set the case sensitivity parameter SEC_CASE_SENSITIVE_LOGON to TRUE. -
After Oracle Database password case sensitivity has been enabled, a DBA should immediately change the passwords of the database administrative accounts such as SYS and SYSTEM. The DBA may also wish to employ a password management policy (profile) to ensure system administrators change the Oracle E-Business Suite database passwords within a reasonable time.
Existing database passwords that have not been changed since you enabled case sensitivity will remain case-insensitive until changed, after which they will become case-sensitive.
Additional Considerations for Oracle E-Business Suite DBAs
Be aware of the following points:
-
We recommend that the APPLSYSPUB password should be changed on all Release 12.x systems, using either AFPASSWD or FNDCPASS. AutoConfig should be run after changing the password, to synchronize all the application tier files.
Important: The APPLSYSPUB password is an exception to the standardization of mixed case passwords, and must always be in upper case. This is true even if case-sensitive passwords have been enabled.
For more information, refer to About Oracle E-Business Suite Secure Configuration, Oracle E-Business Suite Security Guide.
-
Passwords with special characters or multibyte characters are not currently supported with Oracle E-Business Suite.
-
In Oracle Database 12c and 19c, the SEC_CASE_SENSITIVE_LOGON parameter is deprecated, but is still supported for backward compatibility. In later database versions, this parameter is removed. You must use this parameter to enable case sensitivity before you upgrade to Oracle AI Database 26ai or later.
For upgrade instructions, see My Oracle Support article KA1151, Interoperability Notes: Oracle E-Business Suite Release 12.2 with Oracle AI Database 26ai.
ORACLE Users Window
An ORACLE username grants access privileges to the ORACLE database.
This section is provided for reference use only. Beginning with Release 12.2, the ORACLE Users window should not be used. For information on creating custom applications and related ORACLE users, see: AD Splicer, Oracle E-Business Suite Setup Guide and My Oracle Support article KB858105, Creating a Custom Application in Oracle E-Business Suite Release 12.2. For information on changing passwords for ORACLE users, see: Oracle E-Business Suite Password Management.
The installation process always registers your ORACLE username, and additional ORACLE usernames are needed only for custom applications using Oracle Application Object Library. For more information, see My Oracle Support article KB858105, Creating a Custom Application in Oracle E-Business Suite Release 12.2.
Before an ORACLE username is registered, the ORACLE username should be created (this function is usually performed by a database administrator). The ORACLE username must include the create session privilege.
If you register an ORACLE username as a "restricted" ORACLE username, you submit a concurrent request to set up read-only privileges to the Oracle Application Object Library tables. An "enabled" ORACLE username has all privileges to those tables. A "disabled" ORACLE username has no privileges to those tables.
If you do not register and enable your ORACLE username or if you disable a registered ORACLE username, your user cannot use Oracle Application Object Library features such as menus and flexfields.
You should not change the registration of any ORACLE usernames that the installation process registers, other than changing the passwords.
If you are registering a change to an existing ORACLE password, make the password change in the database immediately AFTER you register the password change in Oracle E-Business Suite. Until you register the password changes in Oracle E-Business Suite and implement them in the database, responsibilities using this ORACLE username cannot connect to the database.
Your password must follow the guidelines for creating passwords discussed in the Oracle database documentation. Remember that if you use non-character values in your password, you may need to use quotation marks around your password when changing it in the database.
Note: Use a password management utility described in Oracle E-Business Suite Password Management to change the password, not the ORACLE Users window.
Warning: If you are changing the password to the applsys ORACLE username, which contains the Oracle Application Object Library tables, you must not change the passwords to any other ORACLE usernames at the same time.
As soon as you change and save the password, you should immediately log out of the Oracle E-Business Suite, make the applsys password change in the database, and then sign on again before you do anything else. You should also ensure that no other users are logged on to the Oracle E-Business Suite while you are changing the applsys password.
Important: For passwords for the APPS accounts, the applsys password must be identical to the password for the APPS accounts (APPS, APPS2, APPS3). The uniform passwords enable the different sets of books to operate correctly.
ORACLE Users Block
This block contains the following:
Password
The password of your ORACLE username.
Until you register the password changes in Oracle E-Business Suite and implement them in the database, responsibilities using this ORACLE username cannot connect to the database.
Privilege
The type of privilege to the Oracle Application Object Library database tables for this ORACLE username. The Oracle Application Object Library tables contain information for Oracle Application Object Library features such as menus, help text, and flexfields. If you do not have access to these tables, you cannot use these features.
The default value for this field is Enabled.
-
Enabled - An enabled ORACLE username has full privileges (insert, query, update, and delete) to the Oracle Application Object Library database tables.
-
Restricted - A restricted ORACLE username has only query privileges to the Oracle Application Object Library database tables. This ORACLE username can view Oracle Application Object Library data, but cannot insert, update, or delete information.
-
Disabled - A disabled ORACLE username has no privileges to the Oracle Application Object Library database tables. This ORACLE username cannot insert, query, update, or delete Oracle Application Object Library information and cannot use Oracle Application Object Library features.
Two additional privilege types appear, associated with ORACLE usernames configured at installation. However, these privilege types cannot be selected from your list of values.
-
Public - The installation process registered an ORACLE username with the Public privilege, allowing all users to access the Application Sign-On Security form where they must enter a valid Oracle E-Business Suite username and password.
-
Applsys - The installation process registered the Oracle Application Object Library ORACLE username with the Applsys privilege.
Install Group
The value of the installation group associated with your ORACLE username. Install group numbers should be consecutive whole numbers, where 1 represents the first set of books (or first set of product installations), 2 is the second set of books, 3 is the third set of books, and so on. Install group number 0 represents products that need only single installations.
Important: Since the installation process does not affect ORACLE usernames (also known as "schemas") for custom applications, this value is for your reference only and is currently not used.
Applications Window
Information provided here is for reference only. Beginning with Release 12.2, you must register a custom application using AD Splice. See: AD Splicer, Oracle E-Business Suite Setup Guide and My Oracle Support article KB858105, Creating a Custom Application in Oracle E-Business Suite Release 12.2.
Oracle Application Object Library uses information supplied when an application is registered to identify application objects such as responsibilities and forms as belonging to your application. This identification with your custom application allows Oracle E-Business Suite to preserve your application objects and customizations during upgrades. The application basepath tells Oracle Application Object Library where to find the files associated with your custom application.
You can use your custom application to name your custom menus, concurrent programs, custom responsibilities, and many other custom components. For some objects, the application part of the name only ensures uniqueness across Oracle E-Business Suite. For other components, the application you choose has an effect on the functionality of your custom object.
Applications Block
When you register a custom application, you provide the information Oracle uses to identify it whenever you reference it. Although the application short name of an application can be changed, doing so may cause a change in the application code where the application short name is hardcoded.
Important: You should not change the name of any application that you did not develop, as you cannot be sure of the consequences. You should never change the name of any Oracle E-Business Suite application, because these applications may contain hardcoded references to the application name.
Application
This user-friendly name appears in lists seen by application users.
Short Name
Oracle E-Business Suite uses the application short name as an internal key; for example, when identifying forms, menus, concurrent programs and other application components. The short name is stored in hidden fields while the name displays for users.
Your short name should not include spaces. You use an application short name when you request a concurrent process from a form, and when you invoke a subroutine from a menu.
Tip: Although your short name can be up to 50 characters, we recommend that you use only four or five characters for ease in maintaining your application and in calling routines that use your short name. To reduce the risk that your custom application short name could conflict with a future Oracle E-Business Suite short name, we recommend that your custom application short name begins with "XX".
Basepath
The name of an environment variable that represents the top directory of your application's directory tree. Oracle E-Business Suite searches specific directories beneath the basepath for your application's files and scripts.
In general, your application's basepath should be unique so that separate applications do not write to the same directories.
However, custom applications that will be used only for naming custom responsibilities, menus and other data components may be defined. In this case, you can use the basepath of the Oracle application that uses the same forms as your application. For example, if you are defining a Custom_GL application, you could use the GL_TOP basepath for your custom application. In this case, however, you should not create custom components in the directory structure, such as custom forms and reports, because they will be difficult to isolate for maintenance and upgrading.
See: Oracle E-Business Suite Concepts
Network Test Window
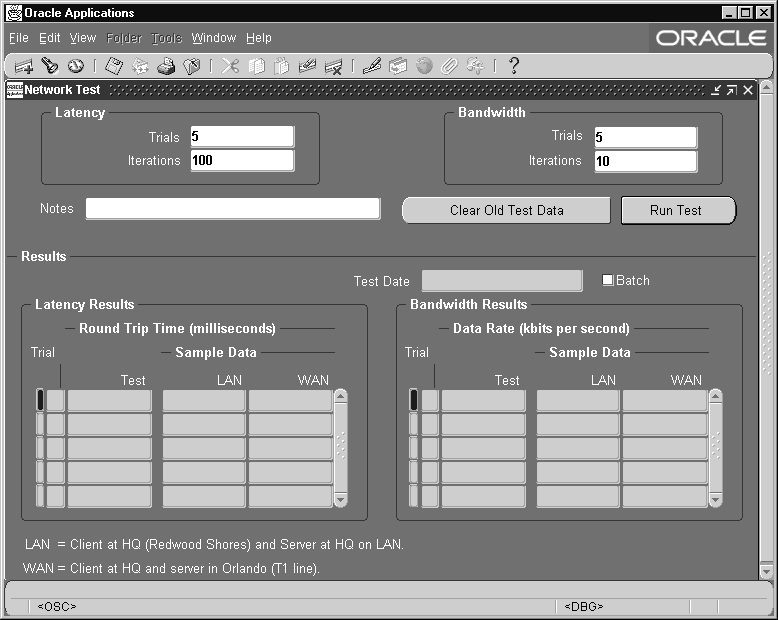
You can use the Network Test form to monitor the latency and bandwidth of the network for forms applications, or to help create a baseline for use in comparing response times from within the application. This information enables you to make comparisons between locations, or at different times of day at the same location. The form shows the time taken to perform one or more Oracle Forms round trips, and the throughput used.
The latency shown on the form represents a combination of the round trip time needed to traverse the physical network (including any devices), and the Forms overhead to process a packet. The network test form is designed to more closely measure the network latency and bandwidth of an actual forms user. Note that the results are not expected to match the times returned by ping, traceroute, or other diagnostic network commands.
To test the network latency, a short sequence of packets is sent from the client application to the application server, then on to the database server, and back to the client. You need to specify the number of sequences (iterations) you want to send, and the number of times you want to send each set of iterations (trials). The default setting is 5 trials of 100 iterations each. The average latency is the total time for all round trips in a trial, divided by the number of iterations.
The bandwidth test (or more accurately, throughput test), examines the data transfer rate, and shows how many bytes per second your network transferred between the client, application server and database server.
Running a Test
Click the Run Test button to perform the test.
You can provide notes to indicate the conditions for each test you run.
Evaluating the Test Results
If one test result varies significantly from the other trials, discard that information.
Use the Clear Old Test Data button to purge previous test results from your database.
The results of both the latency and throughput tests are displayed in the Results block.
-
Latency Results displays the minimum, average, and maximum round trip time for a single round trip from a PC client to the server.
-
The Bandwidth window shows the throughput results, and displays the minimum, average, and maximum data rate in bytes per second.
For comparison, the sample data fields show the results of tests completed at Oracle Headquarters in Redwood Shores, California.
Administering Folders
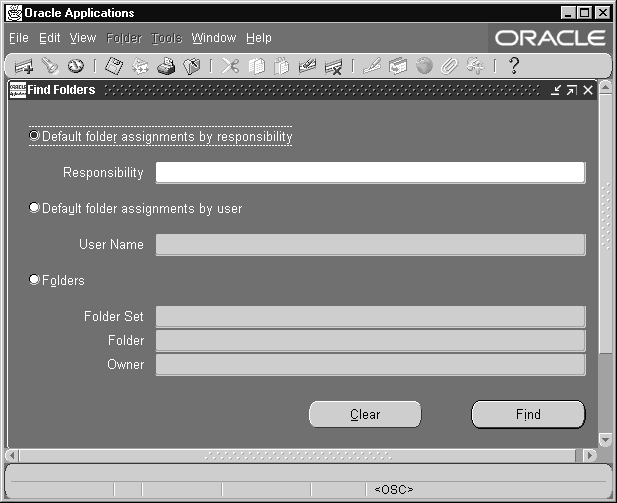
Administer folders by assigning default folder definitions either to a specific user or to a responsibility. Manage folder definitions by assigning them to new owners, determining which folder definitions should be public (accessible by anyone), and setting the AutoQuery behavior of the folders.
You can do different tasks depending on how you search for folders or folder assignments in the Find Default Folders window.
You can assign a default folder to a user or responsibility in "restricted mode" such that all folder functionality is disabled at runtime for the user. In this way you can, for example, prevent users from seeing specific fields, or control which records they can query. This behavior is controlled by the Behavior Mode poplist value, set when the folder is assigned.
You must have default folders before you perform these steps.
To Assign a Folder to a Responsibility:
Follow these steps to assign a folder to a responsibility:
-
Navigate to the Find Default Folders window. Use "Default folder assignments by responsibility" to view the responsibilities for which to assign default folders.
-
You can assign default folders for each responsibility. When users of this responsibility navigate to this folder block, they see the default folder you specify, unless it is overridden by a user-level default.
From the Folder field, enter the name of the default folder. The name of the folder set to which the folder belongs is filled in automatically.
If you do not know the name of the folder, enter the folder set first, then view the folders that belong to that set.
After you save a default folder definition for a folder set, that folder set no longer appears in the list of values.
Folder Set: Every folder set is associated with a particular folder block, and a user or responsibility can have one default folder within each folder set. The folder set name generally describes the records shown in the block; some blocks may have multiple sets of folders associated with them.
To Assign a Folder to a User:
Follow these steps to assign a folder to a user:
-
Navigate to the Find Default Folders window. Use "Default folder assignments by user" to view a list of eligible users.
-
You can assign default folders for each responsibility. When users navigate to this folder block, they see the default folder you specify.
From the Folder field, enter the name of the default folder. The name of the folder set to which the folder belongs is filled in automatically.
If you do not know the name of the folder, enter the folder set first, then view the folders that belong to that set.
After you save a default folder definition for a folder set, that folder set no longer appears in the list of values.
Folder Set: Every folder set is associated with a particular folder block, and a user or responsibility can have one default folder within each folder set. The folder set name generally describes the records shown in the block; some blocks may have multiple sets of folders associated with them.
Source Type: Either User or Responsibility. Records entered in this window use the source type of User. If one of the current user's responsibilities has default folders defined, the default folders are listed with a source type of Responsibility.
User defaults override Responsibility defaults. You cannot delete Responsibility default folders in this window.
Responsibility: The responsibility which uses this default folder definition.
To Assign Ownership of a Folder:
Follow these steps to assign ownership of a folder:
-
Navigate to the Find Default Folders window. Use "Folders" to view general information about folders.
-
Select the folder(s) that requires a change of ownership.
-
Choose "Change Owner" and enter the new owner for the selected folders, or change the value in the Owner field to change the owner of a single folder.
Folder Set: Every folder set is associated with a particular folder block, and a user or responsibility can have one default folder within each folder set. The folder set name generally describes the records shown in the block; some blocks may have multiple sets of folders associated with them.
Public: Whether this folder definition is public; whether users besides the owner can use it. Use this field to determine whether to make folder definitions generally available.
Anyone's Default: Whether this folder definition is used as a default by a user or a responsibility. If it is a default definition, use Default Assignments to view the users and responsibilities for which it is the default folder definition.
Default Assignments: The users and responsibilities that use this folder definition as a default.
To Delete a Folder Definition
Follow these steps to delete a folder definition:
-
Navigate to the Find Default Folders window. Use "Folders" to view general information about folders.
-
If you queried up multiple folders, select the folder(s) to delete.
-
Delete the folder. Deleting folders deletes the folder definition along with any user and responsibility default assignments for the folder.
To Create and Assign a Folder in "Restricted Mode"
Use the steps below to create and assign a folder in a "restricted mode". When user opens a folder in restricted mode, all folder functionality is disabled.
-
Run the folder form and navigate to the folder block.
Hide or show fields as you wish. Take care in choosing the appropriate fields, as the fields that are hidden will not be accessible for users or responsibilities of this folder block after it is assigned to them as a default folder in restricted mode.
-
Save the folder.
-
Assign the folder as a default folder to a responsibility or user.
-
Set the value of the new Behavior Mode poplist to "Restrict fields and folder functions".
A default folder can have one of the following values for Behavior Mode:
-
No restrictions - End user can perform all folder functions.
-
Restrict fields and folder functions - End user cannot perform any folder functions. This is "Restricted Mode".
Note that even if the Behavior Mode is restricted, the owner of the folder can still perform the folder functions.
-
Runtime Scenarios with Restricted Mode
Here are two scenarios with restricted mode:
End user runs folder form with restrictions
When the user opens the restricted default folder form, all folder functions are disabled. For example, the user cannot open any other folders, or move or resize fields.
Within a folder block, once a restricted default folder loads, all folder functionality will become disabled even if that block supports other folder objects.
System Administrator wants to change the default restricted folder
Once a default folder is assigned with the Behavior Mode "Restrict fields and folder functions" to any user or responsibility, it no longer appears in the list of available folders for opening by any user (even though this folder is defined as "Public").
To change this default folder, you should first assign the default folder to yourself. Then run the folder form and navigate to the folder block so that the default folder will load. You can then make modifications and save the folder. Even though the Behavior Mode is restricted, the folder functions can still be performed since you have become the owner of the folder.