Patch Tracking Utilities
Patch Wizard
With Patch Wizard, you can determine patches that have not been applied to your system. It does not report on all available patches. It compares the patches you have already applied against a list of all recommended Oracle E-Business Suite patches. Recommended patches can include high-priority patches or patches that update to a new codelevel, such as release update packs (RUPs), product family RUPs, and pre-upgrade patches.
How Patch Wizard Works
Patch Wizard supplies you with an interface from which you can:
-
Set preferences, both site-specific and general, that include the staging directory and various defaults that will apply to the patches you download.
-
Set up filters that report only those patches that may affect your system.
-
Submit a request for a report of recommended patches, based on the filter(s) you set up.
-
Analyze the impact of specific patches from a list you supply to Patch Wizard.
-
Download patches, specify the language of the patches to download, and merge patches.
Before running any of the Patch Wizard tasks, set up your My Oracle Support credentials on the OAM Update My Oracle Support Credentials page. To access this page, go to the Patch Wizard main page, click Setup in the title bar. Alternatively, click the Setup link at the top right of any page of the OAM interface.
The Dashboard Setup page appears. Click the My Oracle Support Credentials link on the left side. The Update My Oracle Support Credentials page appears.
OAM Update My Oracle Support Credentials Page
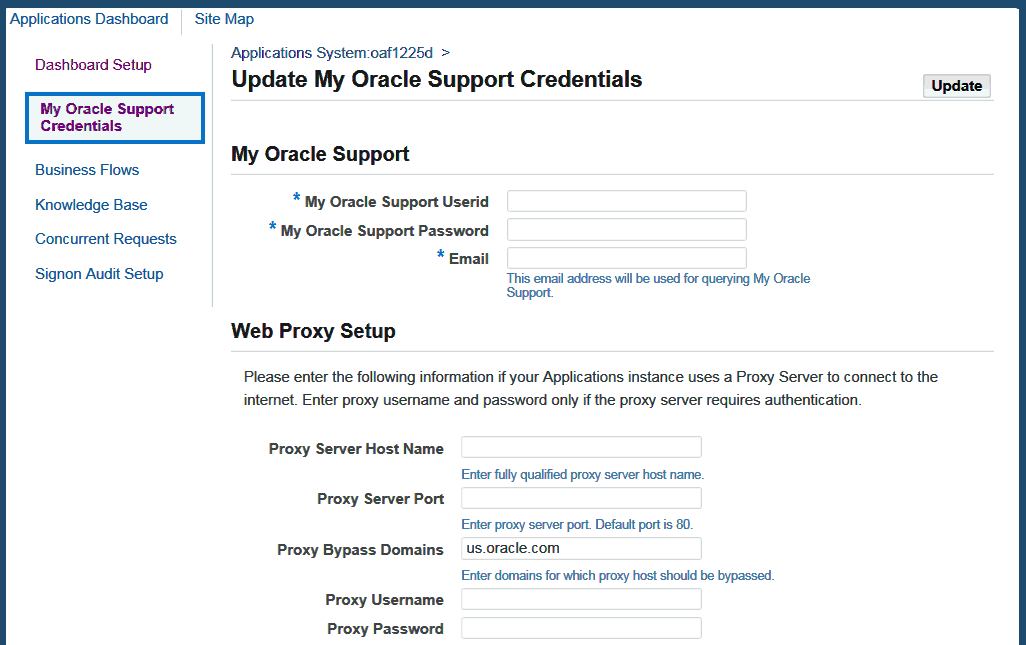
Update your My Oracle Support credentials by providing your user ID, password, email address, proxy server host name, proxy server port, proxy bypass domains, proxy user name, and proxy password. The recommend, analyze, and download patches features typically require that your My Oracle Support user ID and password are set on the OAM Update My Oracle Support Credentials page. However, the recommend and analyze features can also be used when Patch Wizard does not have access to a direct Internet connection. If this is the case, you can leave the My Oracle Support user ID and password empty.
The Patch Information Bundle
The Patch Information Bundle file contains the zip files of recommended patches, the list of recommended patches (Recommended.xml), the latest codelevel patches (Codelevels.xml), and information on products and product families (ProductInfo.xml). Each patch zip file contains a readme file, a patch LDT file, and a patch metadata file (patch_metadata.xml).
The Patch Information Bundle file is updated daily. When you submit a patch analysis request, this file is automatically downloaded (if it is not specified otherwise in your My Oracle Support credentials.)
Patch Wizard loads the Patch Information Bundle data, including LDT files and readme files, into the Oracle E-Business Suite database. It uses the metadata to provide patch recommendations.
Concurrent Programs
When you submit a request for patch analysis, Patch Wizard performs the following tasks using a set of concurrent programs:
-
Uploading patch information from the Patch Information Bundle to Patch Wizard tables
Patch Wizard loads the Patch Information Bundle metadata, including LDT files and readme files, into the Oracle E-Business Suite database.
-
Recommending patches based on the current environment and the Patch Information Bundle
Patch Wizard reports which patches update Oracle E-Business Suite at the current codelevel and which update to a new codelevel.
-
Downloading patches (ad hoc or based on the list of recommended patches)
Patch Wizard can download patches from My Oracle Support, and then merge the patches in the Patch Wizard staging directory.
-
Analyzing lists of patches after downloading them from My Oracle Support
Patch Wizard uploads the metadata for a specific patch or set of patches for you to view information reported from the metadata. For example, you can submit a request for patch analysis, and then view any recommended patches that have not yet been applied and the impact of applying this new patch.
Running Patch Wizard Without Access to an Internet Connection
You can run Patch Wizard without access to an Internet connection, if necessary, by downloading the Patch Information Bundle to a system which has Internet access. Once the download is complete, copy the Patch Information Bundle file to the Patch Wizard's staging directory. Then run Patch Wizard as you normally would, to recommend and analyze patches, based on the files you copied to the staging directory.
The Patch Wizard Interface
Patch Wizard is a Web-based utility in Oracle Applications Manager (OAM). The OAM interface gives Patch Wizard pages a uniform look and feel.
Main Page
From this page, you have access to task icons used to set up the Patch Wizard staging directory, manage patch filters, submit concurrent requests, and view recommended patches. In addition, the Recommended Results section of this page displays a list of patches based on submitted requests.
Task Icons
From the main page, access the other Patch Wizard pages by clicking on Task icons. The icons provide links to the following pages: Patch Wizard Preferences, Define Patch Filters, Recommended/Analyze Patches, Download Patches, and Aggregate Patch Impact.
Details Icons
On many Patch Wizard pages, you can drill down to see more detail. For example, from the Recommended Patches Results section of the main page, click the Details icon for a specific recommended patch request to view the recommended patch results
Accessing Patch Wizard
To access Patch Wizard, use one of the following navigation methods:
-
Log in to Oracle E-Business Suite and navigate to Patch Wizard under Oracle Applications Manager.
Oracle Applications Manager is available under the out-of-the-box System Administration responsibility.
-
Log in to Oracle E-Business Suite as a user with the out-of-the-box Patch Wizard responsibility, which has the Patching and Utilities Standalone menu associated with it. Patch Wizard can thus be accessed without navigating through Oracle Applications Manager.
Patch Wizard Main Page
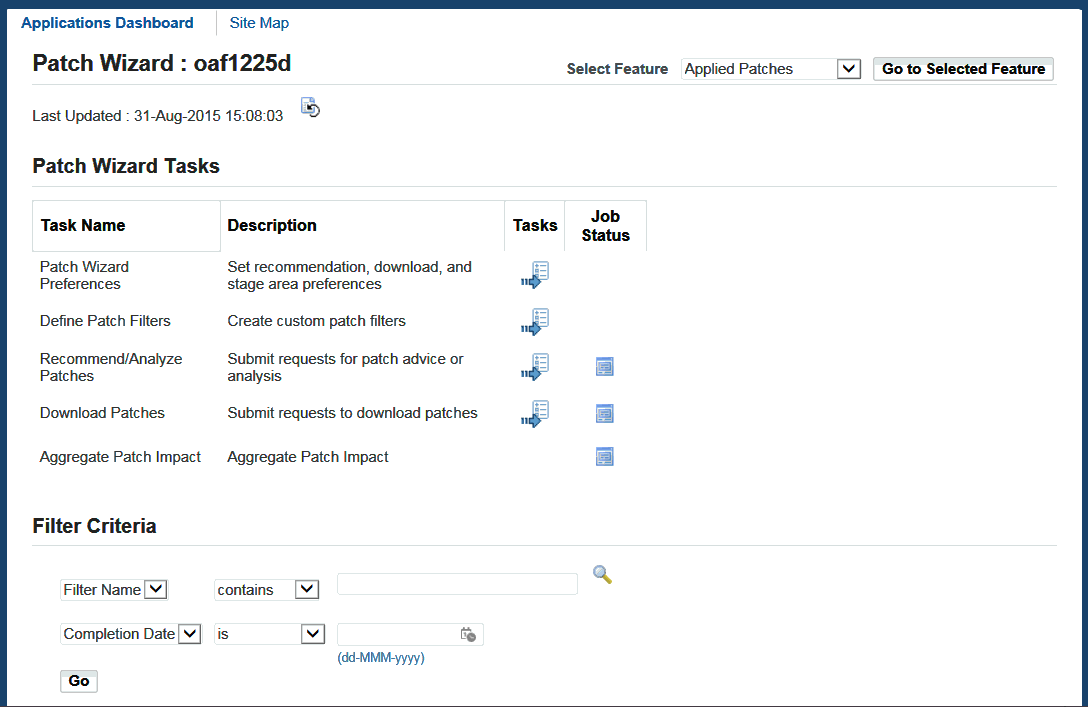
Use the main page to access all features of Patch Wizard and to view the results of your requests for recommended patches. The Select Feature drop-down list at the top of the page provides access to the Applied Patches, File History, Timing Reports, and Register Flagged Files features.
Patch Wizard Main Page
Patch Wizard Tasks Table
The Patch Wizard Tasks table lists the tasks available in Patch Wizard. The table contains the following columns of information for each task:
-
Task Name: Name of the Patch Wizard task.
-
Description: Describes the task.
-
Tasks: Link to the page associated with the Patch Wizard task.
-
Job Status: Link to the request submission status of the task where you can review warnings or errors for your request.
From the Patch Wizard Tasks table, choose the Tasks icons to view:
-
The Patch Wizard Preferences page
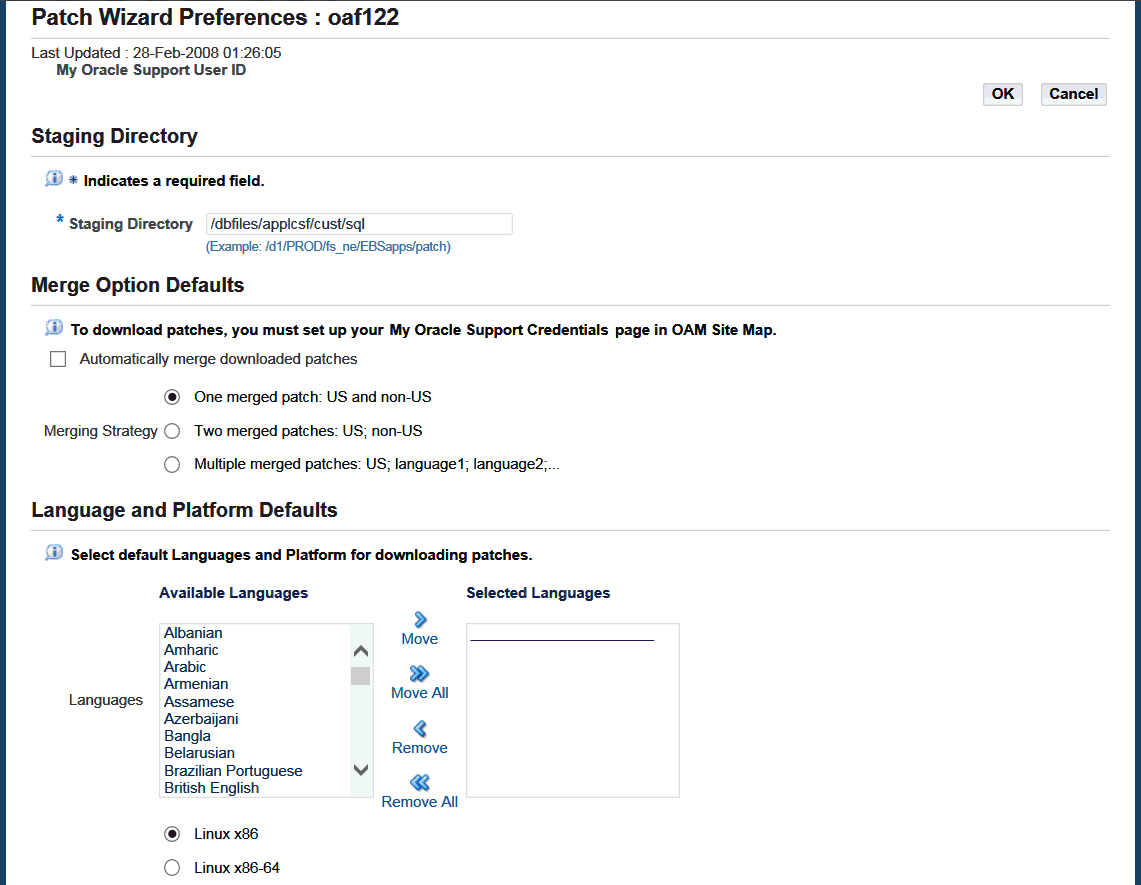
From the Preferences page, set the staging directory, merge patch defaults, the languages and platform defaults for downloading patches, and whether to display or hide hidden patches. You must define the values on this page before you use any other Patch Wizard feature. You can also use this page to modify existing preferences at a later date.
-
The Define Patch Filters page
Typically, you see only those patches that are recommended for your system. Use this page to set up filters that report only those patches that may affect your system.
-
The Recommend/Analyze Patches page
Once you have selected values for a filter, submit the request to create a report of recommended patches based on that filter. You can also analyze specific patches by entering a comma-separated list of patch numbers.
-
The Download Patches page
You can download patches, specify the language of patches to download, and merge patches from this page.
Recommended Patches Results
The Recommended Patches Results section of the Patch Wizard main page lists all in-progress and completed requests for patch recommendations, based on the information you entered in the Filter Criteria section of the main page. For example, you can view only the results that contain a certain text string in the filter name, or only the results of requests completed on a certain date.
Clicking the icon in the Details column of a specific recommended patch request accesses the Recommended Patches Results page. After setting up and submitting a request, view the details of the recommended patches on this page.
Patch Wizard Preferences
The site-specific information you set on the Patch Wizard Preferences page applies to other functions of Patch Wizard, such as Recommend/Analyze, Download Patches, and Codelevels Summary. From the Patch Wizard main page, click the Tasks icon for Patch Wizard Preferences.
The top portion of the page contains these sections: Staging Directory, Merge Option Defaults, and Language and Platform Details.
Patch Wizard Preferences Page - Top
The bottom portion of the page contains the In Use Products Defaults and the Display Option Defaults sections.
Patch Wizard Preferences Page - Bottom

Staging Directory
Depending on the product type (AD or non-AD), Patch Wizard downloads patches to a subdirectory under the staging directory. If the patch that ADOAM is trying to download is an AD product patch, it will be downloaded to the "ad" subdirectory under the stage directory. Non-AD Patches will be downloaded to "nonad" subdirectory.
The staging directory is also used by Patch Wizard to create temporary files and subdirectories for patch recommendation requests. These temporary files and directories are deleted after processing.
Note: Oracle recommends you use the same staging directory each time you run Patch Wizard.
Merge Option Defaults
Merging patches reduces patch application time by eliminating redundant tasks (such as responding to prompts and linking executables) for each individual patch.
Note: AD product patches cannot be merged with other product patches.
Patch Wizard screens allow you to merge AD and non-AD patches by specifying the appropriate options as discussed below. You can choose to automatically merge patches that you download.
The following merge options can be set:
-
My Oracle Support Credentials: This link accesses the OAM Update My Oracle Support Credentials page, which allows you to set your My Oracle Support user ID and password. The recommend, analyze, and download patches features typically require that your My Oracle Support user ID and password are set in the OAM Update My Oracle Support Credentials page. The recommend and analyze features can also be used when Patch Wizard does not have access to a direct Internet connection. If this is the case, leave the My Oracle Support user ID and password empty.
The patches will be downloaded to the relevant subdirectory for the patch's product. If the patch that ADOAM is trying to download is an AD product's patch, it will be downloaded to "ad" subdirectory under the stage directory. Otherewise, it will be downloaded to the "nonad" subdirectory.
-
Automatically merge downloaded patches: This checkbox tells Patch Wizard to automatically merge all downloaded patches.
-
Merging Strategy: The following merging strategies when are available when downloading translation patches:
-
One merged patch: If the list of patches contains a single AD product patch or a single non-AD product patch, a single merged patch containing US and non-US patches will be generated. If the list of patches contains both AD and non-AD product patches, two merged patches will be generated: one for the merge of all the AD product patches, and the other for the merge of all non-AD product patches.
For example, if "mrg_2009072781642" is the merged patch name provided in the Downloads page, the merged AD patch directory name will be mrg_2009072781642_A, and the merged non-AD patch directory name will be mrg_2009072781642_N.
-
Two merged patches: If the list of US patches includes both AD and non-AD product patches, the patches will be merged separately for AD and non-AD product patches. One merged patch will contain all US patches, and a second merged patch will contain all non-US patches.
For example, if "mrg_2009072781642" is the merged patch name provided in the Downloads page, the merged AD US patch directory name will be mrg_2009072781642_US_A, and the merged non-AD US patch directory name will be mrg_2009072781642_US_N.
-
Multiple merged patches: If the list of US patches includes a combination of AD products, non-AD products, AD language patches, and non-AD language patches, the patches will be merged separately for each of these categories.
For example, if "mrg_2009072781642" is the merged patch name provided in the Downloads page, the merged AD US patch directory name will be mrg_2009072781642_US_A, the merged non-AD US patch directory name will be mrg_2009072781642_US_N, the merged AD NLS patch directory name will be mrg_2009072781642_<lang_abbr>_A, and the merged non-AD NLS patch directory name will be mrg_2009072781642_<lang_abbr>_N.
-
Language and Platform Details
You can select the languages (one or more) of patches that Patch Wizard will recommend and download. You can also select the platform of the patches you want recommended and downloaded.
In Use Products Defaults
Selecting the Patch Recommendation for In Use Products Only checkbox directs Patch Wizard to display on the Recommended Patch Results page only patches for the products marked as in use (active) in your system.
Both Patch Wizard and adop examine the In Use flag to determine what products you are using. To review the products currently marked as being in use in your system, click the Codelevels Summary Page link. Refer to the section Codelevels Summary.
Display Option Defaults
Hidden patches are patches that you choose not to see in your reports. For example, if Patch Wizard recommends patches for products you do not need for your system, you can choose to hide these patches.
However, checking the Show Hidden Patches box in the Patch Wizard Preferences page overrides the hidden patch setting, and all patches, even hidden patches, are reported.
After you have made all your selections on the Patch Wizard Preferences page, click OK to save them or click Cancel to discard.
Define Patch Filters
The Patch Information Bundle file contains information for all recommended patches for all products. If Patch Wizard were to compare patches in the patch information database against all metadata in the Patch Information Bundle file, the number of recommended patches in the report might be too large to be useful for an individual system. Patch Wizards provides filters so that only those patch types and products in the metadata that apply to your system are included in the comparison.
From the main page, click the Tasks icon for Define Patch Filters to see all filters created for the current system. Patch Wizard provides three pre-seeded filters. In addition, you can create your own custom filters.
Define Patch Filters Page
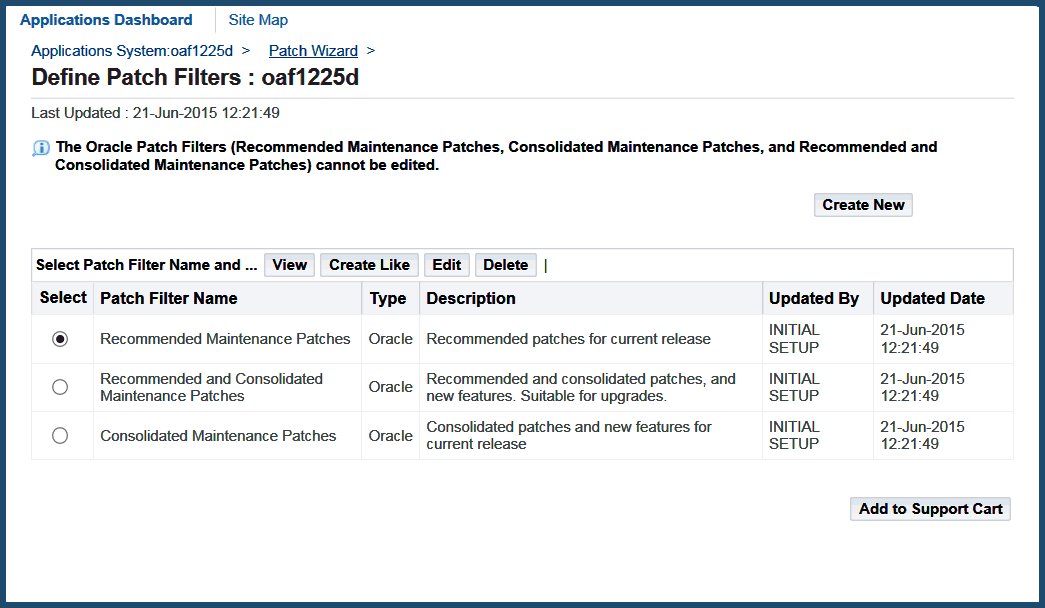
Note that the pre-seeded filters are marked "Oracle" in the Type column, and filters you create are marked "Custom." You cannot edit or delete the pre-seeded filters, but you can use any of them as a template to create a new filter.
The pre-seeded filters are:
-
Recommended Maintenance Patches: Recommended patches for the current release.
-
Recommended and Consolidated Maintenance Patches: Recommended and consolidated patches, and new features. Suitable for upgrades.
-
Consolidated Maintenance Patches: Consolidated patches and new features for the current release.
Creating a New Custom Patch Filter
From the Define Patch Filters page, click Create New to create a new custom filter.
Create Patch Filters Page
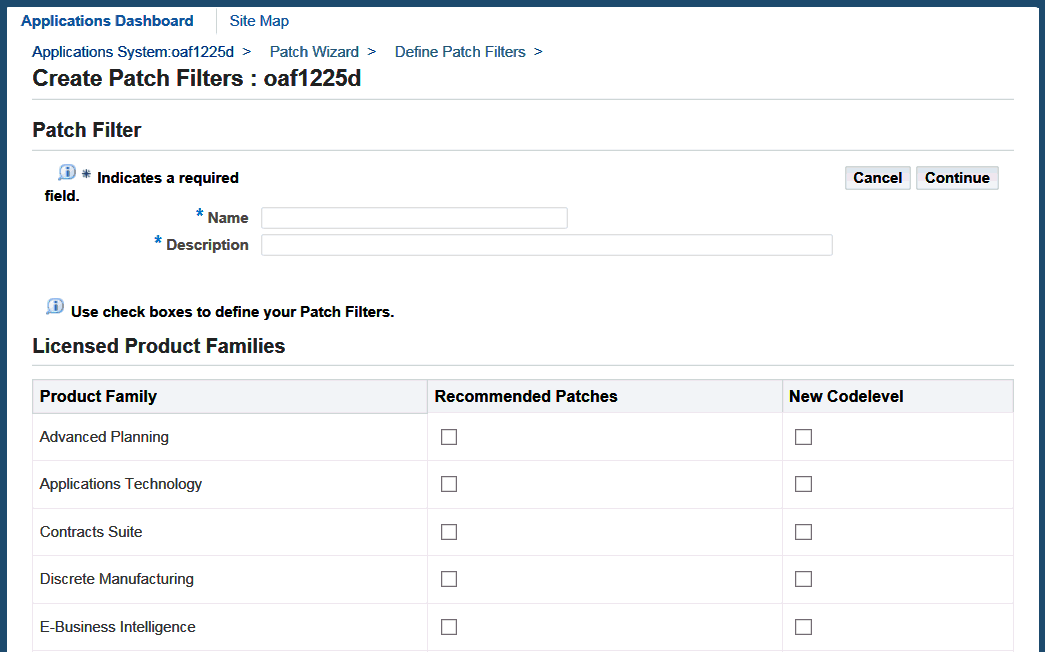
On the Create Patch Filters page, enter a unique name and a description for each new custom filter. All licensed product families are listed in the Licensed Product Families section. Non-licensed product families are listed at the bottom of the page. There are two columns for each product family: Recommended Patches and New Codelevel. Select a box for each product family you want to include in the new filter.
By choosing the Create Like button on the Define Patch Filters page, you indicate you want to use an existing filter as a template to create a new filter. The system supplies the filter criteria from the existing filter for the new filter. Edit the criteria by checking or clearing the boxes. Click Continue to create the new filter.
Recommend/Analyze Patches
After setting up the Patch Wizard staging area (and optionally creating custom filters) on the main page, you can submit requests for processing. Click the Tasks icon for Recommend/Analyze Patches.
The steps for using a predefined filter are, briefly:
-
Choose a predefined Patch Filter to use.
Select Analyze Aggregate Patch Impact if you want a report on the aggregate impact of the recommended patches.
Note that Patch Wizard automatically downloads patches or the Patch Information Bundle from My Oracle Support before using them for analysis or recommendations.
-
Click OK.
-
Check the status of your request by clicking the Request Set ID corresponding to your request in the Recommended Patches Results section of the Patch Wizard main page.
-
When your request has completed, from the main page, click the Details icon for your request in the Results section to access the Recommended Patches Results page. This page shows the set of recommended patches from the list you submitted that are not yet applied on your instance.
The steps for analyzing specific patches are, briefly:
-
In the Recommend Patches page, select the Analyze Specific Patches option.
Note: This option is enabled only after at least one recommendation has been run. If you have never used this tool, refer to My Oracle Support Knowledge Document 1267768.1, Oracle E-Business Suite Releases 11i and 12.x: Required Updates for Patch Wizard, for required patches and minimum Java versions.
-
In the Patch field, enter the list of patches to analyze as a comma-separated list.
-
Click OK.
-
Check the status of your request by clicking the Request Set ID corresponding to your request in the Recommended Patches Results section of the Patch Wizard main page.
-
When your request has completed, from the main page, click the Details icon for your request in the Results section to access the Recommended Patches Results page. This page shows the set of recommended patches from the list you submitted that are not yet applied on your instance.
Recommend Patches Page - Top
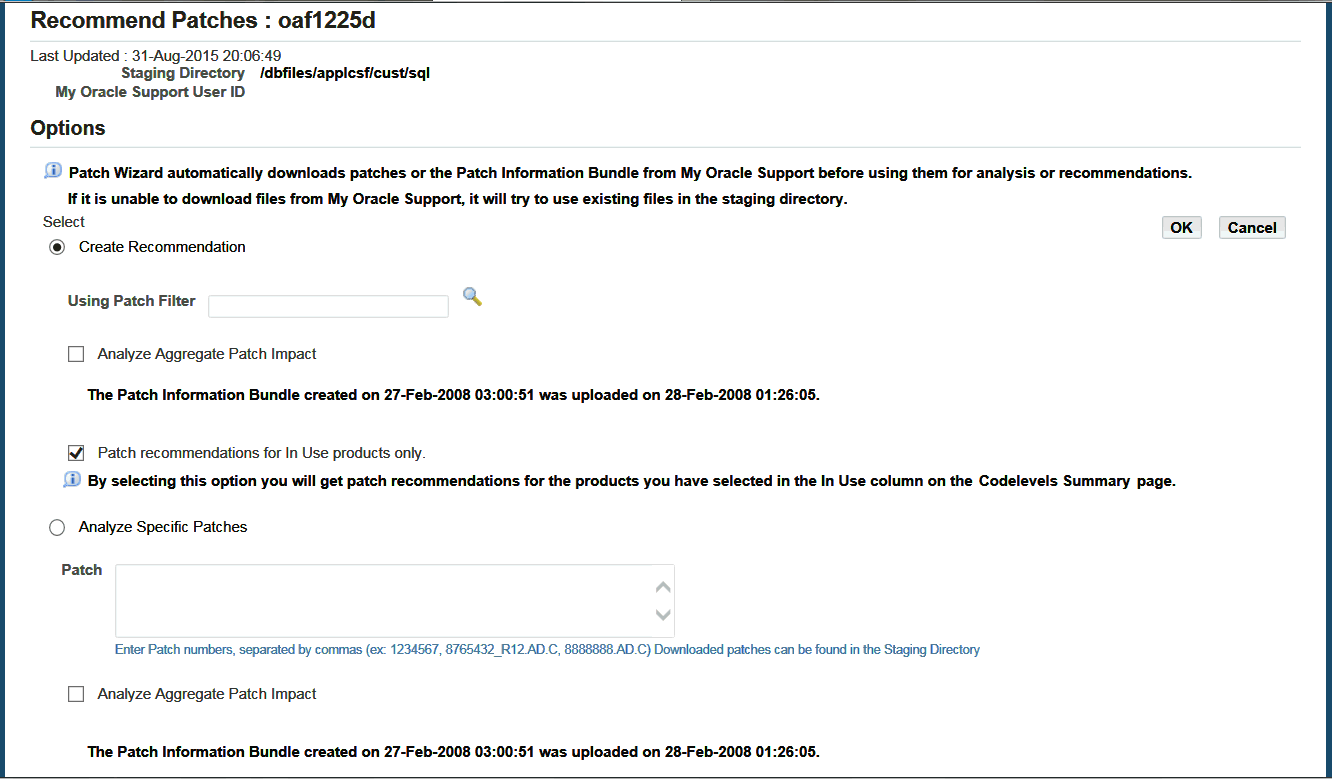
The Options section of the Recommend Patches page contains the following actions:
-
Create Recommendation
This generates recommendations based on the patch filter you selected. Choose one of the pre-seeded filters or any custom filter you created on the Define Patch Filters page. Patch Wizard uses the filter and compares the patch information database against the patch metadata to recommend which patches you should apply.
-
Analyze Specific Patches
This generates recommendations for specific patches. After downloading specific patches from My Oracle Support and placing them in the staging area, you can analyze these patches to determine their affect on your system by entering the patch numbers in this section. (Enter either bug numbers (for example, 1234567) or full patch names (for example, 1234567_R12.AD.A).) Check the "Analyze Aggregate Patch Impact" box to analyze Aggregate Patch Impact.
You can enter a date and time in the Schedule section of this page to run the request at a later time. The default setting is to run the job immediately. You can also schedule automatic recurring requests by entering the information in the Recurrence section.
Recommend Patches Page - Bottom
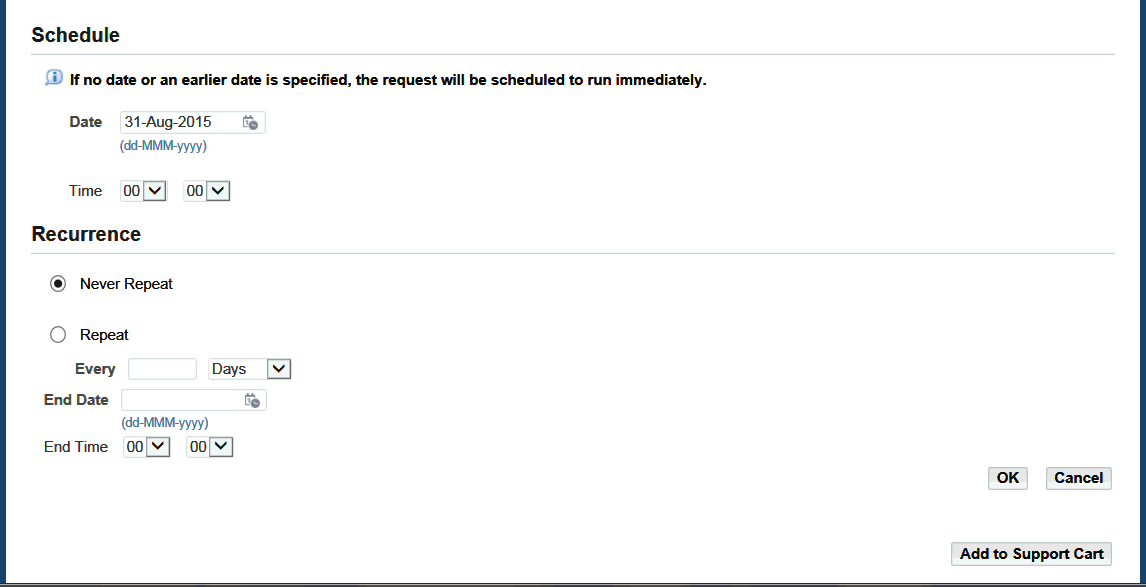
Click OK to submit the request.
When the request is submitted, Patch Wizard looks in the specific directories under the stage directory for the patches. If the patches are not present, or if there are newer versions available, Patch Wizard downloads them from My Oracle Support before creating recommendations or analyzing patches.
Note: If you want to create recommendations or analyze specific patches without using an Internet connection, refer to Creating Patch Recommendations Without an Internet Connection or Analyzing Patches Without an Internet Connection.
Each time you submit a request to analyze specific patches or to recommend patches, Patch Wizard creates a Request Set ID. The Request Set ID is shown in the Results section of the Patch Wizard main page. To check the status of your request, click on the Request Set ID corresponding to your request in the Recommended Patches Results section.
Download Patches
You use the Download Patches page to request a download of specific patches from My Oracle Support. From the main page, click the Download Patches tasks icon. From the Download Patches page, enter the patch numbers in the input field, separated with commas. Enter either bug numbers (for example, 1234567) or full patch names (for example, 1234567_R12.AD.A). You can also choose to analyze the patches while downloading, or analyze and compute aggregate patch impact while downloading.
Download Patches Page - Top
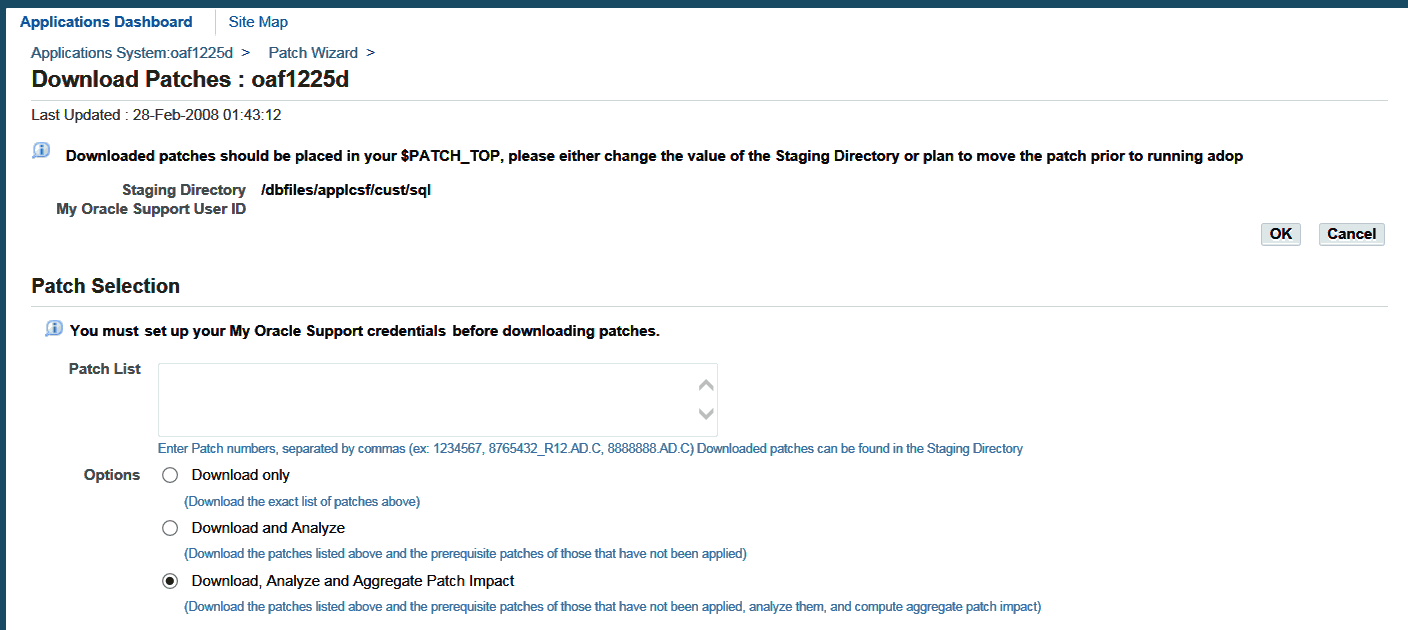
The Merge Options section is where you define how patches should be merged after downloading. The defaults for merging are set on the Patch Wizard Preferences page. If you choose to automatically merge patches while downloading, you can modify the merged patch name and specify the merging strategy in this section. The default merged patch name is "merged_YYYYMMDDhhmmss", where "hh" is in 24-hour format.
Merge Options Region

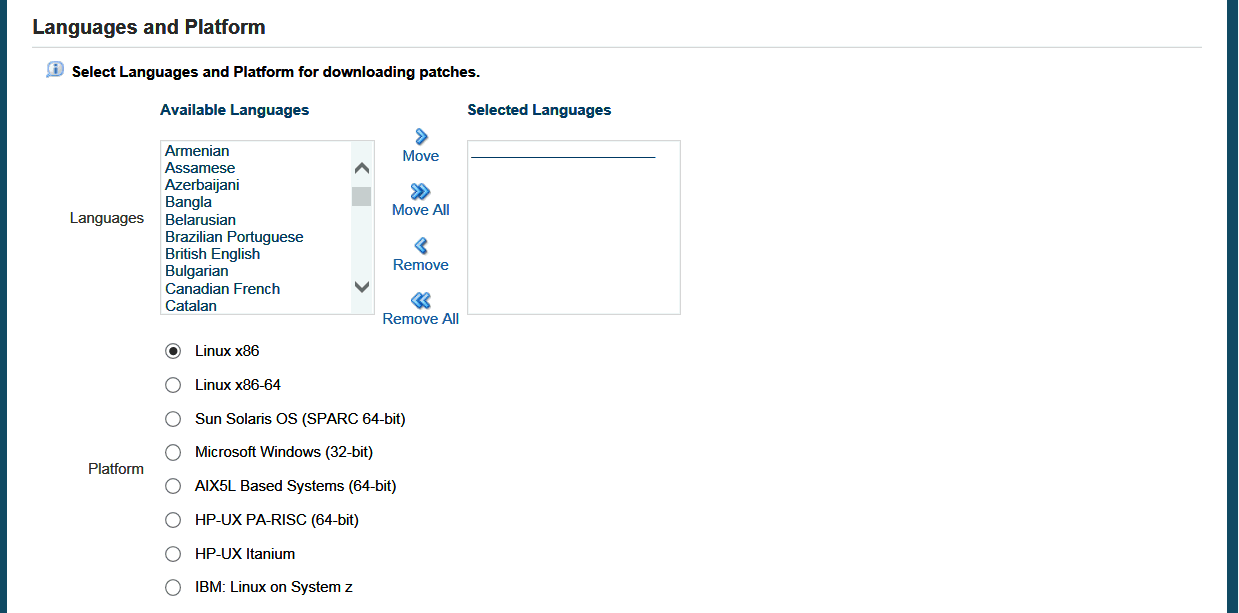
The Languages and Platform section allows you to select the languages and platform of the downloaded patches. The defaults for languages and platform are set on the Patch Wizard Preferences page. However, you can modify the information on this page. When you provide information in this section, Patch Wizard downloads only patches that match the languages and platform you select.
Languages and Platform Region
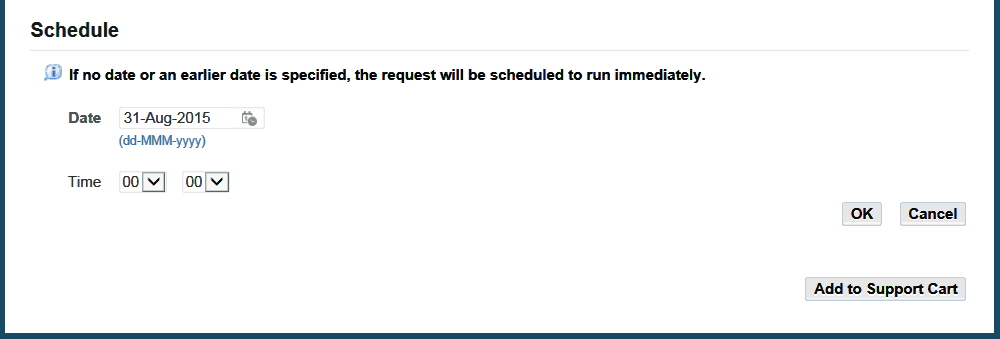
You can also provide information in the Schedule section about downloads you want to perform at a later date.
Download Patches Page - Bottom
Recommended Patches Results
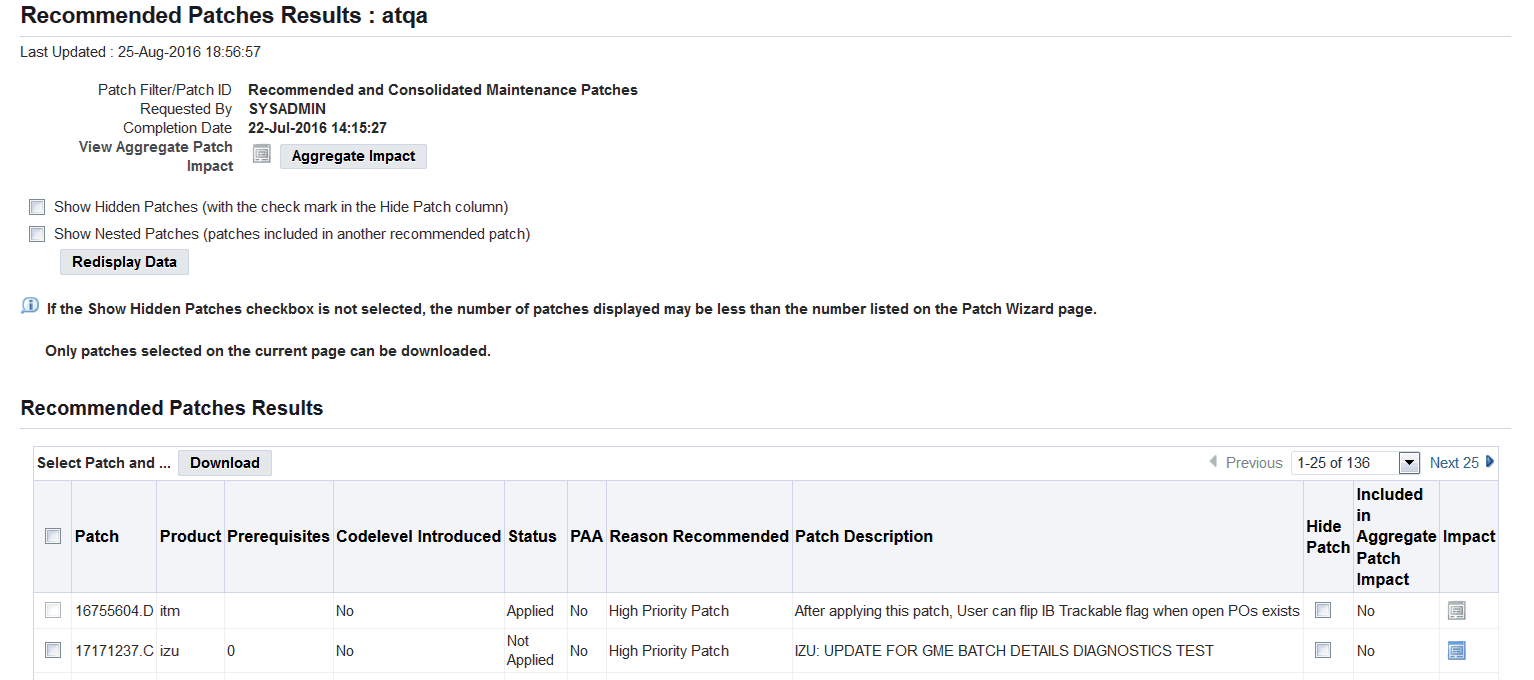
From the main page, click the Details icon associated with a patch request in the Results section to access the Recommended Patches Results page. This page presents a set of recommended patches based on the results of the selected Recommend Patches request that you submitted.
By default, this page displays only the recommended patches that are not included in other recommended patches. However, you can choose to display the nested patches and also see the patches that include them.
The first section lists the recommended patches.
Recommended Patches Results Page
The second section lists patches that introduce new codelevels.
Both sections display the following columns:
-
Select: Select this checkbox and click the Download button if you want the patch number sent to the Download Patches page for submission. You can select any number of patches.
-
Patch: The patch number of the recommended patch.
-
Product: The product to which patch applies.
-
Prerequisites: Specifies the codelevel required before you can apply this patch.
-
Codelevel Introduced: Indicates whether the patch introduces a new codelevel for that product.
-
Status: Indicates whether the patch is applied, not applied, applied indirectly, missing, or obsolete.
-
Applied - Self-explanatory.
-
Not Applied - Self-explanatory.
-
Applied Indirectly - The patch has not been applied, but all of the file versions in it have been applied through other patches.
-
Missing - The patch has not been applied and is missing one or more prerequisites that are defined in the patch itself.
-
Obsolete - Self-explanatory.
-
-
PAA: This indicates whether there are manual steps you have to perform if you apply the patch.
-
Reason Recommended: The reason the patch is recommended, for example, it is a high-priority patch, or part of a maintenance release pack (RUP) or a product family pack (RUP).
-
Patch Description: Describes the patch.
-
Hide Patch: Select this checkbox to hide the patch from the list of recommended patches. Use this feature to hide patches that you don't want to appear in the recommended patch results. To hide or show selected patches, use the Show Hidden Patches checkbox at the top of the page and click Redisplay Data to refresh the page. The default values are set in the Patch Wizard Preferences page.
-
Included in Aggregate Patch Impact: Yes or No.
-
Impact: (For unapplied or missing patches only) Click this icon to access the Patch Impact Analysis page. If you submitted a specific patch to analyze, click the Impact icon on the Recommended Patches Request page to view this report.
Click the Download button to transfer the selected patch number(s) to the Download Patches page for submission.
Click the Export All button to download a list of all the patches in CSV (Comma Separated Values) file format that can be opened with Microsoft Excel. Click the View All button to view all the patches on one page.
Codelevels Summary
To view the codelevels of all the products and product families available and in use in your system, click the Codelevels Summary link in the Software Updates tab of the Applications Dashboard.
Codelevels Summary Page
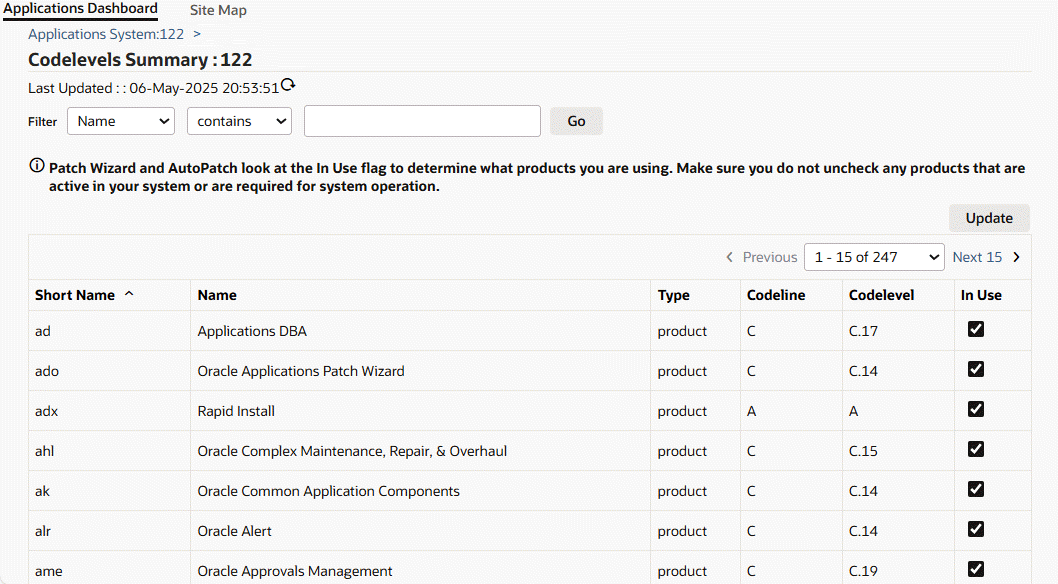
This page summarizes available products. For each product, it indicates the current Codeline and Codelevel and whether it is in use (active) in your system. Patch Wizard and AutoPatch look at the In Use flag to determine active products.
Caution: If you use this page to update your In Use products list, be sure you do not uncheck any products that are active in your system, or are required for system operation.
Patch Impact Analysis
From the Recommended Patches Results page, click an icon in the Impact column to view the Patch Impact Analysis page for that patch.
Patch Impact Analysis Page
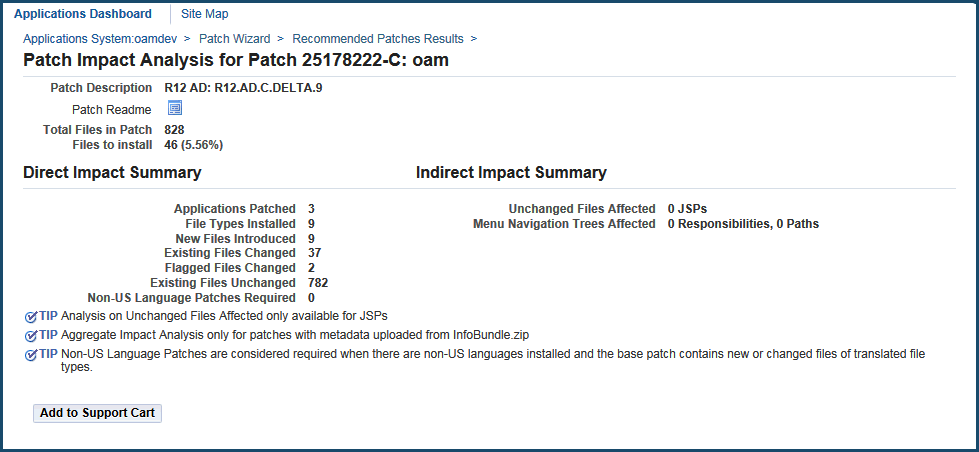
This page displays a list of summary information about which files are new, which files are changed, and which files are ignored when you apply the patch. Prerequisite patches and the readme file for this patch are also shown. Each of the summary items is a link to more complete information.
The key information on this page is separated into these sections.
General Patch Information
General patch information includes:
-
Patch Description: Describes the patch.
-
Patch Readme: Click this icon to see the readme file for the patch.
-
Total Files in Patch: The total number of files in the patch. Click the number link to access the Patch Impact Details page, which lists each file in the patch.
-
Files to Install: The number of files the patch will install.
Summary Information
There are two types of summary information: Direct Impact and Indirect Impact. Each summary item is a link to a page that lists the details for the summary count.
Direct patch impact includes:
-
Applications Patched: The number of products that will have files updated. Click the number link to see details of each product affected, and how.
-
File Types Installed: The number of different file types in the patch. Click the number link to see the file types and how they impact the system.
-
New Files Introduced: The number of new files that will be introduced by the patch. Click the number link to details about each new file introduced.
-
Existing Files Changed: The number of existing files in the system that will be changed by the patch. Click the number link to see the existing files changed and the new version numbers.
-
Flagged Files Changed: The number of custom files that will be changed by this patch. Click the number link to identify the custom files changed by this patch.
-
Existing Files Unchanged: The number of files unchanged because the version in the patch is older than the version in the system. Click the number link to see the files in the patch that are of the same or of earlier versions than those currently in the system.
-
Non-US Language Patches Required: If the patch supports multiple languages, click the number link to identify the other languages available.
Indirect summary information includes:
-
Unchanged Files Affected: The number of system files with dependencies on patched files.
-
Menu Navigation Trees Affected: The number of menu navigation trees that will be updated by the patch.
Patch Impact Analysis: Patched Applications
Patch Impact Applications Patched Page

This page lists the applications patched. For each application, the number of directories and the number of installed files are listed. Counts of new and changed files for each application are also provided. Click on a number link to go to the Patch Impact File Details page for files for the application that match the specified criterion.
Patch Impact Analysis: Installed File Types
Patch Impact File Types Installed Page
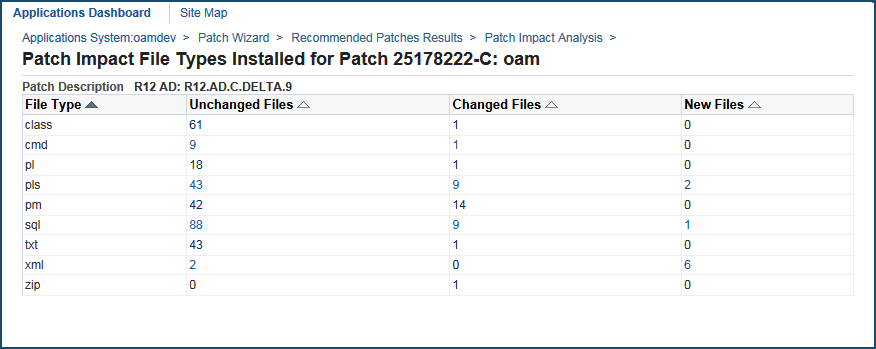
This page lists the file types from the patch impact analysis. For each file type, counts of unchanged files, changed files, and new files are listed. Click on a number link to see the Patch Impact File Details for that category.
Patch Impact Analysis: File Details
This page lists details for the files that match the criteria set by the filter at the top of the page. You can filter by Application Short Name, Directory, File Name, Impact Type (New, Changed, or Unchanged), and Object Type. You can also specify whether you want to include only flagged files or only branched files. If you have navigated to this page from another page, some filters may already be applied.
A table is shown with the following columns for the file listing:
-
Application
-
Directory
-
File Name
-
Impact Type
-
Version in APPL_TOP
-
Version in Patch
-
Objects Affected
-
Flagged Files
You can use the Export All button to download a list of all the files in CSV (Comma Separated Values) file format that can be opened with Microsoft Excel, or use the View All button to view all the files on one page.
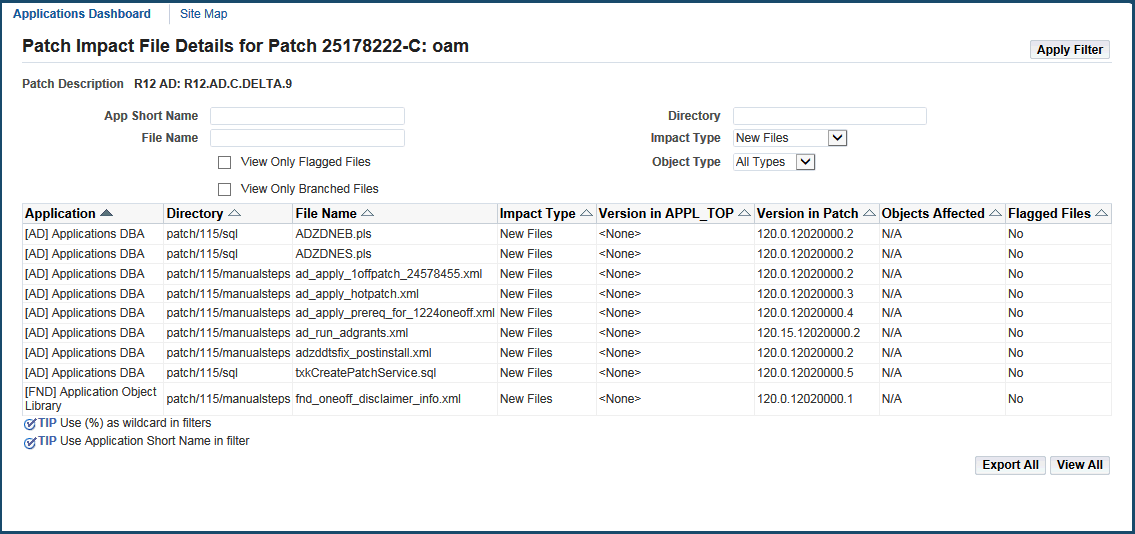
Patch Impact Analysis: New Files Introduced
This page lists details for the new files introduced by the patch.
Example of Patch Impact File Details Page: New Files Introduced
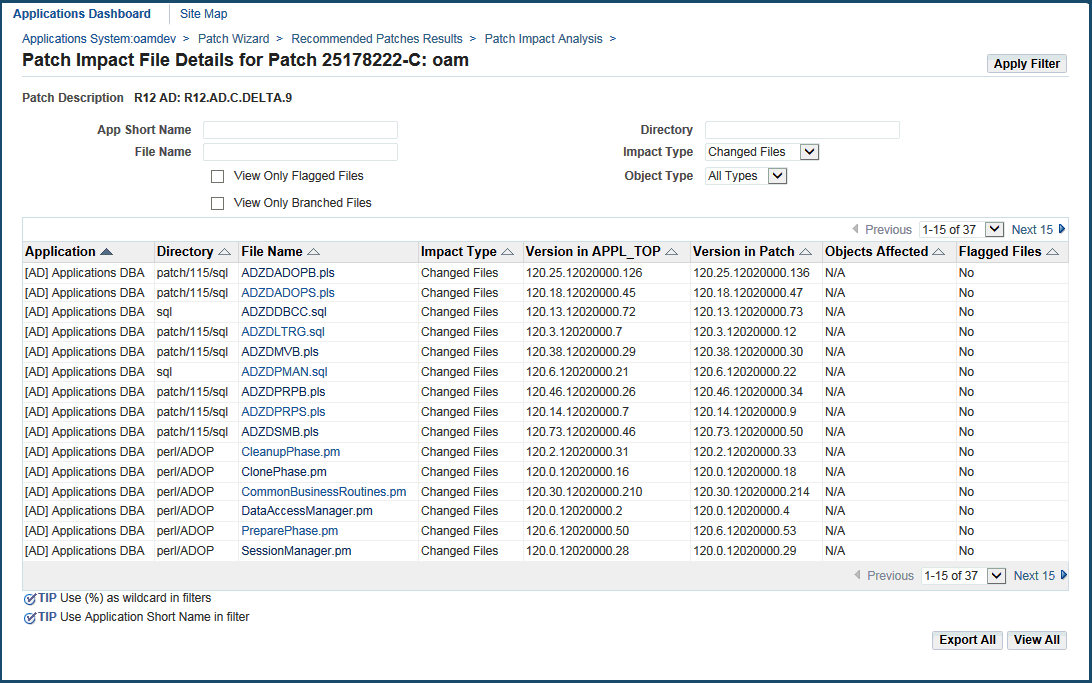
Patch Impact Analysis: Existing Files Changed
This page lists details for existing files that are changed in the patch.
Example of Patch Impact File Details Page: Existing Files Changed
Patch Impact Analysis: Flagged Files Changed
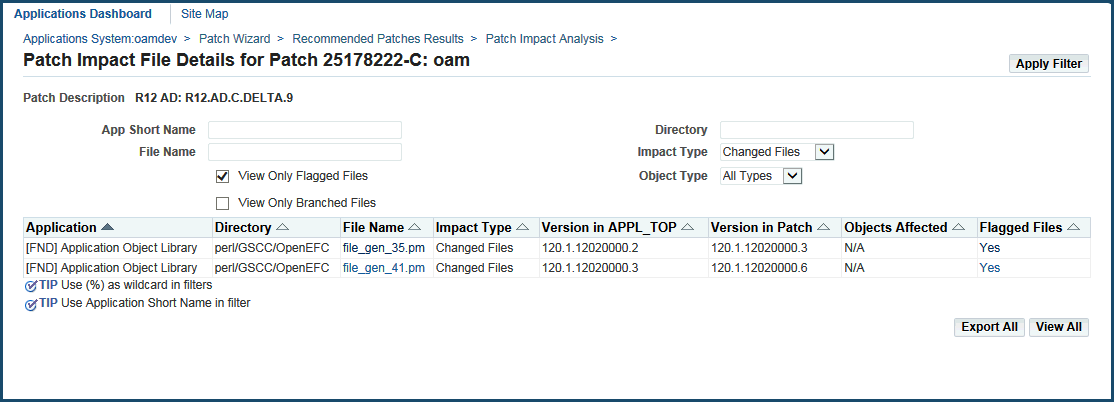
The page lists details for flagged changed files. Note that for the filters, the Impact Type is 'Changed Files' and the View Only Flagged Files box is checked.
Example of Patch Impact File Details Page: Flagged Files Changed
Patch Impact Analysis: Existing Files Unchanged
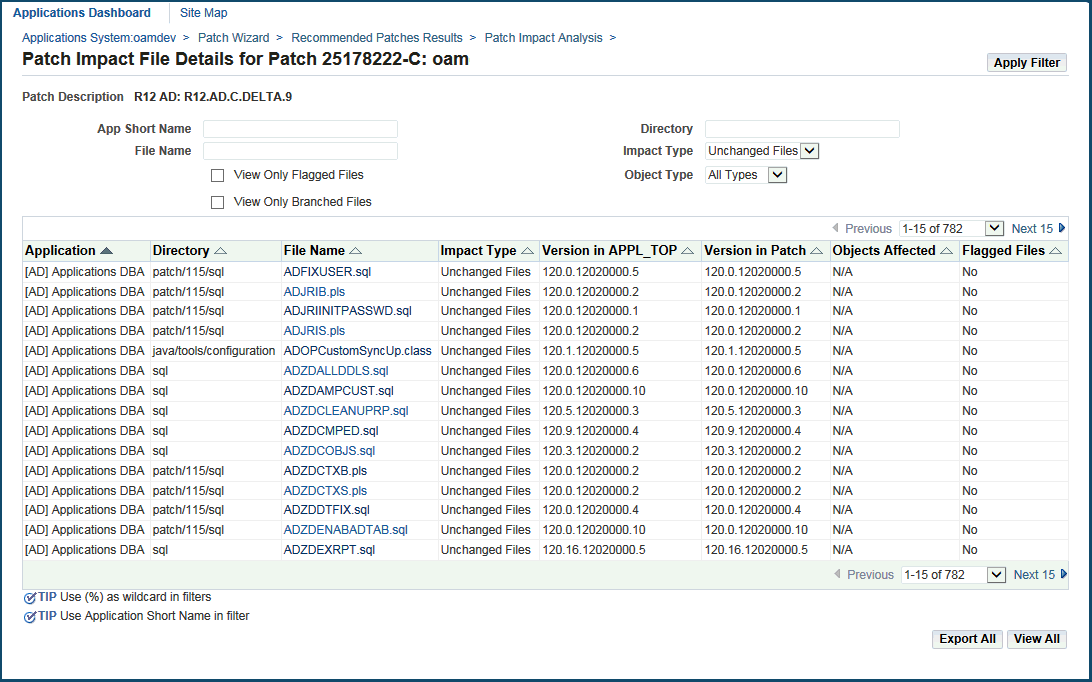
The page lists details for existing files that are unchanged by the patch.
Example of Patch Impact File Details Page: Existing Files Unchanged
Patch Impact Analysis: Required Non-US Language Patches
Patch Impact: Non-US Language Patches Required Page

This page lists the following non-US language patches required for your installation. For each patch, the following is listed:
-
Patch ID
-
Language Code
-
Language
-
Language Status
Patch Impact Analysis: Affected Unchanged Files
Patch Impact Unchanged Files Affected Page

Some files have dependencies on patched files. For each affected unchanged file, the following is shown in the table:
-
Patched File Application
-
Patched Filename
-
Impact Type
-
Affected File Application
-
Affected File Directory
-
Affected Filename
-
Action Required
-
Objects Affected
-
Object Type
Note that you can filter the table's contents by Patched File Application, Patched File Name, Object Type, Affected File Application, and Affected Filename.
Patch Impact Analysis: Affected Menu Navigation Trees Summary
Patch Impact Menu Navigation Trees Affected Summary Page
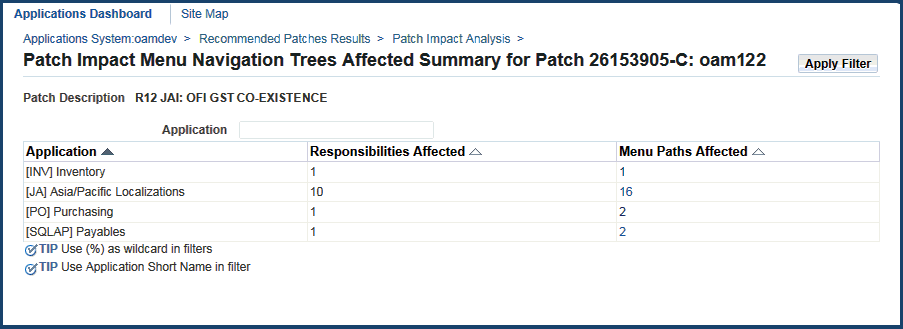
This page shows information on menu navigation trees affected by the patch. The table lists each affected application and for each application, a count of the affected responsibilities and a count of the affected menu paths. You can filter the table results by application.
For each affected menu path, click on the number to get details on the changes to the menu path in the Patch Impact Menu Navigation Trees Affected Detail page.
Patch Impact Analysis: Affected Menu Navigation Trees - Details
Patch Impact Menu Navigation Trees Affected Detail Page
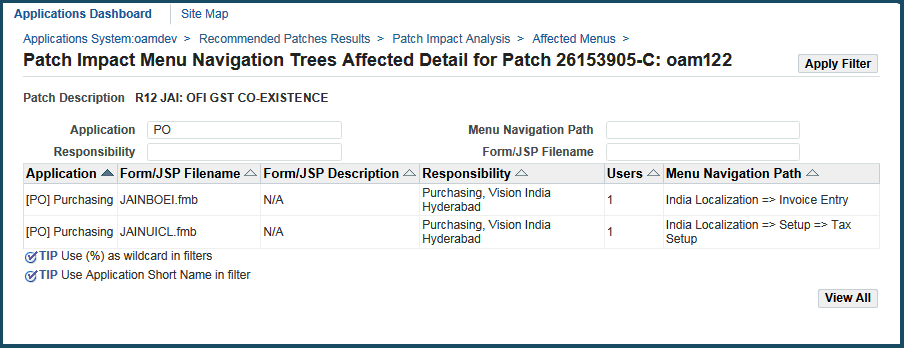
This page shows details for each affected menu navigation path. For each menu path shown, the table includes:
-
Application
-
Form/JSP Name
-
Form/JSP Description
-
Responsibility
-
Users (the number of users with access to this navigation path)
-
Menu Navigation Path
Note that you can filter the table's contents by Application, Menu Navigation Path, Responsibility, or Form/JSP Filename.
Register Flagged Files
With the Register Flagged Files tool, you can record any files in which you have made customizations. In previous releases of Oracle E-Business Suite, the applcust.txt file contained the records for all customized files. You had to maintain your custom files records in this file. In this release, information about customized files is still written to the applcust.txt file. However, with the Register Flagged Files tool you can download the files and maintain them in a web-based interface.
The Register Flagged Files tool displays the following information about customized files:
-
Product abbreviation
-
Directory where the files are located
-
Name of modified file
-
Comments
The Register Flagged Files Interface
The Register Flagged Files tool is a Web-based utility in Oracle Applications Manager. From the Register Flagged Files home page, you can import, export, add, delete, and view records of customized files.
Accessing Register Flagged Files
To access the Register Flagged Files tool, log in to Oracle Applications Manager (OAM) and choose Register Flagged Files from the Site Map.
Step 1: Log in to Oracle Applications Manager
Follow the instructions in Accessing Patch Wizard to access OAM. From the Applications Dashboard, click the Site Map tab.
Step 2: Go the Register Flagged Files home page
On the Site Map page, Register Flagged Files is included on the Maintenance tab under the Patching and Utilities heading. Click the Register Flagged Files link to go to the home page.
Step 3: Select filter criteria
From the Register Flagged Files home page, you can search the records of customized files by product abbreviation, directory, file name, or a combination of product abbreviation, and directory or file name.
Register Flagged Files Home Page
This section describes the Register Flagged Files home page.
Register Flagged Files Home Page
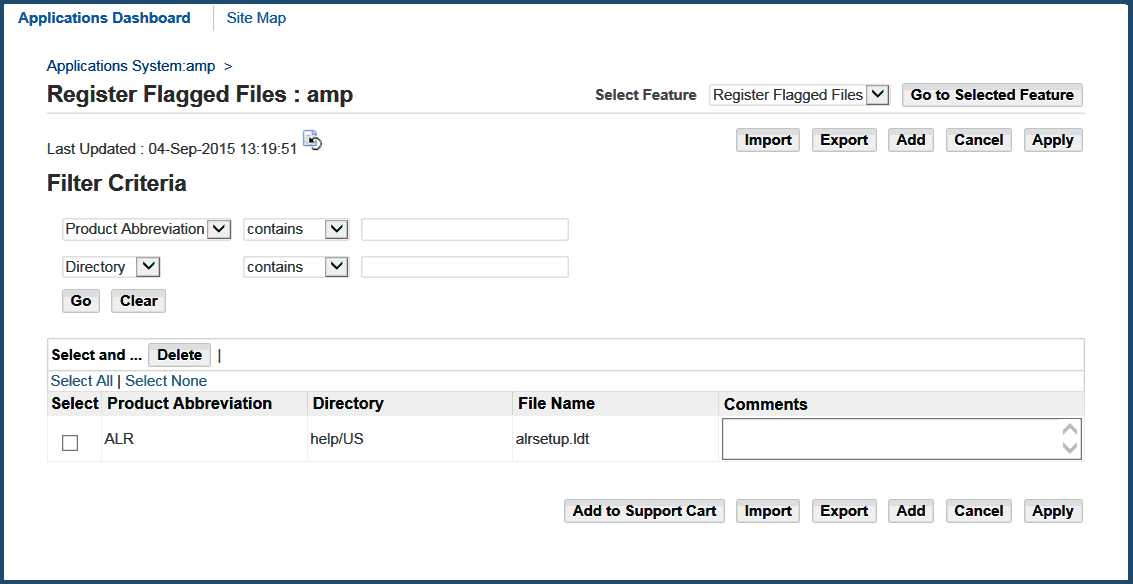
Use the following buttons to:
-
Import: Import a list of customized files from the applcust.txt file in csv format. Use this option to import a local applcust.txt file to the current system or from another system to the current one.
-
Export: Export a list of customized files in csv format. The default name of the exported file is oamreport.csv. You can use this function to export a list of customized files for import into another system.
-
Add: Add a record of a customized file.
-
Cancel: Return to the Applications Dashboard home page.
-
Apply: Apply and save any changes made to the Comments field of the list of customized files.
You can filter results either by product abbreviation, by directory/file name, or by a combination of product abbreviation, and directory or file name.
-
Product Abbreviation: To search by product abbreviation, enter the abbreviation of the product for which the customization is made.
-
Directory/File Name: You can filter the results by directory or file name. Enter the directory or file name for which the customization is made.
List of Customized Files
The list of customized files appears at the bottom of the Register Flagged Files home page. Each line item represents a customized file.
The details provided for each line item are:
-
Select: Select and delete the corresponding customized file. You can select and delete one file or multiple files at a time.
-
Product Abbreviation: The abbreviated name of the Oracle E-Business Suite product family for which there is a customization.
-
Directory: Directory path of the customized file.
-
File Name: Name of the modified file.
-
Comments: Use this area to add any comments associated with the customization. Oracle recommends using this area to record the exact location of the customized file.
Adding a Flagged File
Click the Add button on the Register Flagged Files main page to access the Add Flagged Files page. From this page, you can add customized files. Use the Filter Criteria section to search for files you want to add.
Add Flagged Files Page
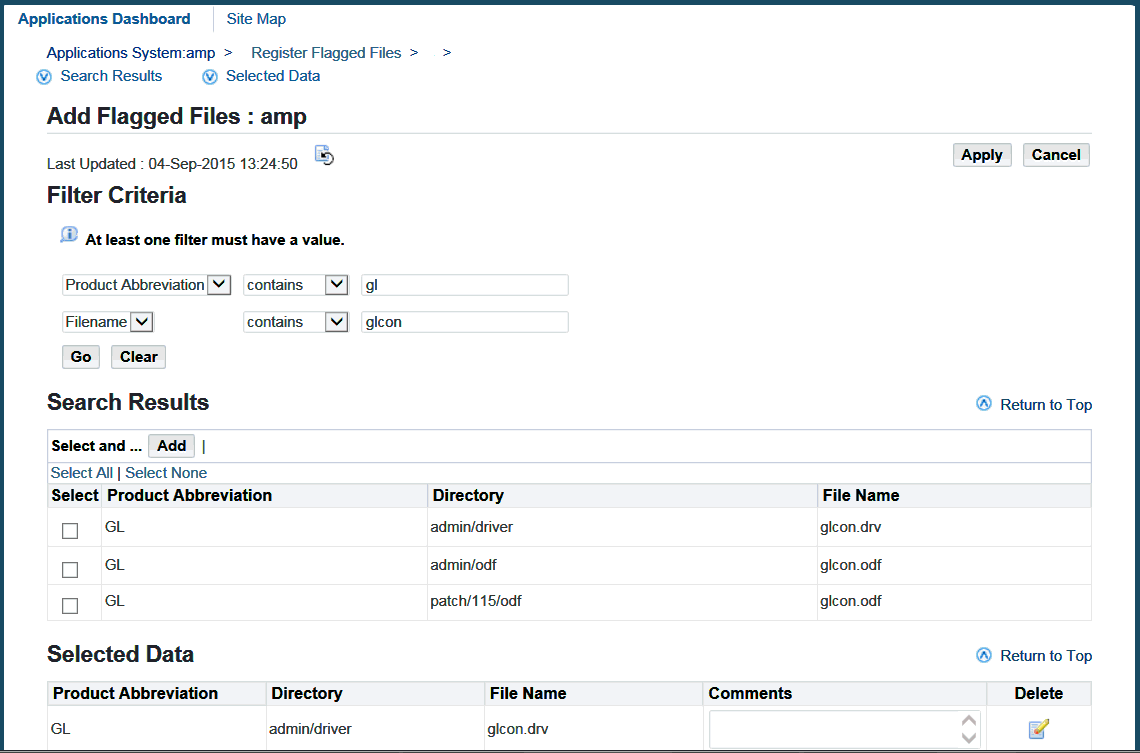
You can filter results either by product abbreviation, by directory/file name, or by a combination of product abbreviation, and directory or file name.
-
Product Abbreviation: To search by product abbreviation, enter the abbreviation of the product for which the customization is made.
-
Directory/File Name: You can filter the results by directory or file name. Enter the directory or file name for which the customization is made.
From the Search Results section, select a file, then click the Add button. The files you select appear in the Selected Data section. Use this section to add any comments you have for each file. Then click the Apply button to confirm your selection.
Importing a Flagged File
Click the Import button on the Register Flagged Files main page to access the Import Flagged File page. From the this page, you can import one file or a list of customized files in csv format.
You can import an existing applcust.txt file or a file from another system to the current one. This features saves you the time of using the Add button to add flagged files individually.
Import Flagged File Page

In the Select File field, enter the name of the file you want to import or click the Browse button to navigate to the file. Then click Import. Click Cancel to return to the Register Flagged Files main page.