Oracle Demantra Demand Management to EBS Integration
This chapter covers the following topics:
- Oracle Demantra Demand Management Business Flow
- Terms and Conventions Used in this Document
- Integration Features
- Seeded Demand Management Component
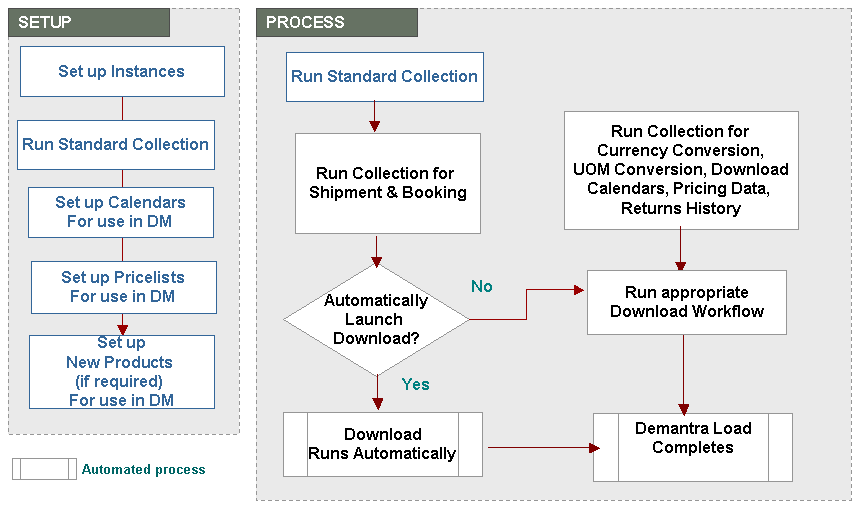
- Summary of Integration Tasks
- EBS Setup
- Demantra Level Setup
- EBS Collections Initial Setup
- Running Collections
- Downloading to Oracle Demantra
- Uploading from Oracle Demantra
- Line Of Business
- Configure to Order
- Embeddable Worksheets
Oracle Demantra Demand Management Business Flow
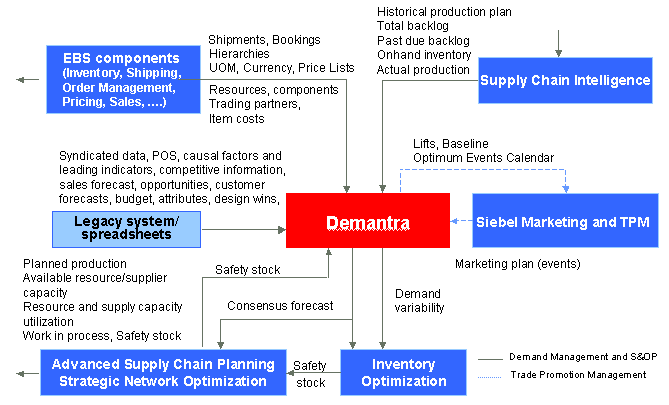
The Integration Data Flow diagram shows, at a general level, the sources and destinations of data.
Supported Integration Configurations
Integration between Oracle Demantra Demand Management and the E-Business Suite leverages Oracle Demantra Foundation functionality to the fullest extent possible. Booking history, price list, currency, calendars, users, and items collected from the E-Business Suite applications are loaded into Oracle Demantra. Forecasts and accuracy measures return.
Oracle supports the following configurations:
-
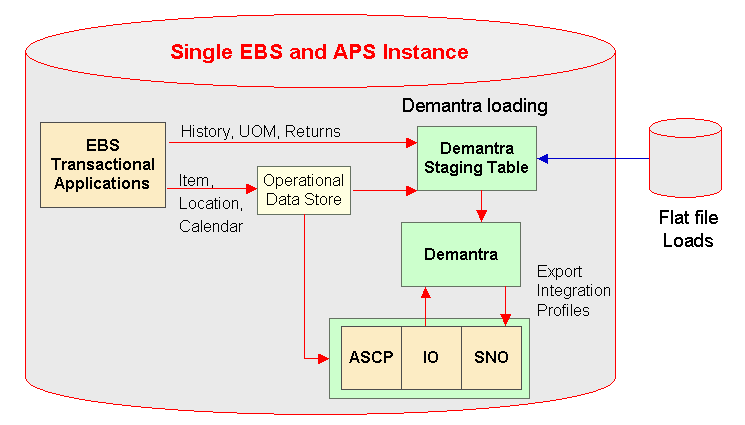
Single instance. The single instance would include ERP, Advanced Planning and Scheduling, and Oracle Demantra. It must be a supported combination of E-Business Suite and Oracle Demantra releases. Please contact support for an up-to-date list of certified versions for integration.
-
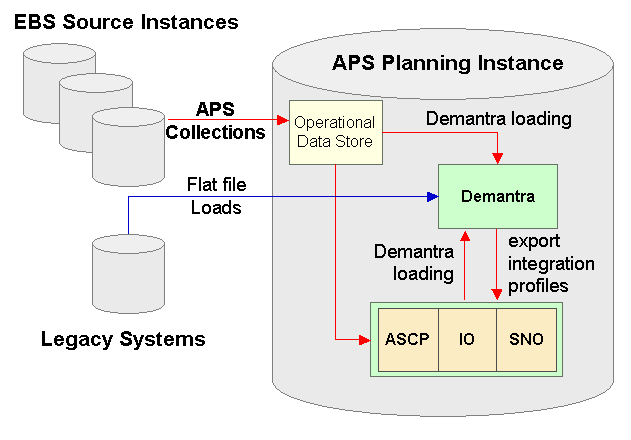
Separate destination and non-legacy source instances. The destination instance and the source instance must both be Demantra-certified combinations of ERP and Advanced Planning and Scheduling.
-
Separate destination and legacy source instances.The destination instance must be a Demantra-certified version of Advanced Planning and Scheduling.
Terms and Conventions Used in this Document
Levels control how data is aggregated and organized. Levels are used in worksheets, in filters, in import and export, and in forecasting. A level member refers to a unit within a level. For example, "tollhouse" is a member of a level named "cookies". A hierarchy organizes levels into ranks. The top level in the hierarchy provides the most aggregate, general view of information. The bottom level provides the most disaggregate, specific view of information. Your application can include multiple, independent hierarchies. Each hierarchy can contain as many levels as needed.
Within Oracle Demantra, you generally apply a filter by specifying a level and the members of that level that you want to display in a worksheet.
A worksheet, sometimes known as a query, is the primary user interface to Oracle Demantra data. For example, within a worksheet, a user can examine and edit data as needed, view the forecast, run simulations, and save changes back to the database.
Our use of the terms download and upload here are always relative to the E-Business Suite, or a similar legacy system. In other words, download procedures move information from an E-Business Suite application, while upload procedures move information from Oracle Demantra to the E-Business Suite, or a legacy system.
When we discuss the source we are referring the E-Business Suite Enterprise Resource Planning applications. Destination refers to the Advanced Planning and Scheduling applications.
Note: Oracle supports legacy collections for level members and history. The user must define and apply Oracle Demantra import integration profiles.
Integration Features
Demand Management Navigator Menus
The Oracle E-Business Suite Navigator provides the following two responsibilities:
-
Demand Management System Administrator
-
Demand Analyst
Note: EBS users can have both Demand Management and Sales and Operations Planning responsibilities, and therefore access both Demantra Demand Management and Sales and Operations Planning.
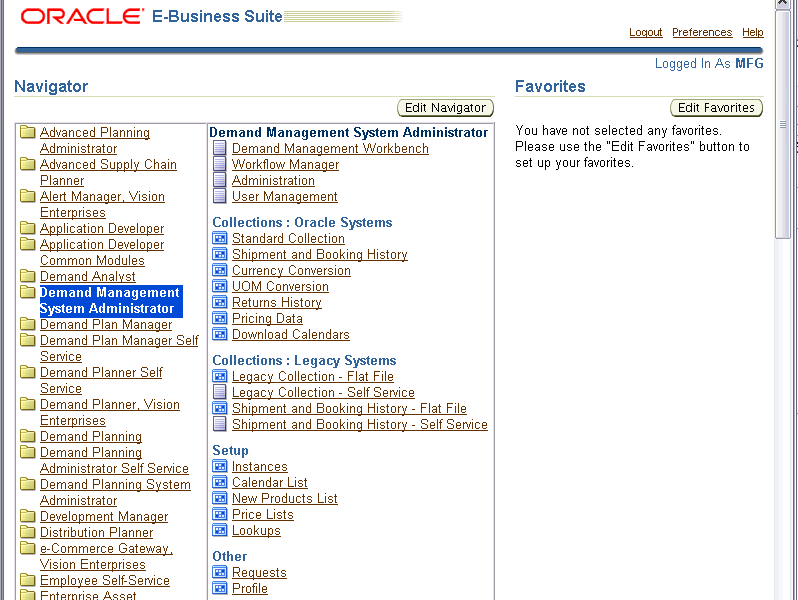
The Oracle E-Business Suite Navigator menu for the Demand Management System Administrator Responsibility provides the following links to integrate with the respective Oracle Demantra functionality:
-
Demand Management System Administrator > Demand Management Workbench – opens the Demantra Local Application user interface
-
Demand Management System Administrator > Workflow Manager – opens the Oracle Demantra Workflow Manager user interface
-
Demand Management System Administrator > Administration – accesses the Oracle Demantra Administration page
-
Demand Management System Administrator > User Management – accesses the Oracle Demantra User Management page
-
Collections: Oracle Systems - accesses collections programs to obtain data entities from the E-Business Suite, Advanced Supply Chain Planning, Operational Data Store applications with an option to download data into Oracle Demantra:
-
Standard Collections
-
Shipment and Booking History
-
Currency Conversion
-
UOM Conversion
-
Returns History
-
Pricing Data
-
Download Calendars
-
-
Collections: Legacy Systems: > Shipment and Booking History - Flat File – allows access to legacy shipment and booking history flat file, if applicable
-
Setup > Instances - Allows setting up multiple Instances from where collections can be run to obtain data entities.
-
Setup > Calendar List - allows setting up calendars to be downloaded into Oracle Demantra
-
Setup > New Products List – allows setting up new products to be downloaded into Oracle Demantra
-
Setup > Price Lists
The Oracle E-Business Suite Navigator menu for the Demand Analyst Responsibility provides the following link:
-
Demand Analyst > Demand Management Workbench – opens the Demantra Local Application user interface.
User Synchronization
When an E-Business Suite user is granted any responsibility containing the Demand Management Workbench (MSD_DEM_DEMPLANR) function grant, an Oracle Demantra user of the same username is created in the Oracle Demantra Demand Management component.
If the E-Business Suite user additionally has the Setup > Instances (MSD_DEM_DEMADMIN) function grant, the corresponding Oracle Demantra user has the following Oracle Demantra function security grants:
-
Business Modeler
-
Run batch engine
-
Workflow Manager to run archive, download and upload workflows
If the E-Business Suite user does not have the MSD_DEM_DEMADMIN function grant, the corresponding Oracle Demantra user has none of the previously listed Oracle Demantra function security grants.
As E-Business Suite users' function grants change over time, the corresponding Oracle Demantra users' function grants automatically change to match. For example, if at any time the E-Business Suite user loses the Demand Management (MSD_DEM_DEMPLANR) E-Business Suite function grant, the corresponding Oracle Demantra user is deleted.
Important: If the user is a customer contact, then restrict the contact's Oracle Demantra data security scope to that customer in the customer class hierarchy.
Users assigned E-Business Suite Demand Management System Administrator or Demand Analyst responsibilities are automatically assigned mirrored responsibilities in Oracle Demantra. When a user is created in the E-Business Suite and mirrored in Oracle Demantra, the default password is a randomly-generated sequence of 10 characters. A Demantra System Administrator/component owner must then go into the Business Modeler and change that user's password before the user can access Demantra.
Single Sign-on Setup for Demantra Using the Oracle Access Manager (OAM) 11g
Note: This setup is required for Demantra 12.2 and later when integrating with EBS.
Prerequisites
-
User synchronization must be enabled between EBS and Demantra.
-
EBS must be integrated with OAM 11g for single sign-on (SSO) which uses OID (Oracle Internet Directory) or OVD (Oracle Virtual Directory) as the data store. OAM uses EBS AccessGate to collect credentials from users. For more information, please refer to My Oracle Support Note ID 1309013.1 “Integrating Oracle E-Business Suite Release 12 with Oracle Access Manager 11gR1 (11.1.1.5) using Oracle E-Business Suite AccessGate”.
-
Ensure that an instance of the Oracle HTTP server was installed by the Oracle Identity Management Suite 11g or Webcenter 11g. If not, download and install Oracle Webcenter 11g where the OAM11g is installed.
Configuring Single Sign-on:
-
Configure a new Oracle HTTP Server (OHS) instance specifically to protect the Demantra WebLogic server. For more information about configuring a new OHS component, please follow the steps in topic “2.3.4.3 Configuring Your Components”, Oracle Fusion Middleware Installation Guide for Oracle Web Tier 11g Release 1 (11.1.1).
-
Set up the HTTP server as a reverse proxy in front of the WebLogic server hosting the Demantra application to validate the user session.
-
Locate the file mod_wl_ohs.conf file under the path $ORACLE_INSTANCE\config\OHS\ohs_instance_name\ Note: replace ohs_instance_name with the newly installed ohs instance name (for example, ohs2).
-
Add the following lines to the file:
<Location context url for Demantra application >
SetHandler weblogic-handler
WebLogicHost weblogichostname
WebLogicPort portnumber
</Location>
-
Save the file and restart the OHS server using the command:
./opmnctl restartproc ias-component=ohs2 from the directory $ORACLE_INSTANCE/bin/.
-
-
Verify that the reverse proxy is working using the following URL. It should redirect you to the Demantra login page.
http://ohs_host:ohs_port/context url for Demantra application/portal/loginpage.jsp
-
Install the new Oracle Access Manager Webgate 11g. See “Installing and Configuring Oracle HTTP Server 11g Webgate for OAM” in Oracle Fusion Middleware Installation Guide for Oracle Identity Management 11g Release 1 (11.1.1) for more details.
Perform the actions listed in the following sections:
-
Post-Installation Steps
-
Verifying the Oracle HTTP Server 11g Webgate for Oracle Access Manager
-
Getting Started with a New Oracle HTTP Server 11g Webgate Agent for Oracle Access Manager
-
-
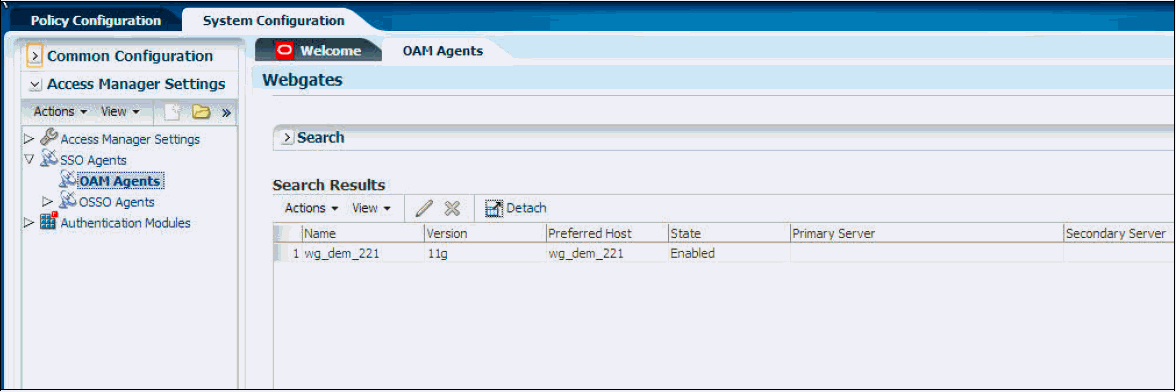
In the Oracle Access Manager Administration Console, click the System Configuration tab.
-
Click the OAM Agents tab. Verify that the host name and webgate name is correct.
-
Specify the authentication in the web.xml file of the Demantra Application:
-
Add the following lines in the web.xml file or if there is already an authentication method specified, then change it to CLIENT-CERT.
<login-config>
<auth-method>CLIENT-CERT</auth-method>
</login-config>
-
Redeploy the application and restart the WebLogic server.
-
-
Open the OAM console and do the following:
-
Expand the Application domain created for Demantra.
-
By default the application domain creates a default resource entry ( /.../* ) that protects all the resources. This can be kept as it is if you have configured an OHS instance and webgate specific to Demantra and not shared with any other applications.
If you want to keep the resources prefixed with the context URL of the Demantra application, then remove the default entry and add the below given resources to the protected resource policy.
Resource Type Authentication Policy Authorization Policy /<demantra_context_url>/* HTTP Protected Resource Policy Protected Resource Policy /<demantra_context_url>/…/* HTTP Protected Resource Policy Protected Resource Policy /<demantra_context_url>/common/…/* HTTP Protected Resource Policy Protected Resource Policy /<demantra_context_url>/portal/…/* HTTP Protected Resource Policy Protected Resource Policy /<demantra_context_url>/workflow/…/* HTTP Protected Resource Policy Protected Resource Policy /<demantra_context_url>/logs/…/* HTTP Protected Resource Policy Protected Resource Policy /<demantra_context_url>/conf/…/* HTTP Protected Resource Policy Protected Resource Policy -
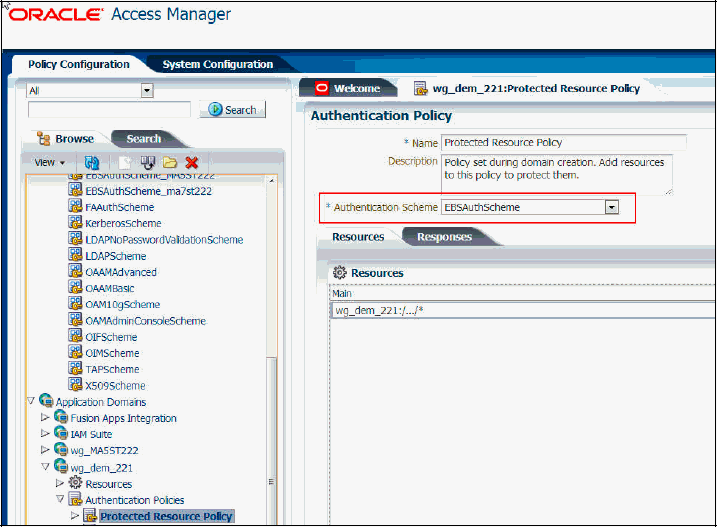
Expand Authentication policies.
-
Open Protected Resource Policies.
-
From the Authentication Scheme drop-down box, select the scheme which protects EBS resources. For example: EBSAuthScheme
-
Click the Responses tab
-
Add the following response:
Response name Type Value OAM_REMOTE_USER Header $user.userid -
Apply the changes and exit console.
-
-
Disable http-only ssoCookie. This step is required to resolve the issue of java applets that are not loading in OAM 11g or 10g. For more details, see My Oracle Support Note #1317110.1.
-
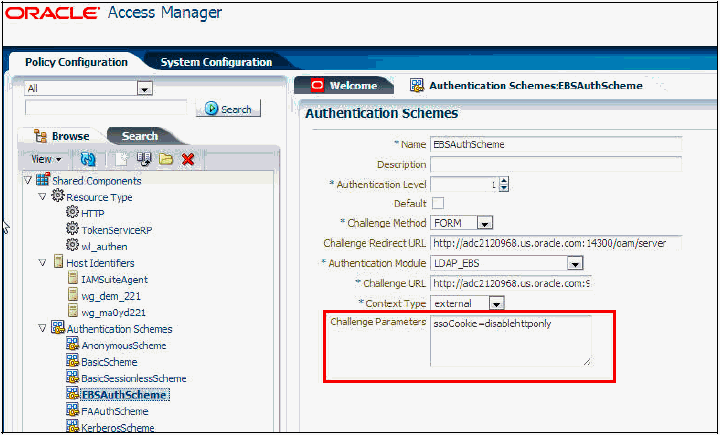
Open EBSAuthScheme under Authentication Schemes in OAM Console.
-
In the Challenge Parameters text box, enter the text “ssoCookie=disablehttponly”. This parameter is case sensitive.
-
Apply the changes and exit OAM console.
-
-
Restart the OAM server.
-
In EBS, set the MSD_DEM: Host URL in EBS to the value http://OHS_HOST_NAME:OHS_PORT/demantra_context_url, save it and logout.
-
To test that you have successfully configured SSO for Demantra, login to your EBS application with a user who has Demantra responsibilities and navigate to the Demantra Local Application page. You will be taken to the Demantra Local Application directly without being prompted with the Demantra Login page.
Logging in to Demantra from an External System
To log in to Demantra from an external system, the URL must be constructed as shown in the examples below.
Note that in each case, 'my_server' must be changed to the name of your application server and the 'component=parameter' value may be different, as it is based on the Demantra component the user wishes to log in to.
Demantra Local Application:
https://my_server/demantra/common/prelogin.jsp?redirectUrl=13&loginUrl=1&loginTo=0&source=0&component=dm
Workflow Manager:
https://my_server/demantra/common/prelogin.jsp?redirectUrl=18&loginUrl=9&loginTo=4&source=0&component=dm
Demantra Anywhere:
https://my_server/demantra/common/prelogin.jsp?redirectUrl=14&loginUrl=3&loginTo=1&source=0&component=dm
Demand Planner Web Client:
https://my_server/demantra/common/prelogin.jsp?redirectUrl=13&loginUrl=2&loginTo=2&source=0&component=dm
Seeded Demand Management Component
The seeded Demand Management component contains the default owning user levels, organized as hierarchies; series; and workflows required for the demand management business functions. The component owner ID for the Demand Management component is 'dm'. The password for this ID is set during Demantra installation.
Seeded Levels and Hierarchies
Oracle Demand Management provides several seeded levels organized into several seeded hierarchies:
Item levels: hierarchy roll-up sequence
-
Product Category: Item > Category > All
-
Product Family: Item > Product Family > All
-
Demand Class: Demand Class > All
-
Resources: > Resource Group> All
Location level: hierarchy roll-up sequence
-
Zone: Site > Trading Partner Zone > Zone > All
-
Geography: Site > Region > Country > Area > All
-
Trading Partner Class: Site > Trading Partner > Trading Partner Class > All
-
Ship From: Organization > Operating Unit > Legal Entity > Business Group > All
-
Business Group: Organization > Operating Unit > Business Group > All
-
Legal Entity: Organization > Legal Entity > All
-
Sales Channel: Sales Channel > All
-
Customer Class: Site > Account > Customer > Customer Class
Time:
-
Manufacturing Calendar: Day > Week(calendar_id) > Period(calendar_id) > All
-
Gregorian Calendar: Day > Month > Quarter > Year > All
-
Fiscal Calendar: as collected from the E-Business Suite
Note: This set of notes applies to Manufacturing Calendars and Fiscal Calendars, but not Gregorian Calendars.
-
Dynamically construct a separate hierarchy for each collected calendar. See Dynamic Creation of Calendar Hierarchies.
-
If the base time unit is set to 'week', then the hierarchy is Week (calendar_id) > Period (calendar_id)
-
If the installed base time unit is set to 'week', then only those Manufacturing Calendars with matching week definitions are collected.
-
Manufacturing and Fiscal Calendars are not supported if the base time unit is set to 'month'
See the “Levels” chapter.
Seeded Series
A series is a set of data that represents some value that varies over time or that varies between item-location combinations, or most commonly, that varies in both ways. A worksheet displays the series data in a table, or in a graph, or both. You can generally view data for any given series at any aggregation level. The definition of the series controls how the data is aggregated.
See the “Series” chapter.
-
Booking History - Booked Items – Booked Date
-
Booking History – Requested Items – Booked Date
-
Booking History – Booked Items – Requested Date
-
Booking History – Requested Items – Requested Date
-
Shipment History – Shipped Items – Shipped Date
-
* Shipment History – Requested Items – Shipped Date
-
Shipment History – Shipped Items – Requested Date
-
Shipment History – Requested Items – Requested Date
-
Return History
* Shipment History - Requested Items - Shipped Date is the default series for the base forecast and historical demand.
Loaded level for all seeded series:
-
Product: Item
-
Demand Class: Demand Class
-
Organization: Organization
-
Geography: Site
-
Channel: Sales Channel
-
Time: Week
The seeded default values are null.
Seeded Workflows
Oracle provides the following out-of-the-box workflows:
-
Seeded workflows to run downloads using EP_LOAD for:
-
Items
-
Locations
-
History (sales data)
-
Calendars
-
-
Seeded workflows to run uploads to Advanced Supply Chain Planning or other sources
-
Seeded workflow to download return history
-
Seeded workflow to download price lists
-
Seeded workflows to run the Demand forecast
-
Seeded workflows to:
-
Set the Final Approval series to NULL
-
Run the statistical forecast, by default based on Shipment History – Requested Date, and
-
Notify all users when the forecast is finished.
-
-
Seeded workflows and seeded user groups used in the approval process. The default setting for the user step is: 'Check Finish Every Day'. The default setting for 'Timeout' is: after 10 days. The Planning Group Workflow should time out 5 days after the Final Approver's targeted time range has passed.
-
Seeded workflow to archive forecasts for the Waterfall Analysis
-
Seeded workflow to calculate forecast for Line of Business
These workflows may be changed depending on the business need. For example, the Administrator wants to ensure that the relevant user groups and users are notified of a change the timeout process. The Administrator does this by editing the relevant workflow and editing the steps.
Predefined Worksheets
Predefined worksheets with the appropriate series for analysis and modification of the forecast are provided. For more information about predefined worksheets, see the Oracle Demantra Demand Management User's Guide.
A predefined waterfall worksheet with the forecast and accuracy series is available for the analyst at the beginning of each cycle. A default level is specified for every hierarchy in the Aggregation tab, although only a subset of these hierarchies will be in a Component.
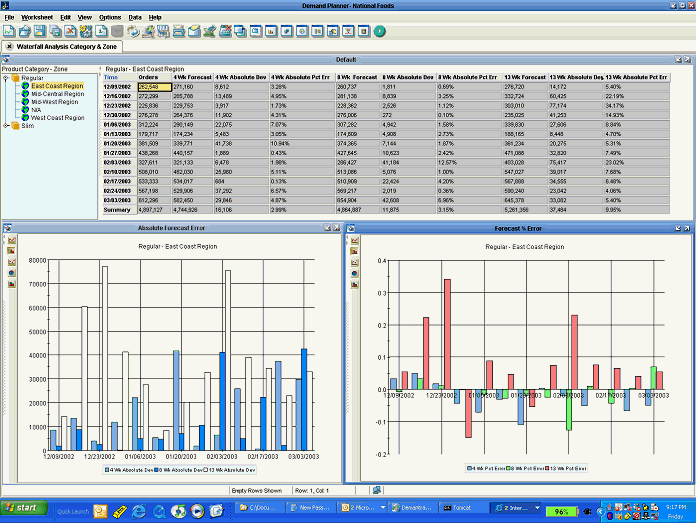
To produce this worksheet, historical final forecasts must be available. For implementations with Weekly time periods, the final forecast from the current quarter must be kept on a rolling basis moving forward. The following archived forecasts are used in the worksheet:
-
The forecast series for the current week minus 4, named 4 Week Lag Forecast
-
The forecast series for the current week minus 8, named 8 Week Lag Forecast
-
The forecast series for the current week minus 12, 12 Week Lag Forecast
-
The Mean Absolute Percentage Error (MAPE) is calculated for each of the historical forecast series named appropriately, for example 4 Week Lag MAPE
-
The Mean Absolute Deviation (MAD) is calculated for each of the historical forecast series named appropriately, for example 4 Week Lag MAD
For implementations with Monthly time periods, the following forecasts must be kept for the current year on a rolling basis moving forward:
-
The forecast series for the previous month, named 1 Month Lag Forecast
-
The forecast series for the current month minus 2, named 2 Month Lag Forecast
-
The forecast series for the current month minus 6, named 6 Month Lag Forecast
-
MAPE calculated for each of the historical forecast series named appropriately, for example 1 Month Lag MAPE
-
MAD calculated for each of the historical forecast series named appropriately, for example 1 month Lag MAD
MAPE calculation:
summation ( absolute value | Actual Demand - Lagged Forecast | / (Actual Demand) / Number of Observations )
MAD calculation:
summation (absolute value | Actual Demand - Lagged Forecast | / Number of Observations )
Summary of Integration Tasks
This section lists integration tasks in the appropriate sequence.
Note: The Demantra schema must be in the same instance as the APS instance.
-
Initial EBS setup. See EBS Setup.
-
Initial setup of EBS collections. See EBS Collections Initial Setup
-
Synchronization of levels. See Demantra Level Setup.
-
Collect data and download to staging tables. See Running Collections.
-
Transfer data to Oracle Demantra schema if not done automatically when collecting data. See Downloading to Oracle Demantra.
-
Generate forecasts.
-
Export output from Oracle Demantra. See Uploading from Oracle Demantra.
EBS Setup
The following need to be configured for EBS to Demantra Demand Management integration:
-
Profile Options
-
New Products List
-
Calendar List
-
Base Time Unit
Configuring the EBS Profile Options
| Profile Name | Description | Default Value |
|---|---|---|
| MSD_DEM: Aggregate Site level in Demantra | This profile determines how historical data collected from EBS is aggregated. Valid values are:
|
Site |
| MSC: Configuration | This profile defines whether item descriptions are collected for the appropriate Demantra tables. At the site level, set to 'APS & CP' if you want to collect item descriptions. Set on both the source and destination instances if decentralized. | Set by the Administrator |
| MSD_DEM: Master Org | This profile defines the Product Family to which an Item rolls up. | Set by the Administrator |
| MSD_DEM: Category Set Name | This profile defines the Item to Category rollups in each instance. | Inv.Items See Note 1 following this table. |
| MSD_DEM: Conversion Type | This profile determines which currency conversion rates are collected from the General Ledger tables. | Corporate |
| MSD_DEM: Customer Attribute | This profile options determines how customer data is imported to Demantra. This setting impacts what type and detail of information is collected into the Site hierarchy of the Location dimension. It works as follows:
For example, MSD_DEM: Customer Attribute is set to "Attribute8". For customers AA, BB, and DD Attribute 8 is set to “Yes” while for customers CC and EE Attribute 8 is set to something else. When data is collected Site, Account, and Customer Data is collected for customers AA,BB, and DD. All data for customers CC and EE is aggregated together and collected against Site="0", Account="0" and Customer="0" |
Set by the Administrator |
Note: Set the MSD_DEM: Category Set Name profile to a 'master level' category set. A master level category set does not allow multiple category roll up, such as an item rolling up to multiple categories within the same category set for the same organization.
Destination Side Profiles
| Profile Name | Description | Default Value |
|---|---|---|
| MSC: Configuration | This profile defines whether item descriptions are collected for the appropriate Demantra tables. At the site level, set to 'APS & CP' if you want to collect item descriptions. Set on both the source and destination instances if decentralized. | Set by the Administrator |
| MSD_DEM: Currency Code | This profile designates the Demand Management base currency. | US Dollar See Note 1 following this table. |
| MSD_DEM: Two-Level Planning | This profile enables demand forecasts at the Product Family level on the basis of sales histories of member items. | Exclude family members with forecast control 'None'. See Note 2 following this table. |
| MSD_DEM: Schema | Set this profile value to the database schema name where the Oracle Demantra schema has been installed. | DMTRA_TEMPLATE |
| MSD_DEM: Data Profile for Price Lists | Set this profile to import integration data profile for price lists. | EBS Price List |
| MSD_DEM: Maximum seeded units available for price lists | This profile determines the number of slots available for price lists in Oracle Demantra. | 30 |
| MSD_DEM: Debug Mode | When set to 'Yes', this profile is used to print debug information to the output file of the concurrent request. | No |
| MSD_DEM: Host URL | Set this profile to the Oracle Demantra Application Server Host Name, Port Number and Application Name. This profile is used to invoke Oracle Demantra URLs from the E-Business Suite applications. | Set by the Administrator See Note 3 following this table. |
Note 1:
Set up profile option MSD_DEM: Currency Code on the destination instance--sysadmin, application, currency:
-
Query your currency and then check the enabled flag
-
Save
-
Populate the profile as required
Set up MSD_DEM: Master Org on the source only. When there is a source instance, you do not need to set it up on the destination.
Note 2:
You can collect all the product family members and their sales histories regardless of the forecast control, as long as:
-
The product family forecast control is 'Consume' or 'Consume & Derive', and
-
The planning method for 'product family' and 'members' is not set to 'Not Planned'.
This is achieved by setting the profile value to: Collect all family members and their sales histories.
The MSD_DEM: Two-Level Planning profile default value, Exclude family members with forecast control 'None' enforces the behavior that only 'Consume' or 'Consume & Derive' product family members are collected.
Note 3:
Use the format:
-
http://<host name>:<port number>/<application name>, or
-
http://<host IP address>:<port number>/<application name>
For example http://pc-anwroy-in:8090/Oracle Demantra
Setting Up the New Products List
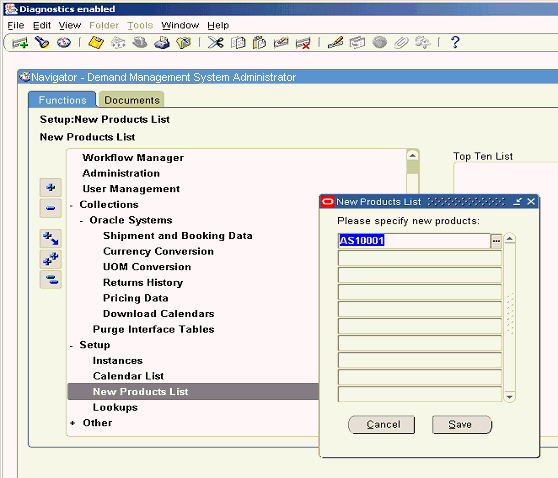
This setup specifies certain new items, for which there is no history data, that need to be downloaded into Oracle Demantra.
All items available in Advanced Supply Chain Planning Operational Data Store are displayed in the list of values. Items across multiple instances can be specified. Items that are downloaded into Oracle Demantra are not processed in subsequent collections.
Once a new item is added to the New Product list and downloaded, it remains in the list unless manually deleted. If a new item is downloaded into Oracle Demantra and then subsequently phased out, it remains in Oracle Demantra until manually deleted. If this item needs to be reintroduced in the future, delete the item from the item list in the New Products List user interface, and then add it back to the list. This ensures treatment as a new item that will be downloaded into Oracle Demantra.
Note: All Items added to the New Products list download into Oracle Demantra. No attribute checking occurs.
Setting Up the Calendar List
This setup specifies which manufacturing and fiscal calendars need to be collected and downloaded into Oracle Demantra. A user interface accessed from the E-Business Suite Demand Management menu structure allows the Demand Management System Administrator to list the E-Business Suite calendars to be used for Demand Management analysis.
All calendars available in Advanced Supply Chain Planning Operational Data Store (ASCP ODS) display in the list of values. Calendars across multiple instances can be specified.
Note: If a calendar is removed from this list, it is not deleted from Oracle Demantra automatically. Subsequent collections will not collect and download that calendar.
Take the following example of a Fiscal Calendar collected from the E-Business Suite source. Assume for this example that the Oracle Demantra base time unit is week, with each week starting on Monday.
| Week | Start Monday | End Sunday | ||
|---|---|---|---|---|
| Fiscal Quarter 2007-1 | Fiscal Month 2007-1 | 1 | 1/1/2007 | 1/7/2007 |
| 2 | 1/8/2007 | 1/14/207 | ||
| 3 | 1/15/207 | 1/21/207 | ||
| 4 | 1/22/2007 | 1/28/2007 | ||
| Fiscal Month 2007-2 | 5 | 1/29/2007 | 2/4/2007 | |
| 6 | 2/5/2007 | 2/11/2007 | ||
| 7 | 2/12/2007 | 2/18/2008 | ||
| 8 | 2/19/2007 | 2/25/2007 | ||
| Fiscal Month 2007-3 | 9 | 2/26/2007 | 3/4/2007 | |
| 10 | 3/5/2007 | 3/11/2007 | ||
| 11 | 3/12/2007 | 3/18/2007 | ||
| 12 | 3/19/2007 | 3/25/2007 | ||
| 13 | 3/26/2007 | 4/1/2007 | ||
| Fiscal Quarter 2007-2 | Fiscal Month 2007-4 | 14 | 4/2/2007 | 4/8/2007 |
| 15 | 4/9/2007 | 4/15/2007 | ||
| 16 | 4/16/2007 | 4/22/2007 | ||
| 17 | 4/23/2007 | 4/29/2007 | ||
| Fiscal Month 2007-5 | 18 | 4/30/2007 | 5/6/2007 | |
| 19 | 5/7/2007 | 5/13/2007 | ||
| 20 | 5/14/2007 | 5/20/2007 | ||
| 21 | 5/21/2007 | 5/27/2007 | ||
| Fiscal Month 2007-6 | 22 | 5/28/2007 | 6/3/2007 | |
| 23 | 6/4/2007 | 6/10/2007 | ||
| 24 | 6/11/2007 | 6/17/2007 | ||
| 25 | 6/18/2007 | 6/24/2007 | ||
| 26 | 6/25/2007 | 7/1/2007 | ||
| Fiscal Quarter 2007-3 | Fiscal Month 2007-7 | 27 | 7/2/2007 | 7/8/2007 |
| 28 | 7/9/2007 | 7/15/2007 | ||
| 29 | 7/16/2007 | 7/22/2007 | ||
| 30 | 7/23/2007 | 7/29/2007 | ||
| Fiscal Month 2007-8 | 31 | 7/30/2007 | 8/5/2007 | |
| 32 | 8/6/2007 | 8/12/2007 | ||
| 33 | 8/13/2007 | 8/19/2007 | ||
| 34 | 8/20/2007 | 8/26/2007 | ||
| Fiscal Month 2007-9 | 35 | 8/27/2007 | 9/2/2007 | |
| 36 | 9/3/2007 | 9/9/2007 | ||
| 37 | 9/10/2007 | 9/16/2007 | ||
| 38 | 9/17/2007 | 9/23/2007 | ||
| 39 | 9/24/2007 | 9/30/2007 | ||
| Fiscal Quarter 2007-4 | Fiscal Month 2007-10 | 40 | 10/1/2007 | 10/7/2007 |
| 41 | 10/8/2007 | 10/14/2007 | ||
| 42 | 10/15/2007 | 10/21/2007 | ||
| 43 | 10/22/2007 | 10/28/2007 | ||
| Fiscal Month 2007-11 | 44 | 10/29/2007 | 11/4/2007 | |
| 45 | 11/5/2007 | 11/11/2007 | ||
| 46 | 11/12/2007 | 11/18/2007 | ||
| 47 | 11/19/2007 | 11/25/2007 | ||
| Fiscal Month 2007-12 | 48 | 11/26/2007 | 12/2/2007 | |
| 49 | 12/3/2007 | 12/9/2007 | ||
| 50 | 12/10/2007 | 12/16/2007 | ||
| 51 | 12/17/2007 | 12/23/2007 | ||
| 52 | 12/24/2007 | 12/30/2007 |
Run the Download Calendars program with the calendar_id parameter set as "Vision Corporate Calendar" to create the following levels and hierarchy:
-
Week (existing level)
-
> Fiscal Month (Vision Corporate Calendar) (new level)
-
> Fiscal Quarter (Vision Corporate Calendar) (new level)
-
> Fiscal Year (Vision Corporate Calendar) (new level)
The level members roll up to parent members (weeks to fiscal months, fiscal months to fiscal quarters, fiscal quarters to fiscal years) according to the calendar definition. The name of the generating calendar (Vision Corporate Calendar, in the above example) in the level names distinguish the newly created levels. In this way, Oracle Demantra accommodates analysis along multiple E-Business Suite calendars. See Setting and Modifying the Base Time Unit.
Calendars are always collected using Full Refresh of Shipment and Booking History Collections. Calendars can also be collected by launching Download Calendars from the menu. In other words, all dates are collected. A check ensures the collected dates fall within the Oracle Demantra default dates. Only levels higher than the lowest model defined time aggregation are loaded. For example, when the base time unit is 'week', only month (period), quarter and year load. For a monthly system, only quarter and year load.
To set up the Calendar List:
-
Navigate to the Demand Management Calendars user interface.
(Setup > Calendar List)
The Demand Management Calendars user interface appears.
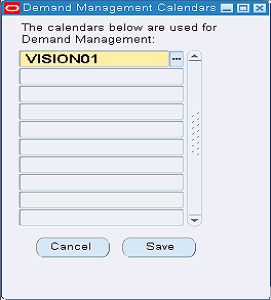
This user interface validates that any calendar listed has a time bucket level that matches the Oracle Demantra base time unit. For all calendars defined in the Calendar List, a stored procedure, invoked via the Oracle Demantra Download Calendars workflow, creates corresponding time hierarchies in Oracle Demantra. If the time hierarchies do not already exist, the procedure adds them to the Demand Management component.
-
To add a calendar to the list, select an empty row.
-
Select a calendar from the drop-down list of values.
-
Click Save.
Setting the Base Time Unit
The base time unit is used by the Demand Planner Data Model to aggregate the source data to the specified time bucket size. Allowed settings of the base time unit (time bucket size) are:
-
day
-
week
-
Gregorian month
See Setting and Modifying the Base Time Unit.
Demantra Level Setup
The Demand Management System Administrator can create a new leaf level for a hierarchy, such as adding a sales representative as a location new leaf level.
-
Navigate to the Open Data Model window.
Business Modeler > Data Model > Open Data Model
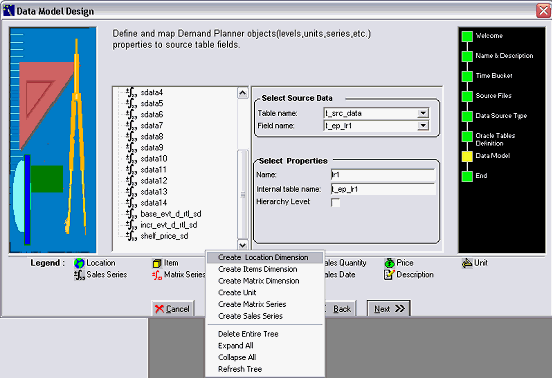
From the Open Data Model window, navigate to the Data Model Design window. In the left pane, with no node selected, select Create Location Dimension from the right-click menu.
-
The Data Model Design window appears.
-
Complete the table and field names that will hold level members.
-
Customize the collections code.
-
Run collections.
-
Rebuild the Oracle Demantra model. See Building the Data Model and Manipulating Existing Data Models.
Creating a New Top Level
The Demand Management System Administrator can create a new top level for a hierarchy, such as creating a level for Product Line located above Product Family level.
-
Navigate to the Configure Levels window.
Business Modeler > Configuration > Configure Levels
The Configure Levels window opens.
-
Select, and then right-click the current top level node. For example, select product category.
-
From the right-click menu, choose New level.
The General Properties window opens.
-
Complete the following General Properties:
-
Level Name, such as Super Category
-
Type: Product Level
-
Status: Enabled.
-
-
Click Next.
The Level <current node> Data Properties window opens.
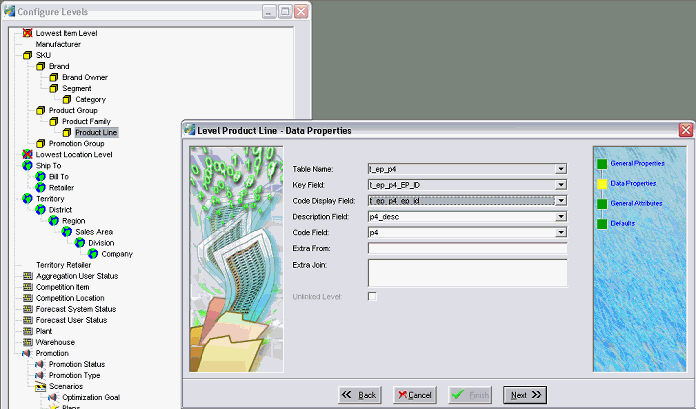
-
Define the Table Name and Column that house members of the new level. You are selecting a field in the database table to house members of the new level.
-
Customize the collections code to populate the appropriate table and column with product line member data.
-
Click Next.
-
Run collections.
-
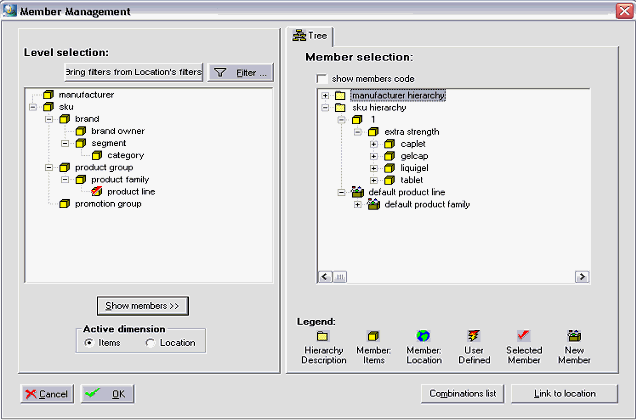
Next define level value associations of specific parent product lines to child product families. Navigate to Member Management.
Demand Analyst > Tools > Member Management
-
Select the Product Line node.
-
Drag Product Families under the appropriate Product Lines.
-
Click Save.
Note: To Create a New Hierarchy on Top of an Existing Leaf Level, perform multiple iterations of the following procedure for Creating a New Top Level.
Creating a New Intermediate Level
Configure Levels does not directly support the addition of intermediate levels. To accomplish the addition of an intermediate level, the process renames an existing level, and then adds a new top level.
For example:
-
Existing level name: 'Category'
-
Rename 'Category' as 'Subcategory'
-
Create a new top level named 'Category'.
-
Navigate: Business Modeler > Configuration > Configure Levels
The Configure Levels window opens.
-
Select, and then right-click the current top level node.
-
Rename the current top level to the name of the new intermediate level.
-
Use the Creating a New Top Level procedure to add a new top level above the intermediate level.
Deleting a Level
-
Navigate: Business Modeler > Data Model > Open Data Model
-
Go to Data Model step
-
In the left hand pane, select the level to be deleted.
-
From the right-click menu, select Delete.
-
Rebuild the Oracle Demantra model – See Building the Data Model and Manipulating Existing Data Models.
EBS Collections Initial Setup
Initial setup encompasses the following steps:
-
Set up Instances
-
Set up Standard Collections
Important: After Demantra has been installed you must run the 'Update Synonyms' concurrent request, which is under the responsibility 'Demand Management System Administrator.' This program defines the value of the MSD_DEM: Schema profile option.
This program has a parameter 'Schema Name' that is not displayed by default. If there is only one schema, (the most likely production scenario), the program will automatically update that one. But if there are multiple schemas (possible in a development environment), an administrator can log in using the 'Applications Developer' responsibility and choose to display the Schema Name parameter. The Demand Management System Administrator will then be able to select a schema when running Update Synonyms.
Set Up Instances
An instance is a database and a set of applications. Setup Instances is run before running Standard Collections to specify the Instances from which Standard Collections obtains data.
Oracle Advanced Planning can plan a single instance or multiple instances. For information about setting up instances, see "Instances" in the Cross-Instance Planning chapter ofOracle Advanced Supply Chain Planning Implementation and User's Guide.
Set Up Standard Collections
"Standard" Collections refer to the Advanced Supply Chain Planning (ASCP) concurrent program for collecting new or changed information from the E-Business Suite to the Oracle Data Store (ODS). For information about collections, see the Oracle Value Chain Planning Collections Guide.
Tip: You are recommended to set the MSC: Configuration profile option to 'APS & CP' if you want to collect item descriptions when standard collections are run. See "Profile Options" for more information about this profile option.
-
Sign on using the Advanced Supply Chain Planner responsibility or the Advanced Planning Administrator responsibility.
-
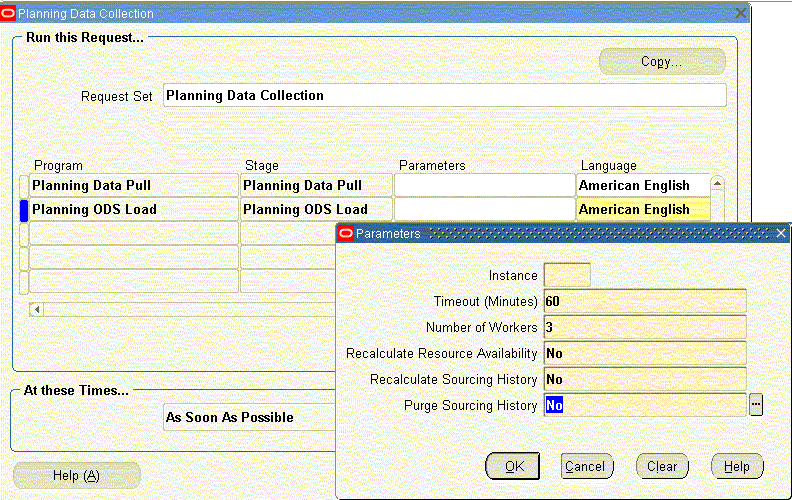
Navigate to the Planning Data Collection window by selecting Collections > Oracle Systems > Standard Collection.
The Planning Data Collection window appears.
-
This window shows that the collections process consists of two sequentially executed concurrent programs. The first program, Planning Data Pull, copies information from the source instance into the APS staging tables on the planning server. The second program, Planning ODS Load, copies information from the APS staging tables into the operation data store on the planning server,
-
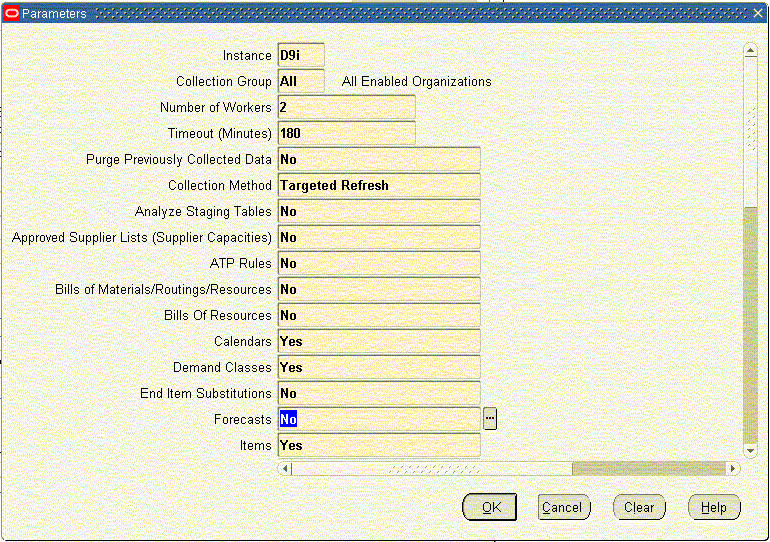
To select the Data Pull Parameters to use during Standard Collections, select the Parameters field for the Planning Data Pull program.
The Planning Data Pull Parameters window appears.
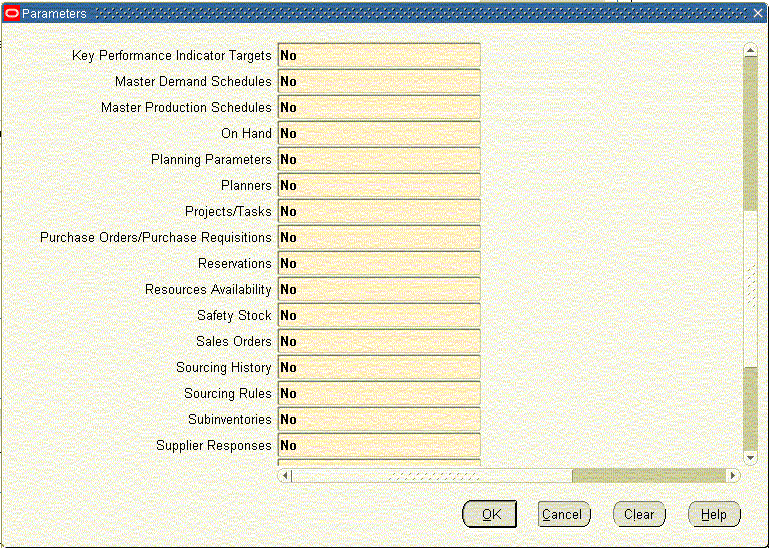
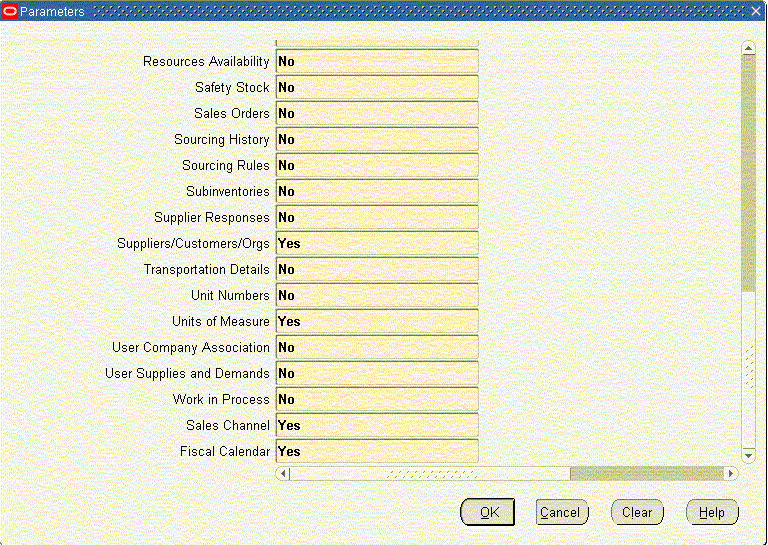
-
Set the parameters as shown in the previous figures.
-
Select the Parameters field for the Planning ODS Load program.
The Parameters window appears.
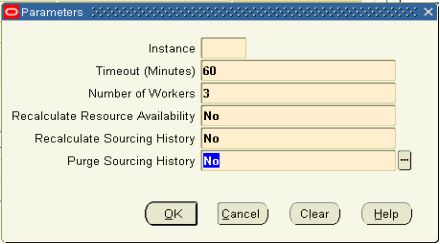
-
Set the parameters as shown in the previous figure.
Note: If the item descriptions have not been collected after you complete this process, set the MSC: Configuration profile option to 'APS & CP' and rerun the collection. See "Profile Options" for more information.
Set up Price Lists, Calendars, and New Products
Setup Calendar, Price Lists and New Products are run initially, and on an as needed basis in ongoing cycles.
See
Collecting Price List Data
Setting Up the Calendar List
Downloading Calendars
Setting Up the New Products List
Other Collections
After setup is complete, the remaining collections are run. All other collection choices under the Oracle Systems menu are used to collect the specified data from the planning server for download to Oracle Demantra. See:
-
Combined Collections of Shipment and Booking History
-
Collecting Currency Conversion Data
-
Collecting UOM Conversion Data
-
Collecting Returns History Data
Legacy Collection loads Shipment and History data into Oracle Demantra
See Collecting Legacy Shipment and History Data.
Running Collections
Note: For more information about collections see the Oracle Value Chain Planning Collections Guide.
Collections use existing Oracle Demand Planning and Oracle Advanced Supply Chain Planning user interfaces, accessed from the Demand Management System Administrator responsibility.
Available collections:
-
Standard Collections -- designates existing ASCP collections of reference data -- items, location, and calendars -- that are collected from the Instances specified in Setup > Instance. Sales Orders, which is an entity inside Advanced Supply Chain Planning Standard Collections, provides the data stream representing future demand. The Standard Collections must be run before other collections. For information about collections see the Oracle Value Chain Planning Collections Guide.
-
Shipment and Booking Data -- provides the data stream representing past demand.
See Combined Collections of Shipment and Booking History, and Collecting Legacy Shipment and History Data
-
Return History, See Collecting Returns History Data
-
Currency Conversion, See Collecting Currency Conversion Data..
-
Units of Measure (UOM) Conversion, See Collecting Unit of Measure Conversion Data
-
Pricing Data, See Collecting Price List Data
Combined Collections of Shipment and Booking History
The Collection Utility merges programs that collect data streams for both Shipment and Booking History.
Prerequisites:
-
Define database instances.
-
Set up appropriate source and destination profiles.
-
Run Standard Collections.
To run Shipment and Booking Data Collections:
-
Navigate to the Collection Utility:
Collections > Oracle Systems > Shipment and Booking History.
The Collections Utility window appears, listing several collections programs.
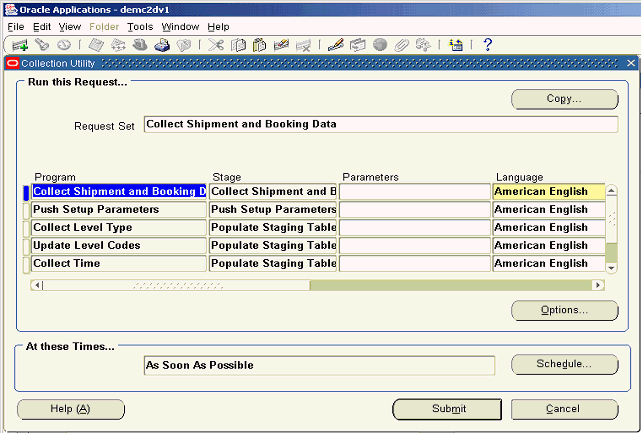
-
Collect Shipment and Booking Data. This program collects shipment and booking history data from the E-Business Suite Order Management source application based on the collection parameters specified, and then inserts the data into the Oracle Demantra sales staging table.
-
Push Setup Parameters. This program pushes destination data into the E-Business Suite source, such as source profiles, organizations in the collection group, and time data from Oracle Demantra.
-
Collect Level Type. There are two Collect Level Type programs, one for items and the other for locations. These programs generate distinct item and location intersections, as defined in Oracle Demantra, from the shipment and booking history, and then insert the data into Oracle Demantra item and location staging tables.
-
Update Level Codes. This program updates the site level codes in the Oracle Demantra sales staging table as present in the Advanced Supply Chain Planning Operational Data Store.
-
Collect Time. This program collects Manufacturing and Fiscal calendars from the Advanced Supply Chain Planning Operational Data Store, as setup in the Calendar List. See Setting Up the Calendar List.
-
Launch EP LOAD.
Historical information and level data are imported into Oracle Demantra via the EP_LOAD procedure. All other series data are imported into Oracle Demantra via Import Integration Profiles. An assumption of the EP LOAD procedure is that the series are populated into the Oracle Demantra staging tables before the load process begins. To ensure this occurs, the collection programs for all eight historical series have been merged so that these streams are always collected simultaneously. See Seeded Series.
-
-
Highlight the Collect Shipment and Booking Data program.
-
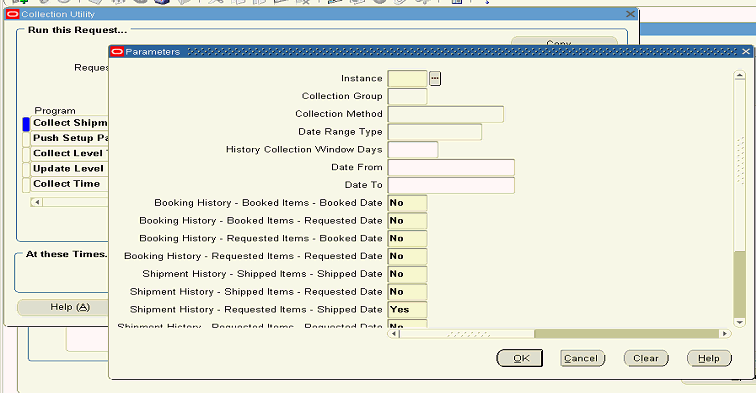
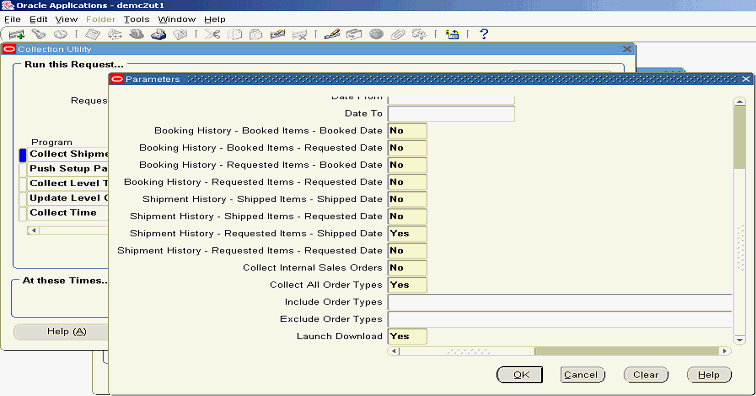
In the row for the Collect Shipment and Booking Data program, click within the Parameters field. The Parameters window appears. The parameters are described following the image.
-
Instance. Select the instance code of the E-Business Suite source instance from the list of values as defined in Instances form.
-
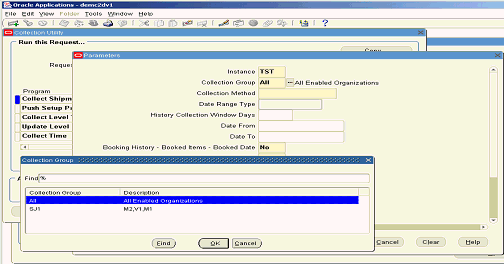
Collection Group. Collection group is a group of Organizations. The parameters screens of all demand planning entities: Level Values, Manufacturing Forecast, Return History, Sales Forecast, Shipment and Booking Data, include a Collections Group parameter. This is to support line of business-specific collections.
-
Currency, Unit of Measure, and Price List do not have a Collections Group parameter. Currency is dimensioned by time only. Unit of Measure is dimensioned by item only. Price List is dimensioned by item and time.
-
The default value is 'All', which implies data for all Oracle Advanced Supply Chain Planning- and all Oracle Demand Planning-enabled organizations available for the specified instance are to be collected.
-
User-defined values can be specified if user-defined collection groups have been created in the Instances form. Only Oracle Advanced Supply Chain Planning- and Oracle Demand Planning-enabled organizations can be added to the user-defined collection groups.
-
-
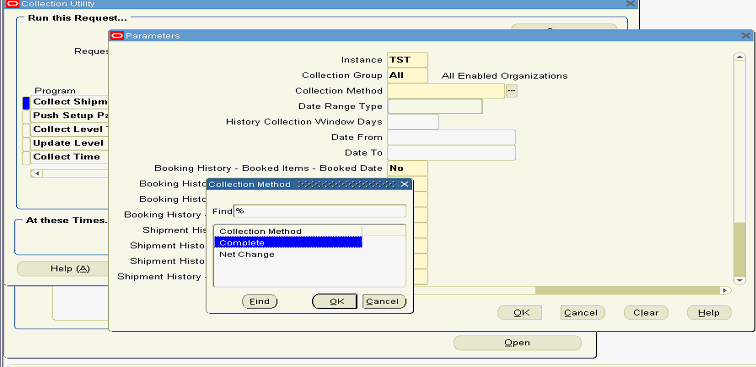
Collection Method. Allowed values are: 'Complete' or 'Net Change'
-
'Complete' clears the data in the Oracle Demantra sales staging table, collects all available records from the E-Business Suite source, and inserts data into the Oracle Demantra sales staging table. No date filters apply for Complete collection. For first time collection of history data, you typically select the 'Complete' Collection Method.
-
'Net Change' clears the data in the Oracle Demantra sales staging table, collects data by applying the specified date filters, and inserts the fetched data into the Oracle Demantra sales staging table. Net Change is typically selected for ongoing, periodic collection of history data, say on a weekly basis.
-
The Complete and Net-Change Collection Methods are mutually exclusive.
-
-
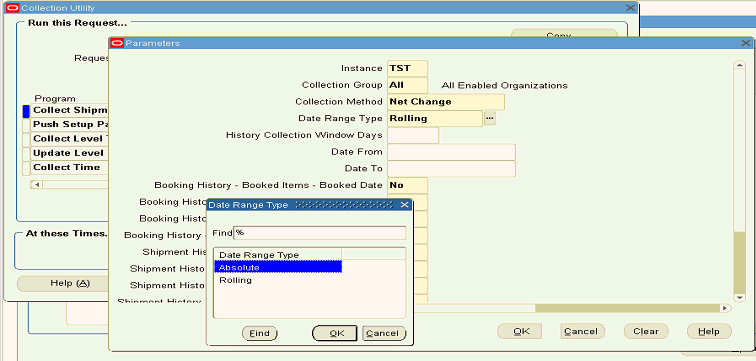
Date Range Type. For Net Change collection, the allowed values for Date Range Type are 'Rolling' or 'Absolute'. Date Range type is not valid for 'Complete' collections.
-
'Rolling' implies the history data is collected from the system date up to the number of days in the past specified in the 'History Collection Window Days' field.
-
'Absolute' implies the user specifies the date range for which collection is to be done in the Date From and Date To fields.
-
The Rolling and Absolute Date Range Types are mutually exclusive.
-
-
History Collection Windows Days. This field specifies the number of days in the past from the system date for which history data is to be collected. This field is valid when the Date Range Type is 'Rolling'.
-
Date From and Date To. These fields specify a date range for the collection of history data. They are valid when the Date Range Type is 'Absolute'.
-
Collected Series. The next eight parameters are the names of the eight seeded history series. Specifying 'Yes' causes a series to be collected. Specifying 'No' will not collect it.
Note: For history collections, at least one series must be specified. The Shipment History – Requested Items – Shipped Date series is the default value.
-
Collect Internal Sales Orders. Specifying 'Yes' collects any internal sales orders available in the source. By default, internal sales orders are not collected.
-
Collect All Order Types. Specifying 'Yes' collects sales orders for all order types. Specifying 'No' enables the Include Order Types field.
-
Include Order Types. Specifying 'No' in the Collect All Order Types parameter enables entry of Order Types in the Include Order Types field, for which sales orders are collected. Enter Order Types one after another with a comma separated delimiter.
-
Exclude Order Types. To exclude certain order types from being collected specify the list of Order Types that are not to be collected in the Exclude Order Types field. Enter Order Types one after another with a comma separated delimiter.
-
Either 'Include Order Types' or 'Exclude Order Types' can be specified, but not both.
-
-
Type Selection Method
The Type Selection Method is available through the EBS Menu under Demand Management System Administrator > Collections > Oracle Systems > Shipment and Booking History. It is disabled if the Collect All Order Types parameter is set to YES (Default). If Collect All Order Types is set to NO, then Type Selection Method is enabled and mandatory.
The available settings are defined in the table below.
List Item Description Comma (,) separated list of order types (Default value) Select either “Include Order Types” or “Exclude Order Types” with a list of order types. The list must be less than 240 characters. SQL query name SQL query name from Table MSD_DEM_ENTITY_QUERIES. When selected; user has to enter the query name stored in Table MSD_DEM_ENTITY_QUERIES in the “Include Order Types” or “Exclude Order Types” parameter fields which will return valid order type ids. It is the customer's responsibility to maintain entity_name, sql query & order types ids. Note: Sql query must be executable on source side instance. Value Set When selected, the user enters the valueset name in “Include Order Types” or “Exclude Order Types” parameter fields. It is the customer's responsibility to create and maintain the valueset to hold the valid order types for Shipment and Booking History collection. Note: ValueSet must be created on source instance and the ValueSet must be “List of values” type. -
Launch Download. Each collections Single Request Submission includes a Launch Download parameter. Valid values are 'Yes' and 'No'.
Specifying 'Yes' automatically launches the download of history data into Oracle Demantra as soon as collections have completed. Internally this invokes the Oracle Demantra EP_LOAD procedure to download the data into Oracle Demantra. E-Business Suite Advanced Planning and Scheduling directly populates the staging tables. The Shipment and Booking history collection automatically invokes Download Calendars program if the Launch Download field is set to 'Yes'. See Downloading Calendars.
If Launch Download is set to 'No', then only collections will be done. Advanced Planning and Scheduling collections leave the data in the Oracle Demantra staging tables. Download does not launch automatically. To download the collected items, locations, and history data, manually launch the Download workflow from Oracle Demantra Workflow Manager.
-
The Administrator launches the workflow.
-
For historical series, all series are loaded.
-
An integration profile for each non-history series determines which data are loaded.
-
-
-
Click OK to close the Parameters window.
-
(Optional) On the Collection Utility window, click Schedule to open a window where you can set up the concurrent program to run collections at a future date and time, or periodically. The At these Times field default value causes the program to run “As Soon As Possible” after the program is submitted.
-
Click Submit.
Collecting Legacy Shipment and History Data
The concurrent programs for Legacy Shipment and History collection are:
-
Flat File Loads. This program loads the shipment and booking history data from a flat file into the Oracle Demantra sales staging table.
-
Sales Data Pre Processor. This program updates the destination keys from Advanced Supply Chain Planning for all of the levels.
-
Collect Level Type and Launch EP_LOAD are the same programs as those used for the E-Business Suite Shipment and Booking History Data collections.
Prerequisites: Prior to launching this collection, complete ASCP collections for the legacy instance.
To collect Legacy Shipment and History Data:
-
Navigate to the Legacy Collection Utility.
Collections > Oracle Systems > Collect Shipment and Booking Data - Flat File
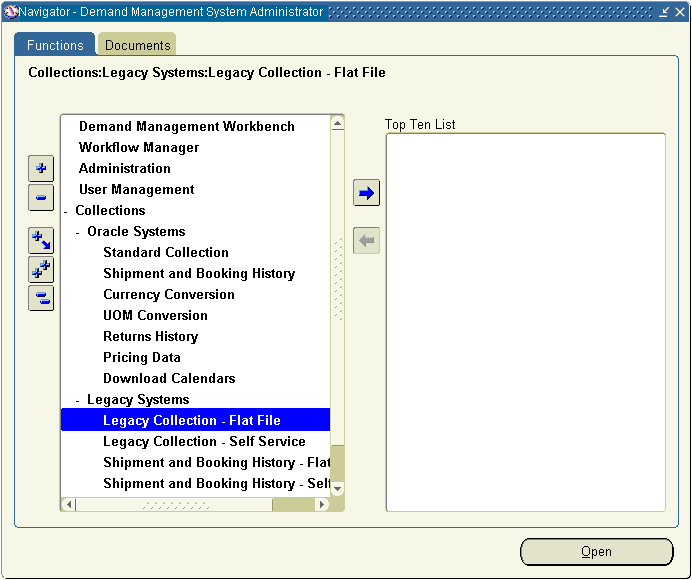
The Collections Utility window appears, listing several collections programs.
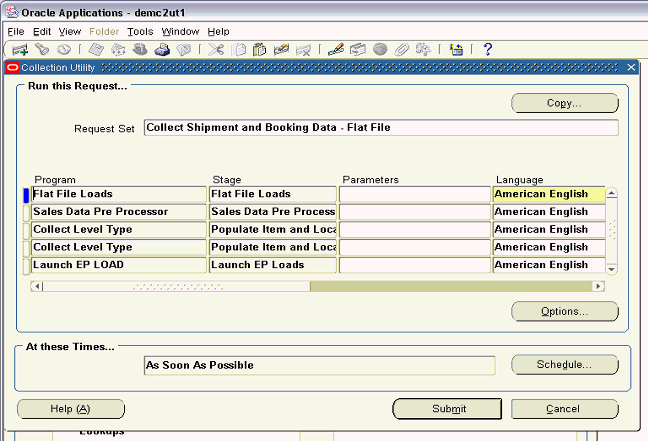
-
Highlight the Collect Shipment and Booking Data program.
-
In the row for the Collect Shipment and Booking Data program, click within the Parameters field.
The Parameters window appears. The parameters are described following the image.
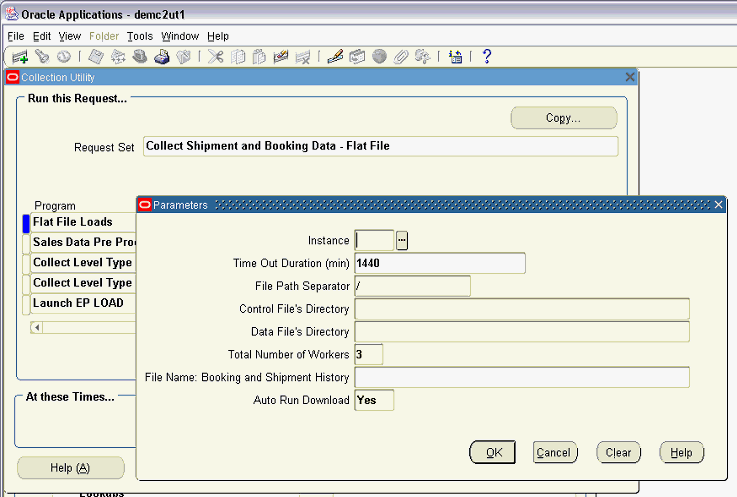
The parameters for the Flat File Loads concurrent program are:
-
Instance. The legacy instance for which data is being loaded.
-
Time Out Duration (min). This is the maximum duration, in minutes, for which this program is allowed to run.
-
File Path Separator. Windows and UNIX path separators are different.
-
Control File's Directory. Specifies the location of the SQL loader control file.
-
Data File's Directory. Specifies the location of the history data flat file.
-
Total Number of Workers. Specifies the number of programs that can be run simultaneously.
-
File Name Booking and Shipment History. Specifies the name of the shipment and booking history flat file.
-
Auto Run Download. 'Yes' automatically downloads data into Oracle Demantra from the staging tables. 'No' indicates that the download into Oracle Demantra will be accomplished using a separate manual procedure.
-
Collecting Returns History Data
To collect Return History Data:
-
Navigate to the Collect Return History window.
Collections > Oracle Systems > Returns History
The Collect Return History window appears.
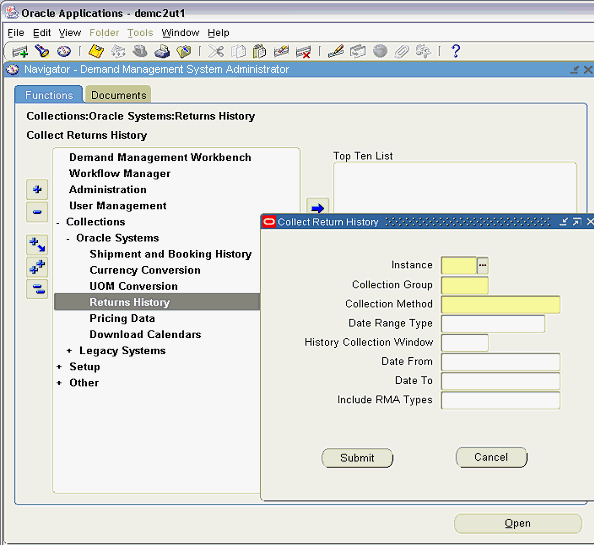
-
Specify Collect Return History parameters.
The collection parameters for Returns History are:
-
Instance. This is the instance code of the source instance, as defined in Instances form.
-
Collection Group. This group of organizations filters the collected data by organization.
-
The default value is 'All', which implies all Advanced Supply Chain Planning and Demand Planning enabled organizations are available for the specified instance.
-
User-defined values can be specified if user-defined collection groups have been created in the Instances form.
-
Only Advanced Supply Chain Planning and Demand Planning enabled organizations can be added to the user-defined collection groups.
-
-
Collection Method. Valid options are: 'Complete' or 'Net-Change'.
-
'Complete' clears the data in the Return History staging table, collects all available records from the source, and inserts them into the Return History staging table. No date filters are applied for Complete collection. Complete collection is typically used for the first time collection of history data.
-
'Net-Change' clears the data in the Return History staging table, collects data by applying the specified date filters, and inserts the fetched data into the Return History staging table. Typically, select net change for regular collection of history data, say on a weekly basis.
-
Complete and Net-Change are mutually exclusive.
-
-
Date Range Type. For 'Net-Change' collection, Date Range Type can be either 'Rolling' or 'Absolute'.
-
'Rolling' implies collection of history data from the system date up to the number of days in the past as specified in the 'History Collection Window Days' field.
-
'Absolute' requires values in the Date From and Date To fields to specify the date range for which collection is to be done.
-
'Rolling' and 'Absolute' Date Range Types are mutually exclusive.
-
Date Range Type is not valid for the 'Complete' Collection Method.
-
-
History Collection Windows Days. This field is valid if the 'Rolling' date range type has been chosen. Specify the number of days in the past from the system date for which history data is to be collected.
-
Date From and Date To. These fields are valid if the 'Absolute' date range type has been chosen. Specify a date range for the collection of history data.
-
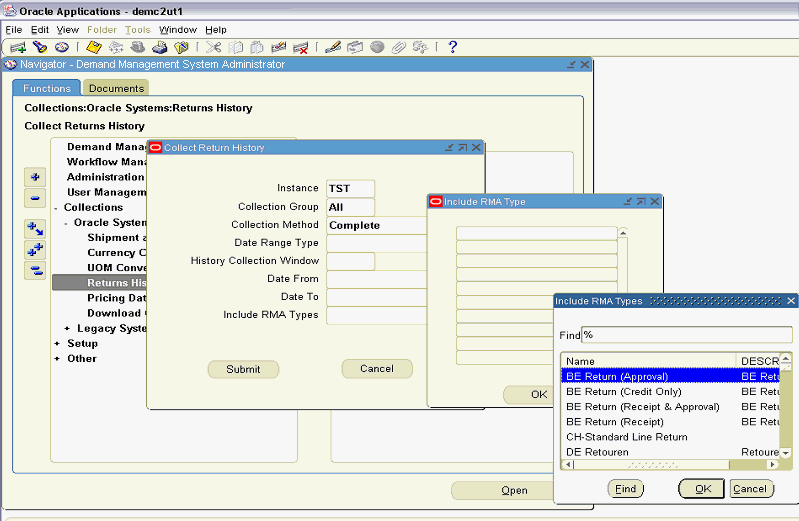
Include RMA Types. Null value implies collection of all Return Material Authorization types. Specifying particular RMA types causes only those listed to be collected. Multiple RMA types can be specified.
-
-
(Optional) To specify particular RMA Types click the cursor within the Include RMA Types Field.
The Include RMA Type window appears.
-
Select the RMA Type. Click OK.
-
Repeat the previous step as necessary to specify all desired RMA Types.
-
Click OK to close the Include RMA Type window.
-
On the collect Return History window, click Submit to launch the concurrent program to execute Return History collections.
Collecting Currency Conversion Data
Currency conversion rates are dimensioned by time only.
To run the Currency Conversion Collections:
-
Navigate to the Collection Utility
Collections > Oracle Systems > Currency Conversion
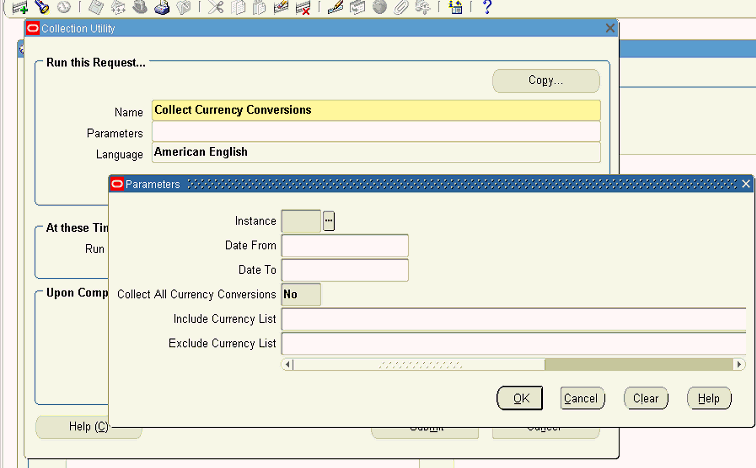
The Collections Utility window appears, with the Collect Currency Conversions program name appearing in the Name field.
-
Click within the Parameters field. The Parameters window appears.
-
Set the program parameters.
The parameter descriptions follow:
-
Instance. This is the Instance code of the source instance, as defined in the Instances form.
-
Date From and Date To. Specify a date range for the collection of currency conversion rates. If no dates are specified then all available records available in source are collected without applying any date filters.
-
Collect All Currency Conversions. Specifying 'Yes' collects Currency conversion rates for all currencies for which conversion rates to the base currency exist in the source. Specifying 'No' enables entry of Currency Codes for which conversion rates can be collected, in the 'Include Currency List' field.
-
Include Currency List. If Collect All Currency Conversions is set to 'No', enter Currency Codes one after another with a comma separated delimiter.
-
Exclude Currency List. To exclude certain Currency conversion rates from being collected, specify the list of Currency Codes that are not to be collected in the 'Exclude Currency List' field. Enter Currency Codes one after another separated by a comma delimiter
-
Either 'Include Currency List' or 'Exclude Currency List' can be specified but not both.
-
-
-
Click OK to close the Parameters window.
-
Click Submit.
Note: The Administrator can run the following script to add more placeholder currencies to Oracle Demantra:
Name: 'Create Seed Entities in Demantra
Script:
declare
            retcode number;
begin
            msd_dem_create_dem_seed.create_dem_seed_data(retcode, <p_start_no>,                  <p_num_entities>,<p_entity_type>);
end;
 /
Parameters to be passed to this script:
p_start_no. - starting number of entities to be created (Already units from 100-199 are created)
p_num_entities - number of entities to be created
p_entity_type - 1 (UOM), 2 (CURRENCY), 3 (PRICE LIST), 0 (ALL)
Collecting Unit of Measure Conversion Data
Unit of Measure conversion rates are dimensioned by time only. UOM conversion rates are always calculated with respect to each collected Item's Primary UOM; up to 100 UOM Conversions can be collected.
To run the Unit of Measure Conversion Collections:
-
Navigate to the Collection Utility.
Collections > Oracle Systems > UOM Conversion
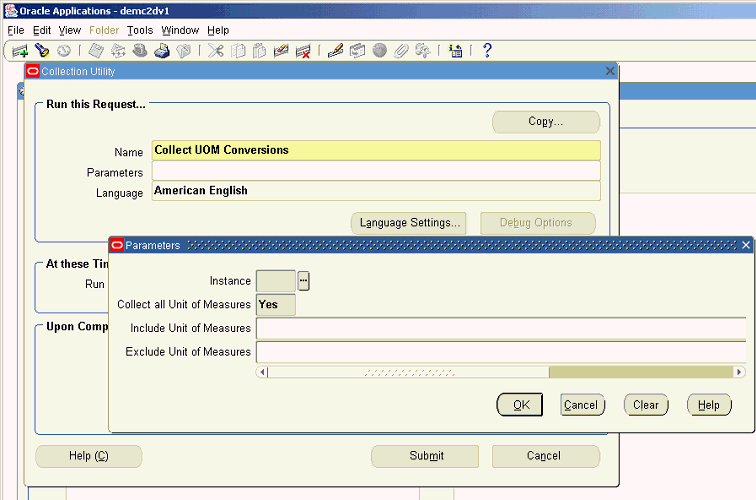
The Collections Utility window appears, with the Collect UOM Conversions program name appearing in the Name field.
-
Click within the Parameters field.
The Parameters window appears.
-
Set the program parameters.
The parameter descriptions follow:
-
Instance. This is the instance code of the source instance, as defined in the Instances form.
-
Collect All Units of Measure.
Specifying 'Yes' collects UOM conversion rates for all units of measure for which conversion rates exist in the source.
Specifying 'No' enables entry of UOM Codes for which conversion rates can be collected, in the 'Include Units of Measures' field.
-
Include Units of Measure. Enter a list of UOM Codes for which conversion rates can be collected. UOM Codes are entered one after another separated by a comma delimiter
-
Exclude Units of Measure. To exclude certain UOM conversion rates from being collected, enter the list of UOM Codes that are not to be collected. Enter UOM Codes one after another, separated by a comma delimiter.
-
Either 'Include Units of Measures' or 'Exclude Units of Measures' can be specified, but not both.
-
-
-
Click OK to close the Parameters window.
-
Click Submit.
Note: The Administrator can run the following script to add more placeholder currencies to Oracle Demantra:
Name: 'Create Seed Entities in Demantra
Script:
declare
            retcode number;
begin
            msd_dem_create_dem_seed.create_dem_seed_data(retcode, <p_start_no>,                  <p_num_entities>,<p_entity_type>);
end;
 /
Parameters to be passed to this script:
p_start_no. - starting number of entities to be created (Already units from 100-199 are created)
p_num_entities - number of entities to be created
p_entity_type - 1 (UOM), 2 (CURRENCY), 3 (PRICE LIST), 0 (ALL)
Collecting Price List Data
The Demand Management forecast considers historical demand and causal factors, such as seasonal demand variation, specific promotional events, and price list changes. The price list is dimensioned by item and by time.
Each time you download price list data, the price list data will be cut off at the current forecast horizon end date. As time rolls forward and the corresponding forecast end buckets roll forward, you will not be able to see pricing and revenue data for the new time buckets until you once again download price list data.
Therefore, Oracle recommends that you either:
-
download price list data with each forecasting cycle, or
-
if you would like to download price list data less frequently, extend the forecast horizon beyond the business standard.
For example, if the business standard forecast horizon is 12 months, extend the forecast horizon to 15 months. Generate a forecast, then download price lists. The downloaded price list information will then be sufficient to cover the next three forecasting cycles (cycles 2 through 4). A second price list download will only be necessary after forecasting cycle 5.
Oracle also recommends that when you collect pricing data, set the "Date To" parameter to match the current end of the forecasting horizon so that you do not needlessly collect more data than can be downloaded into Oracle Demantra Demand Management.
To extend the forecasting horizon:
Note: Before running this program, you must specify which price lists you want to collect (Demand Management System Administrator > Setup > Price Lists).
-
From the Business Modeler navigate Parameters > System Parameters > Engine > Lead.
-
Increase the value of 'Lead'.
To run the Price List Conversion Collections:
-
Navigate to the Collection Utility Collections > Oracle Systems > Price List
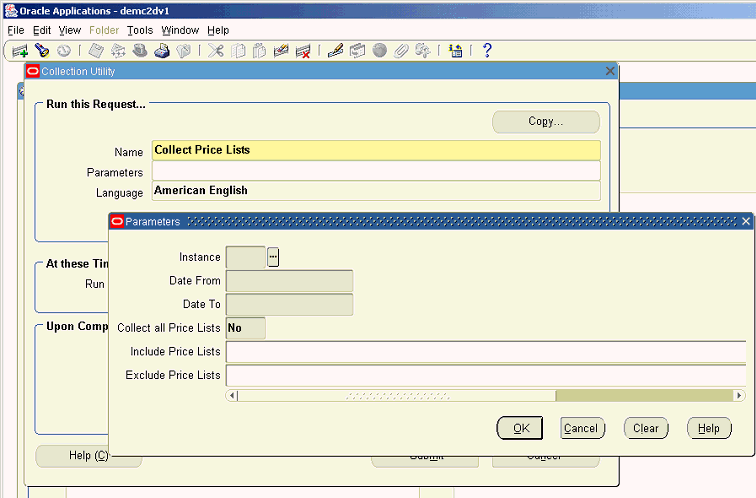
The Collections Utility window appears, with the Collect Price List Conversions program name appearing in the Name field.
-
Specify the Collect Price List program Parameters.
The collection parameters are:
-
Instance. This is the instance code of the source instance, as defined in the Instances form.
-
Date From and Date To. Used to specify a date range for the collection of Price Lists. These fields are mandatory.
-
Collect All Price Lists.
Specifying 'Yes' collects price lists up to the number of seeded series available in Oracle Demantra. The program fails to execute if there are more than the default number of price lists.
Specifying 'No' enables entry of specific Price Lists that can be collected, in the 'Include Price Lists' field.
-
Include Price Lists. Enter Price Lists to be collected, one after another, separated by a comma delimiter.
-
Exclude Price Lists. To exclude certain Price Lists from being collected, specify the list of Price Lists that are not to be collected in the 'Exclude Price Lists' field. Enter Price Lists one after another, with a comma separated delimiter.
-
Either 'Include Price Lists' or 'Exclude Price Lists' can be specified, but not both.
-
Note: The Administrator can run the following script to add more placeholder price lists to Oracle Demantra:
Name: 'Create Seed Entities in Demantra
Script:
declare
            retcode number;
begin
            msd_dem_create_dem_seed.create_dem_seed_data(retcode, <p_start_no>,                  <p_num_entities>,<p_entity_type>);
end;
 /
Parameters to be passed to this script:
p_start_no. - starting number of entities to be created (Already units from 100-199 are created)
p_num_entities - number of entities to be created
p_entity_type - 1 (UOM), 2 (CURRENCY), 3 (PRICE LIST), 0 (ALL)
-
Downloading to Oracle Demantra
Once the EBS collections have been run, data can be downloaded to Oracle Demantra.
Some data can be downloaded automatically through the collection process if desired. The Launch Download option is available in the following collection processes:
-
Shipment and Booking Data
-
Legacy Shipment and History Data
These collections can be downloaded manually if the Launch Download option during collection was set to 'No'.
Other data collections must be downloaded manually. They include:
-
Calendars
-
Price List
-
Return History
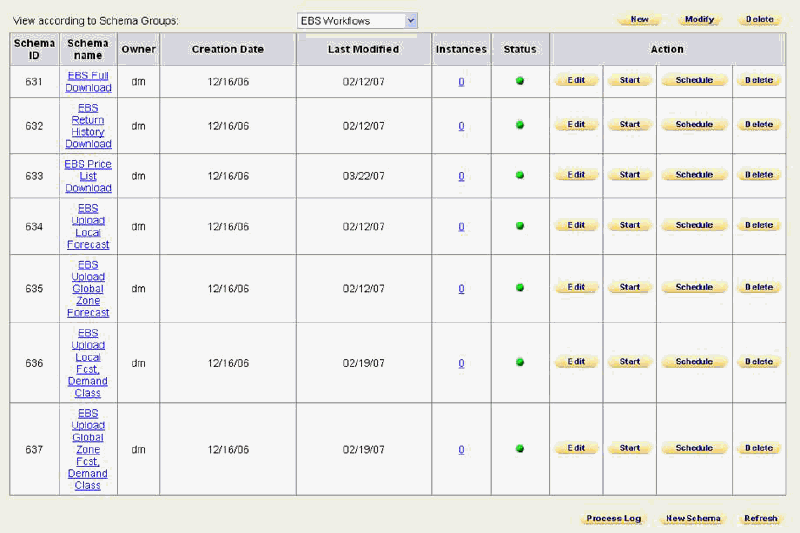
Download can be triggered through the collections process to move collected series, level and reference data into the Oracle Demantra tables. If the options to automatically launch download are not selected during the collection process, the EBS Full Download (EP_LOAD), EBS Return History Download, and EBS Price List Download can be run later to retrieve data from the staging area into Oracle Demantra Tables.
Downloading Calendars
The E-Business Suite contains several types of calendars. Typical calendars include Manufacturing, Gregorian, and Fiscal. These calendars may be changed in the source system. Such changes need to be reflected and synchronized in the Oracle Demantra system.
The Download Calendars concurrent program downloads collected manufacturing and fiscal calendars, in Advanced Supply Chain Planning collections, to Oracle Demantra. Shipment and Booking history collection automatically invokes this program if the Launch Download field is set to 'Yes'.
The following process to run this program manually can be used if there is a need to download calendars to Oracle Demantra without collecting history.
See Time Units.
To download calendars:
-
Navigate to the Collection Utility user interface.
Collections > Oracle Systems > Download Calendars.
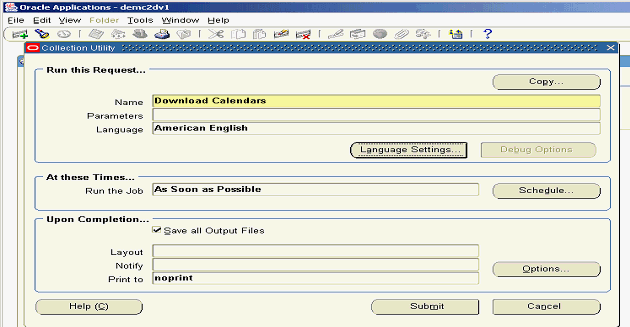
The Collection Utility window with the Download Calendars program name.
-
There are no program parameters. Click Submit.
The calendars specified in the Calendar List are downloaded. See Setting Up the Calendar List.
Downloading Items, Location, Shipping and Booking History
The EBS Full Download workflow, also known as EP_Load, downloads items, location, and shipping/booking history from EBS to Demantra. Within EBS, this is called the EP_LOAD download. This workflow can be started from EBS using the Demand Management System Administrator responsibility > Oracle Demantra Workflow Manager > EBS Full Download workflow.
For members and history series, which are downloaded via the EP_LOAD mechanism, the mode of update is:
-
If there is a new member, it is added in Oracle Demantra.
-
If a member has been deleted in the E-Business Suite source, it stays in Oracle Demantra along with all series data for combinations that include the member. The administrative user must manually delete the member in Oracle Demantra.
-
Series data in the staging area overwrite the series data in Oracle Demantra, for the combinations that are represented in the staging area.
-
Series data in Oracle Demantra for combinations that are not in the staging area are left unchanged.
-
The staging area is erased after the download.
-
All series data in Oracle Demantra, for all combinations, are set to null before the download actions take place.
Downloading Return History and Price Lists
Return History and EBS Price List data is downloaded from EBS to Demantra using the following workflows:
| Workflows | Import Integration Profile |
|---|---|
| EBS Return History Download | Return History |
| EBS Price List Download | EBS Price List |
These workflows can be started from EBS using the Demand Management System Administrator responsibility > Oracle Demantra Workflow Manager.
These two workflows are associated with integration interface profiles, which configure the series, levels, filters and other import details. The purge option for theses integration interface profiles Purge Option is set to Purge all data.
Purging Data Before Import when using Integration Interfaces
The Integration Interface provides the ability to set purge and load options for each series. This controls whether the import integration profile overrides, accumulates, or purges (nulls out) the data for the specified integration profile date range.
For purge details, see the section "Configure Series Load and Purge Options" in the chapter "Demantra Data Tables and Integration Processes".
Import Integration Profiles bring in forecasts such as manufacturing and sales forecasts, as well as data streams from Advanced Supply Chain Planning. For such data streams, setting the Purge Data Before Import profile option to 'Yes' causes the data in Oracle Demantra to be erased before importing the new version of the data stream. For a specific combination's data to be purged, at least one occurrence of the combination is required in the incoming data set. Thus the desired behavior is:
| Jan-07 | Feb-07 | Mar-07 |
| 500 | 600 | 700 |
| Feb-07 | Mar-07 | Apr-07 |
| 800 | 900 | 950 |
Run the Integration Import profile with the Purge Option set to 'Purge All Data.'
| Jan-07 | Feb-07 | Mar-07 | Apr-07 |
| 800 | 900 | 950 |
In the example, the new sales forecast starts in February and not in January. Once the download takes place, Oracle Demantra shows a null value in January.
This contrasts with the following behavior, which is obtained by setting the 'Purge Data Before Import' integration profile option to 'No Purge'.
| Jan-07 | Feb-07 | Mar-07 |
| 500 | 600 | 700 |
| Feb-07 | Mar-07 | Apr-07 |
| 800 | 900 | 950 |
Run the Integration Import profile with the Purge Option set to 'No Purge.'
| Jan-07 | Feb-07 | Mar-07 | Apr-07 |
| 500 | 800 | 900 | 950 |
For more information about using the integration interface to set purge and load options for each series, see Configure Series Load and Purge Options.
Uploading from Oracle Demantra
Oracle Demantra uses workflows to upload forecast and other relevant data to EBS Value Chain Planning applications, or to a legacy planning system. In particular:
-
Forecast and demand priority for Advanced Supply Chain Planning.
-
Forecast and forecast accuracy for Inventory Optimization.
-
Forecast for Strategic Network Optimization.
-
Intermittent demand attributes for Inventory Optimization (used for the Safety Stock calculation).
Oracle Demantra Demand Management provides the following workflows:
-
EBS Upload Local Forecast
-
EBS Upload Global Zone Forecast
-
EBS Upload Local Forecast, Demand Class
-
EBS Upload Global Zone Forecast, Demand Class
-
The upload forecast workflow schema name: APPS is hard coded.
-
The global forecast is output at the “Customer/All Org” hierarchy level.
-
Organizations may belong to multiple instances.
-
Oracle Demantra calculates functional outputs for 26 weeks when the base time unit is 'Week', or for one year when the base time unit is 'Month'. See Setting and Modifying the Base Time Unit.
The profile parameters include:
-
Horizon range and forecast output levels defined as part of integration profile
-
Multiple data series tied to export integration profiles.
The data series internal names must follow the naming convention:
-
Forecast: FCST_
-
Priority: PRTY_
-
Forecast accuracy MAPE: ACRY_MAPE_
-
Forecast accuracy MAD: ACRY_MAD
-
Destination key: DKEY_
-
User-created series that users want to expose to downstream applications, such as Oracle Inventory Optimization, Oracle Advanced Supply Chain Planning, and Oracle Strategic Network Optimization, need to respect the above naming conventions and need to be added to user-created export integration profiles.
Note: The Upload Forecast workflow schema name: APPS is hard coded.
The following integration profiles are manually launched as part of a Workflow after the forecast is approved:
-
Local Forecast
-
Series: Demand Priority, Final Forecast, Mean Absolute Pct Err, Item Destination Key, Organization Destination Key
-
Output Levels: Item, Organization, Week
-
-
Global Zone Forecast
-
Series: Demand Priority, Final Forecast, Mean Absolute Pct Err, Item Destination Key
-
Output Levels: Item, Zone, Week
-
-
Local Forecast with Demand Class
-
Series: Demand Priority, Final Forecast, Mean Absolute Pct Err, Item Destination Key, Organization Destination Key
-
Output Levels: Item, Organization, Week, Demand Class
-
-
Global Zone forecast, Demand Class
-
Series:Demand Priority, Final Forecast, Mean Absolute Pct Err, Item Destination Key
-
Output Levels: Item, Zone, Week, Demand Class
-
Using Alternate MAPE
In the four pre-configured integration profiles listed above, the in-sample MAPE series Mean Absolute Pct Err series is used. This series is automatically populated by the engine and due to its availability serves as the default MAPE value used. A more accurate out-of-sample MAPE value can be achieved but requires additional steps to be followed.
-
At the end of every planning cycles approved forecast should be archived and frozen, this is done by executing the Archive Forecast workflow
-
As new history becomes available archived forecast results are compared to actual historical results with the output generated as out-of-sample MAPE
-
Out of sample MAPE can be seen in series 1 Month Fcst Lag WMape
-
Results of this series can be saved in the Database using Batch Logic Engine workflow step. The Batch logic engine evaluates series including both server and client expression calculations and saves the resulting values. The Batch Logic Engine should be configured and executed at the level at which the weighted MAPE is most useful.
-
If available a series displaying the out of sample MAPE values can replace the series Mean Absolute Pct Err above
Approval and Upload Process
During implementation, the Administrator configures the approval process by specifying a Reviewer/Business Owner who is responsible for final approval of the forecast. One Business Owner (Final Approver) has final approval responsibility for the forecast produced by their group of Analysts. Approval is accomplished by use of a Final Approval Series by User Group and by workflow notifications. The Demand Forecast Workflow manages the planning cycle and calls the Planning Group Workflow that is used in the notification process.
Oracle seeds a user group setup with dummy users. The Administrator edits this group to add the names of the Analysts whose forecasts need approval from the Final Approver. The Administrator also edits a seeded Planning Group Workflow to specify the ID of the Final Approver notified when the Analysts' forecasts are ready for review. The seeded workflow can be used as a template if additional group workflows are needed. The Time Property is set to send an alert after four days if any Analysts have not completed their review, and sends an alert and times out after five days if any Analysts still have not completed their review.
This workflow:
-
Notifies the Final Approver and Analysts that the Forecast is available
-
Polls the users to check whether they are 'Done'.
-
After four days, if any Analysts are not done, a messages is set to the Final Approver.
-
After five days, if any Analysts are still not done, a message is again sent to the Final Approver, and the workflow times out. Processing returns to the calling workflow named: 'Demand Forecast'.
-
If all Analysts check 'Done.' before the time out occurs, the Final Approver is notified that the Analysts' forecasts are ready for review. Processing returns to the calling workflow named: 'Demand Forecast'.
-
Analysts are notified when a forecast is available for review and modification. After their modifications are complete, they select 'Done' in their My Tasks notification. The Workflow polls the user's status, and then notifies the Final Approver when all Analysts are done. If one or more Analysts have not finished their approvals one day prior to the due date, a reminder is sent to the Analysts and Final Approver. On the due date, if any Analyst has not finished their approval process, an exception message is sent to the Final Approver and Analysts to the effect that one or more Analysts have not completed their forecast adjustments.
The Final Approver can lock the forecast by checking the F. Approve check box. After review, the Final Approver either approves or disapproves the forecast. If not approved, the Final Approver contacts the Analysts whose adjustments are in question. This step is not part of the Workflow. If approved, the Final Approval check box is checked and the forecast locked. A notification is sent to the Administrator and the Analysts to the effect that the forecast is available for upload. The Administrator uploads the forecast and other relevant data to the Planning Server.
-
After EP_LOAD completes successfully, the Final Approval and Final Approve By series are set to null, the Forecast is run, and a notification is sent to the Analysts and Final Approver with a Due Date specified.
-
Analysts analyze the forecast, make modifications and, when finished, select 'Done' in MyTasks for the forecast available task.
-
The Workflow polls the status of all Analysts in the User Group. When all Analysts have completed their approvals, a notification is sent to the Final Approver.
-
If all Analysts have not completed their adjustments, on the day before the due date, a reminder message is sent to the Analysts and Final Approver.
-
On the due date, if any Analyst has not completed their approval process, an exception message stating: 'One or more Analysts have not completed their adjustments' is sent to the Final Approver.
-
-
4. The Final Approver can lock the forecast at any time by checking the 'Final Approval' column. After review, the Final Approver approves the forecast by selecting 'Done' in MyTasks for the forecast notification. For one level review:
-
If the Final Approver approves the forecast, a notification is sent to the Analysts and to the Administrator to initiate the upload.
-
If the Final Approver does not approve the forecast, s/he contacts the Analyst(s) whose adjustments are in question. This is not a Workflow step; it is a business process.
-
If the Administrator does not check the box in My Tasks within the specified time range, the Workflow times out.
-
-
When the notification from the Final Approver is received, the Administrator uploads the forecast and other relevant information, for example: Demand Priority, Forecast Accuracy.
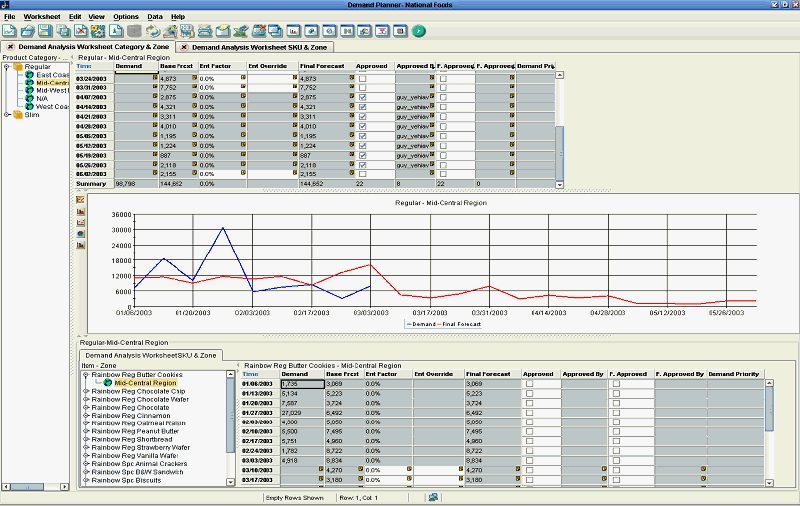
Line Of Business
When an implementation includes multiple business units, the business units require the batch engine to be executed at different times. Since every batch engine run creates a new forecast for the entire population, this could cause issues if the batch engine runs concurrently for different lines of business. A tailored process supports generating forecasts at different intervals across different parts of the business.
This process should be used when the following conditions apply:
-
There is a need for two or more distinct forecast cycles.
-
The populations requiring different forecast cycles are easily identifiable.
-
The population can be defined either as a member, or as members of one aggregation level, such as Segment, Organization, or Brand.
Important: The LOB engine, while smaller than the batch engine, can still be resource intensive and should not be run when users are in the system. The LOB engine should be activated and scheduled during user downtime and when the simulation engine is not on.
Line of Business Solution Engine Process
-
Define the population participating in the LOB batch run.
-
Exclude all other populations from LOB batch run.
-
Run the batch engine to generate a new forecast for the LOB population. Store the new forecast as a new forecast version.
-
Copy the previous forecast version to the new forecast version for the non LOB population
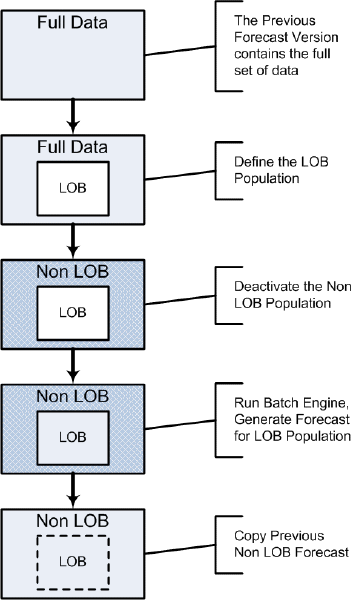
Forecasting by Line of Business (LOB)
Import:
Existing APS and Oracle Demantra capabilities accommodate forecasting by line of business (LOB).
You can run Collections for a collections group. This restricts the uploaded forecast to the set of organizations that corresponds to a line of business.
You can download for a specific line of business by modifying the data security of the seeded import integration profiles. For data downloaded via EP_LOAD, which does not have a mechanism to control data scope, a business process is provided to stagger the timing of collections for the different lines of business.
Caution: There is a risk that if multiple lines of business run collections very close in time to each other, a single EP_LOAD run may pull in data from multiple lines of business.
The Oracle Demantra forecasting engine will run forecasts only for combinations inside of a line of business by invoking the LOB process. Oracle provides user data security for LOB-specific access to data.
A predefined stored procedure called from the LOB Process workflow updates database column do_forecast so that only combinations within the LOB are forecast and run the forecasting engine. The stored procedure also copies existing forecast numbers in the non line-of-business combinations into the new forecast version that is created by the running the forecast engine.
Export:
-
Upload data for a line of business only by modifying the data security of seeded export integration profiles.
-
An administrator user procedure creates export integration profiles with level value access filtered down to LOB scope.
See Creating a Data Export Profile.
LOB Procedures
For the initial download, the DM/ SOP System Administrator specifies the organizations to be collected and downloaded during Shipment & Booking History Collection & Download with the Internal Sales Order parameter set to NO. When the processes complete, s/he logs into Business Modeler to add the name(s) of the LOB(s) to the preseeded LOB Level and associate the LOB(s) with the organizations that rollup to the LOB either by using the edit tools with a worksheet or Member Management. After the LOB is setup, Shipment & Booking History Collections & Download are rerun separately for each LOB, according to its planning cycle, with the ISO parameter set to YES. Users are given access to the LOB or restricted from accessing the LOB via User Security. The DM/SOP Sys Admin modifies the Line of Business - Forecast workflow and the Planning Group workflow for each LOB.
.
Initial setup for LOBs with ISOs:
-
Set up Instance and include organizations that are part of an LOB
-
Run Standard Collection and set up calendars, price lists and new products
-
Run Shipment and Booking History Collection with the 'Collect Internal Sales Orders' parameter UNCHECKED for the initial Download
-
If the Admin mistakenly checks the 'Collect Internal Sales Orders' parameter for the initial Download, the Order Alignment feature, available in the first release of SOP, can be used to purge the series.
-
-
After Download, add the LOBs as a member of the LOB level and associate the relevant organizations
-
Assign the LOB to the relevant users via User Security in Business Modeler
-
Ensure the users with access to the LOB are in the same User Group
-
Create a copy of the Planning Group workflow with the following changes
-
Select the User Group given access to the LOB as the recipient for the Group Step
-
Enter the LOB's Final Approver's ID for the Completed/Incomplete steps
-
-
Rerun Shipment and Booking History Collection with 'Collect Internal Sales Orders' parameter checked
-
Edit the SetLOBParameters' step in the Line of Business - Forecast workflow and set the parameters
-
Modify the Approval step in the Line of Business – Forecast workflow and enter the schema id of the relevant Planning Group workflow.
-
Start the Line of Business – Forecast workflow
The following steps are done by the DM/SOP Sys Admin to setup a component for an LOB and handle ISOs.
DM/SOP System Administrator Detailed LOB Setup
-
Specify the organizations of the LOB to be collected and downloaded when setting up Instances. For ease of use, Collection Groups can be used, but are not required, to group the LOB's organizations.
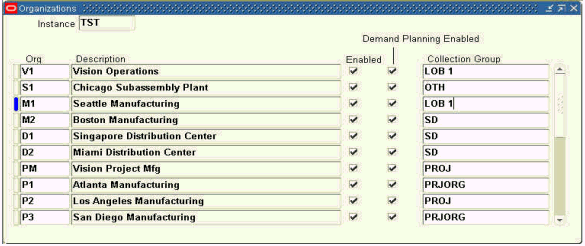
Selecting Organizations of LOB 1
-
Setup calendar, price lists and new products.
-
Components with multiple LOBs must use the same base time bucket.
-
-
Run Shipment & Booking History collections for the Organizations specified in Step 1 with the Collect Internal Sales Order parameter set to NO:
-
If the Launch Download parameter is set to YES, proceed to Step 4
-
If Launch Download = NO, run the EBS Full Download workflow
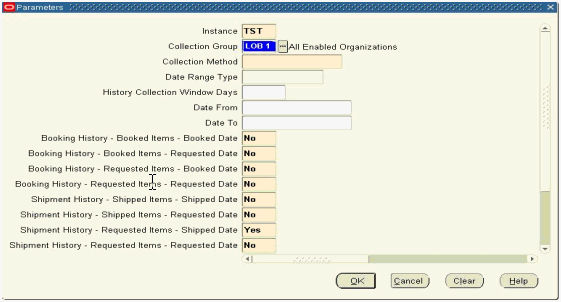
LOB Collection & Download
-
-
Open a worksheet with Line of Business and Organization as the selected Aggregation Levels
-
Right click Line of Business>New Line of Business
-
Enter the LOB's name and click Create
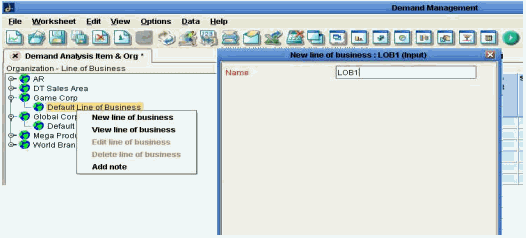
Add New Member to LOB Level
-
For each Organization that is a member of the LOB, right click the Organization>Edit Organization
-
Select the LOB from the dropdown list for Line of Business
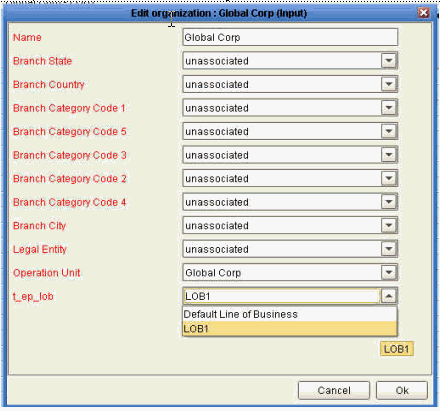
Assigning an Org to an LOB
-
-
Assign the LOB(s) to the relevant users via User Security in Business Modeler
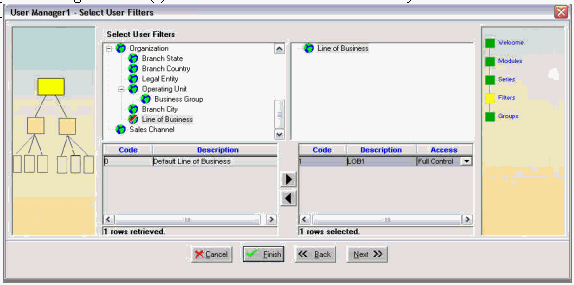
Assigning LOB to Users
-
Ensure the users with access to the LOB are in the same User Group with the Business Modeler menu Security>Modify Group
-
For each LOB, start Workflow Manager and create a copy of the Planning Group workflow. The recommendation is that the workflow name contains the LOB for which it is used, e.g. LOB1 Planning Group workflow. The following parameters must be changed::
-
The User Group selected as the recipient in the Group Step must be the Group given access to the LOB
-
Final Approver's ID for the Completed/Incomplete steps must be the user that approves the forecast for the LOB
-
-
For each LOB, using Workflow Manageredit Line of Business – Forecast workflow and change the parameters for step 'SetLOBParameters'. The parameter settings are:
Parameter 1 - should be comma (,) separated list of member descriptions.
Parameter 2 - should be level title..
-
Edit the Approval process step in this workflow and enter the parameters to identify the Planning Group workflow for the specific LOB.
-
The Approval step in the workflow must have the LOB's Planning Group workflow schema number as the schema_id value
-
-
Run Shipment & Booking History collections again for the Organizations or Collection Groups in Step1 with the Collect Internal Sales Order parameter set to YES:
-
If Launch Download = NO, run the EBS Full Download Workflow
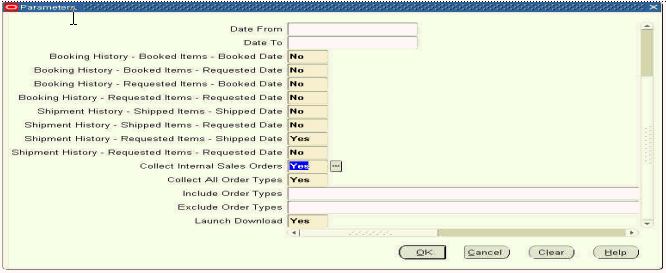
Collect Internal Sales Order Parameter
-
DM/SOP System Administrator Post Initial Setup Process
-
The Collection & Download process is run for the specific LOB by specifying the Organizations or Collection Group that comprise the LOB in Shipment & Booking History collections
-
Run the Line of Business - Forecast workflow
-
Run LOB Reset workflow if the forecast workflow errors out
-
-
Upload the forecast using the LOB specific Upload workflow when approval process completes
-
Archive the forecast for all LOBs
-
For LOBs with different planning cycles, the forecast is archived on the more frequent schedule
-
A business process must be put in place to manage the archiving schedule to avoid conflicts for LOBs with different planning cycles
-
Troubleshooting the Line of Business Forecast Workflow
If problems occur during the LOB Process, the next attempt to run the Line of Business Forecast Workflow will not proceed. Due to the LOB process deactivating the non-LOB combinations, it is not desired to have the next LOB Process begin without successfully completing the previous run.
To remedy this, run the LOB Reset workflow. This workflow computes whether combinations should be active, and resets deactivation of the non-LOB population. Since this may take some time on larger environments LOB Reset is not automatically run as part of the Line of Business Forecast Process.
More information regarding the Line of Business Forecast Process can be seen in the Line of Business Forecast Workflow and in the table integration_lob_error.
Configure to Order
Configure to order products are configurations of components depending on the customer's preference. In most cases, this includes a selected base product (the model) and multiple optional (the options) and mandatory components. To use the Configure to Order feature in Demantra with EBS data, a number of parameters and profile options need to be set. The collection process exports the standard series with the addition of the BOM. A number of upload workflows are available to upload the Demantra forecast dimensions, organization and period back to EBS.
This section includes the following information about CTO:
-
Demantra Setup
-
Oracle EBS Setup
-
Collecting Data from EBS to Demantra
-
Uploading Demantra Plans and Factors to EBS
-
Running CTO Procedures
-
Workflows and Integration Data Profiles
-
Associating Multiple Price Lists with a CTO Worksheet
-
Recurring Item with Multiple Parents in a BOM
-
Importing CTO Data from a Non-Oracle System
Information about the functional aspects of configure to order is in Oracle Demantra Demand Management User's Guide.
Demantra Setup
A number of Demantra settings need to be set to support CTO functionality. They include:
-
CTO_Calc_PP_Forecast
-
CTO_Enable_Worksheet_Calculations
-
CTO_History_Periods
-
CTO_Planning_Percentage_Choice
All of the CTO parameters are accessible through the Business Modeler. From the Parameters menu, choose System Parameters, then System tab.
CTO_Calc_PP_Forecast
The CTO_Cal_PP_Forecast parameter specifies whether you want to forecast planning percentages. The default is No.
CTO_Enable_Worksheet_Calculations
This parameters controls whether planning percentages are automatically calculated when a worksheet is updated. The default is Yes.
CTO_History Periods
CTO_HISTORY _PERIODS specifies the number of historical periods to average for the history planning percentage calculation. The default is 0. If set to 0, then no historical dependent demand will be generated. It is recommended to keep the planning percentage calculation period shorter than 52 weeks as planning percentages from an average of 52 or even 26 weeks ago may be very different than current values. If options generally have demand every week, a calculation span of 26, 13, or even 8 periods may be more accurate. If options demand will be fairly sparse, setting the parameter to 52 or 26 weeks may be appropriate.
CTO_Planning_Percentage_Choice
CTO_PLANNING_PERCENTAGE_CHOICE specifies the planning percentage to use when series Planning Percentage Choice calculates the dependent information in Forecast Dependent Demand.
-
The default is Existing; that means to use the downloaded planning percentages from Oracle e-Business Suite that are in series Planning Percentages - Existing.
-
The other option is to have Oracle Demantra calculate planning percentages based on history and forecast of options.
Oracle EBS Setup
A number of Oracle EBS profiles need to be set to support CTO functionality. They include:
-
MSD_DEM: Calculate Planning Percentage
-
MSD_DEM: Explode Demand Method
-
MSD_DEM: Include Dependent Demand
-
MSD_DEM: Two-Level Planning
Oracle EBS profile options can be set by using the Advanced Supply Chain Planner, Standard responsibility, Other, then Profiles.
MSD_DEM: Calculate Planning Percentage
MSD_DEM: Calculate Planning Percentage: Use this profile option to specify upon what entities to calculate planning percentages. This occurs when system parameter CTO_PLANNING_PERCENTAGE_CHOICE instructs Oracle Demantra to calculate planning percentages.
Do not change the setting of this profile option after the initial download or invalid combinations may result:
-
The typical reason for changing this value is to correct a setup error.
-
In that case, delete the invalid combinations and re-download. See Implementation Considerations.
The default is Null. Valid vales are:
-
Yes for Consume & Derive Options and Option Classes: Include the sales history of options and option classes
-
Yes for Consume & Derive Options only: Include the sales history of options to model and removes option classes. Use it for assemble to order situations.
-
Yes for all the Options and Option Classes: Include the sales history of options and option classes including optional components of product families able to be forecasted that have Forecast Control None.
Note: It is recommended to set this parameter to Yes, for All Options and Option Classes before running shipping and booking history for Configure to Order.
MSD_DEM: Explode Demand Method
MSD_DEM Explode Demand Method: Use this profile option to specify where to calculate dependent demand and derive planning percentages. Valid values are
-
Organization Specific: Calculate dependent demand and derive planning percentages at each organization.
-
Global: Calculate planning percentages at the global level and apply to all organization. The default is Organization Specific.
MSD_DEM: Include Dependent Demand
MSD_DEM: Include Dependent Demand: Use this profile option to specify whether the collections process should include configure to order structures, demand, and history. Valid values are:
-
Yes: Include configure to order structures, demand, and history
-
No: Do not include configure to order structures, demand, and history. This is the default
MSD_DEM: Two-Level Planning
MSD_DEM: Two-Level Planning: Use this profile option to specify that way that the collections process should collect family members and their sales histories. Valid values are:
-
Exclude family members with forecast control 'None'. This is the default. Collect:
-
Only the product family members and their sales history from the organization specified in profile option MSD_DEM: Master Organization for which the forecast control is set to Consume or Consume and derive.
-
The master organization product families from the organization specified in profile, MSD_DEM: Master Organization for which the forecast control is set to Consume or Consume and Derive and the planning method for the product family is set to other than Not Planned.
-
All the items and their sales history--even if they are not related to a product family--for all the enabled organizations for which the forecast control is Consume or Consume and Derive. These items are rolled up to the pseudo-product family Other.
-
-
Collect all family members and their sales histories. Collect:
-
The same entities as setting Exclude family members with forecast control 'None'.
-
All the product family members and their sales history from the organization specified in profile option MSD_DEM: Master Organization regardless of the forecast control, as long as the product family forecast control is Consume or Consume and Derive and the planning method for product family and all of its members are set to other than Not Planned.
-
Additional Implementation Considerations
The series Final Plng Pct, is a client expression and is accurate at the lowest level, for example, Item-Org. When viewing worksheets at levels higher than the lowest level, use the series Final Plng Pct – Aggregate.
The concurrent program Purge CTO Data deletes all data from the configure to order general level related tables. However the items are not deleted from the Oracle Demantra Demand Management-related tables. This program, only available as a Request, is used when an undesired option was selected from Profile MSD_DEM: Calculate Planning Percentage option and a download run. Run the purge is run-- the profile option value changes to your desired option-- and re-execute the download.
Run the workflow CTO Calcs after the forecast is calculated either as part of a workflow or manually as the dependent demand calculations are done after the forecast has been generated. This workflow runs automatically by the seeded workflows for configure to order. However, be aware of the workflow run order in case you have customizations.
In a configure to order worksheet, if an option class, for example Harddrive, is filtered out of the worksheet, it's children are filtered out also, for example 120gig Harddrive, 200gig Harddrive.
If an option class is not in a worksheet but the independent demand of its base model is changed, the changes are propagated to the option class and its children.
If an option class is in the worksheet but its children are not, changes to the option classes dependent demand are propagated to its children.
If an option class is the child of another option class and its parent's dependent demand is changed, the changes must be propagated to its children
In worksheets, you can turn a Summary Row in the worksheet by configure to order level on and off.
You can use subtab notes at the configure to order level.
Review upload forecast processes, select an appropriate one, and develop a procedure for initiating it.
Change worksheet filters to appropriate values after implementation.
Collecting Data from EBS to Demantra
Download - e-Business Suite To Demantra
The standard EBS-Demantra collection process brings configure to order data into Oracle Demantra. It:
-
Brings history streams, level members, and bill structures.
-
Runs Collect BOM when the profile option MSD_DEM: Include Dependent Demand has a value of Yes, which brings the following information to Oracle Demantra:
-
Item
-
Parent Item
-
Base Model
-
Organization
-
BOM Eff Start Date
-
BOM Eff End Date
-
Plng Pct- Existing
-
-
Downloads the planning percentages from the source when the CTO Download Existing Planning Pcts is run. You can also run this workflow by itself between full downloads.
Oracle Advanced Supply Chain Planning loads and processes the data for Consensus Total Demand and Planning Percentage information for models and their options as follows:
-
Model Forecast Control = Consume or Consume & Derive
-
Options Forecast Control = None
-
Oracle Advanced Supply Chain Planning explodes the forecast from model to option using the Oracle Demantra Demand Management planning percentages
Oracle Advanced Supply Chain Planning loads and processes the data for Consensus Total Demand and Planning Percentage information for product families and their children as follows:
-
Model Forecast Control = Consume or Consume & Derive
-
Options Forecast Control = Consume or Consume & Derive
-
Oracle Advanced Supply Chain Planning explodes the option's Consensus Total Demand to find its independent and dependent demand.
Uploading Demantra Plans and Factors to EBS
Data that moves from Oracle Demantra to Oracle e-Business Suite includes:
-
Consensus Total Demand, Final Plng Pct, MAPE CTO, and Demand Priority for all models and options to Oracle Advanced Supply Chain Planning
-
Independent Demand for options with a forecast control of NONE to Oracle Advanced Supply Chain Planning; these options do not have dependent demand
-
Consensus Total Demand & MAPE CTO for base models to Oracle Inventory Optimization
To move configure to order data from Oracle Demantra into Oracle e-Business Suite, use upload workflows:
-
For uploading Consensus Forecast and Final Forecast Dependent Demand, MAPE CTO, and Demand Priority (information for models and their options), use the CTO Upload workflows
-
For uploading product family and item level Consensus Forecast and Product Family ratios, MAPE CTO, and Demand Priority (information for product families and their children), use the CTO Upload Product Family workflows
When you upload planning percentages to Oracle Advanced Supply Chain Planning, you do so at the level Item-Organization for items with item attribute Forecast Control set to None. Oracle Advanced Supply Chain Planning uses the Oracle Demantra planning percentages to explode demand from model to option class to model.
The publishing process will export planning percentages at either an aggregated level or by "top level" model, based on the value of the profile option "MSD_DEM: Publish CTO Forecast Percentage by Top-level Model. If this option is set to No (the default), then planning percentages for each option will be aggregated across base models during export. If it is set to Yes, then planning percentages will not be aggregated and will instead be exported by top-level model.
Note: Planning percentages for items that have a Forecast Control of “none” will always be aggregated when exported from Demantra, regardless of how this profile option is set.
When you upload dependent demand to Oracle Advanced Supply Chain Planning, you do so at levels Item, Organization, Zone, and Demand Class for items with item attribute Forecast Control set to Consume or Consume & derive.
Data in the seeded export workflows matches the worksheet data when viewed at the levels Item, Organization, Week, Demand Class, and Zone.
Running CTO Procedures
If standalone running desired, develop procedure for initiating workflow CTO Download Existing Planning Pcts.
Review upload forecast processes, select an appropriate one, and develop a procedure for initiating it.
Change worksheet filters to appropriate values after implementation.
Calculating Forecast and Dependent Demand in Demantra
Run the archive workflow to archive the prior period forecasts.
CTO Calculation runs as part of the Forecast Calculation & Approval workflow.
The CTO Forecast Calculation process generates the forecast for the history.
CTO Calculate Planning Percentages process calculates planning percentages. Its parameters determine whether planning percentages based on an average of history are calculated
-
CTO_HISTORY_PERIODS
-
CTO_PLANNING_PERCENTAGE_CHOICE
Note: You can improve performance of the Calculate Dependent Demand workflow using the parameters listed in the table below. These parameters control the number of jobs that run and how many jobs run at the same time. To define these parameters, open the Calculate Dependent Demand workflow for editing and then open the Calculate Dependent Demand stored procedure step. In the Properties page, click Add for each parameter you want to define and simply enter a value. Row 1 corresponds to Parameter 1, row 2 to Parameter 2, and so on. To accept the default value for a parameter, leave the row null. These parameters can be used with either Oracle 10g or 11g.
| Parameter # | Description | Default Value |
| 1 | Number of slices/data partitions. Leave null (the default) to set equal to the number of base models. | null |
| 2 | Maximum number of processes (jobs) to run at a time | 4 |
| 3 | Sleep interval (i.e. how often the system checks the queue,) This value is in seconds. | 10 |
| 4 | Log level. Valid values are between 0 and 5 where 5 provides the most data. | 0 |
Calculating Forecast for Line of Business in Oracle Demantra
Configure the line of business population by setting Business Modeler parameters:
-
LOB Population Level
-
LOB Population Members
Calculate Dependent Demand for LOB is run as a step in Line of Business - Forecast workflow. It runs:
-
CTO Forecast Calculation for LOB process: Generates the forecast for the history series
-
CTO Calculate Planning Percentages for LOB: Calculates planning percentages. Its parameters determine whether planning percentages based on an average of history are calculated
-
CTO_HISTORY_PERIODS
-
CTO_PLANNING_PERCENTAGE_CHOICE
-
Workflows and Integration Data Profiles
There are three types of workflows associated with CTO. They are:
-
Procedural workflows that perform specific functions like calculating dependent demand, archiving or stopping batch processes.
-
Import workflows that bring EBS existing dependent demand into Demantra. The main import workflow is the CTO Download Existing Planning Pcts workflow which calls the other import workflows.
-
Upload workflows that export combinations of Demantra data to EBS. In some cases, there are two integration data profiles associated upload workflows. In these cases, the workflows first call the independent demand integration data profile, and then the dependent profile.
There are six integration interfaces that support the CTO integration workflows. They are:
-
CTO: Supports the import integration data and level integration profiles.
-
CTO Consensus Fcst - Global: Supports the CTO Consensus Fcst - Global export integration data profiles.
-
CTO Consensus Fcst - Local: Supports the CTO Consensus Fcst - Local export integration data profiles.
-
CTO Consensus Planning Percentage: Supports the CTO Final Planning Percentage export integration data profiles.
-
CTO Global Forecast: Supports the CTO Global export integration data profiles.
-
CTO Local Forecast: Supports the CTO Local export integration data profiles.
| Workflows | Integration Data Profile | Description |
|---|---|---|
| Calculate Dependent Demand | Calculates the dependent demand and planning percentage calculation processes. It is called by the Forecast Calculation & Approval workflow. The associated batch routines can be stopped using the Kill CTO Batch Jobs workflow. | |
| Calculate Dependent Demand for LOB | Calculates the dependent demand and planning percentage for lines of business. It is called by the Line of Business Forecast Workflow. The associated batch routines can be stopped using the Kill CTO Batch Jobs workflow. | |
| CTO Archive Dependent Demand | Archives the prior period forecasts. This workflow is called by the Forecast Calculation & Approval Process workflow. | |
| CTO Download Existing Planning Pcts | Downloads existing planning percentages to Demantra configure to order and is called by process EBS Full Download. It calls Import CTO Base Model, Import CTO Level, and Import CTO Data If running standalone desired, develop procedure for initiating this workflow. |
|
| CTO Upload Consensus Forecast - Global, Period | CTO Consensus Fcst - Global 445 |
|
| CTO Final Planning Percentage - Global (445) |
|
|
| CTO Upload Consensus Forecast - Org, Period | CTO Consensus Fcst - Org, 445 |
|
| CTO Final Planning Percentage - Local (445) |
|
|
| CTO Upload Consensus Forecast - Org, Week | CTO Consensus Fcst - Org, Week |
|
| CTO Final Planning Percentage - Local (Week) |
|
|
| CTO Upload Consensus Forecast - Zone, Period | CTO Consensus Fcst - Zone, 445 |
|
| CTO Final Planning Percentage - Zone, 445 |
|
|
| CTO Upload Consensus Forecast - Zone, Week | CTO Consensus Fcst - Zone, Week |
|
| CTO Final Planning Percentage - Zone, Week |
|
|
| CTO Upload Global Forecast - Demand Class, Week | CTO Global Fcst - DC, Week |
|
| CTO Global Dependent Demand - DC, Week |
|
|
| CTO Upload Global Forecast - Zone, Demand Class, Week | CTO Global Fcst - Zone, DC, Week |
|
| CTO Global Dependent Demand - Zone, DC, Week |
|
|
| CTO Upload Global Forecast - Zone, Week | CTO Global Dependent Demand - Zone, Week |
|
| CTO Upload Local Forecast - Org, Demand Class, Week | CTO Local Fcst - Org, DC, Week |
|
| CTO Local Dependent Demand - Org, DC, Week |
|
|
| CTO Upload Local Forecast - Org, Week | CTO Local Fcst - Org, Week |
|
| CTO Local Dependent Demand - Org, Week |
|
|
| CTO Upload Product Family Consensus Forecast - DC, Week | CTO Global Fcst - PF, DC |
|
| CTO Consensus Fcst - PF, DC |
|
|
| CTO Upload Product Family Consensus Forecast - Org, DC, Week | CTO Global Fcst - PF, Zone, DC |
|
| CTO Consensus Fcst - PF, Org, DC |
|
|
| CTO Upload Product Family Consensus Forecast - Org, Week | CTO Consensus Fcst - PF, Org |
|
| CTO Upload Product Family Consensus Forecast - Zone, DC, Week | CTO Consensus Fcst - PF, Zone, DC |
|
| CTO Upload Product Family Consensus Forecast - Zone, Week | CTO Consensus Fcst - PF, Zone |
|
| CTO Upload Product Family Global Forecast - DC, Week | CTO Global Fcst - PF, DC |
|
| CTO Upload Product Family Global Forecast - Zone, DC, Week | CTO Global Fcst - PF, Zone, DC |
|
| CTO Upload Product Family Global Forecast - Zone, Week | CTO Global Fcst - PF, Zone |
|
| CTO Upload Product Family Local Forecast - Org, DC, Week | CTO Local Fcst - PF, DC |
|
| CTO Upload Product Family Local Forecast - Org, Week | CTO Local Fcst - PF |
|
| Import CTO Base Model | Import_CTO_BASE_MODEL (Level Profile) | Called by the CTO Download Existing Planning Pcts workflow, which downloads existing planning percentages to Demantra through the EBS Full Download process. The CTO Download Existing Planning Pcts workflow calls the following workflows in order: Import CTO Base Model, Import ChildCTO Level, Import CTOLevel, and then Import CTO Data. Levels: Base Model |
| Import CTO Child | Import_CTO_Child (Level Profile) | Called by the CTO Download Existing Planning Pcts workflow, which downloads existing planning percentages to Demantra through the EBS Full Download process. The CTO Download Existing Planning Pcts workflow calls the following workflows in order: Import CTO Base Model, Import ChildCTO Level, Import CTOLevel, and then Import CTO Data. Levels: CTO Child |
| Import CTO Data | Import_CTO_DATA | Called by the CTO Download Existing Planning Pcts workflow, which downloads existing planning percentages to Demantra through the EBS Full Download process. The CTO Download Existing Planning Pcts workflow calls the following workflows in order: Import CTO Base Model, Import ChildCTO Level, Import CTOLevel, and then Import CTO Data.
|
| Import CTO Level | Import CTO_Level (Level Profile) | Called by the CTO Download Existing Planning Pcts workflow, which downloads existing planning percentages to Demantra through the EBS Full Download process. The CTO Download Existing Planning Pcts workflow calls the following workflows in order: Import CTO Base Model, Import ChildCTO Level, Import CTOLevel, and then Import CTO Data. Levels: CTO |
| Import CTO Option Price | Import_CTO_OPTION_PRICE | Downloads the options' prices from the source. It is called by EBS Price List Download workflow. Series: Option Price Levels: Item |
| Kill CTO Batch Jobs | Stops any CTO batch jobs currently running such as the Calculate Dependent Demand procedures. |
Associating Multiple Price Lists with a CTO Worksheet
Only one price list is supported for CTO. Usually the first price list collected from EBS is loaded to t_ep_cto_data along with sales_data. So if a user wants to see CTO data in another price list (say PL1), then the following steps should be performed.
-
Find the column in sales_data, where the price list information for PL1 is being stored. This mapping can be found by looking at the definition of the display unit 'PL1'. (ex. Assume price list PL1 has been collected from EBS and mapped to the column EBSPRICELIST112).
-
Create a new series on t_ep_cto_data. The database column name should be set to the column name found in Step 1 above. (ex. New series 'CTO PL1' is created on t_ep_cto_data with database column name EBSPRICELIST112).
-
Create a new import data profile. The series created in Step 2 above should be selected. All other details will be similar to data profile IMPORT_CTO_OPTION_PRICE. (ex. New data profile 'CTO PL1 IMPORT' is created, and the staging table name is BIIO_CTO_PL1_IMPORT).
-
Write a new stored procedure in Demantra to copy THE price list data of 'PL1' from the table MSD_DEM_PRICE_LIST to the new import integration staging table created in Step 3 above. For example, create a new stored procedure to copy data from msd_dem_price_list to BIIO_CTO_PL1_IMPORT. The following is a sample insert statement for copying data:
INSERT INTO BIIO_CTO_PL1_IMPORT ( SDATE, LEVEL1, EBSPRICELIST112 ) SELECT SDATE, LEVEL1, EBSPRICELIST112 FROM MSD_DEM_PRICE_LIST WHERE EBSPRICELIST112 IS NOT NULL )
-
Modify the 'EBS Price List Download' workflow.
-
Add a new STORED PROCEDURE STEP as the start step. The step should call the stored procedure created in Step 4 above.
-
At the end, add a TRANSFER STEP for the import data profile created in Step 3 above.
-
-
After the Price List Collection has been run for PL1 from EBS, the staging table MSD_DEM_PRICE_LIST will have data for the price list PL1. When the workflow 'EBS Price List Download' starts, it:
-
firsts copies the data of 'PL1' from MSD_DEM_PRICE_LIST to BIIO_CTO_PL1_IMPORT
-
loads data for PL1 into sales data
-
loads data for PL1 into t_ep_cto_data.
-
Recurring Item with Multiple Parents in a BOM
In Demantra 7.3 and earlier, during Collections, if the same Option Class-Item combination is present more than once in the BOM of a Base Model, the Options under the second occurrence of the Option Class are aggregated appropriately under the first occurrence and then deleted. This second occurrence of the Option Class remains to preserve its planning percentage to the 2nd parent.
In this case, the planning percentages of the options under the first occurrence do not accurately reflect the ratio of the options to their parent. There are two solutions to this:
-
Calculate historical planning percentages which will accurately reflect the demand of the options, and choose 'History' for the Plng Pct Choice option for these options
-
The planning pct for the options under the first occurrence of Option Class 1 can also be overridden so that the planning percentages reflect the correct ratio.
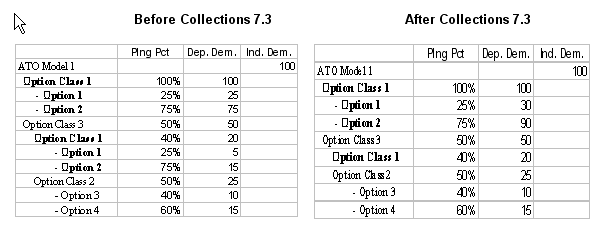
In Demantra version 7.3.0.1, the item is displayed the same wherever it occurs in the tree, with the correct data for each occurrence.
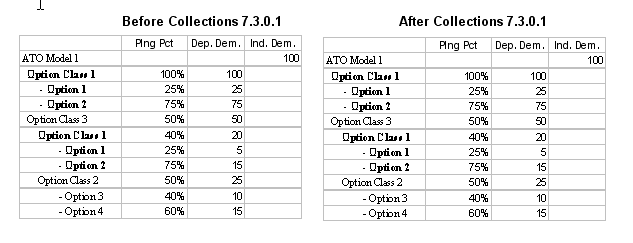
Importing CTO Data from a non-Oracle System
This section provides an example of how to import data from a third party system into the Oracle Demantra staging tables and describes how the data will appear after it is imported.
Initial Data
Consider the following BOM structure:
ATO Model 1
-
Option Class 1
-
Option A
-
Option B
Option Class 3
-
Option Class 1
-
Option A
-
Option B
Option Class 2
-
Option C
-
Option D
-
-
This structure is represented in the table below.
| Base Model | CTO Parent | CTO Child | DM item | Parent Item | Demand Type |
|---|---|---|---|---|---|
| ATO Model 1 | ATO Model 1 | ATO Model 1 | ATO Model 1 | ATO Model 1 | Base Model |
| ATO Model 1 | ATO Model 1 | Option Class 1 | Option Class 1 | ATO Model 1 | Option Class |
| ATO Model 1 | Option Class 1 | Option A | Option A | Option Class 1 | Option |
| ATO Model 1 | Option Class 1 | Option B | Option B | Option Class 1 | Option |
| ATO Model 1 | ATO Model 1 | Option Class 3 | Option Class 3 | ATO Model 1 | Option Class |
| ATO Model 1 | Option Class 3 | Option Class 1 | Option Class 1 | Option Class 3 | Option Class |
| ATO Model 1 | Option Class 1 | Option A | Option A | Option Class 1 | Option |
| ATO Model 1 | Option Class 1 | Option B | Option B | Option Class 1 | Option |
| ATO Model 1 | Option Class 3 | Option Class 2 | Option Class 2 | Option Class 3 | Option Class |
| ATO Model 1 | Option Class 2 | Option C | Option C | Option Class 2 | Option |
| ATO Model 1 | Option Class 2 | Option D | Option D | Option Class 2 | Option |
Tables 1 and 2 below show the workflows, integration interfaces, and integration profiles that are used to import the levels and data into the Demantra staging tables (BIIO_CTO%).
Table 1: Level Integration
| Data Element | Level | Workflow | Integration Interface | Integration Profile | Attribute | Integration (Staging) Table | Integration Table Column |
|---|---|---|---|---|---|---|---|
| Base Model Code | Base Model | Import CTO Base Model | CTO | IMPORT_CTO_BASE_MODEL | Member Description | BIIO_CTO_BASE_MODEL | T_EP_CTO_BASE_MODEL_DESC |
| Base Model Desc | Base Model | Import CTO Base Model | CTO | IMPORT_CTO_BASE_MODEL | Member Code | BIIO_CTO_BASE_MODEL | T_EP_CTO_BASE_MODEL_CODE |
| CTO Child Code | CTO Child | Import CTO Child | CTO | IMPORT_CTO_CHILD | Member Description | BIIO_CTO_CHILD | T_EP_CTO_CHILD_DESC |
| CTO Child Desc | CTO Child | Import CTO Child | CTO | IMPORT_CTO_CHILD | Member Code | BIIO_CTO_CHILD | T_EP_CTO_CHILD_CODE |
| DM Item Code Attribute ( this the real DM item associated with this child) | CTO Child | Import CTO Child | CTO | IMPORT_CTO_CHILD | Item | BIIO_CTO_CHILD | T_EP_ITEM_ID |
| CTO Code (Internal) | CTO | Import CTO Level | CTO | IMPORT_CTO_LEVEL | Member Code | BIIO_CTO_LEVEL | T_EP_CTO_CODE |
| CTO Desc (Internal) | CTO | Import CTO Level | CTO | IMPORT_CTO_LEVEL | Member Description | BIIO_CTO_LEVEL | T_EP_CTO_DESC |
| Base Model Code | CTO | Import CTO Level | CTO | IMPORT_CTO_LEVEL | Base Model | BIIO_CTO_LEVEL | T_EP_CTO_BASE_MODEL_CODE |
| CTO Parent Code | CTO | Import CTO Level | CTO | IMPORT_CTO_LEVEL | t_ep_cto_parent | BIIO_CTO_LEVEL | T_EP_CTO_PARENT_ID |
| CTO Child Code | CTO | Import CTO Level | CTO | IMPORT_CTO_LEVEL | t_ep_cto_child | BIIO_CTO_LEVEL | T_EP_CTO_CHILD_CODE |
| Demand Type Code | CTO | Import CTO Level | CTO | IMPORT_CTO_LEVEL | Demand Type | BIIO_CTO_LEVEL | T_EP_CTO_DEMAND_TYPE_CODE |
| Default Quantity per Parent (Internal EBS) | CTO | Import CTO Level | CTO | IMPORT_CTO_LEVEL | Quantity Per Parent | BIIO_CTO_LEVEL | CTO_QUAN_PER_PAR |
| Default Optional Flag(Internal EBS) | CTO | Import CTO Level | CTO | IMPORT_CTO_LEVEL | Is optional | BIIO_CTO_LEVEL | IS_OPTIONAL |
| Parent Item Code (the actual Parent DM item associated with this item) | CTO | Import CTO Level | CTO | IMPORT_CTO_LEVEL | Parent Item | BIIO_CTO_LEVEL | ITEM |
| Planning PCT | CTO | Import CTO Level | CTO | IMPORT_CTO_LEVEL | Planning PCT | BIIO_CTO_LEVEL | PLANNING_PCT |
| CTO Code (internal) | CTO | Import CTO Level | CTO | IMPORT_CTO_LEVEL | Member Code | BIIO_CTO_POPULATION | LEVEL_MEMBER |
| BOM Start Date | CTO | Import CTO Level | CTO | IMPORT_CTO_LEVEL | Start Date | BIIO_CTO_POPULATION | FROM_DATE |
| BOM End Date | CTO | Import CTO Level | CTO | IMPORT_CTO_LEVEL | End Date | BIIO_CTO_POPULATION | UNTIL_DATE |
| Filter Level | CTO | Import CTO Level | CTO | IMPORT_CTO_LEVEL | Level Name | BIIO_CTO_POPULATION | FILTER_LEVEL |
| Level Order | CTO | Import CTO Level | CTO | IMPORT_CTO_LEVEL | Level Order | BIIO_CTO_POPULATION | LEVEL_ORDER |
| Filter Member | CTO | Import CTO Level | CTO | IMPORT_CTO_LEVEL | Member Code | BIIO_CTO_POPULATION | FILTER_MEMBER |
Table 2: Data Integration
| Data Element | Level | Workflow | Integration Interface | Integration Profile | Attribute | Integration (Staging) Table | Integration Table Column |
|---|---|---|---|---|---|---|---|
| Sales Date | CTO | Import CTO Data | CTO | IMPORT_CTO_DATA | Sales Date | BIIO_CTO_DATA | SDATE |
| CTO Code | CTO | Import CTO Data | CTO | IMPORT_CTO_DATA | CTO | BIIO_CTO_DATA | LEVEL1 |
| Item Code | CTO | Import CTO Data | CTO | IMPORT_CTO_DATA | Item | BIIO_CTO_DATA | LEVEL2 |
| Demand Class Code | CTO | Import CTO Data | CTO | IMPORT_CTO_DATA | Demand Class | BIIO_CTO_DATA | LEVEL3 |
| Organization Code | CTO | Import CTO Data | CTO | IMPORT_CTO_DATA | Organization | BIIO_CTO_DATA | LEVEL4 |
| Site Code | CTO | Import CTO Data | CTO | IMPORT_CTO_DATA | Site | BIIO_CTO_DATA | LEVEL5 |
| Sales Channel Code | CTO | Import CTO Data | CTO | IMPORT_CTO_DATA | Sales Channel | BIIO_CTO_DATA | LEVEL6 |
| Series | CTO | Import CTO Data | CTO | IMPORT_CTO_DATA | Dependent Booking - Book Items - Book Date | BIIO_CTO_DATA | EBS_BH_BOOK_QTY_BD_DEP |
| Series | CTO | Import CTO Data | CTO | IMPORT_CTO_DATA | Dependent Booking - Book Items - Req Date | BIIO_CTO_DATA | EBS_BH_BOOK_QTY_RD_DEP |
| Series | CTO | Import CTO Data | CTO | IMPORT_CTO_DATA | Dependent Booking - Req Items - Book Date | BIIO_CTO_DATA | EBS_BH_REQ_QTY_BD_DEP |
| Series | CTO | Import CTO Data | CTO | IMPORT_CTO_DATA | Dependent Booking - Req Items - Req Date | BIIO_CTO_DATA | EBS_BH_REQ_QTY_RD_DEP |
| Series | CTO | Import CTO Data | CTO | IMPORT_CTO_DATA | Dependent History | BIIO_CTO_DATA | ACTUAL_QUANTITY_DEP |
| Series | CTO | Import CTO Data | CTO | IMPORT_CTO_DATA | Dependent Shipping - Req Items - Req Date | BIIO_CTO_DATA | EBS_SH_REQ_QTY_RD_DEP |
| Series | CTO | Import CTO Data | CTO | IMPORT_CTO_DATA | Dependent Shipping - Ship Items - Req Date | BIIO_CTO_DATA | EBS_SH_SHIP_QTY_RD_DEP |
| Series | CTO | Import CTO Data | CTO | IMPORT_CTO_DATA | Dependent Shipping - Ship Items - Ship Date | BIIO_CTO_DATA | EBS_SH_SHIP_QTY_SD_DEP |
| Series | CTO | Import CTO Data | CTO | IMPORT_CTO_DATA | Plng Pct Existing | BIIO_CTO_DATA | CTO_PLN_PCT |
| Sales Date | CTO | Import CTO Option Price | CTO | IMPORT_CTO_OPTION_PRICE | Sales Date | BIIO_CTO_OPTION_PRICE | SDATE |
| Item Code | CTO | Import CTO Option Price | CTO | IMPORT_CTO_OPTION_PRICE | Item | BIIO_CTO_OPTION_PRICE | LEVEL1 |
| Series | CTO | Import CTO Option Price | CTO | IMPORT_CTO_OPTION_PRICE | Option Price | BIIO_CTO_OPTION_PRICE | OPTION_PRICE |
Procedure for Importing
Before importing CTO data, load all item, location, and sales data via the EP_LOAD process. Refer to "EP_LOAD" in the Demantra Demand Management to EBS Integration chapte
After loading data into the Demantra staging tables, run the following workflows in the order specified to import data into the Demantra CTO application tables (T_EP_CTO%):
-
Import CTO Base Model
-
Import CTO Child
-
Import CTO Level
-
Import CTO Data
-
Import CTO Option Price
Resulting Data
The tables below provide an example of how the data will appear in the Demantra application tables after running the Import CTO workflows.
Note: Only the database tables and columns that are relevant to importing CTO data are shown here.
| Level: CTO Table: T_EP_CTO Column: T_EP_CTO_CODE |
|---|
| ATO Model 1 | ATO Model 1 | ATO Model 1 |
| ATO Model 1 | ATO Model 1 | Option Class 1 | ATO Model 1 | ATO Model 1 |
| ATO Model 1 | Option Class 1 | ATO Model 1 | ATO Model 1 | Option A |
| ATO Model 1 | Option Class 1 | ATO Model 1 | ATO Model 1 | Option B |
| ATO Model 1 | ATO Model 1 | Option Class 3 |
| ATO Model 1 | Option Class 3 | Option Class 1 | Option Class 3 | ATO Model 1 |
| ATO Model 1 | Option Class 1 | Option Class 3 | ATO Model 1 | Option A |
| ATO Model 1 | Option Class 1 | Option Class 3 | ATO Model 1 | Option B |
| ATO Model 1 | Option Class 3 | Option Class 2 |
| ATO Model 1 | Option Class 2 | Option C |
| ATO Model 1 | Option Class 2 | Option D |
| Level: Base Model Table: T_EP_CTO_BASE_MODEL Column: T_EP_CTO_BASE_MODEL_CODE |
|---|
| ATO Model 1 |
| Level: CTO Parent Synonym: T_EP_CTO_PARENT Column: T_EP_CTO_CHILD_CODE |
|---|
| ATO Model 1 |
| Option Class 1 | ATO Model 1 | ATO Model 1 |
| Option Class 3 |
| Option Class 1 | Option Class 3 | ATO Model 1 |
| Option Class 2 |
| Level: CTO Child Synonym: T_EP_CTO_CHILD Column: T_EP_CTO_CHILD_CODE |
|---|
| ATO Model 1 |
| Option Class 1 | ATO Model 1 | ATO Model 1 |
| Option A |
| Option B |
| Option Class 3 |
| Option Class 1 | Option Class 3 | ATO Model 1 |
| Option Class 2 |
| Option C |
| Option D |
| Level: Parent Item Synonym: T_EP_CTO_PARENT_ITEM Column: ITEM |
|---|
| ATO Model 1 |
| Option Class 1 |
| Option Class 3 |
| Option Class 2 |
| Level: Demand Type Synonym: T_EP_CTO_DEMAND_TYPE Column: T_EP_CTO_DEMAND_TYPE_CODE |
|---|
| Base Model |
| Option Class |
| Option |
CTO Level Population
Table: BIIO_CTO_POPULATION
LEVEL_MEMBER: T_EP_CTO_CODE
FILTER_LEVEL: Population Item and Location Level names
FILTER_MEMBER: Population Item and Location Members
Note: Be sure to specify all lowest-level dimensions for both item and location. Also, this is a sample row for a Base Model; all CTO combinations should have a population entry for all dimensions of Item and Location.
| LEVEL_MEMBER (Member Code) | FROM_DATE (Start Date) | UNTIL_DATE (End Date) | FILTER_LEVEL (Level Name) | LEVEL_ORDER (Level Order) | FILTER_MEMBER (Member Code) | |
|---|---|---|---|---|---|---|
| Location Entry: | ATO Model 1 | ATO Model 1 | ATO Model 1 | 10/4/2010 | 10/3/2011 | Organization | 1 | ORG1 |
| Item Entry: | ATO Model 1 | ATO Model 1 | ATO Model 1 | 10/4/2010 | 10/3/2011 | Item | 2 | ATO Model 1 |
Additional information
-
A CTO node (combination) represents the relationships between Base Model, CTO Parent, CTO Child and Item. If the BOM varies by Demand Class or other Location dimensions, then Oracle recommends that you include dimensions such as Demand Class, ORG, Site and Sales Channel. Use the default "N/A" for any dimensions that you do not use.
-
To support multi-parent BOM structures, it is important to generate unique codes for CTO Child Code and CTO Code (Internal). This is done by concatenating the internal codes for the full CTO branch.
The concatenated codes for branches of the BOM structure shown at the beginning of this document are listed below as an example.
-
ATO Model 1 | ATO Model 1 | ATO Model 1
-
ATO Model 1 | ATO Model 1 | Option Class 1 | ATO Model 1 | ATO Model 1
-
ATO Model 1 | Option Class 1 | ATO Model 1 | ATO Model 1 | Option A
-
(etc)
Embeddable Worksheets
This feature allows Demantra worksheets to be accessed and embedded into external Value Chain Planning applications such as APCC. Embedded worksheets are accessed using the Demantra Anywhere user interface and provide the user with the ability to see Demantra Data in a table, modify editable series, and persist the changes. (For more information see “Access to Embedded Demantra Worksheets” in the Oracle Advanced Planning Command Center User's Guide).
Communication is established via a URL. The calling application calls Demantra using a URL and passing specified parameters. This seamless login occurs using Oracle Single Sign On, and both applications must be registered with the same SSO server. The user must be configured to use Demantra Anywhere (go to Security > Create/Modify User, select a user, go to Modules, and enable Demantra Anywhere).
The external user can access the Demantra worksheet either as an embedded object, or by launching a new Demantra worksheet.
For more information see “Access to Embedded Demantra Worksheets” in the Oracle Advanced Planning Command Center User's Guide.