Supply Planning Work Area
This chapter covers the following topics:
- Overview
- Header Area
- Plans Tab
- Plan Inputs Tab
- Distribution Planning Work Area
- Analyzing Master Production Scheduling Plans
Overview
The Supply Planning Work Area is a workbench that is similar to Planner Workbench. You can use it to view and change plan data.
The Supply Planning Work Area includes pages with the same functionality as their corresponding Forms windows, but with a web-based look and feel. You enter this area by clicking the Supply Planning Work Area responsibility.
For a general understanding about using the Supply Planning Work Area for supply chain modeling see the section Overview of Supply Chain Modeling n chapter Supply Chain Plan Modeling.
Main Tabs
When you navigate to Supply Planning Work Area, a page appears with two main tabs:
-
Plans Tab: The name may show as Supply Planning or as a plan name. See Plans.
-
Plan Inputs Tab: See Plan Inputs.
Both of these main tabs display two panes:
-
Left pane: See Left Pane Characteristics.
-
Right pane: See Right Pane Characteristics.
See also: Common Tab Features
Left Pane Characteristics
The left pane shows accordion panels.
The accordion panels are like menus.
You expand them to see their links.
The links navigate to pages (sub-tabs) in the right pane where you can view and change plan data.
To expand or collapse accordion panels, click the disclosure icon (triangle) at the left of the accordion panel.
![]()
To see accordion panels that are not in view, click the icons Show previous panels and Show next panels. They look like double arrowheads pointing up and down.
Right Pane Characteristics
The right pane has two regions:
-
Search, at the top: Use this region to search for data to display in the data region.
-
Data, at the bottom: Use this region to view and change plan data. It begins with a menu bar and the data appears underneath. In pages with no search region, click the Search icon in the Data region menu--it is a white arrow in e gray circle.
Search
For basic searches, enter snfgle values
Common Tab Features
Grid View: Displays data in a table format on the Home page.
Vertical Tabs: Small icon tabs typically in the upper left or right side of the page. They function the same as horizontal tabs.
Infotile: Expandable menu items in the left pane. When you select them, they display content in the right pane.
Status Meter: A color graphic display of a threshold indicator, for example, a thermometer.
Flexfields: When you select a list item, a descriptive panel pops up or appears underneath with more data and/or controls.
Tables: Display data in a grid format. You can scroll vertically and horizontally and freeze columns and rows.
Header: Global information and controls.
Header Area
The header area across the top has controls for controlling the page layout and navigating active tabs. You can select a previously-saved layout from the Page Layout drop-down list. You can save the current layout by selecting Save As from the Save Layout dropdown list, then entering a name, selecting whether the layout will be publically available or not, checking whether it will be the default layout, and hitting the Ok button. You can then see the new layout in the Page Layout dropdown list.
Tabs normally appear horizontally, but you can position them vertically in order to view two different tabs at the same time. The active tab has a highlighted bar across the tab. If you select "Move Down Active Tab", that tab will appear halfway down the page. You can have multiple tabs in the upper and lower positions. If you select "Move Up Active Tab", that tabl will move back to the top of the display area.
You can update the current layout to be like current display by selecting the Save Changes button.
At the upper right are several icons for going to the Home screen or logging out. The gear-shaped icon allows you to set preferences, described below.
Planner Preferences
You can customize the Planner Workbench from the Preferences window. When you open this window, IO retrieves stored settings on the seeded data for Default Preferences Profile.
To set planner preferences
-
Click the Preferences icon, located in the top-right corner of the window.
The User Preferences window appears.
-
Set any of the following options:
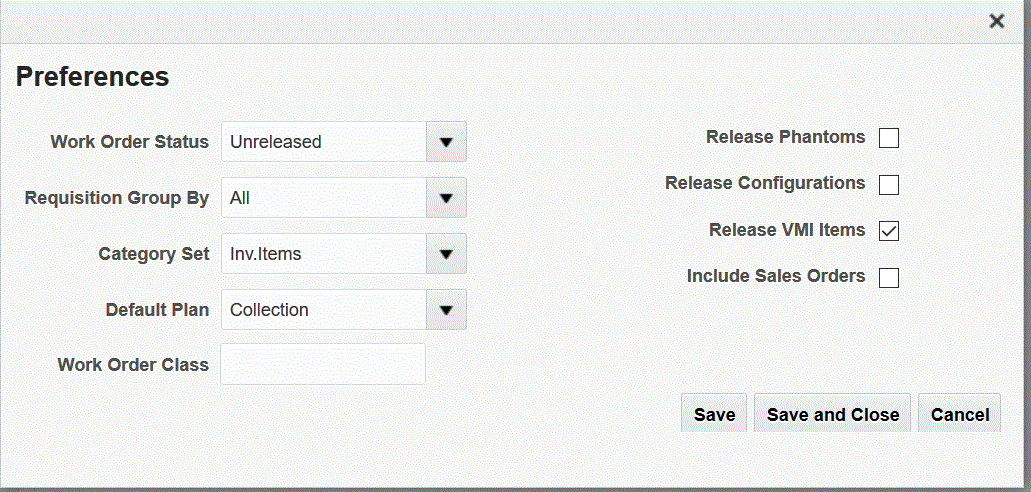
Option Description Category Set Use this drop-down list box to specify the default category set. Default Plan Use this drop-down list box to set the default plan. -
Click Save or Save and Close to keep your settings.
Plans Tab
The Plans Tab contains these four accordion panels:
-
Plans
-
Favorites
-
Plan Links
-
Plan Actions
Favorites
Below the Plans tile is the Favorites tile. Favorites are queries, and the queries shown here correspond to the Queries Tabbed Pane of the Workbench.
The available types of queries correspond to the subitems displayed in the workbench under Personal Queries or Public Queries (Queries Tabbed Pane). These are:
| Personal Query Type | Results View |
|---|---|
| Items | List of Item Orgs (no attributes) |
| Resources | List of Resources (no attributes) |
| Suppliers | List of Suppliers (not attributes or items) |
| Orders | No results view. Navigates to Supply and Demand. |
| Exceptions | List of exceptions with an ability to "group by" attributes. |
For a list of possible criteria values when creating queries on Item, Resources, or Suppliers, see the chapter Viewing Output.
When a tile is expanded, its header displays an expanded set of controls.
![]()
-
Type - The Type dropdown is a list of types that can be used for filtering which queries are displayed in the tile. For example, if you select Exception, then only exception queries will be displayed.
-
Add - Click the Add icon (plus sign) to create a new Favorite query. A dialog appears allowing you to configure the query criteria.
-
Edit - Click the Edit icon (pencil) to select a select a Favorite for editing.
-
Refresh - Click the turned arrow icon to refresh the Favorites list.
Pivot Table Views
You can create views in Pivot Table format (in addition to the Table format) for Exception Type favorites only. This feature is not applicable for other types of favorites.
Setup
Before you run a plan that you expect to run Favorites queries against, select plan option Display Key Performance Indicators.
If you have already run a plan without selecting the plan option and you do not see Favorites data:
-
Select its plan option Display Key Performance Indicators
-
Run concurrent process Generate Plan Summary against it
Metrics
The Supply Planning Work Area includes the Metrics query type. The possible metrics include:
-
Current Scheduled Receipts
-
Exception Count
-
Exception Days
-
Exception Quantity
-
Exception Ratio
-
Fill Rate
-
Forecast
-
Gross Margin
-
In-Receiving
-
Internal Requisitions
-
In-Transit
-
Inventory Turns
-
Manual Demand
-
Manufacturing Cost
-
On-time Delivery %
-
Planned Orders
-
Planned Orders - Buy
-
Planned Orders - Make
-
Planned Orders - Transfer
-
Purchase Orders
-
Purchasing Cost
-
Resource Availability
-
Resource Requirements
-
Resource Utilization
-
Revenue
-
Safety Stock
-
Supplier Capacity
-
Supplier Requirementsl
-
Supplier Utilization
-
Total Demand
-
Total Supply
-
Work Orders
The Supply Planning Work Area supports the following metrics, with the drills specified:
| Graph Filter Criteria Type |
Measures | Drill Context | Drill To |
| Items |
|
All filter criteria from the favorite + Group by + | Supplies and Demands (filter to relevant Order type of the measure) Material Plan |
| Items |
|
All filter criteria from the favorite + Group by | Supplies and Demands (all order types) Material Plan |
| Items |
|
All filter criteria from the favorite + Group by + all supplies | Supplies and Demands (all supplies) Material Plan |
| Items |
|
All filter criteria from the favorite + Group by + all demands | Supplies and Demands (all demands) Material Plan |
| Items |
|
No drill supported | No drill supported |
| Items |
|
No drill supported | No drill supported |
| Resources |
|
All filter criteria from the favorite + Group by | Resource Plan |
| Suppliers |
|
All filter criteria from the favorite + Group by | Supplies and Demands (buy orders only: POs, Reqs, Buy Planned Orders) Material Plan |
| Exceptions |
|
All filter criteria from the favorite + Group by | Exception Details Supplies and Demands (if item/org/order context is not available). For example, drilling to Resource Exceptions will not bring any orders) |
Search
Search Operators
Basic searches do not include operators, but advanced search criteria may include the following Operators:
-
Starts With
-
Ends With
-
Equals
-
Does Not Equal
-
Between
-
Not Between
-
Contains
-
Does not Contain
-
Is Blank
-
Is Not Blank
From the Items view, you can drill to Product Definitions, Supply Chain Bill, Supplies and Demands, Material Plan and Exceptions. The context that is used to drill these views is:
-
Drilling to Material Plan, Supplies and Demands, Exceptions: The drill context is based on the 'Scope' selector in the toolbar.
-
If Scope is set to item, IO uses the item-organization context
-
If Scope is set to Supply Chain, IO uses all components in the Bill of Materials (BOM) (including alternates), except for any substitute components. The listed components are only at the next level (not all levels).
-
-
Drilling to Product Definition, Supply Chain Bill: The drill context is always based on selected item-organization row(s). Since these UI views always show the BOM structure, the scope choice is not relevant.
If you open the Items page from a favorite, IO uses the criteria of the favorite, and ignores saved searches with the same criteria. The Search region is collapsed.
There is an “Application Default” layout with the same fields as the current default folder in IO. The complete list of columns will be same as the list of columns in the Items window of IO.
Entering Dates Manually
You should use the date picker for entering date values. If you do not use the date picker, enter a time value after the date value. Otherwise, you may receive an incorrect date value.
| Format | You enter | Resulting Value |
|---|---|---|
| dd/mm/yyyy | 10/04/2016 | October 4, 2016 (this reverts to mm/dd/yyy) |
| dd/mm/yyyy | 10/04/2016 12:00:00 | April 10, 2016 |
Item Search
You can search the Items results region. Available search criteria are:
-
Basic Search:
-
Item
-
Organization
-
Category
-
Planner
-
-
Advanced Search (in addition to the above):
-
Description
-
Planning Method
-
BOM Item Type
-
Resource Search
You can search the Items results region. Available search criteria are:
-
Basic Search:
-
Department
-
Resource
-
Organization
-
Resource Group
-
-
Advanced Search (in addition to the above):
-
Resource Type
-
Owning Department
-
Plans
You view plans in two separate folders in the Plans accordion panel, one for Supply Plans and the other for Distribution Plans. The Favorites and Plan Links accordion panels show different options depending on which type of plan is selected.
Supply Plans Folder
When you open the Supply Planning Work Area, you see the Plans accordion panel expanded and displaying successfully run plans. This list of Plans corresponds to those displayed in Inventory Workbench Navigator > Plan Tabbed Pane .
Click a plan name to see its information in the right pane.
The tabs across the top correspond to selections in the Plan Links accordion panel.
Right Pane Controls
To remove a tab, click the x to the right of the name.
![]()
To widen and shorten the content display, click the triangle on the left.
![]()
To expand and contract a chart, click the disclosure icon (triangle) to the left of its header.

Distribution Plans Folder
This folder contains Distribution Plans. For more information see the section Distribution Planning Work Area.
Plan Links
In the Plan Links tile, selecting the Exceptions link displays the Exception Details screen. The Exception Details screen allows you to query by Exception type and pull up each exception detail record. The available columns in the Exception Details screen are the same as the available columns in the Forms-based Exception details screen.
For detailed information on the different types of available exceptions see the section Understanding Exceptions in the chapter Supply Chain Plan Exception Messages..
The search criteria on this screen includes: Item, Org, Category, Department, Resource, Supplier, Customer, Exception Type, Order Type, Action Taken. The operators for these search criteria are:
| Column | Default Operator | Available Operators |
| Organization | Starts with | Starts with, Contains, Equals |
| Category | Starts with | Starts with, Contains, Equals |
| Item | Starts with | Starts with, Contains, Equals |
| Order Type | Starts with | Equals |
| Customer | Starts with | Starts with, Contains, Equals |
| Customer Site | Starts with | Starts with, Contains, Equals |
| Supplier | Starts with | Starts with, Contains, Equals |
| Supplier Site | Starts with | Starts with, Contains, Equals |
| Department | Starts with | Starts with, Contains, Equals |
| Resource | Starts with | Starts with, Contains, Equals |
| Exception Type | Equals | Equals |
| Project | Equals | Equals |
| Exception Date | On or Before | Equals, On or after, On or before, Before, After, Between |
| Order Date | On or Before | Equals, On or after, On or before, Before, After, Between |
| Action Taken | Equals | Equals |
Creating Exception Message Filters
You can create Personal Queries that show only the exceptions you want to view. For more information, and a procedure for doing it, see Exception Message Filters in the Viewing Exceptions section of the chapter Supply Chain Plan Exception Messages.
Analyzing Exceptions
From an Exceptions Personal Query you can drill down and perform analysis
-
Create an Exceptions Personal Query to include the set of exceptions that you are interested in seeing once the plan has run
-
Select appropriate group by levels at which the exception information should be displayed
-
-
Execute Exceptions Personal Query
-
Review results of Exceptions Personal Query
-
Drill down to
-
Material Plan for Item Exceptions
-
Resource Plan for Resource Exceptions
-
Orders / Pegging details for Order Exceptions
-
Exception details (as needed)
-
-
Take appropriate exception resolution actions within the three screens mentioned above
Items
The Product Definition page is accessed from the following pages:
-
Items
-
Supplies and Demands
-
Exception Details
Product Definition UI cannot be directly started and must be launched from one of the above pages. The context of this window depends on which Item-Organization is selected in the above pages. If there are multiple rows selected during the navigation the Product Definition displays for the first one and users can switch to the other assemblies using the drop-down list box.
There is no corresponding Oracle Forms window for this page.
The Product Definition page consists of five sections that are explained in detail below:
-
Components
-
Substitute Components
-
Routing Operations
-
Operation Resources
-
End Item Substitutes
Components
The Components view displays the first level components for the selected assembly.
The Components view displays a single Assembly-Organization at a time. However, all the selected assemblies and organizations used as a context to invoke the Product Definition page are available in the drop-downs at the top. Use these drop-downs to switch to a different assembly and organization.
Each click of the Toolbar down arrow icon displays the next level components. It adds additional rows in the table by fetching the components of every item (wherever available). The additional rows are displayed below the respective subassemblies. Components at the next level appear indented with a hyphen character followed by a space.
The corresponding forms window is called Components Window. Its description is in the section Components Window of the Planner Workbench chapter.
Substitute Components
The Substitute Components view displays all substitutes only for components at the first level.
The corresponding forms window is called Substitution Chain Window. Its description is in the section Substitution Chain Window of the Planner Workbench chapter.
Routing Operations
The Routing Operations view displays routing operations.
The corresponding forms window is called Routing Operations Window. Its description is in the section Routing Operations of the Planner Workbench chapter.
Operation Resources
The Operation Resources view displays operation resources.
The corresponding forms window is called Resources Window. Its description is in the section Resources Window of the Planner Workbench chapter.
End Item Substitutes
The End Item Substitutes view displays end item substitutes.
The End Item Substitutes view only shows three levels of the chain at a given time with current item in the center, the items it replaces on the left, and the items that supersede it on the right.
If there are more than three items that precede or supersede the current item, the End Item Substitutes view displays with a More link at the top and bottom to go forward or back in the list of the items. Clicking on the More link refreshes the tab with next set of items shown for that level.
The corresponding forms window is called Substitution Chain Window. Its description is in the section Substitution Chain Window of the Planner Workbench chapter.
Material Plan
The Material Plan allows you to conduct a typical planning flow within the application without having to navigate to other Value Chain Planning (VCP) applications, such as ASCP.
The corresponding forms window is called Horizontal Plan. Its description is in the section Horizontal Plan of the Planner Workbench chapterOracle Advanced Supply Chain Planning Implementation and User's Guide.
For information about the Material Plan, see Understanding the Editable Material Plan, Oracle Advanced Planning Command Center User's Guide.
Material Plan: Setup
Use the Material Plan tab Setup to specify Material Plan parameters.
Its tabs are General, Layout and Global Forecast Layout.
Material Plan: Global Forecast
The section Global displays all types of global forecasts.
The corresponding Forms measures are in the Global Org section. Its description is in the section Horizontal Plan of the Planner Workbench chapter.
The following table lists the corresponding measure names in the two locations.
| Material Plan Global Section (ADF) Measures | Horizontal Plan Global Org Section (Forms) Measures |
| Gross Forecast | Original |
| Cumulative Gross Forecast | Cumulative Original |
| Consumption | Consumed |
| Cumulative Consumption | Cumulative Consumed |
| Forecast | Current |
| Cumulative Forecast | Cumulative Curren |
| Expired Forecast | Expired |
To select the global forecast measures to display, navigate to window Material Plan Setup, tab Global Forecast Layout. To select the local forecast measures to display, navigate to window Material Plan Setup, tab Layout.
Material Plan: Setup
Use the Material Plan tab Setup to specify Material Plan parameters. Its tabs are General, Layout and Global Forecast Layout.
Material Plan: Custom Measures
You can add five custom measures to the Material Plan:
-
Specify the meaning of each measure in the EBS Lookup page (codes 10001-10005)
-
Specify the aggregation of each measure in table
MSC_HP_MEASURESas eitherSUMorAVG. -
At scheduled times, (1) Partition
MSC_CUST_ITEMS_Fbyplan_id. (2) Use your own program to populate the plan measures into tableMSC_CUST_ITEMS_Fas numbers. Each table row contains Plan ID, instance, organization, item, bucket start date, and the attribute 1 – 5 values.
Resource Plan
Resource plans provide critical information about the utilization of critical resources. They allow you to identify and track resources that are underutilized and overutilized.
The corresponding forms window is called Capacity Plan. Its description is in the section Horizontal Plan of the Planner Workbench chapter, Oracle Advanced Supply Chain Planning Implementation and User's Guide.
For more information about Resource Plans, see Understanding the Editable Resource Plan, Oracle Advanced Planning Command Center User's Guide.
Resources
You manage resources such as equipment or employees with the Resources window.
The corresponding forms window is called Resources. Its description is in the section Resources Window of the Planner Workbench chapter, Oracle Advanced Supply Chain Planning Implementation and User's Guide.
Items
Use this page to see information about items.
The corresponding forms window is called Items. Its description is in the section Items Window of the Planner Workbench chapter, Oracle Advanced Supply Chain Planning Implementation and User's Guide.
Safety Stocks
The Safety Stocks window shows time-phased safety stock levels that the planning engine uses.
To display the Safety Stocks window, select an item on the Items page, then open the Drill to menu icon and click Safety Stock.
The corresponding Oracle Forms window is called Safety Stocks. Its description is in the chapter Planner Workbench, section Safety Stock Window.
Supplies and Demands
The Supplies and Demands view displays information about supplies and demands and shows pegging information
For information about this view, see the sectionSupply Demand Window in the Planner Workbench chapter, Oracle Advanced Planning Command Center User's Guide.
In the Supplies and Demands view, the following icons are available:
| Toolbar Item | Type | Description |
|---|---|---|
| Create | Iconic button | Launches Create Order dialog. |
| Delete | Iconic button | Deletes order. Only available for orders that were manually created. |
| Drill To | Text button | Passes context of selected rows into either Exceptions (order number context) or Material Plan (item/org context). |
| Show Table | Iconic button | When selected shows flat table view. |
| Demand Pegging / Supply Pegging | Iconic buttons (only one displayed at a time) | When pegging from supply to demand, the Down arrow id present to toggle to supply pegging. When pegging from demand to supply, the Up arrow is present to toggle to demand pegging. |
| Layout | Combo List | Automatically refreshes the table layout based on selected pre-seeded layout. |
| Freeze | Iconic text button | Freezes the selected column and any columns to the left of the selected column, so they stay fixed on the visible page when the user scrolls horizontally. |
| Detach | Iconic text button | Expands the table to encompass the whole window. Pressing detach a second time returns the back to its original position. |
| Go Up | Iconic button | Used in a tree to move the user up a node level. |
| Go to Top | Iconic button | Used in a tree to move the user to the top of a tree. |
| Show as Top | Iconic | Shows the selected node of a tree as the new top (or root) node. |
| Wrap | Iconic text button | Wraps the text of the selected column so that it displays on multiple lines. |
In the Supplies and Demands view, the Actions list allows you to perform the following:
| List Item | Description |
|---|---|
| Create | Launches Create Order dialog. |
| Delete | Deletes order. Only available for orders that were manually created. |
| Drill to | Passes context of selected rows into either Exceptions (order number context) or Material Plan (item/org context). |
| Select Top Nodes | Selects the root nodes only. User can use the ADF select all action (selecting the first cell in the table, in other words the column header of the row header) to select both root and child nodes. |
| Mark For Release | Applies to selected rows. Updates the release status of all selected rows and updates the fields Implement As, Implement Date, and Implement Qty. If you need to update other implement fields, use Planner Workbench. |
| Unmark for Release | Applies to selected rows. Updates the release status of all selected rows and clears the set of implement fields. |
| View Demand Pegging/View Supply Pegging | Toggles between Demand Pegging and Supply Pegging views. When Supply Pegging view is displayed, the View Demand Pegging action is visible, and when the Demand Pegging view is displayed, the View Supply Pegging action is visible. |
| View End Demands Only | Only shows end/independent demands, not dependent demands. |
| View Exceptions Only | Only displays orders with associated exceptions. |
| Export to Excel | Export to Excel Exports all the data in the table to a Microsoft Excel spreadsheet. |
You can add exception-based columns to the Supplies and Demands Demand view. These columns are only visible in Plan mode (not Plan Inputs mode) and are read-only (not editable). The following columns may be added to custom table layouts:
| Column | Description |
| Actual Lead Time | The Actual Lead Time of associated “Order with Insufficient Lead Time” exception type. Applicable order types: All supply orders except on hand (for example, planned order, work order, purchase order, purchase requisition, and so on.) |
| Minimum Lead Time | The Minimum Lead Time of associated “Order with Insufficient Lead Time” exception type. Applicable order types: All supply orders except on hand (for example planned order, work order, purchase order, purchase requisition, and so on). |
| Minimum Remaining Shelf Life Shortfall | The Minimum Remaining Shelf Life Shortfall associated with the “End Item Minimum Remaining Shelf Life” exception type. Applicable order types: Sales Orders and Forecasts |
| Over Consumed Quantity | The over-consumed quantity associated with the “Items with Forecast over Consumption” exception type. Applicable order type: Forecast |
| Planned Inventory Point | The Planned Inventory Point of the associated “Orders Scheduled to Next Inventory Point” exception type. Applicable order type: Planned Order |
| Quantity Not Satisfied | The quantity from the associated “Demand Quantity not Satisfied” exception type. Applicable order types: Sales Orders and Forecasts |
| Supplier Capacity Overload | The capacity overload value of associated “Order Causes Supplier Capacity Overload” exception type. Applicable order types: Planned Orders (for buy items with supplier capacity), purchase orders, purchase requisitions |
| Volume Capacity Overload | The capacity overload value of associated “Order Causes Transportation Volume Capacity Overload” exception type. Applicable order types: Planned Orders (for transfers), internal |
| Weight Capacity Overload | The capacity overload value of associated “Order Causes Transportation Weight Capacity Overload” exception type. Applicable order types: Planned Orders (for transfers), internal requisitions. |
Supply Chain Billl
The Supply Chain Bill view provides the users with a complete, multi-level view of the supply chain for any end item. This includes the Bill of Materials and component sourcing across the supply chain including make, buy and transfers across the organizations and suppliers based on the assignment set used in the plan.
The corresponding forms window is called Supply Chain Bill. Its description is in the section Supply Chain Bill of the Planner Workbench chapter.
Enterprise View
Use this page to see supply and demand information by Planning Group, Project, and Project-Task, including payback.
The corresponding Forms window is Enterprise View. Its description is in the chapter Integrating with Planning and Manufacturing Environments, Oracle Project Manufacturing.
Vertical View
Use this page to see activity by item over time in a vertical format (non-bucket). The corresponding Forms window is Vertical Plan. Its description is in the section Vertical Plan of the Planner Workbench chapter.
Co-products View
Use this page to see network routing co-product names and splits.
The corresponding Forms window is Co-Product. Its description is in the section Co-Product Window of the Planner Workbench chapter.
Components View
Use this page to see the components of assemblies.
The corresponding Forms window is Components. Its description is in the section Components Window of the Planner Workbench chapter.
Network Routing View
Use this page to see dependency types and offsets within process manufacturing complex routings.
The corresponding Forms window is Network Routing. Its description is in the section Network Routing Window of the Planner Workbench chapter.
Sources View
Use this page to see information about sourcing and assignment associated with items.
The corresponding Forms window is Sources. Its description is in the section Sources Window of the Planner Workbench chapter.
Destinations View
Use this page to see information such as destination organization, sourcing, and assignment associated with items.
The corresponding Forms window is Destinations. Its description is in the section Destinations Window of the Planner Workbench chapter.
Process Effectivity View
Use this page to see process manufacturing information associated with bills of material and routing, including process effectivity dates, use ups, model/unit numbers, supply start dates, manufacturing recipe, and formulae.
The corresponding Forms window is Process Effectivity.
Its description is in the section Process Effectivity of the Planner Workbench chapter.
Forecast Consumption Details View
Use this page to see forecast consumption.
The corresponding Forms window is Consumption Details.
Its description is in the section Setting Up the Supply Chainn of the Supply Chain Plan Modeling chapter.
Resource Batches
Use this page to see information about process manufacturing batchable resources.
The corresponding Forms window is Batches. Its description is in the section Interactive Scheduling Using the Gantt Chart, Right-Click Menu Options of the Planner Workbench chapter.
Resource Charges
Use this page to see process manufacturing resource charges
The corresponding Forms window is Charge Details.
Its description is in the section Resource, Scheduling Resource Charges of the Planner Workbench chapter.
Resource Instances
Use this page to see information about resource instances used in sequence-dependent setups.
The corresponding Forms window is Resource Instances. Its description is in the section Sequence Dependent Setups of the Supply Chain Constraint-Based Planning chapter.
Setup Transitions
Use this page to see information about transitions.
The corresponding Forms window is Setup Transitions. Its description is in the section Setting Up the Supply Chain of the Supply Chain Plan Modeling chapter.
Plan Actions
This accordion panel contains links for taking actions on plans. The actions are:
-
Create Plan: See Advanced Supply Chain Planning Setup and Business Flows > Create A Plan.
-
Copy Plan: See Defining Supply Chain Plans > Copying Supply Chain Plans.
-
Plan Options: See Defining Supply Chain Plans > Setting Plan Options..
-
Launch Plan: See Advanced Supply Chain Planning Setup and Business Flows >the section Launch the Plan.
-
Release Plan: See Advanced Supply Chain Planning Setup and Business Flows > Release or Firm Orders.
Delete Plan
Use this link to delete a supply plan
To delete a service plan, use the Service Planning Work Area.
The corresponding Oracle Forms window in Planner Workbench is Navigator > select node type Plan > right click a plan > select Delete.
To delete a supply navigate to Plan Links and click Delete Plan.
A pop-up appears with a list of values that contains all supply including those you have not run—except plans that you have open.
Select a plan and the planning engine runs concurrent process Purge Plan that deletes the plan.
Plan Inputs Tab
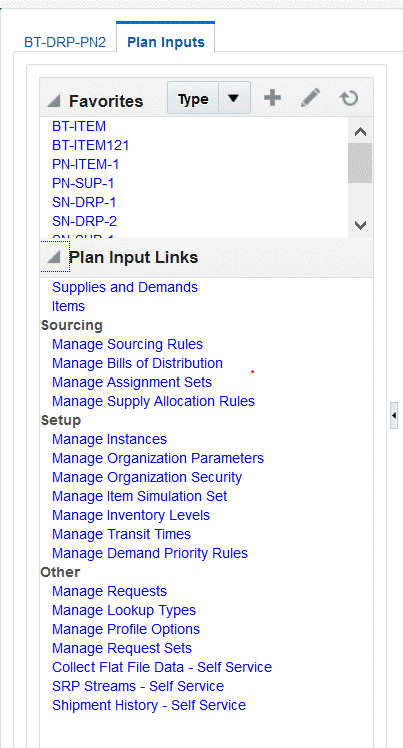
With the Plan Inputs tab you can access:
-
Favorites specifically for this area
-
Plan Input Links for managing specific aspects of a plan, like the Sourcing Rules or Bills of Distribution
Favorites (Plan Inputs)
You can save and access your Plan Inputs Favorites here.
Plan Input Links
Use the Plan Input Links accordion panel, on the Plan Inputs tab, to access these links. They are organized into categories.
Supplies and Demands: The same page as in Plan Links.
Items: The same page as in Plan Links.
Sourcing
-
Manage Sourcing Rules
-
Manage Bills of Distribution
-
Manage Assignment Sets
Setup
-
Manage Instances
-
Manage Organization Parameters
-
Manage Organization Security
-
Manage Parts Classification
-
Manage Inventory Levels
-
Manage Transit Times
-
Manage Service Level Sets
-
Manage Policy Parameter Sets
-
Manage Storage Capacities
-
Manage Budgets
Sourcing
Manage Sourcing Rules
Click the Manage Sourcing Rules link to view the Sourcing Rules tab in the content area.
Use Manage Sourcing Rules to define and edit sourcing rules. You can define sourcing rules that specify:
-
The source of supply for items in an organization.
-
A rank for each source of supply named in the sourcing rules and bills of distribution.
You can specify a sourcing percentage for each source within a rank. This allocates a portion of the total orders to each source.
Sourcing rules and bills of distribution both describe supply sources. Sourcing rules can specify how to replenish all organizations, for example, when the entire enterprise gets a subassembly from a particular organization. The planning engine evaluates alternate ship methods specified in the sourcing rules and recommends the appropriate option. It can also release a ship method to the sales order that is different from the one in the Transit Times page.
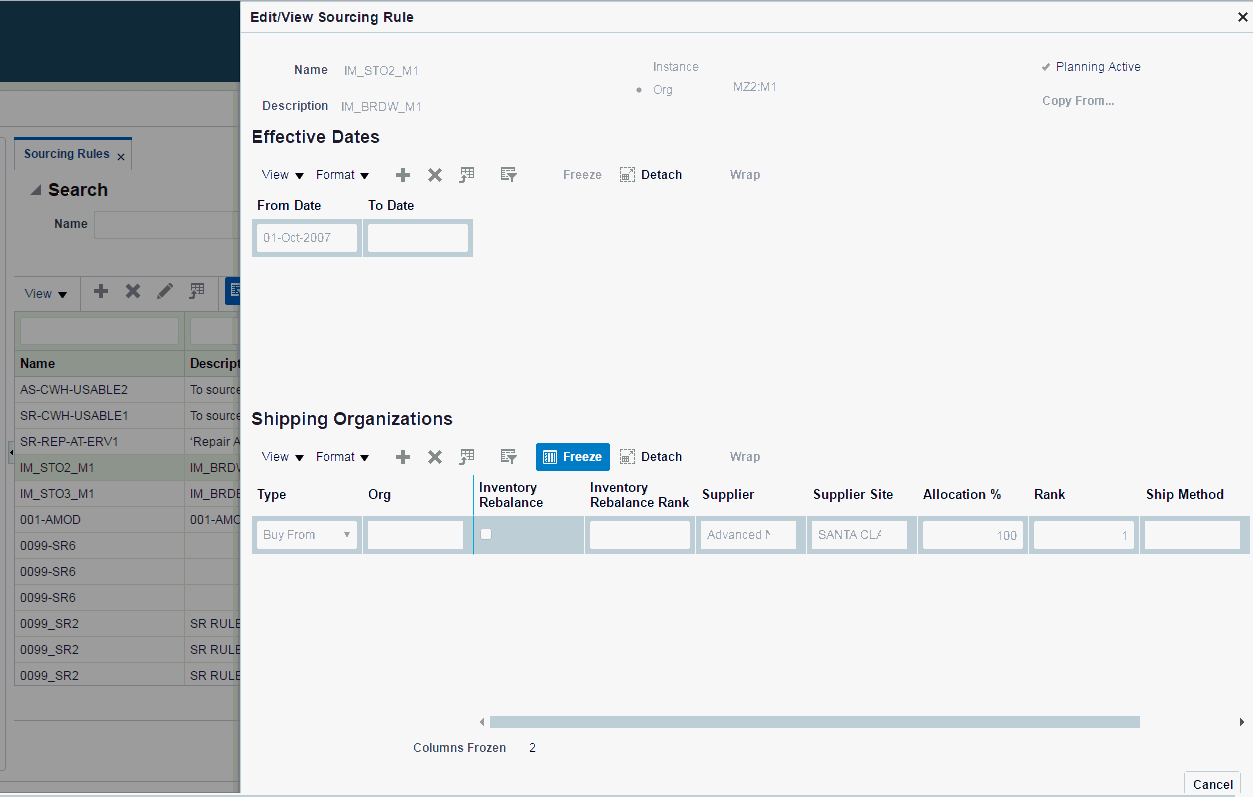
The corresponding forms window is called Sources. Its description is in the section Sources Window of the Planner Workbench chapter, and the section Defining Sourcing Rules of the Setting Up Distribution Planning chapter.
Manage Bills of Distribution
Click the Manage Bills of Distribution link to view the Bill of Distribution tab in the content area.
Use Manage Bills of Distribution to define and edit bills of distribution, multilevel replenishment networks of warehouses, distribution centers, and manufacturing plants. You can specify:
-
Receiving organization parameters
-
Shipping organization parameters
-
A rank for each source of supply
-
A sourcing percentage
The planning engine evaluates alternate ship methods specified in the Bill of Distribution page and recommends the appropriate option. It can also release a ship method to the sales order that is different from the one in the Transit Times page.
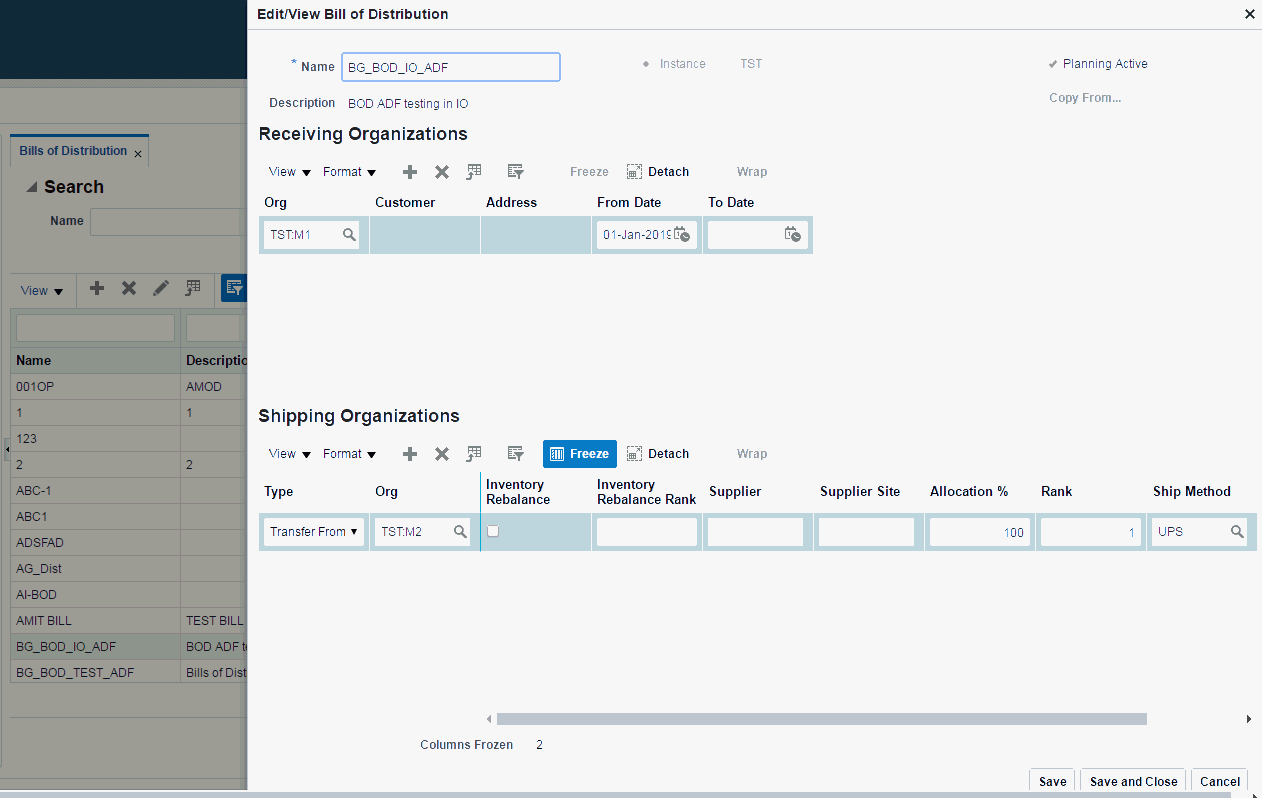
The corresponding forms window is called Bill of Distribution. Its description is in the section Bills of Distribution of the Supply Chain Plan Modeling chapter.
Manage Assignment Sets
Click the Manage Assignment Sets link to view the Assignment Sets tab in the content area.
Use Manage Assignment Sets to define and edit assignment sets. Defining assignment sets in the destination instance improves planning efficiency because you don't have to run collections every time you need to define or edit an assignment set. Each assignment set represents a selection of organizations and items you want planned. You must include an assignment set in your plan options.
Once you have defined your sourcing rules and bills of distribution, you must assign them to particular items and organizations. The planning engine groups assignments into assignment sets and this is where various sourcing strategies define a particular supply chain network.
In an assignment set, you can assign your sourcing rules and bills of distribution at the following levels:
-
Item-instance-organization
-
Category-instance-organization
-
Category-instance
-
Item-instance: If the Item field is empty, use the Reduce Criteria Window to restrict the selection.
-
Instance-organization
-
Instance
You can assign replenishment rules to items. For example, define item category Packaging Material and create a sourcing rule for it.
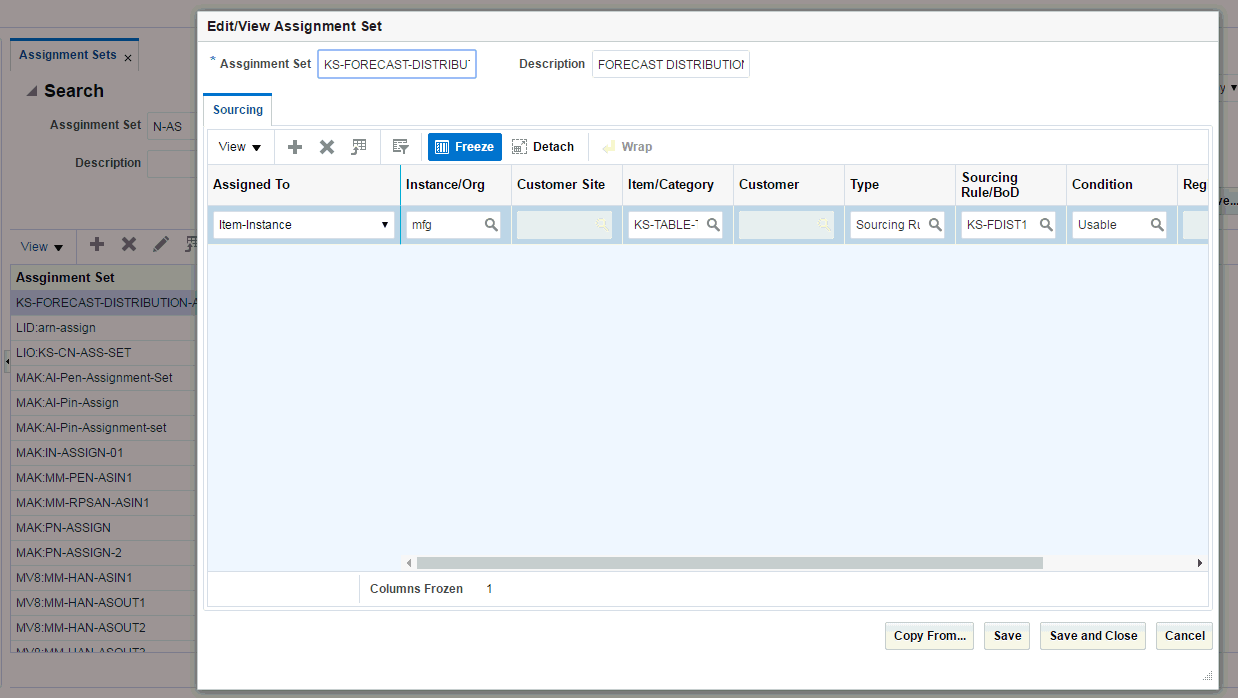
The corresponding forms window is called Sourcing Rule / Bill of Distribution Assignments. Its description is in the section Bills of Distribution of the Supply Chain Plan Modeling chapter.
Setup
Manage Organization Parameters
Click the Manage Organization Parameters link to view the Parameters tab in the content area.
You use Manage Organization Parameters to specify organization-specific planning parameters in the Parameters tab. Here you can revise Planning Parameters and analyze plan results without running a new collection. The parameters in this tab override corresponding values collected from the source instance.
You see these parameters as default values in the Create Plan window.
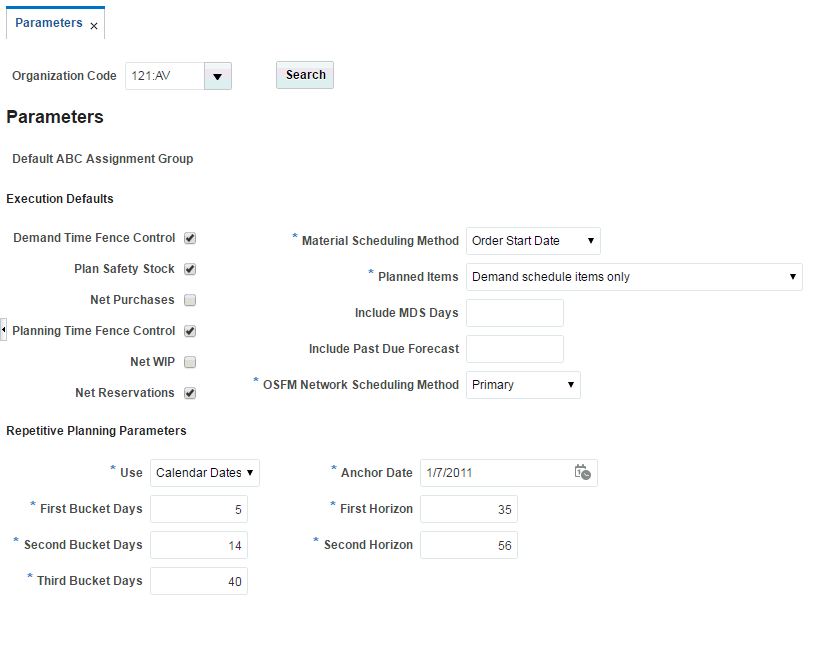
The corresponding forms window is called Planning Parameters. Its field descriptions are in the Setting Plan Options section of the Defining Supply Chain Plans chapter.
Manage Demand Priority Rules
Click the Manage Demand Priority Rules link to view the Priority Rules tab in the content area.
Use Manage Demand Priority Rules to configure demand priority rules. The planning engine fills higher priority demands before lower ones. This improves fill rate for the most important customers.
You can prioritize demand based on the following criteria:
-
Gross margin
-
Promise date
-
Schedule date
-
Request date
-
Sales orders, forecasts, & MDS entries priority
You can only define demand priority rules on the planning server.
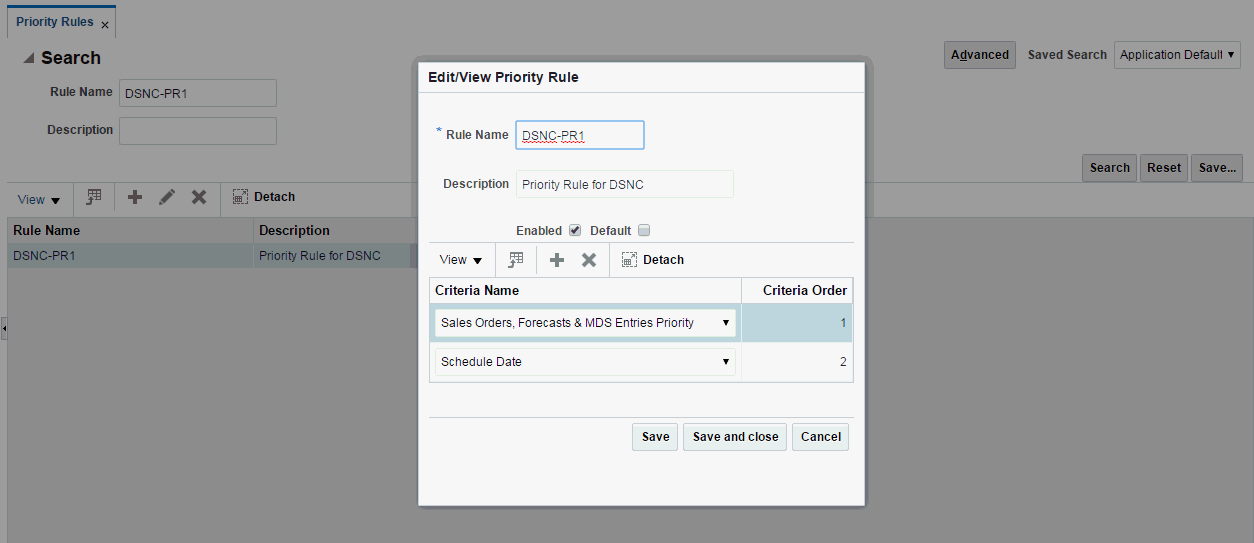
The corresponding forms window is called Priority Rules. Its description is in the section Demand Priority Rules of the Defining Supply Chain Plans chapter.
Manage Transit Times
Manage Transit Times
Click the Manage Transit Times link to view the Transit Times tab in the content area.
You use Manage Transit Times to define and modify:
-
Shipping networks
-
Shipping methods
Cross Instance Versus Source Instance
You can define cross instance shipping networks using the Transit Times tab. With this tab you can also define new shipping networks and ship methods for existing shipping networks.
You can only define same instance shipping networks in the planning instance. The planning system uses these new definitions without running a new collection. Use the Transit Times page
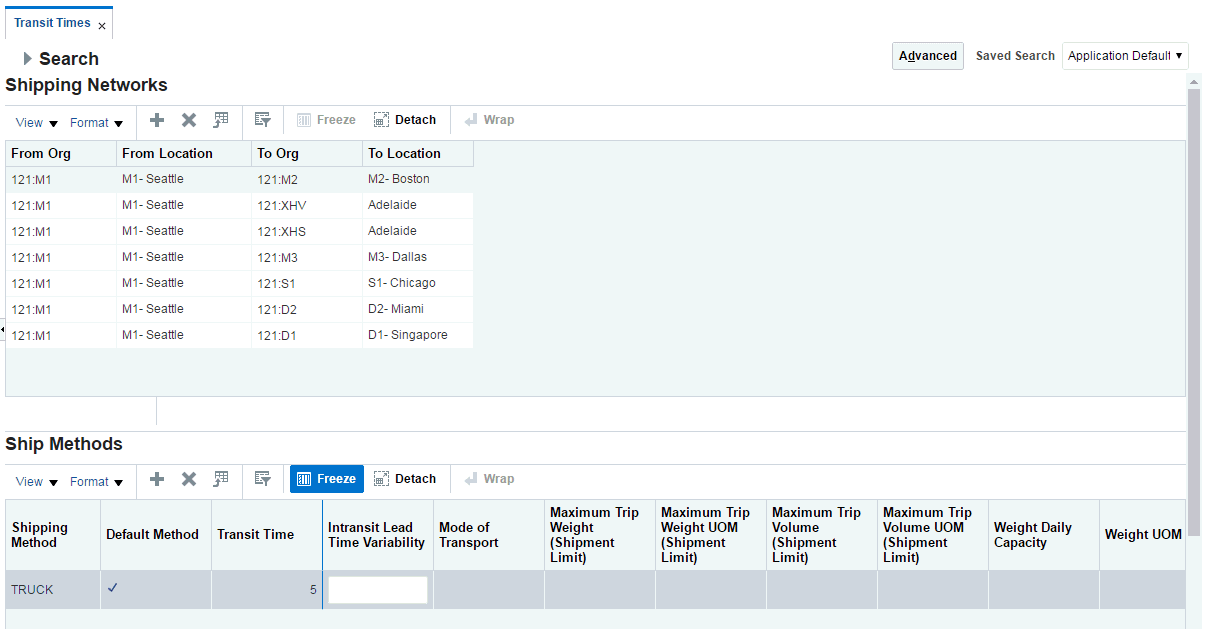
The corresponding forms window is called Transit Times. Its description is in the section Modeling Cross-Instance In-transit Lead-times of the Supply Chain Plan Cross-Instance Planning chapter.
Manage Item Simulation Set
Use this view to make proposed adjustments to item attributes to simulate their effect on a plan results (run a simulation plan).
The corresponding Web Tools page window is called Item Simulation Set. Its description is in the section Item Simulation Set Oage of the Planner Workbench chapter
Manage Bill of Resources
See Master Production Scheduling Using Rough-Cut Simulations.
Manage Organization Security
This section shows the impact of organization security on Supplier Planning Work Area pages. Your responsibilities determine which organizations you are authorized to access. Generally, you cannot see information on Service Planning Work Areas pages that you are not authorized to access.
Items Page
On the Items page, you can only search, view, and access items in organizations you are authorized to access.
Example: Authorized Organizations
You have access to the following organizations, as defined by your responsibilities:
-
SLC:M1
-
SLC:M2
Plan1 plans the following organizations:
-
TST:M1
-
TST:M2
-
TST:M3
-
SLC:M1
-
SLC:M2
When you view the Items window, you cannot see any items in these organizations:
-
TST:M1
-
TST:M2
-
TST:M3
Exception Page
On the Exceptions page, you can only search, view, and access exceptions of items from organizations that you are authorized to access.
Note: Exception page organization security is also applicable to related exceptions.
Supply Chain Bill Page
Organization security applies to the root node of the Supply Chain Bill. In other words, only organizations you're authorized to access appear underneath the root node. However, organization security does not apply to the underlying tree tables, so at these levels the structure you see includes view-only non-authorized organizations.
Product Definition Page
When viewing the Product Definition page, you only see information associated with organizations you are authorized to access. This includes the following:
-
Components
-
Substitute components
-
Routing operations
-
Operations resources
-
End Item substitutes
Notes Page
You can only view item notes of those items in organizations that you are authorized to access.
Material Plan Page
On the Material Plan page, you can only search, view, and access orders from Organizations that you are authorized to access. This applies to all pages accessed through the Material Plan page.
The list of values for the organization field in the tool bar only includes those Organizations that you are authorized to access. Also, the displayed Grand Total is only for the Organizations that you are authorized to access.
Supplies and Demands Page
On the Supplies and Demands page, you can only search, view, and access orders from Organizations that you are authorized to access. This also applies all pages accessed through the Supplies and Demands page.
Organization security also applies to pegging. You can only search, view, and access items in the pegging tree from organizations you are authorized to access. As you move down the pegging tree, once you reach an item in an organization that you are not authorized to access, you cannot see any items at that level or below.
Pegging Examples
You have access to the following Organizations:
-
SLC:M1
-
SLC:M2
-
SLC:M3
Example 1
Item A, in Organization SLC:M1, has the following pegging tree.
| Item | Organization | Visibility | |||
|---|---|---|---|---|---|
| A | SLC:M1 | Visible | |||
| B | SLC:M2 | Visible | |||
| B1 | SLC:M2 | Visible | |||
| B2 | SLC:M2 | VisibleVisible | |||
| C | SLC:M2 | Visible | |||
| C1 | SLC:M2 | Visible | |||
| C2 | SLC:M4 | Not Visible | |||
| C21 | SLC:M4 | Not Visible | |||
| C22 | SLC:M4 | Not Visible |
Pegging displays only the pegging tree items from visible organizations. You are not authorized to access Organization SLC:M4, so those items are not shown.
Example 2
Item D in Organization SLC:M1 has the following pegging tree. The planning system displays only the pegging rows marked visible for Item D. Item E2 belongs to Organization TST:M1, which you are not authorized to access. As a result, you do not see the pegging tree section below E2, even though you are authorized to access the items below E2.
| Item | Organization | Visibility | |||
|---|---|---|---|---|---|
| D | SLC:M1 | Visible | |||
| E | SLC:M2 | Visible | |||
| E1 | SLC:M2 | Visible | |||
| E2 | TST:M1 | Not Visible | |||
| F | SLC:M3 | Not Visible | |||
| F1 | SLC:M3 | Not Visible | |||
| F2 | SLC:M3 | Not Visible | |||
| F21 | SLC:M3 | Not Visible | |||
| F22 | SLC:M3 | Not Visible |
Plan Options Page
When viewing or configuring Plan Options, you can only view and configure organizations that you are authorized to access. You can only view plans associated with organizations that you are authorized to access. Also, the Organizations list of values in the Organizations tab only shows organizations that you are authorized to access.
Queries
Organization security does not limit your ability to set up queries. However, the results of queries only display information associated with organizations that you are authorized to access.
Delete Plan
You can only delete plans whose owning organization is an organization that you are authorized to access.
Manage Instances
Use the Manage Instances page to configure and display information about instances.
To display the Manage Instances page, select the Plan Inputs tab, navigate to the Plan Input Links accordion panel, and click the Manage Instances link.
The corresponding Oracle Forms window is Application Instances. See chapter Setting Up Source and Destination Instances, section Creating a VCP Destination Instance, in Oracle Value Chain Planning Collections Implementation Guide.
Manage Supplier Capacity Flexfences
Use this page to specify the tolerance (in percent) to an increase in capacity that a supplier may indicate.
The corresponding Oracle Forms window is Supplier Capacity, Supplier Flexfences. Its description is in the chapter Planner Workbench, Supplier Capacity Window, Supplier Flexfences Tabbed Pane.
Collect Flat File Data – Self Service
Use this page to access self-service collections.
It opens the page Load Data Files.
For collections information, see Overview of Value Chain Planning Collections in Oracle Value Chain Planning Collections Implementation Guide.
Distribution Planning Work Area
Overview
You use the Distribution Planning Work Area for distribution plans. Its overall look-and-feel is the same as the Supply Planning Work Area. However, some of its options and features are different. These changes occur when you select a distribution plan in the distribution folder of the Plans accordion panel.
Header
The Header section for the Distribution Planning Work Area functions the same as the Supply Planning Work Area.
You view the preferences window by selecting the gear icon at the upper right of the header section.
Plans Tab
Plans
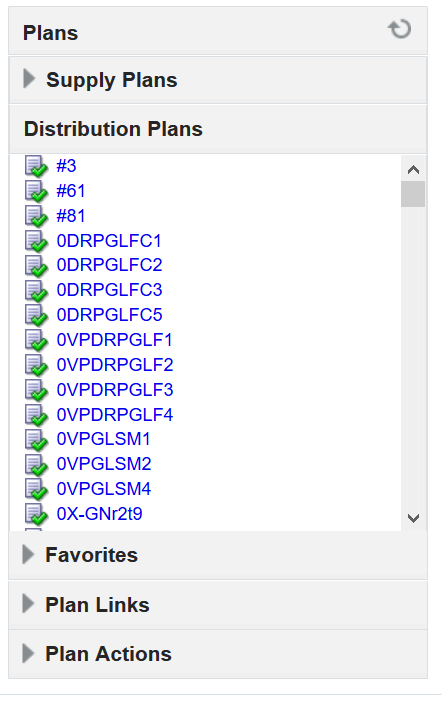
The Plans accordion panel has two folders: one for Supply Plans and one for Distribution Plans. When you select a distribution plan, the distribution plan features and options become available.
Favorites
DRP Favorites function the same as SPWA Favorites. For more information, see the section Favorites in the chapter Supply Planning Work Area.
You will see the Distribution Planning Work Area query results displayed in a regular table.
Plan Links
You display different types of views with the Plan Links accordion panel
The available DRP plan links are:
-
Exceptions
-
Items
-
Material Plan
-
Supplies and Demands
-
Supply Chain Bill
-
Trips
-
Vertical Plan
Exceptions
The Exception Details screen allows you to query by Exception type and pull up each exception detail record.
For information on the Exception Details window, see Exception Details Window in the chapter Supply Chain Plan Exception Messages and the chapter Planner Workbench.
For a listing of DRP exceptions and exception groups, see Distribution Plan Exception Groups in the chapter Running and Analyzing Distribution Plans.
The table below lists available columns in the default Exception Details window. The user can add columns to the window and save the layout.
| Column |
| Organization |
| Category |
| Item |
| Order Type |
| Customer |
| Customer Site |
| Supplier |
| Supplier Site |
| Exception Type |
| Exception Date |
| Order Date |
| Action Taken |
From the Drill To dropdown list you can drill to these other windows:
-
Material Plan
-
Resource Plan
-
Orders
-
Related Exceptions (see below)
Related Exceptions Screen
The Related Exceptions screen is the same as the Exception Details screen but without the Search section. It opens up as a new tab when you drill down to it from a row (or rows if multi selected) in the Exception Details screen.
You can also drill down to the Related Exceptions screen from a row (or rows if multi selected) in the Orders screen.
For example:
-
If you select “Related Exceptions” in the Orders screen from a row corresponding to a sales order that is late, you will see the list of related exceptions for the Late replenishment for sales order exception.
-
If you select “Related Exceptions” in the Orders screen from a row that corresponds to a purchase order that has an “Order with insufficient lead time” exception, you will see the list of sales orders / forecast at risk exceptions that are related exceptions of Orders with insufficient lead time.
Items
This displays the Items window for a distribution plan.
Material Plan
Distribution planning supports a multi-org material plan with an org selection list much like the org selection list available in the SPP Service Planning Work Area. The material plan bar for distribution plans contains the same controls as the one for supply plans. However, some menu options are different (see below).
Material plan output is impacted by the organizations selected in the organization dropdown list.

To create and manage organization lists, select the Org List button.
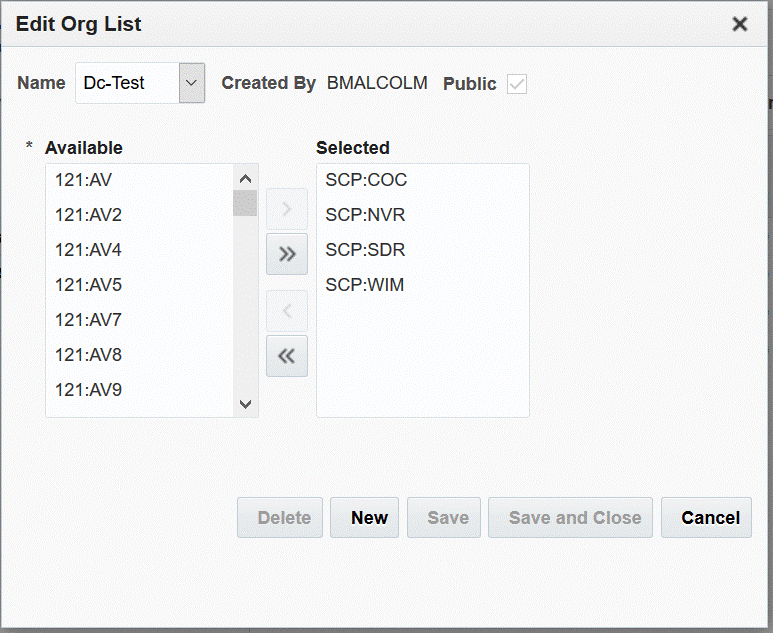
Material Plan Menu Options
Material Plan > Actions
-
Setup
-
Export to Excel
Selecting Setup displays the Setup window.
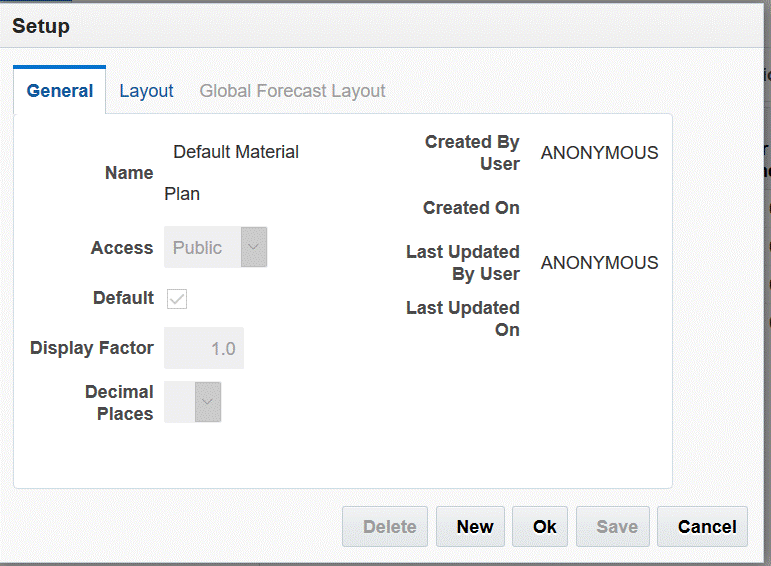
Material Plan > View
-
Hide Totals
-
Show Transfer Organizations Details
-
Include Internal Shipments
-
Horizontal View
Drill To
-
Items
-
Exceptions
-
Supplies
Layout
-
Default Material Plan
Other notes regarding Distribution Material Plans:
-
In addition to using the expand collapse feature, you can create a material plan with the “Transfer Organizations” column.
-
When the measure is Outbound Shipments, Requested Outbound Shipments, or Outbound in Transit, the organizations shown are “transfer to” organizations.
-
When the measure is Inbound Shipments, Requested Inbound Shipments, or Inbound in Transit, the organizations shown are “transfer from” organizations.
Global Forecast
The Global Forecast Material Plan contains the following rows:
-
Original
-
Cumulative Original
-
Consumed
-
Cumulative Consumed
-
Current
-
Consumed Current
-
Expired Forecast
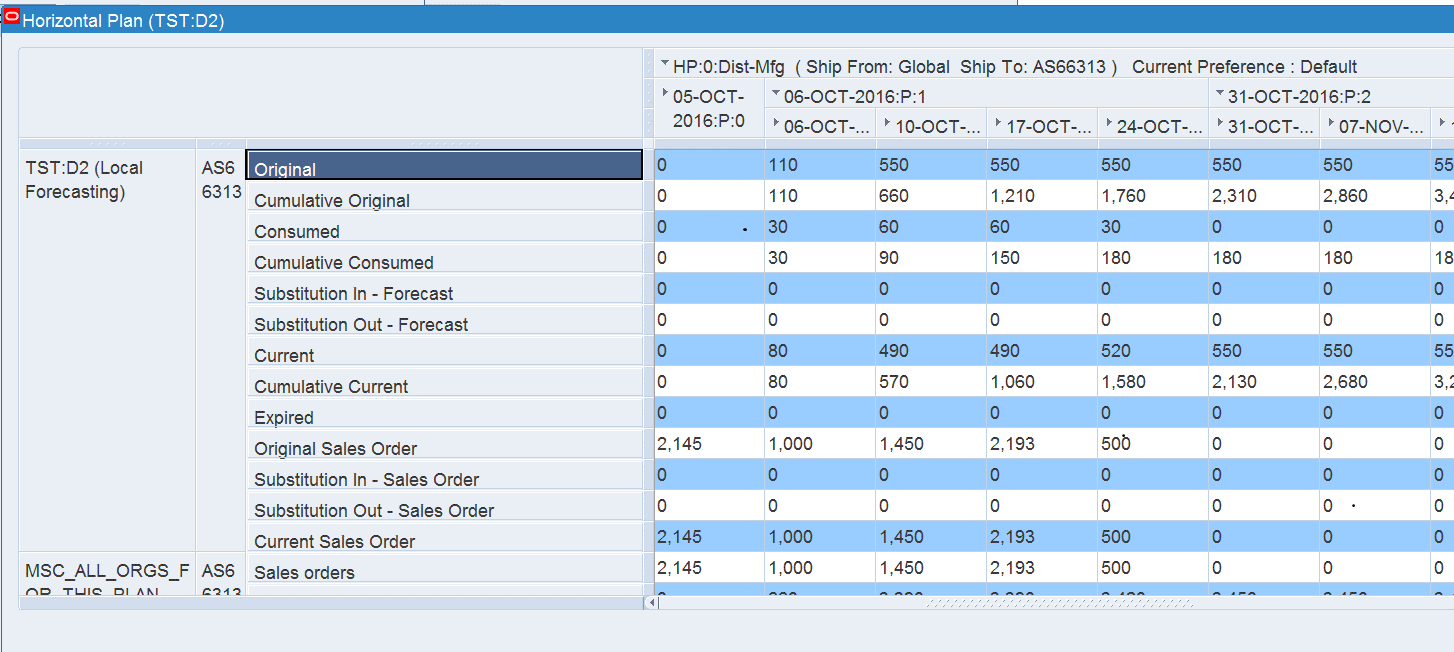
For more information on global forecasting, see the section Global Forecasting in the chapter Running and Analyzing Distribution Plans.
Supplies and Demands
The Supplies and Demands view displays information about supplies and demands associated with the current distribution plan. For more information see the section Supplies and Demands of this chapter.
Supply Chain Bill
Select this link to see a muli-level view of the supply chain for an end item. For more information see the section Supply Chain Bill in this chapter.
Plan Actions
Select Plan Options to display the Plan Options window for viewing and editing plan options.
The Plan Options window has four tabbed areas:
-
Main tab
-
Aggregations tab
-
Organizations tab
-
Decision Rules tab
For detailed information on DRP plan options see Setting Distribution Plan Options in the chapter Defining Distribution Plans.
Launch Plan
You view the Launch Plan window by selecting Launch Plan under Plan Actions.
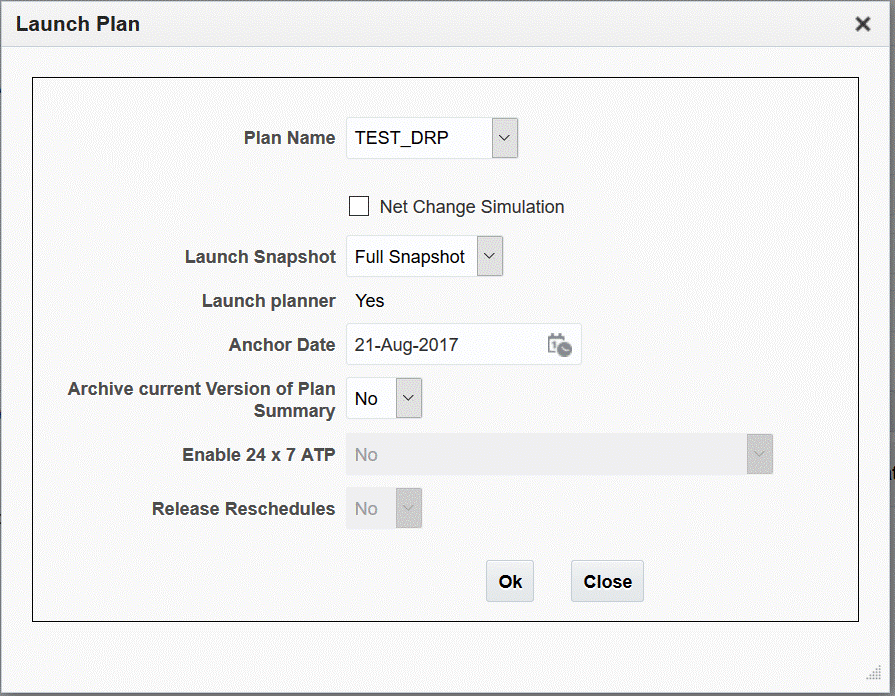
Net Change Simulation
On the Launch Plan window check Net Change Simulation (see previous image) to run a net change simulation plan.
For more information, see the section Net Change Replan in the chapter Supply Chain Plan Simulations.
Release Plan
Select Release Plan to release the plan to production.
Delete Plan
Select Delete Plan to delete the current plan.
Plan Inputs Tab
The Plan Inputs tab contains two accordion panels:
-
Favorites
-
Plan Input Links
Favorites
You can store Favorites here as well as in the Plans Tab.
Plan Input Links
Expand the Plan Input Links accordion panel to display the available plan links. Plan Input Links for distribution plans are the same as those for supply plans.
Analyzing Master Production Scheduling Plans
To analyze the MPS Plan, you use these pages:
-
Build Plan: A combination of the material and resource plans for end assemblies. See Build Plan.
-
Gantt Chart: A visual representation of the load on resources that are on the bill of resources. It displays the information grouped into time slots (buckets). See Gantt Chart for Master Production Scheduling
You can only use these pages for plans in which you select plan option Aggregation > MPS In-line recalculation.
You cannot release planned orders from the MPS plan.
Inline Recalulation
Inline recalculation is a quick replan of the MPS plan after you make changes using:
-
Build Plan: Modify planned order quantities for end assemblies and/or resources.
-
Gantt Chart: Move slots to a different week or alternate slot.
To start inline recalculate, click Recalculate.
Inline recalculation is not a complete engine rerun. The following example indicates the nature of the inline recalculation process.
Aero-Power Generation Unit (EX-HV-493) is the top level MPS item, with a BOR containing other MPS items:
-
Aero Engine PW-404 (quantity 1)
-
Turbine Trailer (quantity 2)
-
Turbine Base (quantity 3)
-
Control House (quantity 1)
-
Generator Trailer (quantity 1)
Aero Engine PW-404 is supplied from an internal organization. The BOR lists all MPS items on EX-HV-493. The recalculation scope may include:
-
Quantity Change: An increase or decrease in EX-HV-493 quantity (a top level finished good item). The recalculation process calculates required assembly quantities, based on the BOR at various levels. Each of the key component quantities are inflated/deflated according to the BOR.
Resource requirements for all upstream and downstream resources are recalculated, and the overloads indicated on the Resource Plan in red.
-
Resource Availability Change: An increase in resource availability on the Resource Plan ensures that the overload is removed and MPS feasibility improves.
-
Creating New Planned Orders: When you update an empty (zero quantity) planned order field, recalculation creates a new planned order for the item.
Build Plan
The ASCP Build Plan is a combination of the typical MRP Material and Resource plans and is used in MPS planning to modify planned order quantities for end assemblies and/or resources. Users are also able to use a filter to select the end assemblies that they want to view in the build plan. Users are able to view changes in planned orders and resource overloads after performing inline calculations.
Note: This functionality is only available with Master Production Scheduling Inline Recalculation.
For more information, see Defining Supply Chain Plans > Master Production Scheduling Using Rough-Cut Simulations.
There is no directly corresponding Forms window. This page has information similar to the information in windows called:
-
Material Plan. Its description is in the section Material Plan of the Planner Workbench chapter.
-
Resource Availability (Details). Its description is in the section Resource Availability (Details) Window of the Planner Workbench chapter.
-
Resource Requirements. Its description is in the section Resource Requirements Window of the Planner Workbench chapter.
Accessing the Build Plan
-
Navigate to the Supply Planning Work Area.
-
Select a plan and then click the Build Plan link.
The Build plan is invoked from the link on the left of the Supply Planning Work Area and a pop-up window will be used to select the end items / categories for which the build plan will be displayed by moving them from the available area to the selected area.
Synching the Build Plan
The Material Plan and Resource Plan portions of the Build Plan can be scrolled horizontally independent of each other. To view the same time buckets on the Material Plan and Resource Plan, click the Synchronization button.
Editing the Build Plan
You can edit and change the planned order quantities on the build plan. The UI will also permit updating of resource availability prior to running the on-line recalculation process.
Also, the current method of creating new planned order will also be supported on the material plan portion of the build plan.
Impact of Planned Order Edits on the Build Plan
Planners view and edit planned order quantities on the Build Plan. They will also be able to insert a new planned order where one does not exist
Changing the assembly quantity also changes the component dependent demand, but not the component planned orders. ASCP uses the BOR offset to figure out where to place the dependent demand.Calendars are ignored while trying to derive the offset.
Since updating the dependent demand may lead to negative PAB at the component level, this will help planners figure out that re-balancing needs to be done. You can rebalance supply at the lower level by either updating the component quantities or by performing a plan run / batch replan.
The measures displayed on the build plan that needs to be updated include Dependent Demand and Gross Requirements Updated planned orders are firmed automatically when edits are complete.
While modeling using the BOR, the constraints that only the Organizations that are on the BOR will be displayed on the build plan.