Demand Planning Setup
This chapter covers the following topics:
- Setup Instances
- Setup Data Collections
- Setup Demand Planning Dimensions
- Setup Demand Planning Hierarchies
- Setup Demand Planning Levels
- Setup Demand Planning Hierarchy Levels
- Setup Profile Options
- Demand Planning Setup Procedures
Setup Instances
Oracle Advanced Planning (consisting of the modules Advanced Supply Chain Planning, Demand Planning, Global Order Promising, Inventory Optimization, and Collaborative Planning) employs a component architecture that allows transaction processing and planning to occur in separate database instances (source and destination instances, respectively.) If you are deploying or intend to deploy any Oracle APS module using this multi-instance configuration, please note the following important restriction:
-
Both source and destination database instances must be on the same major release of the Oracle database. Either both source and destination instances must be on Oracle 8i, or both instances must be on Oracle 9i. The configurations (source on 8i, destination on 9i) and (source on 9i, destination on 8i) are not supported.
Instances setup is required to link the source Oracle Applications instance to the Demand Planning Server instance.
Many companies use Demand Planning for only a few of their ASCP-enabled organizations. To help save time on collections, you can configure Demand Planning to collect data from only those ASCP-enabled organizations that are also enabled for Demand Planning.
To set up instances:
-
Choose the Demand Planning System Administrator responsibility.
-
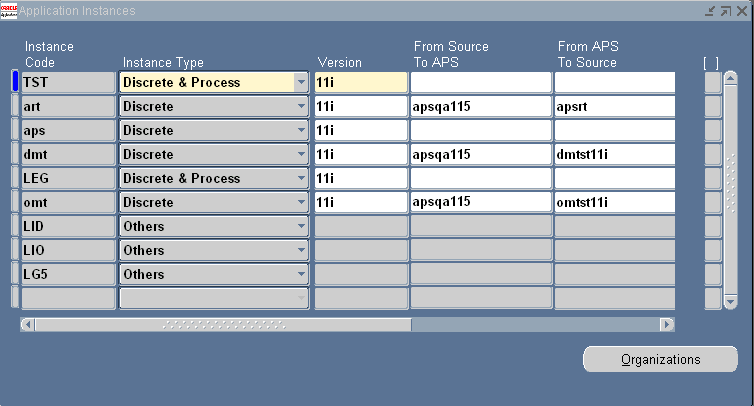
To open the Application Instances window, select Setup > Instances in the Navigator.
-
Complete the fields in the Application Instances window as follows:
-
Select Organization.
The Organization window appears.
-
Select the Enabled option for all inventory organizations in the source instance that contain data collected by the Demand Planning Server for demand planning purposes.
-
Select the Demand Planning Enabled option for those ASCP-enabled organizations from which you also want to retrieve Demand Planning data.
Setup Data Collections
The purpose of this setup is to collect the basic data required for initialization. It collects names of inventory organizations and product categories from the Oracle Applications source instance to the Demand Planning Server. It caches data essential to the collection process in Demand Planning Server so that collections can proceed.
To set up data collections:
-
Choose the Demand Planning System Administrator responsibility.
-
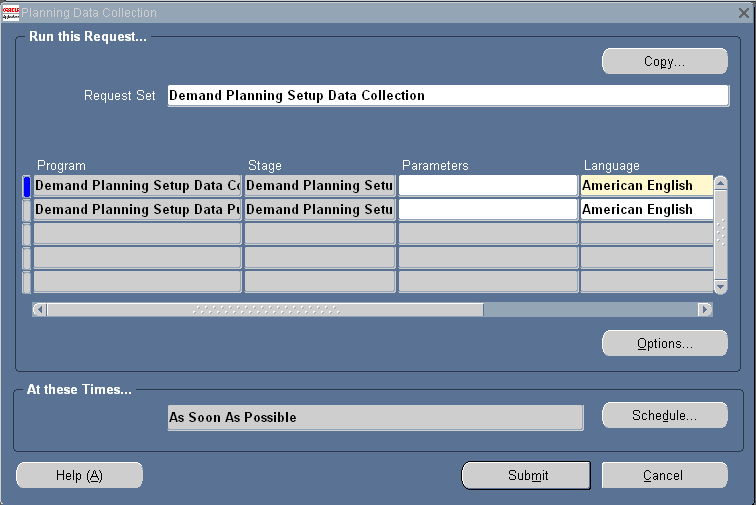
To open the Planning Data Collection window, select Setup > Setup Collections in the Navigator.
-
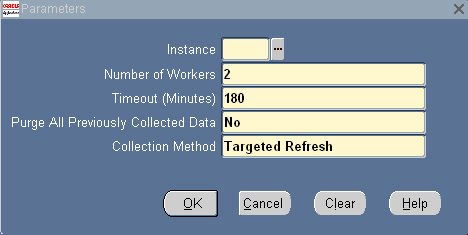
To open the Parameters window, select the Parameters field in the Planning Data Collection window.
-
Complete the fields in the Parameters window as follows:
Important: Do not run setup data collection in Complete Refresh mode if you are using Oracle Demand Planning and Oracle Advanced Supply Chain Planning. Do one of the following:
-
Run set up data collections in Targeted Refresh mode.
-
Run Oracle Advanced Supply Chain Planning collections to gather entities used in Oracle Demand Planning. In this case, you don't need to run setup data collections Oracle Demand Planning.
-
-
Make your selections and select OK.
The Planning Data Collection window reappears.
-
If you select the second parameters field, a window appears that allows you to select the Instance and Number of Workers. However, this is not required because from this window you are launching a concurrent collection request set and the parameters you selected for the first parameter field are the ones that apply.
The source instance inventory organizations from which Setup Collections retrieves data are dictated by the organizations selected by the user in Setup Instances.
Setup Collections needs to be run each time the following changes:
-
The source instance from which data is collected.
-
The source instance inventory organizations from which data is collected.
-
The product categories in the source inventory organizations.
-
Customer or supplier information.
-
To purge fact data:
-
Choose the Demand Planning System Administrator responsibility.
-
In the Navigator, select Other >Purge Fact Data.
-
Enter a From Date and a To Date.
You need to specify the purge data range in such a way that it covers the entire time period for booked dates as well as requested date.
Choose Yes for Booking Data.
-
Select OK.
-
Submit.
Setup Demand Planning Dimensions
Simple demand data has two dimensions: product and time. With each demand, there is an associated item and a time bucket. Product and time are the minimum dimensions required by Oracle Demand Planning in any demand plan. However, in many global organizations, data comes from various sources. For example, sales forecasts may come from various parts of the world, from various sales groups and teams, from various business groups, and from key customers. Similarly, shipments can be made from various business units and distribution centers.
In this situation, typically a number of planners will be working on specific segments of the data for demand analysis and forecast enhancements. Oracle Demand Planning facilitates this by providing the following most frequently used dimensions: ship from location, geography, sales channel, demand class, and sales representative besides the product and time dimensions. In addition, Oracle Demand Planning provides two user-defined dimensions. The hierarchies for user-defined dimensions need to be setup while they are seeded for other dimensions.
Note: This setup step is typically not needed unless user defined dimensions are needed. For details on user defined dimensions and customization of hierarchies within dimensions, see: Customizing Demand Planning hierarchies.
To set up Demand Planning dimensions:
-
Choose the Demand Planning System Administrator responsibility.
-
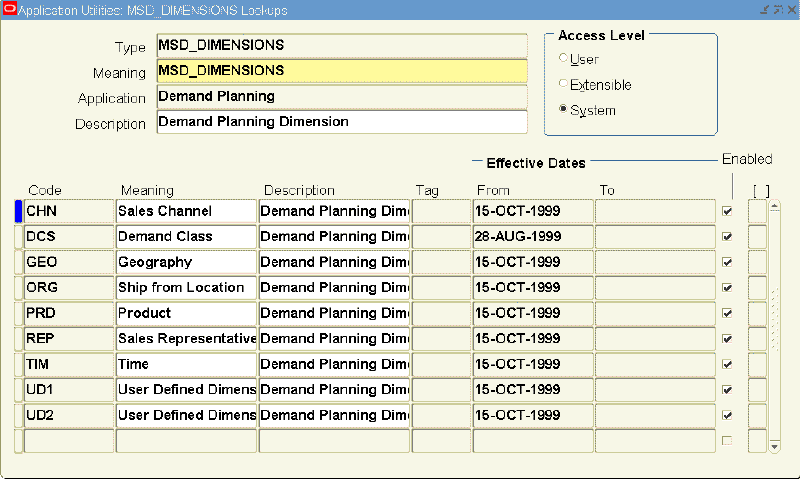
To open the Application Utilities: MSD_DIMENSIONS Lookups window, select Setup > Dimensions in the Navigator.
-
Use this window to view the six predefined Demand Planning dimensions and to change the Meaning and Description names. Two user defined dimensions are also available.
-
Complete the fields in the Application Utilities: MSD_DIMENSIONS Lookups window as follows:
Setup Demand Planning Hierarchies
Each dimension may contain multiple hierarchies. For example, the product dimension may contain the Product Category and Product Family hierarchies. A product (an automobile model: the Corvette) may fit into both a Product Family (a marketing brand: Chevrolet) and a Product Category (a vehicle style: sports car). Each hierarchy may need to be analyzed separately. Oracle Demand Planning provides a set of most frequently used hierarchies for the six dimensions:
Hierarchies are used for aggregating data, allowing one hierarchy to be used for allocation while others are used for reporting.
Demand Class Dimension
-
Demand Class Hierarchy
-
Demand Class > All Demand Classes
-
Product Dimension
-
Product Category Hierarchy
-
Product > Product Category > All Products
-
-
Product Family Hierarchy
-
Product > Product Family > All Products
-
-
Interest Type Hierarchy
-
Product > Interest Type > All Products
-
Time Dimension
-
Manufacturing Calendar Hierarchy
-
Day > Mfg. Week > Mfg. Period
-
-
Gregorian Calendar Hierarchy
-
Day > Month > Quarter > Year
-
-
Fiscal Calendar Hierarchy
-
Day > Fiscal Month > Fiscal Quarter > Fiscal Year
-
-
Composite Calendar Hierarchy
-
Day > Week > Month > Quarter > Year
-
Geography Dimension
-
Geography Hierarchy
-
Ship to Location > Region > Country > Area > All Geography
-
-
Zone Hierarchy
-
Ship to Location > Customer Zone > Zone > All Geography
-
-
Customer Group Hierarchy
-
Ship to Location > Customer > Customer Group > All Geography
Note: The customer group information is not available in 11i source. To support the customer group hierarchy in 11i source, you should modify the customer group collection source views. For details on how to modify the source views, see: Customizing Demand Planning hierarchies.
-
-
Customer Class Hierarchy
-
Ship to Location > Customer > Customer Class > All Geography
-
Ship From (Organization) Dimension
-
Organization Hierarchy
-
Organization > Operating Units > Legal Entity > Business Group > All Organizations
-
-
Legal Entity Hierarchy
-
Organization > Legal Entity > All Organizations
-
-
Business Group Hierarchy
-
Organization > Operating Unit > Business Group > All Organizations
-
Note: The Organization hierarchy and Legal Entity hierarchy are mutually exclusive and cannot be used in the same demand plan.
Sales Channel Dimension
-
Sales Channel Hierarchy
-
Sales Channel > All Sales Channels
-
Sales Representative Dimension
-
Sales Representative Hierarchy
-
Sales Rep > Sales Manager 1 > Sales Manager 2 > Sales Manager 3 > Sales Manager 4 > All Sales Rep
-
-
Sales Group Hierarchy
-
Sales Rep > Sales Group 1 > Sales Group 2 > Sales Group 3 > Sales Group 4 > All Sales Rep
-
Note: This setup step is typically not needed, unless custom hierarchies are needed. For details on customization of hierarchies within dimensions, see: Customizing Demand Planning hierarchies.
To set up Demand Planning Hierarchies:
-
Choose the Demand Planning System Administrator responsibility.
-
To open the Demand Planning Hierarchies window, select Setup > Hierarchies in the Navigator.
-
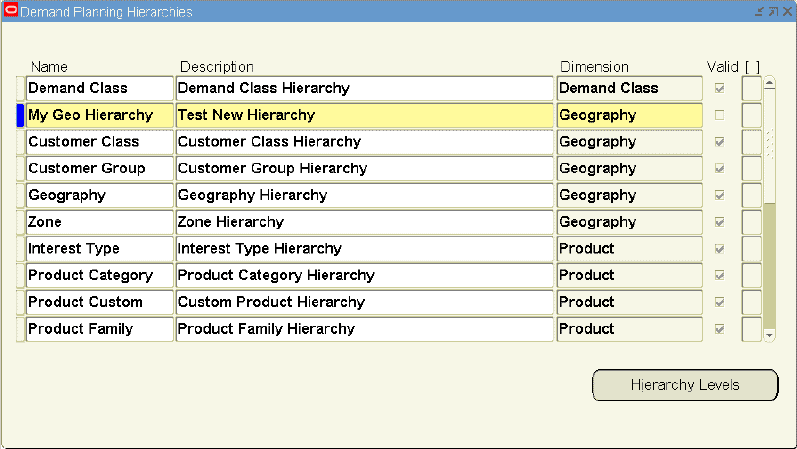
Use the Demand Planning Hierarchies window to view the preseeded hierarchies and their associations with a Demand Planning Dimension defined in the previous window.
In this example, the hierarchy name My Geo Hierarchy has been created for the Geography Dimension with a description of Test New Hierarchy.
You can see in the example that multiple hierarchy names can be created for a dimension as in the case of Geography that has Customer Group, Geography, My Geo Hierarchy, and so forth.
-
Complete the fields in the Demand Planning Hierarchies window as follows:
Field Function Legal Values Name Hierarchy Name VARCHAR2(30) Description Detailed description for the hierarchy name VARCHAR2(240). Note that users can change the names. Dimension Demand Planning Dimension Name List of Values. Note that users can changes the names.
One of the major implementation issues is to decide on the dimensions and hierarchies to be used for demand analysis. Oracle Demand Planning provides a set of six predefined dimensions along with their hierarchies. These preseeded hierarchies are designed to meet most business needs. However, it will be necessary for the users to map their specific business process to these dimensions and hierarchies.
Dimension viewer
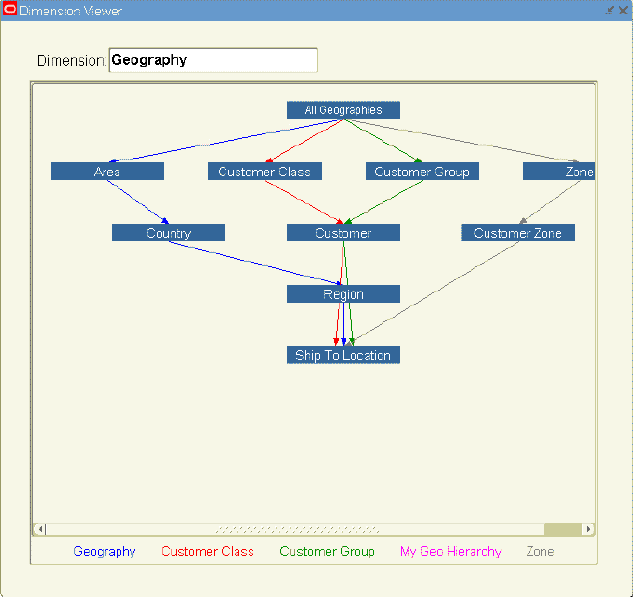
One of the key concepts and features in Oracle Demand Planning is hierarchy levels by which users can view, compare and analyze demands of their products over various dimensions, for example, geography and organizations. It is difficult to visualize the complex interrelationships between hierarchy levels and dimensions where multiple hierarchy levels and dimensions exist. This feature enables you to see the various hierarchy levels and their relationships within each dimension in a user friendly graphical display, helping you to visualize the complex interrelationships.
Dimension viewer features include:
-
The ability to view the hierarchical relationships of levels within each dimension.
-
A tool to train new users on the concepts of dimensions and hierarchies.
The Dimension Viewer shows Levels, Hierarchies, and Hierarchy Levels windows.
To run the dimension viewer:
-
Choose the Demand Planning System Administrator responsibility.
-
In the Navigator, select Other > Dimension Viewer.
-
Select in the Dimension field.
The Dimensions window appears.
-
To display the hierarchies for the selected dimension, select the dimension for which you want to view the hierarchy.
Setup Demand Planning Levels
Demand Planning Levels represent different ways of aggregating data within a Dimension.
Note: This setup step is typically not needed, unless custom hierarchies are needed. For details on customization of hierarchies and levels within dimensions, see: Customizing Demand Planning Hierarchies.
To set up Demand Planning levels:
-
Choose the Demand Planning System Administrator responsibility.
-
In the Navigator, select Setup > Levels.
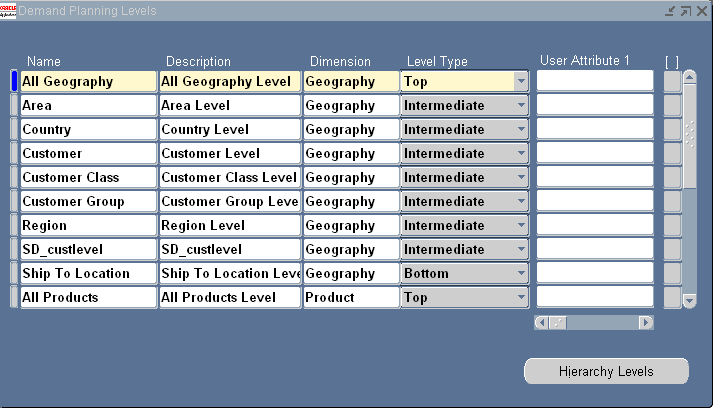
The Demand Planning Levels window appears. Use this window to view preseeded hierarchy levels and identify the position of the level in the dimension.
-
In this example, the following level names: All Geography, Area, Country, Region, and Ship To Location have been defined for the Geography Dimension with detailed description names. The positioning of the levels in the hierarchy have also been defined with All Geography being the top level and Ship to Location the bottom level. Area, Country, and Region level names are the intermediate Levels.
If there are no level values defined for the Geography dimension in the planning server and the profile MSD: Customer Attribute is not set, then the Demand Planning Engine does not collect the Ship-to-Location values. This reduces the size of level values and booking shipment cube.
After data collection, you can check the collection log file to view the action taken, its impact, and how it can be reverted back.
-
Complete the fields in Demand Planning Levels window as follows:
Field Function Legal Values Name Level Name. VARCHAR2(30). Note that users can change the name. Description Detailed Description for the Level. VARCHAR2(240). Note that users can change the description. Dimension The Demand Planning Dimension to which the Level is associated. Lookup Values. Level Type Code The position of the Level in a Hierarchy. Lookup Values 1: Top, 2: Bottom, and 3: Intermediate. User Attributes 1-5 (This field is not currently functioning.) The User Attribute associated with the Level. VARCHAR2(240).
Setup Demand Planning Hierarchy Levels
A Hierarchy Level is created by associating a hierarchy name with a level name.
Note: This setup step is typically not needed, unless custom hierarchies are needed. For details about customization of hierarchies and levels within dimensions, see: Customizing Demand Planning hierarchies.
To set up Demand Planning Hierarchy levels:
-
Choose the Demand Planning System Administrator responsibility.
-
To open the Demand Planning Hierarchy Levels window, select Setup > Hierarchy Levels in the Navigator.
-
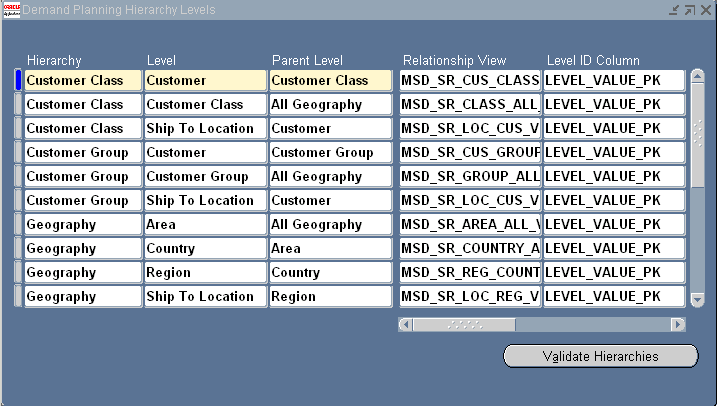
In this example, the level name of Area is associated with parent level name of All Geography, the level name of Country is associated with the parent level name of Area, the level name of Region is associated with the parent level name of Country, and the level name of Ship To Location is associated with parent level name of Region for the Hierarchy Name Geography. This forms one of the hierarchies in the Geography Dimension. For details, see: Setup Demand Plan Hierarchies.
In this window, you can view the associations between levels to parent levels through the same Hierarchy. Once the links are defined and saved, you can use Validate Hierarchies to verify that the levels in a Hierarchy are valid.
-
Complete the fields in the Demand Planning Hierarchy Levels window as follows:
Setup Profile Options
Demand Planning profile options begin with three letters: MSD. The letter is an abbreviation for Manufacturing, Supply Chain, Demand Planning.
To set up profile options:
-
Choose the System Administrator responsibility.
-
To open an empty Personal Profile Values window, select Profile > Personal in the Navigator.
-
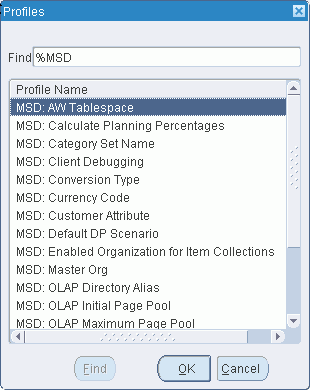
Search for MSD% to open the Profiles window with the MSD profile options.
-
Select the profile you want to use.
-
Complete the fields in the Personal Profile Values window as follows:
For a list of all the MSD profile options, see: Demand Planning Profile Options.
For a complete list of all of the MSD profile options, see: the Profile Options appendix in the Oracle Advanced Planning and Scheduling Implementation and User's Guide.
Demand Planning Setup Procedures
The typical sequence for setting up Demand Planning is as follows:
-
Customize Hierarchies (if needed): establish the way the information is aggregated from a lower level (for example, product) to the higher level (for example, product family). For details on the Dimensions, Hierarchies, Levels, and Hierarchy Levels setup windows, see: Setup Demand Planning Dimensions and Setup Demand Planning Hierarchies. For details about customizing hierarchies, see: Customizing Demand Planning hierarchies.
-
Setup Instances: specify the source application instance from where the data is collected. Organizations can also be enabled while setting up instances. The data pertaining only to the enabled Organization is then being collected. For details on this setup step, see: Setup Instances.
-
Customize Data Streams (if needed): define a new data stream such as Customer Forecast. Use this step when the preseeded data streams such as Booking History, Shipment History, and Manufacturing Forecast are not adequate for your demand planning process and you need to use more information.
-
Setup Collections: collect basic setup related data pertaining to organizations and product category sets. For details, see: Setup Data Collections.
-
Setup Profile Options: select a data collection mode (one-step and two-step), category set, and currency conversion. For details, see: Setup Profile Options.