Lease and Finance Management Command Center Configuration
Lease and Finance Management Command Center Configuration
Setting Up Lease and Finance Management Command Center
The Oracle Lease and Finance Management application configuration and setup must be completed after the installation and common configurations are completed as described in My Oracle Support Knowledge Document 2495053.1, Installing Oracle Enterprise Command Center, Release 12.2.
Setup and Configuration Steps
To complete setup of the Oracle Lease and Finance Management Command Center, you must perform the following:
-
Setting Up Payment Predictions
Setting Profile Options for Lease and Finance Management Command Center
Set a value for the profile options to specify how Lease and Finance Management Command Center controls access to and processes data.
| Profile Option Name | Description | Default Value |
|---|---|---|
| OKL: ECC History Load Years | Sets the number of years used to load history. Choices are One Year of History, Two Years of History, or Three Years of History. This profile option is used for the Vendor Cash Flow dashboard. | Two Years of History |
| OKL: ECC Contract History Years | This site level profile option sets the number of years to load contract history. Choices are One Year of History, Two Years of History, Three Years of History, or Four Years of History. | Two Years of History |
| OKL: ECC Receivables History Years | Sets the number of years used to load receivables history. Choices are Three Months of History, Six Months of History, Twelve Months of History, etc. This profile option is used for the Lease Cash Flow Command Center dashboards. | Three Months of History |
| OKL:ECC Meter Management History Years | Sets the number of years used to load meter management history. Choices are One Year of History, Two Years of History, Three Years of History, or Four Years of History. This profile option is used for the Meter Management dashboard. | One Year of History |
| OKL: AR ECC History Years | This site level profile option sets the number of years to load accounts receivable history. Set this profile at the site level to filter contracts to upload data to the Payment Prediction dashboard based on this reference date. | Three Months of History |
Configuring Descriptive Flexfields for Search
Enterprise command centers support Descriptive Flexfields (DFFs) that enable you to search on DFF attributes. After you configure DFFs, you must run the data load process, which ensures that the DFF attributes are available in the command center.
Note: You must initially run the Metadata Load concurrent program to load the DFF setup information to Enterprise Command Center. After the DFF setup is initially loaded, running Incremental or Full Load concurrent programs on a regular basis will maintain the DFF attributes.
For additional information on configuring and customizing flexfields, see the Oracle E-Business Suite Flexfields Guide and My Oracle Support Knowledge Document 2495053.1, Installing Oracle Enterprise Command Center Framework, Release 12.2.
The following table describes the DFFs available in the Oracle Lease and Finance Management dashboards:
| Dashboard | Data Set | DFF Title | DFF Name | DFF Attribute Group Name |
|---|---|---|---|---|
| Lease Cash Flow Command Center | okl-ar-trx | Transaction Information | RA_CUSTOMER_TRX | Transaction Information |
| Lease Cash Flow Command Center | okl-cash, okl-unapp-cash | Receipt Information | AR_CASH_RECEIPTS | Receipt Information |
| Lease Cash Flow Command Center | okl-ast-ctr-dtls | Contract Additional Information | OKL_K_HEADERS_DF | n/a |
| Lease Cash Flow Command Center | okl-ast-ctr-dtls | Contract Line Additional Information | OKL_K_LINES_DF | n/a |
| Lease Cash Flow Command Center | okl-ast-qte-dtls | Lease Quotes Additional Information | OKL_LEASE_QUOTES_DF | n/a |
| Lease Cash Flow Command Center | okl-ast-qte-dtls | Termination Quote Additional Information | OKL_TRX_QUOTES_DF | n/a |
Loading Lease and Finance Management Command Center Data
The Lease and Finance Management Command Center Data Load concurrent programs are used for loading lease data into the Enterprise Command Center. You can find the concurrent programs from the Submit Request window. The data load concurrent programs include:
-
Lease ECC Data Loader
-
Lease ECC Meter Management Loader
-
Lease ECC AR Cash Data Loader
-
Lease Period Balances Data Load
-
Lease Asset Management ECC Loader
-
Lease ECC Contract Revision Data Load
Note: Before you load data from Oracle E-Business Suite into the Lease and Finance Management Command Center, ensure that your EBS data is accurate and current by running any concurrent programs that impact attributes used in the command center.
Run the concurrent program from the Submit Request window.
To load Lease data into Lease and Finance Management Command Center
-
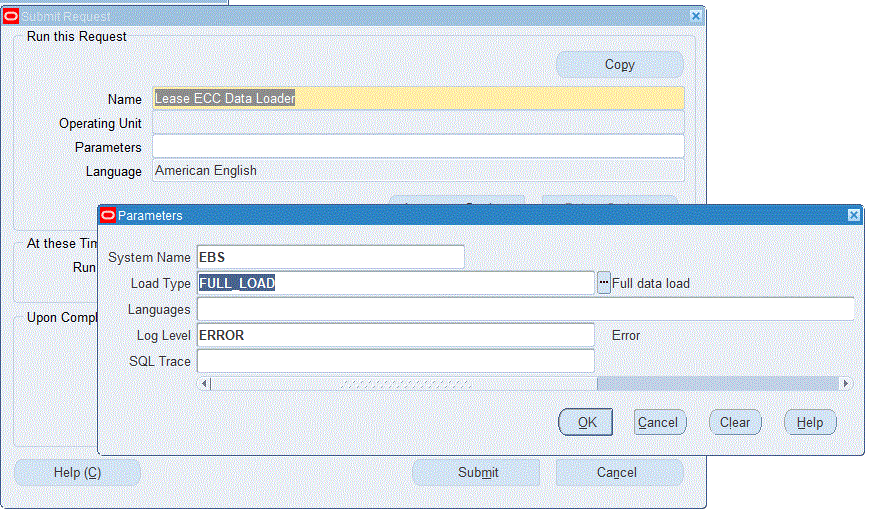
Navigate to the Lease ECC Data Loader and other concurrent programs. The Parameters window appears.
-
In the Name field, enter a data load concurrent program. For example, enter Lease ECC Data Loader.
-
Select the appropriate load type:
-
Full Load: Loads all lease data and is required to be run for the first data load. If you select and run full load for subsequent requests, then this program clears all lease data from ECC and loads fresh data.
-
Incremental Load: Loads the data modified and updated from the previous load only. Incremental load should be scheduled to run as often as required to keep the ECC dashboard current.
-
Metadata Load: In this process, the application waits for other tasks such as consolidation, data entry, or other load processes to finish before proceeding to load the files.
-
-
Enter one or more language codes in the Languages field for the output. For multiple language codes, use the format AA,BB,NN. For example, enter US,AR,KO. If the field is blank, then the data will be loaded for the base language only (usually US).
-
Select the Log Level that you want the program to report. The default value is Error.
-
Select True to enable SQL trace. Otherwise, select False.
-
Submit the concurrent request.
-
Review your request using the Requests page.
-
Monitor data loading using the Data Load Tracking page of the ECC Developer responsibility.
To review request details
-
From the menu, click Requests. The Find Requests window appears.
-
Highlight the All My Requests radio button and click Find. The Requests window appears and displays all of your requests.
-
In the Requests window, select the row that contains your request and then click View Details. The Request Detail window appears and displays the ECC- Run Data Load information.
-
Click OK to exit and close the window.
Setting Up Payment Predictions
The following setup and configuration must be completed for the Payment Predictions dahboard to extract invoice data.
Register the application
Navigate to Setup > Predictions Applications to register and enable a prediction application. The Invoice Payment Prediction application is seeded. When you click the Register button, it will activate the Invoice Payment Prediction application.

The Invoice Payment Prediction application is then in Active status and you can proceed with the Invoice Prediction setup.
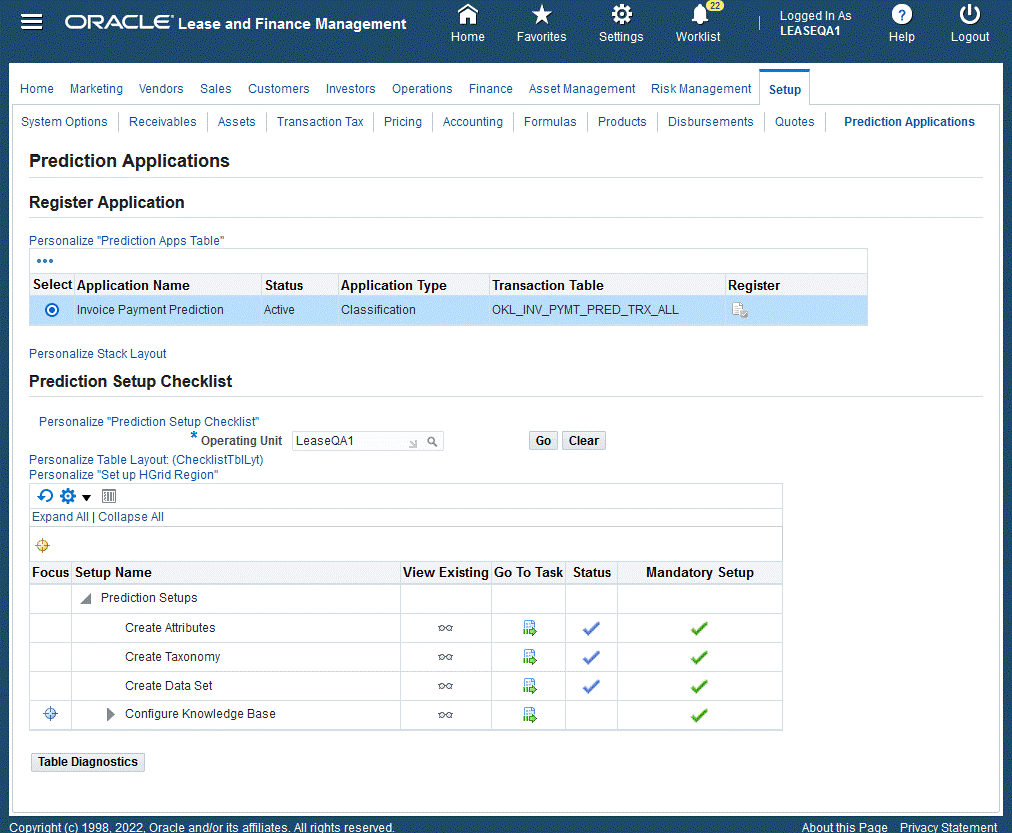
A Setup checklist provides userswith a list of items and order that the items must be performed and completed. Alongside the checklist items are mandatory setup steps and related status. Users can:
-
View Existing - Click the icon and the page appears
-
Go To Task – Click the icon to bring the user to that task
| Items | View Existing | Go To Task (Actionable) | Navigates to Tabs |
|---|---|---|---|
| Create Attributes | icon | icon (create/update) | Renders Attributes page |
| Create Taxonomy | icon | icon (create/update) | Renders Taxonomy page |
| Create Data Set | icon | icon (create/update) | Renders Data Set page |
| Configure Knowledge Base | icon | icon (create/update) | Renders Knowledge Base page |
Create, Update, and Remove Attributes
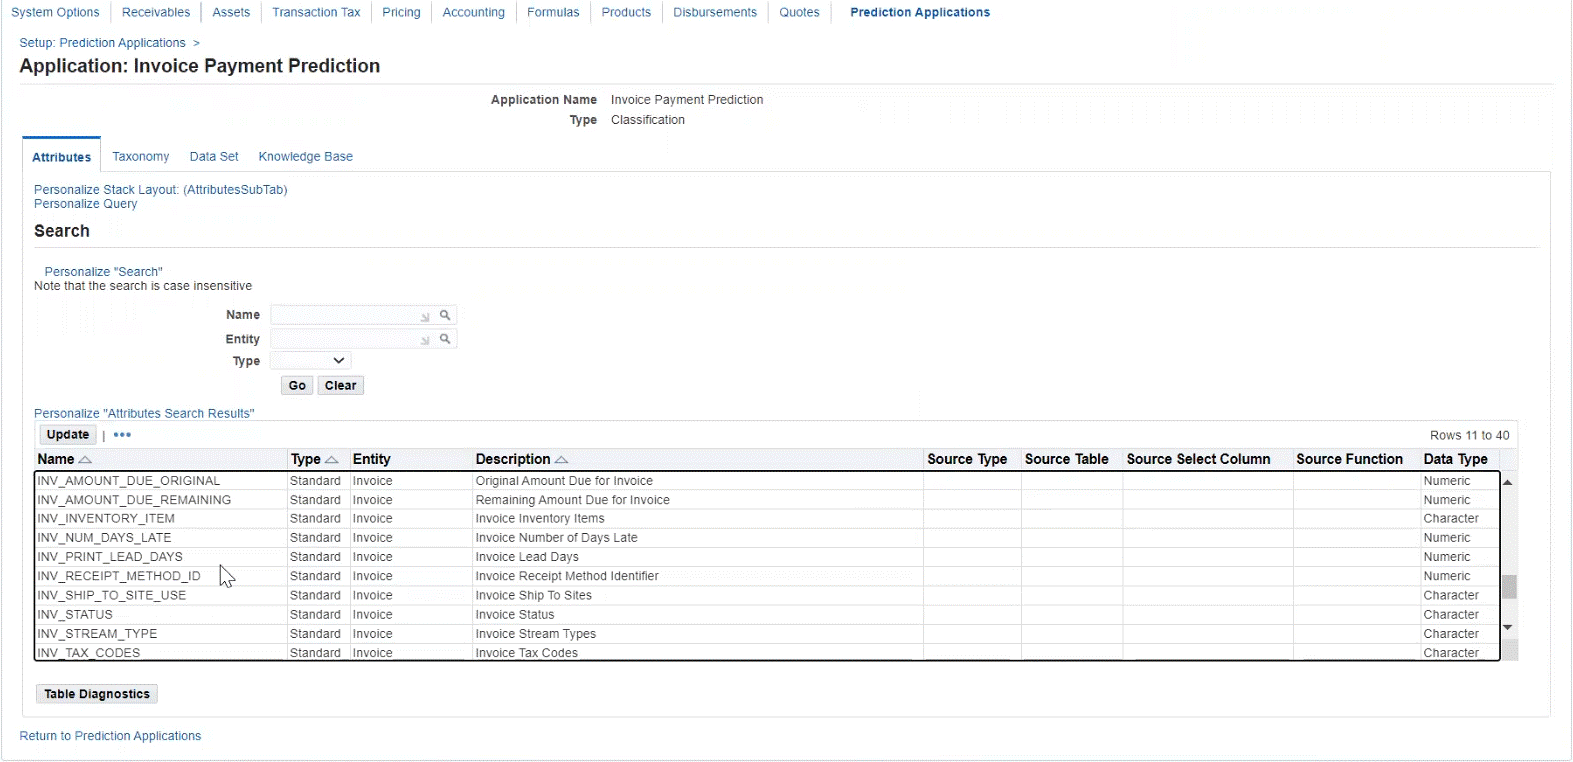
Users can create attributes from a list of standard (seeded) attributes, as well as create their own extended (custom) attributes. The attributes are factors which influence the payment of the invoice. This is used to predict the invoice payments if the payment will be made on time or will be late. Organizations can choose either standard attributes and/or define extended attributes that meet their business needs.
Users can:
-
Search for attributes
-
Name
-
Entity
-
Type (Standard for seeded, Extended for custom)
-
-
Add, update, or remove extended attributes
Users cannot update or remove any of the standard attributes.
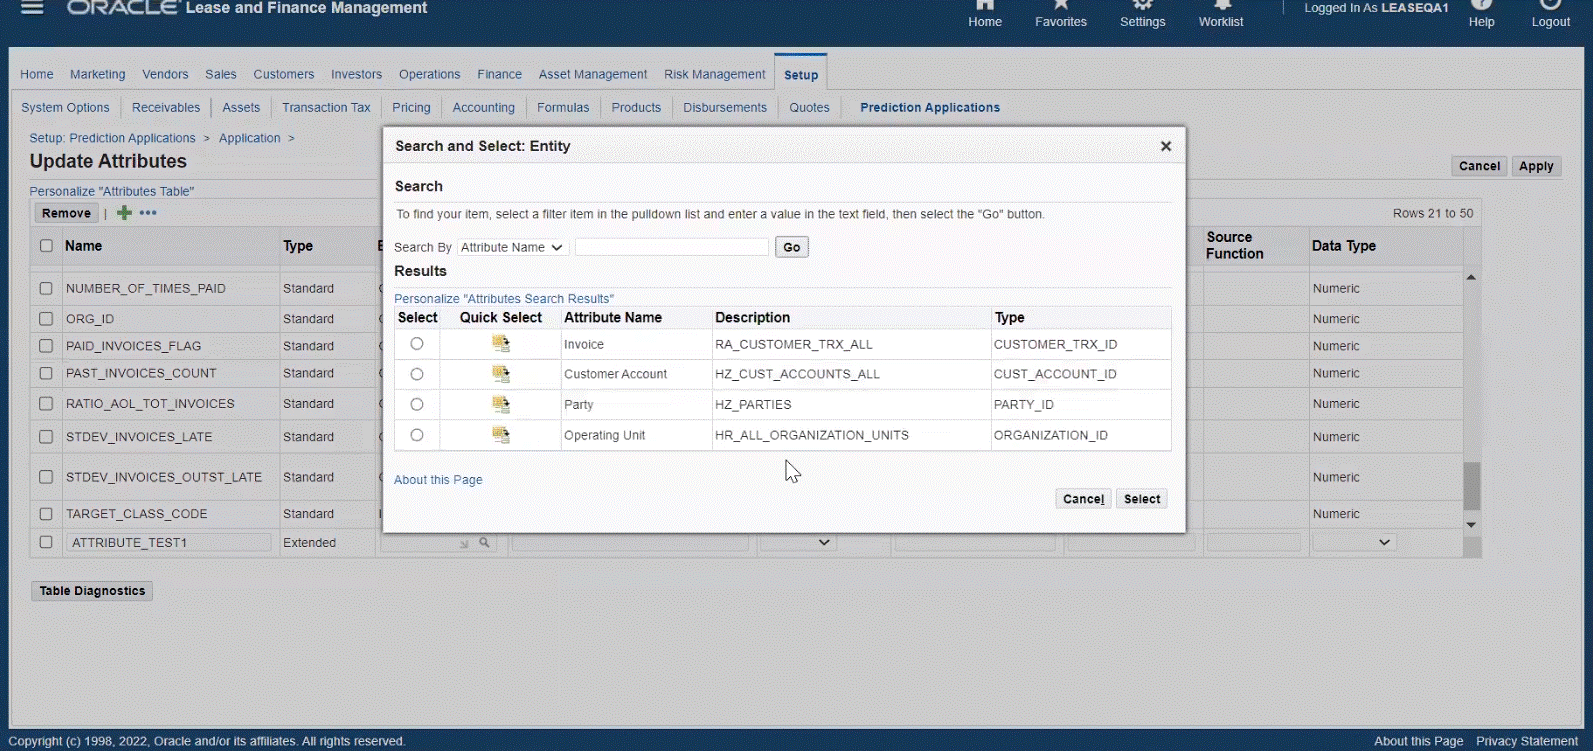
When updating attributes, users can add extended attributes and define the following below. There is on-screen validation to ensure that the data entered is valid. The application displays an error to the user if it fails validation. The attributes must be unique and no duplicates are allowed.
| Attributes | Required / Optional | Valid Values |
|---|---|---|
| Name | Required | Character |
| Type | Required | Extended |
| Entity | Required | Invoice, Customer Account, Party, Operating Unit |
| Description | Optional | Character |
| Source Type | Required | Table or Function |
| Source Table | Required | If Table selected as source type. Must be a valid table. |
| Source Select Column | Required | If Table selected as source type. Must be a valid column. |
| Source Function | Required | If Function selected as source type. Must be a valid function. Plsql will get executed while building the knowledge base. |
| Data Type | Required | Character or Numeric. Must be valid data type. |
Attributes
Updated Attributes

Create, Update, Delete, and Duplicate Taxonomy
Users can create a taxonomy and associate it to an application. Taxonomy is a method for categorizing and classifying a set of data or objects for target classes in which the predicted value should go into. For payment prediction, invoices are the data used. Users can:
-
Search for taxonomy
-
Name
-
-
Create, update, and delete a taxonomy
-
Duplicate a taxonomy
-
View details of the taxonomy
User cannot update or delete any of the standard taxonomies.
One seeded taxonomy Payment Predictions Aging is available and associated to the application: Invoice Payment Prediction. The Payment Prediction Aging has four buckets with category names listed below. Customers can use the seeded taxonomy or create their own according to their business requirements.
| Category Code | Category Name | Low Target Value | High Target Value | Display Name |
|---|---|---|---|---|
| 1 | On-Time | -9999 | 0 | On-Time |
| 2 | Short Delay | 1 | 30 | 1 to 30 Days Late |
| 3 | Medium Delay | 31 | 60 | 31 – 60 Days Late |
| 4 | Long Delay | 61 | 9999 | 61+ Days Late |
Taxonomy Details
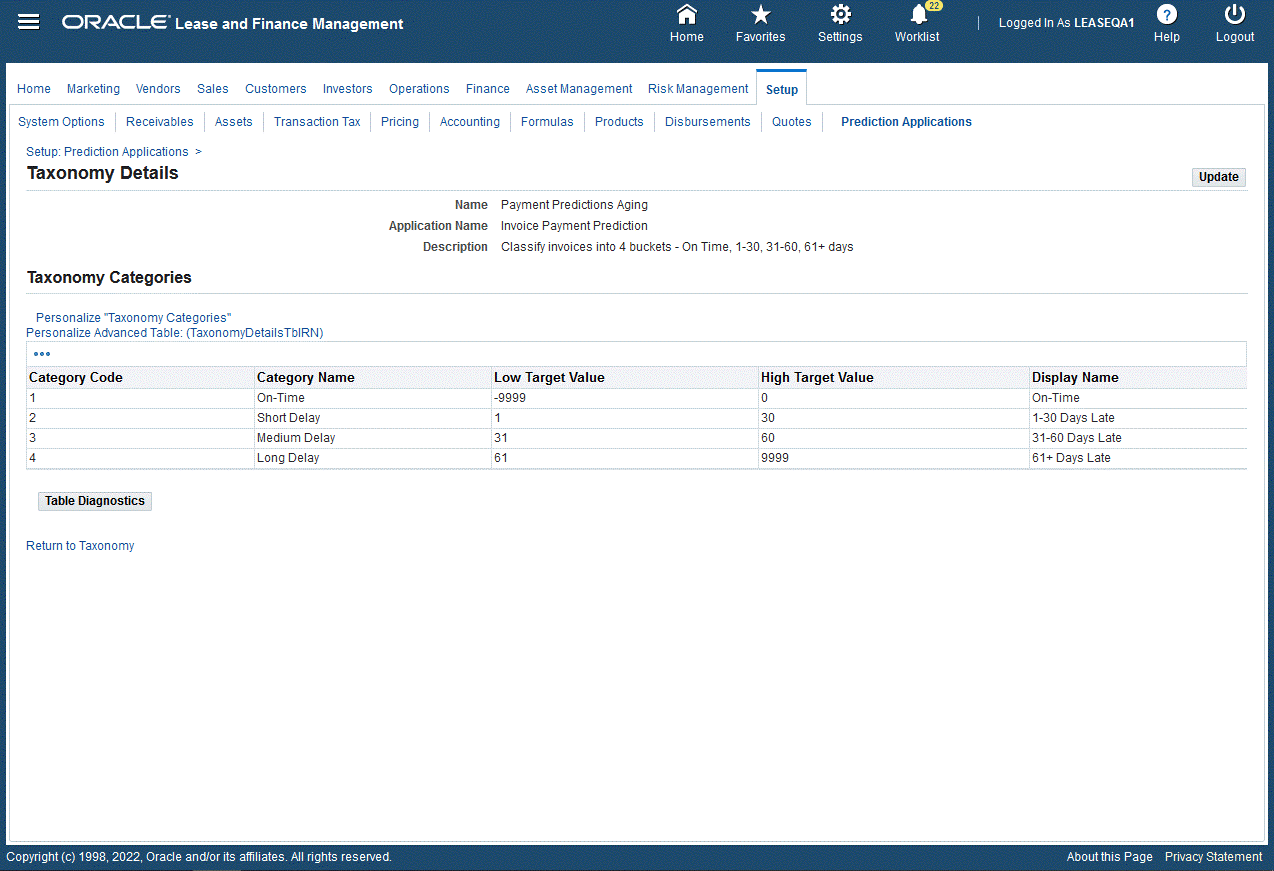
Creating Taxonomy
Complete the following steps:
-
In the Taxonomy page, click Create.
-
Enter taxonomy data in the Create Taxonomy page for Name and Description.
-
Enter Taxonomy Categories.
-
When the values of the taxonomy are defined, click Apply.
Column Values Required/Optional Description Category Code 1, 2, 3, 4 Seeded Seeded and cannot be updated Category Name On-Time, Short Delay, Medium Delay, Long Delay Seeded Seeded and cannot be updated. Used by Prediction Dashboard for buckets to classify likely payment prediction Low Target Value Numeric Required Must be an integer, continuous, and no gaps High Target Value Numeric Required Must be an integer, continuous, and no gaps Display Name Character Required Enter display name
Create, Update, Delete, and Duplicate the Data Set
Users can create a data set and associate it to an application. The data set determines which source data should be processed by the application. Associate the required attributes to the data set and attach it to the knowledge base. Customers can use the seeded data set or create their own. The seeded data set Receivables Invoices is provided and associated to the application: Invoice Payment Prediction. Users can:
-
Search for a data set
-
Name
-
-
Create, update, and delete a data set
-
Duplicate a data set
-
View details of the data set
-
Associate attributes to the data set
-
Enable or disable the attributes in the data set
Users cannot update or delete any of the standard data sets. If the data set that is associated to the knowledge base has been deployed, then the user cannot update or delete the data set.
Data Set
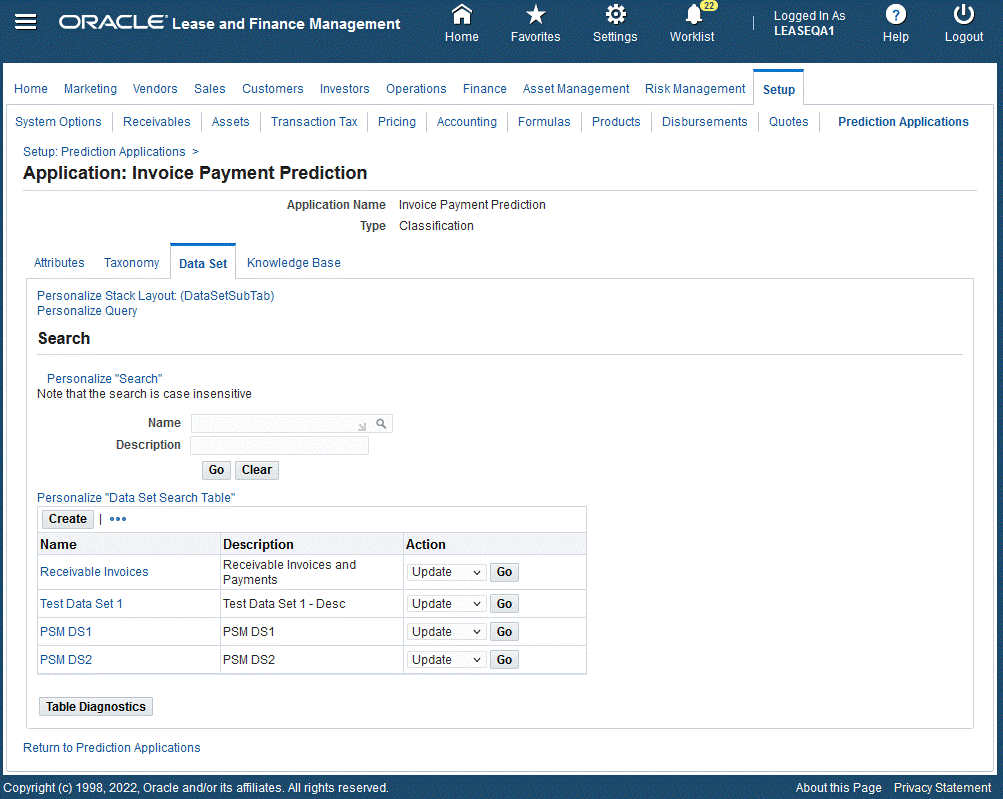
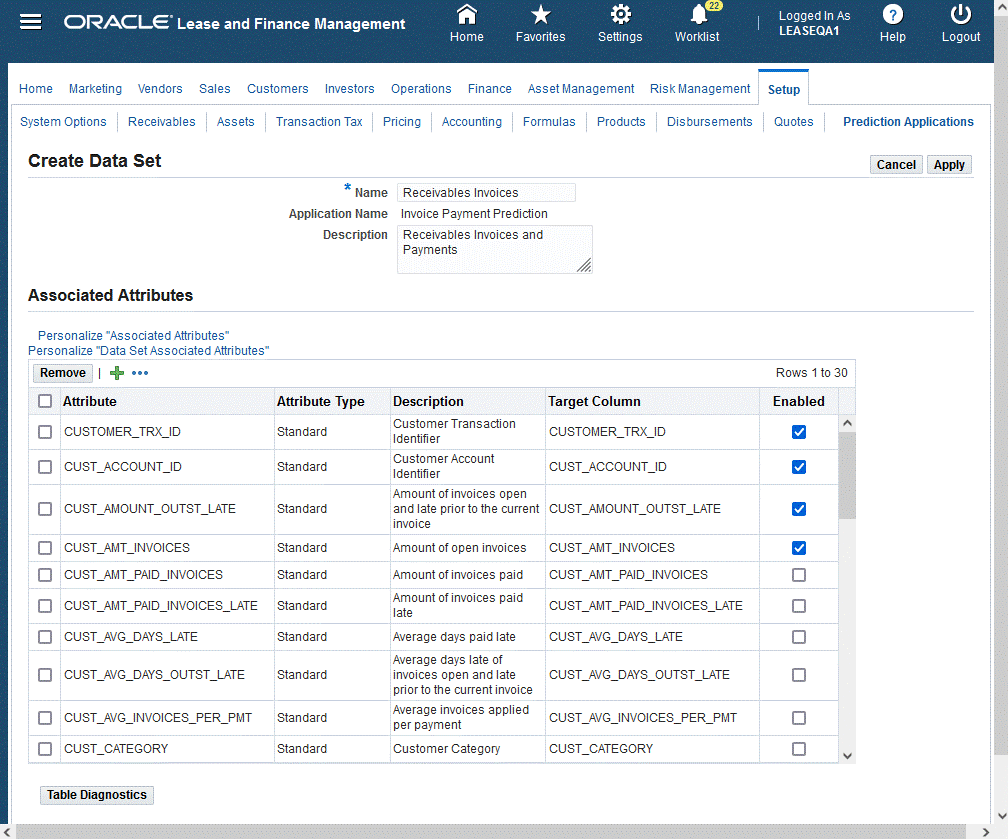
To create the data set:
-
Click Create in the Data Set page.
-
Enter data set data in the Create Data Set page for Name and Description.
-
Select from the list of Associated Attributes and click the Enabled box for those attributes to add to the data set. For any extended attributes, you must define the Target Column. The list of values for ther Target Column must map to the predictions results table. It stores the extended attributes in the predictions result tables.
-
When the associated attributes are selected, click Apply.
Create Data Set
Creating and Updating the Knowledge Base
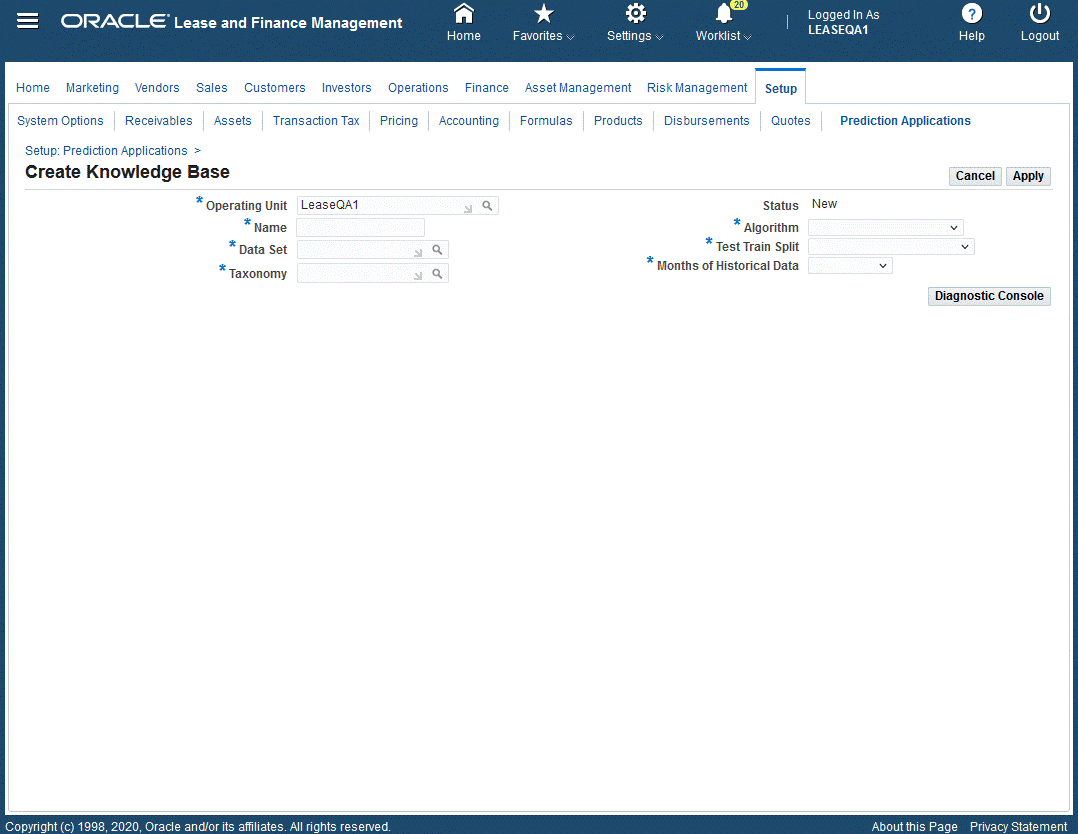
Users can create a knowledge base and associate it to an application. The knowledge base is a combination of the data set, taxonomy, algorithm, and historical data that is used to define a model. It provides the patterns that will be used by the machine learning algorithms to carry out the classification process. After the attributes, taxonomy, and data set have been defined, the user can create the knowledge base. Only one knowledge base is allowed per operating unit. The seeded knowledge base Payment Predictions Model is provided and associated to the application: Invoice Payment Prediction with the data set Receivables Invoices.
You can create the knowledge base by clicking the Go to Task icon from the Prediction Setup Checklist for the Configure Knowledge Base. The Create Knowledge Base page appears.
To create the knowledge base:
-
Enter the knowledge base data in the Create Knowledge Base page.
Attributes Values Required/Optional Description Operating Unit Enter OU Required Enter valid Operating Unit Application Name Invoice Payment Prediction Default Defaults to the application name Name Character Required Name of the Knowledge Base Data Set LOV Required Select the data set from LOV of standard or extended. The default for standard seeded is Receivable Invoices Taxonomy LOV Required Select the Taxonomy that is mapped to Invoice Payment Prediction. The default is Payment Predictions Aging Status Read only Display Status: New - when first created Incomplete - when any updates is done Valid - when passes validation Build - build is complete Deployed - when deployed Algorithm Drop-down list Required Select from list of Algorithms available:
Decision Tree, Random Forest, Support Vector MachineTest Train Split Drop-down list Required Select from list which determines the percentage used to train versus testing
70% to Train, 30% to Test, 75% to Train, 25% to Test, 80% to Train, 20% to TestMonths of Historical Data Drop-down list Required Select from drop down list the number of months to data to load to the staging model. Select from:
6 Months, 12 Months, 18 Months, 24 MonthsCreate Knowledge Base
-
Click Apply when the values of the knowledge base are defined.
Activate the Knowledge Base (Validate, Build, Deploy)
Users can activate the knowledge base.
Activate Knowledge Base
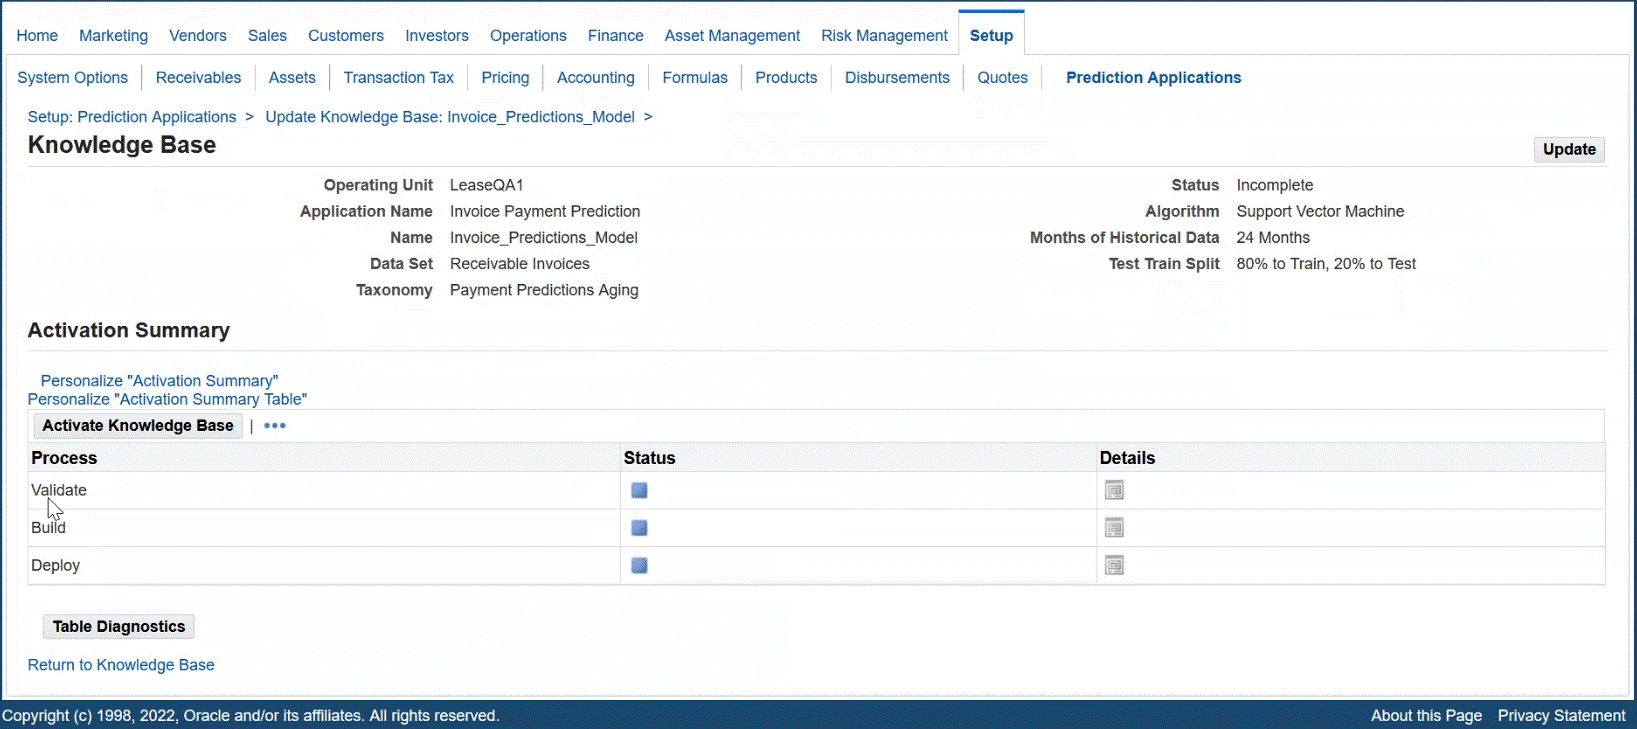
When the user clicks Activate Knowledge Base, the application guides the user through the validation, building, and deploying of the knowledge base.
Validate Knowledge Base
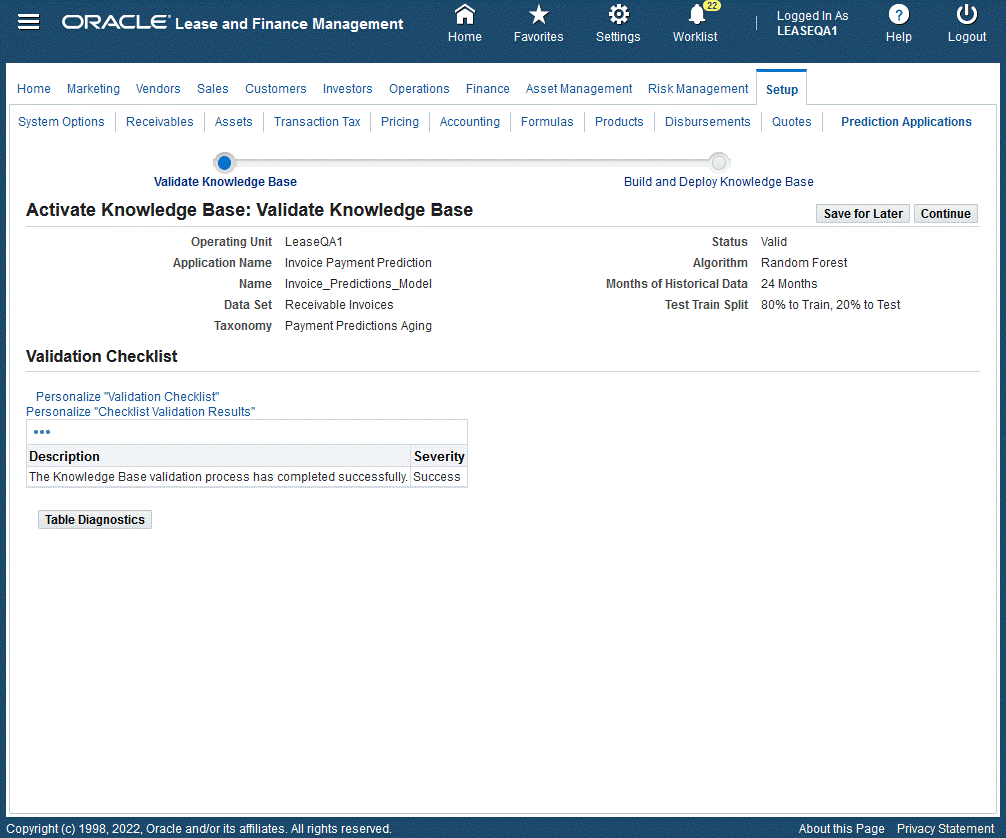
| Process | Status | Description |
|---|---|---|
| Validate | Valid – validation is successful | Validates the knowledge base model with all of the information provided. In the table above, if any validation fails, it will be listed in the Validation Checklist. |
| Build Two options:
|
Built – after successful completion of the concurrent program. The model is then ready to be deployed. | Builds the knowledge base. The user can continue on the train.
|
| Deploy | Deployed | Deploys the knowledge base. The user can continue on the train. Once the user is satisfied with the accuracy of the knowledge base, they can deploy the knowledge base. |
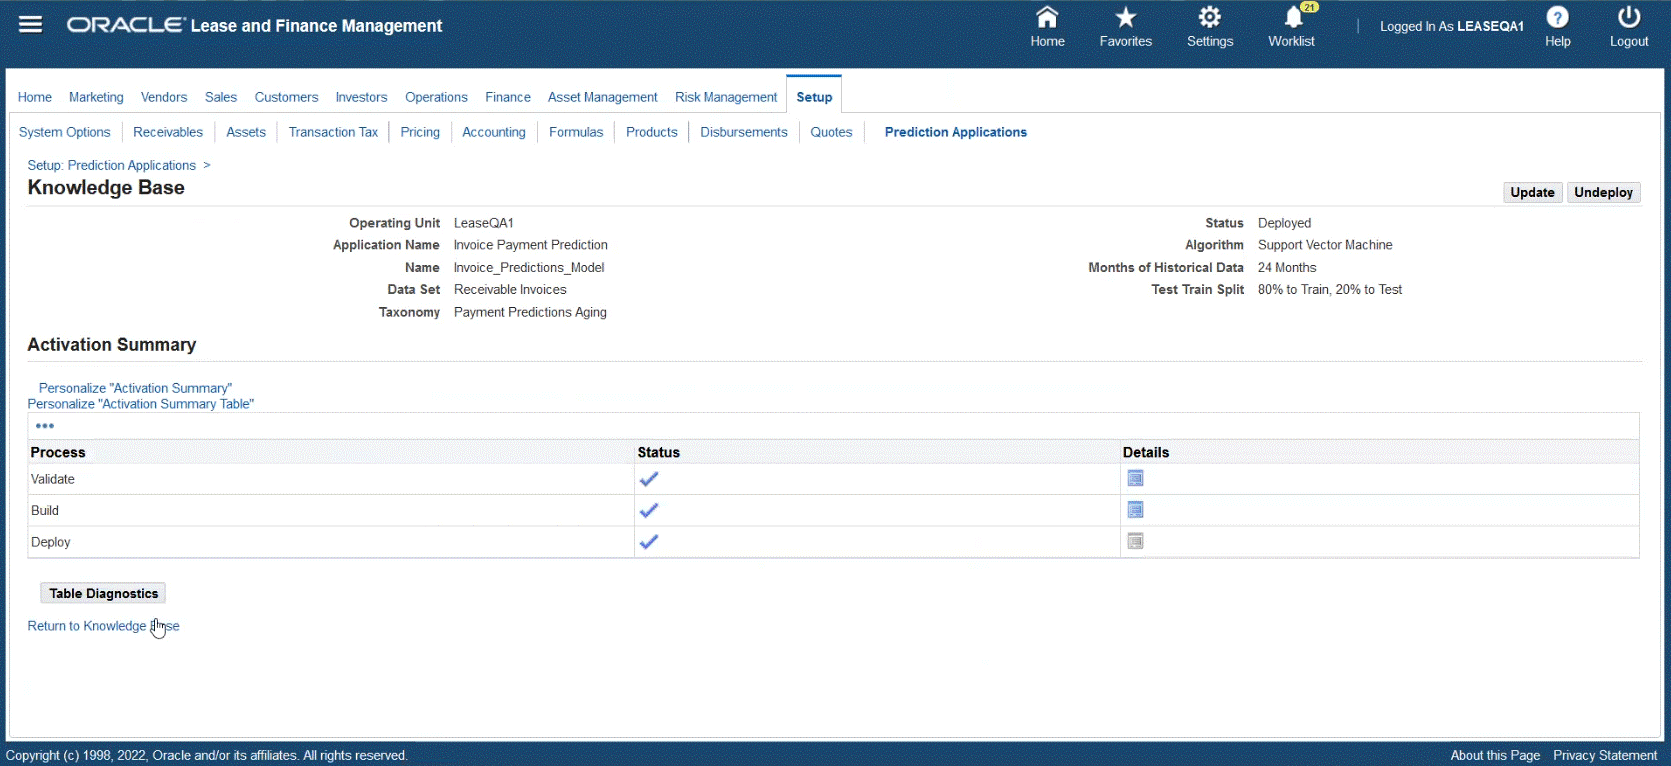
Undeploy the Knowledge Base
Users can update the knowledge base. If the knowledge base has been deployed, then the user must undeploy the knowledge base in order to make further changes.
Undeploy Knowlwdge Base
Verify the Accuracy of the Training Set
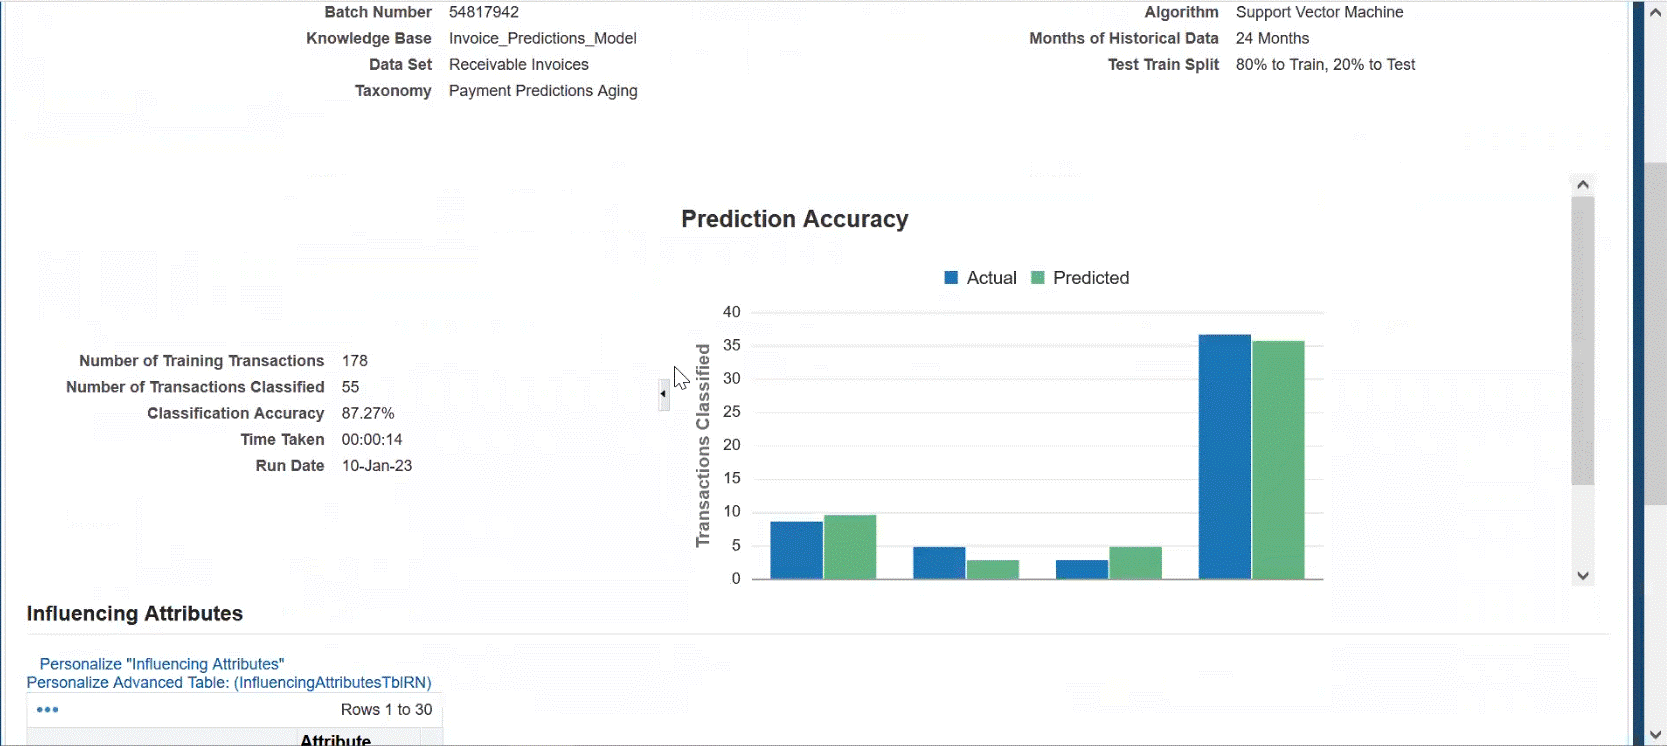
You can verify the accuracy of the training set. Additional changes may be made to fine tune the training set. You can view the activity log by clicking the Training Batch Request ID.
Prediction Accuracy
-
The activity log provides header data information for knowledge base, data set, taxonomy, algorithm use, months of historical data retrieved, and the test train split used.
-
Number of Training Transactions – used to train the model
-
Number of Transactions Classified – used to test the model
-
Classification Accuracy – accuracy percentage
-
Prediction Accuracy bar chart – Displays actual versus predicted
-
Influencing Attributes – attributed used to influence the model
Perform Payment Predictions
You can schedule the payment predictions concurrent program. This makes predictions when payments will be paid (on time or late), and the magnitude of the delay based on the deployed knowledge base.
Extract to ECC
Provides the ability to extract the payment predictions for future invoices as well as customer summary table and loads to the E-Business Suite Command Center (ECC).
Setting Up Asset Renewal Predictions
The following setup and configuration must be completed for Asset Renewal Predictions.
Register the application
-
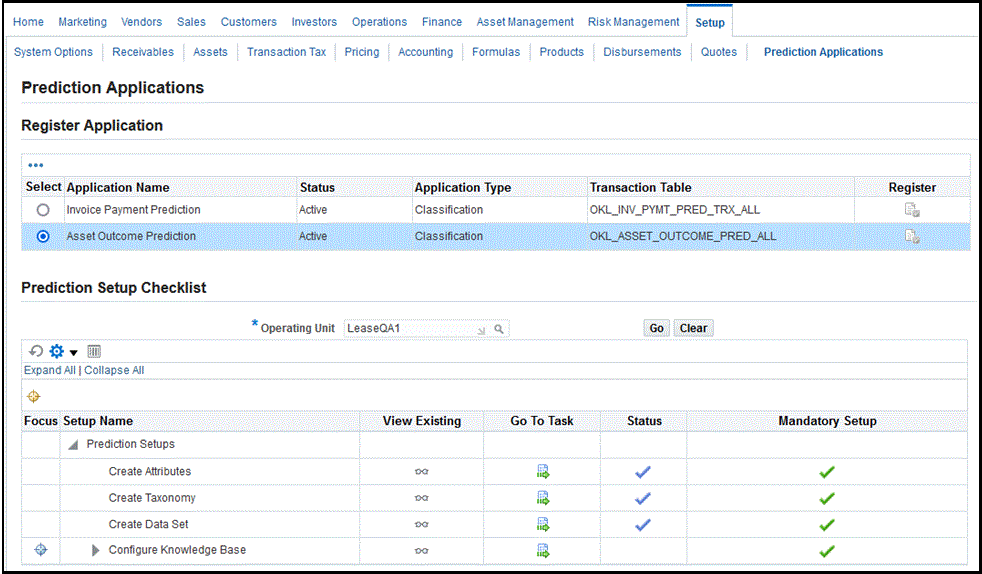
Navigate to the Setup tab > Predictions Applications to register and enable the prediction application. The Asset Outcome Prediction application is seeded. When you click Register, the Asset Outcome Prediction application is activated.

-
The Asset Outcome Prediction application is now in Active status. You can proceed with Prediction setup.
-
A setup checklist displays with a list of checklist items and related order that items must be performed and completed. Alongside the checklist items are mandatory setup items and related status. You can:
-
View Existing - Click the icon to render the page
-
Go To Task - Click the icon to take you to that task
Items View Existing Go To Task (Actionable) Navigates to Tabs Create Attributes icon icon (create/update) Renders Attributes page Create Taxonomy icon icon (create/update) Renders Taxonomy page Create Data Set icon icon (create/update) Renders Data Set page Configure Knowledge Base icon icon (create/update) Renders Knowledge Base page -
Create, Update, and Remove Attributes
-
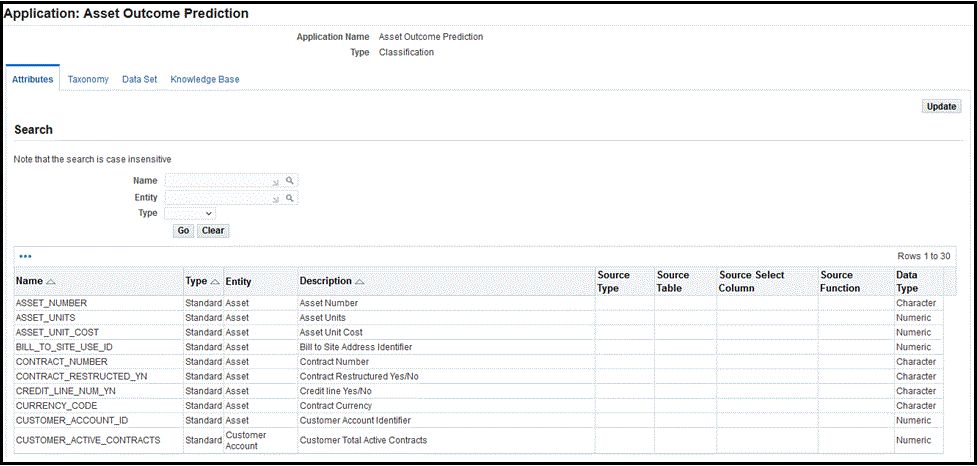
You can create attributes from a list of standard (seeded) attributes as well as create your own extended (custom) attributes. The attributes are factors that influence the active assets and units. This is used to predict the active assets and units. The business can choose either standard attributes and/or define extended attributes that satisfy business requirements.
You can:
-
Search for attributes by:
-
Name
-
Entity
-
Type (Standard for seeded, Extended for custom)
-
-
Add, Update, and Remove extended attributes
You cannot update or remove any of the standard attributes.
-
-
Update attributes - add extended attributes and define them according to the following table. There is on-screen validation to ensure that the entered data is valid. The application displays an error if validation fails. The attributes must be unique and duplicates are not allowed.
Attributes Required / Optional Valid Values Name Required Character Type Required Extended Entity Required Asset, Customer Account Description Optional Character Source Type Required Table or Function Source Table Required If Table is selected as source type, then must be a valid table. Source Select Column Required If Table is selected as source type, then must be a valid column. Source Function Required If Function is selected as source type, then must be a valid function. Plsql will be processed while building the knowledge base. Data Type Required Character or Numeric. Must be a valid data type. 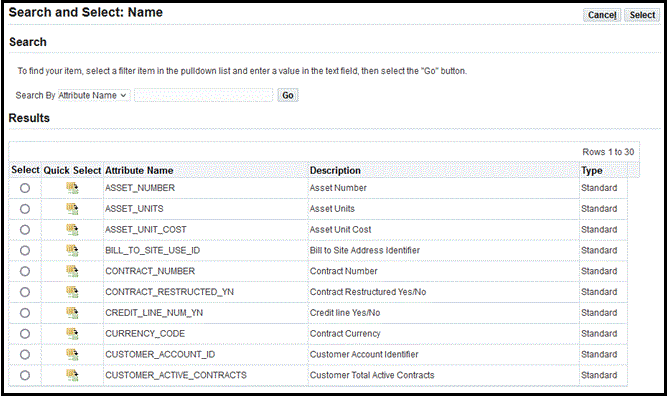

Create, Update, Delete, and Duplicate Taxonomy
You can create a taxonomy and associate it to an application. Taxonomy is a method for categorizing and classifying a set of data or objects for target classes in which the predicted value should go. For asset outcome prediction, the data used is related to assets, contracts, and customer information.
The Taxonomy is based on a two-tiered categorization:
| ECC Metrics | Predicted Unit Outcomes |
|---|---|
| Early Termination Units |
|
| End of Term Termination Units |
|
| Renewal Units |
|
| Default Units | Default |
| Repossession Units |
|
You can:
-
Search for taxonomy
-
Name
-
-
Create, update, and delete a taxonomy
-
Duplicate a taxonomy
-
View details of the taxonomy
You cannot update or delete any of the standard taxonomies.
The Asset Outcomes seeded taxonomy is made available and associated to the Asset Outcome Prediction application. The Asset Outcome Classification contains fourteen categories, with category names as illustrated below. Customers can use the seeded taxonomy or create their own that satisfies their business requirements.
Note: If the classification doesn’t fall within the first thirteen categories, then the application saves the Asset Outcome as Undetermined.

Create Taxonomy
-
Click Create in the Taxonomy page.
-
Enter taxonomy Name and Description data in the Create Taxonomy page.
-
Enter Taxonomy Categories.
-
Click Apply when the values of the taxonomy are defined.
Column Values Required / Optional Description Category Code 1, 2, 3, 4…13 Seeded Seeded and cannot be updated Category Name Character Seeded Seeded and cannot be updated. Used by the Asset Outcome Dashboard for buckets to classify the asset outcome prediction Display Name Character Required Enter display name
Create, Update, Delete, and Duplicate the Data Set
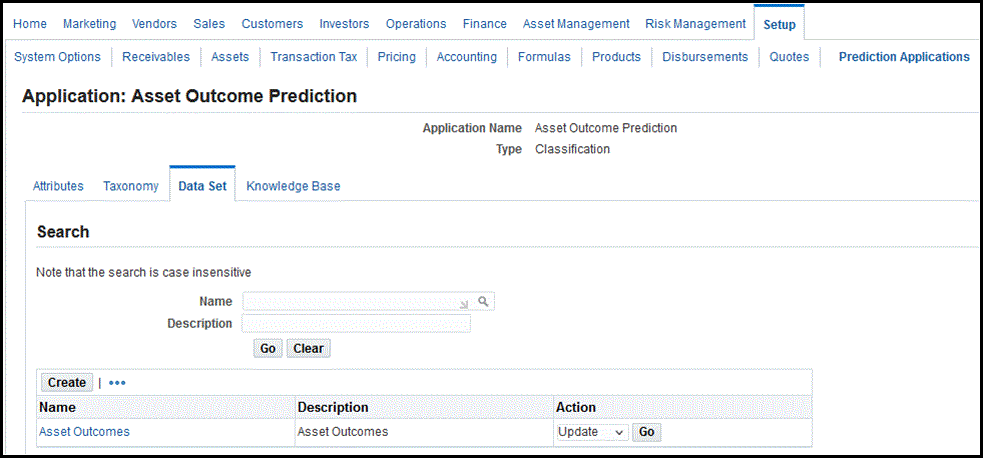
You can create a data set and associate it to an application. The data set determines which source the data should be processed by the application. The application associates the required attributes to the data set and attaches it to the knowledge base. Customers can use the seeded data set or create their own that satisfies their business requirements.
The Asset Outcomes seeded data set is made available and associated to the Asset Outcome Prediction application.
You can:
-
Search for a dataset
-
Name
-
Description
-
-
Create, update, and delete a dataset
-
Duplicate a dataset
-
View details of the dataset
-
Associate attributes to the data set
-
Enable and disable the attributes in the data set
You cannot update or delete any of the standard data sets. If the data set that is associated to the knowledge base has been deployed, then you cannot update or delete the data set.
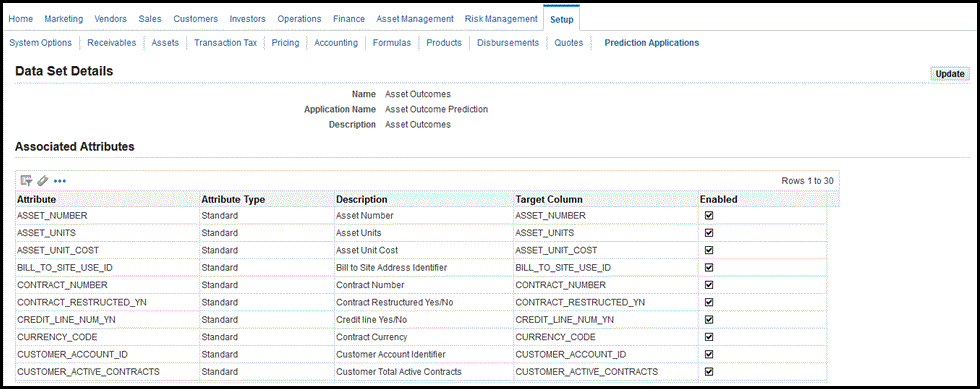
Creating the Data Set
-
Click Create in the Data Set page.
-
Enter data set data in the Create Data Set page for Name and Description.
-
Select from the list of associated attributes, and click the Enabled box for those to add to the data set. For any extended attributes, you must define the target column. The list of values for the target column must map to the predictions results table. The application stores the extended attributes in the predictions result tables.
-
Click Apply when the associated attributes are selected.
Create and Update the Knowledge Base
You can create a knowledge base and associate it to an application. The knowledge base is a combination of the data set, taxonomy, algorithm, and historical data that is used to define a model. It provides the patterns that will be used by the machine learning algorithms to carry out the classification process. After the attributes, taxonomy, and data set have been defined, you can create the knowledge base. Only one knowledge base is allowed per operating unit.
You can create the knowledge base by clicking the Go to Task icon from the Prediction Setup Checklist for Configure Knowledge Base. The Create Knowledge Base page appears.
To create the Knowledge Base:
-
Enter the following knowledge base data in the Create Knowledge Base page:
Attributes Values Required / Optional Description Operating Unit Enter OU Required Enter valid Operating Unit Applicaion Name Asset Outcome Prediction Default The application name is defaulted Name Character Required Name of the Knowledge Base Data Set LOV Required Select the data set from LOV of standard or extended. The default for standard seeded is Asset Outcomes Taxonomy LOV Required Select the Taxonomy that is mapped to Asset Outcome Prediction. The default is Asset Outcomes Status Read only Display Status: -
New – when first created
-
Incomplete – when any update is made
-
Valid – when passes validation
-
Built – build is complete
-
Deployed – when deployed
Algorithm Drop-down list Required Select from list of Algorithms available:
Decision Tree, Random Forest, Support Vector MachineTest Train Split Drop-down list Required Select from the list that determines the percentage used for training vs. testing: -
70% to Train, 30% to Test
-
75% to Train, 25% to Test
-
80% to Train, 20% to Test
Months of Historical Data Drop-down list Required Select the number of months of data to load to the staging table from the drop-down list. Example: -
6 Months
-
12 Months
-
18 Months
-
24 Months
-
36 Months
-
48 Months
-
60 Months

-
-
Click Apply when the values of the knowledge base are defined.
Activate the Knowledge Base (Validate, Build, Deploy)
You can activate the knowledge base.

Steps to Activate the Knowledge Base
When you click Activate Knowledge Base, the application renders train to guide you through the validation, building, and deploying of the knowledge base.

-
Validate the Knowledge Base - Knowledge base validation is the first step in the activation process. The validation step checks for data inaccuracies. If any validation fails, then it will be listed in the Validation Checklist along with the description message and severity. All validations must be passed before you can proceed to the next step. You can click Continue to move to the next step.
-
Build the Knowledge Base - If your knowledge base passed validation, then the next step is building the knowledge base. If you are satisfied with the knowledge base, then you can deploy the knowledge base.
The build knowledge base process builds the model. There are two build options:
-
Load Training Data – Click Go and the data will be reloaded to the staging table for asset outcome prediction.
-
User Existing Training Data – Click Go and the table will not be reloaded. It will use the existing data and run the data mining process.
After selecting one of the options described above, the Build Asset Outcome Predictions concurrent program is launched. Built status displays after successful completion of the concurrent program. The model is then ready to be deployed.
Search Training Batch
You can search on Training Batch by providing the training batch number and clicking Go. The related details of the training batch appear. You can click Refresh to verify that the Phase completed for the training batch.
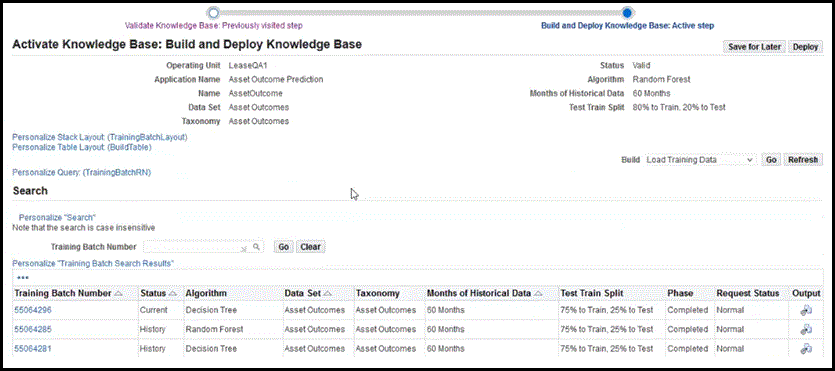
Column Description Training Batch Number Request number of the training batch Status Training batch status -
Current – current training data
-
History – previous version of training data
Algorithm Displays the algorithm Data Set Displays the data set Taxonomy Displays the taxonomy Months of Historical Data Displays the months of historical data Test Train Split Displays the test train split Phase Displays the phase: Pending, Running, or Completed.
When completed the status of the knowledge base is updated to Built.Request Status Display the request status: Standby, Normal, Error Output icon Displays the output report for the program; Build Asset Outcome Predictions. This contains the knowledge base name, load training data, number of processes, and error messages. Verify Accuracy of the Training Set
You can verify the accuracy of the training set. Additional changes may be made to fine-tune the training set.
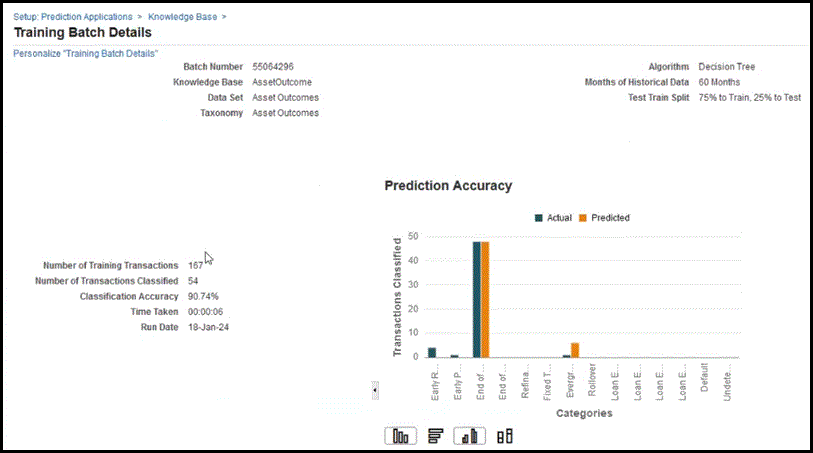
Click on the Training Batch Request ID to review the training set results.
-
The results provides header data information for Knowledge Base, Data Set, Taxonomy, Algorithm used, Months of Historical Data retrieved, the Test Train Split used.
-
Number of Training Transactions – used to train the model
-
Number of Transactions Classified – used to test the model
-
Classification Accuracy – accuracy percentage
-
Prediction Accuracy bar chart – displays actual versus predicted
-
X-axis displays predicted outcome
-
Y-axis displays the number of transactions classified
-
-
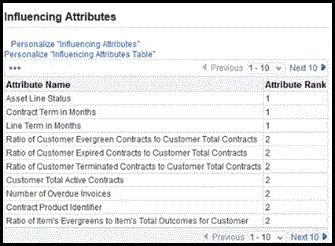
Influencing Attributes – attributes used to influence the model
-
-
Deploy the Knowledge Base
Deploys the knowledge base. You can continue on the train. After the knowledge base is built and you are satisfied with the accuracy of the knowledge base, you may deploy the knowledge base. Click Deploy. The Status of the knowledge base is updated to Deployed.
Undeploy the Knowledge Base
You can update the knowledge base. If the knowledge base has been deployed, then you must undeploy the knowledge base to make any further changes.

Perform Asset Outcome Predictions
You can schedule the asset outcome predictions Generate Asset Outcome Predictions concurrent program. This program takes the active assets and units, and places them into the appropriate asset outcome prediction category.
Extract to ECC
You can extract the asset outcome predictions for active assets and units, and load to ECC. You must run the Lease Asset Management ECC Loader program.