Defining Service Plans
This chapter covers the following topics:
- Service Supply Chain Plan Name
- Service Supply Chain Plan Options
- Item Simulation Set (Mass Maintenance)
- Creating Item Simulation Sets
- Reverting to Original Values
- Item Simulation Set Example
- Updateable Attributes List
- The Parts Classification UI
Service Supply Chain Plan Name
You use the Service Plan Names form for defining multiple plans, and storing them against plan names. You can access the Service Plan Names form from the Service Supply Chain Planner responsibility Navigator.
Service Parts Planning > Names
The design and uses of this form are similar to those of the DRP Plan Name form, except that the Plan Type value is Service Plan. You cannot update the Plan Type field. The Plan Type Service Plan is not visible to Distribution Requirements Planning (DRP). Similarly DRP plans are not visible to SPP. Inventory Optimization users can see and use DRP and SPP plan types, but cannot generate plans based on a mix of definitions from both plan types.
Service Supply Chain Plan Options
You specify plan options to define the scope of the named plan, and control many aspects of the plan generation.
You can access Plan Options in one of the following ways:
-
From Service Plan Names, select a plan, and then click Plan Options
-
From the Service Supply Chain Planner (responsibility) Navigator, select Service Parts Planning > Options
For more information about Plan Options, see Setting Distribution Plan Options, in the Defining Distribution Plans Chapter of the Oracle Advanced Supply Chain Planning Implementation and User Guide.
When you navigate to Plan Options from the navigator, a Find window opens for you to specify the Plan name for which you want to see the plan options.
Main Tab
On the Main tab you specify assignment set, item simulation set, demand priority rule, whether to overwrite supplies and manual forecasts, which type of date to schedule by, whether to enforce constraints and time fences, and so on.
| Field | Validation | Description | Default |
|---|---|---|---|
| Overwrite Supplies | LOV – All, Outside planning time fence, and None | Defines which planning can overwrite supplies. | All |
| Overwrite manual forecast | LOV– All, Outside planning time fence, and None | Defines whether planning considers manual override entries for the forecast. This option is valid only for considering the row type Manual override. For more information see the section "Plan Option: Overwrite Manual Forecast" further on in this chapter. |
All |
| Schedule By | LOV – Schedule Ship Date, Schedule Arrival Date, Request Ship Date, Request Arrival Date, Promise Ship Date, Promise Arrival Date | Set this option to instruct the planning engine to: - Plan supplies based on sales order line request, promise, or schedule dates for either ship or arrival - Consume forecasts based on sales order line request, promise, or schedule dates. You must provide forecast dates that match your choice of this plan option; for example, if you select Promise Ship date for this plan option, make sure your forecast dates are in terms of promise ship dates. Select one of the following sales order line dates: - Schedule Ship Date - Schedule Arrival Date - Request Ship Date - Request Arrival Date - Promise Ship Date - Promise Arrival Date The default is Schedule Ship Date. For forecast consumption, the planning engine uses: - Schedule Date if you select Schedule Ship Date or Schedule Arrival Date - Request Date if you select Request Ship Date or Request Arrival Date - Promise Date if you select Promise Ship Date or Promise Arrival Date. If you do not specify plan option Demand Priority Rule and have not specified a default demand priority rule (in the Define Priority Ruled form), the planning engine uses the value of this plan option as the demand priority rule. |
Schedule Ship Date |
| Enforce Constraints | Yes/No check box | Determines whether to consider capacity and lead-time constraints. Select if you want material and resource capacity constraints to be respected in lieu of demand due date constraints if a conflict exists. | No |
| Planning Time Fence Control | Yes/No check box | Determines whether exception messages can be executed within the time fence. Select this option to enforce demand time fence control. | No |
| Demand Time Fence Control | Yes/No check box | Within this time fence, forecast demand is set to zero. Select this option to enforce planning time fence control. | No |
| Assignment Set | LOV– All assignment sets | Use this option to select an assignment set that holds the sourcing rules and bills of distribution that define the rules for material flow within your supply chain. | Null |
| Item Simulation Set | LOV – Item simulation sets | Select a simulation set from the list of values. A simulation set is a set of adjustments to the base. You can define different simulation sets to model different scenarios. | Collected or Null, in which case planning uses collected data. |
| Demand Priority Rule | Demand Class Priority Rule Set | Demand Priority Rule for each plan. Demand priorities are set by demand class and demand type. Priorities are assigned to sales orders and forecasts. End demand priorities are passed down the supply chain network on the dependent demands. If you prefer, you can enter priorities for each demand in the source instance or load priorities for each demand into the ODS using SQL tools. When you select the demand priority rule set in the plan options form, one of the choices is user defined priorities. If user defined priorities is selected, Service Planning uses the demand priorities entered for each demand. | Null |
| Reallocation Surplus Days | Number | Reallocation messages are not suggested unless surplus occurs for this quantity of days | Null |
| Forecast Allocation and Consumption related fields | Region | Determines the behavior of forecast allocation, consumption and whether forecasts are spread beyond the time fence. | |
| Do Not Spread Forecast | The planning engine should use forecast entries as they exist for planning. | ||
| Spread Forecast Evenly | The planning engine should spread aggregate forecast demand evenly across the daily buckets from the workday calendar. | ||
| Consume by Forecast Bucket | The forecast consumption process does not search outside of the consumption bucket for forecasts and sales orders except in daily buckets. | ||
| Explode Forecast | Select to instruct the planning engine to explode forecasts as follows during the consumption process: - Product family forecasts to product family member item forecasts - Model forecasts to other model, option class, and item forecasts. This option applies to forecasts with forecast control consume and derive. If you clear this plan option, you have arranged for this explosion to occur in the source instance or in Oracle Demantra Demand Management before the planning run. |
||
| Backward Days | This parameter allows a sales order demand to consume forecast demand even if the forecast demand is up to the specified number of days earlier than the sales order demand. It applies only to the supply chain planning forecast and not to Oracle Demand Planning forecast scenarios. | ||
| Forward Days | This parameter allows a sales order demand to consume forecast demand even if the forecast demand is up to the specified number of days later than the sales order demand. It applies only to the supply chain planning forecast and not to Oracle Demand Planning forecast scenarios. | ||
| Planner Worklist (button) | Planner work list groups created by this user plus those planner work list groups to which the planner is included. | This button opens a new window where work lists can be defined. See Specifying Planner Work Lists as Part of Plan Run |
See
Aggregation Tab
On the Aggregation tab, you specify the planning period and how it is divided into time buckets. You also specify whether circular sourcing is enabled.
| Field | Validation | Description | Default |
|---|---|---|---|
| Plan Start Date | Date | Start date for the plan. If you have never run the plan, this field displays today's date. If you have run the plan, this field displays the planning horizon start date of the last run. | sysdate |
| Plan End Date | Date | End date of the plan horizon. Calculated planning horizon end date based on your entries in Buckets and the owning organization calendar. | |
| Start Date | Calculated start date for each bucket based on your entries in buckets and the owning organization calendar. The value for the Days column is the plan start date. | ||
| Time Buckets Days, Weeks, Periods |
Integer | Telescopic planning horizon capability – Number of daily, weekly, and monthly time buckets within the planning horizon. Weekly buckets can start only on the week beginning day from the manufacturing calendar. If the daily horizon does not end on the day before a week beginning day, the planning engine extends it to the next day before a week beginning day. It plans the extended days in daily buckets, never minute or hourly buckets, regardless of any other settings. | |
| Circular Sourcing Enabled | Yes/No check box | Determines whether planning recommends transfer of supplies from existing inventory at other organizations | No |
| Circular Sourcing Surplus Days | Integer | Transfers are not recommended unless surplus exists for this quantity of days |
Daily Allocation Buckets
Daily allocation buckets are the number of buckets during which the allocation bucket size is one day. Null or zero value means that no daily allocation buckets are available. You must specify that the number of daily allocation buckets is less than or equal to the number of daily planning buckets.
Weeks per aggregate allocation bucket is the number of weeks contained in each aggregate allocation bucket. It can be an integer only. If the weeks per aggregate allocation bucket is two or more, then the last allocation bucket cannot contain that number of weeks (depending on how many weeks are left before the plan horizon end date). For example, if weeks per allocation bucket is two, but the plan horizon only allows one week in the last allocation bucket, only one week is used.
The plan horizon is not extended because of the allocation buckets. If daily allocation buckets exist, the aggregate buckets start on the next week start date and additional daily allocation buckets can be used. For example, if the daily allocation buckets end on a Thursday and the week start date is Monday, one additional daily allocation bucket is used (assuming that Saturday and Sunday are nonworking days).
Supply allocation proceeds bucket by bucket. Demands in the first bucket (daily, weekly or period) are sorted by priority and firm demands are given the highest priority. Within the bucket, for each demand priority, demands are allocated supplies on or before the demand date. If supplies are not available by the demand date, then they are allocated by the bucket end date. If a shortage occurs for a demand priority within an allocation bucket, the supplies are fair shared based on the supply allocation rules and plan options. Unsatisfied demands are carried forward to the next allocation bucket.
Inventory Rebalancing - Circular Sourcing
Scope Tab
The organizations and items included in the supply chain define the scope of the service plan.
Organizations Sub Tab
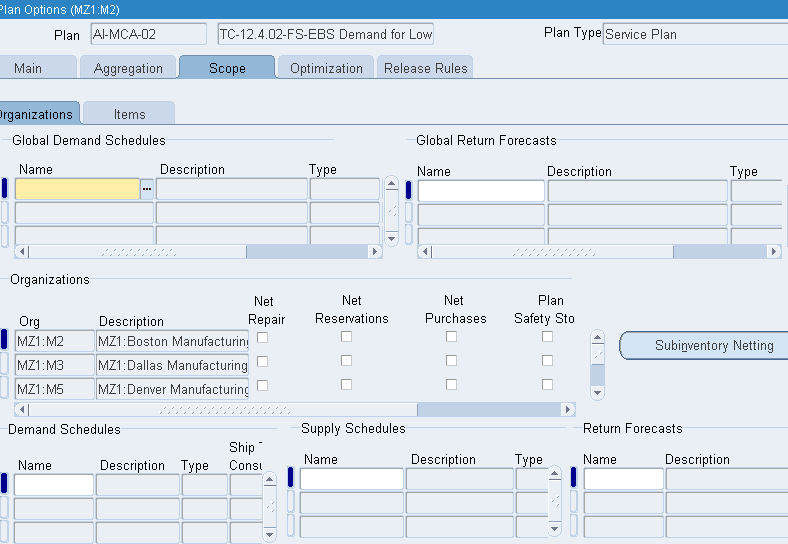
| Field Group | Validation | Description |
|---|---|---|
| Global Demand Schedules | The global demand schedules appear in the LOV. | Select the names of Oracle Demantra Demand Management scenarios that drive this plan. You can select scenarios that do not reference an organization (organization dimension set to All Organization). |
| Global Returns Forecasts | The global returns forecasts appear in the LOV. | Indicates the scenario for returns forecast. This is similar to global demand forecast, but to indicate returns, planning marks the scenario as returns. |
| Organizations | Field organizations are not part of the LOV. | |
| Demand Schedules | The local demand schedules and forecasts appear in the LOV. | Select the names of demand schedules, forecasts, and plans that drive this plan. |
| Supply Schedules | LOV includes forecast scenarios for return forecast as supply schedule | Select the name of supply schedules that participate in this plan. Note that this production schedule should be referencing this plan within its schedule options. That is, the schedule name that is entered should reference the plan on the Schedule Options page, Scope tab. |
| Return Forecasts (Demantra) | LOV includes Org Level forecasts as a schedule of defectives. | When a returns forecast is included in the context of an organization, SPP interprets that as a projected stream of defective supply coming into that organization. It then applies the sourcing rules assigned in the plan to handle the defectives coming in.
Note: Since all Demantra forecasts are available under the Returns Forecast LOV, it is possible to include the same Demantra forecast as both a Demand Schedule and a Returns schedule. Functionally this would mean that returns equal spares. |
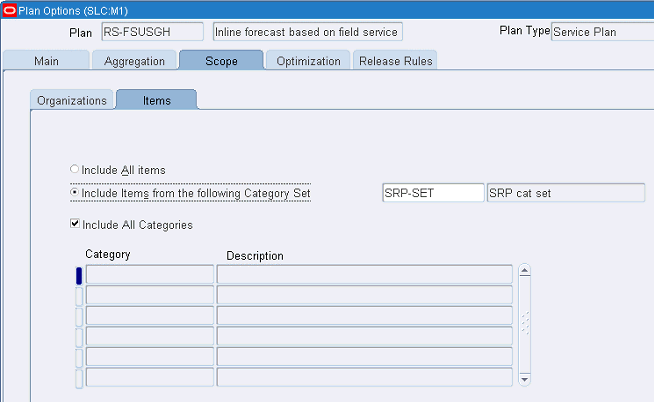
Items Sub Tab
The Plan Options form Items sub tab provides attributes for specifying whether planning includes all items, all items from all categories within a specified category set, or items from listed categories within a specified category set.
First, you either select the Include All Items radio button, or the Include Items from the Following Category Set radio button. Choosing to include all items disables entry for category set and category.
Selecting the Include Items from the Following Category Set radio button enables the Include All Categories check box. Selecting this check box requires a choice from the LOV to specify a category set. These settings cause all items in all categories of the specified category set to be included in the plan.
When the Include Items from the following Category Set radio button is selected, and the Include All Categories check box is not selected, then you can choose from the Categories LOV to specify categories within the category set. These settings cause all items in listed categories of the specified category set to be included in the plan.
You cannot select multiple category sets. Once a category set is changed from the current category set, all categories are deleted from the lower part of the form. Subsequent attempts to change the category set of a saved plan encounter a warning.
Planning verifies and includes all related items in the plan, such as:
-
All items in the supersession chain for the selected item, regardless of the category of these items.
-
In case of a Depot Repair work order for the selected item, all dependent demand component items.
-
All the supplies generated by the plan.
| Field | Validation | Description | Default |
|---|---|---|---|
| Include All items | Yes/No radio button. | Indicates whether the plan should include all items. | Yes |
| Include Items from the following Category Set | If include all items = No LOV includes all categories. | Select the category set that contains the items you want to plan. | No |
| Include All Categories | Yes/No check box. | Include all items in all categories in the specified category set. | No |
| Category | LOV of categories within the specified category set. | Include all items in listed categories in the specified category set. | Null |
| Description | Displays the description of the selected category. | Null |
Optimization Tab
Select the Optimize check box to enable the Optimization tab, and then specify relative weights for the objectives. Valid objective weights range from zero to one.
For example, the following settings would favor plans that achieve high customer service (on-time delivery) at the cost of increased investment in inventory (low inventory turnover ratio):
-
Maximize inventory turns = 0.2
-
Maximize plan profit = 0.4
-
Maximize on-time delivery = 0.9
Note: The weights do not necessarily sum to 1.0. Also note that the relative weights indicate your preferences among these competing objectives. Thus, setting all these weights to 1.0 produces the same result as setting them all to zero.
You can also define Plan Level Penalty Factors, in percent, for exceeding material capacity, exceeding transportation capacity, and demand lateness. This action causes the planning engine to search for alternatives that minimize the total of these penalties.
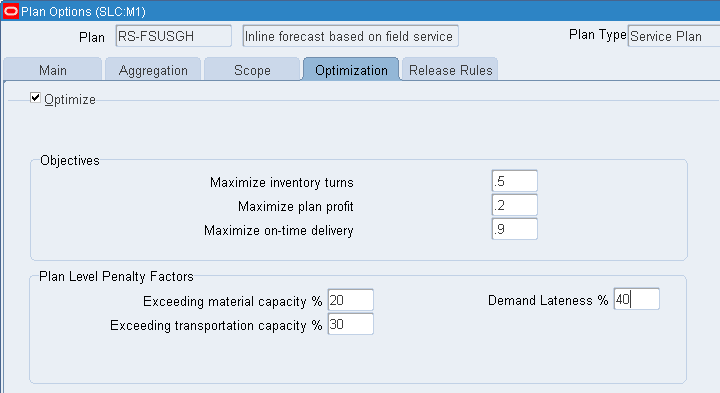
| Field | Validation | Description | Default |
| Maximize inventory turns | Number >= 0, <= 1 | Specify a weighting factor from 0 to 1. | 0 |
| Maximize plan profit | Number >= 0, <= 1 | Specify a weighting factor from 0 to 1. | 0 |
| Maximize on-time delivery | Number >= 0, <= 1 | Specify a weighting factor from 0 to 1. | 0 |
| Exceeding material capacity % | Positive Number | Enter a numerical value to quantify the impact of exceeding material capacity. For example, if you enter 20, the penalty factor is 20%. | 0 |
| Exceeding transportation capacity % | Positive Number | Enter a numerical value to quantify the impact of exceeding transportation capacity. For example, if you enter 30, the penalty factor is 30%. | 0 |
| Positive Number | Enter a numerical value to quantify the impact of late demand. For example, if you enter 40, the penalty factor is 40%. | 0 |
Release Rules Tab
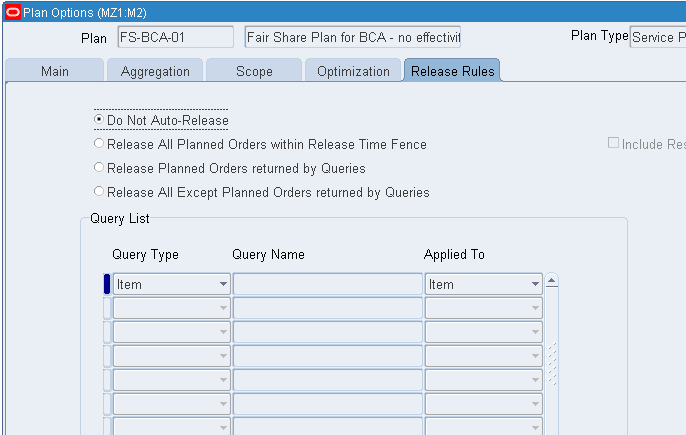
The plan setup provides the following options for releasing orders:
-
The default selection is Do not Auto-Release orders in the plan. In this case, planners manually release planned orders.
-
Automatically Release All Planned Orders in the plan that lie within their associated release time fence. No rules are evaluated prior to release.
-
Release Planned Orders returned by Query - This option causes the plan to automatically release orders returned by the queries identified in the list below.
-
Release All EXCEPT Planned Orders returned by Query - This option causes the plan to automatically release all orders except those returned by the queries identified in the list below
Query List
For each auto-release query to be associated with the plan, fill in the appropriate information for each row.
Select the type of query in the Query Type drop-down list. (Note that orders selected for auto-release are not just the ones returned by the query; it depends on the Applied-to setting, as explained below).
-
Item queries return Item-Org combinations that meet the criteria specified in the query.
-
Order queries return planned orders (for an item, at an organization) that satisfy the criteria specified in the query definition.
-
Exception queries group exceptions and set filters on them, returning a list of exceptions with the count for each of them.
-
Supplier queries return Item-Org -Supplier/Supplier Site combinations that meet the criteria specified in the query.
Under Query Name, click the find icon (…) to show a list of available queries and select one.
Finally, select an item in the Applied-To list. This determines what type of object the query results are applied to, and has a large impact on which orders will be included for auto-release. For example, if an Order Query returns one order for ItemA, and Applied-to is set to "Item"', then all orders for ItemA are marked for auto-release, not just the one returned by the query.
-
Item - Release rules are applied to all orders for the returned item.
-
Item-Org - Release rules are applied to all orders for that item-org combination.
-
Supersession - Release rules are applied to orders for all items in the supersession chain.
-
Supersession-Org - Release rules are applied to orders for all items in the supersession chain of the item-org.
-
Order - This option is only available for queries that return orders. In this case, the release rules are applied to the orders returned by this query.
The Maintain Query button provides a convenient link to the Create Queries window. If no query is selected, you can use this button to create a new query if. If a query is selected, you can view and edit this query's definition.
The Include Re-schedules checkbox determines if rescheduled orders will be evaluated in the query criteria and considered for auto-release. If unchecked, rescheduled orders will not be included.
Note: Re-schedules of repair orders will not be automatically released and must be implemented manually.
Note: When a new plan is copied from a plan that has auto-release queries, these queries will not be automatically run, nor will orders be automatically released. These queries will become active, however, when the new plan is launched.
Plan Option: Overwrite Manual Forecast
The plan option Overwrite Manual Forecast governs how manual edits to the SPP inline forecast and returns forecast (and other manually added forecasts) are treated in subsequent plan runs.
This plan option can take on three values:
-
All: All edits to the forecast and returns forecast are ignored, and the newly generated forecast (in the next plan run) are respected
-
None: Edits to the forecast and returns forecast are retained in the next plan run, and these are applied on top of the newly generated forecast.
-
Outside Planning Time Fence: Edits to the forecast and returns forecast are retained inside the Planning Time Fence. Outside the PTF, the overrides are ignored and the newly generated forecast is respected.
Note: This plan option applies only to edits of inline forecast, returns forecast and manually added forecasts.
If the plan has an external forecast included as a demand schedule, the Overwrite Manual Forecasts LOV shows the options Outside Planning Time Fence and None grayed out. Also, if this LOV is set to Outside Planning Time Fence or None and an external forecast is subsequently added to plan options as demand schedule, the UI will flag a warning that preservation of manual forecast entries is not supported for externally generated forecasts, and set Overwrite Manual Forecasts to All if the user accepts.
Override Rules
The following scenarios explain when overrides to the plan are accepted:
-
If there is a separate SPP plan to generate an inline forecast and forecast overrides are made to it, and plan is then fed to another SPP Plan to recommend replenishments, the overrides are always respected
-
If forecast changes are made in an SPP Plan and an online replan is launched, the overrides are always respected
-
If the inline forecast is edited within SPP, and the plan is subsequently relaunched, the overrides are retained or ignored based on the plan option 'Overwrite Manual Forecast'.
-
The treatment would be similar for Returns Forecasts too, and would be governed by the same plan option (Overwrite Manual Forecast).
Forecast Processing
During planning, SPP it can spread forecasts into planning buckets, allow sales orders to consume forecasts, distribute global forecasts, apply a time-fence if specified etc. The forecast that is seen in the plan is this processed forecast, and the planner should be aware that it is this processed forecast that is available for editing.
When you choose to retain forecast overrides in the next plan run which has a new forecast, the new forecast is first processed, and then overrides are applied to the processed forecast.
Example of Keeping or Overriding Edits
Consider the following case, where a forecast in an SPP plan is as follows:
| 5/3/2010 to 5/30/2010 | 5/31/2010 to 7/4/2010 | 7/5/2010 to 8/1/2010 | 8/2/2010 to 8/29/2010 | 8/30/2010 to 10/3/2010 | |
| Parts History Based Forecast | 500 | 500 | 500 | 500 | |
| Consumption | |||||
| Net Forecast | 500 | 500 | 500 | 500 | |
| Manual Override | |||||
| Total Forecast | 500 | 500 | 500 | 500 |
You then override the forecasts to make the following changes:
-
Change the quantity on 5/3 to 525
-
Zero out the quantity on 7/5
-
Add a forecast on 8/2
-
Change the quantity on 8/30 to 550
| 5/3/2010 to 5/30/2010 | 5/31/2010 to 7/4/2010 | 7/5/2010 to 8/1/2010 | 8/2/2010 to 8/29/2010 | 8/30/2010 to 10/3/2010 | |
| Parts History Based Forecast | 500 | 500 | 500 | 500 | |
| Consumption | |||||
| Net Forecast | --- | 500 | --- | --- | |
| Manual Override | 525 | 0 | 150 | 550 |
Now if the plan were run one month later, with Overwrite Manual Forecast = ALL, the forecast in the next plan run would be as follows:
| 5/3/2010 to 5/30/2010 | 5/31/2010 to 7/4/2010 | 7/5/2010 to 8/1/2010 | 8/2/2010 to 8/29/2010 | 8/30/2010 to 10/3/2010 | |
| Parts History Based Forecast | 500 | 500 | 500 | ||
| Consumption | |||||
| Net Forecast | 500 | 500 | 500 | ||
| Manual Override | |||||
| Total Forecast | 500 | 500 | 500 |
This is because you specified you want to overwrite all manual edits to the forecast (therefore, they are ignored).
Assuming the forecast in the next month's plan remains the same (500/period), that is the final forecast that is planned for. Since the plan is a month later, 5/3 is in the past and no longer part of the plan.
However, if you launch the plan a month later with Overwrite Manual Forecast = NONE, the forecasts planned for would be as follows:
| 5/3/2010 to 5/30/2010 | 5/31/2010 to 7/4/2010 | 7/5/2010 to 8/1/2010 | 8/2/2010 to 8/29/2010 | 8/30/2010 to 10/3/2010 | |
| Parts History Based Forecast | 500 | 500 | 500 | ||
| Consumption | |||||
| Net Forecast | 500 | 500 | 500 | ||
| Manual Override | 0 | 150 | 550 | ||
| Total Forecast | 500 | 0 | 150 | 550 |
The forecast edits on 7/5, 8/2 and 8/30 are retained and applied on top of the forecast in this plan, and so are considered while planning supplies.
Overrides and Consideration of Supersession
It is possible a new revision of an item is introduced in the future. These are usually modeled using date effective supersession in SPP.
In this case, inline forecasting in SPP will generate a forecast for the older revision until the supersession effective date and for the new revision after that. While reviewing and editing the forecasts, the planner should make changes to the forecast of the revision that is effective at each point of time.
For example, consider a plan run on 01-Jan. This has the following date effective supersession:
A -> B effective 30-Jun
In this case, the forecast will be for A until June, and for B thereafter. While editing the forecasts too, the planner should edit the forecast of the relevant item in each period. SPP will consider the forecast and overrides for each item and respect them.
Planner overrides the forecast for the revision that is effective in each period
| Jan | Feb | Mar | Apr | May | Jun | Jul | Aug | Sep | Oct | Nov | Dec | ||
| A | Forecast | 100 | 100 | 100 | 100 | 100 | 100 | ||||||
| A | Override | 150 | 200 | ||||||||||
| B | Forecast | 100 | 100 | 100 | 100 | 100 | 100 | ||||||
| B | Override | 200 | |||||||||||
| FINAL FORECAST | A | 100 | 150 | 100 | 100 | 100 | 200 | ||||||
| FINAL FORECAST | B | 100 | 100 | 200 | 100 | 100 | 100 |
If for some reason, the planner adds a forecast for A, say in Aug, this will be considered in addition to the forecast for B in Aug. In other words, the edit (added forecast) for A will not be applied to the Forecast generated for B.
Forecast of A added in Aug does not override forecast
| Jan | Feb | Mar | Apr | May | Jun | Jul | Aug | Sep | Oct | Nov | Dec | ||
| A | Forecast | 100 | 100 | 100 | 100 | 100 | 100 | 50 | |||||
| A | Override | 150 | 200 | ||||||||||
| B | Forecast | 100 | 100 | 100 | 100 | 100 | 100 | ||||||
| B | Override | 200 | |||||||||||
| FINAL FORECAST | A | 100 | 150 | 100 | 100 | 100 | 200 | 50 | |||||
| FINAL FORECAST | B | 100 | 100 | 200 | 100 | 100 | 100 |
Note: If a supersession that was not previously modeled as a date effective supersession is introduced in the plan, you should ensure the edits in the future are moved to the later revision. Otherwise, SPP might end up double counting demand.
| Jan | Feb | Mar | Apr | May | Jun | Jul | Aug | Sep | Oct | Nov | Dec | ||
| A | Forecast | 100 | 100 | 100 | 100 | 100 | 100 | 100 | 100 | 100 | 100 | 100 | 100 |
| A | Override | 150 | 200 | 125 | 150 |
On July 1, A -> B. This was not previously modeled as a date effective supersession. In this case, you must move the forecast edits for Sep and Nov that were on A, to B. Otherwise, SPP will consider both forecasts for A (125, 150) and for B (100, 100) in those months
| Jan | Feb | Mar | Apr | May | Jun | Jul | Aug | Sep | Oct | Nov | Dec | ||
| A | Forecast | ||||||||||||
| A | Override | ||||||||||||
| B | Forecast | 100 | 100 | 100 | 100 | 100 | 100 | ||||||
| B | Override | 125 | 150 |
Overrides and Changes in Bucketization
Sometimes there is a change the bucketization between when a Forecast Override was made, and when the plan is re-launched. In that case the override should be spread, similar to the way forecasts are spread, and the spread override should be used in the plan.
This is accomplished as follows:
-
Determine the start date and end date of the bucket in which the override was made.
-
When the plan is re-run, determine the number of planning buckets between the start date and end date.
-
If there is more than one period between the start date and end date, spread the override (according to the forecast spreading rules) between those buckets.
Example of Changes in Bucketization
Consider Plan 1, where the planning buckets are 4 weekly buckets followed by 11 period buckets. Assume the Plan is run on Day0 and the Forecast and Overrides are as follows:
Plan 1
| Wk1 | Wk2 | Wk3 | Wk4 | Period1 | |
| Original Forecast | 10 | 10 | 10 | 10 | 40 |
| Override | 80 |
Now assume the plan is being re-run four weeks later with the same plan options. In this case, the Plan Start date would be the start of the original Period1; and this will now have to be 4 weekly buckets.
The override of 80 for Period 1 should now be spread between the 4 weekly buckets that correspond to that period in the re-run plan. The overrides will therefore be as follows:
Plan 1
| Wk1 | Wk2 | Wk3 | Wk4 | Mo1 | |
| Original Forecast | 10 | 10 | 10 | 10 | 40 |
| Override | 80 |
Here is the forecast and override spread when the plan is re-run after 4 weeks.
Plan 1 (rerun after 4 weeks)
| Wk1 | Wk2 | Wk3 | Wk4 | |||||
| Original Forecas | 10 | 10 | 10 | 10 | ||||
| Override | 20 | 20 | 20 | 20 |
Overrides and Plan Copies
When a plan is copied, overrides in the original plan will exist in the copied plan, and when the copied plan is launched, its plan options govern whether the overrides are retained or not.
Policy Based Planning Controls
Replenishment Method
This attribute determines one of two methods for replenishing safety stock.
-
Standard - This is the default. In this mode, inventory replenishment considers features like fair sharing, inventory rebalancing and preference to repair vs. buy.
-
Policy Based - In this mode, safety stock is replenished according to values in the Policy Parameter Set.
Replenishment Order Generation
This indicates whether the Plan will generate a single replenishment or time phased replenishments for an item. Note that, although Policy Parameters created in IO are specified at the Category level, safety stock replenishments are calculated at the item-org level.
-
Single Replenishment - In Single Replenishment mode, only a single replenishment order is created after evaluating policy parameters and considering demand and supply within the lead time of the item.
-
Time Varying - With time varying replenishment, the policy is evaluated across the entire planning horizon, and multiple replenishments are created by the plan, as required to ensure that the policy settings are respected throughout the horizon.
Item Simulation Set (Mass Maintenance)
Mass maintenance functionality stores updated records separately from the collected data against the item simulation set name. The updated data overlays collected data. See the Item Simulation Set Example.
When a plan is run using a specified item simulation set, the plan uses item attribute values as they have been manipulated in the Item Attributes Mass Maintenance window for the named item simulation set. You can create multiple named sets of modified data, and then use them for simulating alternative plan scenarios.
Creating Item Simulation Sets
Item simulation sets created with the SPP responsibility are internally tagged as SPP simulation sets. Only SPP simulation sets appear in the SPP plan options LOV. Only the columns that are specific to SPP appear.
Note: Inventory Optimization users can use both ASCP and SPP simulation sets. However, because only one simulation set can be used per plan, Inventory Optimization users cannot use part of the changes made in an ASCP simulation set, and part of the changes made in a SPP simulation set.
Navigate to the Item Attributes Mass Maintenance window
-
From the Service Supply Chain Planner responsibility, navigate to the Item Attributes Mass Maintenance window.
Setup > Item Attributes Mass Maintenance
When you open the Item Attributes Mass Maintenance window from the Service Supply Chain Planner responsibility, you can either open an existing item simulation set or create a new item simulation set.
-
To access records for an existing item simulation set, in the header region, query the Item Simulation Set Name field, and then choose one of the existing item simulation sets.
The window is populated with information about the existing simulation set.
-
To create a new simulation set, in the header region, enter a unique name, and optionally a description, in the Item Simulation Set Name and Description fields.
-
To create a new simulation set, in the Scope region, you select either the Organization or the Zone radio button to define attributes at either the organization or zone level. All updateable attributes can be defined at the organization level. Only forecast attributes can be defined at the zone level. The only applicable item-zone attributes are the forecast rule for demand and supply, the sourcing rule related attributes, and the forecast accuracy metric and value.
-
In the Find Items region, click the Find button.
The Find Items window appears. You can create new find criteria, or use existing criteria to search for item and organization combinations. The find criteria includes the destination-only item attributes and the updated item attribute, which indicates whether any attribute has changed.
-
Define Find Items criteria to retrieve items for which you want to set Item Attributes values in this named Item Simulation Set. Click Find.
The Items region is populated with items that match the find items criteria.
-
In the Items region select a found item.
-
In the Item attributes available for update region, the Attribute Name column list of values shows item attributes that you can update by using mass maintenance functionality. See theUpdatable Attributes List. Select an updateable attribute from the LOV.
-
Select the Condition, and then specify the Attribute Value. The Condition operator works with the Attribute Value to modify the original value. For example, depending on the Condition operator, setting the Attribute Value to '10' could overwrite the original attribute value with 10, increase the original value by 10, or decrease the original value by 10 percent. You select the Condition from the following list of values:
-
Set Value to
-
Increase by value
-
Increase by percentage
-
Decrease by value
-
Decrease by percentage
-
Set Original value
For more information about setting values for Item Attributes Available for Update, see:
-
You can delete all simulation sets except the seeded simulation set named Collected. In the Collected simulation set, you can delete only rows that you have created. Select the row, and then click the Delete button. This action deletes your updates, and reverts the Updated attribute value to No.
Folder Functionality
This form provides folder functionality for managing lists of returned records. The find criteria in the folder for mass maintenance includes all the updateable attributes using either the original or updated attribute values.
For example:
Planner equals User2 and Original Planner equals User1.
Updated Item AttributeItem Attribute
In the item simulation set, the field labeled Updated indicates whether updateable item attributes have changed. You can use this field as one of the criteria to find updated (or non-updated) item-organization combinations in the collected data.
Reverting to Original Values
For all the items that can be updated, the Original field retains the data for these attributes as originally collected. For example, the item attribute Critical Component has a related attribute called Original Critical Component that stores the collected data value. The original attribute always points to the latest collected data. The attribute itself, such as Critical Component, holds the updated values.
In the case of the seeded item simulation set named Collected, the original and the actual attributes are the same.
Reverting All Attribute Values
To change all of the attributes for an item-organization back to original values, that is, to restore the data as collected from the source for that item and organization combination, select the row for the item-organization. Then click Delete to delete the selected row from the simulation set.
Revert One Attribute Value
To change one or a subset of attributes for an item-organization back to their original values, select the rows for the item-organization combinations to be restored. In the Item attributes available for update region, select the row for the attribute that you want to change to the original value. In the Condition column, select the operator Set Original Value. This action replaces the updated attribute value from the simulation set data with the collected value. Planning uses the collected value.
Note: The Updated attribute reverts to No only after all the attribute updates are deleted for that item-organization combination.
Item Simulation Set Example
-
The user queries Item Attributes Mass Maintenance Simulation Set Name 1 to retrieve the following set of items, organizations, and attributes:
Original collected data Item Updated Org Repair Yield Forecast Set for Demand Aaa No M1 1.0 (100%) Single exponential Aaa No M2 0.9 (90%) Single exponential Aaa No M3 0.9 (90%) Single exponential -
The user makes the following changes to updatable item attributes, and saves the data.
Item: Aaa
Organization: M1
Row 1
Attribute Name: Repair Yield
Condition: Decrease value by percent
Attribute Value: 50
Row 2
Attribute Name: Forecast set for demand
Condition: Set value to
Attribute Value: Double exponential
----------
Item: Aaa
Organization: M3
Row 1
Attribute Name: Repair Yield
Condition: Set value to
Attribute Value: 50
-
All item and organization combinations that have changes are saved along with the corresponding changed attributes and attribute values. The user verifies the updated data by opening the Item Update window. The user also sees other item and organization combinations that were not changed.
Resulting data with updates overlying collected data Item Updated Org Repair Yield Forecast Set for Demand Aaa Yes M1 0.5 (50%) Double exponential Aaa No M2 0.9 (90%) Single exponential Aaa Yes M3 0.5 (50%) Single exponential -
In the source instance organization M2, the repair yield for item Aaa is changed to 80%. This data is collected.
-
A plan that is run using item simulation set 1 uses the following data.
Resulting data with new collection data and updates overlying collected data Item Updated Org Repair Yield Forecast Set for Demand Aaa Yes M1 0.5 (50%) Double exponential Aaa No M2 0.8 (80%) Single exponential Aaa Yes M3 0.5 (50%) Single exponential
Updateable Attributes List
The following table lists attributes that can be updated using Item Attributes Mass Maintenance window.
| Item Attribute | Edit in ODS | Validation |
|---|---|---|
| Critical Component | Yes | Yes or No |
| Preprocessing LT | Yes | Number |
| Processing LT | Yes | Number |
| Post processing. LT | Yes | Number |
| Fixed LT | Yes | Number |
| Variable LT | Yes | Number |
| Fixed Order Quantity | Yes | Number |
| Fixed Days Supply | Yes | Number |
| Shrinkage Rate | Yes | Number |
| Fixed Lot Multiple | Yes | Number |
| Minimum Order Quantity | Yes | Number |
| Maximum Order Quantity | Yes | Number |
| Carrying Cost | Yes | Number |
| Demand Time Fence Days | Yes | Number |
| Forecast Control | Yes | LOV: None, Consume, Consume and Derive |
| Planning Time Fence Days | Yes | Number |
| Standard Cost | Yes | Number |
| Net Selling Price | No | Number |
| PIP Flag | Yes | Yes or No |
| Selling Price | Yes | Number |
| Substitution Window | Yes | Number |
| Safety Stock Days | Yes | Number |
| Unit Weight | Yes | Number |
| Unit Volume | Yes | Number |
| Safety Stock Method | Yes | |
| Safety Stock Percent | Yes | Number |
| ABC Class | Yes | LOV from Valid collected ABC Classes |
| Planning Method | Yes | Not planned, MRP planned, MPS planned, MPP planned, MRP/MPP planned, MPS/MPP planned |
| DRP Planned | Yes | Yes or No |
| Max Inventory Days of Supply | Number | |
| Max Inventory Window | Yes | Number |
| Target Inventory Days of Supply | Yes | Number |
| Target Inventory Window | Yes | Number |
| Preposition Inventory | Yes | Yes or No |
| Repair LT | Yes | Number |
| Repair Yield | Yes | Number |
| Repair Program | Yes |
|
| Service Level | Yes | Number |
| Demand Fulfillment Lead Time | Yes | Number |
| Minimum Remaining Shelf Life (Days) | Yes | Number |
| Continuous Inter-Organization Transfers | Yes | |
| Convergent Supply Consumption | Yes | |
| Create Supply Flag | Yes | Yes or No |
| Divergent Supply Feed | Yes | |
| Exception Set | Yes | LOV |
| Inventory Use Up Date | Yes | |
| Make/Buy | Yes | LOV (Make/Buy) |
| Margin | Yes | |
| Weight UOM | Yes | LOV UOM |
| Volume UOM | Yes | LOV UOM |
| Rounding Control | Yes | Yes or No |
| ATP Flag | Yes | Yes or No |
| ATP Components Flag | Yes | Yes or No |
| Vendor Managed: Minimum Quantity | Yes | |
| Vendor Managed: Minimum Days of Supply | Yes | |
| Vendor Managed: Maximum Quantity | Yes | |
| Vendor Managed: Maximum Days of Supply | Yes | |
| Vendor Managed: Fixed Quantity | Yes | |
| Vendor Managed: Consigned | Yes | |
| Retirement Rate | Yes | |
| History Intermittency | Yes | Default: No |
Special Source Instance Attributes for Service Parts Planning
Item attributes in the source instance for use in Service Parts Planning include repair yield, repair lead time, repair program, and preposition inventory. These attributes are collected in planning and appear in the Item Attributes Mass Maintenance window. These attributes are available for query and updates as well.
Destination-Only Item Attributes
Service Parts Planning capability requires a set of attributes that are maintained only in the destination instance. Because logical organizations (technician organizations) can support many zones, you might want to forecast by zone. You set up forecast rules for the zones where usage data is collected. Destination-only item attributes include Forecast Rule for Demand and Forecast Rule for Returns. These attributes appear in the item query result and are available as part of the mass maintenance capability.
| Attribute | Description | Validation / LOV | Edit in ODS |
|---|---|---|---|
| Forecast Rule for Demand | This is the rule associated for forecasting demand for an item. | List of predefined forecast rules | Yes |
| Forecast Rule for Returns | This is the rule associated with forecasting the returns for an item. | List of predefined forecast rules | Yes |
| Life time buy date | The date for the lifetime buy | Date | Yes |
| End of life date | The date of the end of life for the spare part | Date > Life time buy date | Yes |
| Average demand beyond planning horizon | The average demand expected beyond planning horizon/period. | Number | Yes |
| Average returns beyond planning horizon | The average returns expected beyond planning horizon period. | Number | Yes |
| Return forecast time fence (Days) | The forecast time fence for return forecast | Number | Yes |
| Average Daily Demand | The average demand. | Number | Yes |
| Defective Item Cost | This reflects the cost of a defective part and will be used for cost based optimization plan and while computing Key Performance Indicators (KPI's). | Number | Yes |
| Basis for average daily demand | The stream that is used to calculate the average daily demand. | Valid collected stream. | Yes |
| Standard Deviation for daily demand | The standard deviation for daily demand. | Number | Yes |
| Mean inter arrival | The mean inter-arrival time | Number | Yes |
| Standard deviation of inter-arrival | The standard deviation of inter-arrival times | Number | Yes |
| Inter-arrival distribution method | The inter arrival distribution method will be used by IO as defined by the user in calculating the safety stock. If the value of this attribute is Null and the forecast method for the item is Croston's then inventory planning will assume this to be Poisson's distribution. For all other forecast methods, inventory planning will assume this to be normal distribution. | Varchar | Yes |
| Forecasting process/ engine | In the destination, this attribute signifies that the particular item-organization data collected will be used for SPP or Demantra. This is a collected data only attribute that cannot be changed in a non empty collected simulation set and also sets one flag only for SPP versus Demantra. If the simulation set is Null and pointing to the collected data, then users can edit it in the window or mass update it using the filters and attributes. |
Varchar |
The Parts Classification UI
Given that a high number of parts is characteristic of the spares business, you will typically group parts, and then manage the group, rather than manage each part individually. To facilitate this process, you can define rules that automatically group parts into part categories.
Under "Setup", click on "Manage Parts Classification" to display the Parts Classification UI. This link is also available in the "Plan Health Summary", "Demand and Supply", "Exceptions" and "SLA Analysis" tabs of the SPP dashboard. The Parts Classification UI enables you to define rules to automatically classify parts into part categories.
You can define part classification rules based on the values of item attributes and/or characteristics of historical demand. Each set of rules is associated with a single Simulation Set. You can associate up to eight part classification rules with a Simulation Set. After the rules are saved, you can retrieve them by the rule name name for editing. The Category Set specified at the page header contains categories that parts will be classified into.
Organization
The "Scope" panel, "Organizations" text box lists organizations that will be considered by the parts classification process. You can click on this field and select organizations to be considered by the rule.
Demand Schedule
You may want the rules process to consider characteristics of the demand forecast such as standard deviation, when classifying the part. With the Demand Schedules field (also in the "Scope" panel), you can reference a specific demand schedule whose characteristics are to be evaluated (only one demand schedule can be referenced).
Note: When a demand schedule is included, forecasts for all parts at all organizations included in that schedule will be considered.
Categories
Use the Categories panel to select the category to which parts satisfying certain rules are to be assigned. Clicking on these fields brings up a list of values, and you can set any Category belonging to the Category Set being referenced on the page header.
Classification Rules
This section is where you define the rules. The following table lists the item attributes available to the parts classification rules. They are in the attribute group Update Parts Classification.
| Attribute | Source |
| All item attributes | Available in IMM except the following:
|
| Annual Sales - Quantity Annual Sales - Count Annual Sales - Value Annual Shipments - Quantity Annual Shipment - Count Annual Shipments - Value |
If this attribute is used in a categorization rule, a Concurrent Program Calculate Annual Demand will be launched. Details of the concurrent program are below. |
| Fcst Error (MAPE/MAD) | This attribute (measure) is published along with the forecast. However this cannot be displayed in any simulation set, since the simulation set does not have a reference to a forecast set. This attribute should be enabled only if the forecast set referred to in the Parts Classification UI has the measure populated. |
| Reliability | This attribute can be updated by the user in the Collected Simulation Set. |
| Failure Impact | Set by the user in the COLLECTED Simulation Set. |
| User Attributes 1-15 | In addition to the attributes detailed above, the Simulation Set has 15 user attribute columns; these can be used by the planner to set any other attributethey may want to use in the classification rule. The user sets this in the Simulation Set. |
Defining Rules
Using these attributes, you can define one or more rules and specify whether a particular part has to "match any" or "match all" of those rules in order to be assigned to that part category.
Buttons
This screen has the following buttons:
-
Save - This saves the criteria against the Part Classification Rule Name (Part Classes and rules to assign items to each Class), so that it is available if the form is closed and re-opened.
-
Clear - This clears the entire screen, and all Part Categories and Rules to assign items to them are deleted. This is usually done when you want to delete all existing rules and start fresh. You will be prompted before the screen is cleared.
-
Execute - Clicking on this button executes the specified rules and classifies items to their respective part classifications. When this is clicked the rules are evaluated, and the Criticality Category attribute for each item is updated with the name of the part class it is assigned to. Clicking Execute also launches the "Calculate Annual Demand" concurrent program in the back end to evaluate the attributes mentioned above.
-
When you click on Execute it launches concurrent programs to calculate the Annual Demand (related attributes) and execute the criticality rules. While the concurrent programs are running, you cannot view the results. Instead, a message pops up showing the REQUEST ID and stating that the results will be available after all requests are completed.
-
This Criticality Category can be reviewed in the Item Attribute Mass Maintenance form referenced in the Header region of this form.
-
For more information see the section on Concurrent Programs below.
-
-
Delete (icons) - There is a delete icon for each row for deleting the record in focus. For example, if you have defined a rule on the third row of the Classification Rules and hit the associated delete icon, that row would be deleted. Alternately, if you are in the Part Class section and hit Delete, that category definition along with the rules to assign items to it would be deleted.
-
View Results - After clicking Execute and the concurrent requests have completed, you can view the results of the classification by clicking on this button.
Concurrent Programs
Clicking the Execute button launches one or more of the following concurrent programs.
Collect Sales and Shipment History
If the "Collect Historical Data starting from" check-box is enabled, this will launch a concurrent program. This program will:
-
automatically purge any demand history data earlier than the 1st day of the 12th month prior to todays month
-
retain values previously collected up to the first day of the 12th month prior to todays month
-
collect historical sales and shipment data from the date specified until the current date, for item-organizations included as part of the part classification rules (the default value displayed is the date when this data was last collected)
Calculate Annual Demand
If the Re-calculate Annual Demand Values check-box is checked (or if this data has never been computed in the past), the concurrent program to calculate the Annual Sales Count / Quantity / Value and Annual Shipment Count / Quantity / Value is launched. This uses the collected data for the calculations. If the option to launch the Collect ales and Shipment History has been checked, this program waits untill the latest history data has been collected. If that is not checked, this program will calculate values using the previously collected history data.
Once the history data is available, this program calculates the attributes as follows:
-
Annual shipment Count: Count of shipments (internal and external) of the item, from the organization during the preceding twelve months.
-
Annual Shipment Quantity: Number of units of the item shipped from the organization during the preceding twelve months.
-
Annual Shipment Value: Value of the shipments (based on quantity, price and discount) of the item shipped from the organization during the preceding twelve months.
-
Annual Sales Count: Count of sales records (external) of the item, at the organization during the preceding twelve months.
-
Annual Sales Quantity: Number of units of the item sold at the organization during the preceding twelve months.
-
Annual Sales Value: Value of sales of the item at the organization during the preceding twelve months.
In all these calculations:
-
If an item has less than twelve months of historical data available, the values are prorated.
-
In the case of intermittent demand items, it is possible there are months with no shipments/sales. These are accounted for in the calculations.
-
While calculating these attributes, the program considers the history of the entire supersession chain of the item and updates the values for the latest revision. This is because, if a new revision was introduced mid-way through the history range, history before that would have been for the older revision, and after, would be for the new revision, and both must be considered.
-
The attribute once calculated is available in the specified Simulation Set.
Execute Part Classification Rules
-
This concurrent program will always be launched when Execute is clicked.
-
If the options to launch either or both of the preceding two concurrent programs are checked, this is launched after them.
-
This program evaluates the part classification rules and assigns items to various categories.
-
The rules are evaluated sequentially starting from the top. Therefore if an item satisfies the rules specified for two different categories, it is assigned to the latter Category. The Move Up/Down and Move Top/Bottom buttons can be used to sequence the Categories, so that the desired sequence can be maintained.
-
In case of supersession chains, the rule applicable for the highest revision is evaluated and all other revisions are assigned to the same Category too.
When a Part Classification Rule is executed, the program:
-
Reads the Simulation Set provided as an input there, and selects that as the Simulation Set to be updated.
-
Reads the Category Set provided as an input there. This is the category set to be used for classifying parts. The program then checks the Simulation Set to see if any of the Category Set1-8 columns has been renamed to match this Category Set.
-
If yes, it uses that column to update the results to.
-
If no, it uses the next unused Category Set# column to update the results to.
-
If all 8 Category Set# columns are used up, the system will prevent the rule from executing.
-
-
Then evaluates the rules specified for each Category under the Category Set and assigns item-organizations satisfying those rules to that Category. It then updates the selected column in the IMM with the name of the Category.
Reviewing Part Classification Results
When the Parts Classification rules are executed, the relevant concurrent programs are launched and items are assigned to their particular Categories. The relevant Category Set# column in the IMM is updated to specify the Category that the item is assigned to. This field can be reviewed in the Item Attribute Mass Maintenance form.
Once the execution has completed, the planner can view the results of the Parts Classification UI by clicking on View Results on the Manage Parts Classification page.
While the concurrent program to assign parts to classes is running, the View Requests button is disabled. It becomes again after the process completes successfully. The Review Part Classification Results page is then displayed.
The top part of this page shows the Part Classification Rule Name, Simulation Set Name, Category Set Name and Scope specified for the Parts Classification Rules (Organization and Demand Schedule). These fields are read-only.
The lower part of this page shows a table listing the number of items in each Category for the Category Set. The pie chart next to it shows the same information. These fields are read-only, and numbers are hyperlinked to the relevent location in the Item Attribute Mass Maintenance form.
Table Columns
-
Category: The name of the Category in this Category Set to which parts are assigned.
-
Classification Rule Results: The number of items assigned to that particular Category by the rule defined above. Clicking on the hyperlink here opens up the IMM with records where the Category matches the Category from which you drilled down.
-
Added via Override: The number of parts added to that Category due to overrides in the Simulation Set.
-
Removed via Override: The number of parts removed from that Category due to overrides in the Simulation Set.
-
Final Classification: The end result of overlaying the overrides on the Classification Rule Results.
-
Hyperlinks from Review Part Classification Results: The columns in the Review Part Classification Results table would be hyperlinked, and would work as follows:
-
Clicking on a cell in the Classification Rule Results columns would open the simulation set, with the records with Category Set <#> = the specific categorypre-filtered. For example, if the planner clicked on the 183 in this column, the simulation set would open with the column CostClassification pre-filtered for HIGH.
-
Clicking on a cell in the Overrides Added column would open the simulation set, with the records with Category Set <#> Override = the specific Category pre-filtered. For example, if the planner clicked on the 12 in the Overrides Added column, the simulation set would open with the column CostClassification Override pre-filtered for HIGH.
-
Clicking on a cell in the Overrides Removed column would open the simulation set, with the records with Category Set <#> = the specific category pre-filtered AND Category Set <#> Override not null. For example, if the planner clicked on the 12 in the Overrides Removed column, the simulation set would open for items with CostClassification=VERY HIGH and CostClassification Override=NULL
-
Clicking on a cell in the Final Classification column would open the Simulation set with records as:
-
Category Set <#> = the specific category pre-filtered AND Category Set <#> Override=NULL OR
-
Category Set <#> Override= the specific category pre-filtered
-
For example, if the planner clicked on the 195 in this column it would open with 195 rows as, 183 coming from CostClassification= HIGH AND Override=null + 12 coming from CostClassification=VERY HIGH AND CostClassification Override=HIGH.
-
-
The pie-chart displays the number of items in each category after Final Classification, and hyperlinks would work as described in the last point above.
Using Parts Classification
Once parts are classified into groups as described above, they can be subsequently used for setting planning parameters. For example, categories can be used for grouping items that have similar inventory policies. Categories can be used to group parts, and thresholds can be used to determine stocking locations can be defined at the part group level.
Support flexible part classification enables the same part location to be assigned to different Categories along different Category Sets. The Category Set must be referenced where the Part Classification is being used.
Part Classification in Service Level Set
One of the key use cases for Part Classification is to specify service levels. A planner may want to specify the same service levels for all part-locations that satisfy certain rules. In that case, he would use a Category Set for Service Level assignment, assign items to different Categories in that Category Set based on Rules, and then assign Service Levels and DFLT for each Category in the Service Level Set form.
The option "Category Set for Service Level Assignment" determines the category set from which Categories should be used for assigning service levels. Once the planner specifies the Category Set and Assignment Level, the Category column LoV displays various Categories belonging to that Category Set. The planner can then select among them and assign Service Levels and Fulfillment Lead Times.
Category Set / Category in Simulation Set (IMM)
A planner might wish to select items belonging to a particular Category along a Category Set, and specify an item attribute or a planning policy for that group. For example, he might want to select all items belonging to Category HIGH along Category Set CostClassification and specify the Safety Stock Method as MRP Planned % .
The Item Attribute Mass Maintenance form allows searching and filtering by Category Set and Category. The planner can specify the Category Set-Category combination he wants to filter, and the LoV displays the valid Category Set-Category combinations in that Simulation Set.
The filtered table then shows the item-orgs assigned to that Category in that Category Set column.