Service Planning Work Area
This chapter covers the following topics:
- User Interface
- Creating Favorites
- Using Favorites
- Plan Options
- Exceptions
- Items
- Material Plan
- Supplies and Demands
- Preferences
- Delete Plan
- Replan Options
- Seeded Layouts
- User Defined Layouts
- Product Definition
- Plan Input Links
- Safety Stock Window
- Manage Instances
- Organization Security
User Interface
You use the following path to bring up the Service Parts Planning Work Area:
Service Supply Chain Planner / Service Parts Planning / Service Parts Planning Work Area.
Saving and Canceling Changes
-
To save changes to the plan, select the Save Changes page-level button.
-
To cancel pending changes, select the Cancel page-level button.
The work area name is "Service Parts Planning".
Only one SPP plan may be open at the same time. Clicking on another ASCP plan will close the current plan and open the selected plan.
When the you click on a plan link, the ADF-based UI's appear in a new dynamic tab in the local area.
Clicking on a plan in the plans panel opens the selected plan in the local area. The “Service Parts Planning” level 1 tab is renamed to the Plan name.
You can use the Move Down Active Tab icon to create a two-pane layout. The active pane in the top (or only) pane is move to the bottom pane. You can move a tab from the bottom to the top pane (or vice versa) using the Move Up (or Down) Active Tab action. Once there are no more tabs in the bottom pane, the layout automatically switches to a one-pane layout.
You can switch to plan inputs by selecting the Plan Inputs tab.
Four accordion panels allow you to perform actions for analyzing data executing various plan operations. These four are:
-
Plans
-
Favorites
-
Plan Links
-
Plan Actions
Plans Accordion Panel
Only one SPP plan may be open at a time. Selecting a different SPP plan from what is currently opened closes the current plan and opens the newly selected plan. A warning message appears if there are unsaved changes on the current plan.
Only SPP Plans that have been successfully launched are listed in the plans panel. Plans are listed alphabetically.
When you open an SPP plan in the local area, the default Plan Summary is opened automatically. If no default Plan Summary exists, the local area is empty.
Favorites Accordion Panel
In this area you can create personal queries and store links to them.
You create a favorite by clicking the plus icon in the Favorites accordion panel. This displays the Create Favorite popup window.
Types of Favorites
By selecting Type you can create one of five types of Favorites:
-
Items
-
Exceptions
-
Suppliers
-
Orders
-
Metrics
When you select a type, the relevant fields for defining that type of Favorite will display in the window. More information about specific types of Favorites is provided in the relevant sections below.
For more information, see the section below on Favorites.
Plan Links Accordion Panel
You access the following links in the Plan Links accordion panel:
-
Items:: This opens the Items page.
-
Exceptions:: This opens the Exceptions page.
-
Supplies and Demands: This opens the Supplies and Demands UI
-
Material Plan:: This opens the Material Plan page.
-
Preferences:: This opens the Preferences popup window.
-
Delete Plan: Use this link to delete service plans
Plan Actions Accordion Panel
In this area the following Plan Actions are available:
-
Create Plan. This launches ADF Plan Options dialog.
-
Copy Plan. This launches ADF Copy Plan.
-
Plan Options. This launches ADF Plan Options dialog.
-
Launch Plan. This displays the ADF-based Launch Plan dialog.
-
Release Plan. This displays the ADF-based Release Plan dialog.
Plan Inputs Accordion Panel
When you select the Plan Inputs tab, the following accordion panels are available:
-
Favorites
-
Plan Input Links
In the Plan Input Links accordion panel, the following types of links are available:
-
Supplies and Demands. This opens the Supplies and Demands UI and displays the flat table view. Note: The Tree table view is not visible in plan inputs mode.
-
Item Simulation Set
-
Items. This opens the Items page.
-
Manage Parts Classification
-
Rule Based Sourcing Creation
-
Manage Service Level Sets
Creating Favorites
When you click the plus icon in the Favorites accordion panel, the Create Favorite popup appears. The available fields in this window depend on the Type of Favorite. On the window there is a header section and a panel section, and the panel section has one or more tabs. The sections below define the available fields for each type of Favorite.
Create Favorites - Header
Header: All Types
| Field | Description |
|---|---|
| Type | This determines the type of Favorite to be created. The Favorite Types are: Items, Exceptions, Suppliers, Orders, Metrics. |
| Name | You name your Favorite here. |
| Include in My List of Favorites | If this is checked, the Favorite will be included in your local list of favorites. |
| Public | A Favorite can have public or private visibility. Check this to make the Favorite available to other users Otherwise, it is only visible to the user who created it. |
| Created By | The name of the user who created this Favorite. |
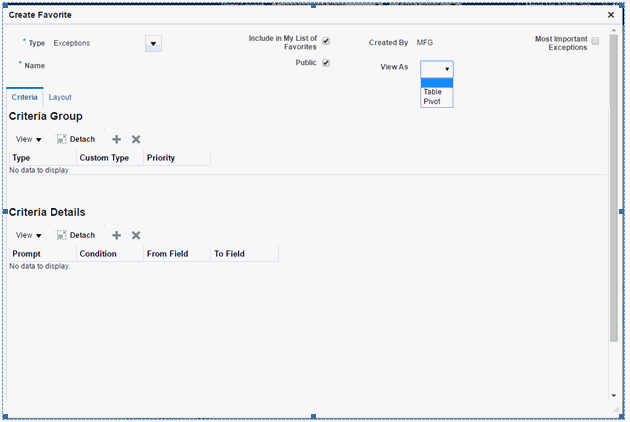
| View As | This allows you to select how you want to view the data. For Exceptions and Orders, you can view that data as a regular table or a pivot table. For Metrics you can select the data display as being either Info Tile or Standard. Items and Suppliers only have one format available, as a table. |
Header: Items, Suppliers, Orders
| Field | Description |
|---|---|
| Auto Release | This checkbox is displayed for the Items, Suppliers, and Orders types. For a definition of this feature see Creating Workbench Queries for Auto-release in the chapter Working with Plans. |
Header: Exceptions
| Field | Description |
|---|---|
| Most Important Exceptions | Check here to make this a Most Important Exception (defined below). |
Create Favorites - Criteria Tab
Although the available fields in the Criteria Tab may change depending on the type of Favorite you're creating, there are generally one or two panels that display here:
| Criteria Details panel | This panel allows you to create a custom query condition for each row in the displayed table. |
| Criteria Group panel | For Exceptions or Orders, you first use the Criteria Group panel to limit your query to a particular type of Exception or Order. You then select a Criteria Group row and create a specific query for it using the the Criteria Details panel. |
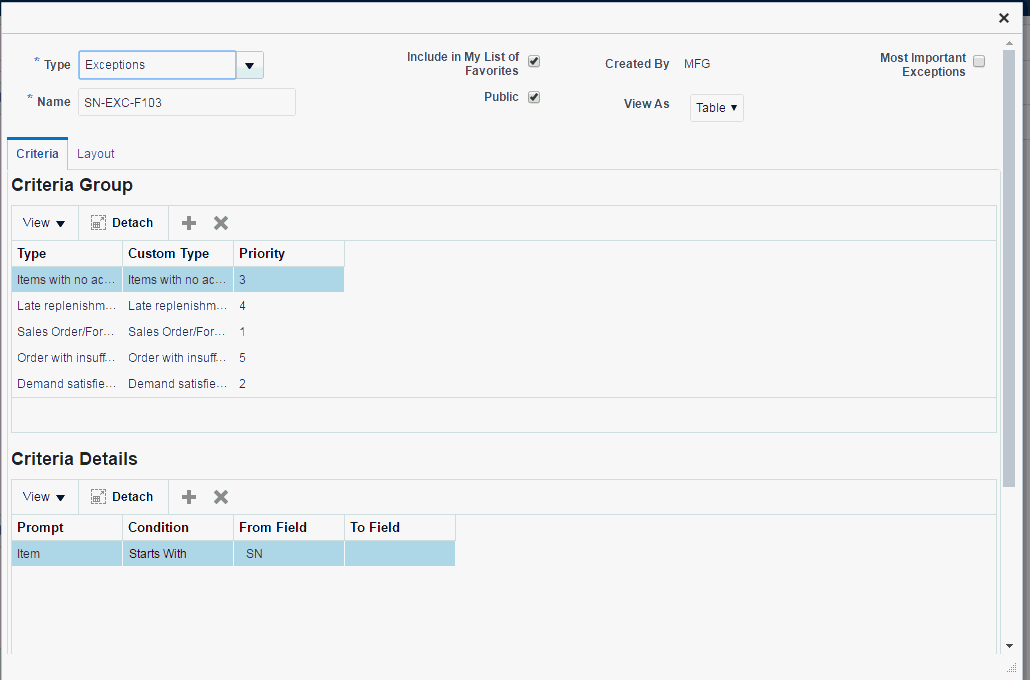
The following shows which panels display for which types of Favorite:
| Type | Panels displaying in the Criteria Tab |
|---|---|
| Items | Criteria Details |
| Exceptions | Criteria Group Criteria Details |
| Suppliers | Criteria Details |
| Orders | Criteria Group Criteria Details |
| Metrics | Criteria Group |
Note: The fields in the Criteria Details and Criteria Groups panels are based on the list of fields used in the Personal Queries of the Service Planner Workbench.
Criteria Details Panel
This panel allows you to define one or more Conditions for a custom query. This panel is composed of a header and a table below it.
Criteria Details Header
| View | This menu allows you to control which fields appear and in what order they display. Displayed fields have a blue check mark in the dropdown menu. Click the item to toggle whether it shows or not. You can also use Manage Columns to comprehensively control which fields are displayed. |
| Detach | Click Detach to display the table in its own window. This allows you to see more rows. |
| plus | Clicking the plus sign starts a new row in the table where you can create a custom search criteria. |
| x | Clicking the "x" removes the currently selected row. |
Criteria Group Header
This header is the same as the Criteria Details header defined above and has the same controls:
-
View
-
Detach
-
plus icon
-
x icon
Criteria Group Table
The displayed set of Criteria Group columns are different for different Favorite Types.
Exceptions
| Type | Here is where you select the exception type from a dropdown list. |
| Custom Type | This is an optional user defined type field. |
| Priority | This is used for determining the Most Important Exception. |
Orders
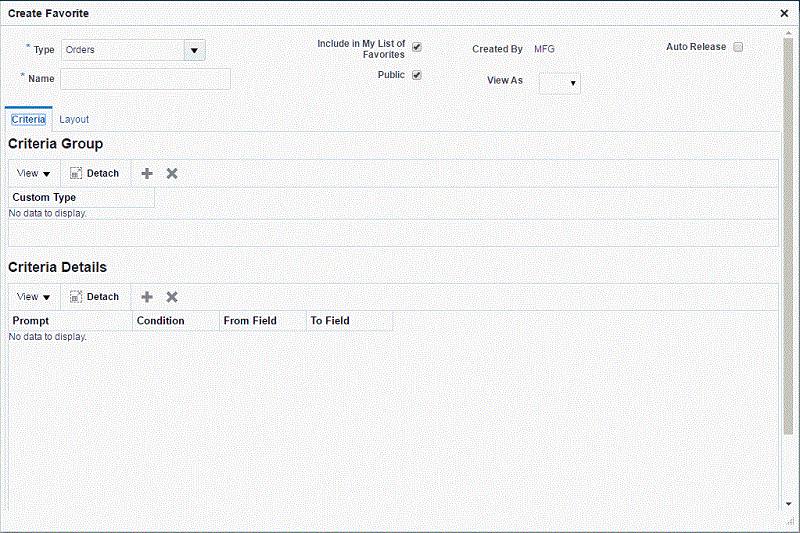
| Custom Type | This is an optional user defined type field. |
Metrics
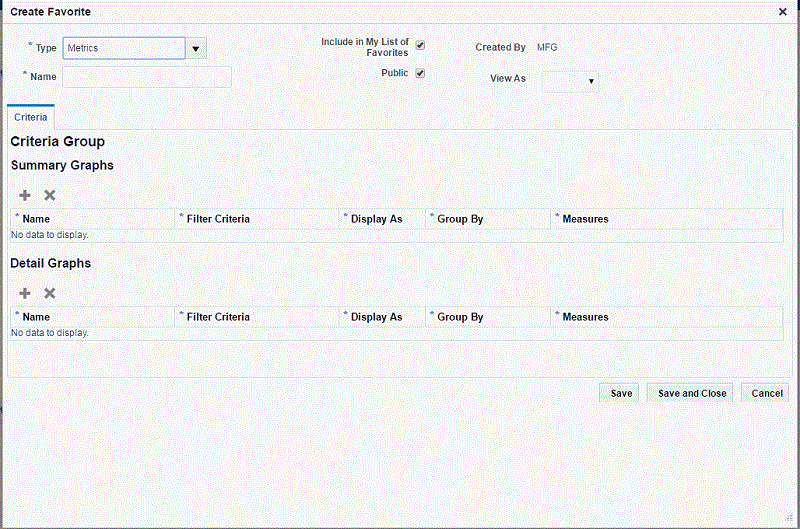
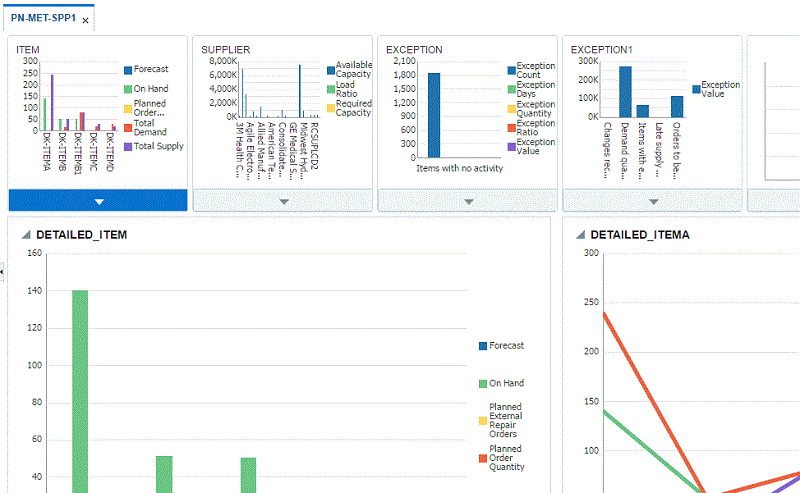
Metrics are key indicators used for measuring performance. Metrics Favorites provide an analytical, graphical view for tracking a specific metric.
The Metrics type of Favorites must be assigned to a plan for the metrics to be calculated for any given plan. When creating Metrics favorites, the filter criteria (Favorite type) can be only based on Items, Exceptions or Suppliers (not Orders)
The Criteria Group for Metrics has its own set of fields, used for setting up graphs.
Note: When defining a Metric, you will reference another Favorite query.
Note: When Metrics definitions are changed, users need to run the “Generate Plan Summary” concurrent program to see the results. This program is automatically run with Plan Run if the plan option “Display Key Performance Indicators” is checked.
| Name | This appears as the title of the displayed graph. |
| Filter Criteria | You select another Favorite here. |
| Display As | Here you can select whether to display the graph as a Bar Graph or a Line Graph. |
| Group By | Here you can select how to group your data. An example of this would be to group the data by Organization. |
| Measures | Here you select which measurable attribute(s) you want to track. |
CreateFavorites - Layout Tab
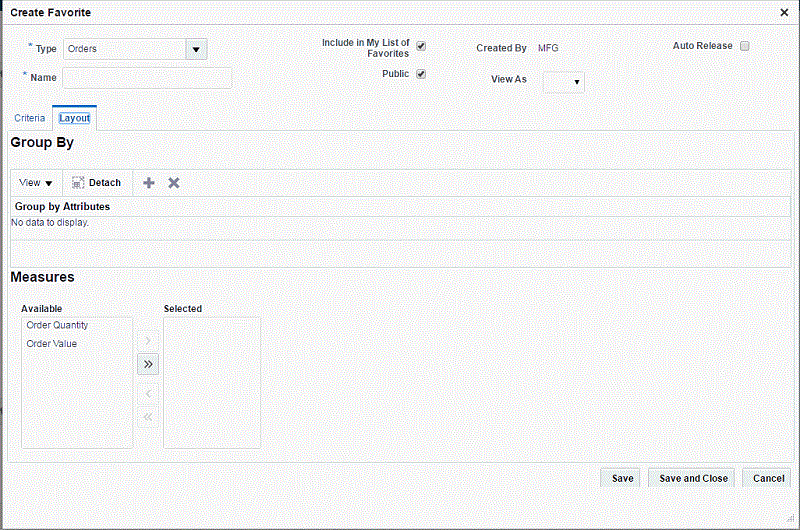
The Layout Tab shows up for Exceptions and Orders. It allows you to organize the data to be displayed. The top panel (Group By) enables you to group the data by one or more categories. For example, you could group the data by Org, then by Week.
You select a particular metric to view in the second panel (Measures).
Note: For Pivot Tables you can only select one Measure.
The corresponding forms window is called Queries Tabbed Pane. Its description is in the section Queries Tabbed Pane of the Planner Workbench chapter, in the Advanced Supply Chain Planning Implementation and User's Guide.
Using Favorites
Favorites are configurable lists of key planning entities that can be defined with user-defined queries. These favorite lists of items, orders etc. can then be used for quickly accessing the related information about them.
The Favorites region contains the following types:
-
Items
-
Exceptions
-
Orders
-
Suppliers
-
Metrics
Note: Favorites are local to each Plan type (i.e. Favorites defined in the Service Planning Work Area will not be visible in other work areas like Supply Planning Work Area).
Favorites can be created or edited using the Create and Edit icons at the top of this section.
You create a favorite by clicking the plus icon in the Favorites accordion panel. The available fields are determined by which type of Favorite you are creating, as shown in the following displays.
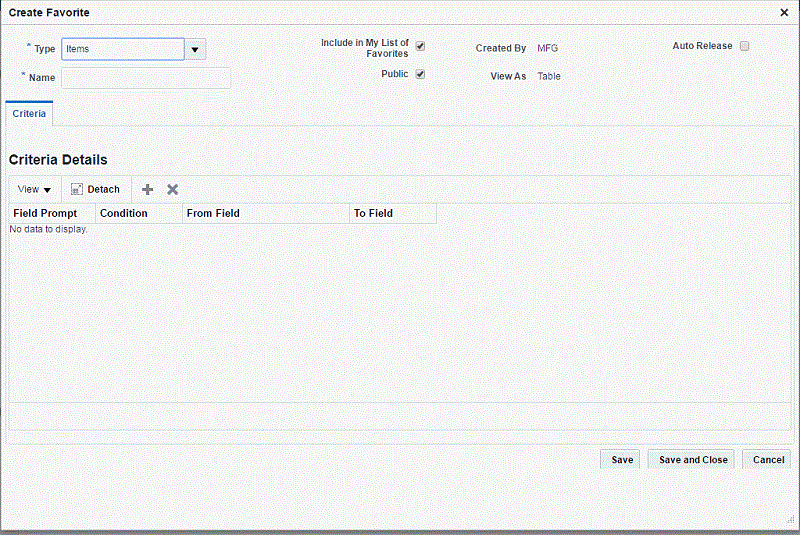
Favorite Items
Below is a display of the popup for creating a Favorite for Items.
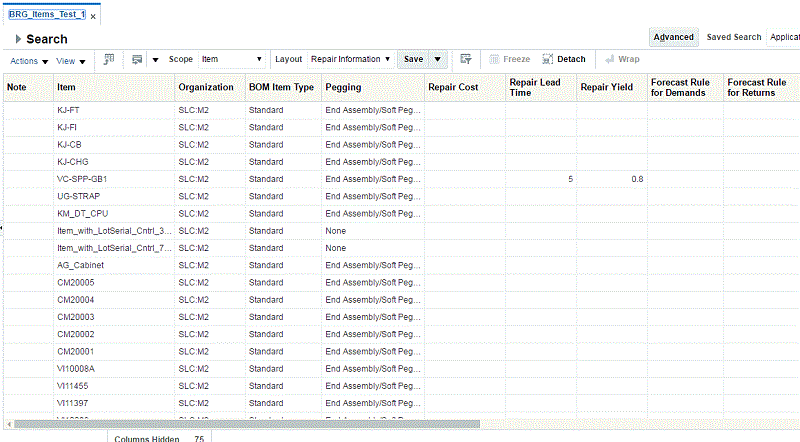
Item Details
Below is a display of an Items Favorite. For each Item, a configurable set of columns list the item fields.
Favorite Exceptions - Layout Tab
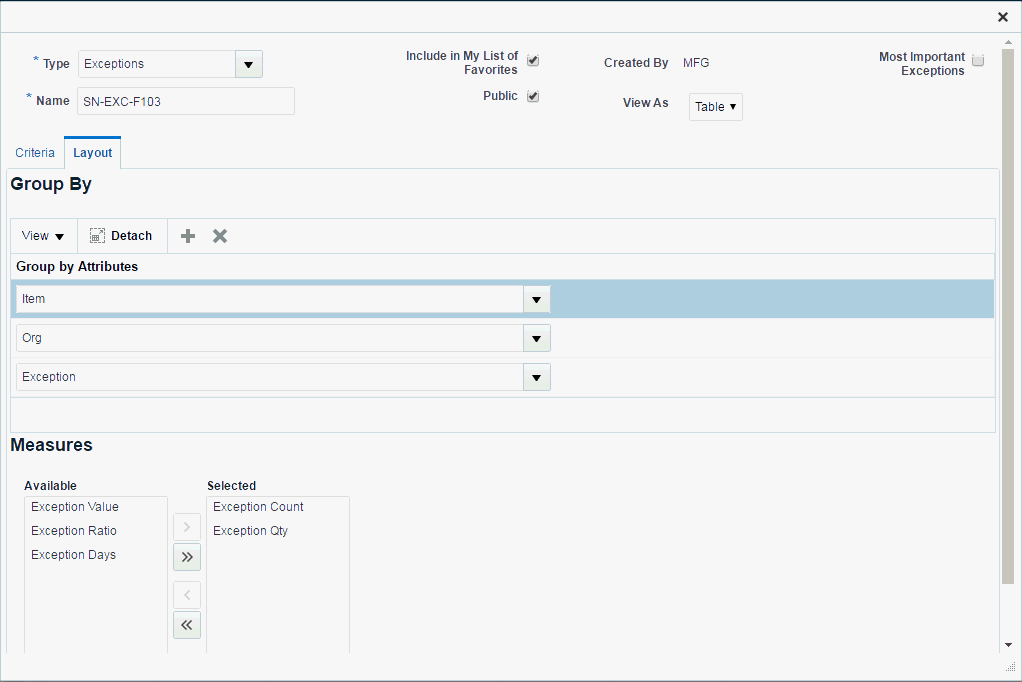
Measures
There are 6 measures available for selection:
-
Exception Count
-
Exception Value
-
Exception Qty
-
Exception Ration
-
Exception Days
-
Priority
Most Important Exception
You select the Most Important Exception checkbox to display only the most important exceptions in the Exceptions Results. One record per item/org will appear in the Exceptions Results table. This record represents the most important exception type based on the user-specified Priority value in the Criteria tab of the Create Favorite window. The most important exception type is the exception type with the lowest priority number for any given item/org.
The following steps describes how the engine identifies the Most Important Exception for an item/org:
Step 1 – Planning identifies all the exception types for an item/org.
Step 2 – The exception types for a given item/org are sorted by the user-specified Priority value in ascending order.
Step 3 – For a given item/org, only the exception type with the lowest Priority value appears in the Exceptions page.
Example – Most Important Exception Based on Priority
The following table shows the planning result details which includes Item, Organization, Exception Type, and the user-specified Priority:
| Item | Organization | Exception Type | Priority |
|---|---|---|---|
| AS66311 | SLC:M1 | Item with a shortage | 1 |
| AS66311 | SLC:M1 | Late supply pegged to a forecast | 5 |
| AS66311 | SLC:M1 | Late supply pegged to a sales order | 10 |
| AS66311 | SLC:M2 | Item with a shortage | 1 |
| AS66311 | SLC:M2 | Past due forecast | 7 |
| AS66312 | SLC:M1 | Item has orders to be rescheduled in | 5 |
| AS66312 | SLC:M1 | Past due sales orders | 7 |
| AS66312 | SLC:M1 | Item has orders with compression days | 10 |
| AS66312 | SLC:M2 | Item with a shortage | 1 |
| AS66312 | SLC:M2 | Late supply pegged to a sales order | 4 |
Based on the above table, the most important exception type for an item/org is selected (Exception Type with the lowest Priority value) and displayed in the Favorite Exceptions Results:
| Item | Organization | Most Important Exception | Priority |
|---|---|---|---|
| AS66311 | SLC:M1 | Item with a shortage | 1 |
| AS66311 | SLC:M2 | Item with a shortage | 1 |
| AS66312 | SLC:M1 | Item has orders to be rescheduled in | 5 |
| AS66312 | SLC:M2 | Item with a shortage | 1 |
Flat Versus Pivot Table
When you create an Exception Favorite, you can choose for the Favorite to display as a flat table or a pivot table. That selection is made in the View As dropdown list in the Create Favorite popup.
Exception Details
After the Exception Favorite is saved, you can select the link in the Favorites accordion panel. It then displays as an Exception Details screen.
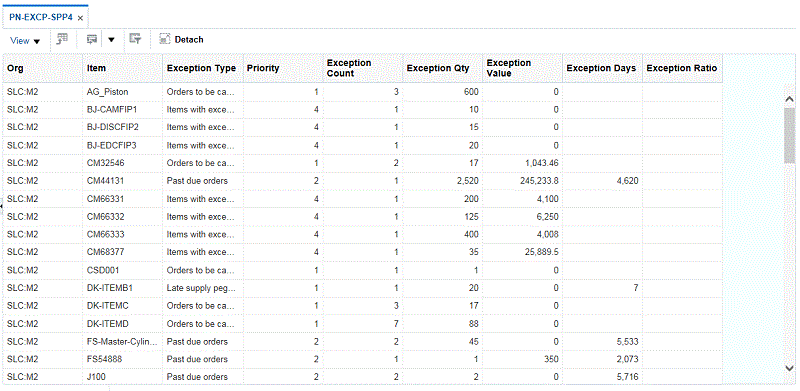
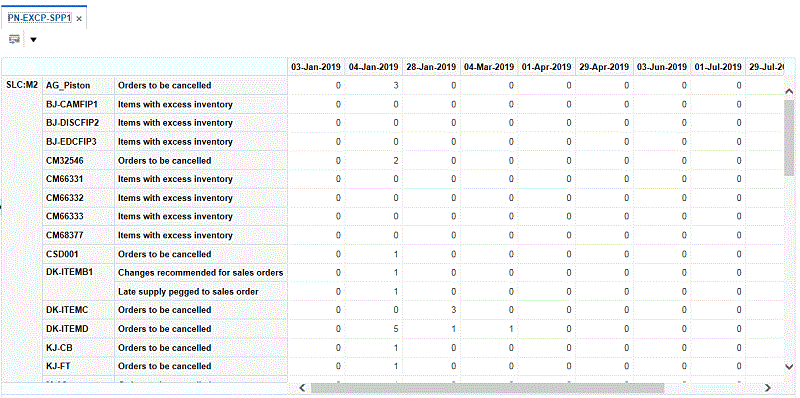
The following two screenshots show the Exception Details screen for a Favorite that has been defined to display in Flat table format, and one that displays in Pivot table format.
Favorite Exceptions - Flat Table
The Flat Table shows an exception in each row, and the column headings identify various exception fields.
Favorite Exceptions - Pivot Table
The Pivot Table shows a particular Item and exception type in each row. The column headings display dates. The fields in each column show the number of exceptions that occurred on that date for a particular Item.
Exception Types
Service Parts Planning Exception Types are:
| Process | Exception Types |
|---|---|
| Item Workflow | Item is over committed |
| Item has a shortage | |
| Item has excess inventory | |
| Items with expired lots | |
| Past due forecast | |
| Late supply pegged to a forecast | |
| Items below safety stock | |
| Rescheduling Workflow | Item has orders to be rescheduled in |
| Item has orders to be rescheduled out | |
| Item has orders to be cancelled | |
| Item has orders with compression days | |
| Item has past due orders | |
| Sales Order Workflow | Past due sales orders |
| Late supply pegged to a sales order | |
| Material Workflow | Material constraint (supplier capacity constraint) |
Favorite Orders
Two tabs are available for creating Favorite Orders:
-
Criteria
-
Layout
Favorite Orders - Criteria Tab
Favorite Orders - Layout Tab
Order Details
Orders are displayed like Exceptions, as a Flat Table or a Pivot Table. Flat Tables shows the individual fields of an Order, whereas the Pivot Table has date columns and shows the number of Orders for a given type on each date.
Favorite Suppliers
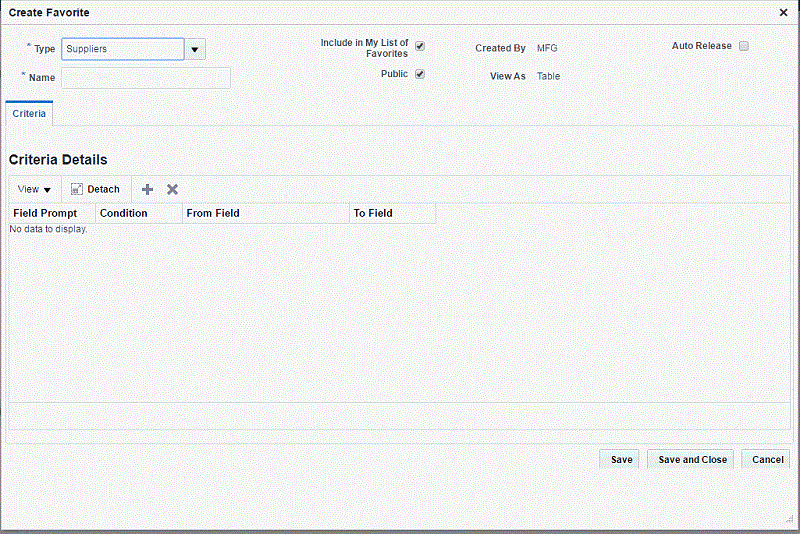
The popup for creating a Favorite Suppliers query is the same as for a Favorite Items query.
Suppliers Details
Below is a display of a Suppliers Favorite. For each Supplier, a configurable set of columns list the fields associated with a Supplier, a supplier site, an Organization, and an Item.
Favorite Metrics
Below is a display of the Create Favorite Metrics popup.
Metrics Details
Below is a configurable display of a Metrics Favorite. This screenshot is an example of the Plan Summary
Supported Metrics
The Service Planning Work Area supports the following metrics, with the drills specified:
| Graph's filter criteria Type | Measures | Drill context | Drill to |
| Items | Planned New Buy OrdersPlanned External Repair OrdersPlanned Internal Repair OrdersOn hand - DefectiveOn hand - UsablePlanned Orders - Transfer Planned OrdersWork OrdersForecast Purchase OrdersInternal Requisitions | All filter criteria from the favorite + Group by + | Supplies and Demands (filter to relevant Order type of the measure)Material Plan |
| Items | Projected Available Balance - QuantityProjected Available Balance - Value | All filter criteria from the favorite + Group by + “part condition” as filter criteria and group by | Supplies and Demands (all order types)Material Plan |
| Items | Current Scheduled ReceiptsTotal Supply | All filter criteria from the favorite + Group by + all supplies | Supplies and Demands (all supplies)Material Plan |
| Items | Total Demand | All filter criteria from the favorite + Group by + all demands | Supplies and Demands (all demands)Material Plan |
| RevenueGross MarginPurchasing CostSafety Stock | No drill supported | No drill supported | |
| Exceptions | Exception CountException DaysException QuantityException Ratio | All filter criteria from the favorite + Group by | Exception DetailsSupplies and Demands |
Plan Options
To display Plan Options select the Plan Options link in the Plan Actions accordion panel.
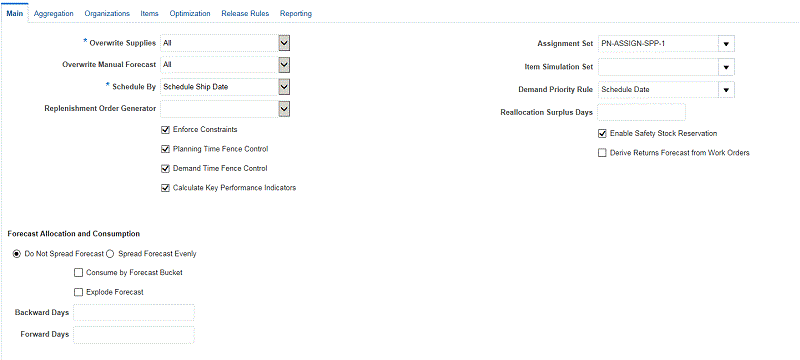
You use Plan Options to define the scope of the named plan and to control many aspects of the plan generation.
Note: For more details about the Plan Options fields see the section Service Supply Chain Plan Options in the chapter Defining Service Plans.
The Plan Options page consists of two main regions: the Header Section and the Tab Section.
Header Section – This section includes the following fields:
-
Plan Name
-
Plan Description
-
Plan Type
-
Inactive Date
-
Notification (Checkbox)
-
Organization
-
Assignment Set
-
Item Simulation Set
-
Replenishment Method
Tab Section – This section includes the following tabs:
-
Main
-
Aggregation
-
Organization
-
Items
-
Optimization
-
Release Rules
General Layout
Main Tab – Below is an illustration of Plan Options Main Tab:
Aggregation Tab – Below is an illustration of Plan Options Aggregation Tab:
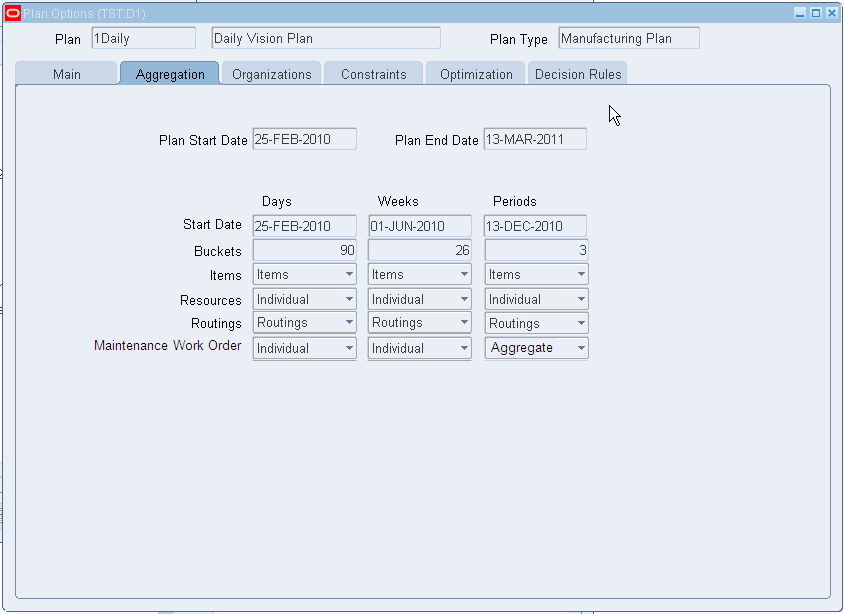
The corresponding forms window is called Plan Options. Its description is in the section Service Supply Chain Plan Options of the Defining Service Plans chapter.
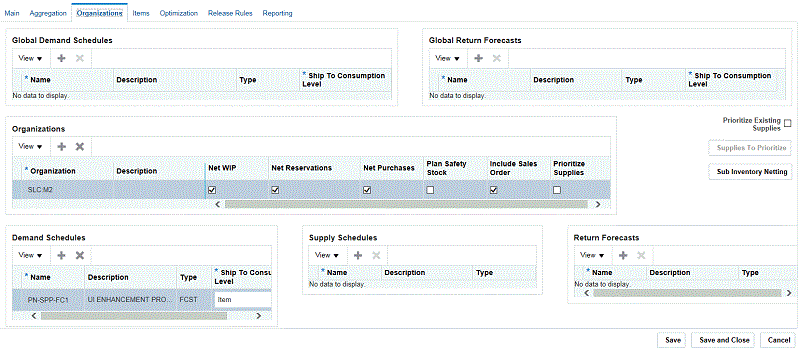
Organization Tab - Below is an illustration of Plan Options Organizations Tab:
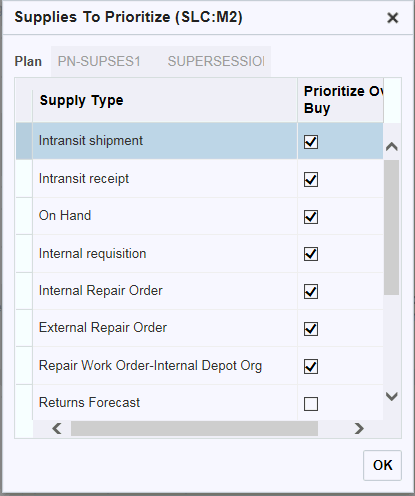
Supplies to Prioritize – In the Organizations tab, you can access the “Supplies to Prioritize” popup window by clicking on the “Supplies to Prioritize” button:
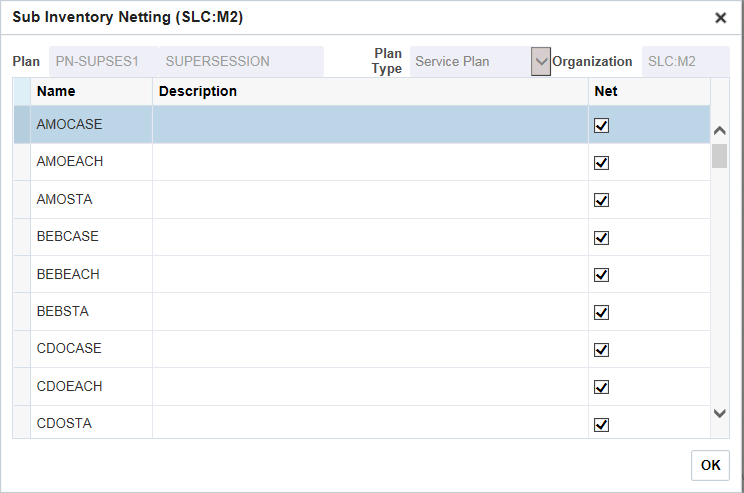
Sub Inventory Netting – From the Organizations tab you can access the “Sub Inventory Netting” popup window by clicking on the “Sub Inventory Netting” button:
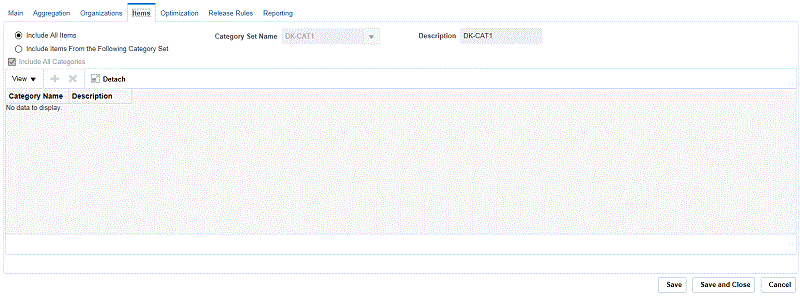
Items Tab - Below is an illustration of Plan Options Items Tab:
Optimization Tab – Below is an illustration of Plan Options Optimization Tab:

Release Rules Tab – Below is an illustration of Plan Options Release Rules Tab:

Exceptions
You can access the Exceptions from SPP work Area using the plan link Exceptions.
Below is an illustration of Exceptions view:
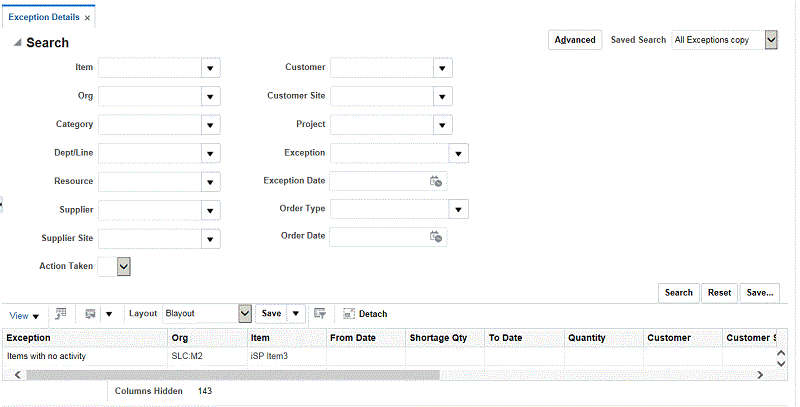
The corresponding forms window is called Exception Details. Its description is in the section Exeption Details - Taking Action of the Working with Plans chapter.
Procedure for analyzing exceptions:
-
Create an Exceptions Personal query to include the set of exceptions that you are interested in seeing once the plan has run
-
Select appropriate group by levels at which the exception information should be displayed
-
-
Execute the Exceptions Personal Query
-
Review the results of Exceptions personal query
-
Drill down to:
-
Material Plan for Item Exceptions
-
Resource Plan for Resource Exceptions
-
Orders / Pegging details for Order Exceptions
-
Exception details (as needed)
-
-
Take appropriate exception resolution actions within the three screens mentioned above
Items
You access the Items page from SPP work area using the plan link Items.
Note: The Items page is only available in a flat format.
Below is an illustration of Items page:
The default columns in the Items page are:
-
Item
-
Organization
-
Description
-
BOM Item Type
-
Repair Program
-
Planner
-
Repair Lead Time
-
Repair Yield
-
Repair Cost
Manage Columns
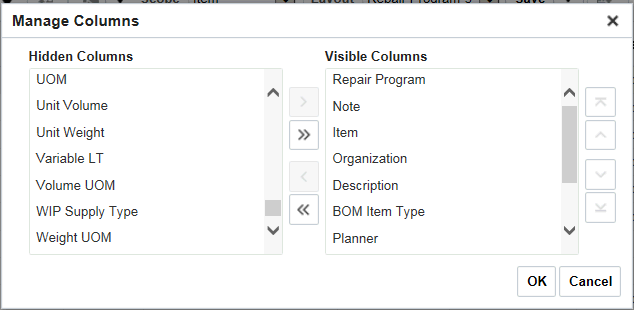
You can select which columns to display in the Manage Columns popup window. You get to this window by navigating: View / Columns / Manage Columns.
Drill To
Available Drill To actions are shown below.

Notes Page
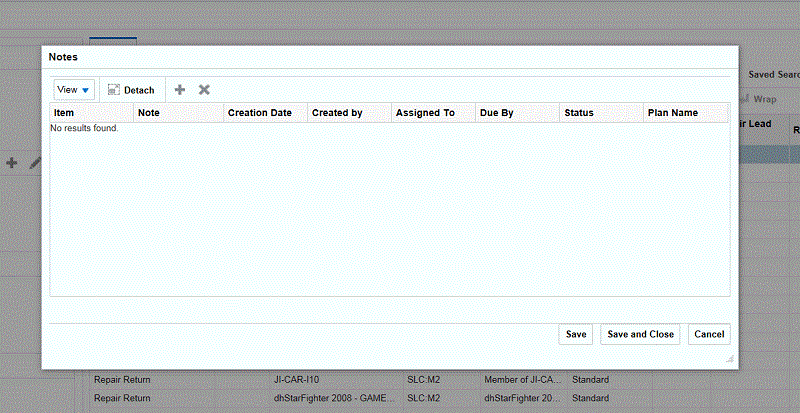
You can drill down to Notes page from the Item page for selected items. Notes are specific to plans. Thus, while saving the notes, the plan name is also saved.
Deleting Notes
In general any notes can be deleted by any user. Delete is a separate privilege that can be removed from a custom responsibility.
The corresponding forms window is called Items. Its description is in the section Items Window of the Planner Workbench chapter, in the Advanced Supply Chain Planning Implementation and User's Guide.
Description of fields
| Field | Default Value | Meaning |
| Item | Defaults from the Items page | Selected item(s) |
| Note | Null | Text of the note |
| Creation Date | Not enterable | System date and time at the time of entering the notes |
| Created By | Not enterable | User who entered the notes |
| Assigned To | Null | You can change to any user in the system. The LOV contains all the users in the system having one of the service planning responsibilities. |
| Due By | Null | You can change to any future date. LOV opens the calendar. |
| Status | Null | LOV: Open, Closed, Pending, Comment. |
| Plan Name | Not enterable | Name of the plan in which the note is entered. |
Scope
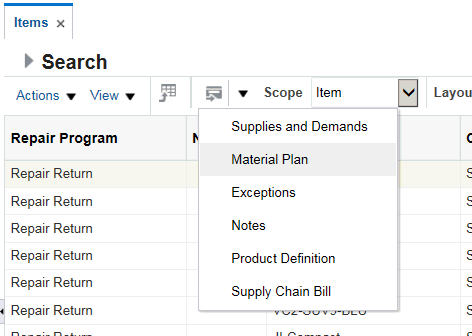
When the Items page is open, you can select the following in the Scope dropdown list:
-
Item
-
Prime
-
Supersession
Passing Context from Items Page
When the Items page is open and then you open the Material Plan, the supplies and demand context are passed down to the Material Plan for the selected items and Scope in the Items page.
When the Items page is open, you can select Prime or Supersession from the Scope LOV and then if you open one of the following pages listed below, the corresponding context of the selected items in the Items page are passed to these pages:
-
Material Plan
-
Supplies and Demands
-
Exceptions
Material Plan
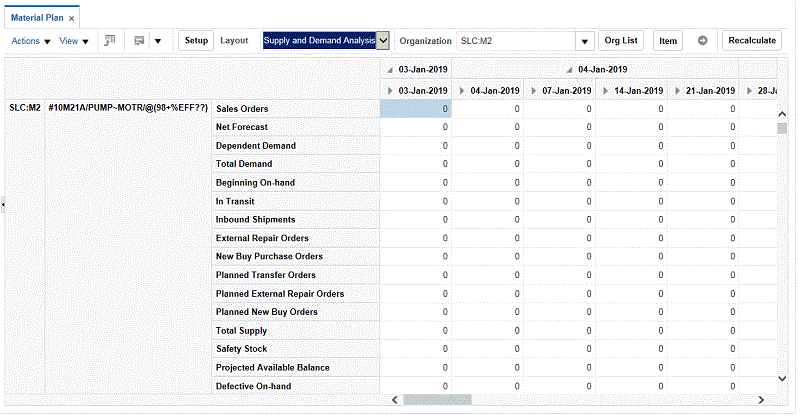
You access the Material Plan from SPP work Area using the plan link Material Plan. The screenshot below is an example of the Supply and Demand Analysis view.
The corresponding forms window is called Horizontal Plan. Its description is in the section Horizontal Plan of the Planner Workbench chapter, in the Advanced Supply Chain Planning Implementation and User's Guide.
For information about the Material Plan see Understanding the Editable Material Plan , in the Oracle Advanced Planning Command Center User's Guide.
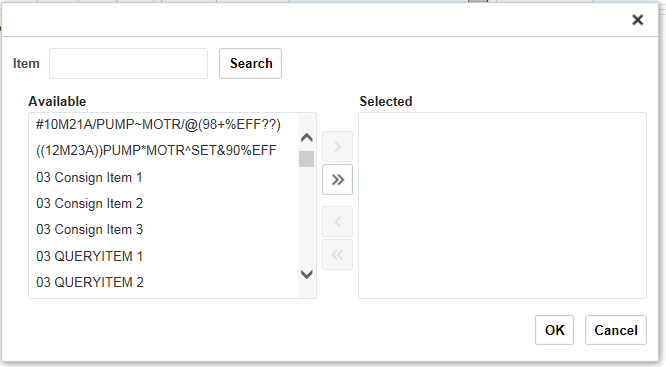
Items Search
You use the “Item” button in the tool bar to search and select for items:
Organization List and Zone List
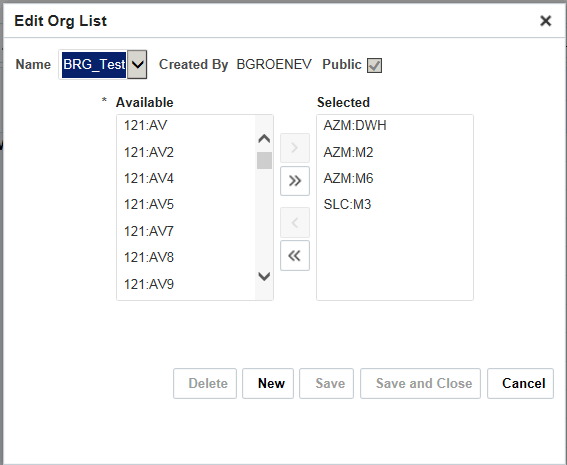
You can create or edit an organization list by clicking the Org button. This displays the Organization List Popup.
Available Measures on the Material Plan Page
-
Total Forecast
-
Original Forecast
-
Consumed
-
Net Forecast
-
Overconsumption
-
Production Forecast
-
Manual Override
-
Demand Schedule
-
Total Returns Forecast
-
Returns Forecast
-
Returns Demand Schedule
-
Returns Manual Forecast
-
Part History Based Forecast
-
Population based Forecast
-
Sales Orders
-
Internal Sales Orders (Field Org)
-
Independent Demand
-
Other Independent Demand
-
Internal Sales Orders
-
Planned Outbound Shipments
-
Dependent Demand
-
Other Demand
-
Payback Demand
-
Total Demand
-
Beginning On-hand
-
In Transit
-
In Receiving
-
New Buy Purchase Orders
-
New Buy Purchase Requisitions
-
Internal Repair Orders
-
External Repair Orders
-
Inbound Shipments
-
Repair Work Orders
-
Expected Scrap
-
Planned New Buy Orders
-
Planned Internal Repair Orders
-
Planned External Repair Orders
-
Planned Transfer Orders
-
Planned Repair Work Orders
-
Payback Supply
-
Total Supply
-
Projected Available Balance
-
Projected On-hand
-
Available to Promise
-
Defective Outbound Shipments
-
Planned Defective Outbound Shipments
-
Defective Part Demand
-
Total Defective Part Demand
-
Defective On-hand
-
Returns
-
Defective Inbound Shipments
-
Planned Defective Inbound Shipments
-
Defectives In Transit
-
Defectives In Receiving
-
Expired Lots
-
Total Defective Supply
-
Projected Available Balance (Defective)
-
Safety Stock
-
Unconstrained Demand
-
Reserved Safety Stock
-
Net Safety Stock
-
Maintenance Work Order Demand
-
Demand History (A Year Ago)
-
Returns History (A Year Ago)
Policy Planning Measures
Policy Planning measures are also part of the Material Plan. For more information see the chapter on Policy Based Planning.
-
Estimated Service Level %
-
Internal Requisitions
-
Max (Days)
-
Max (Units)
-
Max Override (Days)
-
Max Override (Units)
-
Max Recommended (Days)
-
Max Recommended (Units)
-
Min (Days)
-
Min (Units)
-
Min Override (Days)
-
Min Override (Units)
-
Min Recommended (Days)
-
Min Recommended (Units)
-
On Order
-
PAB + On Order
-
Planned New Buy Orders (Creation Date)
-
Planned Transfer Orders (Creation Date)
-
Safety Stock (Days)
-
Target Service Level %
-
Uncovered Demand
-
Uncovered Variance
Material Plan UI Seeded Table Layouts
The Material Plan UI used by SPP planners includes two seeded table layouts:
-
Supply and Demand Analysis
-
Forecast Analysis
Supply and Demand Analysis
The Supply and Demand Analysis view is shown above. The measures for the Supply and Demand Analysis table layout are:
-
Sales Orders
-
Net Forecast
-
Dependent Demand
-
Total Demand
-
Beginning On-hand
-
In Transit
-
Inbound Shipments
-
External Repair Orders
-
New Buy Purchase Orders
-
Planned Transfer Orders
-
Planned External Repair Orders
-
Planned New Buy Orders
-
Total Supply
-
Safety Stock
-
Projected Available Balance
-
Defective On-hand
-
Projected Available Balance (Defective)
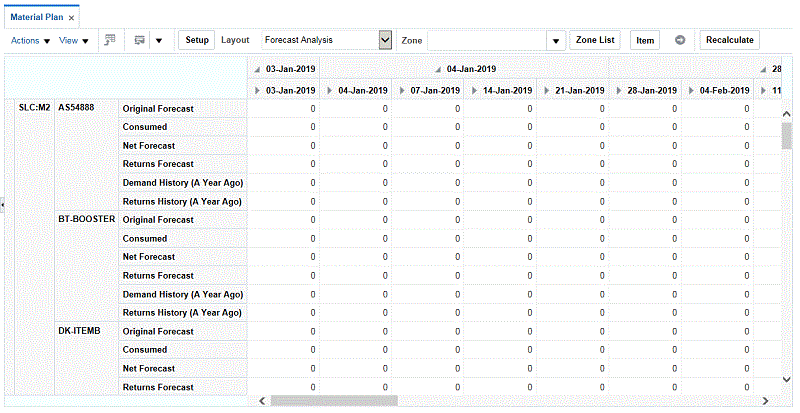
Forecast Analysis
Below is an illustration of Forecast Analysis view:
Supplies and Demands
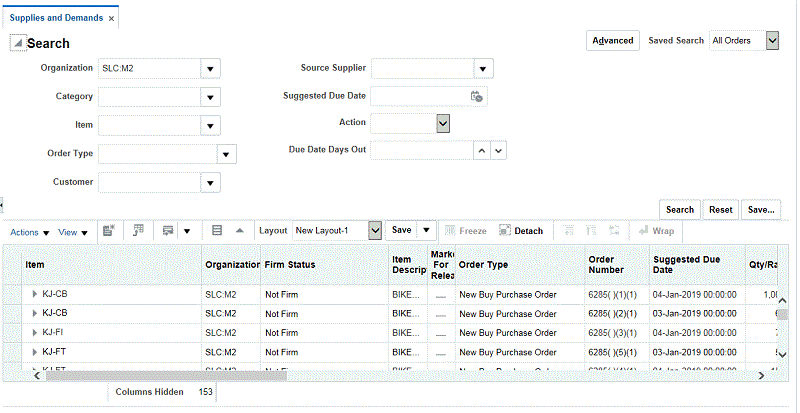
The Supplies and Demands UI includes a pegging (tree-table) view. You can switch between tree table and flat table view. When drilling to Supplies and Demands, the tree-table view is the default view in plan mode. In plan inputs mode, the default view is the flat table view.
General Layout
Below is an illustration of Supplies and Demands tree table view:
The corresponding forms window is called Supply/Demand. Its description is in the section Supply Demand Window of the Planner Workbench chapter, in the Advanced Supply Chain Planning Implementation and User's Guide.
Search Rendering
Before a search is conducted, the text “No search conducted.” appears below the table header. If a search yields no matching results, the text “No results found” is displayed below the table header.
The following fields can be searched:
-
Organization
-
Category
-
Item
-
Order Type
-
Customer
-
Source Supplier
-
Suggested Due Date
-
Due Date Days Out
-
Action (Cancel, Demand, None, Release, Reschedule In, Reschedule Out)
Action Menu
The following table shows the available menu actions in Tree Table view.
| Menu Item | Description |
|---|---|
| Create | This action launches the Create Order dialog. |
| View Demand Pegging/View Supply Pegging | This action toggles between Demand Pegging and Supply Pegging views. When Supply Pegging view is displayed, the View Demand Pegging action is visible, and when the Demand Pegging view is displayed, the View Supply Pegging action is visible. |
| View End Demands Only | This action shows only end/independent demands, not dependent demands. |
| View Exceptions Only | This action displays only orders with associated exceptions. |
| Firm All | This action firms all rows. |
| Mark For Release | Applies to selected rows. Updates the release status of all selected rows and updates the fields Implement As, Implement Date, and Implement Qty. If you need to update other implement fields, use Supply Planner Workbench. |
| Unmark for Release | This action updates the release status of all selected rows and clears the set of implement fields. |
| Release Plan | When this action is selected, all orders “Marked For Release” are released. |
| Replan Item | When this action is selected, all parts within the scope of the plan are planned. |
| Export to Excel | This action exports all the data in the table to a Microsoft Excel spreadsheet. |
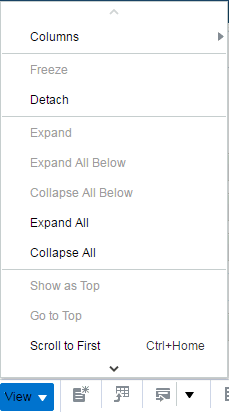
View Menu
The View menu display is shown below.
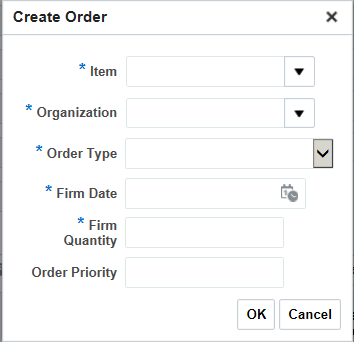
Create Order Dialog
You can create planned orders with the Create Order dialog.
Click the Create action (either from the Actions menu or the iconic button on the table toolbar) to display the Create Order dialog. When you press the OK button, the order is created. You then need to press the page-level save button to commit the changes.
Flat Table View - Tree-Table Toolbar
When Supplies and Demands is selected from Plan Inputs Links, the flat table view will be displayed in the local area and the show table icon is hidden to prevent users from switching to tree-table view.
Action Menu
The Action Menu items for the Supplies and Demands flat table view are:
| Menu Item | Description |
|---|---|
| Create | This launches Create Order dialog. |
| Edit | This launches Edit Supplies and Demands dialog. |
| Delete | This deletes the order. It is only available for orders that were manually created. |
| Drill to | This passes the context of selected rows into either Exceptions (order number context) or Material Plan (item/org context). |
| Mark For Release | Applies to selected rows. Updates the release status of all selected rows and updates the fields Implement As, Implement Date, and Implement Qty. If you need to update other implement fields, use Supply Planner Workbench. |
| Unmark for Release | This applies to selected rows. It updates the release status of all selected rows and clears the set of implement fields. |
| Save Layout | This launches the Save Layout dialog (see more on table layouts below). |
| Reset Layout | This refreshes the table based on the selected layout's definition that was last saved. For example, if the user started to make changes, but didn't save and then decided they didn't want to implement those changes, they could select the reset layout to revert back to the last saved layout definition. |
| Export to Excel | This exports all the data in the table to a Microsoft Excel spreadsheet. |
View Menu
The View Menu items for the Supplies and Demands flat table view are:
| Menu Item | Description |
|---|---|
| Clear Filters | Clears the QBE line. Automatically appears if clearEnabled property is turned on. |
| Refresh | Refreshes the UI table. Automatically appears if searchEnabled property is turned on. |
Toolbar Buttons
The toolbar buttons for the Supplies and Demands flat table view are:
| Toolbar Item | Description |
|---|---|
| Create | |
| Edit | |
| Delete | |
| Drill To | |
| Show Table (func_table_16_ena.png)_ | |
| Layout | |
| Save | |
| Reset Layout: This refreshes the table based on the selected layout's definition that was last saved. | |
| Search | |
| Clear | |
| Should display automatically by turning on clearEnabled property. | |
| Query by Example | |
| Freeze | |
| Detach | |
| Wrap |
Preferences
You show the Preferences popup window by clicking the Preferences icon in the top right hand corner of the page.
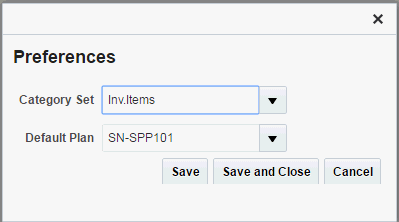
The fields in the Preferences window are:
-
Category Set
-
Default Plan
The system fetches data to the Preferences popup based on the seeded data for Default Preferences Profile. If a new user tries to create or set user preferences, the system associates the default profile and saves it to the database. The system also validates that required fields are populated before saving them.
Delete Plan
Use this link to delete a service plan.
To delete a supply plan, use the Supply Planning Work Area.
The corresponding Oracle Forms window in Service Planner Workbench is Navigator > select node type Plan > right click a plan > select Delete.
To delete a supply plan, navigate to Plan Links and click Delete Plan.
A pop-up appears with a list of values that contains all service plans—including those you have not run—except plans that you have open.
Select a plan and the planning engine runs concurrent process Purge Plan that deletes the plan.
Replan Options
You access the Replan Options popup window by selecting the “Replan Item” from the Actions menu in the following Pages:
-
Items
-
Material Plan
-
Supplies and Demands
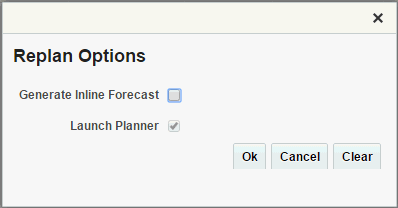
The fields in the Replan Options window are:
-
Regenerate Forecast – Checkbox
-
Launch Planner – Checkbox
Seeded Layouts
You select a layout from the Page Layout dropdown list on the header panel.
There are 3 seeded page layouts:
-
Exceptions and Material Plan
-
Exceptions and Items
-
Items and Material Plan
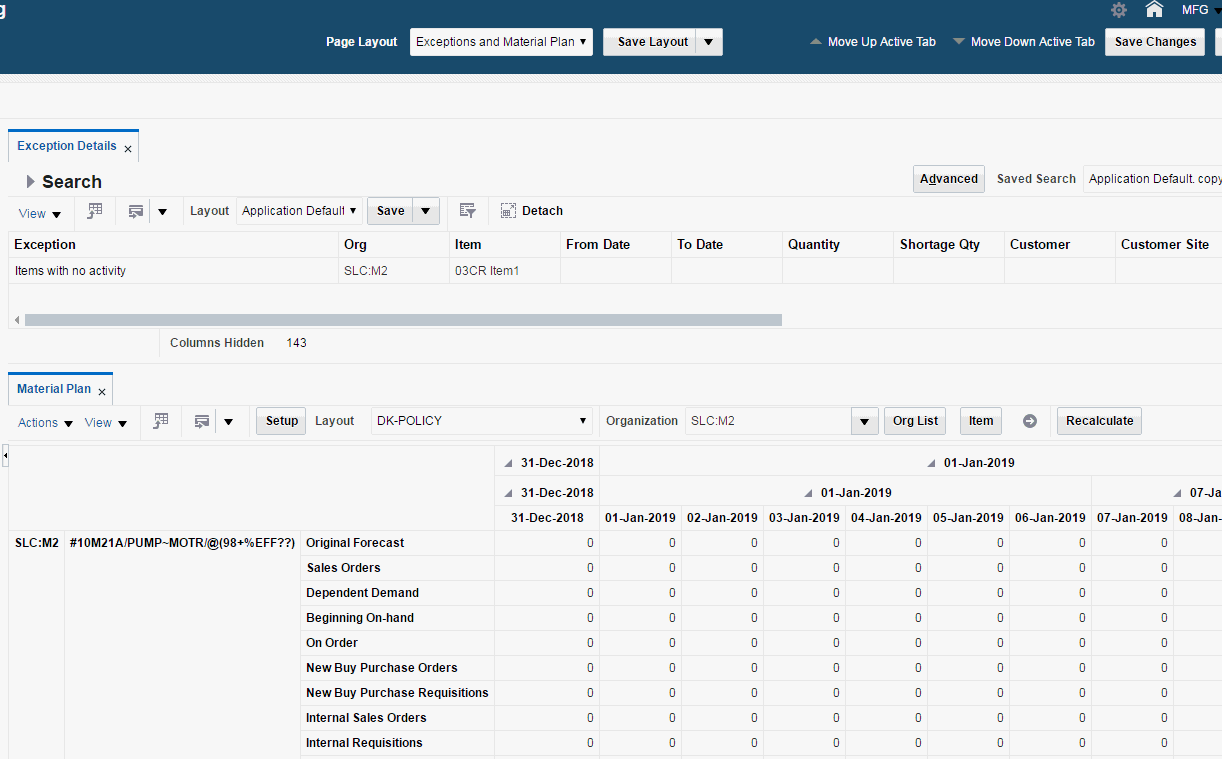
Exceptions and Material Plan
This seeded layout is a combination of the Exceptions Summary (Flat Table) and Material Plan:
Exceptions and Items
This layout is a combination of the Exceptions Summary (Flat Table) and the Items page:
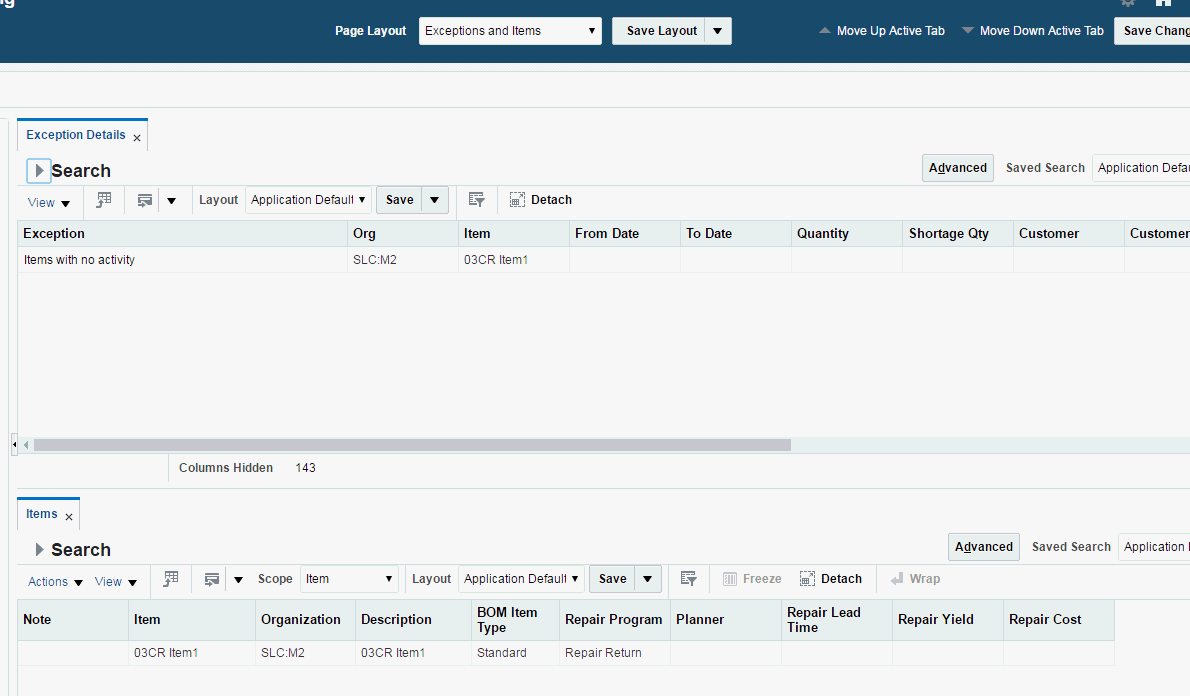
The default columns in the Items page are:
-
Item
-
Organization
-
Description
-
BOM Item Type
-
Repair Program
-
Planner
-
Repair Lead Time
-
Repair Yield
-
Repair Cost
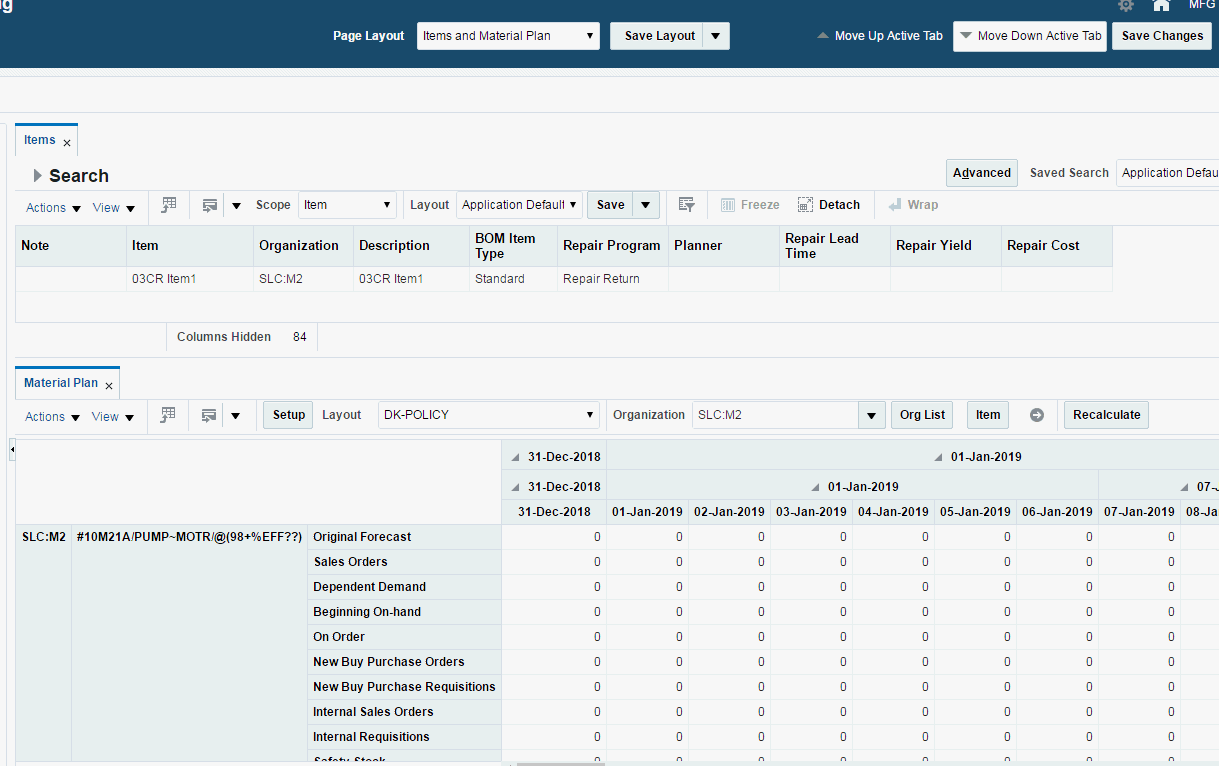
Items and Material Plan
A third seeded layout is a combination of the Items page and Material Plan:
User Defined Layouts
In addition to delivering pre-seeded table layouts, planners can define their own table layouts which determine what table columns to display, the order in which the columns are displayed, and the width of each column.
Table layouts can be kept private so that only the user that created the table layout can view and use the table layout, or the layout can be made public, so other users can view and use the table layout. Only the owner of a table layout can revise the layout.
A table layout is defined in a WYSIWYG fashion. You can select, resize, and move table columns until they display as desired. You can then choose to save the layout as it is currently displayed.
Table Layout toolbar actions
To implement table layout functionality in a UI, use the following toolbar actions:
Actions Menu
-
Save Layout
-
Reset Layout
-
Manage Layouts
Layout Choice List
In the Table Toolbar, use the Layout Choice List to automatically refresh the table based on the selected layout. The layout choice list displays layouts in alphabetical order. Planners can search for more layouts or manage existing layouts.
Save (Table Layout) Button
Use the Save action to either save an existing layout or to create a new layout (see more information on the save dialog below). If you start making changes to the table layout (by moving fields around, etc.) and then decide to discard those changes, you can select the Reset Layout action, which will refresh the table based on the selected layout's definition when last saved.
Save Table Layout Dialog
When you press the Save table layout button, the Save Table Layout dialog appears:
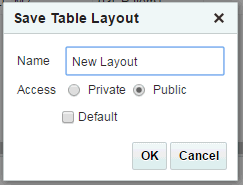
The current layout is defaulted into the name field (a required field). If left alone, the existing table layout will be updated. If a different name is entered, a new table layout is created.
If access is private (the default), only the user who created the layout can view or edit the layout. If access is public, all users can use the layout, but only the owner can edit the layout.
The default layout is specific to the logged-in user. When creating a new layout, if the user presses save and close, the new layout will become the selected layout.
You click OK to save and close the dialog, or cancel changes, which also closes the dialog.
Table Layout Messages
The following table layout messages may occur when editing or deleting a layout:
Error Messages:
-
You do not have permission to change this table layout. Only the person who created the table layout can change it.
-
You do not have permission to delete this table layout. Only the person who created the table layout can delete it.
Warning Messages (only appear if the user is the creator of the layout and can change it):
-
If you change layout access from public to private, other users will be affected who are using this layout. Do you want to continue?
-
If you delete a public layout, other users will be affected who are using this layout. Do you want to continue?
User-Defined Page Layouts
Users can create their own page layout, which saves the current layout (either a one-pane or two-pane page layout depending on what is currently active) and the open tabs in each respective pane.
When saving a two-pane page layout, the height of the two panes is saved as well, so any adjustment the user makes using the horizontal splitter is also saved.
Product Definition
The Product Definition UI displays information for a given service part and the related items in its supersession chain. It is accessible from the following regions:
-
Items
-
Supplies and Demands
-
Exception Details
Note: The context is based on a single item-organization. If there are multiple rows selected during navigation, the Product Definition will be displayed for the top row.
The Product Definition UI consists of 3 sections:
-
Supersession Chain
-
Failure Rates
-
Parts Usage
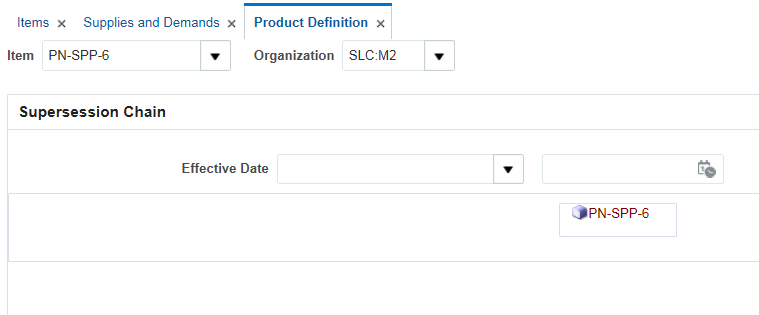
Supersession Chain
The Product Definition UI shows 3 levels of the supersession chain at a given time. The current item is in the center, the items it replaces are on the left, and the items that supersede it on the right. The chain can be filtered for a specific effective date range.
If more than 3 items precede or supersede the current item, the UI displays 3 at a time with a "More.." link at the top/bottom to go forward/back through the list of items. Clicking on the "More.." link refreshes the tab with next set of items shown for that level.
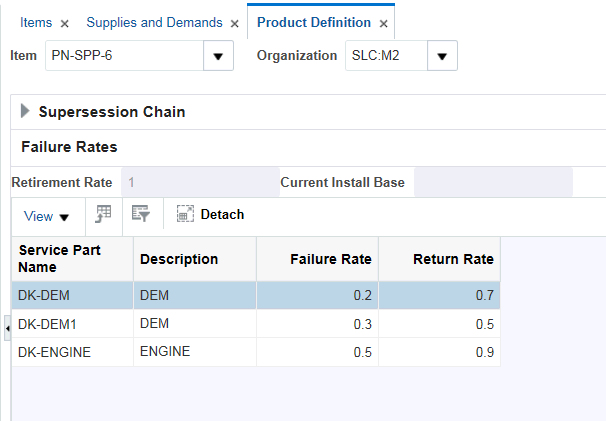
Failure Rates
The Failure Rates section enables you to view all service parts associated with this item. You can set the retirement rate and install base numbers for the current item. All service parts are displayed (auto queried) for the current item, and you can update failure rates and return rates.
Parts Usage
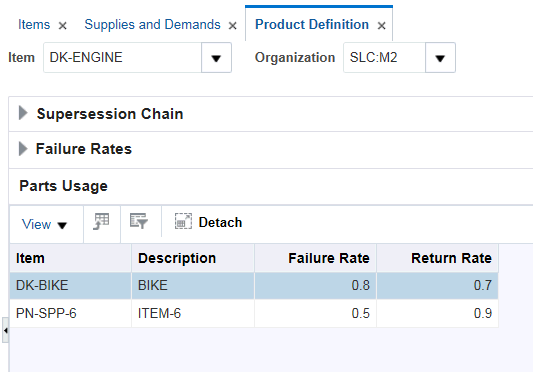
The Parts Usage section displays a list of all items where the current component is used. This is a reverse view of the Failure Rates, and is not updatable.
Plan Input Links
The Service Planning Work Area
The Service Planning Work Area includes pages with the same functionality as their corresponding Forms window, but with a web-based look and feel. You enter this area by clicking the Service Planning Work Area Navigator folder.
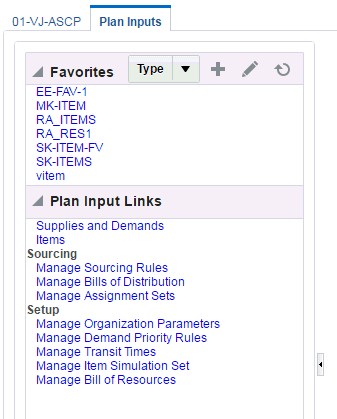
Plan Input Links
Use the Plan Input Links accordion panel, on the Plan Inputs tab, to access these links. They are organized into two categories, Sourcing and Setup, which is also how they are organized in the Oracle Forms Navigator.
Sourcing
-
Manage Sourcing Rules
-
Manage Bills of Distribution
-
Manage Assignment Sets
Setup
-
Manage Organization Parameters
-
Manage Demand Priority Rules
-
Manage Transit Times
Manage Organization Parameters
Click the Manage Organization Parameters link to view the Parameters tab in the content area.
You use Manage Organization Parameters to specify organization-specific planning parameters in the Parameters tab. Here you can revise Planning Parameters and analyze plan results without running a new collection. The parameters in this tab override corresponding values collected from the source instance.
You see these parameters as default values in the Create Plan window.
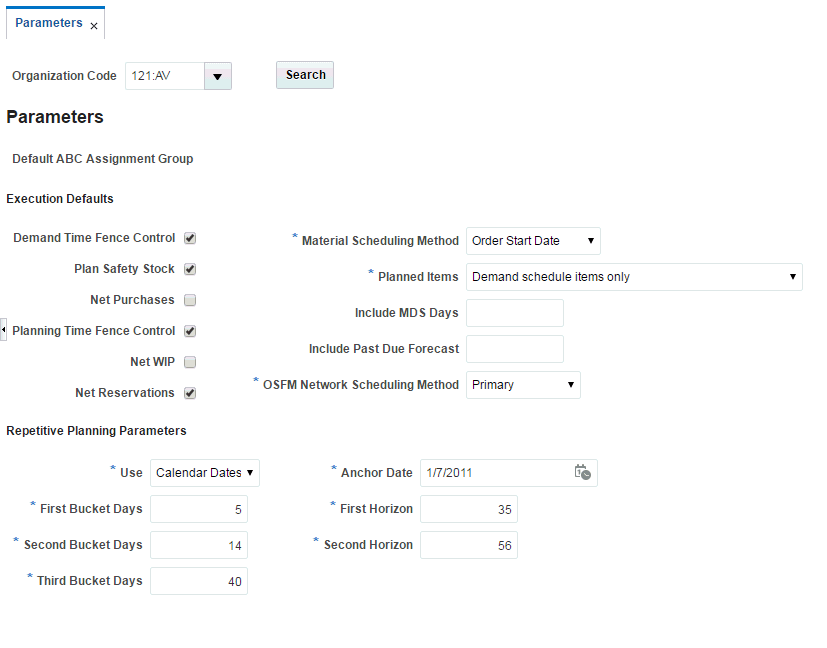
The corresponding forms window is called Planning Parameters. Its field descriptions are in the Setting Plan Options section of the Defining Supply Chain Plans chapter, in the Advanced Supply Chain Planning Implementation and User's Guide.
Manage Transit Times
Click the Manage Transit Times link to view the Transit Times tab in the content area.
You use Manage Transit Times to define and modify:
-
Shipping networks
-
Shipping methods
Cross Instance Versus Source Instance
You can define cross instance shipping networks using the Transit Times tab. With this tab you can also define new shipping networks and ship methods for existing shipping networks.
You can only define same instance shipping networks in the planning instance. The planning system uses these new definitions without running a new collection. Use the Transit Times page
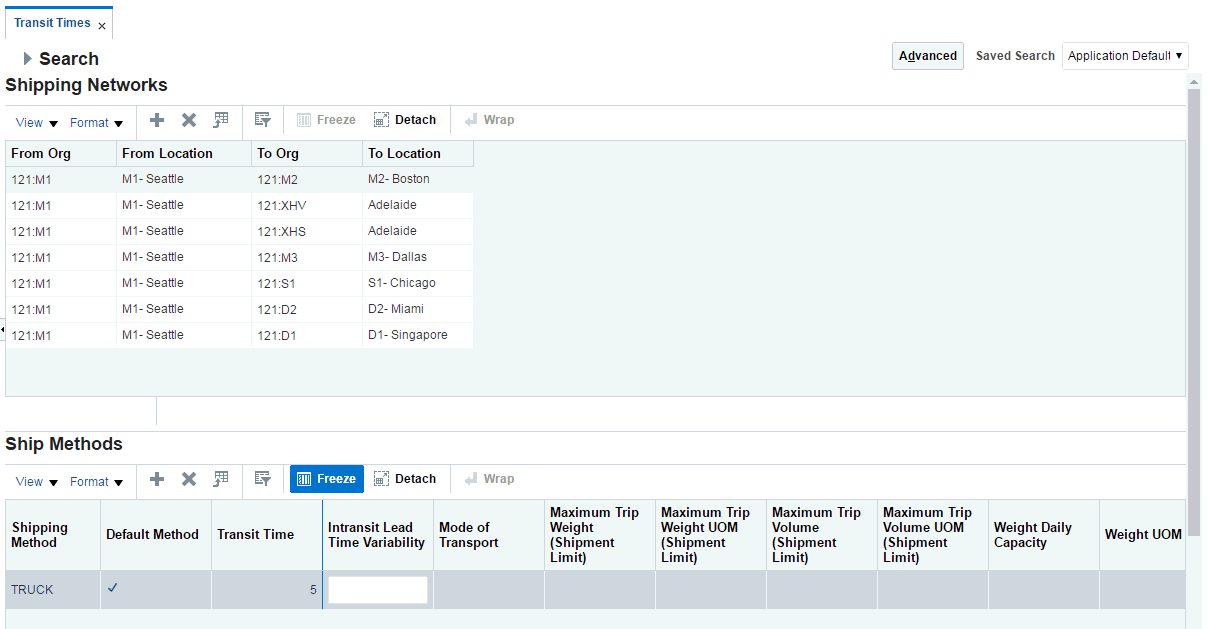
The corresponding forms window is called Transit Times. Its description is in the section Modeling Cross-Instance In-transit Lead-times of the Supply Chain Plan Cross-Instance Planning chapter, in the Advanced Supply Chain Planning Implementation and User's Guide.
Manage Demand Priority Rules
Click the Manage Demand Priority Rules link to view the Priority Rules tab in the content area.
Use Manage Demand Priority Rules to configure demand priority rules. The planning engine fills higher priority demands before lower ones. This improves fill rate for the most important customers.
You can prioritize demand based on the following criteria:
-
Gross margin
-
Promise date
-
Schedule date
-
Request date
-
Sales orders, forecasts, & MDS entries priority
You can only define demand priority rules on the planning server.
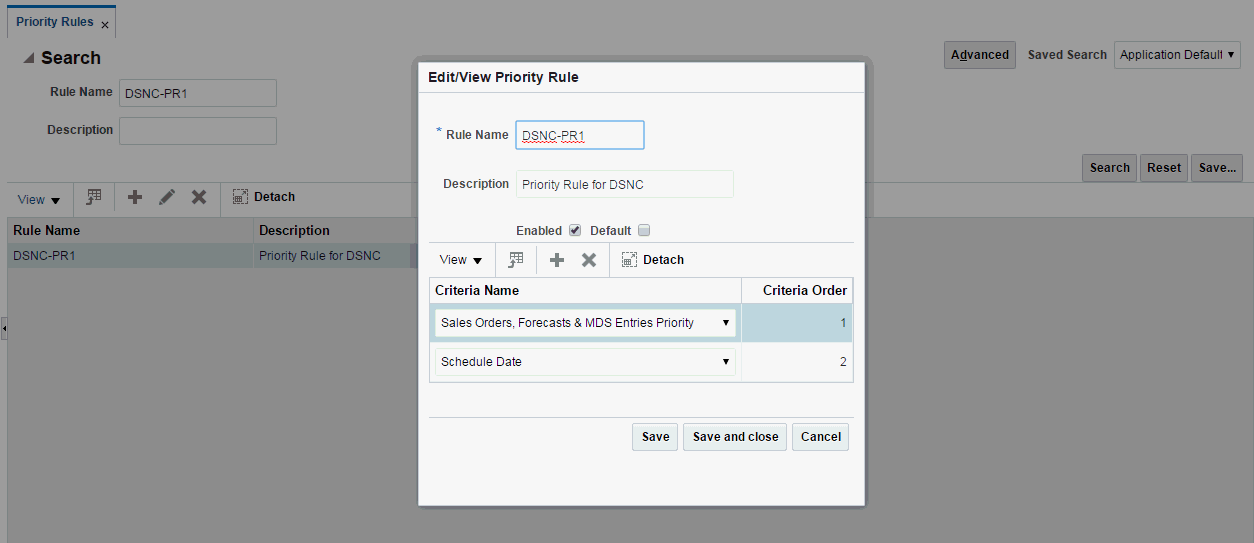
The corresponding forms window is called Priority Rules. Its description is in the section Demand Priority Rules of the Defining Supply Chain Plans chapter, in the Advanced Supply Chain Planning Implementation and User's Guide.
Manage Sourcing Rules
Click the Manage Sourcing Rules link to view the Sourcing Rules tab in the content area.
Use Manage Sourcing Rules to define and edit sourcing rules. You can define sourcing rules that specify:
-
The source of supply for items in an organization.
-
A rank for each source of supply named in the sourcing rules and bills of distribution.
You can specify a sourcing percentage for each source within a rank. This allocates a portion of the total orders to each source.
Sourcing rules and bills of distribution both describe supply sources. Sourcing rules can specify how to replenish all organizations, for example, when the entire enterprise gets a subassembly from a particular organization. The planning engine evaluates alternate ship methods specified in the sourcing rules and recommends the appropriate option. It can also release a ship method to the sales order that is different from the one in the Transit Times page.
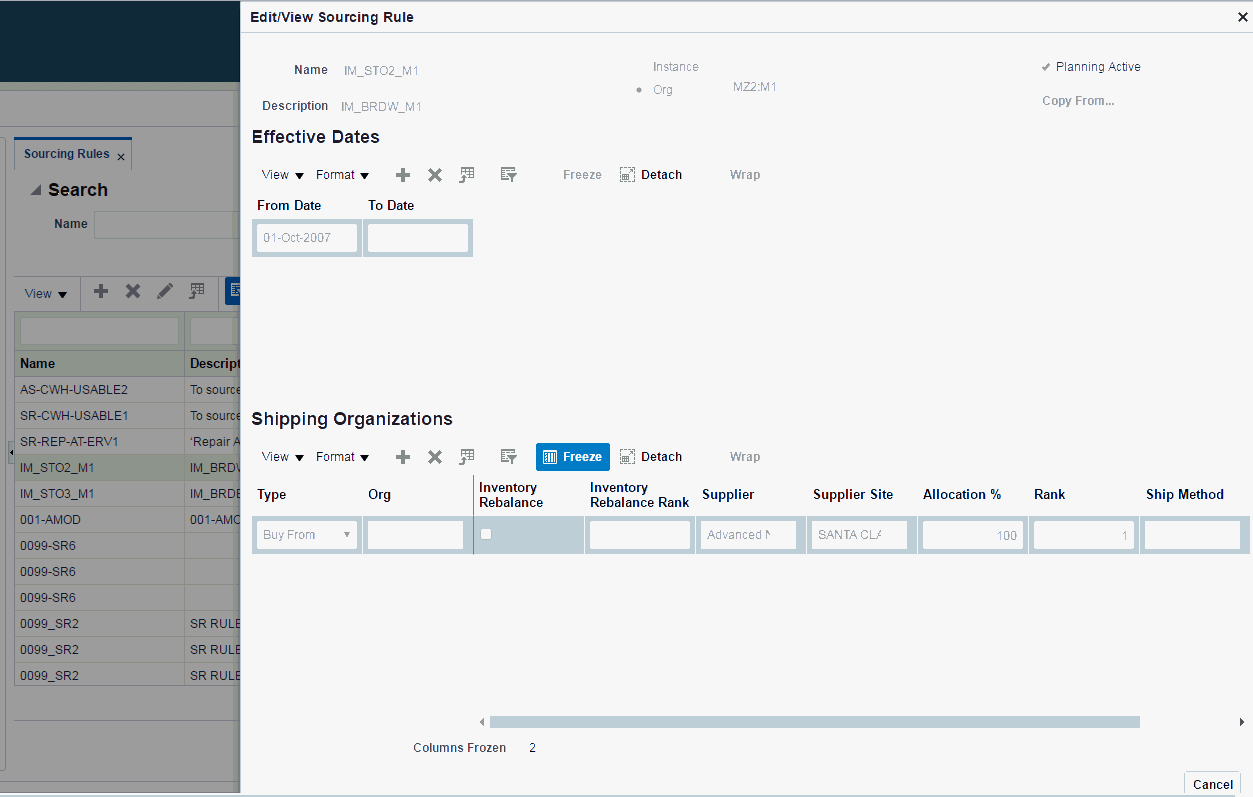
The corresponding forms window is called Sourcing Rules Plan. Its description is in the section Assigning Sourcing Rule – Return To of the Service Planning Concepts chapter.
Manage Bills of Distribution
Click the Manage Bills of Distribution link to view the Bill of Distribution tab in the content area.
Use Manage Bills of Distribution to define and edit bills of distribution, multilevel replenishment networks of warehouses, distribution centers, and manufacturing plants. You can specify:
-
Receiving organization parameters
-
Shipping organization parameters
-
A rank for each source of supply
-
A sourcing percentage
The planning engine evaluates alternate ship methods specified in the Bill of Distribution page and recommends the appropriate option. It can also release a ship method to the sales order that is different from the one in the Transit Times page.
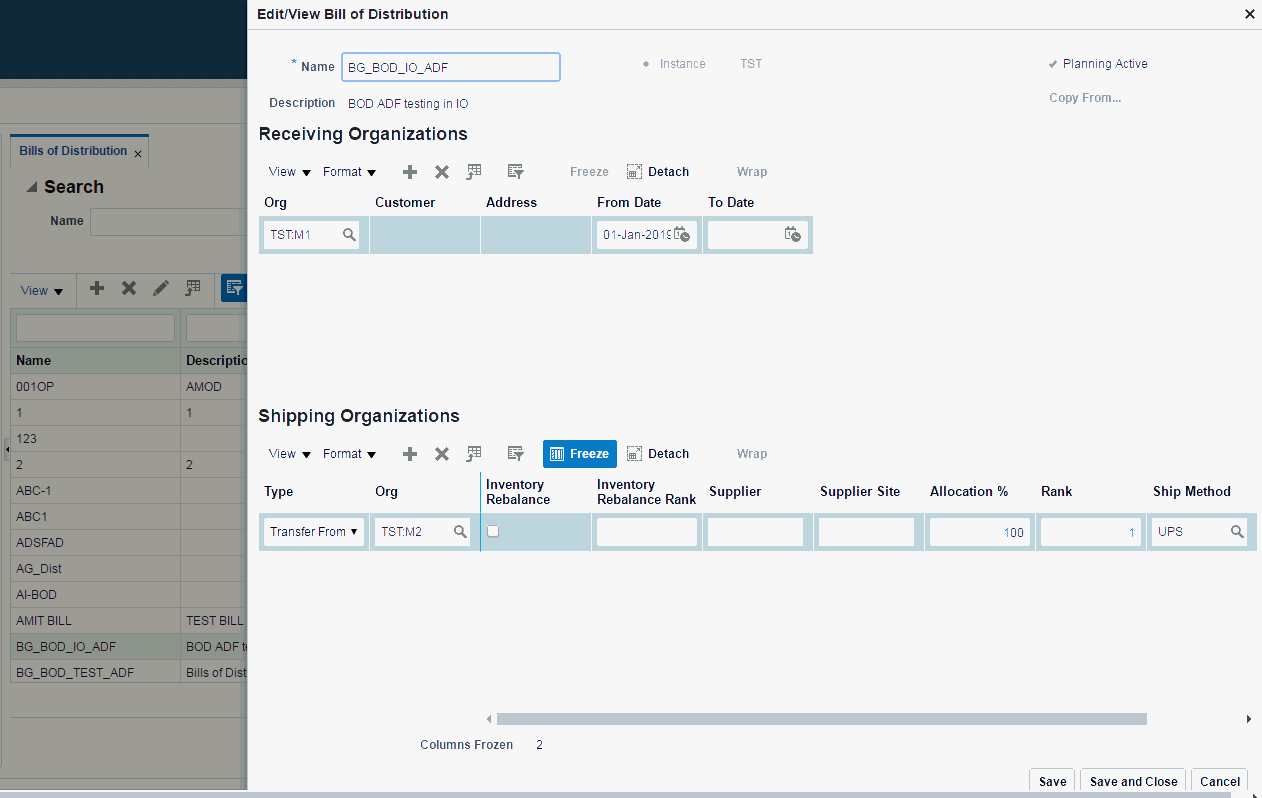
Manage Assignment Sets
Click the Manage Assignment Sets link to view the Assignment Sets tab in the content area.
Use Manage Assignment Sets to define and edit assignment sets. Defining assignment sets in the destination instance improves planning efficiency because you don't have to run collections every time you need to define or edit an assignment set. Each assignment set represents a selection of organizations and items you want planned. You must include an assignment set in your plan options.
Once you have defined your sourcing rules and bills of distribution, you must assign them to particular items and organizations. The planning engine groups assignments into assignment sets and this is where various sourcing strategies define a particular supply chain network.
In an assignment set, you can assign your sourcing rules and bills of distribution at the following levels:
-
Item-instance-organization
-
Category-instance-organization
-
Category-instance
-
Item-instance: If the Item field is empty, use the Reduce Criteria Window to restrict the selection.
-
Instance-organization
-
Instance
You can assign replenishment rules to items. For example, define item category Packaging Material and create a sourcing rule for it.
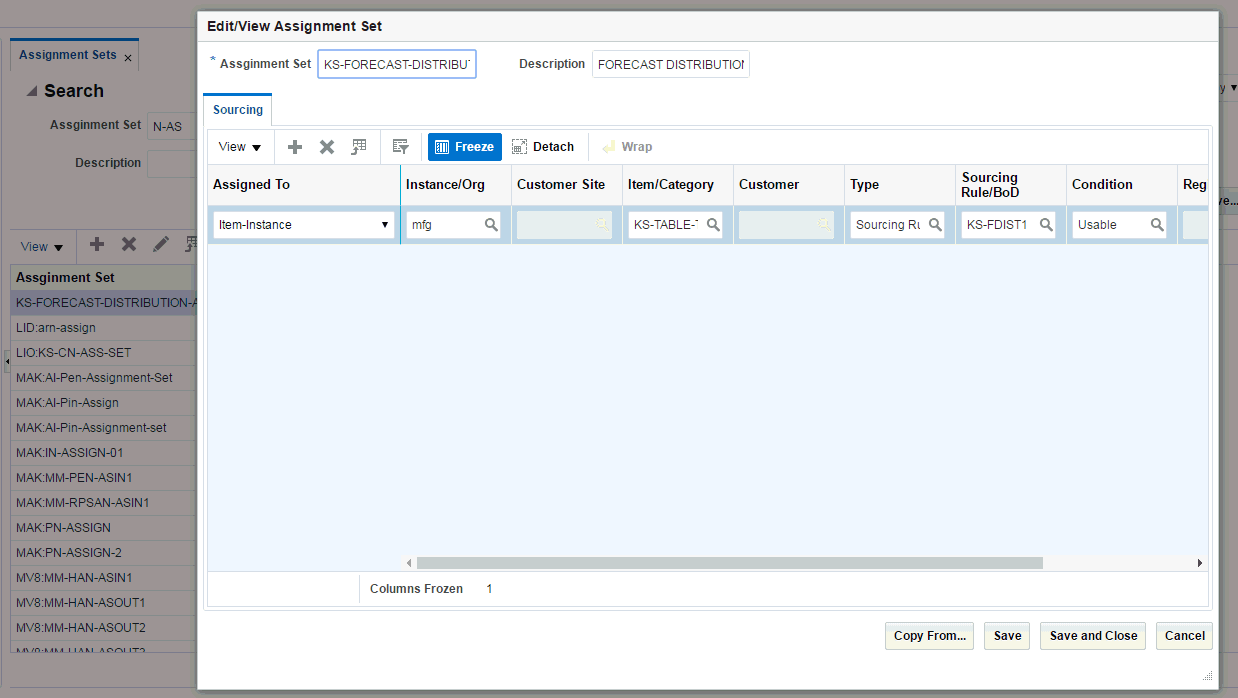
The corresponding forms window is called Sourcing Rule / Bill of Distribution Assignments. Its description is in the section Bills of Distribution of the Supply Chain Plan Modeling chapter, in the Advanced Supply Chain Planning Implementation and User's Guide.
Safety Stock Window
The Safety Stock window shows time-phased safety stock levels that the planning engine uses.
To display the Safety Stocks window, select an item on the Items page, then open the Drill to menu icon and click Safety Stock.
The corresponding Oracle Forms window is called Safety Stocks. Its description is in the chapter Planner Workbench, section Safety Stock Window.

Manage Instances
Use the Manage Instances page to configure and display information about instances.
To display the Manage Instances page, select the Plan Inputs tab, navigate to the Plan Input Links accordion panel, and click the Manage Instances link.
The corresponding Oracle Forms window is Application Instances. See chapter Setting Up Source and Destination Instances, section Creating a VCP Destination Instance, in Oracle Value Chain Planning Collections Implementation Guide.
Organization Security
This section shows the impact of organization security on Supplier Planning Work Area pages. Your responsibilities determine which organizations you are authorized to access. Generally, you cannot see information on Service Planning Work Areas pages that you are not authorized to access.
Items Page
On the Items page, you can only search, view, and access items in organizations you are authorized to access.
Example: Authorized Organizations
You have access to the following organizations, as defined by your responsibilities:
-
SLC:M1
-
SLC:M2
Plan1 plans the following organizations:
-
TST:M1
-
TST:M2
-
TST:M3
-
SLC:M1
-
SLC:M2
When you view the Items window, you cannot see any items in these organizations:
-
TST:M1
-
TST:M2
-
TST:M3
Exception Page
On the Exceptions page, you can only search, view, and access exceptions of items from organizations that you are authorized to access.
Note: Exception page organization security is also applicable to related exceptions.
Supply Chain Bill Page
Organization security applies to the root node of the Supply Chain Bill. In other words, only organizations you're authorized to access appear underneath the root node. However, organization security does not apply to the underlying tree tables, so at these levels the structure you see includes view-only non-authorized organizations.
Product Definition Page
Organization Security does not impact the Product Definition page. Therefore, you see this information on the Product Definition page regardless of which organizations you are authorized to access:
-
Supersession chain
-
Failure rates
-
Parts usage
Notes Page
You can only view item notes of those items in organizations that you are authorized to access.
Material Plan Page
On the Material Plan page, you can only search, view, and access orders from Organizations that you are authorized to access. This applies to all pages accessed through the Material Plan page.
The list of values for the organization field in the tool bar only includes those Organizations that you are authorized to access. Also, the displayed Grand Total is only for the Organizations that you are authorized to access.
Supplies and Demands Page
On the Supplies and Demands page, you can only search, view, and access orders from Organizations that you are authorized to access. This also applies all pages accessed through the Supplies and Demands page.
Organization security also applies to pegging. You can only search, view, and access items in the pegging tree from organizations you are authorized to access. As you move down the pegging tree, once you reach an item in an organization that you are not authorized to access, you cannot see any items at that level or below.
Pegging Examples
You have access to the following Organizations:
-
SLC:M1
-
SLC:M2
-
SLC:M3
Example 1
Item A, in Organization SLC:M1, has the following pegging tree.
| Item | Organization | Visibility | |||
|---|---|---|---|---|---|
| A | SLC:M1 | Visible | |||
| B | SLC:M2 | Visible | |||
| B1 | SLC:M2 | Visible | |||
| B2 | SLC:M2 | VisibleVisible | |||
| C | SLC:M2 | Visible | |||
| C1 | SLC:M2 | Visible | |||
| C2 | SLC:M4 | Not Visible | |||
| C21 | SLC:M4 | Not Visible | |||
| C22 | SLC:M4 | Not Visible |
Pegging displays only the pegging tree items from visible organizations. You are not authorized to access Organization SLC:M4, so those items are not shown.
Example 2
Item D in Organization SLC:M1 has the following pegging tree. The planning system displays only the pegging rows marked visible for Item D. Item E2 belongs to Organization TST:M1, which you are not authorized to access. As a result, you do not see the pegging tree section below E2, even though you are authorized to access the items below E2.
| Item | Organization | Visibility | |||
|---|---|---|---|---|---|
| D | SLC:M1 | Visible | |||
| E | SLC:M2 | Visible | |||
| E1 | SLC:M2 | Visible | |||
| E2 | TST:M1 | Not Visible | |||
| F | SLC:M3 | Not Visible | |||
| F1 | SLC:M3 | Not Visible | |||
| F2 | SLC:M3 | Not Visible | |||
| F21 | SLC:M3 | Not Visible | |||
| F22 | SLC:M3 | Not Visible |
Plan Options Page
When viewing or configuring Plan Options, you can only view and configure organizations that you are authorized to access. You can only view plans associated with organizations that you are authorized to access. Also, the Organizations list of values in the Organizations tab only shows organizations that you are authorized to access.
Queries
Organization security does not limit your ability to set up queries. However, the results of queries only display information associated with organizations that you are authorized to access.
Delete Plan
You can only delete plans whose owning organization is an organization that you are authorized to access.