Plan Analysis: Workbench
Responsibilities and Menus
The seeded responsibility for Rapid Planning planners is Supply Chain Simulation Planner.
This responsibility can access these menus:
-
Plans, Inputs, and Simulations: The Oracle Rapid Planning workbench.
-
Collections, Sourcing, Setup, and Other: Forms appropriate to Oracle Rapid Planning from Oracle Advanced Supply Chain Planning. For information about these forms, see Oracle Advanced Supply Chain Planning Implementation and User's Guide.
Rapid Planning Workbench
The Rapid Planning Workbench is a workspace designed with these characteristics:
-
Simple to understand and easy to learn
-
Access to lots of data
-
Customizable data displays
-
Quick entry of data changes for simulation
When you access Rapid Planning Workbench, you see the global region and a workspace region.
The top region has:
-
Your user name
-
Link Home: Returns to the E-Business Suite Rapid Planning responsibility menu
-
Link Preferences: Set Oracle E-Business Suite preferences
-
Link Help
-
Link Logout
-
Button Save: Saves your updates from all the tabs in the workbench. This is different from the Workbench Actions > Save Plan.
-
Button Cancel: Discards your current updates and reverts to the last saved version of the plan.
The buttons to save and cancel changes apply to all tabs in the workspace. If you make changes in one tab and move to another tab, the Workbench prompts you to save your changes
The workspace region contains:
-
Tabs: Use these to view and manipulate the data. You can open as many multiple tabs as you need to accomplish your task. The Workspace region has top and bottom frames; they are independent places to open more tabs and are not related as in, for example, master-detail information.
-
Links: Use these to manipulate the plans. You can hide this area; click icon Collapse Pane. To show it, click icon Restore Pane.
When you access Rapid Planner Workbench, The open tabs are:
-
Plans
-
Plan Inputs
The Plans contain a navigator on the left that contains three regions that you can access. They are:
-
Plans: Displays a complete list of all the plans that are in the states Launched, completed and Loaded into memory; Launched and currently in-process; and Launched and errored out
-
Plan Links: Contains links to workbench views that display data about the currently selected plan; you can take action against the data
-
Plan Actions: Links to workbench views with actions that users need to manage the plans
The Plan Input tab displays a simpler navigator on the left that only has the Plan Input Links region. These links open views that you can use to see and update plan inputs and simulation set information
Operating in Tabs
Rapid Planning Workbench is organized into multiple views in these main tabs:
-
Plan Inputs
-
Plans
As you open each view, there are these areas:
-
Search area: The top of the view
-
Search results: The bottom of the view
These areas have common features that you work with.
If you want to make a tab disappear, click on its title, then click its icon Close.
This is an example of a workbench view
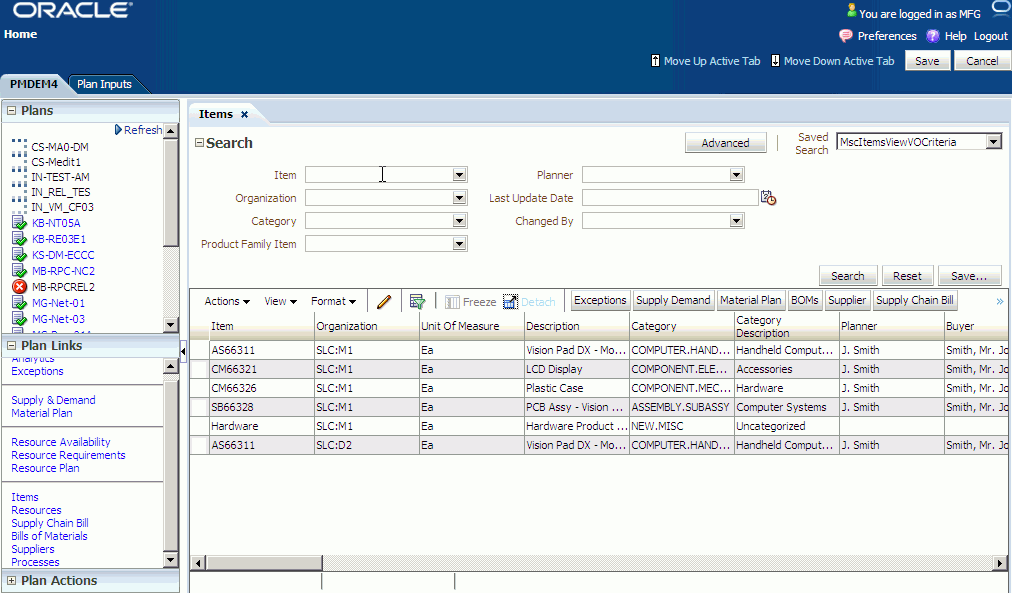
Search Area (Top of the View)
The search area displays attributes that you can use to limit the display in the search results area. For example, in the Items tab, you can search for Item, Organization, Category, Product Family Item, Planner, Last Update Date, and Changed By.
Fill up the search fields that you want to, then click button Search.
Oracle recommends that you enter search criteria. If you do not, the data may take a long time to load. The view may remind you if you click Search without entering search criteria.
If you search on more than one criteria, the search process treats them as if they are joined by logical operator AND. For example, you search on
-
Item Equals AS54888
-
Organization Equals M1
The search process finds everywhere in the data that Item Equals AS54888 AND Organization Equals M1
The search area shows Basic search fields. If you want to do a more advanced search, click button Advanced. The search area shows more fields to search on and shows button Basic to return to the basic search criteria.
If the advanced search does not contain all the fields that you want to search on, click button Add Fields and select them from the list.
To clear all the search criteria, click button Reset.
Search Results Area (Bottom of the View)
The search results area shows the data that matches your search.
-
Change how the data displays
-
Act on the data
There are some common functions that appear in many views. See Search Results Area – Displaying Data and Search Results Area – Acting on Data.
Some functions in the search results area are unique for certain tabs. See Rapid Planning Workbench Views
Search Results Area (Bottom of the View) – Displaying Data
You may see some or all of these menu items on the data area menu bar:
-
Actions
-
View
-
Format
In addition, you may see icons and buttons on the search results menu bar.
Saving Data to Spreadsheet
If you want to see the data in a Microsoft Excel spreadsheet, click Actions > Export to Excel or click button Export to Excel. The export includes the column headings and Grand Totals..
Printing Data
If you want to see the data printed out, click Actions > Print Page. A pop-up window opens with the data in a printable page format.
Sorting Data
To sort the data by a certain column, mouse over the column title and select either icon Sort Ascending or icon Sort Descending. Also, you can click View > Sort > Ascending or View > Sort > Descending.
To sort on multiple columns, click View > Sort > Advanced… In the advanced sort pop-up window, select up to three column names and whether each should sort by.
Changing Column Order
To change the order of the columns, click View > Reorder Columns…. A pop-up window shows the available columns. To move column positions, click the columns' name in the pop-up window and then click one of these icons:
-
Move selected items to top of list
-
Move selected items up one in list
-
Move selected items down one in list
-
Move selected items to bottom of list
Changing Column Size
To change the size of columns, click Format > Resize Columns.
Wrapping Column Data
To wrap the data in the columns, click the Wrap icon or select Format > Wrap.
Removing a Column
To make a column disappear, click View > Columns and click the columns to disappear.
Adding a Column
If you want to add a new column, click View > Columns > Show More Columns. Then click the columns you want to see.
Displaying All Columns
If you want to display all the columns available for the tab, click View > Columns > Show All
Moving Up a Data Hierarchy
To move up in a chain of data, for example, a supply chain bill or pegging tree:
-
To the original top level where used, click icon Go top
-
To the next level where used, click Go up
Making a New Top Level
To make the currently selected row the new top level, click Show as top. To return the display to the original top level where used, click on the new top level, then click either icon Go up or icon Go top.
Freezing Data Columns
If you want to freeze columns, click in a column, then click icon Freeze or click View > Freeze. The column that you selected and all columns to its left freeze while you can scroll through the columns to its right.
Showing Data in a Separate Window
If you want to open the data area in a separate window of its own, click icon Detach. To resume working in the tab, click icon Attach. Use this function if you need to see a large number of data rows.
Searching Using Query-by-Example
To search using the query-by-example method:
-
Click icon Find or click View > Query by Example. A blank row appears above the column titles. Enter your search criteria there. To execute the search, click Return or Search in the query panel. To exit, remove the search criteria and click icon Query by Example again.
-
This function only works with fields that Oracle enables as query-by-example fields; for example, in view Clear to Build Simulation, you cannot query by example on fields Prioritize for Clear to Build and Deprioritize for Clear to Build.
-
In the Supply and Demand view, do not click the Query by Example icon. Click the binocular icon "Query By Example Mode to translate the view into a simple table.
-
For alphabetic fields, you can use operators
Generally, you can use query-by-example in all views and all fields except:
-
String fields: STARTS WITH, EQUAL TO, WILD CARD SEARCH
-
Quantity fields: EQUAL TO, GREATER THAN, LESS THAN
Using Column Groups
In some tabs, Oracle assigns multiple, related columns into column groups. If you want to see the columns arranged by their groupings, select View > Column Groups. For example, in tab Supply & Demand, the column groups are Main, Release, and Other.
Viewing Related Data
If you want to open a tab with data that is related to the data you are viewing, select rows in the data area, then click a button with the name of another tab.
Viewing More Tabs
Sometimes, there are more buttons with the names of other tabs that do not fit in the current tab. Click icon double-greater than and select them from the list of buttons.
Favorites
Use Favorites when you want frequent access to certain information on the workbench.
You can have your own:
-
Multiple lists of items, resources, and suppliers
-
Navigation to material and resource plans, exceptions, and supplies and demands for multiple items, resources and suppliers
A favorite list is either:
-
Static: For example, items, resources, suppliers, supplies and demands
-
Dynamic: Based on a filter condition and built when you use it in the current plan
To access a favorites list from a view, click on Favorites.
Static Favorites
To create a static favorites list:
-
Query entities that you want to visit frequently, for example, specific items.
-
Multi-select them
-
Navigate Actions > Save to Favorites. Enter a name.
Dynamic Favorites
These are the dimensions and measures that you can use:
-
Item and organization
-
Fill rate %
-
Inventory turns ratio
-
On time orders %
-
Late replenishment for sales order (value)
-
Late replenishment for forecast (value)
-
Demand quantity not satisfied (value)
-
-
Resource and organization: Resource utilization %
-
Supplier:
-
Supplier capacity utilization %
-
Purchasing cost
-
To create a dynamic favorites list:
-
Navigate to the view Analytics tab
-
Select one of the measures.
-
Click tab Filter and check Save results to a Favorite list. Enter a name.
Search Results Area (Bottom of the View) – Acting on Data
Copying Data to New Rows
If you want to copy a data to new rows:
-
Highlight the rows that you want copied
-
Click the Duplicate icon or click Actions > Duplicate Selected
Deleting Data Rows
If you want to delete a row of data:
-
Highlight the rows that you want deleted
-
Click the Delete icon or click Actions > Delete Selected
-
Specify a simulation set, see Managing Simulation Sets.
The deleted data remains displayed. It is in red with a strikethrough and the change flag is red.
You cannot delete certain entities, for example, items.
Adding Data Rows
To add a row, click icon Add Row
Editing Data Rows
To edit a row, either:
-
Double-click in it
-
Click in it then click icon Edit
Then, enter or select the new value into the field
To change individual data, click in the field and type in the new data.
Editing Multiple Data Rows
To edit multiple rows, click in them using the Shift and Ctrl keys. To select all rows, click Actions > Select All or click icon Select All. See Mass Update.
Unselecting Data Rows
To unselect a selected row, click in it.
To unselect all selected rows, click in an area of the tab that is not a selected row
Mass Update
Use mass update to edit multiple rows.
Editing One Column
To edit one column (mass update):
-
Use search criteria or a favorite to limit the display to the rows that you want to change
-
Click the column header
Editing Multiple Columns
To edit multiple columns (mass update):
-
Use search criteria or a favorite to limit the display to the rows that you want to change
-
Click the column headers using the Shift and Ctrl keys or rubber banding
Making the Edits
Click icon Mass change or navigate Actions > Update Selected
The tab opens window Update Data. In each row, select a field and an update action, then enter a new value. Each update applies to all the rows you selected.
Saving and Committing
If you want to save all your changes, click Actions > Update All.
If you want to save some of your changes:
-
Highlight the rows that you want changes saved
-
Click Actions > Update Selected
Viewing Changed Data
After you change data:
-
It appears in blue highlight
-
There is a flag that appears in the left column to show the rows that are changed.
Applying Changes to the Database
If you want to apply your changes to the database, click button Commit or click Actions > Commit. To reverse the commit, click button Rollback.
Reversing Mass Updates
If you want to reverse the changes you have made:
-
Highlight them
-
Navigate to Plan Actions > Undo All User Changes
Mass Update Time Capabilities
In the Supplies & Demands and the Resource Availability views, mass update hinges on a separate value of the record. This ensures that each record is updated independently. That is, the records do not all assume the same value.
The number of rows that are updated are displayed at the bottom of the Resource Availability view and the Supplies & Demand View.
The additional option Increment by and Decrement by are also included in the Mass Update FROM TIME.
| Resource | From Time | To Time |
| Resource 1 | 8:00 | 4:00 |
| Resource 2 | 8:30 | 4:30 |
| Resource 3 | 8:00 | 3:00 |
| Resource 4 | 9:00 | 4:00 |
Using this new feature, if we reset the To Time of Resource 1 by one hour, the new To Time is 5:00. Resources 2, 3, and 4 are then also incremented independently by one hour, as shown below:
Mass Update in the Resource Availability View
Mass updating in the Resource Availability view can be based on a separate value in order to obtain results with separate values. This feature is available in the FROM TIME and TO TIME fields.
Example: The following defines the resources work time:
| Resource | From Time | To Time |
| Resource 1 | 8:00 | 4:00 |
| Resource 2 | 8:30 | 4:30 |
| Resource 3 | 8:00 | 3:00 |
| Resource 4 | 9:00 | 4:00 |
Using this new feature, if we reset the To Time of Resource 1 by one hour, the new To Time is 5:00. Resources 2, 3, and 4 are then also incremented independently by one hour, as shown below:
| Resource | From Time | To Time |
| Resource 1 | 8:00 | 5:00 |
| Resource 2 | 8:30 | 5:30 |
| Resource 3 | 8:00 | 4:00 |
| Resource 4 | 9:00 | 5:00 |
To support this and similar features, the following options are included in the Mass Update TO TIME:
-
From Time +
-
Increment by
-
Decrement by
The additional option Increment by and Decrement by are also included in the Mass Update FROM TIME.
Calculating the Value of TO TIME
Using the resources work time from the example above, the sections show how each option behaves.
Using the FROM Time + Option to Calculate To Time
When you select the FROM Time + option, then:
To Time = From Time + Entered Value
If we select 9 as the Entered Value, then To Time = From Time + 9.
The new values of To Time are:
| Resource | From Time | To Time |
| Resource 1 | 8:00 | 5:00 |
| Resource 2 | 8:30 | 5:30 |
| Resource 3 | 8:00 | 5:00 |
| Resource 4 | 9:00 | 6:00 |
Using the Increment by Option to Calculate the Value of To Time
When you select the Increment by option, then:
To Time = To Time + Entered Value
If we select 2 as the Entered Value, then To Time = To Time + 2. The new values of To Time are:
| Resource | From Time | To Time |
| Resource 1 | 8:00 | 6:00 |
| Resource 2 | 8:30 | 6:30 |
| Resource 3 | 8:00 | 5:00 |
| Resource 4 | 9:00 | 6:00 |
Using the Decrement by Option to Calculate To Time
When you select the Decrement by option, then:
To Time = To Time – Entered Value.
If we select 1 as the Entered Value, then To Time = To Time – 1. The new values of To Time are:
| Resource | From Time | To Time |
| Resource 1 | 8:00 | 3:00 |
| Resource 2 | 8:30 | 3:30 |
| Resource 3 | 8:00 | 2:00 |
| Resource 4 | 9:00 | 3:00 |
Calculating the FROM TIME
The options Increment by and Decrement by are included in the Mass Update FROM TIME.
Using the resources work time as shown below, the following examples show how each option behaves.
| Resource | From Time | To Time |
| Resource 1 | 8:00 | 4:00 |
| Resource 2 | 8:30 | 4:30 |
| Resource 3 | 8:00 | 3:00 |
| Resource 4 | 9:00 | 4:00 |
Using the Increment by Option to Calculate From Time
When you select the Increment by option, then:
From Time = From Time + Entered Value.
If we select 2 as the Entered Value, then From Time = From Time + 2. The new values of From Time are:
| Resource | From Time | To Time |
| Resource 1 | 8:00 | 10:00 |
| Resource 2 | 8:30 | 10:30 |
| Resource 3 | 8:00 | 10:00 |
| Resource 4 | 9:00 | 11:00 |
Using the Decrement by Option to Calculate From Time
When you select the Decrement by option, then:
From Time = From Time – Entered Value.
If we select 1 as the Entered Value, then From Time = From Time – 1. The new values of From Time are:
| Resource | From Time | To Time |
| Resource 1 | 8:00 | 7:00 |
| Resource 2 | 8:30 | 7:30 |
| Resource 3 | 8:00 | 7:00 |
| Resource 4 | 9:00 | 7:00 |
Validations Rules for From Time and To Time
The following validations are required when editing From Time and To Time values:
Case 1: To Time Is Greater Than (>) From Time
-
0 {(ShiftDate + To Time + Increment By) – (ShiftDate + From Time)} < 24
For example, if :
ShiftDate = Sept 13th
To Time = 4:00
Increment By = 2
From Time = 3:00, then
0 {Sept 13th + 4:00 + 2:00) – (Sept 13th + 3:00)} < 24
0 Sept 13th 6:00 – Sept 13th 3:00 < 24
This condition is met because the difference is 3 hours.
-
0 {(ShiftDate + To Time + Increment By) – (ShiftDate + From Time)} < 24
-
0 {(ShiftDate + To Time - Decrement By) – (ShiftDate + From Time)} < 24
-
0 {(Shift Date + To Time) – (From Time + ShiftDate + Increment By)} < 24
-
0 {(ShiftDate + To Time) – (ShiftDate + From Time – Decrement By)} < 24
Case 2: From Time Is Greater Than (>) To Time
-
1. 0 {(ShiftDate_plus1 + To Time + Increment By) – (ShiftDate + From Time)} < 24
For example, if :
ShiftDate = Sept 13th
To Time = 4:00
Increment By = 2
From Time = 8:00, then
0<= Sept 13th + 1 + 4:00 + 2:00 – (Sept 13th + 8:00) <=24
0<= Sept 14th 6:00am – Sept 13th 8:00am <=24
This condition is met because the difference is 22 hours.
-
0 {(ShiftDate_plus1 + To Time + Increment By) – (ShiftDate + From Time)} < 24
-
0 {(ShiftDate_plus1 + To Time - Decrement By) – (ShiftDate + From Time)} < 24
-
0 {(ShiftDate_plus1 + To Time) – (From Time + ShiftDate + Increment By)} < 24
-
0 {(ShiftDate_plus1 + To Time) – (ShiftDate + From Time – Decrement By)} < 24
Case 3: From Time is 00:00
If you need to change a From Time, which is currently 00:00, To Time can take a value of 24:00. Note that when From Time or To Time is modified, the conditions of Case 1 of the Validations Rules for From Time and To Time, apply.
Notes:
-
If any of the conditions listed in the above section, Validations Rules for From Time and To Time are violated, do not change either the From Time or the To Time.
-
If a specific record violates the validation rules, then the update is not applied to that specific record. In the case of records that are not violated, the updates is applied.
A message is displayed, which indicates the number of records that have succeeded and the number of records that have failed. For example, you will see a message such as: Mass Update has failed on 6 out of 76 records. Mass Update has succeeded on 70 out of 76 records.
To Change Both the From Time and To Time
When you need to change both the From Time and the To Time in the Resource Availability view, follow the procedure below:
-
Make your initial change to the From Time.
-
Using the new From Time result from Step 1, calculate the new To Time.
-
If any of the above validation rules are violated when you calculate Step 1 or Step 2, then do not change either the From Time or To Time.
Mass Update in the Supplies and Demand View
Similar to the Resource Availability view, mass update is available in the Mass Update FIRM DATE in the Supplies and Demand view. The options are:
-
Reset to Original
-
Set Value To
-
Sugg Due Date+
The new options and their behavior are:
-
Increment by
If Firm Date is not null:
Firm Date = Firm Date + Entered Value
If Firm Date is null:
Firm Date = Suggested Due Date + Entered Value
-
Decrement by
If Firm Date is not null:
Firm Date = Firm Date – Entered Value
If Firm Date is null:
Firm Date = Suggested Due Date - Entered Value
-
Request Date +
Firm Date = Request Date + Entered Value
If you choose Request Date, the system first looks for Requested Arrival Date. If the Requested Arrival Date is not populated, then it uses the Requested Ship Date.
Notes:
-
Request Date + and Sugg Due Date + can have a positive or negative value.
-
For all views the mass update feature for the operators Increase by, Decrease By, Increase By %, Decrease By %, Sugg Due Date +, Request Date +, etc. are applied to the value displayed in the UI and not the value saved in the database. For this reason, the operators must be applied to un-saved date changes too.