Plan Analysis: Outputs
Output Views
Use the views to view, analyze, and update the plan information
Access them from the Plan links section in the Plan tab and the Plan input links in the Plan inputs tab.
For each view, this tells you:
-
The view name
-
The regions that it commonly appears in
-
What it is for and how to use it
Use the actions to act against plans. You find links to the actions in the Plan Actions section of the navigator in the Plan inputs tab.
For each action, this tells you:
-
The link name
-
The regions that it commonly appears in
-
What it is for and how to use it
You cannot perform all actions on all plans. For example:
-
You cannot load, save, or close a plan that you have created but never launched.
-
You cannot perform any action against a plan that is being saved or being re-planned (launched).
-
You cannot load, save, or copy a plan that has failed its re-plan.
Analytics
Most tabs share common functions, see Operating in Tabs.
Use this tab to view base metrics. See Rapid Planning Metrics Overview.
You cannot edit data in this view.
To view exception messages for a plan, load it.
Metrics Tab
You can create metrics from the list of available metrics. Specify the
-
Dimensions, for example, item-organization
-
Aggregation levels, for example, day or week
-
Entities, for example, items and item categories
You can:
-
View the results in graphs, for example, bar and line, and tables
-
Specify the location of the metric on the metrics page, for example, left upper or right bottom
-
See multiple metrics simultaneously
-
Compare metrics across multiple plans or multiple runs of the same plan, for example, previous run and current run
Order Comparison Tab – Sales Order Comparison
You can compare across sales order demands between two plans. You cannot compare forecast demands.
The comparison type describes the satisfaction status of the demand in the base plan (Was…) and the compared plan (…, now…) For example, Was late, now on time.
Order Comparison Tab – Supply Order Comparison
You can compare across supply orders between two plans. You typically use this while solving issues that arise between Advanced Supply Chain Planning plan runs. You compare a baseline Rapid Planning plan (that you copy from Advanced Supply Chain Planning) with a Rapid Planning plan that shows a proposed solution.
See Simulating Plans from Oracle Advanced Supply Chain Planning, Comparing Plans.
Bills of Materials
You can:
-
Add a bill of material or some of its components or substitutes to a simulation set.
-
Duplicate a bill of material, a component, or a substitute and make edits for simulation purposes
See Input Views, Bills of Materials
Clear to Build Workbench
Use the Clear to Build Workbench to influence the allocation of clear to build on hand inventory. Prioritize and deprioritize make orders and sales orders.
The Clear to Build Workbench has these regions:
-
A region to search and view make orders
-
A region to prioritize make orders for clear to build, view contentions (make orders that share common components with other make orders), and deprioritize make orders for clear to build
The search area has these searchable attributes:
-
Item
-
Organization
-
Component Item
-
Order Type
-
Due Date
-
End pegged Demand Customer
-
End Pegged Demand Due Date
-
Resource Used
-
Clear to Build Status
-
Clear to Build Date
-
Clear to Build Component Available %
-
Ready to Build %
The Make Orders table has all the searchable fields and also:
-
Order Number
-
Maximum Potential Ready to Build %
-
Clear to Build Priority
-
Deprioritized from Clear to Build
Phantom Items
When you evaluate the Clear to Build status of a work order, look through any components of the work order that are phantoms and evaluate the non-phantom sub-components.
Viewing a Single Level Phantom
When evaluating the Clear to Build status of a work order, Oracle Rapid Planning looks through the various phantom levels and displays only the real components. This provides you with clear visibility into the real component availability and requirements during a Clear to Build analysis. For example, in the diagram below, you see the components within the phantom, RealComp1 and RealComp2. You do not see any row for the parent phantom item IN-AA-COMP1.

Viewing Multi-Level Phantoms
The display of multi-level phantoms is identical to that of single phantoms. The phantoms are flattened so that only real components are displayed on the component allocation workbench.
For example, if there is a two-level phantom structure as shown below:
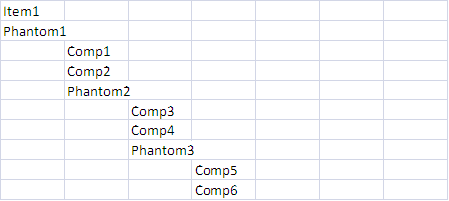
The component allocation displays only the real components. Your screen displays the following:
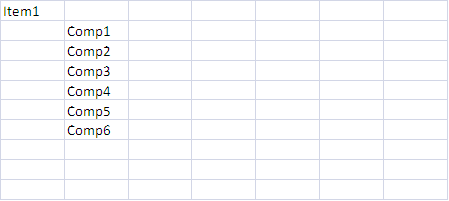
Integration of the Component Allocation View into the Main Clear to Build Workbench Display
There is a new button on the Clear to Build workbench, View Contentious Orders for Components. The “View Contentious Orders for Components” action is enabled only when a component pegging row against a make order is selected.
All columns associated with the component allocation view, such as Quantity Required, Quantity Pegged to On-Hand, and so on, are available as additional columns when you scroll to the right of the table.
Since the main make order table is now in a tree format, the icons used for enabling Query by Example are changed slightly. The icons are similar to those in Supply/Demand.
All columns associated with the component allocation view (Quantity Required, Quantity Pegged to On-Hand, Total Components On-Hand, etc) are available as additional columns when scroll to the right of the table. Functionally, all the data in this view is identical to the erstwhile separate component allocation view.
Since the main make order table now changes from a normal table to a “Tree” table, there are slight changes to the icons used for enabling Query by Example. The icons used will be similar to the ones in Supply/Demand (which is also a tree table).
Note: The Query by Example Mode button will be replaced by an icon of binoculars.
Constraint Details
Most tabs share common functions, see Operating in Tabs.
Use this tab to see constraints for late and unmet demands. See also Planner Analysis: Late Demand Diagnosis.
You can access it for single and multiple demands and from:
-
Supply & Demand View: From Late or Unmet End Demands
-
Exceptions View: From exception messages Late Replenishment for Forecast, Late Replenishment for Sales Order, and Demand Quantity not Satisfied
It is in the Plan Links menu as well.
Here are some specific field definitions:
-
BOM Level: Bill of material level from the finished good; the finished good level is level 1.
-
Constraint Type: Material, Resource or Supplier
-
Material Constraint Type: Lead Time, Time Fence, Date Effectivity, WIP Window
-
Search Path: For the primary path, it reports exhaustive constraints.
-
Requested Date: Date of the constraint
-
Requested Qty: Quantity required to meet the demand on time; units for material or supplier constraints, hours for resource constraints.
-
Available Qty: Quantity available at the moment that the planning solver is planning this demand
-
Shortage Qty: Requested Qty – Available Qty
-
Shortage %: Shortage Qty / Requested Qty
-
Earliest Available Date: When the material or capacity is first available
-
Constraint Duration: Earliest Available Date – Requested Date
Exceptions
Most tabs share common functions, see Operating in Tabs.
Use this tab to view exception messages.
You cannot edit data in this view.
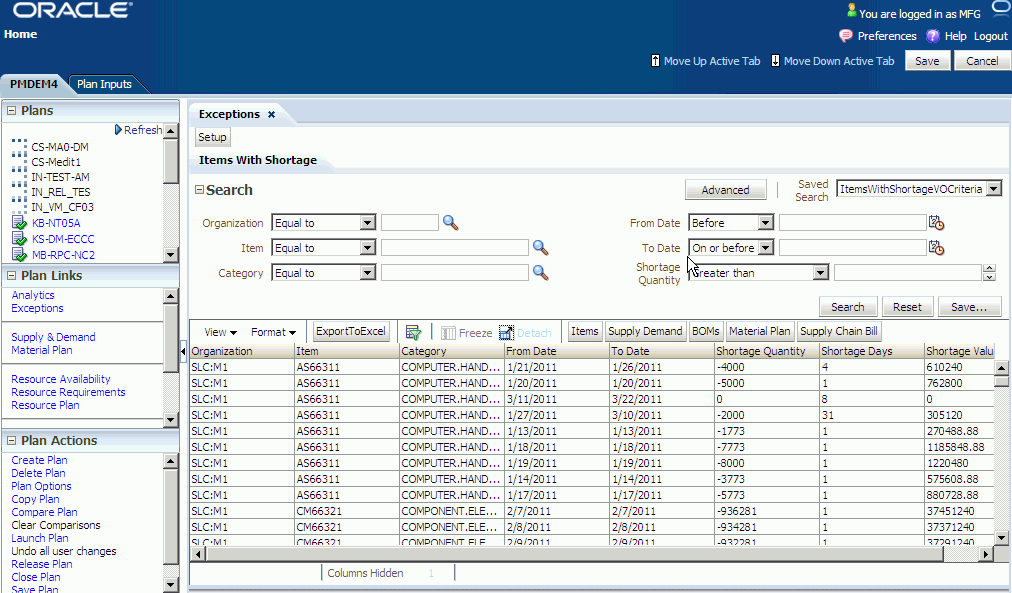
You can set up the exceptions that you want to see:
-
Click on Exceptions > Set Up
-
Select the exceptions that you want to see by moving them between the lists using the > , >> and < ,<< icons in the set up wizard
-
Once you move an exception is moved from one list to another, it is removed from the original list.
-
Use the up and down icons to specify the order of the exceptions display
To see exception messages, you must load the plan to your workspace.
Each exception message appears in a separate sub-tab. Each sub-tab has its own search area and search results area.
The exception message sub-tabs appear in the order that you set up. Several sub-tabs appear when you first see this tab.
To see another exception message sub-tab, click on the sub-tab related to the exception. If the exception you want is not visible, click icon double-greater than and select the exception from the drop down list.
To move around to other exception messages, click icons double-greater than and double-less than and select them.
You can:
-
Save the search criteria for each exception
-
Export exceptions to Microsoft Excel
-
Specify search conditions to limit the display of each exception and save it. After you specify the search criteria, you can drill down to other views
The meaning of each exception message is in Exceptions > Rapid Planning Exceptions Overview.
Items
You can:
-
Make changes to items and add them to a simulation set
-
Mass edit a set of rows, for example, all items of a particular category, or do a single-row edit to update any of these attributes
See Input Views.
Material Plan
Most tabs share common functions, see Operating in Tabs.
Use this tab to view a horizontal picture of the supply and demand. It is a horizontal plan.
You can edit data in this view.
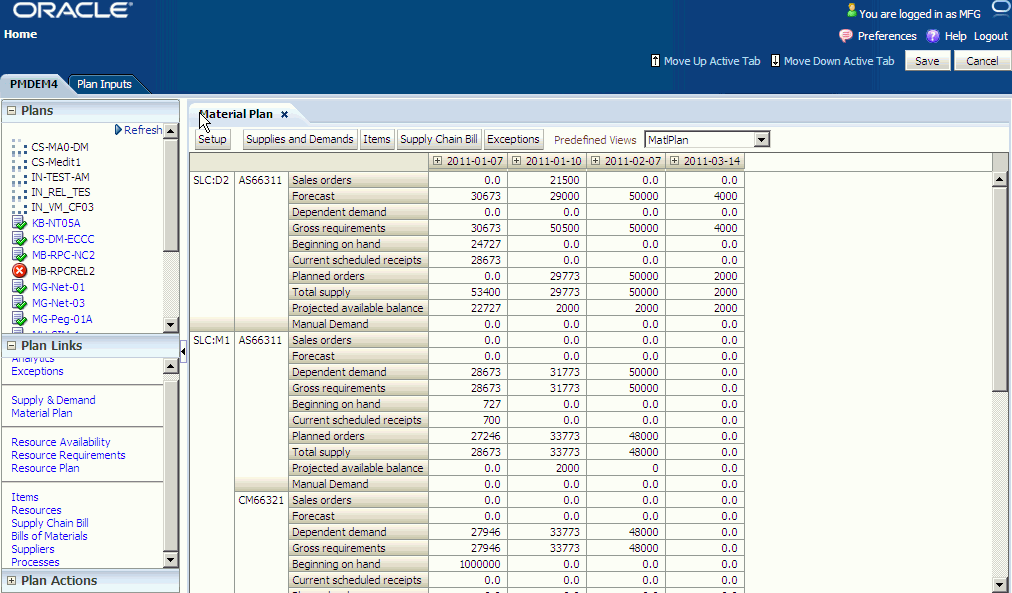
Plan Tab
To drill down to supply and demand detail, highlight cells, then click button Supplies & Demands
The time bucket dates appear as the first three rows of the display. To:
-
Expand a time bucket into lower level buckets, click icon Drill Expand near the date of the higher-level bucket
-
Summarize lower level bucket detail into the higher level bucket, click icon Drill Collapse near the date of the higher-level bucket
Click button Setup to see the Search and Layout window where you can:
-
Specify filter criteria (tab Filters)
-
Specify the layout of the data columns (tab Layout)
-
Specify titles for the data columns (tab Labels)
-
Save the search, layout, and titles and make it your default (tab General)
You can filter on:
-
Category
-
Item
-
Projected available balance
-
Organization
-
Product family
-
Model
-
Global forecast: In the Filter tab, select Show Global Forecast Measures.
You can directly make edits to the following row types:
-
Forecasts
-
Planned orders
-
Manual demands
You can create:
-
Planned orders
-
Manual demands
After you save a changed cell, the tab:
-
Finds the increased or decreased percentage change between what was there and what you changed it to
-
Applies that to all supply or demand details that make up the number in that cell
-
Sets the new quantity and date values as firm
For example, you have a material plan row
| Organization | Category | Measure | 16 February | 23 February | 2 March |
|---|---|---|---|---|---|
| TST_M1 | Hard Drives | Forecast | 2000 | 2400 | 3000 |
The bucket 23 February quantity 2400 is the sum of these detail forecasts.
| Organization | Item | Order Type | Date | Quantity | Firm Date | Firm Quantity |
|---|---|---|---|---|---|---|
| TST:M1 | 320 GB External Hard drive | Forecast | 26 February | 300 | -- | -- |
| TST:M1 | 1 TB Hard drive | Forecast | 25 February | 1500 | -- | -- |
| TST:M1 | 3 TB Hard drive | Forecast | 27 February | 600 | -- | -- |
You update bucket 23 February to quantity 3000.
| Organization | Category | Measure | 16 February | 23 February | 2 March |
|---|---|---|---|---|---|
| TST_M1 | Hard Drives | Forecast | 2000 | 3000 | 3000 |
The tab calculates a 25% quantity increase, passes that increase to all of the detail forecast firm quantities, and sets their firm dates.
| Organization | Item | Order Type | Date | Quantity | Firm Date | Firm Quantity |
|---|---|---|---|---|---|---|
| TST:M1 | 320 GB External Hard drive | Forecast | 26 February | 300 | 26 February | 375 |
| TST:M1 | 1 TB Hard drive | Forecast | 25 February | 1500 | 25 February | 1875 |
| TST:M1 | 3 TB Hard drive | Forecast | 27 February | 600 | 27 February | 750- |
If you are creating a supply or demand in a week or period bucket, the new supply or demand's firm date is the last workday of the week or period.
Measures
You can view most of these measures as low as the item, organization, and day levels. You can roll up to higher:
-
Item levels: Category, product family, and model
-
Time levels: Week, period
If you select global forecast measures, global demand schedules display in a Global Organization section.
These are the demand measures available in the material plan:
-
Dependent Demand: Sum of order types – (Planned order demand + Discrete job demand)
-
Expected Scrap: Sum of Expected scrap; demand resulting from applying item attribute
-
Shrinkage Rate to supplies
-
Forecast: Forecast quantity after consumption
-
Gross Requirements: Sum of all demands
-
Manual Demand: Sum of manually created demand rows
-
Other Independent Demand: Sum of (Hard reservation, Copied schedule demand, Non-standard demand, Demand class consumption)
-
Production Forecast: Sum Production forecasts; can be based on exploded forecasts of product families and models
-
Sales Orders: Sum of Sales order quantities
-
Original (Global Organization section only): The original global forecast quantity. If you spread the forecast to daily buckets, the spread forecast displays in place of Original.
-
Consumed (Global Organization section only): The global forecast quantity that sales orders have consumed
-
Current (Global Organization section only): The global forecast quantity that remains after consumption
-
Cumulative Current (Global Organization section only): The sum of Current for this bucket and Current for all previous buckets
These are the supply measures available in the material plan:
-
Current Scheduled Receipts: Sum of (Discrete jobs, Purchase orders, Requisitions, In transit, In receiving)
-
Flow Schedules: Sum of Flow schedules
-
In Receiving: Sum of In-receiving
-
In Transit: Sum of In-transit
-
Onhand: On-hand balance
-
Planned Orders: Sum of Planned orders
-
Purchase Orders: Sum of Purchase Orders
-
Requisitions: Sum of Requisitions
-
Total Supply: Sum of all supplies
-
Work Orders: Sum of Discrete jobs
These are the other metrics available in the material plan:
-
Projected Available Balance: Onhand + Total Supply – Gross Requirements
-
Projected Onhand: Onhand + (Total Supply – Planned Orders) – Gross Requirements
For global forecasts, this is how the material plan rolls up:
-
Model: It uses the model defined in the organization that you specified in profile option MSC: Organization containing generic BOM for forecast explosion.
-
Categories and product families: If you select an organization view by, it uses that. Otherwise, it uses the definition in the plan owning organization.
Grand Totals
You can see grand totals for Material Plan entities and drill down to their corresponding Supplies and Demands, Items, Supply Chain Bill, and Exceptions windows.
In the Material Plan Setup page, General tab, select Grand Total.
All measures displayed at the Item level or Category level are displayed at the Grand Total level, except Global Forecast.
You can update values for:
-
Planned Order (zero and non-zero values)
-
Forecast (only non-zero values)
-
Manual Demand: (zero and non-zero values)
When you update from:
-
Zero to non-zero (Planned Order and Manual Demand): The page proportionally updates all items/dates and categories/dates to total to the new value. It uses item attribute Rounding Control. For example, there are four items that contribute to a Grand Total, their values are zero, you update Grand Total from 0 to 10, the four items values change to 3, 2, 3 and 2.
-
Non-Zero to Non-zero (Planned Order, Forecast, and Manual Demand): The page proportionally updates all items/dates and categories/dates that have values to total to the new value. It uses item attribute Rounding Control.
-
Non-Zero to Zero (Planned Order, Forecast, and Manual Demand): The page updates all items/dates and categories/dates to zero.
After you finish updates, click Refresh View, then Yes. The page:
-
Recalculates the Planned Order, Forecast, and Manual Demand items/dates and categories/dates to total to their new values
-
Recalculates measures affected by the updates: Total Supply, Total Demand, Gross Requirements, and Projected Available Balance.
-
Saves all changes to the database
Material Plan Display Order
The display order for Material Plan depends on your selection in the view from which you navigate to the Material plan. This section provides use cases and discusses how the Material Plan is displayed.
Examples, which demonstrate use cases, are given below. There are a couple of notes about the examples:
-
The material plan displays the items you select.
-
The material plan preserves the order.
-
You need to determine the Item-Orgs and components that you want to view in the material plan.
-
In these examples, your layout must be set to either Item-Orgs or Org-Item for the drill-downs to show properly. If your default layout is set to Cat-Org, then the material plan displays the Cat-Org view but only the categories for the selected items are displayed. Within each category, the information that is displayed is for the selected items only.
Material Plan in Plan Links frame: When you click on Material Plan in the Plan links frame, you use the set-up feature in material plan to determine the dimensions that are displayed. There is no change in layout in this case.
Example 1: Material Plan from Supply and Demand View
-
Select the following list of rows (pegging trees) in the Supplies and Demand view: Items AS66312 at TST:D2, As66312 at TST:M1, and Components CM66327, SB66324, CM66322 at TST:M1, as shown below. Note that not all rows in a given tree are selected.
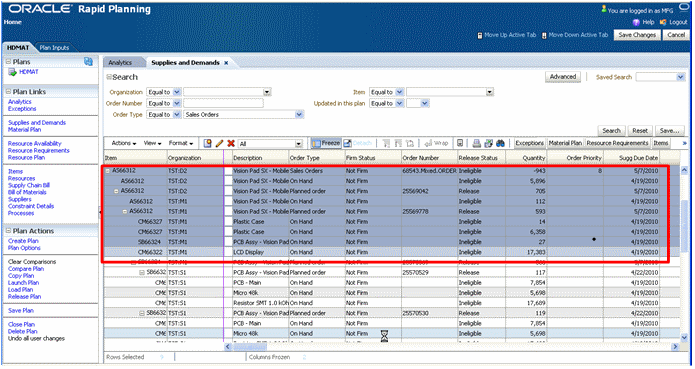
-
Click Material Plan.
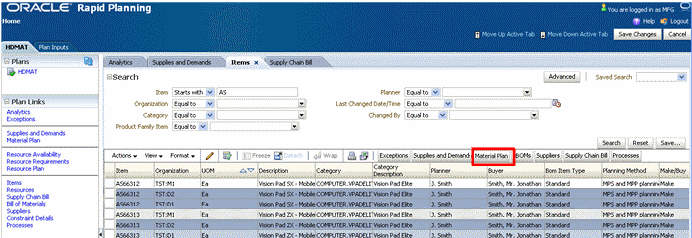
The Material Plan view appears.
Note: Your selection is preserved and only information that you selected appears on Item-Organizations.
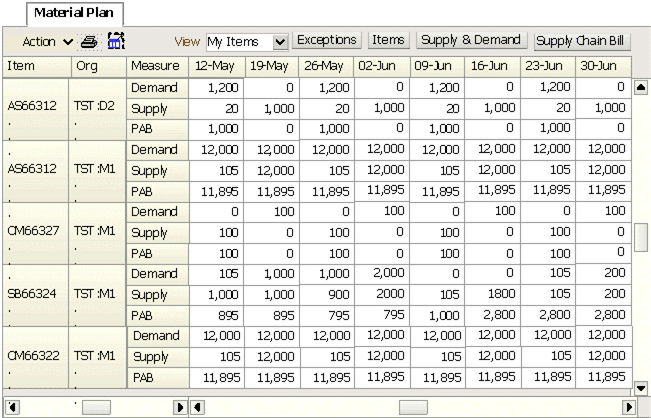
Example 2: Material Plan from Supply Chain Bill View
-
Select the following list of Bill-of-Material Items and components in the supply chain bill: AS66312 at TST:D2; AS66312 at TST:M1 and CM66322 at TST:M1.
Note: Not all Items within a given BOM have been selected.
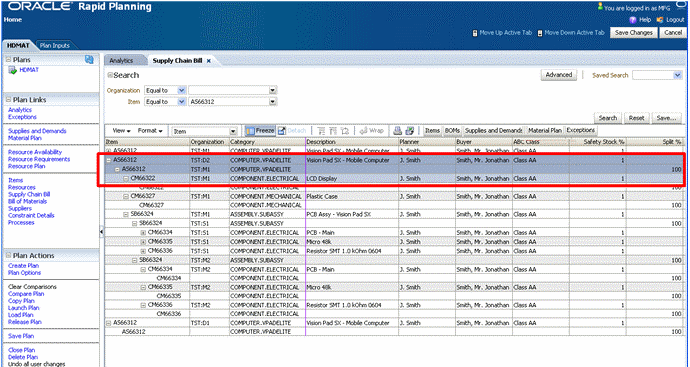
-
Click Material Plan.
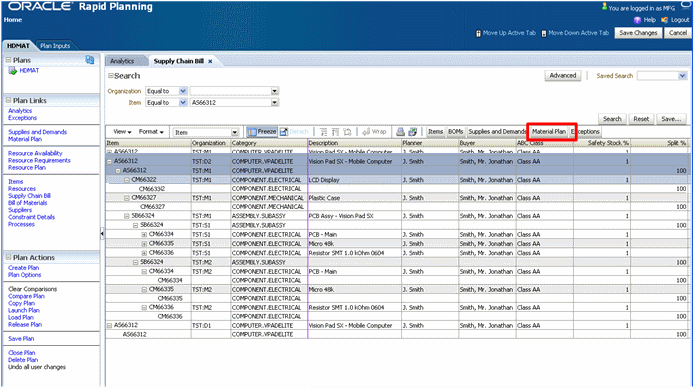
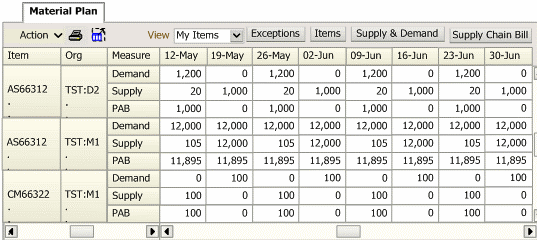
The Material Plan appears.
Note: Your selected Item-Orgs and your order in the Supply Chain Bill is preserved.
Example 3: Material Plan from Items/BOM or Other Similar Views
-
Select a list of items from the list displayed and click on Material Plan. For this example, the Items View is shown.
Note: The items selected are not in consecutive order.
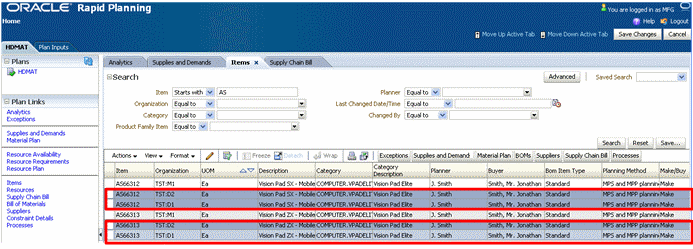
-
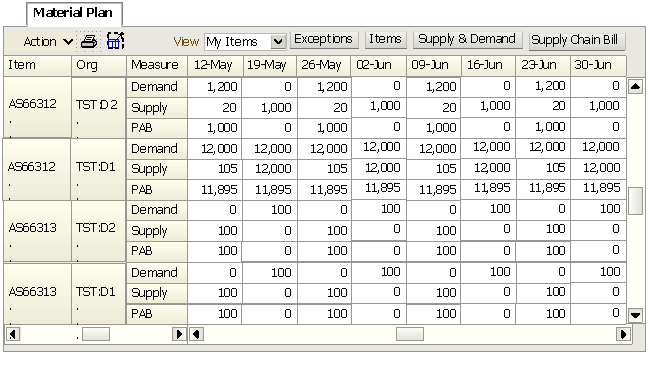
Click on Material Plan.

The Material Plan appears.
Note: Only the selected Item-Orgs are displayed.
Resource Availability
You can:
-
Search, view, analyze, and edit the resource availability used in the plan
-
Add simulation set changes or manual over-rides on resource availability
-
Mass edit a set of rows, for example, all dates of a particular resource, or do a single-row edit to update any of the following attributes
See Input Views, Resource Availability.
Resource Plan
Most tabs share common functions, see Operating in Tabs.
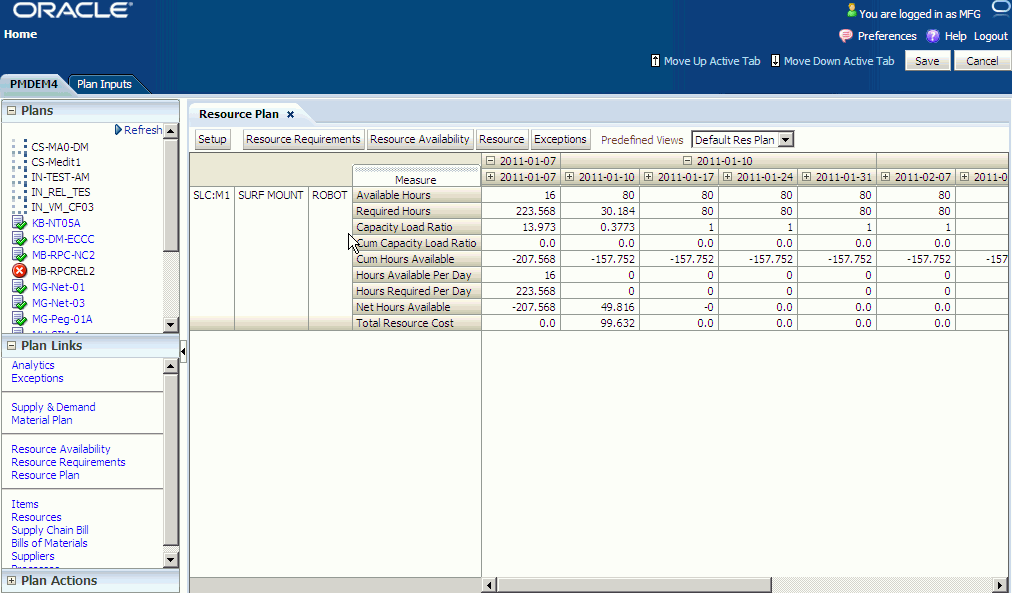
Use this tab to view a horizontal picture of the resources.
You can edit data in this view.
Plan Tab
To drill down to resource detail, highlight cells, then click button Resource Requirements.
The time bucket dates appear as the first three rows of the display. To:
-
Expand a time bucket into lower level buckets, click icon Drill Expand near the date of the higher-level bucket
-
Summarize lower level bucket detail into the higher level bucket, click icon Drill Collapse near the date of the higher-level bucket
Click button Setup to see the Search and Layout window where you can:
-
Specify filter criteria (tab Filters)
-
Specify the layout of the data columns (tab Layout)
-
Specify titles for the data columns (tab Labels)
-
Save the search, layout, and titles and make it your default (tab General)
You can filter on:
-
Organization
-
Resource
-
Department
-
Load Ratio
Measures
These are the measures available in the resource plan.
-
Capacity load ratio
-
Cum capacity load ratio
-
Cum hours available
-
Flow schedules
-
Hours available
-
Net ATP
-
Net hours available
-
Non-standard job orders
-
Planned orders
-
Required hours
-
Run hours
-
Run hour ratio
-
Setup hours
-
Setup hour ratio
-
Sum of capacity changes
-
Total resource cost
-
Work orders
Resource Requirements
Most tabs share common functions, see Operating in Tabs.
Use this tab to view resource requirements.
You cannot edit data in this view.
Plan Tab
You cannot firm or reschedule the resource requirements for simulation purposes
Plan Inputs Tab
You cannot make changes or add simulation changes on the resource requirements
Plan Tab and Plan Inputs Tab
Search, view, and analyze the resource requirements in the plan
Resources
You can:
-
Search, view, analyze, and edit the resources in the plan and add resource changes to a simulation set
-
Mass edit a set of rows or do a single-row edit to update attribute Bottleneck Resource flag.
See Input Views, Resources.
Suppliers
You can save edits in simulation sets.
See Input Views, Suppliers
Supply & Demand
Most tabs share common functions, see Operating in Tabs.
Use this tab to view supply and demand for an item-organization combination.
You can edit data in this view.
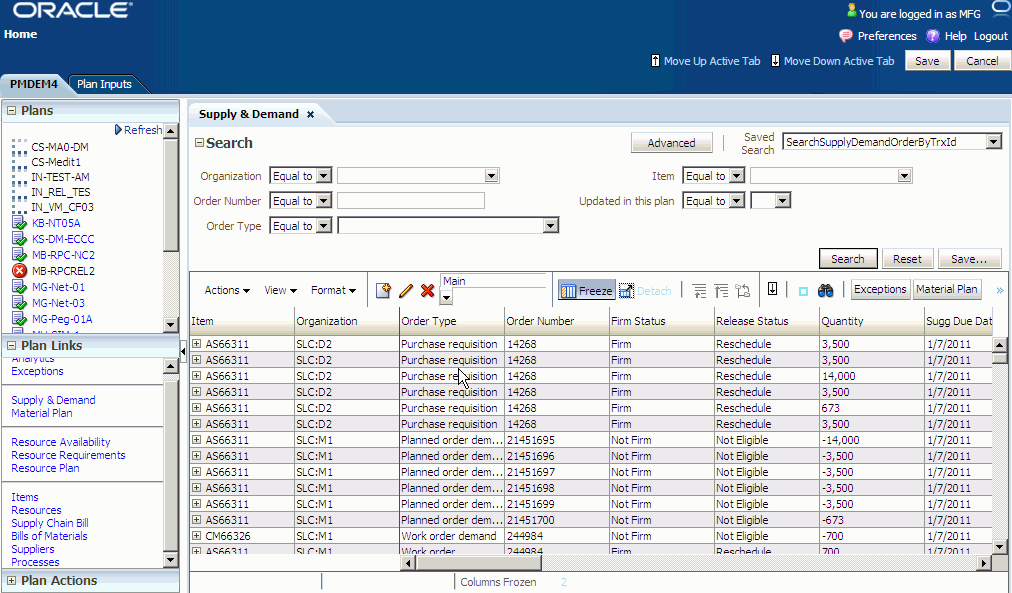
It displays as a collection of trees with the pegging information collapsed under each supply or demand line. The pegging is based on the assignments that the planning solver made in its last replan.
Since the tab is a combined supply-demand display and a pegging tree, a supply or demand could appear multiple times, due to, for example:
-
A supply pegged to multiple top-level demands
-
Once as a root node as returned by search criteria and once as part of the pegging chain of another demand or supply
To expand all nodes completely, click Actions > Expand All
This view shows a list of column groups in the search results area.
You can set the display to show:
-
All: All columns
-
Main: The major columns
-
Release: Columns related to releasing
-
Other: Other columns
To change the upstream (supply) or downstream (demand) orientation of the pegging tree, click toggle icon Supply/Demand Pegging or click Actions > Supply Pegging and Actions > Demand Pegging. In
-
Supply pegging mode, the display begins with the top level demand and proceeds to the lowest level supplies
-
Demand pegging mode, the display begins with the lowest level supply and proceeds to the top level demands
When viewing a demand's upstream (supply) pegging, if you want to see only the supplies that have exceptions, click Actions > Exceptions. To cancel, click it again.
When viewing a supply's downstream (demand) pegging, if you want to see only the end demands that a supply pegs to and none of the intermediate levels:
-
Select the supply
-
Click Actions > End Demands
-
To cancel, click it again
The tab always hides these demand pegging rows:
-
Transfer dependent demand
-
Component dependent demand
The pegging tree shows the downstream supply pegged to the upstream supply.
The tab always hides these routing pegging rows:
-
Operations for work orders
-
Resource requirements for planned orders and work orders
You can click icon Add Row to add:
-
Supply of type Planned order
-
Demand of type Manual MDS
To delete a supply or demand that you have entered, click icon Delete Row before you save the row.
The fields that you can edit in each row depend on:
-
Whether it is a supply or a demand
-
Its order type
Since different fields apply to each order type, Oracle recommends that you perform mass updates on only one order type at a time. If the tab cannot update all selected records with the change that you want, it pops-up an error page that shows the fields and the rows that it cannot update with the new values.
Plan Tab
Mass edit a set of rows, for example, priority of all orders from a customer, or do a single-row edit to update any of the following attributes for simulation purposes:
-
Firm Status
-
Firm Date
-
Firm Quantity
-
Alternate BOM
-
Alternate Routing
-
Source Organization
-
Source Supplier
-
Source Supplier Site
Plan Inputs Tab
You cannot edit the supplies and demands and cannot add them to simulation sets
Plan Tab and Plan Inputs Tab
Search, view, analyze, and edit the supplies and demands in the plan
Order Types
These are the demand order types that Oracle Rapid Planning works with:
-
Flow schedule demand
-
Flow schedule scrap
-
Intransit shipment scrap
-
Manual forecast
-
Non-standard job demand
-
Other independent demand
-
Planned order demand
-
Planned order scrap
-
Production Forecast
-
Purchase order scrap
-
Purchase requisition scrap
-
Sales orders
-
Work order scrap
-
Work order demand
These are the supply order types that Oracle Rapid Planning works with:
-
Demand class consumption
-
Flow schedule
-
Flow schedule by-product
-
Intransit receipt
-
Intransit shipment
-
Non-standard job
-
Nonstandard job by-product
-
On hand
-
PO acknowledgment
-
PO in receiving
-
Planned order
-
Planned order co-product/by-product
-
Purchase order
-
Purchase requisition
-
Supply adjustment
-
Work order
-
Work order co-product/by-product
Mass Update in the Supplies and Demand View
Similar to the Resource Availability view, mass update is available in the Mass Update FIRM DATE in the Supplies and Demand view. The options are:
-
Reset to Original
-
Set Value To
-
Sugg Due Date+
The new options and their behavior are:
-
Increment by
If Firm Date is not null:
Firm Date = Firm Date + Entered Value
If Firm Date is null:
Firm Date = Suggested Due Date + Entered Value
-
Decrement by
If Firm Date is not null:
Firm Date = Firm Date – Entered Value
If Firm Date is null:
Firm Date = Suggested Due Date - Entered Value
-
Request Date +
Firm Date = Request Date + Entered Value
If you choose Request Date, the system first looks for Requested Arrival Date. If the Requested Arrival Date is not populated, then it uses the Requested Ship Date.
Notes:
-
Request Date + and Sugg Due Date + can have a positive or negative value.
-
For all views the mass update feature for the operators Increase by, Decrease By, Increase By %, Decrease By %, Sugg Due Date +, Request Date +, etc. are applied to the value displayed in the UI and not the value saved in the database. For this reason, the operators must be applied to un-saved date changes too.
Firming
You need to firm planned orders before you can process any simulation changes; click the planned orders to firm, then click Actions > Firm. However, you can release planned orders that are not firm.
You can also firm:
-
Work orders
-
Purchase requisitions
-
Purchase orders
-
Forecasts
-
Sales orders
Attend to these fields for all firming:
-
Firm Status
-
Firm Date
-
Firm Quantity
In addition, attend to these additional fields for these specific order types:
-
Planned order: Alternate BOM, Alternate Routing, Source Organization, Source Supplier, Source Supplier Site
-
Work order: <no additional fields>
-
Purchase order and purchase requisition: <no additional fields>
-
Forecast and sales order: Order Priority
Releasing
You can release order type planned orders in the workbench.
Before you can release them, perform some setup steps; see Releasing Planned Orders..
You can instruct the Planning Solver to automatically release some orders, see Planned Order Auto Release.
These are the order types that you can reschedule in the Workbench:
-
Purchase orders
-
Requisitions
-
Work orders
-
Sales orders: But not for substitute items if your source system is at release level 12.0.
These are the order types that you can cancel in the Workbench:
-
Purchase orders
-
Requisitions
-
Work orders
To mark an order for release, click Actions > Mark for release.
For planned orders, attend to these fields prior to release:
-
Implement Quantity
-
Implement Alt BOM
-
Implement Alt Routing
-
Implement As
-
Implement Date
-
Implement Demand Class
-
Implement Firm
-
Implement Job
-
Implement Status
-
Implement Supplier
-
Implement Supplier Site
-
Implement WIP Class
For work orders, attend to these fields prior to release:
-
Implement Quantity
-
Implement Alt BOM
-
Implement Alt Routing
-
Implement As
-
Implement Date
-
Implement Firm
-
Implement Job
-
Implement Status
-
Implement WIP Class
For requisitions and purchase orders, attend to these fields prior to release:
-
Implement Quantity
-
Implement As
-
Implement Date
-
Implement Firm
-
Implement Job
-
Implement Status
-
Implement Supplier
-
Implement Supplier Site
For sales orders, attend to these fields prior to release:
-
Firm Status
-
Firm Quantity: Sales order quantity
-
Firm Date: Sales order schedule date
-
Order Priority
For sales orders, attend to these fields prior to release:
For sales orders, the release process:
-
Actually sends fields Implement Qty and Implement Date fields to the source.
-
Does not send fields Firm Status and Order Priority
-
Sends field Material Available Date as sales order line Earliest Ship Date. You see this date in the Oracle Shipping delivery line.
To monitor the orders during release, use field Release Status of each order. This table shows the values that Release Status displays.
| Action | Release Status Before Mark for Release | Release Status After Mark for Release | Release Status After Release |
|---|---|---|---|
| None available | Ineligible | - | - |
| Release | Release | Marked for Release | Released |
| Reschedule | Reschedule | Marked for Reschedule | Rescheduled |
| Cancel | Cancel | Marked for Cancel | Cancelled |
If you have marked an order for release, you may be able to unmark it for release. After you do, its Release Status returns to the value it had before you marked it for release (Release, Reschedule, or Cancel). Click Action > Unmark for release
Inventory Reservations
Column Reserved Quantity:
-
Shows the quantity reserved from on hand against a sales order
-
Displays a value only for sales orders
You cannot edit it.
If there is an inventory reservation, demand pegging for on hand displays, for sales orders:
-
Reserved Quantity
-
Pegged Qty: This can be lower than reserved quantity
In this example, sales order:
-
45678 shows a full reservation
-
12345 shows a partial reservation: The reserved and pegged quantities are different
| Item | Order Type | Order Number | Quantity | Reserved Quantity | Pegged Quantity |
|---|---|---|---|---|---|
| XYZ | On hand | - | 1000 | - | - |
| . XYZ | Sales order | 12345 | 49 | 49 | 4 |
| . XYZ | Sales order | 45678 | 143 | 143 | 143 |
If there is an inventory reservation, supply pegging for on hand displays:
-
For sales orders, Reserved Quantity
-
For on hand, Pegged Quantity
In this example, sales order:
-
45678 shows a full reservation
-
12345 shows a partial reservation: There are two lines for pegged quantity, one for the partial reservation and one for the remaining quantity that can peg to any supply type.
| Item | Order Type | Order Number | Quantity | Reserved Quantity | Pegged Quantity |
|---|---|---|---|---|---|
| XYZ | Sales order | 12345 | 49 | 19 | - |
| . XYZ | On hand | - | 1000 | - | 19 |
| . XYZ | <other supply type> | - | 80 | - | 30 |
| XYZ | Sales order | 45678 | 143 | 143 | - |
| . XYZ | On hand | - | 1000 | - | 143 |
The planning solver:
-
Cancels the reservation if the on hand is no longer available
-
Reduces the reservation if the sales order quantity is lower than the reservation
Output Plan Actions
Use the actions to act against plans. You find links to the actions in the Plan Actions section of the navigator in the Plan inputs tab.
Copy Plan
Use this action to make copies of plans to save or simulate.
If you want to do this in batch mode, use action Copy Simulation Plan.
Rapid Planning Plans
It opens the copy plan pop-up page with current plan as From Plan. Select Plan Type Rapid Planning. Once you confirm the copy, the new plan appears in the list of plans.
Baseline Plans from Oracle Advanced Supply Chain Planning
Select Plan Type ASCP. See Simulating Plans from Oracle Advanced Supply Chain Planning, Copy Plan.
Copy Simulation Plan
Use this action to make copies of plans to simulate, for example, if you want to mass update demand priorities.
If you want to do this online, use action Copy Plan.
Parameters
Source Plan Name: Select a plan.
Destination Plan Name; Enter a plan, new or existing If the copy plan exists, the process deletes the information in it before copying.
Load Plan Parameter: Valid values are:
-
Yes: This process leaves the copy plan in memory. You can view it online immediately after the process finishes.
-
No: This process leaves the copy plan in memory. You have to open the plan to see it. This is the default
You always need a managed server to run this action, regardless of this parameter setting.
Save Plan Parameter:
-
No: The process does not save the copy plan to the database.
-
Yes: The process saves the copy plan to the database.
-
Yes, Exclude KPIs: The process saves the copy plan to the database, but it does not save the KPI information. This is the default.
Compare Plan
Use this action to compare plans.
It pops up a list of all plans and you select one plan.
If you have any of these tabs open, they are subject to the comparison between the base plan and the comparison plan:
-
Supply and Demand
-
Horizontal plans (material & resource)
-
KPIs
-
Exceptions
A tab that is subject to comparison typically:
-
Automatically re-queries to show the comparison
-
Gains an additional display column to show the plan name
-
Does not allow for editing or drilling down of the comparison plan information
Release Plan
Use this action to perform releases, reschedules, and cancellations in the current selected plan.
You can release the plan if you have not loaded it into memory.
It opens a release plan page in a pop-up window and asks you to confirm the release.
After you confirm, it opens a plan status page in a pop-up window. Use this page to monitor the progress of each phase of the release. It displays the concurrent request numbers of the processes.
To see how to mark orders for release, see Rapid Planning Workbench Views > Supply & Demand > Releasing.
If you are releasing a simulation that has changes to these types of data, the release process releases the order but does not release the component or resource requirement details:
-
Bills of material, for example, component changes, effectivity changes
-
Routings, for example, new operations
Publish Order Forecast
The publish program parameters show the available attributes that let you publish data from Rapid Planning to Collaborative Planning. These are very similar to the parameters that are enabled in ASCP-CP integration. For information on these parameters, refer to the Oracle Advanced Supply Chain Planning Implementation and User's Guide.
The table below lists the parameters that are relevant for Rapid Planning; those parameters that are not listed are not relevant and do not need to be published.
| Parameters | Description |
| Plan | Name of the Plan inherited from the current Rapid Planning plan |
| Organization Code | Enables the publish of order forecast for a specific organization |
| Planner | |
| ABC Class | |
| Item | |
| Supplier | Select a specific supplier |
| Supplier Site | Select a specific supplier site – enabled for selection only when Supplier has been selected |
| Horizon Start Date | Defaulted to current date |
| Horizon End Date | Defaulted to current date + 1 year |
| Automatic Versioning | Valid values: Yes or No. The default is Yes. |
| Last Version Published | Populated with the previous version number that was published from the Plan in case Automatic Versioning is enabled |
| Include Purchase Orders | |
| Include Requisitions | |
| Overwrite |
Publish Supply Commits
The publish program parameters show the available attributes that let you publish data from Rapid Planning to Collaborative Planning. These are very similar to the parameters that are enabled in ASCP-CP integration. For information on these parameters, refer to the Oracle Advanced Supply Chain Planning Implementation and User's Guide.
The table below lists the parameters that are relevant for Rapid Planning; those parameters that are not listed are not relevant and do not need to be published.
| Parameters | Description |
| Plan | Name of the Plan inherited from the current Rapid Planning plan. You can change it to any other plan. |
| Organization Code | Enables the publish of order forecast for a specific organization |
| Planner | |
| ABC Class | |
| Item | |
| Customer | Select a specific supplier |
| Customer Site | Select a specific customer site – enabled for selection only when Supplier has been selected |
| Horizon Start Date | Defaulted to current date |
| Horizon End Date | Defaulted to current date + 1 year |
| Automatic Versioning | Valid values: Yes or No. The default is Yes. |
| Last Version Published | |
| Publish Supplies pegged to Customer Sales Orders | |
| Overwrite | All Records (default), Horizon dates specified |
Change History
Use this action to view the changes that all planners have made to a plan.
It shows the entire change log for the plan in a pop-up window.
Each change log entry shows the entity, who made the change, when they made the change, and the data values before and after the change.
Clear Comparisons
Use this action after you have done a plan comparison and you want to remove the comparison data.
It removes all comparison plan data and returns all tabs to the base plan data.
Define Incremental Replan Scope
Use plan action Define Incremental Replan Scope to specify the scope of the replans by:
-
Selecting the incremental planning mode
-
Naming the entities that the planning engine plans or does not plan (supply selection criteria)
Supply Selection Criteria
You can limit by these selection criteria and conditions:
-
Item: Equals, Saved Selection / Favorite Equals, and That has been updated in the plan (updated items, bills of material, and routings)
-
Org: Equals
-
Resource: Equals, Saved Selection / Favorite Equals, and That has been updated in the plan (updated resource attributes and resource capacity)
-
Item/Supplier/Supplier Site: Equals, Saved Selection / Favorite Equals, and That has been updated in the plan
-
Pegged End Demands: Saved Selection Equals and That have been updated in the plan
-
Supplies: Saved Selection Equals and That have been updated in the plan
These criteria are like OR searches. If a supply meets any criterion and condition, the action selects it.
When you select condition Saved Selection Equals, the list that you see does not include dynamic lists, for example top ten lists.
If you select Include pegged upstream supplies, the action selects all supplies that peg down to the selected supplies.
If you select Include pegged downstream supplies, the action selects all supplies that peg up to the selected supplies.
You can also use search attribute Updated in Plan = Yes to find all of the entities that the plan updated.
Incremental Planning Mode
Freeze existing plan / Replan new demands only: The planning process freezes the supplies and demands in the prior run of the plan and plans to meet demands that you add since then.
Freeze Selected Supplies / Replan all demands: The planning process replans all demands but does not replan the supplies that you select. It can make planned orders and recommend reschedule for supplies that you did not select.
Freeze All Except Selected Supplies / Replan all demands: The planning process replans all demands but does not replan the supplies that you did not select. It can make planned orders and recommend reschedule for supplies that you select.
Firm Supplies
For firm supplies, the process makes dependent component requirements and resource requirements firm as well.
Delete Plan
Use this action to delete plans.
This action purges the plan from memory and the database and is irrevocable.
When you run a copied plan, the planning solver needs its base plan. If you delete a base plan, all plans copied from it are invalid.
If you delete a plan that is a simulation from a baseline Oracle Advanced Supply Chain Planning plan, you receive a warning.
Release
Releasing in the Supply & Demand Tab
See Output Views, Supply & Demand.
Order Release
When you release planned orders to the execution system, this is the information that Oracle Rapid Planning passes.
It auto-releases planned orders within the release time fence.
Work orders:
-
Job details with start date and end date timestamps of 23:59:59
-
Resource details with resource scheduled start date and resource scheduled end date timestamps of 23:59:59
-
Resource usage
-
Resource hours
-
Primary or alternate bill of material and routing combination selection
-
Primary or substitute component selection
-
Primary or alternate resources selection
Purchase requisitions:
-
Selected supplier, supplier site, and ship method
-
Suggested Due Date timestamp of 23:59:59
Internal requisitions:
-
Selected source organization and ship method
-
Order Date timestamp of 23:59:59
Rescheduled work orders:
-
End date
-
If the plan determined the work order start date, all the remaining information in the order is new
Reschedule or cancellation of purchase requisitions:
-
Order number
-
Order Date timestamp of 23:59:59
Reschedule or cancellation of purchase orders:
-
Order number
-
Order Date timestamp of 23:59:59
Reschedule or cancellations of internal requisitions:
-
Order number
-
Order Date timestamp of 23:59:59
Planned Order Auto Release
You can instruct the planning solver to automatically start the release of planned orders, reschedules, and sales orders (auto release). After the plan completes, it starts a concurrent process to automatically release planned orders.
The planning solver releases planned orders and reschedules that:
-
Occur in a plan that you run with a snapshot phase
-
Are for items that have a value in item-organization attribute Release Time Fence. You set Release Time Fence in days.
-
Have dates in their destination organization on the plan start date that are within their items' release time fence.
-
Have Action set to Release
-
Can be released manually: For example, it excludes orders for phantom items
When you run a plan with snapshot and want to use auto release, set these plan options on the Main tab. Their default value is clear or null:
-
Enable Auto Release
-
If you select Enable Auto Release, enable Auto Release Reschedules
This is how the release time fence works:
-
You set Release Time Fence in days. The planning solver calculates the release time fence as this many days after the plan start date. For example, if Release Time Fence is 3, the release time fence date is day 4 of the plan horizon [plan start date, day 1 + 3 days].
-
The planning solver releases orders that have dates before the release time fence date. In this example, it releases orders in days 1, 2, and 3. But, if you run the plan exactly at 00:00:00, it also releases orders that have dates on the release time fence date.
This is how the planning solver decides whether or not to auto release:
-
Planned order: Suggested start date is before (or on) the release time fence date
-
Reschedule out: Old order start date is before (or on) the release time fence date
-
Reschedule in: Suggested start date is before (or on) release time fence date
-
Cancel: Suggested start date is before (or on) the release time fence date
During the auto release process, the planning solver:
-
Does not let you view the plan
-
Changes the release status of each eligible order to Released
-
Updates the quantity in process of each eligible order with the released quantity
-
Saves the plan to the database
-
Starts a concurrent process immediately after it finishes to release eligible orders to the E-Business Suite execution products. This process may start concurrent processes Create Releases, Requisition Import, and WIP Mass Load
-
Lets you view the plan
Other auto release considerations are:
-
Later simulations see the released orders as firm scheduled receipts.
-
After a later replan without snapshot, those released orders remain as firm plan orders and marked as released. After a later replan with snapshot, the Planning Solver ignores them as it replans the supply and demand situation using the latest collected data.
Publish Sales Order Changes
You can release sales order changes to Oracle Order Management. If the sales order is not firmed, you can change Material Available Date and the end item substitute.
The planning solver schedules sales orders using the scheduled sales order ship date, it does not use the scheduled sales order arrival date. It does not suggest alternate ship methods to improve the scheduled arrival date. RP does not recalculate the transit lead time from organization to customer site. It does not schedule sales orders with schedule method of arrival type.
Oracle Rapid Planning does not update the source organization for sales orders with:
-
Assemble to order models
-
Pick to order models and their components, options, and assemble to order models. The planning solver does not change the source organization selected in Oracle Order Management as scheduled by available to promise. Sales order lines for components of pick to order models and kits do not receive any release recommendations.