Properties, Scripts, Backups, Troubleshooting, and Best Practices
This chapter covers the following topics:
- Updating Configuration Data in the WLST_Config.properties File
- Configuring the Engine Domain Using Scripts
- Creating Managed Servers Using Scripts
- Managing the Managed Servers Using Scripts
- Creating RP UI Domains Using a Standard Domain Template
- Backing Up Files
- Troubleshooting
- Best Practices
Updating Configuration Data in the WLST_Config.properties File
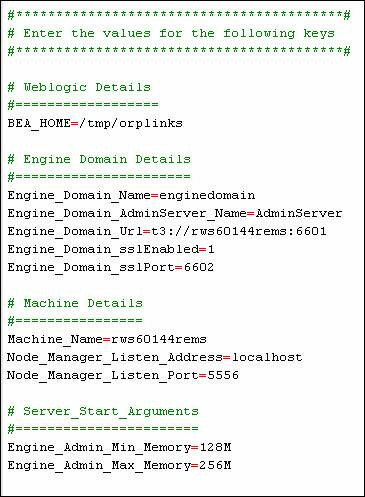
For the initial configuration, the WLST_Config.properties file needs to be up to date with the relevant details. The file is located in the folder WLST_scripts. A sample property file has been attached for reference. Refer to the example below to populate the file with the proper details.
# Weblogic DetailsExample:
#==================
BEA_HOME -
Provide the WebLogic home directory – the path in which WebLogic is installed
<line break>
# Engine Domain Details
#======================
Engine_Domain_Name –
Name of Engine Domain provided during installation in 2.1.
Engine_Domain_AdminServer_Name –
Name of Engine Domain Admin Server provided during installation in 2.1.
Engine_Domain_Url –
t3://<Machine_Name>:<Port_No>
Protocol used should be t3 and not http
Machine_Name (For ex. rws60144rems)
Port_No :- Listen Port No. for Engine Domain
Engine_Domain_sslEnabled=1
Engine_Domain_sslPort –
SSL Port Number provided during installation in 2.1.
# <line break>
# Machine Details
#================
Machine_Name –
Host name of the machine on which the WebLogic server is running (e.g. rws60144rems.us.oracle.com)
Node_Manager_Listen_Address = localhost
Node_Manager_Listen_Port = 5556
# <line break>
# Server_Start_Arguments
#=======================
Engine_Admin_Min_Memory –
Minimum size of the server memory (like 128M)
Engine_Admin_Max_Memory –
Maximum size of the server memory (like 256M)
A sample configuration file appears below.
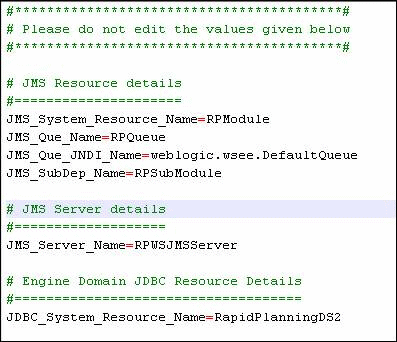
The values below are pre-populated. Do not edit these values.
# JMS Resource details
#=====================
JMS_System_Resource_Name=RPModule
JMS_Que_Name=RPQueue
JMS_Que_JNDI_Name=weblogic.wsee.DefaultQueue
JMS_SubDep_Name=RPSubModule
# <line break>
# JMS Server details
#===================
JMS_Server_Name=RPWSJMSServer
# <line break>
# Engine Domain JDBC Resource Details
#=============================
JDBC_System_Resource_Name – RPPlanningDS2
Configuring the Engine Domain Using Scripts
Perform the following procedure to configure the Engine Domain using scripts:
-
Verify that the Admin Server is running. If the Admin Server is not running, then start it as per the instructions in Starting the Engine Admin Server.
-
Run the InitialSetup.sh script.
Check the present working directory through command pwd.
Go to the directory <WLS_HOME>/user_projects/domains directory, and run the script by issuing the following command:
$ ./WLST_scripts/InitialSetup.sh <Username> <Password>
The Username and Password are required for Engine Domain Server.

-
View the log file InitialSetup.log to verify the servers were successfully created. To view the log file, go to the next directory WLST_log and open the file InitialSetup.log.

-
This script sets up the machine and Node Manager. To verify the setup, refer to Setting the Initial Configuration for the Rapid Planning User Interface and Engine.
Creating Managed Servers Using Scripts
Perform the following procedure to create the Managed Servers using a script.
-
Edit the CreateServer.Properties file to create additional Managed Servers and provide the necessary server details for your environment.
Input the server details in the format below. (Refer to the sample CreateServer.properties file provided in the folder WLST_scripts.)
-
Enter the No_Of_Managed_Servers to be created.
-
For each Managed Server to be created, enter the following values:
ms_Name_[i]=
ms_Listen_Port_[i]=
ms_Listen_Address_[i]=
ms_sslEnabled_[i]=
ms_sslPort_[i]=
ms_Min_Memory_[i]=
ms_Max_Memory_[i]=
where i represents the number of the server.
For example, if No_Of_Managed_Servers is 5, then there should be 5 sets of the values above in the format as mentioned where i has values 1, 2, 3, 4, and 5. Each Managed Server is defined by the following values you define in the CreateServer.Properties file:
-
ms_Name_[i] - Enter the name of the Managed Server.
-
ms_Listen_Port_[i] - Enter the Listen Port for Manager Server.
-
ms_Listen_Address_[i] - Enter the Listen Address for Manager Server.
-
ms_sslEnabled_[i] - Enter '1' to make SSL Port enabled.
-
ms_sslPort_[i] - Enter the SSL Port Number.
-
ms_Min_Memory_[i] - Enter the minimum memory argument for Manager Server.
-
ms_Max_Memory_[i] - Enter the maximum memory argument for Manager Server.
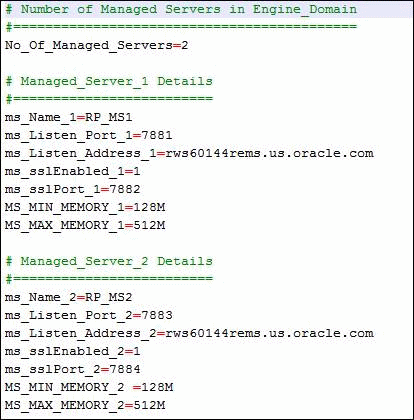
A sample CreateServer.properties file appears below.
-
-
-
Run the CreateServer.sh script.
Check the current working directory using the command pwd.
Go to the directory <WLS_HOME>/user_projects/domains, and run the CreateServer.sh script.
Syntax:
$ ./WLST_scripts/CreateServer.sh <Username> <Password> <ServerName1> <ServerName2>
The Username and Password for the Engine Domain Server are required when running the CreateServer.sh script. Server Names should be same referenced in the CreateServer.properties file.


-
View the log file CreateServer.log to verify the servers were successfully created. To view the log file, go to the next directory WLST_log and open the CreateServer.log file.
-
Verify the newly created Managed Server.
If the log file shows that the Admin Server was shutdown, start the server as per the instructions in Starting the Engine Admin Server.
-
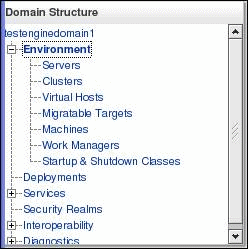
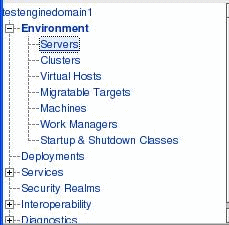
From the WebLogic home page, select Environment from the Domain Structure region.
-
Select Servers.
-
Select a server name (for example, RP_MS1). The machine details appear.

-
From the Domain Structure region, expand the Services tree node and select Data Sources. The Summary of the JDBC Data Sources screen appears.
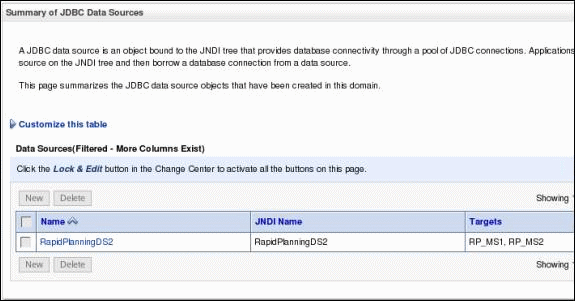
The Target Servers for the JDBC Resource appear in the Targets column.
-
From Domain Structure region, navigate to Services > Messaging> JMS Servers. One JMS Server is created for each Managed Server.

-
In left pane, select JMS Modules. One JMS Module is created. All the Managed Servers will be mapped to a single JMS Module.

A JMS Module contains JMS Queues and Subdeployments.
-
Select the module name (RPModule in this example). One Queue is created for each server.

-
From the Settings region, select the Subdeployments tab.

One Subdeployment is created for each server.

-
Managing the Managed Servers Using Scripts
Refer to the Creating Managed Servers Using Script in order to add Managed Servers to the existing setup.
-
After the necessary Managed Served are added, target all the newly created Managed Servers to the Deployed Application. In order to achieve this, open the WebLogic User Interface for Engine Domain using the procedures in Starting the Engine Admin Server.
-
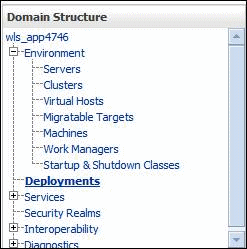
Select Deployments from the Domain Structure region.
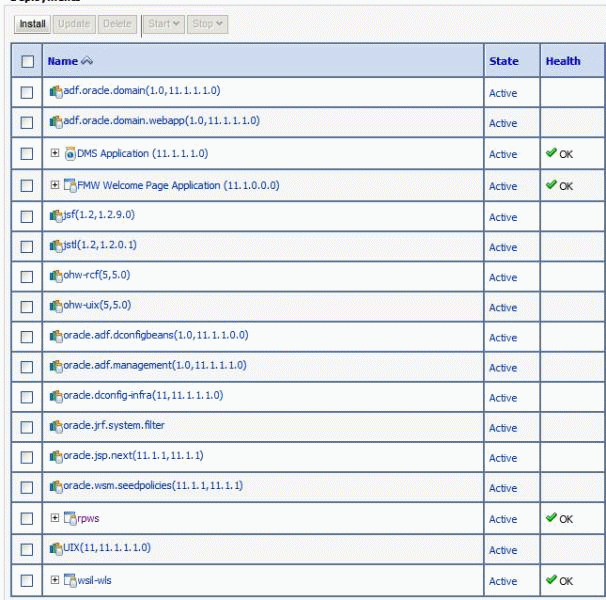
The following page appears.
-
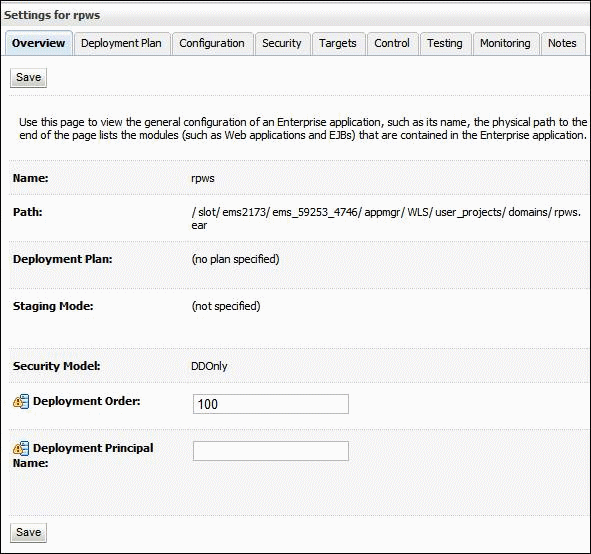
Select the Engine Application (rpws in the example).
-
Select the Targets tab.
-
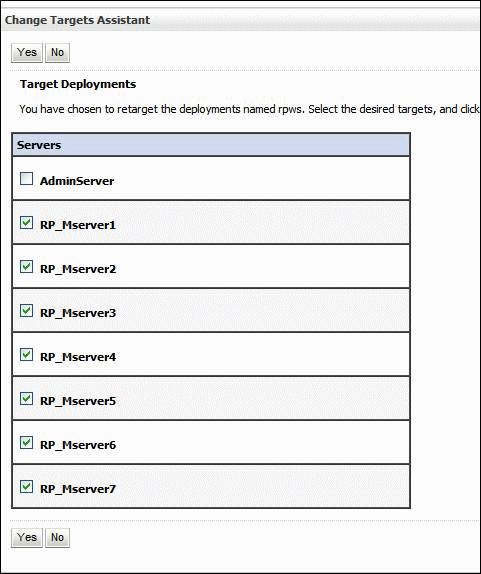
Select the check box with the Type "Enterprise Application", and click Change Targets.

-
Check all the Managed Servers you want to deploy the application, except the AdminServer, and click Yes. Follow the instructions.
Starting Managed Servers
Perform the following procedure to start the Managed Servers using script commands.
-
Check the present working directory through command pwd.
-
Go to the directory <WLS_HOME>/user_projects/domains and run the StartManServer.sh script as shown in the example below.
Syntax:
$ ./WLST_scripts/StartManServer.sh <Username> <Password> <ServerName1> <ServerName2> ….
Username and Password for the Engine Domain Server are required when running the StartManServer.sh script.

-
View the log file StartManServer.log to verify the Managed Servers were successfully started. To view the log file, go to the next directory WLST_log and open the file StartManServer.log file.

-
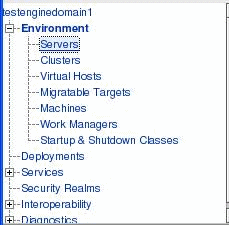
To verify the status of the Managed Servers, select Servers from the Domain Structure region.
-
The table displays the status of all the servers.

Stopping Managed Servers
Perform the following procedure to stop a Managed Server using script commands.
-
Check the present working directory through command pwd.
-
Go to the directory <WLS_HOME>/user_projects/domains and run the StopManServer.sh script as shown in the example below.
Syntax:
$ ./WLST_scripts/StopManServer.sh <Username> <Password> <ServerName>
Username and Password for the Engine Domain Server are required when running the StopManServer.sh script.

-
View the log file StopManServer.log to verify the Managed Servers were successfully stopped. To view the log file, go to the next directory WLST_log, and open the StopManServer.log file.

-
To verify the status of the Managed Servers, select Servers from the Doamin Structure region.
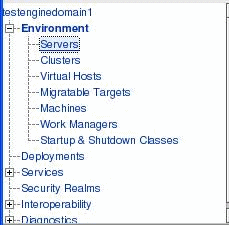
The table displays the status of all the servers.

Deleting Managed Servers
Perform the following procedure to delete a Managed Server using script commands.
-
Check the present working directory through command pwd.
-
Go to the directory <WLS_HOME>/user_projects/domains and run the DeleteServer.sh script as shown in the example below.
Syntax:
$ ./WLST_scripts/DeleteServer.sh <Username> <Password> <ServerName 1> <ServerName 2> …. <ServerName N>

-
To verify the status of the Managed Servers, select Servers in the left pane.
The table displays the status of all the servers. In the Servers section, the Managed Servers you specified should no longer appear in the table.

Creating RP UI Domains Using a Standard Domain Template
The domain template is a supplementary process. Its benefits are that you create the:
-
RP UI domains in a standard process
-
WLS settings related to, for example, JVM, memory parameters, and Java properties, in a standard manner
-
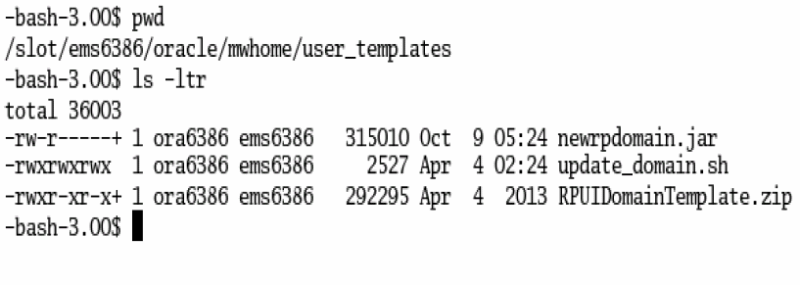
Copy RPUIDomainTemplate.zip to $MW_HOME/user_templates/
For example, cd /.../oracle/mwhome/user_templates/
-
Run command unzip RPUIDomainTemplate.zip. It extracts files newrpdomain.jar and update_domain.sh.
-
Navigate to $MW_HOME/wlserver_[ver]/common/bin.
Example: cd /.../oracle/mwhome/wlserver_10.3/common/bin
-
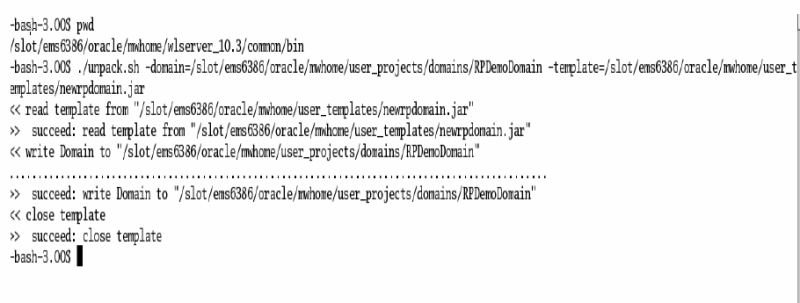
Use the unpack.sh script to create new domain using the template.
../unpack.sh -domain=$MW_HOME/user_projects/domains/(New Domain name) -template=$MW_HOME/user_templates/newrpdomain.jar
Examples: In these examples, RPDemoDomain is the domain name.
./unpack.sh -
domain=/slot/ems6386/oracle/mwhome/user_projects/domains/RPDemoDomain -
template=/slot/ems6386/oracle/mwhome/user_templates/newrpdomain.jar
Modifying domain settings
New domain RPDemoDomain is at $MW_HOME/user_projects/domains/RPDemoDomain.
This process tells how to modify its WLS settings.
-
cd $MW_HOME/user_projects/domains/RPDemoDomain/bin
-
Copy the update_domain.sh script to the bin folder of the new domain.
cp $MW_HOME/user_templates/update_domain.sh . -
-
Run the script to update memory settings and to add extra java_properties
./update_domain.sh -
Run the update_domain.sh script only once.
It modifies memory settings and extra java properties in the setDomainEnv.sh file to suit RP UI requirements. Consider modifying the xms and xmx settings based on your requirements.
$DOMAIN_HOME/bin/setDomainEnv.sh
These listings show the modified settings.
. ${WL_HOME}/common/bin/commEnv.sh

WLS_HOME="${WL_HOME}/server"
export WLS_HOME

if [ "${JAVA_VENDOR}" = "Sun" ] ; then
WLS_MEM_ARGS_64BIT="-Xgc:gencon -XXgcTrigger:30 -Xms1024m -Xmx2048m -Xns:128m -Xss5m "
export WLS_MEM_ARGS_64BIT
WLS_MEM_ARGS_32BIT="-Xgc:gencon -XXgcTrigger:30 -Xms1024m -Xmx2048m -Xns:128m -Xss5m "
export WLS_MEM_ARGS_32BIT
else
WLS_MEM_ARGS_64BIT="-Xgc:gencon -XXgcTrigger:30 -Xms1024m -Xmx2048m -Xns:128m -Xss5m "
export WLS_MEM_ARGS_64BIT
WLS_MEM_ARGS_32BIT="-Xgc:gencon -XXgcTrigger:30 -Xms1024m –Xmx2048m -Xns:128m -Xss5m "
export WLS_MEM_ARGS_32BIT fi
EXTRA_JAVA_PROPERTIES="-Dcommon.components.home=${COMMON_COMPONENTS_HOME} -Djrf.version=11.1.1 -
Dorg.apache.commons.logging.Log=org.apache.commons.logging.impl.Jdk14Logger -Ddomain.home=${DOMAIN_HOME} -
Djrockit.optfile=${COMMON_COMPONENTS_HOME}/modules/oracle.jrf_11.1.1/jrocket_optfile.txt -
Doracle.server.config.dir=${ORACLE_DOMAIN_CONFIG_DIR}/servers/${SERVER_NAME} -
Doracle.domain.config.dir=${ORACLE_DOMAIN_CONFIG_DIR} -
Digf.arisidbeans.carmlloc=${ORACLE_DOMAIN_CONFIG_DIR}/carml -
Digf.arisidstack.home=${ORACLE_DOMAIN_CONFIG_DIR}/arisidprovider -Djava.awt.headless=true -
Doracle.mds.validatelocaluniqueattr=false -Doracle.security.jps.config=${DOMAIN_HOME}/config/fmwconfig/jps-config.xml -
Doracle.deployed.app.dir=${DOMAIN_HOME}/servers/${SERVER_NAME}/tmp/_WL_user -Doracle.deployed.app.ext=/- -
Dweblogic.alternateTypesDirectory=${ALT_TYPES_DIR} -Djava.protocol.handler.pkgs=${PROTOCOL_HANDLERS}
${WLS_JDBC_REMOTE_ENABLED} ${EXTRA_JAVA_PROPERTIES}"
export EXTRA_JAVA_PROPERTIES
Adding data source and MDS
-
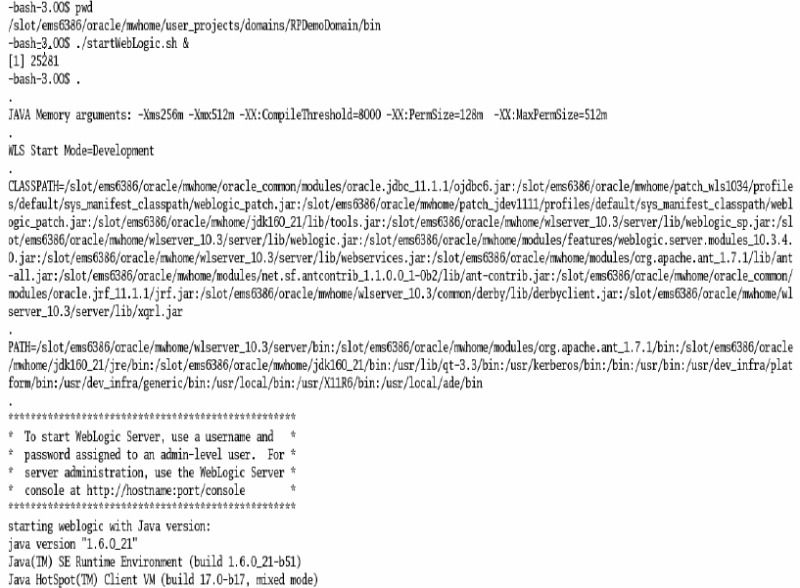
Navigate to $DOMAIN_HOME/bin and start the server using script ./startWebLogic.sh.
-
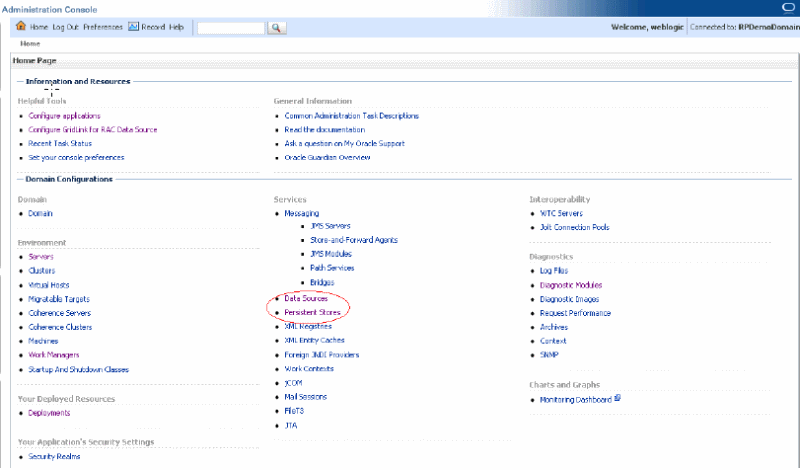
After it starts, login to the WLS Administration console.
Modifying data source
-
From the home page, navigate to services and select Data sources.
The default template comes with multiple data sources configured. Datasource ma9dv213 is targeted to the AdminServer and the Rapid Planning UI needs the JNDI name used in this data source. See Configuring the JDBC Data Source for the User Interface Domain. You can modify the same data source to use the correct data base credentials. The data sources are a reference and you can delete them.
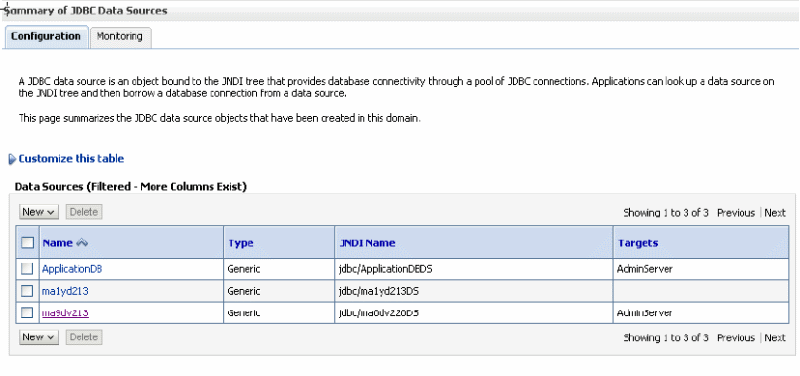
-
To reuse the default data source, modify the DB settings, for example, hostname, port no, SID, user name, and password, and click Save.
Test the datasource.
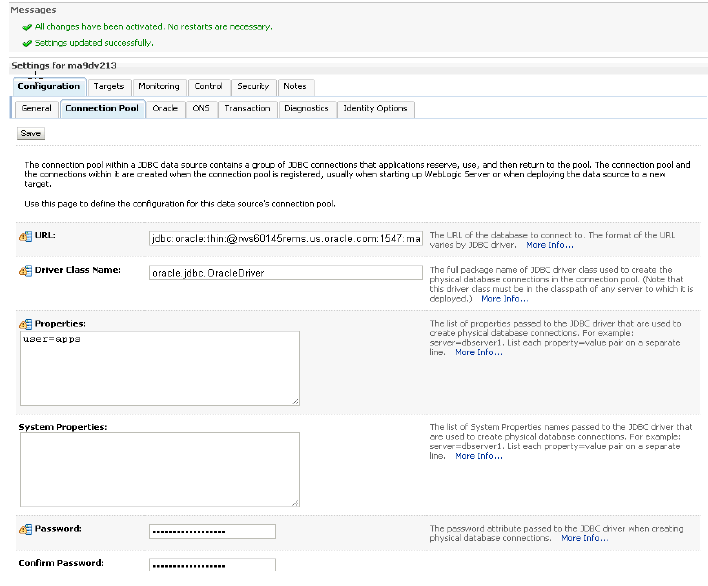
Creating a data source for the UI
-
Click new and select Generic Data Source.
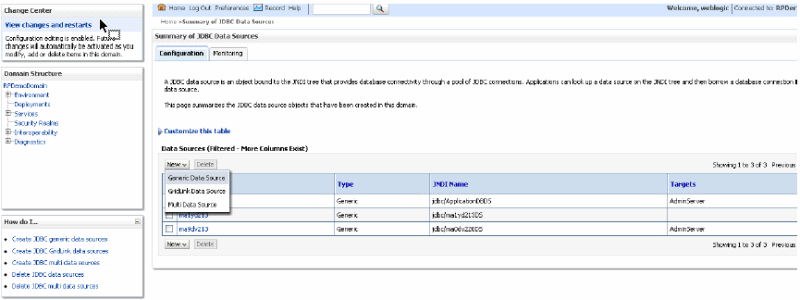
-
Enter Data Source Name and JNDI Namejdbc/ma0dv220DS. Select database type Oracle.
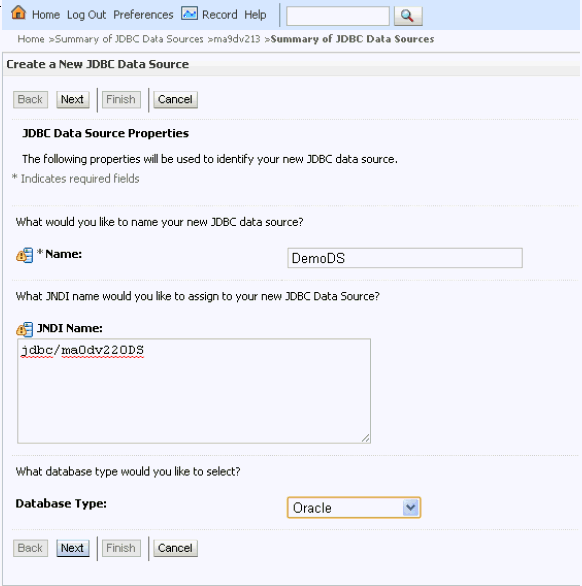
-
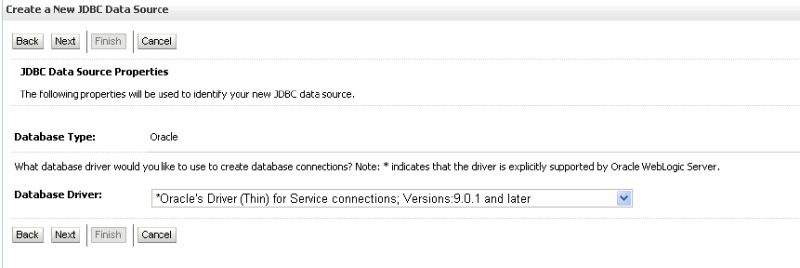
Select the Database Driver. See Configuring the JDBC Data Source for the Engine Domain.
-
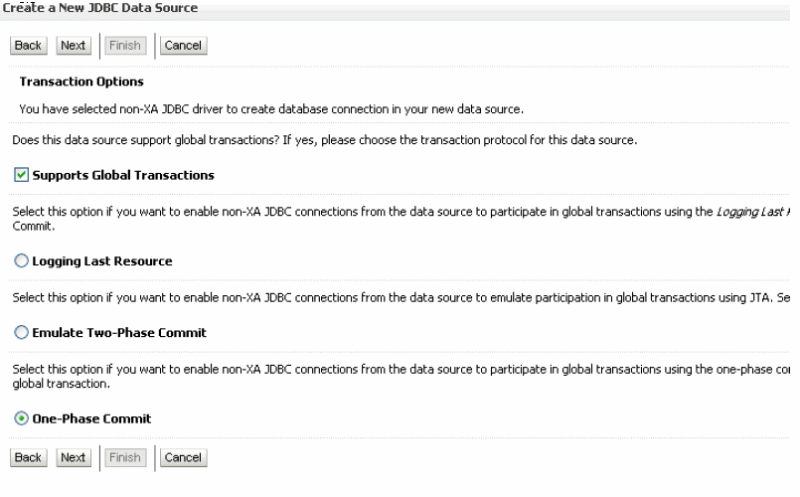
Select transaction options Supports Global Transactions and One-Phase Commit.
-
Create a JDBC data source. Enter the database connection details, for example, DB name, host name, port no, username, and password. Click Next and test the connection.

-
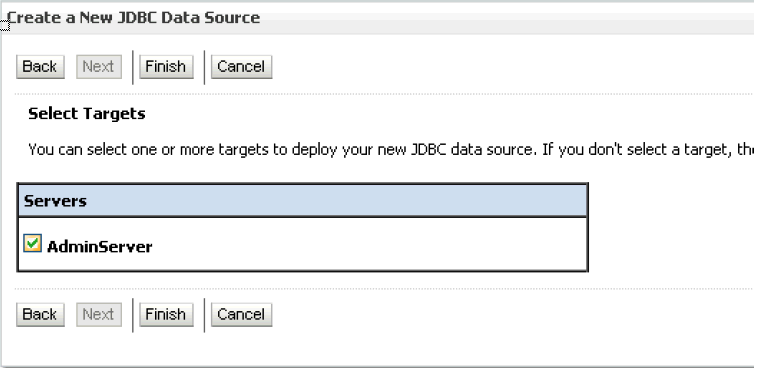
In the next page, select target AdminServer and click Finish.
-
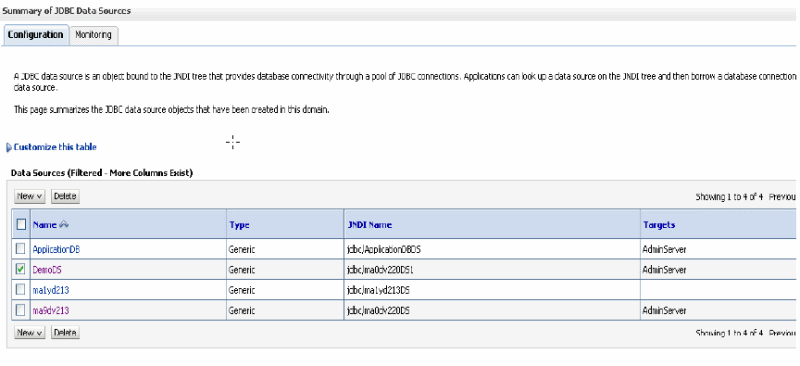
See the new data source in the summary.
Modifying MDS
-
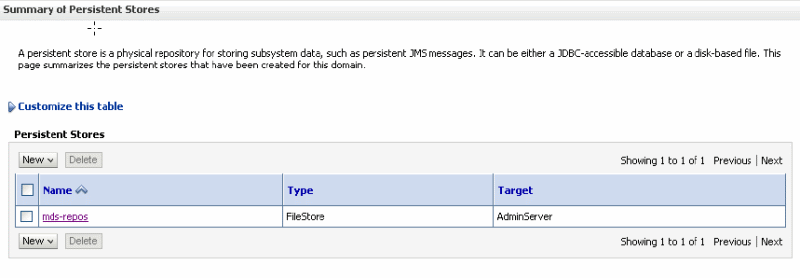
In the WLS console home page, navigate to services and select Persistent Stores. Click on mds-repos.
-
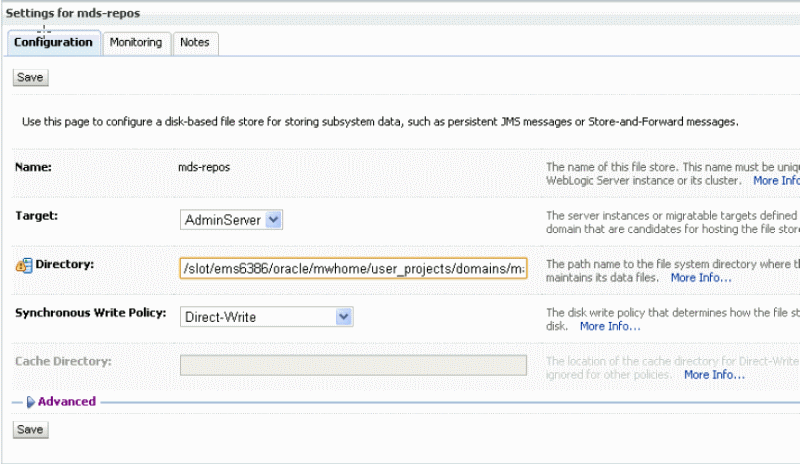
Change the directory.
$MW_HOME/user_projects/domains/<new domain created>/servers/AdminServer/mds
Example: /slot/ems6386/oracle/mwhome/user_projects/domains/RPDemoDomain/servers/AdminServer/mds
Click Save.
Creating MDS
-
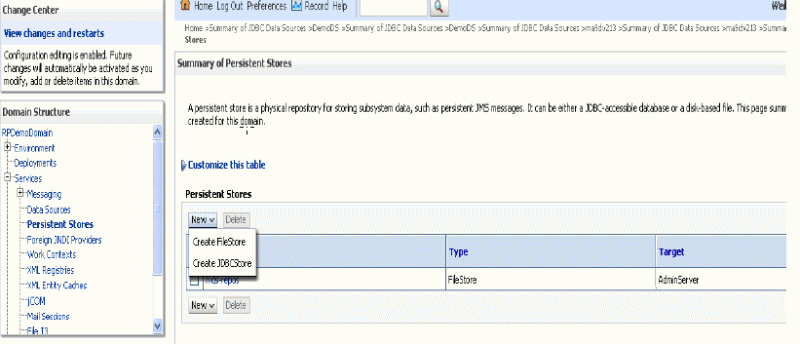
In the WLS console home page, navigate to services, select Persistent Stores, and navigate New > Create Filestore.
-
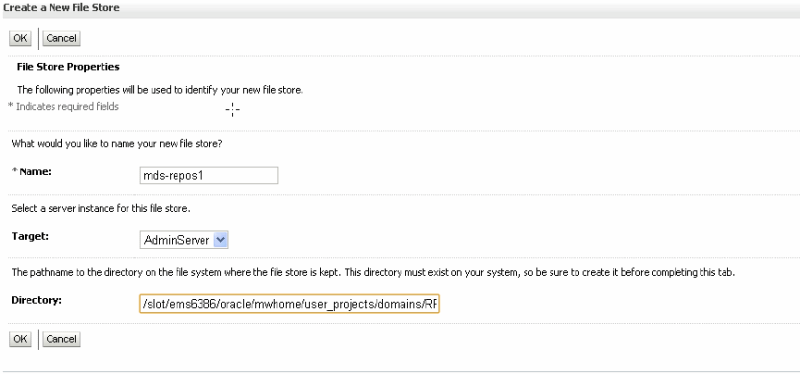
Enter Name, choose target AdminServer and set the directory.
$MW_HOME/user_projects/domains/<new domain create>d/servers/AdminServer/mds
Example: /slot/ems6386/oracle/mwhome/user_projects/domains/RPDemoDomain/servers/AdminServer/mds
-
T he summary page with mds-repos displays.

Backing Up Files
The following directories are candidates for your ad-hoc backup, scheduled backup, or backup processes and scripts:
-
user_projects/domains/WLST_scripts
-
user_projects/domains/WLST_scripts/WLST_Config.properties
It is recommended that this file be backed up periodically for maintaining Managed Server information.
-
user_projects/domains/WLST_log
Troubleshooting
What to do if Admin Server runs out of memory?
If the Admin Server runs out of memory, you need to modify the stack size. Follow the steps mentioned below. The following example modifies the JROCKIT memory size from 256K to 1024K:
Inside engine domain <engine_domain_name>/bin/setDomainEnv.sh
In the file setDomainEnv.sh, locate the memory configuration, as shown in the example below. Overwrite this with the New Memory Configuration (which appears below the Original Memory Configuration).
Original Memory Configuration
XMS_SUN_64BIT="256"
export XMS_SUN_64BIT
XMS_SUN_32BIT="256"
export XMS_SUN_32BIT
XMX_SUN_64BIT="768"
export XMX_SUN_64BIT
XMX_SUN_32BIT="768"
export XMX_SUN_32BIT
XMS_JROCKIT_64BIT="256"
export XMS_JROCKIT_64BIT
XMS_JROCKIT_32BIT="256"
export XMS_JROCKIT_32BIT
XMX_JROCKIT_64BIT="768"
export XMX_JROCKIT_64BIT
XMX_JROCKIT_32BIT="768"
export XMX_JROCKIT_32BIT
<line break>
if [ "${JAVA_VENDOR}" = "Sun" ] ; then
WLS_MEM_ARGS_64BIT="-Xms256m -Xmx768m"
export WLS_MEM_ARGS_64BIT
WLS_MEM_ARGS_32BIT="-Xms256m -Xmx768m"
export WLS_MEM_ARGS_32BIT
else
WLS_MEM_ARGS_64BIT="-Xms512m -Xmx768m"
export WLS_MEM_ARGS_64BIT
WLS_MEM_ARGS_32BIT="-Xms512m -Xmx768m"
export WLS_MEM_ARGS_32BIT fi
<line break>
if [ "${JAVA_VENDOR}" = "Oracle" ] ; then
CUSTOM_MEM_ARGS_64BIT="-Xms${XMS_JROCKIT_64BIT}m -
Xmx${XMX_JROCKIT_64BIT}m"
export CUSTOM_MEM_ARGS_64BIT         CUSTOM_MEM_ARGS_32BIT="-Xms${XMS_JROCKIT_32BIT}m -
Xmx${XMX_JROCKIT_32BIT}m"
export CUSTOM_MEM_ARGS_32BIT else         CUSTOM_MEM_ARGS_64BIT="-Xms${XMS_SUN_64BIT}m -Xmx${XMX_SUN_64BIT}m"
export CUSTOM_MEM_ARGS_64BIT         CUSTOM_MEM_ARGS_32BIT="-Xms${XMS_SUN_32BIT}m -
Xmx${XMX_SUN_32BIT}m"
export CUSTOM_MEM_ARGS_32BIT
fi
New Memory Configuration (Overwrite the old configuration with the following.)
XMS_SUN_64BIT="256"
export XMS_SUN_64BIT
XMS_SUN_32BIT="256"
export XMS_SUN_32BIT
XMX_SUN_64BIT="768"
export XMX_SUN_64BIT
XMX_SUN_32BIT="768"
export XMX_SUN_32BIT
XSS_SUN_64BIT="1024"
export XSS_SUN_64BIT
XSS_SUN_32BIT="1024"
export XSS_SUN_32BIT
XSS_JROCKIT_64BIT="1024"export XSS_JROCKIT_64BIT
XSS_JROCKIT_32BIT="1024"
export XSS_JROCKIT_32BIT
XMS_JROCKIT_64BIT="256"
export XMS_JROCKIT_64BIT
XMS_JROCKIT_32BIT="256"
export XMS_JROCKIT_32BIT
XMX_JROCKIT_64BIT="768"
export XMX_JROCKIT_64BIT
XMX_JROCKIT_32BIT="768"
export XMX_JROCKIT_32BIT
<line break>
if [ "${JAVA_VENDOR}" = "Oracle" ] ; then
CUSTOM_MEM_ARGS_64BIT="-Xms${XMS_JROCKIT_64BIT}m -
Xmx${XMX_JROCKIT_64BIT}m -Xss${XSS_JROCKIT_64BIT}k"
export CUSTOM_MEM_ARGS_64BIT
CUSTOM_MEM_ARGS_32BIT="-Xms${XMS_JROCKIT_32BIT}m -
Xmx${XMX_JROCKIT_32BIT}m -Xss${XSS_JROCKIT_32BIT}k"
export CUSTOM_MEM_ARGS_32BIT
else
CUSTOM_MEM_ARGS_64BIT="-Xms${XMS_SUN_64BIT}m -
Xmx${XMX_SUN_64BIT}m -Xss${XSS_SUN_64BIT}k"
export CUSTOM_MEM_ARGS_64BIT         CUSTOM_MEM_ARGS_32BIT="-Xms${XMS_SUN_32BIT}m -
Xmx${XMX_SUN_32BIT}m -Xss${XSS_SUN_32BIT}k"
export CUSTOM_MEM_ARGS_32BIT
fi
When configuring the machine from the Rapid Planning Admin User Interface, the machine is not created in the Engine AdminServer. How can I resolve this issue?
This might occur due to multiple reasons. Please write down the remedial steps.
Reason 1
Engine Server is not running.
Action required: Start the Engine server.
Reason 2
MSC: Rapid Planning Scripts Home profile value is not set correctly.
Action required:
-
Ensure that you have provided the correct path precisely as mentioned in the pre-configuration section.
-
Ensure the path is accessible and has full permissions for the UNIX user who started the UI Domain Admin Server.
Reason 3
Machine could not be configured due to port conflict.
Action required: Ensure the port numbers specified are available.
I am unable to open the Rapid Planning Administration User Interface or the Rapid Planning Simulation Planner User Interface.
Log in to EBS home page.
-
For Rapid Planning Administration User Interface, select Advanced Planning Administrator responsibility Rapid Planning (Setup and Configuration)
-
For Rapid Planning Simulation Planner User Interface, select Supply Chain Simulation Planner responsibility Supply Chain Simulation Planner (Plans, Inputs and Simulations)
-
If the responsibility is not available in your home page, contact your System Administrator to add this responsibility to your EBS user.
-
In case of any error message regarding User credentials/security, ensure that this step is executed properly.
While performing the configuration steps, “Lock & Edit” mode is not available. Why?
The domain has been created in the Development mode. Production mode is recommended.
When starting the WebLogic Server, the server does not prompt for credentials. Why?
Check if your server is in Development mode or Production mode. Production mode is recommended.
Refer to the instructions in Creating the User Interface Domain and Creating the Engine Domain.
Unable to view Analytics/KPI graphs in the Simulation Planner User Interface. What could be the reason?
The application requires browser plug-ins to enable the KPI views/graphs. If this situation is encountered even after verifying the browser plug-ins are available, you might have missed this setup step in Creating the Engine Domain.
Create output/ and log/ directories as follows:
$ mkdir -m 777 output/
$ mkdir -m 777 log/
Unable to run a plan in the Simulation Planner User Interface. Plan run fails.
Verify in Creating the Engine Domain that this setup step was executed.
Create output/ and log/ directories as follows:
$ mkdir -m 777 output/
$ mkdir -m 777 log/
After deploying the Rapid Planning Admin User Interface (UI) application, the UI does not appear in the browser. Instead an error message "Error 500 - Internal Server Error" appears.
Verify the classpath settings. Make sure that the CLASSPATH, JAVA_HOME have been unset before you start WebLogic Server.
You can try the following to clear its settings: export CLASSPATH= ”
Unset the above mentioned variables and try restarting the server.
SQL failure/error occurs when you set up a database link from a 11g to 10g database.
This is due to a bug in the DMS JDBC driver (ojdbc6dms.jar) regarding connecting from a 11g database to a 10g database.
Find the following in file setDomainEnv.cmd on Windows or in file filesetDomainEnv.sh on UNIX:
if NOT "%PRE_CLASSPATH%"=="" (
set PRE_CLASSPATH=%
COMMON_COMPONENTS_HOME %\modules
#oracle.jdbc_11.1.1
\ojdbc6dms.jar;%PRE_CLASSPATH%
) else (
set PRE_CLASSPATH=%
COMMON_COMPONENTS_HOME %\modules
\oracle.jdbc_11.1.1\ojdbc6dms.jar  )
Replace it with the following:
if NOT "%PRE_CLASSPATH%"=="" (
set PRE_CLASSPATH=%WL_HOME%\lib
\ojdbc6.jar;%PRE_CLASSPATH%
) else (
set PRE_CLASSPATH=%WL_HOME%\lib\ojdbc6.jar
Saved queries do not retain the query condition.
In Rapid Planning User Interface Domain, folder bin, find file startWebLogic.sh.
Below line SAVE_JAVA_OPTIONS="" line, add the following line:
JAVA_OPTIONS="${JAVA_OPTIONS} -Doracle.mds.validatelocaluniqueattr=false
Example:
SAVE_JAVA_OPTIONS="${JAVA_OPTIONS}"
SAVE_CLASSPATH="${CLASSPATH}"
# Start Derby
DERBY_DEBUG_LEVEL="0"
if [ "${DERBY_FLAG}" = "true" ] ; then ${WL_HOME}/common/derby/bin/startNetworkServer.sh >"${DOMAIN_HOME}/derby.log" 2>&1
fi
JAVA_OPTIONS="${SAVE_JAVA_OPTIONS}"
SAVE_JAVA_OPTIONS=""
JAVA_OPTIONS="${JAVA_OPTIONS} -Doracle.mds.validatelocaluniqueattr=false"
Rapid Planning authentication leads to redirect loop
Use the same protocol to access URLs for the Oracle E-Business Suite and the Oracle Rapid Planning User Interface application. If Oracle E-Business Suite is:
-
SSL enabled: Use https:// for both access URLs
-
Not SSL enabled: Use http:// for both access URLs
Use the appropriate port number.
msc_web_services
The number of records shows the managed servers in the WebLogic Server.
The column plan_id shows which plan is loaded on which server.
The URL gives the port number of the managed server.
This is an example of SQL to produce this information.
select ws.web_service_id , ws.plan_id , pl.compile_designator ,
ws.url , pl.status plan_status ,  pl.base_plan_id , pl.ascp_plan_id
from msc_web_services ws , msc_plans pl
where ws.plan_id = pl.plan_id;
Engine Log Files
They are located at $DOMAIN_HOME\log
The file name is rpengine<port num>.log
Port_num is the managed server where the plan is loaded. It is in table msc_web_services.
Check the log files for errors and exceptions.
Plan Status
Column status in table msc_plans shows if the plan completed. Valid values are:
-
- 1: In progress
-
- 0: Completed OK
-
- Others: Completed with error
Use this SQL to check plan status.
select ws.web_service_id , ws.plan_id , pl.compile_designator ,
ws.url , pl.status plan_status ,  pl.base_plan_id , pl.ascp_plan_id
from msc_web_services ws , msc_plans pl
where ws.plan_id = pl.plan_id;
Missing Java Class Files
Problem: Plan launches but the simulation planner request fails.
Diagnose: Simulation planner concurrent log file shows the error ClassNotFoundException ORPEngine.
Solution: Copy ORP class files to $JAVA_TOP.
SIF Invocation (Release 12.1.3)
Problem: Plan launches but it does not complete
Diagnose:
-
- Check simulation planner concurrent log and find no error message
-
- Check the managed server log file and find no plan updates
Solution:
-
Service invocation framework patch is missing
-
Apply patch 10632813:R12.OWF.B
Datasource Time Out
Problem: Plan launches but it does not complete
Diagnose:
-
Check msc_web_services and find that plan_id is not updated
-
Datasource might not be connected to managed server
-
Check WebLogic Server console
-
Datasource monitoring tab shows all target managed servers
Solution:
-
WebLogic Server Console > Data source > Connection Pool
-
Increase the connection reserve timeout
Memory configuration
XMX: Defines max heap size, for example, 512M – 1G
XSS: Defines max stack size, for example, 256K – 2M
Check JVM parameter changes from the back end.
This command shows JVM arguments for managed server 1.
ps –aefl | grep RP_MS1
Use command top to check free memory
Make sure there are a few GB of free RAM for Java native threads.
StackOverflow Exception
Problem: The engine log file shows exception stackoverflow.
Solution: Increase the XSS parameter for the managed server.
Best Practices
If you have any of these, Oracle recommends that you do performance tuning:
-
Big plans
-
Many concurrent users
-
Multiple plans
Set Engine Server Memory Settings
Change directory to, for example, /u01/oracle/Middleware/user_projects/domains/rp_engine_domain/bin.
Open file setDomainEnv.sh.
Modify WLS_MEM_ARGS_64BIT : For example, WLS_MEM_ARGS_64BIT=" -Xgc:gencon -XXgcTrigger:25 -Xms1024m -Xmx12288m -Xns:512m -Xss50m".
Bounce the engine domain and the managed servers.
To confirm the settings, run command – $ps -aefl | grep RPIMS1.
Expect output like this: - -Xms512m -Xmx1024m -Xss30m -Dweblogic.Name=RPIMS1.
Set UI Server Memory Settings
Change directory to, for example, /u01/oracle/Middleware/user_projects/domains/rp_ui_domain/bin.
Open file setDomainEnv sh.
Add or change these parameters:
XMS_JROCKIT_64BIT=“30720"
export XMS_JROCKIT_64BIT

XMS_JROCKIT_32BIT="256"
export XMS_JROCKIT_32BIT

XMX_JROCKIT_64BIT=“30720”
export XMX_JROCKIT_64BIT

XMX_JROCKIT_32BIT="512"
export XMX_JROCKIT_32BIT

XSS_JROCKIT_32BIT="5"
export XSS_JROCKIT_32BIT

XSS_JROCKIT_64BIT="5"
export XSS_JROCKIT_64BIT

XNS_JROCKIT_32BIT="1024"
export XNS_JROCKIT_32BIT

XNS_JROCKIT_64BIT="1024"
export XNS_JROCKIT_64BIT
Modify CUSTOM_MEM_ARGS_64BIT, for example, CUSTOM_MEM_ARGS_64BIT="-Xgc:gencon -XXgcTrigger:30 -Xms${XMS_JROCKIT_64BIT}m -Xmx${XMX_JROCKIT_64BIT}m -Xns:${XNS_JROCKIT_64BIT}m -Xss${XSS_JROCKIT_64BIT}m“.
Change Connection Pool Settings for the Engine
Login to the engine console.
Navigate Services > Data Sources > Data Source Name > Connection Pool.
Change these parameters to these baseline values; you may need different values:
-
Maximum Capacity: 300. Make enough connections available in the domain.
-
Capacity Increment: 5. Make a fast increment of connections.
-
Statement Cache Size: 15. Increase the server performance.
Review and change any advanced parameters that you want.
Change Connection Pool Settings for the UI
Login to the UI Weblogic Console
Navigate Services > Data Sources > Data Source Name > Connection Pool
Change these parameters to these baseline values; you may need different values:
-
Maximum Capacity: 300. Make enough connections available in the domain.
-
Capacity Increment: 10. Makes a fast increment of connections.
-
Statement Cache Size: 20. Increases the server performance.
Review and change any advanced parameters that you want.
Tune the Database
Analyze the database after one or two weeks of load and tune it accordingly.
Try these adjustments:
-
Increase buffer space.
-
Increase the re-do logs size.
-
Move re-do logs to a different file system.
Adjust the default e-Business Suite settings until you have no contentions on the database side.
Use the AWR reports and the IO statistics. There is some performance penalty to generate these reports.
Review parameter MSC_SHARE_PARTITIONS. Oracle recommends that you partition the Rapid Planning plan data for best performance.
Recommendations
Have the users working on good internet coverage. A slow network or pauses in the network connection gives an impression of slow UI performance.
Define multiple UI domains to make the system more scalable.
Review the system configuration regularly and tune it..
Bounce the UI servers daily and bounce the engine servers weekly.
Use a 64-bit platform for more stability with higher data volumes.
Have enough RAM on your platform for both the UI and engine domains to run efficiently.
Give your linux machine enough parallel CPUs so that the multithreaded architecture works efficiently. Oracle recommends two CPUs for each managed server.
The processes running on the Rapid Planning machine should not have any limitation on usage of available memory, regardless of how many CPUs you use.