Preventive Maintenance
This chapter covers the following topics:
- Introduction
- Preventive Maintenance Overview
- Meters
- Entering Meter Readings
- Preventive Maintenance Scheduling
- Generating Work Orders
- Viewing the Preventive Maintenance Work Order Report
Introduction
This chapter discusses how work orders are created automatically using preventive maintenance schedules. The following topics are necessary when setting up preventive maintenance:
Preventive Maintenance Overview
eAM generates work orders automatically based on meter readings, runtime and/or calendar days. An example of meter-based preventive maintenance is your car's oil changes. Most car manufacturers recommend that you change your engine oil every 3,000 miles or six months, whichever comes first.
To set up this scenario:
-
Define your car's odometer as a meter.
-
Associate that meter to an asset (your car), using the Asset Meter Association window.
-
Associate the Maintenance Activity (oil change) that should occur, based on the meters you defined.
This is performed using Preventive Maintenance Scheduling.
Preventive Maintenance includes the following topics:
-
Meters, Oracle Enterprise Asset Management Implementation Guide
-
Project and Task Setup, Oracle Enterprise Asset Management Implementation Guide
-
Defining Meter Templates, Oracle Enterprise Asset Management Implementation Guide
-
Defining Meters, Oracle Enterprise Asset Management Implementation Guide
-
Associating Meter Templates with Asset Groups, Oracle Enterprise Asset Management Implementation Guide
-
Associating Meters with Asset Numbers, Oracle Enterprise Asset Management Implementation Guide
-
Defining Set Names, Oracle Enterprise Asset Management Implementation Guide
-
Defining a Preventive Maintenance Template, Oracle Enterprise Asset Management Implementation Guide
Meters
Meters are defined and associated with asset numbers to measure an asset or rebuildable item's usage, examples include odometers or counters. Meters are used in Preventive Maintenance Scheduling to schedule and generate PM work orders.
Meter related tasks include the following topics:
Entering Meter Readings
After a work order is completed, meter readings are required for all meters, associated with the work order's current asset number, that appear in the Runtime Interval rules in the Preventive Maintenance Scheduling Definition window (See: Entering Preventive Maintenance Schedule Definitions and Work Order Completion). You can enter standalone meter readings at any time.
Note: To enable the Preventive Maintenance Scheduler process, an initial meter reading needs to have already been entered. This might have been performed by entering an initial reading during the Meter's definition.
The Meter Reading window invokes with a Disable button based on the Disable Meter Reading function security setting. If you do not have access to the function security, eAM Disable Meter Reading, then the Disable button does not display and you cannot disable a meter reading.
To enter mass meter readings
-
Navigate to the Mass Meter Readings page (Maintenance Super User > Assets > Mass Meter Readings).
Mass Meter Readings
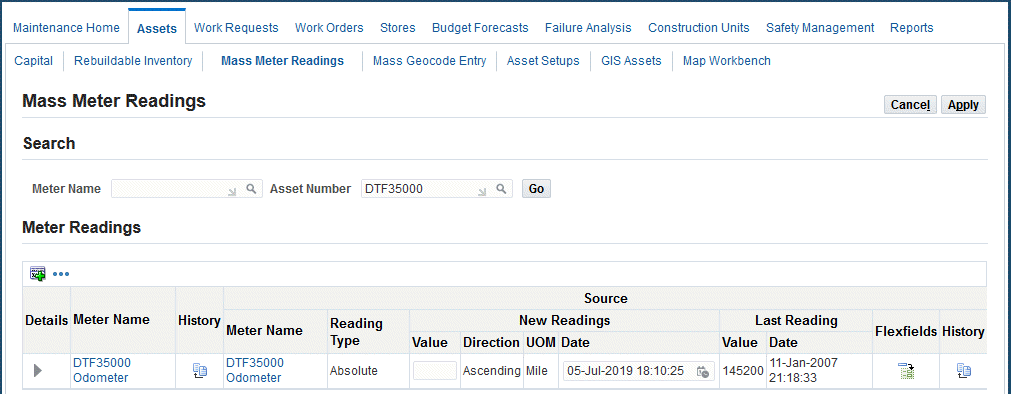
-
Optionally enter a meter name, and then click the Go button.
-
Optionally enter an asset number and then click the Go button.
All meters that are associated with this asset appear (See: Associating Meters with Asset Numbers).
-
Enter a Value or Change Reading value for new meter readings, depending on the meter type.
Note: If the meter is a Change type, the Value field indicates the difference between the last reading and the current reading. The Change value is used to calculate the Life To Date Reading, within the Latest tabbed region.
-
Optionally change the Date, if required.
-
Optionally enter any necessary Comments.
-
Optionally enter Reset information.
-
If you enter a Reset Reading value, you are resetting the source meter to this value.
For example, if a motor must be replaced, you can reset the meter reading value of the pump, associated with the motor.
Companies can associate a Source Meter to an asset number and meter association. The Source Meter reading subsequently feeds corresponding meters that are associated with assets within the Meter Hierarchy (See: Defining Meters for more information on meter hierarchies).
-
Optionally select the Include Target Reset check box to reset the current asset's target meter to the source meter's Reset Reading.
-
Optionally enter a Reset Comment.
Note: You cannot reset past meter readings if a meter reading is entered after the reading date.
-
-
Choose Apply to save your work.
-
Optionally select the History icon to view all meter readings for the selected meter and current asset number.
This helps you to make logical decisions when entering and updating meter readings. For example, you can view the last meter reading, enabling you to make a logical choice when entering the next meter reading.
-
The Life To Date field displays the accumulated meter readings, which is usually the same as the current meter reading.
The current meter reading and Life To Date values are different if you have previously entered a Reset Reading. For example, before the reset, both the current meter reading and the Life To Date value were 17,000. You then reset the meter to 3,000. The Life To Date value continues to increase from 17,000, while the current meter reading increases from 3,000. The system uses the Life To Date meter reading to calculate the Usage Rate and includes the initial reading.
-
Optionally select the Disable icon to disable a past meter reading for the current Reading.
If meter readings are entered before resetting the meter, you cannot disable those meter readings. The most current reading before the meter is reset cannot be disabled, unless the meter reset reading entry is disabled.
Note: Preventive Maintenance Scheduling does not use any disabled information. After a meter reading is disabled, you cannot re-enable it
-
Preventive Maintenance Scheduling
eAM enables you to generate work orders automatically using a preventive maintenance schedule, based on Runtime Rules, Day Interval Rules, List Dates and Calendar dates. For example, a forklift might need servicing after 100 motor running hours, or 90 days, whichever comes first. Meters are used to keep track of asset usage.
Preventive Maintenance Scheduling tasks include the following topics:
Generating Work Orders
After you have established PM scheduling definitions, you can generate work orders. There are two ways to generate work orders. You can execute the Generate Preventive Maintenance Work Orders process, or you can implement forecasted work orders from the Maintenance Workbench.
When executing the Generate Preventive Maintenance Work Orders process, the program creates suggested work orders, based on the date or meter rules that are associated with the scheduling definitions that you defined. See: Entering Preventive Maintenance Schedule Definitions. You should schedule this process to periodically execute, automatically. You can execute this program manually at any time, by accessing the menu option.
If you selected the PM Work Order Prefix option on the Enterprise Asset Management EAM Parameters page, the system will generate PM work orders beginning the specific work order prefix. When the Work Order Business Object API is called, the system will incorporate the prefix into the work order name. This enables the system to differentiate PM work orders from manual work orders.
Use the Maintenance Workbench if you want to review and create PM work orders. You can launch the Preventive Maintenance Scheduler to implement forecasted work orders. See: Using the Maintenance Workbench.
The following are instructions to invoke the process from the Reports menu under the Enterprise Asset management responsibility.
You can also run the Generate Preventive Maintenance Work Orders - Self Service program from the Reports tab in the Maintenance Super User responsibility.
Note: The self service program does not include the Asset Category ID report parameter.
To generate work orders
-
Navigate to the Generate Preventive Work Orders page.
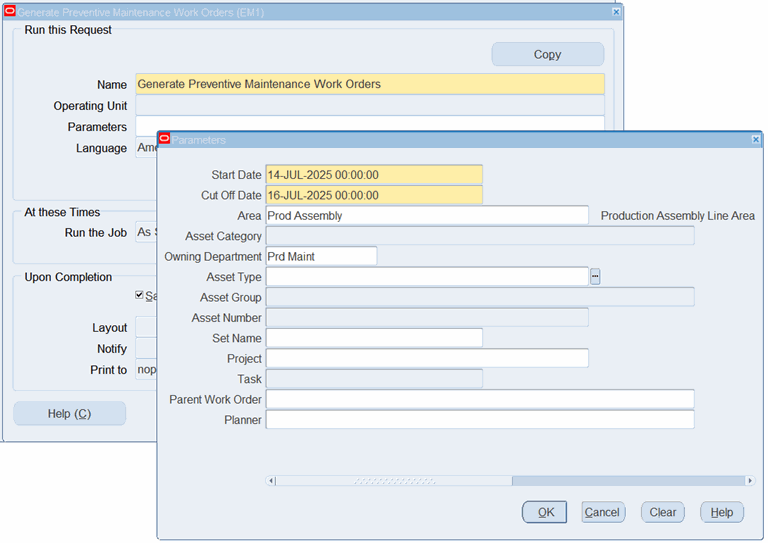
-
In the Parameters page, select a Start Date and time.
-
Select a Cut Off Date and time.
-
To further narrow down the data selection, you can optionally enter any of the following parameters:
-
Area - location where your assets reside.
-
Asset Category - the Class and Subclass code, such as CRANE.OVERHEAD or BUILDING.FLOOR
-
Owning Department
-
Asset Type - Capital and Rebuildable Inventory
-
Asset Group - if you previously selected an Asset Type
-
Asset Number - if you previously selected an Asset Type
-
Set Name - PM set used to implement work orders that are forecasted against default Preventive Maintenance Schedules in this set. If a Set Name is specified, you will only select PM schedules for PM Set for work order generation.
-
Project
-
Task - if you previously selected a project
-
Parent Work Order
-
Planner - select if you want to generate PM work orders for specific planners
-
-
Click the OK button, and the system displays the Generate Preventive Maintenance Work Orders page.
-
Click the Submit button.
Related Topics
Submitting a Request, Oracle Applications User's Guide
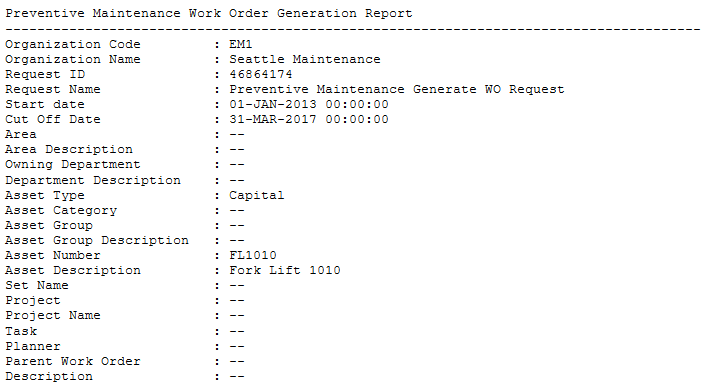
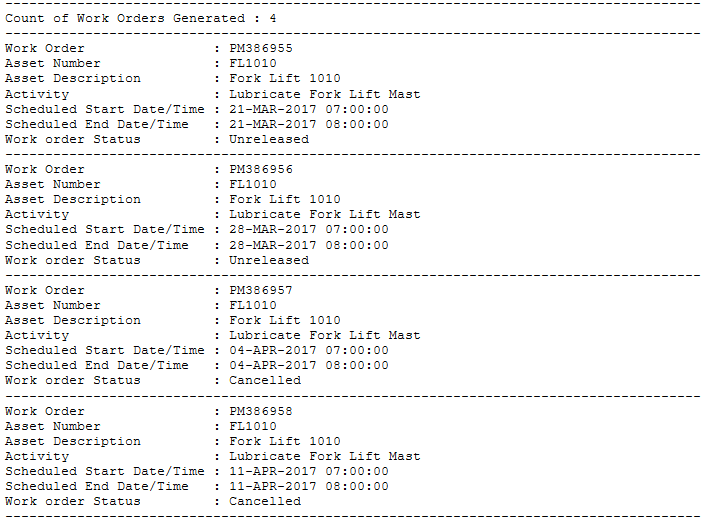
Viewing the Preventive Maintenance Work Order Report
You can generate the Preventive Maintenance Work Order Report that lists the details of work orders generated from the Preventive Maintenance Work Order Generation concurrent program. Use the Generate Preventive Maintenance Work Orders - Self Service program from the Reports tab in the Maintenance Super User responsibility, or the Reports menu under the Enterprise Asset Management responsibility to generate the report.
See Preventive Maintenance Work Order Report for more information.
To view the Preventive Maintenance Work Order Report
-
Run the Generate Preventive Maintenance Work Orders - Self Service concurrent program.
In addition, you can generate the PM work order report as follows:
-
Navigate to the Enterprise Asset Management responsibility.
-
Click Preventive Maintenance, Generate Work Orders.
-
Enter the report parameters, and submit the report.
-
-
Navigate to the View Requests page.
-
Click the View Output button for the report.
The report appears.
-
View the details for the selected PM work orders.
Related Topics