Self Service Work Requests
This chapter covers the following topics:
- Overview of Work Requests
- Work Request Statuses
- Obtaining Work Request Information
- Creating and Updating Work Requests
Overview of Work Requests
A work request serves a different function than a work order: it is a request for maintenance on an asset (Capital or Rebuildable Inventory). Oracle eAM enables operations and maintenance staff to report any problems with an asset. A supervisor can approve, request additional information, or reject a work request.
Use the Work Requests tab to search for existing work requests and to create new work requests for an asset.
If your organization uses work request prefixing, the system automatically derives the work request number when you create a work request.
Based on the existing Request by Dates Setup for a combination of priority and type, the default values for the Request by Start date from system date (Hrs), the Request by Completion date tolerance (Hrs), and the Request by start and completion dates of work request will appear.
This information may enable you to prioritize work requests and improve productivity.
Example
-
Access the Create Work Request page.
-
Default values for Request by start date: 14-Oct-2018 04:52:40
-
Default values for Request by completion date: 15-Oct-2018 04:52:40
Request by dates setup values are as follows:
| Priority | Type | Request by start date from system date (Hrs) | Request by completion date tolerance (Hrs) |
|---|---|---|---|
| Emergency | -- | 2 | 3 |
-
Select Priority: Emergency (Request by start and completion dates are recalculated based on existing setup)
-
Default values for Request by start date: 14-Oct-2018 05:52:40 [System Date, time + Request by start date from system date (Hrs)]
-
Default values for Request by completion date: 14-Oct-2018 08:52:40 [Calculated Request by start date + Request by completion date tolerance (Hrs)]
Note: Request by start and completion date are calculated for a priority and type combination. Priority is a mandatory field for setup; Type is an optional field.
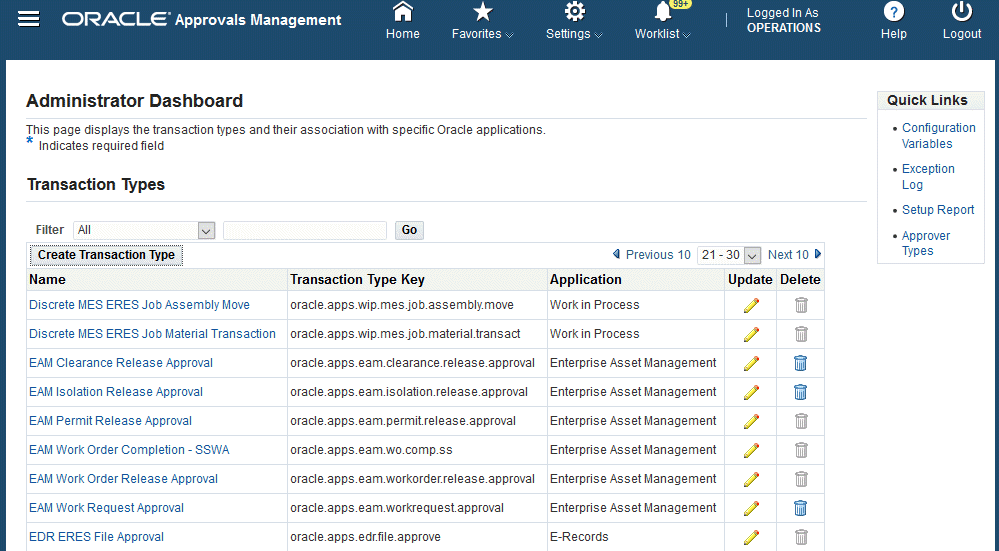
A work request may require approval before it is generated into a work order. Work requests can be approved using the AME approval process. The setup for the Transaction type, EAM Work Request Approval, can be set in Approvals Management. Work requests can be approved based on work request attributes: Assigned Department, Work Request Type, Work Request Priority, Asset Group, Asset Number, Workflow Type, Asset Category, Asset Criticality, Area, Asset Status, Organization Code, Assigned Department.
The Enable AME Approval Workflow check box must be selected to trigger the work request approval process to follow the AME Rules. Department approval can also be used if the AME Approval process is not used. However, department approval and AME approval are mutually exclusive. See Defining eAM Parameters).
Use the Approvals Management responsibility to set the EAM Work Request Approval transaction type.
This section's tasks include:
Work Request Statuses
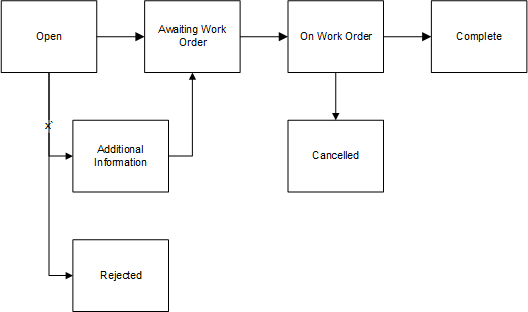
A work request transitions through several statuses during its life cycle. The work request life cycle is as follows:
-
Open - A work request is created in an Open status. You can add attachments to work requests in an Open status.
-
Awaiting Work Order - The work request status changes from Open to Awaiting Work Order if the individual on the approval route has approved it.
If the Auto-Approve Work Request functionality is enabled for the current organization, the status is automatically set to Awaiting Work Order (See: Defining eAM Parameters).
-
On Work Order - After a work request is associated with a work order, the status changes to On Work Order.
If you manually change the status to Cancelled when status is On Work Order, the associated work order is cancelled.
-
Cancelled - The associated work order is cancelled.
You can manually change the status to Cancelled when the status is On Work Order and the associated work order is cancelled. If the associated work order is not cancelled, the system will display an error and the work request cannot be cancelled.
-
Rejected - The individual on the approval route rejected the work request.
-
Additional Information - If the work request's status is Additional Information, the workflow recipient can update the work request with additional information.
During the approval process, the system adds the additional information to the work request notes, and when the user clicks on Save or Apply, the workflow will be updated and resubmitted to the Approver for approval.
-
Complete - The work request status changes to Complete when the work order associated with the work request is completed.
Requesting Information Through Work Request Workflow Notifications
You can request more work request information by clicking one of the following action buttons on the workflow notification received:
-
Request Information: Click this button to obtain additional input from any specified user. The Requested Information text will appear in the notification's Action History region only, and will not update the work request log. Also, the status of the work request is not changed during this request process.
-
Additional Information: Click this button to alternatively request more information and to obtain additional input from the work request originator. The text entered in the notifications response comments are updated to the Work Request Log and to the notification's Comments region. Also, the status of the work request is changed to 'Additional Information' during this process.
See Defining EAM Parameters for more information regarding Oracle Workflow and eAM notifications.
Obtaining Work Request Information
Query for work requests using either the personalized, simple, or advanced search modes. The personalized mode enables you to select specific fields that you like to search with. The simple search mode displays commonly used fields that are normally used for searching. The advanced search mode provides more search criteria options. From the results table, you can view, update, and create work requests.
To obtain work request information using the simple search
-
Navigate to the Work Requests tab (Self Service Work Requests - Work Requests tab).
-
Choose Simple Search.
Work Requests
-
Populate at least one of the following fields to narrow the search results:
-
Request Number
-
Asset Type
If you select Capital, work requests that are created for asset numbers appear. If you select Rebuildable Inventory, work requests that are created for Rebuildable Items appear.
-
Assigned Department
-
Status. See: Work Request Statuses.
-
Asset Number
-
-
Click the Go button.
To obtain work request information using the advanced search
-
Navigate to the Work Requests tab.
-
Click the Simple Search button.
-
Click Advanced Search to narrow your selection criteria. Populate at least one of the following fields:
-
Asset Group. See: Defining Asset Groups.
-
Asset Category - This is the Class and Subclass code, such as CRANE.OVERHEAD or BUILDING.FLOOR. See: Setting Up Category Codes.
-
Optionally select an Add Another value such as:
-
Area - This is a user-defined listing of logical areas of work. Areas are where the assets reside, for example, North Plant, East Wing, or Area 1. See: Setting Up Areas.
-
Asset Criticality - This field enables you to search based on the asset priority ranking.
Important: You must personalize the Work Requests result table of Work Orders tab - Requests search page to include the Asset Criticality value in the drop-down list. Revise the EAM_REQ_ADVSEARCH_PAGE.xml; Package: EamAssetCriticality. See the Oracle Application Framework Personalization Guide for more information.
-
Assigned Department - To view all work requests associated with a specific department. See: Defining Departments and Resources.
-
Created By - To narrow your search to a specific user login name. This field will also contain the Person Name as defined in the Users window.
-
Collection Plan for Quality Triggered Work Request - This field contains the collection plans that are used for the creation of quality triggered work requests.
-
Request Number
-
Request By Date
-
Status. See: Work Request Statuses.
-
Priority. See: Work Order and Work Request Priority Codes.
-
Request Type - User-defined value that describes and categorizes work requests, for example, Manual, System, Routine, Capital, and Furniture. (See: Work Request Types).
-
Source Work Order-Quality - This field contains the source work orders associated with a quality triggered work request created during quality results collection.
-
Work Order - To display all work requests associated with that work order.
An unlimited number of work requests can be associated with a work order.
-
Creation Date
-
Created By - This field also contains the Person Name as defined in the Users window
-
Requested For
-
Include children from hierarchy check box
If there are populated search criteria, they are applied (or effective) on the results of all the work requests and children for the current asset number.
If the asset number is not populated and Yes is selected, the Include children from hierarchy check box setting is ignored and other search criteria are considered.
-
-
-
Click the Go button.
Creating and Updating Work Requests
You can create a work request within the simple or advanced search pages. Click the Advanced Search button to add fields such as:
-
Area
-
Asset Criticality: This field enables you to search based on the asset priority ranking.
Important: You must personalize the Work Requests results table of Work Orders tab - Requests search page to include the Asset Criticality value in the drop-down list. Revise the EAM_REQ_ADVSEARCH_PAGE.xml; Package: EamAssetCriticality. See the Oracle Application Framework Personalization Guide for more information.
-
Asset Full Description
-
Created By - This field also contains the Person Name as defined in the Users window.
-
Creation Date
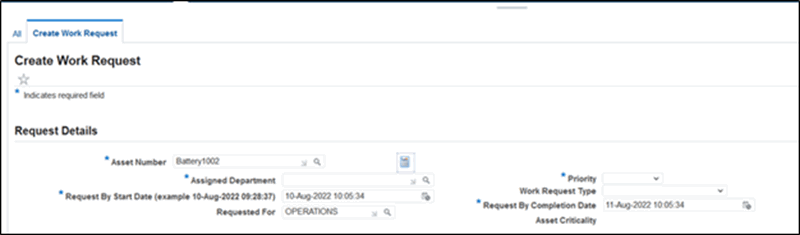
To create a work request
-
Navigate to the Work Requests tab.
-
Select the Create Work Request Sub-tab.
-
If it is indicated as a required field, select an Asset Number.
This determination is based on a setting in the eAM parameters. See Defining eAM Parameters and Defining Asset Numbers.
-
Click the Asset Hierarchy icon next to the Asset Number field to view the asset hierarchy.
Note: The Asset Hierarchy icon appears after the asset number has been selected.
-
Expand the asset to view child assets.
-
Select the child asset.
-
Click Select.
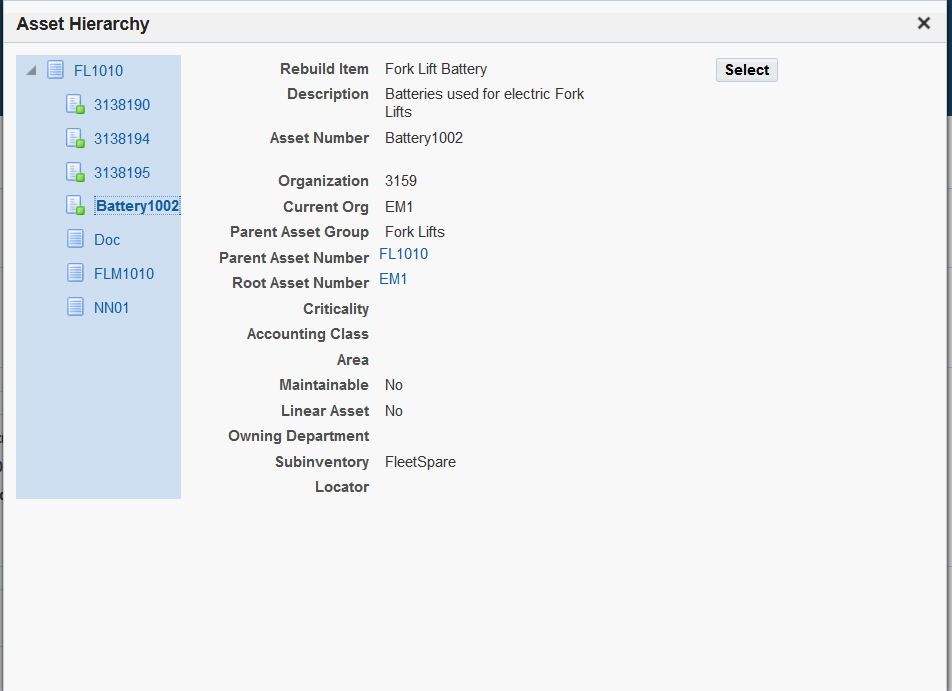
The value appears in the Asset Number field on the Create Work Request page.
-
-
Select the Assigned Department (optional).
-
Select a Priority. See: Work Order and Work Request Priority Codes.
Based on selected priority, the Request by start date and Request by completion dates can be changed if a setup exists for the Request by Dates Setup.
After the priority has been selected, the following message appears, highlighting the revised dates:
Please verify the Request by dates, as they might change if Priority/Type is changed based on setup. -
Enter a Request By Start Date.
The default value is current date, time + 1 hour.
Based on the Work Order Priority, Type and the Dates setup, the Request By start date will be recalculated based on the date tolerances defined.
Request by start Date = System date, time + Request by start date from system date (Hrs).
Important: The Request by Start Date cannot be earlier than system date, and cannot be later than the Request by Completion Date.
-
Enter a Request By Completion Date.
The default value is the Request by Start Date + 24 hours. However, the date value is recalculated based on the Request for Dates setup in the eAM parameters.
Request by completion date = (Calculated) Request by start date + Request by completion date tolerance (Hrs).
-
Optionally update the Priority.
Based on the selected priority or type, the request by start date and Request by completion dates can be changed if a setup exists in the Request by Dates Setup. See Defining eAM Parameters.
After updating the priority or type, the following message appears, highlighting the revised dates:
Please verify the Request by dates, as they might change if Priority/Type is changed based on setup. -
Select an Assigned Department.
-
Optionally update the Type.
Based on the selected priority and type, the Request by start date and Request by completion dates can be changed if a setup exists for the Request by Dates Setup.
After the Type has been selected, the following message appears, highlighting the revised dates:
Please verify the Request by dates, as they might change if Priority/Type is changed based on setup.See: Work Request Types.
-
Optionally select a Requested For value.
-
Enter an Additional Description for the work request.
You can enter a maximum of 2,000 characters in this field.
-
Save your work.
You must first save the work request before you can add attachments in the Request Attachment region.
-
Optionally enter your phone number.
-
Optionally select a Contact Preference; values are E-mail or Phone Number.
-
Optionally enter your e-mail address.
-
Optionally select a Context Value.
-
Click the Apply button.
-
Click the OK button.
-
Save your work.
The status of the work request changes to Awaiting Work Order if the individual on the approval route has approved it. If the Auto-Approve Work Request functionality is enabled for the current organization, the status is automatically Awaiting Work Order.
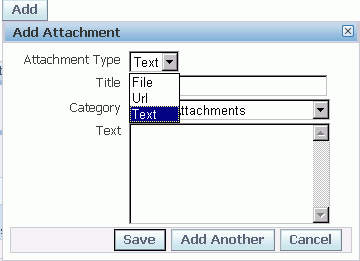
Adding Attachments to Work Requests
You can add attachments such as breakdown photos, work instructions, and so on when you create work requests.
Important: You must first save the work request before you can add attachments.
In addition, you can add attachments when you update a work request.
To add attachments when you create work requests:
-
After you have saved the work request, click the Return to Work Requests link.
-
Click or hover over the Add button in the Request Attachments region of the work request.
If you want to view the attachments, hover or click the View button.
The Add Attachment page appears.
You can attach file, URL, and text attachments.
-
In the Add drop-down list, select one of these values:
-
Desktop File/Text/URL
-
From Document Catalog
-
-
Enter a title for the attachment.
-
Enter a description of the attachment.
-
Select a category.
You can add attachments with a type of Miscellaneous or Work Request Attachments.
-
In the Define Attachment group box, select the Type of attachment that you want to add.
-
If you are adding a File, browse to select the file.
-
If you are adding a URL, type in the URL address.
-
If you are adding plain Text, type the text in the field.
-
-
When you are finished, select one of these buttons:
-
Cancel - if you do not want to add the attachment to the work request.
-
Add Another - this action saves the current attachment to the work request and enables you to add another attachment.
-
Apply - this action adds the attachment to the work request.
You will receive a confirmation that the attachments have been added successfully.
-
To update a work request
-
Navigate to the Work Requests tab.
-
Populate at least one of the following fields:
-
Request Number
-
Asset Type: If you select Capital, work requests that are created for asset numbers appear. If you select Rebuildable Inventory, work requests that are created for rebuildable items appear.
-
Assigned Department
-
Status: See Work Request Statuses.
-
Asset Number: Enter a value for related work requests and work orders.
-
-
Click the Go button.
-
Click the Update icon next to the work request that you want to update.
The Source Work Order-Quality: This field appears if there is a Quality source work order from which the work request is created during the collection plan result entry.
-
Optionally update the Request By Start Date.
-
Optionally update the Request By Completion Date.
-
Optionally update the Priority and Type.
After updating the priority and type, the following message appears, highlighting the revised dates:
Please verify the Request by dates, as they might change if Priority/Type is changed based on setup. -
Optionally update fields in the Additional Details region.
Optionally enter an Additional Description.
You can enter a maximum of 2,000 characters in this field.
-
Optionally add an attachment to the work request by clicking the Add button in the Request Attachments region.
If there are existing attachments associated with the work request, the Attachments icon appears. Click the Attachments icon to view the list of existing work request attachments.
-
Optionally update the values in the Creation Information region.
-
Click the Apply button.
-
Click the OK button.
To view a list of work request attachments
-
Navigate to the Work Requests tab.
-
Enter the search criteria for your work request to view the list of attachments.
-
Click the Go button.
-
Click the View icon in the Attachments column for the work request.
The Attachments page appears and displays the list of all attachments for the work request.
-
Optionally click the Add Attachment button to add more attachments.
-
If the View link is enabled, you can click this link to view the list of existing attachments associated with the work request.
-
Click the attachment link to view the attachment.
You can also save the attachment to a location on your computer.
To delete a work request attachment
-
Navigate to the Work Requests tab.
-
Enter the search criteria for your work request to view the list of attachments.
-
Click the Go button.
-
Click the View link in the Request Attachments group box.
The Attachments page appears and displays the list of all attachments for the work request.
-
Click the Delete icon for the attachment that you want to delete from the work request.
-
Click Yes if you want to delete the attachment.