Safety Management
This chapter covers the following topics:
- Safety Management Overview
- Using Safety Management with EAM
- Creating Lockout Device Codes
- Defining Positional Assets
- Defining an Isolation Status
- Defining Isolation Types
- Creating Isolations
- Updating Isolations
- Viewing Isolations
- Using the Isolation Approval Workflow
- Defining Work Clearance Statuses
- Creating Work Clearances
- Updating Work Clearances
- Associating Work Orders with a Work Clearance
- Viewing Work Clearances
- Using the Work Clearance Approval Workflow
- Defining Work Permit Statuses
- Defining Work Permit Types
- Creating a Work Permit
- Updating a Work Permit
- Associating Work Orders to a Work Permit
- Viewing Work Permits
- Printing Work Permits
- Using the Work Permit Approval Workflow
Safety Management Overview
Use safety management to create work permits mandated by regulatory authorities. You can also create, view and update isolations and work clearances. You can also associate work permits with work clearances.
Note: The phrases "work permit" and "safety permit "are used interchangeably.
By using safety management, you can:
-
Create, update, and view isolations.
-
Create, update, view and copy work clearances.
-
Associate work orders with a work clearance.
-
Use the Work Clearance workflow to approve the work clearance status be changed to Released.
-
Create a work permit.
-
Using the Create Permit or Update Permit pages, create work permits or associate existing work permits to a work order or work clearance.
-
Print work permits.
-
Use the Work Permit Workflow to route a work permit for approval.
Related Topics
See Oracle Workflow User's Guide
Using Safety Management with EAM
Before you can use safety management, you must perform these setup tasks.
Prerequisites
- You must perform the following setup tasks before you can use safety management with EAM:
-
Verify that the Enable Workflow for Safety option on the eAM Parameters page has been selected. See Defining eAM Parameters.
-
Verify that the Enable Workflow for Workorders option on the eAM Parameters page has been selected. See Defining eAM Parameters.
-
Create lockout device codes.
-
Define asset numbers as positional assets or lockout devices.
-
Associate lockout codes with asset numbers, asset groups, and rebuildable and serial-controlled numbers.
-
Define isolation statuses and types.
-
Define permit statuses and types.
-
Define work clearance statuses and types.
-
Create approval groups and approval rules for isolations, work permits and work clearances, if you are using workflow. See Oracle Workflow User's Guide.
Creating Lockout Device Codes
When you change the normal operating position of a positional asset, you must ensure that it remains in that position until the repair work is completed and the maintainable asset is safe to work on. Use lockout devices to secure the positional assets in proper positions so that they are not accidentally changed while asset is still under maintenance.
Lockout device codes indicate what type of lockout device would be used to lock this positional asset. This helps to identify that a certain type of positional asset requires a certain type of lockout device.
Create lockout device codes that can be would be used to associated with asset groups, asset numbers including rebuildable (and capital) and serial controlled items.
Important: A positional asset cannot be a lockout device, and a lockout device cannot be a positional asset.
To create lockout device codes
-
Navigate to the Manufacturing Lookups page (Enterprise Asset Management > Lookups).
The Manufacturing Lookups page appears.
-
Click the New button.
-
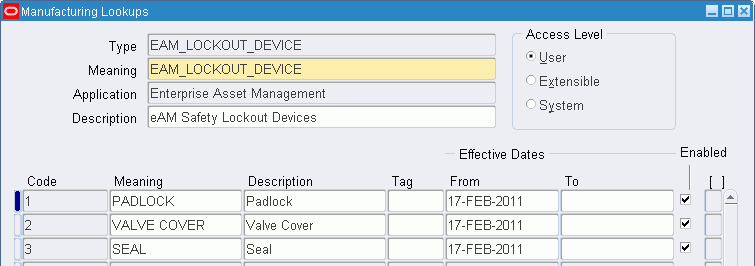
Enter the Type, Meaning, Application, and Description of the lockout codes such as:
-
Type = EAM_LOCKOUT_DEVICE
-
Meaning = EAM_LOCKOUT_DEVICE
-
Application = Enterprise Asset Management
-
Description = eAM Safety Lockout Devices
-
-
Enter values in the Code sequence, Meaning, Description, Tag (optional) and beginning Effective Date fields.
-
Click the Enabled button to indicate that you want users to be able to use these lockout codes.
-
Save your work.
Defining Positional Assets
You can indicate if an asset number is a positional asset or a lockout device to be used in safety management.
Positional assets represent the equipment used to change the operational status of a maintainable asset to isolate it from its surroundings or energy sources.
For example, in the normal operating conditions of a boiler, the inlet valve is open and the drain valve is closed. To isolate a boiler before it is repaired, the inlet valve is closed and the drain valve is opened. In this example, the maintainable asset is the boiler, and the positional assets are the inlet and drain valves. Therefore, the boiler is not physically isolated, but the positions of the valves, switches, and other positional assets are altered in order to isolate the boiler from its surroundings.
Define positional assets during asset number creation.
To define positional assets
-
Navigate to the Define Asset Numbers page (Enterprise Asset Management > Assets > Asset Numbers > New).
The Define Asset Numbers page appears. For more information on defining assets, see Defining Asset Numbers
-
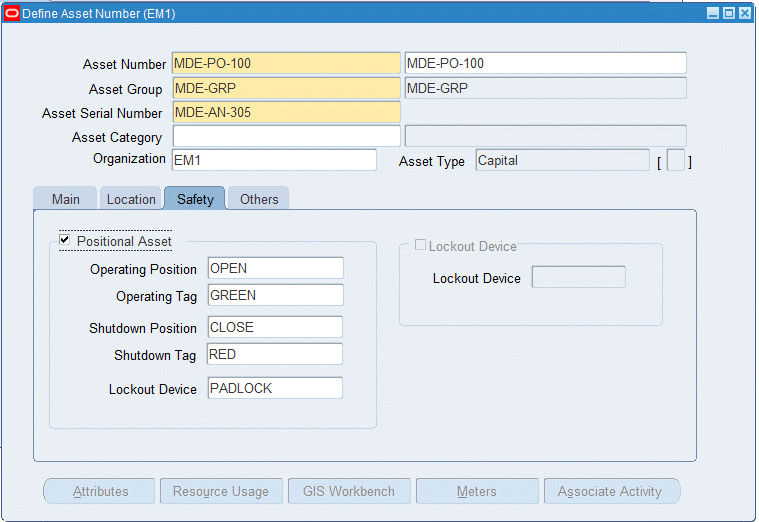
Click the Safety tab.
-
Select the Positional Asset check box.
-
Select the appropriate values for the Operating Position, Operation Tag, Shutdown Position, Shutdown Tag, and Lockout Device fields.
-
You can select the Lockout Device check box to indicate that this asset is a lockout device.
A lockout device uses a positive means such as a lock, either key or combination type, to hold an energy isolating device in the safe position and prevent the energizing of a machine or equipment. Lockout devices are defined during asset creation using the Define Asset Numbers or Define Rebuildable Asset Numbers forms.
Important: A positional asset cannot be a lockout device, and a lockout device cannot be a positional asset.
Defining an Isolation Status
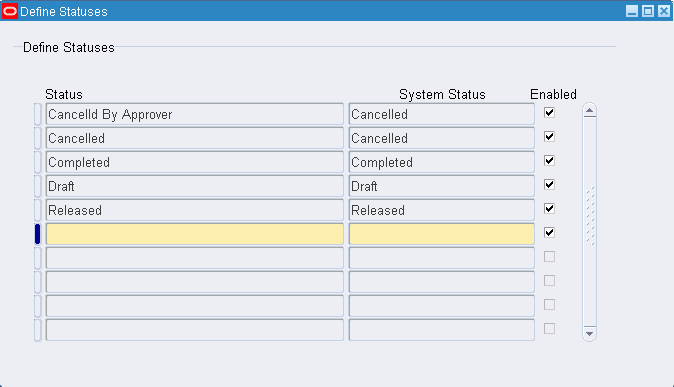
Isolation statuses must be defined before you create an isolation. Seeded (predefined) isolation statuses are Draft, Released, Complete and Cancelled. You can define new statuses that are mapped to these seeded statuses.
To define an isolation status
-
Navigate to the Define Status page (Enterprise Asset Management > Setup > Isolation Statuses).
The Define Statuses page appears.
-
Enter a name for the new isolation status.
The System Status default value appears.
-
Select the Enabled check box if you want users to be able to use the new isolation status.
-
Save your work.
Defining Isolation Types
Follow these steps to define isolation types.
To define isolation types
-
Navigate to the Manufacturing Lookups page (Enterprise Asset Management > Lookups).
The Manufacturing Lookups page opens in the add mode.
Manufacturing Lookups page
-
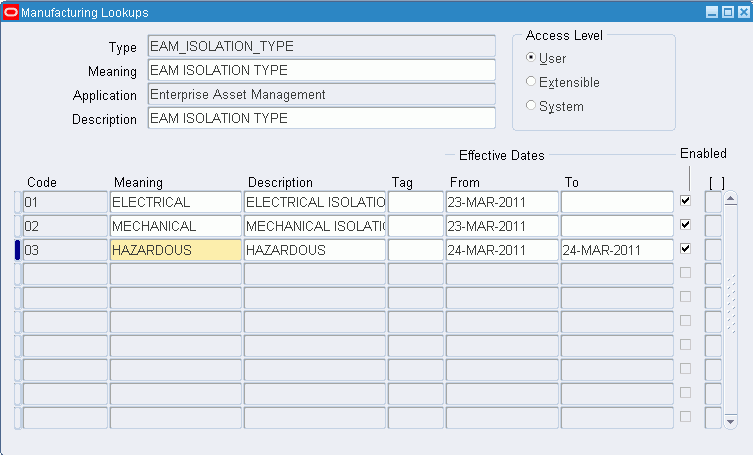
In the Access Level group box, select the User value.
-
In the Type field, enter the name of the isolation type, EAM_ISOLATION_TYPE.
-
In the Meaning field, enter EAM Isolation Type.
-
In the Application field, enter Enterprise Asset Management.
-
In the Description field in the header, enter EAM Isolation Type.
-
In the Code field, enter the code number to be associated with the isolation type such as 10.
-
Enter the Meaning such as Electrical.
-
Enter the Description such as Electrical Isolation.
-
Enter the Effective Dates for the isolation type.
You must enter a date in the From field. You can leave the To date blank.
-
Select the Enabled check box if you want to enable users to select this isolation type.
-
Save your work.
Creating Isolations
You use isolations with a status of Draft or Released to copy their associated steps to a new isolation. In addition, you can use a work clearance with a status of Released or Complete to copy its steps to the new isolation.
Use these steps to create an isolation of equipment or an area.
To create an isolation
-
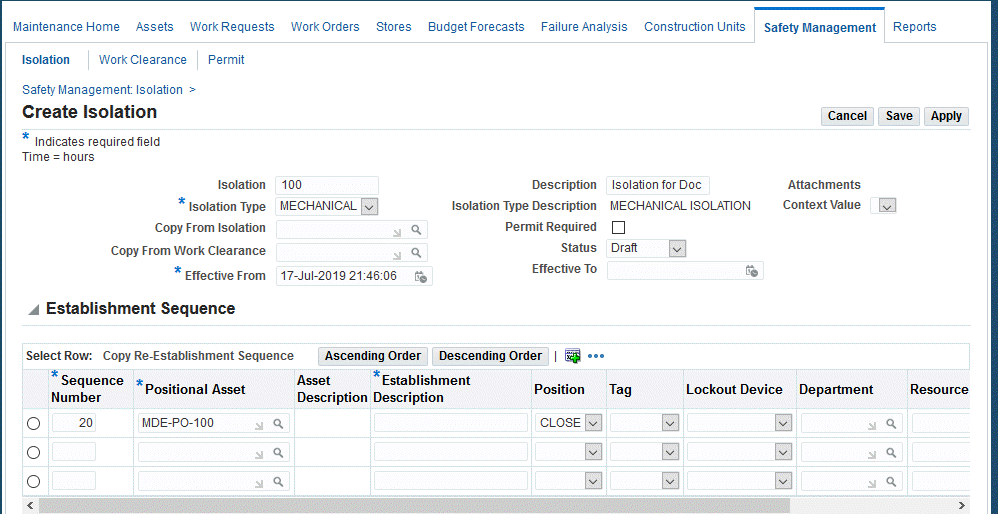
Navigate to the Create Isolation page (Maintenance Super User > Safety Management > Create Isolation).
The Create Isolation page appears.
-
You can optionally accept the system generated value or enter a specific name Isolation number field.
-
Enter a value in the Description field.
-
Select a value from the Isolation Type drop-down list.
-
Optionally select an existing isolation in the Copy From Isolation field to create a new isolation.
-
Optionally select an existing work clearance from which you want to copy the isolation steps to this new isolation.
-
The state of the Permit Required check box (unselected/selected) comes from the isolation, if you selected a value in the Isolation field. You can unselect or select this option, and it is used for informational purposes only.
-
Optionally select a Status; the default value is Draft.
-
Enter a date in the Effective From field; the default value is the current system time and date.
-
Optionally select a value in the Context Value field.
This field may contain descriptive flexfields (DFFs). These values can be configured by your organization and can be used to capture additional information regarding the isolation. If you select a DFF, then the appropriate fields will appear where you will be required to enter information.
For information regarding defining DFFs, see Oracle Applications Flexfields Guide.
-
Click the Establishment Sequence region to optionally enter information for an establishment sequence for the assets to be included in the isolation.
Enter values in any of the fields. You can also copy the list from the Establishment Sequence region by clicking the Ascending or Descending buttons.
-
Optionally enter a value in the Sequence Number, Positional Asset, Tag Position, Establishment Description fields.
The values available in the Positional Assets field are based on the assets created and associated with the organization. See Defining Positional Assets.
-
Save your work if you want to add Flexfields or Attachments to the positional assets in the Establishment Sequence region.
You can also add attachments or flexfields (DFFs) during the update process.
-
Optionally click the Flexfields button to select a DFF.
-
You can optionally click the Attachments button to add a desktop file, text, or URL.
-
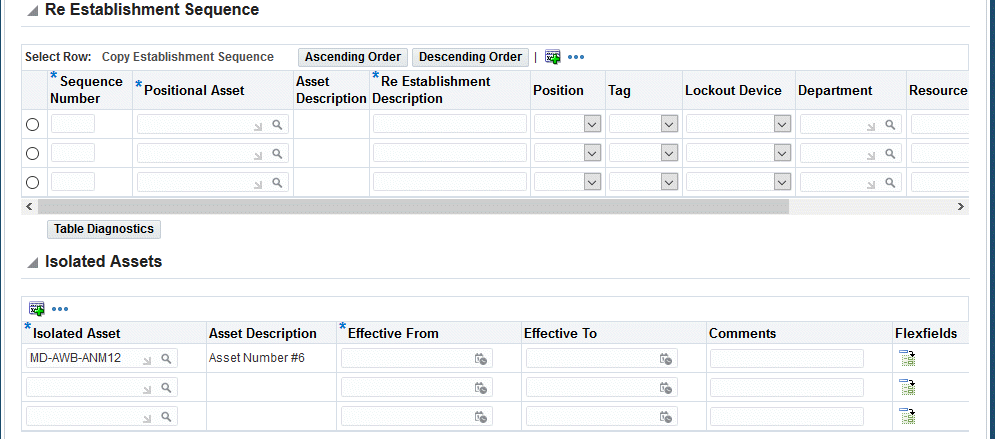
Optionally enter information in the Re-Establishment Sequence region. This region contains information relating to the equipment after the isolation has expired.
Enter values in any of the fields. You can also copy the list from the Establishment Sequence region by clicking the Ascending or Descending button.
-
Select the Isolated Assets to be included in the isolation.
You can select additional information such as the effective dates, comments, descriptive flexfields, and attachments.
-
Click the Save button.
Updating Isolations
You can update various isolation information.
To update an isolation
-
Navigate to the Update Isolation page (Maintenance Super User > Safety Management > Search).
Search for the isolation that you want to update, and then click the Update button. The Update Isolation page appears.
-
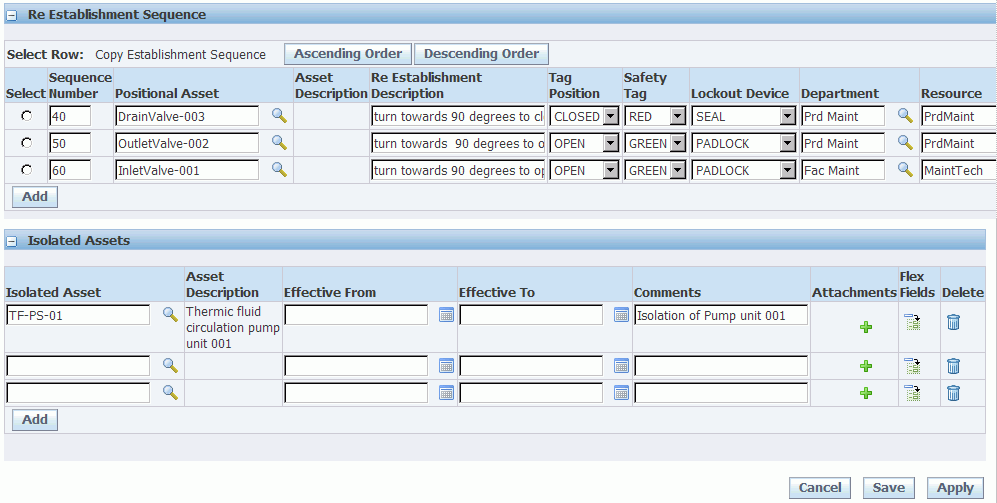
Update any of the available fields on the page.
You can add attachments and descriptive flexfields (DFFs) to the positional assets in the Establishment and Re-establishment Sequences and to the Isolated Assets.
For more information to define DFFs, see Oracle Applications Flexfields Guide.
-
Save your work.
Viewing Isolations
You can view isolations by following these steps.
To view an isolation
-
Navigate to Maintenance Super User > Safety Management and search for an isolation.
-
Click the link for the isolation that you want to view.
-
The View Isolation page appears.
View the associated isolation details.
-
You can also click the Update button to make changes to the isolation.
Using the Isolation Approval Workflow
The Isolation Approval Flow is initiated when a user changes the status of isolation to Released.
The conditions under which you can use the approval workflow are organization code and isolation type.
Before you can use the Isolation workflow:
-
Verify that the Enable Workflow for Safety option on the eAM Parameters page has been selected. See Defining eAM Parameters.
-
Create approval groups and approval rules for isolations.
See Oracle Workflow User's Guide.
Defining Work Clearance Statuses
You must define work clearance statuses before you can create a work clearance. Seeded (predefined) work clearance statuses are Draft, Released, Complete, and Cancelled. You can define new statuses that are mapped to these seeded statuses.
To define work clearance statuses
-
Navigate to the Define Statuses page (Enterprise Asset Management > Setup > Work Clearance Statuses).
The Define Statuses page appears.
-
Enter the name of the new work clearance status.
-
Select the Enabled check box if you want users to be able to use the new work clearance status.
-
Save your work.
Creating Work Clearances
You can add work orders and work permits during work clearance creation.
Note: You must first create and save a work clearance before you can add attachments.
Follow these steps to create a work clearance.
To create a work clearance
-
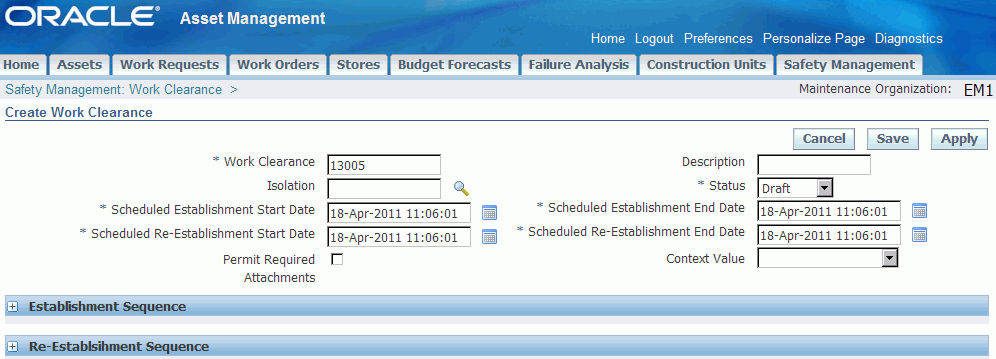
Navigate to the Create Work Clearance page (Maintenance Super User > Safety Management > Work Clearance > Create Work Clearance).
-
Enter a value in the Work Clearance field or accept the system-generated number.
-
Optionally enter a description.
-
Optionally select a value in the Isolation field.
You can use an existing isolation to copy the isolation sequences (establishment and re-establishment steps) to the work clearance. Isolations must have a status of Released before they are available for selection.
You can add isolations using this field. You can manually add and delete isolation sequences, or change the order of the steps.
-
Enter a value in the Scheduled Establishment Start Date and Scheduled Establishment End Date fields (required).
The default values are the system date and time, but you can change these values.
-
Enter a value in the Scheduled Re-Establishment Start Date and Scheduled Re-Establishment End Date fields (required).
The default values are the system date and time, but you can change these values.
-
The Permit Required check box is associated with the isolation, if selected.
You can unselect or select this option, and it is used for informational purposes only.
-
Optionally select a value in the Context Value field.
This field includes any descriptive flexfields (DFFs) that have been defined for your organization. These values can be used to capture additional information regarding the work clearance. If you select a DFF value, then the appropriate fields will appear where you will be required to enter information.
-
The values in the Establishment Region are populated from the Isolation number, if one is selected.
You can override these values and add sequences. You can add contingent workers as resources. See Creating Isolations.
-
The values in the Re-Establishment Region are populated from the Isolation Number, if one is selected.
You can override these values and add sequences. You can add contingent workers as resources. See Creating Isolations.
-
Click the Work Orders region to add a work order.
You can add the following in this region; all other fields are view only:
-
Work Order
-
Attachments: Click this button to access the Add Attachments page where you can add a desktop file, text, or URL.
-
Flexfields: Optionally click the Flexfields icon to add a descriptive flexfield (DFF).
DFFs can be defined to capture additional information specific to your organization. When you select a DFF, additional fields may be required.
For information regarding defining DFFs, see Oracle Applications Flexfields Guide.

-
-
Click the Permits region to add work permits to the work clearance.
You can add the following in this region; all other fields are view only:
-
Work Permit
-
Attachments: Click this button to access the Add Attachments page where you can add a desktop file, text, or URL.
-
Flexfields: Optionally click the Flexfields icon to add a descriptive flexfield (DFFs).
DFFs can be defined to capture additional information specific to your organization. When you select a DFF, additional fields may be required.
For information regarding defining DFFs, see Oracle Applications Flexfields Guide.
-
-
Save your work.
Updating Work Clearances
-
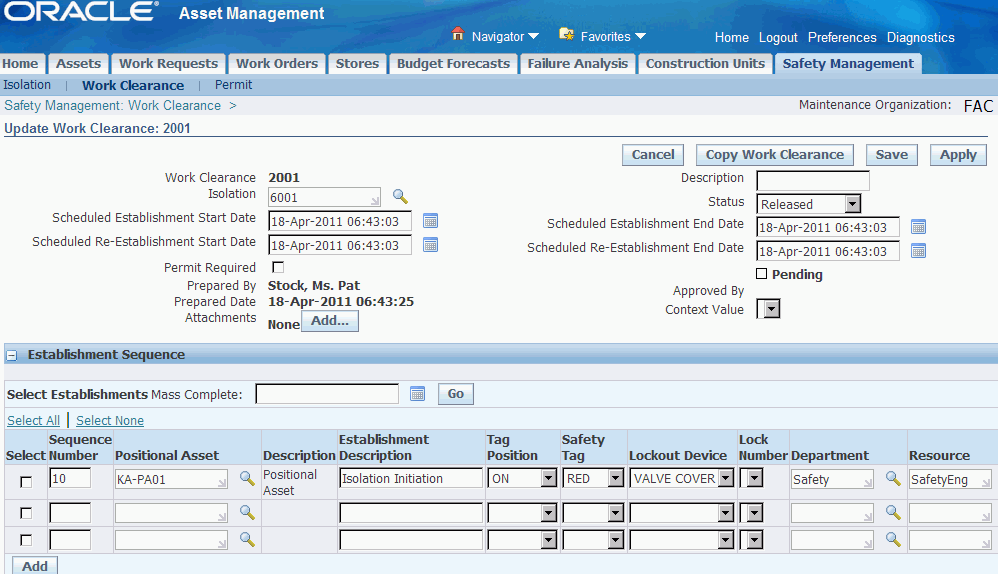
Navigate to the Work Clearance Report page (Maintenance Super User > Safety >Work Clearance).
-
Enter the search criteria for the work clearance that you want to update, and then click the Go button.
Click the Update button for the appropriate work clearance, and the Update Work Clearance page appears.
-
You can optionally add attachments by clicking the Add button.
Use the Add Attachment page to attach a desktop file, text, or URL to the work clearance.
-
You can optionally select a value in the Context Value field.
This field may contain descriptive flexfields (DFFs). These values can be configured by your organization and can be used to capture additional information regarding the isolation. If you select a DFF, then the appropriate fields will appear where you will be required to enter information.
For more information to define DFFs, see Oracle Applications Flexfields Guide.
-
Revise the fields as required.
Positional assets are the asset numbers which are defined as positional assets in Asset Numbers form. Only positional assets are available for selection. In addition, only lockout devices are available for selection in the Lockout Device field.
The Resource field will show only People resources and the Instance field will show Persons. This is because these resources are the actual people who perform the task given in the work clearance.
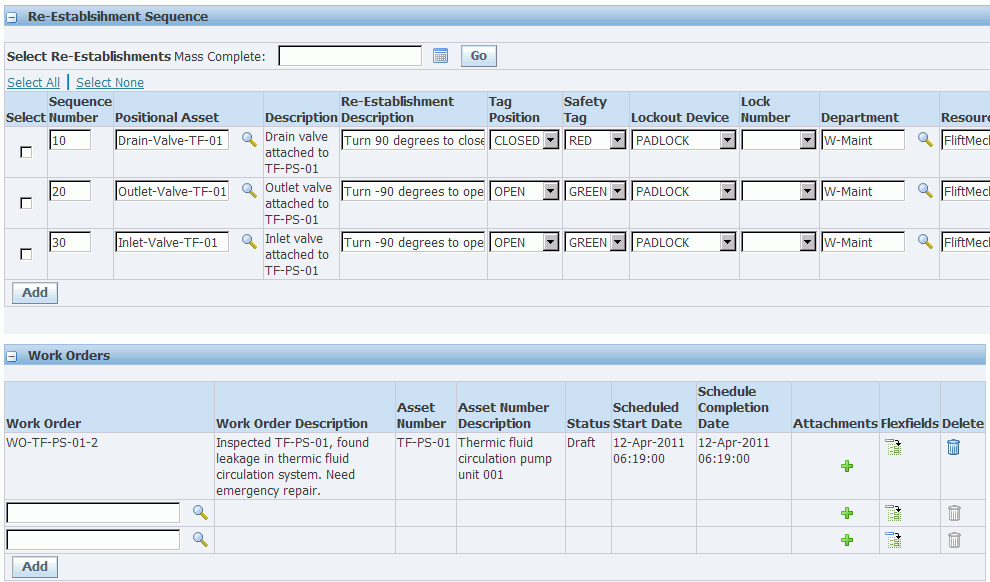
You can add attachments and descriptive flexfields (DFFs) to the positional assets in the Establishment and Re-establishment Sequences.
-
You can optionally copy the work clearance by clicking the Copy Work Clearance button.

-
Save your work.
Associating Work Orders with a Work Clearance
You can associate work order with a work clearance by using the Work Clearances or Work Orders pages. The work orders and work clearances must have a status of Draft or Released.
To associate work orders with a work clearance
-
Navigate to the Update Work Clearances page (Maintenance Super User > Safety Management > Work Clearances).
-
Enter the search criteria for the work clearance that you want to update and then click the Go button.
The Update Work Clearance page appears.
-
Expand the Work Orders region of the page.
-
Select the work orders that you want to associate with this work clearance.

-
You can add attachments and descriptive flexfields (DFFs) to the positional assets in the Establishment and Re-establishment Sequences.
-
Save your work.
Viewing Work Clearances
-
Navigate to the View Work Clearances page (Maintenance Super User > Safety Management > Work Clearances).
-
Enter the search criteria for the work clearance that you want to view and then click the Go button.
The View Work Clearance page appears where you can view associated details such as:
-
Work Clearance and Description
-
Establishment Start and End Dates
-
Establishment and Re-Establishment details
-
-
You can optionally perform the following tasks by clicking the appropriate button:
-
Copy Work Clearance - copy to create a new work clearance
-
Update - to access the Update Work Clearance page to make revisions to the work clearance
-
Using the Work Clearance Approval Workflow
The Work Clearance Approval Workflow is initiated when a user changes the status of the work clearance to Released.
The conditions under which you can use the approval workflow are organization code, isolation type, and work clearance number.
Before you can use the Work Clearance Approval Workflow:
-
Verify that the Enable Workflow for Safety option on the eAM Parameters page has been selected. See Defining eAM Parameters.
-
Create approval groups and approval rules for work clearances.
See Oracle Workflow User's Guide
Defining Work Permit Statuses
Follow these steps to define a work permit status.
To define a work permit status
-
Navigate to the Define Status page (Enterprise Asset Management > Setup > Permit Statuses).
-
Click the New button to add a new work permit status.
The Define Statuses page appears.
-
Enter the name of the new permit status.
-
Select a System Status value to associate to the new work permit status (required).
-
Select the Enabled check box if you want users to be able to use the new work permit status.
-
Save your work.
Defining Work Permit Types
Follow these steps to define a work permit type.
To create work permit types
-
Navigate to the Manufacturing Lookups page (Enterprise Asset Management > Lookups).
The Manufacturing Lookups page opens in the add mode.
-
In the Access Level group box, select the User value.
-
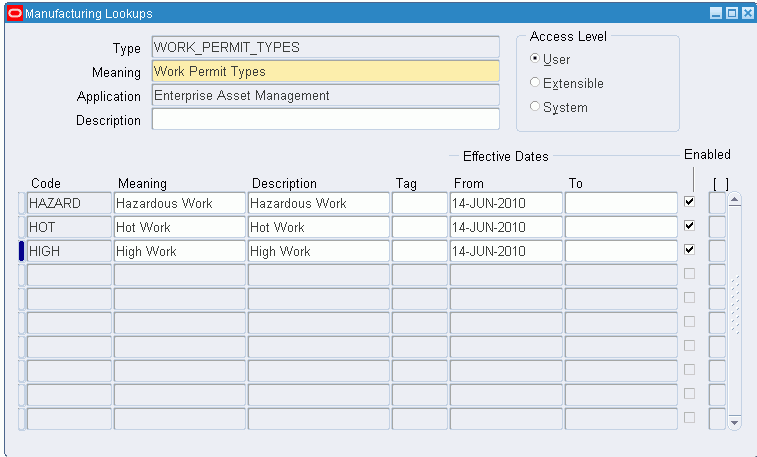
In the Type field, enter the name of the permit type, WORK_PERMIT_TYPES.
-
In the Meaning field, enter Work Permit Types.
-
In the Application field, enter Enterprise Asset Management.
-
In the Code field, enter the name of the code to be associated with the permit type such as HAZARD.
-
Enter the Meaning for the permit type such as Hazardous Work.
-
Enter the Description for the permit type such as Hazardous Work.
-
Enter the Effective Dates for the permit type.
The From (beginning) date will default to the system date, but you can override this value. The To (ending) date is optional.
-
Select the Enabled check box if you want to enable users to select this permit type.
-
Save your work.
Creating a Work Permit
Use the Create Permit page to create a work permit.
To create a new work permit
-
Navigate to the Safety Permits page (Maintenance Super User > Home > Safety Management > Permits).
-
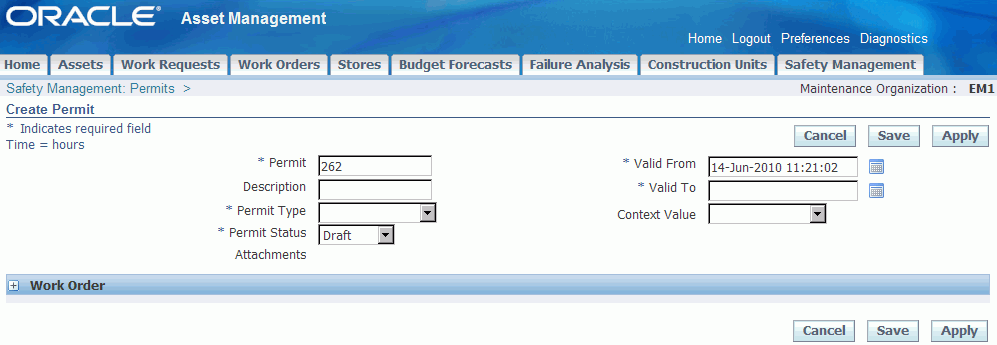
Click the Create Permit button and the Create Permit page appears.
-
Enter a permit number or accept the default number in the Permit field.
-
(Optional) Enter a description for the work permit.
-
Select a work permit type (required).
-
Select a work permit status (required).
All new work permits are automatically created in the Draft status, but you can change this value.
-
Enter a date in the Valid From and Valid To fields (both are required fields).
The default value in the Valid From field is the system date and time that you are creating the work permit, but you can override this value.
-
(Optional) Click the Flexfields button to select a flexfield to add to the page.
See eAM Descriptive Flexfields, Oracle Enterprise Asset Management Implementation Guide and Oracle Applications Flexfields Guide.
-
Click the Work Order collapsible section to add work orders to the work permits.
-
Select the work orders to add.
You can add attachments and descriptive flexfields (DFFs) to the positional assets in the Establishment and Re-establishment Sequences.
See Updating a Work Permit for information regarding adding work orders to a work permit.
-
Click the Apply button.
-
You can add attachments to the work permit after you have saved the work permit.
Click the Attachments button to add attachments.
Updating a Work Permit
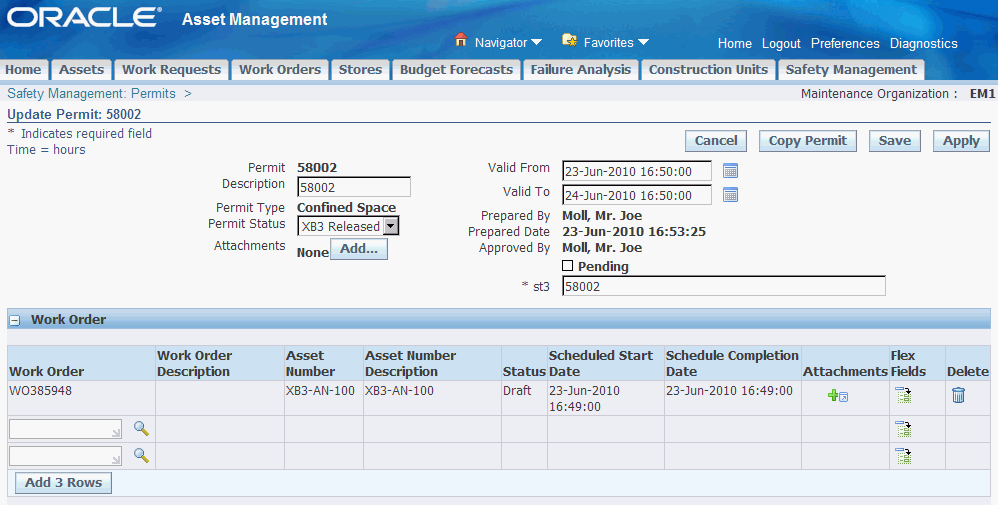
Use the Update Work Permit page to update a safety permit.
Navigate to the Safety Permits page (Maintenance Super User > Home > Safety Management > Permits).
-
Click the Update Permit button for the safety permit that you want to update.
The Update Permit page appears.
-
Revise the permit details.
You can revise the following information:
-
Description
-
Permit Status
If you update a work permit to a status of Released (or a user-defined equivalent), a workflow notification is triggered upon save. The Completed status will open a new field in which you can enter the completion date and time.
-
Attachments (add)
-
Valid From and Valid To dates
-
-
Click the Work Order collapsible section to add work orders to the work permits.
-
Select the work orders to add.
-
Optionally click the Flexfields button to select additional flexfields to add to the page.
See eAM Descriptive Flexfields, Oracle Enterprise Asset Management Implementation Guide and Oracle Applications Flexfields Guide.
-
Click the Work Clearance region to associate a work clearance to the work permit.
-
You can click one of these buttons to perform other actions:
-
Cancel: To return to the Safety Permits page without saving any changes.
-
Copy Permit: To copy the current work permit to a new permit.
-
Save: To save your changes and remain on the Update Permit page.
-
Apply: To save your changes and return to the Safety Permits page.
-
Associating Work Orders to a Work Permit
You can add (associate) existing work orders to a work permit when you create the work permit or when you update the work permit.
Important: You cannot create a new work order through the work permit.
To associate (add) a work order to a work permit
-
Navigate to the Safety Permits page (Maintenance Super User > Home > Safety Management > Permits).
-
Click the Update Permit button for the safety permit to which you want to add a work order.
The Update Permit page appears.
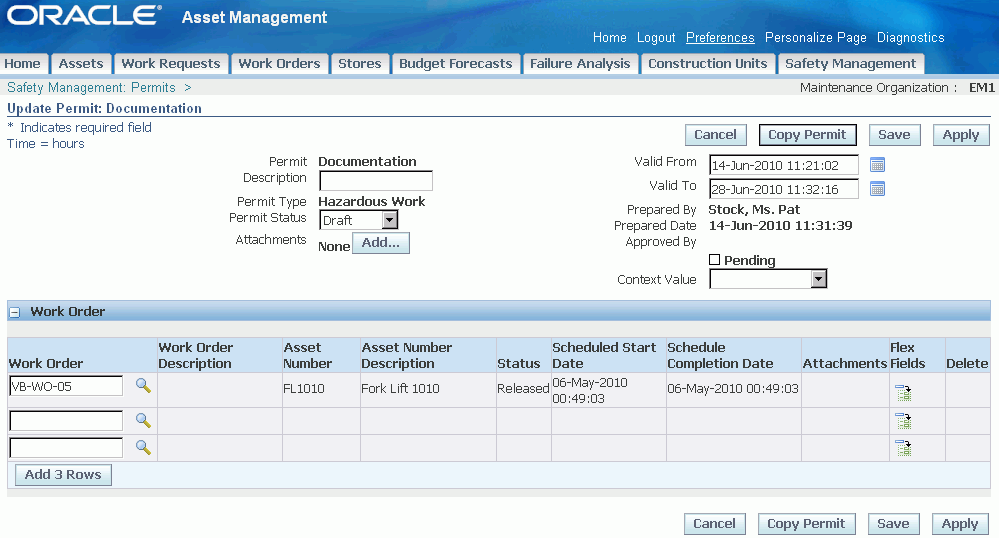
-
Enter the work order number in the Work Order field, or click the search button.
-
Search and select the appropriate work order to add.
-
Repeat these steps to add work orders to the safety permit. Click the Flexfields button to add flexfields to the page.
See eAM Descriptive Flexfields, Oracle Enterprise Asset Management Implementation Guide and Oracle Applications Flexfields Guide.
-
You can click one of these buttons to perform additional tasks on the safety permit:
-
Cancel: To return to the Safety Permits page without saving any changes.
-
Copy Permit: To copy the current work permit to a new permit.
-
Save: To save your changes and remain on the Update Permit page.
-
Apply: To save your changes and return to the Safety Permits page.
-
-
Save your work.
Viewing Work Permits
Use the View Work Permits page to view existing safety permits.
-
Navigate to the Safety Permits page (Maintenance Super User > Home > Safety Management > Permits).
-
Click the link for the safety (work) permit that you want to view.
The View Permit page appears.
-
View the permit details.
-
You can click one of these buttons to perform other actions:
-
Cancel: To return to the Safety Permits page.
-
Update Permit: To make changes to the permit.
-
Copy Permit: To copy the current work permit to a new permit.
-
Printing Work Permits
-
Navigate to the Safety Permits page (Maintenance Super User > Home > Safety Management > Permits).
-
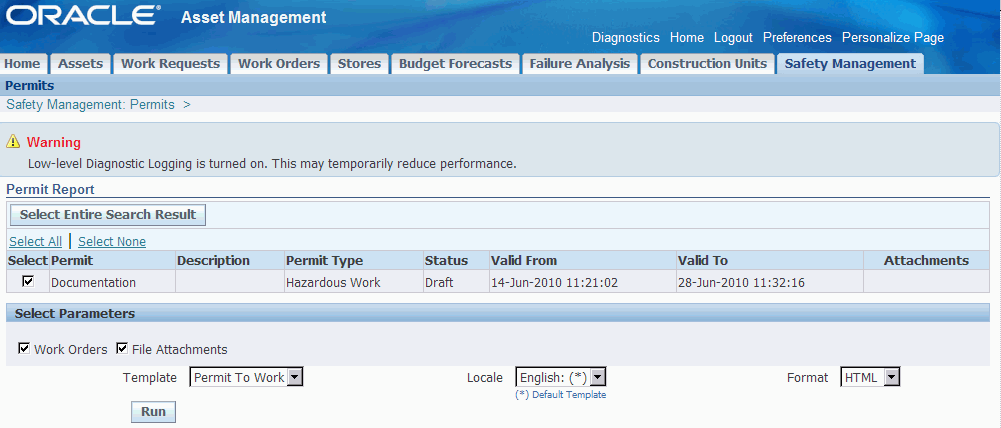
Click the Print Permit button for the work permit that you want to print.
The Permit Report page appears.
-
Select the report parameters that you want to include such as Work Orders and File Attachments.
-
Select a template (if applicable).
-
The Locale defaults to the template (if applicable), and this describes the language in which you want the permit to be printed.
-
Select one of the following report formats:
-
Excel
-
HTML
-
PDF
-
RTF
-
-
Click the Run button to print the work permit.
-
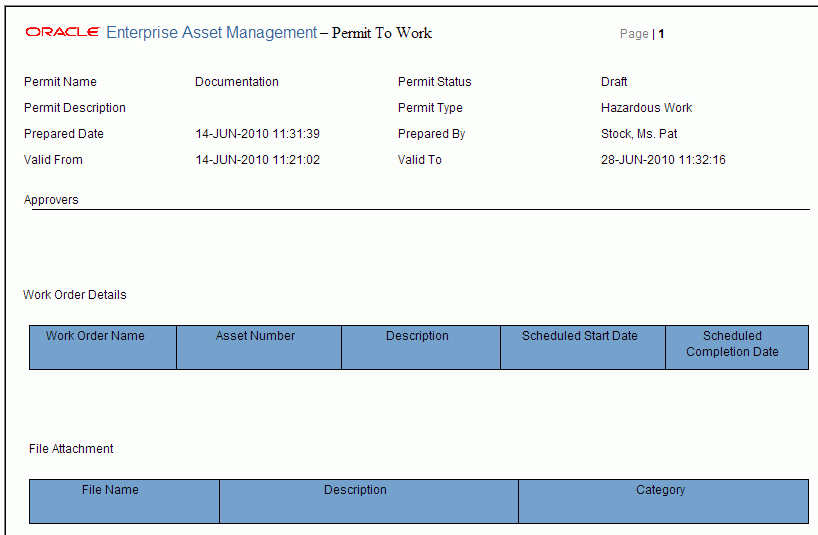
View the printed work permit.
HTML Work Permit
Using the Work Permit Approval Workflow
You can use Oracle Workflow to use the Work Permit Workflow.
The conditions include permit status, permit type, and organization code.
Before you can use the Work Permit Workflow:
-
Verify that the Enable Workflow for Workorders option on the eAM Parameters page has been selected. See Defining eAM Parameters.
This option will enable the Work Permit Workflow to be triggered for work permits.
-
Create approval groups and approval rules for work permits.
Related Topics
See Oracle Workflow User's Guide, for more information about adding approval groups.