Advanced Supply Chain Planning
This chapter covers the following topics:
Performing Pre-Configuration Setup
Complete these tasks after applying the patch and before starting the installation.
Overview
Review this table for the correct WebLogic, Fusion Middleware, and Java Developer Kit versions. Install them based on your platform operating system.
| Release | WebLogic Version | Fusion Middleware Version | Java Developer Kit Version |
|---|---|---|---|
| Value Chain Planning Release 12.2.4.1 and earlier | 10.3.6.0 | - Fusion Middleware 11.1.1.6.0 - ADF Runtime 11.1.1.6.0 |
Use the Oracle JDeveloper and Application Development Framework 11g Certification and Support Matrix. |
| Value Chain Planning Release 12.2.4.2 and later | 10.3.6.0 | - Fusion Middleware 11.1.1.9.0 - ADF Runtime 11.1.1.9.0 |
Use the Oracle JDeveloper and Application Development Framework 11g Certification and Support Matrix. |
If you are installing Value Chain Planning Release 12.2.6, apply these Application Development Framework patches against Fusion Middleware 11.1.1.9.0:
-
23168045: DVT GANTT UNABLE TO MOVE TASK BAR IN ADF 11.1.1.9.0
-
18816814: ALTA - SELECTMANYSHUTTLE WITH WIDE SELECTITEMLABEL MESSED UP IN ALTA
Process
-
Confirm that you have WebLogic 11gR1 (WebLogic Server 10.3.6.0) installed. See the table in this section to confirm that you have the proper Fusion Middleware Version, ADF Runtime, and Java Developer Kit versions installed.
-
Install the required Java Developer Kit.
Confirm that you install a Java Developer Kit that is compatible with your operating system and WebLogic Server version.
See Oracle Fusion Middleware 11g Release 1 (11.1.1.x) Certification Matrix.
-
Install WebLogic 10.3.6 according to Oracle WebLogic Server Installers
Navigate to Installers with Oracle WebLogic Server and Oracle Coherence and download the file for your platform, for example, ./wls1036_linux32.bin.
After installing, create a new Oracle home and note the directory.
-
Install Application Development Framework Runtime according to Downloads for Oracle ADF. Navigate to Application Development Runtime, select the correct version, and download the file.
Download ADF Runtime 11.1.1.6.0 from Oracle Software Delivery Cloud.. Search for Oracle Application Development Runtime.
Unzip the ADF runtime zip file, for example,
unzip ofm_appdev_generic_11.1.1.9.0_disk1_1of1.zip.
cd Disk1
./runInstaller -jreLoc <JDK location>
Use the same Oracle home from the WebLogic installation.
-
Configure the WebLogic Server domain according to Creating the ASCP Domain and Admin Server.
-
-
After applying the patch, copy file $MSC_TOP/patch/115/ear/PlanningUIEar.zip from the EBS server to a directory on the WebLogic Server.
-
Create a folder named applications on the host machine where WebLogic is installed. These instructions reference this folder as applications. For example,
/slot/ems1392/oracle/mwhome/user_projects/domain/fmw_domain/applications.
-
Copy the .zip file to the folder applications.
-
Extract the .zip file to the same folder. The zipped file contains the file PlanningUI.ear that you select from this location during deployment.
See also:
-
In the EBusiness Suite application, set profile option MSC: ASCP Planning URL at the site level--the EBS instance which the data source points to. The internal profile name is MSC_ASCP_WEBLOGIC_URL.
Set it to http://domain_name:port_number, for example, http://rws60144rems.us.oracle.com:6087.
Use the same port number for the Advanced Supply Chain Planning domain managed server that you define in Creating the ASCP Managed Server.
Performing Configuration
This section includes information about the following ASCP configuration tasks:
Creating the ASCP Domain and Admin Server
If you currently have a working WebLogic Server (WLS) and domain created with the certified JDK version and specified ADF Runtime version, this step is optional. Go to Creating the ASCP Managed Server.
On the installed WLS, create a new WLS domain (for example, ascpdomain), and a new admin server (for example, AdminServer) in this domain.
Perform the following procedure to create the ASCP domain.
-
Go to <WLS_HOME>/common/bin folder.
Example:
cd <installation path>/wlserver_10.3/common/bin
-
Run config.sh script.
Example:
./config.sh
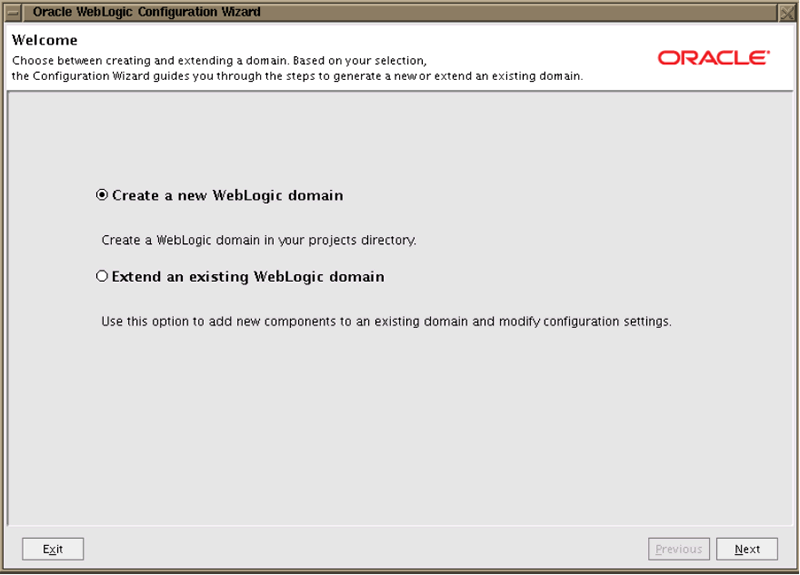
The Welcome screen for the Oracle WebLogic Configuration Wizard appears. This wizard guides you through the steps to generate a new domain or extend an existing domain.
-
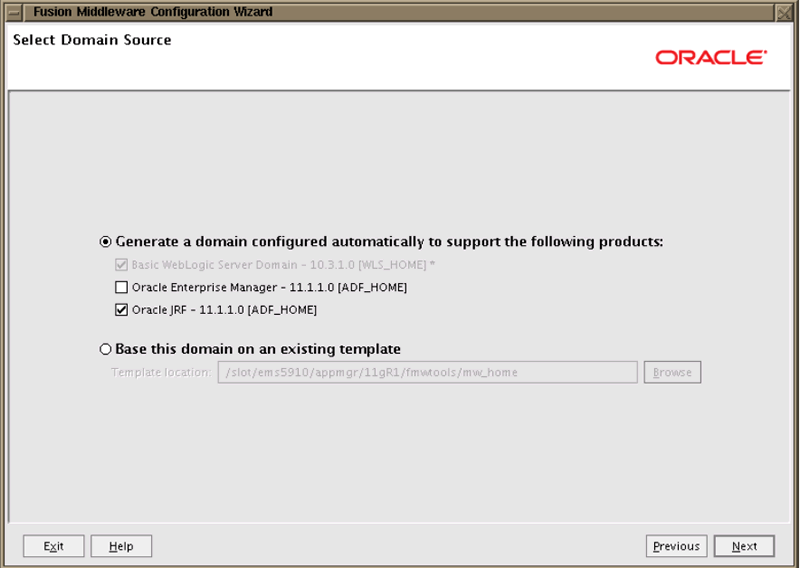
Select Create a new WebLogic domain and click Next. The Select Domain Source screen appears.
-
Perform the following:
-
Select Generate a domain configured automatically to support the following products.
Keep the default settings.
-
Click Next.
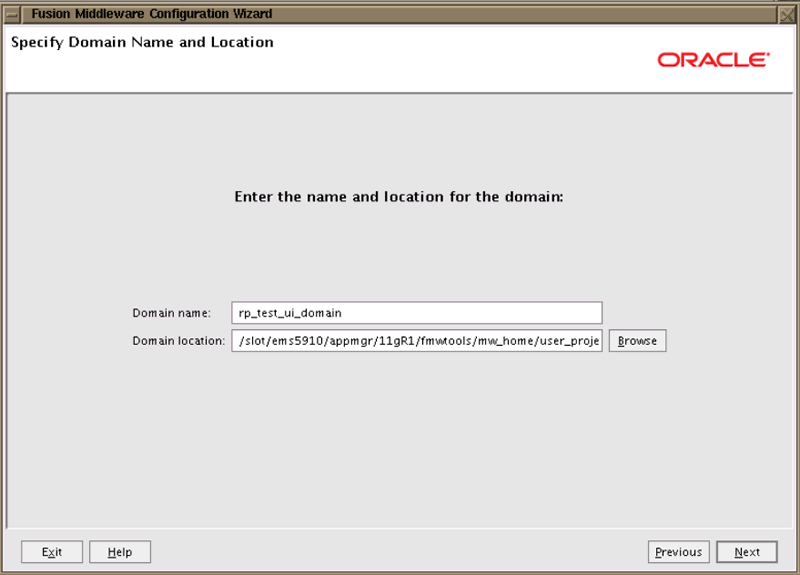
The Specify Domain Name and Location screen appears.
-
-
Provide the Domain name and Domain location, and then click Next.
The domain location is <WLS_HOME>/user_projects/domains where <WLS_HOME> is the installation path for your WebLogic server.
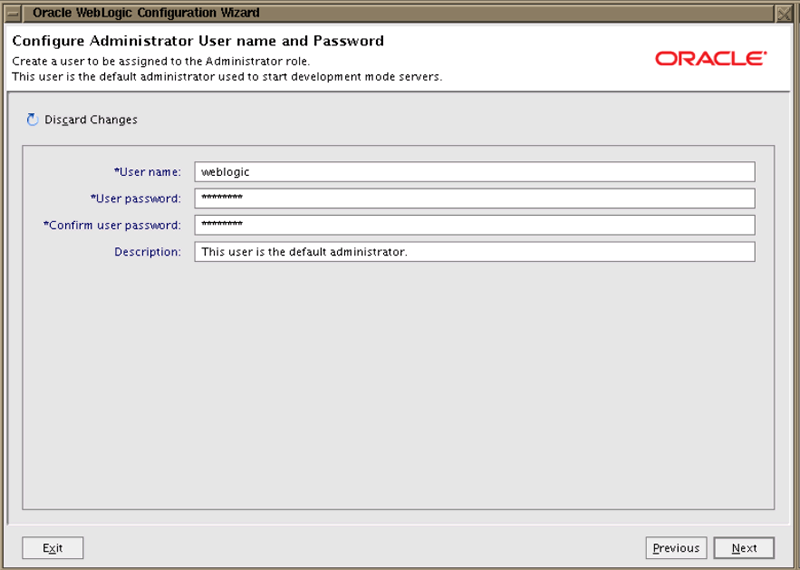
The Configure Administrator User name and Password screen appears.
-
Enter the User name, User password and Confirm user password of your choice, and then click Next.
The Configure Server Start Mode and JDK screen appears.
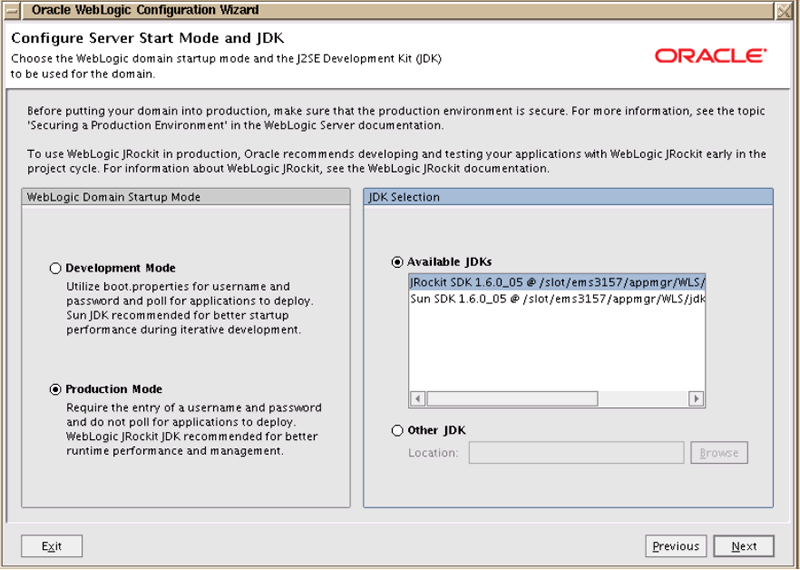
-
Perform the following:
-
Select Production Mode.
-
In JDK Selection region, select Available JDKs and select the appropriate version.
-
Click Next.
The Select Optional Configuration screen appears.

-
-
Select the Administrative Server option only and click Next.
The Configure the Administration Server screen appears.
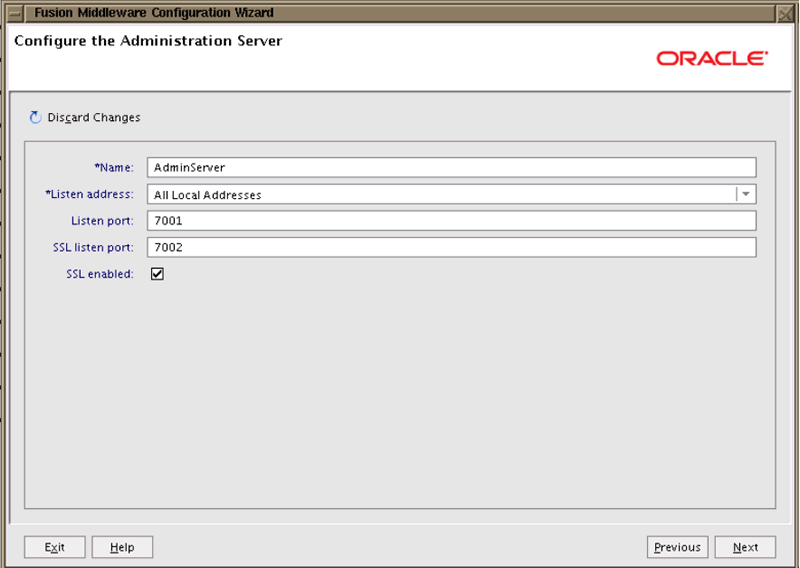
-
Perform the following:
-
Input the fields in the following table.
Field Description Name Enter the name of the admin server. Listen address The admin server listen port address. Leave default option of All Local Addresses. Listen port Enter the server listen port number. Check the availability of the number before entering a value. SSL listen port Enter the SSL listen port number. Check the availability of the number before entering a value. -
Select the SSL enabled option.
-
Click Next.
The Configuration Summary screen appears.
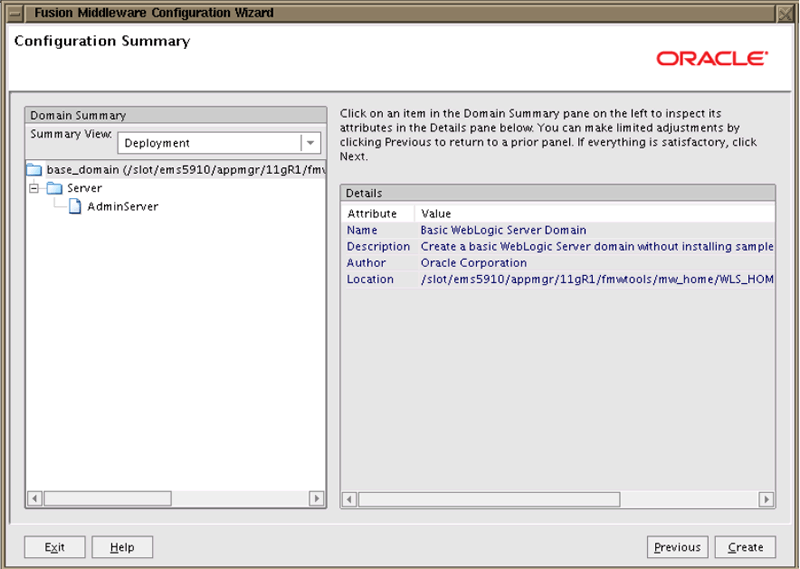
-
-
Review the details. If you want to modify any settings, use the Previous button to return to the appropriate screen. If no changes are required, click Create.
The Creating Domain screen appears and displays the system progress.
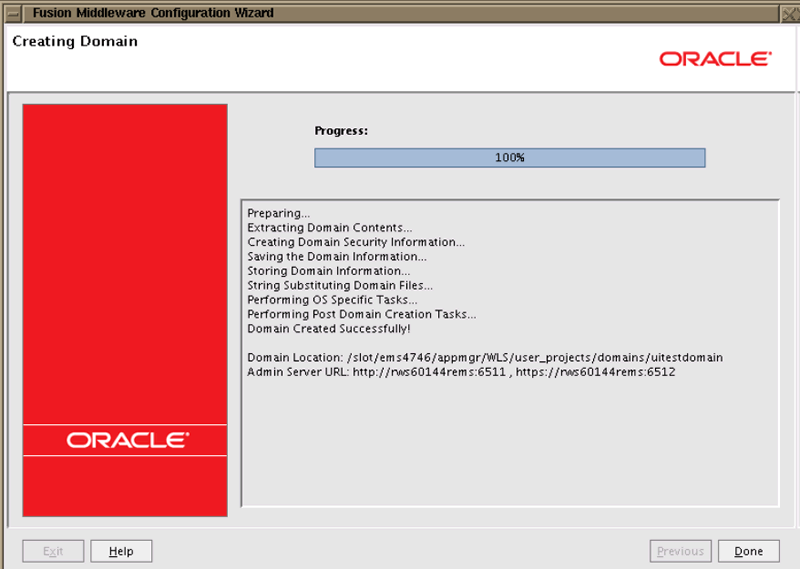
-
When the domain is complete, click Done.
The wizard closes.
-
Go to the ASCP domain directory.
Example:
$ cd /slot/ems3424/appmgr/WLS/user_projects/domains/ascpdomain/
-
In the ASCP domain directory (for example, ascpdomain), create the output/ and log/ directories as follows:
$ mkdir - m 777 output/
$ mkdir -m 777 log/
Creating the ASCP Managed Server
This section provides procedures for creating the managed server and applying JRF.
-
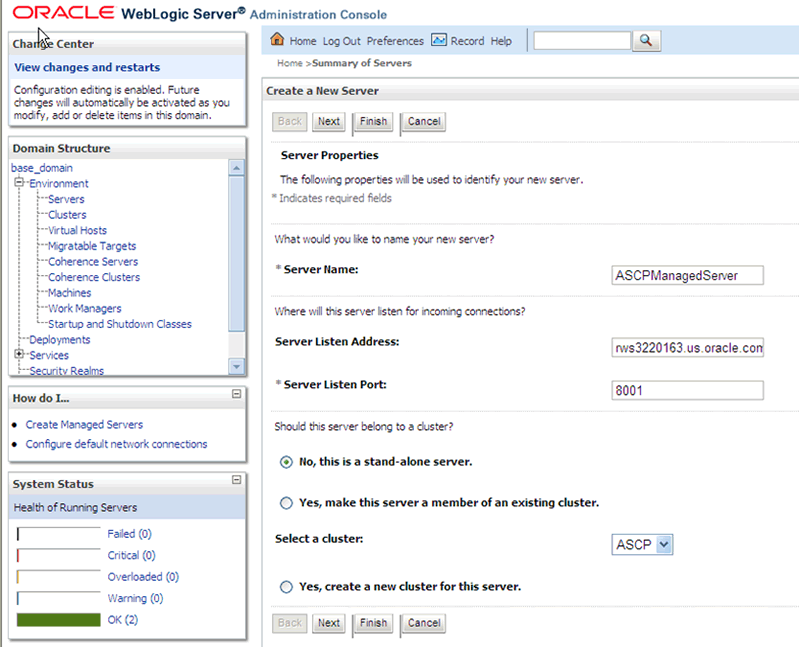
Open a Web browser and type in the URL/address in the following format:
http://<Machine_Name>:<Port_No>/console
<Machine_Name> represents the host name of the machine on which the WebLogic server is running (for example, rws3220163.us.oracle.com) and <Port_No> is the Admin server Listen port number specified when the ASCP domain was created.
Example:
http://rws3220163.us.oracle.com:7901/console
The Oracle WebLogic Administration Console appears.
-
Navigate to Servers in the Domain Structure region.
Example Navigation Path:
base_domain > Environment > Servers
-
Click New to create a new server.
-
Perform the following:
-
Input the fields in the following table.
Field Description Server Name Enter the name of the ASCP managed server (for example, ASCPManagedServer). Server Listen address Enter the listen address for manager server. Server Listen port Enter the server listen port number. -
Define the server cluster options as needed.
-
Click Next.
-
Select the SSL Enabled option to enter the SSL port number.
-
Enter the Secured Socket Listen port in the SSL Port field.
-
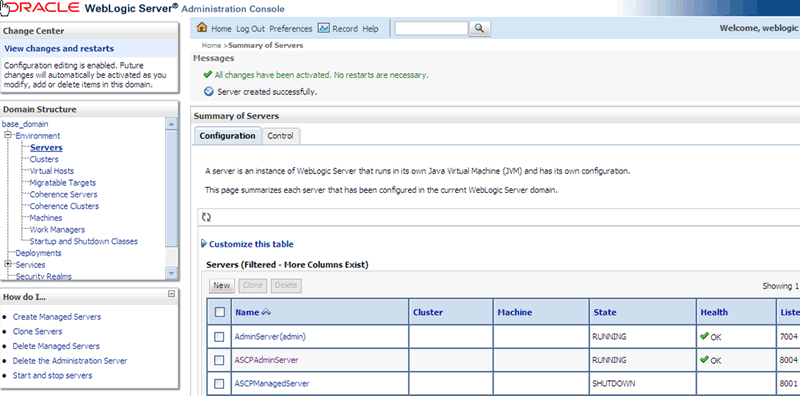
Click Finish.
The Configuration tab displays the new managed server.
-
-
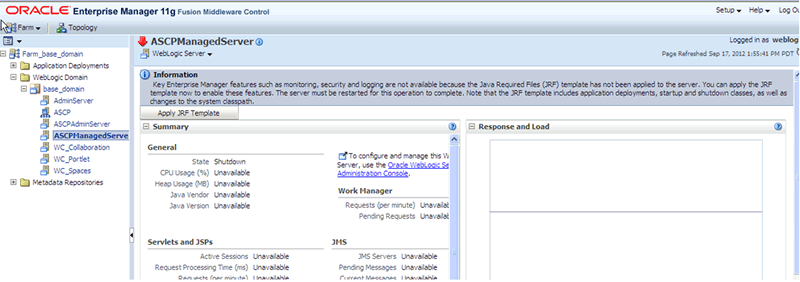
Apply JRF on Managed Server using Enterprise Manger (EM).
-
Open a Web browser and type in the URL/address in the following format:
http://<Machine_Name>:<Port_No>/em
<Machine_Name> represents the host name of the machine on which the WebLogic server is running (for example, rws3220163.us.oracle.com) and <Port_No> is the Admin server Listen port number specified when the ASCP domain was created.
Example:
http:// rws3220163.us.oracle.com:7901/em
-
Navigate to WebLogic domain, your domain name, and select the Managed Server.
The managed server information appears on the right side of the page.
-
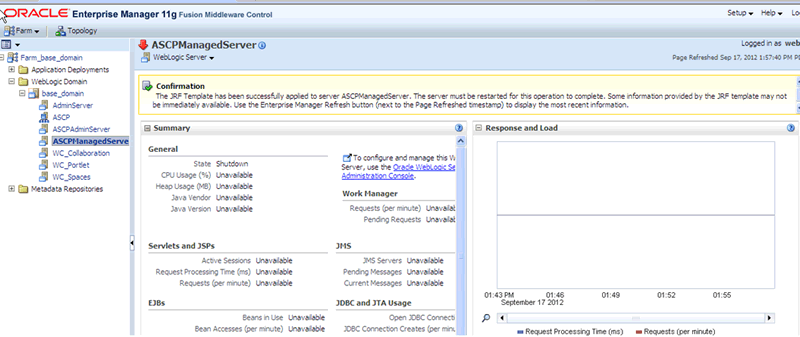
Click Apply JRF Template.
When successfully applied, a confirmation message appears at the top of the page.
The JRF Template can also be applied from the command line using the following procedure:
Note: Skip the command line procedures if JRF was already applied using Enterprise Manger (EM).
-
Run wlst.sh from Middleware bin directory.
cd $MIDDLEWARE_HOME\oracle_common\common\bin
./wlst.sh
-
Authenticate the connection.
Example:
connect('weblogic','welcome1', 'rws3220040.us.oracle.com:7004')
Substitute your WLS username and password in the example above. Provide the host and port where the WLS Admin Server is running for the ASCP domain.
-
Apply JRF.
Example:
applyJRF('ASCPManagedServer', '/slot/ems6479/appmgr/Oracle111160/Middleware/user_projects/domains/base_domain', true)
Use your Managed Server name and the path for the ASCP domain directory example above.
-
-
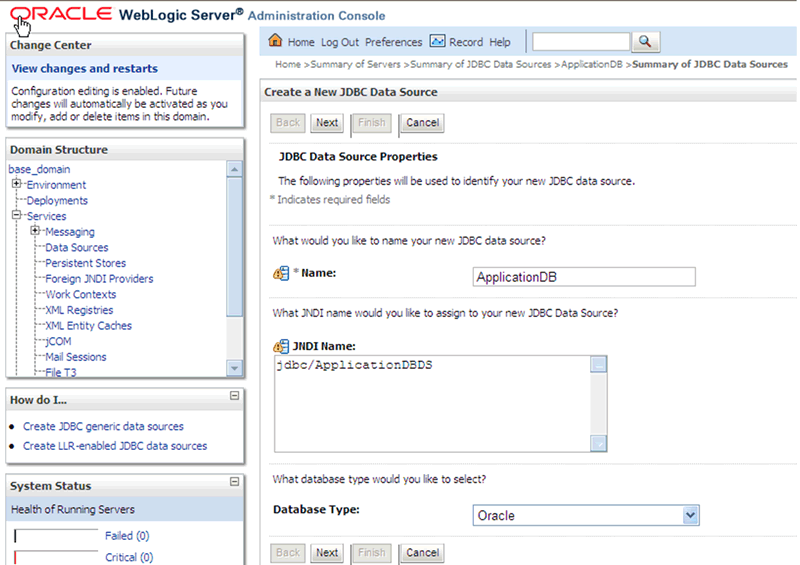
Creating the JDBC Data Source
Perform the procedure below to create the JDBC data source (for example, ApplicationDB).
-
Log in to the WebLogic administration console, as described in Creating the ASCP Managed Servers.
-
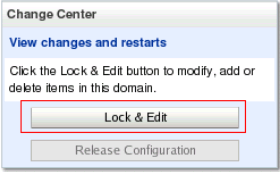
Click Lock & Edit from the Change Center region, located on the top left of the page, if applicable.
-
Navigate to Data Sources under the Domain Structure region.
Example Navigation:
base_domain > Services > JDBC > Data Sources
-
Click New.
The Create a New JDBC Data Source page appears.
-
Perform the following:
-
Input the fields in the following table.
Field Description Name Enter the name of the JDBC data source (for example, ApplicationDB). JNDI Name Enter the name you want to assign to your new JDBC Data Source (for example, jdbc/ApplicationDBDS). -
Select Oracle from the Database Type list.
-
Click Next.
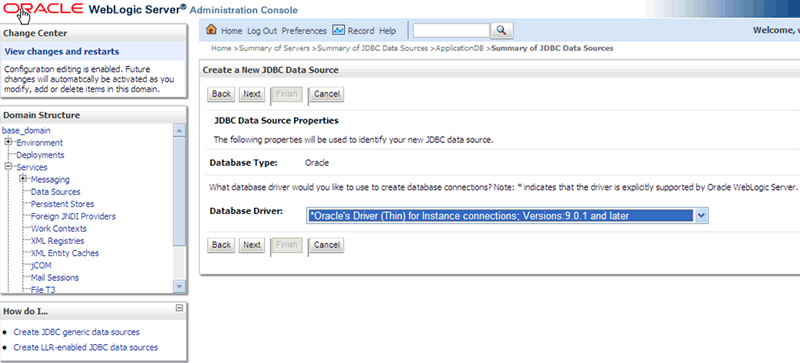
The JDBC Data Source Properties page appears.
-
Select the Oracle's Driver (Thin) for instance connections, Version 9.0.1 and later from the Database Driver list.
-
Click Next.
The Transaction Options page appears.

-
Click Next to accept the default settings displayed.
The Connection Properties page appears.
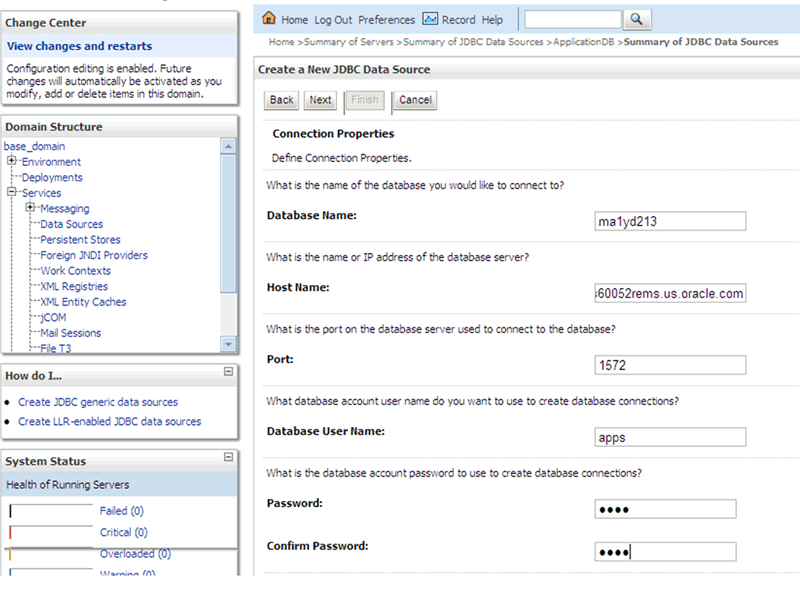
-
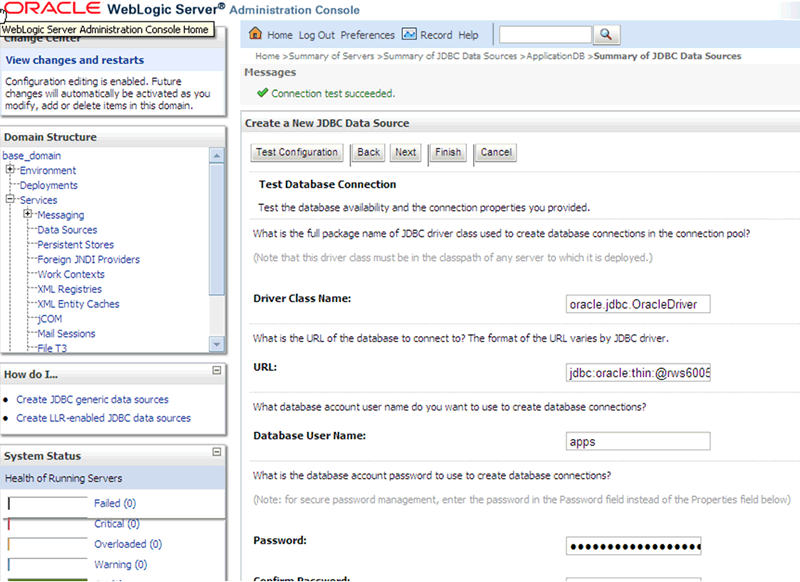
Input the database connection detail fields in the following table.
Field Description Database Name Enter the database name (for example, ma1yd213). Host Name Enter the host name or IP address of the database server (for example, rws60052rems.us.oracle.com). Port Enter the port on the database server used to connect to the database (for example, 1572). Database User Name Enter the database account user name you want to use to create database connections (for example, apps). Password Enter the database account password you want to use to create the database connections. Confirm Password Retype your password. -
Click Next.
The Tests Database Connection page appears.
-
Click Test Configuration.
If the JDBC is set up correctly, then the following message appears at the top of the page:
Connection test succeeded.
-
Click Next.
The Select Targets page appears.

-
Select the ASCP managed server you created (for example, ASCPManagedServer), and click Finish.
-
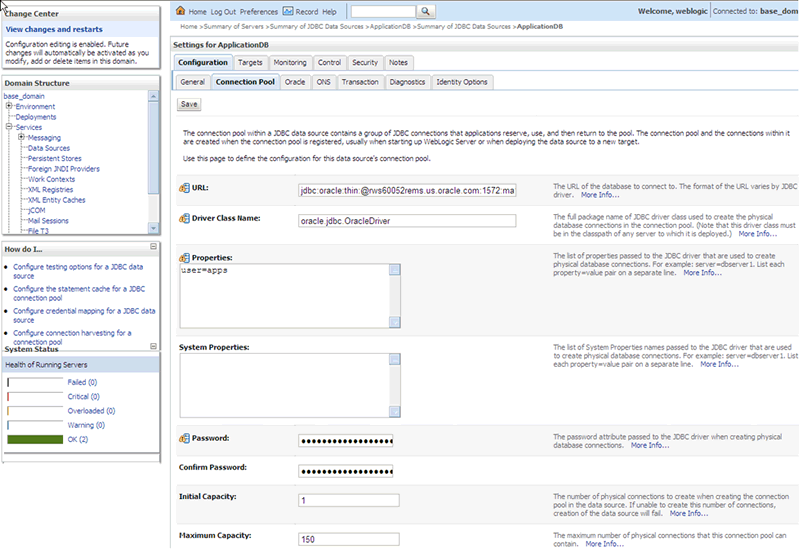
Select the new JDBC data source (for example, ApplicationDB), and click the Configuration tab.
-
Select Connection Pool subtab and set Maximum Capacity field to 150. The default value for the field is 15.
-
Scroll down the page, and click the Advanced link. The Advanced options appear.
-
Select Test Connections on Reserve and click Save.
-
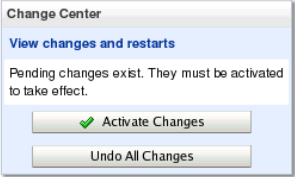
Click Activate Changes from the Change Center region, located on the top left of the page. This screen only appears if you were in Lock & Edit mode, which you selected at the beginning of this procedure.
At this point, you have successfully set up the JDBC Resource.
-
Setting Up MDS Repository
Performing the following procedure to set up the MDS repository.
-
Return to the UNIX console and go to the ASCP domain home (the path where ASCP domain is installed).
-
Create a new directory "mds": (<ASCP_Domain_Home>/servers/<ASCPManagedServer>/mds).
Example:
<installation_path>/user_projects/domains/uitestdomain/servers/AdminServer/mds
Creating a File Persistence Store
To create a file persistence store in WebLogic Server Administration Console, perform the following procedure:
-
Click Lock & Edit button from the Change Center region to change the domain configuration, if applicable.
-
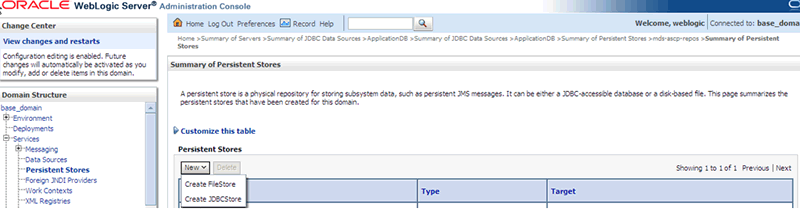
Click Persistent Stores from the Domain Structure region (or you can navigate to Services > Persistent Stores from the Domain Structure region).
The Summary of Persistent Store page appears.
-
Click New, and select Create File Store.
-
Perform the following:
-
Enter mds-ascp-repos in the Name field.
-
Select ASCPManagedServer from the Target list.
-
Enter <ASCP_Domain_Home>/servers/<ASCPManagedServer>/mds in the Directory path field.
-
Click OK.
-
-
Click Activate Changes from the Change Center region, located in top left of the page.
Starting the Admin Server and Managed Server
Perform the command line procedure below to start the ASCP Admin Server and ASCP Managed Server.
-
Change directories to the <DOMAIN_HOME>/bin location.
Syntax:
cd $<DOMAIN_HOME>/bin
Example:
/slot/ems6479/appmgr/Oracle111160/Middleware/user_projects/domains/base_domain/bin
-
Start the AdminServer.
Example Syntax:
nohup ./startWebLogic.sh -Dweblogic.management.username=weblogic -Dweblogic.management.password=welcome1> weblogic.out &
Substitute your Hostname, Managed server post, Username and Password in the example command above.
-
Start the ASCPManagedServer.
Example Syntax:
nohup ./startManagedWebLogic.sh "ASCPManagedServer" "http://rws3220163.us.oracle.com:7001" -Dweblogic.management.username=weblogic -Dweblogic.management.password=welcome1 >ASCPManagedServer.out &
Substitute your Hostname, Managed server post, Username and Password in the example command above.
Deploying and Starting the Planning Application
This procedure consists of the following tasks:
-
Copying and extracting the ZIP files.
-
Deploying the Planning Application.
Copying and Extracting the ZIP Files
Perform the following procedure to copy and extract the ZIP files.
After applying the VCP patch, the PlanningUIEar zip file has to be copied from EBS APPL_TOP to a directory where WebLogic is installed. The new application will have to be deployed to the ASCPManaged server.
-
Create a folder with name "applications" in a directory on the host machine where WebLogic is installed. This folder is referred to as "applications".
Example:
/slot/ems1392/oracle/mwhome/user_projects/domain/fmw_domain/applications
-
Copy the following ZIP files to the folder "applications".
Example:
cp $MSC_TOP/patch/115/ear/PlanningUIEar.zip <applications>
-
Extract the ZIP files to the same folder.
The PlanningUI.ear file is selected from this location for deployment.
Deploying the Planning Application
Perform the following procedure to deploy the Planning Application:
-
In order to deploy the Planning Application, open the WebLogic UI for ASCP Domain according to the procedure mentioned in Starting the Admin Server and Managed Server.
-
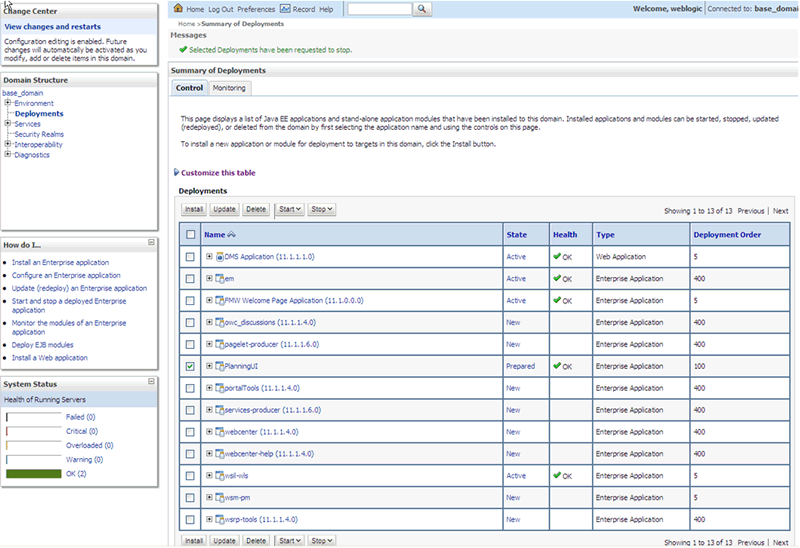
Select Deployments in the Domain Structure region.
The Summary of Deployments - Control tab appears.
-
Select Install to install the new Planning Application.
The Install Application Assistant - Locate deployment to install and prepare for deployment page appears.
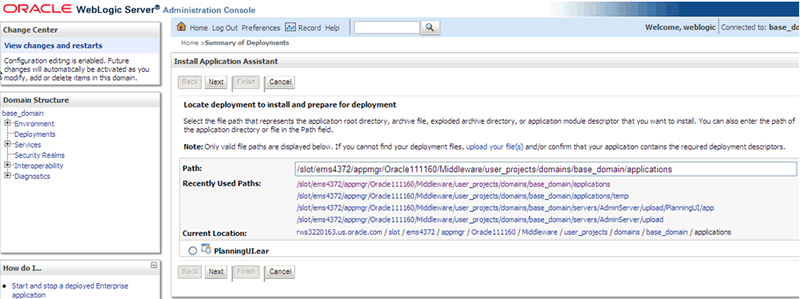
-
In the Path field, enter the <applications> directory path.
Example:
/slot/ems1392/oracle/mwhome/user_projects/domain/fmw_domain/applications
-
Select PlanningUI.ear and click Next.
The Select deployment targets page appears.
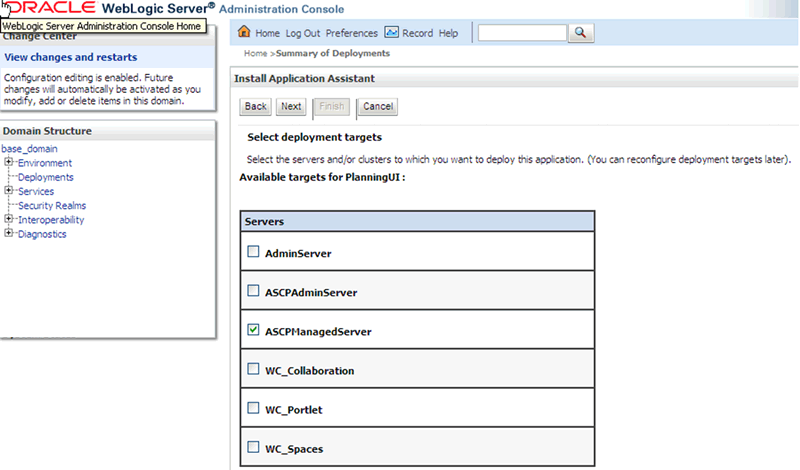
-
From the list of Available targets for PlanningUI, select ASCPManagedServer and click Finish.
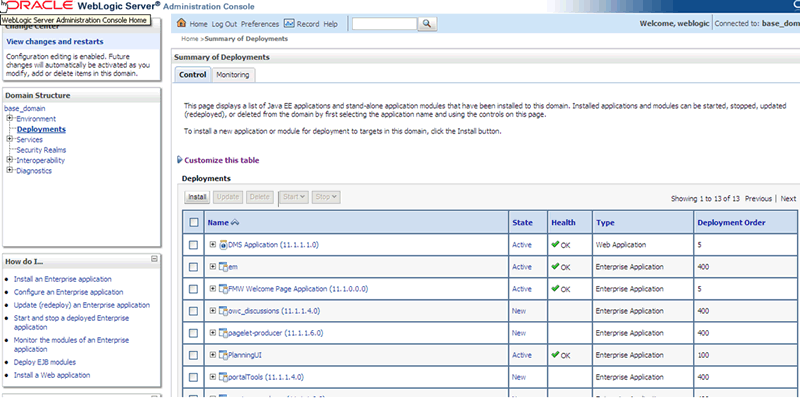
When the deployment is complete, the "PlanningUI" deployment is visible.
-
Verify your deployment.
Select Deployments from the Domain Structure region, locate PlanningUI in Deployments table. PlanningUI deployment should be in "Active" state.
Post-Installation
If you are installing Value Chain Planning Release 12.2.6, edit the file $FND_TOP/secure/allowed_redirects.conf by adding these lines:
profile MSC_ASCP_WEBLOGIC_URL
profile FND_OBIEE_URL
Upgrading ASCP
Performing an upgrade consists of the following tasks:
-
Copying and extracting the ZIP files.
-
Redeploying the planning application.
Copying and Extracting the ZIP Files
Perform the Copying and Extracting the ZIP Files procedure in Deploying and Starting the Planning Application.
Redeploying the Planning Application
To redeploy, you must first delete the existing PlanningUI application. Perform the procedure below to delete the PlanningUI application, then refer to Deploying and Starting the Planning Application for instructions on deploying your new Planning Application.
-
In order to redeploy the Planning application, open the WebLogic UI for the ASCP Domain according to the procedure mentioned in Starting the Admin Server and Managed Server.
-
Select Deployments in the Domain Structure region.
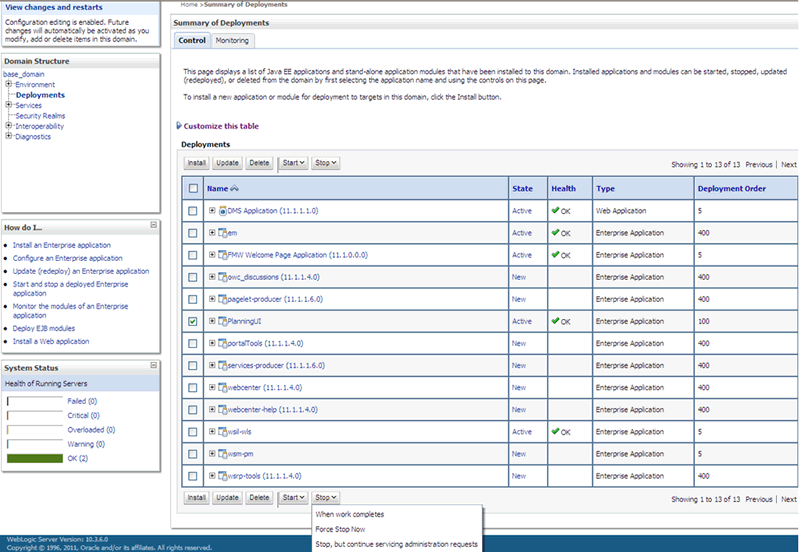
-
Select the PlanningUI application you want to redeploy and click Stop. Select Force Stop Now.
-
Click Yes to stop the application.
-
Select the PlanningUI application you want to redeploy and click Delete.
-
Deploy your new Planning Application. Refer to Deploying and Starting the Planning Application for instructions.
Troubleshooting
The table below contains information or possible solutions about potential issues or errors that may occur while attempting to upgrade to the ASCP Usability Enhancement.
| Issue | Solution |
|---|---|
| The PlanningUI deployment does not appear in Active state. | Please stop and delete the deployment. Follow steps in Redeploying the Planning Application. |
| Deployment errors indicate ADF related error or libraries missing. | Ensure that the managed server was created in a domain which is JRF enabled. |
| An error occurs while running applyJRF from command line wlst.sh. | Type help('all') and make sure applyJRF is available. Use the following: $MIDDLEWARE_HOME\oracle_common\common\bin\wlst.sh |