Using Oracle Asset Tracking
This chapter covers the following topics:
- Overview of Using Oracle Asset Tracking
- Viewing and Updating Descriptive Flexfields for Item Instances
- Updating Extended Attributes for Item Instances
- Submitting a Request
- Viewing Request Results
- Running the EIB Asset Creation for In-Service Items Concurrent Program
- Requesting an Assumed Loss Rate Report
- Requesting a Bill of Lading Report
- Adjusting the Invoice Price Variance
- Running the Interface Invoice Price Variance to Oracle Assets Program
- Running the Interface Invoice Price Variance to Oracle Projects Program
- Running the Generate Notification - New Fixed Assets for Installed Base Tracking Program
- Running the Create Reversal GL Entries for Inventory FA Items Program
- Finding Personal Profile Values
Overview of Using Oracle Asset Tracking
This topic group provides process-oriented, task-based procedures for using the application to perform essential business tasks.
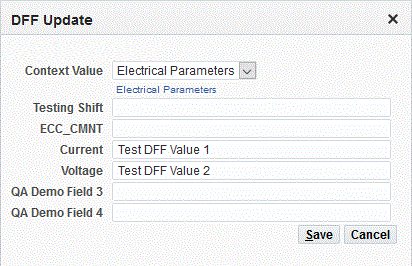
Viewing and Updating Descriptive Flexfields for Item Instances
A flexfield is a field made up of sub-fields or segments. A descriptive flexfield (DFF) appears on your form as a two-character-wide text field with square brackets [ ] as its prompt. When opened, the flexfield appears as a pop-up window that contains a separate field and prompt for each segment. Each segment has a name and a set of valid values. The values may also have value descriptions.
For more information on descriptive flexfields, see Defining Descriptive Flexfields, Oracle E-Business Suite Flexfields Guide.
You can update the descriptive flexfield (DFF) in the Item Instance Search page.
-
Navigate to the Item Instance Search page (Asset Tracking Super User > Assets > Item Instances).
-
Search for an item or item instance.
-
For the selected item, click DFF Update to view or update the descriptive flexfield information.
The DFF Update dialog box appears.
-
You can view the information in the Context Value field and any other custom fields created for this flexfield.
-
Enter any new values, and save your work to return to the Item Instance Search page.
-
Click Apply to save the changes and add the new DFF values.
Updating Extended Attributes for Item Instances
You can update the extended attributes associated with an item instance.
-
Navigate to the Item Instance Search page (Asset Tracking Super User > Assets > Item Instances).
-
Search for an item or item instance.
-
For the selected item, choose Extended Attribute Update to view or update the attribute information.
The Extended Attribute Update dialog box appears.
-
You can view the information in the Name, Value, and Category fields for this attribute.

-
Click OK to return to the Extended Attribute Update page.
-
Enter any new values, and save your work.
-
Click Save.
A warning message displays: Click Apply to Save DFF/Extended Attribute Values.
-
Click Apply to commit the changes made to the extended attributes.
For more information regarding extended attributes, see Managing Item Instances in Oracle Installed Base, Oracle Installed Base User's Guide.
Submitting a Request
Use the Submit Request window to request one of the following reports and concurrent processes in Oracle Asset Tracking:
Viewing Request Results
When you request a report, Oracle Asset Tracking assigns a number to your request, runs the request, and stores the report. Use this procedure to view the report that you requested.
Prerequisites
You must request a report and save the request ID number.
To view request results
-
Using the Asset Tracking Super User responsibility, navigate to Request > View.
-
In the Find window, click Specific Request, and enter the ID number of the report that you wish to view.
-
Click Find to retrieve the record.
-
Click View Output to see the report online.
If the report was completed with errors, then choose View Log to see a list of the errors that were encountered when your request was processed.
-
To print the report, in the Menu Bar choose Tools and then select Reprint.
Enter the number of copies to print, the printer, and the print style.
-
Save.
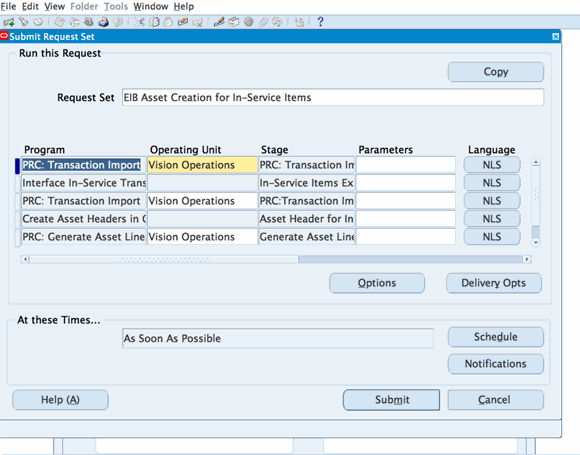
Running the EIB Asset Creation for In-Service Items Concurrent Program
You can run the EIB Asset Creation for In-Service Items request set to create assets for in-service items. This request set contains the following concurrent programs:
-
PRC: Transaction Import: Creates expenditure lines for the invoice price variance amount in projects.
-
Interface In-Service Transactions to Oracle Projects - Normal Items: Reverses the originally created expenditure items using the net-zero adjustment functionality and recreates the expenditure items in PA transaction interface with all the attributes (item, serial, book type, asset category, location and product classification) required by the CRL process to complete the capitalization process. This concurrent program should be run after deployment transactions in a project instance.
-
Create Asset Headers in Oracle Projects - Normal Items: Creates an asset header for capitalized project expenditures. Asset creation is based on item, serial (if serialized item), asset category, date placed into service, and product classification.
-
PRC: Generate Asset Lines for a Single Project: Automates the creation of a project asset. After this process is completed, you can navigate to the capital projects form and query for the project to see the project assets that have been created.
-
PRC: Interface Assets to Oracle Assets: Associates the expenditure items to the asset headers and creates project asset lines. The project asset is ready to be interfaced to Oracle Assets.
-
Navigate to the Request Set page (Asset Tracking Super User > Request > Set).
-
Click the Search icon and the Find Set window appears.
-
Enter EIB% in the Set field, and then click Find.
-
Select EIB Asset Creation for In-Service Items, and then click OK. The Request Set page appears.
-
(Optional) Enter a description.
-
In the Active Dates region, enter From and To dates.
-
Select any of these Run Options:
-
Print Together
-
Allow Incompatibility
-
Recalculate Default Program Parameters
-
-
Click Submit.
Requesting an Assumed Loss Rate Report
Use this procedure to generate a list of items that have been issued to projects but have never been placed in service.
To request an assumed loss rate report
-
Using the Asset Tracking Super User responsibility, navigate to Request and then select Run.
-
Choose to run a single report.
-
In the Name field, choose Assumed Loss Rate Report.
-
Choose either Detail or Summary report type.
The Detail type displays all individual transactions that meet your criteria. The Summary type provides only transaction totals.
-
In the Parameters window, enter any needed information in the fields to define your search.
-
If you leave all optional fields blank, then the search returns all records across all organizations in the format that you requested.
-
Task Number: Enter the task number to further limit your search results to those items that have been issued to a particular task for a project.
-
Project Number: To limit your search results to those items that have been issued to a specific project, enter the project number here.
-
Organization: To limit your results to a particular organization, enter that organization here.
-
Inventory Item: To limit your search results to records for a specific item, enter the item number here.
-
-
Click OK to close the Parameters window.
-
Click Submit when you have finished defining the report.
-
The application assigns an ID number to your request. Use the ID number to find your request in the View Request window.
Related Topics
Requesting a Bill of Lading Report
Use this procedure to generate a bill of lading report, which displays the following:
-
Move order number
-
Transaction request date
-
Ship-to location name and address
-
Project number
-
Task number
-
Line item number
-
Item number
-
Item revision
-
Quantity requested and quantity shipped, both with totals for each item number
-
CLEI
-
Serial number
-
Vendor serial number
Follow these steps to generate a bill of lading.
-
To print a bill of lading for a specific range of dates, enter a date in both the Data Required From and Data Required To fields. If you do not enter any dates in these fields, then the bill of lading report shows all move orders up to the system date.
-
If you enter a value for Task Number, then enter a corresponding Project Number.
-
To keep the report results to a manageable length, enter data for as many of the parameter fields as possible.
To request a bill of lading report
-
Using the Asset Tracking Super User responsibility, navigate to Request and then select Run.
-
Choose to run a single report.
-
In the Name field, choose Bill of Lading Report.
In the Parameters window, enter any necessary information in the fields to define your search.
-
If you leave all fields blank, then the report will include all move orders for the current day.
-
Move Order Number: To limit the report to a specific move order, enter that number here.
-
Organization Name: Limits the report to a specific organization.
-
Date From: To limits the report to all move orders generated from a specific date forward, enter that date here.
-
Date To: To limit the report to all move orders generated before a specific date, enter that date here.
-
Project Number: To limit the report to only those move orders for a specific project, enter that project number here.
-
Task Number: To limit the report to only those move orders for a particular project task, enter that task number here.
-
Location: To limit the report to only those move orders for a particular physical location, enter that location here.
-
-
Click OK to close the Parameters window.
-
Click Submit when you have finished defining the report.
The application assigns an ID number to your request. Use the ID number to find your request in the View Request form.
Related Topics
Adjusting the Invoice Price Variance
When assets are procured through Oracle Purchasing, they are created with purchase order costs.
After the invoice is created, any cost difference must be adjusted in project accounting or fixed asset applications. For the depreciable items, the difference is adjusted in Oracle Assets. For non-depreciable items, the adjustment is done in Oracle Projects.
For both normal and depreciable items, in Oracle Payables, the invoice must be approved, and accounting must be created. Also you need to run an Oracle Payables concurrent program to interface the transaction to Oracle General Ledger before adjusting the invoice price variance.
You must run a concurrent program to ensure that the construction cost of the project is as close to the actual cost as possible.
Two types of invoice price variance are available:
-
Invoice Price Variance in Oracle Projects
To adjust the cost from Oracle Payables, you must bring in invoice cost from Oracle Payables into Oracle Projects and then assign attributes to new expenditures. The steps are as follows:
-
Run the program Interface Invoice Price Variance to Oracle Projects. It creates invoice price variance data in the Project interface table, including self-assessed taxes that are reflected in the invoice header.
-
Run the program PRC: Transaction Import. It creates expenditure lines for the invoice price variance amount in projects.
-
Run the program PRC: Generate Asset Lines.
-
Run the Oracle Assets request set Post Mass Additions for the category book.
-
-
Invoice Price Variance in Oracle Assets
To adjust the cost from Oracle Payables, bring the invoice cost from Oracle Payables into Oracle Assets, and then update the Mass Addition table. The steps are as follows:
-
Run the program Interface Invoice Price Variance to Oracle Assets. It creates invoice price variance data in the Fixed Asset Mass Additions table, including self-assessed taxes that are reflected in the invoice header.
-
Run the Oracle Assets request set, Post Mass Additions for the category book.
-
For more information regarding self-assessed taxes, see Taxes on Invoices, Invoices, Oracle Payables User's Guide.
The topics in this section are the following:
-
Running the Interface Invoice Price Variance to Oracle Assets Program
-
Running the Interface Invoice Price Variance to Oracle Projects Program
Running the Interface Invoice Price Variance to Oracle Assets Program
In Oracle Payables, first approve the invoice, then create accounting for the invoice.
Run the Oracle Payables program Payables Transfer to General Ledger.
To run the Interface Invoice Price Variance to Oracle Assets program
-
Using the Asset Tracking Super User responsibility, navigate to Request and then select Run.
-
Choose to run a single report.
-
In the Name field, choose Interface Invoice Price Variance to Oracle Assets program.
-
In the Parameters window, enter the parameters: PO Number, Inventory Item, Organization, Include Zero IPV.
-
Click OK to close the Parameters window.
-
Click Submit when you have finished defining the report.
The application assigns an ID number to your request. Use the ID number to find your request in the View Request window.
Related Topics
Running the Interface Invoice Price Variance to Oracle Projects Program
In Oracle Payables, first approve the invoice, then create accounting for the invoice.
Run the Oracle Payables program Payables Transfer to General Ledger.
To run the Interface Invoice Price Variance to Oracle Projects Program
-
Using the Asset Tracking Super User responsibility, navigate to Request and then select Run.
-
Choose to run a single report.
-
In the Name field, choose Interface Invoice Price Variance to Oracle Projects.
-
In the Parameters window, enter the parameters: Project Number, Task Number, Purchase Order Number, Inventory Item, and Organization.
-
Click OK to close the Parameters window.
-
Click Submit when you have finished defining the report.
The application assigns an ID number to your request. Use the ID number to find your request in the View Request window.
Related Topics
Running the Generate Notification - New Fixed Assets for Installed Base Tracking Program
You can run the concurrent program Generate Notification - New Fixed Assets for Installed Base Tracking, from the Asset Tracking Super User or Asset Tracking Planner responsibilities. This program generates a workflow notification for all the assets which may need an item instance created. If an asset is created in Oracle Assets and the source of the asset is not Oracle Asset Tracking, then running this program inserts a row in the staging table CSI_FA_TRANSACTIONS and generates a notification. Depending on the setup of Oracle Workflow, an email is sent to users associated to the seeded responsibilities, Asset Tracking Super User or Asset Tracking Planner. The Asset Tracking Planner responsibility has been created to simplify the process of generating and acting on the new assets workflow notifications.
Note: You can also view a notification from the Oracle Workflow worklist.
To run the Generate Notification - New Fixed Assets for Installed Base Tracking program
-
From the Asset Tracking Super User responsibility, navigate to Request and then select Run.
-
Choose to run a single report.
-
In the Name field, choose Generate Notification - New Fixed Assets for Installed Base Tracking.
-
Click Submit.
The application assigns an ID number to your request. Use the ID number to find your request in the View Request window.
Running the Create Reversal GL Entries for Inventory FA Items Program
Oracle Asset Tracking enables you to capitalize assets but regardless of its capitalization status the application allows movement of items within and out of inventory. As capitalized assets move in and out of inventory, accounting entries are generated automatically by the Cost Manager to update the associated inventory value. The Cost Manager has no way to identify these assets as capital assets. To negate the unwanted material accounting transactions that were created, Oracle Asset Tracking uses the Create Reversal GL Entries for Inventory FA Items program to reverse the accounting entries made by the Cost Manager.
Following is a description of how the Create Reversal GL Entries for Inventory FA Items program works:
-
Finds unprocessed CSI transactions using the 1 value (Pending) of gl_interface_status_code column. (The CSI_TRANSACTIONS table stores all transactions related to Item Instances.)
If there are no unprocessed transactions, then the program ends.
Otherwise, it gets the corresponding MTL_MATERIAL_TRANSACTIONS (MMT) row for each unprocessed CSI transactions. For each inventory transaction of an item instance, a CSI_TRANSACTIONS row is created with the MMT transaction id as foreign key.
-
After the MMT record is found, checks to determine whether any item instances are capitalized item instances.
If there is none, the record is not processed.
Otherwise, it will process to find the corresponding SLA entries.
-
To ensure that there will be no other changes before proceeding any further with the SLA entries, the process looks for Final Mode SLA entries.
-
The amount to be reversed is computed using the following formula:
(Ledger Amount / quantity in MMT)multiplied by the # of capitalized item instances.The accounts used to generate reversal entries are the same as the original distribution entry which is being reversed.
-
Inserts reversal entries into GL_INTERFACE, to be posted in General Ledger later.
-
Sets the gl_interface_status_code of CSI_TRANSACTIONS to 2 (Posted). This ensures the transactions are not processed again the next time the program runs. If the program logic derives that the transaction does not need accounting reversal then the gl_adjustment_process_flag of CSI_TRANSACTIONS is updated to 3 (None). This typically is the case when the distributions are not transferable to general ledger as with some upgrade data.
Note: The process can be initiated any time. However, you must also run it after all your SLA entries have transferred to the GL, and before you close your period.
From the GL side, the Journal Import process can be run to create journal entries from the GL_INTERFACE records. After reviewing for validity, they can be posted to GL .
To run the Create Reversal GL Entries for Inventory FA Items program
-
From the Asset Tracking Super User responsibility, navigate to Request and then select Run.
-
Choose to run a single report.
-
In the Name field, choose Create Reversal GL Entries for Inventory FA Items.
-
Click Submit.
The application assigns an ID number to your request. Use the ID number to find your request in the View Request window.
Finding Personal Profile Values
In the Find Personal Profile Values window, you can search for the personal profile values that have already been defined in other Oracle applications. Then use the Personal Profile Values window to display and make changes to your personal settings. Do not enter user values unless you require a setting that is different from the default setting.
Follow these steps to find and edit personal profile values used in the Oracle Asset Tracking application.
Prerequisites
Create profiles.
To find personal profile values
-
Using the Asset Tracking Super User responsibility, navigate to Setup and then select Profiles.
The Find Personal Profile Values window opens.
-
Click [...] to open the list of values.
The Organizations window appears.
-
Enter any partial search mask, if you want, in the Find field, and click Find.
The Profiles window displays the profiles for Oracle Asset Tracking.
-
Select the profile that you want to edit, and click OK.
The Find Personal Profile Values window displays the name of the selected profile.
-
Click Find.
The Personal Profile Values window opens and displays the selected profile.
-
Enter values in the User Value column to customize the user profile.
-
Save.