Secondary Invoice Approval Setup
Overview
Secondary Invoice Approval for Payables lets you enforce additional levels of approval within departments before an invoice or purchase order is released for payment.
You can create departmental groups, assign departmental approvers and invoice clerks to departmental groups, assign flexfield ranges to departmental approvers, and deactivate departmental approvers and invoice clerks in the Maintain Secondary Approval Relationships window.
Prerequisites
Before setting up Secondary Invoice Approval, you must define departmental approvers and invoice clerks as valid application users.
Secondary Invoice Approval Setup Steps
This table lists setup steps for Secondary Invoice Approval.
| Step Number | Step Description | Required or Optional |
|---|---|---|
| 1 | Create Additional Users | Required |
| 2 | Set Profile Options | Required |
| 3 | Maintain Secondary Approval Relationships | Required |
Creating Additional Users
Create new users with access to Oracle Public Sector Financials (International) or assign existing users access to Oracle Public Sector Financials (International).
You must define users assigned to these roles:
-
Departmental approvers
-
Invoice clerks
-
Central finance group user, conditionally required if payment approvals are used
Related Topics
Creating Users, Oracle E-Business Suite User's Guide:
Maintaining Secondary Approval Relationships Procedure
Set Profile Options
Secondary invoice approval provides the following profile options:
-
Secondary Invoice Approval: Payment Approvals Required - Determines if there are two level of approvals.
-
Secondary Invoice Approval: Central Finance Group User - Indicates if users are authorized to release payment approval holds.
For information on setting profile options, see the following:
Maintaining Secondary Approval Relationships
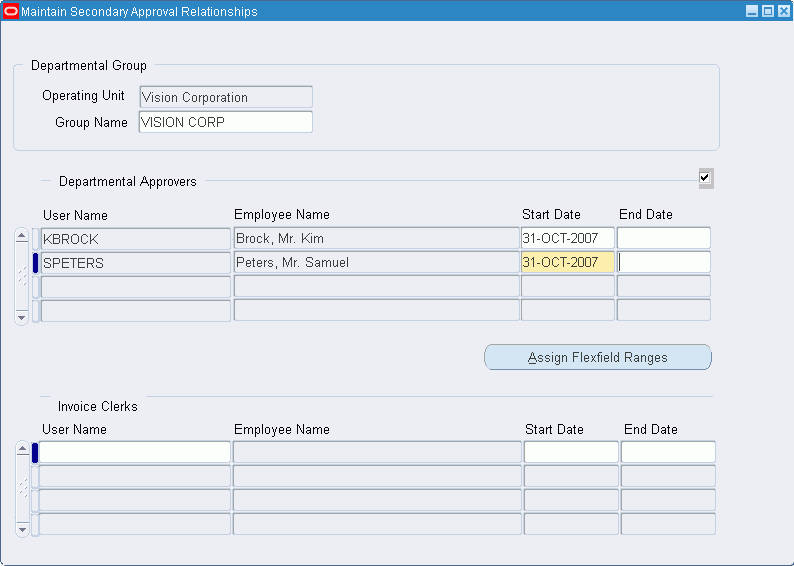
To create a departmental group, define departmental approvers and invoice clerks, and assign flexfield ranges to approvers:
-
Navigate to the Maintain Secondary Approval Relationships window.
-
Select the operating unit.
-
Enter a unique departmental group name.
-
Select the user names of the departmental approvers permitted to authorize invoices.
Note: Each department can have multiple departmental approvers assigned to it. A single departmental approver can be assigned to multiple departments. All departmental approvers within a group can approve invoices created by any invoice clerk within that group.
-
Enter a date range within which the authorization must remain active.
Note: Leave the End Date blank if the end date is unrestricted.
-
To assign flexfield ranges to an approver, click Assign Flexfield Ranges.
Note: Save the changes before defining the flexfield ranges.
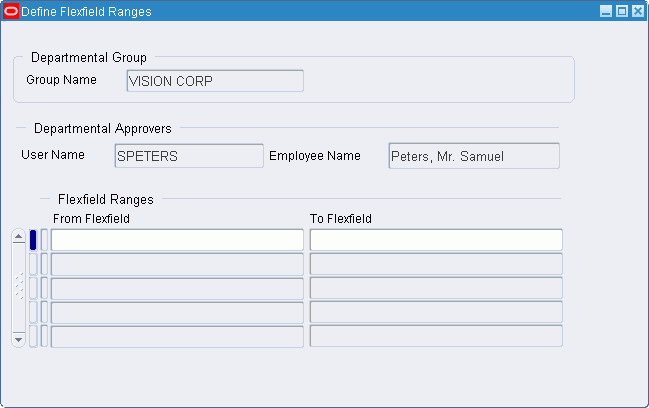
Note: If no flexfield ranges are assigned, approvers can approve transactions for all accounts.
-
Place the cursor in the From Flexfield field.
-
Enter the lowest and highest flexfields in the range.
The flexfield numbers are automatically displayed in the From Flexfield and To Flexfield fields.
-
In the Invoice Clerks User Name field, select the user names of the invoice clerks permitted to enter invoices.
Note: Each department can have multiple invoice clerks assigned to it. A single invoice clerk can be assigned to multiple departments.
-
Enter a date range within which the assignment is active.
Note: Leave the End Date blank if the end date is unrestricted.