Mobile Materials Management
This chapter covers the following topics:
- Overview of Mobile Materials Management
- Receiving Transactions
- Receiving Standard Purchase Orders
- Receiving Standard Internal Shipments
- Receiving Standard Return Material Authorizations
- Receiving Standard Internal Requisitions
- Receiving Standard Items Against an Unknown Document Type
- Receiving Through Return ASN
- Receiving Through Kanban Card
- Item Receipts
- Material Receipt Inspections
- Delivering Material
- Inventory Transactions
- Inventory Receipts
- Inventory Issues
- Inventory Transfers
- Explaining Task Loading and Dropping
- Tasks in the Dropping/Loading Process
- Transacting Move Orders
- Inventory Move Orders
- Consigned and Vendor Managed Inventory
- Inventory Replenishment
- Counting
- Cycle Counting
- Physical Inventory
- Replenishment Counting
- Picking and Shipping Items
- Pick Confirm
- Mobile Shipping
- Labels
- Setting Up Label Formats
- Inventory Inquiries
Overview of Mobile Materials Management
You can use mobile materials management to perform inventory, receiving, and shipping transactions. You can perform the following functions:
-
Record inspections, deliveries, and material movements during receiving transactions.
-
Process multiple receiving transactions consecutively; if you click No for the warning, then the application stops processing the transactions that are not allowed.
-
Create transactions for material including kanban movement, cycle counting, and intraorganization replenishment.
-
Perform pick confirm and ship confirm transactions.
-
Print labels.
-
Inquire on item and kanban transactions.
Receiving Transactions
You can use mobile devices to record the movement of an item through receiving, inspection, transfers, and delivery into your organization.
UCC128 / UCC14 Support
Support of the barcoding and product number standards as promoted by UCC/EAN is growing. The Global Trade Item Number (GTIN) solution includes support for EAN/UCC-14. Companies use EAN/UCC-14 for packaging identical consumer units standard quantities of intermediate packs or shipping containers. EAN/UCC-14 is commonly used in a non-retail environment, particularly in distribution centers that work with packaged goods. Complete support includes a cross-reference from EAN/UCC-14 to Item and Transaction unit of measure. You can perform mobile transactions by scanning the EAN/UCC-14 barcodes on standard packs and indicating the transaction quantity in number of standard packs.
Standard Receipts
When the routing on the receiving document indicates Standard Receipt, you initially receive the items into a receiving location. Receiving locations are designated areas where you temporarily store material before you deliver it to inventory. You can inspect standard receipts depending on the receipt routing the receiving document specifies.
The Receipt Information window appears after you enter information on the Receipt page and you select<Done>. The document number and receiving source may appear based on the specific receipt transaction, and the system generates a receipt number for the transaction.
You can receive items from purchase orders, internal shipments, return material authorizations (RMA), internal requisitions, and All. The All function enables you to receive any type of receipt. The following sections detail how to receive each type of standard receipt.
Overview of Receiving, Oracle Purchasing User's Guide
Receiving Controls, Options, and Profiles, Oracle Purchasing User's Guide
Defining Receiving Options, Oracle Purchasing User's Guide
Defining Locations, Oracle Purchasing User's Guide
Receiving Standard Purchase Orders
You can use a mobile device to receive purchase orders. Purchase orders are documents that you create to purchase items from outside suppliers.
To receive purchase orders:
-
Navigate to the Receipts Page.
-
Select PO from the Receipts page.
-
Enter, select from the list of values, or scan the purchase order number. If you can access more than one operating unit, then the operating unit appears along with the document type and document number. If you enter a PO, and the number exists in only one operating unit, the PO number is supplied automatically, and you can advance to the next field. If you enter a PO in the PO field and the PO number exists in more than one operating unit, then the list of values (LOV) appears and prompts you to select the PO in the correct operating unit.
Note: You can receive an item for which an Item master has not been created through the mobile user interface.
-
Optionally, enter the line number in the Line Num field.
When this data is scanned, the supplier name and any notes that are specified on the purchase order appear.
-
Modify the project and task information if desired. The project and task information appear only if you are in a project-enabled organization. This assigns the purchase order to a particular project or task. If you assign the purchase order to a project or task, you cannot use it in another project or task.
-
Select Enter or enter the item number. The item description is supplied automatically.
Note: The default receiving location is the location that is assigned to the organization you are currently in. The UOM defaults to the item's primary UOM.
Purchase Order Receipt Page
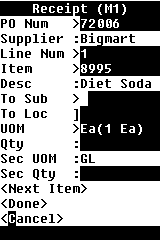
-
Select the country. The country LOV contains all the country codes that are added in the application. If you have defined a material classification code and the Material Classification Type COO (country of origin) is assigned to the item that you are receiving then on the Receipt page the value that you select from the Country LOV is considered as the material classification code.
-
Enter the receiving subinventory, and optionally the locator if required.
-
Enter the quantity to receive in the Qty field. If the item is under dual unit of measure control, the system may display the secondary unit of measure and secondary quantity. To display the Sec Uom and Sec Qty fields, you must set a form function parameter. If you set the form function parameter to display the Sec Uom and Sec Qty fields, then you can modify them based on the parameters that you set on the Item Master. See Inventory Attribute Group, Oracle Inventory User's Guide for more information.
-
If the item is lot, serial, or lot and serial controlled, you can enter, select a lot, or scan the first lot, and enter a quantity. If the item is under dual UOM control, then the secondary lot quantity defaults based on how you defined the item in the Item Master. Three types of defaulting are available, Fixed, Default and No Default, see Inventory Attribute Group, Oracle Inventory User's Guide for more information.
The remaining quantity is displayed indicating the quantity that is yet to be received or the total quantity received to date, depending on the setting of the QTYTRG form function parameter. If the lot is under child lot control, you enter the parent lot, and the child lot appears automatically in the Lot field.
Note: If you set Lot Divisible to no on the Item Master, then you can receive any quantity in to the locator as long as no reservation exists, and you receive the entire lot quantity in to the same locator. You can continue to receive the lot into an existing indivisible lot provided that it is in the same locator. If the lot exists in a locator, then you cannot receive that lot into a different locator.
Note: If the item requires inspection, you do not have to enter the lot information.
To enter Lot attributes press Enter in the Lot field. The lot attributes are as follows:
-
Lot
-
Status
-
Expiration Date
-
Grade
-
Expiration Action Date
-
Expiration Action
-
Retest Date
-
Hold Date
-
Mature Date
-
Supplier Lot
For more information about lot attributes see Inventory Attribute Group, Oracle Inventory User's Guide
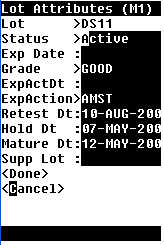
-
-
Select
<Next Item>to receive another item on this purchase order, <Done> to continue this receipt, or<Cancel>to void this transaction.If you select
<Done>, the Receipt Information page appears.Note: If you have enabled shortage message viewing and tolerance warnings or rejections during receiving, the messages display at this point in the transaction.
The PO Num, Supplier, and Rcpt Num (Receipt Number) fields are populated automatically.
-
Optionally, enter the carrier. This is the freight carrier for the shipment.
-
Optionally, enter the packing slip number in the Pack Slip field. The packing slip itemizes details the contents of the shipment.
-
Optionally, enter the bill of lading number in the BOL field. The bill of lading is the freight carrier's contract and receipt for transported goods.
-
Optionally, enter the waybill number in the Waybill field.
-
Optionally, enter the airbill number in the Airbill field.
Purchase Order Receipt Information Page
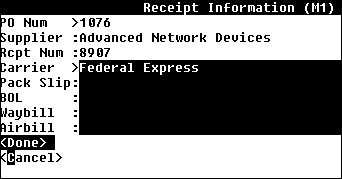
-
Select
<Done>to complete the transaction, or<Cancel>to cancel the transaction.
Related Topics
Defining Control Options, Oracle Purchasing User's Guide
Receiving Standard Internal Shipments
You can use a mobile device to receive internal shipments. Internal shipments are shipments that you source from within your company.
Dual Unit of Measure Control Across Organizations
When you receive an item under dual unit of measure control from another organization, the units of measure may differ, but they must be part of the same unit of measure class. Items may also be under dual unit of measure control in one organization, but not in another organization. The following conditions apply:
-
Shipping Organization Dual UOM, Receiving Organization Single UOM: The system does not require the secondary quantity in the receiving organization, and it performs a validation against the internal order or transfer line.
-
Shipping Organization Single UOM Receiving Organization Dual UOM: The system does not require the secondary UOM on the internal order or transfer. You must enter the secondary quantities on the receipts page, or the system defaults the secondary quantities based on the rules for the item and the receiving organization.
-
Shipping Organization Dual UOM, Receiving Organization Different Dual UOM: If the units of measure differ between organization, then the system calculates the primary ordered quantity and the secondary ordered quantity for the destination organization based on the UOM conversion between the primary and secondary quantities of the shipping organization.
-
Shipping Organization Dual UOM, Receiving Organization Different Primary Ordered UOMs but Same Secondary UOMs: The system copies the secondary quantity to the destination organization and derives the primary ordered quantity based on the default conversion.
-
Shipping Organization Dual UOM, Receiving Organization Dual UOM: If you specify default or no default on the item master, then the system copies the primary and secondary quantities in the receiving organization if the quantities are within the deviation limit that is defined on the destination item and organization.
Receiving Lots Across Organizations
If the lot is indivisible in the shipping organization, but divisible in the receiving organization, you can receive multiple quantities of the same lot in the receiving organization. If the lot is indivisible in both organizations, you must receive the entire lot in the receiving organization. If the lot is child lot enabled, the system receives only the child lot. You cannot create a parent lot in the receiving organization.
To receive internal shipments:
-
Navigate to the Receipts Page.
Standard Receipts Main Page with Int Ship Selected
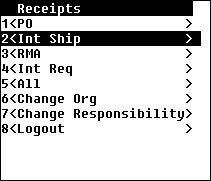
-
Select Int Ship..
-
Enter, select from the list of values, or scan the shipment number in the Ship Num field. The system displays the source organization.
-
Modify the project and task information if desired. The project and task information appear only if you are in a project-enabled organization. The ship num list of values shows only the Shipment Numbers that you can receive in the current organization.
-
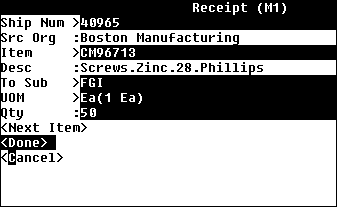
Scan or enter the item received to display the other values on this internal shipment, including description, and default location and unit of measure.
-
Enter the quantity to receive in the Qty field.
Internal Shipments Receipt Page
-
Enter the receiving subinventory, and optionally the locator if required.
-
Enter the quantity that you are receiving in the Qty field. If the item is under dual unit of measure control, then the system may display the secondary unit of measure and secondary quantity. To display the Sec Uom and Sec Qty fields, you must set a form function parameter. If you set the form function parameter to display the Sec Uom and Sec Qty fields, then you can modify them based on the parameters that you set on the Item Master. See, Inventory Attribute Group, Oracle Inventory User's Guide for more information.
-
If the item is lot, serial, or lot and serial controlled, you can enter a lot, select a lot, or scan the first lot, and enter a lot quantity. If the item is under dual UOM control, then the secondary lot quantity defaults based on how you defined the item in the Item Master. Either the remaining quantity is displayed indicating the quantity yet to be received or the total quantity received to date, depending on the setting of the QTYTRG form function parameter. If the lot is under child lot control, you enter the parent lot, and the child lot appears automatically in the Lot field.
Note: If you set Lot Divisible to no on the Item Master, then you can receive any quantity in to the locator as long as, no reservation exists and you receive the entire lot quantity in to the same locator. You can continue to receive the lot into an existing indivisible lot provided that it is in the same locator. If the lot exists in a locator then you cannot receive that lot into a different locator.
Note: If the item requires inspection, you do not have to enter the lot information.
To enter lot attributes, press Enter in the Lot field. The lot attributes are:
-
Lot
-
Status
-
Expiration Date
-
Grade
-
Expiration Action Date
-
Expiration Action
-
Retest Date
-
Hold Date
-
Mature Date
-
Supplier Lot
For more information about Lot Attributes see, Inventory Attribute Group, Oracle Inventory User's Guide

-
-
Select
<Done>or<Cancel>to return to the Receipts page. -
Select <
Next Item>to receive another item, <Done> to continue this receipt, or<Cancel>to void this transaction.Note: If you enabled shortage message viewing during receiving, then the messages appear at this point in the transaction.
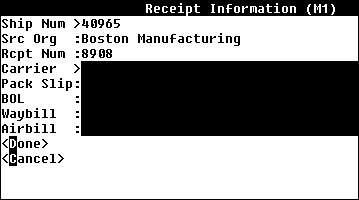
The Ship Num (Shipment Number), Src Org (Sourcing Organization), and Rcpt Num (Receipt Number) fields are populated automatically.
-
Optionally, enter the carrier. This is the freight carrier for the shipment.
-
Optionally, enter the packing slip number in the Pack Slip field. The packing slip itemizes the contents of the shipment.
-
Optionally, enter the bill of lading number in the BOL field. The bill of lading is the freight carrier's contract and receipt for transported goods.
-
Optionally, enter the waybill number in the Waybill field.
-
Optionally, enter the airbill number in the Airbill field.
Internal Shipments Receipt Information Page
-
Select
<Done>to complete the transaction or<Cancel>to cancel the transaction.
Receiving Standard Return Material Authorizations
Return Material Authorizations (RMA) are used when a customer wants to return the goods shipped on a sales order. You can create a receipt against an RMA as you would any other receipt.
Receiving Lots on an RMA
If the item the customer returns is under lot control, then you can set a profile option to determine how you receive lots. You can set the system to receive only lots that are specified on the RMA, new lots, or receive material into existing lots that are not specified on the RMA.
The system does not allow you to manually enter a lot number that does not follow the predefined lot naming convention of the item. It also does not allow you to enter a quantity that is outside of tolerance. In addition, you cannot receive material into an existing lot if the lot statuses differ or violate the status of the destination lot.
To receive standard return material authorizations:
-
Navigate to the Receipts Page.
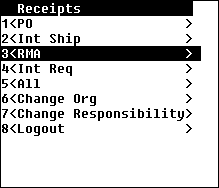
Standard Receipts Main Page with RMA Selected
-
Select RMA.
-
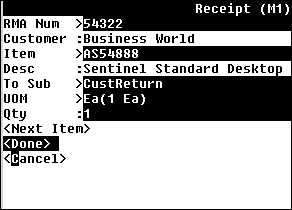
Enter, select from the LOV, or scan the return material authorization number in the RMA Num field.
When this data is scanned or entered, the customer name appears.
-
Modify the project and task information if desired. The project and task information appear only if you are in a project-enabled organization.
RMA Receipt Page
-
Scan or enter the item received to display the other values on this RMA, including description and default receiving location and unit of measure.
-
Enter the receiving subinventory, and optionally the locator if required.
-
Enter the quantity that you are receiving in the Qty field. If the item is under dual unit of measure control, the system may display the secondary unit of measure and secondary quantity. To display the Sec Uom and Sec Qty fields, you must set a form function parameter. If you set the form function parameter to display the Sec Uom and Sec Qty fields, then you can modify them based on the parameters that you set on the Item Master. See Inventory Attribute Group, Oracle Inventory User's Guide for more information.
-
If the item is lot, serial, or lot and serial controlled, you can enter a lot , select a lot, or scan the first lot, and enter a quantity. Either the remaining quantity is displayed indicating the quantity yet to be received or the total quantity received to date, depending on the setting of the QTYTRG form function parameter. If the item is under dual UOM control, then the secondary lot quantity defaults based on how you defined the item in the Item Master. If the lot is under child lot control, you enter the parent lot, and the child lot appears automatically in the Lot field.
Note: If you set Lot Divisible to no on the Item Master, then you can receive any quantity in to the locator, as long as no reservation exists, and you receive the entire lot quantity in to the same locator. You can continue to receive the lot into an existing indivisible lot provided that it is in the same locator. If the lot exists in a locator, then you cannot receive that lot in to a different locator.
Note: If the item requires inspection, you do not have to enter the lot information.
To enter lot attributes press Enter in the Lot field. The lot attributes are:
-
Lot
-
Status
-
Expiration Date
-
Grade
-
Expiration Action Date
-
Expiration Action
-
Retest Date
-
Hold Date
-
Mature Date
-
Supplier Lot
For more information about lot attributes see Inventory Attribute Group, Oracle Inventory User's Guide

-
-
Select
<Done>or<Cancel>to return to the Receipt page. -
Select
<Next Item>to receive another item,<Done>to continue this receipt, or<Cancel>to void this transaction.Note: If you have enabled shortage message viewing during receiving, the messages appear at this point in the transaction.
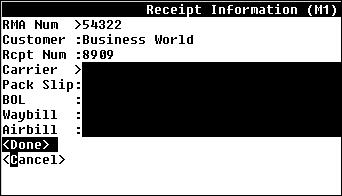
The RMA Num, Customer, and Rcpt Num (Receipt Number) fields are populated automatically.
-
Optionally, enter the carrier. This is the freight carrier for the shipment
-
Optionally, enter the packing slip number in the Pack Slip field. The packing slip itemizes in details the contents of the shipment.
-
Optionally, enter the bill of lading number in the BOL field. The bill of lading is the freight carrier's contract and receipt for transported goods.
-
Optionally, enter the waybill number in the Waybill field.
-
Optionally, enter the airbill number in the Airbill field.
RMA Receipt Information Page
-
Select
<Done>to complete the transaction, or<Cancel>to cancel the transaction.
Receiving Standard Internal Requisitions
An internal requisition is an internal request for goods or services. A requisition can originate from an employee or from another process, such as inventory or manufacturing. An internal requisition is an order that is generated and sourced from your inventory.
To receive internal requisitions:
-
Navigate to the Receipts Page.
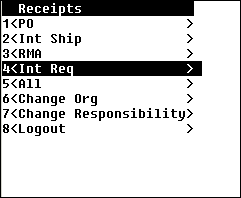
Standard Receipts Main Page with Int Req Selected
-
Select Int Req.
-
Enter, select from the lov, or scan the requisition number in the Req Num field.
-
Modify the project and task information if desired. The project and task information appear only if you are in a project-enabled organization.
-
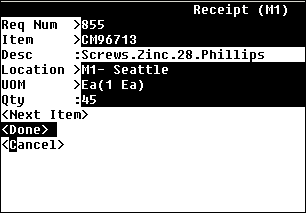
Scan or enter the item to display the other values on this requisition including description, and default receiving location and unit of measure.
Receive Internal Requisitions Receipt Page
-
Enter the receiving subinventory, and optionally the locator if required.
-
Enter the quantity that you are receiving in the Qty field. If the item is under dual unit of measure control, the system may display the secondary unit of measure and secondary quantity. To display the Sec Uom and Sec Qty fields, you must set a form function parameter. If you set the form function parameter to display the Sec Uom and Sec Qty fields, then you can modify them based on the parameters that you set on the Item Master. See Inventory Attribute Group, Oracle Inventory User's Guide for more information.
-
If the item is lot, serial, or lot and serial controlled, then you can enter, select a lot, or scan the first lot, and enter a quantity. Either the remaining quantity is displayed indicating the quantity yet to be received or the total quantity received to date, depending on the setting of the QTYTRG form function parameter. If the item is under dual UOM control, then the secondary lot quantity defaults based on how you defined the item in the Item Master. If the lot is under child lot control, you enter the parent lot, and the child lot appears automatically in the Lot field.
Note: If you set Lot Divisible to no on the Item Master, then you can receive any quantity in to the locator, as long as no reservation exists, and you receive the entire lot quantity in to the same locator. You can continue to receive the lot into an existing indivisible lot provided it is in the same locator. If the lot exists in a locator then you cannot receive that lot into a different locator.
Note: If the item requires inspection, you do not have to enter the lot information.
To enter lot attributes press enter in the Lot field. The lot attributes are:
-
Lot
-
Status
-
Expiration Date
-
Grade
-
Expiration Action Date
-
Expiration Action
-
Retest Date
-
Hold Date
-
Mature Date
-
Supplier Lot
For more information about lot attributes see Inventory Attribute Group, Oracle Inventory User's Guide

-
-
Select
<Done>or<Cancel>to return to the Receipts page. -
Select
<Next Item>to receive another item on this Internal Requisition,<Done>to continue this receipt, or<Cancel>to void this transaction.Note: If you have enabled shortage message viewing during receiving, the messages display at this point in the transaction.
Receiving Standard Items Against an Unknown Document Type
You can use the All function to receive items against an unknown document type.
To receive items against an unknown document type:
-
Navigate to the Receipts Page.
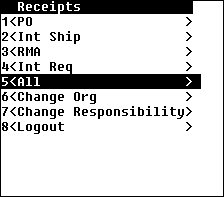
Standard Receipts Main Page with All Selected
-
Select All.
Receive All Documents Receipts Page
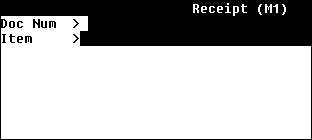
-
Enter, scan, or select the document number from the list of values.
Documents Page
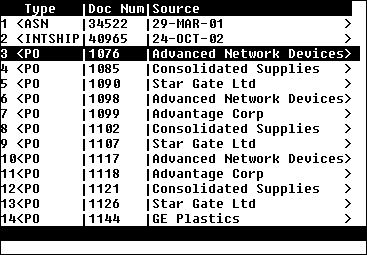
The system returns the appropriate receipts page.
Receipts Page
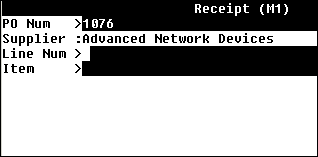
-
Perform the receipt according to the receipt type.
Receiving Through Return ASN
Return ASN (RASN) is the advance shipment notice number used to return material; a RASN can be created when an item is returned after receipt in the destination organization or when the shipment is canceled.
For more information about Return ASNs, see Return of Items Received Through an Internal Sales Order Shipment, Oracle Inventory User’s Guide
For more information about steps to receive material through a Return ASN, see:
-
To receive material in Inventory MSCA, Oracle Inventory User’s Guide
-
How to Perform a Return ASN Receipt, Oracle Warehouse Management User’s Guide
Receiving Through Kanban Card
You can use Kanban Card Number or eKanban Card Number to receive purchase orders or internal sales orders.
Steps to receive items through Kanban Card
-
Navigate to the Receipts page.
-
Select Kanban.
-
In the Card Num field enter the Kanban Card number or the eKanban Card number.
-
The application displays the fields for a purchase order, or an internal requisition based on the document’s association with the card.
-
You can enter the required details in the respective fields.
Item Receipts
You can initiate a receipt based on an item number instead of a document number. Item receipts enable you to scan the item, followed by the document number. You can perform the same receipt types as with standard receipts.
To perform item based receipts:
-
Navigate to the Receiving page.
Receiving Main Page with Item Receipts Selected
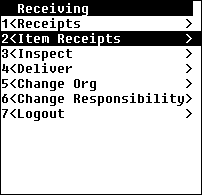
-
Select Item Receipts.
-
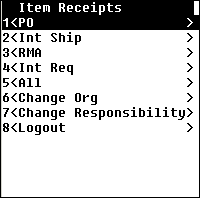
Select the desired item receipt type.
Item Receipts Page with PO selected
-
Enter or scan the item number. The system displays the item number and item description information.
-
Enter or scan the document information, and proceed as before.
PO Item Receipt Page
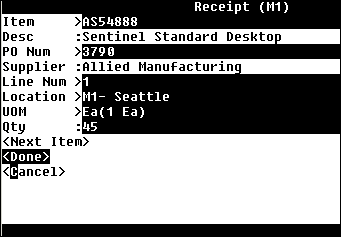
Note: To enable item initiated receipts, set the form function parameter ITEM_CONTROLLED to Yes for all desired receipt types on the desktop application.
Material Receipt Inspections
Inspections are procedures that you perform to ensure that received items conform to quality standards. You can use either Oracle Purchasing or Oracle Quality inspection features to inspect items that you receive. You can use either the Mobile Purchasing Inspection window or the Mobile Quality Inspection window if a collection plan exists to inspect items. You determine which module to use based on the same setup that you use in the desktop applications.
To inspect material receipts:
-
Navigate to the Receiving page.
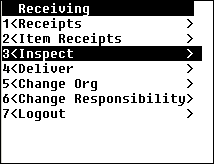
Receiving Page with Inspect Selected
-
Select Inspect.
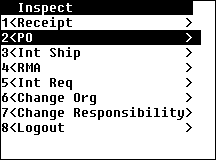
Inspect Page with PO Selected
-
Enter the inspection results either by receipt number when you select the Receipt menu option, or select the document that is appropriate to your inspection. The Inspect window appears.
-
Enter, select from the list of values, or scan the values for this inspection
Inspect Receipt Page
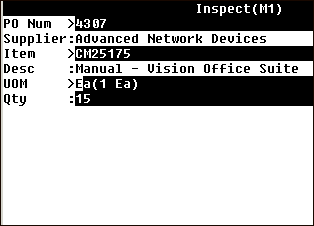
The Inspect window display prompts correspond to the receipt type. Enter the values that are applicable to the receipt type. You can modify the UOM and quantity information if necessary.
-
Receipt Number: generated receipt number, item
-
Purchase Order: purchase order number, item
-
Internal Shipment: shipment number, item
-
Return Material Authorization: RMA number, item
-
Internal Requisition: requisition number, item
-
-
-
After you enter the values for your receipt, select Enter.
The Inspection Detail window appears.
-
Enter the quantity to inspect in the Qty field. If the item is under dual UOM control, then the secondary UOM and secondary quantity depending on how you set the form function parameter that controls the display of secondary UOM and secondary quantity.
-
Enter the accepted quantity in the Acc Qty field. If the item is under dual UOM control the secondary UOM and secondary accepted quantity appear.
-
Optionally, you can enter a description code in the Quality code field, and a value in the Reason field to describe this inspection.
-
If your accepted quantity is less than the inspected quantity, the difference appears in the Rej Qty and SecRejQty fields if the item is under dual UOM control. Optionally, you can enter a reason code for this rejection in the Reason field.
-
Select
<Done>to save this transaction.The Inspect window displays again. Choose
<Next Item>to inspect another item on this receipt, or<Done>to complete this transaction.Inspection Details Page
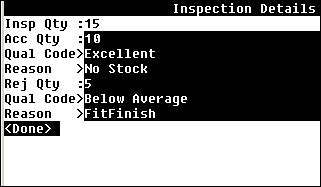
Delivering Material
After you receive and optionally inspect material, you put it away to the final delivery location. You use the Delivery window to put away material.
Note: When the receipt transaction is saved, if the receipt routing type is Direct Delivery, it is delivered in one transaction, rather than received and delivered in two separate transactions. Also, on the initial receipt form, you are prompted for a Subinventory and a Locator if applicable.
To deliver material to its destination:
-
Navigate to the Receiving Page.
-
Select Deliver.
-
Select the appropriate delivery type. The choices are:
-
Receipt
-
PO
-
Int Ship
-
RMA
-
Int Req
-
-
Enter the delivery transaction information either by the receipt number or document type.
In addition to receipt number, you can deliver items received from purchase orders, internal shipments, return material authorizations, and internal requisitions.
Delivery Page
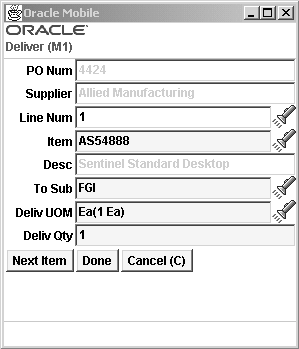
The Deliver window display prompts correspond to the receipt type. Enter the values that are applicable to the receipt type.
-
Receipt Number: receipt number, item
-
Purchase Order: purchase order number, item
-
Internal Shipment: shipment number, item
-
Return Material Authorization: RMA number, item
-
Internal Requisition: requisition number, item
Note: If the receipt routing type is Direct Delivery, it is delivered in one transaction, rather than received and delivered in two separate transactions. At this point, the on-hand inventory is incriminated and the received material is on-hand.
-
-
-
Modify the project and task information if desired. The project and task information appear only if you are in a project-enabled organization.
-
Optionally, you can change the default values for subinventory and, if applicable, the locator in the Sub and Loc fields, and the unit of measure
-
Enter the subinventory, and optionally the locator if required.
-
Enter the quantity to receive in the Qty field. If the item is under dual UOM control, the system may display the secondary unit of measure and secondary quantity. To display the Sec Uom and Sec Qty fields, you must set a form function parameter. The Deliver Type field displays for inspection routings. You can select from the following list of values in the field; Accepted, Rejected, Both. If you set the form function parameter to display the Sec Uom and Sec Qty fields, then you can modify them based on the parameters you set on the Item Master. See Inventory Attribute Group, Oracle Inventory User's Guide for more information.
-
If the item is lot, serial, or lot and serial controlled, you can enter, select , or scan the lot, and enter a lot quantity. The system either displays the remaining quantity and indicates the quantity that remains to be received, or displays the total quantity received to date. The display choice depends on how you set the QTYTRG form function parameter. If the item is under dual UOM control, then the secondary lot quantity defaults based on how you defined the item in the Item Master. If the lot is under child lot control, you enter the parent lot, and the child lot appears automatically in the Lot field.
To enter Lot attributes press enter in the Lot field. The Lot Attributes are:
-
Lot
-
Status
-
Expiration Date
-
Grade
-
Expiration Action Date
-
Expiration Action
-
Retest Date
-
Hold Date
-
Mature Date
-
Supplier Lot
For more information on Lot Attributes see Inventory Attribute Group, Oracle Inventory User's Guide

-
-
Select
<Done>or<Cancel>to return to the Delivery page. -
Select
<Next>to find the another item on this receipt. Choose<Done>to save this transaction, or<Cancel>to void this transaction.
Inventory Transactions
Mobile Materials Management enables you to perform inventory transactions.
Creating Materials Management Inventory Transactions:
-
Navigate to the Materials Management menu, and select Inventory. You can create receipt and issue transactions, transfer material between subinventories, move material from a shipping organization, use inventory replenishment features, enter cycle count items, and enter physical inventory count items.
Inventory Transactions Page
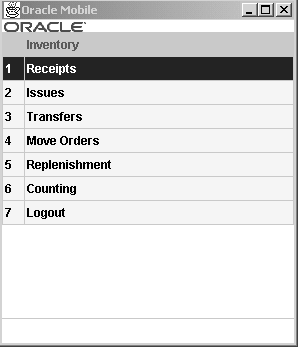
-
Select an inventory transaction.
-
Continue entering values for the prompts for the specific transaction that you are creating.
Note: You can set up defaults for transaction type and account using form function parameters.
-
Save your work.
Inventory Receipts
You can perform alias receipt transactions, and miscellaneous receipt transactions. An account alias is an easily recognized name or label representing a general ledger account number. You can use the account alias instead of an account number to refer to the account. Miscellaneous receiving transactions enable you to receive material from groups that are not inventory, receiving, or work in process.
To create alias and miscellaneous receipts:
-
Navigate to the Materials Management menu, and select Inventory.
-
Select Receipts
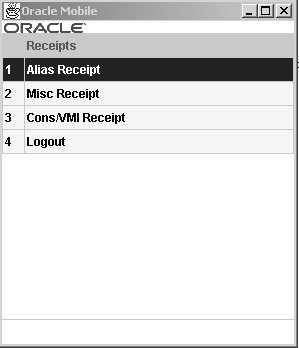
Inventory Receipts Page
-
Select either Alias Receipt to create an alias receipt, or Misc Receipt to create a miscellaneous receipt.
Depending on your choice, either the Alias Receipt or Miscellaneous Receipt window appears.
Note: The prompts for both alias and miscellaneous receipt transactions are the same. The window name distinguishes the transaction type.
-
Enter or select the account number that is used for this receipt transaction in the Acct field.
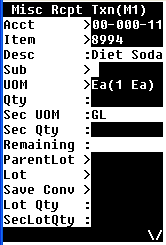
Miscellaneous Receipt Transactions Page
-
Enter, select from the list of values, or scan the item number in the Item field
When this data is entered, the item description and unit of measure appear.
-
Enter the project and task if applicable.
Note: The project and task fields appear only if you are in a project-enabled organization.
-
Enter the subinventory and, if applicable, the locator values in the Sub and Loc fields. Enter the quantity in the Qty field.
-
Enter the quantity to receive in the Qty field. If the item is under dual UOM control, then the secondary UOM and quantity is supplied automatically depending on how you define the item in the Item Master.
-
If the item is lot, serial, or lot and serial controlled, you can enter, select, or scan the first lot, and enter a quantity. The system displays either the remaining quantity to receive or the total quantity received to date. This depends on how you set the QTYTRG form function parameter. If the lot is under child lot control, you enter the parent lot, and the child lot appears automatically in the Lot field.
Note: If you set Lot Divisible to no on the Item Master, then you can receive any quantity in to the locator as long as no reservation exists, and you receive the entire lot quantity in to the same locator. You can continue to receive the lot into an existing indivisible lot provided that it is in the same locator. If the lot exists in a locator, then you cannot receive that lot into a different locator.
To enter lot attributes press Enter in the Lot field. The lot attributes are:
-
Lot
-
Status
-
Expiration Date
-
Grade
-
Expiration Action Date
-
Expiration Action
-
Retest Date
-
Hold Date
-
Mature Date
-
Supplier Lot.
For more information on Lot Attributes see Inventory Attribute Group, Oracle Inventory User's Guide.

-
-
If you set the Auto Create Lot UOM Conversions to Yes, you can create a new lot conversion for a dual unit of measure controlled item if the units of measure in different UOM classes. The system creates the units of measure bases the conversion on the transaction quantity.
-
Optionally, you can enter a reason for this transaction in the Reason field.
-
Select
<Save/Next>to transact another item,<Done>to save this transaction, or<Cancel>to void this transaction.
Kanban Receipts
If you use kanban cards to replenish material, then you can receive material through the Kanban Card menu on the MSCA app. This feature is applicable only to the inventory-enabled and eKanban enabled organizations.
To receive material using Kanban Card:
-
Navigate to the Materials & Mfg responsibility, select Receiving, select Receipts, select Kanban, and then select Receipts.
The Receipt page appears.
-
Select a value from the Card Num LOV.
The Card Num LOV contains the Kanban card numbers associated with:
-
PO when the card is for a Supplier Kanban.
-
IR when the card is for an Inter Org Kanban.
-
-
Select the appropriate item.
-
Click Save.
For more information about Kanban cards, see Oracle Electronic Kanban User’s Guide.
Related Topics
Defining Account Aliases, Oracle Inventory User's Guide
Performing Miscellaneous Transactions, Oracle Inventory User's Guide
Inventory Issues
You can perform alias issue transactions and miscellaneous issue transactions. An account alias is an easily recognized name or label representing a general ledger account number. You can use the account alias instead of an account number to refer to the account. Miscellaneous issue transactions enable you to issue material to groups that are not inventory, receiving, or work in process.
To create alias and miscellaneous issues:
-
Navigate to the Materials Management menu and select Inventory. The Inventory menu appears.
-
Select Issues. The Issues menu appears.
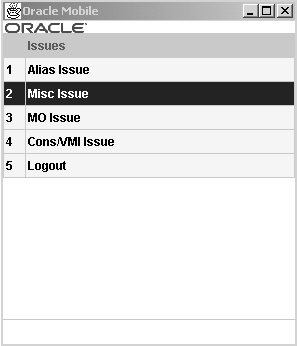
Inventory Issues Page with Misc Issue Selected
-
Select either Alias Issue to create an alias issue or Misc Issue to create a miscellaneous issue.
Depending on your choice, either the Alias Issue or Miscellaneous Issue window appears.
Note: The prompts for both alias and miscellaneous issue transactions are the same. The window name distinguishes the transaction type.
-
Enter or select the account number to use for this issue transaction in the Acct field.
-
Enter, select from the list of values, or scan the item number in the Item field.
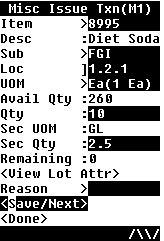
Miscellaneous Transactions Issues Page
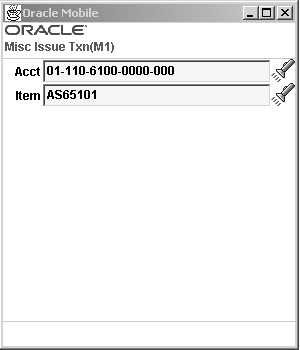
When this data is entered, the item description and unit of measure appear.
-
If applicable, enter the project and task information in the Project and Task fields. The Project and Task fields appear only if you are in a project-enabled organization.
-
Enter the subinventory and, if applicable, the locator values in the Sub and Loc fields. Enter the quantity in the Qty field.
-
Enter the quantity to issue in the Qty field. If the item is under dual UOM control, then the secondary UOM and quantity are supplied automatically depending on how you define the item in the Item Master.
-
If the item is lot, serial, or lot and serial controlled, you can enter, select, or scan the first lot, and enter a quantity. The system displays either the remaining quantity to issue, or the total quantity issued to date. This depends on how you set the QTYTRG form function parameter. If the lot is under child lot control, you enter the parent lot, and the child lot appears automatically in the Lot field.
Note: Even if you set Lot Divisible to no on the Item Master, you can issue a partial quantity of the lot as long as no reservation exists. Miscellaneous and account alias issues are allowed for partial quantities of individual lots.
To view the lot attributes press Enter in the Lot field. The lot attributes are:
-
Lot
-
Status
-
Expiration Date
-
Grade
-
Expiration Action Date
-
Expiration Action
-
Retest Date
-
Hold Date
-
Mature Date
-
Supplier Lot
For more information about Lot Attributes see Inventory Attribute Group, Oracle Inventory User's Guide

-
-
Optionally, you can enter a reason for this transaction in the Reason field.
-
Select
<Save/Next>to transact another item,<Done>to save this transaction, or<Cancel>to void this transaction.
Related Topics
Defining Account Aliases, Oracle Inventory User's Guide
Performing Miscellaneous Transactions, Oracle Inventory User's Guide
Inventory Transfers
You can transfer material within your current organization, between subinventories, and perform other transfers from the Inventory Transfers page.
Inventory Transfers page
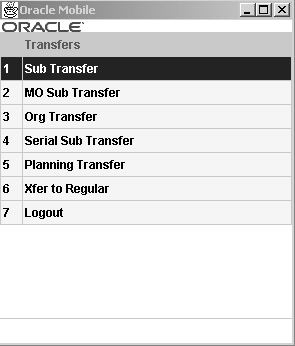
To transfer material between subinventories
You can transfer material within your current organization between subinventories, or between two locators within the same subinventory. You can transfer from asset to expense subinventories, as well as from tracked to non-tracked subinventories. If an item has a restricted list of subinventories, you can only transfer material from and to subinventories in that list.
-
Navigate to the Transfers menu.
-
Select Sub Transfer.
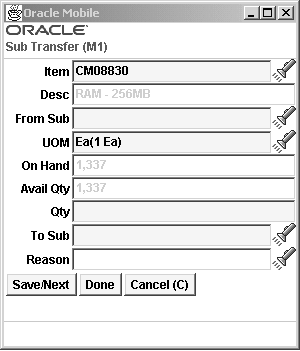
Subinventory Transfer
-
Enter, select from the list of values, or scan values for item number, subinventory, and locator (if locator controlled).
The available quantity appears as well as the default UOM.
-
If applicable, enter the project and task information in the Project and Task fields. The Project and Task fields appear only if you are in a project-enabled organization.
-
Enter the quantity to transfer in the Qty field. If the item is under dual UOM control, the secondary UOM and quantity are supplied automatically depending on how you define the item in the Item Master.
-
If the item is lot, serial, or lot and serial controlled, you can enter, select, or scan the first lot, and enter a quantity. The system displays either the remaining quantity to transfer, or the total quantity transferred to date. This depends on how you set the QTYTRG form function parameter. If the lot is under child lot control, you enter the parent lot, and the child lot appears automatically in the Lot field.
Note: If you set Lot Divisible to no on the Item Master, then you cannot transfer a partial lot quantity.
To view lot attributes select
<View Lot Attributes>The lot attributes are:-
Lot
-
Status
-
Expiration Date
-
Grade
-
Expiration Action Date
-
Expiration Action
-
Retest Date
-
Hold Date
-
Mature Date
-
Supplier Lot.
For more information about lot attributes see Inventory Attribute Group, Oracle Inventory User's Guide.

-
-
Optionally, you can enter a reason for this transfer in the Reason field.
-
Select
<Save/Next>to transact another item,<Done>to save this transaction, or<Cancel>to void this transaction.
To transfer material between organizations
-
Navigate to the Materials Management menu and select Inventory.
-
Select Transfers.
-
Select Org Transfer.
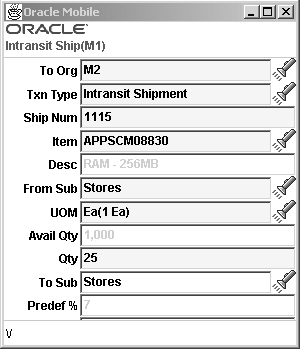
Organization Transfer Window
-
Enter the to organization in the To Org field.
-
Enter the transaction type in the Txn type field.
-
Enter the item number in the Item field.
-
If applicable, enter the project and task information in the Project and Task fields. The Project and Task fields appear only if you are in a project-enabled organization.
-
Enter the from subinventory in the From Sub field.
-
If necessary enter the serial number in the SN field.
-
Enter the quantity to transfer in the Qty field. If the item is under dual UOM control, then the secondary UOM and quantity are supplied automatically depending on how you define the item in the Item Master and if you set the form function parameter to display the secondary UOM.
-
If the item is lot, serial, or lot and serial controlled, you can enter, select, or scan the first lot, and enter a quantity. The system displays either the remaining quantity to transfer, or the total quantity transferred to date. This depends on how you set the QTYTRG form function parameter. If the lot is under child lot control, you enter the parent lot, and the child lot appears automatically in the Lot field.
Note: If you set Lot Divisible to no on the Item Master, then you cannot transfer partial quantities of a lot.
To view attributes choose
<View Lot Attributes>The lot attributes are as follows:-
Lot
-
Status
-
Expiration Date
-
Grade
-
Expiration Action Date
-
Expiration Action
-
Retest Date
-
Hold Date
-
Mature Date
-
Supplier Lot.
For more information about Lot Attributes see Inventory Attribute Group, Oracle Inventory User's Guide

-
-
Enter the to subinventory in the To Sub field.
-
You can optionally enter the following shipping information:
-
Transfer Cost
-
Account
-
Carrier
-
Waybill
-
-
-
Optionally, enter a transfer reason in the Reason field.
-
Select
<Next Item>to enter another item. -
Select
<Done>to complete the transaction.
To transfer serial controlled material between subinventories
-
Navigate to the Transfers menu.
-
Select Serial Sub Transfer.
-
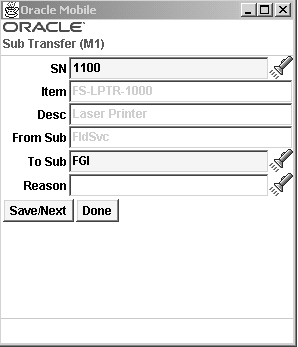
Enter or scan the serial number to transfer.
The item information, from subinventory and locator are supplied automatically.
Serial Subinventory Transfer Page
-
Enter the to subinventory in the To Sub field.
-
Optionally, enter the transfer reason.
-
Enter or scan another serial numbered item.
-
Select
<Save/ Next>to enter or scan a different item. -
Select
<Done>when complete.
Explaining Task Loading and Dropping
Task loading and dropping includes the following and completes the Oracle Warehouse Management picking task process.
-
Loading material onto equipment
-
Dropping material directly into a staging lane or consolidation locator
After the operator picks the load, they can either drop it directly into a staging lane, or load it on to their equipment. They can then proceed to the next pick location. The operator can view the current LPNs at any time, including information on the customer and the destination address, on the equipment that are waiting to be dropped.
When the operator is ready to drop the material into a staging lane, the system directs the operator to an appropriate staging lane (as determined by the dock appointment or pick release rule). The operator confirms the drop by scanning the staging lane.
If an LPN for the same delivery has already been dropped into the staging lane, the operator will be shown that LPN as a suggested drop LPN. The operator can select another LPN in that lane, if multiple LPNs have been staged for the same delivery. Alternatively, the operator can enter a new LPN to drop into, or drop without packing the LPN from the task into another LPN. The final pack can also be competed as a user-initiated packing transaction.
Task dropping completes the Oracle Warehouse Management picking task process.
Considerations for Catch Weight Processing
The mobile pick drop page honors the catch weight quantities by enabling you to enter the LPN level tare, net, and gross weights (which will be rolled up to the delivery level). The Drop page will not allow a drop if the catch weight transaction is required to correct the on-hand quantity (like in a super light scenario where primary quantity is negative after allocation). Also, the dropped quantity maintains the accuracy of the transaction UOM to ensure continuity as the transaction is processed through inventory interface and intercompany pricing.
Tasks in the Dropping/Loading Process
Task loading and dropping process includes the following tasks in the picking task process.
To raise a Change Locator/LPN exception for a task during loading
On the mobile application, during a pick task, the picker can raise a Change Locator/LPN exception. The user can choose a different subinventory/locator/ LPN other than the one suggested by the system and raise this exception. A cycle count task and reservation will be generated for the original suggested location and the picking will be done from the new subinventory/locator/LPN chosen by the picker. A cycle count task and reservation are created for the original location suggested by the system. For example, if there is no availability at the system-generated location for completing a pick task, you can enter an alternative locator that has sufficient material to fulfill the task, and do the picking from the new location.
To back order tasks during loading
When a picker loads a task, he can raise a Pick None/Pick Short exception. Raising this exception can:
-
Back order only the current task for which the task is being performed.
-
Back order all the tasks for the same item (SKU)-location combination.
Note: The form function BACKORDER_ON_EXCEPTION determines the back order options for the Pick Load page. For more information on form function parameters, see Oracle Warehouse Management Implementation Guide.
When the exception raised is associated with a workflow, then the task generated by the alternate suggestion will be placed in the queue of the picker who raised the exception or to the person identified by custom hook.
During the loading phase, you can select from the following options to back order the current task:
-
Raise either a zero pick or a short pick exception to back order only the current task for which the load transaction is being performed.
-
Back order all the tasks for the same stock keeping unit (SKU) for which the load transaction is being performed.
Additional Information: The back ordering of a single task or all tasks is dependent on the setting of the form function BACKORDER_ON_EXCEPTION. For more information on setting this form function parameter, see Oracle Warehouse Management Implementation Guide.
When the exception raised is associated with a workflow, then the alternative suggestion raised from the workflow is sent to the picker who raised the exception. If the workflow has been customized, then the suggestion is sent to the person identified in the customized "hook."
To drop by location
In a single step you can drop all the loaded LPNs, including nested LPNs, that are destined for the same subinventory and locator. This process reduces the transaction time and increases the efficiency of the dropping transaction. You can also verify which LPNs are dropped in the scanned area.
-
Load the tasks into LPNs.
-
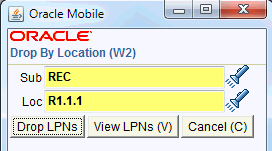
Navigate to the Drop By Location page
-
Enter (or scan) the desired subinventory and locator.
-
(Optional) Click View LPNs to review the LPNs to be dropped in this scanned area.
-
Click Drop LPNs to drop all the loaded LPNs, including the nested LPNs, to the selected subinventory or locator.
Note: This feature honors dock door appointments and locator-based consolidation.
Transacting Move Orders
Use the following procedure to transact move orders.
To between move orders between subinventory locations:
-
Navigate to the Transfers menu.
-
Select MO Sub Transfer.
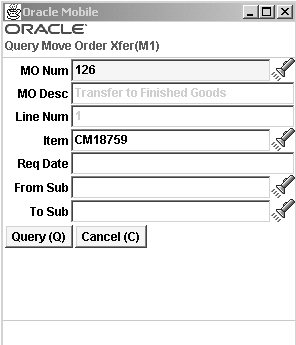
The Query Move Order Transfer window appears. Select the move order that you want to transact by entering search criteria in any one of the following fields: Move Order number, Line Number, Item, Request Date, Subinventory locations (From and To).
Query Move Order Page
-
Select
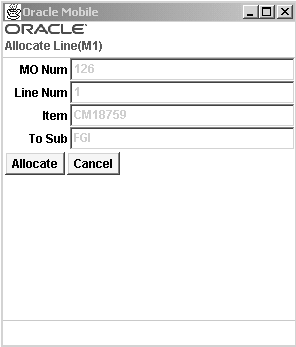
<Query>to search for the move order, or<Cancel>to void this transaction.If the move order is not allocate, the Allocate Line page appears. You must allocate the move order line before you can transact the allocations in the Move Allocations window.
If the move order has been allocated, the Move Order Allocation page appears.
Allocate Line
-
Select
<Allocate>to create the allocations,<Next>to find the next record that fits this query, or<Cancel>to void this query.When you select
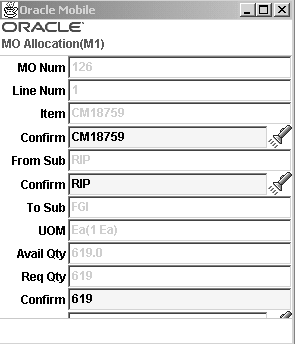
<Allocate>, the Move Order Allocation window appears. The field information displays from your query, including move order number, line number, item, subinventory (From and To), and required quantity for this move order. -
Enter the item number in the first Confirm field to validate this item number for the transfer.
-
If applicable, enter the project and task information in the Project and Task fields. The Project and Task fields appear only if you are in a project-enabled organization.
Move Order Allocation
-
Enter the From Subinventory value in the second Confirm field to validate the inventory location that you are transferring from.
The UOM and available quantity appear. If the item is under dual UOM control the secondary unit of measure and secondary available quantity appear if you set the form function parameter to yes.
-
In the third Confirm field, enter the quantity that you want to transfer. If the item is under dual UOM control, you must also confirm the secondary quantity.
-
If the item is under lot control, you must confirm the lot quantity, and secondary lot quantity if the item is under dual UOM control.
-
Optionally, enter a reason code for the transaction in the Reason field.
-
Select
<Save/Next>to save your work. If there is another item that fits your query, it appears. Otherwise the Transfers menu appears.
Related Topics
Overview of Move Orders, Oracle Inventory User's Guide
Inventory Move Orders
Move orders are requests for the movement of material within a single organization. This enables movement of material within a warehouse or facility for replenishment, material storage relocations, and quality handling.
To move material using move order requests:
-
Navigate to the Materials Management menu, and select Inventory.
-
Select Move Orders.
The Query All Move Orders window appears. Select a move order by entering search criteria in either the Move Order Number or Line Number field.
Query All Move Orders Page
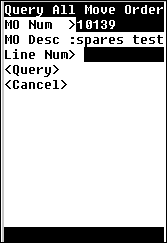
If this move order number is not allocated, the Allocate action displays on the window.
You can define the order of allocations by defining the picking order for subinventory and locator.
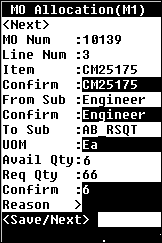
The field information that you must confirm appears including item, from and to subinventory and locator, and required quantity. You can enter the system suggested quantity or a quantity less than the suggested quantity, but you cannot change the suggested destination subinventory or locator.
Move Order Allocation Page
-
Follow the procedure for creating move order transactions.
Related Topics
Overview of Move Orders, Oracle Inventory User's Guide
Setting Up Move Orders, Oracle Inventory User's Guide
Consigned and Vendor Managed Inventory
Vendor Managed Inventory (VMI) is a procurement and planning practice in which you delegate key inventory management functions to one or more suppliers. Under this arrangement, the supplier determines the items, quantities, and delivery schedules on your behalf based on information the supplier receives from your inventory and procurement systems.
Consigned inventory is on hand inventory that is physically located in an inventory organization but is still owned by a third party legal entity, such as a supplier.
Consigned and VMI transfers enable you to assume the planning responsibility, owning responsibility, or both from the supplier. This transaction does not move goods, it changes the planning organization owning organization, or both from the supplier site to the internal organization that holds the goods. After you perform a planning transfer and run collection, your supplier can no longer see the transferred quantity in the on-hand quantity column.
To perform a consigned / vendor managed inventory receipt or issue:
-
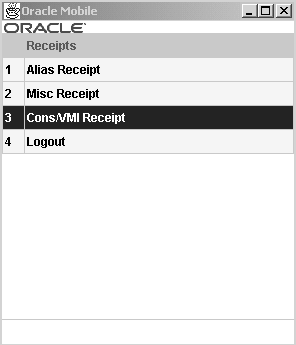
Navigate to the Issues or Receipt page.
-
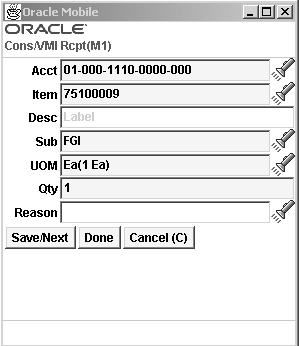
Select Cons/VMI Receipt or Cons / VMI Issue. The Cons/VMI Rcpt or Cons/VMI Issue page opens
-
Enter the owning party and/or planning party in the Owng Party and/or Plng Party fields
-
Enter the account in the Acct field.
-
Enter the item in the Item field.
-
Enter the Subinventory to which to transfer the stock in the Sub field.
-
Enter the Quantity to receive in the Qty field. If the item is under dual unit of measure control, the secondary UOM and quantity populate automatically depending on how you define the item in the Item Master.
-
If the item is lot, serial, or lot and serial controlled, you can enter, select, or scan the first lot, and enter a quantity. The system either displays the remaining quantity to receive, or the total quantity received to date. This depends on how you set the QTYTRG form function parameter. If the lot is under child lot control, you enter the Parent Lot, and the child lot appears automatically in the Lot field.
Note: If you set Lot Divisible to no on the Item Master, then you cannot transfer a parti
To view Lot attributes press enter in the Lot field. The Lot Attributes are as follows:
-
Lot
-
Status
-
Expiration Date
-
Grade
-
Expiration Action Date
-
Expiration Action
-
Retest Date
-
Hold Date
-
Mature Date
-
Supplier Lot.
For more information on Lot Attributes see, Inventory Attribute Group, Oracle Inventory User's Guide

-
-
Choose
<Save/Next>to enter a different item. -
Choose <
Done>when finished.
Inventory Replenishment
Mobile Materials Management enables you to manage your inventory levels using any combination of the system planning and replenishment features, including min–max planning, kanban replenishment, and generating manual move orders.
You can use min-max planning, replenishment counting, and kanban replenishment to automatically create pre–approved move orders. These processes generate move orders based on the replenishment source type. Four sources for replenishing inventory are available:
where Make/Buy flag = Buy
| Source | Source Type | Document Created |
|---|---|---|
| Supplier | Supplier | External requisition |
| Organization | Organization or Inter-org | Internal requisition |
| Subinventories | Subinventory or Intra-org | Subinventory transfer move order |
where Make/Buy flag = Make
| Source | Source Type | Document Created |
|---|---|---|
| Production | n/a | Work order |
A Kanban system is a self-regulating pull system that is typically applied to items that have relatively constant demand.
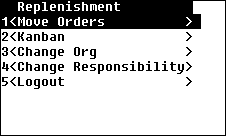
Replenishment Page with Move Order Selected
To replenish inventory:
-
Navigate to the Materials Management menu, and select Inventory.
-
Select Replenishment.
The Replenishment menu appears. Three types of replenishment are available using move orders, kanban, and automatic kanban replenishment.
-
Select a replenishment type.
-
Enter values for the prompts that are specific to the transaction you are performing.
To replenish inventory using move order:
-
Navigate to the Replenish menu and select Move Orders.
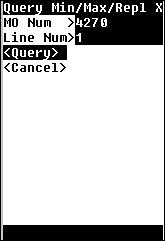
The Query Min/Max Replenishment window appears.
Note: The move order is automatically generated when you run the Min/Max planning report.
Query Min/Max Replenishment Page
-
Follow the procedure for transacting move orders.
To replenish inventory using kanban cards:
-
Navigate to the Replenishment menu and select either Kanban or Auto Replenish Kanban.
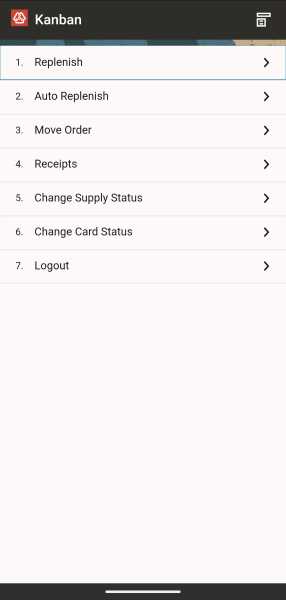
Kanban Page
-
If you selected Kanban, the Kanban menu appears.
The available options are Replenish, Auto Replenish, Move Order, Receipts, Change Supply Status, and Change Card Status. Specific windows and prompts appear according to your selection.
-
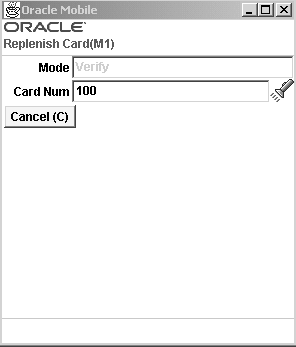
If you selected Replenish, the Replenish Card window appears. The mode is Verify. Enter a kanban card number in the Card Num field.
This mode lets you verify the kanban card before you replenish it.
Replenish Card Page
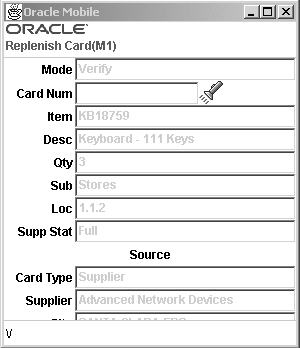
The Replenish Card detail window appears.
Replenish Card Page
-
Review the information displayed (card number, quantity, subinventory, locator, project and task information) to verify that you want to use this card for replenishment.
Note: Project and Task fields appear only if you are in a project-enabled organization.
-
Select
<Replenish>to create this transaction,<Replenish/Next>to create this transaction and display the next one that fits your search criteria, or<Cancel>to void this transaction. -
If you selected Auto Replenish, the Replenish Card Query window appears. The mode is Automatic. Enter a kanban card number in the Card Num field.
The Auto Replenish option automatically replenishes the card once you scan or enter the kanban card number.
Note: This option does not let you verify the replenishment details when the kanban card is replenished.
-
Review the information displayed (card number, quantity, subinventory, and locator) to verify that you want to use this card for replenishment.
-
Select
<Replenish>to create this transaction,<Replenish/Next>to create this transaction and display the next one that fits your search criteria, or<Cancel>to void this transaction.
Kanban Card Options
Use the Kanban menu to select the following actions:
-
Move Order: to perform move order transactions for a Kanban card.
-
Receipts: to receive material for a Kanban card.
-
Change Supply Status: to change the supply status of a Kanban card. This is applicable only to the eKanban-enabled organizations.
-
Change Card Status: to change the status of a Kanban card. This is applicable only to the eKanban-enabled organizations.
For more information about the actions that you can perform using Kanban cards, see the topic Viewing and Updating Kanban Card Details, Oracle Electronic Kanban User’s Guide.
Related Topics
Generating Replenishment Move Orders, Oracle Inventory User's Guide
Overview of Kanban Replenishment, Oracle Inventory User's Guide
Counting
Oracle Mobile Materials Management provides windows to perform cycle counting and complete physical inventory functions.
You can perform cycle counting instead of taking complete physical inventories to verify inventory quantities and values. Accurate system on-hand quantities are essential for managing supply and demand, maintaining high service levels, and planning production.
You can also perform replenishment counts that you have previously defined in the inventory desktop.
Cycle Counting
Cycle counting is the periodic counting of individual items throughout the year to ensure the accuracy of inventory quantities and values. You can also perform a full physical inventory to reconcile system maintained item on-hand balances with actual counts of inventory; however, you cannot perform any transactions in or out of a subinventory while you conduct a physical inventory. You can perform a normal cycle count, as well as a serial-triggered cycle count. In a serial controlled environment, you can enter or scan the serial number of the item, and derive the item, revision, and lot information.
Before you can use the mobile device to enter cycle count entries, you must complete set up work in the desk top application. You must set up your ABC classes, and cycle count header information. See Overview of ABC Analysis, and Overview of Cycle Counting in the Oracle Inventory User's Guide.
You can also use the intuitive Cycle Count Dashboard to perform few tasks, such as, check cycle counts for today, monitor cycle counts that are delayed, recount, view adjustments, and so on. For more information, see Cycle Count Dashboard, Appendix B Mobile User Interface and Oracle Warehouse Management, Oracle Warehouse Management User’s Guide.
Prerequisites
- To perform cycle counting for individual lots (for lot-controlled items), set the form function parameter ENFORCE_TOTAL_QTYCOUNT_FOR_LOTITEM = NO for the function INV_MOB_CYCL_COUNT. For more information, see To perform individual lot counting for a lot-controlled item.
To perform a normal cycle count
-
Navigate to the Materials Management menu, and select Inventory.
-
Select Counting.
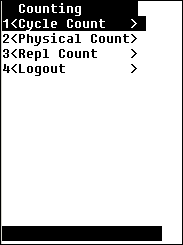
Inventory Counting Page
-
Select Cycle Count.
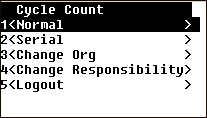
Cycle Counting Page Menu
-
Select Normal.
-
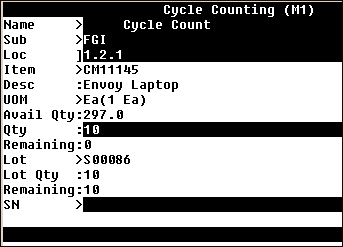
Enter the designated name for this inventory count in the Name field.
-
Enter the subinventory, and if applicable, the locator for this inventory count in the Sub and Loc fields.
-
Enter the project and task information if applicable in the Project and Task fields. The Project and Task fields appear only if you are in a project enabled-organization.
-
Enter the item number and quantity in the Item and Qty fields. If the item is under dual UOM control, the system may display the secondary UOM and secondary quantity. To display the Sec Uom and Sec Qty fields, you must set a form function parameter. If you set the form function parameter to display the Sec Uom and Sec Qty fields, then you can modify them based on the parameters that you set on the Item Master. For more information, see Inventory Attribute Group, Oracle Inventory User's Guide.
Cycle Counting Page Complete information
-
Enter the Lot number and Lot quantity in the Lot and Lot Qty fields if applicable.
-
Enter the Serial Number in the SN field if applicable.
-
If the item is scheduled for multiple serials, the list of values contains the serials that are scheduled to be counted. If the item is scheduled for a single serial, you can select the serial from the LOV.
-
From the SN list of values, you can select the specific serials that were actually found during the cycle counting process.
-
If the item is scheduled for multiple serials, you are presented with
<Save/Next>to save this serial and get the next serial,<Remove/Next>to remove this serial and get the next serial, or<Done>to continue.
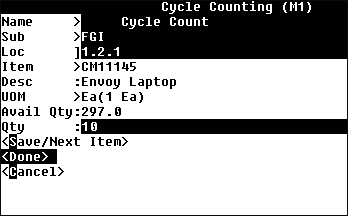
Cycle Count Header
-
-
Select
<Save/Next>to transact another item,<Done>to save this transaction, or<Cancel>to void this transaction.
To skip a cycle count task
Optionally, click the Skip Task button to skip the current task and display the next eligible cycle count task in the Cycle Counting page. If no task is found, then the system returns to the menu page.
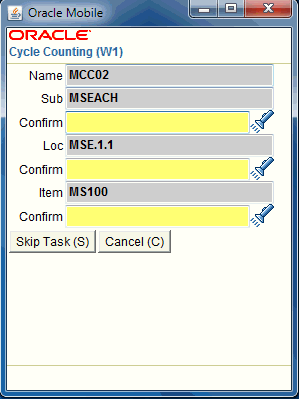
Additional Information: The skip task feature is available on the Cycle Counting page.
To perform individual lot counting for a lot-controlled item
When performing a cycle count for a lot controlled item, you may want to enter only the quantity for each lot (rather than enter the total quantity first then the quantity of each lot). Oracle MSCA enables you to perform cycle counting for individual lots (for lot-controlled items) by setting the form function parameter ENFORCE_TOTAL_QTYCOUNT_FOR_LOTITEM = NO for the function INV_MOB_CYCL_COUNT.
For example, you could bring the mobile handler to the warehouse to complete the following tasks:
-
Open the first case for LOT 1, count the quantity of 10, and enter that quantity using the mobile device.
-
Open the second case for LOT 2, count the quantity of 30, and enter that quantity using the mobile device.
The system then automatically calculates the total quantity of 40 for the two lots.
To perform a serial triggered cycle count
-
Navigate to the Materials Management menu, and select Inventory.
-
Select Counting
-
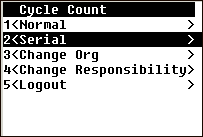
Select the appropriate transaction, either Cycle Count or Physical Count.
Cycle Count Page
-
Select Serial from the Cycle Count or Physical Count page. The Cycle Counting page appears.
-
Enter the designated name for this inventory count in the Name field.
-
Enter the subinventory, and if applicable, the locator for this inventory count in the Sub and Loc fields.
-
Scan, enter or select the SN (serial number). If you select the serial number from the list of values, the Serial Number page appears.
-
Select the desired serial number from the list of values.
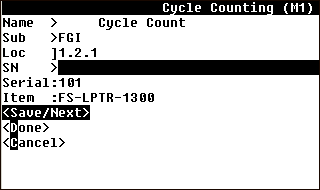
The item information, including the Lot, and project information are supplied if applicable.
Cycle Counting Page
-
Enter, scan, or select the remaining serial numbers for the item.
-
Select
<Save / Next>to proceed to the next item, and repeat steps five through 10. -
Select
<Done>when complete.
To perform a consolidated cycle count
Consolidated cycle counting is available only for the Project Manufacturing (PJM) organizations. Use the Consolidate menu to count all the entries of an item in a consolidated manner, which is available only if the total quantity present under a physical location (including logical locators) is equal to the count quantity for the respective subinventory in the PJM organization. You can record the total on-hand quantity with a single consolidated cycle count for inventory tracked by projects and tasks. If there is a discrepancy, then the application creates additional cycle counts for each project and task to ensure that the existing inventory is allocated correctly.
Prerequisites:
To perform consolidated cycle counting for an item and collect the logical locators under a physical location for a subinventory, set the form function parameter ENABLE_CONS_COUNT=Y for the form function INV_MOB_CYC_COUNT_PJM.
Steps to perform a consolidated cycle count:
-
Navigate through one of the following paths:
-
PJM Mobile User, select Inventory, Counting, and then Cycle Count
-
PJM Whse Mgmt Mobile User, select Warehousing, Inventory, Counting, and then Cycle Count
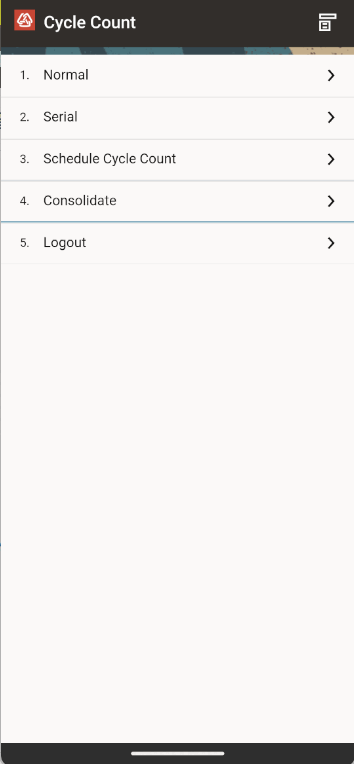
Navigation Path to Consolidate Cycle Count
-
-
Select Consolidate.
The Cycle Counting page appears.
-
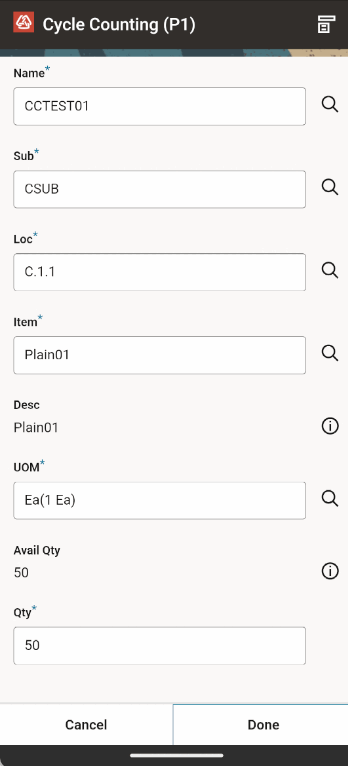
Enter the cycle count name and subinventory.
-
In the Loc field, select from the physical locators for that subinventory.
-
Enter the item.
The application displays the quantity that you can update with the consolidated quantity.
-
If the consolidated quantity is equal to the total quantity (including logical locators under the physical locator), then the application displays the Done and Cancel buttons.
If the consolidated quantity is not equal to the total quantity, then the application displays a warning message with Yes and No buttons.
-
If you click Yes, then the application displays the Cycle Counting page where you can add information to the Project and Task fields for that physical locator (to perform counting for each logical locator).
-
If you click No, then the application returns to the Cycle Count menu page.
Consolidate Cycle Count for Physical Locator (including logical locator) for an Item
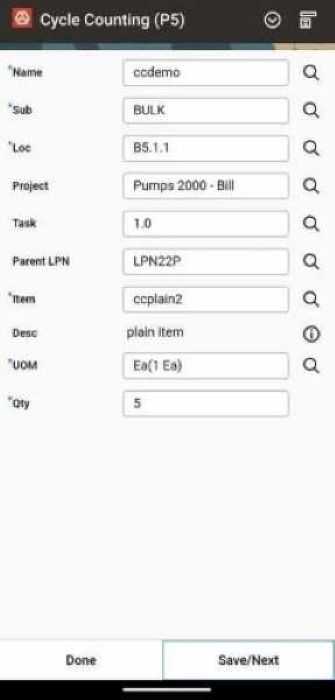
For Oracle Warehouse Management (WMS) organizations, when you count the scheduled or unscheduled entries in an LPN (License Plate Number), the Summary or Detail buttons are not displayed on the consolidate Cycle Counting page.
When you perform the cycle count:
-
If there is a discrepancy, then the application considers it as the Detail count.
-
If there is no discrepancy, then the application considers it as the Summary count.
Consolidate Cycle Counting Page for WMS Orgs
-
Related Topics
See the following topics in the Oracle Inventory User's Guide:
Defining and Running an ABC Compile
Defining ABC Classes
ABC Assignment Groups
Defining ABC Item Assignments
Purging ABC information
Defining and Maintaining Cycle Counting
Defining Cycle Count Classes
Cycle Count Items
Serialized Cycle Counting
Physical Inventory
Oracle Inventory provides a fully automated physical inventory feature that you can use to reconcile system maintained item on-hand balances with actual counts of inventory. Accurate system on-hand quantities are essential for managing supply and demand, maintaining high service levels, and planning production. Before you can enter physical inventory information on the mobile device, you must perform some set up steps on the desktop application. See Overview of Physical Inventory, Oracle Inventory User's Guide.
To perform a normal physical inventory:
-
Navigate to the Counting menu.
-
Select Physical Count. The Physical Count Page appears.
Physical Count Page - Normal

-
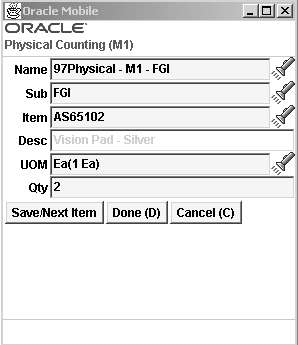
Select Normal. The Physical Counting page appears.
-
Enter the organization in the Org field.
-
Enter the physical inventory name in the Name field.
-
Enter the subinventory in the Sub field.
-
Enter the project and task information, if applicable, in the Project and Task fields. The Project and Task fields appear only if you are in a project-enabled organization.
-
Enter the locator in the Loc field if applicable.
-
Enter the Item in the Item field.
-
Enter the Quantity in the Qty field. If the item is under dual UOM control, the system may display the secondary UOM and secondary quantity. To display the Sec UOM and Sec Qty fields, you must set a form function parameter. If you set the form function parameter to display the Sec UOM and Sec Qty fields, then you can modify them based on the parameters that you set on the Item Master. See Inventory Attribute Group, Oracle Inventory User's Guide for more information.
-
Enter the lot and lot quantity information if applicable.
-
Enter the serial information if applicable.
-
Enter the remaining serial numbers for the item if applicable.
-
Select
<Save/Next Item>to enter the count information for another item. -
Select
<Done>when you finish entering items.Physical Counting Page
To perform a serial triggered physical inventory:
-
Navigate to the Count page.
-
Select Physical Count.
-
Select Serial.
-
Enter the organization in the Org field if necessary.
-
Enter the physical inventory name in the Name field.
-
Enter the subinventory in the Sub field.
-
Enter the locator, if applicable, in the Loc field.
-
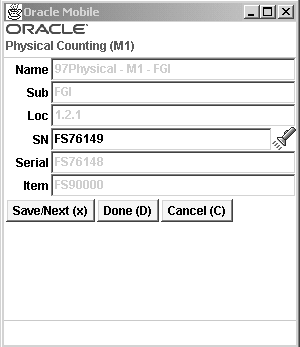
Scan, enter, or select the SN (serial number). If you select the serial number from the list of values, the Serial Number page appears.
The item information including the lot, and project information are populated if applicable.
Serial Physical Counting Page
-
Enter, scan, or select the remaining serial numbers for the item.
-
Select
<Save/ Next>to proceed to the next item, and repeat steps five through nine. -
Select
<Done>when complete.
To perform tag based physical inventory counting:
-
Navigate to the Counting menu.
-
Select Physical Count. The Physical Count page appears.
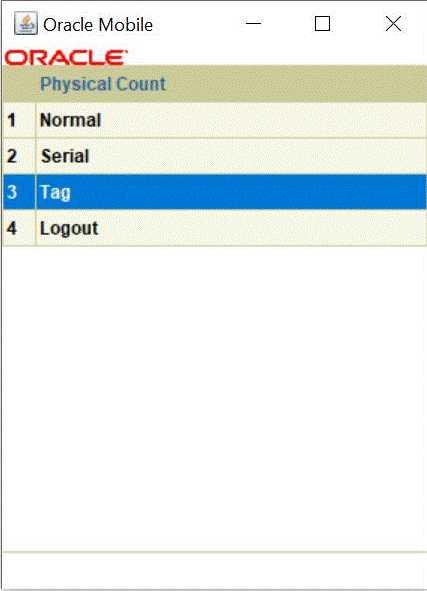
Physical Count Page - Tag
-
Select Tag. The Physical Counting page appears.
-
Enter the organization in the Org field.
-
Enter the physical inventory name in the Name field.
-
Enter the tag number in the Tag field. The respective SKU is displayed.
-
Enter the quantity in the Qty field. If the item is under dual UOM control, the application can display the secondary UOM and secondary quantity.
-
Enter the lot quantity information, if applicable.
-
Enter the serial information, if applicable.
-
If Physical Inventory is setup with Multiple Per Request, then the SN Detail button appears, which enables you to count the serials for the corresponding tag. If the Physical Inventory is setup with One Per Request, then the SN field appears, which enables you to count the serial with respect to the tag. Use the SN field to count the specific serial that was actually found during the physical counting process.
Physical Inventory - Multiple Per Request Setup
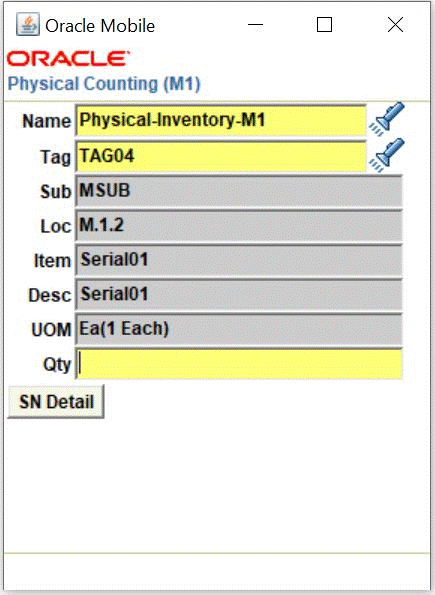
Physical Inventory - One Per Request Setup
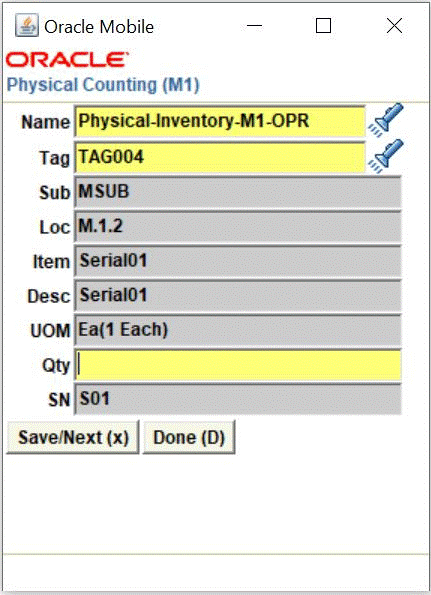
-
-
For multiple serials, click Save/Next to save this serial and to proceed to the next serial. Click Remove/Next to remove this serial and proceed to the next serial. Click Done to continue.
-
Click Save/Next Item to enter the count information for another item.
-
Click Done when you finish entering items.
Related Topics
Overview of Physical Inventory, Oracle Inventory User's Guide
Taking a Snapshot of Inventory Quantities, Oracle Inventory User's Guide
Generating Physical Inventory Tags, Oracle Inventory User's Guide
Replenishment Counting
You can use a mobile device to perform a replenishment count defined on the inventory desktop. You can enter either the on-hand quantity, or order quantity depending on the line type.
-
Enter Order Quantity: You can enter the order quantity regardless of the min-max quantities.
-
Enter On-Hand Quantity: You enter the on-hand quantity at the locator, and the system determines whether a replenishment count is necessary. The system compares the on-hand quantity value you enter to the minimum quantity, and creates a requisition to bring the on-hand value up to the maximum quantity if the on hand value is lower than the minimum. This option is available only for non-qty tracked subinventories
Note: Count types Order Max and Order PAR are not available for the mobile device. You must use the desktop windows to perform these count types.
To perform a replenishment count
-
Navigate to the Counting menu.
-
Select Repl Count.
-
Optionally, enter or select the subinventory. If you select the subinventory from the list of values, all subinventories that have mobile defined replenishment counts appear in the list of values.
-
Enter the replenishment count name in the Name field or select it from the list of values.
Query Replenishment Count Page
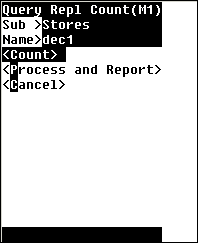
-
Select
<Count>to count the items listed in the replenishment count. The Enter Repl Count page appears.Enter Replenishment Count Page
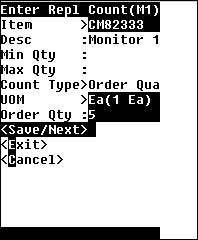
-
Enter the item to count in the Item field. The Min Qty, Max Qty, Count Type, UOM fields appear as read-only fields.
-
Enter the order quantity in the Quantity field. If you are using Min / Max planning, the max quantity defaults as the on-hand quantity for the count type.
-
Select
<Save/Nextto enter another item,<Exit>to save the entered count and return to the Query Count page, or<Cancel>to cancel the count. -
Select
<Process and Report>to process the replenishment count, or select<Cancel>to cancel the replenishment count and return to the Counting menu.
Picking and Shipping Items
You can use a mobile device to perform picking and shipping transactions. Pick Confirm enables you to verify the picked material and enables you to stage the material for shipment. Quick Ship expedites the shipping process by shipping all the lines for a delivery. The Ship Confirm process records the shipped items, and enables you to verify the items that belong to a delivery.
Picking and Shipping Page
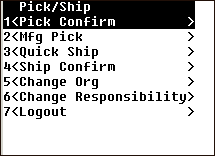
Pick Confirm
Pick wave move orders are pre-approved requests for subinventory transfers to bring material from the source locations in the warehouse to a staging subinventory. Oracle Shipping Execution automatically creates pick wave move orders during pick release.
Sales Order Picking Process
To Perform Pick Confirm Transactions:
-
Navigate to the Query Pick Wave Move Order page.
Query Pickwave Move Order Page
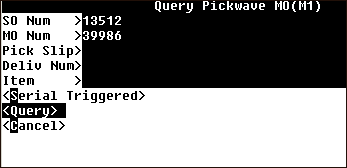
-
Enter the desired move order query criteria. You can use the following criteria to query pick wave move orders:
-
SO Num: The sales order number associated with the Pickwave move order.
-
MO Num: The move order number.
-
Pick Slip: The pick slip number.
-
Deliv Num: The delivery number
-
Item: The item number.
-
-
Select Query.
The Move Order Allocation Page appears if the move order is allocated. If the move order is not allocated, then the Allocate Line Page appears.
Move Order Allocation Page
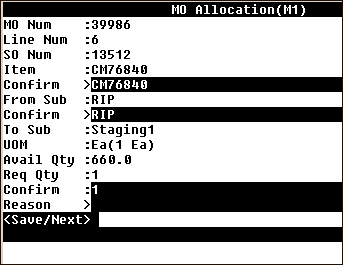
-
Enter the item number in the Confirm field if necessary.
-
Enter the subinventory to confirm. You can enter the from subinventory, or select another subinventory that has on-hand quantities of the item.
-
Enter the quantity to confirm. You can enter the entire required quantity, or a quantity that is less than the required quantity.
If the item is under dual UOM (unit of measure) control, you must confirm both the primary and secondary quantities. You cannot edit the secondary UOM field. The secondary UOM field appears if you set the form function parameter to display secondary UOM information.
When you enter a quantity that is less than the system-suggested missing required quantity, the Missing Quantity field appears. This field is mandatory and you must enter an action for the missing quantity such as backorder, cycle count, or split.
Additional Information: If you enter an incorrect value or skip the Missing Quantity field, an error message appears such as No result is found.
-
Enter the desired lot if the item is under lot control.
-
Enter the lot quantity to confirm if the item is under lot control. If the item is under dual UOM control, then you must confirm both the primary and secondary lot information. If you set the profile option INV: Target Preferred Grade to Yes, and if the sales order line contains the preferred grade, then you can select only lots with the preferred grade. If the profile option is set to No, and the sales order line does not contain the preferred grade, you can select lots of any grade.
If the lot is indivisible, then you cannot confirm less than the lot quantity.
-
Optionally, enter a reason.
-
Select
<Save/Next>to complete the move order.
To Pick Confirm Transactions Containing Serial Controlled Items:
-
Navigate to the Query Pick Wave Move Order page.
Query Pickwave Move Orders Page
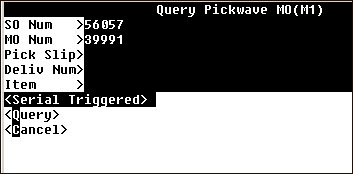
-
Select Serial Triggered to access the Move Order Allocation page.
-
Enter the desired move order query criteria. You can use the following criteria to query pick wave move orders:
-
SO Num: This is the sales order number that is associated with the Pickwave move order.
-
MO Num: The move order number.
-
Pick Slip: The pick slip number.
-
Deliv Num: The delivery number
-
Item: The item number.
-
-
-
If the move order is allocated, the Move Order Allocation page appears and highlights the SN (serial number) field automatically. If the move order is not allocated, the Allocate Line Page appears.
Serial Controlled Move Order Allocation Window
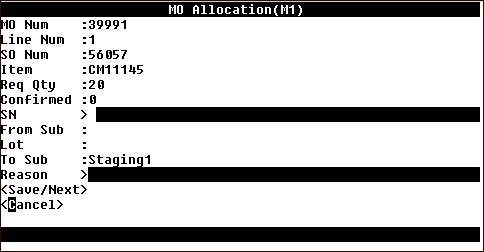
-
Enter or scan the desired serial number.
The system returns you to the Move Order Allocation page. Notice the number of confirmed items has changed.
Move Order Allocation Page
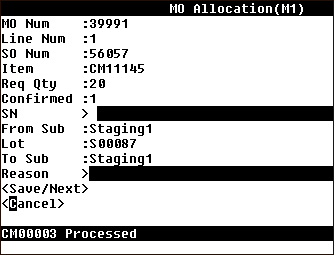
-
Repeat Step 4 if necessary to fulfill the allocation.
-
Enter or select a reason if necessary.
-
Select
<Save/Next>to complete the transaction. -
Select
<Save/Next>to get the next line,<Done>to complete the transaction, or<Cancel>to void this transaction.
Mobile Shipping
Oracle Mobile Supply Chain Application has two shipping modes, Quick Ship and Ship Confirm. Quick Ship enables you ship confirm an entire delivery at once without having to verify item information. Ship Confirm prompts you to enter the delivery and each item to ship within the delivery. You can adjust the shipped quantity for each item and you can generate serial numbers
You can automate the shipping process for some sales orders that meet a specific criterion in the Quick Ship menu option. You can ship confirm all lines on a particular delivery number if:
-
All sales order lines for that delivery are staged.
-
No serialized items are on the sales order lines that require serial number generation at the time of issue.
To perform Quick Ship transactions:
-
Navigate to the Materials Management menu, and select Inventory.
-
Select Picking/Shipping.
-
Select Quick Ship.
The Quick Ship window appears.
Quick Ship Page
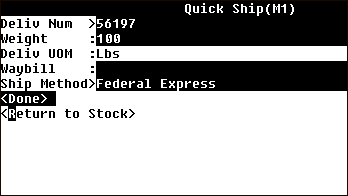
-
Enter, scan, or select the delivery number. This is a required field.
-
Optionally enter the weight, delivery UOM, and waybill.
-
Select a reason for backordering material from the destination subinventory to the source subinventory.
-
Select
<Done>to save your work, or<Return to Stock>to cancel this transaction.If you select Return to Stock the reservations for the lines are removed, and the material is now available in on-hand quantity. In addition, the delivery status is changed from Staged to Ready to Release.
Ship Confirm
Ship confirm is the process of recording items that have shipped. The difference between Ship Confirm and Quick ship is that you enter the information of what you want shipped, rather than automatically shipping all items on the delivery. When you ship confirm a delivery, Oracle Shipping Execution confirms that the delivery lines associated with the delivery have shipped. See Overview of Ship Confirm, Oracle Shipping Execution User's Guide.
To perform ship confirm transactions:
-
Navigate to the Materials Management menu, and select Inventory.
-
Select Picking/Shipping.
-
Select Ship Confirm.
-
Enter the delivery number and item to query the ship confirm record.
-
Select
<Find Lines>to search for the delivery line, SN Req'd Lines to find delivery lines that require serial numbers at the time of issue, or<Cancel>to void this query.The SN Req'd Lines option accesses any lines in the delivery that have items serialized at sales order issue. The serial numbers are created for these items during the ship confirmation process. When this option is selected, the line window is accessed to confirm the quantities and to enter the serial numbers.
Ship Confirm Page
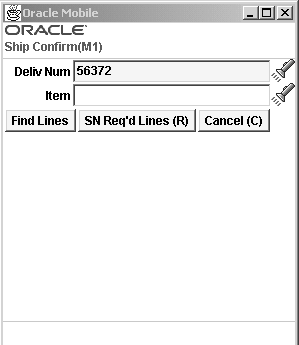
-
Select
<Find Lines>to query the delivery line, or<Cancel>to void this query.If you selected
<Find Lines>, the Ship Confirm window appears. -
Enter the item number in the Confirm field to validate that this is the item you want to ship. The required quantity is defaulted. You can enter the quantity you want to ship in the Ship Qty field. If the shipped quantity is less than the required quantity, you can enter the remaining quantity as missing quantity or you can leave the missing quantity blank. If you entered a missing quantity, the delivery line for the original quantity is split and the missing quantity is unassigned from the current delivery.
If you leave the missing quantity field blank and the shipped quantity is less than the required quantity, the system prompts you with a warning message. You have two options: Return to Stock, by which the unshipped quantity is split into a new delivery line, The reservations for the new line are removed and the material is now available as on-hand quantity. The delivery line status is changed from Staged to Backordered; Delay Shipment, by which the delivery for the original quantity is split into two, one for the shipped amount and the other for the difference, and the second line is assigned to a new delivery. The system creates a new delivery line number and assigns it to this line. You can then ship this new line separately on this new delivery.
If the item is under dual UOM control, you must also confirm the secondary required quantity. The system also displays the secondary picked quantity, secondary missed quantity, and secondary shipped quantity.
Ship Confirm Page
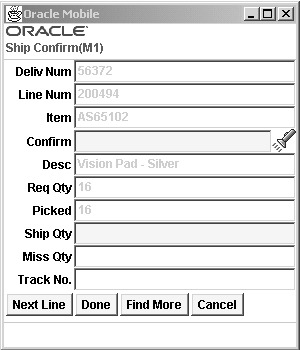
-
Select
<Done>to save this transaction,<Find More>to search for other lines on the ship confirm record, or<Cancel>to void this transaction.
Related Topics
Releasing Sales Orders for Picking, Oracle Shipping Execution User's Guide
Overview of Material Pick Waves, Oracle Inventory User's Guide
Overview of Pick Release, Oracle Shipping Execution User's Guide
Overview of ship Confirm, Oracle Shipping Execution User's Guide
Labels
Labels can be printed manually or automatically at various transaction points.
The Labels menu enables you to submit requests to print labels. Five types of labels are available in the Mobile Material Management application, including material, serial number, location, shipping, and shipping content.
Compliance Labeling Setup
The compliance labeling features help inventory to move more efficiently throughout the warehouse. Compliance labeling from suppliers speeds the receiving process by allowing barcode scanning of inbound purchase orders, resulting in less receipt processing time, immediate recognition of available materials, and higher receiving accuracy.
By producing customer specific labels on demand for each shipment, compliance labeling also enables your organization to easily comply with customer requirements for barcode labeling and advance shipment notifications (ASNs).
The compliance labeling features enable you to:
-
Meet supplier-specific needs for barcode labels for both products and containers.
-
Meet customer-specific needs for barcode labels for both products and containers.
-
Produce partner-compliant shipping labels that are specific to the carrier and customer.
Note: To design and print compliance labels, you need to use a third-party label printing package certified by Oracle Warehouse Management and Oracle Mobile Supply Chain Applications.
Setting up compliance labeling includes the following tasks:
-
Labeling Requirements
-
Setting Up Labels
Describing Customer Labeling Requirements
Labels are typically centered on the following major requirements:
-
Label format
-
Label data
-
Barcode specifications
-
Symbol content
The compliance labeling features enable all of these requirements to work together to meet your guidelines. The system supports the following label types:
-
Materials label: Provides information about an item, including the lot information, if applicable.
-
Serial label: The Serial label provides information specific to a serial of an item.
-
Location label: Provides information about a specific warehouse locators. The Mobile Label Request page enables you to manually request labels for locators and subinventories. These requests can be initiated one at a time, for each subinventory and each locator, or they can be issued for all locators of a particular subinventory, or all locators of all subinventories (if the subinventory is locator controlled).
-
Shipping label: Provides information for an outbound shipment. It does not include information about the contents of the shipment, but includes only addresses and information that are pertinent to the shipment itself.
-
Shipping Contents label: Provides information for an outbound shipment. It includes information for all of the contents that are part of that shipment.
-
Flow Content label: Provides information for flow components. It includes the component number, serial, lot, job number, assembly number, and start date.
-
Dispense Pallet label:
-
Process Dispense Material label:
-
Process Material label:
-
Process Product label:
-
Process Sample label: Provides sample information if the material requires a quality test. It includes: intermediate product code, intermediate product description, sample number, parent lot, child lot, quantity, date sampled, date of manufacture (lot creation date, expiration date, hazardous material class, and notes
Setting Up Labels
Setting up labels involves the following tasks:
-
Defining label formats
-
Associating label types to business flows
Defining Label Formats
When you define label formats, you are setting up the data fields that you want the system to include on a particular label. The following figure provides an example of the data that might appear on a small hazardous items content label. To define this label in the system, you would set up the label fields, serial number, item description, volume, and unit of measure.
Associating Label Types to Business Flows
After you set up label formats, you must associate them to the specific warehouse business flow in which you want to use them. This association enables the label type to be printed automatically as part of that business flow.
The following table provides a list of the various business flows and the types of labels that you can associate to each flow. The horizontal header row of the table lists the various label types available. The far left vertical column lists the warehouse-related business flow. Yes, indicates that the system can generate the label type for that business flow. No indicates that the system does not generate that label type for the business flow.
| Business Flows | Materials | Serial | Location | Shipping | Shipping Content | Flow Content |
|---|---|---|---|---|---|---|
| Receipt | Yes | Yes | No | No | No | No |
| Inspection | Yes | Yes | No | No | No | No |
| Delivery | Yes | Yes | No | No | No | No |
| Replenishment drop | Yes | No | No | No | No | No |
| Cycle count | Yes | No | No | No | No | No |
| Physical count | Yes | No | No | No | No | No |
| Miscellaneous/alias receipt | Yes | No | No | No | No | No |
| Inter-org transfer | Yes | No | No | No | No | No |
| Subinventory transfer | Yes | No | No | No | No | No |
| Serial number generation | No | Yes | No | No | No | No |
| Pick Load | Yes | No | No | Yes | Yes | No |
| Pick Drop | Yes | No | No | Yes | Yes | No |
| Miscellaneous Alias / Issue | Yes | Yes | No | No | No | No |
| Dynamic Locator | No | No | Yes | No | No | No |
| WIP Completion | Yes | Yes | No | No | No | No |
| Ship confirm | Yes | Yes | No | Yes | Yes | No |
| Flow Line Start | No | No | No | No | No | Yes |
| Flow Line Operation | No | No | No | No | No | Yes |
| Flow / WOL Assembly Completion | Yes | Yes | No | No | No | No |
| Process Business Flow | Dispense Pallet | Process Dispense Material | Process Material | Process Product | Process Sample |
|---|---|---|---|---|---|
| Process Dispensing | Yes | Yes | Yes | No | No |
| Process Production | No | No | No | Yes | No |
| Process Quality | No | No | No | No | Yes |
Setting Up Label Formats
When you set up label formats, you must set up the following:
-
How to Set Up Label Formats
-
How to Define Label Field Variables
-
How to Associate Label Types to Business Flows
How to Set Up Label Formats
Before you can specify label generation points and construct label format rules, you must define label formats. You define labels in the Define Label Formats window.
-
Navigate to the Define Label Formats window.
-
In the Label Type field, use the list of values to select the label type for which you want to define label formats.
-
In the Label Formats region, Name field, enter a name for the label.
This name should be the name that is recognized by the third-party printing software.
-
In the Description field, enter an optional description to describe this label format.
-
In the Disable Date field, enter an optional date on which this label format can no longer be used.
-
Select the Default Label check box to identify that this label format will be used as the default label format. Oracle Mobile Supply Chain Applications always uses the default format when the label is requested as part of a transaction. However, other formats can be used during manual requests that are accessed by the mobile manual print page.
Note: You can specify only one label format as the default label.
Note: Oracle Mobile Supply Chain Applications supports only one label format per label type.
-
Save your work, and click the Label Fields button to open the Define Label Field Variable window.
How to define label field variables:
These instructions assume that you have already defined a label format and you clicked the Label Fields button to open the Define Label Field Variables window.
-
In the Label Fields region, Field Name field, use the list of values to select the data element that represents the field on the label.
The list of values in this field is determined by the label type that you selected, for example Contents, in the Define Label Formats window.
-
In the Field Variable Name field, enter a unique text string to use as the identifier in the XML data that is produced by Mobile Supply Chain Applications.
-
In the Description field, enter an optional description for the field variable name.
-
Repeat the steps as necessary to enter additional label fields.
-
When you are finished, save your work.
How to associate label types to business flows:
Before you can associate label types to business flows, you must already have defined the appropriate label format that is compatible with the business flow. For a list of compatible label formats for business flows, see the Assign Label Types to Business Flows window. Note that you also use this window to associate label types to business flows.
-
Navigate to the Assign Label Types to Business Flows window.
-
In the left panel of the window, expand the Business Flows icon to display a list of business flows.
-
Select the business flow to which you want to associate a label type.
-
In the Label Type field, use the list of values to select the label type that you want to associate to the business flow.
Note: The list of values displays only the valid label types for the business flow.
-
In the Level field, select the level at which you want to control printing for this label type.
Valid values are Site, Application, Responsibility, and User.
-
In the Value field, select the value for the level that you selected in Step 5.
The Value field is disabled if you selected Site as the level in Step 5.
-
The Enabled check box is automatically selected to indicate that this label type can be used for generating the label that is associated with the business flow. Clearing this check box disables this association, and the label type will not be generated for the business flow.
-
In the Comments field, enter any comments about the association that you just created.
-
Save your work.
In addition to automatic label printing previously described, Oracle Mobile Supply Chain Applications lets you create individual label print requests from the Mobile user interface.
To print labels:
-
Navigate to the Materials Management menu.
-
Select Labels.
The Label Printing window appears.
-
Enter or select the type of label that you want to print in the Label Type field.
Depending on your selection, prompts specific to that label type appear on the window:
-
Material: Item number, quantity (if there is more than one item per container), unit of measure, (if a quantity exists ), lot (if item is lot controlled)
-
Serial: From serial number, item, to serial number
-
Location: Subinventory and Locator is applicable
-
Shipping: Delivery
-
Shipping Contents: Delivery
Label Printing Page
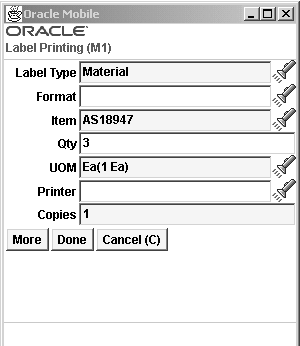
-
-
-
Optionally, enter or select the printer from the list of values.
-
In the Copies field, the default value is 1. If you want more than one label, enter that number.
-
After you enter the label information, select
<More>to print another label with this label type,<Done>to save this transaction, or<Cancel>to void this transaction.
Related Topics
Assigning Labels to Printers, Oracle Warehouse Management Implementation Manual
Choosing Printers for Shipping Documents and Labels, Oracle Order Management Suite Implementation Manual
Inventory Inquiries
Oracle Mobile Material Management enables you to search and view item information including where the part is located, quantity on hand, quantity available, and kanban data.
Item Inquiry
The Item Inquiry allows you to view detailed information about an item such as the on-hand quantity, packed quantity, loose quantity, and unit of measure.
To view item information:
-
Navigate to the Materials Management menu.
-
Select Inquiry.
Inquiry Page
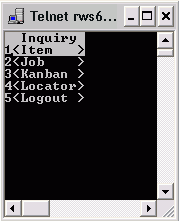
Note: In the Inquiry menu, the initial window displayed is a query window. To display a list of values, use the LOV control key (this key defaults to Control-L, unless it has been changed by your system or database administrator), rather than selecting Enter.
-
Select Item.
Item Inquiry Page
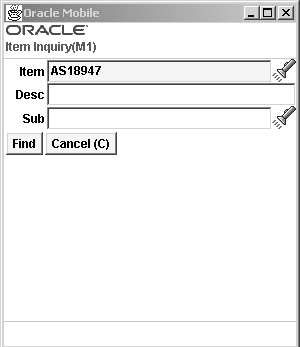
-
In the Item field, enter the item number, or use the list of values.
The description appears for this part number.
-
Enter the project in the Project field if necessary.
-
Enter the task in the Task field if necessary.
Note: The Project and Task fields appear if you are in a project-enabled organization.
-
Enter the subinventory and the locator values if you want to restrict the search criteria.
The Inquiry window appears with the UOM, quantity on-hand, and quantity available. If the item is under dual UOM control, then the system displays the secondary UOM, secondary on-hand quantity, and secondary quantity available.
Inquiry Page
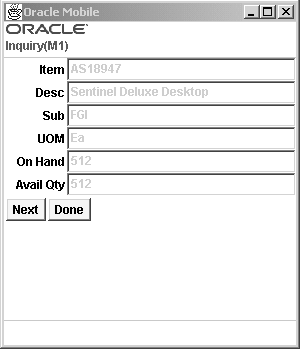
-
Select
<Lot Attributes>to view lot information,<Next>to find the subsequent items that fit your query criteria, or<Done>to end this query.Note: If the item is lot controlled, selecting
<Next>displays the next lot; otherwise, it shows the next locator or subinventory.
Locator Inquiry
The Locator Inquiry allows you to query for a particular item within a locator based on the subinventory, locator, and item information, and view detailed information about the item such as the on-hand quantity, packed quantity, loose quantity, and unit of measures in the locator you entered.
To view location information
-
Navigate to the Materials Management menu.
-
Select Inquiry.
-
Select Locator Inquiry.
Locator Inquiry Page
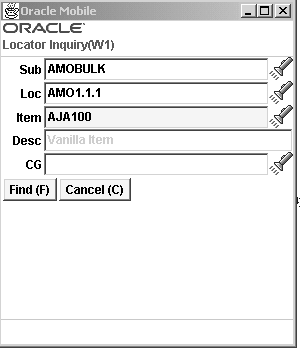
-
In the Sub field, enter the Subinventory value, or use the list of values.
-
In the Loc field, enter the Locator value, or use the list of values.
-
In the Item field, enter the Item value, or use the list of values.
-
Enter the description value if you want to restrict the search criteria.
-
Select
<Find>to view the material details of the items that fit your query criteria.Locator Inquiry Page
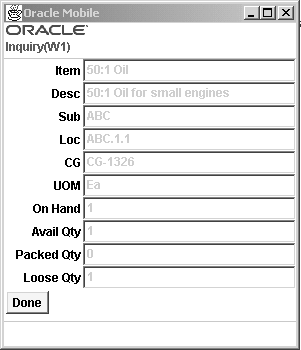
-
Select
<Done>to go back to the menu.
Job Inquiry
The Job Inquiry allows you to query for details of a particular job based on job name.
To view job information:
-
Navigate to the Materials Management menu.
-
Select Inquiry.
-
Select Job.
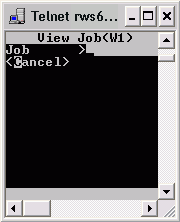
-
In the Job field, enter the job name, or use the list of values.
-
Select
<Find>to view the job details that fit your query criteria.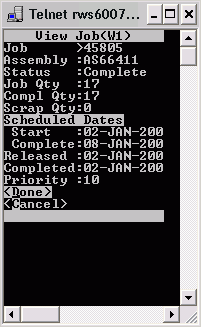
-
Select
<Done>to go back to the menu.
Kanban Card Inquiry
The Kanban Card Inquiry allows you to query for details of a kanban card based on kanban card number, item number, supply type, project or task.
To view kanban card information:
-
Navigate to the Materials Management menu.
-
Select Inquiry.
-
Select Kanban.
Kanban Inquiry Page
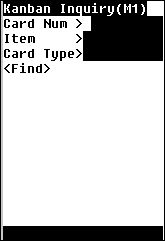
-
You can define your search criteria by kanban card number, item number, supply type, project or task.
Note: The Project and Task fields appear if you are in a project-enabled organization.
To query by kanban card number or item number, enter a value or use the list of values in the Card Num and Item fields. If you are querying by either of these criteria, you must enter a kanban supply type in the Card Type field.
To define your search by kanban supply type, enter a value or select the supply type in the list of values in the Card Type field. You can further define your search by entering criteria corresponding to the specific supply type:
-
Inter-Org: Replenished by another organization, search by organization, subinventory, and locator.
-
Intra-Org: Replenished by a locator in the same organization, search by subinventory and locator.
-
Production: Replenished by a production line. Search by the line code.
-
Supplier: Replenished by an external source. Search by the supplier.
When you enter your search criteria, the Kanban Inquiry window appears with information on the kanban including replenishment type, item number, description, locator, project, task and status. See Using the Kanban Calculation Program, Oracle MRP User's Guide.
Kanban Inquiry Page
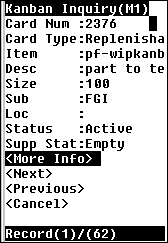
Note: The Project and Task fields appear if you are in a project-enabled organization.
-
-
-
Select
<More Info>to view more information about the kanban source including kanban type and activity,<Next>to find the subsequent items that fit your query criteria,<Previous>to view the last item that you queried, or<Cancel>to end this query.
Related Topics
Mobile Inquiries, Oracle Warehouse Management User's Guide
Overview of Kanban Replenishment, Oracle Inventory User's Guide