Cost and Profitability Analysis
Overview
Oracle Cost and Profitability Analysis provides tools for a full approach to maximizing profit margins by enabling near real-time insight into all aspects of cost management in Discrete and Process Industries. Cost accountants can use the cost planning tool to perform complex activities around planning cost drivers and allocating costs in order to derive accurate Cost of Goods Manufactured (COGM) in complex global manufacturing environments. Major features include:
-
Real-time allocation tool to obtain accurate COGM from GL, Procurement, Logistics, Maintenance, and other supply chain functions.
-
What-if simulations for planning costs across multiple manufacturing locations, processes, and contract manufacturers.
Cost accountants, finance, and operations managers can use Oracle Cost and Profitability Analysis to quickly perform what-if simulations on complex cost data and instantly visualize the impact of changes to their business. Oracle Cost and Profitability Analysis provides a suite of solutions to perform complex cost analysis, identify optimal profit margins, and perform cost planning and forecasting so that companies can make decisions in time to capture the highest possible profits, safeguard current margins, identify optimal future margins, streamline financial overview across the supply chain, and increase financial close efficiency.
The Cost Management Cost and Profitability Analysis application enables users to analyze the impact of cost variations in items, resources, overheads, and recipes on your enterprise. You can specify the new cost and review all impacted assemblies and subassemblies. This new cost is the simulated cost. For impacted material and resources, you can view the current on-hand, work in process, and in-transit values compared with the simulated value. You can review summary to detailed data for each affected assembly and view the indented cost structure in the Simulated Cost Impact Details page. Additional cost changes can be made to material, material overhead, resources, overhead, outside processing, and resubmitted in the simulation program.
Cost and Profitability Analysis Home
The Home page lists all recent Cost Simulations, Cost Plans, and Simulated Margins. You can navigate directly to individual cost simulations, cost plans, simulated margins from the Cost and Profitability Analysis Home page.
Cost Simulations
The Cost Simulations page displays all simulations that users have created, submitted, and completed. The Cost Management Cost Simulations application provides a method to analyze the impact of cost variations in items, resources, overheads, as well as in sourcing, bom, formulas, recipes, and routings. You can specify the new cost and review all impacted assemblies and subassemblies. This new cost is the Simulated Cost. For impacted assemblies, subassemblies, batches, recipes, and formulas, you can view the current on-hand, work-in-process, and in-transit values compared with the simulated value. You can review summary-to-detailed data for each affected assembly, and view the indented cost structure in the Simulated Cost Impact Details page. In the Simulated Cost Impact Details page, additional cost changes can be made to material, resource, and outside processing rates and usages, as well as to overhead and material overhead rates, and then resubmitted in the simulation program.
Viewing and Creating Simulation Criteria
Simulation Criteria captures a group of entities that typically receive similar cost treatment or are handled and analyzed together when cost reviews are performed. This is very similar to the allocation scope in cost planning. However, the items are not required to belong to the same UOM because they are not a target for cost allocation.
The Search Simulation Criteria page displays Item, Resource, and Overhead simulation criteria. You can also narrow the list of simulation criteria using the Simple Search or Advanced Search options.
The Create/Update Simulation Criteria page contains a Header region that displays the Criteria Name, Criteria Description, Criteria Type, Inactive Date, and Status.
The Attributes region displays Attribute Type, From Value, and To Value to define ranges of simulation criteria.
Examples of groups that Simulation Criteria represent may include:
-
A category of items
-
A list of related items
-
All raw materials in a particular organization
-
All raw materials with a particular cost element
-
All resources in a department
The Attribute Types used to select items for criteria work together, therefore, all attributes must be true for the items to be selected.
All saved and submitted simulation criteria are listed on the Search Simulation Criteria page.
To create simulation criteria:
-
Navigate to the Search Simulation Criteria page.
Cost Management responsibility > Cost and Profitability Analysis > Home > Cost Simulation > Simulation Criteria (tab).
-
Click the Create Simulation Criteria button. The Create/Update Simulation Criteria page appears.

-
In the Header region, enter a Criteria Name, Criteria Description.
-
Select a Criteria Type from the drop-down list.
-
Click the + icon to add simulation criteria Attributes.
-
Select Attribute Type, From Value, and To Value.
-
Click Save.

Creating Simulations
-
Navigate to the Cost Simulations page.
Cost Management responsibility > Cost and Profitability Analysis > Home > Cost Simulation > Simulations (tab)
-
In the Cost Simulations page, click Create Simulation. The Create Simulation page appears.
-
In the Header region, enter a Simulation Code and a Simulation Description.
-
Choose a Basis Cost Type that will calculate the costs of all items, resources, and overheads that are part of the exploded cost structures of the assemblies that are using the entities in the simulation criteria (either directly or indirectly).
-
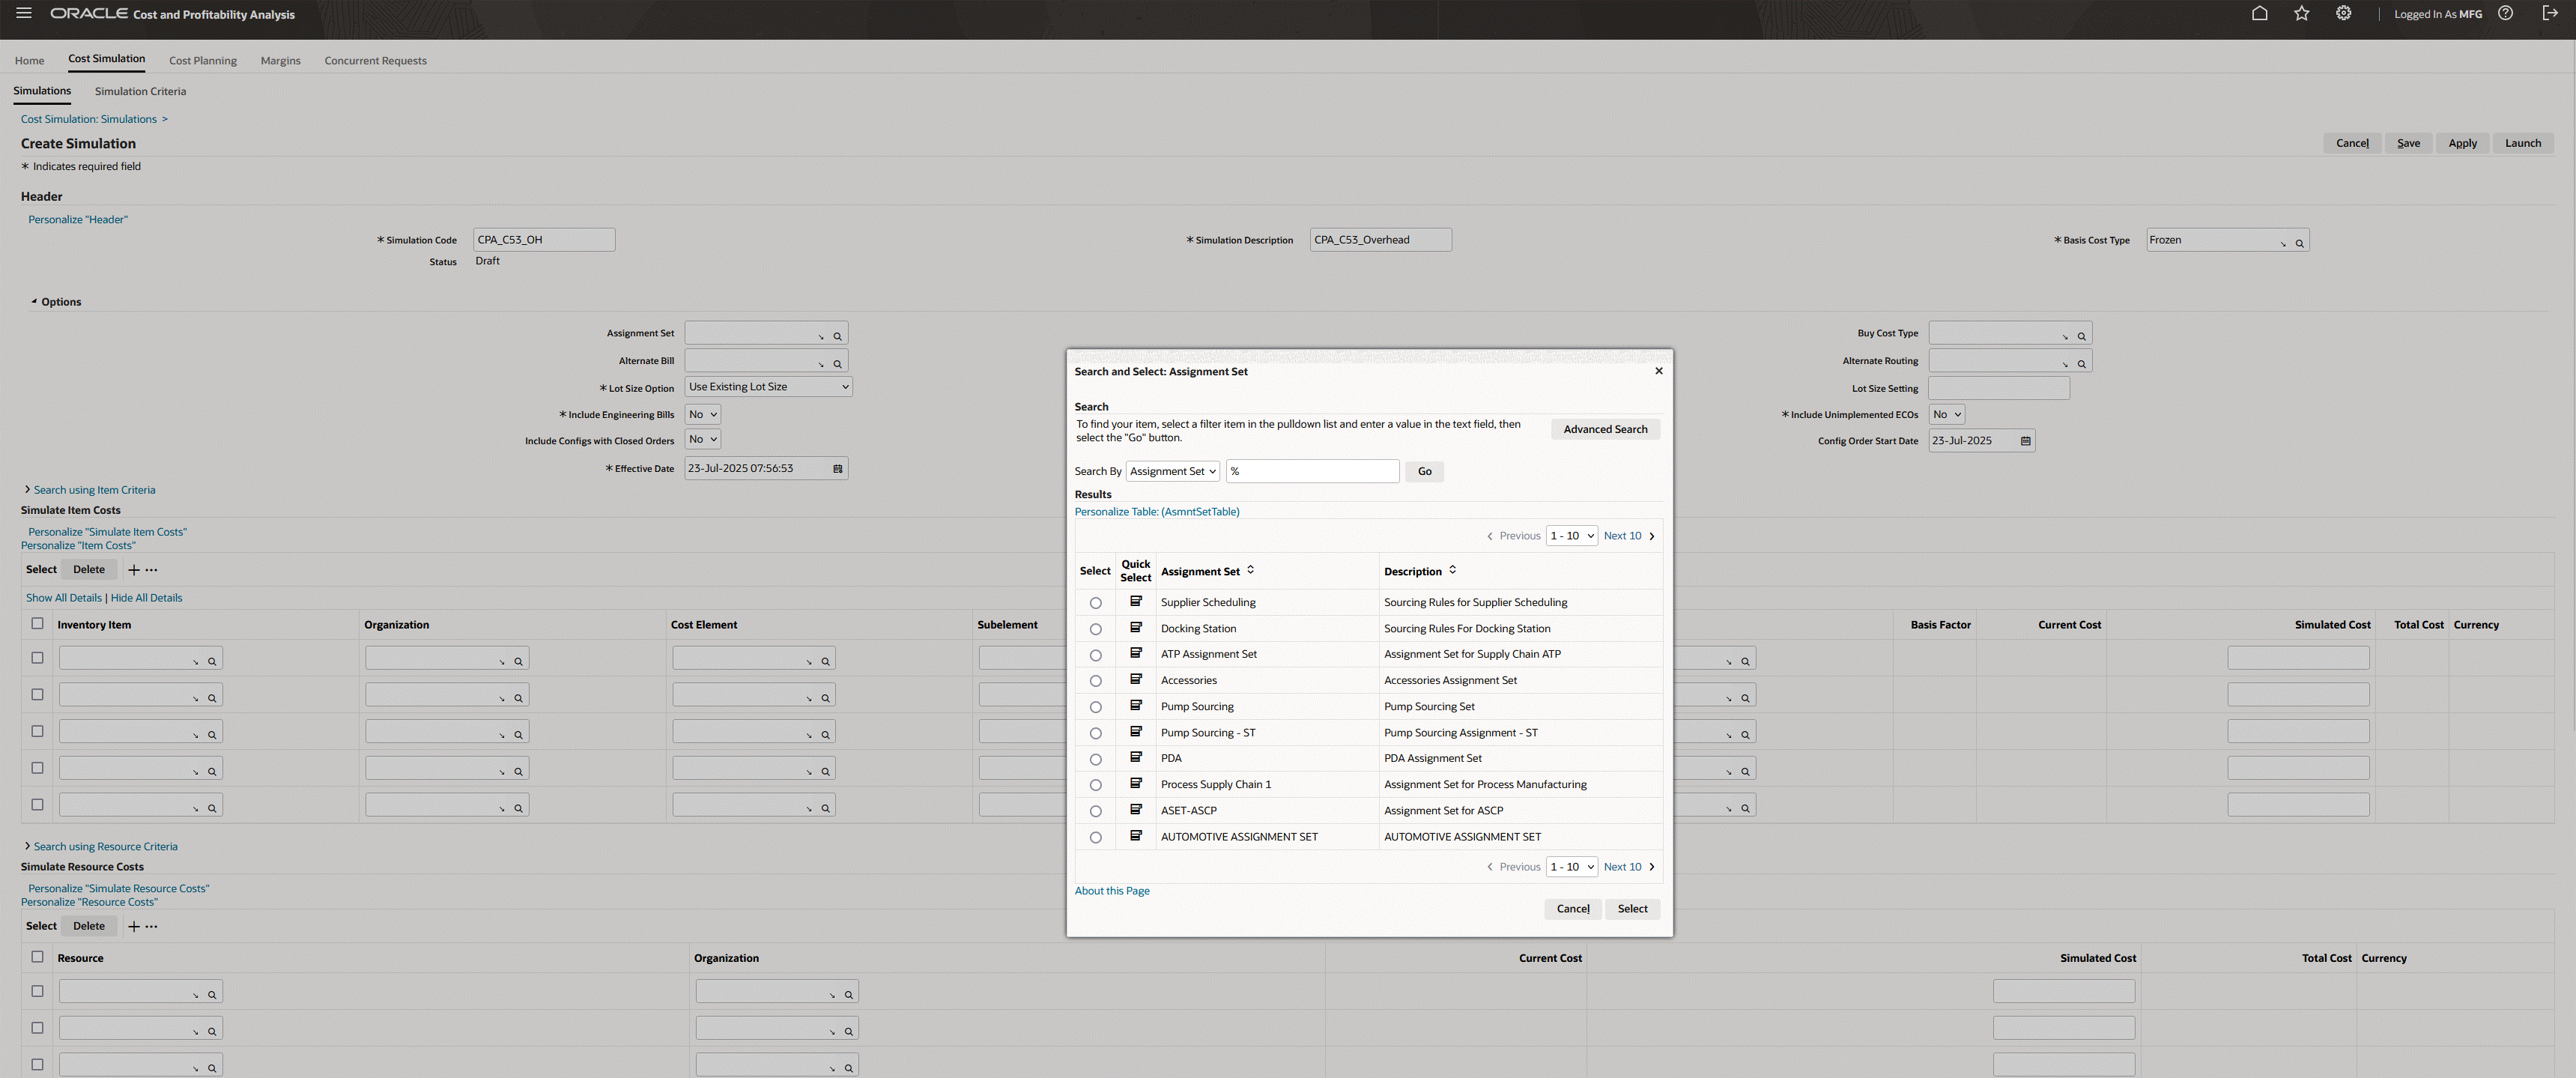
Click Options to search and select Cost Simulation Criteria, and view and enter rollup parameters. Parameters used here are the same parameters used by the Supply Chain Cost Rollup program.
-
There are two options available for entering entities for cost simulation:
-
Choose a Simulation Criteria under which Items, Resources and Overheads are listed
-
Manually enter Items, Resources, and Overheads for which costs need to be simulated.
Note: Only those costs can be simulated that are user defined. Users cannot create a simulation by trying to provide an alternate cost to the rolled up cost of an assembly. Valid entities that can be simulated are typically as follows:
-
Material overheads for items (including manufactured items)
-
Any cost for a raw material
-
Rates for resources and overheads
-
-
-
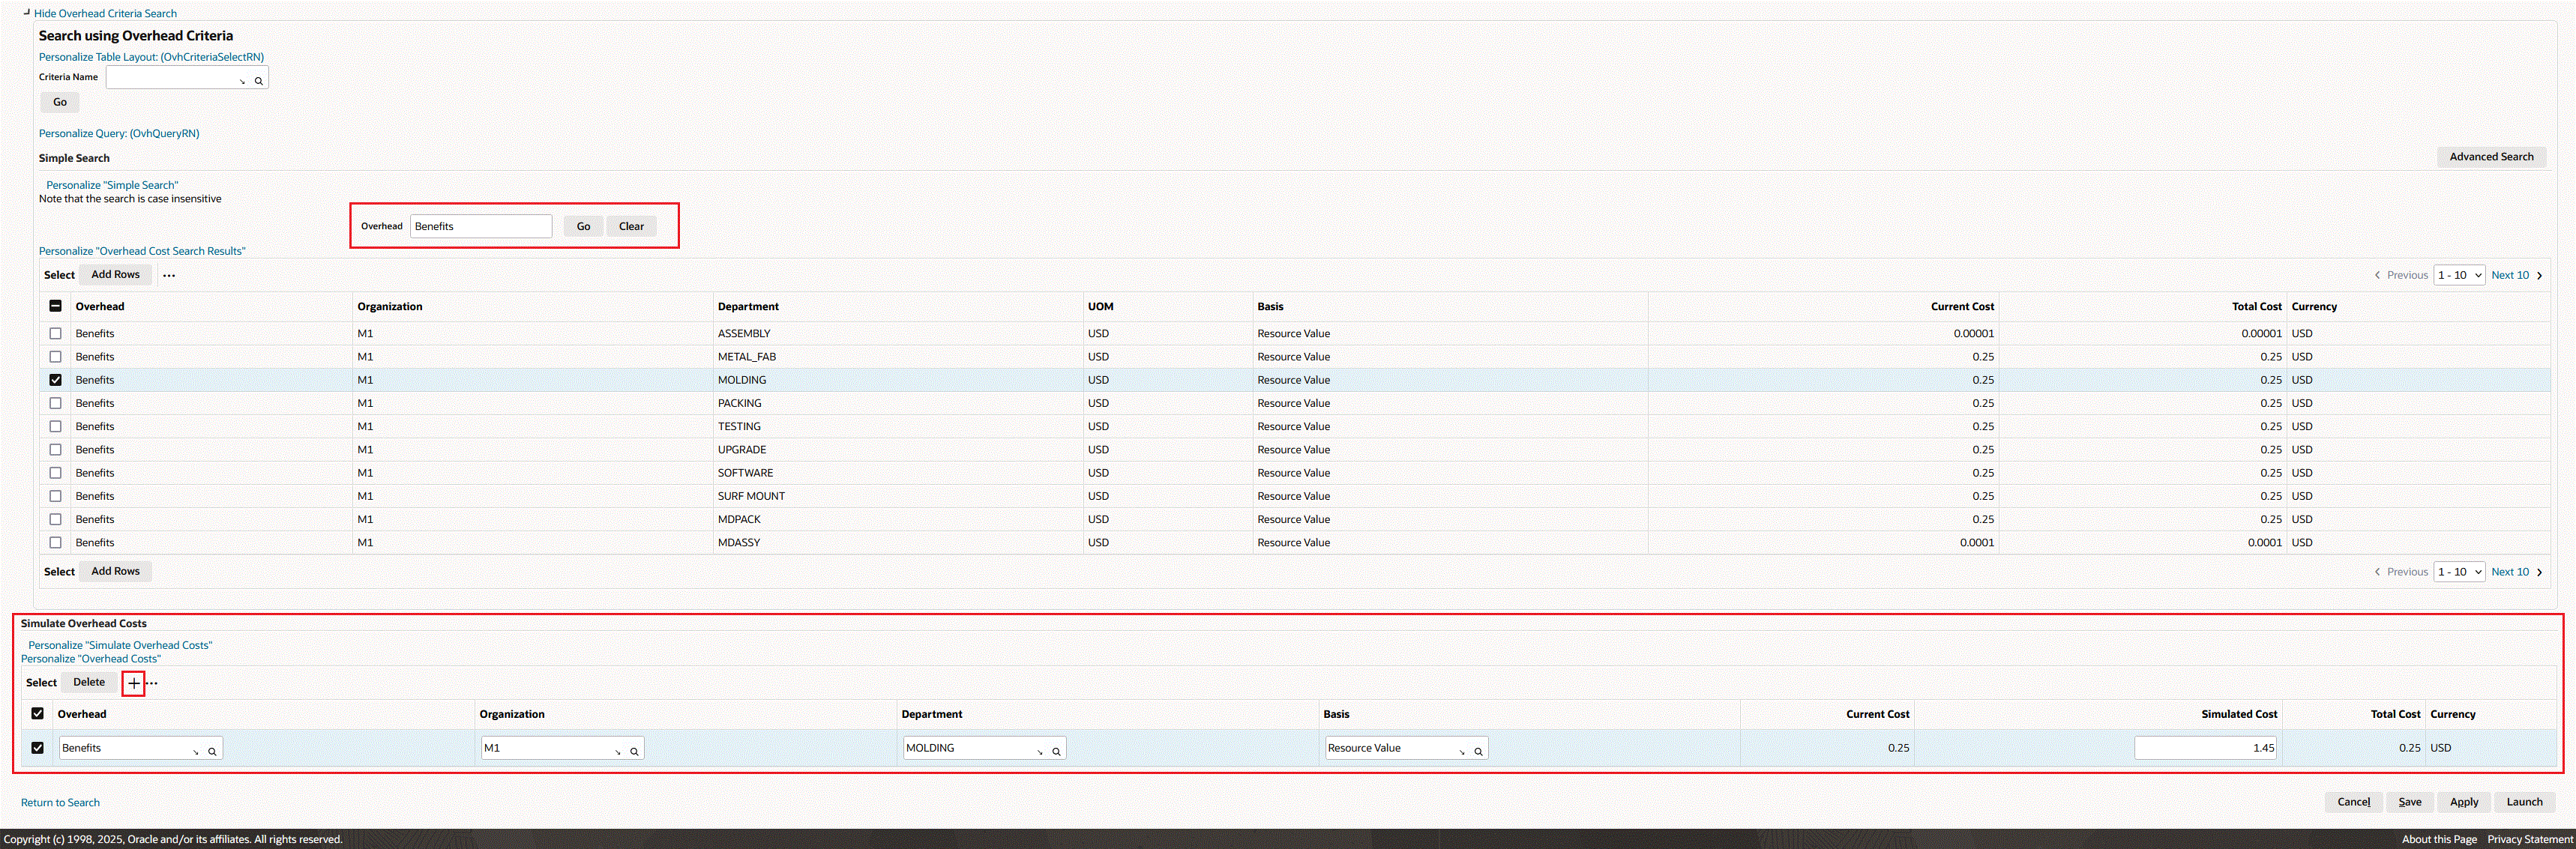
When using Simulation Criteria, you can search and choose the respective entity type. For this example, we are using Overhead Criteria.
-
The application returns all items retrieved by the criteria. You can choose all or specific items from the criteria and add them to the simulation. When adding to the simulation, the item and the granular sub-elemental cost of the criteria are selected. This allows you to choose the exact cost to simulate for an item.
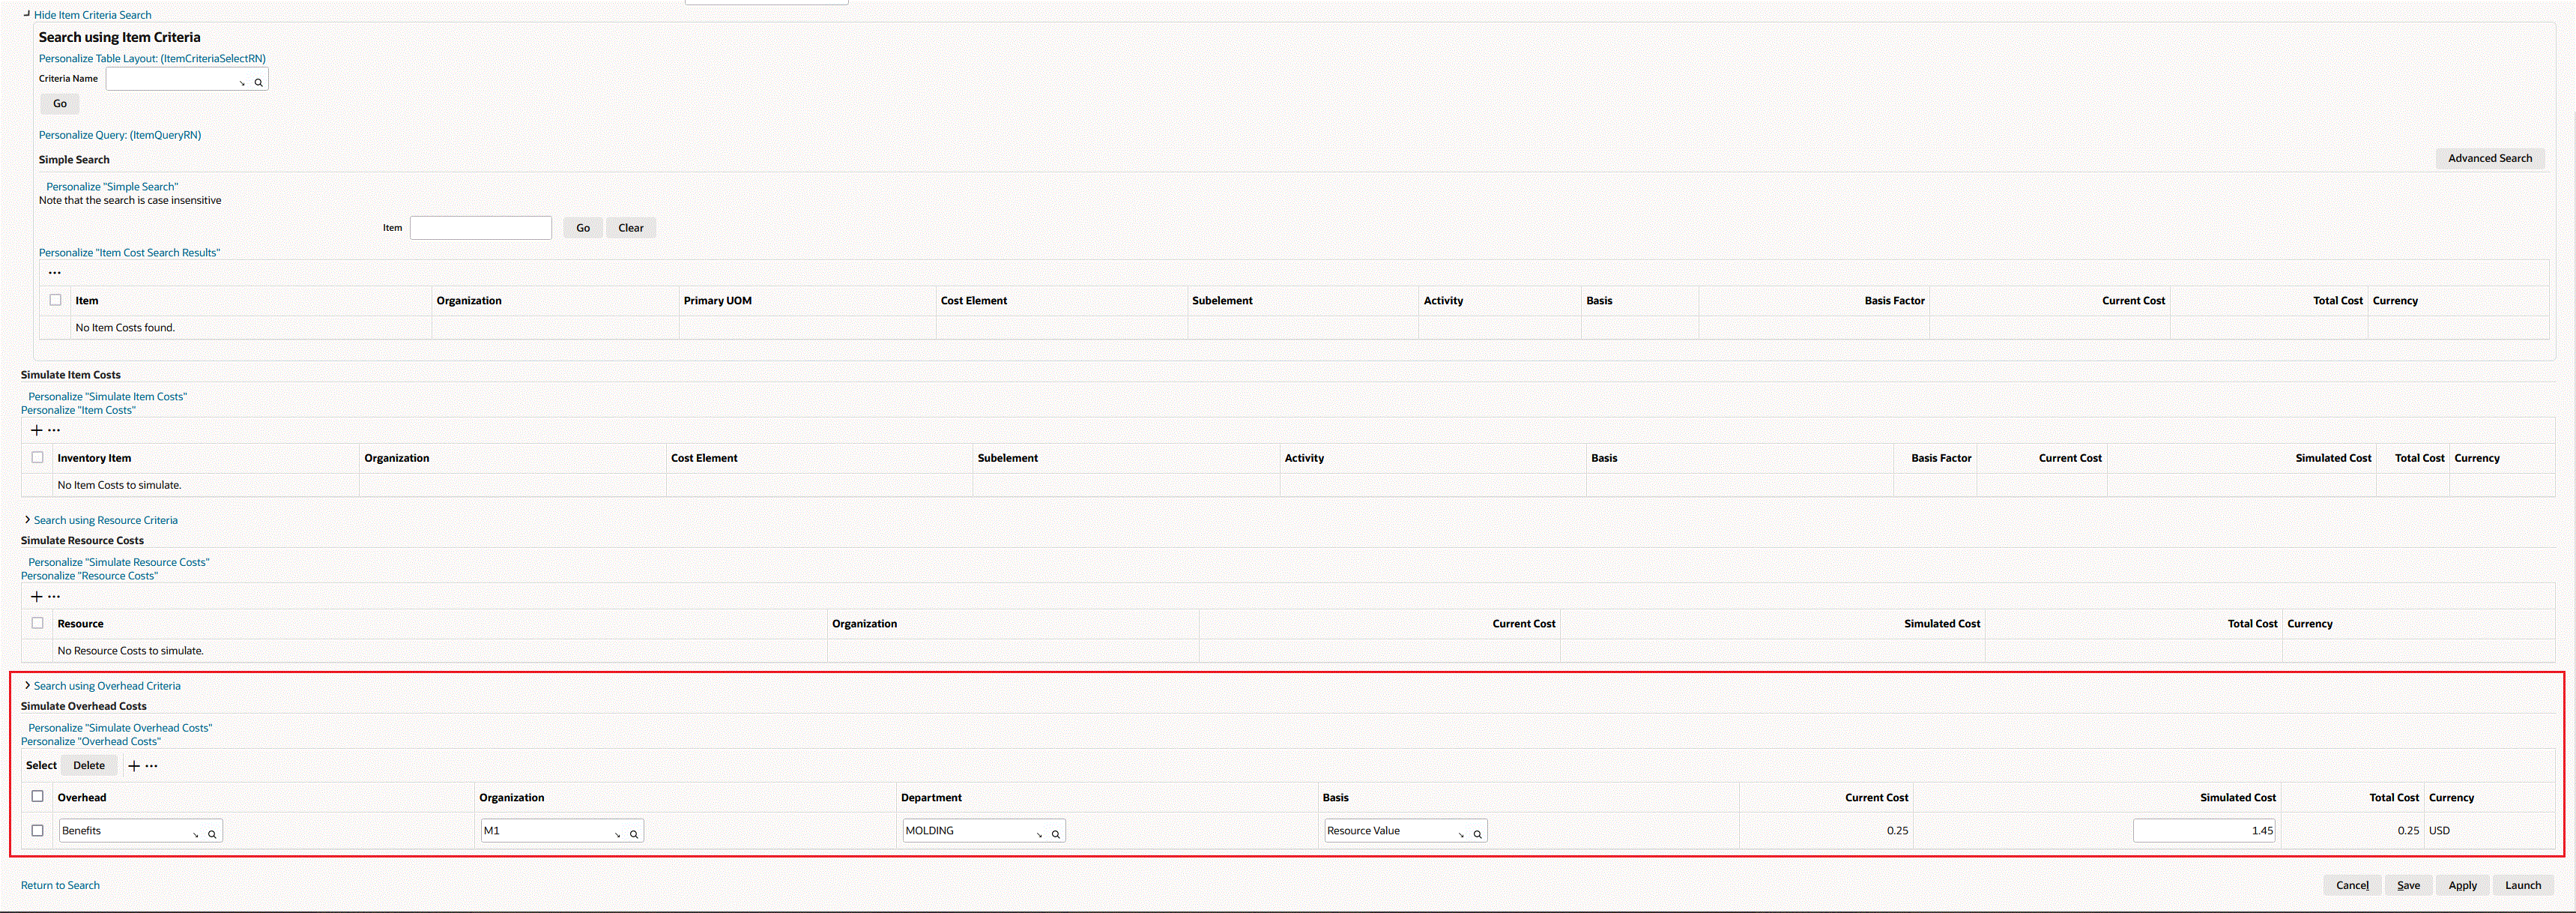
-
The application loads the selected costs in the Simulate Overhead Costs region for this scenario. You can then enter the simulated costs by clicking the + icon to add a row. Add Simulated Overhead Cost details for each Overhead Item that you have added.
-
At any point of building the simulation, you can choose to Save a simulation and return to it later. You can continue to edit and refine a simulation, and the simulation remains in Draft status until it is submitted by clicking the Launch button.

-
You can launch a simulation by clicking the Launch button. This initiates the processing of the simulation.
-
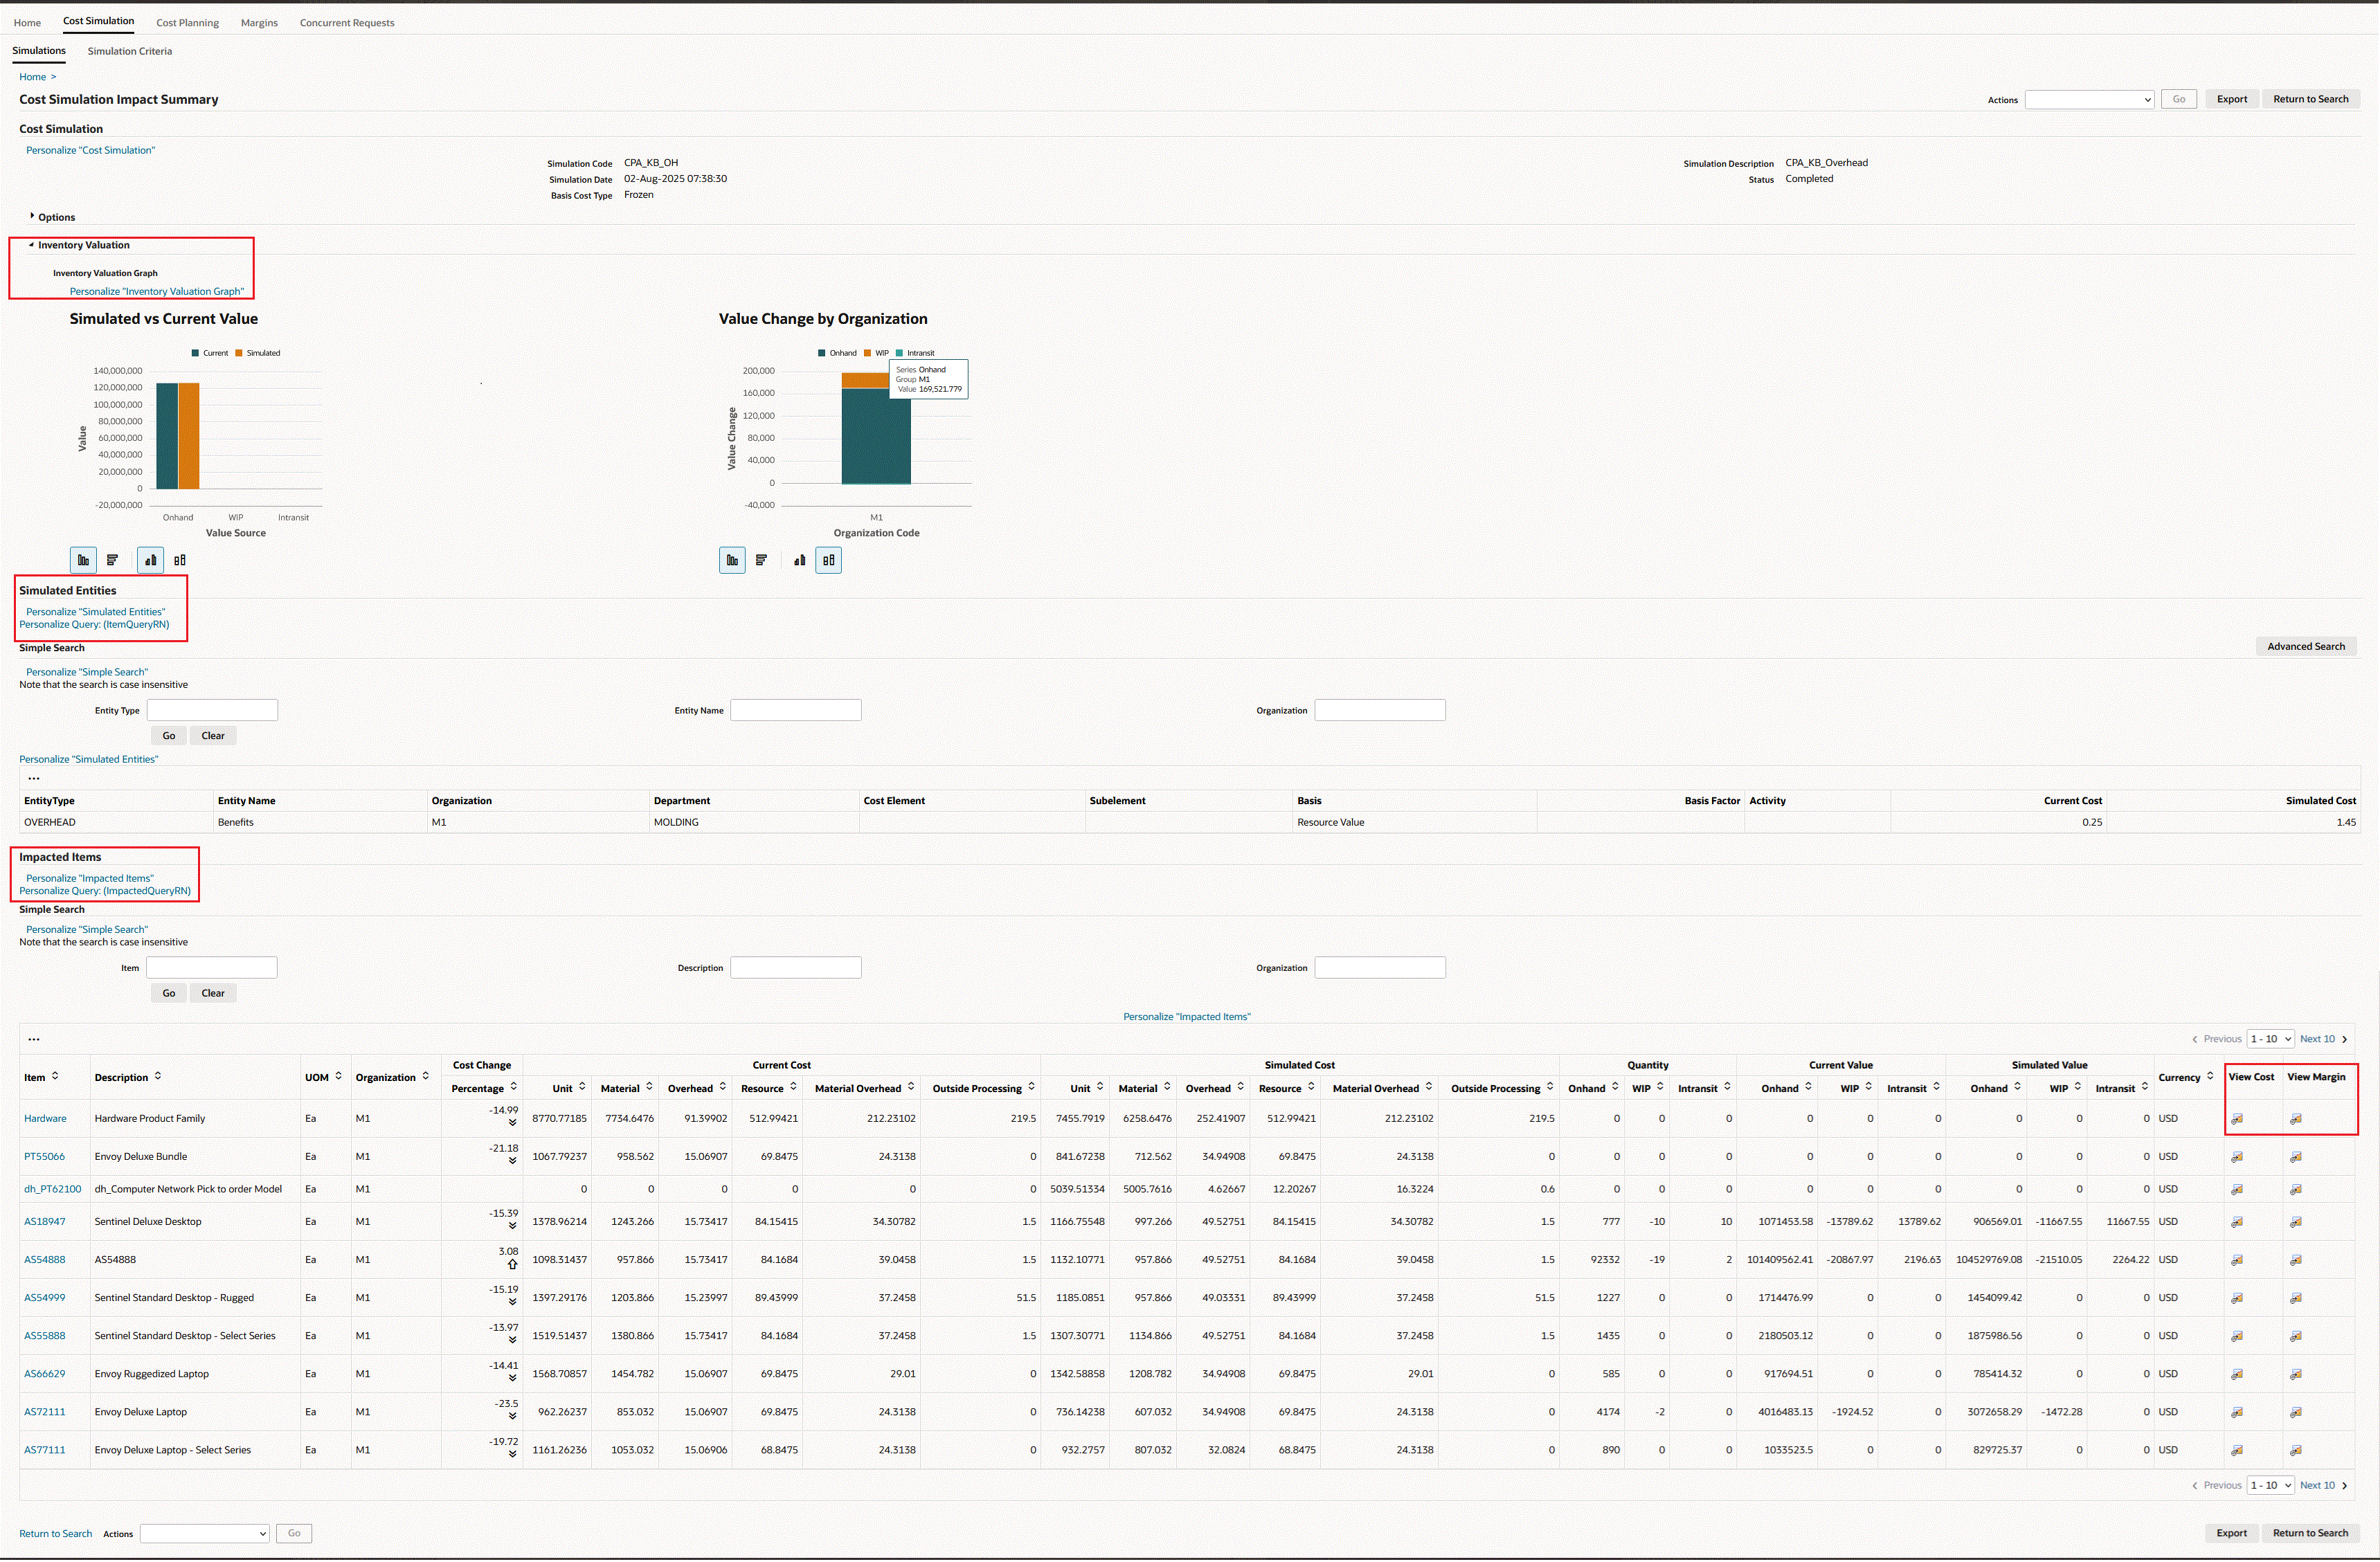
When the simulation completes, you can click on the simulation and analyze the impact of the simulation on the Cost Simulation Impact Summary page. You can navigate from the Home tab or Cost Simulation tab to open the Cost Simulation Impact Summary page to view impacted items, assemblies and sub-assemblies in a simulation, along with their current and simulated costs, current and simulated on-hand, WIP, and intransit values.
-
The Cost Simulation Impact Summary page contains the following sections:
-
Inventory Valuation: This section contains graphs and charts that display an overview of the simulation impact on Cost, Valuation, and Margins.
-
Simulated Entities: This section displays the simulation criteria that was selected or manually entered.
-
Impacted Items: This section displays all of the impacted items, products, and simulated entities in which costs have been impacted by the simulation.
You can also click the View Cost and View Margin action icons in each item row to view Simulated vs. Actual charts and graphs.
-
-
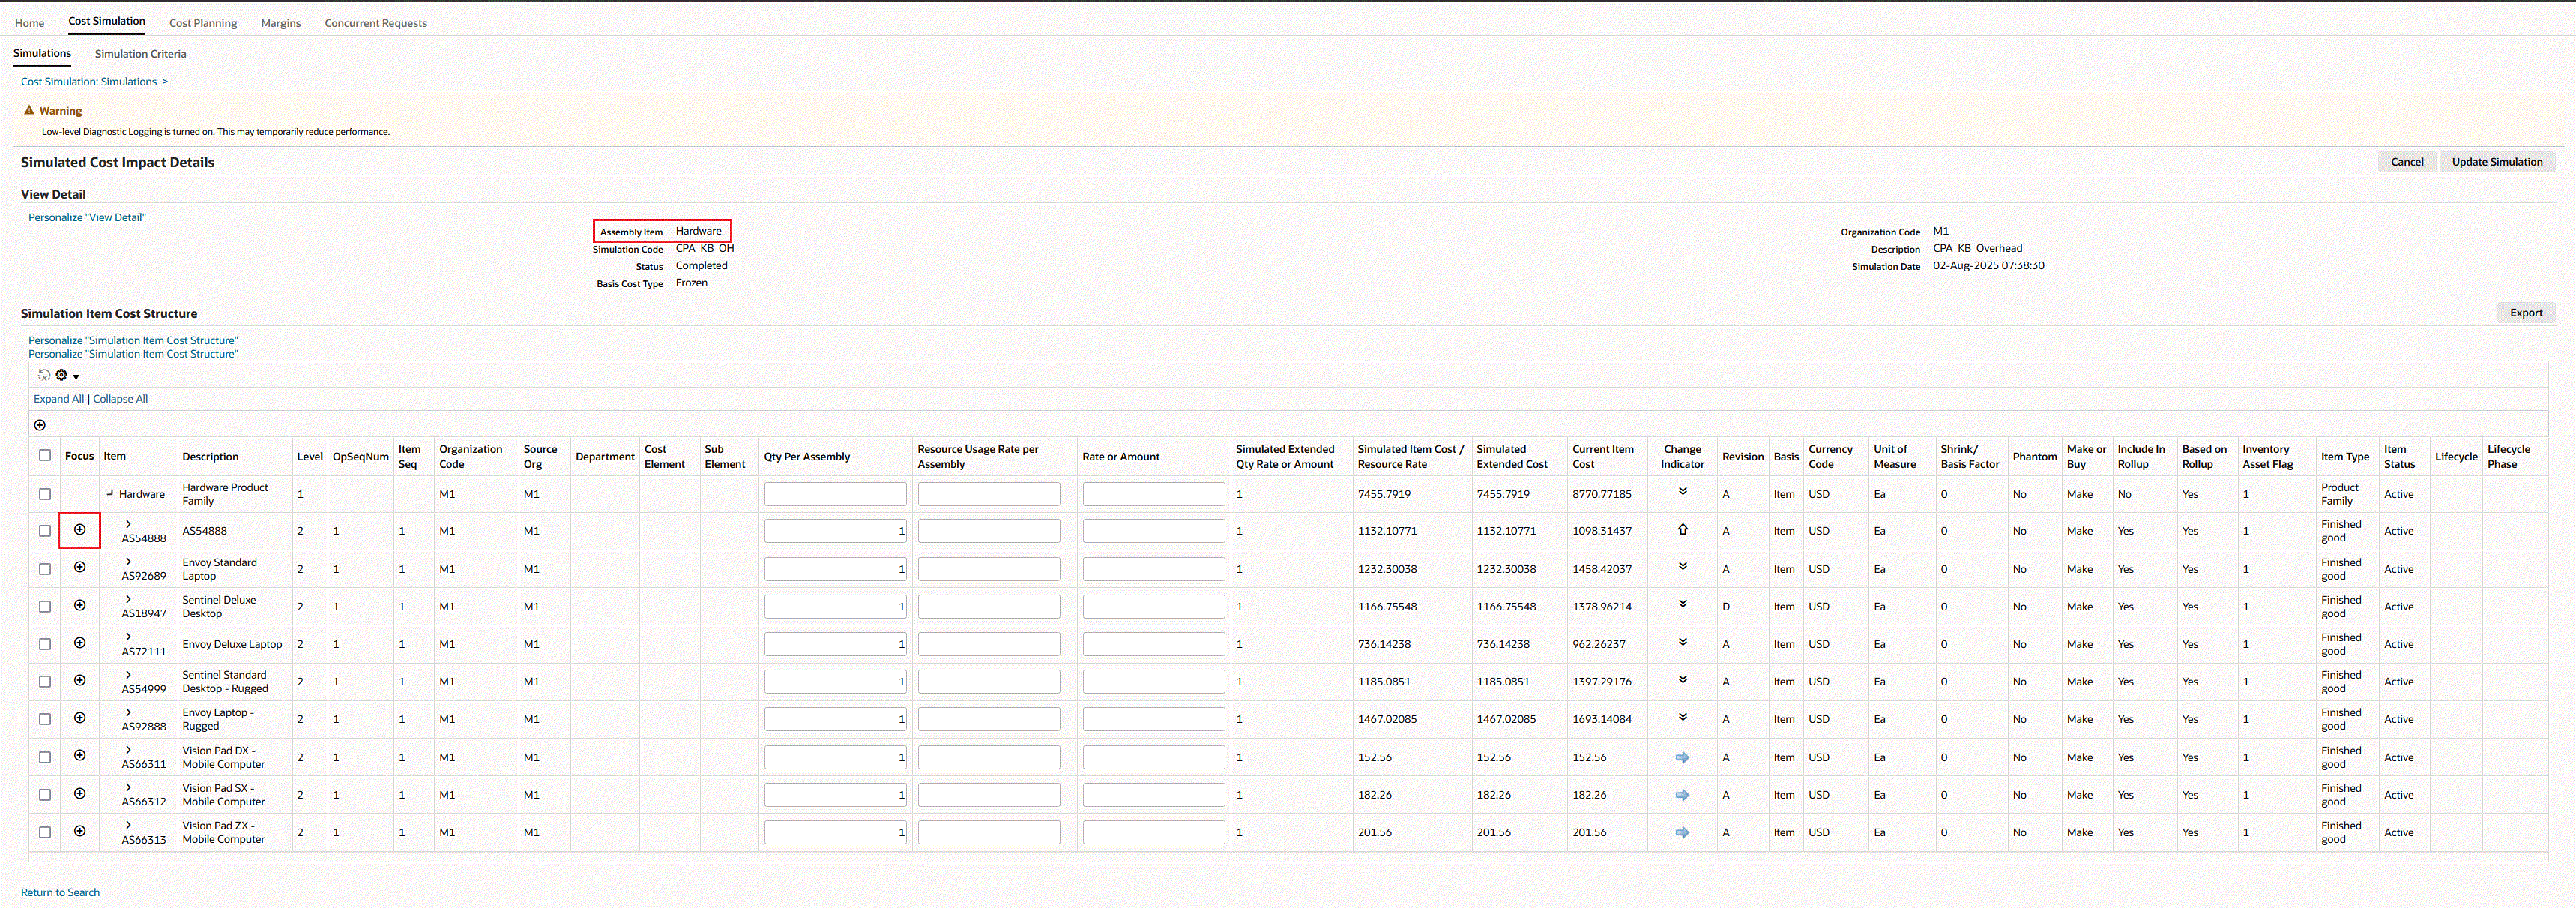
On the Cost Simulation Impact Summary page, you can click an Item link in the table to open the Simulated Cost Impact Details page to review the cost structure of that item. If it is a multi-level rolled up cost, then you can click on the tree structure to traverse through the cost levels, or use the Expand and Collapse All buttons.
-
Click the + icon in the Focus column to open the multi-level cost structure of the intermediate item in question.
-
This enables you to separate a section of the cost from a complex muti-level cost structure.
-
You can do this across multiple levels and then use the navigation links (breadcrumbs) in the top of the table to navigate back to the Cost Simulations Search and Cost Simulation Impact Summary pages.
-
-
You can edit Qty Per Assembly, Resource Usage Rate Per Assembly, and Rate or Amount values and then click the Update Simulation button to refresh the simulation with changes.
-
From the Cost Simulation Impact Summary page, you can click the following options from the Actions drop-down menu followed by clicking the Go button:
-
Load Values: updates Onhand, WIP, and Intransit values on the simulation.
-
Calculate Margins: calculate the impact of the simulation on margins by launching the Gross Margin Load for Simulation process.
-
Analyze Margins: navigates to the Margin Analysis page.
-
Analyze Detailed Margins: navigates to the Detailed Margin Analysis page.
-
-
All Simulated Margins from simulations or cost plans display on the Simulated Margins page. Click the Margins tab to navigate to the Simulated Margins page. See: Margins
Cost Planning
Cost Planning models direct costs, overhead, and fixed costs by using allocation pools, allocation scopes, and allocation rules.
The Search Plans page displays Cost Plans by period for which the cost plan was run. Cost Planning provides a set of features enabling an accurate assessment of all costs in a business. You can define an enterprise-wide cost strategy and perform cost planning scenarios. Cost Planning enables you to keep the manufacturing process profitable by:
-
Analyzing the costs associated to product lines in detailed planned cost structures.
-
Evaluating multiple allocation strategies to identify the one that best fits your business. The right cost allocation strategy ensures accurate cost visibility, enabling better pricing, budgeting, and profitability decisions.
-
Identifying high costs and low value flows.
-
Automatically generating comprehensive product cost structures by using purchasing documents, production and planning data, and user provided rules for allocation.
-
Providing the ability to perform what-if simulations.
Allocations
Cost allocators enable manufacturers to set up and derive accurate product costs based on historical trends and external parameters.
-
Allocation pool represents indirect or shared cost sources - expenses that may not be directly traced to a single product, service, or department.
-
General ledger accounts (utilities, rent, administrative salaries)
-
Budgets or forecasts (planned overhead, future marketing spend)
-
Expense estimates (expected maintenance costs, service contracts)
-
Pooled departmental costs (support functions such as HR, IT, or facilities)
-
-
Allocation Scope includes the products, resources or overheads considered for a cost plan. It is used to group these elements that will absorb costs defined in an allocation pool.
-
Allocation Rule is the method cost accountants use to allocate costs using the scope and pools defined. This provides multiple allocation methodologies. The cost driver is the cost basis used to allocate costs to products.
Cost Plans
Cost plans perform the cost allocations defined by the allocation rules included in the cost plan. After generating the cost plan, you can use the new cost types created and run simulations based on these new cost types. The simulation enables you to use an estimated cost and check how the new estimate will impact the current production and profitability. You can:
-
Run different cost plans enabling you to create cost estimates using different cost drivers and then choose the best fit for the business.
-
Choose multiple allocation rules for a given plan period, enabling the plan to be used across organizations.
-
Specify a percentage of dollars absorbed by the plan.
-
Calculate the impact of inflation using a markup percentage.
-
Review the status and output of the cost plan in the Cost Plans page.
-
Query a current cost plan and change the options.
Searching and Viewing Cost Plans
You can search for cost plans using Simple Search or Advanced Search methods:
-
Simple Search enables searching when you know information such as part of a name or description.
-
Advanced Search offers multiple criteria and conditional qualifiers. This method is used when looking for specific values.
To search and view cost plans:
-
Navigate to the Search Plans page.
(N) Cost Management responsibility > Cost and Profitability Analysis > Home > Cost Planning > Cost Plans (tab)
-
For a Simple Search, in the Search region, enter values in either the Plan Code, Description, or Plan Date fields, or any combination of fields.
-
Click Go to view the results of your query.
-
Optionally, you can select Advanced Search to enter more details for the query on the Advanced Search page.
-
In this search method, specify how to filter the results of your search criteria by choosing one of the following:
-
Show table data when All conditions are met.
-
Show table data when Any condition is met.
-
-
For each search criteria value, select a conditional qualifier. Your choices are: contains, ends with, is, is not, is not (include blanks), starts with.
-
Enter a value for any of the following fields:
-
Plan Code: Unique value created for the cost plan.
-
Description of the cost plan.
-
From and To Month: Time period for the plan.
-
Basis Cost Type: Planned costs are derived from the basis cost type. However, the cost element and subelement in Cost Planning for is not derived from the basis cost type.
-
Currency
-
Status: System generated. Statuses include Draft, Submitted, Running, Error, and Finished.
-
-
Click Go to display the results of your search.
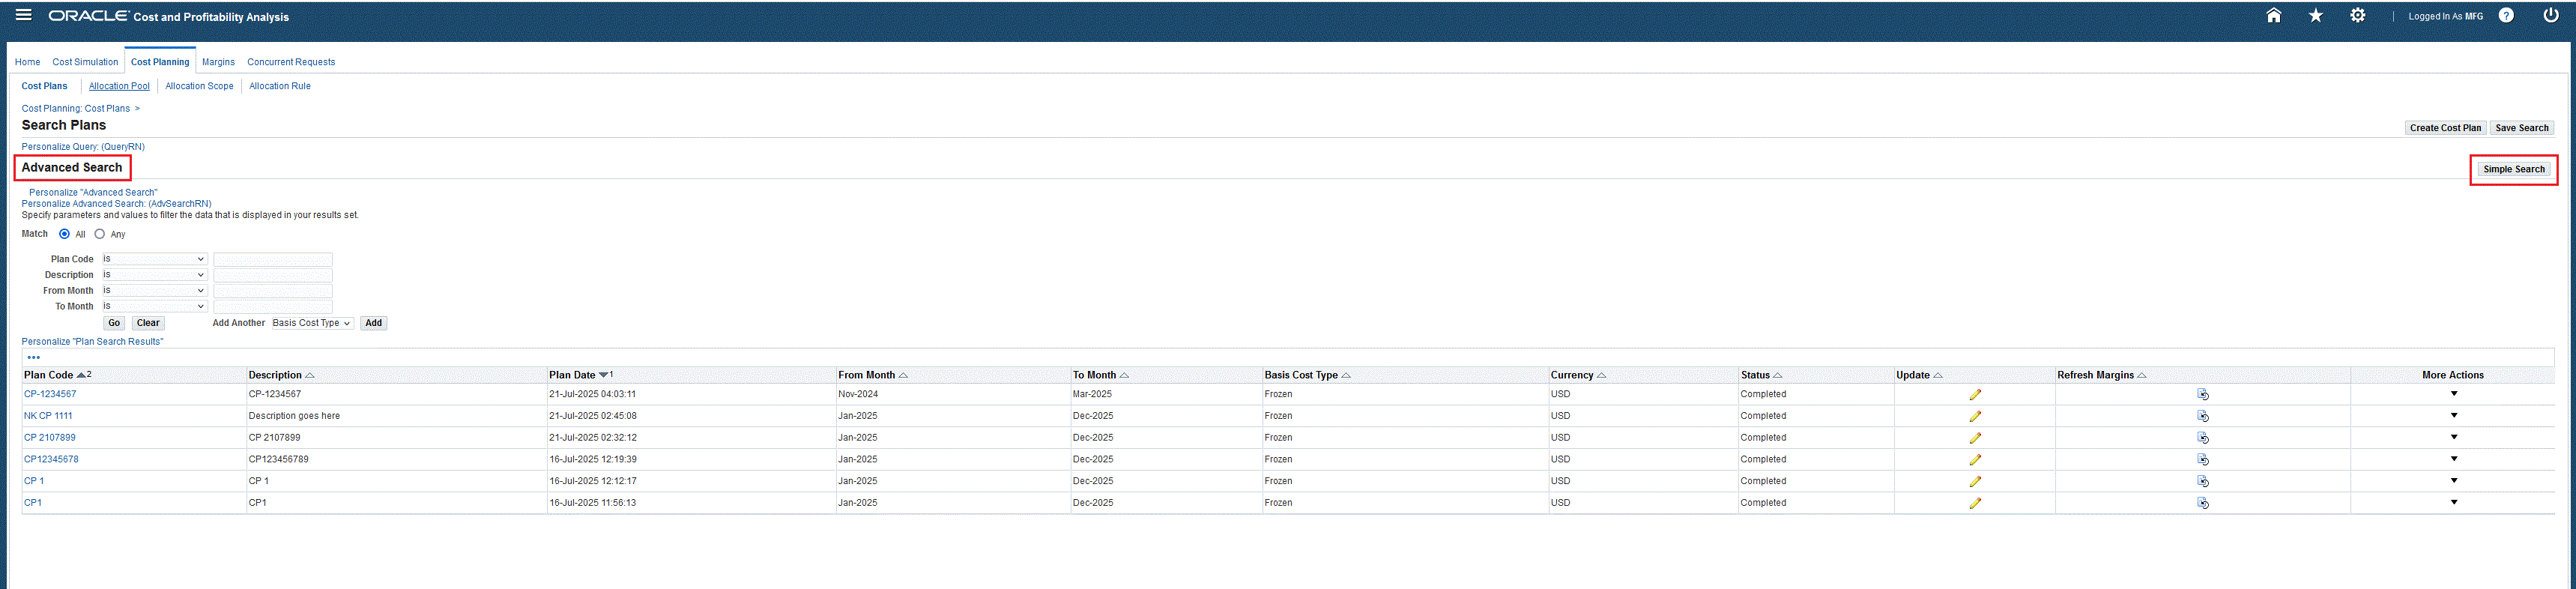
-
For plans with a status of Completed, you can select the Plan Code link to navigate to the View Cost Plan page to view the plan details.
-
You can perform the following tasks from the Search Plans page:
-
Click Create Cost Plan to create a new record.
-
Click the Update icon to edit the plan record. This option is not available for plans with the status Submitted or Running.
-
Click a Plan Code link to navigate to and view the View Cost Plan page.
-
Click the More Actionsdropdown option to:
-
View the Detailed Margin Analysis page
-
Duplicate the cost plan
-
Purge the cost plan
-
-
To view details for a cost plan:
-
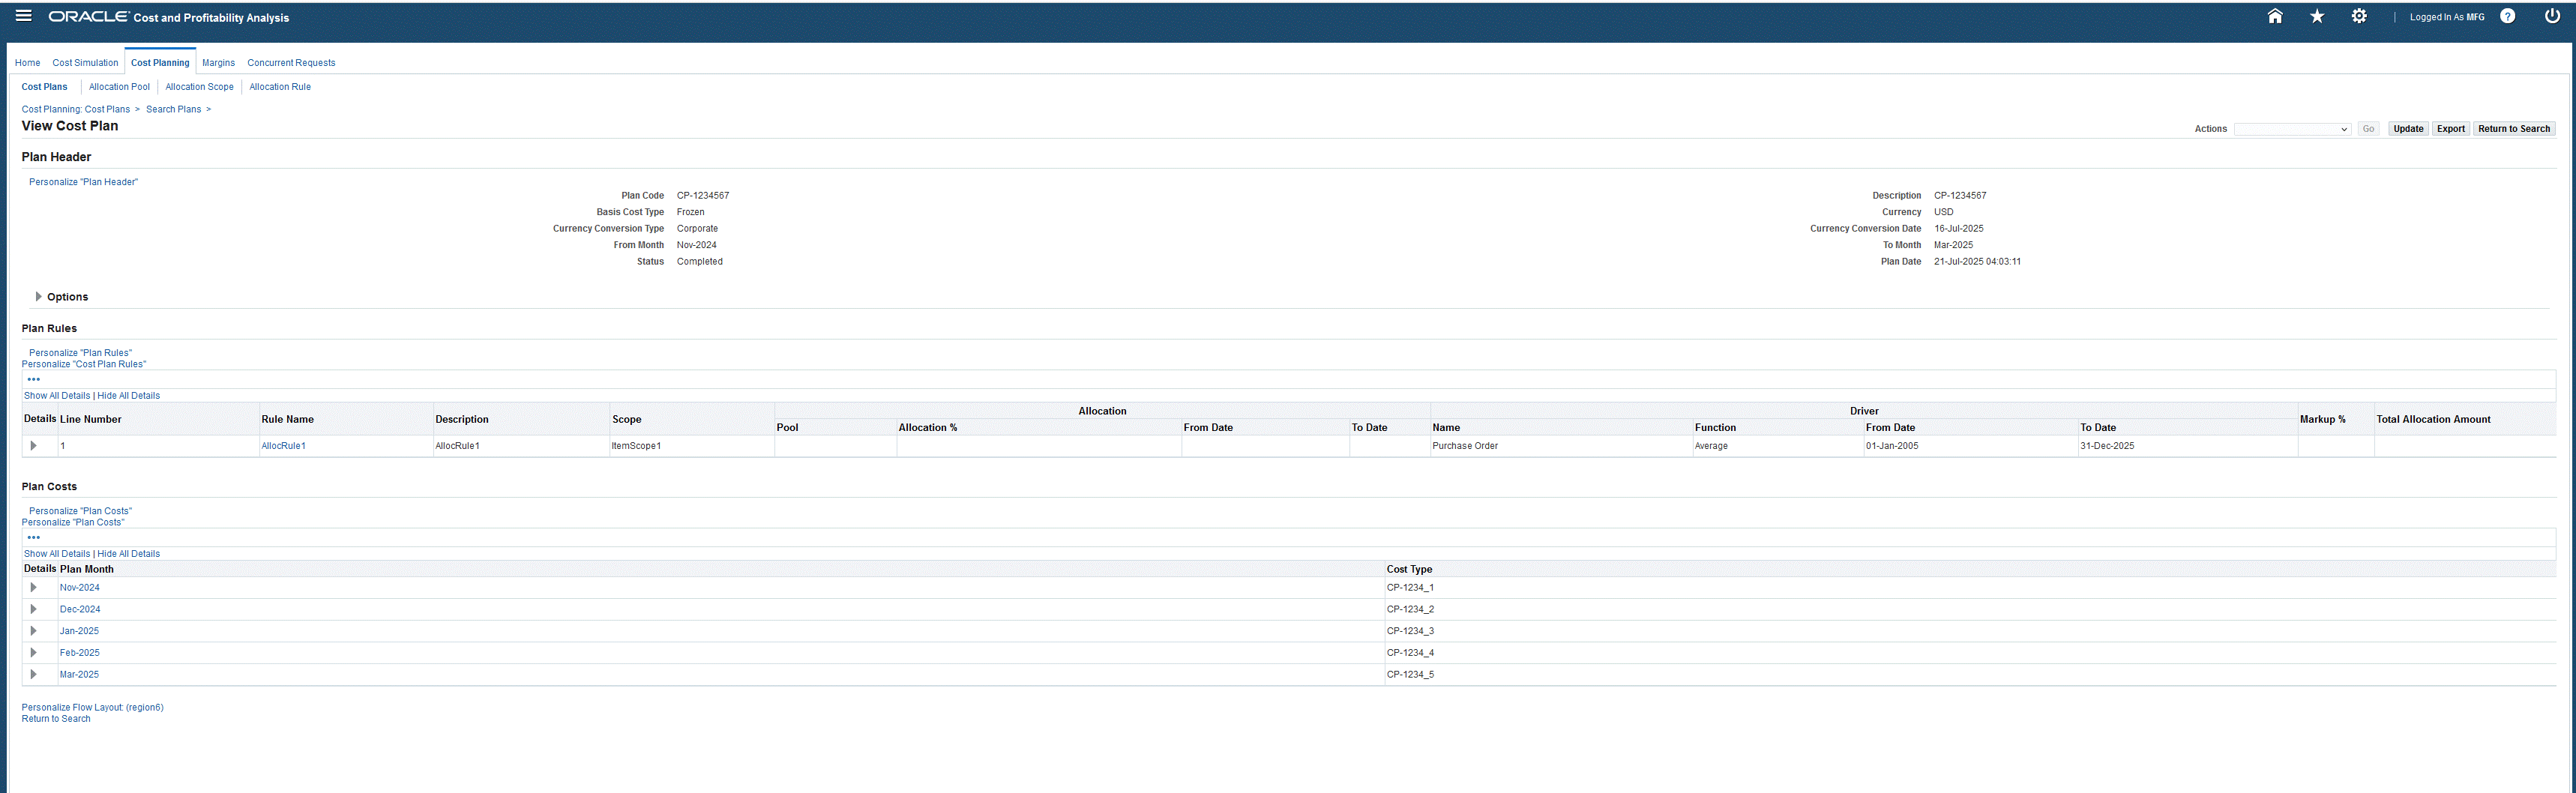
In the Search Plans page, click a Plan Code link to navigate to the View Cost Plan page.
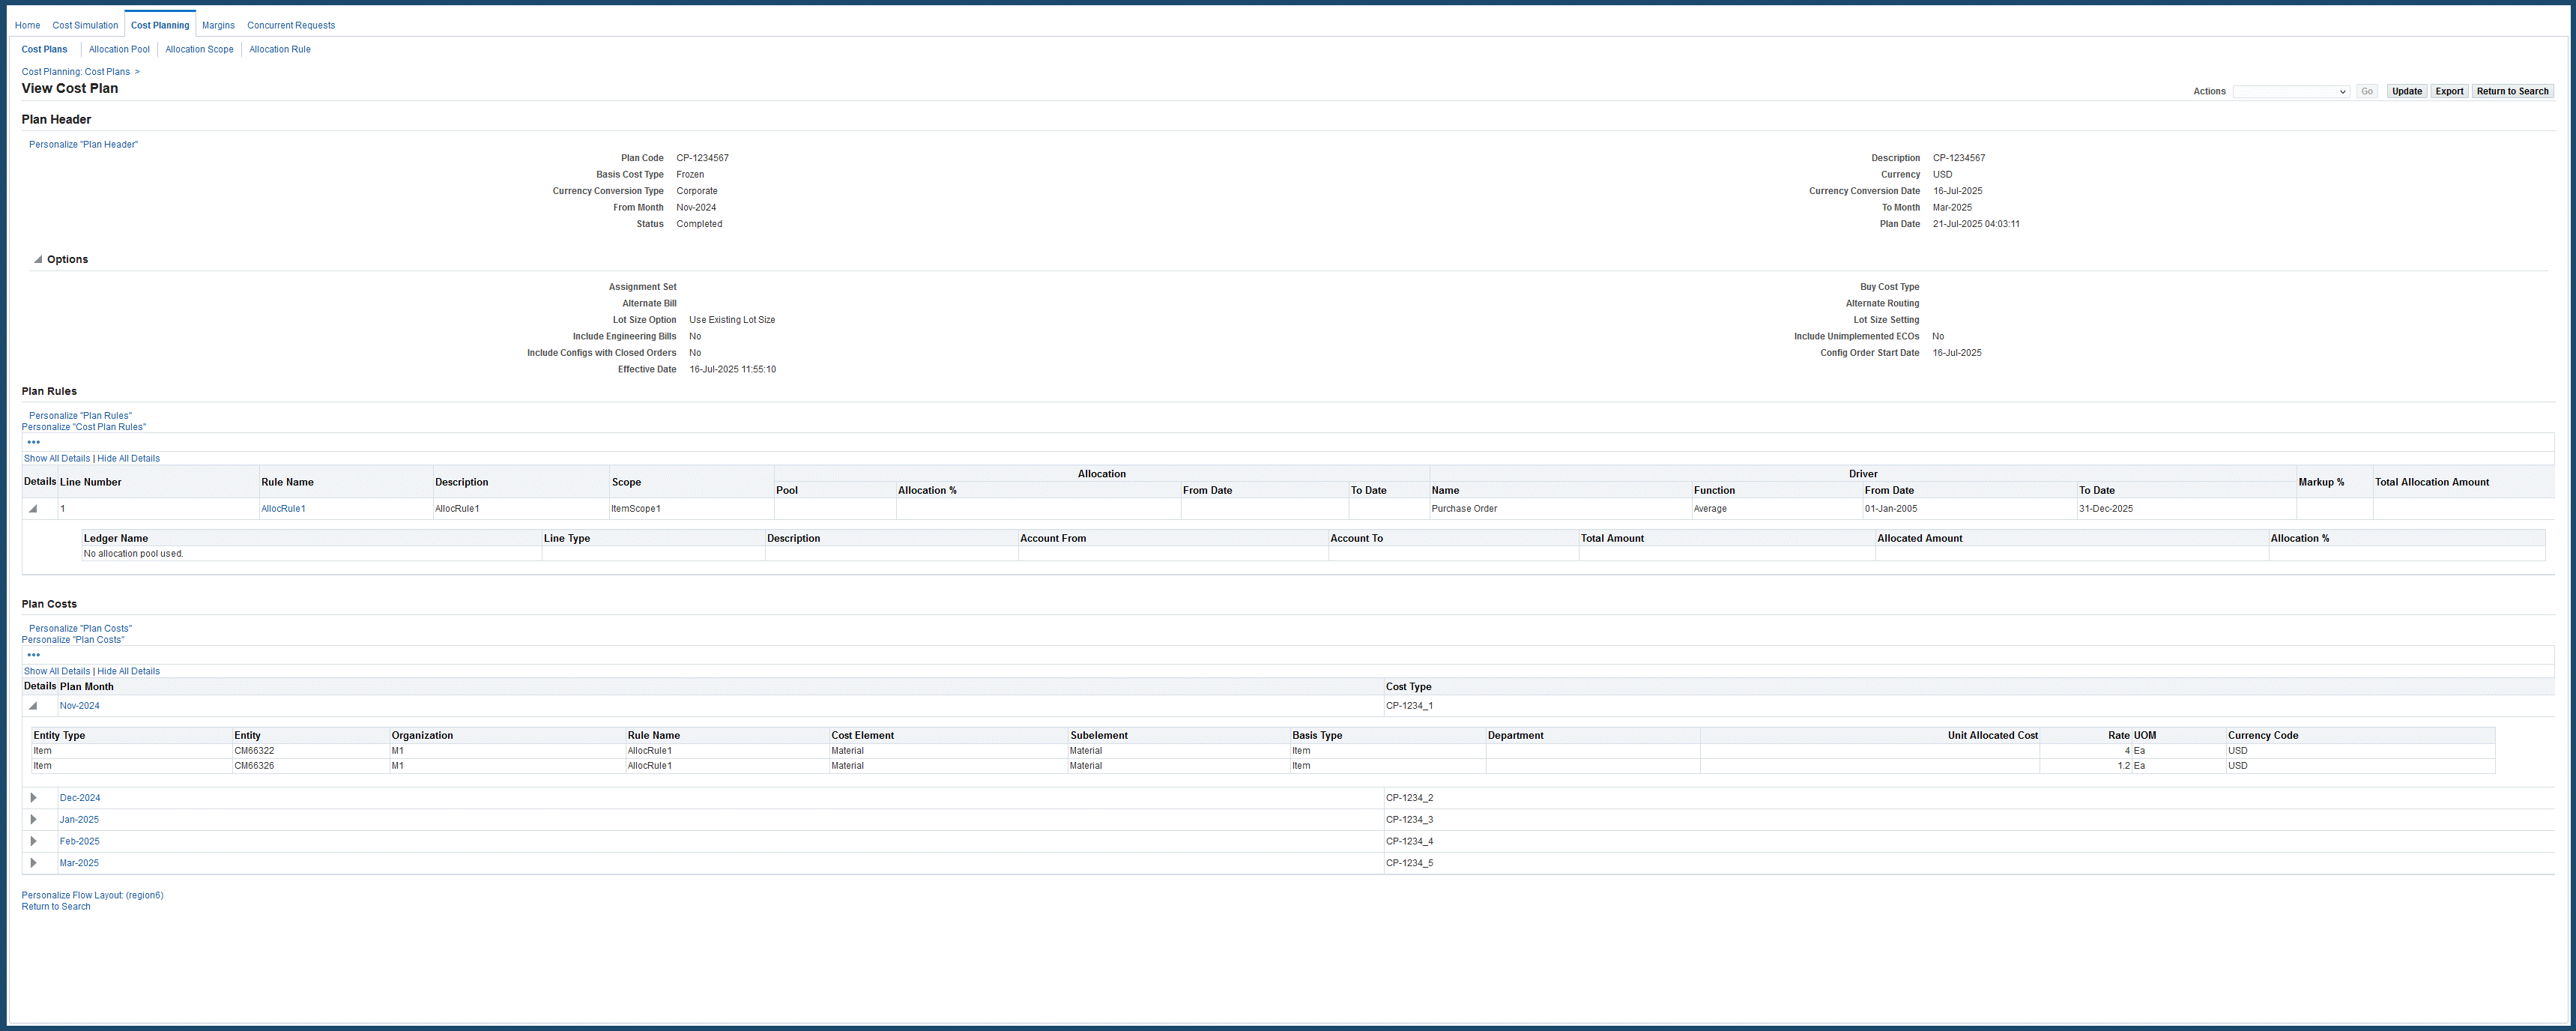
The details of the plan display in the Plan Header section of the page:
-
Plan Code: Unique value created for the cost plan.
-
Description of the cost plan.
-
Basis Cost Type: Planned costs are derived from the basis cost type. However, the cost element and subelement in Cost Planning for is not derived from the basis cost type.
-
Currency and Currency Conversion Type as defined in Oracle General Ledger.
-
Currency Conversion Date
-
From Month and To Month: Time period range for the cost plan.
-
Status
-
Plan Date: Date and time the previous cost plan completed its run.
-
-
In the Options region of the View Cost Plan page, additional values appear, depending upon how you set up the items in Oracle Manufacturing, including the Planning, Bills of Material, Configurator, and Inventory products. The fields are the options for the cost rollup run as part of the cost plan execution:
-
Assignment Set
-
Buy Cost Type
-
Alternate Bill
-
Alternate Routing
-
Lot Size Option
-
Lot Size Setting
-
Include Engineering Bills
-
Include Unimplemented ECOs
-
Include Configs with Closed Orders
-
Config Order Start Date
-
Effective Date
-
-
In the Plan Rules region of the page, the rule details appear in several sections:
-
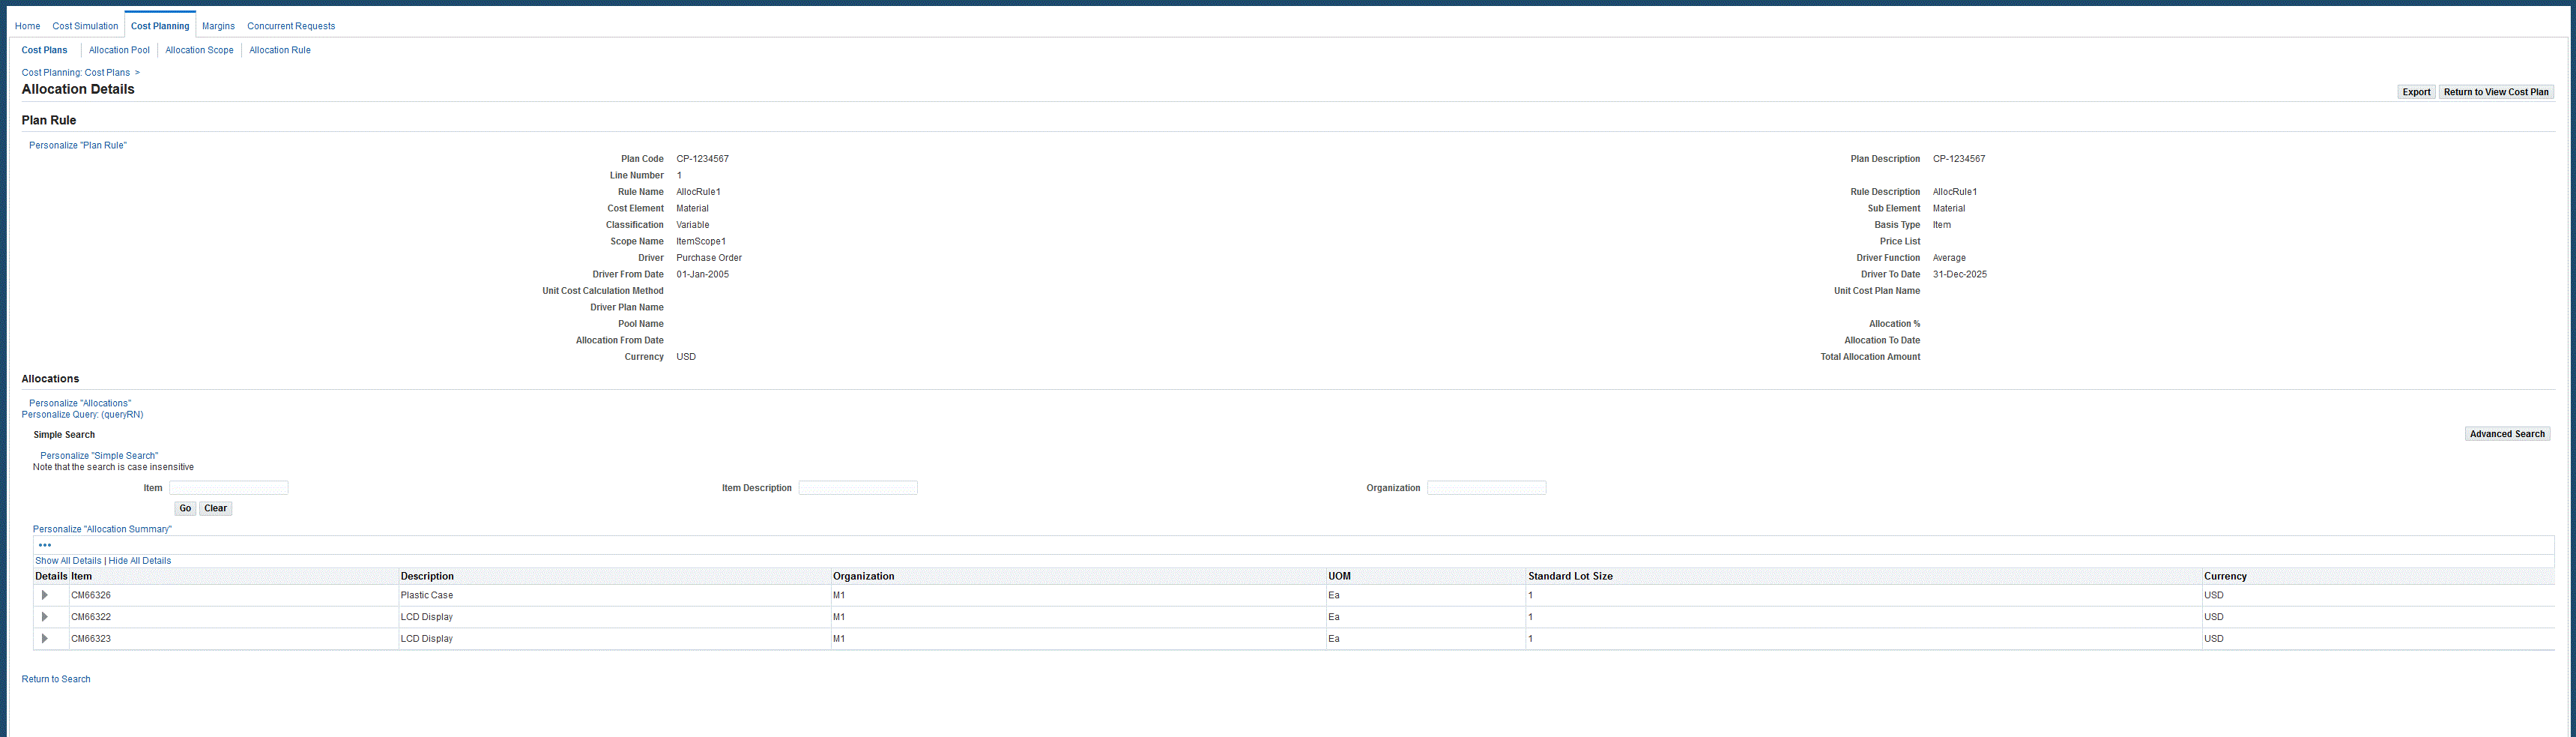
Plan Rule information displays for Line Number, Rule Name, Description, and Scope assigned to this plan. You can navigate to the plan rule record in the Allocation Details page by clicking the Rule Name link in the View Cost Plan page.
-
The Allocation section displays values for Pool, Allocation Percentage, From Date and To Date ranges.
-
The Driver section displays Function, From Date and To Date ranges, and Markup Percentage.
Total Allocation Amount for each plan appears in the final column of the table.
-
-
You can also click the Details icon to view general ledger details in the following columns: Ledger Name, Line Type, Description, Account From and To, Total Amount, Allocated Amount, and Allocation Percentage. You can also review the Allocation Pool details.
-
In the Plan Costs region of the page, you can view plan costs by Plan Month and Cost Type.
-
You can also click the Details icon to view plan cost details in the following columns: Entity Type, Entity, Organization, Rule Name, Cost Element, Subelement, Basis Type, Department, Unit Allocated Cost, Rate, UOM, and Currency Code.
-
Select a value in the Actions drop-down list to submit concurrent programs, navigate to the Simulation worksheet, or Gross Profit Analysis dashboard. Choices are:
-
Calculate Margins
-
Analyze Margins
-
Analyze Detailed Margins
-
Creating and Updating Cost Plans
When creating and updating cost plans, the following components are used in the calculations:
-
Standard costs for direct purchase of materials are estimated based on one or more sources, such as purchase contracts, price lists, and historical prices.
-
Material overhead costs, such as the cost of related services or support operations (freight, brokerage, taxes, material handling salaries, and so forth) may be estimated using either a landed cost or through an analysis of prior period expenses.
-
General overhead costs (manufacturing facility rent, energy, supervisor salaries, etc.) are usually estimated based on an analysis of prior period expenses.
When creating a cost plan, you can choose multiple allocation rules for particular plan periods, enabling the plan to be used across organizations. For example, you can choose the following allocation rules:
-
Specify a percentage of dollars the current plan can absorb.
-
Provide a mark-up percent for calculating the impact of inflation.
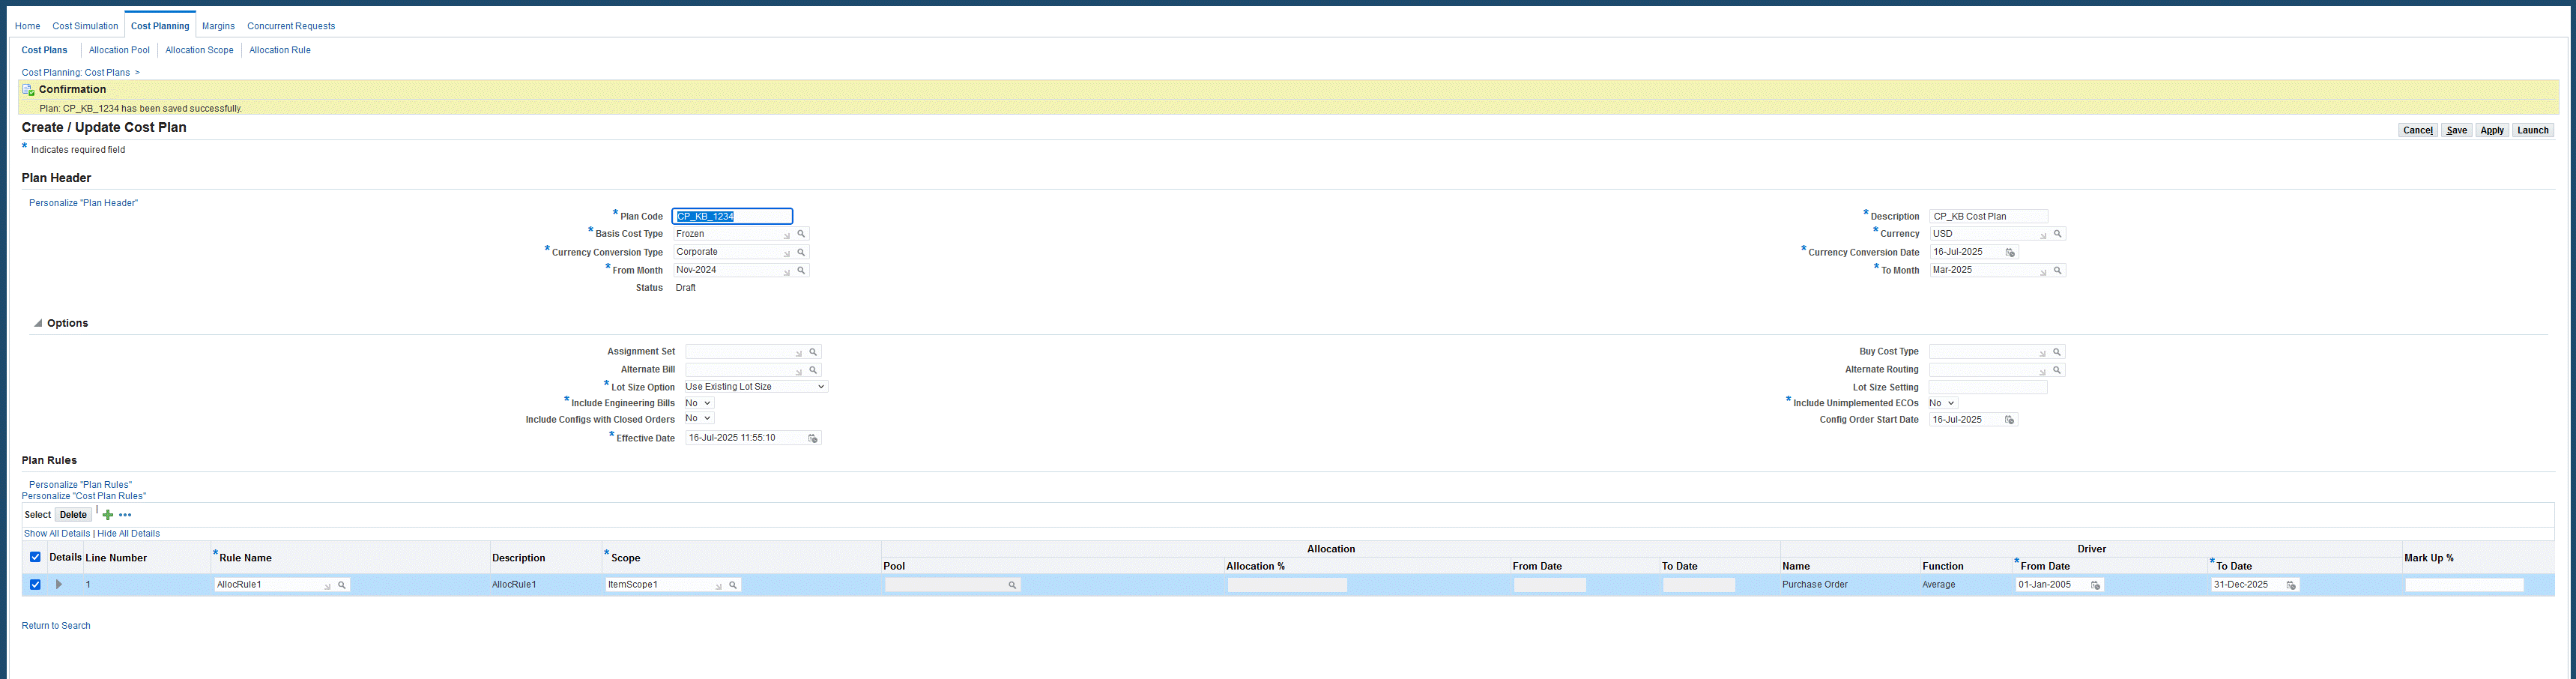
To create a cost plan record:
-
From the Search Plans page, click the Create Cost Plan button. The Create/Update Cost Plan page appears.
-
Enter a unique value for this plan in the Plan Code. This code can be used to compare plans or treated as a separate cost type.
-
Enter a value in the Description field.
-
Select a Basis Cost Type.
Costs are defined in Oracle Cost Management. See: Defining Item Costs, Oracle Cost Management User's Guide. When the plan runs, it uses the existing cost types to store the planned costs, and creates new basis cost types.
-
Select values in the Currency, Currency Conversion Type, and Currency Conversion Date fields.
The values for currency for the plan and the daily rate are defined in Oracle General Ledger. These values are automatically converted into the conversion type.
-
Select dates in the From Month and To Month fields to define the time period range for the cost plan.
Status values are system generated. This record is in Draft status when creating or updating the plan.
-
You have the option to add manufacturing and planning parameters in the Options region:
-
Assignment Set
-
Buy Cost Type
-
Alternate Bill
-
Alternate Routing
-
Lot Size Option
-
Lot Size Setting
-
Include Engineering Bills
-
Include Unimplemented ECOs
-
Include Configs with Closed Orders
-
Config Order Start Date
-
Effective Date
-
-
In the Plan Rules region, select values in the Rule Name and Scope fields specific to this plan.
Optionally, you can specify a Pool name record.
-
In the Allocation section of this table, you have the option to select Allocation Percentage and From Date and To Date values for this plan.
-
In the Driver section of this table, enter From Date, To Date, and Mark Up Percentage values.
-
Click Save to save a draft of this record as you continue to add rules to this cost plan.
-
Click Apply to save and create this record.
-
Click Launch to run the concurrent program to execute the cost plan.
Viewing Plan Impact Summary
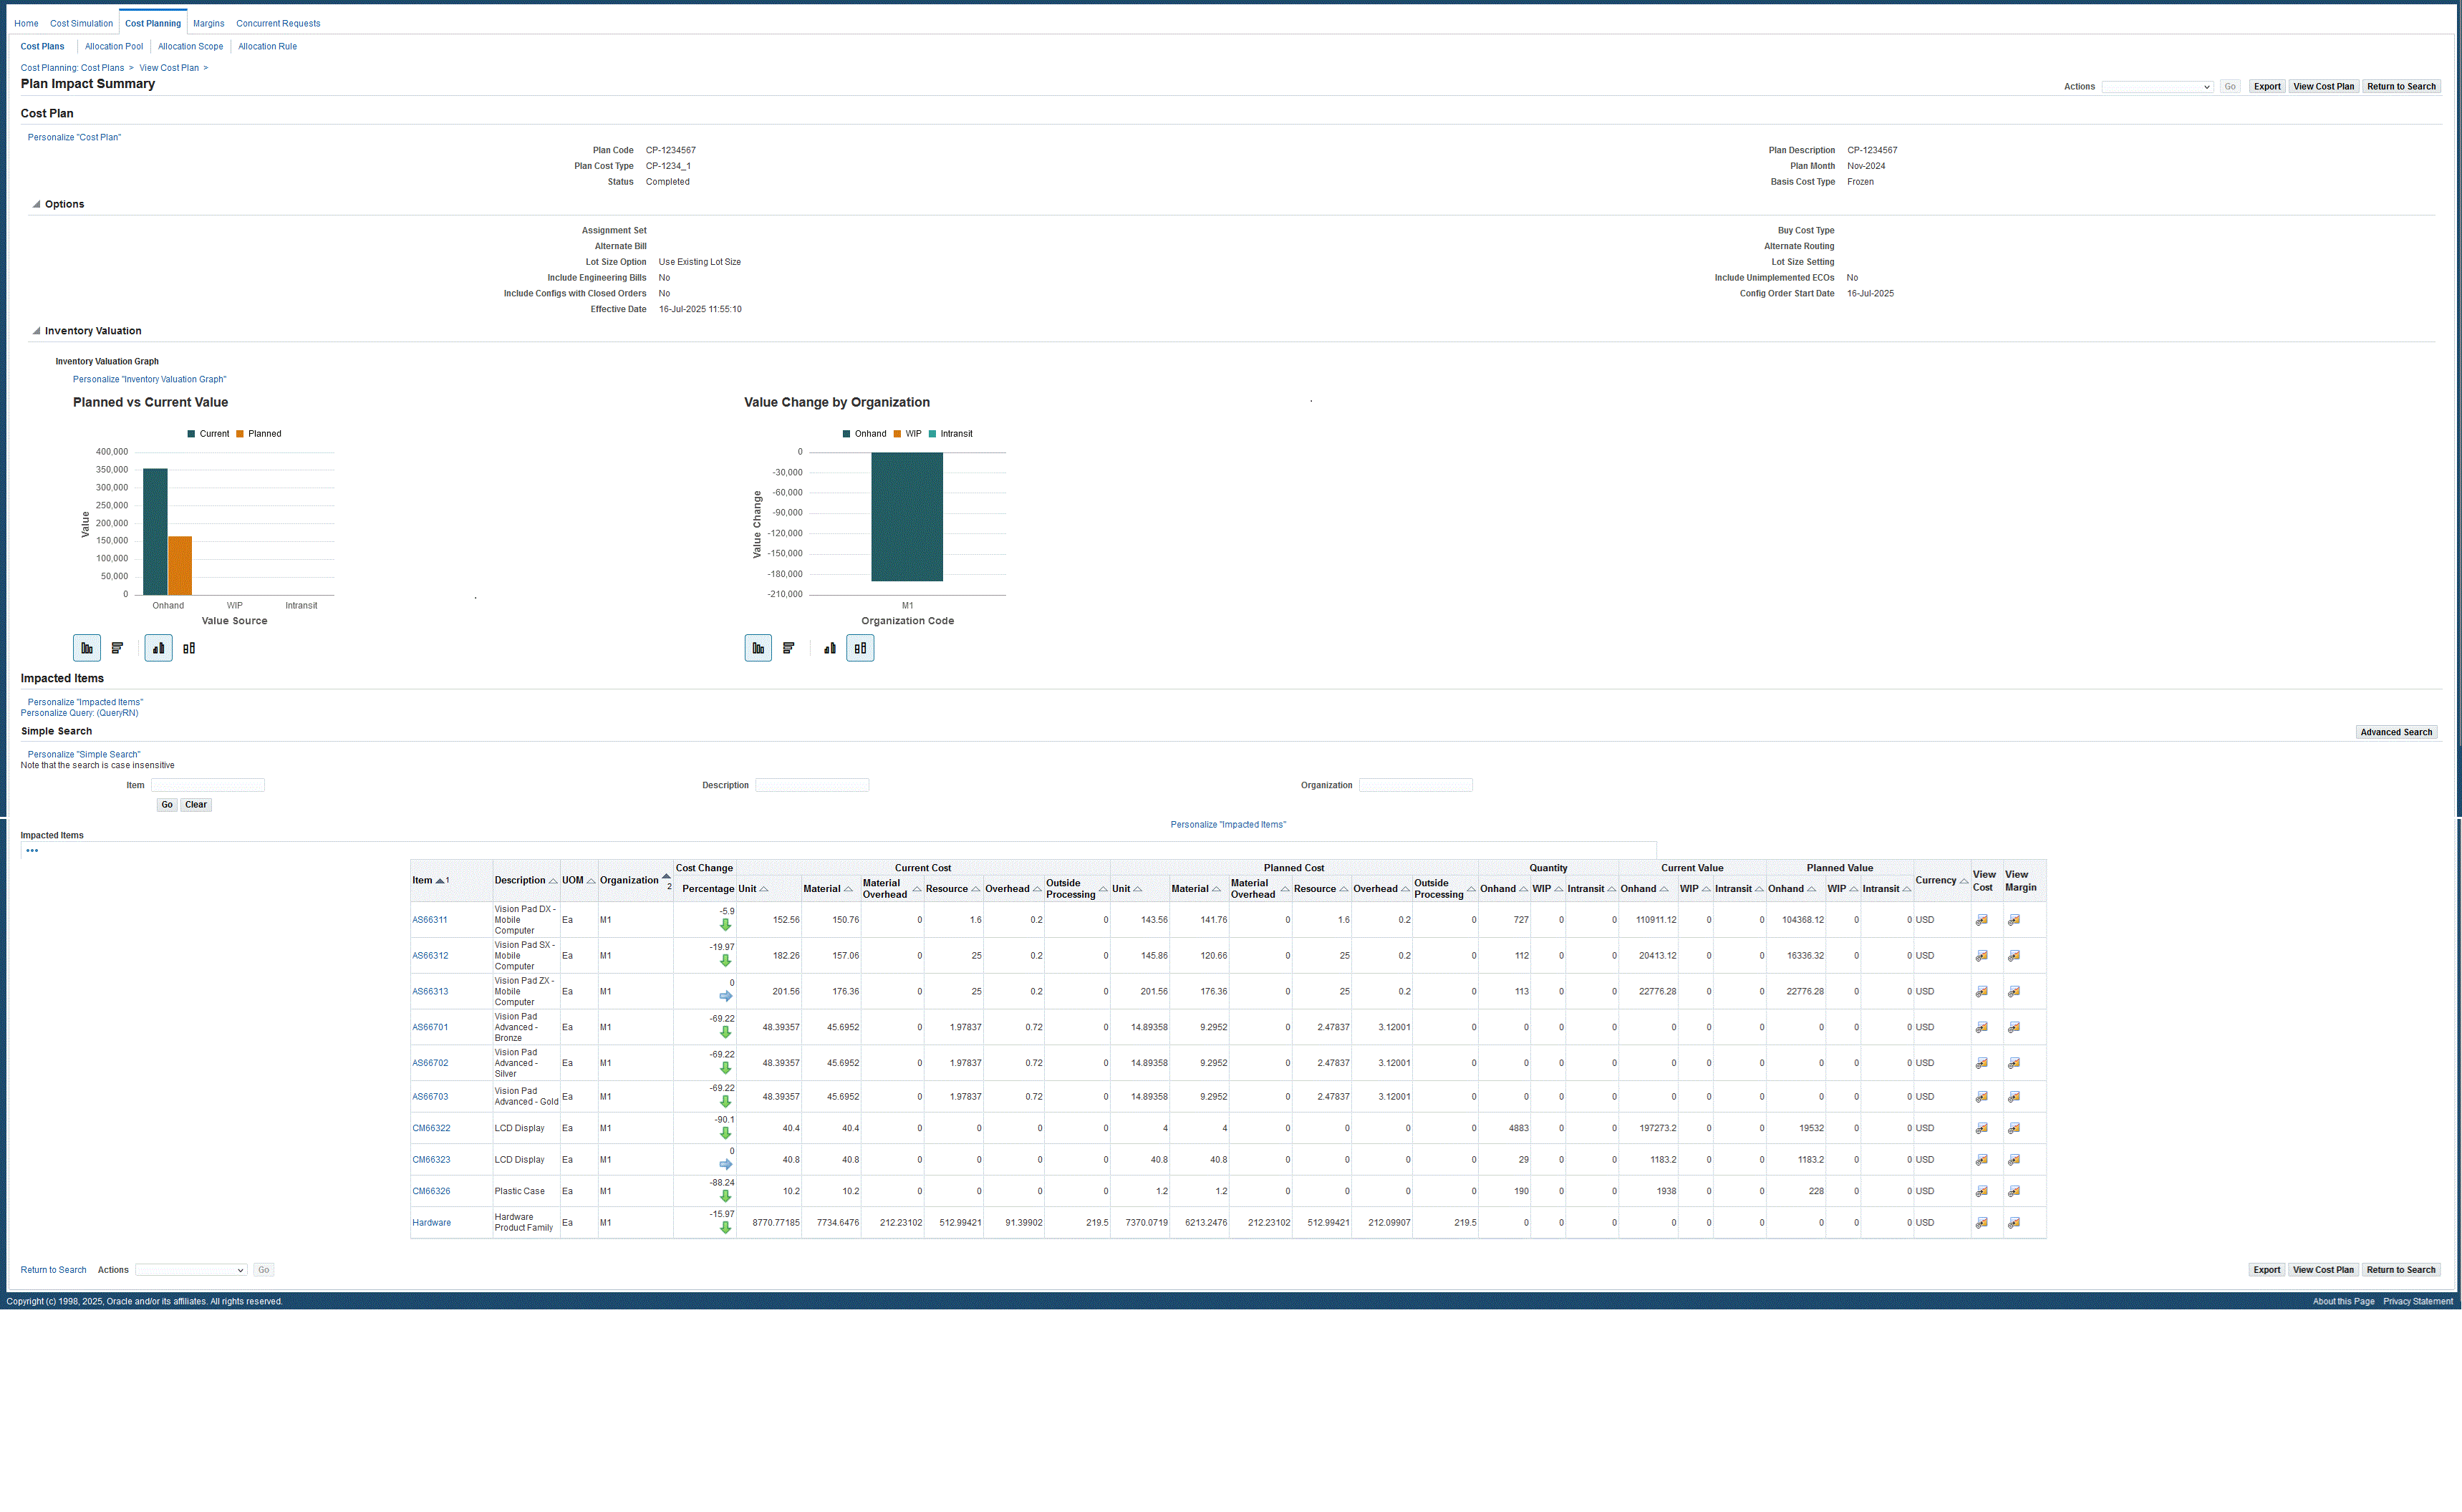
The Plan Impact Summary page displays the impacted items, assemblies, and sub-assemblies in a cost plan along with their current and planned costs, current and planned on-hand, WIP, and intransit values. The page also displays charts that give an overview of the Cost Plan impact on Cost, Valuation, and Margins.
You can also calculate GPA and view the results for an item in this page, or in the ECC Margin Analysis dashboard for all impacted items in the simulation.
To view the Plan Impact Summary page:
-
From the Search Plans page, click a Plan Code link. The View Cost Plan page appears.
-
In the View Cost Plan page, click a Plan Month link in the Plan Costs region. The Plan Impact Summary page appears and displays details for the selected cost plan. Expand the Options and Inventory Valuation regions to view all cost plan impact details.
Viewing Plan Item Cost Structure Detail
The header section of the Plan Item Cost Structure Detail page displays manufacturing details of the cost plan in the following fields: Plan Code, Plan Description, Plan Month, Plan Cost Type, Basis Cost Type, Buy Cost Type, Engineering Bills, Unimplemented ECO, Conversion Type, Assignment Set, Basis Alt BOM, Basis Alt Routing, Effective Date, Lot Size Option, Lot Size Setting, Status, Total Extended Cost.
The Total Extended Cost for the assembly in the cost structure details appears for these manufacturing options.
You can review the entire bill of material and routing of this product, including all details of the costs. This data displays in the Plan Item Cost Structure Details region.
To view the Plan Item Cost Structure Detail page:
-
Navigate to the Plan Impact Summary page (see prior section).
-
In the Impacted Items region, click an Item link in the table. The Plan Item Cost Structure Detail page appears.
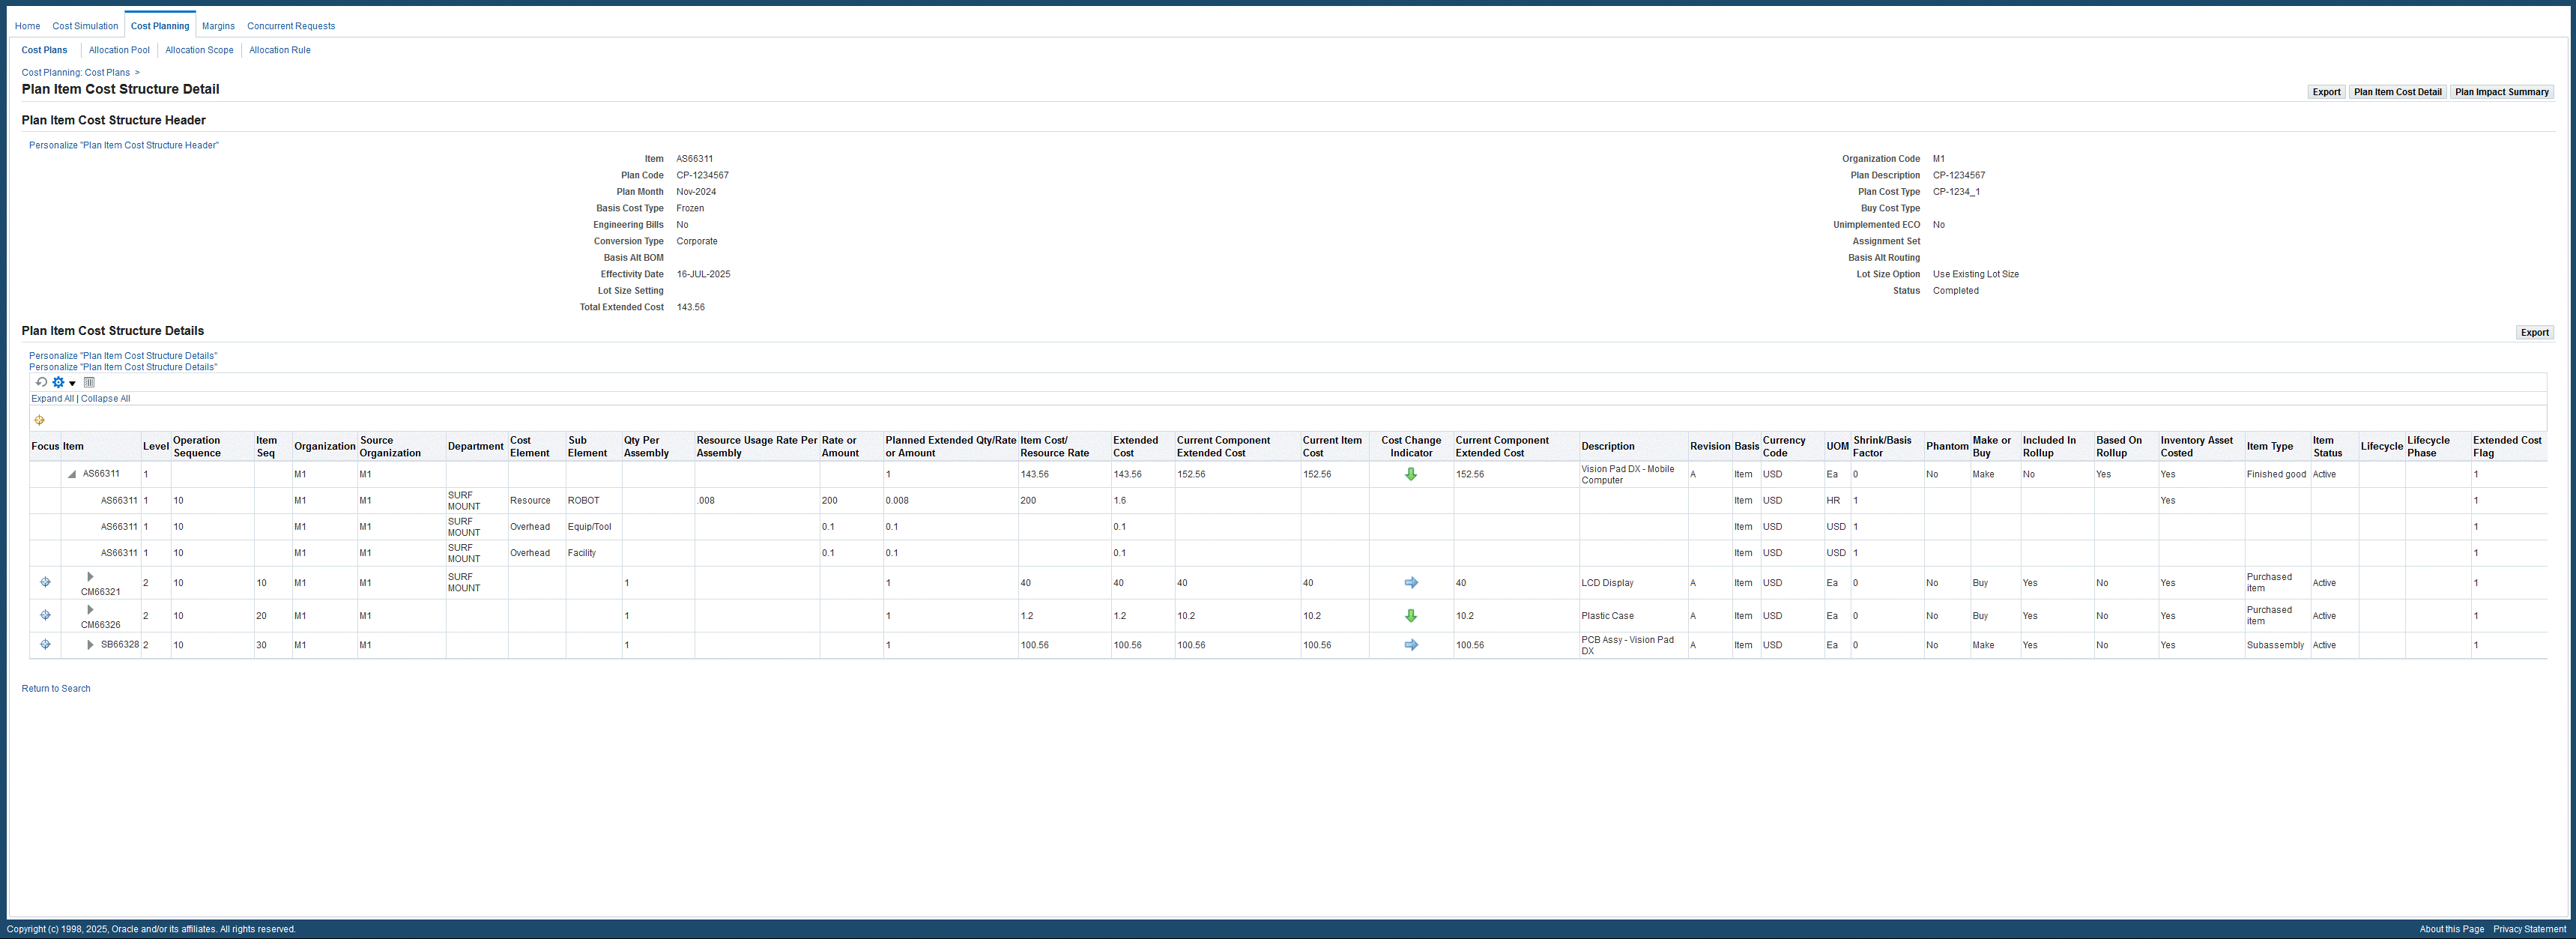
-
Click the Focus icon in the Plan Item Cost Structure Details table to view details of a specific item.

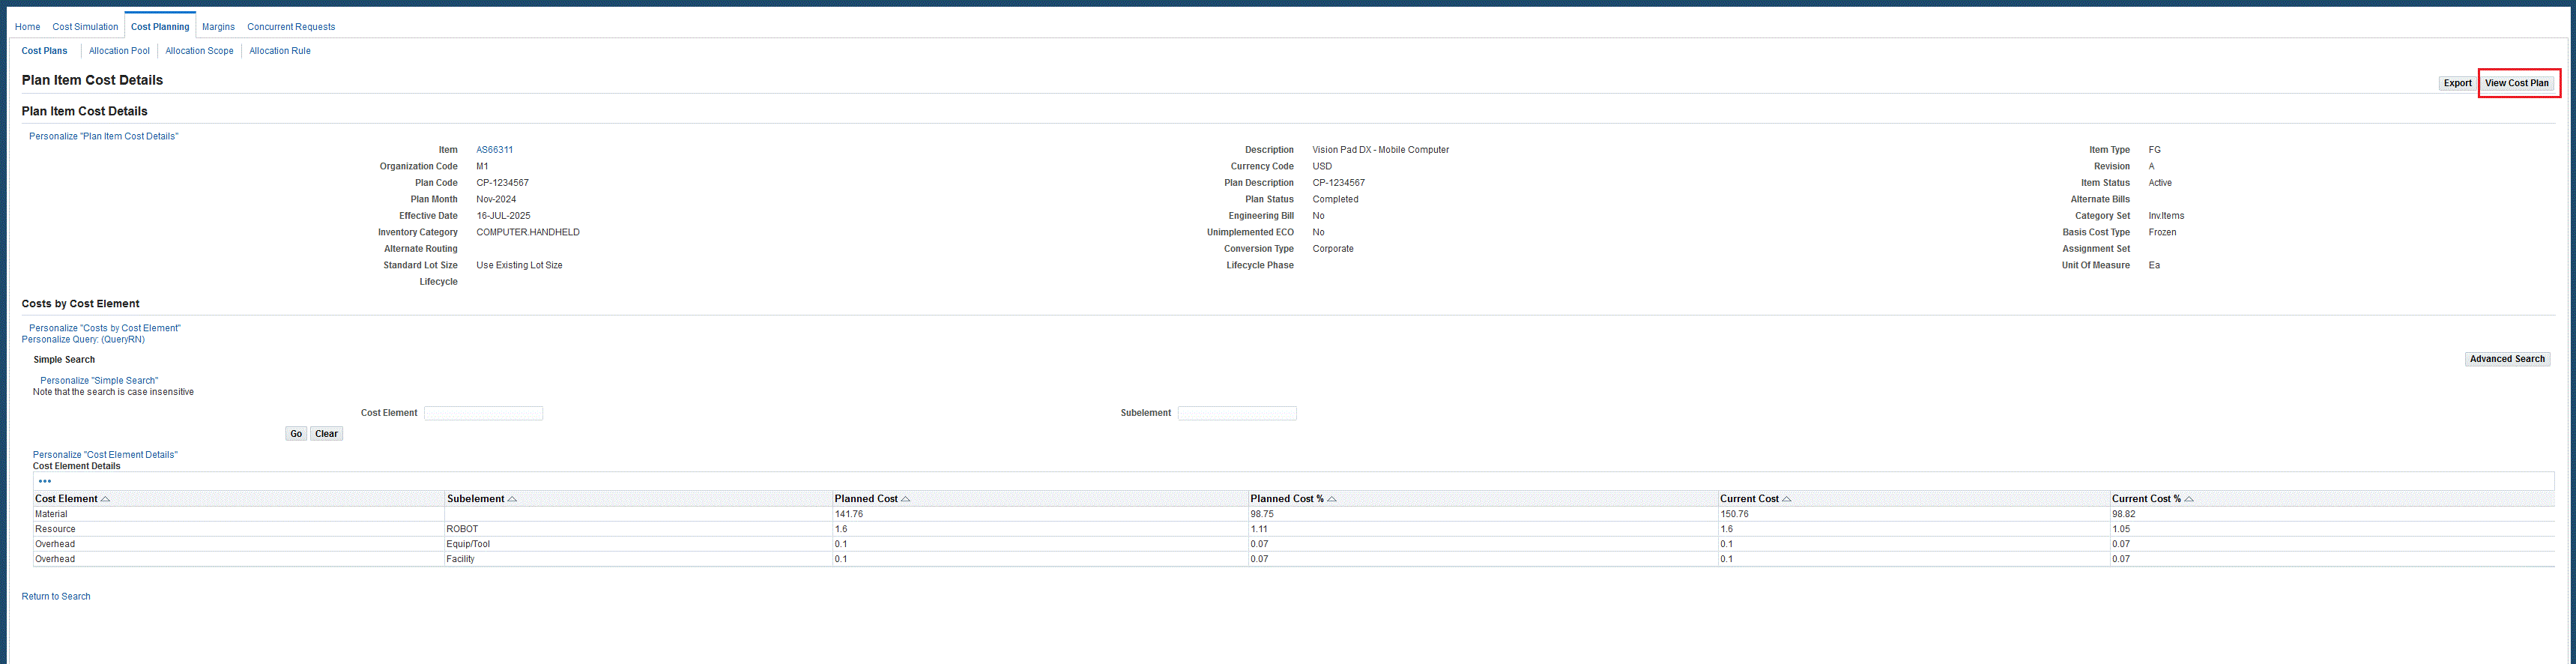
Viewing Plan Item Cost Details
The Plan Item Cost Details page displays cost plan details.
The Costs by Cost Element region provides a view of the detailed cost structure of the product for both planned and current costs.
To view the Plan Item Cost Details page:
-
From the View Cost Plan page, click a Plan Month link in the Plan Cost region. The Plan Impact Summary page appears.
-
Click an Item link in the Impacted Items table. The Plan Item Cost Structure Detail page appears.
-
Click the Plan Item Cost Detail button in the header region. The Plan Item Cost Details page appears.
-
Click the View Cost Plan button in the header region to return to the View Cost Plan page.
Searching and Viewing Allocation Pools
Material costs are usually estimated using historical transactions such as purchase orders and receipts. Overheads are captured and maintained as part of various expense management and budgetary control systems and incurred at various levels of organization. In order to accurately allocate the costs, they are grouped into a pool. Allocation pools are used to group costs absorbed or allocated by a scope of products, resources, or overheads in a cost plan.
You can search for allocation pools using a simple or advanced search:
-
Simple Search enables searching when you know information such as part of a name or description.
-
Advanced Search offers multiple search criteria and conditional qualifiers. This method is used when looking for specific values.
To search and view Allocation Pools:
-
Navigate to the Search Allocation Pool page. The Search Allocation Pool page displays all Allocation Pools.
-
For a simple search, in the Search region, enter values in either the Pool Name or Description field, or both.
-
Select Go to view the results of your query.
-
You can also select Advanced Search to enter additional details for the query on the Advanced Search page.
-
Using this search method, specify parameters to filter the results of your search criteria by choosing one of the following:
-
Show table data when all conditions are met.
-
Show table data when any condition is met.
-
-
For each search criteria value, select a conditional qualifier. Your choices are: contains, ends with, is, is not, is not (include blanks), and starts with.
-
Enter a value for any of the following fields:
-
Pool Name
-
Description
-
Ledger
-
Source Type
-
Currency Code
-
Inactive Date
-
Source GL System
-
-
Click Go to display the results of your search.
-
You can navigate to the following pages related to the results of your search by selecting the following:
-
Pool Name link to access to the Allocation Pool Details page.
-
Update icon to access the Update Allocation Pool page.
-
Create Allocation Pool to access the Create Allocation Pool page.
Additional Information: Creating and Updating Allocation Pools
-

To view details of an Allocation Pool:
-
Navigate to the Allocation Pool Details page for a specific record by clicking a Pool Name link in the Search Allocation Pool page.
In the Allocation Pool Details region, the specific information for this pool appears in the following fields: Pool Name, Ledger, Description, Ledger Currency, Source Type, Source GL System, and Inactive Date.
Account information appears in the table in the following fields: Amount Type, Account From, Account To, Manual Amount, Allocation Percentage, Description, and Enabled.
-
For lengthy lists of plan codes in the Allocation History region, you can filter records by performing a Simple or Advanced Search. Enter values in the Plan Code, Plan Description, or Plan Month fields, and then click Go.
The results of your search appear in a table showing values for Plan Code, Plan Description, Plan Month, Allocation Amount, Currency Code, and Firmed.
-
You can select a plan record in the Allocation History table to view the allocation distributions across organizations and subelements. You can select:
-
Update Allocation Pool: navigates to theUpdate Allocation Pool page to update the selected Allocation Pool.
-
Export: saves or opens the Allocation Pool Details as a Comma Separated Values file (.csv) for a spreadsheet.
-
Return to Search: returns you to the Search Allocation Pool page.

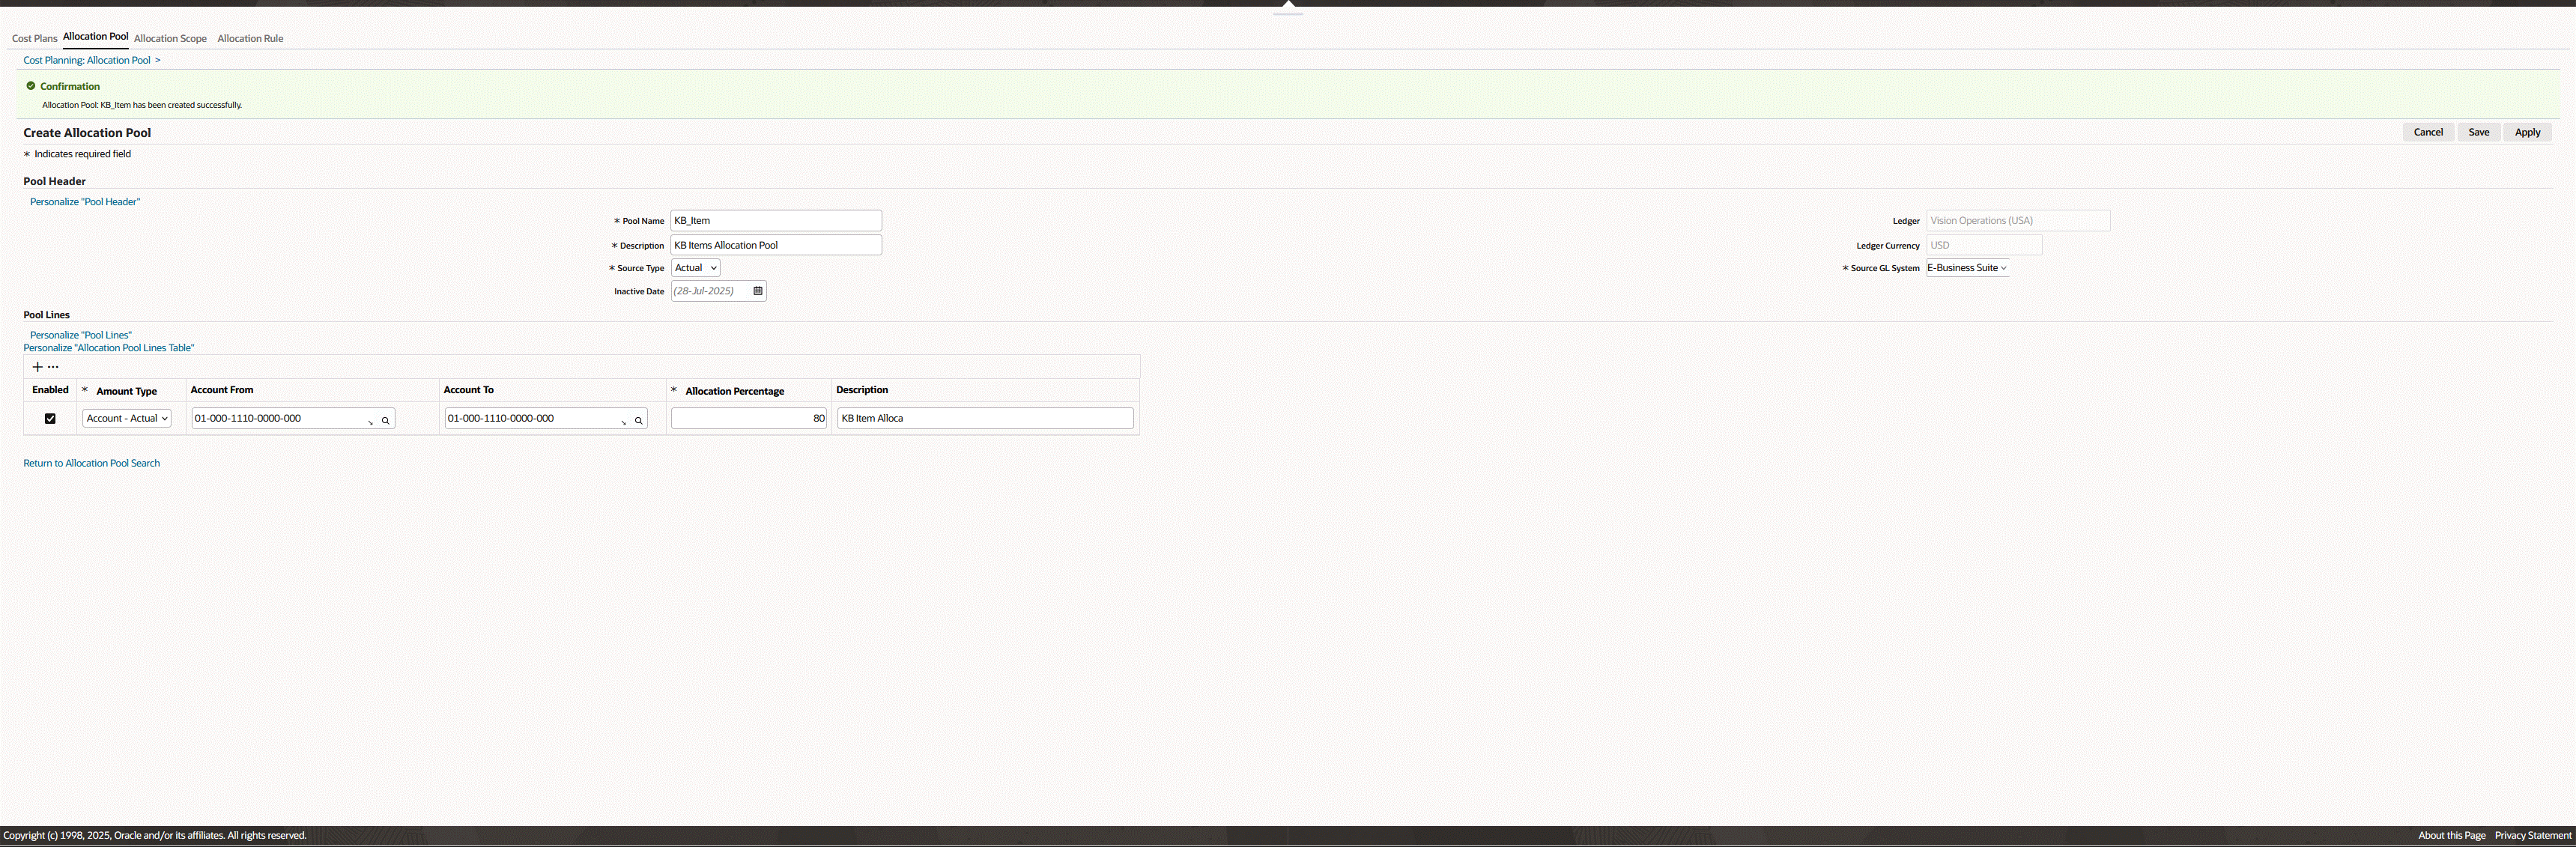
Creating and Updating Allocation Pools
Allocation pools enable the grouping of costs to obtain an insight into spending amounts. Combined with the margin analysis tools, allocation pools aid in cost savings and optimization. When creating allocation pools, you can use actual, budget, or ad hoc accounts (improvised accounts for dollar amounts that are not maintained in GL Accounts.)
To create an Allocation Pool:
-
Navigate to the Create Allocation Pool page. From the Search Allocation Pool page, click Create Allocation Pool.
-
Search for a value in the Choose a Ledger field, and select a corporate organization general ledger account. Click Choose.
The Pool Header and Pool Lines regions appear on the page for this record. The Ledger and Ledger Currency fields show the information from the corporate ledger selected.
-
In the Pool Header region, enter values in the following fields:
-
Pool Name: A unique value.
-
Description: Description of this allocation pool.
-
Source Type: The source type chosen affects the value of the Amount Type field in the Pool Lines region. The field value choices are:
-
Actual: If selected, only Account-Actual accounts can be selected in the Amount Type fields in the Pool Lines table section.
-
Budget: If selected, only Account-Budget accounts can be selected in the Amount Type fields in the Pool Lines table section.
-
Ad-hoc: Enables you to select Account - Actual, Account - Budget, and Manual amount types in the Pool Lines table section
-
-
Source GL System: Identifies an Oracle source for the general ledger accounts. Choices are:
-
E-Business Suite
-
ERP Cloud
-
JDE
-
PeopleSoft
-
Others
-
-
Inactive Date: You can select a date that this pool record will no longer be active.
-
-
In the Pool Lines region, enter information in the following fields:
-
Enabled: The default value for a pool line is enabled, but you can choose to enable or disabled a specific pool line.
-
Amount Type: If the selection in the Source Type field is:
-
Actual, then Amount Type = Account - Actual.
-
Budget, then Amount Type = Account - Budget.
-
Ad Hoc, all amount types are available.
-
-
Account From and Account To: Select the range of accounts you are using for this pool. These fields are enabled when Amount Type is Account - Actual, or Account - Budget.
-
Allocation Percentage: The percentage for each pool line defined should be less than or equal to 100 percent.
-
Description: Enter descriptive text for this amount type.
-
Allocation Amount: Define the dollar amounts that are not maintained in GL Accounts. This field is enabled when the Amount Type field value is Manual.
-
-
Click Save to save a draft of this record as you continue to add accounts. or Apply to save and update this record.
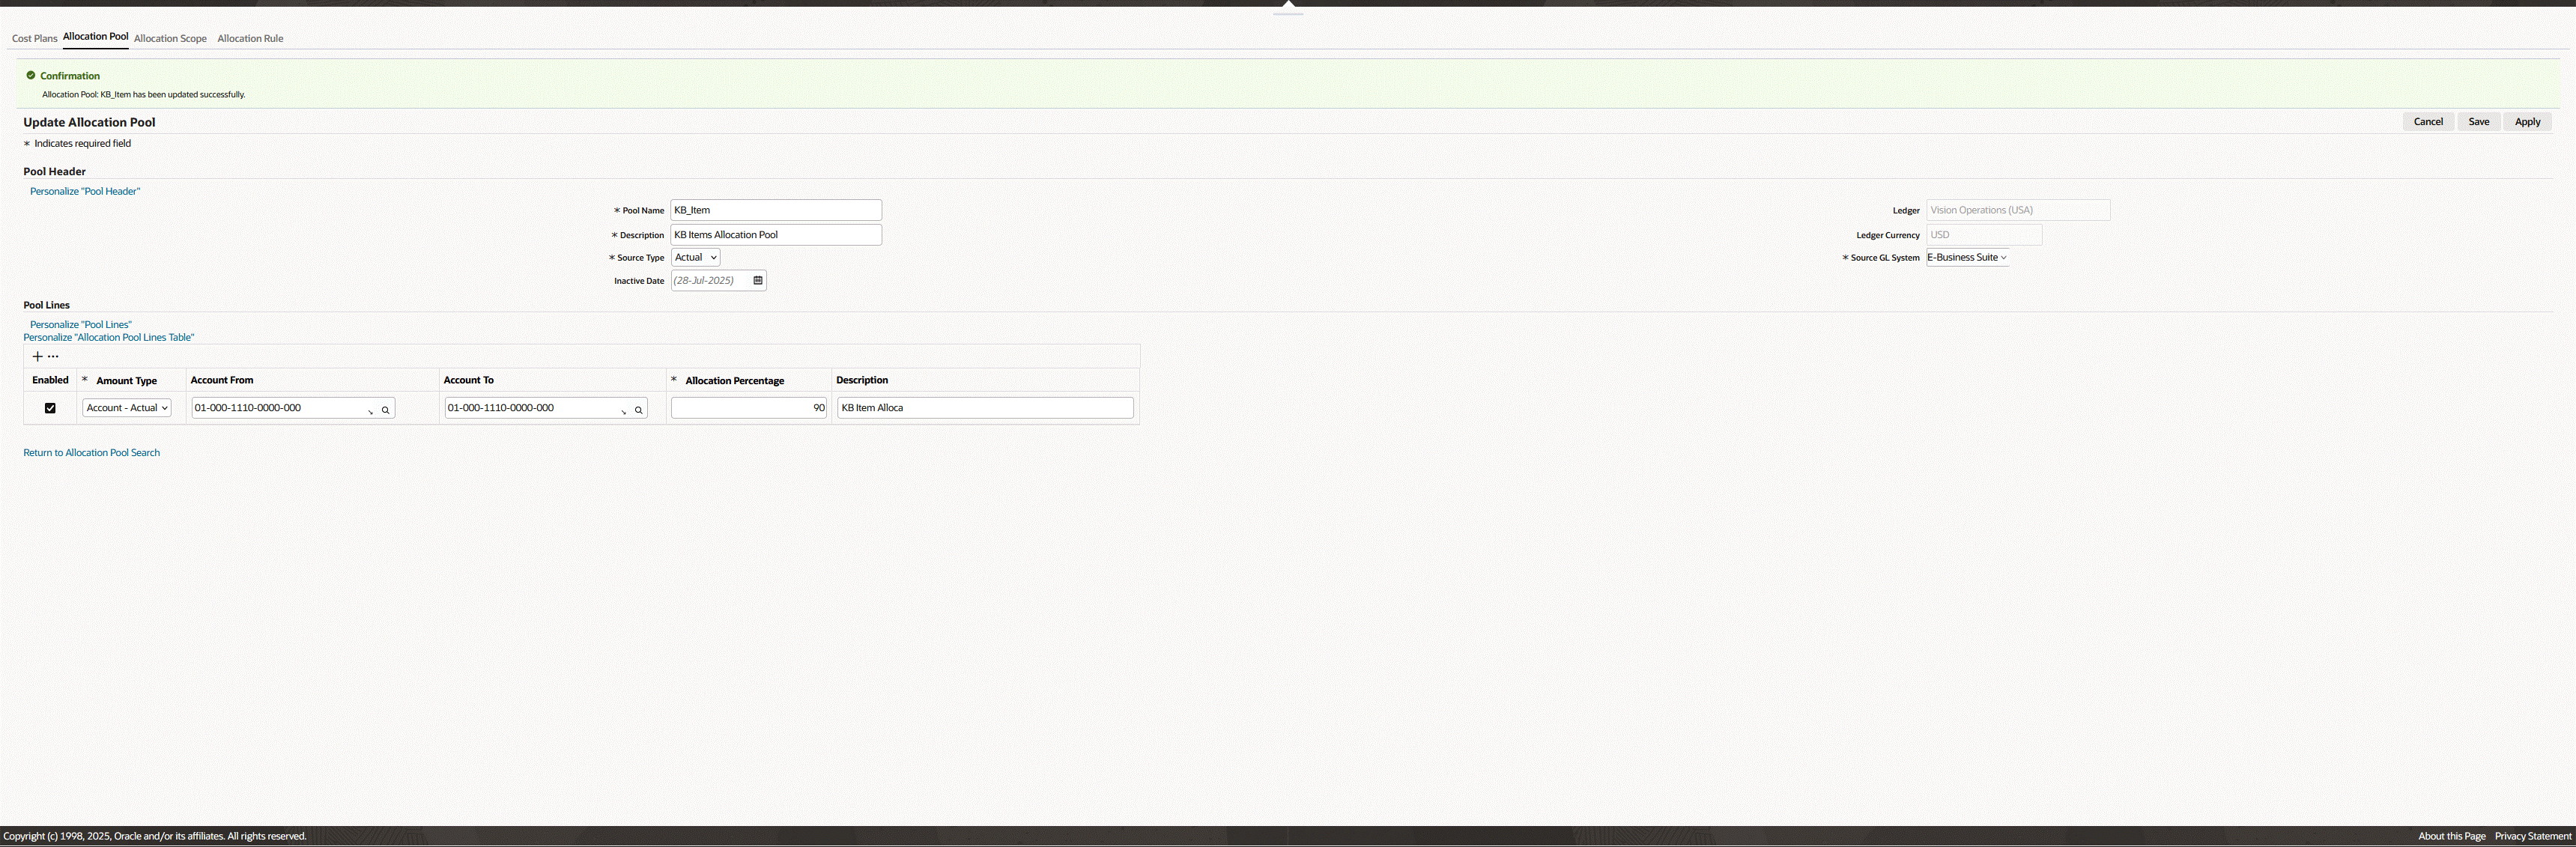
To update and edit an allocation pool record:
-
Navigate to the Update Allocation Pool page for a record. In the Search Allocation Pool page, click the Update icon for the allocation pool to update. The Update Allocation Pool page appears.
-
You can update the following fields:
-
Pool Name
-
Description
-
Source Type
-
Source GL System
-
Inactive Date
-
-
Enter any changes or additions in the Pool Lines region including: Enabled, Amount Type, Account From, Account To, Allocation Amount, Allocation Percentage, and Description.
If you change the value in the Source Type field, then you will need to abide by the selection limits for that particular source type.
-
Click Save to save a draft of this record as you continue to add accounts.
-
Click Apply to save and update this record.
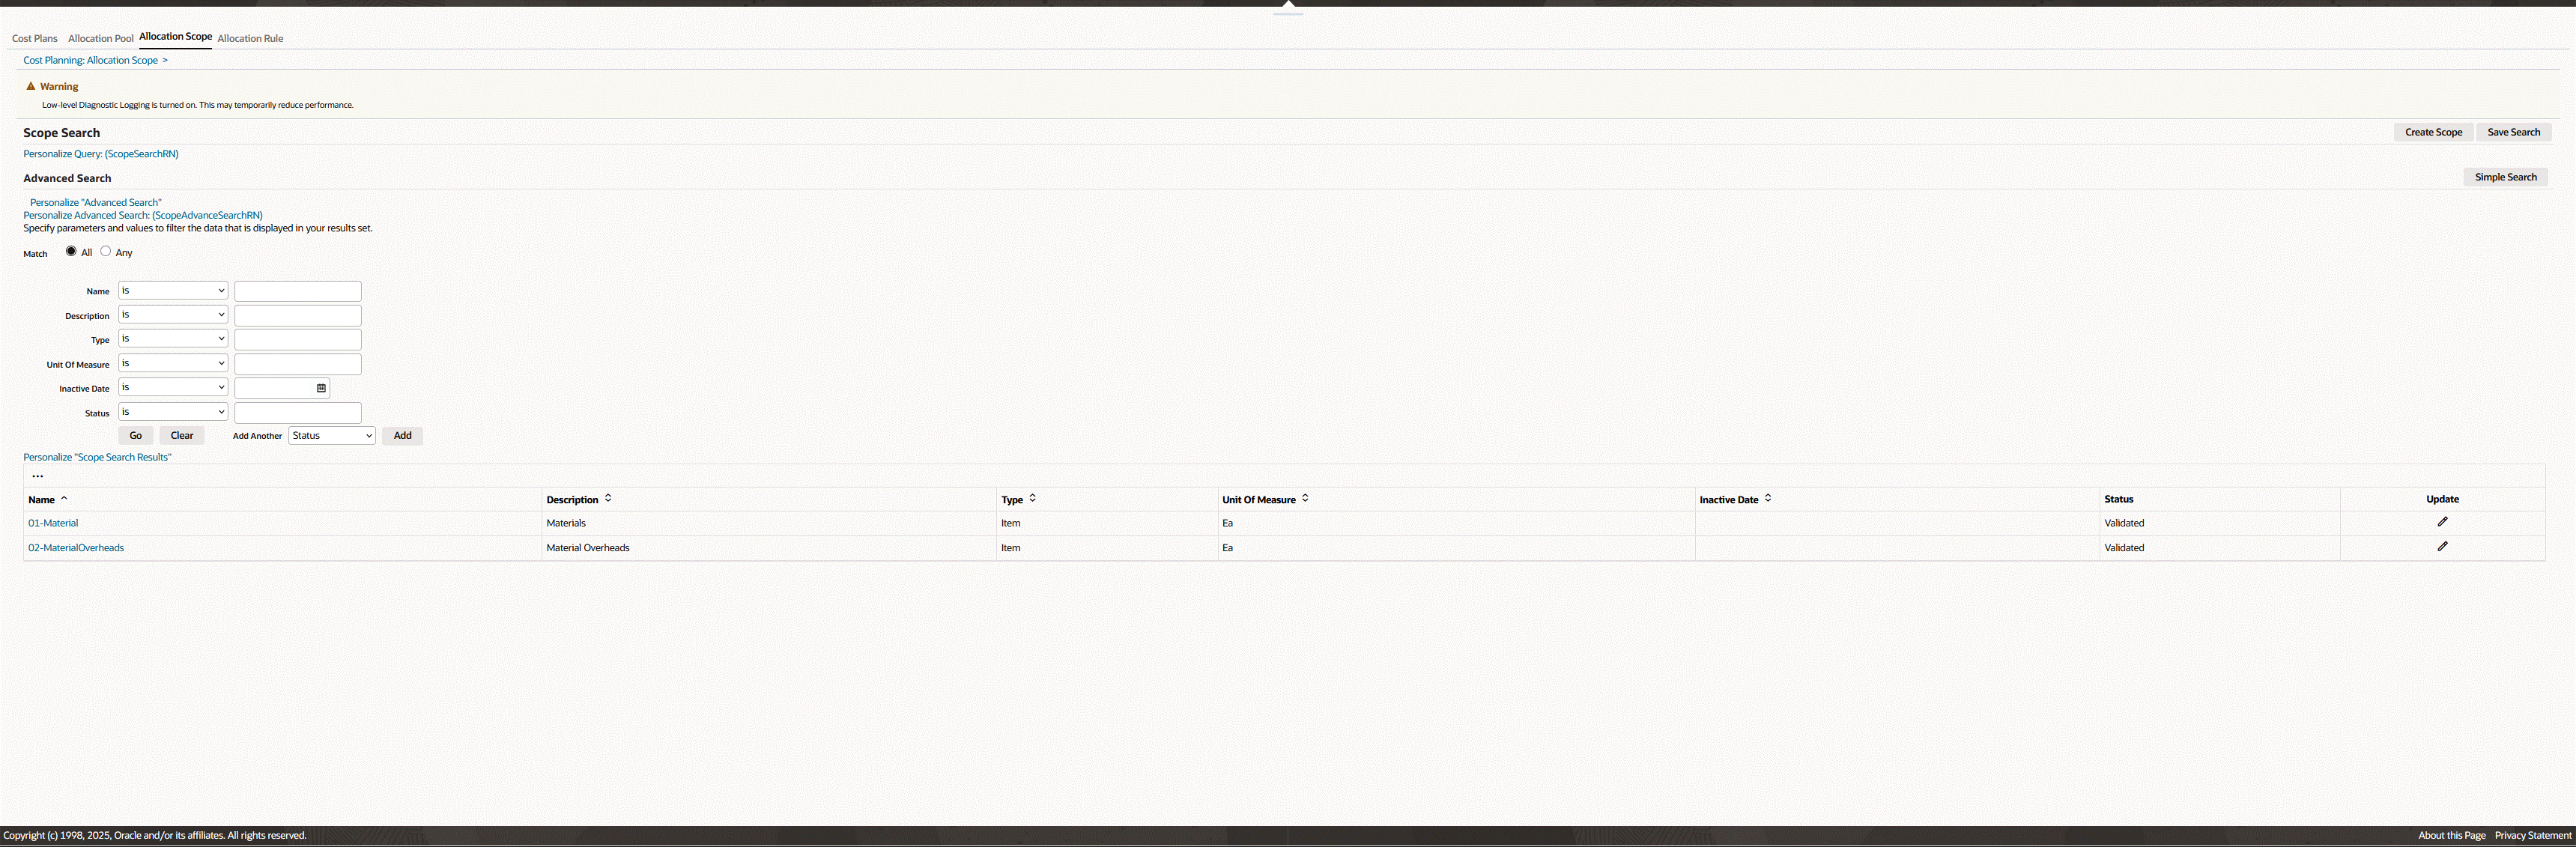
Searching and Viewing Allocation Scopes
An allocation scope defines the items, overheads, and resources required to absorb the costs. An unlimited number of scopes can be defined based on various business scenarios for products. You have the option to search for scopes using a simple or advanced search:
-
Simple Search enables searching when you know information such as part of a name or description.
-
Advanced Search offers multiple search criteria and conditional qualifiers. This method is used when searching for specific attributes.
To search and view Allocation Scopes:
-
Navigate to the Scope Search page.
(N) Cost Management responsibility > Cost and Profitability Analysis > Cost Planning > Allocation Scope
-
For a Simple Search, in the Search region enter values in the Name, Description fields, or both.
-
Click Go to view the results of your query.
-
You can also select Advanced Search to enter additional details for the query on the Advanced Search page.
Using this search method, specify how to filter the results of your search criteria by choosing one of the following:
-
Show table data when all conditions are met.
-
Show table data when any condition is met.
-
-
For each search criteria value, select a conditional qualifier. Your choices are: contains, ends with, is, is not, is not (include blanks), or starts with.
-
Enter a value for any of the following fields: Name, Description, Type, Unit of Measure, Inactive Date, and Status.
-
Click Go to display the results of your search.
-
You can navigate to the following pages by selecting the following:
-
Name link to access the View Scope page.
-
Update icon to access the Create/Update Scope page.
-
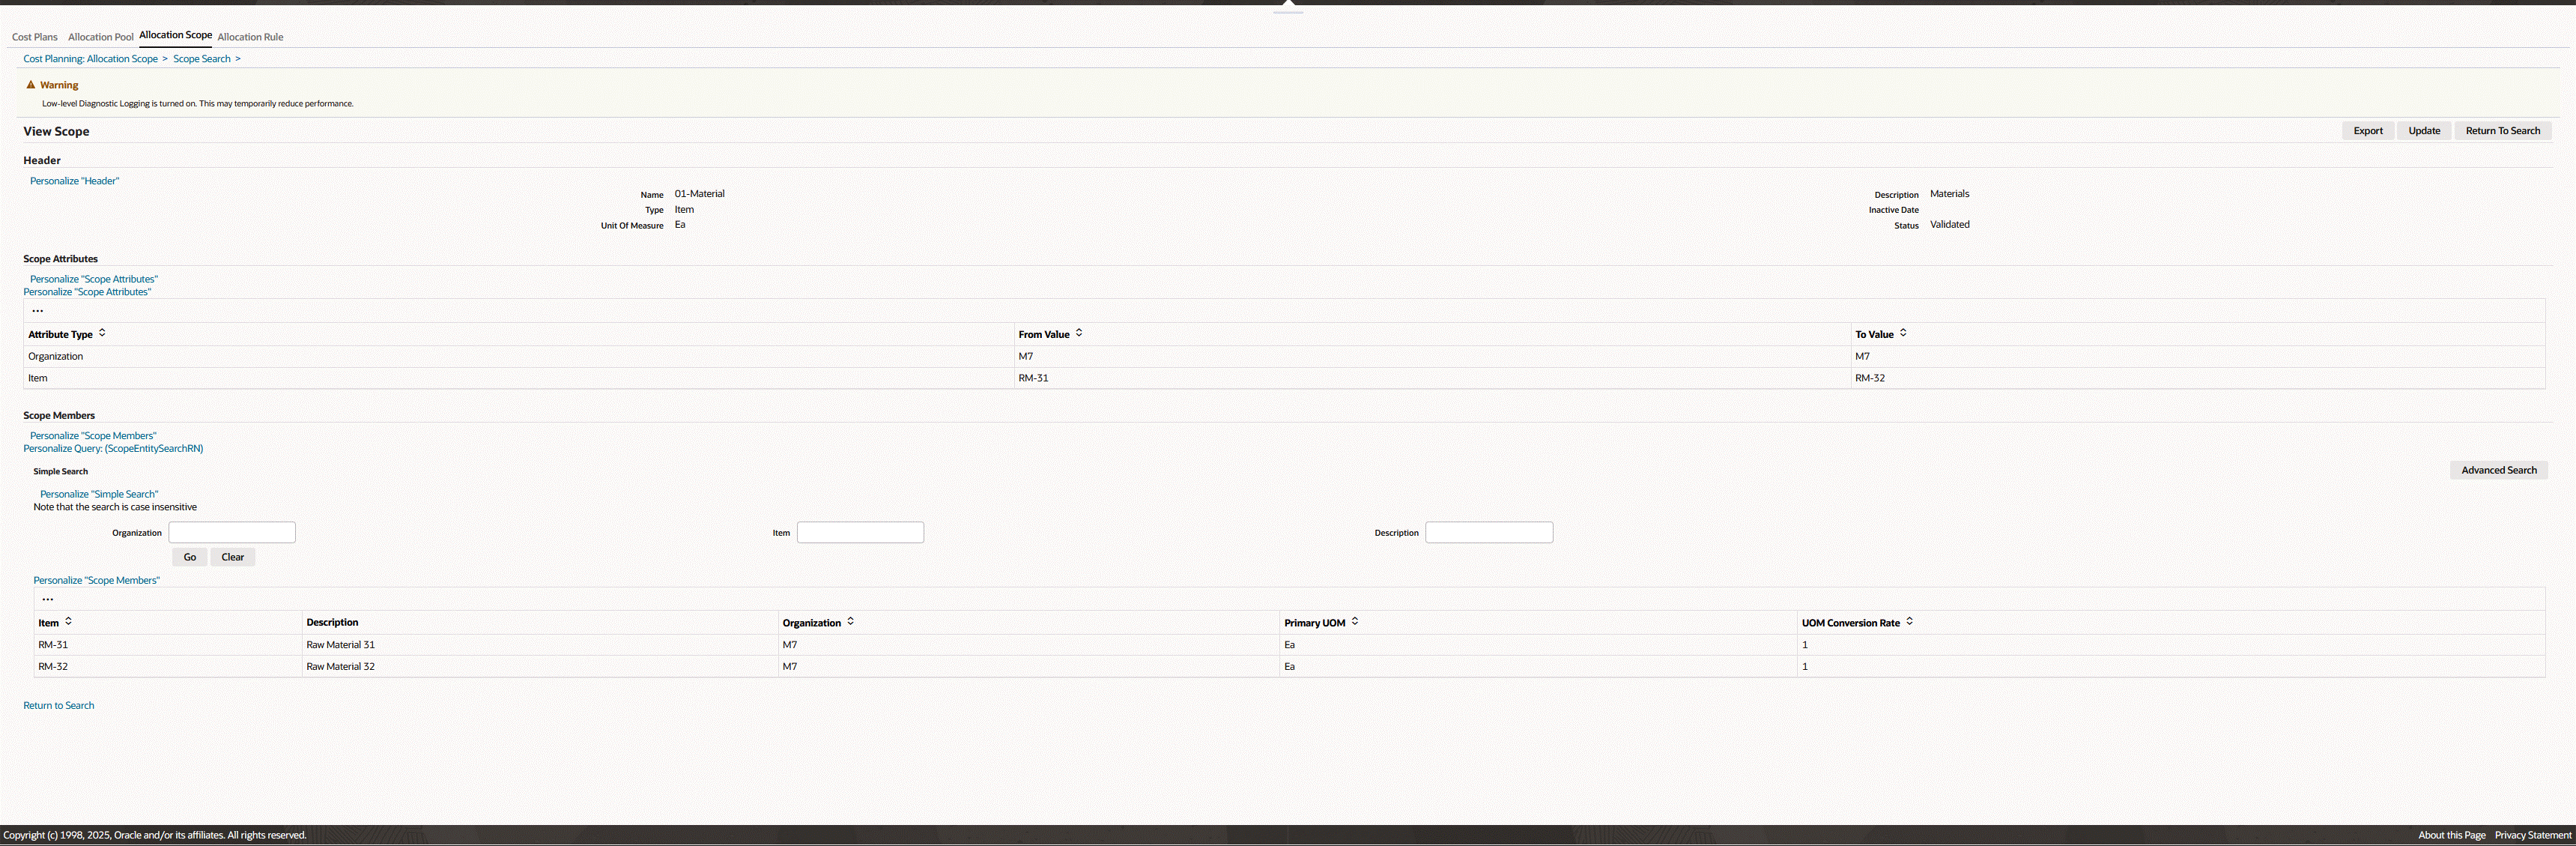
To view details of an allocation scope record:
-
Navigate to the View Scope page for a specific record. From the Scope Search page, click the Name link for the selected scope.
The details regarding this allocation scope appear in three regions of this page:
-
Header: Specific information for this scope appears in the following fields: Name, Description, Type, Inactive Date, Unit of Measure, and Status.
-
Scope Attributes: Information on Attribute Type in the range of From and To Values appears.
-
Scope Members: The individual items, resources, overheads, and other parts of this scope grouping appear in a table.
-
-
For lengthy lists of members, you have the option to filter the list by using search criteria of Organization, Item, and Description values.
-
You have the option to select:
-
Export: Save or open the details as a comma separated values file (.csv) for a spreadsheet.
-
Update: Navigate to the Create/Update Scope page.
-
Return to Search: returns to the Scope Search page.
-
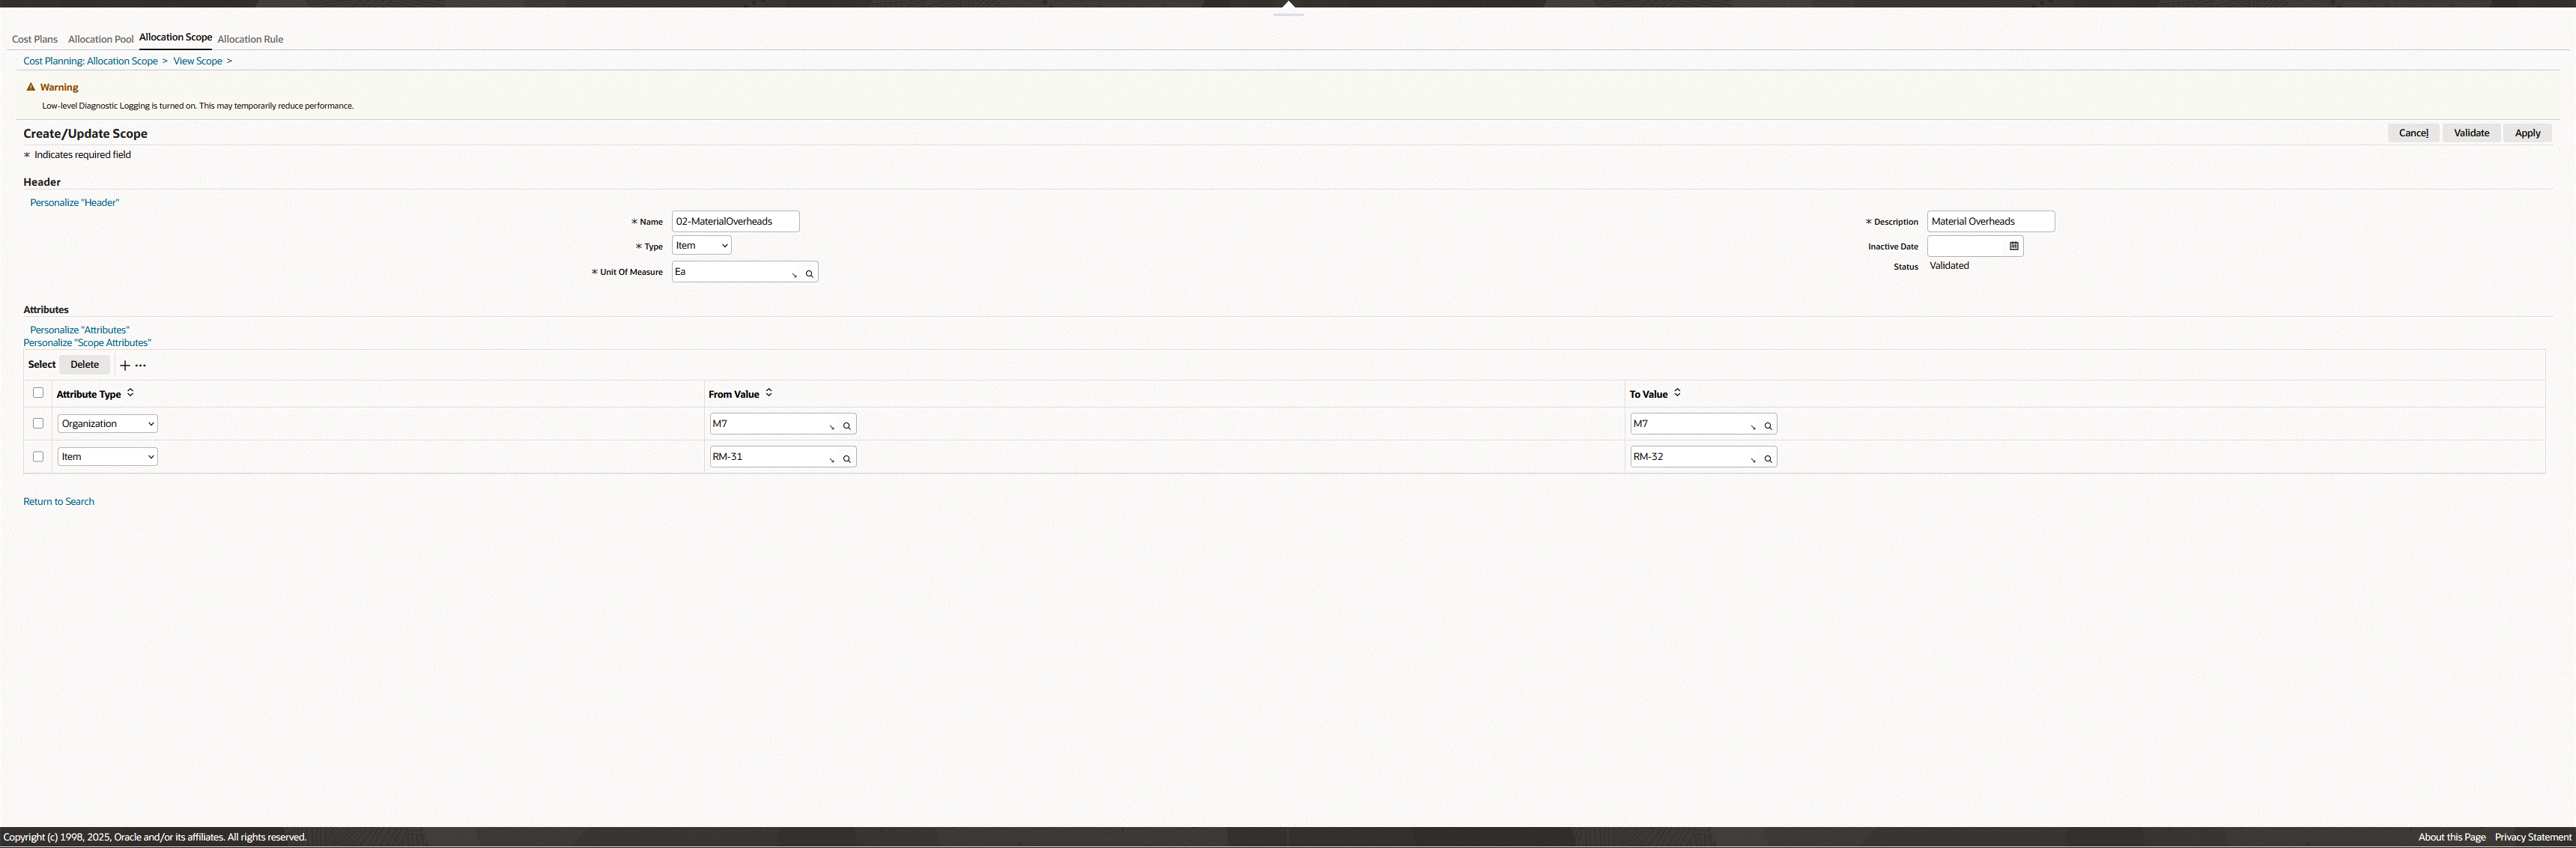
Creating and Updating Allocation Scopes
Allocation scopes are used to capture and maintain various expenses and budgetary control systems. Cost accountants can run different scopes to analyze identified costs and trends for production. These costs are ultimately recorded in the General Ledger.
To create an allocation scope:
-
Navigate to the Create/Update Scope page. Click Create Scope in the Scope Search page. The Create/Update Scope page appears.
-
In the Header region, enter the following values:
-
Name: A unique value for this scope record.
-
Description
-
Type: Choices are: Item, Resource, or Overhead.
-
Inactive Date: You can select a date that this scope record will no longer be active.
-
Unit of Measure
-
Status: The value is Draft, when creating or updating the plan.
Other values are Error, Validation in Progress, and Validated:
-
When you select Validate, the application runs the Validate Cost Planning Scopes (Discrete) concurrent program and the status becomes Validation in Progress.
-
Once validation is completed based on the result, the status is either Validated or Error (if there are issues).
-
-
-
In the Attributes region, select Attribute Types and enter From and To values for your selection.
Depending on the Scope Type value selected, the following table shows the choices available for each attribute type:
Item Item Overhead Resource Organization Organization Organization Cost Type Cost Type Cost Type Cost Group Department Department Cost Sub Element WIP Accounting Class WIP Accounting Class Subinventory Overhead Resource Group Item Category - Resource Item - - Project - - Task - - -
Click Apply to save this record.
-
Click Validate to run the Validate Cost Planning Scopes (Discrete) concurrent program. This program checks if the products, resources, and overheads included in the scope have the unit of measure conversion defined.
When the scope is validated, you can review the actual products, resources, and overheads finalized as this scope.
Searching and Viewing Allocation Rules
Allocation rules are used to define the costing method for your cost plan. The rule sets the allocation pool, scope, driver, and cost elements for a cost plan. You have the option to search for scopes using a simple or advanced search:
-
Simple Search enables searching when you know information such as part of a name or description.
-
Advanced Search offers multiple search criteria and conditional qualifiers. This method is used when looking for specific values.
To search and view allocation rules
-
Navigate to the Search Allocation Rules page.
(N) Cost Management responsibility > Cost and Profitability Analysis > Cost Planning > Allocation Rule
-
For a Simple Search, in the Search region enter values in either the Name or Description field, or both.
-
Click Go to view the results of your query.
-
Optionally, you can select Advanced Search to enter more details for the query on the Advanced Search page.
In this search method, specify how to filter the results of your search criteria by choosing one of the following:
-
Show table data when all conditions are met.
-
Show table data when any condition is met.
-
-
For each search criteria value, select a conditional qualifier. Your choices are: is, is not, contains, starts with, or ends with.
-
Enter a value for any of the following fields: Name, Description, Classification, Cost Element, Cost Driver, Default Allocation Pool, Default Scope, Inactive Date, Price List, and Sub Element.
-
Click Go to display the results of your search.
-
You can navigate to the Create/Update Allocation Rule page by:
-
Click the Update icon to edit the rule.
-
Click Create Allocation Rule to create a new rule.
-

Creating and Updating Allocation Rules
The allocation rule defines the allocation method details including cost elements, default allocation pool, default scope, and cost driver. You can include one or multiple allocation rules in a given cost plan.
To create an allocation rule:
-
Navigate to the Create/Update Allocation Rule page. In the Search Allocation Rules page, click Create Allocation Rule or click the Update icon for a selected rule.
-
In the Allocation Rule region, enter cost element, default allocation pool, and default scope information in the following fields:
-
Name: Enter a unique value.
-
Description
-
Cost Element: choices are:
-
Fixed Cost
-
Material
-
Material Overhead
-
Outside Processing (Non Routing)
-
Outside Processing (Routing)
-
Overhead (Non Routing)
-
Overhead (Routing)
-
Resource (Non Routing)
-
Resource (Routing)
-
-
Basis Type: Choices are:
-
For Material Overhead cost element: Item, Lot, Resource Units, Resource Value, Total Value.
-
All other cost elements: Item or Lot.
-
-
Sub Element: The sub element is a mandatory field for all cost elements with the exception of Resource (Routing), Overhead (Routing) and Outside Processing (Routing). In these cases the field is disabled.
-
Classification: This value is derived from the cost element selection. If the cost element is Fixed, the classification is Fixed. For all other cost elements the classification is Variable.
-
Default Scope: Select the allocation scope to use as a default in this allocation rule.
-
Inactive Date: Select a date this rule will no longer be active, if applicable.
-
Default Allocation Pool: Select the allocation pool to use as a default in this allocation rule.
-
-
Select values in the Cost Driver region to specify the method to apportion costs chosen in the pool and apply to the members in the scope. Scope members can products, resources, and overheads.
-
Cost Driver, choices are:
-
If the default Allocation Pool is left blank, then the choices are Invoice, Landed Cost, Price List, Purchase Order, Quote, or Receipt.
-
If the default Allocation Pool is provided, then the cost driver choices are Volume, Value, Contribution Margin, Planned Volume, Planned Value, and Planned Contribution Margin.
-
-
Cost Driver Method: choices are Average, First, Last, Maximum, Minimum.
This field is disabled if the cost driver is Price List, Volume, Value, Contribution Margin, Planned Volume, Planned Value, and Planned Contribution Margin.
-
Cost Driver Plan Name: This value is imported after you run the concurrent program Import Supply/Demand for Cost Planning.
This field is enabled only for cost drivers Planned Volume, Planned Value, and Planned Contribution Margin.
-
Cost Driver Plan Type: Three different plan types are supported dependent on the cost driver selected. They include Procurement, Production, and Demand.
-
Unit Cost Calculation Method: Planned or Average Volume.
-
Unit Cost Plan Name
When a user chooses the unit calculation method, the plan name which system needs to consider is provided in this attribute. This attribute will show all the plans which have been successfully imported and stored in cost planning
-
Allocation Percent: Enter the percentage amount that needs to be allocated by the pool. The default value is 100.
-
Price List: Specify where the price is derived such as Advanced Pricing or another source.
-

-
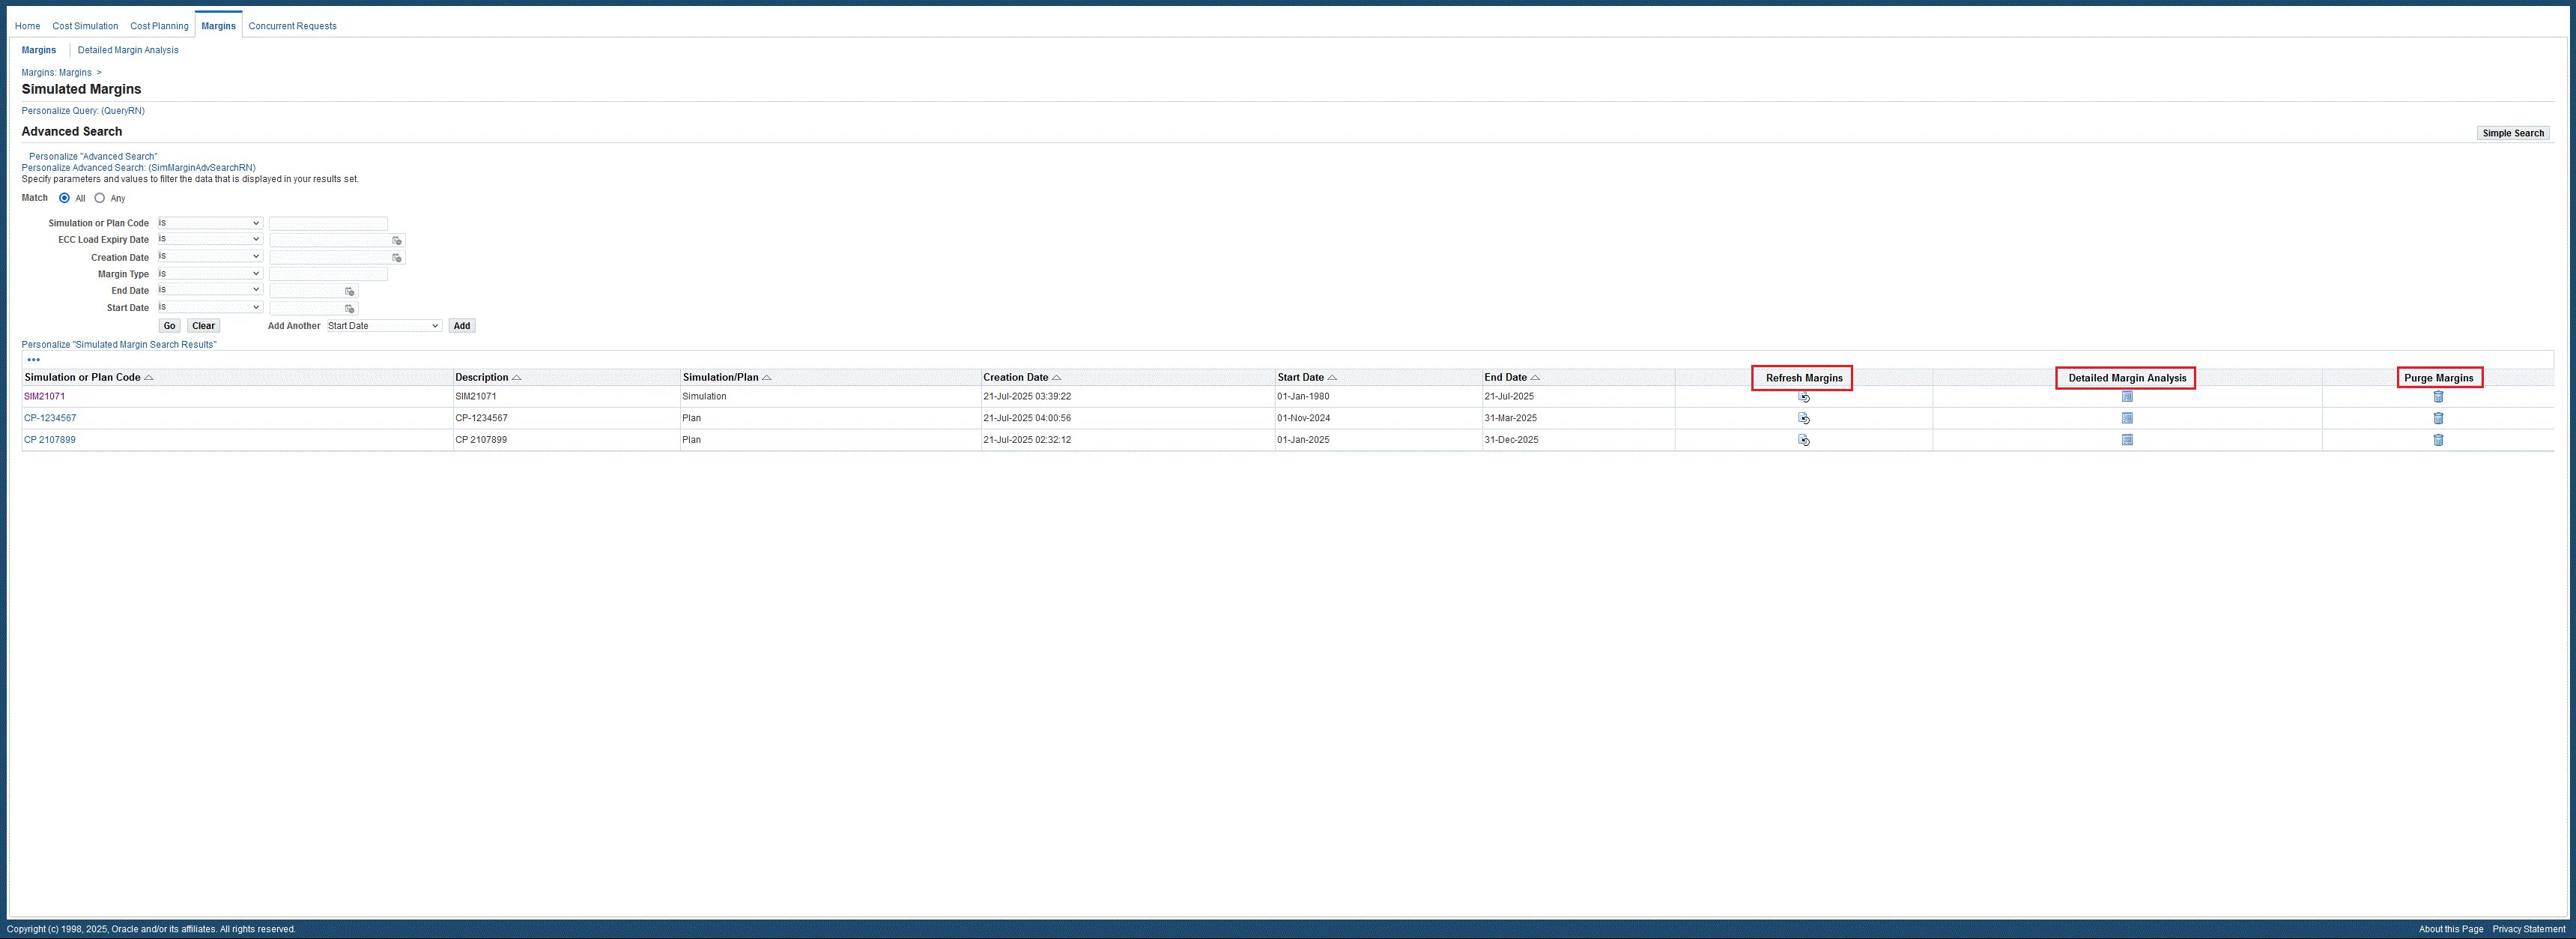
Margins
All Simulated Margins from simulations or cost plans display on the Simulated Margins page. Click the Margins tab to navigate to the Simulated Margins page where you can:
-
Refresh Margins: recalculate simulated margins according to the latest actual margins information.
-
View the Detailed Margin Analysis page.
-
Purge Margins.
Note: If RBAC is configured to enable access to the Command Center Margin Analysis dashboard, then the dashboard is visible as a tab beneath the Margins tab. You can assess the profitability of your cost strategies from the Margin Analysis dashboard for user-defined costs. The dashboard enables users to:
-
Calculate the impact of simulated costs on historical COGS and margins.
-
Identify product categories or products that will face significant margin pressure.
-
Determine which dimensions (products, regions, or channels) are most sensitive to cost changes.
You can also perform a Simple Search or an Advanced Search to narrow the list of simulated margins.
Click a Simulation or Plan Code link to view a Cost Simulation. The Cost Simulation Impact Summary page appears where you can view Cost Simulation details.
The Cost Impact Simulator enables cost accountants and line-of-business owners to quickly visualize the impact of different cost strategies on their business. You can use the Cost Impact Simulator to:
-
Create Simulation Scenarios - Model variations in material and resource costs, supply chain rules, engineering changes, and alternate BOMs and routings.
-
Run Near Real-Time What-If Analysis - View the impact of different simulation scenarios on products with complex, multi-level BOMs, formulas, and recipes.
-
Understand Business Impact - Assess cost strategies from target cost setting to impact to valuation, COGS, and margins.
-
Identify Cost Optimization Opportunities - Visualize multi-level product cost structures and identify potential savings.
-
Identify Opportunities to Increase Profitability - Integrate with margin analysis to view the effect of cost decisions on product margins.
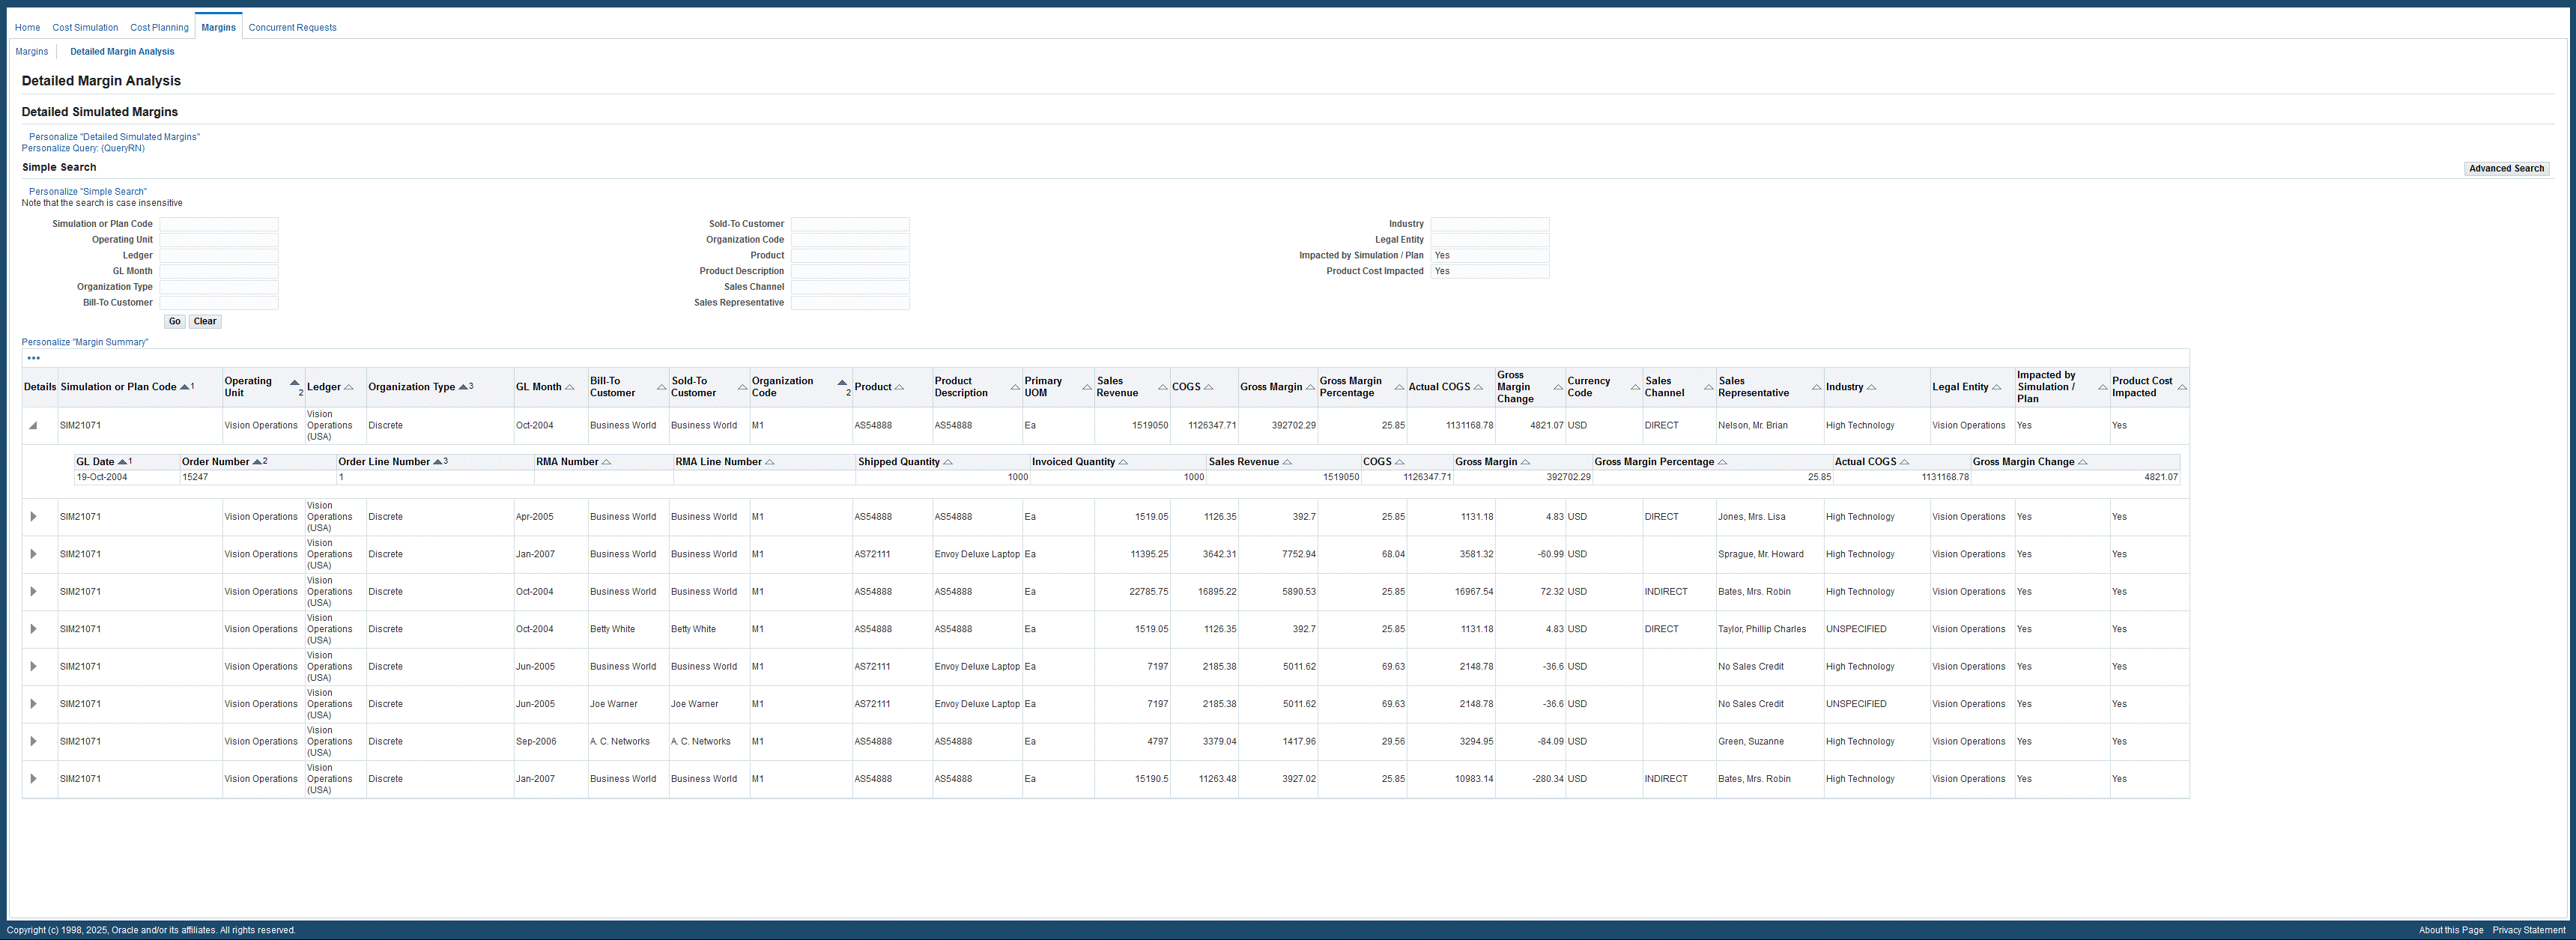
Detailed Margin Analysis
The Detailed Margin Analysis page enables users to view the detailed simulated margins for a simulation cost type, cost simulation, or a cost plan at a detailed order line level.
To view the Detailed Margin Analysis page:
-
Navigate to the Detailed Margin Analysis page.
(N) Cost Management responsibility > Cost and Profitability Analysis > Margins > Detailed Margin Analysis (tab)
-
You can also navigate to the Detailed Margin Analysis page from the Simulated Margins page by clicking the Detailed Margin Analysis icon within a selected row.
-
For each row you can expand the view to display additional Details.
Click a Simulation or Plan Code link to view a Cost Simulation. The Cost Simulation Impact Summary page appears where you can view Cost Simulation Details.
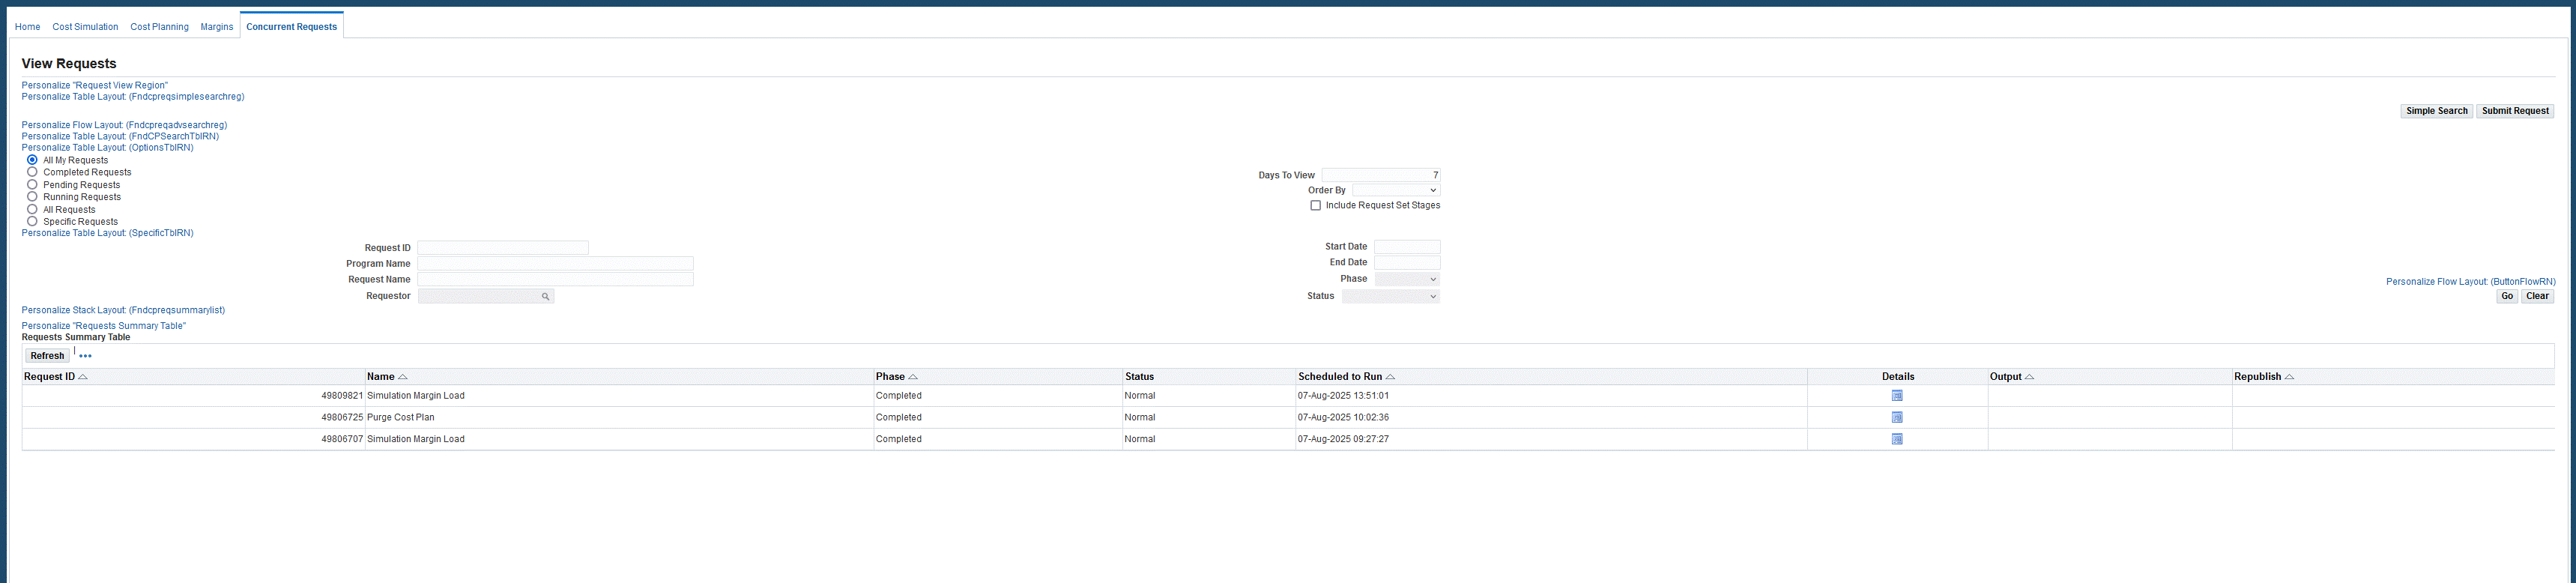
Concurrent Requests
Many actions taken by users are processed through concurrent processes. You can monitor these concurrent processes and investigate errors or warnings within the Cost and Profitability Analysis application.