Oracle Warehouse Management Rules Engine
This chapter covers the following topics:
- Overview of the Rules Engine
- Components of the Rules Engine
- Overview of Rules Setup
- Defining WMS Rules
- Picking Rule Allocation
- Defining WMS Rules for Logistics Service Providers (LSPs)
- Picking Rules for Oracle Warehouse Management Enabled Project Manufacturing Organizations
- Setting Up Pick Wave Rules
- Oracle Warehouse Management Strategies Window
- Rules Workbench
- Explaining the Oracle Warehouse Management Rules Engine Simulator
- Summary of Rule Properties
Overview of the Rules Engine
The rules engine provides a repository for restrictions and business policies. You define and implement rules, directly from standard Oracle Applications windows. You select from the elements in the lists of values to compose rules. The rules engine also does not allow you to modify rules currently in use.
Based on the restrictions that you define, the rules engine performs the following activities:
-
Assigns tasks to a resource with the appropriate training and equipment
-
Identifies the loaded or picked LPNs for verification before they are shipped
You can base rules on nearly any attribute in the database, including user-defined flexfields. You can create rules based on the following rule types:
Put Away Rules
Directed put away directs operators to put newly received material into the most appropriate location. You can base the rule on virtually any business process, and the rules engine provides intelligent suggestions for put away locations for the material. Some typical processes that put away rules are capable of modeling include the following:
-
Direct an operator to put away an item in the same locator where other quantity of the item already resides. This minimizes item fragmentation.
-
Prohibit commingling of different items or different lots of the same item in a single locator
-
Avoid lot commingling in a locator
-
Base the put away location on inspection results, the type of purchase order, or item category
You can also use the rules engine to suggest locations to put away any item anywhere within the warehouse.
Picking Rules
Directed picking creates material allocations and directs operators to pick material from specific locations. To ensure proper stock rotation, you can set up picking rules to allocate material using FIFO (First In, First Out) or FEFO (First Expired, First Out). You can also set up the rules engine to meet customer requirements, such as stock condition or quality. Furthermore, you can set up different rules to deplete a locator to free up additional warehouse space, or to pick by cost group ownership for particular customers.
Task Type Assignment Rules
Based on user-defined criteria, such as the source subinventory, locator, or item attributes, the rules engine can identify the task type for each task that is generated by the system.
Task type assignment captures the skill sets and equipment required for a warehouse task, ensures the system assigns the task to the appropriate operator . An operator can sign onto a mobile radio frequency (RF) device, and optionally specify the equipment they are using. Based on the operator skill set, the equipment requirements, and the equipment capacity, the rules engine can then assign tasks to the operator. In some cases, the system assigns tasks based on the subinventory in which the task occurs.
For example, the rules engine assigns hazardous tasks to personnel who have completed hazardous material handling training. Another task assignment example, might include limiting put aways to top racks to those operators who signed on to a high-reach forklift.
Cost Group Rules
Cost groups capture the material valuation accounts necessary for tracking inventory value. For example, you might set up different accounts for refurbished versus new goods, or for consigned goods that might have cost groups that are tied to the owning company. When material is received into the warehouse, the rules engine can automatically determine the owning cost group.
The rules engine automates cost group assignment decisions, thus removing the complexity of making this decision from the warehouse floor. For example, the rules engine can make a cost group assignment based on sales channel by assigning different cost groups to internet orders and in-store orders. The rules engine can also make a cost group assignment based on inspection results. It can assign an item that fails inspection to a “Hold” cost group. The rules engine can also assign cost groups by vendor site, item category, item. If you do not assign a cost group rule for a particular item, then the system uses the default cost group of the storage subinventory where the item resides.
Label Format Assignment Rules
The rules engine selects the appropriate label format and content for the business need. With the compliance labeling feature, labels with the required information, barcode symbols, and layout can be generated for each item and container.
Operation Plan Selection Rules
Consolidation is the process of bringing material from various parts of the warehouse together. Operation plan selection rules correspond to the three modes of consolidation: LPN, Locator, and LPN and Locator. There are three types of operation plans, inbound, crossdock, and outbound. You use these plans to build the operation plan selection rules. You also use operation plan selection rules to determine if you can consolidate material across outbound deliveries. Oracle Warehouse Management allows you to create inbound and crossdock operation plans. For more information, see Setup Operation Plans. You cannot create outbound operation plans. Oracle Warehouse Management is seeded with the following outbound operation plans:
-
LPN based consolidation in staging lane within delivery
-
Direct consolidation in staging lane across deliveries
-
Direct consolidation in staging lane within delivery
-
LPN based consolidation in consolidation locator, across deliveries in staging lane
-
LPN based consolidation in consolidation locator within delivery in staging lane
-
LPN based consolidation in staging lane across deliveries
-
Locator based consolidation in consolidation locator, across deliveries in staging lane
-
Locator based consolidation in consolidation locator within delivery in staging lane.
You set up rules to determine which operation plan to select for a given task. This is an optional step. If you do not set up operation plan selection rules, the system uses the organization level plan.
For example, if you want certain categories of items to go through the consolidation step, and other categories of items to be dropped directly to the staging lane, you create an operation plan selection rule that specifically selects the operation plan based on the item category.
Pick Verification
The rules engine identifies and then marks tasks for pick verification. After you load the task, you can select Pick Verify to inspect the loaded material. This action will start the verification process for the corresponding LPN. If there is any discrepancy between the loaded material and the picked material, then the pick verification process logs exceptions. The pick verification rules are organization specific.
With this feature, the Warehouse Managers can do the following:
-
Track picking exceptions.
-
Perform corrective actions.
-
Ensure that the LPNs are shipped without any picking discrepancies.
The rules engine is applicable to the following processes and marks the tasks for verification:
-
Sales Order Pick Release
-
Sales Order Task updated through the Warehouse Control Board
Related Topics
Rules Engine Capabilities and Rule Types.
Components of the Rules Engine
The rules engine contains the following components:
Objects
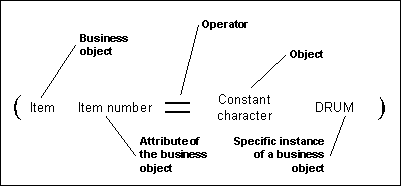
Objects are the entities that you use within a rule. They correspond to tables and their attributes (or columns). Oracle Warehouse Management also includes two objects you can use to specify constant values: Constant Character and Constant Number.
You select constant character or constant number when you want to specify a specific parameter value for an object. For example, you might set the parameter item number equal to the constant number, 23454. In this case, the constant value would be 23454, and represents the item number.
Rules
A rule is one or more restrictions that must be fulfilled to satisfy a business or customer requirement. For picking and put away rules, you assign a sort criteria that determines in which order the system uses a rule to suggest an allocation. Picking and put away rules also have a quantity function that specifies the quantity considerations used to determine the material available for picking, or the space available for put away. Cost group, task type, label assignment, and operation plan selection rules have a return value, that returns a value, based on the type of rule that you define. If all of the restrictions are met for a particular cost group, task type, label assignment, or operation plan selection rule, then the return value provides the name of the task type, label format, cost group, or operation plan.
Examples of Quantity Functions
-
Picking rule: available to reserve
-
Put away based on locator weight capacity only
-
Put away: use a custom function to determine the destination locator capacity
Return values are used in cost group, task type, label format, and operation plan selection rules. If the rule restrictions are met, then the rules engine returns the value specified. For example, if an item has a HAZMAT code, then the return value for a task type might be Hazardous. In this case, the system assigns the task to an operator who is qualified to handle hazardous materials. Likewise, if all of the items in an EACH PICK subinventory should be assigned the same cost group, you might specify a rule that returns the cost group associated with the EACH PICK subinventory. For example if the cost group value is EP100, then every time an item is put away into the EACH PICK subinventory, the system returns the cost group value of EP100. This cost group is then assigned to the item being put away into the subinventory.
The figure below provides an example of a picking rule. In this example, you can review the various components that make up a rule.
Strategies
A strategy is an ordered sequence of rules that the system uses to fulfill complex business demands. The system selects the rules of a strategy in sequence until it fully allocates a picking or put away task, or until it finds a cost group that meets restrictions. When you define strategies, you also specify the date or range of dates on which the strategy is effective. When setting up strategies, you also specify whether you want the system to use a rule if it can only allocate some of the material or space required by that allocation.
Note: Strategies are not used for task type, label format, and operation plan selection rules.
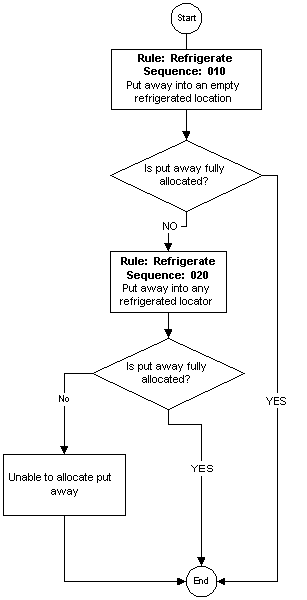
Strategy Example
The following figure provides a graphical example of a simple strategy that includes two rules: a rule that specifies to put the item away to an empty refrigerated location, and a rule to put away to any refrigerated location.
Overview of Rules Setup
You use a series of Oracle Warehouse Management rule types to set up various rules for your warehouse. Although you use the same windows to set up all rules, the setup that is required for Cost Group, Picking, and Put Away rules differ from the setup that is required for Task Type, Label Format, and Operation Plan Selection rules. You do not assign task type, label format, and operation plan selection rules to strategies. Rather, the rules engine automatically links these types of rules directly to the organization when you enable the rule. The search order is determined by a weight applied. The larger the number, the higher the weight. You can assign weights only to task type assignment, label rormat, and operation plan selection rules.
Use the following windows to set up rules:
-
Note: All of the rules engine windows are organization-specific, so make sure that you select the appropriate organization before defining your rules.
Defining WMS Rules
You define rules in the WMS Rules window.
Use the WMS Rules window to set up any of the following rule types:
-
Cost Group Assignment
-
Label Format
-
Operation Plan Selection
-
Pick
-
Pick Verification
-
Put away
-
Task Type Assignment
The setup for picking and put away rules differs from the setup for cost group, task type, label assignment, and operation plan selection rules. Picking and put away rules require a quantity function and use an optional sort criteria, while the assignment-type rules require a return value. Picking rules also have optional consistency requirements as well as the choice of allocation modes.
In the header section of the Oracle Warehouse Management Rules window, you select the type of rule to define. You also specify a name and description for the rule, and the quantity function or return value. If you are creating a picking rule, you also specify the allocation mode for the rule.
All rules must be enabled before you can use them. Therefore, you must enable the rule before the system can consider it for use in a strategy. You must also enable a rule before you can assign it in the Rules Workbench. After the rule is enabled, the system also evaluates the rule syntax to ensure it is valid.
Note: After you enable a rule, you cannot change it. Furthermore, rules that you assign to a strategy cannot be disabled. To modify a rule already assigned to a strategy, you must disable the strategy and then disable the related rule. If an enabled rule has not been assigned to a strategy and you need to modify it, clear the Enabled check box.
In the Rules Workbench window, you can also enable rules that are not assigned to strategies. (A rule can be used even if it is not assigned to a strategy.) For example, in the Object field, you can select Stock on-hand then the parameter Material Status to create a rule restriction that affects on-hand stock.
You can optionally make the rule available to all of the organizations in your company. If you enable a picking or put away rule in all organizations, then other organizations can include it in strategies. If you make a task type, label format, and operation plan selection rules available to all organizations, then all organizations will use the rule, because there are no strategy assignments for these types of rules.
The rules engine comes seeded with several basic rules. For seeded rules, the User Defined check box is clear. You cannot edit seeded rules, but you can use the rule copy function on the Tools menu to copy a rule.
To locate existing rules, use the Find Rules window. Use any of the following fields to narrow your search:
-
Type
-
Name
-
Description
-
Weight
-
User Defined
-
Enabled
Using Zones in WMS Rules
You can select zone objects (destination zone or source zone) when you configure the following rule types:
-
Put away: Use zones for restrictions and sort criteria.
-
Pick: Use zones for restrictions, sort criteria, and consistency.
-
Task Type Assignment: Use zones for restrictions.
Restrictions Tab
You specify the business objects, their related parameters, and the restrictions of the rule. Each line in corresponds to a restriction on the Restrictions tab. You use the AND and OR operators to join multiple lines of restrictions. You use the open and close parenthesis to create complex compound statements. The Sequence Number field in this window, enables you to specify the sequence in which the restrictions are linked together.
Note: When you set up restriction sequence numbers, consider a numbering scheme, such as 10, 20, 30. This enables you to easily add more restriction lines, if necessary.
For example, in the Object field, you can select Stock on-hand then the parameter Material Status to create a rule restriction that affects on-hand stock.
Restrictions for Advanced Catch Weight
Oracle enables you to apply various sort and restriction attributes in the WMS Rules window to the Fulfillment Base parameter for sale order lines. This provides the flexibility to create picking rules with the sort criteria or restrictions that you assign. The following restriction objects are available for the primary and secondary quantity:
-
Actual Transaction
-
Delivery Details
-
License Plate
-
Move Order Line
-
Outermost License Plate
-
Sale Order Lines
Sort Criteria Tab
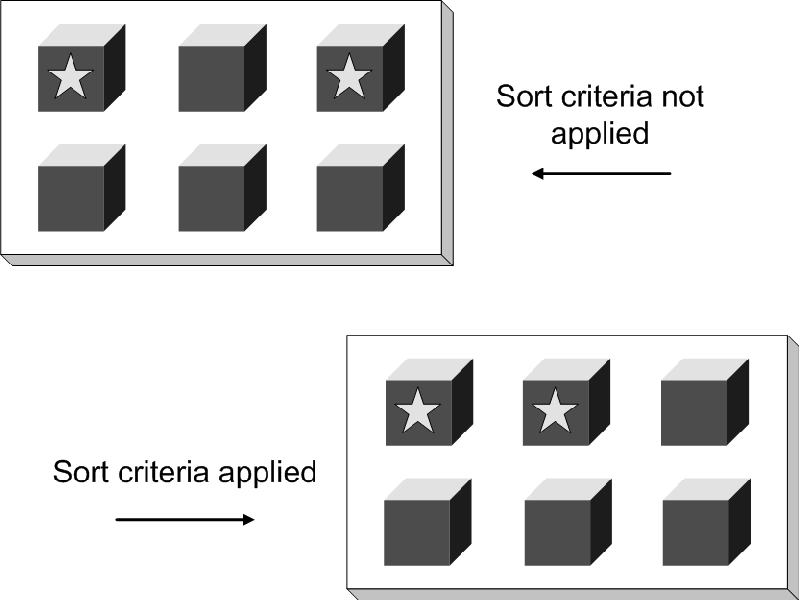
The Sort Criteria tab enables you to impose an order on the criteria returned that meet the restrictions in your rule. The figure below provides an example of the results of applying a sort criteria to a picking rule. In the example, assume that you want to pick cases of an item in stock. In this case, also assume that multiple cases of the item are in stock. To determine how the items that meet your rule's restrictions should be picked, you specify a sort criteria based on FEFO (first expired, first out).
If the blocks with stars in them represent cases of items that will be expiring within the next week, and the blocks that do not include stars represent cases that will expire at the end of the month, the system would suggest picking based on the order that you specified in the sort criteria.
In this example, the first set of blocks shows the unsorted items that meet the rule's restrictions. The second set of blocks shows this same set of items, but with the sort criteria applied to them. If the pick task required that three cases be picked, the system would suggest picking the two expiring cases first, and one of the cases that expires later in the month.
You can specify multiple sort criteria. To break any ties that might occur at a level, the system considers subsequent sort criteria in ascending order.
Sort Criteria for Advanced Catch Weight
Oracle enables you to apply various sort and restriction attributes in the WMS Rules window to the Fulfillment Base parameter for sale order lines. This provides the flexibility to create picking rules with the sort criteria or restrictions that you assign. The following sort objects are available for both primary and secondary quantity:
-
Actual Transaction
-
License Plate
-
Move Order Line
-
Outermost License Plate
-
Sale Order Lines
Consistency Tab
A consistency requirement is used to indicate that all allocations for a particular line must have a common criteria. The most typical use of consistency requirements is a customer that requires that for a particular item, they will only accept a single lot; thus, in this scenario, a quantity of mixed lots, would be unacceptable. Consistency requirements can also be used for lot attributes and for many other attributes of an allocation.
The Consistency tab enables you to specify that all of the allocation lines must have the same value for a particular attribute. For example, you might decide that the specific lot that gets allocated to a customer is not important, so long as their order for 1000 items gets filled by exactly one lot. Specifying consistency requirements can help you to optimize your warehouse. For example, you can set up a consistency requirement that allocates a pick to just one locator, or just one revision, or one subinventory, and so on.
The following figures provide a three-part example of the effects of using a consistency option.
Assume that a customer, Business World requires that although they prefer Excellent-grade strawberries over Good-grade strawberries, it is more important that all of their order come from a single lot of strawberries. Also assume that Business World has just submitted a sales order for three cases of strawberries. The following figure shows the rules associated with this example, and the available quantity in each of the three grade categories, Excellent, Good, and Average.
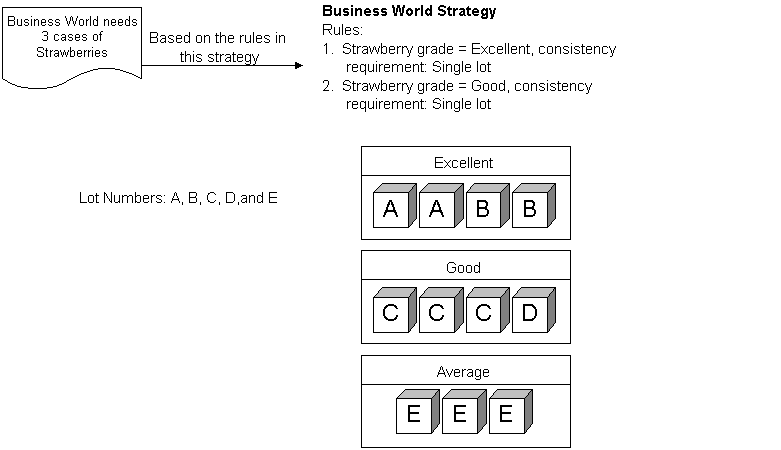
Oracle Warehouse Management first applies the rule restrictions to the available strawberries. Business World will not accept Average-grade strawberries so those quantities are not considered. The first rule in the restriction states Excellent Only and a consistency requirement of Single Lot. Because there are not enough Excellent-grade strawberries in a single lot to satisfy the first restriction, the Oracle Warehouse Management Rules Engine proceeds to the next rule in the strategy.
The second rule specifies Good Only and a consistency requirement of “Single Lot.” There are enough Good-grade strawberries in a single lot (lot C), to satisfy the requirements of the second rule's restrictions.
So, the rules engine allocates three cases from lot C. The following figure illustrates the results of this allocation.
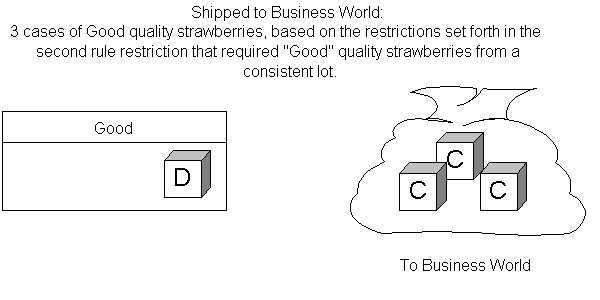
In this example, Business World valued receiving a single lot over receiving Excellent-grade strawberries. However, it is also possible to model other preferences. For example, another scenario might have illustrated that Business World preferred to receive Excellent-grade strawberries–from mixed lots–before it considered accepting Good-grade strawberries. You can model all of this using the Oracle Warehouse Management Rules Engine.
Task Type, Label Format, and Operation Plan Selection Rules
You use the WMS Rules window to set up task type, label, and operation plan selection rules. These types of rules do not require strategies; however, they do require that you assign a weight. Later, the system uses this weight to evaluate which rule to carry out first. The higher the number is , the higher the rule weight. For these types of rules, both the Sort Criteria and Consistency tabs are disabled.
Picking Rule Allocation
Oracle Warehouse Management provides the following allocation modes for picking rules:
Allocate Entire LPN Only
This allocation mode will allocate only LPNs that can be entirely consumed by the allocation. This allows a warehouse to take full advantage of the way material is already packed in the warehouse, particularly when LPNs contain mixed lots. Using this allocation mode, customer exclusions or inclusions based on lot attributes or other restrictions can be honored while selecting the single (or multiple) best LPNs that meet the customer requirements.
This allocation mode only considers packed material. It also does not consider any LPNs which can not be fully allocated for a single move order line, so LPNs that contain mixed items, that are partially reserved or allocated to other requirements, or that have a quantity greater than the allocation quantity are immediately discarded.
This allocation mode is best used when the LPNs are all a standard size, because the Rules Engine does not perform any best fit algorithm.
Example of Allocate Entire LPN Only Mode
Consider the following example:

Suppose a sales order for five of an item were placed, and nine pieces were available in the following three LPNs:
-
L4A (qty 2)
-
L5A (qty 3)
-
L6A (qty 4)
Suppose the Rules Engine allocated LPN L6A first, either because that is the LPN that the Rules Engine happens to come across first or because of the sort criteria that are indicated in the rule. There is a qty of 1 left to be allocated, but neither L4A nor L5A can be entirely consumed by the task so the remaining quantity of 1 is backordered.
The Rules Engine does not have visibility to the fact that L4A and L5A would make an exact fit; it only allocates in the sequence determined by the sort criteria, or in the absence of a sort criteria that differentiates different material or LPNs, in an arbitrary sequence. While a sort criteria indicating to sequence LPNs by ascending order of their on-hand quantity would produce the correct results in this example, there are other examples in which this sort criteria would not produce the correct results.
Consistency requirements impose an all-or-nothing requirement on the allocations. If the item in the example above were a lot controlled item, all 9 were of the same lot, and the rule with Allocate Entire LPN Only allocation mode also indicated consistent lot, then the nothing would be allocated, because as in the example above, the Rules Engine would be unable to allocate all 5 required.
Only the innermost LPNs that contain the items are allocated, so when LPNs are nested the allocation will be made to the innermost LPN only.
Allocate LPN and Loose
This allocation mode is useful when the system should suggest particular LPNs to allocate. Using this allocation mode, both loose and packed material is considered equally. However, if material that has been allocated resides in an LPN, then that LPN will be indicated on the allocation record, and the task will be for that particular LPN. In other words, instead of leaving it to the operator to select one of potentially many LPNs that contain the required item, the Rules Engine chooses a particular LPN.
Rule restrictions can be built based on details of an LPN, for example only LPNs that are associated with a particular container item are allocated for particular customers, or only LPNs that do not have mixed items, mixed revisions, or mixed lots are allocated. In addition, sort criteria can be used to indicate that packed, or loose, material should be preferred by the system. This allocation mode will allocate loose material, partial LPNs, multiple partial LPNs, or full LPNs subject to the sort criteria and restrictions and LPN availability.
Only the innermost LPNs that contain the items are allocated, so when LPNs are nested the allocation will be made to the innermost LPN only.
No LPN Allocation
This allocation mode allocates both packed and loose material, but does not allocate material at the LPN level. The system considers loose and packed material as equal. The system does not suggest an LPN to the operator who performs the task. If there is both loose and packed material available in the suggested locator, the choice is left to the operator to determine how to perform the pick.
Note: If an LPN is reserved for a particular sales order, then the allocation will be made to the LPN detail level, so long as the rule restrictions and consistency requirements are met, even if the allocation mode is No LPN Allocation.
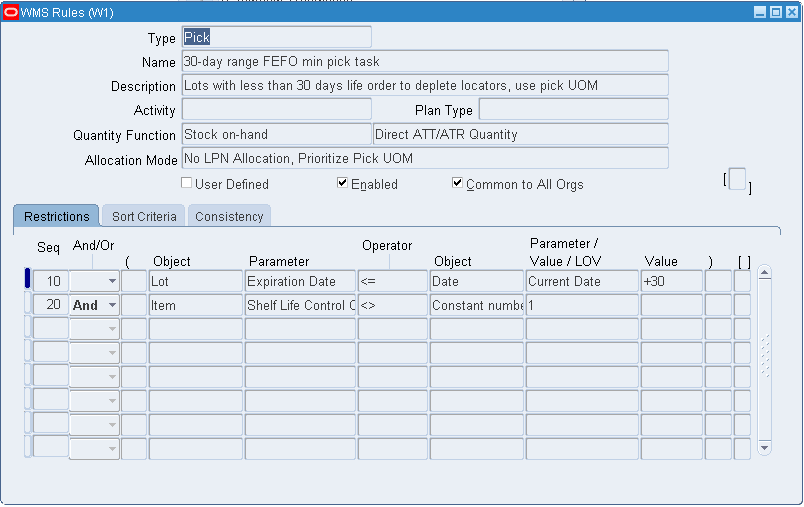
No LPN Allocation, Prioritize Pick UOM
Similar to rules made in the No LPN Allocation mode, this allocation mode does not allocate to the LPN detail level. The system consider loose considered equally, subject to the sort criteria and restrictions, and the operator determines which combination of loose and packed material from a suggested locator to fulfill the allocation. In addition, this allocation mode honors the pick unit of measure for a subinventory before it considers the sort criteria in the rule. The figure below provides an example of the results of selecting this allocation mode for a picking rule.
Note: This allocation mode works best for material that is not lot or revision controlled, and when either LPNs are not used or all LPNs are of a standard pack size which is defined as the Pick Unit of Measure. Also, if an LPN is reserved for a particular sales order, the allocation will be made to the LPN detail level, so long as the rule restrictions and consistency requirements are also met, even if the allocation mode is No LPN Allocation, Prioritize Pick UOM.
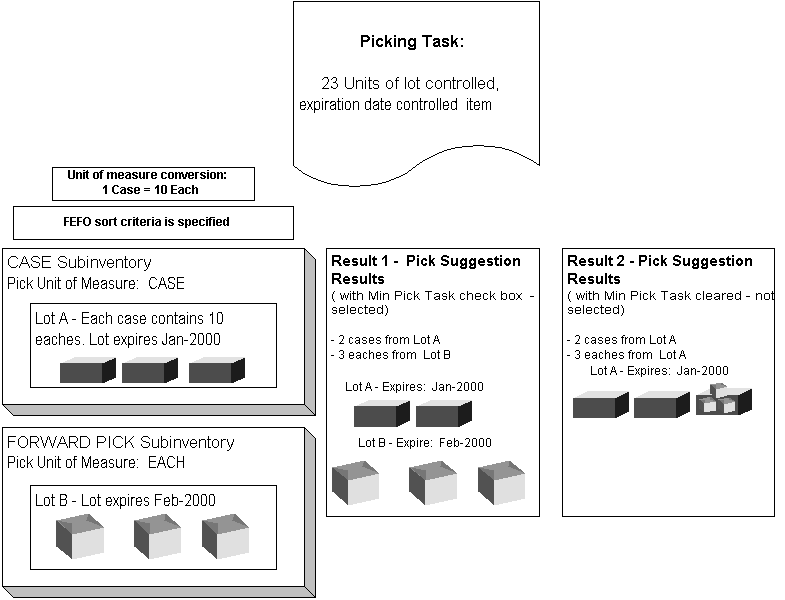
For example, assume a picking task requires 23 units of a lot controlled, expiration date-controlled item. The sort criteria for the rule specifies picking by the first expired, first out (FEFO) method.
In this example, two subinventories exist from which to fulfill the pick: a CASE subinventory and a FORWARD PICK subinventory. If you select the If No LPN Allocation, Prioritize Pick UOM allocation method, then the rules engine prioritizes the picking task by the pick unit of measure specified at the subinventory (Result 1). In Result 1, which assumes that No LPN Allocation, Prioritize Pick UOM is selected, the system suggests picking two cases from the CASE subinventory and three eaches from the EACH subinventory.
In Result 2, which assumes No LPN Allocation, Prioritize Pick UOM is not selected, the rules engine prioritizes the pick task based on the sort criteria defined for the rule. In this result, the system suggests picking the full order from Lot A, which expires before Lot B.
Strict Pick UOM
If you enable pick UOM, a pick UOM, and a picking rule, then you can enable a strict pick UOM allocation for the item. If you enable strict pick UOM allocation, then the system does not break the standard pack (pick UOM). It assumes that subsequent replenishments will allocate the balance quantity. For example, suppose you have a demand for 49 EA and your warehouse stocks pallets in a BULK subinventory with a pick UOM of pallet (1 Pallet = 10 EA). The following table illustrates how the system allocates the material using strict pick UOM allocation.
Note: The Strict Pick UOM allocation does not break cases, and enables you to allocate in multiples. The No LPN Allocation, Prioritize Pick UOM allocation enables you to allocate only one of any pick unit of measure, whereas strict pick UOM allocation enables you to allocate any multiples of a pick UOM.
| Subinventory | Pick UOM | Onhand Quantity | Result with Strict Pick UOM |
|---|---|---|---|
| Bulk | Pallet = (10 EA) | 90 EA (9 Pallet) | 40 |
| Each | EA | 6 EA | 6 46 EA is allocated. The remaining quantity of 3 remains unallocated because of the allocation rule. |
Process Allocation Logic
You can create rules and allocate material according to specific process manufacturing allocation requirements such as grade, lot, and dual unit of measure. The following table shows the process manufacturing allocation criteria:
| Rule Type | Description |
|---|---|
| FEFO / FIFO | Directs user to pick lots based on earliest lot creation date (FIFO) or lot expiration date (FEFO) |
| Lot Indivisible | If you set the Lot Divisible attribute to No on the Item Master, the allocation engine attempts to allocate only entire lots until the required quantity is fulfilled. The allocation must be within shipping tolerances for sales orders. For manufacturing orders the rules engine over-allocates only if you enabled over picking for manufacturing. |
| Shelf Life Days | Directs the system to allocate material before it expires. For example, in process production, if the expiration date of an ingredient lot is greater than the transaction date + shelf life days, then the system allocates the lot to the batch. |
| Partial Allocation | You can partially allocate part of the requested quantity if sufficient inventory is not available to fulfill the requested quantity. |
| Grade Matching | You can allocate material according to preferred lot grade. If you specify a preferred grade on a sales order line, the system allocates lot of this grade. |
| Customer Specification Matching | The system allocates inventory only if quality results match the customer specification. |
Dual Unit of Measure Allocation
If the item is under dual unit of measure (UOM) control, then the system uses the primary unit of measure for allocation. For example, if item FG1 has a primary UOM of EA and a secondary UOM of LB, and a sales order exists that requires 2 KG of the item, then the allocation engine converts the quantity in KG to EA and allocates the required quantity in EAs. The system allocates the secondary quantity based on the conversion between EAs and LBs. If lot specific UOM conversions exist for the item, then the actual allocated quantity in the secondary UOM could differ from the standard conversion.
Allocation by Secondary Quantity for Catch Weight Items
The advanced catch weight feature allows fulfillment (storing, picking/shipping, receiving) based on conversion from either primary or secondary UOM, rather than only the primary UOM. The fulfillment base attribute, which determines the fulfillment base, can have the values of primary, secondary, or null, and is populated when the UOM defaults or when any changes occur to the item, UOM, or warehouse.
Fulfillment by secondary UOM occurs if the ordered UOM is the same as the secondary UOM; alternatively, if the ordered UOM is the same as the primary UOM, then the fulfillment base will be primary (consequently, the fulfillment base value is stored in the order lines table). The
| Warehouse Management status? | When the ordered UOM is.. | Then the fullfillment base (fb) is.. |
|---|---|---|
| WMS | Secondary | Secondary (S) |
| WMS | Primary | Primary (P) |
| Non-WMS | -- | Null |
| No WMS | -- | Null |
Related Topics
For more information about the advanced catch weight feature, see the following document on My Oracle Support: Advanced Catch-Weight Solution in Oracle E-Business Suite Applications [ID 1551171.1]
Defining ATP, Pick, Item-Sourcing Parameters, Oracle Inventory User's Guide
Inventory Attribute Group, Oracle Inventory User's Guide
Lot Specific Unit of Measure Conversions, Oracle Inventory User's Guide
Defining WMS Rules for Logistics Service Providers (LSPs)
You can define client-specific WMS rules to carry out picks, put aways, label printing, and task management. You can define a specific client category and associate the category to items and use this category to define client-specific rules. In the case of picking and put away, you can define a client-specific rule or strategy by using the key flexfield established during LSP setup to store the client reference. To create the picking rule, use the item object and the key flexfield as one of the parameters. After you define the rule or strategy, then you can assign the rule or strategy in the Rules Workbench by item or by category.
Picking Rules for Oracle Warehouse Management Enabled Project Manufacturing Organizations
To support environments where cross project picking is required but intelligent allocation is desired, four picking rules and one picking strategy have been seeded with Oracle Warehouse Management. When an existing Oracle Warehouse Management organization is enabled for Project Manufacturing, or when a Project Manufacturing organization is Oracle Warehouse Management enabled, the seeded strategy, Project Manufacturing Allocation Preferences, will be assigned to the organization. Thus, picking will work according to this strategy, out of the box.
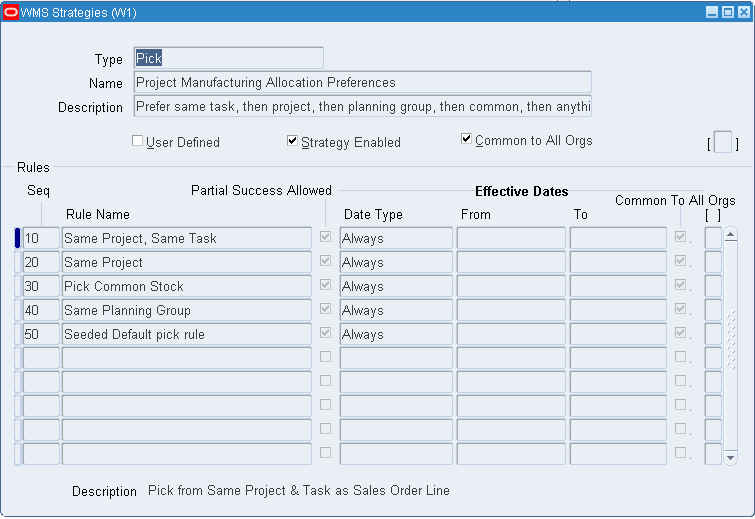
When allocating a work order or sales order this strategy searches for material in the following order:
-
It attempts to find on hand material in the same project and task as that on the sales order or WIP job/schedule
-
It will attempt to find material in the same project, without regards to the task
-
It will attempt to allocate material from common (non-project and task) inventory
-
It will attempt to allocate material from another project where the project assigned to the inventory is the same planning group as the project on the sales order
-
Failing all of the above, the strategy will allocate any available material regardless of project or task
Note: This strategy can also be useful if a sales order or WIP job/schedule, without a project reference (common), is pick released. The strategy will first try to allocate common material and failing that, it will allocate any available inventory regardless of project. This is because rule sequences 10, 20, and 40 will not return any results, but rule sequences 30 and 50 will execute properly.
This strategy uses four seeded picking rules. These rules can be used 'as is' within a user-defined strategy. No modifications are necessary to make these rules behave, as defined below, as restrictions. All of the four rules are applicable for Project Manufacturing organizations only.
-
Same Project, Same Task
This rule ensures that only material that is for the same project and task as that on the move order line is allocated.
Note: The project and task on the move order line comes from the project and task on the sales order or WIP job/schedule for which the move order was created.
-
Same Project
This rule ensures that only material that is for the same project as that on the move order line is allocated. The task on the sales order or WIP job/schedule and the task on the on-hand inventory will not be taken into account.
-
Pick Common Stock
This rule will only allocate material in a locator with no project and task (regardless of the project and task on the sales order or WIP job/schedule.)
-
Same Planning Group
This rule will allocate material n a project whose planning group is the same as that of the project on the sales order or WIP job/schedule.
Rules Allocation for WIP Transactions in Oracle Project Management Organizations
The Allow Cross Project Issues check box on the Project Manufacturing Parameters window enables cross project issues for projects belonging to the same planning in the inventory organization. It also allows cross unit issues based on Warehouse Management picking rules in a Warehouse Management organization.
Note: The allocation results are the same whether or not Oracle Warehouse Management is enabled.
The following tables show the behavior of the rules engine when creating picking allocations for WIP transactions for Oracle Project Management organizations based on the Allow Cross Project Issues check box settings:
-
If the Allow Cross Project Issues check box is Selected.
Material Allocation Soft pegged/no pegged item Hard Pegged Items P1 to P1 (same project) Allowed Allowed Common to P1 Allowed Allowed P1 to P2 Allowed Allowed -
If the Allow Cross Project Issues check box is Deselected.
Material Allocation Soft pegged/no pegged item Hard Pegged Items P1 to P1 (same project) Allowed Allowed Common to P1 Allowed Not Allowed P1 to P2 Not Allowed Not Allowed
Setting Up Pick Wave Rules
Setting up pick wave rules includes the following tasks:
Use the Pick Slip Grouping Rules window to set up pick methodologies.
For instructions on setting up pick slip grouping rules see: Defining Pick Slip Grouping Rules, Oracle Inventory User's Guide.
Use the Release Sequence Rules window to set up rules that specify the priority in which you want the system to consider pick line releases. You can prioritize picking lines by the following criteria:
-
Order number
-
Outstanding invoice value
-
Departure date
-
Schedule date
-
Shipment priority
You set up release rules to specify the release criteria that you want the system to consider during pick release. Release rules specify the following release criteria:
-
Order, either for all, backordered, or un-released orders
-
Shipping, including specifying the carrier and ship from location
-
Inventory, including specifying the warehouse and pick slip grouping rule
Setting Up Release Rules
-
Navigate to the Release Rules window.
-
Enter the name of the release rule.
-
In the Release Criteria region, Order tab, select the type of order (either All, backordered, or un-released) to which this rule applies.
-
Specify any optional order information, such as order type, in the remaining fields on this tab.
-
Select the Shipping tab.
-
On the Shipping tab, enter optional shipping information, such as the carrier and ship-from location.
-
Select the Inventory tab.
-
On the Inventory tab, enter optional inventory information, such as the Ship-from warehouse, and pick slip grouping rule.
Note: Although optional, if you want the system to consider your warehouse and pick slip grouping rule, you should at least complete these fields, on the Inventory tab.
-
Save your work.
Related Topics
Defining Release Sequence Rules, Oracle Shipping Execution User's Guide
Oracle Warehouse Management Strategies Window
After you define your rules, you must set up a strategy and then associate the applicable rules. After you assign rules to a strategy, the rules engine can execute the strategies on any objects to which the strategy applies. The rules engine executes each subsequent rule in your strategy until an allocation is completely filled.
After the rules engine finds a strategy, it will not continue to another strategy if the task cannot be fulfilled based on the first strategy. Therefore, unless you want the strategy to fail if specific restrictions are not met, the last rule in your rule strategies should be a default rule that includes no restrictions. You set up strategies in the Oracle Warehouse Management Strategies Window.

When you define strategies, verify that the User Defined check box is selected; for seeded strategies, the User Defined check box is clear. You cannot modify system defined strategies, however you can copy them using the strategy copy function located in the window's tool bar.
Make sure you enable the strategies so that the strategies can later be assigned in the Rules Workbench. To add rules strategy, you specify a sequence number in which you want the rule to be considered (within the strategy) and then use the list of values in the Rule Name field to select the rule that you want to add.
The Partial Success Allowed check box enables the system to only partially fulfill the requirements of a rule's allocation, and then move onto the next rule in the strategy.
Note: Enabled strategies cannot be modified. To modify a strategy, you must disable the strategy by clearing the Strategy Enabled check box.
Rules Workbench
The Rules Workbench enables you to assign strategies, rules, and cost group values directly to any number of objects in an assignment matrix.
The Rules Workbench provides you with the following functionality:
-
Add, update, or delete strategies, rules, and cost group values in the selection criteria
-
Enable and disable selection criteria in the assignment matrix
-
Hide and show columns of the strategy selection matrix based on user preferences
-
Query where a rule, strategy, or cost group value is assigned
-
Assign crossdock criteria to business objects for planned and opportunistic crossdocking. For more information on creating crossdock criteria, see Crossdock Criteria.
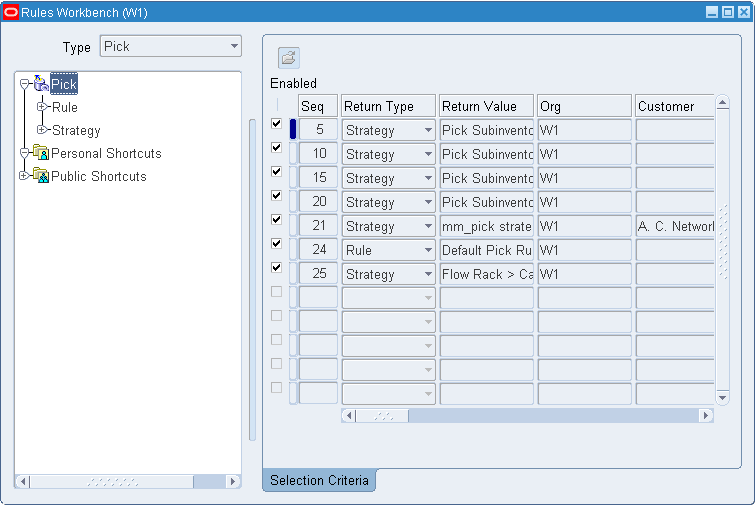
The Rules Workbench is comprised of two regions:
-
Rules Workbench Tree
The Rules Workbench tree displays a view of all the rules and strategies that are available in the organization. In the Type field, you can select from the following rule types:
-
Pick
-
Put Away
-
Cost Group
-
Planned Crossdock
-
Opportunistic Crossdock
-
Cartonization. For more information about cartonization, see Using Cartonization.
-
Pick Verification
Click the Rule node to view a list of all valid rules, or click the Strategies node to view the available strategies.
-
-
Rules Workbench Matrix
You assign rules to business objects in the rules workbench matrix. You identify the return type, which is a strategy, rule, or value and the name of the strategy, rule, or value.
You enter the specific strategy to execute, date effectivity, and sequence. The rules workbench uses the other columns to indicate under what conditions each assignment is applicable. You can also make assignments based on supplier, item, item category, transaction type, user, unit of measure, project, and many other objects. The values in each field are restricted to valid values for the organization.
The organization column always defaults to the current organization and cannot be changed because all rule assignments are organization specific.
Rules Engine Behavior
The Rules Engine evaluates the assignments in the Rules Workbench, after filtering out any assignments that are not enabled or not currently effective. The remaining assignments are evaluated in the user-defined sequence, and the system returns the first return type in which all the values in the assignment match the attributes of the record in the Rules Engine.
If the Rules Engine returns a strategy instead of a rule, then the system evaluates the rules in the strategy in sequence. If after the Rules Engine evaluates all the picking or putaway rules in a strategy, and the allocation is not wholly allocated, then the remaining quantity remains unallocated. If the system cannot find a cost group rule in the strategy, then the system uses the default cost group for the subinventory. The Rules Engine never attempts to retrieve a second strategy from the Rules Workbench. If it cannot find a match then the system uses the default picking and put away rules for the organization, and the default cost group for the subinventory.
Rules Engine Simulator and Rules Execution and Trace
The Rules Engine Simulator and Rules Execution Trace windows list the strategy assignment that was selected by the Rules Engine, by displaying the Rules Workbench within the respective windows and highlighting the selected row.
How to use the Rules Workbench
-
Navigate to the Rules Workbench.
-
Select the rule type to use to view assignments.
The types that are available are pick, put away, cost group, opportunistic crossdock, and planned crossdock.
-
The Rules Workbench is folder enabled so that objects not applicable to your organization can be hidden to make defining strategy assignments easier. For example, project and task would only be used in a project manufacturing organization.
Note: Validation on defining a folder has been enabled to ensure that you do not hide fields for which any assignments have already been made for that rule type. For example, you cannot make a strategy assignment to the Destination Subinventory object, and then hide the Destination Subinventory column.
-
Enter the Sequence.
Sequence controls the order in which the strategy assignments are evaluated. The sequence must be unique within the rule type and organization.
-
Enter the return type. You can enter a strategy, rule, or value.
-
Enter the return value. This is the name of the rule, strategy, or cost group.
-
Enter any of the following combination of values to assign your rule or strategy. These parameters determine how the rules engine returns suggestions for allocations. The available values are:
-
Organization
-
Customer
-
Item
-
Item category
-
Item type
-
Assignment group
-
Source subinventory
-
Supplier
-
Order type
-
Freight code
-
Project
-
Task
-
User
-
UOM
-
Transaction action
-
Destination subinventory
-
Transaction reason
-
Transaction source
-
Transaction type
-
UOM class
-
-
Enter the Date Type. This determines how long the rule or strategy remains active. If you choose something other than ALWAYS, optionally enter a from and to date for the rule or strategy to remain active.
-
Select the Enabled check box. You can enable or disable each return type. The Rules Engine evaluates only enabled rows, and you can modify or delete only disabled rows.
-
Save your work.
Explaining the Oracle Warehouse Management Rules Engine Simulator
The Oracle Warehouse Management Rules Engine Simulator enables you to create and debug the picking and putaway setup for the rules engine. Individual rules or strategies, as well as the entire process including strategy selection, can be performed for allocation of material for picking, allocation of space for putaway, or both. The Simulator enables you to select a rule, strategy, or entire process, and then select a move order line to simulate against. Any existing move order is eligible for simulation. The output is displayed in tabular format, including which lot numbers, revision numbers, and serial numbers were allocated, if applicable.
The Rules Engine Simulator has several modes. These modes determine which part of the rules engine processes that you want to simulate, which in turn determines which types of move orders are valid. You can simulate the following:
-
Picking rule: You indicate which rule should be used in order to allocate material for a move order. If the move order cannot be filled in its entirety by this rule, then only the quantity that can be fulfilled is shown in the results.
-
Picking strategy: You indicate which strategy should be used in order to allocate material for a move order. The Simulator then traverses the rules in that strategy, in sequence, as the rules engine would do. If the move order cannot be filled in its entirety by this strategy, then only the quantity that can be fulfilled is shown in the results.
-
Picking process: You can simulate the entire material allocation process. The Simulator finds a picking strategy, and then executes the rules in the strategy in sequence, as is done by the rules engine.
-
Put away rule: Same as a picking rule.
-
Put away strategy: Same as a picking strategy.
-
Put away process: Same as a picking process.
-
Entire process: You can simulate the entire picking and put away process.
Any move order that allocates material can be selected to simulate a picking rule, a picking strategy, or the picking process. These include move order transfers, move order issues, and picking lines from a sales order. In addition, a put away rule, a put away strategy, or the put away process can be simulated on move order transfers, picking lines from a sales order, put away from WIP, or receiving. The type of move order that can be simulated is dependent on the type of simulation. There are three types to simulate:
-
A pick simulation (rule, strategy, or process) can be performed for any unallocated move order that requires material, such as a replenishment move order, a manual move order or a sales order picking move order.
-
A put away simulation (rule, strategy, or process) can be performed for any unallocated move order that requires only material to be put away, such as a WIP completion, or a purchase order receipt.
-
A simulation of the pick and put away entire process can be performed for any unallocated move order for which there is a material movement of both a pick and put away, including sales order staging transfers, replenishments, and manual move orders.
-
In order to perform a simulation, the Rules Engine Simulator requires a move order that has not yet been allocated. An unallocated move order can be obtained in several ways, including the following:
-
For a pick wave move order, release the sales order with the Auto-Allocate flag disabled on the Inventory tab of the Pick Release window
-
For a put away move order from receiving, perform a purchase order receipt of a standard (or inspection) purchase order but do not attempt LPN drop or perform the actual put away transaction.
Note: When you attempt a put away drop on the LPN (by clicking Drop LPN to see the suggestions and then pressing Ctrl + N and exiting without completing the actual put away), an implicit load is performed on the LPN making it unavailable for simulation again.
-
For a WIP completion move order, perform a WIP completion into an LPN without the drop step on the mobile device
-
For a manual move order, do not allocate the move order through the Transact Move Orders or through any other method
-
The output of the Rules Engine Simulator is a list of suggestions. In the case of picking or when the entire process is simulated the following data is displayed:
-
Source - What subinventory/locator the material came from
-
Cost group - Which cost group the material was allocated from
-
Lot - If the material is lot controlled, which lots were allocated and information about the lots
-
Revision - If material is revision controlled, which revision was allocated
-
Serial - If material is serial controlled, and serial allocation is enabled for the organization, which serials were allocated and information about the serials
-
Rule used - Which rule was used for each allocation line
-
Strategy used - Which strategy was used for the process
-
In the case of put away or when the entire process is simulated, the following data is displayed:
-
Destination - What subinventory/locator the material is going to
-
Rule used - Which rule was used for each allocation line
-
Strategy used - Which strategy was used for the process
-
Performing a Simulation
The Simulator window contains four unique guidance tools. The first tool is the Instructions. You will notice, in the top left corner of the window, an icon that is titled Instructions. This area of the window will help to guide you through the necessary steps needed to perform a simulation. The second tool is at the top middle and right of the window. These icons are labeled 1 Entire process, 2 Move Order and 3 Simulation Done. These icons will change from a red X to a green check mark when each task has been completed. For example, when you select the type of process you want to simulate, the Entire Process icon will change to a green check mark. When you have selected the move order, the Move Order icon will changed to a green check mark and so on.
-
Navigate to the Rule Simulation window
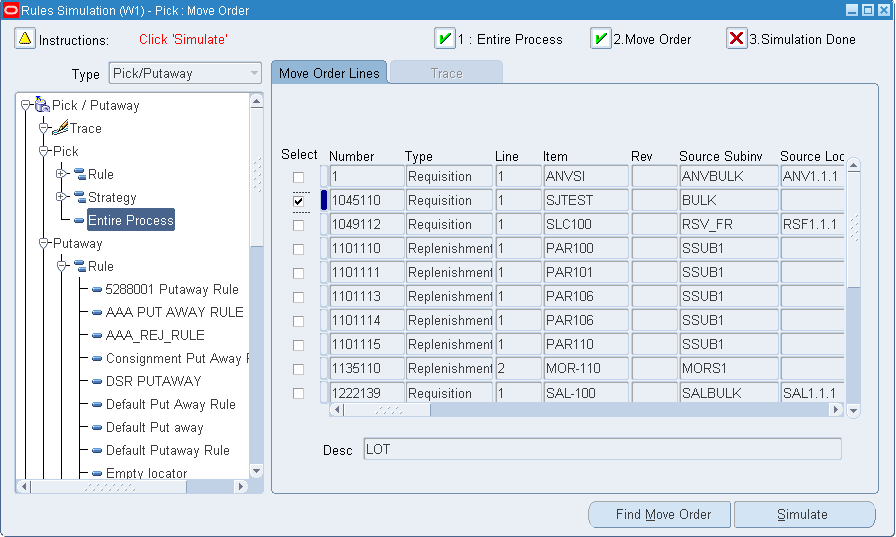
-
Select the simulation mode that you want to use by selecting the appropriate node on the tree. (Disabled rules or strategies cannot be simulated and are indicated on the tree with a different icon.)
-
Select Find Move Order. This will enable you to find all move orders that meet your selected criteria. (Only unallocated move orders are available.)
-
Select which move order, returned by the query criteria, should be simulated. (Only one move order can be simulated at a time.)
-
Select Simulate. This will begin the simulation process.
The output of your simulation is displayed on several tabs including:
-
Source loc, which displays where the material comes from
-
Destination loc, which displays where the material is put away to
-
Lot, which displays lot information if applicable
-
Serial, which displays serial information if applicable
-
Strategy assignments
-
The initial move order tab is still displayed so that you can switch to other move orders that you want to simulate. Or, if conditions have changed in the warehouse, you can select Simulate again to re-simulate the move order without having to reset the Simulator window. For example, these changes may include receiving additional material into the warehouse or changing the rule definition. Note that the data displayed on the move order tab is all the data that is included on the move order before any allocations have been made. This data will not be changed by the Simulator, and all suggestions provided by the rules engine must match the data already on the move order.
Note: The output on the Simulator is displayed in the same order that the rules engine allocated the material. There is a one-to-one relationship between the lines on the various tables. For example, if you are simulating a transfer and line 1 of the source locator tab is from locator A, quantity 100, then line 1 of the destination locator tab is for that entire quantity, and line 1 of the lot tab is for that material movement.
-
After a simulation has been successfully completed, trace details of the Rules Engine execution are available for further information on why specific material was excluded from consideration. The trace output provides this information in an easy-to-use format.
-
Complete a rule simulation.
-
Select the Trace Node at the top of the tree in the Rules Engine Simulator window.
-
The following explains the differences between a trace performed on a rule simulation, strategy simulation, and an entire process simulation:
-
If a rule was simulated, the tree will have only the rule in the tree, and that rule will be marked by a green check mark to indicate that it was used.
-
If a strategy was simulated, the tree will display the strategy and the rules under it. Any rules that were used for allocating the move order will be marked with a green check mark, while any rules for which material met the restrictions but was rejected for other reasons will be marked with a red “X”. Rules that returned no material, or which were not used at all are not marked with an icon.
-
If the entire process was simulated, the tree will display the Pick Selection criteria, Putaway Selection criteria, or both depending on the rule engine node simulated. If either the Pick Selection criteria or Putaway Selection criteria is selected, the Trace tab displays the assignment matrix from the Rules Workbench. If the selection in the assignment matrix is a strategy, the selection criteria node can be expanded to show all the rules within the strategy.
When a rule that was used by the simulation (as indicated by the check mark) is highlighted in the tree, the pre-suggestions used by the Rules Engine in making the allocation are displayed. Pre-suggestions are on-hand records that met the rule restrictions, but then must go through additional validation before they are actually confirmed as an allocation by the Rules Engine.
The set of checks is displayed in the Constraints section on the right-hand side, and the constraints are different for picking rules and putaway rules. Validations that pass are marked with a check mark, while validations that fail are marked with an “X”. Validations that are not applicable to the particular allocation are not marked at all. Highlight any pre-suggestion in the form to view the outcome from its validations. The pre-suggestions that pass the additional validations are marked as selected, and the suggested quantity is indicated in the row.
The following is a brief description of each of the validations used for picking rules:
-
Available Qty - All of the item that is on-hand in that locator has been allocated or reserved for other transactions.
-
Pick UOM - The rule has pick unit of measure enabled. When pick unit of measure is enabled, the system attempts to make a best fit of full units of measure. A full unit of measure could not be allocated of this material because there are not enough left to be allocated and a smaller unit of measure may make a better fit.
-
Consistency - The rule has one or more consistency requirements defined. All allocations using this rule must have some common attribute, as defined by the rule. There is not enough matching quantity available to make the allocation of this material.
-
Sort Criteria - The rule has pick unit-of-measure enabled. This material was not allocated because there is other material which is deemed better by the sort criteria defined in the rule. This material is displayed here because of the how pick unit of measure processing occurs internally.
-
Serial Num Used - The serial number has already been allocated to a different transaction. Because availability of particular serial numbers is not stored in the same way as availability of non serialized material, this verification must be made in addition to the availability check.
The following is a brief description of each of the validations used for picking rules:
-
Same Subinv & Locator - This subinventory and locator will not be considered because that is also the source of the material. For all move orders except pick wave move orders, the system will not suggest a putaway to the same locator from which the material was picked.
-
Material Status - Either the material status of the destination subinventory or locator disallows putaways, or the lot or serial status (if applicable) disallows putaways.
-
Comingle Cost Groups - The material being put away has one cost group while the destination has material of another cost group. There are no characteristics (revision, lot, serial, or license plate) which would differentiate these two groups of material. The system does not allow cost group commingling where the cost group cannot be identified by some physical characteristic.
-
Locator Capacity - The locator does not have sufficient capacity to hold the material being put away.
Messages similar to these descriptions are displayed in the comments region on the trace output. Note that the validation check will only fail if the entire quantity fails for that reason. If, for instance, the entire quantity of a pre-suggestion is not allocated because only some of it was available, the pre-suggestion will not be considered to have failed the “Available Qty” check.
Note: Material status check is not part of the trace output for a picking rule. The material status validation for picking rules is performed prior to generating the pre-suggestions, so that if material is not available to pick because of material status, then it will not even be displayed as a pre-suggestion. The material status check for put away, however, is performed after the pre-suggestions have been made.
-
The Rules Engine Simulator can be used to help fine-tune the rules setup during implementation. The Simulator is helpful for verifying how the Rules Engine behaves for each move order individually. However, a manager may wish to understand why the Rules Engine allocated a particular lot for picking or a particular locator for putaway after the move order has been allocated and potentially, even transacted. The Run-Time Rules Execution Trace feature provides the ability to view all the details the Rules Engine Simulator provides, at some point after a move order has been allocated.
Capturing the data required for run-time trace is expensive and thus should only be enabled when necessary. To enable the data capture, navigate to Help -> Diagnostics -> Preferences from the toolbar, verify the check box is enabled for Runtime Logging, and save the preferences. After debugging has been completed, disable the runtime logging through the same window so that performance is not unnecessarily reduced.
The trace data generated for picking and put away rules when the rules engine is invoked is provided by move order allocation of the following transactions:
-
Pick release of sales orders
-
Component pick release for WIP jobs
-
Directed put away of LPNs
-
Completion with drop from WIP jobs
-
Navigate to the Rules Engine Execution Trace window.
-
The Find Move Order Lines window will appear on top of the Rules Engine Execution Trace window. Find the move order that you want to trace.
Note: To find move orders, you can utilize the sales order number, item number, batch number, purchase order number, and so on.
-
The search criteria entered in the Find Move Order Lines window, batch number for example, may return multiple move orders. Select the move order that you want to trace.
Note: The Rules Engine Execution Trace window displays instructions that will help in utilizing this feature. You can follow these instruction throughout the trace process.
-
After you have selected the move order, select Suggestions.
-
Expand the Pick/Putaway node located as part of the tree on the left side of the window.
-
Expand the Trace node.
-
Depending on your particular trace, expend either the Pick Selection criteria or the Putaway Selection criteria node.
-
Select the check marked node.
-
Continue by selecting the check marked nodes that expand off of the tree.
-
You can now inspect the Pre-suggestions that the trace generated.
The information on the Trace tab displays pre-suggestions based on constraints defined in the rule. The constraints for the rule are also available on the Trace tab. The allocated space and quantity can be seen on the selected row in the Pre-Suggestions area of the Trace tab. Lot and serial information is shown on the Lot and Serial tabs. Detailed comments on why an allocation could not take place will be displayed in the Comments area of the Trace tab.
Additionally, move order lines can be purged after the trace output has been analyzed. All the data captured from the debugging is stored in several tables in the database. This data should be periodically purged, as data from move orders that are no longer required is not unnecessarily stored. The purge button can purge all move order trace data for a particular move order batch, or for all move orders allocated in a particular date range. Note that this purges only the trace data created when Runtime Logging is enabled; it does not purge the move order lines or move order allocations.
Summary of Rule Properties
The following table provides a summary of the properties associated with each rule type.
| Prop | Pick | Put Away | Cst Grp | Task | Label | Op. Plan |
|---|---|---|---|---|---|---|
| Uses restrictions | Yes | Yes | Yes | Yes | Yes | Yes |
| Uses sort criteria | Yes | Yes | No | No | No | No |
| Uses consistency restrictions | Yes | No | No | No | No | No |
| Has a return value | No | No | Yes | Yes | Yes | Yes |
| Assigned to a strategy | Yes | Yes | Yes | No | No | No |
| Assigned a weight, but no strategy | No | No | No | Yes | Yes | Yes |
| Uses the quantity function | Available quantity | Available capacity | Not applicable | Not applicable | Not applicable | Not applicable |
| Allows partial quantities | Yes | Yes | No | No | No | No |
| Uses effective dates | Yes | Yes | Yes | No | No | No |
| Use Allocation Mode | Yes | No | No | No | No | No |
Related Topics