Oracle Warehouse Management Reports
This chapter covers the following topics:
- Overview of Reports
- Material Status Change History Report
- Material Status Where Used Report
- Cycle Count Reports
- ASN Discrepancy Report
- Consolidation Report
- Space Utilization Report
- Scheduled Shipment Report (Without Barcodes)
- Concurrent Requests
- Allocate Replenishment Move Order
- Archiving Tasks
- Create Mining Models
- Create Custom Mining Models
- Pull Replenishment
- Purge WMS History Tables
- Generate LPN
- WMS Bulk Task Generation
- Generate Bulk Tasks for WIP Jobs
- Generate Inbound Dispatching Tasks
- Push Replenishment
- Schedule Cycle Count
- Synchronize Dock Doors with Transportation Management
- Un-Archive WMS Tasks
- Launch Task Release Concurrent Request
- Wave Planning - Catch Exceptions Concurrent Request
- Wave Planning Initiate Process Concurrent Request
- Wave Planning Plan Wave Concurrent Request
- Wave Planning Release Wave
- Wave Planning - Track Completion Status
Overview of Reports
Oracle Warehouse Management provides you with reports, intended for different business needs. Detailed information on submitting and analyzing Oracle Warehouse Management reports is provided in the following topics:
Material Status Change History Report
Material Status Change History Report provides a history of every material status change that has occurred on a given serial, lot, locator, or subinventory. If no lot number is entered, but a lot controlled item is entered on the report parameters, then the history of all lots of that item will be included on the report. Similarly, if no serial number is entered, but the serial controlled item is entered on the report parameters, then the history of all serials of that item will be included on the report.
Report Submission
Navigate to the Submit Request window and enter, or select from the list of values, Material Status Change History Report in the Name field.
Report Parameters
-
Organization Code
-
Subinventory Code
-
Locators From and To
-
Item (Lot Controlled)
-
Lot Number
-
Item (Serial Controlled)
-
Serial Number
-
Date From and To
Material Status Where Used Report
Material Status Where Used Report provides a detailed list of serials, lots, locators, and subinventories that have been assigned a particular material status.
Report Submission
Navigate to the Submit Request window and enter, or select from the list of values, Material Status Where Used Report in the Name field.
Report Parameters
-
Organization
-
Material Status From and To
-
Search in Subinventories
-
Search in Locators
-
Search in Lots
-
Search in Serials
Cycle Count Reports
Cycle Count Listings
The Cycle Count Listing report shows all of the scheduled requests for a specified time period. This report includes both manually and automatically scheduled items.
Report Submission
Use the ABC and Counting Reports or Submit Requests window and enter Cycle count listing in the Name field to submit the listing.
Report Parameters
Cycle Count Name
-
Select a cycle count name.
The report shows cycle count items included in this cycle count.
Start/End Date
-
Enter a starting and/or ending date to restrict the report to a range of schedule dates.
Include Recounts Only
-
Select Yes or No to indicate whether to print recounts only.
Subinventory
-
Select a subinventory to restrict the report to a single subinventory.
Display Serial Numbers
-
Select Yes or No to indicate whether the report will include serial numbers for the items listed.
Cycle Count Pending Approval
The Cycle Count Pending Approval report shows those counts that were entered and are currently pending approval. The supervisor or manager with the authority to approve cycle count adjustments would typically run this report to monitor the approval queue.
Report Submission
Use the ABC and Counting Reports or Submit Requests window and enter Cycle counts pending approval report in the Name field to submit the report.
Report Parameters
Cycle Count Name
-
Select a cycle count name.
The report shows cycle count items included in this cycle count.
Sort Option
-
Select one of the following options:
-
By Item
Sort the report by subinventory and then by item within the subinventory.
-
By Locator
Sort the report by subinventory, then by locator within the subinventory, and then by item within the locator.
-
Display Serial Numbers
-
Select Yes or No to indicate whether the report will include serial numbers for the items listed.
Cycle Count Entries and Adjustments
The Cycle Count Entries and Adjustments report shows all cycle count entries for a specified time period. It analyzes the number of cycle counts transactions that you make against an item, and the number of units that you actually adjust. This report also calculates the value, in your functional currency, of the adjustments to inventory.
Report Submission
Use the ABC and Counting Reports or Submit Requests window and enter Cycle count entries and adjustments report in the Name field to submit the report.
Report Parameters
Cycle Count Name
-
Select a cycle count name.
The report shows cycle count items included in this cycle count.
Subinventory
-
Select a subinventory to restrict the report to a single subinventory.
Start/End Date
-
Enter a beginning and/or ending transaction date to restrict the report to a range of cycle count transaction dates.
Display Serial Numbers
-
Select Yes or No to indicate whether the report will include serial numbers for the items listed.
Cycle Count Hit/Miss Analysis
The Cycle Count Hit/Miss Analysis report shows, for each cycle count class, the total number of count entries and the number of counts outside the limits of the user-specified hit/miss tolerances. The report also calculates the overall accuracy percentage, broken down by cycle count class and subinventory. This report is based on the first count only, not recounts.
Report Submission
Use the ABC and Counting Reports or Submit Requests window and enter Cycle count hit/miss analysis in the Name field to submit the report.
Report Parameters
Cycle Count Name
-
Select a cycle count name.
The report shows cycle count hit/miss analysis associated with this cycle count name.
Start/End Date
-
Enter a starting and/or ending date to restrict the report to a range of dates.
ASN Discrepancy Report
The ASN discrepancy report enables users of Oracle Warehouse Management to generate a report that details any discrepancies between the material information that a supplier sent on their ASN, and the material information that was collected at the time of actual receipt. The ASN Discrepancy Report is only valid for material that was not received through an Express Receipt, but through a Confirmed Receipt instead.
At the time of Confirmed receipt, you can enter different LPNs, Items, Quantities, Lots and Serials than what was shipped on the ASN. This report enables you to see the difference between the expected information and the actual information. The report also enables you to specify what types of discrepancies to report on and other parameters to control the behavior of the report.
Report Submission
Log into the application and navigate to the Submit Request window. In the Name field, enter, or select from the list of values, Oracle Warehouse Management ASN Discrepancy Report.
Report Parameters
Organization
-
The organization for which Oracle Warehouse Management ASN Discrepancy Report will be executed.
Shipment Num
-
The shipment number to query for ASN Confirm Receipts.
Item
-
The item number to query for ASN Confirm Receipts.
From Date
-
The earliest date ASN receipts should be searched for ASN Confirm Receipts.
To Date
-
The latest date ASN receipts should be searched for ASN Confirm Receipts.
Supplier
-
The supplier that should be searched for.
Supplier Site
-
The supplier site that should be searched for.
Check LPN
-
Include expected and received LPNs on the report.
Check Revision
-
Include expected and received revisions on the report.
Check Lot Number
-
Include expected and received lot numbers on the report.
Check Serial Number
-
Include expected and received serial numbers on the report.
Show Only Discrepancies
-
Display all ASN Confirm Receipts that met the selection criteria, or display only those that had discrepancies.
Consolidation Report
A consolidation report is available to help direct manual consolidation based on sales order, delivery, or trip. This report displays all staged LPNs for a given sales order, delivery, or trip.
Report Submission
Use the following instructions to run the Consolidation Report.
-
Navigate to the Submit Request window.
-
Enter, or select from the list of values, Consolidation Report in the Name field.
-
In the Parameters window, enter, or select from the list of values, the organization that you want to run the report against.
-
Enter one of the criteria in the Parameters window and submit your request.
Note: Only one of the following criteria should be entered per request: Trip, Delivery, Sales Order Type and Sales Order Number, and Customer Name. While the report supports entering any combination of criteria, the report will only include LPNs that meet all the criteria. Therefore, entering multiple criteria will likely not return data.
Report Parameters
The Consolidation Report parameters include the following:
Organization
-
The organization that you want to run the report against.
Trip
-
The trip for which staged LPNs should be included.
Delivery
-
The delivery for which staged LPNs should be included.
Sales Order Type and Sales Order Number
-
The sales order for which staged LPNs should be included.
Customer Name
-
The customer for which staged LPNs should be included.
Check LPN Multiple Association
-
Include additional data on whether the LPNs have been staged for other sales orders, deliveries, and trips in addition to that which has been queried.
The Consolidation Report displays the following fields:
-
Trip Number
-
Delivery Number
-
Sales Order Number
-
All LPNs that belong to the search criteria
-
Current location (subinventory and locator)
-
Items (Item Number)
-
Unit of measure (UOM)
-
Quantity in the primary UOM (Qty)
-
Secondary unit of measure
-
Quantity in the secondary UOM.
-
A flag which lets the user know whether the LPN contains items that either belong to multiple sales orders, multiple deliveries, or multiple trip stops
-
Trip Stop Location (if a trip exists)
-
Status of the delivery detail (Staged, Released to Warehouse, and so on)
Note: It is only possible for LPNs to be staged for multiple sales orders, deliveries, or trips if bulk picking has been used. Therefore, if bulk picking is not used in the organization, the output will be easier to read and also will complete faster if this option is disabled.
Space Utilization Report
The Warehouse Space Utilization report provides a current snapshot of the capacity and percentage fill of a location in the warehouse. Querying by percentage of space used will show all the locators below or above a certain percentage. It can also be used to find empty locators. The percentage usage can be queried by units, volume, and weight.
Distribution managers may use this information to create replenishment transactions, run the min-max report, or analyze item locator storage relationships.
Report Submission
Log into the application and navigate to the Submit Request window. In the Name field, enter, or select from the list of values, Warehouse Space Utilization Report.
Report Parameters
-
Organization
-
Subinventory
-
Locator
-
Detail Level: Subinventory or Locator
-
Weight Fill %
-
Weight Operator: <, =, >
-
Output Weight UOM
-
Volume Fill %
-
Volume Operator: <, =, >
-
Output Volume UOM
-
% Utilization by Units
-
Units Operator: <, =, >
-
Order By: Subinventory, Locator, Travel Sequence
-
Include Non Convertable Stock: Yes/No
The Space Utilization report displays the following information:
-
Subinventory
-
Detail Level Quantity Unpacked
-
Detail Level Quantity Packed
-
Total On-Hand Quantity for Detail Level
-
Locator (if the detail level is locator)
-
Detail Level Weight (UOM)
-
Detail Level Weight Fill %
-
Detail Level Volume (UOM)
-
Detail Level Volume Fill %
Scheduled Shipment Report (Without Barcodes)
The direct ship process is facilitated by the Scheduled Shipment report. The Scheduled Shipment report displays sales order lines that meet certain user-defined criteria and are ready to be shipped. The report includes details of the sales order line, delivery, and trip stop. The report also displays several additional fields specific to the customer's manufacturing line: customer production line, customer production sequence, customer dock code, customer job, and customer model serial.
Report Submission
Log into the application and navigate to the Submit Request window. In the Name field, enter, or select from the list of values, Scheduled Shipment Report or Scheduled Shipment Report without Barcodes.
Report Parameters
-
Organization
-
Customer
-
Sales Order Type
-
Sales Order Number
-
Sales Order Line Number
-
Schedule Date From
-
Schedule Date To
-
Requested Date From
-
Requested Date To
-
Delivery
-
Trip
-
Project
-
Task
-
Print Prior Reservations Only
-
Print Customer Production Details
The Scheduled Shipment report displays the following fields:
-
Trip
-
Delivery
-
Ship To
-
Intermediate Ship to Location
-
Schedule Shipment Date
-
Requested Date
-
Barcode
-
Sales Order
-
Order Line No
-
Item, Revision, Description, UOM, and Secondary UOM
-
Ship Set
-
Requested Quantity
-
Secondary Requested Quantity
-
Reserved Quantity
-
Secondary Reserved Quantity
-
Shipment Tolerance Above and Below
-
Project
-
Task
-
LPN
-
Customer Production Sequence
-
Customer Production Line
-
Customer Dock Code
-
Customer Job
-
Customer Model Serial
Concurrent Requests
You can also run concurrent requests within Oracle Warehouse Management. Concurrent requests are similar to reports in that you must submit a request for the process to run. You can run the following concurrent requests.
Allocate Replenishment Move Order
This concurrent program can be scheduled to run periodically to allocate the move orders created. This program reviews the locators of destination subinventories for the open replenishment move orders (not only those that are part of WMS_REPLENISMENT_DETAILS table but all open replenishment move orders) to see if any capacity becomes available in those locators.
If the available capacity at the destination locator is more than the single unit Pick UOM quantity of the corresponding source subinventory, then the allocation process for the move order is triggered. If multiple replenishment move orders are eligible to be allocated, then those replenishment move orders with the highest priority for the associated demand orders lines are consumed first.
-
Navigate to the Submit Request window.
-
Select Allocate Replenishment Move Order.
-
In the Parameters window, select a Quantity Function that determines how the capacity is to be allocated (for example, by volume or weight).
Archiving Tasks
You can use the Archive WMS Tasks concurrent request to archive tasks. For inbound tasks tied to an operation plan, you can archive only tasks that belong to a completed or aborted operation plan. You cannot archive an in-progress plan. For other task types not associated with an operation plan, you can archive any completed task.
-
Navigate to the Submit Requests window.
-
Select Archive WMS Tasks as the request type.
-
Enter the following parameters:
-
Organization Code
-
Past Exempt Days
-
Archive Batches
-
-
Submit the request.
Create Mining Models
Use the concurrent program Create Mining Models to create Mining Models based on the predefined data set. The mining model that is created will be entered into the database table WMS_MINING_MODELS. As and when required the models can be recreated using this concurrent program.
Run the concurrent program Create Mining Models from the Warehouse Manager responsibility. Enter the parameter Organization Code. This program creates mining models based on the CLASSIFICATION mining function.
For more information about this concurrent program, see Pick Verification Using Machine Learning.
For more information about creating, evaluating, and querying data mining models, see DBMS_Data_Mining, Oracle Database PL/SQL Packages and Types Reference.
Create Custom Mining Models
Use the concurrent program Create Custom Mining Models to define logic and create data sets based on business requirements. Run the concurrent program Create Custom Mining Models from the Warehouse Manager responsibility.
Enter the following parameters:
-
Organization Code: The organization code for which the model needs to be created.
-
Model Name: The prefix for the model name. The final model name contains the algorithm name and organization code suffixed to it.
-
Mining Function: By default, the mining function is set to CLASSIFICATION.
-
Training Table Name: The training table name or training view name to train the model. Ensure that the training view or table contains the columns TRANSACTION_TEMP_ID and PICK_VERIFICATION_NEEDED.
-
Algorithm Name: Select the algorithm from the list of values, SVM, DT, NB, or GLM. If the algorithm name is provided, then a model will be created for the specific algorithm. Otherwise, models will be created for all the algorithms.
-
Settings Table Name: The name with which you want to create the model. If you do not enter the settings table name, then the application uses predefined lookups.
-
Target Table Name: The task is evaluated for pick verification from this target table or view name. Ensure that the target table structure is same as the training table structure. Data must be present in the target table before the concurrent program Pregenerate Pick Verification Suggestions is launched.
For more information, see Pick Verification Using Machine Learning.
Pull Replenishment
You can use the Pull Replenishment concurrent request to restart the dynamic replenishment process if it fails. The Pull Replenishment concurrent request creates a replenishment move order that is generated after the pick release process. It contains the following parameters:
-
Batch ID: The pick release batch ID
-
Organization: The current organization
-
Plan Tasks: The system uses the warehouse control board to plan the replenishment tasks
-
Release Rule: The release rule to use to generate the replenishment move order
Purge WMS History Tables
To prevent the history tables from growing too large, run the Purge WMS History Tables concurrent request to purge the device, LPN record, and label history tables in Oracle Warehouse Management. You have the option to specify how often this concurrent request runs and request up to which day should be removed. The request takes a value of days as a parameter and deletes any requests that are older than the number of days entered.
-
Navigate to the Purge WMS History Tables concurrent request.
-
Enter the following parameters:
-
Purge Date
-
Purge Name
-
Purge Age (in days)
-
Purge Type (Device, LPN Label, EPC, or Wave)
-
-
Submit the request.
Generate LPN
Use the Generate LPN concurrent program to generate LPNs based on client-specific LPN parameters.
To generate LPN
-
Navigate to the Submit Request window.
-
Select Generate LPN as the request type.
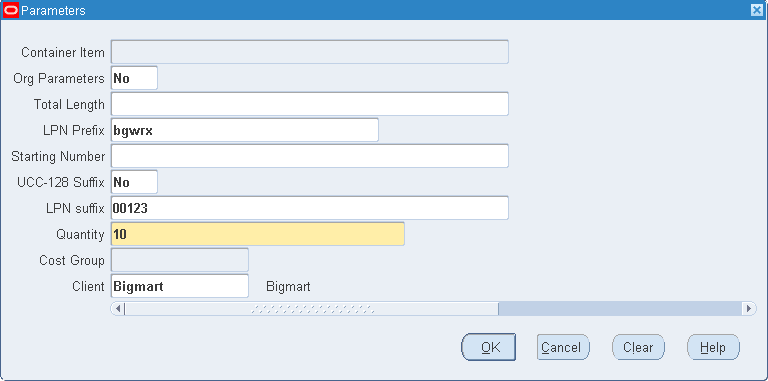
-
Enter the following parameters as desired:
-
Org Parameters: Select No or Yes.
Note: If you select Yes, only the Quantity and Client fields are enabled.
-
Total Length: Defines total length of characters for the LPN.
-
LPN Prefix
-
Starting Number
-
UCC-128 Suffix
-
LPN Suffix
-
Quantity (mandatory field)
-
Cost Group
-
Client: Select the client for which you want to generate LPNs.
-
WMS Bulk Task Generation
Use this concurrent program to create bulk tasks for pick waves. This program is ideal for small pick release batch sizes. The program will first examine the input parameter criteria, which is also the restriction criteria for bulk picking.
Restrictions:
-
The material status must be unreleased.
-
The material should not be released with a status of order picking.
-
The material should not be cartonized.
Steps to submit the concurrent program are as follows:
-
Navigate to the submit requests window.
-
Select WMS Bulk Task Generation as the request type.
-
Enter the following parameters:
-
Organization - Select any Oracle Warehouse Management enabled organization from where the units of work will be grouped together.
-
Move Order (From) / Move Order (To) - Specify a from and to move order number. The move order number corresponds to the batch number for pick release.
-
Pick Release Date (From) / Pick Release Date (To) - Specify the date range of when the material was pick released. You may want to request that all orders that were pick released today can be grouped into a batch.
-
Pick From Subinventory - This is the subinventory from where the material is allocated. If you specify a subinventory, then only material allocated from that subinventory is examined for bulk picking.
-
Item - If filled in, then only this item will be examined by the bulk picking grouping logic.
-
Delivery - This restricts the delivery that is examined for grouping.
-
Trip - This restricts the trip that is examined for grouping. The trip and delivery are independent variables as part of this report.
-
Only bulk enabled items / subinventories - If you select Yes, then only items and subinventories that are bulk pick enabled will be the contenders for bulk task generation. If you select No, then all items and subinventories are possible targets.
-
-
Submit the request.
Generate Bulk Tasks for WIP Jobs
Use this concurrent program to create bulk tasks for discrete WIP work orders. The application groups all lines that are allocated the same component from the same location into a single large task, so that the operator can pick multiple WIP Jobs in a single step and then deconsolidate them while dropping the tasks. This concurrent program can create bulk tasks for both the PJM -enabled and non PJM-enabled organizations.
Restrictions:
-
The material status must be unreleased.
-
The material should not be released with a status of order picking.
-
The material should not be cartonized.
-
WIP component bulk picking is not applicable to lot and serial controlled items.
The parameters for this concurrent program are the same as the parameters for the concurrent program WMS Bulk Task Generation. Few additional parameters in the concurrent program Generate Bulk Tasks for WIP Jobs are as follows:
-
Work Order From and Work Order To: Select from and to open work orders that are pick released.
-
Project: Select a project for the selected PJM organization.
-
Task: Select a task that belongs to the project.
Generate Inbound Dispatching Tasks
You can use Generate Inbound Dispatching Tasks to create parent inbound tasks for received LPNs. This program assigns the task for all the LPNs in receipt based on the putaway task type assignment rule.
-
Navigate to the Submit Requests window.
-
Select Generate Inbound Dispatching Tasks as the name.
-
Select a value for the Organization parameter. This will generate dispatching for all the inbound tasks that belong to the selected organization.
Push Replenishment
The Push Replenishment concurrent request determines the net replenishment quantity and creates replenishment move orders. It contains the following parameters:
-
Organization-Warehouse Organization to run Push Replenishment
-
Item- Item for filtering demand
-
ABC Compile Group- ABC compile group
-
Item Classification- Item classification based on ABC compile
-
Sales Order Type- Type of sales order
-
Customer Class- Customer class for customer referred on the sales order
-
Customer- Customer listed on the sales order
-
Carrier- Carrier listed on the sales order
-
Ship Method- Ship method listed on the sales order
-
Days to Scheduled Ship Date- Specified in days for example, +3 days
-
Days from Scheduled Ship Date- Specified in days for example, -3 days
-
Forward Pick Subinventory- The destination subinventory for push replenishment
-
Replenishment UOM- The UOM used to calculate replenishment demand
-
Replenishment Lot Size- Rounding quantity for replenishment. The system automatically rounds up to the next lot size.
-
Minimum Order Lines Threshold- The minimum order of sales order lines needed for replenishment to occur
-
Minimum Threshold for Replenishment-Net demand required to generate replenishment
-
Max Number of Items Considered- The number of items considered for replenishment. If you set this number, then only the top items considered based on sort criteria will be considered for replenishment.
-
Sort Criteria- Total Demand Quantity and Number of Order Lines
-
Release Sequence Rule- The LOV allows you to select a release sequence rule.
-
Create Reservation-The Yes and No options lets you decide whether to create reservations during push replenishment.
-
Auto Allocate- The system allocates the replenishment move orders
-
Plan Tasks- The system uses the warehouse control board to plan the replenishment tasks
Schedule Cycle Count
You can use the Schedule Cycle Count to schedule and generate cycle counts for a zone.
-
Navigate to the submit requests window.
-
Select Schedule Cycle Count as the Name.
-
Enter the following parameters:
-
Organization
-
Zone
-
Cycle Count Header: this LOV displays the cycle count headers that belong to the selected Zone parameter and the cycle count headers defined for all the subinventories
-
Item: this LOV displays the items that are available for the selected Cycle Count Header parameter
-
Synchronize Dock Doors with Transportation Management
The Synchronize Dock Doors with Transportation Management concurrent program sends all the selected dock doors and their corresponding location information from Oracle Warehouse Management to Oracle Transportation Management.
-
From the Warehouse Manager responsibility, select Outbound Logistics, then select Synchronize Dock Doors with OTM.
-
Enter the parameters such as the Organization and update dates.
-
Click Submit to run the concurrent request to synchronize the dock doors.
-
After you run the concurrent program, verify that it has completed successfully by reviewing its status in the Requests window.
-
After the dock door information is synchronized, you can view the dock doors in Oracle Transportation Management when viewing or setting up appointments (typically in the Manage Appointments page).
Un-Archive WMS Tasks
You can un-archive Oracle Warehouse Management tasks and return them to the Oracle Warehouse Management history tables. To un-archive Oracle Warehouse Management tasks
-
Navigate to the Submit Requests window.
-
Select Un-Archive WMS Tasks as the Request Type.
-
Enter the following parameters:
-
From Date
-
To Date
-
Organization Code
-
Un-Archive Batches
-
-
Submit the request.
Launch Task Release Concurrent Request
In the Task Release Setup window, you can create one or more templates that define default options for releasing tasks. To run the task release process, select the desired template in the Launch Task Release concurrent request window, then run the request. When the request runs, the tasks are released according to the conditions defined in the selected template.
Note: You can create or modify task release conditions for a template on the Task Release Setup window. You can create one or more templates.
Cartonization at Task Release
The Launch Task Release concurrent request can perform cartonization across pick release batches based on the cartonization options defined in the Organization Parameters window on the Warehouse tab. Cartonization eliminates suboptimal packing configurations by evaluating grouping rules, carton weight capacity, carton volume, and the dimensions of the items to be packed and suggesting the optimal cartonization options based on the cartons' dimensions.
Warning: This concurrent program Launch Task Release supports only the releases for outbound tasks but not the release of manufacturing (MFG) tasks; therefore, manufacturing tasks will not cartonize through this concurrent program.
To run the task release concurrent request
-
Navigate to the Launch Task Release window.
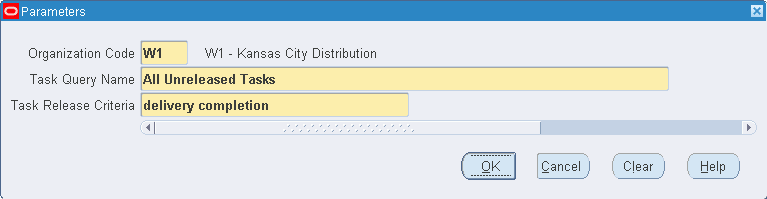
-
Enter the following parameters:
-
Organization Code: Select the organization.
-
Task Query Name: Select the status of the tasks to be released such as completed, pending, uncompleted, or unreleased.
-
Task Release Criteria: Select an existing template with the desired task release criteria.
-
This concurrent program Launch Task Release does not support manufacturing (MFG) task releasing, only the releases for outbound tasks (the manufacturing tasks will not cartonize). Similarly, the release options on the Task Release Setup window are mainly for outbound tasks too.
Related Topics
Setting Up Task Release Options
Oracle Warehouse Management Implementation Guide, Warehouse Organization Setup
Wave Planning - Catch Exceptions Concurrent Request
The Wave Planning - Catch Exceptions concurrent request scans waves and logs exceptions based on the entity, progress, and threshold specified. You can create exceptions during any stage of the picking process; the system prioritizes the exceptions based on the following hierarchy:
-
Dock door appointment.
-
Scheduled ship date.
-
Excepted ship date (if neither a dock door appointment or scheduled ship date exists).
Optionally, you can take specific corrective measures. For example, you could create an exception that logs a severe exception if a wave is not 95% picked ten hours before a dock door appointment. You can choose to take corrective measures within the concurrent request, or later using the Wave Workbench window.
Submission
Navigate to the Wave Planning - Catch Exceptions window and, after verifying the correctness of the parameters data, click OK. Then run the request by clicking the Submit button in the Submit Request window.
Parameters

-
Organization Code: Select the organization.
-
Wave Number: Optionally, select a wave number.
-
Entity: Select the entity to base the exception on such as a delivery, order, order line, trip, or wave.
-
Progress Stage: Select the stage during the wave's progress when exceptions should be logged; for example, to log exceptions at the picking stage, select Picked.
-
Completing Threshold: Select the completion threshold value (from 0-100) to provide a margin of tolerance before an exception is logged.
-
Low/High Threshold (Hrs): Enter the threshold tolerance values in hours to provide a margin of time before an exception is logged.
-
Take Corrective Measures: Select whether you want the system to take corrective action when an exception is encountered.
Wave Planning Initiate Process Concurrent Request
Use this concurrent request to create, plan, and release a wave based on the conditions specified on the wave template (you must have already created a wave template). You can schedule the wave manually with a template.
Submission
Select the Wave Planning Initiate Process concurrent request, then run the request by clicking the Submit button in the Submit Request window.
Parameters

-
Wave Template Name: Select a template name.
-
Wave Number: Optionally, select a wave number to initiate wave planning for a specific wave.
-
Organization Code: Select the organization.
Wave Planning Plan Wave Concurrent Request
Use this concurrent request to plan the wave for fulfillment and labor requirements based on a specific template name. You can run this request either by clicking the Plan Concurrently button in the Plan Wave window or running the concurrent request from the Submit Request window.
Submission
Select the Wave Planning Plan Wave request, then run the request by clicking the Submit button in the Submit Request window.
Parameters
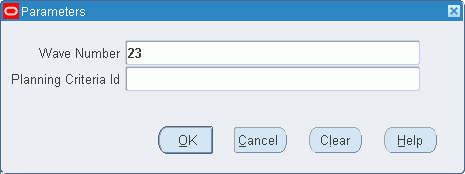
-
Wave Number: Select the wave to be planned.
-
Planning Criteria Id: Select the planning criteria for the wave by selecting an existing template.
Wave Planning Release Wave
Submission
Select the Wave Planning Release Wave concurrent request, then run the request by clicking the Submit button in the Submit Request window.
Parameters
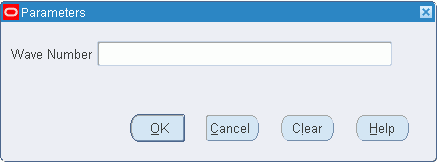
Wave Number: Select the wave number to be released.
Wave Planning - Track Completion Status
You must schedule the concurrent request Wave Planning - Track Completion Status to update the wave status to Completed and update the actual fill rate of the wave lines. These actions can be accomplished only by using this concurrent request.
Submission
Select the Wave Planning - Track Completion Status concurrent request, then run the request by clicking the Submit button in the Submit Request window. Alternatively, click the Schedule button on the Submit Request page to set up a schedule for running the concurrent request.
Parameters
There are no parameters to select for this concurrent request.