Setting Up Inbound Product Data Synchronization and Data Quality Management
This chapter covers the following topics:
Setup Overview of Inbound Product Data Synchronization
Oracle Product Hub uses the Import Workbench to bring product data from disparate systems into a master product information repository, known as the Product Information Management Data Hub (PIMDH).
While importing data into a centralized data model, the Import Workbench identifies and resolves duplicates and errors while at the same time enriching existing data with external information. This process creates a blended record, known as the single source of truth. You can then create business reports and other documents related to the updates.
In order to import data from an external source system, you must define a source system for each data source and create match rules to help match imported data to existing data in the product information repository.
Related Topics
Overview of Inbound Product Data Synchronization and Data Quality Management, Oracle Product Hub User's Guide
Creating Match Rules
A match rule defines matching criteria in order to find matches between the incoming external (source system) items and Oracle Product Information Management Data Hub (PIMDH) items. Create match rules at the item catalog level.
After uploading the records into the interface table, PIMDH determines if cross-references for items exist in the production table. If the source system item matches a PIMDH item name, the system confirms the match. At the source system batch level, users can define the default matching rule and choose whether to run the matching rule automatically upon data upload. If you choose to run the matching rule automatically, then a concurrent request launches to find a match using the default matching rule for all unconfirmed records. Alternatively, you can select a match rule and launch the concurrent request to find a match for all unconfirmed items. You can run different matching rules against each batch one at a time while searching to match batch items to the appropriate PIMDH items. The matching process only applies to unconfirmed items. You cannot make changes to the batch while the matching concurrent request executes. The system searches to match source system items against all PIMDH items, including unapproved items.
To create a match rule for an item catalog
-
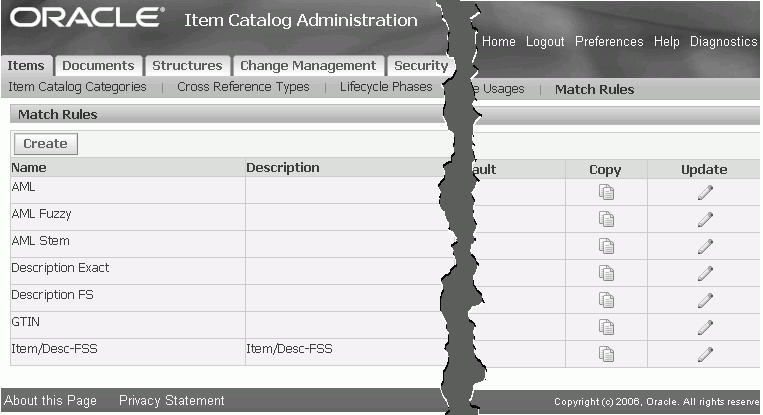
Navigate to the Setup Workbench. From the Items tab, click the Match Rules sub-tab. Click Create.
-
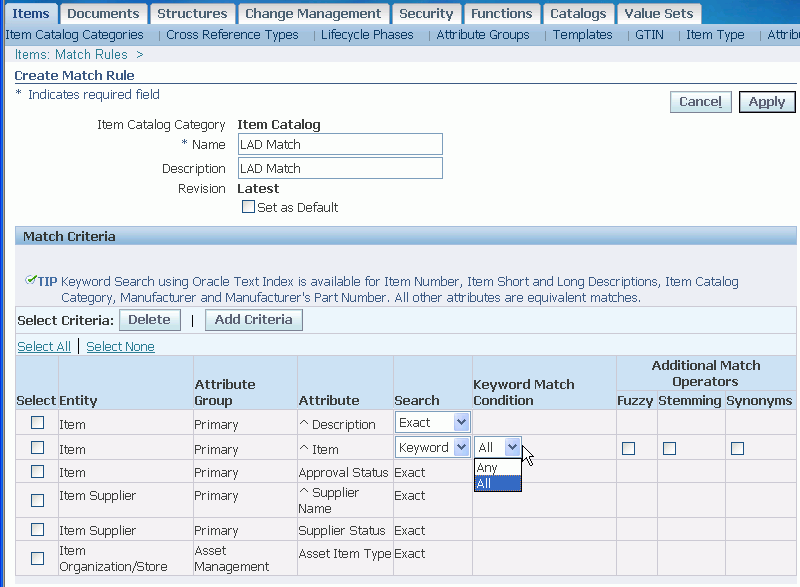
Name the match rule and provide a Description. Check Set as Default to have this match rule automatically appear as the default item catalog match rule for source systems. Optionally, you can select another default match rule when defining a source system.
-
Click Add Criteria.
-
Find and select the item attributes for which you want to add criteria using either the Attribute Name, Business Entity, or Attribute Group field. Click Apply.
Choose from the following business entities:
-
Item
-
Item Organization/Store
-
Item Revision
-
Item Supplier
Tip: You can match the following attributes by keywords, using fuzzy, stemming, and synonym searches:
-
item
-
item description
-
item long description
-
item catalog category
-
manufacturer
-
manufacturer part number
-
supplier
-
supplier part number
All other attributes must match exactly. To use synonym searches, you must load a thesaurus into the database and set the site level EGO: Thesaurus for Matching profile option to Yes.
-
-
Once you have added all of the criteria, click Apply.
To optionally create a match rule for an item catalog category
After defining match rules at the item catalog level, you can optionally create additional match rules for individual item catalog categories.
-
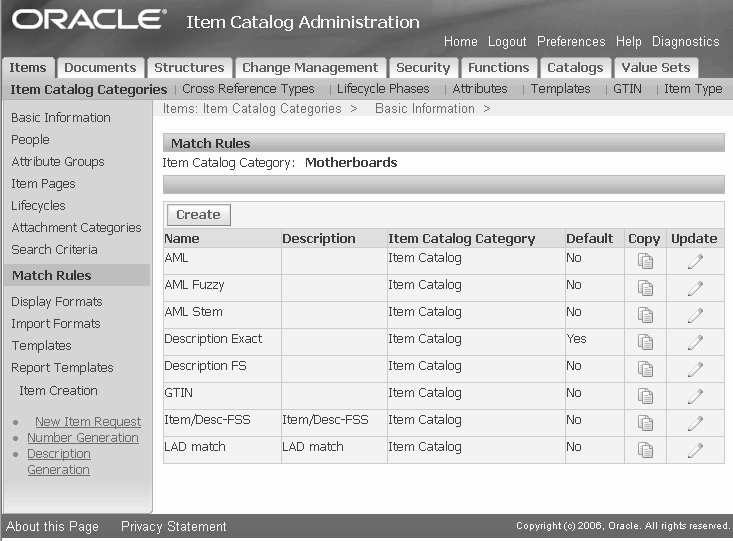
Navigate to the Setup Workbench. Click the Item Catalog Categories tab. Search for the item catalog category, then click an item catalog category name link.
-
Select Match Rules from the list of options under the Item Catalog Categories sub-tab. From here, follow the same procedure to create match rules for the item catalog category as you did to create match rules for an item catalog.
Note: The item catalog match rules are listed along with the item catalog category match rules, but you cannot update them from within the item catalog category.
Related Topics
Overview of Inbound Product Data Synchronization and Data Quality Management, Oracle Product Hub User's Guide
Defining Source Systems
When importing data from a source other than Oracle Product Information Management Data Hub (PIMDH), you must create a source system within Import Workbench.
To define a source system
-
Navigate to the Import Workbench and select the Source System Setup tab.
-
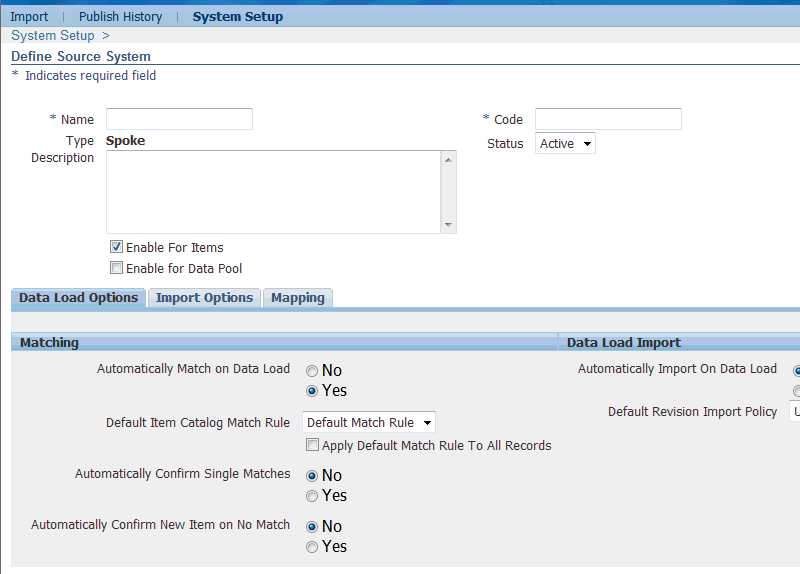
Click Define Source System to create a new source system.
-
Alternatively, you can search for and view any existing source system item that is enabled only for customer items. Enable it for items.
-
On the Define Source System page, enter the following for the source system:
-
a unique name
-
a unique code
Note: The code can be alphanumeric, but must not contain any spaces. Ensure that the code matches the System Code defined on the System Setup page within the corresponding Oracle Application Integration Architecture (AIA).
Select the Enable For Items check box if you plan to use this source system for item-related data.
Additional Information: Oracle Product Hub uses the same architecture as Oracle Customer Data Hub. The Enable For Items check box communicates that you plan to enter item-related data. You can always uncheck this box at a later time.
Select the Enable for Data Pool check box if the source system is a GDSN data pool. The system can perform certain tasks for GDSN batches, such as:
-
using a group ID to process an entire item hierarchy
-
automatically sending a message to the data pool once data is imported
-
enabling you to send messages to the data pool as needed
Additional Information: You can specify a GDSN-enabled source system for both GDSN and non-GDSN batches. However, you cannot specify a non-GDSN source system for a GDSN batch.
-
-
On the Define Source System page, Click the Data Load Options sub-tab.
-
Select Yes by Automatically Match on Data Load if you want to run match rules.
Tip: If you want to load data from a source system and manually inspect it before running match rules, then select No.
-
If you are using match rules, then select a Default Item Catalog Match Rule from the list.
-
Determine whether to check or uncheck Apply Default Match Rule To All Records.
-
Uncheck - The system applies the default item catalog category-level match rule to unconfirmed items with an assigned item catalog category. The system assigns the item catalog level match rule for items with no item catalog category.
Check - The system applies the default item catalog-level match rule to all unconfirmed items.
-
-
Select Yes if you want to Automatically Confirm Single Matches that you find when running match rules for the entire batch. If you select No, then the system tries to match all unconfirmed records using the default match rule.
-
Select Yes if you want to Automatically Confirm New Item on No Match. When you run match rules for the entire batch, this option enables you to automatically confirm an item with no matches as a new item. If you select No, then you must manually move any unmatched items from the Unconfirmed tab to the Confirmed tab, where they are marked with the match status of New.
Note: If the Item Number and Description are not provided, the Source System Item Reference and Description will be used as the Item Number and Description by default.
-
Select the appropriate Import option:
-
Immediately on data load - automatically updates the Oracle Item Master table with matched data.
-
Schedule Data and Time - select the date and time to import the confirmed items or structures in the batch.
-
None - leaves the data in the Import Workbench. You can manually import the data at a later time.
-
-
Select the appropriate Default Revision Import Policy:
-
Create New - creates a new version of the item.
-
Update Latest - updates the latest item revision upon import.
-
-
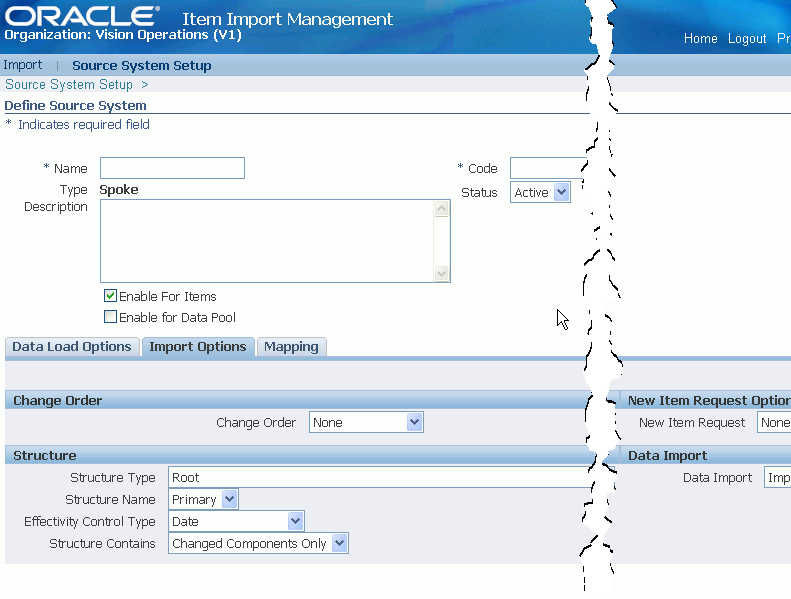
Click the Import Options sub-tab.
Define default import options here. You can change the import options for a particular batch later, if necessary.
-
Select one of the following Change Order options:
-
Add To Existing - associates the imported data with an existing change order.
-
Create New - creates a new change order for the imported data.
Additional Information: When creating a new change order, you have the opportunity to enter or select the following:
-
Change Order Category
-
Change Order Type
-
Change Order Name
-
Change Order Description
Once you select the change order type, depending on the setup, the Change Order Number field is automated or you must manually enter a change order number.
-
-
None - imports the data into PIMDH without going through a change approval process.
-
-
Select one of the following New Item Request options:
-
None - you cannot create any new item requests from this source system. Instead, the system creates draft items. Later, you can navigate to the Item Workbench, further define the draft items, and add it to a new item request. See:
-
One per Item Catalog Category - create one new item request per item catalog category within an imported batch. This new item request can contain multiple line items.
-
One per Item - create one new item request per item.
For more information about new item requests, see: Creating New Item Requests, Oracle Product Hub User's Guide.
-
-
If you are importing structures, select the following default options:
-
Structure Type
Caution: Oracle Product Hub recommends avoiding the use of the Root structure type. User-defined attributes and import formats are not supported for the Root structure type.
-
Structure Name
-
Effectivity Control Type - choose Date or Model/Unit Number
-
Structure Contains - choose All Components or Changed Components Only
-
-
Select one of the following Data Import options:
-
Import All Data
-
Create Cross References Only - Select this option if you want to create cross-references only. It will not import the data.
-
-
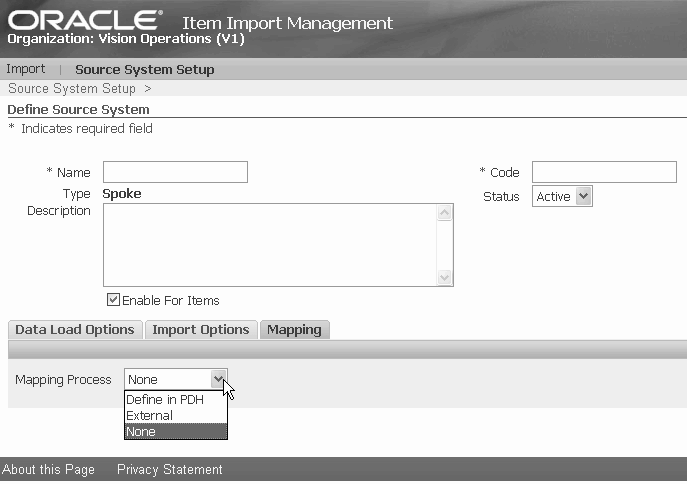
Click the Mapping sub-tab. Select one of the following Mapping Process options:
-
Define in PIMDH - Enables you to define the mapping of attributes between an external source system and PIM Data Hub within PIM Data Hub.
-
External - Enables you to upload an XSLT file containing mapping information between an external source system and PIM Data Hub.
-
None - No mapping occurs.
-
Related Topics
Overview of Inbound Product Data Synchronization and Data Quality Management, Oracle Product Hub User's Guide