Concurrent Programs
This appendix covers the following topics:
- Details
- Adjust Sales Agreement Amounts with Taxes and Charges
- Assign Customer Service Rep Concurrent Program
- Audit History Consolidator Concurrent Program
- Batch Price Concurrent Program
- Calculate Party Totals Concurrent Program
- Create Billing Lines Concurrent Program
- Credit Check Processor Concurrent Program
- Credit Exposure Import Concurrent Program
- Defaulting Generator Concurrent Program
- Diagnostics: Apps Check Concurrent Program
- Diagnostics: OM Debug File Retrieval Concurrent Program
- Diagnostics: OM Order Information Concurrent Program
- Export Compliance Screening Concurrent Program
- Initialize Credit Summaries Table Concurrent Program
- Inventory Interface No Ship Concurrent Program
- Message Purge Concurrent Program
- Order Import Statistics Concurrent Program
- Process Pending Payments Concurrent Program
- Archival Set, Order Archive Selection Concurrent Program
- Purge Advanced Item Search Session Data Concurrent Program
- Purge Imported Credit Exposure Concurrent Program
- Purge Set, Order, and Quote Purge Selection Concurrent Programs
- Purge Order Management Workflow Concurrent Program
- Purge Retrobilling Requests Concurrent Program
- Release Expired Holds Concurrent Program
- Re-Schedule Ship Sets Concurrent Program
- Reserve Orders Concurrent Program
- Schedule Orders Concurrent Program
- Validate OM Workflow Concurrent Program
Details
All Order Management concurrent programs are classified as single-org, multi-org or global.
Single Org Concurrent Programs
You can run the following concurrent programs for one Operating Unit (from the ones you have access to) at a time, without switching responsibility:
-
Re-schedule Ship Sets
-
Diagnostics: OM Order Information
-
Create Billing Lines
The mandatory Operating Unit parameter in the submit request window displays a default value.
Multi-Org Concurrent Programs
These programs have the Operating Unit as a parameter. You can run these concurrent programs either for an Operating Unit at a time (by specifying an Operating Unit value) or for all Operating Units that you have access to (by leaving the Operating Unit parameter blank):
-
Audit History Consolidator
-
Credit Check Processor
-
Credit Exposure Import
-
Export Compliance Screening
-
High Volume Order Import
-
Included Items Freeze at Pick Release
-
Inventory Interface – non ship
-
Order Import
-
Order Purge Selection
-
Process Pending Payments
-
Progress from Firm Process
-
Purchase Release
-
Purge Imported Credit Exposure
-
Purge Open Interface Data
-
Purge Retrobilling Requests
-
Quote Purge Selection
-
Release Expired Hold
-
Reserve Orders
-
Schedule Order
-
Show Sales Order
For these programs the Operating Unit parameter in the submit request window is disabled and you can optionally specify an Operating Unit in the parameter window.
Operating Unit Sensitive Parameters
The parameter LOVs for Operating Unit sensitive data (see list below) show the Operating Unit name. If there is no default or user specified Operating Unit Value then the LOVs show data across all Operating Units accessible to you. If you have specified an operating unit, then the LOVs restrict data to that particular Operating Unit.
These are the various concurrent request parameters that are Operating Unit sensitive:
-
Bill To Location
-
Customer PO Number*
-
Quote Number Low/High*
-
Order Number Low/High*
-
Order Reference*
-
Order Type
-
Line Type
-
Request Name (Retro-Billing Request Name)
-
Ship To Location
-
Ship Set
* - While the LOVs for these fields will show Operating Unit, if you do not specify an Operating Unit parameter, specifying these alone will not necessarily restrict output by Operating Unit. If you want to restrict data by Operating Unit, specify an operating unit as a parameter.
Important: It is recommended that if you want to pick Operating Unit sensitive parameter(s), you should first select the Operating Unit, as this will automatically restrict all the OU sensitive parameter LOVs to the selected Operating Unit.
In the case where you have not specified an Operating Unit and you then pick an Operating Unit sensitive parameter value, the Operating Unit parameter field will remain blank (it is not defaulted based on the other parameter value selection) and other OU sensitive parameter LOVs will continue showing data across all accessible OUs. Provided that all the different Operating Unit sensitive parameters are for the same OU then the program will process data in that specific Operating Unit alone. If they are not, then the concurrent program will process nothing.
Concurrent Programs that let users specify an Inventory Item value as a parameter: The LOV for the Item parameter relies on the Item Validation Org System Parameter. If you have specified an Operating Unit parameter, the item LOV will show data based on the Item Validation Org for that Operating Unit. If you have not specified an Operating Unit, then the LOV will show data based on the Item Validation Org for your default Operating Unit. If you do not have a default Operating Unit then the LOV will return no values.
Global Concurrent Programs
The following concurrent programs are global (process data across Operating Units).
-
Calculate Party Totals
-
Generate Constraints Validation Packages
-
Defaulting Generator
-
Diagnostics: Apps Check
-
Diagnostics: OM Debug File Retrieval
-
Initialize Credit Summaries
-
Order Import Statistics
-
Purge Advanced Item Search Session Data
-
Retry Activities In Error
-
Message Purge
For these programs the Operating Unit parameter in the submit request window is disabled and they do NOT have an Operating Unit parameter in the parameters window.
Adjust Sales Agreement Amounts with Taxes and Charges
To calculate the released amounts for existing sales agreements considering the taxes and charges, set the system parameter Consider Tax and Freight in Sales Agreement Releases to Yes, and then run the Adjust Sales Agreement Amounts with Taxes and Charges program.
This concurrent program adjusts the released amount, the fulfilled amount, and the returned amount on existing Active BSAs to consider the tax and freight charges on the releases.
You can also correct the BSA amounts for any discrepancy by running the concurrent program. Enter the parameter Sales Agreement Name for a particular BSA or Operating Unit to check and correct for all BSAs in that operating unit.
The parameters:
-
Operating Unit - This is an optional parameter. Select an operating unit to adjust the amounts with the taxes and freight charges. If you do not select an operating unit, then all operating units are included.
-
Sales Agreement Name - This is an optional parameter. Select the active sales agreement name in the selected operating unit.
Assign Customer Service Rep Concurrent Program
Run the Assign Customer Service Rep program after you update Customer Service Rep (CSR) assignment rules in the Customer Service Rep Assignment page. You can use this program to bulk assign or reassign CSRs to multiple orders at a time for given parameters.
Note: This program will not assign CSRs to closed orders.
Access the program from the standard Order Management responsibility. (N) Order Management > Reports, Requests > Run Requests.
This concurrent program Assign Customer Service Rep is available to the responsibilities that are assigned the request group OM Concurrent Programs. Run the program from the Submit Request window.
To run the Assign Customer Service Rep program:
-
In the Name field, select Assign Customer Service Rep.
-
In the Customer field, select the customer for whom you want to assign CSRs. This field is optional. If you select a customer, then the program assigns or reassigns CSRs to all open sales orders for that particular customer.
-
The Customer Service Rep field is optional. If you select a CSR and Override Existing Assignment is Yes, then the orders assigned to the given CSR are overridden as per the latest CSR assignment rules.
Note: If you leave the Customer and Customer Service Rep fields blank, then the program bulk assigns CSRs based on the latest assignment rules.
Audit History Consolidator Concurrent Program
The Audit History Consolidator concurrent program, when submitted populates an Order Management table with consolidated audit trail details recorded for orders and lines. Each subsequent submission of the program updates any additional order audit trail details that have been captured since the previous successful submission of the program. For details on capturing order audit trail details, see Order Audit Trail.
Order Management consolidates the following four order entities within the table:
-
Order Header
-
Order Line
-
Sales Credit
-
Price Adjustment
The data within the table is can be viewed within Oracle Applications via the View Audit History window or printed for display via the Order Management Audit History Report.
To consolidate order audit trail history via concurrent program:
-
Navigate to the Run Requests window, and select Audit History Consolidator in the Name field.

-
Enter the History Date From. This field is optional.
-
Enter the History Date To.This field is optional.
-
Enter the Order Number From. This field is optional.
-
Enter the Order Number To. This field is optional.
Additional Information: Note: If the order number is more than 10 characters then the order number in the audit history report is displayed as @ *********.
-
Enter a numeric value in the Changes in Last N days field to capture audit history changes captured over a period of days. For example, if you wish to consolidate order changes captured for audit purposes during the last 7 days, enter the value 7.
-
Select OK, then Submit.
Note: Order Management recommends your schedule this report based upon your business needs.
Batch Price Concurrent Program
The Batch Price concurrent program attempts to price orders or order lines as specified by input parameters. The concurrent program attempts to price any orders or lines that have an open status. Batch Pricing honors the Calculate Price Flag on the individual order lines.
For input parameters where you can specify a range (Low and High values):
-
If you specify a Low value and not a High value, this program will price all order lines that meet or exceed the Low value.
-
If you specify a High value and not a Low value, the program will price all order lines equal to or less than the High value entered.
To perform batch price via the concurrent program:
Preview Mode: This is a mandatory parameter. If you select Yes, then the concurrent program will not price or re-price the orders or lines, it will only list the order and line details that will be impacted if batch pricing is run with the specified parameters. Preview mode is useful if you want to see the effect of the pricing or re-pricing on the orders and lines for the specified input parameters. You can then decide if you wish to run the concurrent program in execute mode (when Preview Mode is No) or not. If you select No, then the concurrent program runs with the parameters you specify and prices or re-prices the orders and lines. The price is fetched from the price list defaulted on the order / line by the relevant API.
Pricing Level: This is a mandatory parameter. You can select between order level pricing and line level pricing to determine whether line level or list level modifiers get applied. If you select order level pricing, and the order status is Entered, then the Pricing API is called with the Batch event. If at order level pricing, the order status is Booked, then the Pricing API is called with the Batch, Book and Ship events. If you select line level pricing, the Pricing API is called with the Line event only, irrespective of the line status (booked or otherwise).
Operating Unit: The Batch Price concurrent program can be run across operating units. You can specify All or a given operating unit for the orders/lines that you want priced or re-priced.
Order Number (Low/High): Select an order number to price or reprice order lines for. If you do not specify an order number, the system will attempt to reprice all order lines during concurrent program execution.
Order Type: Select an Order Type that you want to specify.
Line Type: Select a Line Type. This parameter is disabled if you have selected Order Level pricing at the Pricing Level parameter.
Booked Orders: If you select Yes, then only booked orders will be priced/re-priced. If you select No, then orders with a status Entered will be priced/re-priced. If you leave this parameter blank, then the concurrent program will select all open orders/lines irrespective of their booked status.
The following parameters are enabled only if the Pricing Level selected is Line:
-
Item
-
Item Category
-
Warehouse
-
Line Creation Date (Low and High)
-
Pricing Date (Low and High)
-
Schedule Ship Date (Low and High)
Select OK, then Submit. The log file generated as a result of a submission of the Batch Price concurrent program displays all order details selected for processing based upon the input parameters entered.
Calculate Party Totals Concurrent Program
The Calculate Party Totals concurrent program calculates the total number of orders and the summary order amount of all orders, and determine the last date an order was placed, by customer Party number.
The following order attributes determine eligibility for inclusion within the concurrent program calculations during program execution:
-
Orders must be booked
-
Orders can be on Hold
-
Return orders and return order lines are included
-
Cancelled orders and cancelled order lines are not included
The concurrent program does not produce a report output. However, within the standard submission request log file, Party Total amount is listed by Party number, and whether or not the Party totals were successfully updated. The Calculate Party Totals program results are stored within the following columns within table HZ_PARTIES:
-
TOTAL_NUM_OF_ORDERS
The total number of orders for the Sold To customer on an order.
-
TOTAL_ORDERED_AMOUNT
The value stored within this column is dependent upon the Order Management profile option OM: Party Totals Currency. All orders for a party in a currency other than the currency specified by the profile option are converted to the profile option currency and then summarized.
Order Management currently uses the Order Request Date as the currency conversion date for conversion types, if the Invoice Date is not available at the order level. The currency conversion type (spot, corporate or user) is stored for an order header; if the conversion type is user, both the conversion date and conversion rate are stored.
Total Order Amount does not include the order tax amount but will include the Freight and Special charges.
-
LAST_ORDERED_DATE
The value stored within this column is the Order Date for the last order placed for a given Party number.
The data stored in the within HZ_PARTIES is intended to be an approximate value indicating the volume of orders and approximate revenue generated by customer Party number. It is not intended to be accurate per accounting standards, and is not maintained real time, unless the request submission parameters are set so the program is continually executed after each successful completion.
Note: The total number of orders and the summary order amount of all orders reflect the number of orders that are currently active within Order Management tables.
Note: If you have submitted the Order Purge concurrent program and successfully purged orders, when you submit the Calculate Party Totals concurrent program, only the orders remaining within Order Management tables are used during concurrent program calculations.
Submission
Navigate to the Order Management Standard Request submission window, select Calculate Party Totals, and select Submit. There are no parameters to enter for the concurrent program.
Create Billing Lines Concurrent Program
The Create Billing Line concurrent program reads billing plans associated to source order lines and then creates billing lines (invoice lines) in the same sales order in which the source order line exists.
For more information about recurring billing, see:
You can submit the concurrent program for any or all of the following combinations:
-
Sales Order
-
Sales Order and Line
-
Order Type
-
Line Type
-
Customer Name and Customer Number
-
Bill Date range
To Create Billing Lines Using the Concurrent Program:
-
Navigate to the Submit Request window, and select Create Billing Lines in the Name field.
-
Select the Operating Unit for which you want to create billing lines. The Operating Unit displays by default from the profile option MO: Default Operating Unit.
-
Enter the following information:
Field Description Customer Name (Optional) Select the name of the customer for which you want to create billing lines. Customer Number (Optional) Select the number of the customer for which you want to create billing lines. Order Type (Optional) Select the order type for which you want to create billing lines. Line Type (Optional) Select the line type for which you want to create billing lines. Sales Order Number (Optional) Select the sales order number for which you want to create billing lines.
After you select the sales order number, the Line (Source Order Line) field becomes available.Line (Source Order Line) (Optional) Select the line associated with the sales order for which you want to create billing lines. Bill Date (From) and Bill Date (To) (Optional) Select the bill date range for which you want to create billing lines.
Select the Bill Date (From) for usage based billing. The billing line is generated on the Bill Date.Submit Request window
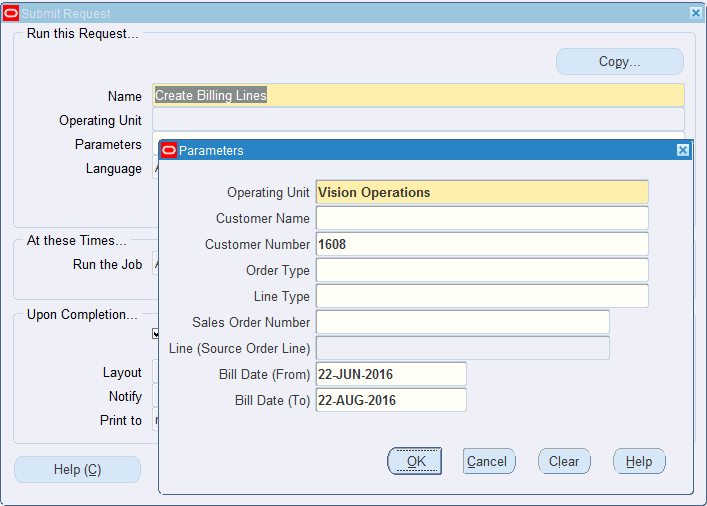
-
Click OK.
-
Click Submit.
Sales Orders window - Line Items tab
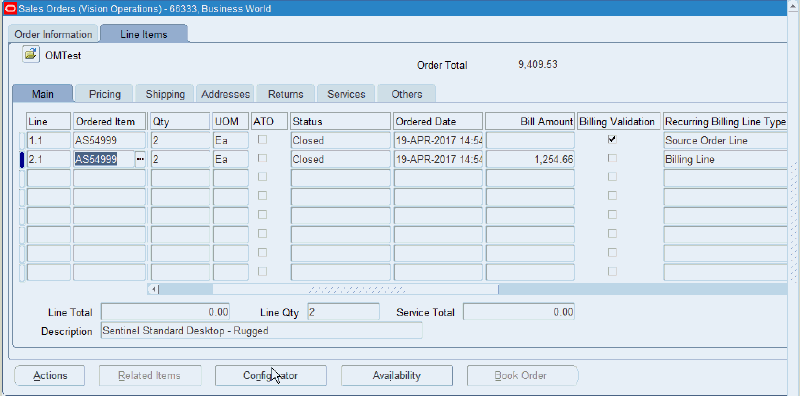
The program retrieves all eligible source order lines related to the parameters entered for the program. Then the program reads the billing plans associated to the source order lines to create billing lines (invoice lines) in the same sales order in which the source order line exists. The Bill Amount field is populated for a billing line and the Recurring Billing Line Type for a billing line is Billing Line.
If the billing plan has a fixed number of periods, the program picks all billing plan lines that match this criteria:
-
System date is greater than or equal to Bill Date on the billing plan line
-
Billing Plan Status is Billing In Progress or Open
-
Source order line is closed
If the billing plan has an indefinite number of periods, the program picks all billing plan lines that match this criteria:
-
Billing plan line is due between system date and Bill Date of last billing plan line or Start Date
-
Billing Plan Status is Billing In Progress or Open
-
Source order line is closed
If the billing plan has milestone periods, the program picks all billing plan lines that match all of the following criteria:
-
The sales order is booked
-
The bill date is available on the billing plan line.
-
The SYSDATE is greater than or equal to the bill date on the billing plan line.
-
The billing line is not generated.
-
The billing plan status is Billing in Progress or Open.
The system checks that there is no change to the source order line amount since the billing plan was last updated. If there is a change, the billing plan status is set to Review Required and no billing plan lines are created.
Create Billing Lines Program Output File
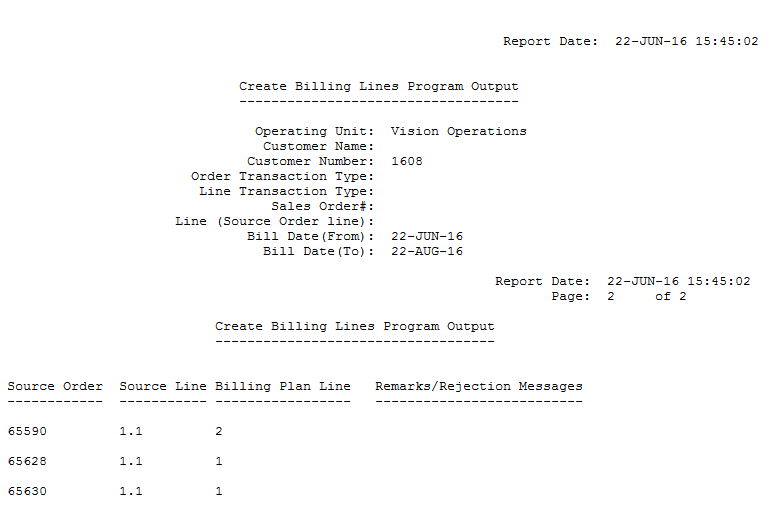
After the program completes, you can view the output file which displays the billing lines that were created. The output files lists the source order, source line, and billing plan line for which the billing line was created. Plus, the output file displays messages for those billing lines that were not able to be created.
If the billing plan has a fixed number of periods, the program updates the Billed Line column and Billed Line Status column for the billing plan in the Billing Plan page to reflect the line number and line status for the newly created billing line. If the billing plan has an indefinite number of periods, the program populates the billed lines in the Billing Plan Lines region of the Billing Plan page. The program populates the Sequence, Bill Date, and Bill Amount, Billed Line, and Billed Line Status columns for the newly created billing lines. If the billing plan has milestone periods, the program updates the Billed Line column and Billed Line Status column for the billing plan in the Billing Plan page to reflect the line number and line status for the newly created billing line.
For more information about recurring billing, see:
-
Credit Check Processor Concurrent Program
The Credit Check Processor program can be run on demand to re evaluate Booked orders that have not been shipped yet.
Use the Credit Check Processor when your customer's credit exposure may have changed and you want to reevaluate their sales order status so that you can release or apply credit check holds accordingly. Also use Credit Check Processor whenever you change your customer or default credit setup and you want the change to immediately take effect in your booked sales orders.
In order to apply holds, the Credit Check Processor evaluates the open booked sales order lines that are not picked, whereas for drop ship sales order lines, only lines that are in Booked status are evaluated. When releasing holds, this program evaluates open booked sales order lines that have not progressed to Shipped status.
This program can be used if you run credit checking at booking, for booked orders (all orders are booked). The Credit Check Processor uses sales order lines in Booked status, as well as lines with a status of Awaiting Shipping where the delivery details are not picked yet.
To re evaluate booked orders not yet shipped via concurrent program:
-
Navigate to the Run Requests window, and select the Credit Check Processor concurrent program from the Name field.
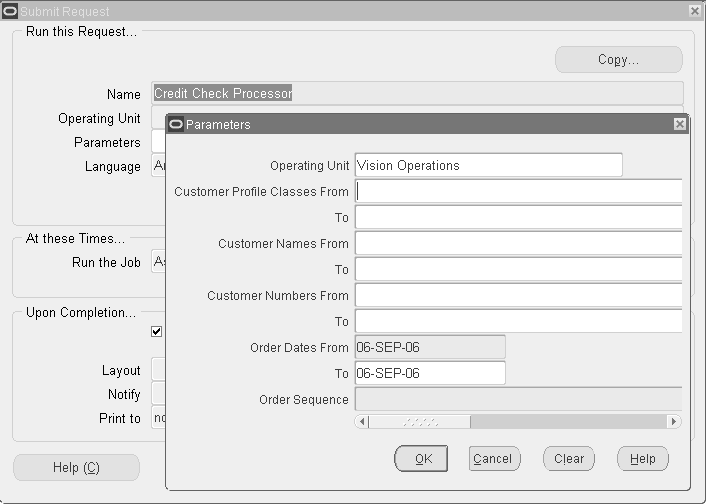
-
To select customer credit profile classes to include when updating credit balances, enter a value in the Customer Profile Class From field, the Customer Profile Class To field, or both.
-
Determine which customers to include when updating your credit balances. Select either a value for Customer Names From, Customer Names To, select a value for both fields, or choose to include or exclude customer names within the range selected for Customer Names From/To by selecting additional limiting values for the input parameters Customer Numbers From/To.
-
Select customers to include when updating your credit balances.
-
Select a range of customer names by entering a value in the Customer Names From field, the Customer Names To field, or both.
Optionally, include or exclude customer names within the range by providing values for the input parameters Customer Names From and Customer Names To.
-
Select a range of customer numbers by entering value for in the Customer Numbers From field, the Customer Numbers Tofield, or both.
Optionally, include or exclude customer numbers within the range selected by entering additional limiting values for the input parameters Customer Names From/To.
-
-
Select order dates to include when updating your credit balances by entering a value in the Order Date From field and, optionally, in the Order Date To field, or both.
-
To set the processing order for updating credit balances, select a value for the Order Sequencefield. Choose from:
-
Earliest Order Date First
-
Earliest Ship Date First
-
Greatest Order Value Frst
-
-
Click OK, then Submit.
Credit Exposure Import Concurrent Program
The Credit Exposure Import concurrent program enables you to import external credit exposure details (such as transaction amounts for sales orders created outside of Oracle Applications) into Oracle Order Management, provided you have correctly populated the corresponding Order Management Exposure Interface table.
External exposure details can then be:
-
Utilized exclusively for Credit Checking
-
Used in conjunction with existing pre-calculated exposure amounts when performing credit checking
-
Used in conjunction with real time transactional data when performing credit checking
Order Management will determine whether to include external exposure amounts imported within the overall exposure amount when performing credit checking based upon the credit checking rules you define.
Program Details
External exposure details imported within Order Management are stored in the same exposure summary table used by the Initialize Credit Summaries Table concurrent program. Successfully imported external exposure records within the summary exposure table can be determined by the value for the field BALANCE_TYPE; all externally imported exposure detail records will have the value 18 for the field BALANCE_TYPE.
Note: when you submit the Initialize Credit Exposure concurrent program, externally imported exposure records are never overwritten.
When importing credit exposure details from an external system, Order Management will import all records selected, provided each record successfully passes validation. If a single record fails validation, Order Management will not import any records within the exposure interface tables which were selected for processing. If you encounter exceptions during run time, review the exception details within the concurrent program output and log files, correct the issues, and then resubmit the program.
The Credit Exposure Import concurrent program can be submitted in two different modes, Update and Insert. Interface records are processed based upon the mode, which is determined by the value of the column OPERATION_CODE within the exposure interface table.
-
Insert: All credit exposure amounts previously imported will be overwritten with the given exposure amount within the Order Management Exposure Interface tables.
-
Update: The credit exposure amount within the Order Management Exposure Summary table will either be added (positive amount) or subtracted (negative amount) to any previously imported amount. If a corresponding exposure amount does not previously exist, a new exposure amount record will be created.
This program will never delete records from the credit exposure summary table.
Note: The current value of the profile option MO: Operating Unit is used as a input parameter to this concurrent program. This parameter is hidden by default, and is used to prevent the Credit Exposure Import program from importing exposure records into incorrect operating units.
Note: If you need to input exposure details for multiple operating units, Order Management recommends you set this profile option at the Responsibility level, and then switch to the corresponding Responsibility when importing exposure details.
To import credit exposure details from an external system:
-
Navigate to the Run Requests SRS window, and select Credit Exposure Import in the Request Name field.
Run Requests SRS Window - Credit Exposure Import
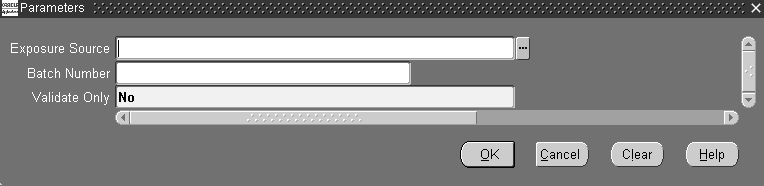
-
Select the Exposure Source. Exposure Sources are based upon user defined values for the Order Management Quick Code ONT: Credit Exposure Import Source. If you select a value for this parameter, only records which have the same value (case sensitive) within column EXPOSURE_SOURCE_CODE within the exposure import interfaces tables will be processed. This field is not required.
-
Enter a numeric value, greater than zero, if you wish to specify a batch number to process a portion of the records with the exposure import interface tables.
You can use a batch number for auditing purposes, or to improve performance when large amounts of exposure records are to be imported (choose to process only a portion of the exposure records within one submission and the remaining records within additional submissions - running the concurrent program in parallel with the initial request).
-
If you select a value for this parameter, only records which have the same value within column BATCH_ID within the exposure import interfaces tables will be processed. This field is not required.
-
Validate Only:
Select Yes to validate records within the credit exposure interface tables only. No records are imported into summary exposure tables during submission.
-
Select No to validate and process records within the credit exposure interface tables.
This field is required.
-
Select OK, then Submit.
Note: When importing exposure details using the Credit Exposure Import, only interface records that belong to a Bill To Site for the current operating unit can be imported. Therefore, ensure your records are grouped accordingly.
Note: For example, if you have multiple Bill To sites within the exposure interface table, ensure that each Bill To Sites has been previously defined for the current operating unit you are currently working within.
Note: Additionally, if you specify either an Exposure Source or a Batch Id as an input parameter, ensure the corresponding records (marked with values for either Exposure Source or Batch ID) within the interface table utilize Bill To Sites defined for the same operating unit you are submitting the program for.
Output
The Credit Exposure Import concurrent program produces a standard Oracle log file, along with a Standard Order Management Report output.
Concurrent Program Log File
-
The concurrent program log file contains standard details such as program name and the value of input parameters, as well as the following summary details:
Number of rows to Process: X_num_rows_to_process
Number of rows to Validate: x_num_rows_validated
Number of rows that failed Validation: x_num_rows_failed
Number of Rows Imported: x_num_rows_imported
Concurrent Program Output (report)
-
The concurrent program output (report output), available only by selecting Output within the View Requests window (provided your have previously selected the row with the appropriate request id) displays the following details:
Report Parameters Region
-
Concurrent program input parameters with values entered for submission.
Report Information
-
Concurrent program details such as request id
Report Header Region
-
Concurrent program details such as operating unit and report date.
Report Output
-
Concurrent program details such as Number of credit exposure to process, and Number of credit exposure failed validation.
-
Concurrent program exception details (errors).
-
Defaulting Generator Concurrent Program
The Defaulting Generator concurrent program enables you to quickly update existing defaulting packages for defaulting rules and conditions. From the Order Management Standard Request Submission window, you can choose to submit the program for
-
an Application and Entity
-
an Application, Entity, and Attribute
-
Whenever defaulting rules/conditions are updated for an attribute, the Defaulting Generator concurrent program must be run to generate new defaulting packages for that attribute. The Defaulting Rules form will display a note reminding users to run this program when updates are saved.
-
Whenever validation rules for a defaulting condition are updated, the Defaulting Generator concurrent program must be submitted for the Entity updated in order for the updates to be processed. Defaulting packages needs to be re-generated for all attributes whenever a defaulting condition's validation rules are updated.
-
You may execute the Defaulting Generator concurrent program while users are still on the system, although the defaulting package may not generate successfully. This can be due to the package currently being called by other users who are processing orders on the system. Common errors within the output log file for this concurrent program may contain text that a time-out occurred while waiting to lock object.
Note: If you are running Defaulting Generators for an Entity and do not specify an Attribute, it is recommended that users log off the system to decrease the concurrent processing run time.
Note: If defaulting packages do not generate successfully, you must choose to run the concurrent program at a later time, or have users briefly log off the system while defaulting packages are being regenerated in order for your modifications to take effect.
To submit the Defaulting Generator concurrent program from within the Defaulting Rules window:
-
Within the Defaulting Rules main window, from the Tools menu, select Defaulting Generator.
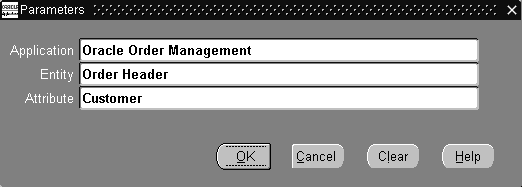
You can only submit the concurrent program from the Defaulting Rules main window. If you choose to submit the concurrent program from the Defaulting Rules window, input parameters are based upon the current cursor location. The Defaulting Generator is run for whatever attribute is highlighted.
For example, if the field Application has a value of Oracle Order Management, the field Entity has a value of Order Header, and the cursor was positioned on the row displaying the attribute Agreement, the concurrent program will be executed with the above values as input parameters.
Note: From within the Defaulting Rules window, the Defaulting Generator concurrent program is always submitted with a value for the input parameter Attribute, which is based upon the cursor location when the concurrent program is invoked.
To submit the Defaulting Generator concurrent program from the Order Management SRS window:
Navigate to the Run Requests SRS window, and select Defaulting Generator in the Request Name field.
Run Requests SRS Window
-
Select a value for the Application. This field is required.
-
Select a value for the Entity. This field is required.
Running this program with only a value for the input parameter 'Entity' will result in re-generating defaulting packages for every defaultable attribute for the entity value selected.
-
Select a value for the Attribute. This field is optional.
Running this program with a value for the input parameter 'Attribute' results in re-generating the defaulting logic for the attribute value selected only. All other attribute rules and conditions of the entity will not be re-generated.
-
Select OK, then Submit.
Diagnostics: Apps Check Concurrent Program
This program provides summary output details for Oracle Application schema's. Details such as product installation status, application profile values, invalid objects, package versions, database triggers, and form versions are displayed within the program output based upon the Oracle Applications you select as an input.
You can choose to display an output for a single Oracle Application, up to five Oracle Applications, or all Oracle Applications. Order Management recommends that you submit the program with at least one Application Name for the input parameters defined; each subsequent Application Name selected increases the program run time.
The following lists the entities, along with the current value, for each Oracle Application selected by the input parameters that will be displayed within the program logfile.
-
Customer/Business Unit Details
-
Installed Products
-
Database Name and Creation Date
-
Oracle Version(s)
-
Database Parameter Settings
-
Patch Set/Release Information
-
Patches Applied
-
Profile Option Values
-
OM System Parameters
-
Database Triggers
-
Table Indexes
-
Packages Versions and Status
-
Invalid Objects/Errors
-
Invalid Referenced Objects/Errors from Other Products
-
Product Tops
-
Table/View Definition File Versions
-
LDT File Versions
-
Forms Tool Version
-
Product Form Versions
-
Product Library Versions
-
Product Report Versions
-
Executable Versions
To review Oracle Application details:
-
Navigate to the Order Management Standard Request Submission window, and select OM Diagnostics: OM Check.
Apps Check Input Parameters Window
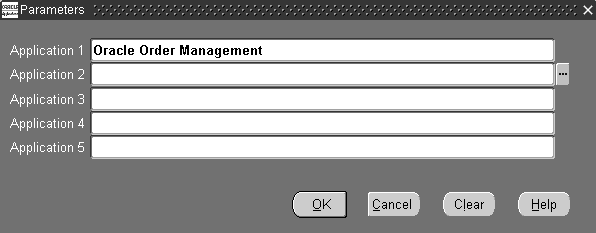
-
Enter or select a value for the optional input parameters Application1 through Application5.
Oracle Order Management, Oracle Pricing, and Oracle Shipping are automatically defaulted for input parameters Application1through Application 3, respectively; these values may be changed. If you clear the Application1 through Application3 input parameter defaults, the program output will display data for all Oracle Applications.
-
Select OK, then Submit.
Diagnostics: OM Debug File Retrieval Concurrent Program
This concurrent program will retrieve Order Management Debug files generated by a user for review on-line. The value of the profile option OM: Debug Log File Directory determines the location the concurrent program will search for the log file specified in the input parameter to this program.
You can also submit this concurrent program to validate your setup for generating Order Management Debug files. Results are displayed within the program output and will include possible suggestions on how your Debug setup can be fixed.
To retrieve an Order Management Debug file for viewing on-line:
-
Navigate to the Order Management Standard Request Submission window, and select Diagnostics: OM Debug File Retrieval.
OM Debug File Retrieval Input Parameters Window
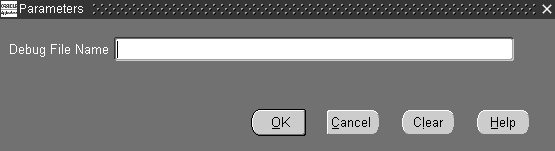
-
Enter the Order Management Debug file name to retrieve (debug file which was displayed to a user when Debug was turned on). This field is optional.
If you leave this parameter blank, the program will attempt to validate your Debug setup and provide results based upon the validations performed.
-
If the debug file cannot be located, the program will complete successfully, but an error will be displayed within the report log file.
-
-
Select OK, then Submit.
-
Navigate to the View Requests window.
Enter the appropriate criteria in the Find Requests window, select Find, locate your request with your cursor within the Request window, and then select View Output.
Diagnostics: OM Order Information Concurrent Program
This program selects order related data from various Oracle Application product database tables and provides a detailed output for the order selected. Additionally, you can choose to limit order details to a specific order line by specifying the line number prior to submission.
The following lists the entities or attributes and their associated current value which will be displayed within the program output for the order or order line selected by the program:
| - | - | - |
|---|---|---|
| Order/Line Details | Order/Line Workflow Status | Order/Line Workflow Notifications |
| Order/Line Workflow Errors | Line History | Holds |
| Price Adjustments | Drop Ship Sources | PO Requisition Interface Details |
| PO Requisition Details | Requisition Workflow Approval Status | Requisition Workflow Approval Notifications |
| Requisition Workflow Approval Errors | Receiving Shipment Lines | Receiving Transactions |
| Receiving Transactions Interface | Material Supply | Item Reservations |
| WIP Job Schedule Interface | WIP Discrete Jobs | WIP Discrete Job Transactions |
| WSH Trips | WSH Trip Stops | WSH Delivery Legs |
| WSH New Deliveries | WSH Delivery Assignments | WSH Delivery Details |
| WSH Freight Costs | Material Transactions Interface | Material Transactions Temp |
| Material Transactions | Move Transactions | Receivable Interface Details |
| Receivable Interface Errors | Invoice Details | Order Cancellation Report |
To display detailed order or order and order line information:
-
Navigate to the Order Management Standard Request Submission window, and select OM Order Information.
OM Order Information Input Parameters Window
-
Enter the order number you wish to view details for. This field is required.
-
Optionally, choose to limit the program output to display line number details for a specific order by entering a line number.
-
Select OK, then Submit.
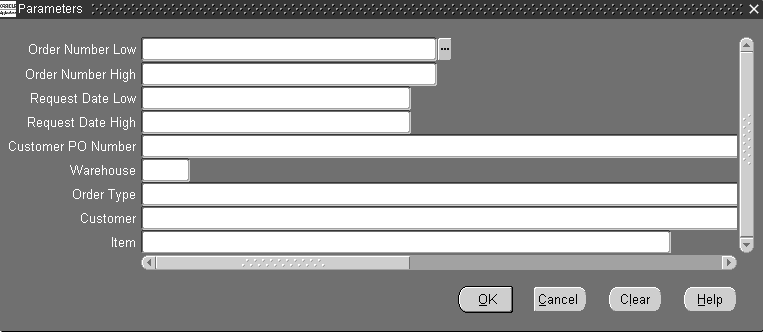
Export Compliance Screening Concurrent Program
The Export Compliance Screening concurrent program can be used to progress order lines that are currently waiting at the Export Compliance Screening Eligible workflow activity. If an order line has initially failed export compliance screening due to data errors, you can attempt to correct the order data, and submit the Export Compliance Screening concurrent program to progress orders and lines past the Export Compliance Screening Eligible workflow activity; export compliance routines are called to perform the compliance screening again.
-
If the order or line pass the screening process during resubmission, orders and lines then progress to the next workflow activity within their respective flows.
-
If the order or lines do not pass the screening process, they will again be waiting at the Export Compliance Screening Eligible workflow activity.
Note: You cannot use the Export Compliance Screening concurrent program to initiate export compliance; this program only enables you to progress order lines past the Export Compliance Screening Eligible activity within the Export Compliance Screening subprocess.
To progress waiting at the Export Compliance Screening Eligible activity:
-
Navigate to the Order Management Standard Request Submission window, and select Export Compliance Screening.

-
Progress export compliance order lines by Order Number. Enter a value for in the Order Number Low, Order Number High, or range of order numbers to include by entering a value for both fields. Additionally, leave these fields blank to progress all order lines.
-
Progress export compliance order lines by Customer. Enter a value in the Customer field.
-
Progress export compliance order lines by Customer PO. Enter a value in the Customer PO number that corresponds with the purchase order received from your customer.
-
Progress export compliance order lines by Order Type. Select a value for the Order Type field.
-
Progress export compliance order lines by Warehouse (organization). Select a value for the Warehouse field.
-
Progress export compliance order lines by Line Ship To Location. Select a value for the Line Ship To location.
-
Progress export compliance order lines by Item. Select or enter an value in the Item field.
-
Progress export compliance order lines by Line Scheduled Date. Select a value for Line Schedule Date Low, an optional value for Line Schedule Date High, or by selecting a value for both fields.
-
Progress export compliance order lines by Order Date. Select a value for Order Date From, an optional value for Order Date To, or by selecting a value for both fields. This field is required.
-
Select OK, then Submit.
Initialize Credit Summaries Table Concurrent Program
Order Management enables you to periodically rebuild a credit exposure image (orders, invoices and payments) for all customers or customer sites for all possible credit rule definitions. When you submit the, The Initialize Credit Summaries Table concurrent program, changes to customer or customer site credit exposure are calculated and updated, based upon your exposure setup for each credit check rule defined. Exposure information is stored in a summary table so that the credit check process can refer to summary credit data as opposed to real time transactional data, reducing the effort needed to evaluate credit standing.
Note: You must run the Initialize Credit Summaries Table concurrent program periodically to get the correct exposure values for the party.
Additionally, if you wish to import exposure details from an external system, you can use the Credit Exposure Import concurrent program. See: Credit Exposure Import Concurrent Program.
-
Exposure summary information is used only during the credit checking process if you have selected the Use Pre-Calculated Exposure check box within the Exposure tab on the Credit Check Rules window.
-
The Credit Check Rules are always checked from the Order Transaction Type, whether line level credit checking is performed or order level is checked by looking at the Credit Check Rule itself.
-
Do not submit the program too frequently, as system resources may be affected. It is recommended that you build credit exposure at least once a day during off business hours.
-
Ensure that you allow enough time for the program to complete before rescheduling it to run again.
-
When you submit this concurrent program, if you have externally imported exposure records within the summary table, they are not overwritten.
To initialize or update credit exposure via concurrent program:
-
Navigate to the Run Requests SRS window, and select Initialize Credit Summary Table in the Request Name field.
Run Requests SRS Window - Initialize Credit Summary Table

-
Determine whether or not you wish to lock database tables when submitting this program. Select from:
-
Yes: Lock database tables during execution of this program. When you lock a database table, you are not allowed to modify any aspects of any record within the table that is locked.
-
No: Do not lock tables during the submission and execution of this concurrent program.
This parameter is required.
-
-
Select OK, then Submit.
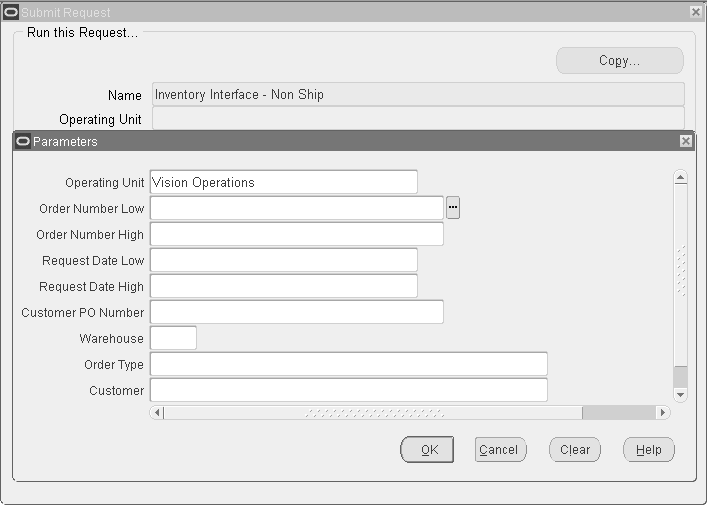
Inventory Interface No Ship Concurrent Program
The Inventory Interface concurrent program processes interfacing orders or lines to inventory if:
-
The order or line has failed during a previous execution of the Inventory Transaction worker
-
If the current status for the Inventory Interface- Eligible activity within the workflow subprocess for the Inventory Interface has a value of Wait
In order for the Inventory Interface concurrent program to properly function, you must customize order or line workflow processing flows to include the Inventory Interface - Eligible block activity before the Inventory Interface sub process.
The Inventory Interface concurrent program creates a standard Oracle log file containing processing results for the programs execution.
-
The Inventory Interface No Ship concurrent program will process lines that are awaiting completion of the Inventory Interface for Non Ship flows only.
-
Order lines may be in this state (awaiting completion) as a result of certain validation failures that occur when Order Management originally attempted to Inventory Interface said lines.
-
Under normal circumstances, order lines will complete the Inventory Interface No Ship workflow sub process without any errors and therefore not be in an Eligible state.
-
This concurrent program does not process any order lines that have failed Inventory Interface on regular order line Ship flows.
To process Inventory Interface transactions via concurrent program:
-
Navigate to the Run Requests SRS window, and select Inventory Interface in the Request Name field.
Run Requests SRS Window
-
In the parameters window, select a value for the following parameters, based upon your processing needs:
-
Order Number Low
-
Order Number High
-
Request Date Low
-
Request Date High
-
Customer PO Number
-
Order Type
-
Customer
-
Item
-
Warehouse
-
-
-
Select OK, then Submit.
Message Purge Concurrent Program
The Message Purge concurrent program purges Order Management messages that are generated during order processing. To keep the Oracle Order Management Message tables at manageable sizes, you should submit the Message Purge concurrent program at periodic intervals. After the concurrent program has successfully completed, you can use the Process Messages window and to verify that the Order Management message tables have been purged as specified by the input selection criteria.
If you leave any of input parameters blank, the concurrent program will process all possible values for the parameter.
To purge Order Management messages via concurrent program:
-
Navigate to the Message Purge menu entry.
Message Purge Window
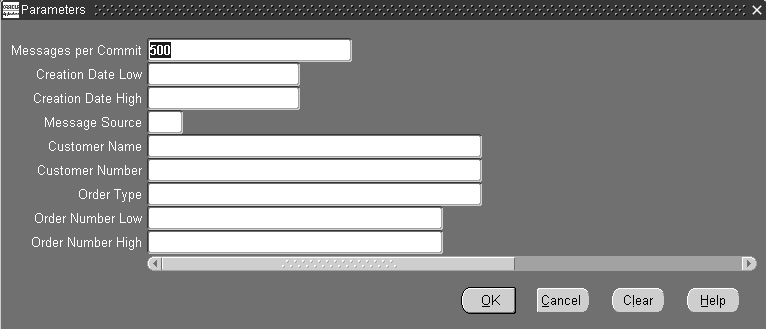
-
Determine the number of messages you wish to purge per database commit by entering a value for the Messages per Commit input parameter.
If you enter a value of 100, 100 messages will be purged (based upon all input parameters) prior to the database actually performing the commit. Once a commit has successfully completed, you are unable to rollback changes that occurred prior to the commit. In the event of a system failure, a rollback will be performed, rolling back any changes that took place immediately after the last successful commit. The default for this field is 500, and the field is optional.
-
Determine if you wish to purge messages created on a specific date or range of dates by selecting a value for the Creation Date Low, the Creation Date High, or both input parameters. All messages created for the date range specified are purged, provided other input parameters also enable purging. These fields are optional.
-
Determine a Message Source to purge Order Management messages. All messages created with the source specified by the input parameter Message Source will be purged, provided other input parameters also enable purging. Select from:
C: Concurrent Program
U: On Line (U/I)
W: Workflow
This field is optional.
-
Determine if you wish to purge messages generated for a specific Customer Name by selecting a Customer Name in the Customer Name input parameter, provided other input parameters also enable purging. This field is optional.
-
Determine if you wish to purge messages for a specific Customer Number by selecting a Customer Number in the Customer Number input parameter, provided other input parameters also enable purging. This field is optional.
-
Determine if you wish to purge messages for a specific Order Type by selecting a value in the Order Type input parameter. All messages generated for the Order Type selected will be purged, provided other input parameters also enable purging. This field is optional.
-
Determine if you wish to purge messages for a single order number or range of order numbers, by entering values for Order Number Low, Order Number High, or both input parameters. All messages created for order numbers entered will be purged, provided other input parameters also enable purging.
These fields are optional.
-
Select OK, then Submit.
Order Import Statistics Concurrent Program
Order Import uses the Cost Based Optimizer of the database for optimizing queries. The Cost Based Optimizer uses generated statistical information to optimize queries. The Order Import Statistics concurrent program gathers statistics that will be used by the cost based optimizer. This concurrent program should be run after data is populated into the interface tables.
The Cost Based Optimizer performs a table analysis of all interface tables related to Order Import for determining optimum record processing. You can choose to submit this program (or not) prior to each submission of the Order Import concurrent program. If you normally process a similar number of interface records, you typically do not need to submit this program. There are no parameters for the submission of the Order Import Statistics concurrent program.
To schedule orders via concurrent program:
-
Navigate to the Run Requests SRS window, and select Order Import Statistics in the Request Name field.
-
Click Submit.
Below is a list of columns that are present in the interface tables, but not available via the Corrections Window:
-
Header
-
ship_to_customer_id invoice_customer_id deliver_to_customer_id sold_to_phone_id supplier_signature supplier_signature_date customer_signature customer_signature_date orig_sold_address_ref order_firmed_date ib_location_code orig_sys_end_customer_ref orig_end_customer_address_ref end_customer_contact_ref end_customer_site_use_code
-
-
Line
-
return_context price_request_code attribute_status ship_to_customer_id invoice_to_customer_id deliver_to_customer_id ship_to_customer_name invoice_to_customer_name invoice_to_customer_number deliver_to_customer_name line_category_code actual_shipment_date planning_priority order_firmed_date actual_fulfillment_date end_customer_site_use_code end_customer_contact_ref orig_end_customer_address_ref orig_sys_end_customer_ref
-
-
Price Adjustments
-
price_adjustment_id
-
-
Pricing Attributes
-
order_price_attrib_id override_flag
-
-
Credits
-
sales_group_id sales_group_updated_flag
-
-
Lotserials
-
quantity2 sublot_number
-
-
Customer Information (Add Customer)
-
site_number location_number org_id is_sold_to_address new_address_id_sold_to
-
Process Pending Payments Concurrent Program
The Process Pending Payments concurrent program enables you to submit credit card orders for payment processing and to additionally process orders on hold (for select hold types only). Orders using both a Payment Term that enables prepayments and a Payment Type of Credit Card, and orders with the following hold type are processed by this concurrent program:
-
ePayment Failure Hold
-
ePayment Server Failure Hold
-
Pending Process Payment (PPP) Hold
When you submit this concurrent program, orders with the above hold types are first released (provided the validation of removing the hold is successful); the order and order lines are then able to continue within their respective workflows.
This concurrent program produces an output log file and output listing with any error messages generated during processing. The following additional details can be located in the both the log file and concurrent program outputs:
-
Total orders processed during runtime (No. of orders found)
-
Total number of authorizations successful during runtime (No. of orders successful)
-
Total number of credit card holds released during runtime (No. of orders released)
-
Total number of orders not processed due to processing failure (No. of orders failed)
Additionally, you can use the Process Messages window to view concurrent program runtime details such as warning or error messages generated.
To process pending payments via concurrent program:
-
Navigate to the Run Requests window, and select Process Pending Payments in the Name field.
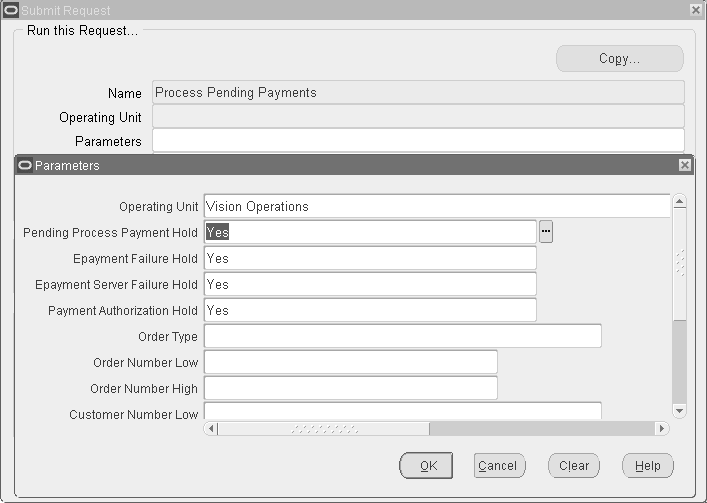
All input parameters to this concurrent program are optional.
-
Pending Payment Process Hold: Select Yes to process orders currently on Pending Payment Process Hold, or select No to not process orders on Pending Payment Process Hold. The default value for this parameter is Yes.
-
ePayment Failure Hold: Select Yes to process orders currently on ePayment Failure Hold, or select No to not process orders on ePayment Failure Hold. The default value for this parameter is Yes.
-
ePayment Server Failure Hold: Select Yes to process orders currently on ePayment Server Failure Hold, or select No to not process orders on ePayment Server Failure Hold. The default value for this parameter is Yes.
-
Payment Authorization Hold: Select Yes to process orders on Payment Authorization hold. Select No to bypass these orders. This hold is used if you set up payment authorization to be a deferred process. Then this request will attempt to process those authorizations in a batch mode.
-
Order Type: Select a specific order type to limit credit card payment processing of orders.
-
Order Number (Low/High): Enter a value for Order Number Low, Order Number High, or both to limit credit card payment processing to specific order numbers. If you wish to process a single order, enter the same value in both fields.
-
Customer Number (Low/High): Enter a value for Customer Number Low, Customer Number High, or both to limit credit card payment processing to orders for specific Customer numbers. If you wish to process credit card orders for a single customer, enter the same value in both fields.
-
Customer Class: Select a specific customer class to process credit card payments.
-
Credit Card Number: Enter a specific credit card number to process orders for credit card payment. Only orders with the specific card number entered will be processed.
-
Credit Card Type: Select a credit card type to process orders for credit card payment. Only orders with the specific credit card type will be processed.
-
Bill to Org: Select a specific Bill To to process credit card payments.
-
Booked Date Since: Enter a specific date to process all orders which have a creation date greater than or equal to the date entered for processing credit card payments.
-
Select OK, then Submit.
Archival Set, Order Archive Selection Concurrent Program
Archival Set
An archival set contains orders to archive based on user-specified criteria. You can create an archival set in the following ways:
-
Use the Order Archive Selection concurrent program.
-
Select an order or multiple orders in the Order Organizer window and then run the Create Archival Set concurrent program from the Tools menu.
Creating an Archival Set Using the Order Archive Selection Concurrent Program
The Order Archive Selection concurrent program enables you to select sales orders that you can archive. You determine which orders you want to archive by creating an archival set. After you select the orders to archive within an archival set, you can later choose to archive the entire set or a subset of the archival set.
You can also perform the following archival tasks:
-
Retrieve the archived sales orders
-
Purge sales orders directly from the archive
Use the Order Archive Selection program to create a new archival set to group the existing sales orders for archival. To create an archival set:
-
Navigate to the Order Archive Selection concurrent program.
-
Click Orders* Returns, click Purge, Archive and then click Order Archive Selection.
-
Select the operating unit.
-
Enter a unique name to create the archival set. This information is mandatory.
-
Enter a description for your archival set. This information is mandatory.
-
Select a range of order numbers to identify the sales orders for archival.
-
Select the order type.
-
Select the order category.
-
To archive the sales orders for a specific customer, select the customer from the list of values.
-
Select a range of dates between which the sales orders are created.
-
Select a range of dates between which the sales order or quote is created. You can directly create a sales order or convert an existing quote to a sales order. If the sales order is converted from a quote, then enter the creation date when the quote was created. The order date is the date on which a quote is converted to an order.
-
Select Yes in the Contract Terms field to include the sales order that is under a contract for purge. The default value is No.
-
Select one of the following options in the Include Open Orders field:
-
To include only closed or canceled orders in the archival set, select No.
-
To include orders that are still open in the archival set, select Yes. The default value is Yes.
-
-
In the Purge Acknowledgements field, select Yes to delete the sales order acknowledgment data during archival. The default value is No.
-
Click OK.
Order Archive Selection
Archive Option for Sales Orders with Terms and Conditions
When you create an archival set, use the Contract Terms parameter to indicate whether orders with contractual terms and conditions are eligible for purge. Select No if you do not want to purge orders with terms and conditions.
Creating an Archival Set Using Order Organizer
To create an archival set using the Order Organizer window:
-
Navigate to the Order Organizer window.
-
Select multiple orders.
-
From the menu, click Tools, then click Purge, Archive.
-
Click Archival Set to create an archival set.
-
In the Archival Set window that opens, enter a name and a description for the archival set.
-
Click Submit to create an archival set with all the selected orders.
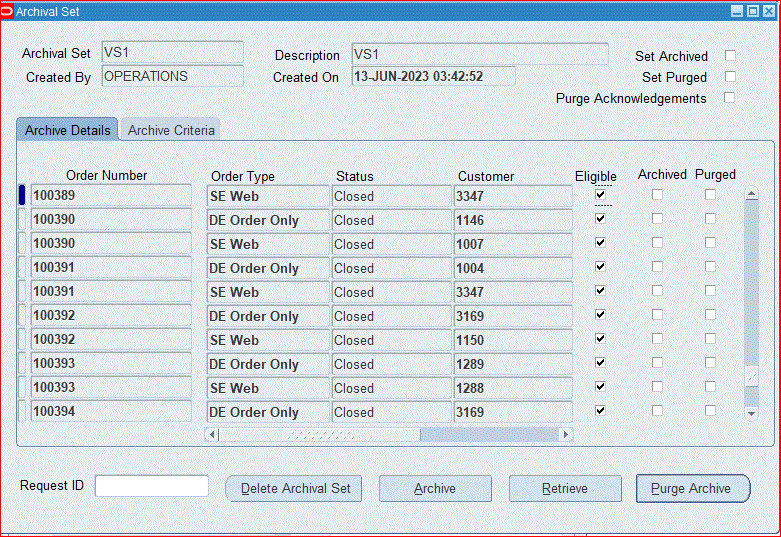
Using the Archival Set
Use the Archival Set window to query and select the archival sets to archive, retrieve, or purge. You create the archival sets using the Order Archive Selection concurrent program or using the Order Organizer window.
-
Navigate to the Archival Set window.
-
Click Orders* Returns, click Purge, Archive and then click Archival Set.
The Archival Set window opens with the Archive Detail and the Archive Criteria tabs.
You can view the information for the selected archival set.
-
A unique name for the archival set.
-
The name of the user who created the archival set.
-
A description of the archival set.
-
The date when the archival set is created.
-
The Set Archived check box indicates whether an archive has been completed or not for the set. If all the orders in the set are archived, then this check box is checked. The Set Purged check box indicates whether the purge process has been completed or not for the set. If all the orders in the set are purged, then this check box is selected.
-
The Purge Acknowledgements check box indicates whether the sales order acknowledgement data must be deleted during archival. While creating an archive set, if you have specified Yes for the parameter Purge Acknowledgements, then this check box is selected.
Using the Archive Details tab:
Use the Archive Detail tab to view the following information for the selected archival set:
-
The order type of the sales order in the archival set.
-
The Status field indicates the status of the sales orders when the archival set is created.
-
The name of the customer in the sales order in the archival set.
-
The Eligible check box identifies the sales orders that are chosen for archive before starting the archive process. You can select or deselect this check box at any point. Select the check box to validate and verify if the order can be archived. If not valid, an error is displayed.
-
The Archived check box identifies whether a sales order is archived. When you run the Archive Orders concurrent program, this check box is selected to indicate that the order is archived.
-
The Purged check box identifies if the sales order is purged. When you run the Purge Archive concurrent program to purge the sales order, then this check box is selected to indicated that the order is purged.
Archival Set - Archive Details tab
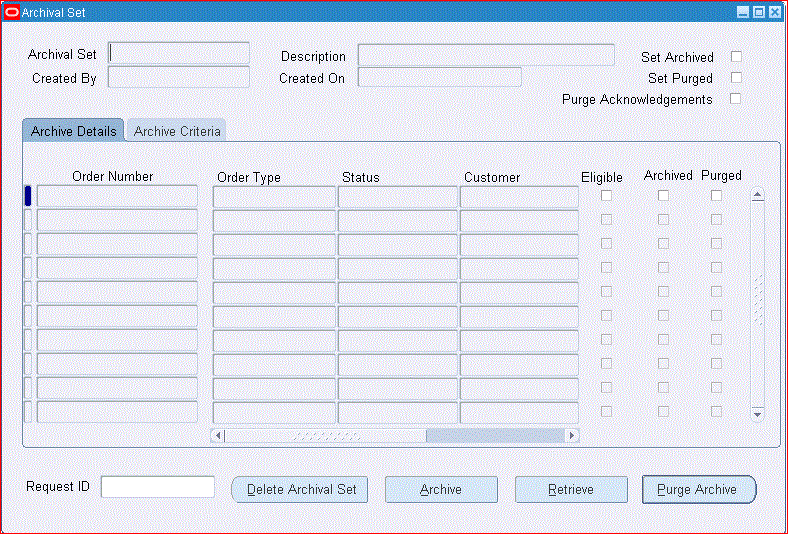
Use the Archival Set window to perform the following tasks:
Delete archival sets: To remove the archival set, click Delete Archival Set. When you delete a set, the data is deleted from the archival tables and not from the base transaction tables. You can delete a set only if the Set Archived and Set Purged check boxes for the set are deselected and if the Purged or the Archived check box are also deselected for all the sales orders in the set.
Important: An archival set can be deleted only by the user who has created it.
Archive sales orders: To archive sales orders, click Archive to run the Archive Orders concurrent program. This program processes all those orders with the Eligible check box selected. You can run this program only when the set is not completely archived nor purged. See Archive Orders.
Retrieve archived sales orders: To retrieve the archived sales orders, click Retrieve to run the Retrieve Archive concurrent program. This program processes all those orders with the Archived check box selected. You can run this program only when the set is completely or partially archived. See Retrieve Orders.
Purge archived sales orders: To purge the archived sales orders, click Purge to run the Purge Archive concurrent program. This program processes all those orders with the Archived check box selected. You can run this program only when the set is completely or partially archived. See Purge Orders
Request ID: Depending on the program you run (Archive, Retrieve, or Purge), you can see the request in the Request ID field.
-
Reviewing Data to be Archived
You can view all orders that meet the archival set creation criteria. You can preview the archive lists in the Archival Set window.
Archive Orders Program
To archive orders
Use the Archive Orders program to archive eligible sales orders. Select the Archival Set of the orders to archive.
To run the Archive Order program, complete the following steps:
-
Query the archival set in the Archival Set window to get the archival set information.
-
Click Archive in the Archival Set window to run the archival process for the selected sales orders.
The check box Eligible is selected or deselected based on the eligibility of the sales order when the archival set is created. You can select or deselect the check box to make the sales order eligible for archival. When you try to archive open sales orders, the application displays an error message.
-
The check box Archived is selected when the concurrent program Archive Orders is completed for individual sales orders.
-
The check box Set Archived is selected when all the sales orders in the set are archived.
When the archival process completes, the check box Set Archived is selected automatically. Also, the field Request ID is updated with the archive process request ID.
Note: When you archive a few sales orders in an archival set, the check box Archived is selected only for those orders, and the Set Archived check box is deselected
Viewing Archived Data
After an archive is complete, you can view the archived data only in the Archival Set window. Navigate to the Archival Set window and query the archival set name. You can choose orders in the archival set and submit the archival sets for the archive. All orders that are archived can be retrieved or completely purged.
Retrieve Archive Program
To retrieve orders
In the Archival Set window, select the archival set for the orders to be retrieved. Click Retrieve to retrieve the selected archived orders in an archival set. You can then query these retrieved orders as earlier in the Order Organizer window or in the HTML user interface.
To retrieve the archived sales orders, run the Retrieve program as follows:
-
Query the archival set in the Archival Set window that has one or more archived orders.
-
Click Retrieve to run the Retrieve Archive program to retrieve the archived sales orders.
When the concurrent program is logged, the field Request ID is updated with the request ID of the concurrent program. Also, the check box, Archived is deselected to indicate that the individual sales order is retrieved. The check box Set Archived, if selected, will also be deselected to show that any of the sales orders in the archival set are retrieved.
Note: The retrieved sales orders will not be automatically loaded to Order Management Command Center. If you require these sales orders to be loaded, then you must run the OM: Command Center Data Load concurrent program and specify the load type as Full Load.
Searching Archival Sets
Use the Find window to search for sales orders in an archival set.
Tip: If you select the Order Number, then you cannot use the fields Archival Set or Show Orders and vice versa to search for archival sets.
To search archival sets:
-
Click the Find icon.
The Find window opens.
Find Order or Set
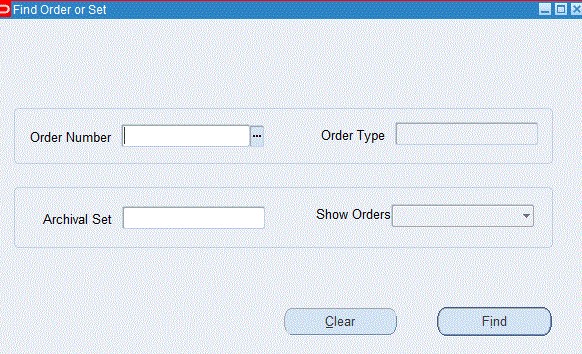
-
Select from the following search criteria:
-
Order Number - Select the order number to see all the archival sets for that order.
-
Order Number and Order Type - When you select an order number, then you can select Order Type. Select the order type to search for the archival set with that selected order number and order type. The combination of an order number and order type is unique for a sales order.
-
Archival Set - Select the archival set to see the particular archival set.
-
Show Orders - For the selected archival set, select the appropriate option in the Show Orders field to see eligible orders, ineligible orders, or both.
Find Orders
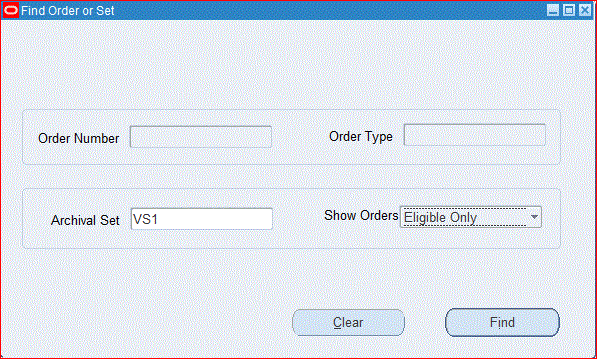
If you do not select any value in the Show Orders field, then you can see all the orders.
The Eligible check box is automatically selected in the Archive Details tab for the eligible orders.
Eligible Orders
-
-
Click Clear in the Find window to delete the previously entered data.
Validate Set Eligibility
Only eligible, closed, or canceled orders can be archived. Ineligible sales orders of an archival set can be revalidated to check for eligibility.
Click Tools, then select Validate Set Eligibility to run the concurrent program to check for ineligible sales order.
Purge Archive Program
To purge archived orders
Use the Purge Archive program to purge the archived sales orders of an archival set, so that these are permanently deleted and cannot be retrieved from the archive tables. To purge the archival sets, complete the following steps:
-
Query an archival set in the Archival Set window that has one or more archived orders.
-
Click Purge Archive to run the program to purge the archived sales orders.
The check box Purged is automatically selected for the archived sales orders selected for purge after the purge is complete. The check box Set Purged is selected when all the sales orders in the set are purged. After you run the Purge Archive program, the field Request ID is updated with the request ID of the requested Purge Archive program. Purged orders can no longer be retrieved. The Archived check box for the eligible sales orders remains selected and the Purged check box is selected to indicate that the orders are purged.
OM: Orders Archival Per Commit
Ensure that the profile option OM: Orders Archival Per Commit is set up. This profile option determines how many orders the archive process should archive before saving to the database. If you do not set, then the application will enforce a value of 500 orders per commit.
Purge Advanced Item Search Session Data Concurrent Program
Use this program to purge advanced item search sessions data. When you perform the Advanced Item Search action from the Sales Order or Quick Sales Order windows, data gets added to the oe_selected_items table. This data is session specific and has no relevance outside the applicable session. The application stores the session data forever, unless purged using the Purge Advanced Item Search Session Data Concurrent Program. Periodic purging of this data ensures efficient performance of the application.
To purge advanced item search session data:
-
Navigate to the Submit Request window, and select Purge Advanced Item Search Session Data in the Concurrent Programs Request Name field.
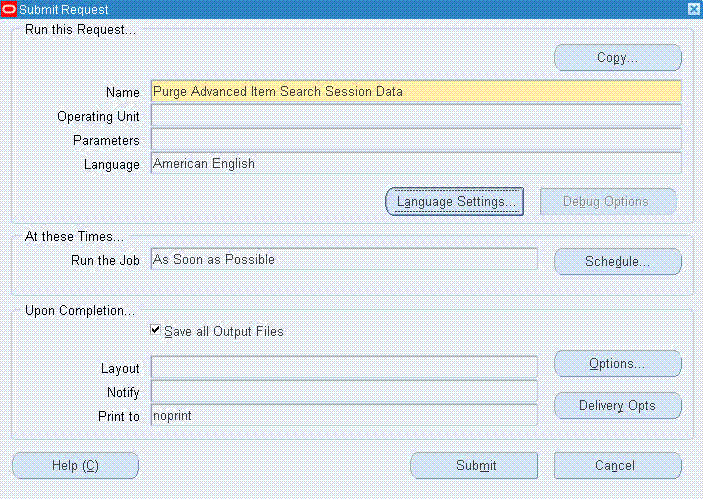
-
Click Submit.
Purge Imported Credit Exposure Concurrent Program
The Purge Imported Credit Exposure concurrent program enables you to purge imported external credit exposure records by operating unit and exposure source. If you have imported external credit exposure records for multiple operating units, in order to purge all external credit exposure records you will need to submit the concurrent program for each operating unit you have imported external credit exposure records for.
To purge credit exposure details which were imported from an external system:
-
Navigate to the Run Requests SRS window, and select Purge Imported Credit Exposure in the Request Name field.
Run Requests SRS Window - Purge Imported Credit Exposure

-
Select the Exposure Source, Exposure Sources are based upon user defined values for the Order Management Quick Code ONT: Credit Exposure Import Source. Prior to selecting a value for this parameter, ensure that external credit exposure records have previously been imported successfully. Otherwise, the program will fail.
-
Select ok, then Submit.
Note: The current value of the profile option MO: Operating Unit is used as a input parameter to this concurrent program. This parameter is hidden by default, and is used to prevent the Credit Exposure Import program from importing exposure records into other operating units.
If you need to purge exposure details for multiple operating units, Order Management recommends you set this profile option by responsibility, and then switch to the corresponding responsibility when purging exposure details.
Purge Set, Order, and Quote Purge Selection Concurrent Programs
The Purge concurrent program enables you to purge large number of closed and cancelled orders or quotes along with their workflow and audit history with its bulk processing capability. You first determine which sales orders or quotes you want to consider for purge by creating a purge set. After you select the orders or quotes to be included within a purge set, you can then choose to purge the entire set, a subset of the purge set. You can purge data to create space in your database and to improve performance.
A purge set contains orders or quotes for purge based on user-specified criteria. You can create a purge set in the following ways:
-
Use the Purge Set Creation concurrent program.
-
Select an order or multiple orders in the Order Organizer window and then run the Create Purge Set concurrent program from the Tools menu.
Purge Prerequisites
The following are the prerequisites to consider before you can purge:
-
Operating unit must be selected to restrict the quotes and orders for purge because the Order/Quote Purge Selection program can search for quotes and orders across operating units.
-
Quote status must be expired or lost.
-
Order status must be canceled or closed.
-
No open activity must exist including open invoices or open returns.
-
Unpaid invoices can exist for sales orders.
Note: Order or quote purge capability is available to Oracle Order Management Super Users only. You can submit the order or quote purge using a batch process. This program is controlled by function security to determine which responsibilities see Purge/Archive in the Tools menu.
Selecting Criteria for Order/Quote Purge Selection
To create a purge set for sales orders, select from the following criteria:
-
Operating Unit
-
Order Number (range)
-
Order Date (range)
-
Creation Date (range)
-
Order Category
-
Order Type
-
Customer
To create the purge set for quotes, select from the following criteria:
-
Operating Unit
-
Order Type
-
Customer
-
Expired Quotes
-
Lost Quotes
Reviewing Data to be Purged
You can view all orders or quotes that meet the purge criteria. You can preview preliminary purge candidate listings in the Purge Set window.
Canceling the Purge or Change the Batch Run Time
You can submit the Order or Quote Purge Selection program in a batch mode, cancel the batch job, or change the batch runtime.
Viewing Purged Data
After a purge is complete you can view the purged data only in the Purge Set window. Navigate to the Order/Quote Purge Set window and query the purge set name. You can submit the purge sets for purge, exclude certain orders/quotes within the set from being purged, or completely purge them (provided the records have been previously purged).
Purge Option for Sales Orders with Terms and Conditions
When you create a purge set, use the Contract Terms parameter to indicate whether orders with contractual terms and conditions are eligible for purge. Select No if you do not want to purge orders with terms and conditions.
OM: Transactions Purged Per Commit
This profile option can be set only at the site level. The value of this profile option indicates the number of orders/quotes per commit, in order/quote purge processing.
Creating a Purge Set Using the Purge Set Selection Concurrent Program
To create a purge set using Purge Set Selection program
-
Navigate to the Order Purge Selection concurrent program.
Order Purge Selection Parameters Window
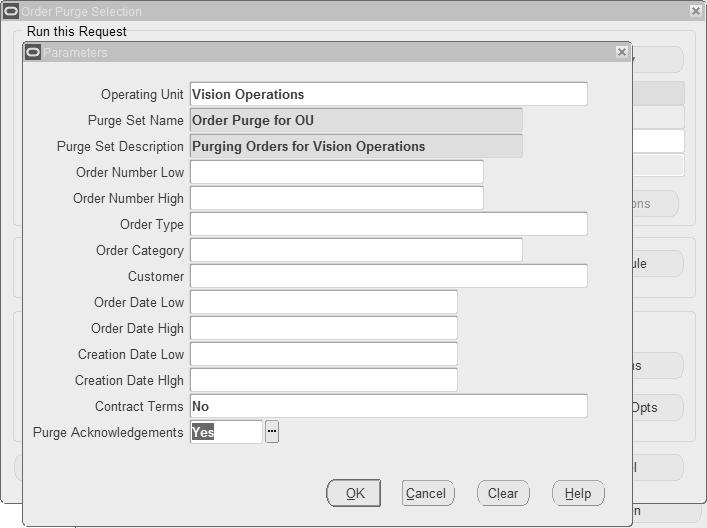
-
Click Orders* Returns, click Purge, Archive , and then click Purge Order Selection.
-
Enter a unique name to create the purge set. This information is mandatory.
-
Enter a description for your purge set. This information is mandatory.
-
Select a range of order numbers to identify the sales orders for purging.
-
Select the order type.
-
Select the order category.
-
To purge the sales orders for a specific customer, select the customer from the list of values.
-
Select a range of dates between which the sales orders are created.
-
Select a range of dates between which the sales order or quote is created. You can directly create a sales order or convert an existing quote to a sales order. If the sales order is converted from a quote, then enter the creation date when the quote was created. The order date is the date on which a quote is converted to an order.
-
Select Yes in the Contract Terms field to include the sales order that is under a contract for purge. The default value is No.
-
In the Purge Acknowledgements field, select Yes if you want to delete the sales order acknowledgment data during purign. The default value is No.
-
Click OK.
Creating a Purge Set using Quote Purge Selection Concurrent Program
Use the Quote Purge Selection program to create a new purge set for quotes. To create an purge set.
-
Navigate to the Quote Purge Selection concurrent program.
Quote Purge Selection - Parameters
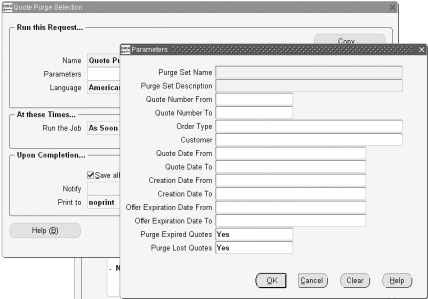
-
Click Orders* Returns, click Purge, Archive, and then click Quote Purge Selection.
-
Enter a unique name to create the purge set. This information is mandatory.
-
Enter a description for your purge set. This information is mandatory.
-
Select a range of order numbers to identify the quotes for purging.
-
Select the order type.
-
Select the order category.
-
To purge the sales orders for a specific customer, select the customer from the list of values.
-
Select a range of dates between which the quotes are created.
-
Select a range of dates between which the sales order or quote is created. You can directly create a sales order or convert an existing quote to a sales order. If the sales order is converted from a quote, then enter the creation date when the quote was created. The creation date is the date on which a quote is converted to an order.
-
Select the date to purge expired or lost quotes.
-
Click Submit.
Process Exceptions
If the selected orders or quotes do not meet the purge restrictions, such as the order is not closed or if there are outstanding reservations, or if the purge process encounters an issue, the process errors. You can view these errors in the Purge Set window.
For example, if you specify all orders for customer Business World in the Order Purge Selection concurrent program and when you navigate to the Order Purge window, orders that are ineligible for purge are marked in the Error column. The application displays that the order is not closed; and the Eligible check box is not enabled.
Creating a Purge Set Using Order Organizer
To create a purge set using the Order Organizer
Use the Order Organizer window to create a purge set.
Note: This method of creating a purge set is recommended only for a low volume of orders. For high a volume of purge data (greater than 100 orders) the Order/Quote Purge Selection (using the concurrent program) is recommended.
-
Navigate to the Order Organizer window.
-
Select an order or multiple orders to create in the purge set.
-
From the menu, click Tools, then click Purge, Archive.
-
Click Purge Set to create a purge set.
-
In the Purge Set window that opens, enter a name and a description for the purge set.
-
Click Submit to create a purge set with all the selected orders.
Using the Purge Set
Use the Purge Set window to query and select the purge sets to purge. You create the purge sets using the Order Purge Selection concurrent program or using the Order Organizer window.
To view a purge set
-
Navigate to the Purge Set window
-
Click Orders* Returns, click Purge, Archive and then click Purge Set.
The Purge Set window opens with the Purge Detail and the Purge Criteria tabs.
Using the Purge Detail tab
Use the Purge Detail tab to view the following information for the selected purge set.
Purge Set Window - Details Tab
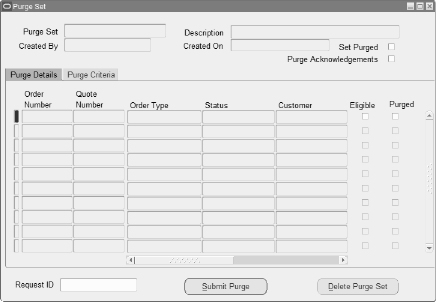
-
A unique name for the purge set.
-
The name of the user who created the purge set.
-
A description of the purge set.
-
The date when the purge set is created.
-
An error that may occur during purging in the Expiration Date Error field
-
The Set Purged check box indicates whether the purge process has been completed for the set. If all the orders in the set are purged, then this check box is selected.
-
The Purge Acknowledgements check box indicates whether the sales order acknowledgement data must be deleted during purging. While creating a purge set, if you have specified Yes in the parameter Purge Acknowledgements, then this check box is selected.
-
The Eligible check box identifies the sales orders that are chosen for purge before starting the purge process. You can select or deselect this check box at any point. Select the check box to validate and verify if the order can be purged. If not valid, an error displays as closed or canceled.
-
The Purged check box identifies whether a sales order is purged. When you run the Purge Order concurrent program, then this check box is selected.
Click Delete Purge Set to remove a purge set. When you delete a set, the data is deleted from the purge tables and not from the base tables.
When the purge process is completed, you can see the request ID in the Request ID field.
Using the Purge Criteria tab
You can see the criteria used to create the purge set in the Purge Criteria tab ater you submit the Order Purge Selection concurrent program.You can also enter the criteria to create a purge set.
Purge Set Window - Purge Criteria Tab
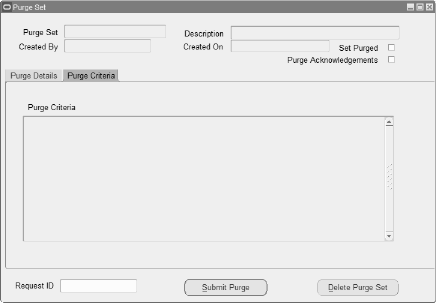
To create a purge set by specifying a where (selection) condition
-
Click Purge, Archive, then click Order Purge Selection from the navigator.
-
Enter the name, description, and the desired selection criteria and click OK.
-
Click Submit on the subsequent request screen.
To create a purge set for quotes replace the Order Purge Selection with the Quote Purge Selection concurrent program.
Viewing Order Purge
You can view the orders or quotes in that purge set in the Purge Set window after you create the purge set.
To view order purge
You can submit the purge set to purge, or exclude a few orders or quotes from the purge set or delete them.
-
Navigate to Purge, Archive, then click Purge Set.
-
Access the Purge Set window from Tools menu of the Order Organizer window.
-
Query by purge set name.
You can see the purge criteria.
Messages
Message Name: OE_PUR_ADD_ORDER
Message Text: This Order is ineligible for purging.
Description: This message is issued when the user tries to include an order into purge set.
Message Name: OE_PUR_DELETE_PURGE_SET
Message Text: You cannot delete a purge set that has some orders that have already been purged.
Description: This message is issued when user tries to delete a purge set, from which some orders have been purged.
Message Name: OE_PUR_DELETE_PURGE_SET_OK
Message Text: Delete Purge Set &PURGE_SET_NAME
Description: This message is for confirmation of delete.
Message Name: OE_PUR_PURGE_SET_DELETED
Message Text: Purge Set &PURGE_SET_NAME Deleted.
Description: This note is issued after the deletion of a purge set.
Message Name: OE_PUR_PURGE_SET_PURGED
Message Text: You cannot delete a purge set that has already been purged.
Description: This message is issued when a user tries to delete/submit a purge set.
Message Name: OE_PUR_REQUIRED
Message Text: Field must be entered.
Description: Message for a required field.
Message Name: OE_SRS_TITLE_GENERATE_PURGESET
Message Text: Order Purge Selection.
Description: Title for order purge selection.
Message Name: OE_PUR_CREATE_SUBMITTED
Message Text: Create purge set submitted with request id = &REQUEST_ID.
Description: Message issued when create purge set is submitted.
Message Name: OE_PUR_ORDER_PURGE_SUBMITTED
Message Text: Order purge submitted with request id = &REQUEST_ID.
Description: Message issued when order purge is submitted.
Message Name: OE_PUR_OPEN_ORDER
Message Text: Order is open.
Description: Message issued when an order is open.
Message Name: OE_PUR_OPEN_INVOICES
Message Text: Open invoices exist for this order.
Description: Message issued when open invoices exist for an order.
Message Name: OE_PUR_OPEN_RETURNS
Message Text: Open returns exists for this order
Description: Message issued when open returns exists for an order.
Message Name: OE_PUR_CANNOT_SUBMIT
Message Text: Purge set is already purged.
Description: Message issued when a user tries to submit order purge for a purge set which has already been purged.
Messages For Quotes
Message Name: OE_PUR_ADD_QUOTE
Message Text: This quote is ineligible for purging.
Description: This message is issued when a user tries to include a quote into purge set.
Message Name: OE_PUR_OPEN_QUOTE
Message Text: Quote is open.
Description: Message issued when Quote is open.
Message Name: OE_SRS_TITLE_GENERATE_QUOTE_PURGESET
Message Text: Quote Purge Selection
Description: Title for Quote purge selection.
Purchase Order Related Purge Changes
Message Name: OE_PUR_OPEN_PO_REQ
Message Text: Open drop ship PO/Requisition exists for externally sourced line of this order.
Description: This message is issued when there is an open PO or requisition existing for an order that has drop ship order lines.
Purge Order Management Workflow Concurrent Program
This concurrent program purges workflow items associated with Oracle Order Management, such as OM Order Line and OM Order Header. Unlike the Purge Obsolete Workflow Runtime Data program provided by Oracle Workflow, the Purge Order Management Workflow program purges workflows of closed sales order lines even if the sales order header is still open. It tries to close open workflows in a few very specific cases to make more workflow items eligible for purge. Use this purge program to reduce the size of workflow tables and improve high volume order processing performance.
To purge Order Management workflows of closed sales orders:
-
Navigate to the Submit Request window and select Purge Order Management Workflow.
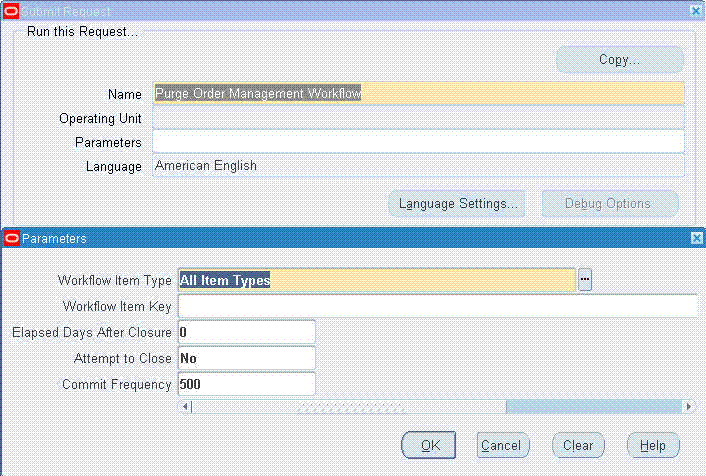
-
Select the workflow item type to purge the closed workflows corresponding to the applicable item type. The default value for this parameter is All Item Types. If you do not select any item type, then the concurrent program purges all the closed workflows corresponding to Order Management flows.
-
Enter the unique identifier of the workflow item that you want to purge. The application uses this information to purge the workflow corresponding to the workflow item key.
-
Enter the number of elapsed days after closure to purge workflows that were completed no later than this many days ago.
-
Select an applicable Attempt to Close option. If the workflow item type is OM Order Header or All Item Types, then the concurrent program identifies and attempts to close all the header workflows that are open due to pending line closure, even though all the lines in the order are in fact closed. If the workflow item type is OM Error, then the concurrent program identifies all the OM Error and WF Error flows that are either orphan, or those that are associated with OM flows that are no longer in error. The program completes the error flows and purges them.
-
Enter the purge frequency of the workflow data. The default value is 500. The application issues commits to the database engine after every 500 purged workflow items.
Tip: To purge high volume of transactions, it is recommended that you attempt to purge data in blocks of data, purging oldest workflow data first. For example, you could purge workflow data older than 1000 days (instead of 120) if you have workflows that are 1000 days old. Then purge WF date that is 900 days, 800 days old. After each purge action, collect bde_wf_data.sql output, verify that the figures gathered earlier have been reduced and run gather table statistics on WF_tables. You must perform this action for OEOL and OEOH. This enables the Purge process to complete in a reasonable time if you run it on a regular basis.
Purge Retrobilling Requests Concurrent Program
Use this program to delete the retrobilling requests that are executed in the Preview mode. You can raise retrobill requests in Preview and Execute modes, however, this program enables you to delete Preview mode retrobill requests. You cannot purge retrobill requests raised in the Execute mode as such requests are required for reference and auditing purpose. You can schedule this program to run on a frequent basis. Whenever the application generates retrobilled orders, it adds data to the oe_retrobill_requests table. This data is stored in the table forever, unless purged by the Purge Retrobilling Requests program.
To purge retrobilling requests:
-
Navigate to the Submit Request window, and select Purge Retrobilling Requests in the Concurrent Programs Request Name field
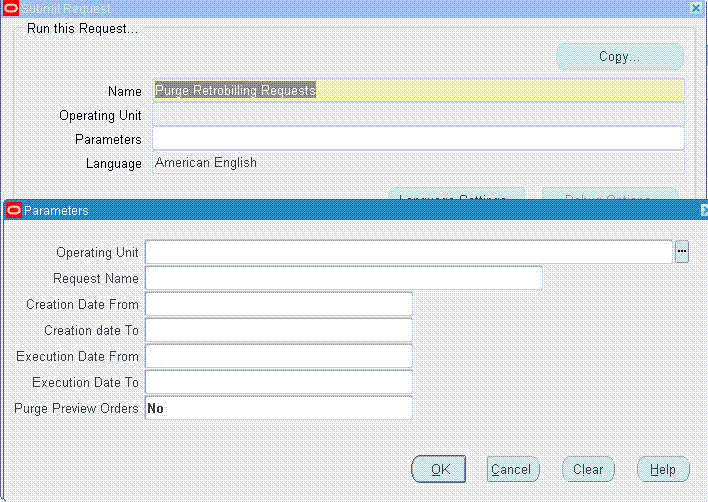
-
Select the operating unit of the retrobill requests.
-
Enter the retrobill request name.
-
Provide the retrobill request creation and execution dates.
-
Select Yes to purge preview orders.
-
Click OK.
-
Click Submit.
Release Expired Holds Concurrent Program
Order Management provides the ability to release all expired holds by effectivity date.
There are no enterable input parameters for this program: When the concurrent program is called, all expired holds with an ending Effectivity Date less than or equal to the system date will automatically be released.
To release Expired Holds:
-
Navigate to the Run Requests SRS window, and select Release Expired Holds in the Request Name field.
-
Select OK, then Submit.
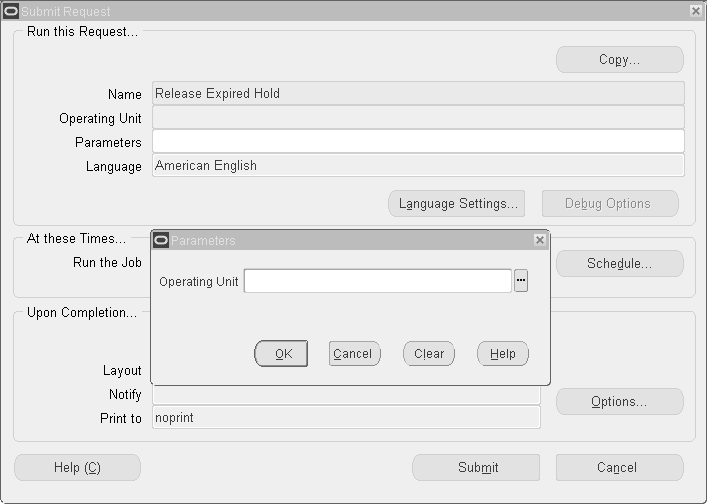
Re-Schedule Ship Sets Concurrent Program
The Re-Schedule Ship Sets concurrent program is utilized to re-schedule Ship Sets to the earliest finite supply date, for all order lines within the set. The time fenced used in the calculation is the time fence defined for the ATP rule linked to the order line item.
Note: If order lines are scheduled based on the Infinite Supply Time Fence you can submit this program to reschedule order lines to secure a more practical (and the best) Earliest Available Date. This program will process order lines only if the lines are part of the set.
To re-schedule Ship sets via concurrent program:
-
Navigate to the Order Management Standard Request Submission window, and select Re-Schedule Ship Sets.
Order Management Standard Request Submission Window
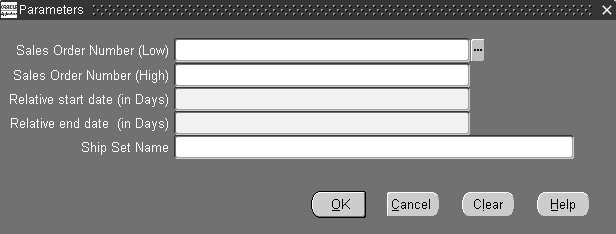
-
Determine the orders you wish to attempt Ship Set rescheduling for. Select a value for the Sales Order Number (low), Sales Order Number (high), or a combination of sales order numbers. These fields are optional.
-
Determine the date or dates you wish to include re-scheduling of Ship Sets from or to. Enter a value for the Relative Start Date (in days), Relative /End Date (in days), or a combination of Relative Start/End Dates (in days). These fields are required.
-
Re-schedule a Ship Set by Set Name. Select a value in the Ship Set Name field. This field is optional.
-
Select OK, then Submit.
Reserve Orders Concurrent Program
The Reserve Orders concurrent program attempts to reserve items as specified by input parameters. The concurrent program attempts to reserve any order lines (for order line types that support Reservations) that are scheduled, and have quantity for complete fulfillment. Reserve Orders supported two modes for scarce inventory, Fair Share and Percentage. The Fair Share reservation mode calculates fair share percentage based on demand and available supply in primary quantity, regardless of the fulfillment base on the selected order lines. This program supports a third mode, Partial. Using Reserve Orders, you can choose whether to reserve or simulate reservations.
Note: For input parameters where you can specify a range (Low and High values):
-
If you specify a Low value and not a High value, this program will reserve all order lines that meet or exceed the Low value.
-
If you specify a High value and not a Low value, the program will reserve all order lines equal to or less than the High value entered.
Note: When the parameter Reservation Run Type is Create Reservation for Set, only the Set Name parameter will be honored and all other parameters will be ignored. The concurrent program will attempt to process the data within the specified Set.
The Reserve Orders program always honors the Order By criteria (if specified) regardless of subinventory. This program reserves order lines created first within the Order By value. For orders with Fair Share reservation mode, the program does not accept the Order By criteria. In this case, the program reserves orders based on the subinventory, thereby ensuring accurate share to the lines having same subinventory. It first reserves orders that have a subinventory specified for them and later reserves orders with no specified subinventory.
To Reserve Orders via concurrent program:
The Reserve Orders concurrent program can be run across operating units.
-
Navigate to the Order Management Requests window, and select Reserve Orders.
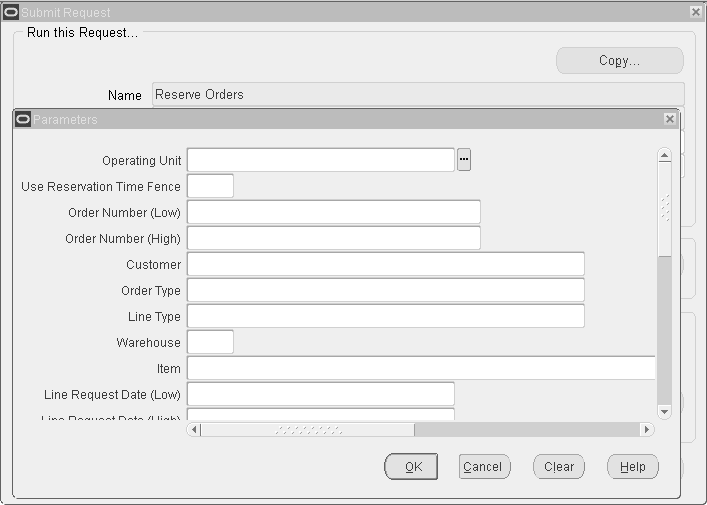
-
Operating Unit: This parameter can be defaulted or specified at run time. If this program is run for a specific Operating Unit then list of values for operating unit dependent parameters will be validated against the Operating Unit entered. Else those parameters will show appropriate values for all Operating Units the user has access to.
-
Use Reservation Time Fence: Select from
-
Yes: Include the value of the Order Management system parameterOM: Reservation Time Fence when reserving orders and lines utilizing this concurrent program.
-
No: Do not include the value of the Order Management system parameter OM: Reservation Time Fence when reserving orders and lines utilizing this concurrent program.
If you do not enter a value for this parameter, then Order Management interprets a null value as equivalent to Yes.
-
If you do not specify a value for this parameter, and the system parameter OM: Reservation Time Fence is set to NULL, the order line will not be processed for generating a reservation.
-
If this parameter is set to Yes, and Order Management system parameter OM: Reservation Time Fence is set to NULL, the order line will not be processed for generating a reservation.
-
-
-
Order Number (High): Select an order number to reserve order lines for. If you do not specify an order number, the system will attempt to reserve all order lines during concurrent program execution.
-
Reserve orders for a specific customer by selecting a value for Customer. All order lines for a customer that are not currently reserved will be processed for reservations during the execution of this concurrent program.
-
Reserve orders for a specific Order Type by selecting a value for Order Type.
-
Reserve order lines for a specific Line Type by selecting a value for Line Type.
-
Reserve orders by warehouse (organization) by selecting a value for Warehouse.
-
Reserve order lines by item by selecting a value for Item.
-
Reserve orders by Line Requested Date by entering a value for Line Request Date Low, Line Request Date High, or a range of line requested dates by entering a value for Line Request Date (Low/High).
-
Reserve orders by Scheduled Ship Date by entering a value for Scheduled Ship Date Low, Scheduled Ship Date High, or a range of Scheduled Ship Dates by entering a value for Scheduled Ship Date (Low/High).
-
Reserve orders by Scheduled Arrival Date by entering a value for Scheduled Arrival Date Low, Scheduled Arrival Date High, or a range of Scheduled Arrival Dates by entering a value for Scheduled Arrival Date (Low/High).
-
Reserve orders by Ordered Date by entering a value for Ordered Date Low, Ordered Date High, or a range of ordered dates by entering a value for Ordered Date (Low/High).
-
Reserve orders by Demand Class. Enter a Demand Class previously defined within the system.
-
Reserve orders by Planning Priority. Enter the Planning priority previously defined within the system
-
Determine the processing order that the concurrent program will utilize during execution within the Order By field. Existing supply will be reserved on the basis of you choice. If you choose a value that utilizes a date, the earliest date available will be the first order processed for reservations, based upon you other input parameters selected.
For example, if you select Date Ordered, then the order with the earliest Order Date (based upon all other input parameter values) will be processed initially. Select from:
-
Actual Arrival Date
-
Date Ordered
-
Date Requested
-
Planning Priority
-
Promised Date
-
Scheduled Ship Date
-
-
For Reservation Mode = Partial Reservations - Include Partially Reserved Lines, and Prioritise by Reserved Lines? = Yes, the program groups the partially reserved lines and then tries to allocate the available reservable quantity to these lines first. In essence, partially reserved lines always get high priority over the lines which are not yet reserved (irrespective of the Schedule ship dates on the lines). If Prioritise by Reserved Lines? = No, then the program processes as it does currently.
-
Reserve from Subinventory. Lists all the subinventories associated with a warehouse that you have specified. This field is disabled if you have not entered the warehouse.
-
Lot Number - Lists the Lot numbers associated with the specified item and warehouse. Lot Number is enabled when you have specified item, warehouse, and subinventory.
-
Revision Number - Lists the Revision numbers associated with the specified item and warehouse. Revision Number is enabled when you specify item and warehouse.
Note: While reserving the lines, if the line has the subinventory, then the program does not honor the 'Reserve From Subinventory' value. If the line has prior partial reservation with different subinventory as entered in 'Reserve From Subinventory', then the program does not honor subinventory, lot, or revision level reservation. This program does not reserve serial or locator controlled items. You must use Inventory Reservation Details window to reserve these items.
-
Select OK, then Submit.
The log file generated as a result of a submission of the Reserve Orders concurrent program displays all internal order line ids' selected for processing based upon the input parameters entered.
Schedule Orders Concurrent Program
The Schedule Orders concurrent program enables you to schedule, unschedule, and reschedule sales orders. This program can also progress the Scheduling workflow for those order lines that are waiting at the Schedule-Eligible activity. The scheduling mode you select when you run the program determines the process that the program performs.
Scheduling Orders
The Schedule Orders concurrent program schedules only those lines that have failed workflow scheduling. Apart from being able to schedule lines that have failed workflow scheduling, manually entered lines in the Entered status can be scheduled periodically using the Schedule Orders concurrent program, or unscheduled lines imported in Entered status can be scheduled. Additionally, orders that have been imported and are in Entered status can also be scheduled using the Schedule Orders concurrent program. The concurrent program:
-
Obtains additional scheduling attributes including delivery lead times and shipping methods.
-
Obtains the ship from location for order lines.
-
Obtains the schedule date and the warehouse for order lines.
-
Reserves order lines if the lines are within the reservation time period.
-
Progresses an order line belonging to a Ship/Arrival set if its workflow is at the "Schedule - Eligible" activity.
If the program fails, because for instance the schedule date for an item could not be found, Order Management returns an error for the line. Lines that fail scheduling can be scheduled in the next run of the program. All lines that are successfully scheduled are placed on demand and the next planning run can pick these lines up as demand.
The Schedule Orders concurrent program processes order lines you specify by using the parameters listed above, if the line is not already scheduled. The Schedule Orders concurrent program performs the following:
-
Checks for any holds on the order. If a hold exists and the system parameter OM: Schedule Line on Hold is set to No, the program ignores the order. If the system parameter is set to Yes, the order continues to the next step.
-
Queries the lines of the order and locks the lines. If locking fails, it will print a message and skip the order.
For each line of the order, the Schedule Orders concurrent program:
-
Checks the workflow status to verify that the line is eligible for scheduling.
-
Checks if the line needs scheduling. Processes only the lines that need scheduling.
-
Checks if the line is on hold. If there is a hold and if the system parameter OM: Schedule Line on Hold is set to No, the line is skipped.
-
Adds the line to the list of lines ready to be scheduled.
-
Schedules the line.
Note: If scheduling was successful, it completes the scheduling workflow activity with the result of Complete so that the line can progress to the next activity. If scheduling was unsuccessful, the workflow activity displays the result of Incomplete.
Rescheduling Orders
You can use the Schedule Orders program to reschedule orders. The Schedule Orders program provides two scheduling modes for rescheduling: Reschedule and Reschedule using Request Date. You may need to reschedule sales order lines if item availability has changed or if orders or delivery schedules from suppliers are changed or cancelled. The reschedule process reschedules the allocated products to meet the changed demand.
When you run the Schedule Orders program using the rescheduling modes you can also choose to enter the additional parameters First Order By, Bulk Processing, and Workers (the number of parallel workers).
If you do not select the Bulk Processing parameter for rescheduling orders, the Schedule Orders program processes line by line, unscheduling one line then rescheduling it before moving to the next line. Since only one line is unscheduled at a time, when that line is scheduled again within Available to Promise (ATP) it does not receive a better date because other lines have not released their demand.
Note: Because the Schedule Orders program processes one line at a time, the Reschedule mode never alters allocation within the lines selected for reschedule. To alter allocation within the lines selected for reschedule, you can use the Release Sales Order Recommendations program from the Planning Workbench.
Below is an example of how the Schedule Orders program performs in the Reschedule mode.
| Order Number | Ordered Item | Request Date | Schedule Ship Date |
|---|---|---|---|
| 11001 | AS54888 | 27-May-2011 | 08-Jun-2011 |
| 12012 | AS54888 | 01-Jun-2011 | 13-Jun-2011 |
| 12056 | AS54888 | 02-Jun-2011 | 08-Jun-2011 |
| 13670 | AS54888 | 03-Jun-2011 | 13-Jun-2011 |
If the requirement is to have lines rescheduled again to have allocation in the order of request date and you execute the program with mode as Reschedule Using Request Date, then the result displays the same details as the previous table. This is because, as the program process one line at a time and releases allocation of that line only, the allocation remains the same.
For rescheduling orders, if you set the Bulk Processing parameter to Yes, set the Workers parameter to a value greater than one, and set the First Order By parameter to Request Date, then the Schedule Orders program unschedules all of the selected lines and then schedules them again using the order-by criteria. The order lines with the earliest request dates receive the earliest ship dates. If you set the Workers parameter, the lines are processed in parallel based on the number of workers you enter. The program does not reschedule all of the lines selected based on the First Order By parameter. The First Order By parameter is applicable only within the individual child workers. If any of the lines fail the scheduling action after unscheduling, they are scheduled again to the previous date in ATP override mode.
Note: When requests across different parallel sessions for the same Item-Organization get sent to Global Order Promising (GOP) at the same time, GOP uses the same supply to promise multiple orders. If you are rescheduling for one item-warehouse combination, then you should not use the Workers parameter as this would guarantee the functional accuracy of the result.
Concurrent Program Parameters
Scheduling Mode
When running the Schedule Orders concurrent program you must select a Scheduling Mode. The Scheduling Modes are:
Note: Schedule Orders concurrent program works for all unscheduled lines and the sales order lines may or may not be waiting at the Schedule-Eligible activity.
-
Progress Lines at Schedule-Eligible Activity
Only selected lines waiting at the Schedule-Eligible workflow activity are selected and scheduled. Note that the lines may or may not be scheduled and still could be waiting at the activity. If the lines are not scheduled and are at this activity, then they are scheduled and progressed. If lines are already scheduled, and they are at this activity, then they are just progressed because they have already been scheduled. If no value is entered for the Scheduling Mode parameter, this is the default mode.
-
Reschedule
Lines are rescheduled by using the specified scheduling attributes (warehouse, date). If no scheduling attributes are entered, then the existing line level attributes (warehouse, date) are used for rescheduling.
If the rescheduling action is not successful, then the line is left unchanged, so the line remains scheduled. You can avoid high-risk failures by performing an unschedule and then schedule appropriately. Scheduling attributes are supported only for Schedule or Reschedule modes.
-
Reschedule Using Request Date
Lines are rescheduled by using the Request Date instead of Schedule Ship Date or Schedule Arrival Date. Only scheduled lines will be queried.
-
Schedule (all unscheduled lines)
All unscheduled lines are selected and scheduled. If a line is waiting at the Schedule-Eligible activity, then the activity is progressed after scheduling completion. You can also specify the Scheduling attributes (warehouse, date).
If the query includes one line in a Set (ship, arrival) SMC PTO Model, or ATO Model, then all the lines in the Set or SMC PTO Model or ATO Model are scheduled. The exception is when the Schedule Mode is Schedule without any scheduling attributes. In this case, the top model with included item/Optional item/Optional class are scheduled. If the query includes a line with PTO Model, Kit, or a PTO Class, then the included items are also scheduled with the parent.
-
Unschedule
Unschedules all the selected lines. Only scheduled lines are queried.
The Unschedule action is not supported for lines belonging to Sets (Ship, Arrival).
Include and Exclude Reserved Lines
The Include Reserved Lines parameter is available in the Schedule Orders concurrent program when the scheduling mode is set to Reschedule, Reschedule using Request Date, or Unschedule. When performing these scheduling modes you have the option to include or exclude reservation lines. The values for this parameter are predefined using the ONT_SCH_RESERVE (Schedule Including Reserved Lines) lookup type. The values are:
-
No: Exclude both inventory and non-inventory reservations
-
Non-Inventory Reservations Only: Exclude inventory reservations and include non-inventory reservations
-
Yes: Include Inventory and non-Inventory reservations
-
Null: Default, equivalent to Yes
If you set the Included Reserved Lines parameter to No or Non-Inventory Reservations Only, the Include Pick Release Lines parameter is disabled as there is no meaning to selecting this parameter after the reserved lines are excluded.
If you set the Included Reserved Lines parameter to No, then all standard, Available to Order (ATO), or non-ship-model complete (non-SMC) lines that are already fully or partially reserved are excluded from reschedule. If the lines are part of an SMC model, a Ship set, or a Arrival set then the entire SMC model, Ship set, or Arrival set is excluded from further processing when all the shippable lines are reserved. If any of the shippable lines that are part of the SMC model, Ship set, or Arrival set are not reserved than all the lines in the SMC model, Ship set, or Arrival set are picked for further processing. If the parameter is set to Non-Inventory Reservations Only, then only lines that have reservations against Inventory only are excluded. Lines that have non-inventory reservations or no reservations are processed. If the parameter is set to Yes or is null, then all lines are processed whether there are reservations or not.
Bulk and Parallel Processing
Using the Schedule Orders concurrent program you can perform bulk processing for any of the scheduling modes. Plus, you can run the program in parallel. You can spawn multiple child requests for the program and then each child request processes the records in parallel.
To process the orders in bulk and in parallel, you need to enter these parameters:
-
Bulk Processing
Enter Yes if you want to perform bulk processing. If you set this parameter to Yes, then ATP is called in batches as specified by the Commit Threshold parameter, for all the sales order lines selected for processing.
Enter No if you do not want to perform bulk processing. It you set this parameter to No, the selected lines are processed one by one. Each line is sent to ATP and depending on the mode is scheduled, unscheduled, or rescheduled.
-
Workers
This parameter is only enabled if the Bulk Processing parameter is set to Yes.
Enter the number of child requests (workers) you would like to spawn for parallel processing:
-
If you enter a value that is greater than one then approximately that many child requests are spawned, and for each child request, ATP is called in batches (as specified in the Commit Threshold parameter) for all the lines assigned to the child for processing.
-
If you enter a value of 1 or no value, then all the records are processed in a single parent run itself. In this case, the entire group of lines selected for processing (including models, sets, and standard lines) are processed through a single request. Spawning a child request does not add any value. Instead, an entire group of lines are processed in the parent run itself. So, by spawning one child request, standard lines are processed in the child request and groups (models and set) are processed in the parent run.
If a line errors out, only that line or group (in case of sets/models) is not scheduled, unscheduled, or rescheduled. All of the other lines are scheduled, unscheduled, or rescheduled successfully.
-
-
Commit Threshold
In the case of Bulk Processing, this parameter value is considered as the number of order lines sent together to ATP at one time within each worker. If you have not entered any value, then the program issues commit after executing all records. 1000 appears as the default. The program commits by default after every 1000 records. Though the exact number of order lines processed in each commit depends upon whether the lines are part of a set/model.
Note: If bulk processing is not selected, this parameter can be used to issue a commit after the execution of the number of records as given in this parameter.
Bulk Processing Examples
Example 1:
1200 standard lines are selected for processing, and Bulk Processing is set to Yes, Commit Threshold is set to 100, and Workers is set to 4.
In this example, approximately 4 child requests are spawned. Each child request processes roughly 300 lines. In each child request, ATP is called 3 times in batches of 100 records.
The number of lines assigned to each child request is not straightforward. If the 300th line happens to be part of an ATO model, then the entire model needs to be processed by a single child request.
Example 2:
Let's say you have an order with the following lines:
-
1 Kit with 2 child lines (3 lines)
-
1 ATO model with 2 child lines (3 lines)
-
1 PTO model with 2 child lines (3 lines)
-
1 Hybrid SMC model with 7 child lines (8 lines)
-
1 Standard line (1 line)
Total 18 lines. Now if Bulk Processing is set to Yes and number of Workers is set to 5, then ideally each child request would get 4 lines and 5 child requests would be spawned. However 5 requests are not spawned. This is how the child requests are spawned:
-
While logging the first child request, it will try to process 4 lines. But the 4th line is an ATO model and the entire ATO model needs to go in a single run. So the first 6 lines go to child request 1.
-
While logging the second child request, it will try to process 4 lines. But the 4th line is again part of a Hybrid SMC model and the entire SMC model needs to go together, so the next 11 lines go to child request 2.
-
While logging the third child request, it will get the last line.
For this example only three requests will be logged.
This table illustrates the order line grouping when assigning lines to child requests:
| Item Type | Schedule |
|---|---|
| Standard Line | Only standard line mandatory. |
| Standard Line in Ship/Arrival Set | Whole set mandatory. |
| ATO Model | Whole configuration mandatory. |
| ATO Class | Whole configuration mandatory. |
| ATO Option | Whole configuration mandatory. |
| PTO Model (SMC) | Whole configuration mandatory. |
| PTO Class (SMC) | Whole configuration mandatory. |
| PTO Option (SMC) | Whole configuration mandatory. |
| PTO Model (Non - SMC) | Model and its Included Item will be scheduled. |
| PTO Class (Non - SMC) | Class and its Included Item will be scheduled. |
| PTO Option (Non - SMC) | Only Option Line will be scheduled. |
| Included Item | Cannot be done independently. Parent will schedule included item. |
Schedule Date and Warehouse
You can query lines, and assign either a new Schedule Ship Date (this can be Schedule Ship Date or Schedule Arrival date; depending on the Order Date Type value) or Warehouse when rescheduling a line, and have the flexibly to change to a location meeting the schedule requirements.
This is possible with Scheduling Across Orders (SAO), but for high volume, you can change the Schedule Date in batch mode.
Sorting
You can sort the sequence of line scheduling; setting the scheduling priority, using the sorting parameters First Order By and Second Order By and the following:
-
Demand Class
-
Line Creation Date
-
Planning Priority
-
Request Date
-
Schedule Arrival Date
-
Schedule Ship Date
-
Shipment Priority
For items with no supply constraints, all lines are scheduled, lowering the dependence on the Order By parameters. For ATP items, the Order By parameter is useful, especially if an API is written to implement specific business rules.
Note: Sorting is based on line level columns. Sorting for the Shipment Priority and Demand Class is based on the internal lookup codes and not the values.
Schedule Orders Procedures
To Schedule Orders:
-
Navigate to the Submit Request window, and select Schedule Orders in the Name field.
After you select the name, the Parameters window appears.
-
Enter the parameters for the orders you want to schedule. You can use these parameters for scheduling orders:
-
Operating Unit
-
Order Number Low
-
Order Number High
-
Order Request Date Low
-
Order Request Date High
-
Order Customer PO Number
-
Order Ship-To Location
-
Order Type
-
Customer
-
Ordered Date Low
-
Ordered Date High
-
Warehouse
-
Item
-
Demand Class
-
Planning Priority
-
Shipment Priority
-
Line Type
-
Request Date Low
-
Request Date High
-
Ship-to Location
-
Schedule Ship Date Low
-
Schedule Ship Date High
-
Schedule Arrival Date Low
-
Schedule Arrival Date High
-
Booked
-
Scheduling Mode
-
Include Reserved Lines
This parameter is only enabled when the scheduling mode is set to Unschedule, Reschedule, or Reschedule using Request Date.
-
Bulk Processing
-
Apply - Warehouse
-
Apply - Schedule Date
-
First Order By
-
Second Order By
-
Include Pick Released Lines
This parameter is disabled if you exclude reserved lines using the Include Reserved Lines parameter.
-
Commit Threshold
Note: This can be used to issue a commit after execution of the number of records as given in this parameter when Bulk Processing is not selected. In the case of Bulk Processing, this parameter value is considered as the number of order lines sent together to ATP at one time within each worker. If you have not entered any value, then the program issues commit after executing all records. 1000 appears as the default. The program commits by default after every 1000 records. Though the exact number of order lines processed in each commit depends upon whether the lines are part of a set/model.
-
Workers
Schedule Orders Parameters window (1 of 2)
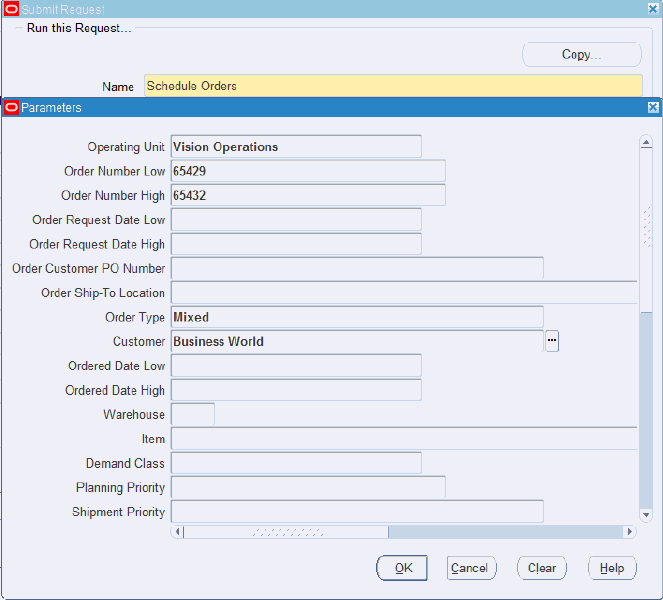
Schedule Orders Parameters window (2 of 2)
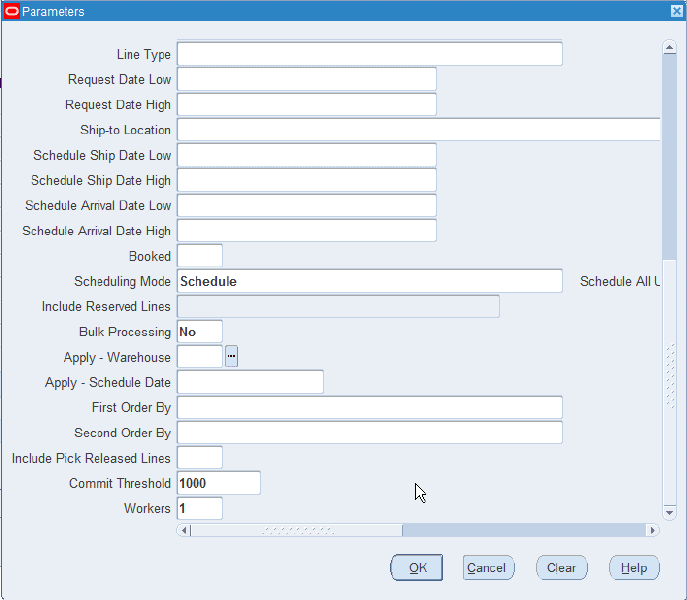
-
-
Click OK, then Submit.
Note: A business flow may require a customer service representative (CSR) to enter orders without scheduling, to save time. Later, you could run the Schedule Orders concurrent program to schedule the order lines.
Scheduling failures are written to the concurrent request log file. In addition, error messages are stored in the process messages table with the Concurrent Request ID, Order and Line Details. The Process Messages window can be used to query the messages for the Request Run or an order.
Summary processing statistics like the number of processed lines and number of failed lines are printed at the end of the concurrent request log file.
If the number of Sales order lines scheduled in the batch are small, then the Schedule Across Orders module can be used to query back the results by using the appropriate fields in the find window.
To Schedule Orders that Were Never Scheduled
-
Set the profile option OM: Auto Schedule to No. The lines are scheduled at the time of entry.
-
Enter a sales order header and lines, and then save the order making sure it was not scheduled.
-
Navigate to the Submit Request window, and select Schedule Orders in the Name field.
-
Enter the search parameters for the orders you want to schedule. Select Schedule in the Scheduling Mode parameter.
-
(Optional) Enter a scheduling attribute such as Apply - Schedule Date and Apply - Warehouse.
-
Submit the request.
-
Verify that the request has completed, then view the order in the Sales Orders window, checking any scheduling attributes you have made.
To Schedule Booked Orders:
-
Set the profile option OM: Auto Schedule to No. The lines are not scheduled at the time of entry.
-
Create two sales orders with each one having at least one line.
-
Place a hold on one of the sales order lines within one of the sales orders to prevent automatic (workflow) scheduling at booking time.
To prevent automatic (workflow) scheduling:
-
Set the system parameter Schedule Lines on Hold to No.
-
Place a generic hold on the order line by selecting Apply Holds from the Actions menu.
You can also use the Defer Scheduling Workflow Activity.
-
-
Book the sales order that has the line on hold and verify that the line did not get scheduled.
-
Release the hold on the line.
-
Navigate to the Submit Request window, and select Schedule Orders in the Name field.
-
Enter the search parameters for the orders you want to schedule. Select Schedule in the Scheduling Mode parameter.
-
Enter Yes in the Booked parameter.
-
Submit the request.
-
Verify that the request has completed, and then view the orders in the Sales Orders window, checking to see that only the booked order was scheduled.
To Reschedule the Lines that Have Been Scheduled
-
Enter a sales order header and lines, schedule the lines, and then save the order.
-
Navigate to the Submit Request window, and select Schedule Orders in the Name field.
-
Enter the search parameters for the orders you want to reschedule. Select Reschedule in the Scheduling Mode parameter.
-
(Optional) Select a value for the Include Reserved Lines parameter. Values are:
-
No: Exclude both inventory and non-inventory reservations
-
Non-Inventory Reservations Only: Exclude inventory reservations and include non-inventory reservations
-
Yes: Include inventory and non-inventory reservations
-
Null: Default, equivalent to Yes
-
-
Enter one or both of these scheduling attributes: Apply - Schedule Date and Apply - Warehouse.
-
Submit the request.
-
Verify that the request has completed, and then view the orders in the Sales Orders window, checking to see if the values entered are there.
Some factors to consider: If rescheduling is not successful, the line is unchanged, which implies that the line will still be scheduled. You can determine the number of failed lines from the concurrent request log or the Process Messages window. It is advisable to follow a two-step rescheduling process, which is to unschedule first and then schedule appropriately. Scheduling attributes are supported only for Schedule or Reschedule modes.
To Unschedule the Lines that Have Been Scheduled
-
Enter a sales order header and lines, schedule the lines, and then save the order.
-
Navigate to the Submit Request window, and select Schedule Orders in the Name field.
-
Enter the search parameters for the orders you want to unschedule. Select Unschedule in the Scheduling Mode parameter.
-
(Optional) Select a value for the Include Reserved Lines parameter. Values are:
-
No: Exclude both inventory and non-inventory reservations
-
Non-Inventory Reservations Only: Exclude inventory reservations and include non-inventory reservations
-
Yes: Include inventory and non-inventory reservations
-
Null: Default, equivalent to Yes
-
-
Submit the request.
-
Verify that the request has completed, and then view the orders in the Sales Orders window, checking to see if the lines are unscheduled with the Scheduled Ship Date being blank.
To Progress Lines at the Schedule-Eligible Activity
-
Set the profile option OM: Auto Schedule to No. The lines are not scheduled at the time of entry.
-
Create two sales orders with each one having at least one line.
-
Place a hold on the sales order lines within the sales orders to prevent automatic (workflow) scheduling at booking time.
To prevent automatic (workflow) scheduling:
-
Set the system parameter Schedule Lines on Hold to No.
-
Place a generic hold on the order line by selecting Apply Holds from the Actions menu.
You can also use the Defer Scheduling Workflow Activity or the Workflow - Manual Scheduling Sub Process.
For more information, see the Workflow - Manual Scheduling Sub Process.
-
-
Book the sales orders and verify that the lines did not get scheduled.
-
Navigate to the Monitor Activities History page (Tools menu > Workflow Status) to view the current workflow activity and status for the sales orders. The Workflow activity is Schedule Eligible and the Status is Notified.
-
Release the holds on the lines for the sales orders.
-
Navigate to the Submit Request window, and select Schedule Orders in the Name field.
-
Enter the search parameters for the orders you want to schedule. Select Progress Lines at Schedule-Eligible Activity in the Scheduling Mode parameter.
-
(Optional) Enter Yes or No in the Booked parameter.
-
Submit the request.
-
Verify that the request has completed, and then view the orders in the Sales Orders window, checking to see that the sales orders were scheduled.
Workflow - Manual Scheduling Sub-Process
A scheduling sub-process named Schedule-Line, Manual handles situations where you want to control scheduling manually after the order is booked. If the new sub-process is used in the line workflow, then after booking the order, the lines will be blocked at the Schedule-Eligible activity. You can progress the Schedule-Eligible activity from Sales Orders window or use the Schedule Orders program to schedule the lines.
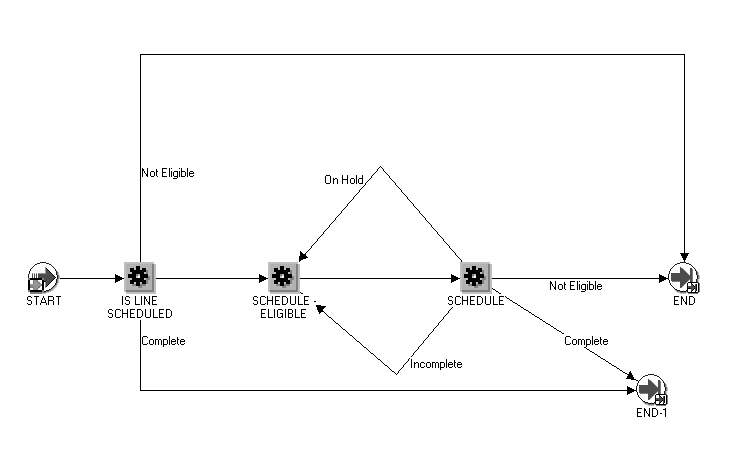
Validate OM Workflow Concurrent Program
To validate workflow definitions that you changed after assigning the workflows to transaction types, you must submit the Validate OM Workflow concurrent program using the Submit Request window with Order Type as an optional parameter. The application performs a full validation of the fulfillment, negotiations, and line flows assigned to the order type. The application then displays the workflow errors.