Customer Related Actions
This chapter covers the following topics:
- Add Customers
- Add Customer Window Overview
- Adding Customers Using the Add Customer Window
- Add Customers Using the Process Order Public API
- Customer Location Overview
- User Procedures
- Add Customer Sample Business Flows
Add Customers
Review the following prerequisite information before you attempt to add customer information using the Add Customer window:
-
An understanding of how Oracle Trading Community has been integrated within Oracle Applications.
-
The profile option OM: Add Customer must be set to a value other than None for at least one level within the system profile option hierarchy; user, responsibility, application, or site.
-
The Order Management system parameter Customer Relationships must be enabled if you wish to add Ship To addresses for customers other than the sold-to on the order.
-
The Receivables system parameters Automatic Customer Numbering and Automatic Site numbering determine if the customer number and customer address location is system generated or can be manually entered when adding a new customer and customer address within the Add Customer window.
Note: When the Receivables option Automatic Customer numbering is set to NO you need to enter the New Customer Number.
The Receivables system parameter Address Validation determines how address information within the Add Customer window is entered, displayed, and validated.
-
The following profile options affect the functionality of adding customers from the Sales Order window.
-
OM: E-Mail Required On New Customers. The value of this profile option determines whether you must define an mail address for both the customer and any contacts defined when adding a new customer.
-
ICX: Territory, HZ: Reference Territory, ICX: Territory, HZ: Reference Territory: These determine the default country and should be set to expedite address entry.
-
Flexfields: Open Descr Window. The value of this profile option determines whether to automatically display descriptive flexfields when navigating to the descriptive flexfield display field.
-
AR: Change Customer Name. The value of this profile option determines whether you can change a customer name after saving their information. This profile option is set to Yes by default.
Note: You cannot update a customer Name within the Add Customer window. If you wish to update a customer Name, use the Receivables Standard Customer window.
-
HZ: Generate Party Number. The value of this profile option determines if the party number is system generated or manually entered when adding a new customer.
-
HZ: Generate Party Site Number. The value of this profile option determines if the site number is system generated or manually entered when adding a new customer address. The site number is unique.
-
Adding Customers using the Add Customer window
Add Customers using the Process Order Public API
Add Customer Sample Business Flows
Add Customer Window Overview
The Add Customer window, accessible from the Sales Order Header window is a versatile user interface from Order Management to Oracle Receivables enabling you to define new entities (customers) and related entity details (customer details) within the Oracle Trading Community model. For more information on the Trading Community customer model, see:
-
Trading Community usage within Order Management
-
Oracle Receivables User Guide, Customers
Note: All account site (customer location) contacts created within the Add Customer window are created at the customer level only; you cannot create site level contacts using the Add Customer window. Please note, however, that customer level contacts can be used as site level contacts for orders or returns.
You can create the following:
-
New customer & Party
-
New address for a new customer
-
New customer and associate the customer with an existing Party
-
New Bill To, Ship To and Deliver To Locations (addresses) for an existing customer
-
New Ship To (drop ship) customers and associated addresses
-
New contacts for new or existing customers
-
New customer account sites from previously defined party sites.
-
New account contacts from existing party level contacts
-
E-mail addresses for new and existing customers and customer contacts
Note: You can not update existing values for customer Name or E-mail addresses for both customers and customer contacts currently defined within the system while working within the Add Customer window.
Note: If an e-mail address is undefined for either a existing customer or customer contact, you can add a new email address, irrespective of the value the for the profile option OM: E-Mail Required On New Customers.
Oracle Application Folder functionality has not been enabled for any region within the Add Customer window. However, the Eraser icon (from the Toolbar) has been added to all regions, enabling you to clear individual regions. within the window, while retaining information within other regions. The Eraser icon does not perform a commit to the database.
Security
The profile OM: Add Customer limits both accessibility and functionality to the Add Customer window. Choose to allow all users or no users access to the window or choose to only allow users to add new address or contact information.
Adding Customers using the Add Customer window
Add Customer Sample Business Flows
Order Management Implementation Manual, Profile Options.
Adding Customers Using the Add Customer Window
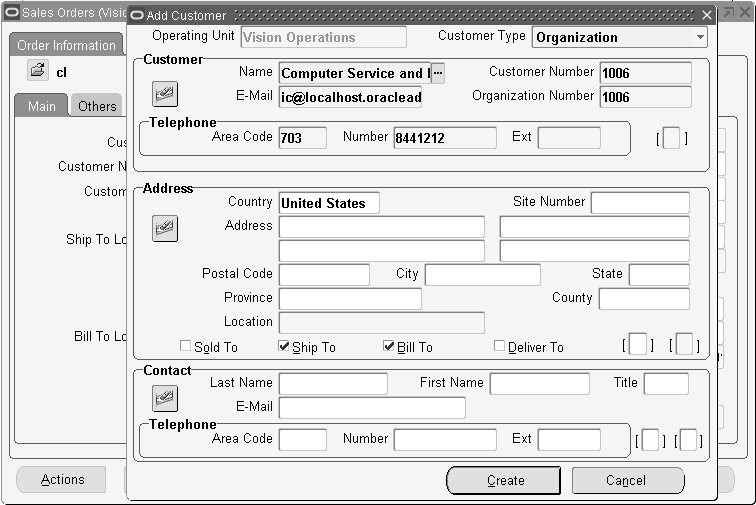
The Add Customer window contains the following three regions:
-
Organization or Person
-
Customer Address
-
Customer Contact
To display the Add Customer window, select one of the following options available within the Sales Order Header Window:
-
With your cursor in any field, use the mouse right click functionality and select Add Customer from the menu list displayed
-
Click Actions and then select Add Customer from the menu list displayed
-
Click Yes within a decision dialog box, when displayed
-
The decision dialog box is displayed when entering a unique, case in-sensitive value within any of the following fields on the Sales Order Window, Main tab:
-
Customer: If you use the Add Customer window from this field, the address created will be a Sold To address. Additionally, if you have selected the Ship To and Bill To boxes, the address will be used as a Ship To and Bill To address.
-
Customer Contact
-
Ship To Location: If you use the Add Customer window from this field, the address created is a Ship To address and will display on the sales orders window in the Ship To fields.
-
Bill To Location: If you use the Add Customer window from this field, the address created is a Bill To address and will display on the sales orders window in the Bill To fields.
Note: The decision dialog box can also be displayed if entering a unique, case in-sensitive value for the following fields within a user defined folder for the Sales Order Header window:
-
E-Mail
-
Ship To, Ship To Contact, Ship To Customer
-
End Customer, End Customer location, End Customer Contact, Customer Location
-
Bill To Contact, Bill To Customer, Bill To
-
Deliver To, Deliver To Location, Deliver To Contact
Within the decision dialog box, you must either click Create to define new customer information or click Cancel to return to the Sales Order Window before you can proceed.
-
-
Note: If the value for the profile option OM: Add Customers is set to Address and Contact only, you will not be presented with the decision dialog box when entering a new, case in-sensitive value in either the customer or E-Mail fields. Instead, a FRM error will be displayed within the status bar.
Note: If you choose to display the Add Customer window from the Actions button menu, ensure you have either entered or defaulted all or none of the required order header fields, or you will receive an error.
Note: Choosing an action from the Actions button menu after entering a required order header field invokes a commit to the database, and all required order header fields must be present for the commit to be successful.
All customers and customer contacts defined within the Add customer window are defined as active, and when defining a customer, the customer is automatically assigned the DEFAULT customer profile class.
You can update the customer profile at either the customer or site (address) within the Receivables Standard Customer, Profile Classes tab page and Customer Address, Profile - Transactions tab page, respectively.
Once a request is made to display the Add Customer window, depending on your cursor location, customer data previously entered or defaulted within the Sales Order Header window can be passed to the Add Customer window.
If your cursor is within an address field that contains data, when you invoke the Add Customer window, the customer and address information is passed.If your cursor is within the Customer Name or Customer Number field and the field(s) contains data, when you invoke the Add Customer window, customer name and customer number are passed.
Note: Contact Name is never passed from the Sales Order Header window to the Add Customer window. However, Contact Name can be passed from the Add Customer window to the Sales Order Header window provided data is present when clicking Create.
If no customer data has been entered within the Sales Order Header window, and you choose to open the Add Customer window, you can then either:
Select existing customers and create new customer addresses or contacts for the customer.
Enter a new customer details
Data entered via the Add Customer window is only committed to the database when you click Create. Relevant data committed is automatically passed back to associated fields within the Sales Order Header window, effectively reducing the time taken to capture both new customer and order details.
Add Customer Window
Creating Party Information
Utilizing the Oracle Trading Community model, the Add Customer window enables you to create the relationships with your customers. Customer Type enables you to indicate if you are working with a organizational customer or a individual customer.
Whenever you create a new customer within the Add Customer window, an address is required. Both a new Party and Party Site are always created.
If a new customer is defined, the associated Party Name will have the same value as the customer Name.
-
The value of the profile option HZ: Generate Party Number determines whether the Party Number is system generated or manually entered. If set to Null (or system generated), then a value should not be entered by the user, as the Party Number will be system generated.
-
The value of the profile option HZ: Generate Party Site Number determines whether the Party Site Number is system generated or manually entered. If set to Null, then a value should not be entered by the user, as the Party Site Number will be system generated.
Note: If you select a Party Name within the Person or Organization Number fields, the value within the customer name field is automatically updated to the value chosen with either field selected.
Note: You can choose to update the Party number for a customer or site within the Receivables Standard Customer window.
Operating Unit
This field defaults the Operating Unit from the main transaction window it was launched from (like the Sales Order window or Pricing and Availability window) and you can create Customer information in that Operating Unit.
If there is no Operating Unit specified in the calling window then the field will display your default Operating Unit. You can change the Operating Unit by selecting another Operating Unit accessible to you from the LOV. An Operating Unit is required before you can specify other information for creating the Customer.
Customer Type:
The value you choose within this field will determine the available fields within the Customer region. The default value for this field is set to Organization, which initially determines the fields available.
-
If Customer Type is set to Organization, the following fields are displayed.
-
Customer Name
-
Customer Number
-
Organization Number
-
Email address
-
Telephone number
-
Receivables Customer Information Descriptive Flexfield
Note: If Customer Type is set to Organization, the value within the Organization Number field equates to Account Party Number.
-
-
If Customer Type is set to Person, the following fields are displayed:
-
Prefix, First Name, Middle Name, Last Name, Suffix
-
Person Number
-
Person Number
-
Email address
-
Telephone number
-
Receivables Customer Information Descriptive Flexfield
Note: If Customer Type is set to Person, the value within the Person Number field equates to Accounts' Party Number.
-
Customer Type:
The List of Values pop up window for the Person Number or Organization Number fields will display existing Party names based upon the value of the Customer Type field.
Customer Address Region:
Refer to the Oracle Receivables User's Guide for additional details regarding defaulting address information, flexible address mapping, and address validation.
Customer Address Region Layout
The address regions layout is dependent on the value entered or defaulted in the Country field. If the Country defaulted or entered has an address style associated with it, then the Address Descriptive Flexfield pop up window will display the associated address format (when navigating to any field other than the Country, Site, or Location fields within the Customer Address region).
For more information on the setting up the Address Descriptive flexfield, see Oracle Receivables User's Guide, Setting Up Flexible Addresses.
Country: This defaults from the profile ICX: Territory, and if that is not set, the value defaults from the profile HZ: Reference Territory.
Address: Enter the address location for the customer information you are creating.
Postal Code: Enter the postal code of the address location for the customer information you are creating.
City: Enter the City of the address location for the customer information you are creating.
State: Enter the State of the address location for the customer information you are creating.
Province: Enter the Province of the address location for the customer information you are creating if necessary.
Country: Enter the Country of the address location for the customer information you are creating.
Location: Enter the address location Name for the customer information you are creating.
Ship To: Select the Ship To check box if you want the address location defining to also be a Ship To customer location.
The default value for this field when entering either person or organization customer details is Enabled (check box is checked).
Bill To: Select the Bill To check box if you want the address location defining to also be a Bill To customer location.
The default value for this field when entering either person or organization customer details is Enabled (check box is checked).
Deliver To: If the Deliver To box is selected, the Deliver To Address in the Sales Orders window comes from the address that you enter in the Add Customers window. If the Deliver To box is unselected, the Deliver To Address in the Sales Orders window comes from the defaulting framework.
Receivables Address Information Descriptive Flexfield: Enter the Receivables Address Information Descriptive Flexfield information if enabled and required.
Receivables Site Use Descriptive Flexfield: Enter the Receivables Site Use Descriptive Flexfield information if enabled and required.
Last Name: Enter the Last Name for the customer contact you are defining.
First Name: Enter the First Name for the customer contact you are defining.
Title: Select the Title for the customer contact you are defining.
E-Mail: Enter the E-Mail address for the customer contact you are defining or updating.
Telephone: Enter the telephone number for the customer contact you are defining.
Select the Create or Cancel button.
Select the Create button to commit new customer information or the Cancel button to return to the Sales Order Window before you can proceed.
Related Topics
Add Customer Sample Business Flows
Adding Customers using the Add Customer window
Add Customers Using the Process Order Public API
You can create customer accounts, sites, and contacts on the fly using the Process Order public API if the details sent, don't exist in the system. You can create different Sold To , Ship To, Bill To, Deliver To customers at the same time and create relationship between customer accounts on the fly if the relationship does not exist. Additionally, you can update the new and existing customer, site, and contact information using this API.
You can send customer related information like customer, site, and contact details to header and line records through separate pl/sql input tables. These new tables for customer information can accept both Ids and values. If you wish to use this new structure to send customer information, then you need not send the customer information in header/line record. If you do not want to use this feature, then you can choose not to pass these two parameters and continue to pass customer information in header and line records. The value of the existing profile, OM: Add Customers, impacts the ability to create and update customer, site, and contact information. If you set the profile value as 'None', then you cannot create customer, site, and contact information on the fly. If set to 'Address and contact only', then you can add address and contact to existing customers but you cannot create new customers. If set to 'ALL', then there is no restriction and you can create customer, site, and contacts on the fly.
For further information, see the Oracle Integration Repository (iRepository).
Customer Location Overview
Customer Location can be used both during the Negotiation phase (for both quotes and Sales Agreementss) or Fulfillment phase. In Negotiation phase, it should be used as a mailing address where the quote can be sent.
Customer Location will be a header level value that can be defaulted if it represents the primary sold to site and used as a data source for defaulting attributes.
Currently, the Business Purpose of Sold To is used by EDI and the Quoting Application (at the Party Site level).
Customer Location (an account site with a business purpose of 'SOLD_TO) on a Quote/Order can be different from Ship To and Bill To Address.
Customer Location (Sold-To Site) is used as an address where the quote is mailed. Customer Location displays during any transaction at the header level.
Identify Sold To Site Usage through Add Customer /Standard Customer Window
When creating a new customer or new address you might require to assign a sold to usage to the customer record either through the Add Customer function from the sales order or through the Standard Set-Up Customer window.
-
Add Customer – indicates the business purpose of Sold to apply by selection of a check box.
-
Standard Customer – Assign a Sold To Usage
Defaulting Values to the Sales Transaction Via Customer Location
Customer Location is used as a data source in defaulting rules if required. Example: Price List, order type, or payment terms.
Find Sales Transactions by Customer Location
Provides the Customer Location attribute in the Find Orders window to be used as search criteria either in conjunction with other attributes or as a single attribute.
Customer Location can be used both at the Negotiation phase (For both quotes and Sales Agreementss) and the Fulfillment phase. In the Negotiation phase, it is used as a mailing address where the quote can be sent.
The Customer Location is a header level value that can be defaulted if it represents the primary Sold To site and is used as a data source for defaulting attributes. Currently, the Business Purpose of 'Sold to' is used by EDI and the Quoting Application (at the Party Site level). Customer Location (an account site with a business purpose of Sold To) on a Quote/Order can be different from the Ship To and Bill To Address.
Customer Location is defaultable and constrainable. There is a seeded constraint that will not allow you to update the Customer Location if the order is an internal order, ship confirmed or invoice interfaced, or RMA Received. The conditions that are used for the Customer (Sold To) will also be used for Customer Location.
User Procedures
To create the customer location:
-
Navigate to the AR Customer Standard page.
-
Query the customer whose address you want to enter.
-
Click the Sites tab and enter the address/location information in the fields displayed.
Add Customer Addresses
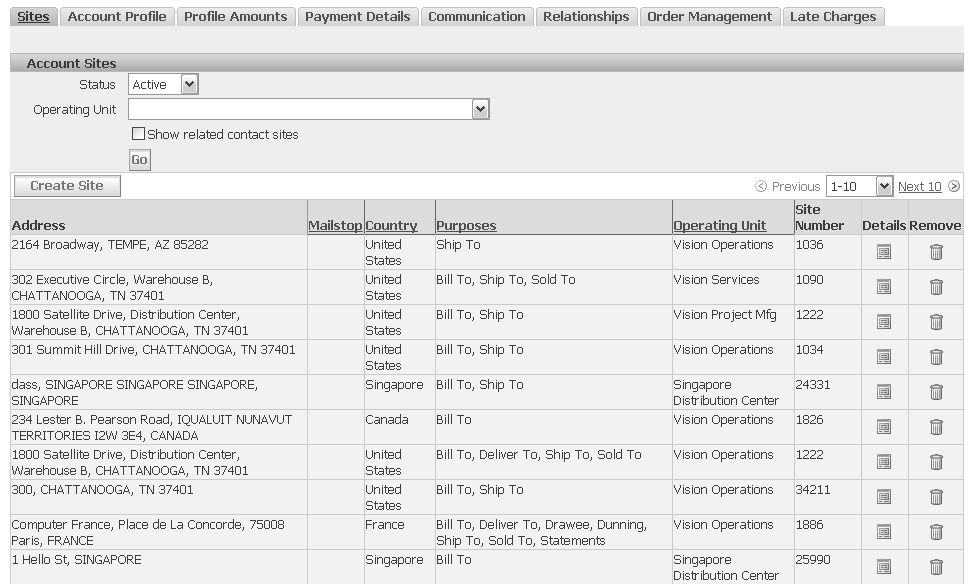
-
Save your work.
Please refer to the Oracle Receivables User Guide for more information on setting up customer locations.
To Enter a Customer Location on a Quote/Order
Customer Location is optional and can be used for mailing purposes.
-
Navigate to the Sales Orders window.
Note: Customer Location is defaultable and constrainable. There will be seeded constraint which will not allow to update Customer Location if the order is an internal order or ship confirmed or invoice interfaced or RMA Received. The conditions which are used for Customer (Sold To) will also be used for Customer Location.
-
Enter the Customer Number or Customer Name.
-
Click the Customer Location LOV on the Others tab, this LOV will show the list of customer addresses for the entered Customer.
Sales Orders Window - Customer Locations List of Values
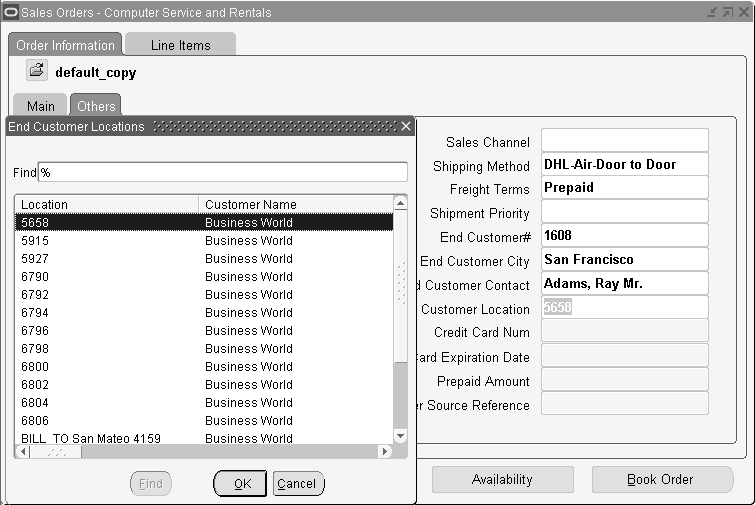
-
Choose any site from the LOV or enter any partial site location, it will populate the other details like Customer Address1 Customer Address2, Customer Address3, Customer Address4, or Customer Address5 (which is the combination of City, State, Zip, and Country) on the Sales Orders window.
-
Save your work.
To set up defaulting rules for defaulting customer location:
Once the customer is entered, the primary Customer Location will be defaulted by setting up the defaulting rules. Optionally, you can change the defaulted Customer Location, if any, or can select from the LOV that will show the list of Customer Locations.
Defaulting Shipping & Billing Address from Customer Location
Based on the defaulting rule setup on the header level, the Customer Location can be defaulted into Ship To and Bill To Sites.
To query orders using the Customer Location on the Find window:
-
Navigate to the Find Orders window from the Order Organizer.
-
In the Order Information tabbed region, enter the Customer Location. Click Find.
-
The resulting list contains all the orders with matching Customer Locations.
To apply a mass change on Customer Location at the order header level:
-
Navigate to the Order Organizer and query the orders to apply a mass change to.
-
Multi-select the orders to apply the mass change in Order Organizer Summary Information View.
-
Select Mass Change from the Tools menu.
-
Select the Customer Location from the LOV under the Main Tab.
-
Click OK.
Defaulting Order Type, Price List, Payment Terms etc. from Customer Location
You can default Order Type, Price List, Warehouse, and Payment Terms etc. from Customer Location on Sales Orders window based on the defaulting rule setup.
To create a new customer location using the Add Customer window:
-
Navigate to the Sales Orders window and invoke the Add Customer window. Alternatively, choose to pass existing customer details to the Add Customer window by providing appropriate values within respective fields on the Sales Orders window prior to invoking the Add Customer feature.
-
When the Add Customer window displays, enter the required customer address information and check the Sold To check box.
-
Click Create, the Customer Location will be populated on the Sales Orders window with the address details.
To search for a customer location using the Find Customer window:
-
Navigate to the Quick Order Entry or Sales Orders window.
-
Choose the Find Customer icon located in the toolbar or through the right mouse menu Customer->Find Customer.
-
Select the Address Usage as Sold To and click Find.
-
The Address/Customer Information LOV displays Customer Name, Number, Address, and identifies if it is a Customer Location. It also shows the Sold To Location Name.
-
Once you make the selection in the LOV, the Order Usage window appears with different check boxes for different usages. Check Sold To to populate the Customer Location in the Sales Orders window.
Add Customer Sample Business Flows
To create new Contacts for a new or existing Customer or Update Contact email address only:
-
Navigate to the Sales Order Header window and invoke the Add Customer window.
Alternatively, choose to pass existing customer details to the Add Customer window by providing appropriate values within respective fields the Sales Order Header window prior to invoking the Add Customer feature. For example, select an existing contact to an a new address location for the contact.
-
When the Add Customer window displays, enter new customer, address, and contact information or select an existing customer and update contact email address.
To Create new Ship To (drop ship) customers and associated addresses:
There are business scenarios when your customer asks you to ship directly to his customer. To be able do so you need to create a new customer or customer address.
The Add Customer window supports the creation of new Ship To customers and addresses.
Two different scenarios for creating new customer details for drop ship sales orders are provided below.
-
You must enter the Sold To customer name in the Customer Name field.
-
Your cursor must be in one of the Ship To address fields within the Sales Order Header window prior to invoking the Add Customer window in order to properly create Drop Ship customer details.
Scenario 1
-
The Ship To customer and customer address do not exist for a alternate drop ship location.
-
Navigate to the Sales Order Header window and invoke the Add Customer window. Ensure you have entered the Ship To Customer name and then place the cursor in one of the Ship To address fields within the Sales Order Header window.
-
When the Add Customer window displays, you may choose to clear customer details, as Ship To or Sold To customer details are passed by default. Enter the appropriate customer details (enabling the Ship To check box) for defining a new customer and click Create.
-
Create a new address for the customer, ensuring you select the Ship To check box, and then click Create.
-
Validate the correct customer details were passed from the Add Customer window, and then save your sale order header details.
Scenario 2
-
Navigate to the Sales Order Header window with the cursor in one of the Ship To address fields, invoke the Add Customer window. Alternatively, choose to pass existing customer details to the Add Customer window by providing appropriate values within respective fields the Sales Order Header window prior to invoking the Add Customer feature. Additionally, you may choose to select alternate values for customer fields once the Add customers window has displayed. The Ship To customer may exist, but the Ship To address does not exist.
-
When the Add Customer window displays, ensure the appropriate customer name has been passed. If you choose not to pass the customer name from the Sales Order Header window, you can select the value in the customer name field.
-
Enter the new address information that the order will be shipped to, ensuring you select the Ship To check box, and then click Create.