Using Shipping Exceptions
This chapter covers the following topics:
- Overview of Shipping Exceptions
- Viewing and Updating Logged Shipping Exceptions Using the View Exceptions Window
- Viewing and Updating Logged Exceptions Using the Shipping Execution Simplified User Interface
- Logging New Shipping Exceptions Using the Log Exception Window
- Logging New Shipping Exceptions Using the Shipping Execution Simplified User Interface
- Purging and Resolving Logged Shipping Exceptions Using the Resolve/Purge Exceptions Parameters Window
- Purging and Resolving Logged Shipping Exceptions Using the Shipping Execution Simplified User Interface
Overview of Shipping Exceptions
During the shipping and transportation of goods, unforeseen shipping exceptions can occur that conflict with the actual requirements of the shipper, transportation carrier, or customer.
If these exceptions are not handled promptly or properly, it could result in reduced customer satisfaction and loss of business and revenue for a company. Tracking exceptions can also be helpful to identify and correct defects in the business process.
Shipping Execution enables you to do the following:
-
View and update logged shipping exceptions using the View Exceptions window
-
View and update logged shipping exceptions using the Shipping Execution Simplified User Interface
-
Log a new shipping exception manually using the Log Exceptions window
-
Log a new shipping exception manually using the Shipping Execution Simplified User Interface
Note: Exceptions, and processes for exception handling, must be set up before exceptions can be viewed, logged, or updated.
For more information, see Shipping Execution Setup, Defining Shipping Exceptions in Oracle Order Management Implementation Manual.
Viewing and Updating Logged Shipping Exceptions Using the View Exceptions Window
In the View Exceptions window, you can track, review, and update current and past exceptions that have been logged either manually or automatically.
You can use the Find Exceptions window to find selected exceptions or all exceptions. The search displays the results in a series of tabs in the View Exceptions window:
-
Exception tab: Displays general information about the exception, including exception name, exception ID, logging entity, logging user ID, picked user ID, resolved user ID, logged at location, exception location, exception type, exception behavior, status, and a flag to indicate if exception was manually logged.
-
Trip tab: Displays all trip information specific to the exception, including: trip name, stop location, departure date, and arrival date.
-
Delivery tab: Displays all delivery information specific to the exception, including: delivery name, and delivery detail ID.
-
Container tab: Displays the LPN (container) name specific to the exception.
-
Inventory tab: Displays all inventory information specific to the exception, including: inventory item, inventory organization, item description, lot number, serial number, UOM, quantity, secondary UOM secondary quantity, subinventory, and locator.
-
Transportation Batch tab: Displays all transportation batch information specific to the exception, including: batch name and sub batch name.
You can also select a single exception to view or update it. Single exceptions display in the Log Exception window.
In both the View Exceptions and Log Exception windows, you can update details about a selected exception by choosing the tab that corresponds to the information you want to update, and updating the fields in that tab.
Some exceptions are set up to notify you automatically if an exception occurs during a shipping process (such as ship confirm). The notification alerts you that an exception has occurred and displays details to help you identify the exception.
Note: Exceptions and processes for exception handling must already be set up before exceptions can be viewed, logged, or updated. For more information, see Shipping Execution Setup, Defining Shipping Exceptions in Oracle Order Management Implementation Manual.
To View and Update Logged Shipping Exceptions
-
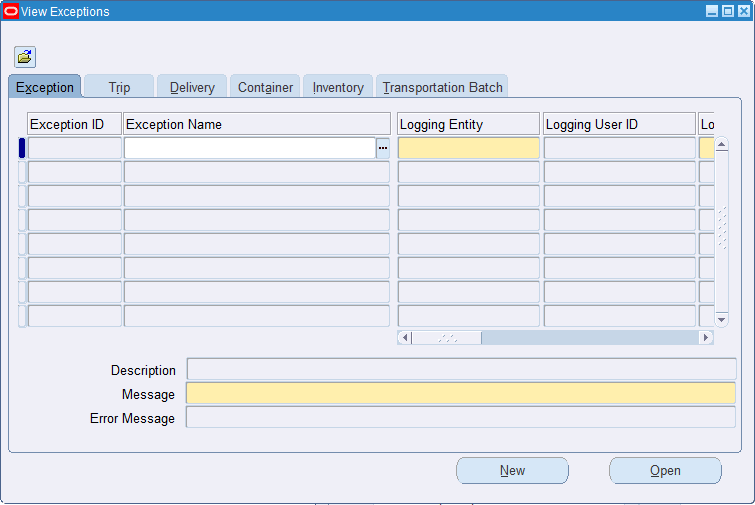
Navigate to the View Exceptions window.
View Exceptions window
-
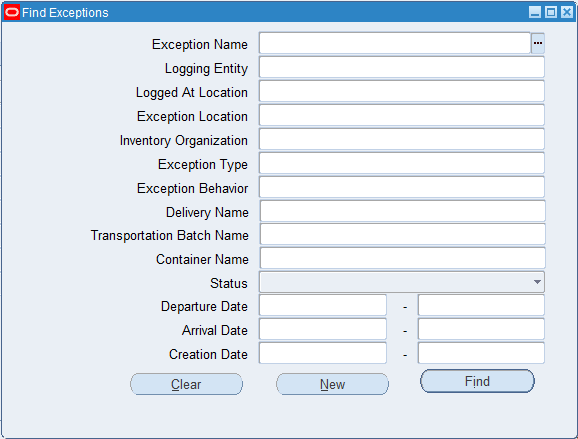
Click the Find icon to display the Find Exceptions window.
Find Exceptions window
-
Select one or more of the following criteria for your query. Select only the criteria for the exception(s) you want to find:
Note: To view all exceptions, leave the search fields blank and click Find.
-
Exception Name: The particular name of the exception: for example, Picking Hold exception.
-
Logging Entity: The log-on entity of the exception: shipper, receiver, transportation carrier, or verifier.
-
Logged At Location: The location where the exception was entered into the system.
-
Exception Location: The location where the shipping exception occurred.
-
Inventory Organization: Exceptions according to a particular inventory organization.
-
Exception Type: Type of exception: Batch, Delivery, Picking, Trip, and Verify Pick.
-
Exception Behavior: Type of alert provoked by the exception: Error, Warning, or Information Only.
-
Delivery Name: Exceptions by delivery.
-
Transportation Batch Name: Exceptions by transportation batch name.
-
Container Name: The name of the LPN that has an exception.
-
Status: Describes the current status of the exception:
-
Open: Select to query shipping entities with exceptions that have not been resolved or closed.
-
Closed: Select to query exceptions that have been closed.
-
No Action Required: Select to query exception for which no action is required, such as an exception provided as information only.
-
-
Departure Date: Exceptions according to the departure date.
-
Arrival Date: Exceptions according to the arrival date.
-
Creation Date: Exceptions according to the date the exception was created.
-
-
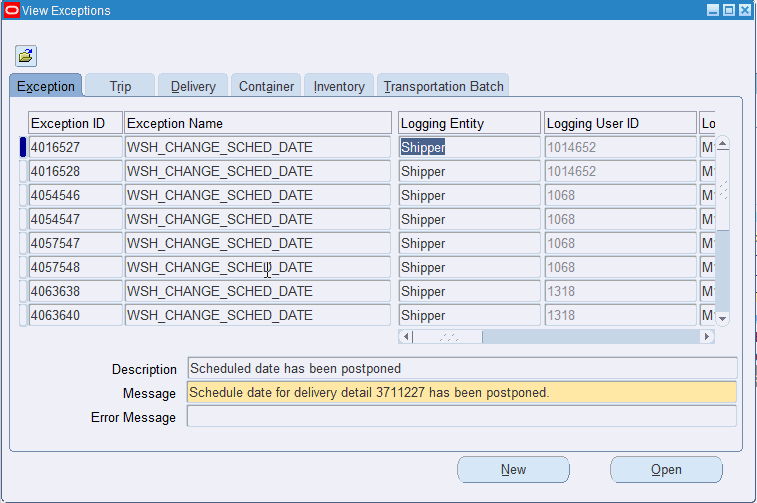
Once you have completed your entries, click Find to display the search results in the View Exceptions window.
View Exceptions window (with results)
-
Select the tab that corresponds to the information you want to view regarding the exception.
You can view details for the Exception, Trip, Delivery, Container, Inventory, and Transportation Batch.
-
To view or update a single exception:
-
Select the exception in the View Exceptions window.
-
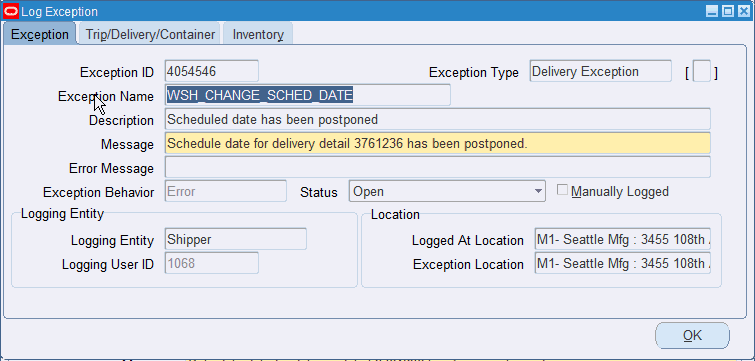
Click Open to display the selected exception in the Log Exception window.
Log Exception window
-
Select the tab to display the details that you want to view or update: Exception tab, Trip/Delivery/Container tab, or Inventory tab.
-
View or update the available fields in the selected tab.
-
Click OK to save your changes.
-
Viewing and Updating Logged Exceptions Using the Shipping Execution Simplified User Interface
In the Shipping Execution Simplified User Interface pages Deliveries, Delivery Line Detail, Details, Line Details, Trips, Trip, Stops and Stop, you can track, review, and update current and past exceptions.
To view or update exceptions in the Shipping Execution Simplified User Interface pages, click the Exception Details icon that appears next to a shipping entity in the first column of the search results pages or click the Exception icon in the detail record for a shipping entity.
There are three types of exception icons. They are:
-
Error: A red circle with an X indicates that an error message exists.
-
Warning: A yellow triangle with an exclamation point indicates that a warning message exists.
-
Informational: A blue circle with an exclamation point indicates that an informational message exists.
When you click an Exception Details icon, the Update Exception page appears. Use the Update Exception page to view the exception messages and take appropriate action.
To View and Update Logged Shipping Exceptions
-
Navigate to the Update Exception page in the Shipping Execution Simplified User Interface.
The Update Exception page appears displaying all of the exception messages for the shipping entity.
-
Update the message text in the Message field.
-
Update the status for the exception using the Status field. Statuses are:
-
Closed
-
No Action Required
-
Open
Information Only exception messages initially have a Behavior of Information Only and a Status of No Action Required. You can only change an Information Only message status to Closed.
Warning exception messages initially have a Behavior of Warning and a Status of Open. You can only change a warning message status to Closed.
Error exception messages initially have a Behavior of Error and a Status of Open. You can only change an error message status to Closed.
-
-
Click Save to save your work and stay on the page.
Click Apply to save your work and return to the previous page.
The exception messages are updated. After you change an exception message to a Closed status you can no longer update the message.
Logging New Shipping Exceptions Using the Log Exception Window
Exceptions are logged automatically and manually.
For information on automatically logged exceptions, refer to the Oracle Order Management Implementation Manual.
The following outlines a simple shipping process that requires a manual exception to be logged:
-
Process: Transport Shipment
-
Logging Entity: Customer, Transportation Carrier
-
Exception: The transportation carrier does not deliver goods to the customer on time.
-
Handling: The exception should be logged and customer may be given discount for their inconvenience. Transportation carrier may be charged for the delay.
The following are ways of logging a manual exception:
-
Select an existing exception name as a “template” to which you can add specific shipping entity details. For example, if you had a seeded exception called Picking Hold that defined handling for picking exceptions, you could enter the exception name Picking Hold in the Log Exception window to default the handling procedures into the new exception window. Then you only need to add information about the specific shipping entities you are logging the exception against such as the trip name, delivery name, or container name.
-
Log a new exception without selecting an exception name. This is useful if you want to create a new exception not based on the default values of an existing exception name.
To Log a New Shipping Exception
-
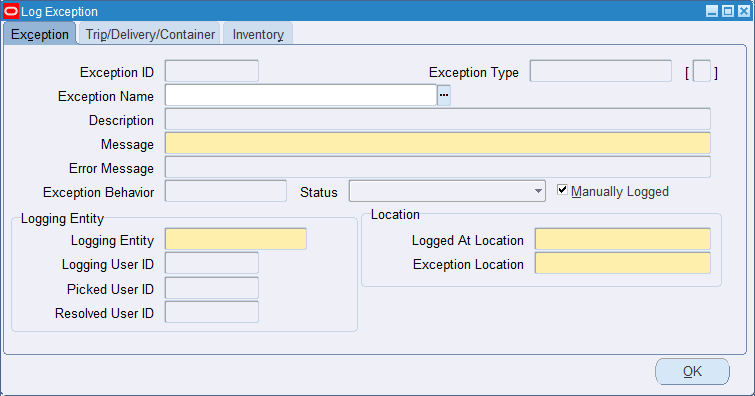
Navigate to the Log Exception window.
Log Exception window
-
Select an Exception Name.
When you select an exception name, the exception definition associated with that name defaults into the Log Exception window. After the values default to the window, you can update fields you want to change (those not grayed out). For example, you may want to change the exception behavior of the exception.
If you do not want to use a predefined exception name, leave the Exception Name field blank and complete the fields required for the new exception you are logging.
-
Enter a Message to explain the nature of the exception.
This message will be visible to other users who view the exception.
-
Based on the exception setup, one of the following Exception Behaviors appears by default:
-
Information Only: An exception flag is issued but the operation can be completed without handling the exception.
-
Warning: A warning flag is issued but the operation can be completed without handling the exception.
-
Error: An error flag is issued and the operation cannot be completed without handling the exception.
-
-
The Status is determined by the other selections:
-
If an exception name is defined, then the status appears by default based on the Exception Behavior for the exception defined in the Define Exceptions window. Information Only exception behavior defaults to No Action Required. Warning/Error defaults to Open.
-
If no exception is named (the Exception Name field is blank), then the exception status is Open.
One of the following statuses can display in the Status field:
-
Open: Exception has not yet been resolved.
-
Closed: Exception handling was completed successfully.
-
No Action Required: No handling required for this exception.
Note: The Manually Logged check box is automatically checked if this exception is logged manually in the Log Exception window. It is unchecked if it is logged through a program.
-
-
Select the Logging Entity to indicate the party that the exception is being logged against (the party who caused the exception).
Logging Entity values are: Receiver, Shipper, Transportation Carrier, and Verifier.
The Logging User ID field shows the application user ID of the person who logged the exception.
The Picked User ID field shows the application user ID of the person who picked the container.
The Resolved User ID field shows the application user ID of the person who resolved the exception.
-
Enter the Logged At Location to identify the location to which the logging entity belongs.
-
Select the Exception Location where the exception occurred.
-
Select the Trip/Delivery/Container tab.
-
Select the Trip Name of the shipping exception.
The Stop Location field displays by default from the stop locations for the particular trip.
Log Exception window - Trip/Delivery/Container tab

-
Select the Departure Date for the trip.
The system validates that the arrival date is later than the departure date.
-
Select the Arrival Date of the trip.
The system validates that the arrival date is later than the departure date.
-
Select the Delivery Name of the exception.
-
Select the Delivery Detail ID of the delivery.
-
Select the container name of the exception in the LPN field.
-
Select the Inventory tab:
-
Enter the Inventory Item involved in the exception.
If the inventory item is not specified or if the exception name selected is not an inventory exception, the inventory fields are grayed and you cannot enter any entries.
Log Exceptions window - Inventory tab

-
Enter the details of the inventory item if you are logging an exception against an inventory item.
If the exception is not logged against an inventory item, then the fields are grayed out.
These fields are dependent on the inventory item: item description, revision, serial number, lot number, unit of measure (UOM), and quantity:
-
The Item Description field displays the default description of the inventory item.
-
The Lot Number field displays the default lot number of the inventory item.
-
The Revision field displays the item revision, if applicable.
-
The Serial Number field displays the serial number of the inventory item, if applicable.
-
The Primary UOM field displays the default unit of measure of the inventory item.
-
The Primary Quantity field displays the quantity based on the Primary UOM.
-
The Secondary UOM field displays the secondary unit of measure of the inventory item.
-
The Secondary Quantity field displays the quantity based on the Secondary UOM.
-
The Stocking Subinventory field displays the subinventory associated with the inventory organization.
-
The Stocking Locator field is dependent on the Subinventory field. It is enabled only if the Subinventory field is populated.
-
-
Click OK to save your changes.
Logging New Shipping Exceptions Using the Shipping Execution Simplified User Interface
You can manually enter exceptions for a shipping entity (for example, delivery or trip) using the Log Exceptions page in the Shipping Execution Simplified User Interface.
To Log a New Shipping Exception
-
Navigate to the Log Exception page in the Shipping Execution Simplified User Interface.
The Log Exception page appears displaying an Exception region and, depending on the shipping entity against which you are logging the exception, the Trip region, the Delivery region, and the Inventory region.
If you are creating an exception for a trip or stop, then the Exception region appears displaying fields available for entry, and the Trip region appears displaying the Trip Name, Location, Departure Date, and Arrival Date for the trip.
If you are creating an exception for a delivery, then the Exception region appears displaying fields available for entry, and the Delivery region appears displaying the Delivery Name and Delivery Detail ID for the delivery.
If you are creating an exception for a detail, then the Exception region appears displaying fields available for entry, the Delivery region appears displaying the Delivery Name and Delivery Detail ID for the detail, and the Inventory region appears displaying the Org Code, Item Name, Lot Number, Revision, Serial Number, Unit of Measure, Quantity, Subinventory, and Locator for the detail.
-
Enter this information in the Exception region of the page:
Field Description Exception Id -1 (minus 1) displays in this field until you save the exception. Once the exception is saved the system populates the Exception Id. Exception Name Select an exception name. Exception Type The exception type appears by default from the exception name you selected. Description The exception description appears by default from the exception name you selected. Message Enter a message for the shipping exception. Error Message This field is disabled when manually logging shipping exceptions.
This field is populated only for system logged batch processing exceptions. While the system is logging batch processing exceptions, if it encounters any errors or warnings then it populates this field.Exception Behavior Displays the type of exception. Values are: -
Error
-
Information Only
-
Warning
Status The exception status appears by default from the exception name. Manually Logged check box This check box is automatically selected if you are manually entering an exception. The check box ix not selected if the exception is logged through a program. Logging Entity Select the logging entity to indicate the party against which the exception is being logged. Values are: -
Receiver
-
Shipper
-
Transportation Carrier
Logging User Id The logging user ID appears by default from the person submitting the exception. Logged At Location Select the logged at location to identify the location to which the logging entity belongs. Exception Location Select the location at which the exception occurred. Flexfields Enter the flexfields associated with the exception. -
-
Click Apply to save your work and return to the previous page.
Related Topics
Overview of Shipping Exceptions
Viewing and Updating Logged Shipping Exceptions Using the View Exceptions Window
Logging New Shipping Exceptions using the Log Exception Window
Purging and Resolving Logging Shipping Exceptions
Purging and Resolving Logged Shipping Exceptions Using the Resolve/Purge Exceptions Parameters Window
To help maintain the shipping exception records and conserve computer storage space, you may want to purge (delete) logged shipping exception records that are no longer required. For example, you may want to purge shipping exception records that are five months and older.
You might also want to mass change the status of (resolve) shipping exceptions.
You can use the Resolve/Purge Exceptions Parameters window to resolve or purge shipping exceptions.
Note: Be careful when resolving and purging (deleting) shipping exception records because you cannot undo the action or retrieve the purged data.
To Resolve or Purge Selected Logged Shipping Exceptions
-
Navigate to the Resolve/Purge Exceptions Parameters window.
Resolve/Purge Exceptions Parameters window
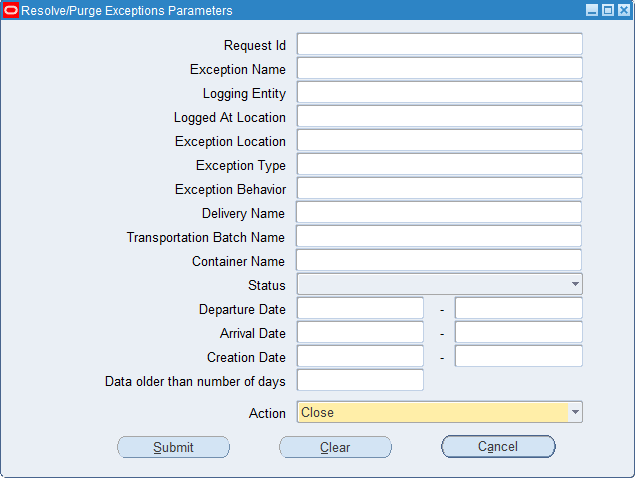
Select and enter only the criteria required for your resolve or purge:
-
Request ID: Close/purge exceptions by a particular Request ID.
-
Exception Name: Close/purge exceptions by exception name.
-
Logging Entity: Close/purge exceptions by a particular logging entity.
-
Logged At Location: Close/purge exceptions by logged at location. This is the location the logging entity belongs to.
-
Exception Location: Close/purge exceptions by location. This is the location where the shipping exception occurred.
-
Exception Type: Close/purge exceptions by exception type such as a delivery exception or picking exception.
-
Exception Behavior: Action is taken on exceptions by type of alert provoked by the exception: error, warning, or information only.
-
Delivery Name: Close/purge exceptions for the delivery.
-
Transportation Batch Name: Close/purge exceptions for the transportation batch name.
-
Container Name: The name of the LPN that has an exception.
-
Status: Close/purge exceptions by status:
Open: Action taken on exceptions that have not been resolved.
Closed: Action taken on exceptions that have been closed (resolved).
No Action Required: Action taken to close or purge exceptions for which no action was required, such as an exception provided as information only.
-
Departure Date: Close/purge exceptions by range of departure dates. For example, if you enter 20-MAY-2015 to 29-MAY-2015, exceptions with departures in this date range are purged.
-
Arrival Date: Close/purge exceptions by range of arrival dates. For example, if you enter 20-MAY-2015 to 29-MAY-2015, exceptions with arrivals on and between this date range are purged.
-
Creation Date: Close/purge exceptions by range of creation dates. For example, if you enter 20-MAY-2015 to 29-MAY-2015, exceptions created on or between this date range are purged.
-
Data older than number of days: Close/purge exceptions older than the number of days entered. For example, if you enter 25, exceptions 25 days and older are purged.
-
Action: Mass updates (close or purge) the status of exceptions selected by the other criteria to the selected status but does not purge them.
Note: Be careful when resolving or purging (deleting) shipping exception records because you cannot undo the action or retrieve the purged data.
-
-
Click Submit to resolve or purge the exceptions.
To Resolve or Purge All Logged Shipping Exceptions
-
Navigate to the Resolve/Purge Exceptions Parameters window.
-
Leave all the fields blank in the Resolve/Purge Exceptions Parameters window and select Close or Purge from the Action list of values.
-
Click Submit.
The Decision dialog box appears displaying the message that the action will resolve/purge all of the exceptions and would you like to proceed.
-
Click Yes to resolve/purge all logged shipping exceptions or click No to cancel the purge.
If you click Yes, the logged exceptions are resolved or purged.
Purging and Resolving Logged Shipping Exceptions Using the Shipping Execution Simplified User Interface
You can use the Resolve Exceptions page in the Shipping Execution Simplified User Interface to resolve (close) or purge shipping exceptions.
Note: Be careful when resolving and purging (deleting) shipping exception records because you cannot undo the action or retrieve the purged data.
To Purge and Resolve Logged Shipping Exceptions
-
Navigate to the Shipping Execution Simplified User Interface.
-
Search for trips, stops, deliveries, or details that has exceptions.
-
Select an entity in the search results table that has exceptions.
-
From the Actions menu, select Resolve Exceptions.
Resolve Exceptions page
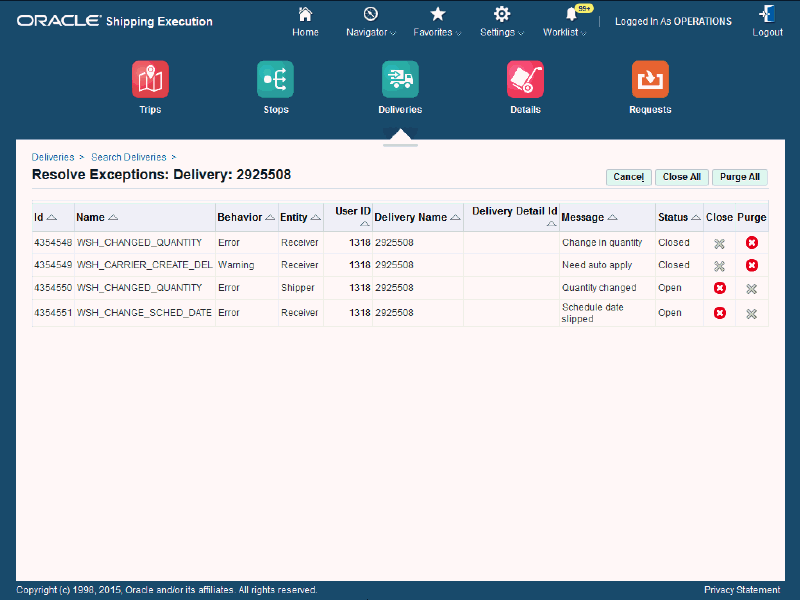
The Resolve Exceptions page appears displaying all of the open and closed shipping exceptions for the shipping entity.
-
Click the Close icon in the table to close an individual shipping exception or click Close All to close all open shipping exceptions.
-
Click the Purge icon in the table to purge an individual shipping exception or click Purge All to purge all closed shipping exceptions.