Resource Scheduling Workbench
This chapter covers the following topics:
- Overview of Resource Scheduling Workbench
- Using the Resource Scheduling Workbench
- Defining User Preferences
- Job Operation Bars
- Navigation
- Viewing Property Windows
- Capacity Exceptions
- Showing Select Resources and Resource Load Versus Capacity Panes
- Selecting a Resource
- Adjusting Resource Capacity
- Rescheduling Jobs, Operations, and Resources in the Gantt Chart
- Rescheduling Start and End Dates
- Resource Transfer
- Transferring Work to an Instance
- Transferring Work Between Instances
- Transferring Work Between Alternate Resources
- Launching the HTML User Interface
Overview of Resource Scheduling Workbench
The Resource Centric Gantt provides a graphical display of your shop floor by resource, and make it extremely easy for you to visualize the workload on any given resource. By providing a resource centric view, it is easy to pinpoint resource overloads and find bottlenecks on your shop floor.
You can view the graphical representation of the released lot based jobs. The workbench displays completed, current, and future operations for all jobs for a particular resource, or set of resources. Color codes represent operation stages.
You can use the workbench to:
-
View resource overloads and update resource capacities.
-
Update operation start and end dates.
-
Change to an alternate resource.
-
Assign a resource instance or change to a different resource instance.
-
Use the Oracle Shop Floor Management HTML user interface to change recommended paths, or choose substitute components.
If changes are made, then you can reschedule the entire shop floor based on midpoint, forward, or reverse scheduling. The scheduling is based on the infinite scheduling method.
This section includes the following topics:
Using the Resource Scheduling Workbench
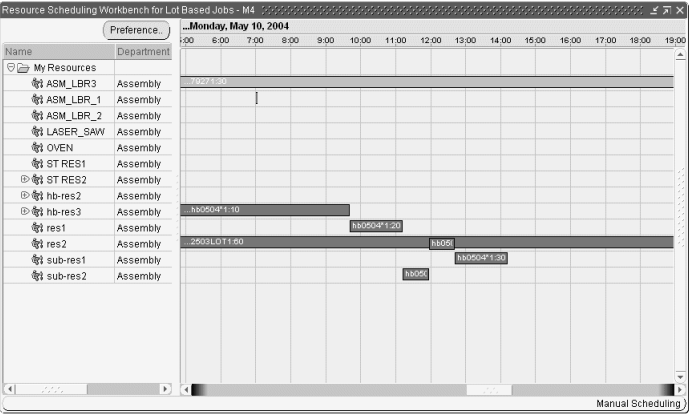
Launch the Resource Scheduling Workbench by navigating to the Resource Scheduling Workbench for Lot Based Jobs window from the Resource Scheduling Workbench menu item in Oracle Shop Floor Management responsibility.
The workbench appears and shows all the jobs in the Navigator hierarchy and Gantt Chart panes.
The navigator on the left side of the workbench displays the resources, and the Gantt Chart pane displays graphical bars that represent the job operation that the resource is used in.
My Resources is the root in the navigator, and contain no resources the first time you open the workbench. The resources that you select and the display order are saved in User Preferences.
If you drill down a level from the resource, then you will see all resource instances for that resource. Person type instances also display under Resources in the navigator. You can assign the same person to multiple resources.
The Resource in the navigator is a combination of the resource and owning department, and any instances under that resource belong to the department.
The bars in the timeline represent the job operations where the resource is being used. The duration of the bar depicts the start and end times of the resource used in that job operation.
-
Each job and operation bar has a label that represents the job, operation, and department where the resource is used. You can customize labels in the Preferences window.
-
If a resource is used in multiple job and operations, and those job and operations overlap, then the bars overlap in a cascading pattern.
-
The current operation of a lot-based job displays in a different color.
Defining User Preferences
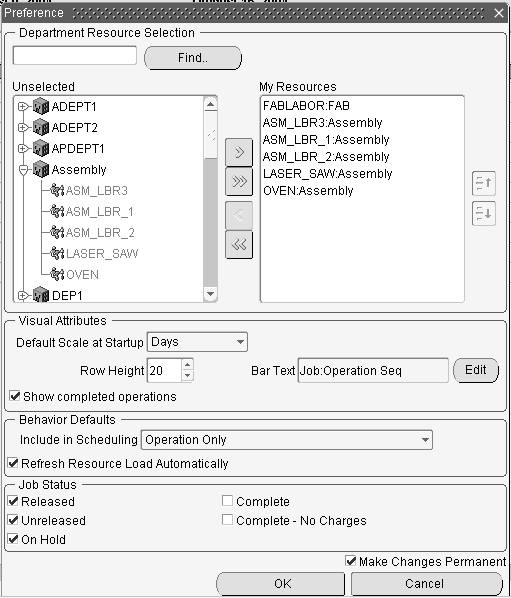
The user preferences let you select the resources to initially display in the Gantt chart. The resources in the unselected list display in a navigator by department, with the resources that the department owns being the second level in the navigator.
To define user preferences
-
Navigate to the Resource Scheduling Workbench for Lot Based Jobs window.
-
Choose Preference to select resources for displaying in the workbench.
-
Select resources you want to view in the Unselected region and move them to the My Resources region.
When the resource you select is moved to the My Resources region, the workbench displays the resource name followed by the owning department. The order in which resources display in the navigator are determined by the order in the My Resources region. If you select the Department category in the Unselected region and move it to the My Resources region, then all resources for that department will be included in the My Resources region.
You can change the display order of the resources by selecting the resource in the My Resources region and using the arrows to move the resources. Any resources that remain in the Unselected list will not display in the workbench.
-
Enter the Default Scale at Startup value.
-
Enter the default Row Height.
-
Select the Bar Text. You can display the assembly name or the job name.
-
Select the Lot Based Job Status values to display on the gantt chart. Only the Job Status values selected will display on the gantt.
-
Choose the Make Changes Permanent indicator to save the changes to the My Resources region when choosing OK.
Job Operation Bars
The bars in the timeline represent the job operations where the resource is being used. The duration of the bar represents the start and end times of the resource used in that job operation.
-
Each job and operation contain a label that represents the job, operation, and department where the resource is being used.
-
If a resource is used in multiple job and operations, and those job and operations overlap, then the bars overlap and display in a cascading pattern.
-
The current operation of a lot-based job displays in a different color.
Instance
Instances are shown beneath the resource node in the navigator.
-
Job Operations assigned to a specific instance display on the timeline at the instance level.
-
Job Operations that are not assigned to a specific instance display at the resource level.
Batchable Resources
The job operations where batchable resources are used overlap.
Alternate Resources
Alternate Resources display on the navigator and timeline.
Setup Time
Setup time for the resource displays as a separate bar from the job operation bar. The color of the bar for setup time displays as a different color from the job operation bar.
Bar Color
The color scheme for operations are:
-
Grey: completed operations
-
Blue: current and future operations
-
Red: current operation deleted from path
Navigation
Job Operation
If you position the cursor over a job operation, then that job operation bar is selected. If you keep the cursor over the bar, a tool tip appears, giving details about the job operation.
Simultaneous and Batched Resources
If you position the cursor over a job operation that contains a simultaneous resource, then any other corresponding simultaneous job operation resources are selected. Similarly, if you place the cursor over a job/operation for a batched resource, then all other job/operations in that batch will also be selected.
Progress Indicator Bars
The bars in the gantt chart contain a progress indicator. Since a lot-based job does not have partial completion, this indicator displays either 0% or 100%. This displays separate completed operations from those not completed.
Selecting Overlapped Bars
If you select a bar that is in a group of overlapping bars, then that bar appears at the top of the group. The vertical position of the bar will not change, and the bar will remain on top as long as the mouse button is pressed. Once the mouse button is released the bar will return back to its original position.
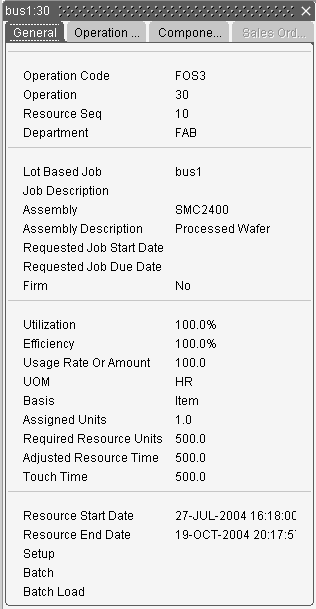
Viewing Property Windows
Property windows for jobs, operations, or resources are available in the Gantt Chart pane. These windows contain information about dates, quantities, descriptions of the scheduling data. See: Job Properties Window, Operation Properties Window, and Resource Properties Window.
To view a property window
-
Right click on a job, operation, or resource in the navigator hierarchy or Gantt Chart pane.
-
Right click on a job, operation, or resource.
A drop-down menu appears.
Choose Properties. The property window for the respective job, operation, or resource displays.
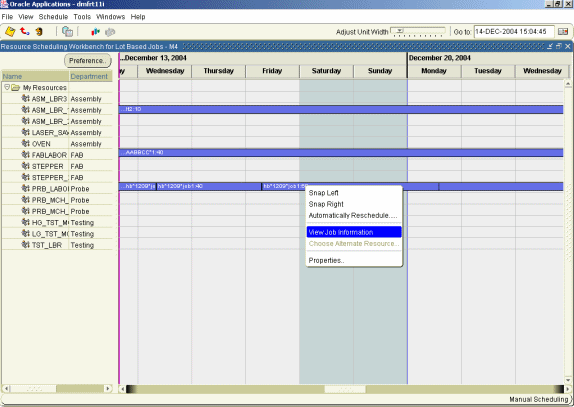
Job View
Right click on an operation resource bar, select menu "View Job Information" and a job view will appear on the bottom of the window.
Job Operation Property
Right click on the operation in "Job View" area, select menu "Properties", a property window for the job operation will show up.
Load Graph
A load graph will be available to display at the bottom of the window. You would be able to toggle the display of the load graph on/off, by pressing the load graph icon on the toolbar.
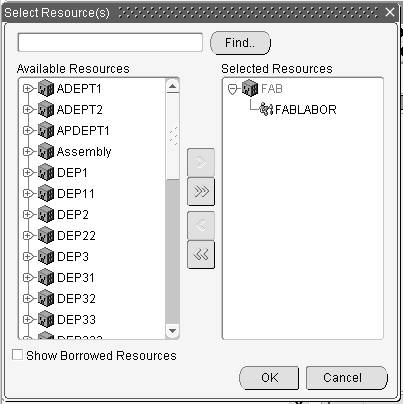
You will be able to select the resources to display on the Load Graph, by clicking the Select Resource(s) button. The name of the resources that you selected would then be displayed for each row on the load graph. The resources you select are the department resources, and will be displayed as the resource name followed by the owning department.
In addition to viewing the load graph and then selecting resources via the Select Resource(s) button, you will also be able to view the load for a resource by right clicking it in the tree. By right clicking the resource in the tree a popup menu will appear, and from there you may pick the View Resource Load option. Choosing that option will automatically display the load graph (if it isn't already displayed) and will show the load for the resource.
Capacity Exceptions
You can define capacity exceptions by right clicking on the resource (or instance) in the workbench, or by right clicking on the resource (or instance) in the load graph region. Choosing Change Capacity displays the Capacity Change window.
Reason Codes
When defining a capacity exception, you can define an exception a reason. Navigate to the Resource Capacity Change Reasons window to define reason codes. You can apply reason codes to the capacity changes when defining exceptions in the Bills of Material window or in the workbench.
The pre-seeded Reason codes include:
-
Breakdown
-
Scheduled Maintenance
-
Plant Shutdown
-
In training
-
Not available
Displaying Resource Unavailable Time
If a capacity exception brings the availability for the resource to zero, then capacity exceptions for a resource display on the timeline. The exception displays as a shaded region on the timeline and is the same color for displaying weekends.
Capacity exceptions display at both the resource and resource instance level.
Showing Select Resources and Resource Load Versus Capacity Panes
The Resource Scheduling Workbench lets you show or hide job operations from the resources listed, and the resources in relationship to the capacity available. You can identify problems for analysis so that tasks can be modified. For example, the order in which the resource performs these tasks or the shifting the tasks across the other resources.
To show the Select Resources and Resource Load Versus Capacity Panes
-
Choose the Resource Load indicator from the View menu.
-
Choose Show/Hide Resource Load from the toolbar.
The Select Resources and Resource Load Versus Capacity panes appear.
To hide the Select Resources and Resource Load Versus Capacity Panes
-
Choose the Resource Load indicator again from the View menu.
-
Choose Show/Hide Resource again from the View menu or toolbar.
The Select Resources and Resource Load Versus Capacity panes do not appear.
Selecting a Resource
You can select a specific resource. If you are uncertain of the resource name, expand a job and an operation and view the specific resource of interest. Select a resource bar with your mouse pointer (yellow text bubble appears which indicates the name of the resource). The name of the resource is also available on the Resource Properties window.
To select a resource
-
In the Select Resource(s) pane choose the Select Resources button.
The Select Resource(s) window appears.
-
In the Available Resources pane select a resource or an instance.
-
Choose the right arrow button.
The resource appears in the Selected Resources pane.
-
Choose OK.
The name and description of the resource appears in the Select Resources pane and its corresponding graphic display for the resource appears in the Resource Load Versus Capacity pane. This represents the resource load for all jobs on the shop floor requiring this resource. The default graphic view is Table. The Required and Available key indicators appear.
-
From the graphic drop-down menu choose Continuous.
A continuous line graph appears. The Required, Available, and Overload key indicators appear.
-
From the graphic drop-down menu choose Bar.
A bar graph appears. The Required and Available key indicators appear.
Adjusting Resource Capacity
You can adjust resource capacity to respond to machine or personnel availability. This includes:
-
Delete or add a day of capacity, adjusting for overtime shifts or shop closures
-
Add or delete resource units when either extra resources are obtainable or resources are unavailable
-
Adjust Assigned Units or Usage Rate for the resource on the job routing
Simulation sets are used to link resource changes for scheduling. Simulation sets are defined, associated to resources in Oracle Bills of Material, and linked to Work in Process scheduling in Work in Process Parameters window.
There are two methods for adjusting resource capacity:
-
Navigate to the Departments window in Oracle Bills of Material, and from there access the Resources, Shifts, and Capacity Changes windows.
-
Access the Capacity Changes window directly from the Resource Scheduling Workbench.
To adjust resource capacity through Bill of Materials
-
Navigate to the Departments window from Oracle Bills of Materials.
-
Choose Resources to navigate to the Resources window.
-
Select a resource, then choose Shifts.
The Shifts window displays. This window is used to assign shifts to the resource from those assigned to the workday calendar.
-
Select a shift and choose Capacity Changes to define capacity changes for a shift.
The Capacity Changes window displays. Capacity modifications include adding or deleting days.
-
Select the designated simulation set defined on the Work in Process Parameters window.
-
Save your work.
-
In the Resource Scheduling Workbench, select Refresh Resource Load from the View menu to display your changes.
-
Select Schedule Multiple Work Orders to apply these capacity adjustments to the shop floor schedule.
Note: If you select an alternate resource, make changes to the current operation, and save the job in the workbench, then changes do not display in the html based User Interface. The application stores changes made to the current operation in the WIP tables, not Shop Floor Management copy tables. Shop Floor copy tables store information from the last APS and Infinite Scheduler manual change.
To adjust directly from the Scheduler Workbench
Select Resource Load from the View menu or toolbar to display the Resource Load versus Capacity pane.
-
Choose Resources in the Select Resource(s) pane.
If the resource is scheduled by instance, and you want to adjust capacity, then select the instance in the Available Resource(s) pane. If you select the resource and not the instance, then the only action you can perform is deleting a day.
-
When the resources display on the workbench, select and right-click on the resource you want to adjust.
A list appears.
-
Choose Change Capacity. The Capacity Changes window displays. A resource must be assigned to a department and a shift to display this window.
The Resource and Department fields display the resource name and the department it is assigned. The Simulation Set field displays the simulation set used to link resource changes to available resource capacity.
The Schedule by Instance field displays Yes or No depending on whether the resource has specified instances (machine or labor type). This is set on the Resources window, the Schedule by Instance indicator.
In the Capacity Changes region of the window, you can change or add information depending on the resource definition.
If you select a resource scheduled by instance, then the only available value in the Action field is Delete a Day. For these resources, access the instance to adjust capacity.
-
In the Shift field, select available shifts from the list of values.
Shifts are defined on the Shifts window when you are assigning a resource to a department.
-
Select the action you want to perform. The choices are Add Capacity, Delete a Day, Reduce Capacity, or Add a Day.
You can only delete work days, and only add non-work days.
-
If you are adding or reducing capacity, select the capacity units you want to change.
The value in the Units field is defaulted from the assigned units of the resource to this department, and can be changed.
-
In the Date fields, From and To, select the dates for this capacity action to occur.
-
In the Time fields, From and To, the values default from the shift information, but can be changed.
-
Save your work.
-
Select Refresh Resource Load to display your changes.
Rescheduling Jobs, Operations, and Resources in the Gantt Chart
You can manually reschedule the start and end dates of a job, operation, or resource:
-
Grab and drag the start or end of a bar
-
Use the Edit Schedule window
You can invoke the Bar Inspector window that shows the start and end dates of a selected job, operation, or resource.
Rescheduling Start and End Dates
You can manually reschedule any job, operation, or resource without regard for constraints or scheduling rules.
To manually forward or backward reschedule using the pointer
-
Point at the start or end of a job, operation, or resource bar.
-
Click and drag to the right (forward) or left (backward).
-
The beginning or end of the bar moves to the right or left, respectively.
-
Save your work.
To manually forward or backward reschedule using the editor:
-
Right click on any bar.
A list appears.
-
Choose Edit Schedule.
The Edit Schedule window appears.
-
In the Start Date and/or End Date fields, enter the new start and/or end date for the required job or operation.
-
Choose Apply.
The bar moves to the new start and/or end date.
-
Save your work.
Modifying Times: You can only change or reschedule a job operation in terms of time by dragging the bar. You cannot alter the duration (width) of the bar.
You can use the snap to feature to align when dragging. This feature helps to eliminate small gaps between operations that may be too small to visually see on the gantt chart.
Note: To use the Snap To feature:
Right click on the job operation bar that you wish to move. A menu will appear.
-
Choose Snap To from the menu
-
Choose Snap Left or Snap Right. Snapping left aligns the starting time of your job operation to the next closest start or end time of another job operation. Snapping right aligns the ending time of your job operation to the next closest starting or ending time of the nearest job operation.
The behavior of rescheduling a job operation varies with the type of resources the job operation uses.
Single Resource
A single resource refers to a resource that is not batched or simultaneous.
To reschedule a job operation using single resources
-
Click and drag the job operation bar. When you release the bar, a small window appears and displays scheduling information.
-
Choose Schedule to schedule around the job operation resource bar that you dragged. Choose Cancel if you don't want to perform the change. Choosing Cancel will close the window, and move the bar back to its original location
-
Choose Schedule to schedule the job. The job is scheduled according to the following rules:
-
The job operation resource or operation resource instance you dragged is locked at the location you dragged it to, and the application schedules any prior or future operation resources around it.
-
The job is midpoint forward scheduled from the starting date of the job operation resource that you dragged.
-
The application backward schedules any prior operations.
-
-
To schedule reschedule a job operation using simultaneous resources
Simultaneous resources are those resources that are performing at the same time as another resource, and will occur within the same job operation of a given job.
-
Select the job operation you wish to modify and drag the bar.
If you are dragging the job operation, then other instances of the same job operation containing a simultaneous resource will first remain at the original location, but will move the same amount as the operation you are dragging when you release the mouse.
-
Release the bar. Scheduling in this scenario is similar to using a single resource. When using simultaneous resources, scheduling considers multiple job operation resources.
Rescheduling Instances
Dragging (changing time) of a job operation bar at the instance level will be similar to the other procedures. There are a couple of things to note, however, and these are listed below:
-
If the job operation you are dragging is spread across several instances, we will still only show the one job operation bar move as you drag, but the scheduler will move the other instances accordingly once it completes.
-
We will never re-dispatch the job operation to other instances.
Resource Transfer
Using the Resource Centric Gantt, you can transfer work from one resource to another. There are three types of transfers that can occur:
-
transferring work to an instance
-
transferring work between instances
-
alternating resources.
Transferring Work to an Instance
Transferring work to an instance involves moving the job operation from the resource level node to an instance node. By performing this action, you are taking a job operation that was previously unassigned, and assigning it to an instance.
To transfer work to an instance
-
Select a job operation resource to transfer to an instance and drag the bar vertically to the instance you want to assign it to.
The following conditions exist while dragging to the instance:
-
You can only drag in the vertical direction and cannot change the job operation time.
-
If there is work scheduled at the instance you are dragging to, then you can drag and drop the bar there.
-
If you are dragging a resource that has more than one assigned unit, then the application distributes the units between the instances when you execute the assignment. If a resource has two assigned units after you execute the drag to a resource instance, then the application assigns the other assigned unit to any other remaining instance. This behavior also applies to person type instances.
-
-
-
Choose Schedule.
Transferring Work Between Instances
To transfer work between instances
-
Select the job operation for the instance you want to transfer from, and drag the bar to the instance to transfer to.
The conditions for dragging between instances are as follows:
-
You can only drag in the vertical direction and cannot change the time of the operation.
-
If there is work scheduled at the instance you are dragging to, then you can drag and drop the bar there.
-
-
-
Choose Schedule.
Transferring Work Between Alternate Resources
Transferring work to an alternate resource may be done at both the resource level and instance level. If you assign a job operation that is associated with a particular instance to an alternate, then the job operation will be assigned at the resource level on the alternate (i.e., It will no longer be associated with an instance).
To transfer work to an alternate resource
-
Right click on the job operation bar that to assign. The Alternate Resource window appears.
-
Choose Alternate.
-
Choose Schedule.
When you choose Schedule, the scheduler executes, and when the scheduling is complete, a dialog displays any exceptions, if any.
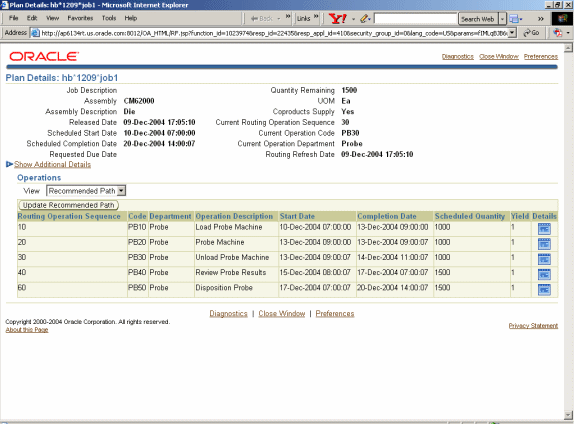
Launching the HTML User Interface
To launch the HTML User Interface
-
Navigate to the Resource Scheduling Workbench.
-
Right click a job or operation bar in the Gantt Chart region.
-
Select View Job Information from the drop down menu. The Job Information region displays a new graphical region at the bottom of the Gantt Chart region that displays the job information.
-
Right click a job bar in the Job Information region.
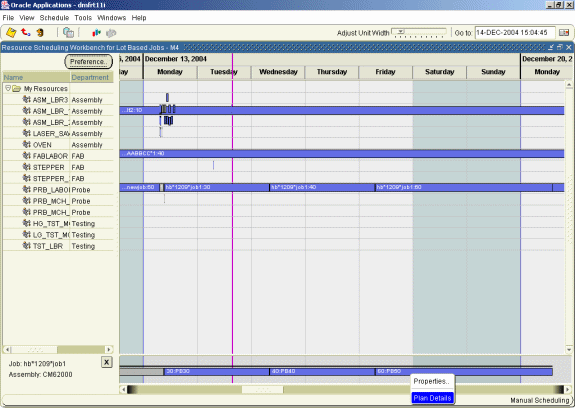
-
Select Plan Details from the list. The Plan Details HTML window appears and displays the plan details of the job. You can make changes to the lot-based job from the Plan Details HTML window.
See: Integration with Oracle Advanced Supply Chain Planning (ASCP) for using the HTML UI for changing plan information on the lot based job.