Inventory Transfers
This chapter covers the following topics:
- Overview of Inventory Transfers
- Recording Borrow/Payback Transactions
- Project Inventory Inquiries
- Removing Payback Demands
- Payback Supply and Demand
- Project Mass Transfer
Overview of Inventory Transfers
Inventory Transfer enables parts to be moved between projects and manages the replenishment accounting. The transaction is recorded and repayment made to the lending project when the borrowing project receives a replenishment order. The original cost of the material is transferred to the lending project, and the borrowing project absorbs the difference in cost.
You can:
-
Determine project inventory shortages and surpluses.
-
Record borrow transaction.
-
View borrow/payback related exception messages while planning your items.
-
Manage inter-project loan balances.
-
Implement orders (purchase orders or WIP jobs) to fulfill payback demand.
-
Optionally view borrow/payback transactions using the dedicated transaction types.
-
View outstanding loan summary balances and detail borrow/payback transactions.
-
Locate project on-hand to payback.
-
Record payback transaction.
-
Reschedule payback.
-
Permanently transfer all items from one project to another project.
-
Remove payback demands for closed lending projects.
Related Topics
Recording Borrow/Payback Transactions
Recording Borrow/Payback Transactions
Borrow/Payback lets you transfer material between projects within your current organization. Borrow/Payback transactions apply to temporary project-to-project transfers. For additional information, see: Viewing Material Transactions, Oracle Inventory User's Guide. When you enter a payback transaction, the system automatically allocates the payback transaction to borrow transactions using a FIFO algorithm.
To enter a borrow/payback transaction
-
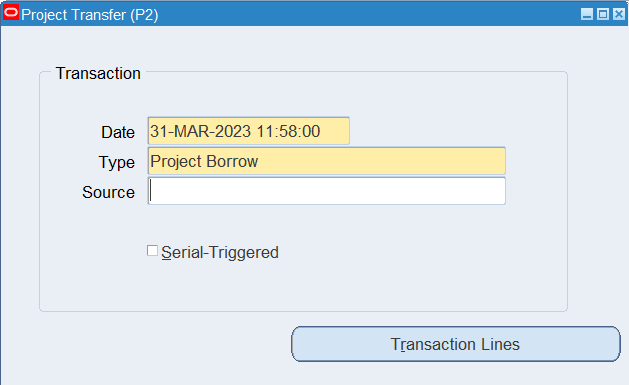
Navigate to the Project Transfer window.
Project Transfer Window
-
Enter the date and time of entry for the transaction.
The date you enter is controlled by the INV:Transaction Date Validation profile option. See: Oracle Inventory Profile Options, Oracle Inventory User's Guide .
-
Select the desired transaction type from the following options:
-
Project Borrow - Borrow items from a project.
-
Project Payback - Payback borrowed items to a project.
-
Project Transfer - Transfer items to another project.
-
-
Optionally, enter the source of the transaction type.
-
Optionally, indicate if you want inventory information to be defaulted from the serial number.
-
Click Transaction Lines. The window that opens depends on the transaction type you select.
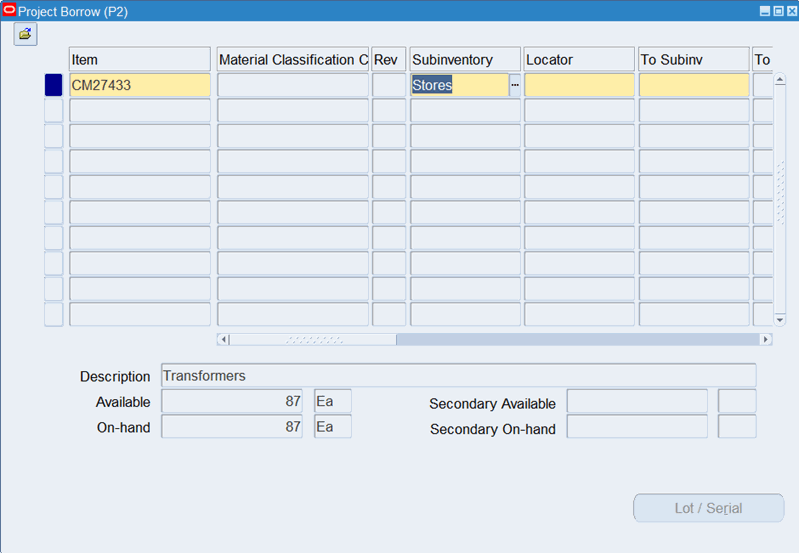
Project Borrow Window
-
Enter an inventory item to transfer. If you choose to default inventory information from the serial number, enter a serial number.
-
Optionally, enter the revision for the item. You must enter a value here if the item is under revision control.
-
Enter the subinventory to which to transfer material. Enter the same subinventory in the Subinventory and To Subinv fields to transfer material between locators.
-
Enter the locator to which to transfer the item. In the Project Manufacturing environment, the project and task are stored as segments in the locator flexfield.
-
Optionally, enter a lot number for the item. If you want to enter multiple lot numbers, complete the remaining steps, then choose the Lot/Serial button to display the Lot Entry window.
-
Select a unit of measure. This can be the primary unit of measure (the default) or any valid alternate unit of measure.
If you enter an alternate unit of measure, Oracle Inventory issues the quantity you specify in this unit of measure. Oracle Inventory also converts the quantity to the primary unit of measure so that it can correctly update the on-hand quantity.
-
Enter the quantity of the inventory item to transfer, based on the unit of measure you specified. If the item is under dual unit of measure control, the secondary unit of measure and the secondary quantity populate automatically in the Secondary UOM and Secondary Quantity fields.
-
Optionally, enter a reason code for the transaction. For example, you can use reason codes to allow you to mark exceptional charges to support a quality data collection and reporting system.
-
Optionally, enter up to 240 characters of free text that describes the transaction.
-
Select the Scheduled Payback Date. This field is mandatory for the transfer type borrow.
-
Optionally, click Lot/Serial. See: Assigning Serial Numbers, Oracle Inventory User's Guide .
-
Save your work to process the transaction.
Project Inventory Inquiries
You can determine your project shortages and surpluses through inquiries such as:
-
Inventory on-hand inquiry.
-
Supply and demand view.
-
Borrow/Payback inquiry for outstanding inter-project loan balances in Project Manufacturing.
-
Remove payback demand details.
To view Borrow/Payback/Transfer Status information
-
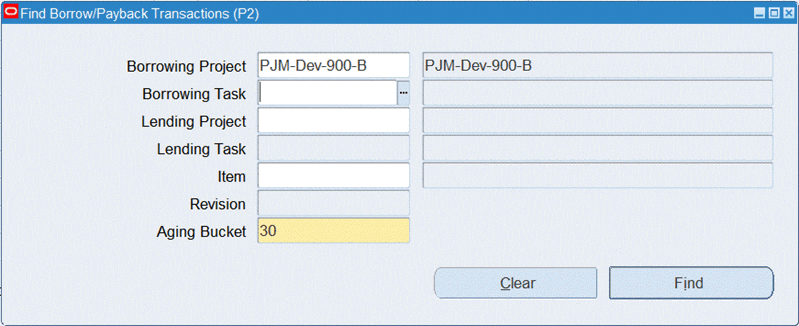
Navigate to the Find Borrow/Payback window.
Find Borrow/Payback Window
-
In the Find/Borrow/Payback Transaction window, you can perform a search by providing information in the following fields:
-
Borrowing Project
-
Borrowing Task
-
Lending Project
-
Lending Task
-
Item
-
Revision
-
Aging Bucket (The default is 30 days.)
-
-
Click Find.
Project Borrow/Payback Summary Window
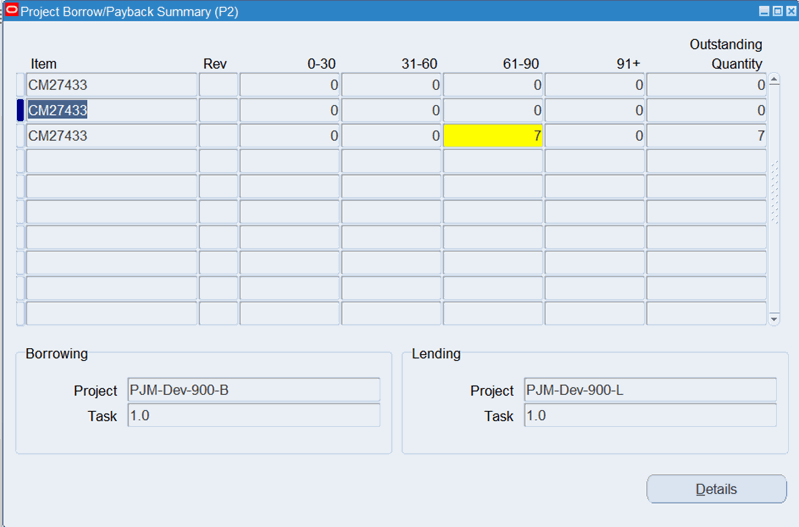
In the Project Borrow/Payback Summary window, you can view information such as the item number, revision, quantity in aging buckets, and the outstanding quantity.
-
Select an item to display its borrowing project and task and its lending project.
-
Select an item row and click Details to open the Project Borrow/Payback Details window.
Project Borrow/Payback Details Window
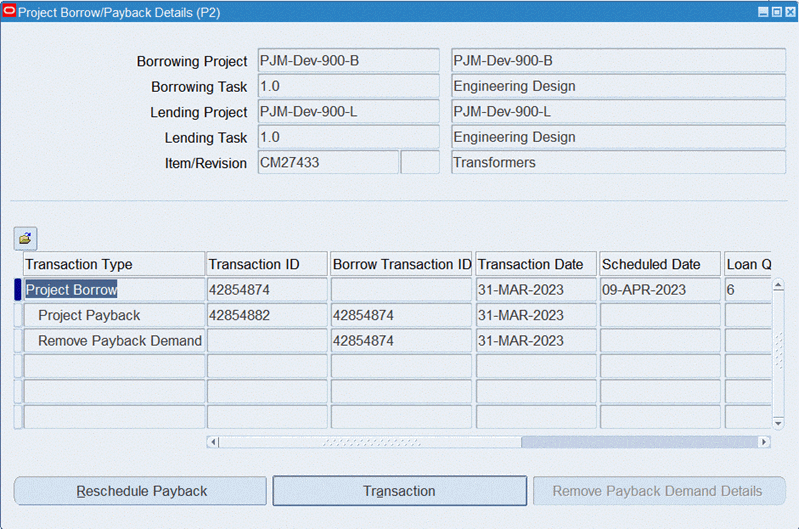
The number and name for the following information is displayed in the upper portion of the window: Borrowing Project, Borrowing task, Lending Project, Lending Task, and Item/Revision. Line details are shown for the following information: Transaction Type, Transaction ID, Borrow Txn ID, Transaction Date, Scheduled Date, Loan Quantity, Outstanding Qty, Payback Quantity, and Aging Days.
Note: The Transaction Type, apart from project borrow and project payback transactions, also includes remove payback demand transactions that are created when you remove payback demands for closed lending projects.
To perform the following actions in the Project Borrow/Payback window, see:
To drill down to the transaction details
-
Select a Borrow Payback or Project Payback transaction type in the Project Borrow/Payback Details window.
-
Click the Transaction button to drill down to the transaction in the Material Transactions window. See: Viewing Material Transactions, Oracle Inventory User's Guide.
-
Select a Borrow Payback transaction type in the Project Borrow/Payback Details window.
-
Click the Reschedule Payback button to open the Reschedule Payback window.
Reschedule Payback Window
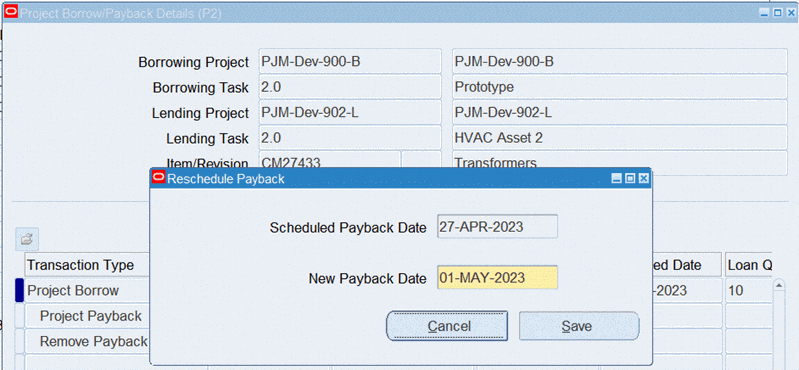
You can view the scheduled payback date and can enter a new payback date in this window.
-
Save your work.
To view removed payback demands
-
Select a Remove Payback Demand transaction type in the Project Borrow/Payback Details window.
-
Click the Remove Payback Demand Details button.
Note: The Remove Payback Demand Details button is enabled only under the following conditions:
-
The logged in user is the project manager of the lending project associated to the item.
-
The lending project is closed.
-
-
Use the Remove Payback Demand Details page to view information about payback demands that you have removed for a closed lending project. See: To view remove payback demand details
Also see:
Related Topics
Recording Borrow/Payback Transactions
Removing Payback Demands
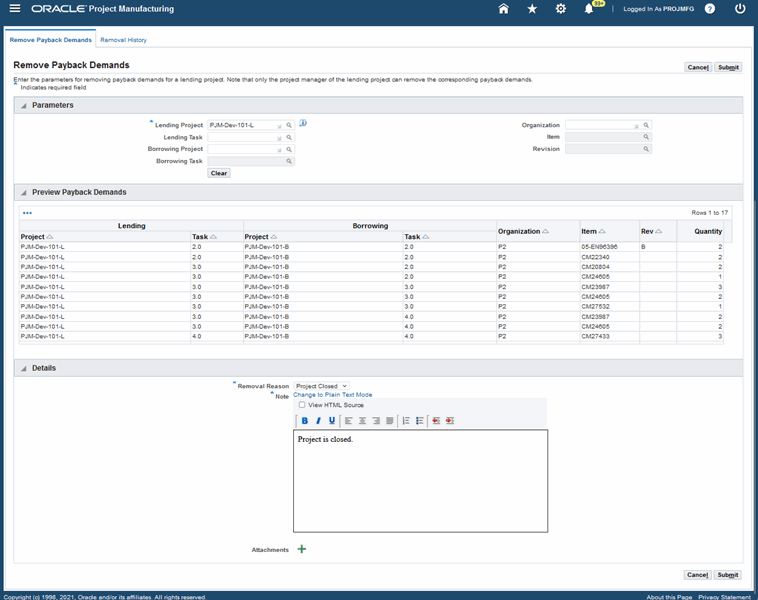
You can choose to remove pending payback demand for closed lending projects. This will automatically create remove payback demand transactions that you can view on the Remove Payback Demand History page when required. You can also view the remove payback demand details from both the Remove Payback Demand History page and the Project Borrow/Payback Details window.
To remove payback demands
-
From the Borrow, Payback Transfer menu, click Remove Payback Demand.
-
On the Remove Payback Demands page, use the Parameters region to select and enter a lending project that you own as the project manager.
-
In the Lending Project field, select a lending project. The list of values contains only closed lending projects with outstanding borrows for the logged in project manager.
-
You can view all payback demands for a lending project that you select. You can also provide information to filter payback demands based on specific parameter combinations. The list of values for the following optional parameters are associated to the lending project that you select:
-
Lending Task
-
Borrowing Project
-
Borrowing Task
-
Organization
-
Item
-
Revision
-
-
Optionally, click Clear to clear your selection and select different parameters.
-
Depending on the parameters you select, the Preview Payback Demands region displays the payback demands for a lending project by item, lending task, borrowing project, and borrowing task.
-
Select the payback demand you want to remove.
-
In the Details region’s Removal Reason field, select the reason for removing the payback demand.
Note: Currently, Project Closed is the only seeded value for the Removal Reason list of values. You can include additional values using the "Payback Demand Removal Reasons" lookup.
-
In the Note field, add additional information related to the payback demand removal. You can select to enter notes using the plain text mode or the rich text mode. You can also view the HTML source.
Remove Payback Demands Page
-
Click Attachment to open the Add Attachment dialog box and enter the following information:
-
Attachment Type – Select the file type from the list of values. You can attach a file, URL, short text, long text, or a document catalog type.
-
Title – Enter a title for the attachment.
-
Description – Enter a description for the attachment.
-
-
Depending on the selected Attachment Type, select to browse and attach a file, or enter a URL, short or long text, or a document catalog.
-
Click Cancel to cancel the attachment or click Add Another to add additional attachments.
-
Click Apply.
-
Click OK on the Confirmation message that appears to complete adding the attachment.
-
On the Remove Payback Demands page, click Cancel if you do not want to remove the payback demand.
-
Click Submit to confirm the payback demand removal.
-
Upon submitting, the message “The payback demands will be removed, confirm to proceed” displays. Click No to cancel the removal. Click Yes to remove the payback demand.
See:
To view remove payback demands history
On the Remove Payback Demand History page, you can view the payback demand removal transactions that are automatically created.
-
Navigate to the Remove Payback Demands page and click the Removal History tab.
-
On the Remove Payback Demand History page, select a value for the following parameters:
-
Lending Project
-
Lending Task
-
Borrowing Project
-
Borrowing Task
-
Organization
-
Item
-
Revision
-
Removal Reason
-
-
Click Clear to remove the selected parameters.
-
Click Go to search based on your selection.
Remove Payback Demands History Page

-
Details of the payback demands removal history appears in the table.
-
Click the Details icon to open the Remove Payback Demand Details page.
See:
To view remove payback demand details
You can view details related to the removal such as the removal reason, notes, and attachment on the Remove Payback Demands Details page. Note that this is a read only page and you cannot use this page to update or add details related to the removal.
You can open the Remove Payback Demands Details page from the Remove Payback Demand History page. You can also open this page from the Project Borrow/Payback Details window (see: To view removed payback demands)
-
On the Remove Payback Demand History page, search and select a transaction, and then click the Details icon.
Remove Payback Demand Details Page
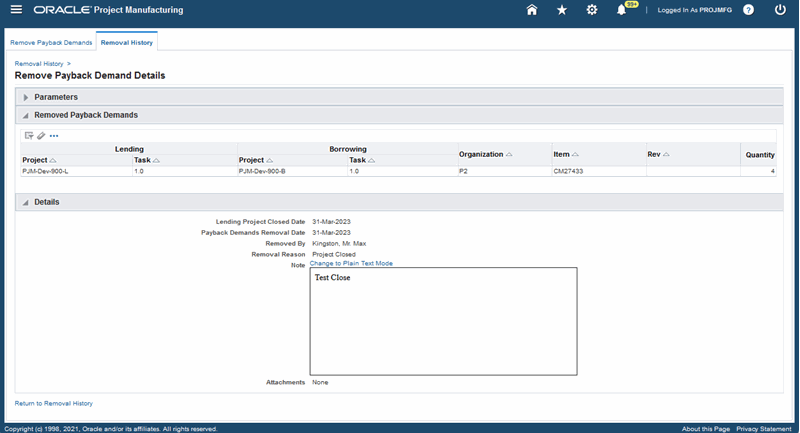
-
Use the Remove Payback Demand Details page that opens to view the following details for the removed payback demand:
-
Lending Project
-
Lending Task
-
Borrowing Project
-
Borrowing Task
-
Organization
-
Item
-
Quantity
-
Revision
-
-
In the Details region you can view the following information:
-
Lending Project Closed Date
-
Payback Demands Removal Date
-
Removed By
-
Removal Reason
-
Notes
-
Attachments
See:
-
Payback Supply and Demand
Two order types exist in Project MRP to distinguish demand and supply resulting from a borrow/payback transaction in Project Manufacturing. Planning recognizes a scheduled project payback transaction as a supply for the lending project and a demand for the borrowing project. The scheduled payback date is used as the supply date for the lending project and demand date for the borrowing project. The two order types are:
-
Payback Demand
-
Payback Supply
You can use these order types to search for borrow/payback demand/supply. You can also see these order types on the planner workbench. The following example illustrates how payback demand and payback supply are treated in a plan.
If you want to view the payback demand and payback supply on the horizontal material plan, check the Payback Demand and Payback Supply check boxes under preferences.
See: Reviewing the Horizontal Plan, in Oracle MRP User's Guide
Plan Options
Reservation Level: Project Task Hard Pegging Level: Project Task
On performing the following borrow transactions for Item SB-1:
| Item | Quantity | Lending Project | Borrowing Project | Payback Date |
|---|---|---|---|---|
| SB-1 | 60 | P1,T1 | P2,T2 | Period 1 |
| SB-1 | 50 | P3,T3 | P4,T4 | Period 3 |
The results of running MRP with the above transactions along with some additional MDS demands is shown below. In the example below, the demand for 80 (P1,T1), 100(P3, T3) and 150 (P2,T2) are MDS demands. The example assumes a zero lead time for the item.
| SB-1 MRP Planned | Period 1 | Period 2 | Period 3 |
|---|---|---|---|
| Demand | 80 (P1,T1) 60 (P2,T2) Payback demand |
150 (P2,T2) 50 (P4,T4) Payback demand |
|
| Scheduled Receipts | 60 (P1,T1) Payback supply | 50 (P3,T3) Payback supply | |
| Planned Orders | 20 (P1,T1) 60 (P2,T2) |
100 (P2,T2) 50 (P4,T4) |
Since the borrowed quantity of 60 is scheduled to be paid back in period 1, a payback demand is created for project P2, T2. This also results in a corresponding payback supply for project P1, T1. Similarly the second borrow/payback transaction for item SB-1 results in payback demand for 50(P4, T4) and payback supply for 50(P3, T3) in period 3.
Notice that the planned orders carry the project and task references of the borrowing project. Also, the payback supply is treated as firm and MRP does not suggest any reschedules or cancellations for the payback supply.
Costing of Borrow Transactions
The system costs borrow transactions in the same manner as a regular transfer from the lending project to the borrowing project. If the lending project and the borrowing project belong to the same cost group, or if the borrow transaction is between two tasks within the same project, the system does not perform average cost recalculation because the transferred item remains in the same cost group.
Costing of Payback Transactions
For the borrowing project, the system decrements the on-hand quantity by the payback quantity and credits the borrowing cost group inventory valuation by the payback quantity extended by the current average cost of the payback item. The system records any difference between the current average cost and the original borrow transaction as a variance.
For the lending project, the system increases on-hand quantity by the payback quantity and debits the lending cost group inventory valuation by the payback quantity extended by the original borrowing cost. The average cost of the payback item is re-averaged based on the new aggregate inventory valuation for the item and the current on-hand quantity.
In the example of a borrow/payback transaction shown in the table below, Project B is the borrowing project and Project L is the lending project. If a payback transaction was allocated to multiple borrow transactions, the increase in inventory valuation for the lending project is the sum of the allocated payback quantity extended by the original borrowing cost for each borrow transaction.
| Description | Quantity | Each ($) | Total ($) |
|---|---|---|---|
| Beginning Balance in Cost Groups for Item A | |||
| Cost Group for Project B | 0 | 0 | 0 |
| Cost Group for Project L | 5 | 10 | 50 |
| Project B borrows Quantity 1 Item A | |||
| Transaction Detail for Borrow Transaction | |||
| DebitProject B Cost Group Inventory Account | 1 | 10 | 10 |
| Credit Project L Cost Group Inventory Account | (1) | (10) | (10) |
| Project B issues Item A to WIP | |||
| Transaction Detail for WIP Issue | |||
| Debit Project B WIP Job Accounting Class | 1 | 10 | 10 |
| Credit Project B Cost Group Inventory Account | (1) | (10) | (10) |
| Project B Receives Quantity 20 Item A @ $12 | |||
| Debit Project B Cost Group Inventory Account | 20 | 12 | 240 |
| Credit PO Receipt Accrual Account | 20 | 12 | 240 |
| Balance in Cost Groups for Item A | |||
| Cost Group for Project B | 20 | 12 | 240 |
| Cost Group for Project L | 4 | 10 | 40 |
| Project B does Payback Transaction to Project L | |||
| Transaction Detail for Payback Transaction | |||
| Debit Project L Cost Group Inventory Account | 1 | 10 | 10 |
| Credit Project B Cost Group Inventory Account | (1) | (12) | (12) |
| Debit Project B Cost Group Payback Variance Account | 2 |
If the borrowing project and the lending project belong to the same cost group, or if the payback transaction is between two tasks within the same project, the average cost in the borrowing project is not recalculated because the transfer item remains in the same cost group, and no variance is recorded.
The following table shows the effect of a Borrow/Payback between two tasks on the same project.
| Description | Quantity | Each ($) | Total ($) |
|---|---|---|---|
| Beginning Balance in Cost Group for Item A | |||
| Project Locator for Project B, Task 1 | 0 | 10 | 0 |
| Project Locator for Project B, Task 2 | 5 | 10 | 50 |
| Project B Task 1 borrows Quantity 1 Item A from Task 2 | |||
| Transaction Detail for Borrow Transaction | |||
| Debit Project B Cost Group Inventory Account | 1 | 10 | 10 |
| Credit Project B Cost Group Inventory Account | (1) | (10) | (10) |
| Project B Task 1 issues Item A to WIP | |||
| Transaction Detail for WIP Issue | |||
| Debit Project B WIP Job Accounting Class | 1 | 10 | 10 |
| Credit Project B Cost Group Inventory Account | (1) | (10) | (10) |
| Project B Task 1 Receives Quantity 20 Item A @ $12 | |||
| Debit Project B Cost Group Inventory Account | 20 | 12 | 240 |
| Credit PO Receipt Accrual Account | 20 | 12 | 240 |
| Balance in Cost Group for Item A | |||
| Project Locator for Project B, Task 1 | 20 | 11.67 | 233.33 |
| Project Locator for Project B, Task 2 | 4 | 11.67 | 46.67 |
| Project B Task 1 does Payback Transaction to Task 2 | |||
| Transaction Detail for Payback Transaction | |||
| Debit Project B Cost Group Inventory Account | 1 | 10.00 | 10.00 |
| Credit Project B Cost Group Inventory Account | (1) | (11.67) | (11.67) |
| Debit Project B Cost Group Payback Variance Account | 1.67 | ||
| Balance in Cost Group for Item A | |||
| Project Locator for Project B, Task 1 | 19 | 11.60 | 220.40 |
| Project Locator for Project B, Task 2 | 5 | 11.60 | 46.40 |
The payback transaction results in the reduction of the cost group cost of the item from $11.67 to $11.60. This reduction is caused by re-averaging at the borrow cost, with the difference of $1.67 (24 items @ $.07) charged to the payback variance account.
Posting of Borrow / Payback Variance to Projects
You can define a new Borrow/Payback variance account at the cost group level. The difference between the current average cost and the original borrowing cost posts to the new account for the borrowing project cost group.
In addition, the variance amount is posted to Oracle Projects against the borrowing project as a material expenditure.
Related Topics
See: Overview of Project MRP in Oracle MRP User's Guide
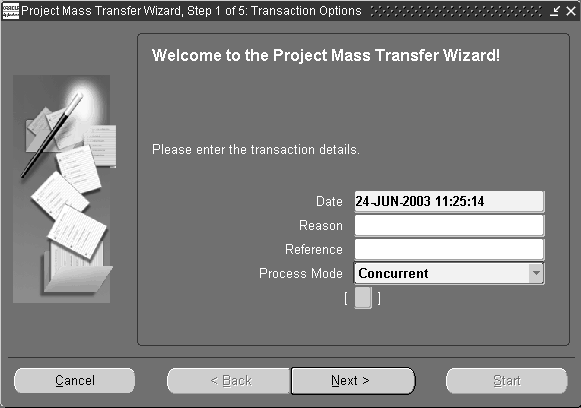
Project Mass Transfer
Project mass transfer enables you to transfer all items of a project to another project, and sends appropriate workflow notifications to the project manager. If the project manager on the from and to projects is different, an approval is required from both project managers before the system processes the transaction. If the project manager is the same for both projects, the system generates a notification.
To mass transfer items to another project
-
Navigate to the Project Mass Transfer Wizard.
-
Enter the Transfer date.
-
Optionally, select the transaction Reason from the list of values.
-
Optionally, enter a transaction reference. This reference appears in the workflow notification.
-
Select a transaction process mode. See: Setting Transactions Processing Profile Options, Oracle Inventory User's Guide.
-
Choose Next.
-
Select the item Range from the drop down list. The values are as follows:

-
All Items- Transfers all items from the project to a different project.
-
Specific Item- Transfers all on-hand quantity of an item from one project to another project.
-
Category- Transfers all items assigned to a category from one project to another project.
-
-
-
Enter the Item Number if you selected Specific Item in the range field.
-
Enter the Category if you selected Category in the range field.
-
Choose Next.
-
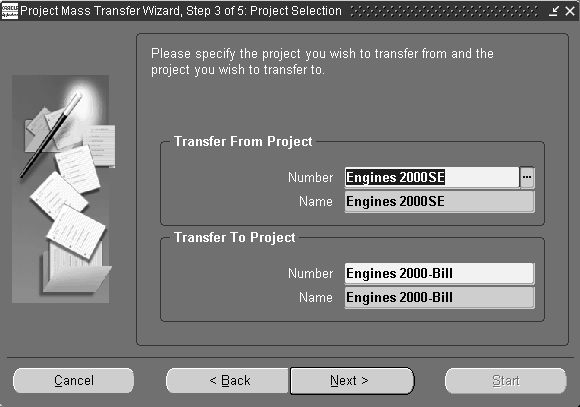
Enter the Transfer from Project Number. This is the project from which you are transferring the items.
-
Enter the Transfer to Project Number. This is the project to which you are transferring the items.
-
Choose Next.
-
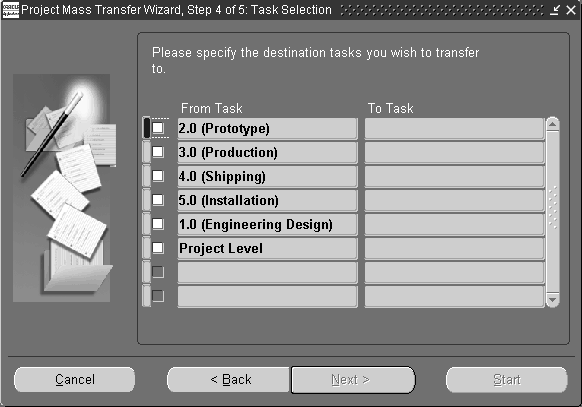
Select one or more tasks to transfer the items to different tasks. In a Project controlled organization, you can also select project to transfer the items to the project level.
-
Choose Next
-
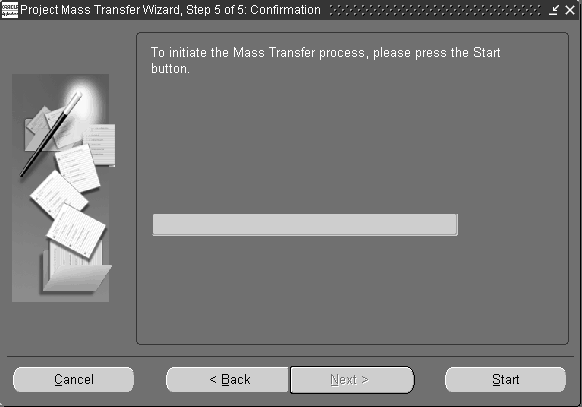
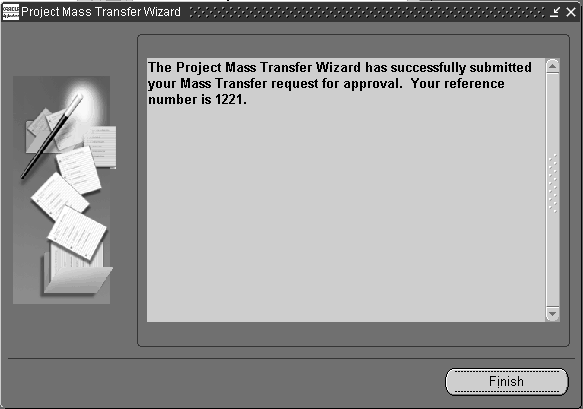
Choose Start to initiate the Transfer.
-
Choose finish.
Related Topics
Overview of Item Categories, Oracle Inventory User's Guide
Overview of Items, Oracle Inventory User's Guide
Defining Transaction Reasons, Oracle Inventory User's Guide