Depot Workbench
This chapter describes task-based procedures for different processes that a user can perform to fulfill responsibilities.
This chapter covers the following topics:
- Overview of Managing Business Processes
- View Customer Profile
- View Coverage Information
- View Service History
- Determine Contract and Price List Defaults at Service Order Creation
- Create a New Customer
- Create a Customer Contact
- Create a Service Request
- Find a Customer for an Installed Base Item
- Create a Service Order in the Depot Repair Workbench
- Create a Service Order Starting From Oracle TeleService
- Create a Service Order Starting From Oracle Order Management
- Update the Service Order Status
- Update the Service Type of a Service Order
- Create and Book a Return Line Manually
- Move Items Internally
- Find Service Requests and Service Orders
- Transfer Installed Base Ownership
- Create and Maintain Notes
- Use the Diagnostics Tab and Oracle Knowledge Management
- Manage Diagnostic Codes in the Diagnostics Tab
- Search Oracle Knowledge Management
- Manage Solutions in the Diagnostics Tab
- Manage Service Codes in the Diagnostics Tab
- Select Service Codes Manually in the Service Codes Area
- Activate and Deactivate Service Codes in the Service Codes Area
- Delete Service Codes in the Service Codes Area
- Estimate Service Charges
- Create an Estimate
- Revise an Estimate
- Obtain Customer Approval for an Estimate
- Auto-Receive an Item
- Receive an Item
- Receive an Item for an Internal Order Refurbishment
- Split a Service Order
- Manage the Service Process
- Create and Process WIP Jobs
- Create a WIP Job for a Single Service Order
- Process a WIP Job for a Single Service Order
- Create a WIP Job Across Multiple Service Orders
- Process a WIP Job Across Multiple Service Orders
- Create and Process Tasks
- Create a Task Manually
- Create a Task Using a Task Template
- Enter and Update Task Details
- Prepare the Tasks Debrief
- View Activities Related to a Service Order
- Update Service Orders Concurrently
- Send and View Workflow-Based Messages
- Create a Ship Line Manually
- Ship an Item
- Move an Item to a Usable Spares Subinventory
- Record Billing Data in Actuals
- Add WIP Summary to Actuals
- Add Task Debrief to Actuals
- Add Estimate to Actuals
- Create Manual Charges in Actuals
- Book Actuals
- Invoice a Customer
- Close a Service Order
- Close a Service Request
- Create and Process an Internal Party Refurbishment
- View Service Orders in Oracle iSupport
- Third Party Flows
- Execute Outside Processing
- Select Service Parts from Dynamic Repair BOM Window
- Print Traveler Document
- View Service Bulletins using Depot Repair Workbench
- Service Order Orchestration
- View Read Only Workbench
Overview of Managing Business Processes
Oracle Depot Repair improves the efficiency of the depot repair process.
Many different users can be involved in the overall depot process. These users and roles include the call center agent, service technician, shop floor technician, shop floor accountant, shop floor production manager, warehouse administrator, shipping administrator, receiving administrator, service administrator, accounts receivable manager, purchasing manager, HR manager, and depot manager.
For example, the call center agent logs the Service Request, the service technician diagnoses the broken part, the shop floor technician fixes the item, the shop floor accountant keeps track of the service costs, the shop floor production manager schedules the jobs, and the depot manager has the overall service process responsibility. Depending on the service organization, a user can have multiple roles. For example, the service technician can log the Service Request, and diagnose the broken part.
For key concepts and features of Oracle Depot Repair, see the Introduction to Depot Repair.
To explore the Oracle Depot Repair user interface, see Overview of Using Oracle Depot Repair.
For an overview of the processes behind different depot repair business scenarios, see Oracle Depot Repair Business Scenarios.
View Customer Profile
The customer profile summarizes customer information. A system administrator usually sets up the profile entries that appear in the customer profile, which contain a set of previously defined verifications. You can configure these verifications, as well as the actual range values and value definitions. The verification results appear by using the Customer Profile Engine, which is a concurrent program.
The customer profile information appears in the Profile window when you select Profile from the Tools menu in the Depot Repair Workbench. Click Refresh in the Profile region to view the latest profile information for the customer. This Oracle Depot Repair functionality lets service agents verify a customer's profile information, including Open Orders, Booked Orders, Cancelled Orders, Open Service Requests, Escalated Service Requests, Active Contracts, Expired Contracts, Cancelled Contracts, Open Service Orders.
Prerequisite
Service Order records associated with the customer must exist in the database.
Steps:
-
In the Depot Repair Workbench, select the customer whose profile you want to view.
-
Select Profile from the Tools menu.
The Profile window opens.
-
Double-click a key indicator in the profile window.
Oracle Depot Repair shows a summary list of that profile verification. For example, double-clicking Open Service Request (a key indicator) displays the list showing all open Service Requests for the selected customer type.
This list displays information such as the Service Request Number, incident date, problem code and resolution code.
-
Double-click any line in the summary list.
Oracle Depot Repair displays the appropriate window containing details of the selected line.
View Coverage Information
Items that a warranty or service contract covers and that link to Oracle Installed Base, populate the coverage fields with a list of all entitlements or all active entitlements (based on option selection) that apply to the selected Service Order.
Oracle Depot Repair permits the service agent to select a contract coverage that can be applied to the Sales Order charge lines that Charges created. The selected Contract Number automatically defaults on each charge line that is generated from the WIP Summary Report only. This option excludes those charge lines that relate to any new item upgrades and enhancements. The agent can verify active warranties existing for the item. Also, the contract selected as default in the Coverage window cannot be applied to charge lines in the Debrief Report. Instead, the contract selected at the Service Request level applies by default to the Debrief charge lines.
Oracle Depot Repair also permits the agent to find all contracts including those that have already expired. This is a handy tool for service agents to advise customers on contract coverage expiry, and service contract renewal offers to reinstate their coverage.
Prerequisite
You can view coverage information only for an Installed Base item referenced on a Service Order.
Steps:
-
Retrieve the Service Order referencing the item for which you want to view coverage information.
For more information, see Find Service Requests and Service Orders.
-
Select the relevant result from the Results area of the Find Service Orders window, and click OK.
The Depot Repair Workbench shows the selected Service Request and Service Order details.
-
From the top menu, select Tools > Coverage.
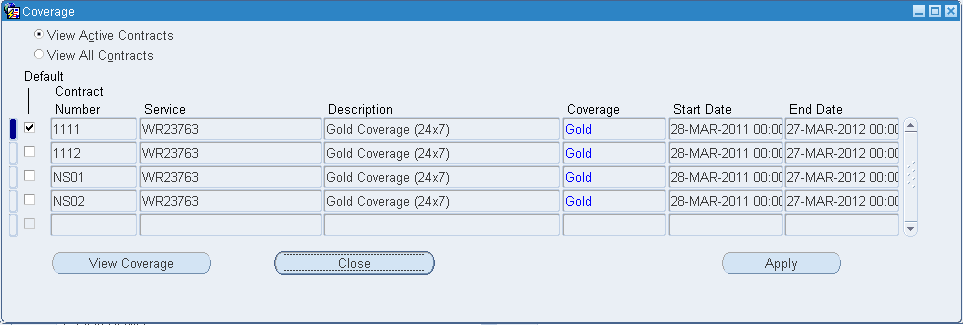
The Coverage window displays the configuration and entitlements for the Installed Base item referenced on the Service Order.
Based on option selection, you can automatically query all contracts or all active contracts applicable to the Service Order. By selecting the Default check box beside a contract, you apply this as the default contract to the Service Order. For detailed field descriptions, see Coverage Window.
If you select a contract that does not specify a Price List, the application defaults the Price List that is set for the default Price List profile option. This happens if the Price List currency is the same as the Service Order currency. If the Price List currency is not the same as that of the Service Order, or if the profile option is not set, you can select any Price List from the list.
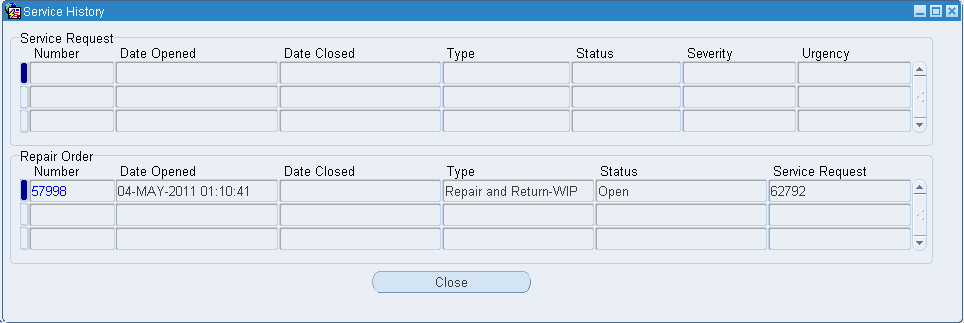
View Service History
Service agents can view all the Service Requests and Service Orders that were logged against a service item. The item must be serialized and linked to an Installed Base Instance value in order for this functionality to work. This valuable functionality permits the service provider to review the service history and service records that were recorded over the lifetime of the Installed Base item, and is especially useful when attempting to troubleshoot and diagnose service patterns and trends that affect the item.
The following procedures describe how to view an item's service history.
Prerequisite
You can view the service history of only an Installed Base item. Service Order records must exist for the item.
Steps:
-
Retrieve the Service Order corresponding to the item, the service history of which you want to view.
For more information, see Find Service Requests and Service Orders.
-
Select the relevant result from the Results area of the Find Service Orders window, and click OK.
The Depot Repair Workbench shows the selected Service Request and Service Order details.
-
From the top menu, select Data > Service History.
The Service History window lists all the Service Requests and Service Orders previously opened against the Installed Base item on a Service Order.
For detailed field descriptions, see Service History Tab.
Determine Contract and Price List Defaults at Service Order Creation
A service contract has entitlements, for example, discounts, and response time. Entitlements are specified for each business process setup for the contract. There are cases where a contract can have entitlements that are specified for the Business Process of the Service Request, but not for the Depot Repair Business Process. If that is the case, Oracle Depot Repair cannot use that contract.
The rest of this section describes how the default contract and Price List are evaluated when you create a new Service Order.
Default Contract
-
If there is a contract in the Service Request, it becomes the default contract only if the contract is valid for the Business Process associated with the Oracle Depot Repair Service Type in the Service Order.
-
If the contract in the Service Request is not valid for the Business Process associated with the Oracle Depot Repair Service Type or if there is no contract in the Service Request, the "best" contract calculated by response time becomes the default contract.
Default Price List
1. With Contract
-
If there is a contract, get the Business Process Price List of the contract for the Service Type in the Service Order and derive the currency.
-
If the contract does not have a Business Process Price List for the Service Type, get the contract (selling) Price List and derive the currency. If there is no Price List, then get the default from the profile option CSD: Default Price List.
-
If the profile option CSD: Default Price List is not set, get the Service Type Price List and derive the currency.
-
If Service Type Price List is not set, neither the currency nor the Price List is set.
2. Without Contract
-
If no contract is set, get the default Price List from the profile option CSD: Default Price List and derive the currency.
-
If the profile option CSD: Default Price List is not set, get the Price List from the Service Type setup and derive the currency.
-
If the Service Type Price List is not set, neither the currency nor the Price List is set.
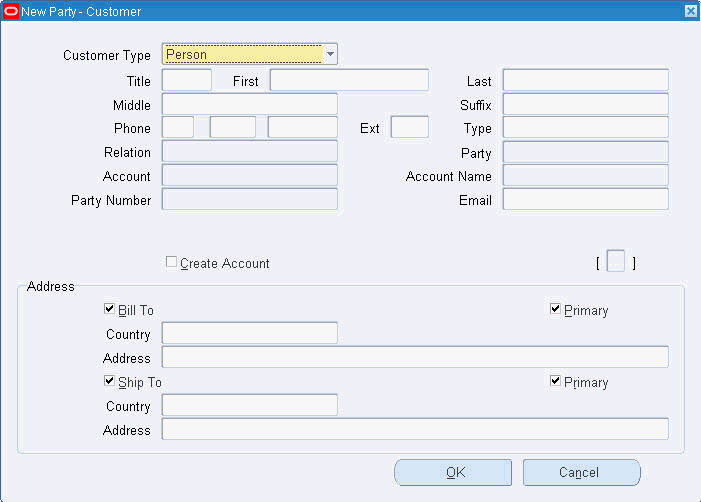
Create a New Customer
You can create a new customer in the Depot Repair Workbench.
Steps
-
Navigate to the Depot Repair Workbench.
-
In the Service Request Information area click the New Customer button. The New Party - Customer window appears.
-
In the New Party - Customer window, the Customer Type defaults as Person. Enter the required information in the following fields:
-
Title: Indicates the customer's title, such as Miss, Mr., Mrs., and Dr.
-
First, Last, Middle, Suffix: Indicate the First, Last and Middle names of the customer and Suffixes in the name.
-
Phone: Indicates the customer's phone number. You can look up area codes in the list of values.
-
Ext: Indicates the phone extension of the customer.
-
Type: Refers to the phone type, such as Work, Home, Cell, or General. Select from the list of values.
-
Email: Enter the customer's email address.
-
Create Account: Check box, when selected, creates an account for the new customer in your database.
-
Bill-to: Refers to the address to which you should send the customer's bill. When you have entered the Country in the Address field, the Address window appears where you can select the Context Value to choose the customer's Address style, such as North European, Japanese, or South American. After you select the Context Value, the Address window provides you with fields appropriate to the address style you have chosen. Enter the address, and click OK.
-
Ship-to: Refers to the address to which you should ship an item for the customer.
-
Primary: Check boxes that indicate whether the Bill-to and Ship-to addresses are the customer's primary addresses.
-
Click OK to return to the Depot Repair Workbench.
-
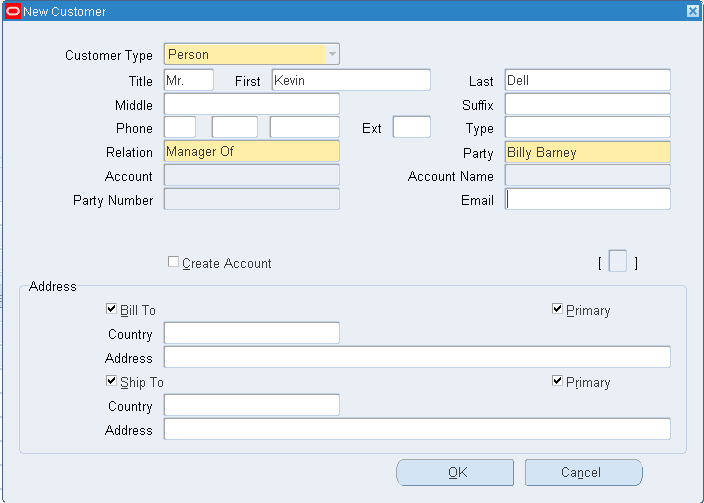
Create a Customer Contact
You can create a new contact for a customer in the Depot Repair Workbench, and use this contact while creating your new Service Request.
Prerequisite
The customer whose new contact is being created must have an existing record in the database.
Steps:
-
In the Find Service Orders window, click New to display the Service Orders window.
The Service Orders window serves as the Depot Repair Workbench. From the Depot Repair Workbench, you can perform all depot processes, end-to-end.
-
In the Service Request Information area of Depot Repair Workbench click New Contact.
The New Party - Contact window opens.
-
In the New Party - Contact window, the Customer Type defaults as Person.
Enter the required information in the following fields:
-
Title: Indicates the contact's title, such as Miss, Mr., Mrs., and Dr.
-
First, Last, Middle, Suffix: Indicate the First, Last and Middle names of the contact, and Suffixes in the name.
-
Phone: Indicates the contact's phone number. You can look up area codes in the list of values.
-
Ext: Indicates the phone extension of the contact.
-
Type: Refers to the phone type, such as Work, Home, Cell, or General. Select from the list of values.
-
Relation: Specifies the contact's relationship with the customer, such as Associate of, Child of, and Benefactor of. Select from the list of values.
-
Party: Refers to the name of the customer. Select from the list of values.
-
Email: Enter the contact's e-mail address.
-
Create Account: Check box, when selected, creates an account for the new contact in your database.
-
Bill-to: Refers to the address to which you should send the contact's bill.
When you have entered the Country in the Address field, the Address window appears where you can select the Context Value to choose the contact's Address style, such as North European, Japanese, or South American. After you select the Context Value, the Address window provides you with fields appropriate to the address style you have chosen. Enter the address, and click OK.
-
Ship-to: Refers to the address to which you should ship an item for the contact.
-
Primary: Check boxes that indicate whether the Bill-to and Ship-to addresses are the contact's primary addresses.
-
-
In the New Party - Contact window, click OK.
A note appears informing you that a Party Number and an Account Number (if you selected the Create Account check box) have been created and saved for the new contact.
-
In the note, click OK.
The application returns you to the Depot Repair Workbench.
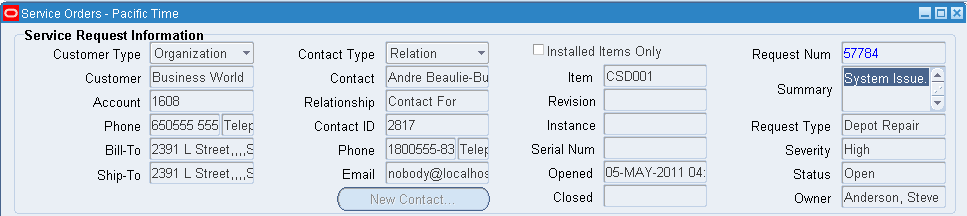
Create a Service Request
Service Requests initiate the actions required to solve a customer problem. A Service Request is mandatory for any service process, and needs to be created before any Service Order can be created in the Oracle Depot Repair module.
You can log a customer request for assistance in the Depot Repair Workbench. The application lets you create Service Requests without having to leave the Depot Repair Workbench.
Generally, as you create a Service Request, you know which customer to associate with the Service Request. There may be situations where you are only provided with identifiers for Installed Base items, and the customer information is not provided. In this case, you can use an Oracle Depot Repair feature to find and select the customer associated with the item.
Note: You cannot create a Service Request without a value in the Item field if the profile CSD: Require Item For Service Request has been set to Yes during implementation. Setting this profile option to No lets you create a Service Request without entering a value in the Item field. Also, when the profile option is set to No, you can specify an Installed Base item without specifying an Instance value in the Service Request.
You can search for existing Service Requests and Service Orders from the Find Service Orders window.
For more information, see Find Service Requests and Service Orders.
Prerequisite
The customer and contact records must exist in the database. Service Requests can be logged only for items recorded in inventory.
Steps:
-
In the Find Service Orders window, click New.
The Depot Repair Workbench opens.
In the Service Request Information area in the Depot Repair Workbench, the Contact Type, Customer Type, and Opened Date fields default to Relation, Organization, and the Current Date respectively.
The Severity and Status fields default to the value of the profile options Service: Default Service Request Severity and Service: Default Service Request Status respectively.
If you need to discover the customer for the Installed Base item that will be the subject of the Service Request, perform the operations in Find a Customer for an Installed Base Item.
-
If you select a customer using these operations, the customer-related and the item-related fields in the Service Request Information area are automatically filled in. The fields can be changed before you save the Service Request.
-
Choose the Contact Type and Customer Type from the lists of values, and use lists of values to select the Contact, Customer, Request Type (such as Customer Call, Depot Repair, Field Service), Severity, and Status fields.
You can also enter the date and time in the Opened field.
Note: Contact information is not mandatory for creating a Service Request. Selecting a blank contact type in the Contact Type field disables all Contact information fields.
The Bill-To and Ship-To address fields are populated automatically when the Customer and Contact Names are entered. The addresses always default to the primary Bill-To and Ship-To addresses of the customer. Even if you select a primary address for the Installed Base instance, the Bill-To and Ship-To address fields default only to the primary address of the customer party. Also, the list of values for both fields contains addresses for related parties, which can be for either persons or for organizations.
For more information, see The Service Request Information Area.
-
To validate the item against the Installed Base, select the Installed Items Only check box.
Note: The system will not allow a service request to be created if the item instance selected is not owned by the party entered in the Customer field or owned by a party with an Installed Base relationship to the party entered in the Customer field unless the profile CSD: Default Instance-Party Association Type has a value assigned.
-
Select the Item that the customer is reporting as defective from the Item list of values.
If the item is serialized, the Serial Number appears. After validation, the Instance field is automatically populated. For a given customer, the call center agent can view all the items in the customer Installed Base.
For more information about entering the Item, Instance and Serial Number fields, see Item Information Fields.
-
Select the name of the person responsible for overseeing the Service Request in the Owner field from the list of values.
-
Enter a brief summary of the service issue in the Summary text field.
-
Click the Save icon on the toolbar to create the Service Request record.
The application populates the Request field in the Service Request Information area with the Service Request Number. When you click any of the fields in the Service Order Information area, the application populates the Item, Item Description, UOM, and Quantity fields from the Service Request Information area.
-
Authorized users can launch the Service Request HTML page by clicking the hyperlinked Request Number from both the Depot Workbench and the Technician Portal. This renders the Service Request HTML page in editable mode where you can update and save data. This enables you to update service request values such as Customer Bill-to and Ship-to addresses, SR Status and SR Resolution Type.
You can enable the hyperlink through profile option, CSD: Enable Service Request Drill-down (Yes/No).
Find a Customer for an Installed Base Item
Sometimes, when you are creating a Service Request, you may know the Item Name, or its Serial Number, or its Installed Base Instance Number, but the customer name is unknown or simply not provided.
In these circumstances, you can provide the item information, and search for the customers that have the item in their Installed Base.
After you select one of the customers for the item, all the customer-related and item-related fields appear in the Service Request Information area of the Depot Repair Workbench.
This procedure is only available when you are creating a new Service Request in the Depot Repair Workbench.
Prerequisites
You must be in the process of creating a Service Request.
The items provided as search parameters must be Installed Base trackable or serialized items.
Steps:
-
In the Depot Repair Workbench, from the top menu, select Tools > Find Customer.
The Find Customer window opens.
-
Select one or more of the following fields as search parameters:
-
Item
-
Instance
-
Serial Num
-
Revision
-
-
Click Find.
The Results area shows the customers that have the item in their Installed Base.
-
Highlight the customer whose data you want to have on the Service Request, and click OK.
-
The Find Customer window closes, and the fields related to the customer and the item appear in the Service Request Information area of the Depot Repair Workbench.
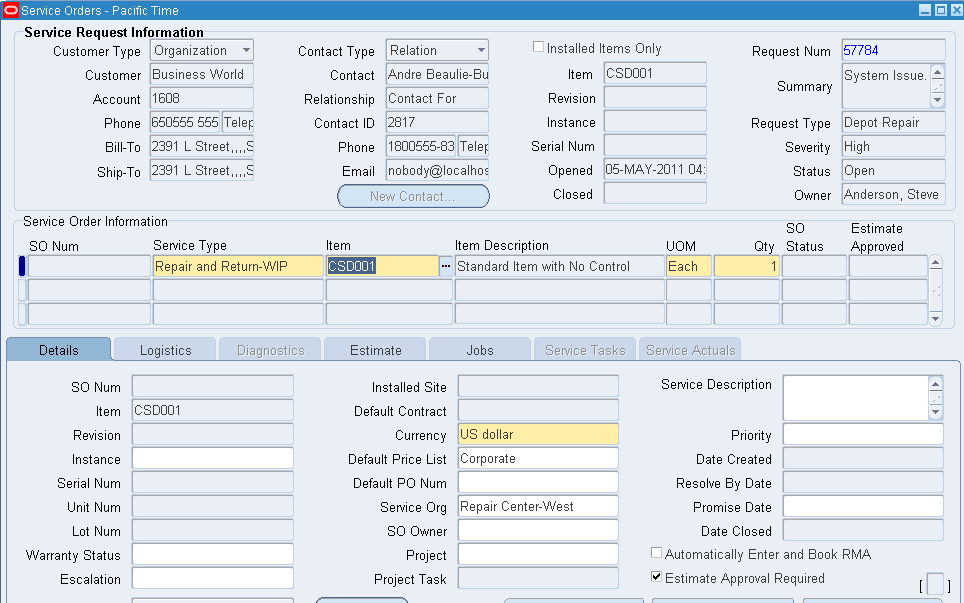
Create a Service Order in the Depot Repair Workbench
The depot business process starts with a Service Order. Creation of Service Orders occurs only against Service Requests for serviceable items.
You can create a Service Order and its associated Service Request directly in the Depot Repair Workbench, which automates part of the process. Alternatively, you can start the process of creating a Service Order in another Oracle application. For more information, see Alternative Ways of Creating Service Orders.
For service items that are under revision control, a correct Revision Number is mandatory. If your Service Order Item is serialized, and the quantity to service is greater than 1, you will have specify each of the Serial Numbers of the item to be serviced, for Installed Base trackable items.
Oracle Depot Repair also lets you add items to a customer's Installed Base from the Depot Repair Workbench. This enables the depot to process (Installed Base trackable) service items that the customer purchased from outside the service organization. If you try to create a Service Order line without specifying an Instance value for an Installed Base trackable item, the application will prompt you to add a new item instance to the Installed Base. This lets you process the service.
Each Service Order must have a Service Type. When you create a Service Order in Oracle Depot Repair, then, depending on the Service Type, the application automatically creates one or more RMA and Sales Order lines. The RMA and Sales Order lines appear in the Logistics tab, with action types of Repair and Ship respectively. If you choose the Standard Service Type, no charge lines are created automatically; you must create them manually.
You can also choose to create RMA charge lines manually. If you want to create the RMA charge line manually, first you must clear the check box Automatically Enter and Book RMA, during the creation of the Service Order. Afterwards, you can create the RMA charge line, as described in Create an RMA Manually.
The following procedures describe how to create a Service Order in the Depot Repair Workbench.
Prerequisite
A Service Request record must exist for the broken item in order to create a Service Order for its service.
Note: You can also proceed to creating a Service Order immediately after creating a Service Request record, without having to navigate to the Find Service Orders window. In this case, start at step 3.
Steps:
-
From the Find Service Orders window, retrieve the pertinent Service Request.
For more information, see Find Service Requests and Service Orders.
-
Select the relevant Service Request, and click OK.
The Depot Repair Workbench shows the Service Request information.
-
In the Service Order Information area in the Depot Repair Workbench, confirm the information appearing in the table, or enter the appropriate information for the defective item.
-
Select the Service Type from the list of values.
For more information on Service Types, see Service Type Processing. For field descriptions, see Details Tab.
Note: A Service Order supports a single currency. Different currencies are supported for different Service Orders within a Service Request. The default currency is based on the default contract. If no default contract is selected, the default Price List determines the currency. If neither defaults are set, the currency selection is based on the manually selected Price List in the Details tab.
After a charge line is created, you cannot change the currency of the Service Order in the Details tab or select another default contract that has a Price List with a different currency. To change the currency of a Service Order, all the charge lines have to be deleted.
-
Optionally, enter the quantity of items to be serviced in the Qty field.
The default quantity is 1. If you specify a Qty that is greater than 1 for a serialized item, then you will need to capture the Serial Numbers separately, after the Service Order is created. For details, see step 13.
-
In the Details tab, optionally enter the Promise Date (date and time) for service completion after negotiation with the customer.
-
Optionally, select the name of the person responsible for overseeing the service in the Service Owner field from the list of values.
-
If you require estimates to be approved before you can proceed with the service of an item, then select the check box Estimate Approval Required, else clear this check box.
-
If you want the RMA line to be automatically entered and booked when you create the Service Order, then select the check box Automatically Enter and Book RMA, else clear this check box.
-
Click Save to create the Service Order.
-
If you have tried to create a Service Order line without specifying an Instance value for an Installed Base trackable item, or without specifying a Serial Number for a serialized item with a Qty of 1, a message window appears.
In the message window, you can either click Add to IB to add an item instance to the Installed Base, or you can click Save As Is to create the Service Order without adding to the Installed Base. You can only Add to IB if the User Function Name Service Orders: Add to IB is associated with your responsibility.
Note: If you select Save As Is, the Service Order is created, but no charge lines are created automatically. You will have to create all the required charge lines for your Service Type manually in the Logistics tab.
After the Service Order is created, the application populates the SO Number fields both in the Details tab, and in the Service Order Information area, with the Service Order Number.
-
For the case where the Service Order Item is serialized, and the quantity of the item Service Order Item is greater than 1, continue at step 13.
For all other cases, continue at step 18.
Capture Serial Numbers
-
If your Service Order contains a serialized item, and the quantity is greater than 1, when you click Save, a message window appears, which instructs you as follows:
-
The Service Order created will be a draft Service Order, that is, its Service Status will be Draft.
-
You must enter the Serial Numbers using the Capture Serial Numbers option from the Tools Menu.
-
-
To complete the processing for servicing many individual serialized items, click OK in the message window, then, from the top menu, select the options Tools > Capture Serial Numbers.
In the Serial Numbers window that appears, your main functions are to select a Serial Number for each individual item instance, and to process the Serial Numbers. Processing the Serial Numbers creates a separate Service Order for each item instance.
-
Select a Serial Number from the Serial Number list of values for the customer account.
You can specify a Serial Number that does not exist yet. In this case, a message appears asking if you wish to create the new Serial Number.
-
You can optionally select the check box Add to Order within Service Request.
If you select this option, then, when the Serial Numbers are processed, each RMA line will be added to the same Order Number.
-
After you have specified the Serial Numbers, click one of the following buttons:
-
Save: This saves the Serial Numbers, but does not process the values into separate Service Orders for each Serial Number.
-
Process: This creates a separate Service Order for each Serial Number, each with a status of Open.
-
Close: This closes the window without saving or processing the Serial Numbers.
Note: For serialized, non-Installed Base trackable items, if you enter fewer Serial Numbers than the Qty on the Service Order, Oracle Depot Repair creates as many Service Orders as the Qty number of units. For example, if Qty is 10, and you enter 8 Serial Numbers, you get 8 Service Orders with Serial Numbers provided, and 2 without Serial Numbers. You will need to provide the 2 missing Serial Numbers at time of receipt.
Note: For serialized, Installed Base trackable items, if you enter fewer Serial Numbers than the Qty on the Service Order, Oracle Depot Repair creates only as many Service Orders as the number of Serial Numbers you entered. For example, if Qty is 10, and you enter 8 Serial Numbers, you get 8 Service Orders with Serial Numbers provided.
Checking the Logistics Tab
-
-
Click the Logistics tab.
While not technically part of the creation process, after you have created the Service Order, you should check the Logistics tab to determine the next process to perform.
Depending on your choice of Service Type and whether you set the check box Automatically Enter and Book RMA, the Logistics tab generally contains one or more Return and Ship lines, each of which has a Status.
-
In certain cases, there are no charge lines in the Logistics tab, such as when one of the following has occurred:
-
The Service Type is Standard.
-
For a serialized service item, you selected Save As Is in the Create IB Instance window (see step 11).
You must create and book the required charge lines manually.
See Create and Book a Return Line Manually and Create a Ship Line Manually.
-
-
If your Service Type involves the return of a defective item, then, in order to receive the defective item into inventory, the following conditions must apply:
-
There must be a Return line in the Logistics tab.
-
The Status of the Return line must be Booked.
To fulfill these conditions, except for the special case where you created the Service Order after creating an order in Oracle Order Management, proceed to create and book the Return line, as required.
-
Comments:
-
If you are creating more than one service order line, and the value of the profile option CSD: Default Service Order is set to Yes, then, as you arrow down from the last service order line, the values are defaulted from the last service order line into the new line.
-
After creating the Service Order record, you can attach additional information to the Service Request or Service Order by clicking the Notes button in the Details tab
For more information, see Create and Maintain Notes.
After creating the Service Order record, you can attach additional information to the Service Request or Service Order by clicking the Notes button in the Details tab.
-
After creating the Service Order record, you can also search from the Diagnostics tab for possible solutions to the problem affecting the service item.
In the Diagnostics tab, by selecting Service Codes, either manually or as a result of a search performed in Oracle Knowledge Management, you can get the information ready to automatically create estimate lines and default Bills and Routings for WIP Jobs.
For more information, see Use the Diagnostics Tab and Oracle Knowledge Management.
Alternative Ways of Creating Service Orders
In addition to the method of creating a Service Order and its associated Service Request in the Depot Repair Workbench, which enables you to automatically create charge lines associated with the Service Type, there are two other ways by which you can create a Service Order, as follows:
Create a Service Order Starting From Oracle TeleService
The depot agent can view activities performed against a Service Request that was initiated in the call center and transferred to the depot for resolution. You can link RMAs and Sales Orders generated through the call center to Service Orders created within the Depot Repair Workbench.
This procedure shows an example of creating a Service Order, where an existing Service Request already has RMA and Sales Order lines.
-
Create a Service Request in Oracle TeleService, with a Service Request Type of Depot Repair.
-
In the Charges tab of the Service Request, create one or more charge lines with typical Depot Repair activities for the items that require service processing.
A RMA charge line, for example, could include the following values:
-
Charge Line Type = Actual
-
Business Process = Depot Repair
-
Service Activity = Return for Repair
A Sales order line, for example, could include the following values:
-
Charge Line Type = Actual
-
Business Process = Depot Repair
-
Service Activity = Ship Returned Item
-
-
Submit the lines for processing.
-
In the Navigator, using the Depot Repair Super User responsibility, navigate the path Depot Repair > Service Orders.
-
In the Find Service Orders window, enter the Service Request Number you created in step 1, and click Find.
-
When the record appears in the Results area, click OK.
A message window informs you that RMA/Sales Order lines not linked to a Service Order were found, and asks if you want to create a Service Order or associate the RMA/sales lines.
-
When you click OK, the Create Service Order window appears, containing the not-yet-linked RMA lines.
-
Select the lines that you want to become Return (RMA) lines in the Service Order, and click OK.
If there are submitted Sales Order lines in the Service Request, the Link Sales Order window appears, containing the not-yet-linked Sales Order lines.
-
Select the lines that you want to become Ship lines in the Service Order, and click OK.
The Service Order appears in the Depot Repair Workbench, with a Standard Service Type. The Return and Ship lines appear in the Logistics tab, each with the Status of Submitted.
Create a Service Order Starting From Oracle Order Management
This procedure shows an example of creating a Service Order, which starts with the creation of an order in Oracle Order Management, and includes the operation of receiving the service item into inventory.
-
In Oracle Order Management (if you use the Depot Repair Super User responsibility, navigate the path: Order Management > Orders, Returns > Sales Orders), create a Sales Order, with the following values:
Order Information tab:
-
Set Order Type = Mixed
Line Items tab, Main sub-tab:
-
Specify the item to be serviced in Ordered Item, and set Qty = -1
Line Items tab, Returns sub-tab:
-
Specify the Return Reason
Line Items tab, Shipping sub-tab:
-
Specify the Warehouse
-
-
When the order status is Booked, note the Order Number.
-
In Oracle Purchasing (if you use the Depot Repair Super User responsibility, navigate the path: Purchasing > Receiving > Receipts), in the Find Expected Receipts window, click the Customer tab, and search for the receipt whose RMA Number you noted in step 2.
-
In the Receipts window, select Inventory for the Destination Type, select the Subinventory.
-
If required, specify the Serial Number or Serial Number range of the item to be received.
-
Submit a request to run the program Create SR/SO from OM RMA Lines; specify the Organization and Subinventory parameters.
-
When this program finishes, the Service Order has been created, with a Standard Service Type.
Because the item to be serviced has already been received, the Logistics tab contains neither Return nor Ship lines.
-
From the top menu, select Data > Activity, to find summary information in the Activity window about the receiving of the item.
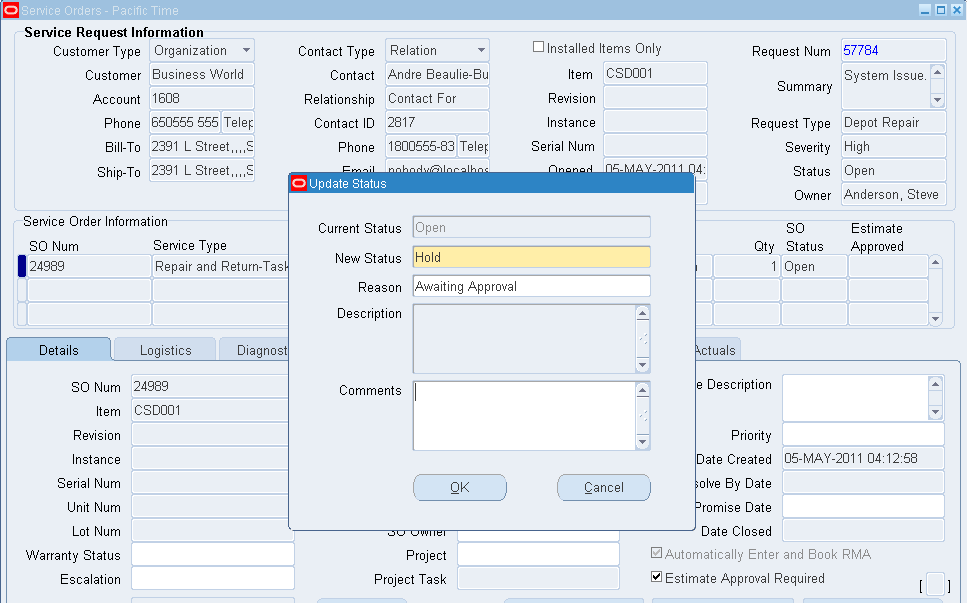
Update the Service Order Status
You can update the Status of a Service Order either by selecting a Service Order and then clicking the Update SO Status button from the Depot Repair Workbench or by clicking the Update Status button from the Service Order page.
When you update the Status of a Service Order, you can only change to a Status defined as acceptable for the current Service Type in your setup of Service Order Status Transitions. The list of values for New Status shows only the allowable statuses from which you can select.
For more details, see Service Order Status Transitions in the Oracle Depot Repair Implementation Guide.
If the transition has been set up to require you to enter a reason at the time of status change, enter the Reason, else it is optional for you to do this. You may also add or edit Comments.
Update the Service Type of a Service Order
Begin the process of updating the Service Type of a Service Order by selecting Tools > Update Service Type from the main menu.
You can update the Service Type of a Service Order only if the Status of the Service Order has previously been defined as a Status of both the current Service Type and your intended target Service Type.
For more details, see Service Type Transitions in the Oracle Depot Repair Implementation Guide.
Enter the New Service Type. The Description associated with the service type transition appears.
If the transition has been set up to require you to enter a reason at the time of service type change, enter the Reason, else it is optional for you to do this.
Important: Service type transitions do not add, delete, nor default any logistic lines. After a service type transition is performed on a service order, you must perform manual adjustments to your logistic lines, if your organization processes require this.
Create and Book a Return Line Manually
Important: In this section, the terms RMA, RMA line, and Return line are used interchangeably.
When creating a Service Order for Service Types that require RMA creation, the application automatically generates the Return line based on Service Type setup. If you choose or have to create an RMA manually, then, in the Details tab, clear the Automatically Enter and Book RMA check box, before saving the Service Order.
The main objective of creating and booking an RMA is to create an order in Oracle Order Management. When the RMA is fully interfaced with Oracle Order Management, an Order Number is associated with the RMA, and appears in the Return line.
The following procedures explain how you can create and book an RMA manually, after you have created the Service Order. If the RMA has already been created, you can just book the RMA.
For background information about RMA creation, see Create a Service Order in the Depot Repair Workbench.
Prerequisite
You must have created a Service Order.
Steps:
-
Retrieve the Service Order for which you want to create or book the RMA.
For more information, see Find Service Requests and Service Orders.
-
Select the relevant result from the Results area of the Find Service Orders window, and click OK.
The Depot Repair Workbench shows the selected Service Request and Service Order details.
-
Select the Logistics tab in the Depot Repair Workbench.
If a Return line already exists for the defective item to be returned, but the Status is not Booked, then continue at step 10.
Creating a Return Line
-
If you need to create a Return line, click the Action Type field in the next blank line, and select Return.
-
Select the fields for the Return line.
The main fields that you must select are Action Code, Service Activity, Price List, and Return Reason. For serialized items, you must select the Source Serial Number.
Item-related fields default to the Service Order Item. You may edit these as required.
Note also the Add to Order field. Oracle Depot Repair lets you place all Return (RMA) and Ship lines on the same order.
By default, all Return (RMA) and Ship lines appear on the next-highest Order Number created when the lines are transferred to Order Management.
You can also select the specific order for the Return (RMA) or Ship line by selecting the Order Number in the Add to Order field before interfacing the specified line to Oracle Order Management.
Note: Use the following profile options:
-
CSD: Add to Order Num Within Service Order Default to submit/book logistics lines to the same order number within a single service order.
-
CSD: Add to Order Num Within Service Request Default to submit/book logistics lines to the same order number across multiple service orders that belong to the same service request.
For field descriptions, see Logistics Tab.
If you want to process the Return line directly to the Booked stage, continue at step 10.
-
-
Select the Process Trans check box for the Return line.
-
Select the Automate order processing steps through check box.
-
Click Process.
Acknowledge the message in any message window that appears.
The Status of the Return line changes to Entered or Submitted.
Booking a Return Line
-
Select the Process Trans check box for the Return line.
-
Select the Automate order processing steps through check box.
-
Select Book Order radio button option.
-
Click Process.
Acknowledge the message in any message window that appears.
The Status of the Return line changes to Booked.
The Sales Order Number can optionally be hyperlinked to allow you to click on it to launch the Sales Order window in editable mode and in context of the clicked Order Number. You can enter information such as credit card number, ship method and payment details, save the order, close the Sales Order screen and return to the Depot Workbench without ever leaving.
Comments:
-
During the processing of the Return line, when the Return line is fully interfaced with Oracle Order Management, the Order Num field is populated with the system-generated RMA Order Number.
If you have not selected the No Charge check box, the application returns the item price to the Price field based on Price List selected.
-
To delete a Return or Ship line, select the Return or Ship line on the Logistics tab, and click the Delete icon on the toolbar.
Note: The Delete icon on the toolbar remains enabled as long as the Return or Ship line has not been fully interfaced with Order Management. After the order is fully interfaced to Order Management, the application disables the Delete icon, and you cannot delete the order line. You can cancel the submitted order line by selecting Cancel Order Line from the Actions drop list and clicking on the Go button.
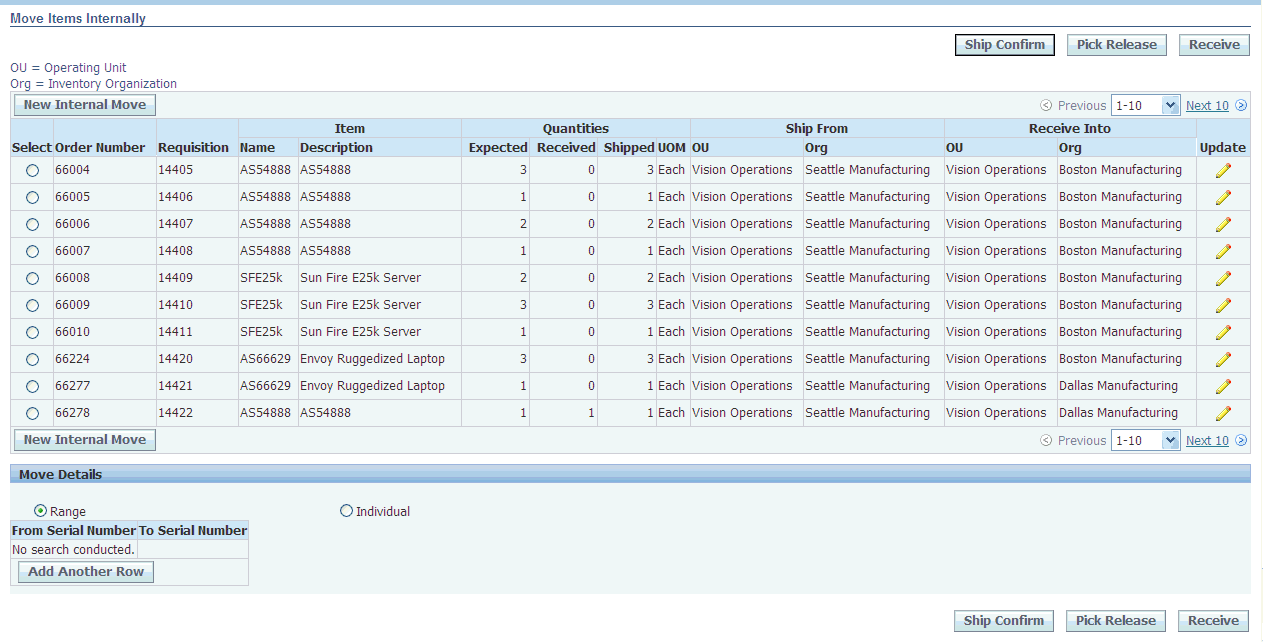
Move Items Internally
The Internal Move capability allows you to move items or parts from one warehouse or sub-inventory location to another. The Internal Move window wraps the capabilities provided by the Internal Requisition and Internal Sales Order modules provided by Purchasing and Order Management. A single service order can be linked to both sales orders and internal sales orders at the same time. Moreover, one service order can be linked to many sales orders and many internal sales orders at the same time.
Additionally, it provides the ability to create Internal Requisitions and Internal Sales Orders in one step, ship and receive Internal Sales Orders and link Internal Moves to a service order along with RMAs and Sales Orders. The business value of this functionality is that it prevents losing track of items as they move from one location to another, enables ad-hoc routing of material to the best processing location and reduces click count to create Internal Requisitions and Sales Orders.
To move items internally:
-
Navigate to the Find Service Requests window and select a Service Order to open the Service Orders window.
-
Select the Logistics tab.
-
Choose the Internal Move Orders option from the Actions drop down list and click Go.
Alternatively, click the Internal Orders button to navigate to the Internal Orders page. This button is enabled if at least one internal order for the service order exists.

The Move Items Internally page appears. The page displays the existing internal move orders linked to this service order. The Move Details region provides the ability to enter one or more serial numbers or a serial number range.
-
To create a new internal move order, click the New Internal Move button. The Create Move Orders page appears.
-
Enter the fields in the Internal Order Attributes region:
-
Item
-
Description
-
Quantity
-
Unit of Measure
-
Need By
-
-
Enter the Operating Unit and Inventory Organization in the Ship From region.
-
Enter the Operating Unit, Inventory Organization, and Location in the Receive Into region.
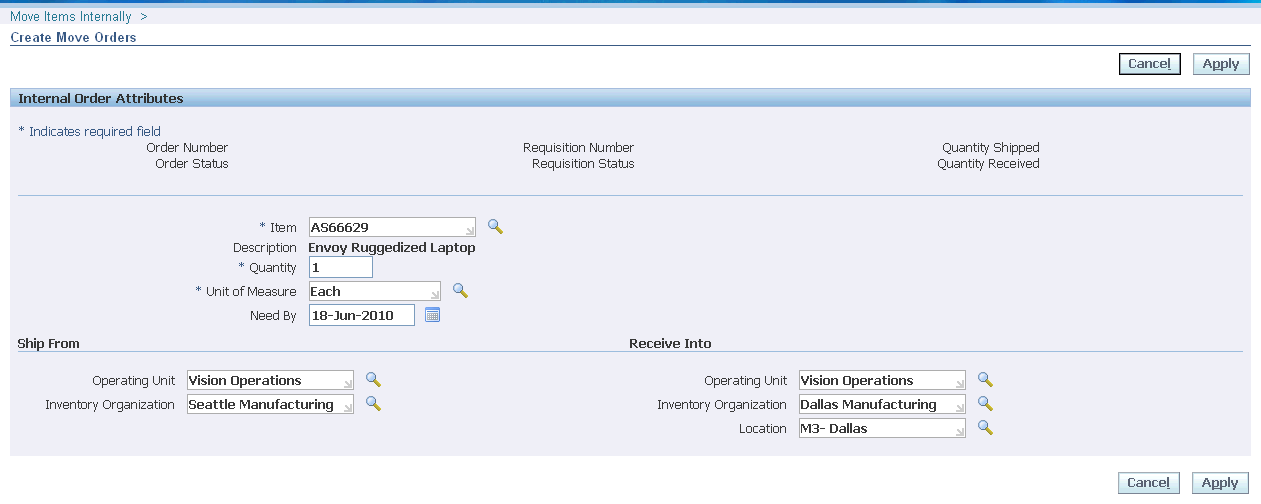
-
Optionally, specify the pick from (source) and receive into (Destination) subinventories.
-
Click Apply to create a new internal move order. A confirmation page appears. You cannot edit any fields once an Internal Sales order is created.
The header of the Create Move Orders page populates with the following:
-
Order Number
-
Order Status
-
Requisition Number
-
Requisition Status
-
Quantity Shipped
-
Quantity Received
-
-
In the Move Details region, choose the Range option to include the subsequent serial numbers in a continuous range. In the absence of a continuous range, it stops at the number after which the sequence is broken.
-
To Pick Release the internal sales order line, select the move order on the Move Items Internally page and click the Pick Release button. Provide the pick from subinventory or override the pick if subinventory has been previously provided. A confirmation message appears validating the pick release.
-
To Ship Confirm the internal sales order line, select the relevant move order and click the Ship Confirm button. A confirmation message appears validating the ship confirm.
-
You can receive the internal requisition associated with Internal sales order in the destination organization. If the shipping network between source and destination organization are set up as direct then the receipt automatically happens as part of ship confirm action in the source organization. Though the internal requisition is automatically received as part of ship confirm action, you must click the Receive button to refresh the receipt information in the depot schema. A confirmation message appears validating the receipt.
Note: Users can specify the pick from subinventory and receive into subinventory at the following two stages:
-
During creation of internal orders.
-
During picking and during receiving using Internal Orders main page.
Additionally, you can perform partial shipments and partial receipts. For example, for an Internal Order with quantity of 5, the shipping clerk ships out only 3. In this case the destination organization receives these 3 into their inventory. Later when the remaining quantity of 2 is shipped out, the destination organization receives the remaining quantity.
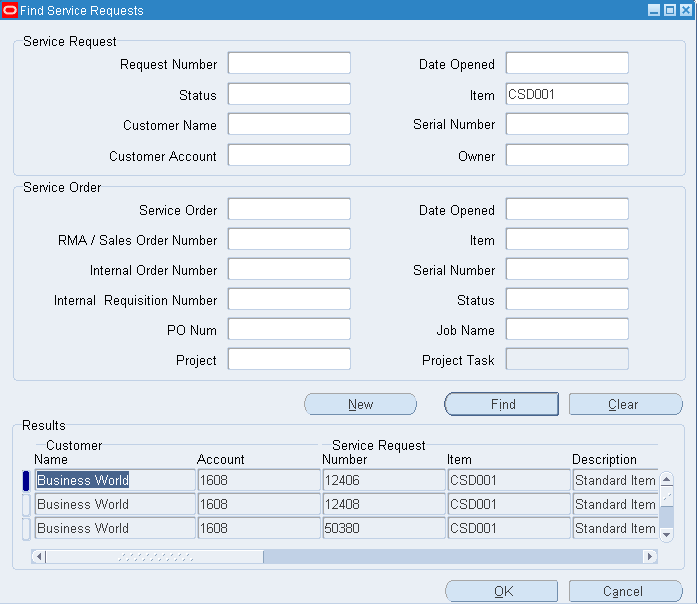
Find Service Requests and Service Orders
On the Find ServiceRequests window, you can retrieve Service Requests or Service Orders from the database.
A search in Oracle Depot Repair enables you to retrieve Service Requests and Service Orders based on parameters related to a Service Request or Service Order (Number, Customer, Item, or Date Opened). You can use a combination of these parameters to restrict your search so as to retrieve only the Service Requests or Service Orders that you want.
Prerequisite
The Service Request or Service Order record that you want to retrieve must exist in the database.
Steps:
-
In the Find Service Requests window, specify the parameters based on whether you want to search for the Service Request or Service Order.
-
The search parameters in the Service Request area include:
-
Request Number
-
Status
-
Customer Name
-
Customer Account
-
Date Opened
-
Item
-
Serial Number
-
Owner
The search parameters in the Service Order area include:
-
SO Number
-
RMA / Sales Order Number
-
Internal Order Number
-
Internal Requisition Number
-
PO Num
-
Project
-
Date Opened
-
Item
-
Serial Number
-
Status
-
Job Name
-
Project Task
Note: Performing a search based on these values searches for Project or Task values saved on the Service Order Details tab, and not the values stored on linked Sales Orders or WIP jobs.
-
-
Click Find to find matching Service Requests or Service Orders based on the parameters you have specified.
-
The Results region in the Find Service Requests window displays the search results.
You can select any of the retrieved Service Requests or Service Orders, and click OK to view its details in the Service Orders window, generally known as the Depot Repair Workbench.
Transfer Installed Base Ownership
Transfer Installed Base Ownership function is performed in two ways:
-
Changing ownership based on the service request
-
Changing ownership on a service order
Changing ownership based on the service request
You can change the ownership based on the service request.
Prerequisite
You must set up Transfer Ownership from System Administrator Responsibility.
Steps:
-
Navigate to the Service Request region.
-
Enter an SR with Installed Base item instance owned by a party other than the SR party.
-
Save the SR.
-
Click OK when the system prompts you to change the ownership of instance.
-
Select Change Ownership option from the Tools menu.
-
Click Yes to commit the change in the decision window.
-
Save the SR.
From Installed Base query the instance number; you will find item's owner name is changed to new one.
Changing ownership on a service order
You can change the ownership based on a service order.
Prerequisite
You must set up Transfer Ownership from System Administrator Responsibility.
Steps:
-
Navigate to the Service Request region.
-
Enter an SR without item details.
-
Enter Service Order details with item instance belonging to another customer other than the SR Party.
-
Save the SO.
-
Click OK when the system prompts you to change the ownership of instance.
-
Select Change Ownership option from the Tools menu.
-
Click Yes to commit the change in the decision window.
-
Save the SO.
From Installed Base query the instance number; you will find item's owner name is changed to new one.
Create and Maintain Notes
Notes are used to record and manage the comments that the depot agents and technicians generated against various services. Notes in a Service Request help in recording the descriptive information about customer service issues, any progress that the agent had done in resolving this issue, and so on. You can enter either Service Request or Service Order notes from the Details tab in the Depot Repair Workbench.
Prerequisite
A Service Order record must exist for an item before you can attach notes to the relevant Service Request or Service Order.
Steps:
-
Retrieve the Service Request or Service Order to which you want to attach a note.
For more information, see Find Service Requests and Service Orders.
-
In the Results area of the Find Service Requests window, select the relevant result, and click OK.
The Depot Repair Workbench shows the selected Service Request and Service Order details.
-
On the Details tab of the Service Order window, select Service Request or Depot Repair in the Notes area.
-
To open the Notes window, click Notes.
-
In the Type field, select a note type.
-
In the Status field, select a note status.
The choices are: Personal, Internal, and Publish. If you use the Personal status, this note would not be viewable to any customer in a customer facing application. Employees at the depot can view Internal notes. All employees and customers can view Publish notes. You can create additional Status codes. For more information, see the Oracle Common Application Components Implementation Guide.
-
In the Note field, enter a brief description of the note.
-
To enter more notes, click the More button.
The Detailed Note window opens and holds textual notes up to 32K characters.
-
After entering notes, click OK.
-
In the main Notes window, to specify more details for the note, specify the Related To and Value fields.
-
Save the note.
The note appears in the table under the Notes tab on the left. The Summary tab displays the notes as text in a chronological or reverse chronological manner. You can change the chronological view by clicking the Latest First check box.
-
To search for existing notes, use the Find Notes functionality.
-
Open the Notes main window.
-
Click the flashlight icon on the toolbar to open the Find Notes window.
-
Enter the fields such as Source, Entered By, and so on.
-
Click Search to display the results.
-
Use the Diagnostics Tab and Oracle Knowledge Management
The main purpose of the Diagnostics tab is to enable you to make use of solutions to previous problems stored in Oracle Knowledge Management. Oracle Knowledge Management is a repository of solution sets that have already been contributed. Solutions to previous incidents can guide users to resolve current problems at hand.
However, even if you have not installed Oracle Knowledge Management, you can still use the Diagnostics tab to select Service Codes, which enable you to automatically create estimate lines and default Bills and Routings for WIP Jobs.
This section consists of the following topics:
Diagnostic Codes and Service Codes
Depot repairs are generally repetitive in nature and the number of problems and resolutions is finite. As such, Oracle Depot Repair provides the ability to associate the potential problems with a Diagnostic Code, and to associate the potential resolutions with a Service Code. By utilizing Diagnostic Codes and Service Codes, users can quickly document service efforts for customer charges and depot service history.
For details of setting up Diagnostic Codes and Service Codes, see the Oracle Depot Repair Implementation Guide.
Using Diagnostic Codes and Service Codes with Oracle Knowledge Management
The association of Diagnostic Codes to Service Codes is done in Oracle Knowledge Management via Solutions. Once a Diagnostic Code is associated to a Service Code and that Service Code is linked to an Oracle Knowledge Management Solution, then the service work to be performed has been defined.
For details of associating Diagnostic Codes and Service Codes with Oracle Knowledge Management, see the Oracle Depot Repair Implementation Guide.
Using Service Codes in the Service Order
Oracle Depot Repair enables you to automate Service Order processing as follows:
-
In WIP service mode, Oracle Depot Repair provides the ability to predefine work using Bills and Routings and any associated material, labor and expense charges. The user can retrieve the defined work using Service Codes. The Service Code association with Bills and Routings can be used to create material, labor and expense estimate lines as well as default routes to WIP Jobs.
-
In Task service mode, Oracle Depot Repair provides the ability to predefine work using Task Templates and Task Parts and any associated material, labor and expense charges. The user can retrieve the defined work using Service Codes. The Service Code association with Task Templates and Task Parts can be used to create material, labor and expense estimate lines, and to create tasks.
For details of how Service Codes are used in the Service Order, see the following:
Diagnostics Tab Usage Overview
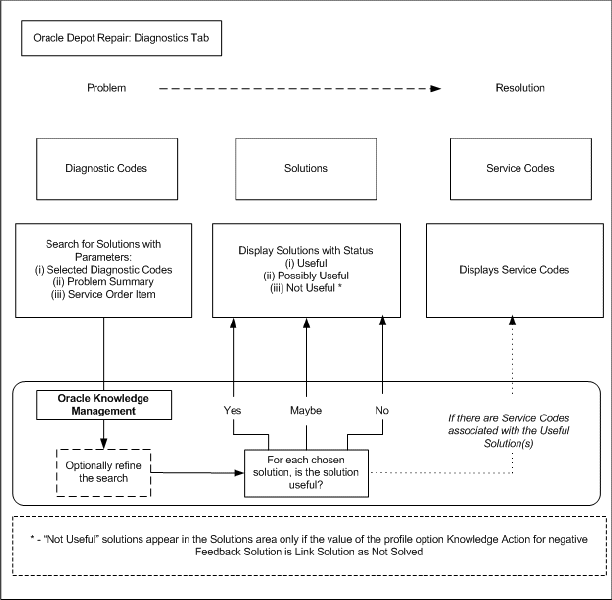
The interface from Oracle Depot Repair to Oracle Knowledge Management is the Diagnostics tab, which is divided into three areas:
-
Diagnostic Codes
-
Solutions
-
Service Codes
The following figure shows an overview of the standard use of the different areas of the Diagnostics tab.
Overview of Standard Diagnostics Tab Usage
See Also
Manage Diagnostic Codes in the Diagnostics Tab
Prerequisites
You must have set up Diagnostic codes and Service Codes in Oracle Depot Repair.
You must have associated the Diagnostic Codes and Service Codes to Solutions in Oracle Knowledge Management.
For details of setting up and associating Diagnostic Codes and Service Codes, see the Oracle Depot Repair Implementation Guide.
Steps:
-
Retrieve the Service Order that you want to process.
For more information, see Find Service Requests and Service Orders.
-
If you are not already in the Diagnostics tab, click the Diagnostics tab.
-
If you do not want to provide any Diagnostic Codes as parameters to the search in Oracle Knowledge Management, continue at step 7.
-
Enter a Diagnostic Code manually or select a Diagnostic Code from the list of values.
The list shows all Diagnostic Codes that have been associated with either the Item or the Item Category of the Service Order Item.
For more information on setting up Diagnostic Codes, see the Oracle Depot Repair Implementation Guide.
Note: If you enter an invalid Diagnostic Code, the list of values appears, which contains all the valid Diagnostic Codes for your Service Order.
-
Click the Select check box.
-
Repeat steps 4 to 5 for as many Diagnostic Codes as you want to display.
Note: You may click the Select All or Deselect All as appropriate any time before you click Search Solutions.
Note: Only the Diagnostic Codes that are explicitly selected are forwarded as search parameters to the Oracle Knowledge Management search.
-
Click Search Solutions.
This launches two windows:
-
A Refresh linked Solutions box, with the message: Please press OK after searching for Solutions.
-
An Oracle Knowledge Management window.
The window that is launched in Oracle Knowledge Management depends on the value of the profile option Knowledge: Search to display for integrating applications.
If the value of this profile option is Unified Search, then the window that is launched is a Simple Search window; if the value of the profile option is Advanced Search, then the window that is launched is the Advanced Solution Search Results window.
Continue the search process at the section Search Oracle Knowledge Management.
-
Search Oracle Knowledge Management
The search in Oracle Knowledge Management is the second stage of the completely integrated process which starts in the Diagnostics tab. This section concentrates on the Oracle Knowledge Management search itself, and how it provides feedback back into the Diagnostics tab.
This procedure follows immediately after you have clicked the Search Solutions button in the Diagnostics tab.
Use of the Search Parameters in Oracle Knowledge Management
The parameters passed to Oracle Knowledge Management to search for solutions are the following:
-
All selected Diagnostic Codes
-
Problem Summary
-
Service Order Item
The search for solutions is performed as follows:
-
The Diagnostic Codes and Problem Summary are used as search keywords in the title and body of the Solutions.
-
The Service Order Item are used to match the specified item with the Related Items as set up in the Solutions.
By utilizing the profile option Knowledge: Search results include weighting from Product, Platform and Category filters, you can narrow or widen your search results.
When the profile option is set to No, the search results contain only Solutions matching the specified Product/Platform/Category.
When the profile option is set to Yes, the results can also contain Solutions that do not match the Product/Platform/Category specified -- the Solutions that do match the Product/Platform/Category are given a boost in the scoring algorithm.
Note: Oracle Depot Repair does not make use of platform and category filters in Oracle Knowledge Management.
For additional information on how to use Oracle Knowledge Management, please refer to the Oracle Knowledge Management User Guide.
Search Result Examples
Consider the following search parameters:
-
Selected Diagnostic Codes = DC01, DC02.
-
Problem Summary = Mouse Malfunction.
-
Service Order Item = ITM342.
With the profile option Knowledge: Search results include weighting from Product, Platform and category filters set to No, you get the following results:
-
All Solutions whose title or body contains DC01, DC02, Mouse, or Malfunction, and whose Related Items include ITM342.
With the profile option Knowledge: Search results include weighting from Product, Platform and category filters set to Yes, you get both of the following sets of results, with the first set having a higher score:
-
All Solutions whose title or body contains DC01, DC02, Mouse, or Malfunction, and whose Related Items include ITM342.
-
All Solutions whose title or body contains DC01, DC02, Mouse, or Malfunction.
Prerequisites
You must have started the search process by clicking the Search Solutions button in the Diagnostics tab.
For details, see Manage Diagnostic Codes in the Diagnostics Tab.
Overview of Main Oracle Knowledge Management Search Procedure
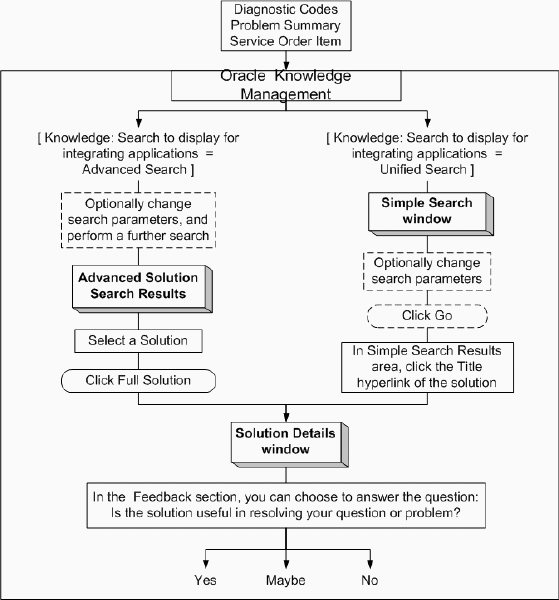
Steps:
-
You can optionally add and edit search parameters in the Oracle Knowledge Management search window, and then perform an explicit search.
The net objective of the Oracle Knowledge Management search is to specify whether a solution is useful or potentially useful for the current service problem. To do this, you must first select a solution in a "search results" window, then access the solution details for that solution.
-
If you are in the Simple Search window, click the Title hyperlink of the potentially useful solution in the Simple Search Result area. If you are in the Solution Advanced Search Results window, click the radio button beside the potentially useful solution, and click Full Solution.
In the Solution Details window, there is a section available for you to decide the usefulness of the solution. This section is the Feedback section, whose main constituent is the question "Is the solution useful in resolving your question or problem?"
Note: The Feedback section only appears if the solution has not already been linked to the current Service Order. However, after a user explicitly selects an answer to the usefulness question, then the next time the Solution Details window appears for that solution, the Feedback section does not appear.
-
In the Solution details window, scroll down to, and just beyond, the External Objects area.
-
If the Feedback section appears, then, you can optionally respond to the question "Is the solution useful in resolving your question or problem?", by clicking Yes, Maybe, or No.
If you choose one of these options, a confirmation message appears, indicating that your feedback was recorded.
-
You may optionally continue in Oracle Knowledge Management, and select more Solutions for feedback to Oracle Depot Repair.
-
When you have finished in Oracle Knowledge Management, close the Oracle Knowledge Management window.
-
Click OK in the Refresh linked Solutions box.
If you have linked any Solutions from Oracle Knowledge Management to a Service Order, they appear in the Solutions area of the Diagnostics tab. Additionally, Service Codes appear in the Service Codes area of the Diagnostics tab (if any exist).
Providing Feedback into the Solutions Area of the Diagnostics Tab
In step 4, your response to the question "Is the solution useful in resolving your question or problem?" causes the following to occur in the Solutions area of the Diagnostics tab:
-
If you answered Yes, then the solution appears with a Status of Useful.
-
If you answered Maybe, the solution appears with a Status of Possibly useful.
-
If you answered No, and if the value of the profile option Knowledge: Action for Negative Feedback Solution is Link Solution as Not Solved, the solution appears with a Status of Not useful.
Providing Feedback into the Service Codes Area of the Diagnostics Tab
If the Useful Solutions returned to the Solutions area have any Service Codes associated with them, then those Service Codes will appear in the Service Codes area, together with their associated Solution Number and with their Applicable check box set.
Manage Solutions in the Diagnostics Tab
The main use of the Solutions area is to change the status of Solutions returned from Oracle Knowledge Management searches, in order to influence the Service Code information in the Service Codes area.
When you change the Status of a Solution in the Solutions area to Useful, any Service Codes associated with that Solution in Oracle Knowledge Management appear in the Service Codes area, and are initially marked as Applicable.
Under the following conditions:
-
The profile option CSD: Use Tasks from Knowledge Base Solutions is set to Yes
-
The Solution in the Solutions area is marked as Useful
-
The corresponding Solution in Oracle Knowledge Management has one or more Task Templates among its Related Objects
you can retrieve the associated Task Template charge lines into the Estimate tab by clicking Add Lines from Diagnostics.
For more details, see Create a Estimate.
Note: From the Solutions area, you may also return to Oracle Knowledge Management to view the solution details, by clicking the Details button.
Prerequisite
You must have previously performed an Oracle Knowledge Management search for the Service Order, and returned one or more Solutions into the Solutions area (see Search Oracle Knowledge Management)
Steps:
-
If you have not already accessed the Service Order, retrieve the Service Order that you want to process.
For more information, see Find Service Requests and Service Orders.
-
If you are not already in the Diagnostics tab, click the Diagnostics tab.
-
Click the right-hand side of the Status field of a solution whose status you want to change.
-
Select a different status from the list of values.
This enables the Update Status button.
-
Click Update Status.
If, in steps 3 and 4, you changed the Status to Useful, existing Service Codes associated with the solution will appear in the Service Code area with the Applicable check box set on.
Continue at step 6.
-
If, in steps 3 and 4, you "downgraded" the Status from Useful to Possibly useful or Not useful, then an Update Solution Status message box appears, presenting the following information:
-
Service Codes associated with the solution in the Service Codes area will be marked as not applicable.
-
You may delete the Service Code in the Service Codes area manually.
Click OK in the Update Solution Status message box.
This clears the Applicable check box for the associated Service Code in the Service Codes area.
For details of deleting Service Codes in the Service Codes area, see Delete Service Codes Manually in the Service Codes Area.
-
-
Optionally, repeat steps 3 through 6 for each solution whose status you want to change.
Note: You cannot delete any Solutions from the Solutions area, you can only change the status values of the Solutions.
Manage Service Codes in the Diagnostics Tab
The topics in this section include the following:
Select Service Codes Manually in the Service Codes Area
As part of Oracle Depot Repair implementation, when Service Codes are set up, they are associated with Items, Categories, a combination of Bills and Routings, and Task Template Groups.
The main usage of the Service Codes area in the Diagnostics tab is to enable the associated elements of the Service Codes to be added to the estimate lines and WIP Jobs of the current Service Order.
The Service Codes area is populated with Service Codes in one or more of the following ways:
-
Automatically by Useful Solutions (see Search Oracle Knowledge Management).
-
Manually, by selecting Service Codes from the lists of values in the Service Codes area - in this case, there is no associated Solution Number.
This section deals with the manual selection of Service Codes in the Service Codes area.
Prerequisites
You must have set up Service Codes in Oracle Depot Repair.
To make use of prior service knowledge, you must have associated Service Codes to Solutions in Oracle Knowledge Management.
For details of setting up and associating Diagnostic Codes and Service Codes, see the Oracle Depot Repair Implementation Guide.
Steps:
-
If you have not already accessed the Service Order, retrieve the Service Order that you want to process.
For more information, see Find Service Requests and Service Orders.
-
If you are not already in the Diagnostics tab, click the Diagnostics tab.
-
Select a Service Code from the Service Code list of values in the Service Codes area.
This list of values that appears shows all the Service Codes that have been associated with either the service Item or the Inventory Category of the service item.
For more information on setting up Service Codes, see the Oracle Depot Repair Implementation Guide.
-
In the Code field, either enter a Service Code, or select a Service Code from the list of values.
Note: If you enter an invalid Service Code, the list of values appears, which contains all the valid Service Codes for your Service Order.
By default, as each valid Service Code is entered or selected, its Applicable check box is set.
Manually entered Service Codes do not have a Solution Number.
-
Repeat steps 3 to 4 for as many Service Codes as you want to display.
-
Save your changes.
Activate and Deactivate Service Codes in the Service Codes Area
You activate Service Codes in the Service Codes area by marking them as applicable.
Activating Service Codes in the Service Codes area enables the following subsequent processing options:
-
In the Estimate tab, after you have created a estimate header, you can add lines from the Diagnostics tab associated with the activated Service Codes in the Service Codes area.
Charge lines can be added in for WIP mode services (if Bills and Routings are associated with the Service Codes) and for Task mode services (if Task Template Groups are associated with the Service Codes).
-
In the Jobs tab, you can create a WIP Job with the Bills and Routings associated with the activated Service Codes in the Service Codes area.
For more information on setting up Service Codes, see the Oracle Depot Repair Implementation Guide.
Prerequisites
You must have previously performed one or more of the following operations for the Service Order:
-
Searched Oracle Knowledge Management, and returned one or more Service Codes into the Service Codes area (see Search Oracle Knowledge Management and Manage Solutions in the Diagnostics Tab).
-
Selected one or more Service Codes manually (see Select Service Codes Manually in the Service Codes Area)
Steps:
-
If you have not already accessed the Service Order, retrieve the Service Order that you want to process.
For more information, see Find Service Requests and Service Orders.
-
If you are not already in the Diagnostics tab, click the Diagnostics tab.
-
In the Service Codes area, check the Applicable check box for each Service Code that you want to activate.
-
In the Service Codes area, clear the Applicable check box for each Service Code that you want to deactivate.
-
Save your changes.
Delete Service Codes in the Service Codes Area
You may delete Service Codes from the Service Codes area, whether they are marked as applicable or not.
Note: After the first time that you use Service Codes in a Service Order in either the creation of a estimate or the creation of a WIP Job, then the selected Service Codes are protected against deletion in that Service Order.
Prerequisites
You must have previously performed one or more of the following operations for the Service Order:
-
Searched Oracle Knowledge Management, and returned one or more Service Codes into the Service Codes area (see Search Oracle Knowledge Management and Manage Solutions in the Diagnostics Tab).
-
Selected one or more Service Codes manually (see Select Service Codes Manually in the Service Codes Area).
Steps:
-
If you have not already accessed the Service Order, retrieve the Service Order that you want to process.
For more information, see Find Service Requests and Service Orders.
-
If you are not already in the Diagnostics tab, click the Diagnostics tab.
-
In the Service Codes area, click the marker field to the left of the Service Code that you want to delete.
-
From the top menu, select Edit > Delete.
-
Optionally, repeat steps 2 through 3 for each Service Code that you want to delete.
-
Save your changes.
Comments
If you wish to reinstate Service Codes that you have deleted, then perform one of the following operations:
-
Change the status of any associated solution in the Solutions area to Useful, as described in Managing Solutions in the Diagnostics Tab.
-
Select and activate Service Codes manually, as described in Selecting Service Codes Manually in the Service Codes Area.)
Estimate Service Charges
Some service organizations provide customers an estimate of the expected charges for providing service on returned items before performing the service. Only if the customer approves the estimated charges will the service organization invest the effort to provide service. The depot technician typically performs this by inspecting or performing a teardown of the item to determine the required parts and labor for the service. After completing this process, the depot provides a formal quotation to the customer for approval before any work is scheduled. During the teardown and inspection, the technician identifies parts that need repair or replacement, and estimates how long the work will take. Technicians can use historical frequency data, service bulletins, knowledge management and other tools as aids during the evaluation.
Note: If you have set up the application to not use the Estimate functionality, by setting the profile option CSD: Enable Estimates to No, the Estimate tab in the Depot Repair Workbench is not available and you cannot create an estimate. For more information, see the note in the topic Estimate Tab.
Pricing and Currency
To charge for services, a service provider can use standard pricing method using Price Lists to determine the fixed service price. Variable pricing method can also be used, which permits the depot to charge the customer for the actual material, labor, and other expenses incurred during the service.
In Oracle Depot Repair, a Service Order supports a single currency. The default currency is based on the default contract. If no default contract is selected, the default Price List determines the currency. If neither defaults are set, the currency selection is based on the Price List manually selected in the Details tab. After a charge line is created, you cannot change the currency of the Service Order in the Details tab, or select another default contract that has a Price List of a different currency. To change the currency of a Service Order, all the charge lines, including the Logistics lines, have to be deleted.
The Service Order currency drives the list of Price Lists that you can use for estimate charge lines. You cannot select a Price List with a currency that is different from the Service Order currency.
For more information on Advanced Pricing features supported by Oracle Depot Repair see the Advanced Pricing section in Integration with Other Oracle Modules.
Estimate Lines from Diagnostics
If you have Service Codes marked as applicable in the Diagnostics tab, and these Service Codes are associated with Bills, Routings, and Task Template Groups, then you can copy the following into the Estimate tab:
-
Charge lines associated with the Bills and Routings for WIP mode services.
-
Charge lines associated with Task Template Groups for Task mode services.
When you add in lines for WIP mode services through Service Codes, then, typically:
-
Bill of Material items are added as Material lines.
-
Resources associated to the Operations for BOM Routing are added as Labor lines.
When you add in lines for Task mode services through Service Codes, then, typically:
-
Items specified in Task Parts in Spares Management are added as Material lines.
-
Planned Effort elements for a Task Template are added as Labor lines.
Estimate Cost Analysis
While preparing an estimate, you can also perform estimate cost analysis. Estimate cost analysis lets you compare your estimated margins and profitability based on estimated costs and estimated charges. The only supported costing method is standard costing. The estimate cost analysis is always an aggregate of all estimated costs and charges for the Service Order.
Materials, labor, and expenses comprise the totals for charges or costs. Taxes and other fees are not included in cost analysis.
Costing of items differs in WIP and Task mode.
-
In WIP mode, Item Cost is used for material, labor, and expense charges; however, if a Resource Cost exists, it is used for the Labor charge.
-
In Task mode, Item Cost is used for material, labor, and expense charges; Resource Cost is not used.
To enable estimate cost analysis, the following conditions must apply:
-
The profile option CSD: Enable Costing must be set to Yes.
-
Each material, labor, and expense item must have an item cost defined in Oracle Inventory.
Estimate Approval
On the Details tab for a Service Order, you can check or uncheck the Estimate Approval Required field. If the check box is set, you must get customer approval for the estimate, and record this as a status change in the estimate.
The topics in this section include the following:
Create an Estimate
The following procedures describe how to prepare a service charges estimate for the customer.
For information on estimates generated in the Technician Portal, see Generating Estimates, and Estimates Generates in the Technician Portal in the Estimate Tab.
Prerequisite
You must complete all steps in the relevant business scenario prior to creating the estimate. For more information, see Oracle Depot Repair Business Scenarios.
Steps:
-
Retrieve the Service Order for which you want to estimate charges.
For more information, see Find Service Requests and Service Orders.
-
Select the relevant record from the Results area of the Find Service Requests window, and click OK.
The Depot Repair Workbench shows the selected Service Request and Service Order details.
-
Select the Estimate tab in the Depot Repair Workbench.
-
Optionally enter the Status, Date, Lead Time, and UOM field values.
For field descriptions, see the topic Estimate Tab.
-
Click Save Estimate to save the estimate header record.
-
You can enter estimate details in one or more of the following ways:
-
Manually, by entering individual charge line details in the multi-record table area.
For field descriptions, see the topic Estimate Tab.
-
If you have previously selected and activated Service Codes in the Diagnostics tab, then you can click Add Lines from Diagnostics.
This adds the charge lines associated with the active Service Codes in the Diagnostics tab, that is, the Service Codes marked as applicable.
You can also add Task Template charge lines associated with Solutions if the following conditions are true:
1. The profile option CSD: Use Tasks from Knowledge Base Solutions is set to Yes.
2. At least one Solution in the Solutions area of the Diagnostics tab is marked as Useful, and the corresponding Solution in Oracle Knowledge Management has one or more Task Templates among its Related Objects.
When these conditions are true and you click Add Lines from Diagnostics, you retrieve the associated Task Template charge lines into the Estimate tab.
After you have clicked Add Lines from Diagnostics, the added lines appear in the Estimate tab, and an information window appears which records any errors and information about the lines added.
If the lines that you expect to be added do not appear, you should check a variety of factors associated with your Service Order and the data that you are trying to add in. See Checks for Adding Estimate Lines from Diagnostics.
For more information, see the topic Activate and Deactivate Service Codes in the Service Codes Area.
Note: After you have added the lines associated with the active Service Codes, the Service Code rows from which you derived the estimate lines are disabled in the Service Codes area of the Diagnostics tab.
-
-
After entering a charge line, click Save Estimate to record the charge line.
The application populates the Unit Price and Est Charge fields in the table. The Summary of Estimated Charges region is also populated. This region is updated as you add (or delete) charge lines.
-
Optionally, click Costs to see an estimate cost analysis.
-
The Estimated Costs versus Estimated Charges window opens and shows the estimated Cost, the estimated Charge, the estimated Profit (Charge less Cost), and the estimated Profit Margin % by separate Material, Labor, Expense, and Total lines.
Click Close to exit the Estimated Costs versus Estimated Charges window.
-
Click Line Details to display the Estimate Charge Details window.
Enter the detailed charge line values in the table fields.
For field descriptions, see the topic About Estimate Charge Line Details Window.
-
To allow provisioning for overriding the entered charges later, select the Override Charges check box.
This is enabled if the profile option CSD: Allow Charge Override for Estimates is set to Yes.
The Override Charges check box lets you override service charges, in the Estimated Charge field, after you have saved it. Discounts associated with the contract are not applied if you manually change the Estimated Charge.
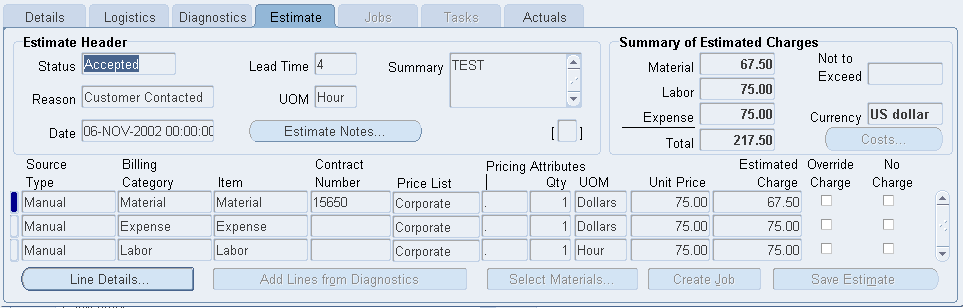
-
Click Save to record the changes.
-
Click Close to close the Estimate Charge Details window, and return to the Estimate tab.
The Totals fields in the lower part of the Estimate tab show charge line totals.
-
To delete a charge line, select the relevant charge line on the Estimate tab, and click the Delete icon on the toolbar.
Please refer to Select Repair Parts from Dynamic Repair BOM Window section to learn more about creating an estimate from Dynamic BOM window.
Comments
-
You cannot add or delete charge lines in the Estimate Charge Details worksheet. You can add or delete charge lines only in the Estimate tab.
-
If you have added estimate lines derived from a Service Code, using Add Lines from Diagnostics, then you cannot add the lines again from the same Service Code.
Checks for Adding Estimate Lines from Diagnostics
You should ensure that the following conditions are true before you add lines from the Diagnostics tab. Failure to satisfy all the conditions results in rows not being imported as estimate lines.
(A) General Checks
The following checks apply to all lines:
-
You must have at least one active Service Code, that is, a Service Code marked as applicable, associated to the Service Order.
-
The default Price List must be defined and active.
-
The Billing Type for the item must be defined.
Note: You cannot add an estimate line from the same Service Code entry on the Diagnostics tab twice.
(B) WIP-Specific Checks
The following checks apply to WIP lines:
-
The Service Code must be associated with at least one work entity (bill or routing), and each associated work entity must be defined for the organization specified by the profile option Service: Inventory Validation Organization.
-
Each work entity must have a Bill of Material.
-
Each operation sequence must have a Resource.
-
Each Resource must have a billing Item.
(C) Task-Specific Checks
The following checks apply to task lines derived through Service Codes and, under profile control, directly from Task Templates related to Oracle Knowledge Management Solutions.
-
Each work entity must have a Task Template Group.
-
Each Task Template Group must have a Task Template.
-
You must have a product part defined for the Task Templates and the Service Order Item.
-
For a task parts definition, you should have a manual or a rollup quantity or both.
-
If there is a substitute defined for a task part, the task part is not added as an estimate line.
-
For labor lines only, for Planned Effort, you must have provided a value for the profile option CSD: Default Labor Item for Estimate Line from Tasks.
-
For labor lines, the Planned Effort Interval and UOM for the Task Template must not be null.
(D) Tasks-from-Solutions Checks
In addition to the Task-Specific checks, the following additional checks apply to task lines derived directly from Oracle Knowledge Management Solutions:
-
The profile option CSD: Use Tasks from Knowledge Base Solutions must be set to Yes.
-
The Solution in the Solutions area of the Diagnostics tab must have a Status of Useful.
-
The corresponding Solution in Oracle Knowledge Management must have an active Task Template among its Related Objects.
Revise an Estimate
Certain services can require service providers to revise estimates many times. The service agent should verify existing warranties or contracts while quoting and revising estimates.
Note: If you manually override the Estimated Charge, which you are allowed to do if the profile option CSD: Allow Charge Override for Estimates is set to Yes, then discounts associated with the contract are not applied.
Note: Net Discount will always be the Extended Price minus the Estimated Charge, not the contract discount.
The following procedures describe how to revise the estimated charges for an item under service.
Prerequisite
A charges estimate must exist for the broken item.
Steps:
-
Retrieve the Service Order for which you want to revise the estimate.
For more information, see Find Service Requests and ServiceOrders.
-
Select the relevant record from the Results area of the Find Service Orders window, and click OK.
The Depot Repair Workbench shows the selected Service Request and Service Order details.
-
Select the Estimate tab in the Depot Repair Workbench.
The existing charge lines appear in the multi-record area.
-
Click Line Details.
The Estimate Charge Line Details window opens.
-
Make the necessary changes to the charge line field values.
For more information, see Estimate Charges.
-
Click Save to record the revised charges.
-
Click Close to close the Estimate Charge Line Details window and return to the Estimate tab.
The charge lines and totals on the Estimate tab reflect the revision made to the estimate.
-
To change the estimate status, choose an appropriate value from the list of values in the Status field.
-
Click Save Estimate to record the changes.
Obtain Customer Approval for an Estimate
If estimate approval is required for a estimate, then, after creating the service charges estimate, the service agent seeks the customer's approval of the estimate.
Upon customer's approval, the depot receives the defective parts in service subinventory. If the customer rejects the estimate, the Service Order can be closed, or put on hold as appropriate.
Service Order estimates can be New, Drafted, Bid, Accepted, Rejected, or Cancelled. These statuses indicate whether to start a service process. Typically, a estimate must be approved prior to the start of the WIP Job.
The following procedures describe how to record customer approval for a estimate.
Prerequisite
A Service Order record with an approved estimate must exist. Also, you must have revised the original estimate as appropriate.
Steps:
-
Retrieve the Service Order that you want to revise.
For more information, see Find Service Requests and Service Orders.
-
Select the relevant record from the Results area of the Find Service Orders window, and click OK.
The Depot Repair Workbench shows the selected Service Request and Service Order details.
The Details tab of the Depot Repair Workbench displays the total charges for the service in the Charges area.
-
Make changes to the original estimate charge lines as required.
For detailed instructions, see Revise a Estimate.
-
Discuss the revised charges with the customer.
-
In the Estimate tab, update the estimate Status to Estimate Accepted or Estimate Rejected.
-
Click the Save icon on the toolbar to save the updated status.
The Service Order is revised with the new charges and customer approval information.
-
On the Details tab, create or consult notes as required.
For detailed instructions, see Create and Maintain Notes.
-
Click Update SO Status.
In the Update Service Order Status window, you can update the Service Order status.
For details, see Update the Service Order Status.
-
Optionally, from the top menu, click Tools > Freeze Estimate to freeze the estimate.
After the estimate is frozen, you cannot change the estimate.
Auto-Receive an Item
When you receive an item into a subinventory, you generally have to perform a number of operations in several different windows (for example, find a receipt, edit one or more receipt fields).
You can select a value in the profile CSD: Automatically Receive Items to specify if you want to be prompted to automatically receive items in the Logistics tab of the Depot Repair workbench. If you accept the option to auto-receive the item, the auto-receive operation is performed. The most efficient way to receive items on the Logistics tab is to use the auto-receiving capability.
Under certain conditions, you can receive an item directly from the Logistics tab, without having to navigate through extra windows. The operation of receiving an item directly from the Logistics tab is called auto-receive.
The conditions under which you can auto-receive an item are as follows:
-
The item can be serialized or non-serialized. If it is serial controlled, the serial must be entered.
-
The item must be lot controlled. If it is lot controlled, the lot must be entered.
-
The item must be locator controlled.
-
The quantity on the RMA (Return) line is 1.
-
The Receipt Routing must not be Inspection Required.
-
You must enter the Source Serial Num and Subinv fields on the RMA (Return) line.
Note: After the successful completion of the auto-receive operation, the Status of the RMA (Return) line is Booked. After you click Refresh Logistics, the Status changes to Received.
Steps
-
When all the above conditions apply, in Logistics tab, select the Process Transaction check box for the row you want to receive.
-
Select Receive from the Actions list and click Go.
-
An alert message appears informing you that item is eligible for auto-receive. To confirm the auto-receive, select Yes to complete the receiving process.
Note: For serialized items, enter the serial number on the logistics line for auto-receiving to function. If the item is locator controlled, the locator must be entered on the logistics line before auto-receiving. In cases where you want to use the Inspection functionality from Oracle Receiving, selects No when asked to auto-receive and complete steps described in Receive an Item.
Receive an Item
Oracle Depot Repair provides a number of options for receiving items from customers and third parties, as well as for receiving items from other warehouses or sub-inventory locations. The system allows items to be received with RMAs or without RMAs, and can even receive serialized items when the serial number is unknown at time of booking the return. All of this flexibility can be made more restrictive using profile options to match the service organization's business rules.
Before receiving an item the system allows you to receive a serial number different from the one originally entered in the service order. In case of a mismatch or discrepancy the system allows the receipt of the discrepant serial number and logs an activity to track the discrepancy.
Inspection
You can also inspect items during the receiving process, which allows for more accurate estimates as a result of inspection. Inspection of items is possible only if the routing on the RMA order is either Standard Receipt or Inspection Required.
The procedure for receiving an item with inspection is more extensive than the procedure for receiving an item without inspection
The following is an overview of the procedure for receiving an item without inspection:
-
Receive the item on the RMA order into a subinventory.
The following is an overview of the procedure for receiving an item with inspection:
-
Receive the item on the RMA order into a receiving location.
-
Inspect the item, then accept or reject it.
-
Move the item into a subinventory.
The following procedures describe how to receive an item.
Prerequisite
You must complete all steps in the relevant business scenario prior to receiving the general item. For more information, see Oracle Depot Repair Business Scenarios.
Steps
-
Retrieve the Service Order for which you want to receive the general item.
For more information, see Find Service Requests and Service Orders.
-
Select the relevant result from the Results area of the Find Service Orders window, and click OK.
The Depot Repair Workbench shows the selected Service Request and Service Order details.
-
Select the Logistics tab in the Depot Repair Workbench.
If the RMA (Return) line was not created and booked automatically for the Service Order, then create an RMA order manually.
For detailed instructions, see Create and Book a Return Line Manually.
-
Click Receive to open the Find Expected Receipts window.
-
In the Customer tab in the Find Expected Receipts window, enter the RMA Number, and click Find.
If the RMA is found, the application displays the Receipt Header and Receipts windows.
-
Confirm the Received By field of the Receipt Header window, that is, the person receiving the RMA.
-
Confirm the Receipt Date, and click the Save icon on the toolbar to obtain the system-generated Receipt Number.
-
Close the Receipt Header window.
If you want to receive an item without inspection, continue at step 9.
If you want to receive an item with inspection, continue at step 16.
Receiving an Item Without Inspection
Note: For Direct Delivery Routings, you must receive an item without inspection. Inspection is optional if your routing is Standard Delivery or Inspection Required.
However, for Inspection Required Routings, Oracle recommends that you perform the steps starting at step 16.
-
In the Receipts window, in the Lines tab, select the check box located beside the Qty field to confirm quantity.
-
For the Destination Type, select Inventory.
-
Scroll the horizontal bar to reveal the Subinventory field, and select a Subinventory location in this field from the list of values.
If the general item is a serialized item, the Lot-Serial button on the Receipts window is enabled.
-
Click Lot-Serial to display the Serial Number window.
-
Enter the received Serial Number, and click OK.
You can manually enter a Serial Number even if the number does not appear in the list of values
-
-
Click the Save icon on the toolbar.
-
Close the Receipts window to return to the Depot Repair Workbench.
-
In the Logistics tab, click Refresh Logistics.
The status of the RMA (Return) line changes to Received.
-
Optionally, you can see item reception details in the Activity window. From the top menu, select Data > Activity to open up the Activity window.
This completes the procedures for receiving an item without inspection.
Receiving an Item With Inspection
Note: Note: For Inspection Required Routings, Oracle recommends that you perform the inspection steps that follow.
-
In the Receipts window, in the Lines tab, select the check box located beside the Qty field to confirm quantity.
-
For the Destination Type, select Receiving.
-
Select a Location.
-
Click the Save icon on the toolbar.
-
Close the Receipts window.
-
Back in the Logistics tab of the Depot Repair Workbench, click Inspect/Move.
-
In the Customer tab in the Find Receiving Transactions window, enter the RMA Number, and click Find.
The Receiving Transactions window appears.
-
If there is more than one line, select the lien you want to inspect.
-
Click Inspect.
-
In the Inspection Details window, select the Status (values are either Accept or Reject).
-
Click OK.
This closes the Inspection Details window.
The Destination Type of the item shows as Inspect.
-
Click the Save icon on the toolbar.
-
Close the Receipt Transactions window.
-
Back in the Logistics tab of the Depot Repair Workbench, click Inspect/Move.
-
In the Customer tab in the Find Receiving Transactions window, enter the RMA Number, and click Find.
The Receiving Transactions window appears, with the Destination Type of the item showing as Inventory.
-
Scroll the horizontal bar to reveal the Subinventory field, and select a Subinventory location in this field from the list of values.
-
If the general item is a serialized item, the Lot-Serial button on the Receiving Transactions window is enabled.
-
Click Lot-Serial to display the Serial Number window.
-
Enter the received Serial Number, and click OK.
You can manually enter a Serial Number even if the number does not appear in the list of values.
-
-
Click the Save icon on the toolbar.
-
Close the Receiving Transactions window to return to the Depot Repair Workbench.
-
In the Logistics tab, click Refresh Logistics.
The status of the RMA (Return) line changes to Received.
-
Optionally, you can see item reception details in the Activity window. From the top menu, select Data > Activity to open up the Activity window.
This completes the procedures for receiving an item with inspection.
Additional Information: You can enable the functionality of updating the Service Order Status automatically once an item is received successfully. This is done by setting the profile option CSD: Enable Auto Update of Service Order Status upon Receiving to Yes. The profile option CSD: Default Service Order Status After Receiving will hold the value for the new status.
Use caution in setting the profile option CSD: Default Service Order Status After Receiving to Yes, as only one status can be chosen irrespective of the item or service type used.
Receive an Item for an Internal Order Refurbishment
When a Service Order has been created in the Planner's Desktop of Spares Management, or an equivalent external agency, and the item or items are to be sent to an Oracle Depot Repair depot for processing, this type of service is called an internal order refurbishment.
Note: This is not the same as an internal party refurbishment, where the items to be refurbished belong to an internal party. For more information, see Create and Process an Internal Party Refurbishment.
If you do not select a subinventory for the item, the subinventory is derived from the picking rule defined in the profile option CSD: Default Pick Release Rule for Sales Orders.
In Oracle Depot Repair, the Service Order for each item or item instance to be refurbished contains two transactions, with action types Move In and Move Out. This section describes the Move In transaction.
The Move In transaction has two components:
-
First, the shipment stage, where the item is shipped from a source organization, such as Spares Management.
-
Then, the receiving stage, where the item is received into a depot subinventory.
In the shipment stage, if you do not select a subinventory for the item, the subinventory is derived from the picking rule defined in the profile option CSD: Default Pick Release Rule for Sales Orders.
The shipment stage includes a Pick Release process, and then either a manual Ship process or an automatic Ship Confirm process. When both Pick Release and Ship Confirm processes can be performed automatically, that is, without any manual Serial Number entry required, you can select whether to perform both processes separately one after the other, or in sequence automatically.
Inspection
During the receiving stage, you can also inspect the items to be refurbished, which allows for more accurate estimates as a result of inspection. Inspection of items is possible only if the routing on the requisition order is either Standard Receipt or Inspection Required.
The procedure for receiving an item with inspection is more extensive than the procedure for receiving an item without inspection.
The following is an overview of the procedure for receiving an item without inspection:
-
Receive the item on the requisition order into a subinventory.
The following is an overview of the procedure for receiving an item with inspection:
-
Receive the item on the requisition order into a receiving location.
-
Inspect the item, then accept or reject it.
-
Move the item into a subinventory.
Prerequisites
The Service Request and the associated refurbishment Service Order or orders must have been created in the Planner's Desktop of the Spares Management module of Oracle Field Service.
Note: It is possible to create demand for refurbishment using a module other than Oracle Field Service and to pass this demand to Oracle Depot Repair.
Note: The module must be able to create Internal Requisitions and associate them to Internal Sales Orders. However, Oracle recommends using the out-of-the-box integration to Oracle Field Service.
Steps
-
Retrieve the Service Order for which you want to receive the item for refurbishment.
For more information, see Find Service Requests and Service Orders.
-
Select the relevant result from the Results area of the Find Service Orders window, and click OK.
-
Click the Logistics tab.
-
Click any field of the Move In line to make that line current.
The Status of the Move In line should be Booked.
Shipping the Item to be Refurbished from Spares Management
Note: The following description assumes that you select the automatic Pick Release option when processing the Move In line.
Note: Even if you select Ship Confirm as your first choice for processing the Move In line, the application automatically processes the Pick Release stage first, then the Ship Confirm stage.
Pick Release
-
Click the Process Trans check box for the Move In line.
-
Click the Automate order processing steps through check box.
-
Select the Pick Release radio button.
-
Click Process.
The Status of the Move In line generally changes to Released.
However, for a serialized item that has Serial Control which is either Predefined or At Receipt, the resulting Status depends on whether you are performing the Pick Release processing for the first time or the second time.
-
The first time, you must enter a Serial Number, navigating through the Find Move Order Lines window that appears automatically, to the Transact Move Orders window.
For details of the Find Move Order Lines window and the Transact Move Orders window, see the Oracle Inventory User's Guide.
When you return from the Transact Move Orders window, the Status of the Move In line remains as Booked.
-
The second time you perform the Pick Release process (steps 5 through 8), you do not have to enter any further data, and the Status changes to Released.
To see the Serial Number that you entered during the first-time Pick Release processing in the (Source) Serial Num field on the Logistics tab, click Refresh Logistics, after you complete the second-time Pick Release processing.
-
-
Optionally, from the top menu, select Data > Activity to see the details of the item shipment in the Activity window.
If there has been a mismatch between the Serial Number in the Move In line and the Serial Number you entered in the Transact Move Orders window, an alert message line appears in the Activity window, recording the two Serial Numbers. You must explicitly select Data > Activity to display the alert message.
This completes the Pick Release processing.
Manual Ship or Ship Confirm
-
For the case of a serialized refurbished item, whose Serial Control is At Sales Order Issue, the Ship Confirm button is disabled. In this situation, click Ship and enter the item's Serial Number in Oracle Shipping Execution windows. For details of these windows, see the Oracle Shipping Execution User's Guide.
When you return to the Logistics tab, click Refresh Logistics. The Status changes to Shipped.
This completes the manual ship processing for these special Move In lines.
Continue at step 16.
-
For all other cases, click the Process Trans check box for the Move In line.
-
Click the Automate order processing steps through check box.
-
Select the Ship Confirm radio button.
-
Click Process.
When processing the Ship Confirm stage, you should wait until the concurrent program Interface Trip Stop has completed successfully before you click Refresh Logistics, to see the changed value of the Status.
You can monitor the progress of the program by selecting Requests from the View menu on the toolbar, and selecting appropriate search criteria.
-
Click Refresh Logistics.
The purpose of this is to update the Status on the Move In line, so that it reflects in Oracle Depot Repair the results of the procedures executed in other Oracle applications when you clicked Process.
After the background concurrent process Interface Trip Stop has completed successfully, the Status changes to Shipped.
Starting the Process of Receiving the Item to be Refurbished
-
Click any field of the Move In line to make that line current.
-
Click Receive to open the Find Expected Receipts window.
-
In the Supplier and Internal tab in the Find Expected Receipts window, enter the Requisition from the Requisition Num of the Move In line, and click Find.
If the requisition is found, the application displays the Receipt Header and Receipts windows.
-
Confirm the Received By field of the Receipt Header window, that is, the person receiving the requisition.
-
Confirm the Receipt Date, and click the Save icon on the toolbar to obtain the system-generated Receipt Number.
-
Close the Receipt Header window.
If you want to receive an item without inspection, continue at step 22.
If you want to receive an item with inspection, continue at step 29.
Receiving the Item to be Refurbished Without Inspection
-
In the Receipts window, in the Lines tab, select the check box located beside the Qty field to confirm quantity.
-
In the Destination Type field, select Inventory.
-
Scroll the horizontal bar to reveal the Subinventory field, and select a Subinventory location in this field from the list of values.
If the item is a serialized item, the Lot-Serial button on the Receipts window is enabled.
-
Click Lot-Serial to display the Serial Number window.
-
Enter the received Serial Number, and click OK.
You can manually enter a serial number even if the number does not appear in the list of values.
-
-
Click the Save icon on the toolbar to save the receipt record.
-
Close the Receipts window to return to the Depot Repair Workbench.
-
Click Refresh Logistics.
The Status of the Move In line changes to Received.
-
Optionally, from the top menu, select Data > Activity to see the details of the reception of the item in the Activity window.
This completes the process of receiving an item without inspection.
Receiving the Item to be Refurbished With Inspection
-
In the Receipts window, in the Lines tab, select the check box located beside the Qty field to confirm quantity.
-
For the Destination Type, select Receiving.
-
Select a Location.
-
Click the Save icon on the toolbar.
-
Close the Receipts window.
-
Back in the Logistics tab of the Depot Repair Workbench, click Inspect/Move.
-
In the Supplier and Internal tab in the Find Expected Receipts window, enter the Requisition from the Requisition Num of the Move In line, and click Find.
The Receiving Transactions window appears.
-
Click Inspect.
-
In the Inspection Details window, select the Status (values are either Accept or Reject).
-
Click OK.
This closes the Inspection Details window.
The Destination Type of the item shows as Inspect.
-
Click the Save icon on the toolbar.
-
Close the Receipt Transactions window.
-
Back in the Logistics tab of the Depot Repair Workbench, click Inspect/Move.
-
In the Supplier and Internal tab in the Find Expected Receipts window, enter the Requisition from the Requisition Num of the Move In line, and click Find.
The Receiving Transactions window appears, with the Destination Type of the item showing as Inventory.
-
Scroll the horizontal bar to reveal the Subinventory field, and select a Subinventory location in this field from the list of values.
-
If the item is a serialized item, the Lot-Serial button on the Receiving Transactions window is enabled.
-
Click Lot-Serial to display the Serial Number window.
-
Enter the received Serial Number, and click OK.
You can manually enter a Serial Number even if the number does not appear in the list of values.
-
-
Click the Save icon on the toolbar.
-
Close the Receiving Transactions window to return to the Depot Repair Workbench.
-
In the Logistics tab, click Refresh Logistics.
The status of the Move In line changes to Received.
-
Optionally, from the top menu, select Data > Activity to see the details of the reception of the item in the Activity window.
This completes the procedures for receiving an item with inspection.
Split a Service Order
Often as a result of an inspection carried out during the receiving of an item, you may decide to service some but not all of the defective units.
Under certain conditions (see the Prerequisites that follow in this section), Oracle Depot Repair allows you to split a service order so that part of an order can be processed separately from the rest of the order.
Service Type Change Options
One of the prerequisite conditions is that the original Service Type must have a Service Type Ref value of either Standard or Repair and Return. You can change the Service Type on the new Service Order, so long as the final Service Type also has a Service Type Ref value of either Standard or Repair and Return.
Note: The explicit condition specifies the Service Type Ref attribute of the allowable Service Types. The seeded Service Types Standard and Return and Repair have the same Service Type Ref values as their Service Type names.
For details of setting up Service Types, see the Oracle Depot Repair Implementation Guide.
Splitting Options
When you choose to split a Service Order, you have the following options:
-
You can split into two separate Service Orders, as for example when splitting 10 units into two lines of 8 and 2 units.
-
You can split into multiple Service Orders, each with a quantity of 1.
When you choose to split the Service Order into two separate Service Orders, you can also decide whether to copy attachments from the original Service Order to the new Service Order.
When you split into multiple lines, each with a quantity of 1, all attachments on the original Service Order, if any exist, are automatically copied to each new Service Order.
Prerequisites
-
The Service Order Item must be serialized.
-
The item must not be Installed Base trackable.
-
All quantities must be received.
-
For WIP mode, all jobs must be completed, that is, no partial completions are allowed.
-
The Service Order status must be Open.
-
The Service Type Ref of the Service Type must be Standard or Repair and Return.
-
No Ship lines have been interfaced to Oracle Order Management.
Steps
-
Retrieve the Service Order that you want to split.
For more information, see Find Service Requests and Service Orders.
-
Select the relevant result from the Results area of the Find Service Orders window, and click OK.
-
From the top menu, select Tools > Split Service Order.
The Split Service Order window appears.
Your splitting options are indicated by the two radio buttons:
-
Split into 2 lines
-
Split into lines with quantity of 1
Split into 2 Lines
Under the Split into 2 lines option, there is a table showing the following fields:
-
Original Service Order Quantity (enabled)
-
Original Service Order Service Type
-
New Service Order Quantity
-
New Service Order Service Type (enabled)
There is also a check box under the Split into 2 lines option, enabling you to copy attachments from the original Service Order to the new Service Order.
If there are no attachments to the original Service Order, the check box is disabled.
Split into Lines with a Quantity of 1
Under the Split into lines with a quantity of 1 option, a message indicates that any attachments to the original order will be automatically copied to the new order.
-
-
Select one of the radio buttons.
-
If you selected Split into lines with a quantity of 1, you have no further choices. Continue at step 7.
-
If you selected Split into 2 lines:
-
Enter the Original Service Order Quantity, that is, the new quantity that you wish to have on the original Service Order after splitting.
The New Service Order Quantity is automatically calculated after you enter the Original Service Order Quantity.
-
Select the New Service Order Service Type.
You can only select a Service Type whose Service Type Ref was set up as Standard or Repair and Return.
-
Optionally, select the check box Copy attachments from original Service Order to new Service Order.
-
-
Click OK.
Manage the Service Process
Oracle Depot Repair lets service organizations manage service by using either Oracle WIP or Task Manager, a module in Oracle Common Application Components.
WIP mode is the recommended mode as it allows a service organization to take advantage of integration with Costing, Demand Planning, Service Parts Planning, Supplier Warranty Management and the Technician Portal. Task mode is still supported for businesses with extremely lightweight repair operations.
The WIP or Task modes are associated to the Service Types during implementation. Though a service organization can have different Service Types associated with different service modes, it is recommended that a service organization select only one service mode for all Service Types to enhance usability.
The topics in this section include the following:
Create and Process WIP Jobs
The topics in this section include the following:
Create a WIP Job for a Single Service Order
The Shop Floor Technician can create a non-standard WIP Job from the Depot Repair Workbench. You select the organization for the WIP Job, and the items for the WIP Job must be defined in that organization.
Multiple jobs can be created for each Service Order. You can release WIP Jobs on to the shop floor. You must provide the WIP Accounting Class through which costs are posted to Oracle General Ledger.
Depot agents can view WIP Discrete Jobs window in a read-only mode to verify the status and additional details of the WIP Job.
The following procedures describe how to create a WIP Job for a single Service Order.
Prerequisites
You must complete all steps in the relevant business scenario prior to creating the WIP Job for the Service Orders. For more information, see Oracle Depot Repair Business Scenarios.
Note: You may need to create a Job without an RMA in case of remanufacture or refurbishment on items that your organization already owns, or if your organization took ownership or possession of an item through a field service agent rather than against an RMA.
Note: Oracle Depot Repair provides you with a profile option, CSD: Allow Creating WIP Job Without RMA, which enables you to create a WIP Job without an RMA. Refer to the Oracle Depot Repair Implementation Guide for details.
Steps:
-
Retrieve the Service Order for which you want to create a WIP Job.
For more information, see Find Service Requests and Service Orders.
-
Select the relevant record from the Results area of the Find Service Orders window, and click OK.
The Depot Repair Workbench shows the selected Service Request and Service Order details.
-
In the Depot Repair Workbench, select the Jobs tab, and click Create Job.
The Submit Jobs window opens. The job you create will be in the organization set up when you perform the Change Organization operation. If you have not performed the Change Organization operation, the organization is taken from the profile option CSD: Default Repair Inventory Org.
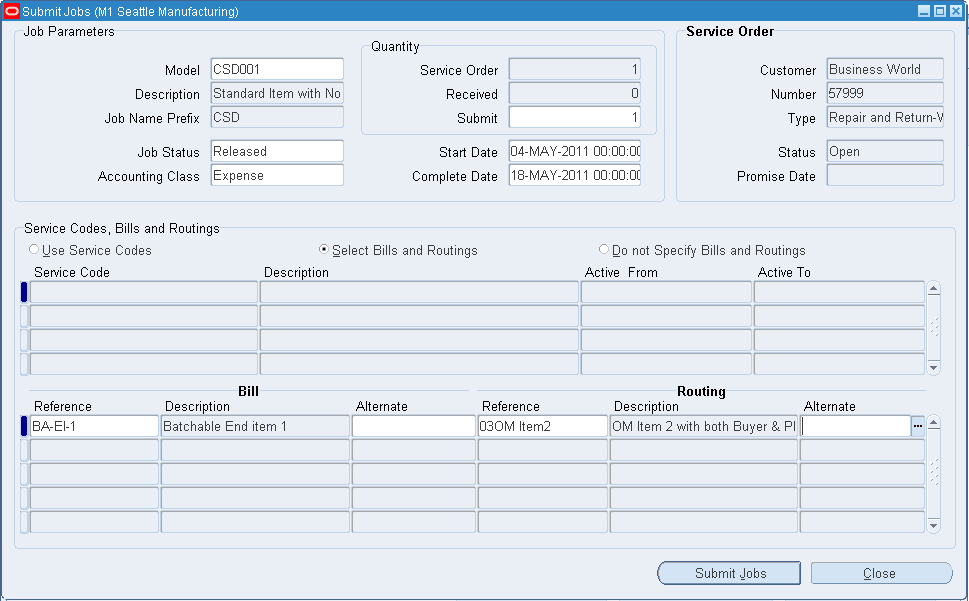
-
If the WIP Job item is different from the Service Order Item, select the relevant WIP item from the list of values in the Item field.
-
Select the Released Job Status from the list of values.
Note: The default value for this field is taken from the profile option CSD: Default Job Status.
Note: You may submit a WIP Job with a Job Status of Unreleased. You will be able to change the status later using Oracle Work In Process transactions.
-
Select an Accounting Class from the list of values, for example, Rework.
-
Enter the number of items that you want to submit in the (Quantity) Submit field.
-
The system date defaults as Start Date. Select the Complete Date for the WIP Job.
-
In the Service Codes, Bills and Routings area, select one of the three radio buttons:
-
Use Service Codes
-
Select Bills and Routings
-
Do not Specify Bills and Routings
If you select Use Service Codes, the following occurs:
-
Bills and Routings associated with the active Service Codes, that is, the Service Codes marked as applicable, in the Diagnostics tab are attached to the WIP Job.
-
Read-only summary information about the Service Codes, Bills, and Routings is displayed in the Service Codes, Bills and Routings area.
-
After you have added the Bills and Routings associated with the active Service Codes, the Service Code rows from which you derived the Bills and Routings are disabled in the Service Codes area of the Diagnostics tab.
Note: After you have added the Bills and Routings associated with the active Service Codes, the Service Code rows from which you derived the Bills and Routings are disabled in the Service Codes area of the Diagnostics tab.
If you select Select Bills and Routings, enter appropriate Bill and Routing data in the Bill and Routing sections.
If you select Do not Specify Bills and Routings, you are choosing not to provide any Bill and Routing information for the WIP Job.
-
-
Click Submit Job to submit the job in a released status to WIP.
-
To make sure that the program completes successfully, monitor the requests by choosing View > Requests.
-
Close Jobs window to return to the Depot Repair Workbench.
-
Click Refresh Job.
The new job appears on the Jobs tab.
-
To view the job, select the job record on the Jobs tab, and click View Job.
To process the WIP Job, see Process a WIP Job for a Single Service Order.
See Also
Create a WIP Job Across Multiple Service Orders.
Multiple WIP Jobs and Partial Quantities for a Single Service Order
Oracle Depot Repair lets you create multiple WIP Jobs for a single Service Order and supports the creation of multiple WIP Jobs with partial quantities per RMA.
WIP Job Item Same As Service Order Item
If the item selected for the WIP Job is the same as the one in the Service Order, then for each WIP Job submission, the submit quantity cannot be greater than the quantity received. A submit quantity less than the quantity received implies that you can create multiple WIP Jobs against a single Service Order, with each WIP Job handling part of the RMA quantity.
For example, consider that the item on the Service Order is A, and the quantity of item A is 5. When you submit WIP Jobs for item A, the maximum number of units of A that can be submitted in a WIP Job is 5, and the minimum is 1.
WIP Job Item Different From Service Order Item
If the item selected for a WIP Job is different from the one on the Service Order, the submit quantity restriction does not apply, and you can submit the WIP Job for any quantity. The application validates this quantity with the quantity received in the Service Order line. In this case, the quantity to be submitted to WIP must be at least 1.
Process a WIP Job for a Single Service Order
The following procedures describe how to process a WIP Job that contains a single Service Order.
Prerequisite
You must complete all steps in the relevant business scenario prior to processing the WIP Job for the Service Order. For more information, see Oracle Depot Repair Business Scenarios.
Steps:
-
Retrieve the Service Order for which you want to process the WIP Job.
For more information, see Find Service Requests and Service Orders.
-
Select the relevant record from the Results area of the Find Service Orders window, and click OK.
The Depot Repair Workbench shows the selected Service Request and Service Order details.
-
In the Depot Repair Workbench, select the Jobs tab.
-
Click Material Txn to display the Material Transaction window.
-
Issue the item and the material required to process the WIP Job.
For details, see Issuing and Returning Specific Components in the Oracle Work in Process User's Guide.
-
Complete the item service using a recommended service procedure.
-
When the service is complete, click Complete Job in the Jobs tab.
The Completion Transaction Find window opens.
Enter the completion details, such as quantity completed and completion subinventory, for the WIP Job.
For details, see Completing and Returning Assemblies in the Oracle Work in Process User's Guide.
-
In the Jobs tab of the Depot Repair Workbench, click Refresh Job to update the Service Order activity information.
Post-Processing
-
To see information about the WIP Job activity, from the top menu, select Data > Activity.
For more information, see View Activities Related to a Service Order.
-
After you have processed a WIP Job, if invoicing is required, you must move the data to Actuals.
For more information, see Record Billing Data in Actuals.
Create a WIP Job Across Multiple Service Orders
Oracle Depot Repair lets service organizations automatically create a single WIP Job against multiple Service Orders for identical items.
You search for WIP Jobs issued for items that have already been received into the service organization. You can perform the search against the Item Code, or attributes that pertain to the linked Service Request.
You perform this operation in two stages:
-
First, you search for the Service Orders, in the Find Service Orders for Job Submission window.
-
Then, you determine how many units to submit for service for each Service Order, and submit the WIP Job, in the Submit Jobs for Service Orders window.
The Find Service Orders for Job Submission window incorporates a multi-select feature to let you select any or all Service Order lines that appear in the search results.
In the Submit Jobs for Service Orders window, you can specify the quantity of the item to submit for each Service Order, and optionally, select Bills and Routings.
The following procedures describe how to create a WIP Job for multiple Service Orders relating to the same item.
Prerequisite
You must complete all steps in the relevant business scenario prior to creating the WIP Job for the Service Orders. For more information, see Oracle Depot Repair Business Scenarios.
Steps:
-
Select the relevant Service Organization from the list of values.
Find Service Orders for Job Submission Window.
The Find Service Orders for Job Submission window opens.
For field descriptions, see Find Service Orders for Job Submission Window.
-
Enter one or more search criteria by using one or more of the following fields:
-
(Service Request) Request Num
-
(Service Request) Customer
-
(Service Request) Account
-
(Service Request) Severity or Urgency
-
(Service Order) Item
-
(Service Order) Promise Date or Date Range
-
(Service Order) Create Date or Date Range
This is a sample list of the search parameters.
For descriptions of all the fields, see Find Service Orders for Job Submission Window.
-
-
Click Find to start the query.
The search results appear in the Results area of the Find Service Orders for Job Submission window.
-
Select the relevant Service Order or combination of Service Orders.
-
To select all the rows, click Select All.
-
To select multiple, non-continuous rows from among the search results, press and hold the Control key, and click each row.
-
To select a complete range of rows from among the search results, click the first row of the range, then press and hold the Shift key, and click the final row of the range.
-
To deselect all rows, click Deselect All.
-
-
After you select the relevant rows, click OK.
Submit Jobs for Service Orders Window.
The Submit Jobs for Service Orders window opens.
The selected rows populate the Service Order Information area in the window, and the Total Quantity Submitted for service automatically appears.
For field descriptions, see Submit Jobs Window.
-
In the Job Status field, select Released from the list of values.
You may submit a WIP Job with a Job Status of Unreleased. You will be able to change the status later using Oracle Work In Process transactions.
-
Select an Accounting Class from the list of values, for example, Rework.
Your organization determined these values during implementation of Oracle Depot Repair.
-
The system date defaults as Start Date. Select the WIP Complete Date.
-
In any line of the Service Order Details tab, you can optionally change the number of units to submit in the (Quantity) Submit field.
-
You can optionally click the Bills and Routings tab, and select one of the radio buttons:
-
Select Bills and Routings
-
Do not Specify Bills and Routings
If you choose Select Bills and Routings, then you must select at least one Bill or Routing.
-
-
Click Submit Jobs to submit the job in a released status to WIP.
-
To verify that the program completes successfully, monitor the requests by choosing View > Requests from the toolbar.
-
Close the Submit Jobs for Service Orders window and return to the Navigator.
Refresh Job for Each Service Order.
-
Retrieve these Service Orders by using the Find Service Orders window.
-
In the Depot Repair Workbench, select each Service Order, and click Refresh Job. The new job appears on the Jobs tab.
For more information, see Update Service Orders Concurrently.
Comments
After you have created and submitted a WIP Job for identical items across multiple Service Orders, you can process the WIP Job.
For more information, see Process a WIP Job Across Multiple Service Orders.
See Also
Create a WIP Job for a Single Service Order
Process a WIP Job Across Multiple Service Orders
The following procedures describe how to process a WIP Job containing multiple Service Orders. Processing a WIP Job across multiple Service Orders involves the following areas:
Prerequisite
You must complete all steps in the relevant business scenario prior to processing the WIP Job for the Service Orders. For more information, see Oracle Depot Repair Business Scenarios.
Steps:
Find Discrete Jobs Window
-
Enter the WIP Job Number, and click the Find button.
The Discrete Jobs window opens.
-
Confirm that the Job is in Released status.
-
Click the Routing Tab and select the Completion Subinventory from the list of values.
-
If the item is under Locator control, enter the Locator value.
-
Save your work.
-
Close the Discrete Jobs window to return to the navigator.
Material Transactions Window
-
Navigate to WIP > Material Transactions > WIP Material Transactions.
The Material Transactions window opens.
-
Select the Specific Component option if the material to be issued is not defined as a material requirement for the job.
-
Enter the WIP Job Number, and click the Continue button.
The WIP Component Issue window opens.
-
In the Components Issue window, enter the Items to be serviced.
If you did not select the Specific Component option, and the material you want to issue is not defined as a material requirement for the job, you might not be able to issue the item.
-
Select the present Subinventory location of the items.
-
If the items are Locator controlled, enter Locator information.
-
Enter the Quantity to be serviced.
-
If the items are under Serial or Lot control, enter Serial or Lot information.
-
Enter the material needed to assist the service.
-
Click Done.
This issues the material and closes the window.
-
Close the Material Transactions window to return to the Navigator.
Completion Transactions Window
-
After completing the , navigate to WIP > Material Transactions > Completion Transactions.
The Completion Transactions window opens.
-
Enter the WIP Job Number, and click the Continue button.
-
Enter the completed quantity and the completion subinventory if you did not enter this information previously.
-
If the items are Locator, Serial, or Lot controlled, and you entered such information previously, enter these values.
-
Click Done to perform the completion transaction and return to the Depot Repair Navigator window.
WIP Jobs and Schedules Window
-
Navigate to WIP > Discrete > WIP Value Summary.
The WIP Jobs and Schedules window opens.
-
Enter the WIP Job Number, and click Find.
The WIP Jobs and Schedules window opens.
-
Enter the From Period and To Period information.
-
Click Value Summary.
The WIP Value Summary window opens.
Create and Process Tasks
Tasks consist of work assignments that detail the actions required of company personnel.
The Tasks tab in the Depot Repair Workbench provides a solution for service establishments that use simple, standard business processes without requirements for WIP-based processes. The Tasks module is accessed (Tasks tab is enabled or disabled) depending on the Service Type selected in the Depot Repair Workbench Details tab.
In the Tasks tab, you can create, update, assign, and view previous tasks assigned to a Service Order. Tasks assigned previously appear in the table in the upper part of the tab, while details of the selected task appear in the fields below it. You can create a task directly from the Tasks tab by entering all the relevant information, or by using a template.
Using Quality Collection Plans with Tasks
You can assign Oracle Quality collection plans to tasks, through setups to be performed in Oracle Quality.
For general information about collection plans, see the Oracle Quality User's Guide. For detailed information see Quality Data Collection in Oracle Depot Repair, Oracle Quality User's Guide.
Tip: When creating the collection plan, copy the elements from the Template Depot Task Plan as a starting point.
To link a collection plan with a task, you must select Depot Repair Task Transaction as a Quality Collection Transaction. You may choose to make this transaction mandatory: this will require Oracle Depot Repair users to enter quality results before they close the task.
You can also set up one or more collection triggers to specify conditions under which the collection plan is to be assigned to tasks.
In Oracle Depot Repair, you must enter the quality results for mandatory plans. For details, see Enter and Update Task Details.
Task Debrief
On the Tasks tab, you can click the Debrief button to display Material, Labor, and Expense forms. You can debrief a job with actual Material, Labor, and Expense service charges.
For jobs that you have managed using Tasks, the Debrief provides the actual charges incurred during the service that would be invoiced to a customer. If both estimate and debrief exists for a service that you have managed using Tasks, the customer is invoiced based on charges that appear in the debrief.
The topics in this section include the following:
Create a Task Manually
The following procedures describe how to create a task manually.
Prerequisites
You must complete all steps in the relevant business scenario prior to creating the tasks for the Service Order. For more information, see Oracle Depot Repair Business Scenarios.
Steps:
-
Retrieve the Service Order for which you want to create tasks.
For more information, see Find Service Requests and Service Orders.
-
Select the relevant record from the Results area of the Find Service Orders window, and click OK.
The Depot Repair Workbench shows the selected Service Request and Service Order details.
-
In the Depot Repair Workbench, click the Tasks tab.
If tasks have already been defined for the Service Order, the table lists the tasks. If more than one task appears, selecting a different task displays the corresponding detail in the lower fields on the tab.
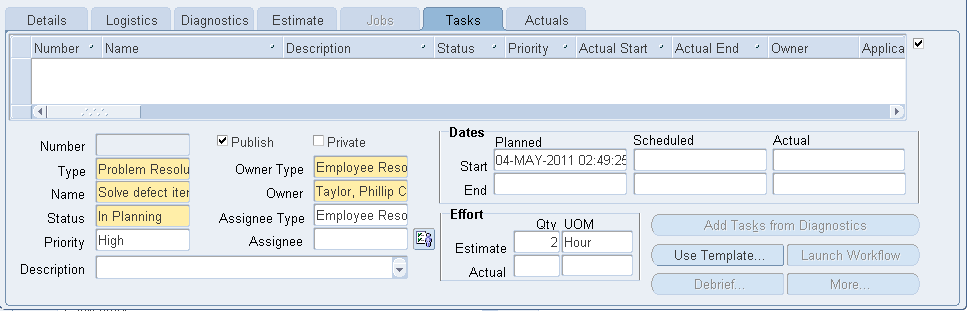
-
Enter the task information in the required fields by selecting from the list of values.
For field descriptions, see The Tasks Tab.
-
Enter the values in the Assignee and Owner fields (or change them) by selecting from the list of values.
You can also change the Assignee field values from the Assignment Manager. To access the Assignment Manager, click the Assignment Manager button next to the fields. For additional information about the Assignment Manager, see Oracle Common Application Components User's Guide.
-
Choose the Planned Start and End Dates.
-
Click the Save icon to save the task record.
A system-generated Task Number populates the Num field.
-
Optionally, you can click Add Tasks from Diagnostics. This adds tasks from task template groups associated with the service codes marked as applicable in the Diagnostics tab.
-
To manually launch workflow, select the task from the table, and click Launch Workflow.
Based on the task, the workflow runs. The designated resources are reserved, and the workflow notifies the task owner of task creation through email.
Note: The Launch Workflow button is available only if resources have been assigned to the selected task.
-
To add or update task details, click More.
The Task Details window opens.
For more information, see Enter and Update Task Details.
Create a Task Using a Task Template
The following procedures describe how to create a task using a Task Template.
Prerequisites
You must complete all steps in the relevant business scenario prior to creating the tasks for the Service Order. For more information, see Oracle Depot Repair Business Scenarios.
Before you create a task from a Task Template, a template design must exist.
Steps:
-
Retrieve the Service Order for which you want to create tasks.
For more information, see Find Service Requests and Service Orders.
-
Select the relevant record from the Results area of the Find Service Orders window, and click OK.
The Depot Repair Workbench shows the selected Service Request and Service Order details.
-
In the Depot Repair Workbench, select the Tasks tab.
If tasks have already been defined for the Service Order, the table lists the tasks. If more than one task appears, selecting a different task displays the corresponding detail in the lower fields on the tab.
-
On the Tasks tab, click Use Template.
The Create Tasks from Template Group window opens.
-
In the Template Group field, select the Template Group based on the task which is to be created.
Values in the Source Document, Source Name, Owner Type and Owner fields are default values. You can change these values.

-
Click Create Tasks.
The Tasks tab opens and displays a new task line that shows a system generated Task Number in the Num field.
-
To manually launch workflow, click Launch Workflow.
Based on the task, the workflow runs. The designated resources are reserved, and the workflow notifies the task owner of task creation through email.
Note: The Launch Workflow button is available only if a resource has been assigned to a selected task.
-
Click More to open the Task Details window to enter details such as resource assignments, dependencies, references, and contacts.
For more information, see Enter and Update Task Details.
Enter and Update Task Details
After a task record is created, you can update task information and task details. The following procedures describe how to update task information and to add task details.
Prerequisite
Task records that you want to update or add details to must exist in the database.
Steps:
-
Retrieve the Service Order for which you want to update task details.
For more information, see Find Service Requests and Service Orders.
-
Select the relevant record from the Results area of the Find Service Orders window, and click OK.
-
The Depot Repair Workbench shows the selected Service Request and Service Order details.
-
In the Depot Repair Workbench, select the Tasks tab.
If tasks have already been defined for the Service Order, the table lists the tasks. If more than one task appears, selecting a different task displays the corresponding detail in the lower section of the window.
-
To update task information, make the necessary changes to the field values, and click the Save icon.
For field descriptions, see the Tasks Tab topic.
Entering Quality Results
-
If your task has any mandatory collection plans associated with it, you will not be able to set the task Status to Closed unless you first enter quality results for the task. To do this, either click the Enter Quality Results icon in the toolbar, or select Tools > Enter Quality Results; then enter the information required.
Specifying Task Details
-
To specify task details, select the task for which you want to update details, and click More.
The Task Details window opens. The Task Details window comprises the following tabs:
-
Resources: Assign personnel information to a task. This tab defines resource requirements, assignments, and scheduling information.
-
Dependencies: Determine the order of tasks. Oracle Depot Repair, however, does not enforce task dependencies.
-
References: Link the task to different documents or tasks with pertinent background information.
-
Dates: Identify more dates in addition to the planned dates, the scheduled dates, and the actual dates. You can track task progress by entering dates after task milestones such as task creation, resource reservation, or task completion.
-
Contacts: Create and manage multiple contacts assigned to a task. Contact information is obtained from customer information. To enter this information, you must identify a customer in the main task window.
-
Recurrences: Schedule tasks so as to occur automatically. Examples of intervals include daily, weekly, monthly, or yearly occurrences. To schedule recurring tasks, you must either specify a start date and the number of tasks to create, or the end date. The task dates are populated as the planned start and end dates.
-
Others: Identify additional information about the task, and select different configurations for each task. Setting flags customizes each task according to business needs.
-
Audit: Track each update to a task. The tab documents and dates the history of task change, and provides a trail from the original task through to the current task status.
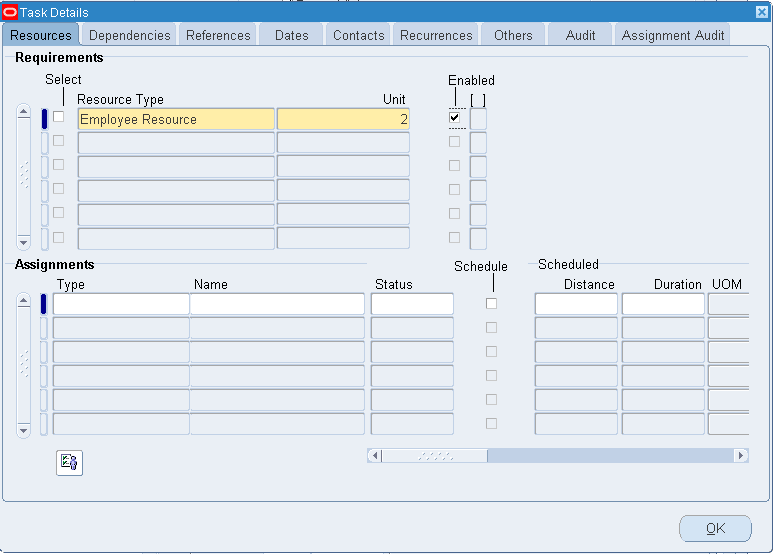
-
-
Enter the field values on the different tabs as required.
For detailed instructions, refer to the Task Manager topic in Oracle Common Application Components User's Guide.
-
Click OK to save your work and return to the Tasks tab in the Depot Repair Workbench.
Prepare the Tasks Debrief
On the Tasks tab, you can click the Debrief button to display the Debrief Report, with Material, Labor, and Expense tabs. You can debrief a job with actual Material, Labor, and Expense service charges.
For jobs that you have managed using Tasks, the Debrief provides the actual charges incurred during the service that would be invoiced to a customer. If both estimate and debrief exists for a service that you have managed using Tasks, the customer is invoiced based on charges that appear in the debrief.
Note: The Debrief Report form does not let you apply contracts per charge line. If you are using the Debrief Report form to generate charges, the system automatically applies the contract at the Service Request level to the charge line.
The following procedures describe how to create the Debrief. This procedure is applicable only to service processes that you have managed by using Tasks.
Prerequisite
You must complete all steps in the relevant business scenario prior to creating the tasks for the Service Order. For more information, see Oracle Depot Repair Business Scenarios.
Steps:
-
Retrieve the Service Order for which you want to update task details.
For more information, see Find Service Requests and Service Orders.
-
Select the relevant record from the Results area of the Find Service Orders window, and click OK.
The Depot Repair Workbench shows the selected Service Request and Service Order details.
-
In the Depot Repair Workbench, select the Tasks tab.
If tasks have already been defined for the Service Order, the table lists the tasks. If more than one task appears, selecting a different task displays the corresponding detail in the lower section of the window.
-
Select the task for which you want to create the report, and click Debrief.
The Debrief Report window shows the selected task details populated in the fields at the upper part of the window. The lower half of the window comprises the Material, Expense, and Labor tabs.
-
Select the Material tab to enter required details of material transactions of the task.
-
Select the Expense tab to enter required details of other expenses of the task.
-
Select the Labor tab to enter required labor transaction details of the task.
-
Click Update to save the details.
For detailed instructions and discussion on buttons and check boxes accessible from the Debrief Report window, refer to Oracle Field Service User Guide.
View Activities Related to a Service Order
The Activity window displays a real-time view of events and activities that surround a Service Order. This permits the depot agents and planners to know the exact status of each Service Order line.
The following procedures describe how to view the activities that have elapsed at the depot in association with a Service Order.
Prerequisite
None
Steps
-
Retrieve the Service Order for which you want to view the elapsed depot activities.
For more information, see Find Service Requests and Service Orders.
-
Select the relevant result from the Results area of the Find Service Orders window, and click OK.
The Depot Repair Workbench shows the selected Service Request and Service Order details.
-
From the top menu, select Data > Activity.
The Activity window displays the quantity received, quantity submitted to WIP, quantity completed in WIP, and quantity shipped. It also displays individual events, event dates, quantity, and other details. For detailed field descriptions, see Activity Tab.
Note: The fields, Quantity Submitted to WIP and Quantity Completed in WIP, appear only for services processed in WIP mode. However, when quantities are submitted in WIP mode across Service Orders, these Quantity fields do not contain valid values.
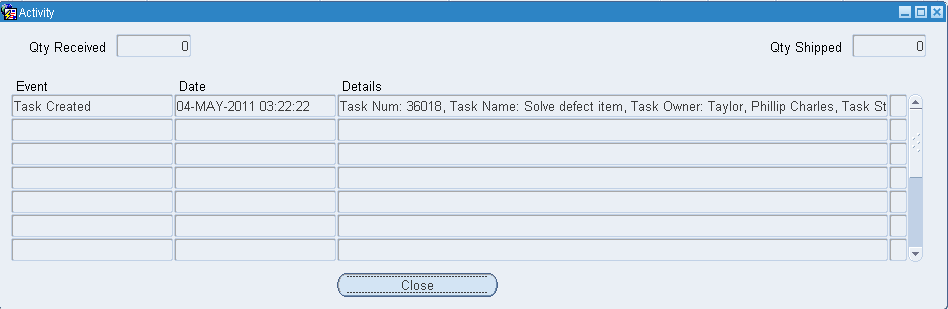
-
If the Activity window does not display the updated information that you expect, you may need to run the appropriate information update program:
-
Click the Logistics tab, then click Refresh Logistics.
-
Click the Jobs tab, then click Refresh Job.
Note: The programs triggered by the Refresh Logistics and Refresh Job buttons update the activity information only for the Service Order currently selected in the Depot Repair Workbench.
For more information, see Update Service Orders Concurrently.
-
Update Service Orders Concurrently
The following concurrent programs update all the open Service Orders at the same time:
-
Depot Repair Job (WIP) Update
-
Depot Repair Receipt Update
-
Depot Repair Shipment Update
To access these programs, from the Depot Repair Navigator, navigate to:
Depot Repair > Other > Run Requests.
The Submit a New Request window opens. In the Submit a New Request window, you can choose to submit a single request. When you submit a single request, the Submit Request window opens. In the Name field, select the program that you want to run. Choices include Depot Repair Receipt Update, Depot Repair Job (WIP) Update, or Depot Repair Shipment Update. You also specify to update quantity received, quantity submitted to or completed in WIP, and quantity shipped respectively, for all open Service Orders.
In the remaining fields, you can schedule the program to run at times or intervals of your choice, choose whom to notify on completion, and choose whether to print or save the reports. For more information, refer to the online help available from these windows.
The Depot Repair Receipt Update concurrent program picks only the receiving lines that are delivered to a subinventory. This is to support business scenarios that involve quantity correction of goods received at the dock.
For example, during the inspection of goods received at a dock, you can correct or return some quantity of the goods delivered. This could be because not as many items were sent as the customer said they would, or the customer returned more than expected, such as, goods that were too damaged to qualify for a refund, or goods that your organization did not sell. Items are not considered as received until they pass the inspection, and are delivered to a subinventory. Only at this point does the Depot Repair Receipt Update concurrent program stamp the received quantity and show the change in the received quantity.
Send and View Workflow-Based Messages
At a high level, the Workflow-based Messaging functionality provides the ability to send a workflow notification message, and have that message link to the Service Order selected in the Depot Repair Workbench at the time the message was sent. Messages can be of various types, from information-only to those that request actions or approvals from others. When the message recipient responds to the message linked to the specified Service Order, that response is captured in the Service Order's message history. A message can be sent to one or many recipients, and can be sent to group lists. Messages sent to multiple recipients can only be informational messages.
In Oracle Depot Repair, messages are tied to a Service Order, and are sent from the Service Orders form.
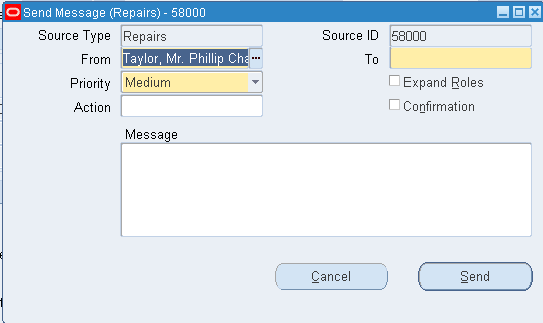
For more information on message types, sending, receiving, and viewing messages, and user procedures, see the Oracle TeleService User Guide and Oracle TeleService Implementation Guide.
Create a Ship Line Manually
The following procedures describe how to create a Ship line manually.
Prerequisites
You must complete all steps in the relevant business scenario prior to creating a ship line manually. For more information, see Oracle Depot Repair Business Scenarios..
Steps
-
Retrieve the Service Order for which you want to create the Ship line manually.
For more information, see Find Service Requests and Service Orders.
-
Select the relevant result from the Results area of the Find Service Orders window, and click OK.
The Depot Repair Workbench shows the selected Service Request and Service Order details.
-
Select the Logistics tab in the Depot Repair Workbench.
-
In the Action Type field, select Ship.
-
Select the fields for the Ship line.
The main fields that you must select are Action Code, Service Activity, and Price List.
Note also the Add to Order field. Oracle Depot Repair lets you place all Return (RMA) and Ship lines on the same order.
By default, all Return (RMA) and Ship lines appear on the next-highest Order Number created when the lines are transferred to Order Management.
You can also select the specific order for the Return (RMA) or Ship line by selecting the Order Number in the Add to Order field before interfacing the specified line to Order Management.
For field descriptions, see Logistics Tab.
-
Click the Save icon on the toolbar to save the record.
The Ship line is created with the Status of Entered.
Ship an Item
Depending on the business scenario, an item being shipped might be serviced. Shipments can include serviced, replacement, loaner, or exchange items.
If you do not select a subinventory for the item, the subinventory is derived from the picking rule defined in the profile option CSD: Default Pick Release Rule for Sales Orders.
The Ship line that corresponds to the shipment goes through several stages of processing, and at each stage the Status is updated. The Status values that it passes through are Entered, Submitted, Booked, Released, and Shipped.
You may go through each processing stage one stage at a time, or process several stages in sequence automatically.
Enter Order (Submit to Oracle Order Management)
After a Ship line is created, its first Status is Entered.
When you submit the line to Oracle Order Management, and it is successfully interfaced, it gets an Order Number returned from Oracle Order Management, and its Status changes to Submitted.
After the Ship line has been interfaced with Oracle Order Management, it cannot be deleted. However, the ship line can be canceled by selecting Cancel Order Line from the Actions menu in the Logistics Tab and clicking Go.
Note: It is not necessary to enter an order as a separate step from booking the order.Most businesses book the order, which automatically enters the order in Order Management as part of the booking process.
Book Order
In this stage, the line must be booked in Oracle Order Management. The main effect of this in Oracle Depot Repair is that the Status of the line changes to Booked.
Pick Release
During the Pick Release processing, the application reserves the exact items to ship.
The Status of the Ship line at the end of the Pick Release stage changes to Released.
[For serialized items whose Serial Control is either Predefined or At Receipt, you are required to perform the Pick Release processing twice:
-
The first time, you must enter the Serial Number in a separate Oracle Inventory window, but the Status of the Ship line remains as Booked.
-
The second time, you automatically upgrade the Ship line Status to Released.]
Ship Confirm
At the end of the Ship Confirm stage, the item has been shipped and the Status of the line changes to Shipped.
Automatic Processing of a Ship Line
The standard way to process a Ship line for a general item is as follows:
-
Decide the stage you want to reach.
-
Click the Automate Order Processing steps through check box.
-
Select the radio button which corresponds to the stage you want to reach:
-
Enter Order
-
Book Order
-
Pick Release
-
Ship Confirm
-
-
Click Process.
Note: You can optionally process the last stage, that is, with the Ship line in the Released status, by clicking the Ship button, and then entering data in Oracle Shipping Execution windows. For details of these windows, see the Oracle Shipping Execution User's Guide.
Prerequisites
You must complete all steps in the relevant business scenario prior to shipping the general item. For more information, see Oracle Depot Repair Business Scenarios.
Steps
-
Retrieve the Service Order for the item that you want to ship.
For more information, see Find Service Requests and Service Orders.
-
Select the relevant order from the Results area of the Find Service Orders window, and click OK.
The Depot Repair Workbench shows the selected Service Request and Service Order details.
-
Select the Logistics tab of the Depot Repair Workbench.
-
Click any field of the Ship line to make that line current.
-
Click the Process Trans check box.
-
Select the Automate Order Processing Steps Through check box.
-
Select one of the following radio buttons:
-
Enter Order
-
Book Order
-
Pick Release
-
Ship Confirm
-
-
For the special case where you have chosen Ship Confirm, for a serialized item whose Serial Control is At Sales Order Issue, enter the Source Serial Number.
-
Click Process.
Depending on how many stages you have chosen to perform, a variety of procedures are performed.
In all cases, acknowledge the message in any message window that appears.
Enter Order
If, at step 7, you chose Enter Order, the Status changes to Submitted.
Book Order
If, at step 7, you chose Book Order, the Status changes to Booked.
Pick Release
If, at step 7, you chose Pick Release, the Status changes to Released.
Pick Release for Items with Serial Control Predefined or At Receipt
For a serialized item that has Serial Control which is either Predefined or At Receipt, the resulting Status depends on whether you are performing the Pick Release processing for the first time or the second time.
-
The first time, you must enter a Serial Number, navigating through the Find Move Order Lines window that appears automatically, to the Transact Move Orders window.
For details of the Find Move Order Lines window and the Transact Move Orders window, see the Oracle Inventory User's Guide.
When you return from the Transact Move Orders window, the Status of the Ship line remains as Booked.
Repeat the Pick Release processing (steps 5 through 9).
-
The second time you perform the Pick Release process, you do not have to enter any further data, and the Status changes to Released.
-
-
To see the Serial Number that you entered during the first-time Pick Release processing in the (Source) Serial Num field on the Logistics tab, click Refresh Logistics, after you complete the second-time Pick Release process.
-
When the Status of the Ship line is Released, the Pick Release stage is complete.
Ship Confirm
When processing the Ship Confirm stage, you should wait until the concurrent program Interface Trip Stop has completed successfully before you click Refresh Logistics, to see the changed value of the Status.
-
You can monitor the progress of the program by selecting Requests from the View menu on the toolbar, and selecting appropriate search criteria.
-
Click Refresh Logistics.
The purpose of this is to update the Status on the Ship line, so that it reflects in Oracle Depot Repair the results of the procedures executed in other Oracle applications when you clicked Process.
If, at step 7, you chose Ship Confirm, and the background concurrent process Interface Trip Stop completes successfully, the Status changes to Shipped.
-
When the transaction is completed, you can optionally view the shipping information in the Activity window, by selecting Data > Activity from the top menu.
Move an Item to a Usable Spares Subinventory
In Oracle Depot Repair, after a refurbished item has been received from the Spares Management warehouse and serviced, it is ready to be shipped back to Spares Management.
Note: Spares Management is a module of Oracle Field Service.
If you do not select a subinventory for the item, the subinventory is derived from the picking rule defined in the profile option CSD: Default Pick Release Rule for Sales Orders.
You must process the item through the Pick Release and a Ship stages. These stages are similar to the Pick Release and Ship Confirm stages for shipping a general item.
Where both options are allowed (that is, where the equivalent radio buttons are both enabled), you can either perform the two stages one at a time, or process both stages in sequence automatically.
For serialized items whose Serial Control is either Predefined or At Receipt, you are required to perform the Pick Release processing twice, as for general items. For more information, see Ship a General Item.
Manual Ship Processing for Items with Serial Control At Sales Order Issue
The only difference in the processing of a refurbishment item and a general item occurs in the final, Ship stage, and then only for the case of a serialized refurbished item, whose Serial Control is At Sales Order Issue.
To ship this type of item, you must use the manual method of clicking Ship and entering the Serial Number using Oracle Shipping Execution windows; you cannot use the automatic method of choosing Ship Confirm and clicking Process.
Note: You must also use the manual method for partial shipments.
The following procedures describe the Move Out transaction, that processes the shipment of the refurbished item back to Spares Management.
Prerequisites
The Service Request and the associated refurbishment Service Order or orders must have been created in the Spares Management module of Oracle Field Service.
The item must have been received and serviced.
Steps
-
Retrieve the Service Order for which you want to ship the refurbished item.
For more information, see Find Service Requests and Service Orders.
-
Select the relevant result from the Results area of the Find Service Orders window, and click OK.
-
Click the Logistics tab.
-
Click any field of the Move Out line to make that line current.
The Status of the Move Out line should be Booked.
Note: The following description assumes that you select the automatic Pick Release option when processing the Move Out line.
Even if you select Ship Confirm as your first choice for processing the Move Out line, the application automatically processes the Pick Release stage first, then the Ship Confirm stage.
Pick Release
-
Click the Process Trans check box for the Move Out line.
-
Click the Automate order processing steps through check box.
-
Select the Pick Release radio button.
-
Click Process.
The Status of the Move Out line generally changes to Released.
Pick Release for Items with Serial Control Predefined or At Receipt
For a serialized item that has Serial Control which is either Predefined or At Receipt, the resulting Status depends on whether you are performing the Pick Release processing for the first time or the second time.
-
The first time, you must enter a Serial Number, navigating through the Find Move Order Lines window that appears automatically, to the Transact Move Orders window.
For details of the Find Move Order Lines window and the Transact Move Orders window, see the Oracle Inventory User's Guide.
When you return from the Transact Move Orders window, the Status of the Move Out line remains as Booked.
-
The second time you perform the Pick Release process (steps 5 through 8), you do not have to enter any further data, and the Status changes to Released.
-
-
To see the Serial Number that you entered during the first time Pick Release processing in the (Source) Serial Num field on the Logistics tab, click Refresh Logistics, after you complete the second time Pick Release process.
-
To check if there has been a mismatch between the Serial Number in the Move Out line and the Serial Number you entered in the Transact Move Orders window, select Data > Activity to display the Activity window. If a mismatch occurred, an alert message in the Activity window records the two Serial Numbers.
When the Status of the Move Out line is Released, the Pick Release stage is complete.
Manual Ship or Ship Confirm
-
For the case of a serialized refurbished item, whose Serial Control is At Sales Order Issue, or for partial shipments, the Ship Confirm button is disabled. In these situations, click Ship and enter the item's Serial Number in Oracle Shipping Execution windows. For details of these windows, see the Oracle Shipping Execution User's Guide.
When you return to the Logistics tab, click Refresh Logistics. The Status changes to Shipped.
This completes the manual ship processing for these special Move Out lines.
-
For all other cases, click the Process Trans check box for the Move Out line.
-
Click the Automate order processing steps through check box.
-
Select the Ship Confirm radio button.
-
Click Process.
When processing the Ship Confirm stage, you should wait until the concurrent program Interface Trip Stop has completed successfully before you click Refresh Logistics, to see the changed value of the Status.
You can monitor the progress of the program by selecting Requests from the View menu on the toolbar, and selecting appropriate search criteria.
-
Click Refresh Logistics.
The purpose of this is to update the Status on the Move Out line, so that it reflects in Oracle Depot Repair the results of the procedures executed in other Oracle applications when you clicked Process.
After the background concurrent process Interface Trip Stop has completed successfully, the Status changes to Shipped.
-
Optionally, from the top menu, select Data > Activity to see the details of the Move Out transaction in the Activity window.
Record Billing Data in Actuals
When you have completed the service and have determined the final billing for materials, labor, and expenses that you want to bill your customer, you need to put the billing amounts in Actuals. Sources of billing amounts in Actuals can include the estimate, WIP Summary, Task Debrief, or manual entries.
Note: For WIP mode jobs, although it is not prohibited to create actuals from both WIP and Estimate sources, generally you will copy in from either WIP or Estimate sources.
Similarly, for Task mode jobs, although you can copy in lines from both Task and Estimate sources, generally you will copy in from either Task or Estimate sources.
When you record the billing entries in Actuals, the system creates charge lines in the Actuals area. In turn, the system can transfer the billing data to other modules for invoicing.
Note: The Debrief Report form does not let you apply contracts per charge line. If you are using Debrief Report form to generate charges, the system automatically applies the contract at the Service Request level to the charge line.
Topics that guide you through adding data into your Actuals tab include:
See Also
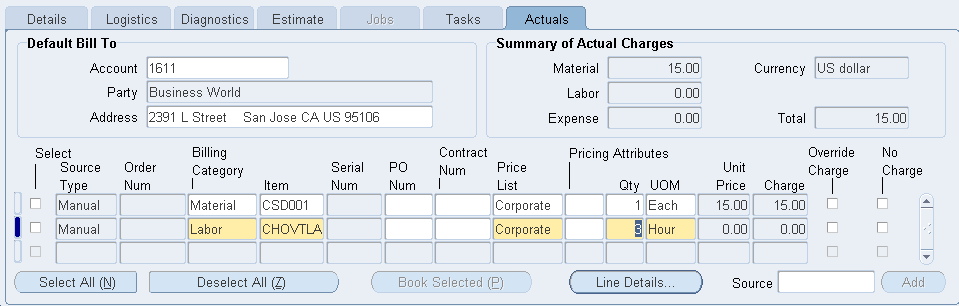
Add WIP Summary to Actuals
If your Service Order is in WIP mode, you can add the WIP Summary as a source for your Actuals.
When you add from the WIP Summary to your Actuals, the system adds all material, labor, and expense lines from the WIP Summary into the Actuals.
Generally, when adding in lines from WIP Jobs:
-
Material Transactions are added as Material lines.
-
Resources Transactions are added as Labor lines.
Note: Before you can add WIP Summary data into the Actuals, you must define a billing inventory item for all the BOM Resources that are associated with a WIP Job. This requirement lets Depot Repair add the WIP Summary lines into Actuals as material, labor, and expense items. For more information, see the Oracle Depot Repair Implementation Guide.
After you add WIP Summary lines into the Actuals, you can:
-
View the WIP Job Name in the Source column of the Actuals tab to see the source of the added lines.
-
Update the WIP Summary-sourced lines in Actuals but not delete them. The updates you can perform are limited: under profile option control, you can either set No Charge for a charge line or you can override the charge.
Note: If you manually override the charge, then discounts associated with the contract are not applied.
-
View each line's details to let you view more information about the line, indicate whether or not to override charges, or indicate to make no changes.
Important: After you have imported at least one line from a WIP Job into the Actuals, you cannot import any additional lines from that job.
Additionally, lines will not be imported from WIP Jobs shared across Service Orders.
-
Manually create additional charge lines. You can manually create charge lines before and after you add lines from the WIP Summary.
Upon importing the WIP Summary lines to the Actuals, the system creates charge lines for each line.
Prerequisites
You must be processing a Service Order.
Steps:
-
In the Source field, click the right-hand end of the field, then click the ellipsis (...) button.
A window opens and displays the possible sources from which you can add data to Actuals.
For a WIP mode service, the options are WIP and Estimate.
For a Task mode service, the options are Task and Estimate.
-
Select a Source and click OK.
-
Click Add.
The system automatically populates rows and fields on the Actuals tab from the source that you selected. An information window appears which records any errors and information about the lines added
The Source field shows the Source Name. You should review each line on the Actuals tab to:
-
Determine if any lines require overrides.
-
Determine if any lines should be at no charge.
-
-
(Not available for lines imported from Task Debrief.)
If the profile option CSD: Allow Charge Override for Actuals is set to Yes, you override an amount on a line, as follows:
-
Select Override Charge.
-
In the Charge column, enter a new amount.
-
-
(Not available for lines imported from Task Debrief.)
To change a line to No Charge, select the No Charge check box.
-
Click Save to record the changes.
View Line Details
On the Actuals tab, you can view additional information about a charge line's details. Additional details include charge, and project information. You can access a charge line's details by selecting a charge line and clicking the Line Details button. An expanded window shows the detailed information.
See Also
Add Task Debrief to Actuals
If your Service Order is in Task mode, you can import the Task Debrief as a source for your Actuals.
When you import from the Task Debrief to your Actuals, the system imports all material, labor, and expense lines from the Task Debrief into the Actuals.
Note: The Debrief Report form does not let you apply contracts per charge line. If you are using the Debrief Report form to generate charges, the system automatically applies the contract at the Service Request level to the charge line.
After you import Task Debrief lines into the Actuals, you can:
-
View the Task Number in the Source column of the Actuals tab to see the source of the imported line.
-
Add additional Task Debrief lines to the Actuals.
-
Manually create additional charge lines. You can manually create charge lines before and after you add lines from the Task Debrief.
Upon importing the Task Debrief lines to the Actuals, the system creates charge lines for each line.
Note: You cannot update lines whose Source is Task.
For procedural information on how to add Task Debrief data to the Actuals, see the Steps in the topic Add WIP Summary to Actuals.
See Also
Add Estimate to Actuals
If your service includes an estimate, you can use the Estimate as a source for your Actuals.
When you import from the Estimate to your Actuals, the system imports all lines from the Estimate into the Actuals.
After you import Estimate lines into the Actuals, you can:
-
Update, add, or delete the Estimate-sourced lines in Actuals.
-
View each line's details to let you view more information about the line, indicate whether or not to override charges, or indicate to make no changes.
-
Manually create additional charge lines. You can manually create charge lines before and after you add lines from the Estimate.
Note: If you manually override the charge, then discounts associated with the contract are not applied.
Upon importing the Estimate lines to the Actuals, the system creates a charge line for each estimate line.
Note: After you have imported any estimate lines into Actuals, any changes made to those source estimate lines are not automatically forwarded to the corresponding Actuals lines. To take advantage of the new estimate changes, you must delete the corresponding Actuals lines, and then re-import the changed source estimate lines.
For procedural information on how to add Estimate data to the Actuals, see the Steps in the topic Add WIP Summary to Actuals.
See Also
Create Manual Charges in Actuals
In addition to adding billing data from other sources--such as the WIP Summary, Task Debrief, or Estimate you can:
-
Manually create entries in Actuals.
-
Update or delete the manual charge lines in Actuals.
Prerequisite
You must be processing a Service Order.
Steps:
-
To manually create a new charge line on the Actuals line, select the new row on which you are adding a charge line.
The Source Type field automatically indicates Manual.
-
Enter or select the Billing Category, Item, Price List, Qty, UOM, Pricing Attributes fields, and optionally, the PO Num field.
-
Optionally, complete the Contract Number field.
-
If the profile option CSD: Allow Charge Override for Actuals is set to Yes, you override an amount on one line, as follows:
-
Select Override Charge.
-
In the Charge column, enter a new amount.
Note: If you manually override the charge, then discounts associated with the contract are not applied.
-
-
To change a line to No Charge, select the No Charge check box.
-
Click Save to record the changes.
See Also
Book Actuals
After you have recorded your billing data in Actuals, from one or more sources, and possibly entered charge lines manually in Actuals, you can book selected charge lines.
The following procedures describe how to book selected Actuals charge lines.
Prerequisite
You must be processing a Service Order.
You must have charge lines in Actuals, either manually entered or added in from a Source of Estimate, WIP, or Task.
Steps
-
Select either individual charge lines or click Select All if you want to book all the charge lines in the Actuals tab.
-
Click Book Selected.
Comments
For lines whose Source is Task, the items used in the Debrief Report decrement inventory only after the Field Service concurrent program CSF: Update Debrief Lines is submitted. This concurrent program updates the Quantity On Hand (QOH) in the inventory.
Invoice a Customer
Note: Tax, Shipping, and Freight charges are not calculated within Oracle Depot Repair, but are calculated in Order Management when orders transfer to Order Management. For this reason, the charge totals in the estimate lines and lines from Task Debrief may be different from the value charged on the invoice.
The following procedures describe how to invoice a customer.
Prerequisites
You must complete all steps in the relevant business scenario prior to invoicing the customer. For more information, see Oracle Depot Repair Business Scenarios.
Steps
-
Invoice the customer by using normal business procedures.
For more information, see the Oracle Receivables User Guide.
Close a Service Order
The following tasks describe how to close a Service Order.
Prerequisite
You must complete all steps in the relevant business scenario prior to closing the Service Order. For more information, see Oracle Depot Repair Business Scenarios.
Steps
-
Retrieve the Service Order for the item that you want to ship.
For more information, see Find Service Requests and Service Orders.
-
Select the relevant result from the Results area of the Find Service Orders window, and click OK.
The Depot Repair Workbench shows the selected Service Request and Service Order details.
-
Confirm that the quantity on the Service Order is complete.
-
Consult or create notes if necessary.
For detailed instructions, see Create and Maintain Notes.
-
In the Details tab of the Depot Repair Workbench, click Update Status.
The Update Status window opens. In the Update Status window, you can update the Service Order status. The Service Order can remain Open, be on Hold, or Closed.
-
Select Close by selecting the option button, and click OK to close the Service Order line.
You can select a Reason Code from the list of values, and enter additional details supporting the status update.
-
Click the Save icon on the toolbar to save the record.
Note: Alternatively, you can set up a workflow to auto-close the service order after the last item ships. See: Using Workflows to Auto-close Service Orders, Oracle Depot Repair Implementation Guide.
Close a Service Request
The Depot Workbench does not allow you to manually update the service request status and as a result you cannot manually close a service request from the Depot Workbench. However, there are several options for closing the service request.
The first option is to allow the system to automatically close the service request when all of the service orders are closed. This is done by setting the profile option CSD: Close Service Request When All Service Orders are Closed to Yes.
The second option is to click the hyperlinked service request number in the Request Num field on the Depot Workbench window. If the profile CSD: Enable SR Hyperlink is set to Yes, this launches the HTML Service window where you can change the service request status to Closed.
The third option is to log out of the Depot Workbench and log into the Teleservice or HTML Service Request windows.
Steps
-
Navigate to the Find Service Request window. Retrieve the Service Request that you want to close.
The selected Service Request details are displayed in the SR header section.
-
In the Service Request Information area, change the status of the Service Request to Closed by selecting from the list of values.
-
Enter the closing date.
-
If required, create notes stating the reason for the Service Request closure. For detailed instructions, see Create and Maintain Notes.
-
Click the Save icon to close the Service Request.
Create and Process an Internal Party Refurbishment
In Oracle Depot Repair, you can create and process items that need to be refurbished that belong to an internal party. In these cases, the items to be refurbished do not move from an external location, such as a Spares Management warehouse, they remain in the internal party location.
Note: Spares Management is a module of Oracle Field Service.
Create the Service Request
You must first create a Service Request, and explicitly choose an internal party for your customer.
An internal party is defined as a customer set up in at least one of the following ways:
-
The customer is the Party Name set up in the Installed Base Install Parameters.
-
The customer is set up in Oracle Order Management with a classification type of Internal.
For more information on setting up internal parties, see the Oracle Depot Repair Implementation Guide.
Create the Service Order
When you create the Service Order, you must select a Service Type that has been set up with a Service Type Ref of Refurbishment, and whose Internal Order check box has not been set.
For more information on setting up Service Types, see the Oracle Depot Repair Implementation Guide.
Process the Service Order
After the Service Order has been created, the Logistics, Estimates, and Actuals tabs are disabled, as is the tools option menu Tools > Coverage.
The main operations that you perform on internal party refurbishment items are services to be carried out through WIP Jobs or Tasks.
The only special considerations that apply to the internal party items to be refurbished are as follows:
-
For serialized items, that are Installed Base trackable, the lists of values for Serial Num and Instance show all item instances owned by the internal party, and whose Oracle Installed Base usage is In-Inventory.
-
For serialized items, that are not Installed Base trackable, the lists of values for Serial Num and Instance show all item instances whose Oracle Installed Base usage is In-Inventory.
View Service Orders in Oracle iSupport
Oracle Depot Repair customers can now search for their Service Orders through a self-service user interface in Oracle iSupport.
Oracle iSupport authenticates the user and displays only the Service Orders for accounts which the user is authorized to view. For each Service Order, summary and detail information, including Service Order status, can be displayed.
The procedure to view Service Orders in Oracle iSupport is as follows:
-
Login to Oracle iSupport.
-
Click the Accounts tab.
-
Select the Service Orders menu item.
The Service Order Summary page appears.
-
Click the Service Order Number hyperlink for a Service Order.
The Service Order Details page appears.
You can also use the Saved Searches function in Oracle iSupport to assist subsequent searches.
For more information, see the Oracle iSupport User Guide.
Third Party Flows
The service centers interface with the third parties to execute many of customer's service requirements. They track the movement of products, work and financial obligation between all the parties involved in executing a service.
The functions for managing service operations across multiple parties consists of the following:
-
Third Party Logistics for Repairs
-
Invoice Third Party
-
Supplier Warranty Claims
-
Invoice Third Party
Third Party Logistics for Repairs
Broken products, serviced products, and exchanges are moved and tracked between service organization, customer, and third parties. The Depot Repair application supports the following models of third party repair logistics:
-
Ad hoc Repairs
A service organization manually creates orders to ship items to a third party or RMA items back from a third party. Outside processing orders for repair service are automatically generated from jobs.
-
Cross Dock Repairs
A service organization sends broken customer product out for third party service immediately upon receipt. Depot Repair defaults the appropriate service vendor and ship to location based on customer defined disposition rules. Overdue returns trigger escalation notifications. Third party refurbishment status is tracked via workflow and/or iSupplierPortal.
-
Portal Repairs
A service organization provides a third party service shop with technician portal access. The third party views service orders assigned to them, update status, capture time and materials, and capture symptoms and root causes. The service organization keeps the service intelligence without exposing customer or pricing information to an outside party.
-
Control Tower Repairs
A service organization coordinates the service process without executing any service or fulfillment operations in house. Customer broken products are routed to third party service shops while exchanges are sourced from OEMs or third party distribution centers. Depot Repair defaults the appropriate service vendor, and ship from inventory based on customer defined disposition rules. Overdue returns and refurbishments trigger escalation notifications. Third party refurbishment status is tracked via workflow and/or iSupplierPortal.
Setting Up Repair and Return with Third Party
-
Navigate to the Service Types page. The Service Type Summary region displays the existing service types in the system.
-
To create a new service type, click the New icon on the menu option.
-
Enter the required information in the following fields:
-
Service Type: Enter the name of the service type.
-
Description: Enter description of the service type.
-
Business Process: Select Depot Repair from the list of values.
-
Service Mode: The default value is Work In Process. The other available options are Task Mode and None.
Note: You must select WIP Mode to use the Technician Portal.
-
Service Type Ref: It defaults if you select a seeded Service Type.
-
Third Party Ship and RMA: Select the Ship and RMA Service Activity Billing Types from the list of values.
The list of values displays the Service Activity Billing Types, which are setup in the Charges setup windows. These values must be associated with a third party RMA line and third party Ship line to indicate what OM line types to use, what operating unit to associate them with, what contract entitlements apply, and so on.
You must set up the Service Activity Billing Types under the Pre-Service and Post-Service columns in order to have a RMA line under pre-service, and a Ship line under post-service.
-
Third Party checkbox: Selecting the check box creates a third party ship and RMA line at time of service order creation if a Service Activity Billing Type is selected in the Third Party RMA and ship columns. If a Service Activity Billing Type is selected for the Ship column but not the RMA column, only a ship line will be created at time of service order creation. Likewise, if a Service Activity Billing Type is selected for the RMA column but not the Ship column, only an RMA line will be created at time of service order creation.
If the third party flag is not checked, no Third party lines will be auto-created, even if service activities are entered in the Third Party Ship and RMA fields.
Note: A service type having third party lines can also have regular lines, provided the Service Activity Billing Types are set up for them in their respective columns.
-
-
Click Save.
-
In the Service Type Details region, enter Service Activities in the Material, Labor, and Expense tabs. This is optional and is required only when a customer creates Estimate or Actual lines. They are not needed if no billing is done in Estimates or Actuals.
-
Select Automatically enter and book RMA, and Automatically ship through options for third party shipments. This is optional and depends on the business process of the service center. You can use any of the following options: auto-create, auto-enter, or auto-book. Automatically process through option enables the ship lines to create a charge line, or enter an unbooked line in OM, or book a line in OM.
This is optional and depends on the business process of the service center.
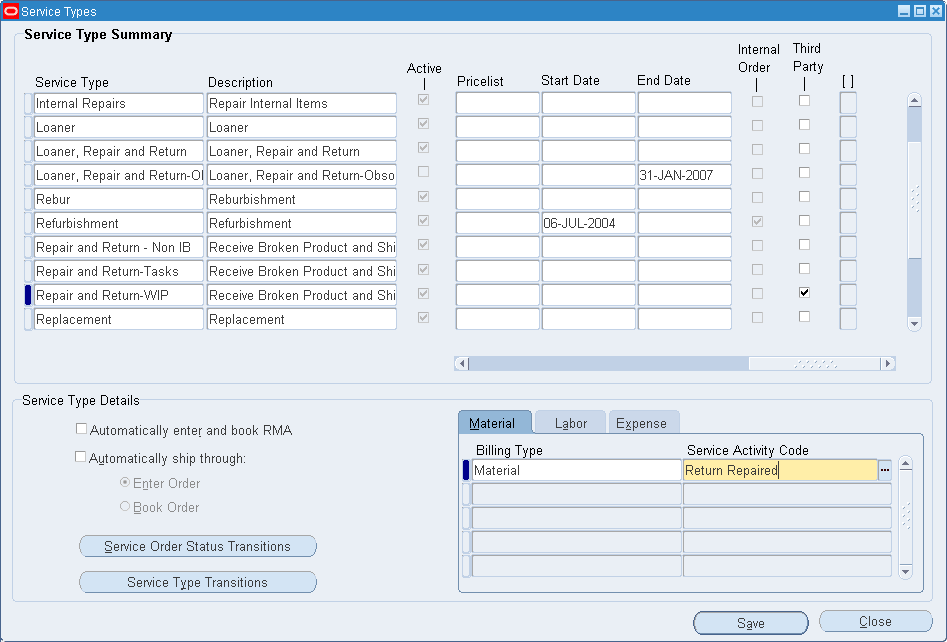
-
Click Save. Close the Service Type form.
-
Navigate to the Service Orders page.
-
Create a new Service Request.
-
Create a new Service Order.
-
Click Save.
-
Navigate to the Logistics tab.
You can view four lines in the Action Type column. Return and Ship lines for regular repair and return and Ship Third Party and Return Third Party lines for third party (RMA and Ship).
-
Receive the item in inventory. For more information, see: Auto-Receive an Item.
-
Select the row to ship an item to the third party and select the Process Trans check box.
-
The third party account field should have defaulted at time of ship line creation if the disposition rules were set up correctly. You cannot change the account if the line is set to automatically book. Click the Ship radio button.
-
Click the Process button. Item is shipped to the third party for repair and the status of the line shows Shipped.
-
Receive the item from third party using third party RMA line. Item is received from third party and the status of the line changes to Received.
-
Ship the item back to customer through regular ship line.
Invoice Third Party
Depot Repair allows sending service invoices to a different party from that which logged the service request. Invoices can be sent to multiple parties for a single service order.
Updating the Invoice Third Party Flow
-
Navigate to the Depot Workbench and query for a service order.
-
Click the Actuals tab. The tab displays the following information:
-
The Total column reflects the total charges associated with the service order if the Actual Lines are billed to more than one party.
-
The Default Bill To Account, Party, and Address default from the information entered on the Service Request.
-
You can set the CSD: Default Actuals Account from Customer Account profile option to Yes to default the customer account information in the service request header to the Account field.
-
You can change the default information. Changing the Default Bill To Account, Party, and Address will not impact the already created lines. It will impact the lines created after the change.
-
-
Click the Line Details button to navigate to the Actual Line Details page.
The Actual Line Details page displays the following information:
-
Bill To Account, Party and Address details for each corresponding line, default from Actuals tab.
-
You can update the Bill To Account, Party or Address fields if you choose to bill a different party, account, or address than that specified on the Service Request for a specific charge line.
-
Supplier Warranty Claims
Organizations performing services on products manufactured by other companies need a mechanism for reporting and settling warranty claims with the Original Equipment Manufacturers (OEM) or suppliers. The mechanism consists of the following:
-
Send Claim to Supplier
Depot Repair enables you to capture claim data and trigger the claim submission workflow. Multiple claims can be made against multiple vendors per service order. The OM Line Flow is used as the mechanism for triggering communications between a repairer and a supplier. The standard Accounts Receivable invoice that OM generates is used for settling third party claims.
-
Track Approval Status and Claim Number from Supplier
Depot Repair provides fields to capture the supplier warranty claim number and warranty claim status from the supplier's claim management system. Multiple claim numbers and statuses can be tracked per service order.
Capturing Warranty Claim Information
-
Navigate to the Depot Repair Workbench and query for a service order.
-
Click the Actuals tab.
-
Click the Line Details button to navigate to the Actual Line Details page.
-
To capture warranty claim information, select the Warranty Claim checkbox in the Actual Line Details region.
-
Enter the Number and Status for the warranty claim. These fields are non editable if you do not select the Warranty Claim option.
-
Select a Replaced Item from the list of values. Replaced item shows list of items belonging to the Organization. The replaced item information is sent along with the warranty claim information.
-
Click Save.
Execute Outside Processing
A service technician can trigger the creation of a purchase order for outside processing by completing an Outside Processing (OSP) operation in the Technician Portal. See: Outside Processing, Oracle Work in Process User's Guide.
Select Service Parts from Dynamic Repair BOM Window
Depot Repair provides a new region in the Technician Portal to enable a technician to view any bill of materials, or alternate bill of materials. The Technician Portal also enables the technician to choose a routing. The technician can check off the removed, replaced, or serviced parts. You can add the selected parts first to a estimate, and then create a job from the estimate.
Select Repair BOM
The Dynamic Repair BOM screen enables the technician to quickly capture the parts required for a service. Upon completion of the inspection, the selected parts are automatically added to the service order estimate.
-
Navigate to the Depot Repair Workbench and query an item.
-
Click the Estimate tab on the Service Order page.
-
Select the Select Materials button to navigate to the Expanded BOM window.
-
In the Search region, enter a valid BOM item in the Item field or select an item from the list of values. You can also select an Alternate BOM from the list of values.
-
Click Go. The Select From BOM Hierarchy regions displays those items in the BOM hierarchy which have billing type as Material defined in Inventory Item Master.
-
Select the BOM components required in the service. These materials appear as new estimates lines on the Estimates tab at completion of triage.
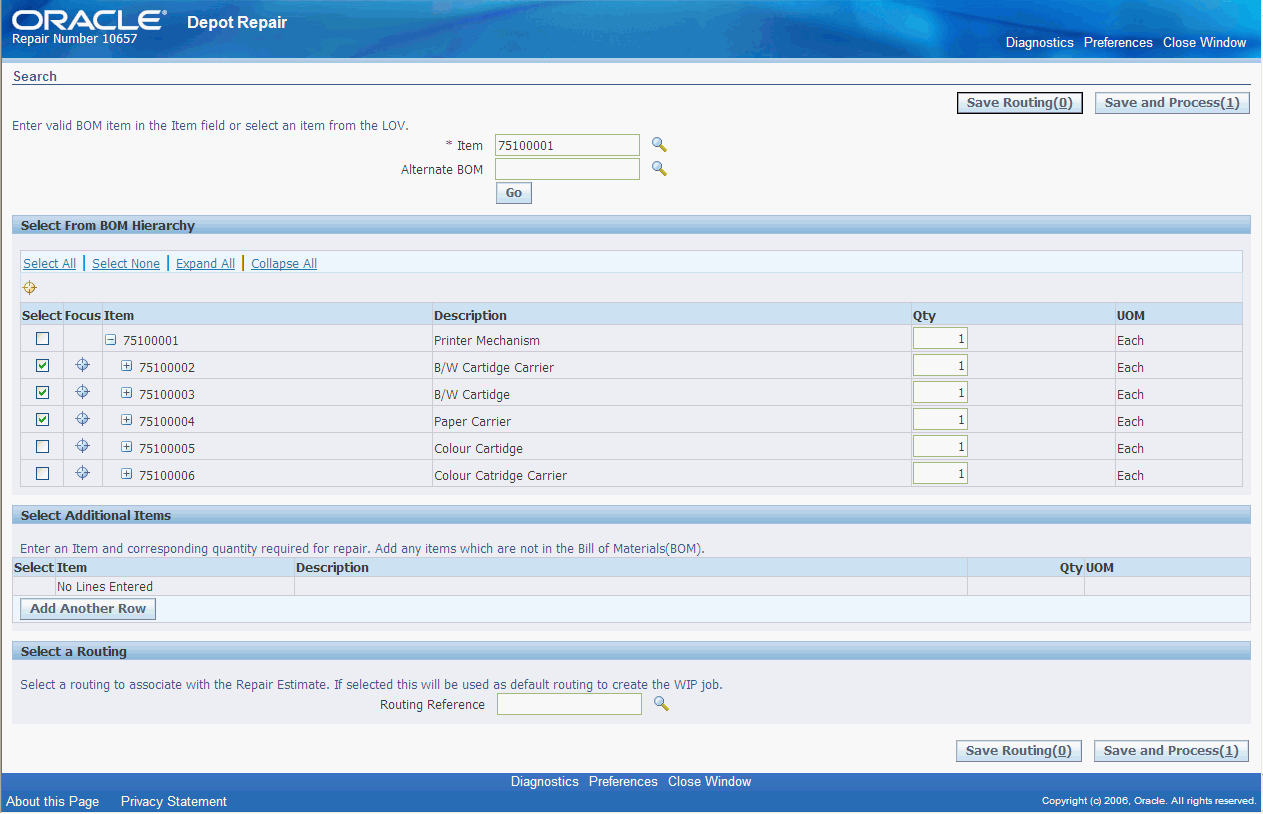
-
The Select Additional Items region enables you to enter an Item and corresponding quantity required for service. Add any items which are not in the existing BOM.
-
You can select a routing to associate with the Estimate in the Select a Routing region.
Note: You can save only a single Routing at one time, and that Routing can only be viewed on the Select Material window. You can modify the saved routing if required. The routing is used to create a job from estimate.
-
Click the Save and Process button to commit the selection of desired components. Close the window.
-
Click OK on the alert to trigger the refresh in the Estimate tab.
-
The following values default for Estimate lines created from the Expanded BOM window:
-
Source Type: Repair BOM
-
Billing Category: Material
-
Contract Number: Use the contract associated to the service order if a contract exists
-
Price list: Default the Price lists selected on the Details tab

-
Create Job from Estimate
Once the estimate is created, a service manager works with the customer to approve the estimate. After the approval of the estimate, the service manager initiates the service by generating a job from the estimate.
To create job from estimate
-
Select the Create Job button on the Estimate tab.
Clicking the Create Job button initiates and follows the process flow outlined in the section Jobs tab.
Note: The Submit Job button and the Select Materials button appear only if the function to view these buttons is granted.
Print Traveler Document
Depot Repair provides an out-of-box traveler document to enable the service technicians to scan in maximum data thereby reducing the time consumed in data entry. Traveler documents allow easy identification and disposition of items in the service shop. Bar coded serial numbers and service order numbers allow technicians to quickly find service records without typing.
To print a traveler document:
-
Navigate to the Depot Repair Workbench.
-
Create a Service Order or retrieve an existing service order.
-
Select the Print Traveler option from the Data menu.
This command prints the traveler.
Depot provides a standard traveler format, and also a barcoded traveler, both of which can be tailored to a customer's preferences using XML Publisher.
View Service Bulletins using Depot Repair Workbench
Depot Repair automatically links a service bulletin to a service order based on customer defined service bulletin rules. A number of predefined bulletin types are seeded in the product. You can add any additional bulletin types to fit your business needs. You can view service bulletins from the Depot Repair Workbench.
The Depot Repair Workbench enables the service managers, coordinators, billing clerks, and other users to view service bulletins. The Depot Repair Workbench is enhanced to allow a user to view the service bulletins associated with a service order from the Workbench.
To view a service bulletin from the Depot Repair Workbench
-
Navigate to the Depot Repair Workbench.
-
Create a Service Order. Alternatively, you can search and retrieve an existing service order.
The Service Orders page opens.
-
Click the View Service Bulletins option from the Data menu.
The Service Bulletins page opens.
-
The Service Bulletins page displays the existing service bulletins if the Retrieve Service Bulletins concurrent program is running. Click Retrieve New Service Bulletins button to display any additional new service bulletin.
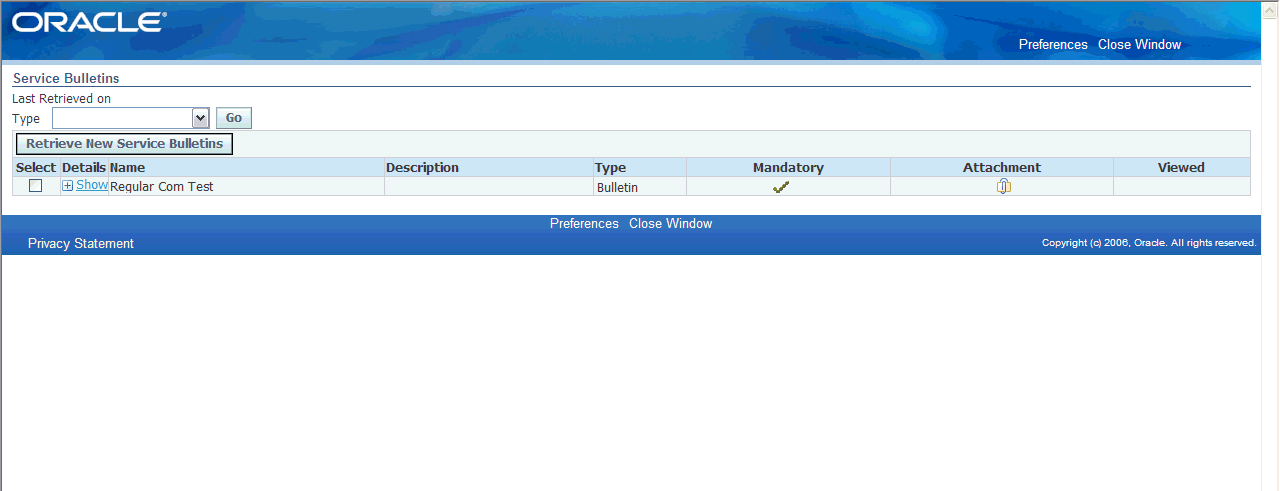
-
Select the service bulletin and click Show to display the service bulletin details.
Related Topics
Define Triggers for Service Bulletins
View Service Bulletins from the Technician Portal
Service Order Orchestration
Service Order Orchestration enables users to track important related events that occur in other functional domains during the processing of a service order. The related cross-domain documents currently supported are:
-
Shipping Delivery Line
-
Internal Sales Order
-
Internal Requisition
-
Job
-
Purchase Requisition
-
RMA Line
-
RMA Line - Third Party
-
Ship Line
-
Ship Line - Third Party
-
Service Request
-
Service Request Task
Using the Service Order Orchestration page:
The Service Order Orchestration page displays the details of a service order and the numbers and status of the documents related to this service order. Service order details and document statuses can be refreshed by using the Refresh Status and Refresh All Statuses buttons on the page or via the Depot Repair Service Order Orchestration concurrent program.
To open the Service Order Orchestration page in the Depot Workbench, query and open a service order and select the option to Launch Service Order Orchestration from the Data menu.
Alternatively, you can launch the Service Order Orchestration page from the Technician Portal. See: Launching Service Order Orchestration in the Technician Portal.
Defining Service Order Orchestration Rules:
You can define service order orchestration rules in an organization using the Service Order Orchestration Rules page. You can set up rules to trigger a Service Order status change and/or a PL/SQL action when events (status changes to related documents) occur. The currently supported events are:
-
Shipping: Delivery Line Status Change
-
Order Management: Internal Sales Order Line Status Change
-
Internal Requisition: Internal Requisition Status Change
-
WIP: Job Status Change
-
Purchase Requisition: Purchase Requisition Status Change
-
Order Management: RMA Line Status Change
-
Order Management: RMA Line - Third Party Status Change
-
Order Management: Ship Line Status Change
-
Order Management: Ship Line - Third Party Status Change
-
Service Request: Service Request Status Change
-
Service Request Task: Service Request Task Status Change
Following are the non-document related conditions that can be used in addition to existing defaulting rule conditions:
-
Job Operating Unit
-
Job Country
-
Service Order Status
-
Service Order Priority
-
Service Order Owner
-
Service Order Contract
-
Service Vendor (for third party services)
-
Pre and Post Update Status of Each Document Type
View Read Only Workbench
Oracle Depot Repair provides the ability to launch the Depot Workbench in read-only mode. The Depot Workbench provides numerous data and functionality that is not specific to any specific user type. It provides functions to service managers, service representatives, receiving clerks, shipping clerks, billing clerks and many more. The read-only mode allows you to access data that they need but restricts them from performing functions outside of their purview.
To view the Depot Workbench in read-only mode, set the profile option, CSD: Read Only Workbench, to Yes.
To Access a Read-only Depot Workbench
-
Navigate to the Depot Workbench. The Workbench launches in read-only mode. You can only view data, but not execute any functions.
-
The read-only mode allows you to click certain buttons and view menu options. The disabled functions/buttons are:
-
Create new service request
-
Create new contact
-
Create new service order
-
Create Note - Details Tab
-
Change Status - Details Tab
-
Counters - Details Tab
-
Configuration - Details Tab
-
Process Transaction Checkboxes - Logistics Tab
-
Process Transaction Through Checkbox - Logistics Tab
-
Process button - Logistics Tab
-
Receive - Logistics Tab
-
Ship - Logistics Tab
-
Create Job - Jobs Tab
-
Create Task - Tasks Tab
-
Capture Quality Plan - Tasks Tab
-
Create Estimate, Estimate Line - Estimates Tab
-
Create Job from Estimate - Estimates Tab
-
Submit Actuals - Actuals Tab
The disabled menu items are:
-
Reserve/Un-reserve Serial Number
-
Split Service Order
-