Service Manager Portal
This chapter outlines the broad set of capabilities that a service manager performs in the course of normal service center operations.
This chapter covers the following topics:
- Overview
- Service Manager Portal Page
- Using the Service Order Backlog region
- Using the Quality Event Watchlist region
- Using the Advanced Search page
- Using the Batch Create Jobs region
- Using the Create Service Order page
- Setting Up Aging Threshold
- Setting Up Quality Threshold
Overview
The Service Manager Portal provides the ability to monitor and manage the return center from a single screen. The Portal provides instant visibility to bottlenecks and process exceptions and allows you to manage the exceptions quickly. It allows a manager to:
-
Monitor and report product quality issues:
Managers set quality thresholds for an item regarding the number of services during a specified time. The system triggers workflow notification when the quality thresholds exceed.
-
Monitor and manage work backlog and resources:
Managers allocate resources to ensure that the highest priority work is done first and all the work is completed on time. Managers set aging thresholds for how long services are open or in the same status without changing. System triggers notification for the ones passed aging thresholds and due dates.
-
Monitor and manage processing exceptions and escalations:
Managers monitor work orders needing attention or approval and drill down to the details of respective service orders. Managers update service orders to remove escalations, change ownership, change priority, and so on.
-
Create, update and search service orders:
Managers create new service orders and/or update existing service orders. Managers can perform a mass-update of ownership, priority, due date, and other values on service orders. Additionally, they can search existing service orders and save the search queries, if required.
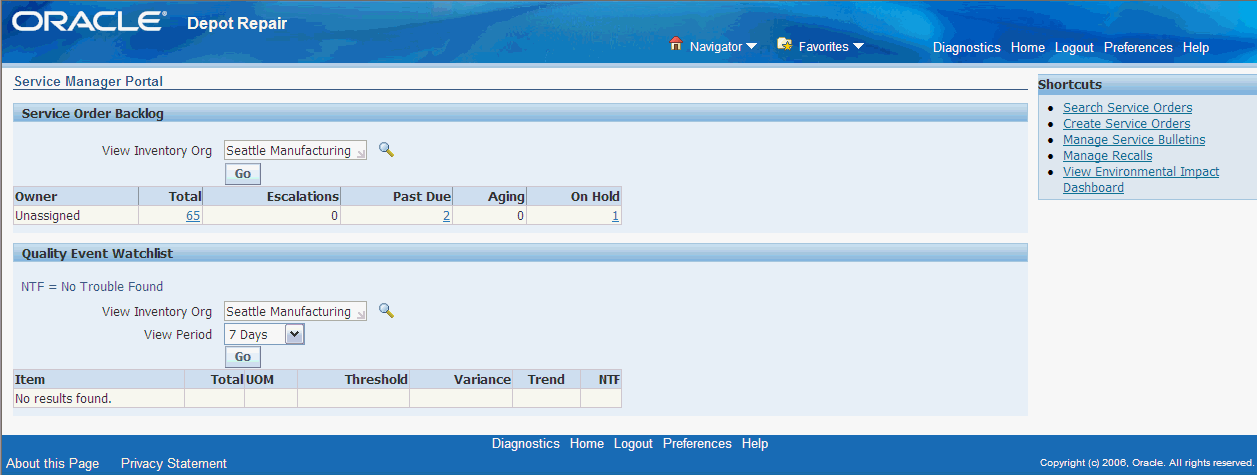
Service Manager Portal Page
The header of the Service Manager Portal page is the Service Order Backlog region and the footer is the Quality Event Watchlist region. Additionally, you can use the Shortcuts section to navigate to the Search Service Orders page, Create Service Orders page, and Manage Service Bulletins page.
For more details on the regions, select one of the following:
Using the Service Order Backlog region
A Service Order Backlog region is a summary table that indicates for each of the resources how many service orders they own, how many are escalated, past due, aging or on hold.
The Service Order Backlog region displays the following information:
-
View Inventory Org: Displays the default organization to which you belong based on your user profile organization. You can choose other organization if required.
-
Owner: Displays the resources that are assigned the service orders.
-
Total: Displays the number of service orders for the owner in total.
-
Escalations: Displays the number of escalated service orders for the owner.
-
Past Due: Displays the number of past due service orders for the owner.
-
Aging: Displays the number of aged service orders for the owner.
-
On Hold: Displays the number of service orders for the owner that are on hold.
All the non-zero numerical entry in the columns mentioned above is hyperlinked. Click any hyperlink to navigate to drill down to a details table for any resource or category combination.
Using the Quality Event Watchlist region
A Quality Event Watchlist region is summary table that indicates how many of each item type are returned for a selected organization and time period. Additionally, this region indicates a preset threshold for returns in a selected period and an indicator of whether the number of returns is trending upward or downward from the prior period. You can drill down to a details table for any item.
The Quality Event Watchlist region displays the following information:
-
View Inventory Org: Displays the default organization to which you belong based on your user profile organization. You can choose other organization if required.
-
View Period: Defaults to 7 days. You can select any value for the view period.
-
Item: Displays the items returned.
-
Total: Represents the number of service orders for the item during the selected period.
-
UOM: Unit of measurement of the item.
-
Threshold: Displays the quality threshold for each item as defined in the Quality Threshold Setup table. As the period changes the threshold updates to match the selected period.
-
Variance: Indicates the difference between Total and Threshold. Has plus or minus prefix. Red for plus, green for minus.
-
Trend: The indicator displays whether the number of service orders has increased, decreased or stayed the same relative to the prior time period. Red arrow indicates increase, green arrow indicates decrease, and black line indicates same as prior period.
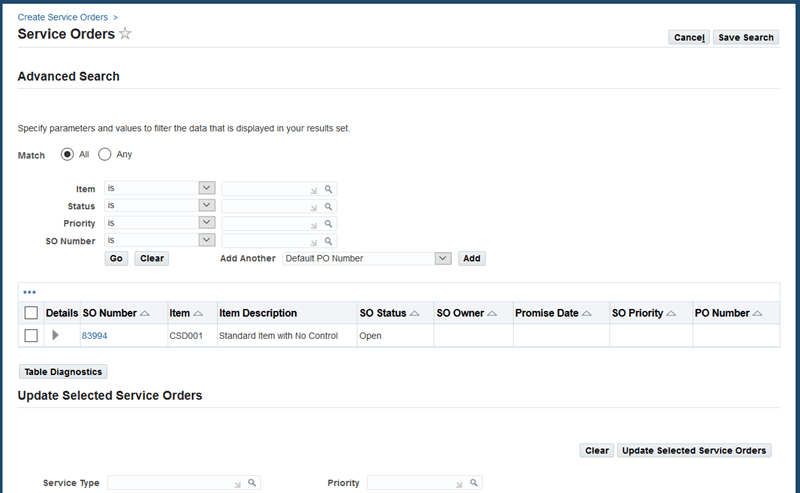
Using the Advanced Search page
The Advanced Search page provides advanced search capability to search service orders using dynamic queries with many different search criteria.
You can navigate to the Advanced Search page in the following ways:
-
From the Service Order Backlog region:
Click any numeric hyperlink on the Total, Escalations, Past Due, Aging, or On Hold columns to navigate to the Advanced Search page. This page displays pre-populated data for the Owner/column combination you choose. Click a service order hyperlink to drill down to the Technician Portal and see the details of that service order.
-
From the Quality Event Watchlist region:
Click the numeric hyperlink on the Total column to navigate to the Advanced Search page. This page displays pre-populated data for the Item/column combination you choose. Click a service order hyperlink to drill down to the Technician Portal and see the details of that service order.
-
From the Shortcuts panel:
Click the Search Service Orders link on the right hand panel on Service Manager Portal to navigate to the Advanced Search page.
The Advanced Search page enables you to perform a search using the following criteria:
-
Item
-
Status
-
Priority
-
SO Number
-
SO Owner
-
Service Request
-
External Reference
-
Job Exists
-
PO Number
Advanced Search results area displays the information based on the search criteria already mentioned. In addition, some columns are displayed:
-
The Job Name column displays the job from WIP. If no job exists, this field is null. If more than one job exists, all Job Names are displayed separated by commas.
-
The Internal Orders column displays the internal order, if any, for a service order. This column is hidden by default. Once this field is enabled, you can drill down to the Internal Move Orders page.
Update Selected Service Orders region
The Update Selected Service Orders region enables you to select one or more service orders and perform mass update of attributes like ownership, priority, due date, and other values on service orders.
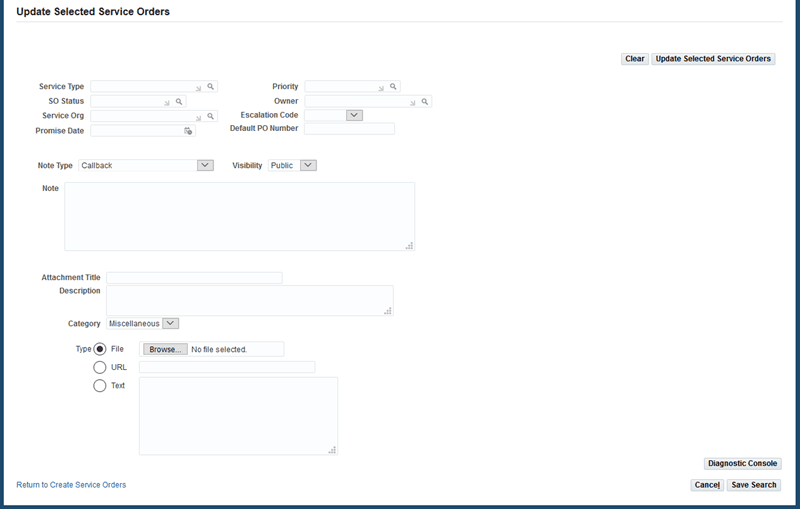
The Update Selected Service Orders region displays the following information:
-
Service Type: Contains a list of values of the user-defined Service Types. Service type requires that both the old and new service type allow the current service order status.
-
Service Status: Status of the Service Order. Service Status can only be updated to a status which has a valid transition defined from the current service order status on the service order.
-
Service Org: Enter the organization to search.
-
Priority: Priority of the service order.
-
Owner: Depot resource responsible for execution and completion of the service.
-
Escalation Code: Indicates whether the service order is escalated, and if so, what type of escalation it is.
-
Promise Date: The promised date of the service order.
-
PO Number: The purchase order number.
-
Note Type: Limited to Service Order Note Types.
-
Visibility: Indicates whether the Note is public or private.
-
Note: Enter the desired note.
-
Attachment Title: Title of the attachment.
-
Description: Description of the attachment.
-
Category: Indicates the category to which an attachment belongs.
-
Type: Type of attachment.
To update selected service orders:
-
Select the service orders you want to update from the Advanced Search results table.
-
Enter the changes in the Update Selected Service Orders region.
-
Click Update Selected Service Orders button to process your request.
A confirmation message on mass update appears at the top of the Advanced Search page.
Using the Batch Create Jobs region
The Batch Create Jobs region contains a set of job-related parameters and a Create Jobs button that enables you to create a new job for each service order in the selected set of service orders. You can select the set of service orders using the Advanced Search capability.
This region is hidden by default. You can enable this region via Personalization.
The Batch Create Jobs region displays the following information:
-
Inventory Org: Specifies the Inventory Org in which a batch of jobs is to be created. This field is mandatory for all jobs.
-
Item: Specifies the item on the job header and the item that is completed when the job completes. The Item list of values is restricted based on the selected Inventory Org. If you clear the Inventory Org field, the Item field gets cleared simultaneously.
-
Job Type: Specifies the job type.
-
Job Status: Allows batches of jobs to be created in Released, Unreleased or On-hold status based on the profile CSD: Default Repair Job Status. If no value is entered in this field, the system assumes that jobs are created in Released status.
-
Job Priority: Specifies the job priority
-
Accounting Class: Specifies which Accounting Class to associate with each created job. This field is mandatory.
-
Start Date: Specifies the Start Date for each job created in the batch. This field is mandatory. The Start Date field always defaults to system date.
-
Complete Date: Specifies the Complete Date for each job created in the batch. This field is optional.
-
Template: Allows you to specify whether to use a service code, BOM & routing or no BOM & routing when creating a job. Selecting the Service Code option displays the Service Code field and hides the BOM and Routing fields. Selecting BOM and Routing option hides the Service Code field and displays the BOM and Routing field. Selecting No BOM or Routing option hides all fields.
-
Service Code: Allows you to specify the service code to use when creating jobs.
-
BOM: Allows you to specify a BOM to use when creating a batch of jobs. You can select the BOM or BOM+Alternate.
-
Routing: Allows you to specify a routing to use when creating a batch of jobs. You can select the routing or routing+Alternate.
-
Create Button: Triggers the program to batch create jobs. It uses the entered parameters to create the jobs. Once completed, the program refreshes the list of selected service orders with the newly created job names.
-
Clear Button: Removes all data (including defaulted data) from the parameter entry fields.
Using the Create Service Order page
The Create Service Order page enables you to create multiple service orders at a time. You create service orders using bulk serial number capture or quick entry of item and serial. Defaulting Rules apply to service orders you create on this page.
Click Create Service Orders link on the right panel of Service Manager Portal to navigate to the Create Service Order page.
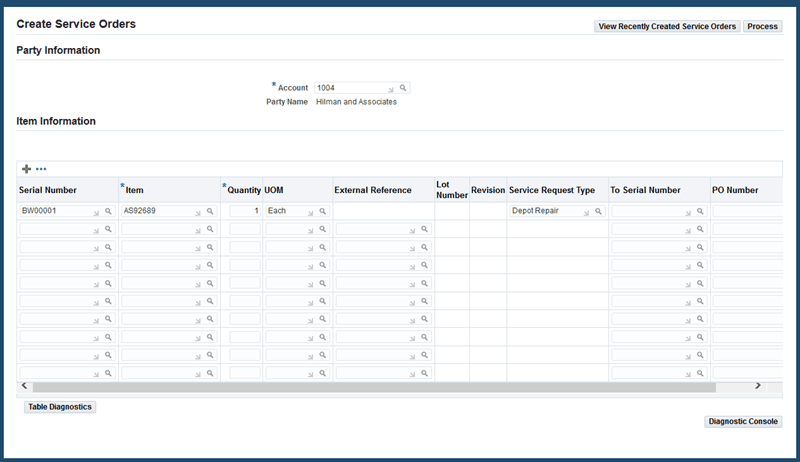
This page displays the following information:
-
Party Information region:
-
Account: Enables you to query for Party.
-
Party Information: Displays the party name for the selected account.
-
-
Item Information region:
-
Serial Number: Enter a single serial number or enter the first serial number in the range.
-
Item: Select the item.
-
Quantity: Enter the quantity.
-
UOM: Enter the unit of measure.
-
External Reference: Capture unique external reference number, if any.
-
Lot Number: Enter the lot number for a lot controlled item.
-
Revision: Enter the revision number for a revision controlled item.
-
Service Request Type: Enter the type of service request. You only need to enter this once, because the service request type you enter on the first row will apply to all service orders that are created in the same batch.
Note: You can use defaulting rules to enable the service request type to default. If more than one service order item is entered during mass create service orders, then the first service order item is used to determine the default service request type. However, if you specify a service request type, then it will override the defaulting rules. The Service Request Type field will only default if no service request type is specified in the field.
-
To Serial Number: Enter the final serial number in the range.
-
PO Number: Enter the purchase order number.
-
-
View Recently Created Service Orders: Displays the details of the recently created service orders. Click this button to navigate to the Advance Search page to search and view service orders and update selected service orders. For more information, see Using the Advanced Search page.
-
Process: Processes the creation of new service orders.
Defaulting rules apply to creation of service orders the same way as it is applied when creating service order from Depot Workbench.
You can also use this page to automatically create internal move orders for the items entered. For more information, see Oracle Depot Repair Implementation Guide.
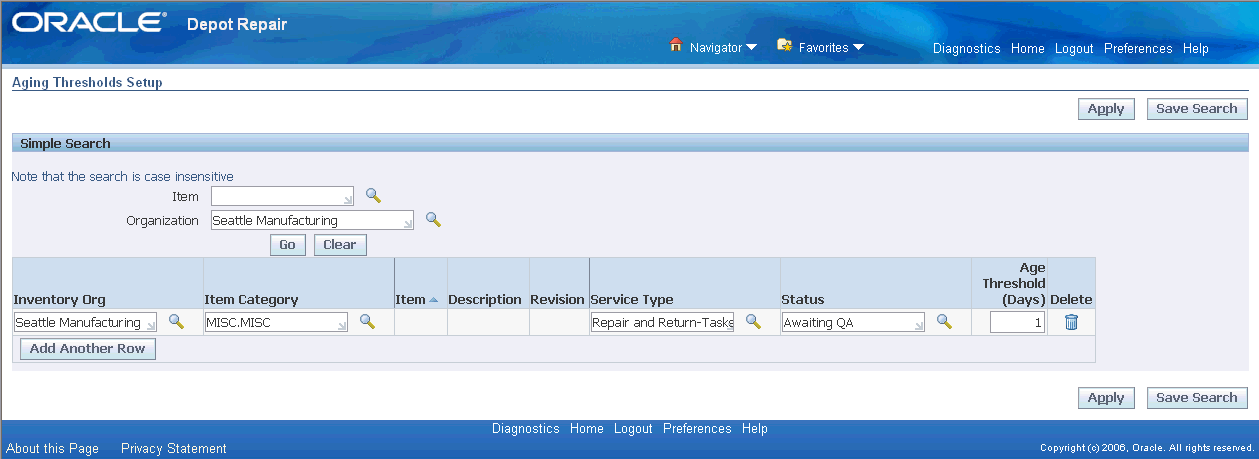
Setting Up Aging Threshold
Aging is defined as the amount of time from service orders creation or the amount of time that a service order is in a specific status. Aging is related to elapsed calendar time and not to actual service time. The unit of measure (UOM) for aging is time-bound, for example, days, hours, minutes, and so on.
To set up aging threshold
-
Navigate to the Aging Thresholds Setup page from the Depot Repair Setup menu.
-
Select an organization. To search for an existing aging threshold go to step 3 or continue to step 4 to set up a new aging threshold.
-
Click Go to search for an existing aging threshold in the selected organization.
-
Click the Add Another Row button to enter aging threshold details.
-
Enter the following information:
-
Inventory Org: Displays the default organization to which you belong based on your user profile organization.
-
Item Category: Select the item category.
-
Item: Select the item.
-
Description: Describes the item.
-
Revision: For revision-controlled items, you can optionally specify thresholds to specific revision number.
-
Service Type: Specifies the service type for which age threshold applies.
-
Status: Specifies the status to which age threshold applies.
-
Age Threshold (Days) : Specifies the number of days at which a service is considered aging. It must be a positive value (>0).
-
Delete: This icon deletes an aging threshold entry.
-
-
Click Apply to record the new aging threshold.
A confirmation message appears on the top of the page.
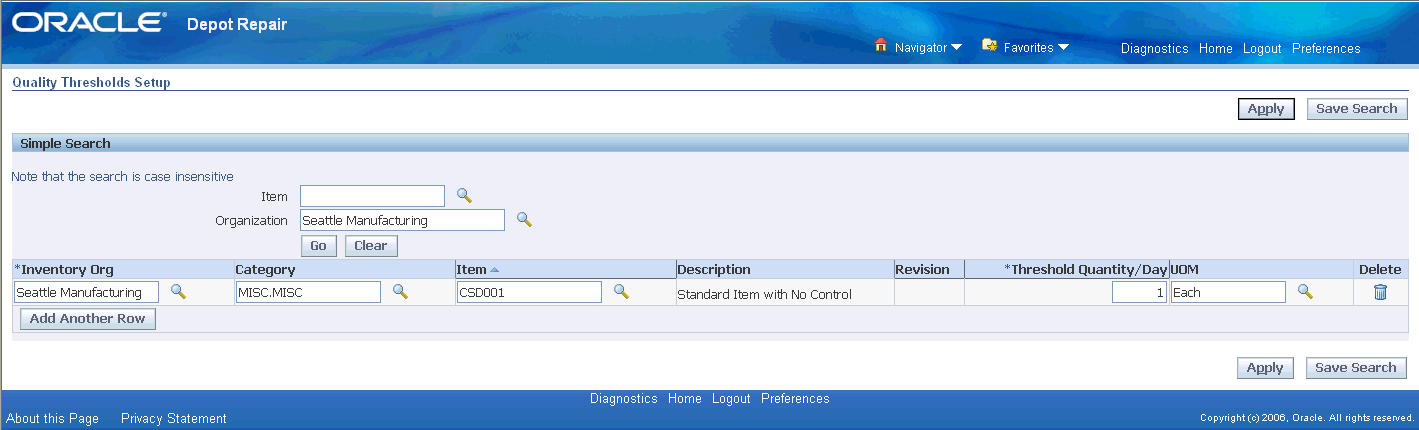
Setting Up Quality Threshold
Quality thresholds setup page enables you to create item record and corresponding quantity per day. Use quality thresholds to set how many items can be returned per day.
To set up quality threshold
-
Navigate to the Quality Thresholds Setup page from the Depot Repair Setup menu.
-
Select an organization. To search for an existing quality threshold go to step 3 or continue to step 4 to set up a new quality threshold.
-
Click Go to search for an existing aging threshold in the selected organization.
-
Click the Add Another Row button to enter aging threshold details.
-
Enter the following information:
-
Inventory Org: Displays the default organization to which you belong based on your user profile organization.
-
Category: Select the item category.
-
Item: Select the item.
-
Description: Describes the item.
-
Revision: Active only for revision-controlled item.
-
Threshold Quantity/Day: Represents the number of returns per day at which a service is considered a quality event. It must be a positive value (>0).
-
UOM: Describes the item's unit of measurement.
-
Delete: This icon deletes a quality threshold entry.
-
-
Click Apply to record the new quality threshold.
A confirmation message appears on the top of the page.