Entering Usage Lines
This chapter describes the process of how to enter usage lines and charge customer for a contract.
This chapter covers the following topics:
- Overview of Entering Usage Lines
- Charging a Customer for Usage
- Entering a Usage Line
- Specifying How the Customer Is Charged
- Charging Based on a Fixed Quantity of Usage Regardless of the Actual Usage
- Charging a Flat Fee Regardless of the Actual Usage
- Charging for Reported or Estimated Usage Per Period
- Charging Based on Reported Usage
- Entering a Counter
- Entering the Starting Counter Reading
- Entering a Usage Group
- Creating Special Price Breaks
- Point and Range Price Breaks
- Deleting Special Price Breaks
- Prorating Price Breaks to Apply to Multiple Periods
- How Price Breaks Are Prorated
- Specifying a Billing Schedule for a Usage Line
- Recording Usage by Updating a Counter Reading
Overview of Entering Usage Lines
This group of topics explains how to charge customers for usage.
Charging a Customer for Usage
To charge a customer for usage, you must enter:
-
A usage item as a contract line. This is where the prices for usage are defined.
-
One or more counters as sublines. These track usage.
About Usage Items
The usage item specifies the price list and the price breaks that are used to charge the customer.
The application administrator sets up the usage items themselves as items in Oracle Inventory, and prices them using price lists in Oracle Advanced Pricing.
For example, a bank may create price breaks on the corporate price list that offers customers 10 free support calls per month and then charges $1.50 for each call. A copier distributor may set up a price list to charge customers based on the volume of copies made, for example, $0.05 for the first 1000 copies, charging $0.03 for the next thousand, and then $0.02 for copies greater than 2,000.
You can modify the pricing and the price break ranges for each contract.
Set the profile option OKS: Default Pricing Date For Usage Contracts to calculate the bill amount.
About Counters
The application records customer use within counters. These can represent real devices that measure usage such as a counter in a copier, automobile odometers, and electric meters. The counters can also be purely logical constructs that are used to record the number of phone calls to a call center, for example.
The application creates counters automatically each time you order a service or enter a customer product as an item instance in Oracle Install Base.
For example, if a bank's application administrator sets up the Gold service to track phone calls made to the call center, then each time you add the Gold service as a line in your contract, the application automatically creates a counter where the number of calls can be tracked. For physical objects, such as the copier, the application creates a counter that is linked to the Oracle Install Base instance.
Although the application creates counters automatically for you, for each usage line you must enter the counters that you want to use to charge the customer as sublines. This may be just one counter, to track phone calls to a call center or to charge for copies that are made on one printer, for example, or many counters to charge for the copies that are made in a building, for example.
You can enter actual usage into the counters manually. Service agents can enter counter readings in Oracle Service Contracts (see Entering the Starting Counter Reading), Oracle TeleService (see Recording Counter Readings in the Oracle TeleService Implementation and User Guide), and Oracle Field Service (see Recording Counter Readings in the Oracle Field Service User Guide). Customers can enter counter readings from a Web portal that is created with Oracle iSupport.
How Usage Lines and Counters are Entered
The following provides an overview of how to enter usage lines and counters:
-
If you are charging for usage as part of a service (for phone calls made to a call center, for example), then you must enter the service as a line in your contract first.
-
Enter the usage item as a line in the contract.
-
Enter the counters as sublines.
-
You identify counters that are attached to a service by the service name, the contract number, and the line number where you entered the service.
-
You identify physical counters by the inventory name of the product where the counter is located and by that product's serial number, the Oracle Install Base item instance number, or both.
Note: Because of the way counters are named, you can have only one counter per service line in a contract and one counter per item instance in Oracle Install Base.
-
You can specify various options on how to charge and bill the customer.
You can charge the customer for the actual usage that is recorded in the counter each month and have the application estimate any missing counter readings, for example, or you can charge a flat rate regardless of what the counter readings are.
You can also specify minimum amounts charged and the details of how customers are credited for any overcharges.
Entering a Usage Line
-
Create the contract with the Service Agreement or Subscription Agreement category.
-
Enter required information in the contract header and Summary tab.
-
If you are charging a customer for usage that is tied to a service that you are selling, enter the service line first.
-
Identify the prices and price breaks for the items that are set up within your organization.
To enter a usage line:
-
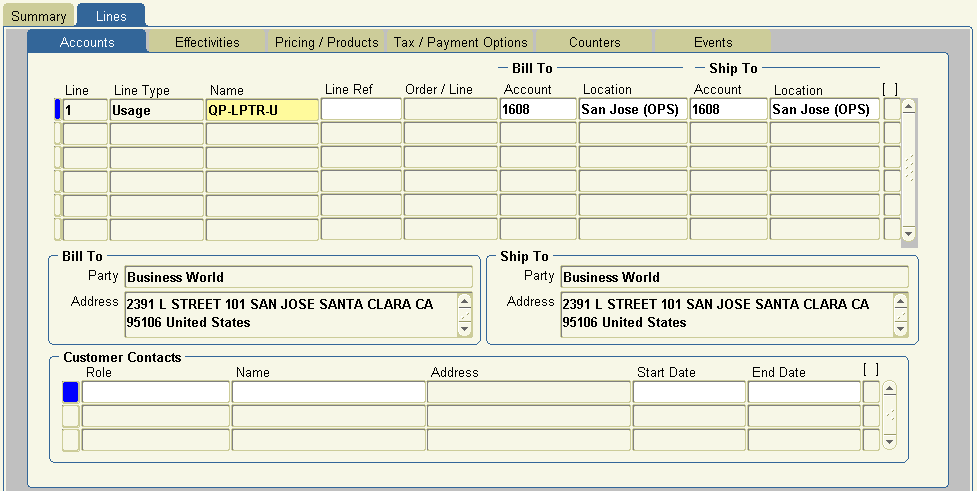
From the Service Contracts Authoring window, select the Lines tab and Accounts subtab.
-
Select Usage from the Line Type LOV.
-
Select the usage item from the Name LOV.
-
The party accounts that you selected on the Summary tab and Parties subtab appear as the Bill to and Ship to accounts. (The Account fields display the account numbers. The Location fields display the city. The account parties and addresses for those accounts appear at the bottom of the window.) You can select different accounts for this contract line using the LOVs that are provided.
-
Optionally, enter billing and shipping contacts that are specific to this contract line by following the procedure that is described in Entering Billing and Shipping Contact for a Contract Line. If a contact does not exist in the database, then you can add one by following the procedure that is described in Creating or Modifying a Contract .
The contacts that you enter are different from the ones that you entered in the contract header.
-
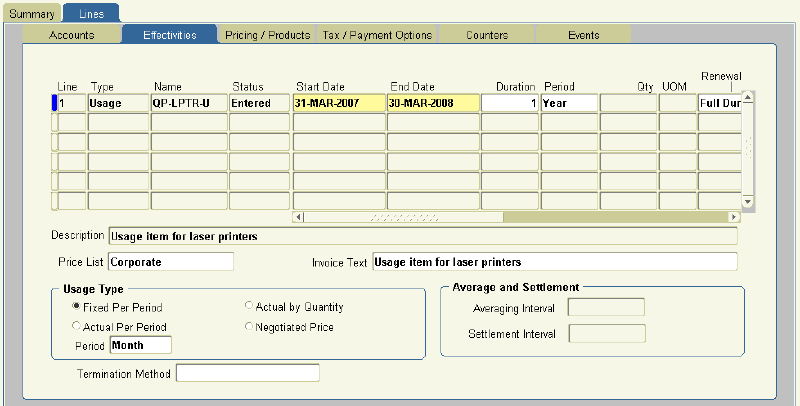
Select the Effectivities subtab.
-
The price list comes from the entry that you made on the Summary tab. Make sure that the price list that is displayed in the Price List field matches the price list that is used by the usage item.
-
Specify the duration of the usage line.
By default, the start date, end date, and duration are copied from the contract header.
You can specify different values by entering either of the following:
-
Start and end dates
-
Duration and period
The application calculates the missing information. If you supply a duration and period, then the start date is the start date of the contract.
Note: If the duration of the usage line starts earlier than the start date or ends later than the end date of the contract, then you must extend the start and end dates of the contract at the header level before you can make the contract active.
-
-
If the contract can be renewed (you have not selected Do Not Renew on the Summary tab and Renewals subtab), then specify how the line is to be renewed using the Renewal Type LOV. The renewal options are the same for usage lines as they are for service lines. See Specifying How a Contract Line is to Be Renewed.
-
Specify how the customer is to be charged and any counters that are required to capture the usage. Different ways of charging the customer require different combinations of entries in the Effectivities and Pricing/Products subtabs. See Specifying How the Customer is to be Charged.
-
The remaining information for a line comes from the information that you entered in the Summary tab. You can make modifications by following these procedures:
-
Save.
Specifying How the Customer Is Charged
You can charge customers in four different ways, depending on the selection that you make in the Usage Type region of the Lines tab, Effectivities subtab.

The following table lists the different methods and the selection that you must make for each.
| Method for Charging the Customer | Usage Type |
|---|---|
| For a fixed quantity of usage every period, regardless of the actual usage recorded | Fixed Per Period |
| A flat fee regardless of the actual usage recorded | Negotiated Price |
| For reported or estimated usage in each billing period | Actual Per Period |
| For usage whenever usage is reported | Actual by Quantity |
Follow the procedure corresponding to the method that you want to use:
Charging Based on a Fixed Quantity of Usage Regardless of the Actual Usage
You can charge a customer for making 100 phone calls to the call center, regardless of the number of calls that were actually made. The price that the customer pays for the 100 phone calls is determined by the usage item's price list and its price breaks.
Prerequisite
Enter a usage item.
To charge a customer based on a fixed quantity of usage regardless of the actual usage:
-
From the Service Contracts Authoring window, select the Lines tab and Effectivities subtab.

-
In the Usage Type Region, select Fixed Per Period.
-
From the Period LOV, select the period to use as the basis for the entries you will make.
-
Save.
-
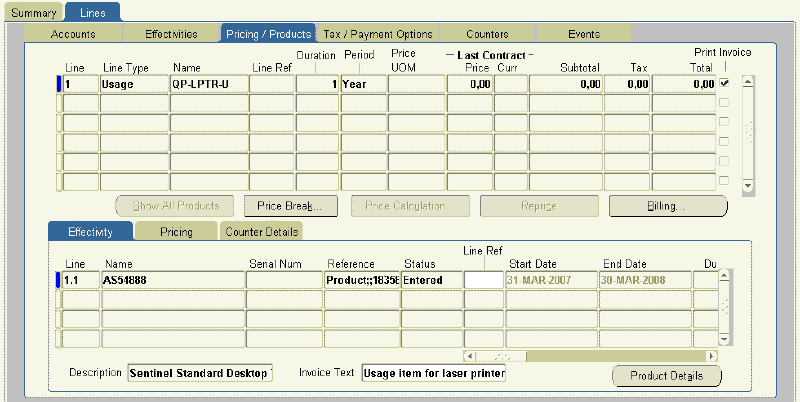
Select the Pricing/Products subtab.
-
Using the Name field LOV on the Effectivity secondary tab, enter the counter that is used to record the usage. See Entering Counters for details.
-
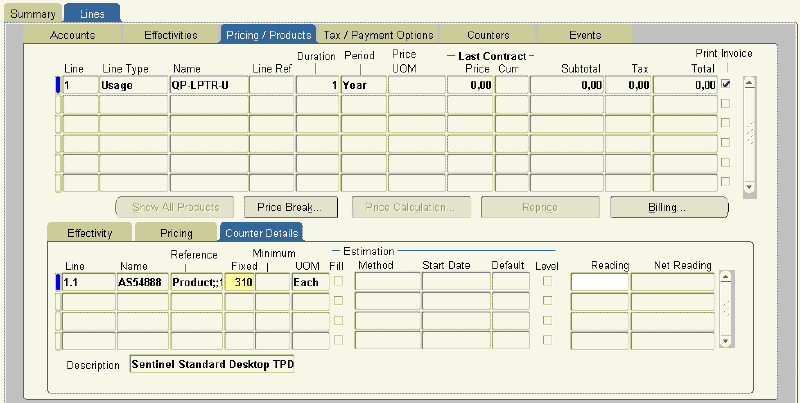
Select the Counter Details secondary tab.
-
Enter the quantity on which you are going to be charging in the Fixed field. The fixed quantity is based on the period that you selected on the Effectivity subtab. The period acts as a unit of measure for your entry.
Suppose that you are billing the customer monthly.
If you chose a year as the period, then entering 1200 here means that the customer is charged for the usage of 100 each month.
If you chose a month as the period and enter 1200, then the customer is charged 1200 per month.
-
Save.
-
Repeat steps 6 through 9 for each additional counter that you want to use to calculate usage.
-
Optionally, enter the counter reading to use to start calculating usage:
-
If you have already captured previous readings with this counter, then select the start reading from the Reading LOV. This LOV includes all historical readings for this counter.
-
If no historical reading is available to select, the application assumes the initial reading for the contract is 0. To enter another initial reading, follow the procedure that is described in Entering the Starting Counter Reading.
-
Charging a Flat Fee Regardless of the Actual Usage
You can charge a customer $100 for making phone calls to the call center, regardless of the number of calls that were actually made. In this case, the customer is charged the price that you enter here rather than the price in the price list.
Prerequisite
Enter a usage item.
To charge a flat fee regardless of the actual usage:
-
From the Service Contracts Authoring window, select the Lines tab and Effectivities subtab.
-
In the Usage Type Region, select Negotiated Price.

-
Save.
-
Select the Pricing/Products subtab.
-
Using the Name field on the Effectivity secondary tab, enter the counter that is used to record usage. See Entering a Counter for details.
-
Optionally, enter any text that you want to display in the invoice regarding this subline. Because invoice formats are specific to each implementation, contact your application administrator to determine whether this text is used in the invoice.
-
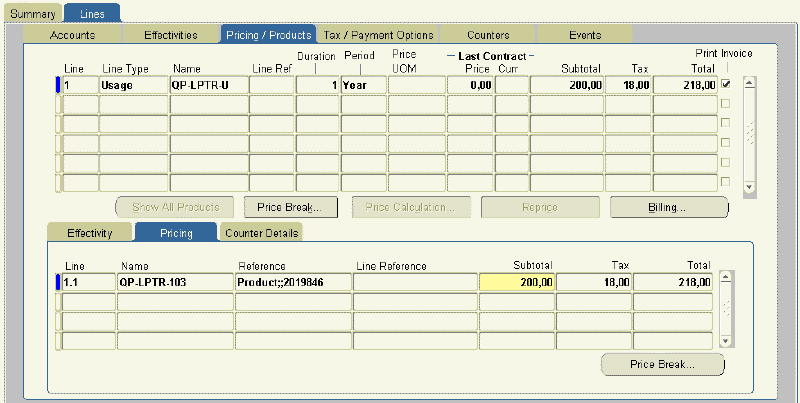
Select the Pricing secondary tab.
-
Enter the total currency amount on which you are going to be charging the customer in the Subtotal field.
-
Save.
-
Repeat steps 5 through 9 for all counters you are using to track usage for this usage item.
-
Optionally, enter the counter reading that you want to use to start calculating usage:
-
If you have already captured previous readings with this counter, then select the start reading from the Reading LOV. This LOV includes all historical readings for this counter.
-
If no historical reading is available to select, the application assumes that the initial reading for the contract is 0. To enter another initial reading, follow the procedure that is described in Entering the Starting Counter Reading.
-
Charging for Reported or Estimated Usage Per Period
You can charge the customer for actual or estimated usage within a period. This usage type permits you to have the application create an estimate for any missing or partial counter readings and bill the customer based on these estimates.
Prerequisites
-
Enter a usage item.
-
Confirm that billing is set to arrears.
To charge for reported or estimated usage per period:
-
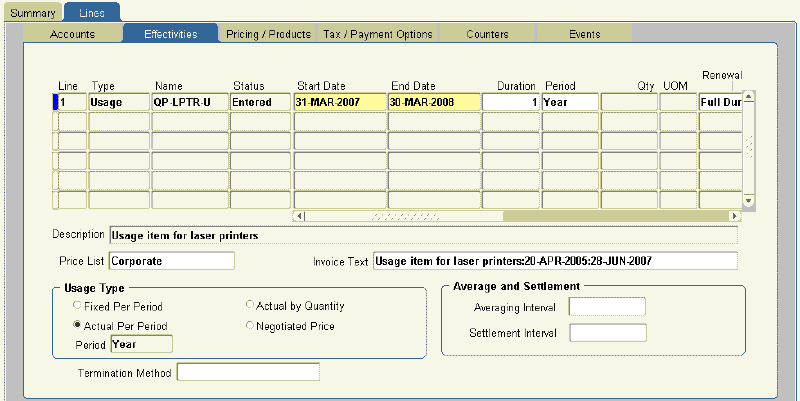
From the Service Contracts Authoring window, select the Lines tab and Effectivities subtab.
-
In the Usage Type region, select Actual Per Period.
-
From the Period LOV, select the period to use as the basis for the entries that you will make on the Counter Details secondary tab.
-
To charge customers based on an average of usage in a particular number of periods, enter the number of periods in the Averaging Interval field.
Note: The entry that you make here is based on the period that you selected on this tab rather than the period in the billing schedule.
Billing based on an average usage enables you to offer customers with uneven usage a different set of price breaks from what they would get if they were charged based on actual use.
To have usage averaged, the application administrator must periodically run the Service Contracts Usage Averaging concurrent program. See Running the Service Contracts Usage Averaging Program .
-
Specify when the application settles any customer undercharges or overcharges using the Settlement Interval LOV. The choices are:
-
Billing Period: The application settles at the end of each period. The customer receives a credit memo or is invoiced for the difference in the next billing period. This action is performed automatically by Oracle Receivables.
-
End of Usage: The application settles all undercharges and overcharges at the end of the contract. The customer receives one credit memo or invoice for the difference. The application administrator must regularly run the Service Contracts Usage Settlement concurrent program which calculates the settlement.
-
-
From the Termination Method LOV, select one of the two methods for charging the customer for usage when the line is terminated:
-
Amount Based Termination
Charges the customer based on the amount of usage that is recorded when the contract is terminated. The customer is charged based on the actual usage. This is the default method for all usage types.
-
Counter Based Termination
The application credits the unused portion of the service based on the price that the customer would pay if they continued consumption at the same rate for the rest of the period. This means that the customer receives any price break based on the estimated usage.
-
-
Save.
-
Select the Pricing/Products subtab.
-
Using the Name field on the Effectivity secondary tab, enter the counter that is used to record the usage. See Entering a Counter for details.
Entry in the Line Ref field is for your information only. It is not used in by the application.
-
Optionally, enter any text to display in the invoice regarding this line. As invoice formats are specific to each implementation, contact your application administrator to determine whether this text is used in the invoice.
-
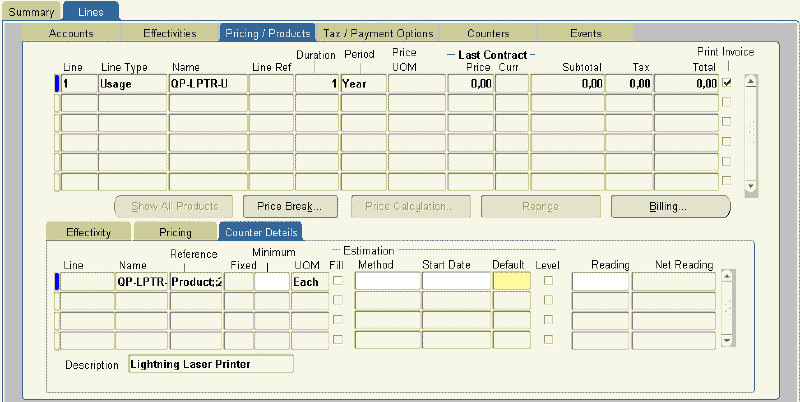
Select the Counter Details secondary tab.
-
In the Default field, enter the reading that the application uses to charge a customer if no counter reading is entered manually and no estimate is available. For example, the application uses the default quantity to charge a customer at the beginning of a contract when no historical data exists to calculate an estimate.
Note: The entries that you make in the Default and Minimum fields are based on the period that you selected in the Effectivities tab.
The period acts as a unit of measure.
Suppose that you are billing the customer monthly.
If you chose year as the period, and enter 1200 as the minimum, then the customer is billed for a minimum of 100 in any month.
If you chose month as the period, then entering 1200 as the minimum bills the customer for a minimum of 1200 units in any month.
-
Optionally, enter a minimum counter value in the Minimum field. A customer is charged this minimum if a counter reading or estimate falls below this number in any billing period.
-
You can have the application estimate usage for a billing period when no reading is entered or the reading does not cover the whole period. To do so:
-
Select an estimation method from the Estimation Method LOV:
-
Average Monthly Counter Volume
Averages historical readings to calculate any missing values within a billing period.
-
Counter Estimation
Your application administrator can set up additional estimation methods using the Counters module of Oracle Install Base.
For an explanation of the available methods see About Estimation Methods.
-
-
If you chose Counter Estimation as your method, then enter a date that you want to use as the start date for the estimation in the Start Date field. The counter estimation bases the estimates on all readings since the start date.
Note: You must select an estimation method before entering any counter readings. The estimation method will not work if you have already made an entry.
-
Set the Fill check box:
-
When this check box is cleared, the application estimates usage only when no reading was taken during the period.
-
When this check box is selected it estimates usage for any remaining days in a billing schedule period since the reading was entered.
For example, if you are billing the customer monthly, and a reading is entered on 15 January, then selecting the Fill check box causes the application to estimate usage for the remaining half of January.
-
-
-
If you are billing a customer based on the usage that is recorded in multiple counter values, to average out all of the counter readings each period, select the Level check box.
For example, a copier manufacturer charging a customer by the number of copies made may charge for all the copiers in a building at the same time and apply minimums and discounts based on average volumes rather than per copier.
-
Enter the counter reading to use to start calculating usage:
-
If you have already captured previous readings with this counter, then select the start reading from the Reading LOV. This LOV includes all historical readings for this counter.
-
If no historical reading is available to select, the application assumes that the initial reading for the contract is 0. To enter another initial reading, then follow the procedure that is described in Entering the Starting Counter Reading.
-
-
Save.
-
Repeat steps 8 through 17 to enter any additional counters.
You can have the application estimate the missing counter values for you and bill the customer accordingly. If the customer is overcharged, you can generate a credit later.
You can use one of the following two methods for estimating usage for a given billing period:
-
Average Monthly Counter Volume
Oracle Service Contracts uses a simple averaging method, Average Monthly Counter Volume (AMCV), to calculate missing readings within each scheduled billing period.
Note: Although the name suggests otherwise, this estimation method creates averages based on any billing schedule period that you are using, whether it is month, quarter, week, or day.
The AMCV sums up all historical counter readings and averages them by dividing them by the number of billing periods.
-
Counter Estimation
Your application administrator can set up additional estimation methods using the Counters module of Oracle Install Base. The module enables you to set up additional methods for estimating usage, including:
-
Fixed value estimation
-
Estimation based on percent usage of the associated counter
-
Charging a Customer with No Estimation Method
The selection of an estimating method is optional. If you do not select an estimation method and no counter reading is available for the billing period, then the application bills the amount that is entered in the Default field.
If any counter reading is entered within the billing period, the application bills based on the reading. If the counter reading is lower than the amount entered in the Minimum field, then the application bills based on the minimum instead.
Charging with Estimation
The application uses the estimation methods as follows:
-
If no reading is available for the billing period and you chose the Average Monthly Counter Volume estimation method, then the application uses the historical average to estimate the usage. If you chose Counter Estimation, then the application uses the method that is set up by the application administrator to calculate missing readings from the date that you entered in the Start Date field.
-
If no readings are available to extrapolate from, for example, at the beginning of the contract when no historical data exists to make an estimate, then the application uses the number that is entered in the Default field.
-
If the reading covers only a part of the period and you have selected the Fill check box, then the application estimates the rest of the period and adds this estimate to the partial counter reading.
-
If the reported and estimated amount is less than the amount that you entered in the Minimum field, then the application bills for the minimum.
About Crediting a Customer in Terminations
You can have the application credit a customer for any disputed amount of usage that has already been billed when a customer terminates a usage line.
Suppose, for example, that a customer is being billed based on monthly usage of a copier. The customer calls after receiving the invoice for February to complain that the copier has not been working properly since February 10. For this reason, the customer does not want to pay for all the copies that were made that month and wants to terminate the contract for the copier.
You can have the application use the previous month's reading to estimate the amount that the customer should be charged from February 1 until February 10 and credit him for the rest.
How the application calculates the usage and credits the customer depends on the termination method that you select:
-
Counter Based Termination
The application estimates how much the customer used based on the quantity that the customer used in the previous billing period.
-
Amount Based Termination
The application estimates how much the customer used based on the currency amount that the customer used in the previous billing period.
-
Charging Based on Reported Usage
Here is an example of how this method applies to a copier customer who is being billed monthly based on the number of copies that are made:
| Billing Period | Counter Reading Reported | Minimum | Default | Number of Copies Charged that Month |
|---|---|---|---|---|
| December | No counter reading in December. | 90 | 100 | 100 The customer is charged the default because no recorded usage is available for the month. |
| January | 1,000 on January 10 | 90 | 100 | 1,000 The customer is charged for usage based on the recorded usage. |
| February | No counter reading in February. | 90 | 100 | 100 The customer is charged the default because no usage is recorded for the month. |
| March | 50 on March 1 | 90 | 100 | 90 Because the recorded usage is less then the minimum, the customer is charged the minimum. If you do not set a value as the minimum, then the customer is charged based on the recorded usage. |
Prerequisite
Enter a usage item.
To charge based on reported usage:
-
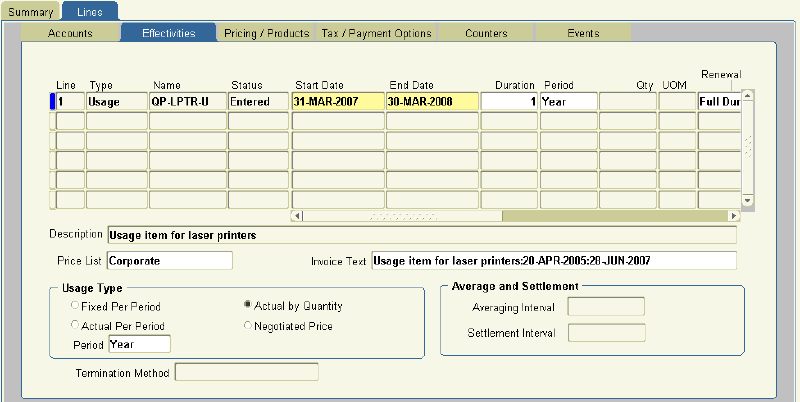
From the Service Contracts Authoring window, select the Lines tab and Effectivities subtab.
-
In the Usage Type Region, select Actual by Quantity.
-
Save.
-
Select the Pricing/Product subtab.
-
Using the Name field on the Effectivity secondary tab, enter the counter that is used to record usage. See Entering a Counter for details.
-
Optionally, enter any text to display in the invoice regarding this subline. Because invoice formats are specific to each implementation, contact your application administrator to determine whether this text is used in the invoice.
-
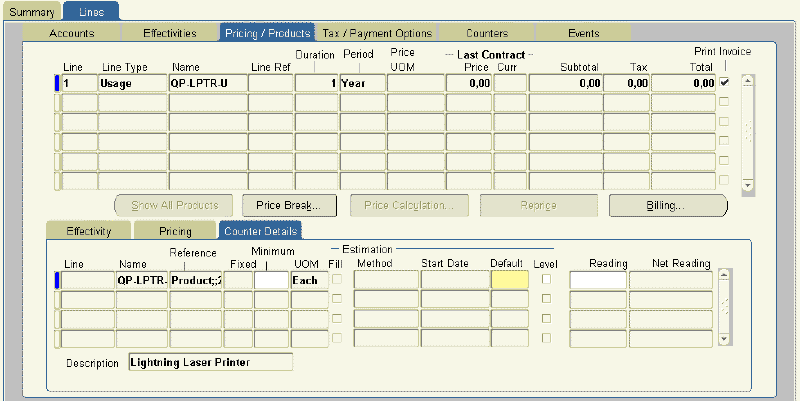
Select the Counter Details secondary tab.
-
In the Default field, enter the reading the that application uses to charge a customer if no counter reading is entered manually or the estimated reading is 0. The entry that you make here is based on the time period you selected in the Effectivities tab.
-
Optionally, enter a minimum counter value. A customer is charged this minimum if a counter reading or estimate falls below this number in any billing period.
-
If you are billing a customer based on the usage recorded in multiple counter values, to average out all of the counter readings each period, select the Level check box.
For example, a copier manufacturer charging a customer by the number of copies made, can charge for all the copiers that the customer owns at the same time and apply minimums and discounts based on average volumes rather than per copier.
-
Save.
-
Repeat steps 5 through 11 to enter any additional counters for this usage item.
-
Enter the counter reading to use to start calculating usage:
-
If you have already captured previous readings with this counter, then select the start reading from the Reading LOV. This LOV includes all historical readings for this counter.
-
If no historical reading is available to select, the application assumes that the initial reading for the contract is 0. To enter another initial reading, follow the procedure that is described in Entering the Starting Counter Reading.
-
Entering a Counter
You can enter a counter to track usage for either a physical item, such as a printer, or the usage of a service, such as the number of telephone support calls.
Note: If you are entering multiple counters for a usage line, then each counter must be associated with a different Oracle Install Base item instance number or a different service line. The application cannot distinguish between two counters that are attached to the same item. For example, if your organization sets up copiers with two different counters to register the number of copies, one for color copies and the other for black and white, you cannot distinguish between these two counters.
Prerequisites
You must be in the process of entering a usage line.
Identify the item to which the counter will be attached.
To enter a counter:
-
From the Service Contracts Authoring window, select the Lines tab, Pricing/Products subtab and Effectivities secondary tab, and click the LOV indicator in the Name field in a new line.
The Counter window appears.
-
Enter a partial or complete inventory item name in the Find field. You can use the % sign to represent missing characters.
-
Click Find.
The window displays the list of counters for the inventory item.
-
For physical items, the References field includes a concatenation of the two unique identifiers:
-
Product serial number
-
Oracle Install Base item instance number
-
-
For service items, this field displays the concatenation of the contract number and line number of the contract for which you are specifying the usage line.
-
-
Enter the identifying information for the counter after the
%sign and click Find again. -
Select the counter to enter, and click OK.
The Name field displays the inventory item name of the product or service to which the counter is attached. The Reference field shows the identifying information including the product serial number and the counter number.
Entering the Starting Counter Reading
You must do this if the counter that you are using does not start at 0.
Prerequisite
Enter a usage line.
To enter the starting counter reading:
-
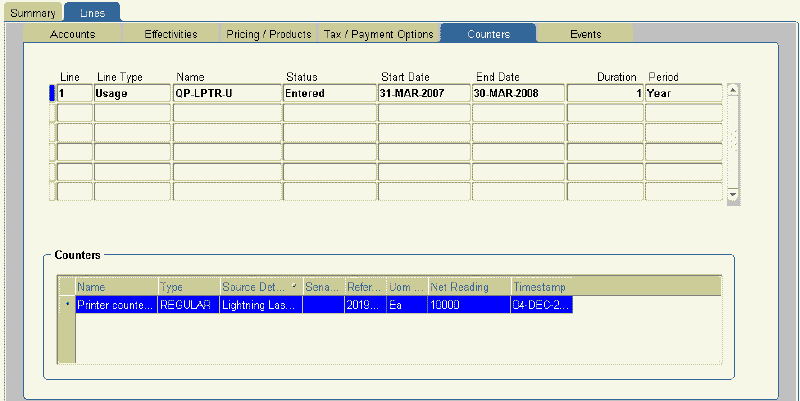
From the Service Contracts Authoring window, select the Lines tab and Counters subtab.
-
Select the usage line to update.
-
Select the counter for the usage line in the Counters region.
-
From the Actions menu, select Counter Setup.
The Setup Counters window appears.
-
Enter the initial counter reading in the Initial Reading field.
-
Click OK.
-
Save.
Entering a Usage Group
A usage counter group is a collection of similar assets. For example, to track the usage of printers that are present on different floors of one building, you can add all of the printers to a usage counter group. Each printer in the group is an instance.
Prerequisites
-
Enter a usage line with a usage type of Actual per Period.
-
Identify the item to which the group will be attached.
To enter a usage group:
-
Navigate to the Service Contracts Manager responsibility.
-
Open the service contract to which you would like to add a usage group.
-
Click the Line Summary link.
-
Click the line number link for Type Usage. The Line Details page appears.
-
Click the Covered Levels link.
-
Click the Add Covered Level icon. The Add Usage Counter page appears.
-
For the Covered Level, select Usage Counter Group.
-
Enter details for the fields according to your business requirements.
The following limitations apply:
-
For the Distribution field, you can set the usage limit level to Group only when consolidation is set to Yes.
-
For the Rollover field, the usage limit must not be zero and the usage limit level must be Group.
-
-
Click Apply.
Charging Based on Rollover Fields
The application carries forward the unused units in the rollover fields to the next available period. You can define the following rollover fields:
-
Rollover Level: determines which usage attribute to use for the rollover calculation; values are Minimum and Usage Limit.
-
Rollover: specifies the method of rollover; values are Complete, None, and Partial. The Complete method rolls over all the units specified as minimum or usage limit, if the meter readings are less than the minimum or usage limit. The Partial method rolls over only the unused units.
Prerequisites
-
The usage type must be Actual per Period.
-
Enter the meter readings in Oracle Installed Base. To enter the readings:
-
Navigate to the Oracle Installed Base Agent User responsibility, Counters, and then Counter Instances.
-
Select Counter Name in the Search drop down list and click Go.
-
For the selected counter instance, click Enter Readings.
-
Select a date, enter a value, and click Apply.
-
To enter the rollover fields for a contract
-
Create a contract with the Usage Type as Actual per Period.
-
Access the Line Summary for this contract.
-
On the Add Usage Counter page, select a value for the Rollover field, and then select a value for the Rollover Level field.
-
Select an instance.
-
In the Usage Attributes region, enter values for the entire duration of the contract line.
The usage attributes that are defined at the usage group level take precedence.
-
Click Apply.
-
Select the Submit for Approval action.
-
Approve and sign the contract to activate the contract.
When you copy this contract, the usage attributes are copied as is to the new contract. However, when you renew the contract, you must enter the usage attributes.
The following sections describe various scenarios of charging a usage counter or a usage counter group based on rollover values.
-
Charging for one usage counter with the rollover level set to Minimum and the rollover set to Partial
-
Charging for one usage counter with the rollover level set to Usage Limit and the rollover set to Partial
-
Charging for a consolidated usage group with the rollover level set to Minimum and the rollover set to Partial
-
Charging for a consolidated usage group with the rollover level set to Usage Limit and the rollover set to Partial
-
Charging for a consolidated usage group with the rollover level set to Usage Limit and the rollover set to Complete
1. Charging for One Usage Counter with Rollover Level Set to Minimum and Rollover Set to Partial
The following tables show the calculations for the unused units that are carried forward to the next available period when you set the rollover level to Minimum and the rollover to Partial.
For the Usage Attributes section, the following table shows the contract durations, default values, and their minimum values:
| Period | Default Quantity | Minimum Quantity |
|---|---|---|
| June 1, 2022 to June 30, 2022 | 100 | 100 |
| July 1, 2022 to May 31, 2023 | 200 | 200 |
For the meter readings entered in a month, the following table shows the billed units and calculates the unused units that are carried forward:
| Month | Actual Quantity | Billed Quantity | Unused Quantity |
|---|---|---|---|
| June | 50 | 100, because the minimum quantity is 100 | 50 |
| July | 250 | 200 (250-50), because the unused quantity from the previous month is rolled over and deducted | 0 |
| August | 50 | 200, because the minimum quantity is 200 | 150 |
| September | 250 | 200, because the minimum quantity is 200 | 100 |
2. Charging for One Usage Counter with Rollover Level Set to Usage Limit and Rollover Set to Partial
The following tables show the calculations for the unused units that are carried forward to the next available period if you set the rollover level to Usage Limit and the rollover to Partial.
For the Usage Attributes section, the following table shows the contract durations, default values, and their minimum values:
| Period | Default Quantity | Minimum Quantity | Usage Limit Quantity |
|---|---|---|---|
| June 1, 2022 to June 30, 2022 | 100 | 100 | 50 |
| July 1, 2022 to May 31, 2023 | 200 | 200 | 100 |
For the meter readings entered in a month, the following table shows the billed units and calculates the unused units that are carried forward:
| Month | Actual Quantity | Billed Quantity | Unused Quantity |
|---|---|---|---|
| June | 300 | 250 (300-50) | 0 |
| July | 300 | 200 | 0 |
| August | 200 | 200 | 0 |
| September | 250 | 200 | 0 |
3. Charging for Consolidated Usage Group with Rollover Level Set to Minimum and Rollover Set to Partial
For a consolidated usage group that contains multiple counter instances, the following tables show the calculations for the unused units that are carried forward to the next available period when you set the rollover level to Minimum and the rollover to Partial.
For the Usage Attributes section, the following table shows the contract durations, default values, and their minimum values:
| Period | Default Quantity | Minimum Quantity |
|---|---|---|
| June 1, 2022 to June 30, 2022 | 300 | 300 |
| July 1, 2022 to May 31, 2023 | 600 | 600 |
If the consolidated usage group contains three printers, the net quantity that will be used for billing the printers is as follows:
| Printer | June 2022 | July 2022 | August 2022 | September 2022 |
|---|---|---|---|---|
| Printer 1 | 50 | 200 | 50 | 100 |
| Printer 2 | 100 | 400 | 20 | 980 |
| Printer 3 | 100 | 50 | 10 | 289 |
Derive the actuals for all three printers by adding them as follows:
| Calculation for Consolidated Usage Group | June 2022 | July 2022 | August 2022 | September 2022 |
|---|---|---|---|---|
| Actual Quantity | 250 | 650 | 80 | 1369 |
| Billed Quantity | 300, because this is the minimum quantity | 600 (650-50) | 600, because this is the minimum quantity | 849 |
| Distributed | 100 | 200 | 200 | 283 |
| Unused Quantity | 50 | 0 | 520 | 0 |
4. Charging for Consolidated Usage Group with Rollover Level Set to Usage Limit and Rollover Set to Partial
For a consolidated usage group that contains multiple counter instances, the following tables show the calculations for the unused units that are carried forward to the next available period when you set the rollover level to Usage Limit and the rollover to Partial.
The following table shows the contract durations, default values, minimum values, and their usage limits:
| Period | Default Quantity | Minimum Quantity | Usage Limit Quantity |
|---|---|---|---|
| June 1, 2022 to June 30, 2022 | 300 | 0 | 100 |
| July 1, 2022 to May 31, 2023 | 400 | 0 | 200 |
If the consolidated usage group contains three printers, then the net quantity that will be used for billing the printers is as follows:
| Printer | June 2022 | July 2022 | August 2022 | September 2022 |
|---|---|---|---|---|
| Printer 1 | 100 | 100 | 10 | 190 |
| Printer 2 | 200 | 300 | 10 | 990 |
| Printer 3 | 100 | 50 | 10 | 290 |
Derive the actuals for all three printers by adding them as follows:
| Calculation for Consolidated Usage Group | June 2022 | July 2022 | August 2022 | September 2022 | Usage Limit for September |
|---|---|---|---|---|---|
| Actual Quantity | 400 | 450 | 30 | 1470 | 1270, because for this period the usage limit is 200 |
| Billed Quantity | 300 (400-100), because 100 is the usage limit | 250 (450-200), because 200 is the usage limit | 0 | 1100 | 1100 |
| Distributed | 100 | 83.33 | 0 | 366.66 | NA |
| Unused Quantity | 0 | 0 | 170, because 30 out of the usage limit 200 is consumed | 0 | NA |
5. Charging for Consolidated Usage Group with Rollover Level Set to Usage Limit and Rollover Set to Complete
For a consolidated usage group that contains multiple counter instances, the following tables show the calculations for the unused units that are carried forward to the next available period when you set the rollover level to Usage Limit and the rollover to Complete.
The following table shows the contract duration, default value, minimum value, and the usage limit:
| Period | Default Quantity | Minimum Quantity | Usage Limit Quantity |
|---|---|---|---|
| June 1, 2022 to May 31, 2023 | 400 | 0 | 300 |
If the consolidated usage group contains two printers, the following table shows the readings for these printers from June 2022 to September 2022:
| Printer | June 2022 | July 2022 | August 2022 | September 2022 |
|---|---|---|---|---|
| Printer 1 | 100 | 310 | No counter reading entered | 300 |
| Printer 2 | 100 | 410 | No counter reading entered | 700 |
When the rollover is selected as Complete, the actuals for the two printers is as follows:
| Calculation for Consolidated Usage Group | June 2022 | July 2022 | August 2022 | September 2022 |
|---|---|---|---|---|
| Actual Quantity | 200 | 720 | 0 | 1000 |
| Billed Quantity | 0, because the actual is less than the usage limit of 300 | 420 (720-300) | 400, because the default quantity is 400 | 400 (1000-300-300), Usage limit of 300 from previous period is rolled over since in August no readings are entered |
Adding New Counter Instances to a Group
Add a counter to a group to track the usage of a physical item such as a printer, for which you want to count the number of pages printed, or the usage of a service such as customer support, for which you want to track the number of telephone calls received.
Prerequisites:
-
You must be entering a usage line.
-
Identify the group to which the counter instances will be attached.
To add counter instances to a group
-
Navigate to the Service Contracts Manager responsibility.
-
Open the service contract containing the group to which you would like to add counter instances.
-
Click the Line Summary link.
-
Click the line Number link for Type Usage. The Line Details page appears.
-
Click the Covered Levels link.
-
Click the line Number link for Type Usage Counter Group. The Subline Details page appears.
-
Click the Add Covered Level icon. The Add Usage Counter page appears.
-
Search by a partial or complete inventory item name.
-
Click Go.
-
Select one or multiple counter instances.
-
Click Apply.
You can delete counter instances from a user group and from a covered level. You can remove counter instances from the user group but it will still be available as an independent counter instance.
Adding Existing Counter Instances to a Group
You can move existing counter instances to a group up to the time that an invoice is not generated for the counter instances.
Prerequisites:
-
The contract status must be Entered.
-
You must be entering a usage line.
-
Identify the counter instances to add to a group.
-
The Last Usage Billed and Total Usage Billed column values must be null.
To add existing counter instances to a group
-
Navigate to the Service Contracts Manager responsibility.
-
Open the service contract containing the group to which you would like to add counter instances.
-
Click the Line Summary link.
-
Click the line Number link for Type Usage. The Line Details page appears.
-
Click the Covered Levels link.
-
Select the counter instances to add to a group.
-
Select Add to Group from the Actions drop-down list. The Add To Group page appears.
-
Select the group Number option to which you would like to add the counter instances.
-
Click Apply.
The group name is stamped on the counter instance rows.
Creating Special Price Breaks
Each usage item is associated by the application administrator with a list of default price breaks. You can modify these default price breaks and create special price breaks for your customer. You can offer special price breaks at the usage line level for all the items that are covered by the usage line, or at the subline level, for individual counters.
By modifying the price breaks, you are creating a locked copy of the price list attached to the line or subline where you create it. This means that any future changes to the price list are not reflected in the copy.
Prerequisite
Enter a usage item.
To create special price breaks:
-
From the Service Contracts Authoring window, select the Lines tab and Pricing/Products subtab.
-
Select the usage item to set up.
-
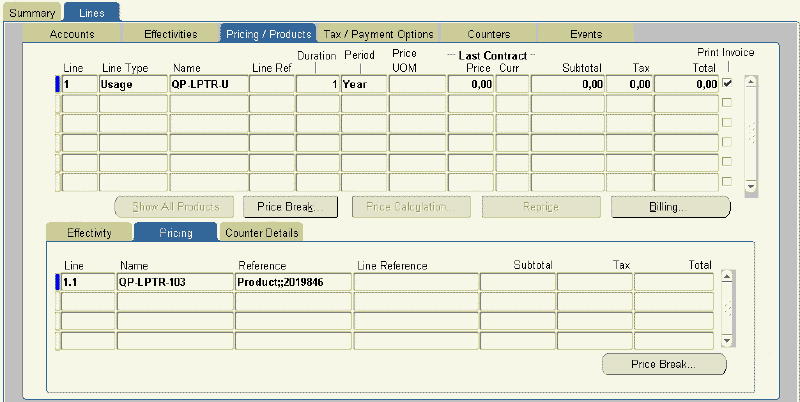
To set up a price break for all of the items that are covered by the usage line, click Price Break on the Pricing/Products subtab.
-
To set up a price break for a specific counter that is covered by a usage line:
-
Select the Pricing secondary tab.
-
Select the counter.
-
Click Price Break.
The Price Break window appears.
If the Locked check box is cleared, then the price breaks that are in effect are the same as those that were set up by the application administrator.
A selected Locked check box indicates that the price breaks have already been modified. The prices are now determined by the locked price list.
Note: The appearance of this variation of the Price Break window is different:
-
The Update button replaces the Lock button.
-
The Delete button restores the original price list.
-
-
-
Click Lock or Update.
The first time you modify the price breaks, the application creates a copy of the price list where the price breaks are defined. This action locks the prices for usage to their values at the time the copy is made.
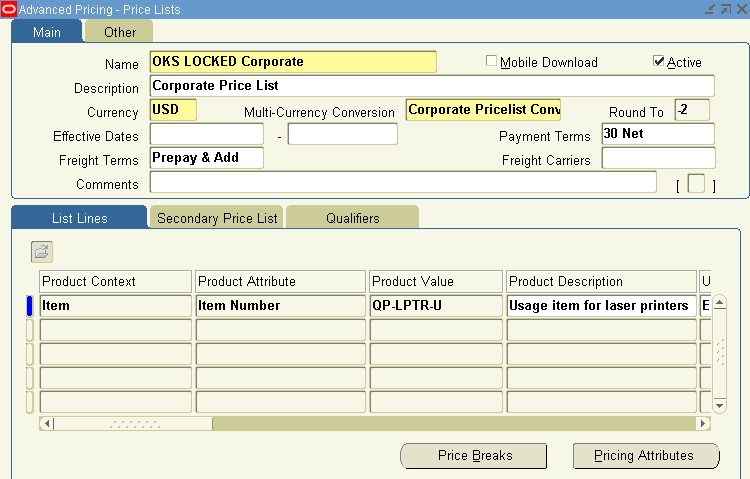
The Advanced Pricing - Price Lists window appears.
Note: Although the application displays a full copy of the price list, you can modify only the price-break related information. Entries affect only the copy. They have no effect on the price list itself.
-
To change the price break type from point to range or vice versa, scroll to the right in the List Lines tab and change the type using the Price Break Type LOV. See Point and Range Price Breaks for an explanation of the two price break types.
-
To change the price break ranges themselves:
-
Click Price Breaks.
The Price Breaks window appears.
-
You can modify the ranges by:
-
Entering different values in the Value From and Value to fields.
Note: With release 12, the application uses continuous price breaks. These are price breaks where there are no gaps between the price tiers, for example, 0–1000, 1000–2000, 2000–3000. Price breaks set up prior to release 12, will not use continuous price breaks and will continue to behave as in the prior release. Non-continuous price breaks do not overlap, for example, 0–100, 101–200.
This primarily affects proration, see How Price Breaks Are Prorated.
For more information about how pricing works, refer to the Oracle Advanced Pricing User's Guide.
-
Modifying the prices for each range in the Pricing field.
Note: You may have to scroll to the right or maximize the window to see the Pricing field.
-
-
Save and close the window.
-
-
Save and close the Advanced Pricing Price Lists window.
Point and Range Price Breaks
You can have the application apply price break discounts based on one of the following methods:
-
Point
-
Range
The following example explains the difference between the two methods for a customer reporting that they made 3500 copies in the billing period.
The following table lists the price breaks:
| Break | Price |
|---|---|
| 0–1000 | $.05 |
| 1000–3000 | $.04 |
| 3000–5000 | $.03 |
| 5000–10000 | $.02 |
Point Method
The point method gives the customer the best price based on the total number of copies made:
| Point Calculation | Amount |
|---|---|
| 3500 Xs $.03 | $105.00 |
| Total Invoice: | $105.00 |
Range Method
The range method charges based on all of the price break ranges up to the level corresponding to the counter reading.
| Range Calculation | Amount |
|---|---|
| 1000 Xs $.05 | $50.00 |
| 2000 Xs $.04 | $80.00 |
| 500 Xs $.03 | $15.00 |
| Total Invoice: | $145.00 |
Deleting Special Price Breaks
To delete the special price breaks:
-
From the Service Contracts Authoring window, select the Lines tab and Pricing/Products subtab.
-
Select the usage item to modify.
-
To delete a special price break that was created for all of the items that are covered by the usage line, click Price Break on the Pricing/Products subtab.
-
To revert the special price break that was created for a specific counter that is covered by a usage line:
-
Select the Pricing secondary tab.
-
Select the counter.
-
Click Price Break.
The Price Break window appears.
-
-
Click Delete.
Prorating Price Breaks to Apply to Multiple Periods
Price breaks are set up in each price list based on one specific period. A customer is offered a discount if they purchase so many units in each quarter, for example.
You can turn proration on to enable the price breaks to be prorated for other periods as well. This way, a customer receives the same price breaks for purchasing 1/3 the amount within one month as the full amount in the quarter. When you turn proration on using this procedure, it is available for all periods including one week and one day.
You can use this procedure to turn proration on or off. By default, proration is turned off.
See How Price Breaks Are Prorated for an explanation of how the proration is calculated and how it takes rounding errors into account.
Prorating price breaks is independent of price list locking.
Prerequisites
-
Confirm the setup of price breaks or the price list.
-
Confirm that the system profile QP: Break UOM Proration Allowed is set to Yes.
To prorate price breaks to apply to multiple periods:
-
From the Service Contracts Authoring window, select the Lines tab and Pricing/Products subtab.
-
Select the usage item to set up.
-
To turn on or off proration for all of the items that are covered by the usage line, click Price Break on the Pricing/Products subtab.
Note: Turning price breaks on or off at the line level does not affect any sublines where proration has been set.

-
To enable or disable price break proration for a specific counter that is covered by a usage line:
-
Select the Pricing secondary tab.
-
Select the usage line.
-
Click Price Break.
The Price Break window appears.
Note: The appearance of this window is different if the price break ranges have already been modified. In this case, the Locked check box is selected and the Update button replaces the Lock button.
-
-
To turn price break proration on, select All from the Prorate LOV.
-
To turn price break proration off, select None from the Prorate LOV.
-
Save.
-
To modify the price break ranges, click Lock or Update and follow the procedure that is described in Creating Special Price Breaks for Your Customer.
How Price Breaks Are Prorated
This topic explains how the application calculates prorated price breaks. With Release 12, the application uses continuous price breaks. Continuous price breaks do not have gaps between the price tiers, for example, 0–1000, 1000–2000, 2000–3000. It is important to understand that there may be minor differences between how much customers are charged for prorated amounts depending on whether the application uses continuous price breaks or non-continuous price breaks, which existed before Release 12.
Note: This section describes how proration works for continuous price breaks.
Suppose, for example, that the price breaks that are set up in the price list are based on quarterly usage as shown in the following table:
| Units/Quarter | Price per Unit |
|---|---|
| 0–1000 | $.05 |
| 1000–3000 | $.04 |
| 3000–5000 | $.03 |
| 5000–999999999 | $.02 |
Now suppose, you extend the same price breaks to a customer billed based on monthly usage by turning proration on.
Here is how the application calculates the monthly price breaks. It divides the range by a third.
Note: Oracle Service Contracts truncates to two decimal points.
| Quarterly Ranges/3 |
|---|
| 0–333.33 |
| 333.33–1000 |
| 1000–1666.67 |
| 1666.67–333333333 |
| Units/Month | Price per Unit |
|---|---|
| 0–333.33 | $.05 |
| 333.33–1000 | $.04 |
| 1000–1666.67 | $.03 |
| 1666.67–33333333 | $.02 |
Note: Price breaks set up prior to release 12, did not use continuous price breaks. Non-continuous price breaks did not allow the use of fractions during proration. The prorated price breaks for each tier were set to the previous whole number, for example 0–333, rather than 0–333.33.
Specifying a Billing Schedule for a Usage Line
You can bill a customer for usage at the usage line level.
If you have entered a billing schedule at the contract header level, then this schedule appears at the line level.
Prerequisite
Enter a usage line.
To specify a billing schedule for a usage line:
-
From the Service Contracts Authoring window, select the Lines tab and Pricing/Products subtab.
-
Select the line to set up.
-
Click Billing.
The Billing window appears.
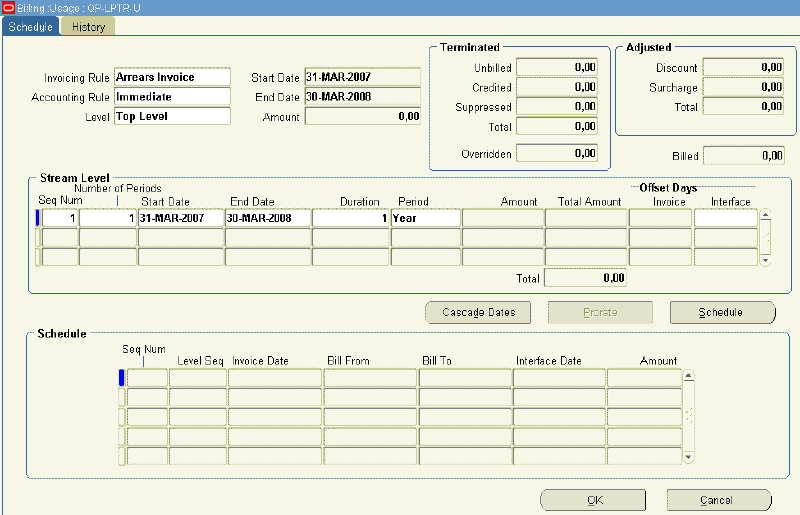
Top Level is selected as the Level.
-
Select the appropriate accounting rule for invoicing from the Invoicing Rule LOV. You must select Arrears Invoice for the two usage types that charge customers based on recorded counter values in a period: Actual Per Period and Actual by Quantity.
-
Specify the billing schedule by entering one or more billing streams. This is the same procedure that is used for creating schedules for service lines. See Entering a Billing Stream for details.
Note: For Arrear Invoices, the Invoice Offset Days is disabled.
-
Click Schedule to generate the schedule.
-
Click OK.
For renewed contracts, if you do not specify any starting reading and do not select the counter to be reset, then the application calculates the Actual and Quantity Billed values based on the last billed counter reading. For example, if the counter reading that was billed in the previous contract is 150; current counter reading for the renewed contract is 170, then in the absence of a starting reading and the counter not being reset, the application calculates the Actual and Quantity Billed values as 20.
Recording Usage by Updating a Counter Reading
Counter values can also be captured in other Oracle E-Business Suite applications, including Oracle Depot Repair, Oracle Field Service, and Oracle TeleService.
To record customer usage by updating a counter reading:
-
From the Service Contracts Authoring window, select the Lines tab and Counters subtab.
-
Select the usage line to update.
-
From the Actions menu, select Counter Capture.
The Counter Capture Reading window appears.
-
Follow the Capturing Counter Reading procedure that is described in the Oracle Install Base User's Guide to enter your reading.
Warning: You cannot nullify a counter reading after billing occurs.