Approving Contracts
This chapter describes the process of approving a contract.
This chapter covers the following topics:
- Approving Contracts
- Submitting Contracts for Approval
- Tracking Contracts During the Approval
- Approving Contracts
- Signing Contracts
Approving Contracts
This group of topics explains the contract approval process.
Oracle Service Contracts leverages Oracle Workflow to automate the contract approval process. After you author a contract you must:
-
Submit the contract for approval.
-
Secure approval on the contract.
-
Obtain a signature on the contract.
The Submit for Approval function starts the quality assurance (QA) check. If the QA check is successful you can continue the approval process, which submits the contract to the approval workflow. See About the Quality Assurance Check.
Note: The standard contract approval workflow integrates with Oracle Approval Management Engine (AME). Oracle Service Contracts supports standard AME features such as rules based approval routing and definition of approval groups. There are mandatory setups in AME for Oracle Service Contracts. For more information, see the Oracle Service Contracts Implementation Guide.
In the contract approval process, the Send Confirmation Email node in the OKSKPRCS workflow sends the confirmation e-mail to the customer. The e-mail address is taken from the Quote To section on the Renewals tab of the contract header.
Following the contract approval and signing, the application updates the contract status to Signed or Active, depending on whether or not the start date has passed.
After a contract is approved and signed, an FYI notification that the contract is activated is sent to the sales representative and the help desk email addresses available for the contract. If the sales representative or the help desk contact has access to the contract, they can open the Contract Details page from the FYI notification.
Submitting Contracts for Approval
You can submit a contract for approval from the Service Contracts Authoring window, which is covered in the following procedure. You can also submit a contract for approval from the Administrator Workbench, see Submitting a Contract for Approval from the Administrator Workbench.
To submit contracts for approval:
-
From the Service Contracts Authoring window, select the Summary tab and Administration subtab.
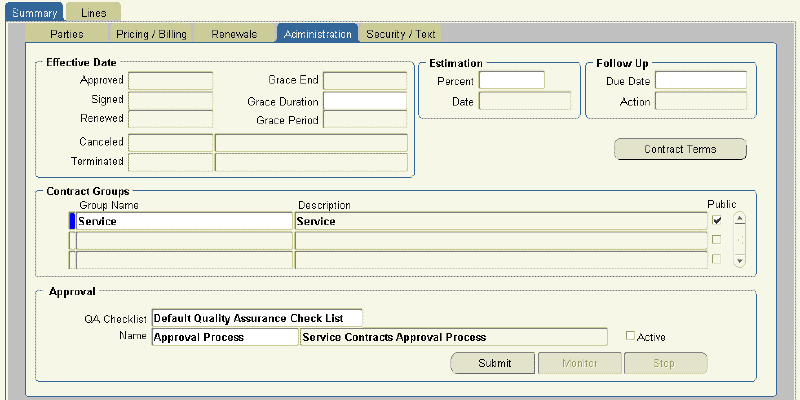
-
Click Submit.
The Quality Assurance Results window appears. You must confirm there are no errors on the report. See About the Quality Assurance Check.
-
From the Quality Assurance Results window, click Continue Approval.
The Contract Authoring page returns with the Summary Administration subtab selected. You have submitted the contract to the approval workflow that is selected in the Approval Workflow region.
Review the following procedures:
Alternatively, you can submit the contract by selecting Submit for Approval from the Actions menu.
Note: Contracts that have been submitted to the approval workflow are locked for further authoring. However, communications and attachments can still be added to the contract after it has been submitted for approval.
Tracking Contracts During the Approval
To track contracts during the approval:
-
From the Service Contracts Authoring window, select the Summary tab and Administration subtab.
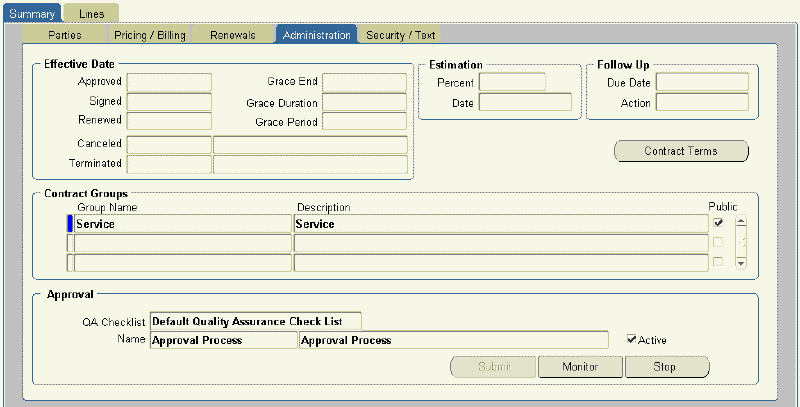
-
Select Monitor.
The Monitor Diagram page appears in a new browser window.
Beneath the Current Status heading, you can view the current status and a visual diagram of the workflow approval process.
-
Follow the green arrow within the diagram to determine where the contract is in the approval process.
For example, if the contract requires approval the green arrow leads to the Contract Approval Required process.
-
To view details for a given process step, select the process icon within the diagram.
The tabs beneath the diagram show status information for the selected process. Tabs include Definition, Status, Usage, and Notification.
For more information on monitoring workflows, refer to the Oracle Workflow User's Guide.
Note: You can stop the approval process by clicking Stop on the Administration subtab or by selecting Stop Approval from the Actions list on the corresponding HTML page.
Approving Contracts
To approve a contract:
-
From the Navigator, navigate to Contract Administration, and then select Launchpad.
-
From the Inbox region, click Find.
The Inbox Find window appears.
-
From the Select Notification Type list, select Contract Approvals.
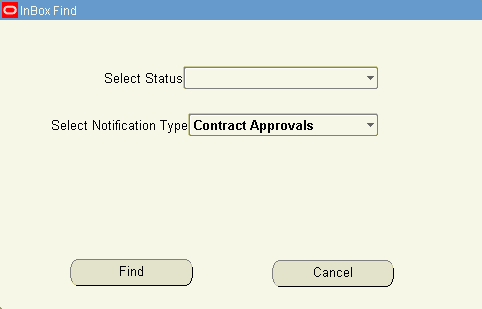
-
Select Find.
The Inbox is refreshed with contracts that require approval.
-
Highlight the contract you would like to approve.
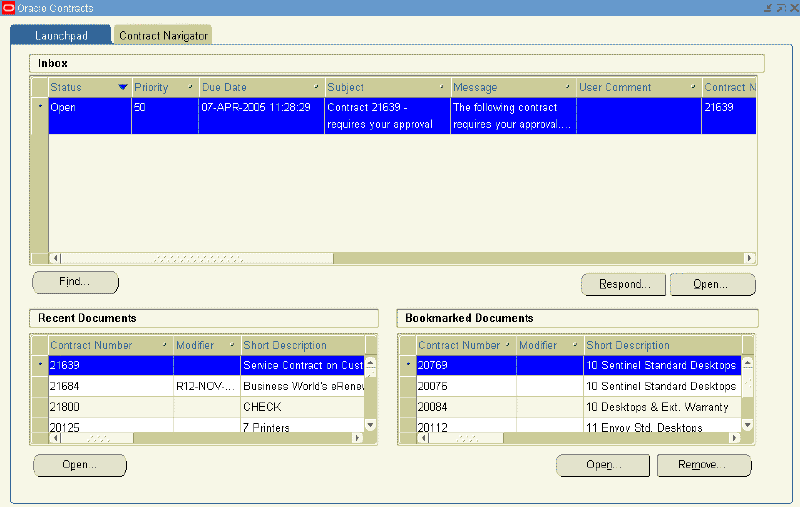
-
Select Respond.
A worklist page appears within a new browser window. You can either approve, reject, reassign the approval to someone else, or request information.
You may add a note to the Response region.
-
Select Approve.
The Worklist summary appears. The message indicates, Contract requires your signature. You can select the Contract requires your signature link and sign the contract.
Signing Contracts
To sign a contract:
-
From the Navigator, navigate to Contract Administration, and then select Launchpad. The Launchpad appears.
-
In the Inbox region, click Find.
The Inbox Find window appears.
-
From the Select Notification Type list, select Contract Requiring Signature.
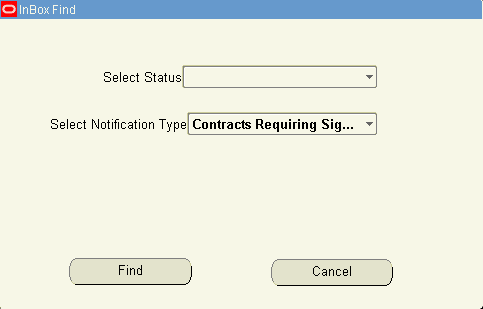
-
Select Find.
The Inbox is refreshed with contracts that require a signature.
-
Highlight the contract you would like to sign.
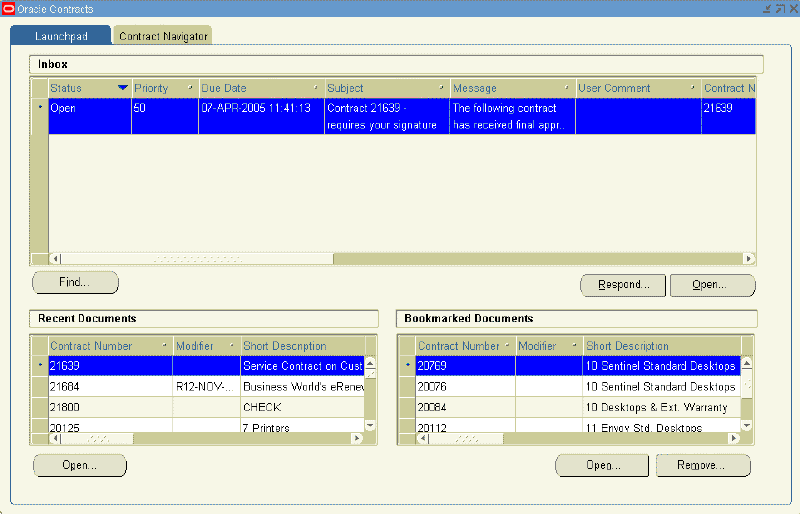
-
Select Respond.
A worklist page appears within a new browser window. You can either sign, not sign, reassign, or request additional information.
You may add a note to the Response region.
-
Select Yes.
The Worklist summary appears. The message indicates, Contract has been Signed.
After a contract is approved and signed, a contract becomes active and an FYI notification is sent to the sales person or help desk. The FYI notification contains a Contract Details link, which will redirect you to the login page to view the contract details.