Administrative Tasks
Overview
This chapter describes how to perform the following administrative tasks for the Oracle Mobile Application Foundation:
-
Setting the Conflict Resolution Rule
-
Configuring the Interapplication Bar
-
Manually Creating Mobile Users
-
Managing Concurrent Programs.
-
Viewing User Synchronization Statistics
-
Viewing Synchronization Summary Tables on the Home Page
-
Viewing Synchronization Details on the Sync Detail Page
-
Viewing Synchronization Summary Reports
-
Viewing Engineer Synchronization Details
-
Viewing Load Distribution
-
-
Working With Upload Errors
-
Understanding Upload Errors
-
Purging Upload Errors
-
Viewing the Upload Errors Summary
-
-
Managing Deferred Upload Errors
-
Working With the Deferred Upload Errors of a Particular User Synchronization Session
-
Editing the Details of Deferred Upload Errors
-
-
Managing Discarded Upload Errors
-
Managing Passed Upload Errors
-
Defining and Editing Mobile Queries
-
Setting Profiles for E-Mail Mobile Queries
Additional Information: Note: There is a mobile administrator responsibility that is similar to the system administrator responsibility. Any user who has been granted the mobile administrator responsibility can perform administrative activities for the Oracle Mobile Application Foundation. You must log in as a user with this responsibility to access the Mobile Field Service Administrator Console, which is where the relevant administration screens are located.
Setting the Conflict Resolution Rule
The profile option, JTM: Application Conflict Rule, specifies the conflict resolution rule that is used in case of updates to the same entity by both the enterprise system and the Oracle Mobile Field Service Store and Forward applications.
This profile option determines how the Oracle Mobile Field Service Store and Forward applications make updates to the database. The following are the possible types of updates:
-
Client wins. Changes made by the mobile user are always applied to the enterprise database. No timestamp checking is done.
-
Server wins. Changes made by the mobile user are applied to the enterprise database if the record has not been modified since the mobile user last synchronized. If the record has been modified in the meanwhile, then the mobile user's change is not applied.
Configuring the Interapplication Bar
You can set up the Interapplication Bar to conveniently navigate between the CRM System Administrator Console and the Mobile Application Foundation Administration Console. This is an optional procedure. Performing this setup will allow administrators to easily navigate from the Mobile Application Foundation Administration Console to the CRM System Administrator Console in order to run diagnostic tests and check error logs.
To navigate between the CRM System Administrator Console and the Mobile Application Foundation Administration Console, you will need to create a user who has both mobile administrator ("MobileAdmin") and system administrator ("CRM HTML administration") responsibilities. Log in as that user to the CRM System Administrator Console and set up the Interapplication Bar with the two applications being "CRM Gateway for Mobile Services" and "CRM HTML administration".
Refer to the Oracle E-Business Suite CRM System Administrator's Guide or the online help for the CRM System Administrator Console for instructions on how to successfully set up the Interapplication Bar.
Manually Creating Mobile Users
The Oracle Mobile Application Foundation allocates resources for mobile users when they are assigned a responsibility that is associated with a mobile application (such as the responsibility "Oracle Mobile Field Service"). The concurrent program MANAGES MOBILE USERS runs periodically and creates or removes these mobile user resources based on the assigned responsibilities. A user who recently has been assigned a mobile responsibility will not be able to synchronize until after this concurrent program runs. The user cannot change his or her password on the mobile client, and will need to do so online.
During system testing, it may be helpful to create users more rapidly. In this case, you can manually run the MANAGES MOBILE USERS concurrent program using the Concurrent Manager.
The home page of the Mobile Application Foundation Console displays the number of users who do not have the correct mobile subscriptions. To view the error messages associated with the mobile user subscription failures, run the diagnostic tests described in "Diagnostic Testing Oracle Mobile Application Foundation".
Managing Concurrent Programs
The JTM master concurrent program runs all concurrent jobs registered by Oracle Mobile Field Service Store and Forward applications. The JTM master concurrent program uses the following category types:
-
TRANSACTION
-
LOOKUP
-
INVENTORY
-
CUSTOMER
-
PURGE
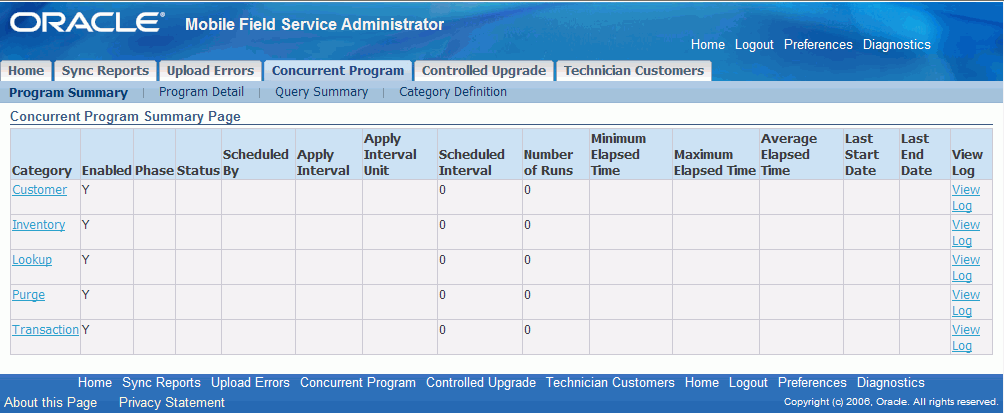
The Mobile Concurrent Program Summary page displays the JTM concurrent program details for all the concurrent programs related to Oracle Mobile Field Service Store and Forward. The mobile concurrent program displays how many times the program has currently ran, and the maximum and the minimum times taken to finish the program.
The concurrent program screens enable you to view the status of mobile logic (PL/SQL) modules, which process the various business events for the Oracle Mobile Field Service Store and Forward applications. The mobile logic modules are grouped in various categories and the frequency of their execution is based on the category. You can change the mobile logic modules from one category to another or add a new category and hence change the frequency of execution, based on the business requirements. These screens can also be used to understand the resources used by mobile logic modules, identify and resolve any performance bottlenecks.
Steps
Complete the following steps to view the concurrent program summary and view the log history for a concurrent program.
-
Login as a Mobile Field Service Administrator.
-
Select the Concurrent Program tab.
The Concurrent Program Summary page appears.
Concurrent Program Summary page
-
Click the View Log link for a concurrent program in the table row.
The Concurrent Log page appears displaying the log details of the program from the first run of the program. The log page describes the status of the concurrent program in each run.
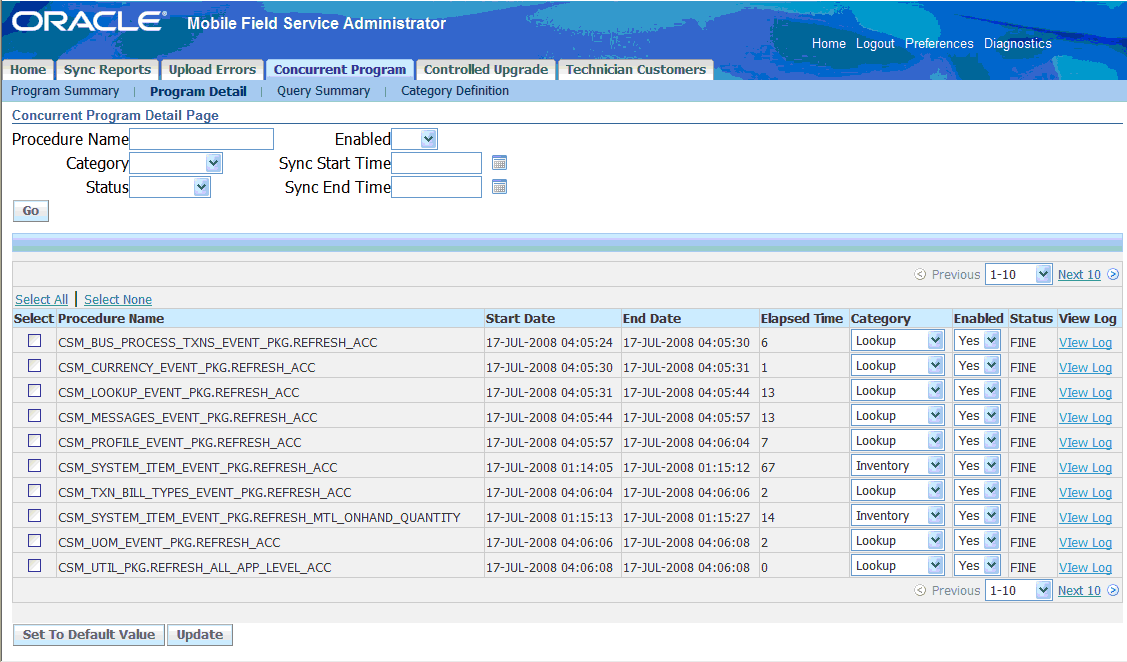
Mobile Concurrent Program Details
The Mobile Concurrent Program Detail page displays the details for each of the concurrent programs. Using this page, you can re-assign a concurrent program to another category. For example, you can re-assign a concurrent program from LOOKUP to TRANSACTION by making a selection from a drop-down list. You can also enable and disable concurrent programs by specifying YES or NO from a drop-down list. These changes can be done even in runtime and will be effective from the next run of the concurrent program.
Concurrent Program Detail page
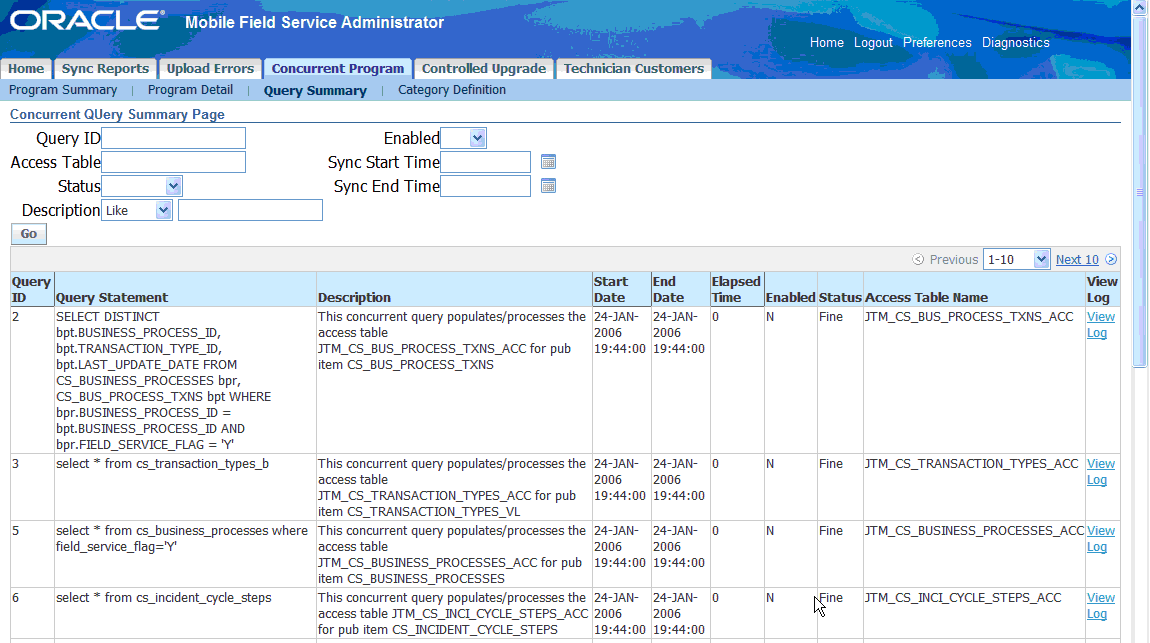
Mobile Concurrent Query Summary
The following graphic contains the details for a specific query. This information appears in table format, providing such details as the query statement, description, and last start and end dates.
Concurrent Query Summary page
Mobile Concurrent Category Summary
The following graphic displays the definition of each category. The categories are defined in a table by such information as category type, description, and start and end active dates.
You can move queries from one category to another or create your own category and then seed queries in them.
Category Summary page

Viewing User Synchronization Statistics
This section covers the following tasks:
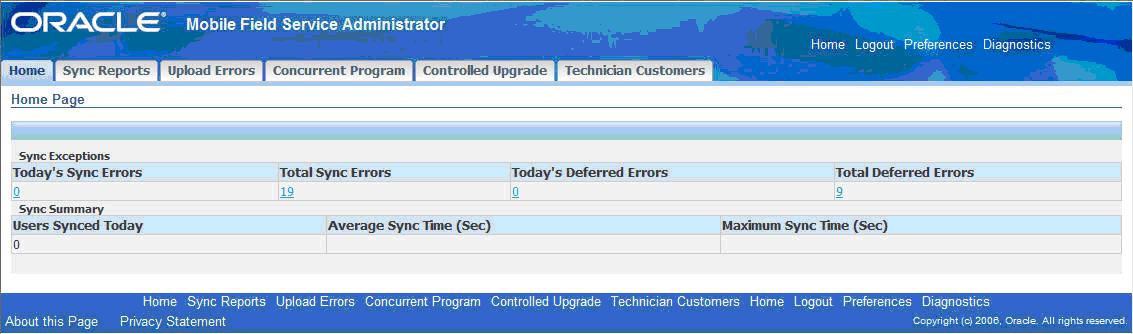
Viewing Synchronization Summary Tables on the Home Page
The home page of the Mobile Field Service Administrator Console provides the following features:
-
The Sync Exceptions table:
This table displays a summary of critical synchronization and upload errors. You can click the links provided to display detailed error reports.
-
The Sync Summary table:
This table displays a summary of synchronization metrics: You can view the number of synchronizations that occurred on the current date, the average time per synchronization, and the maximum synchronization time.
To navigate to the home page of the Mobile Field Service Administrator Console, log in as Mobile Field Service Administrator. The home page will automatically display the two tables as described above.
Screenshot
An image of the Mobile Field Service Administrator Console home page is provided below:
Mobile Field Service Administrator Console - Home page
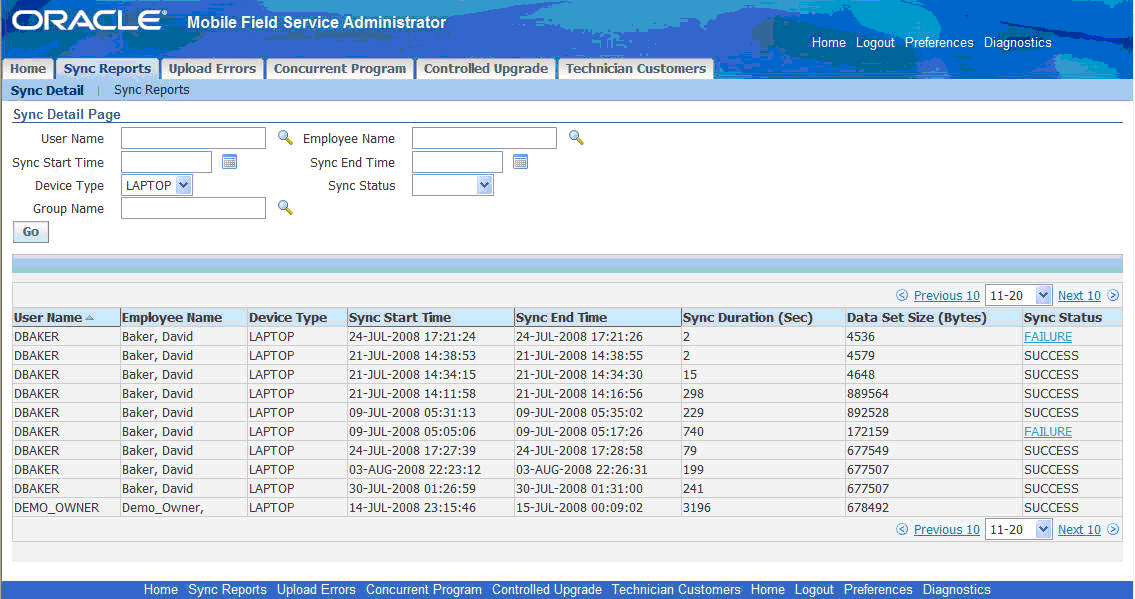
Viewing Synchronization Details on the Sync Detail Page
Use this procedure to view details about the synchronizations of particular user sessions.
Steps
-
In the Mobile Field Service Administrator Console, from the Home tab, click the link in the Today's Sync Errors or Total Sync Errors column.
You can click the link in the Today's Deferred Errors or Total Deferred Errors column to view the details of the deferred upload errors.
The Sync Details page appears. On the Sync Detail Page, the synchronization details for each user session are displayed.
-
Review the data provided, which includes user name, the time of the synchronization, the data set size of the last synchronization, if any exceptions occurred during the synchronization, and how many upload errors have occurred for that particular user.
-
If desired, you can filter what data appears on the Sync Detail page. At the top of the page you can search by user name, synchronization time, and whether there was an exception in the synchronization.
You can search by one or more of these parameters. To do so, enter values as desired into the fields, and then click Go to perform the search.
Screenshot
An image of the Sync Detail page is provided below:
Sync Detail page
There is also a daily synchronizations report, which you can access from the Sync Reports sub tab. It offers a searchable table that lists how many synchronization attempts and failures have occurred during specified hours on a given date. It also provides metrics on the average and maximum synchronization times, upload data sizes, and download data sizes. You can filter the table by date and device type, as well as specify the range of hours (Start Time and End Time) displayed.
Viewing Synchronization Summary Reports
For each hour of the day, the following report summarizes the synchronization for the entire system along with a graph. Use this report to view the overall synchronizing pattern of the day.
Sync Summary Report (Daily) page (1 of 2)
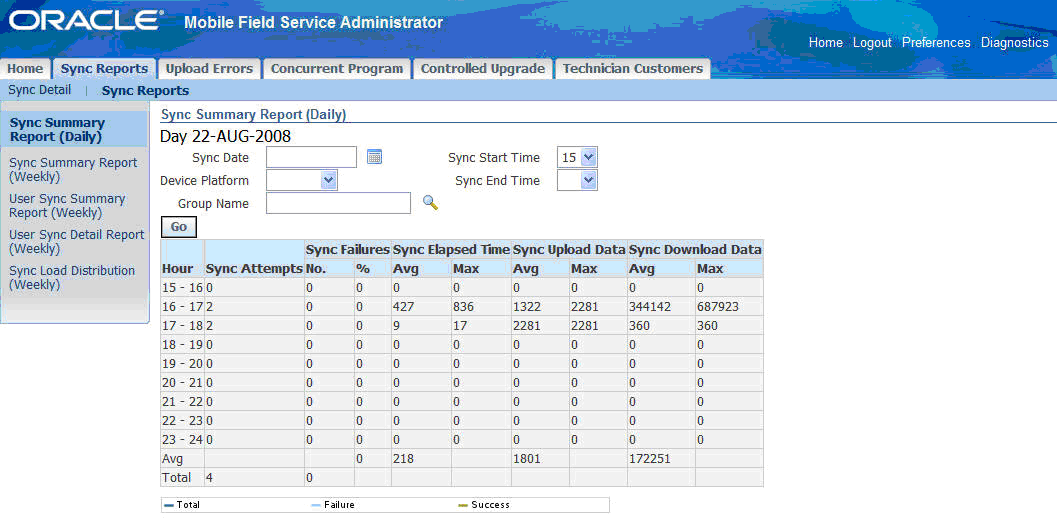
Sync Summary Report (Daily) page (2 of 2)

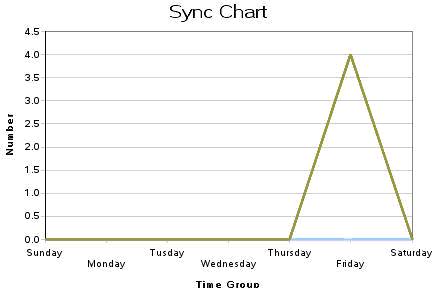
The following report displays the summary of the synchronization for the entire system for each week on daily basis along with a graph. Use this report to view the overall synchronizing pattern of the week.
Sync Summary Report (Weekly) page (1 of 2)
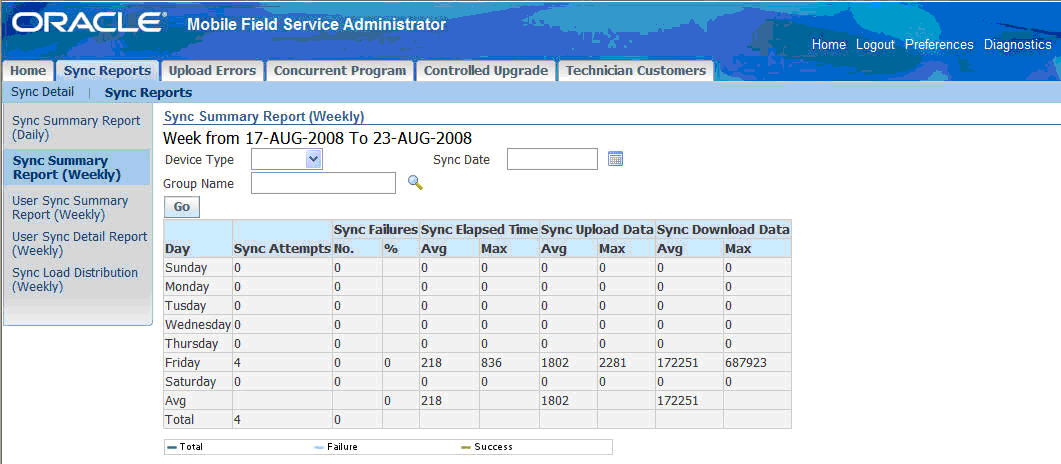
Sync Summary Report (Weekly) page (2 of 2)
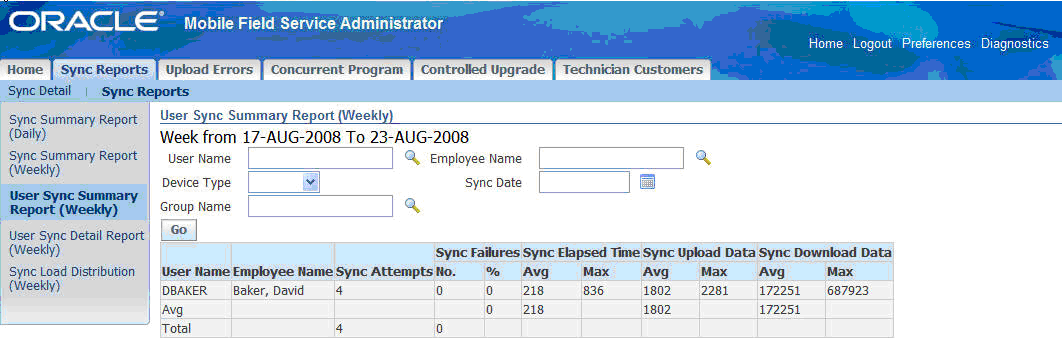
Viewing Engineer Synchronization Details
The following report summarizes the synchronizations for all engineers for each week. Use this report to compare the different synchronizing activities for each engineer.
User Sync Summary Report (Weekly) page
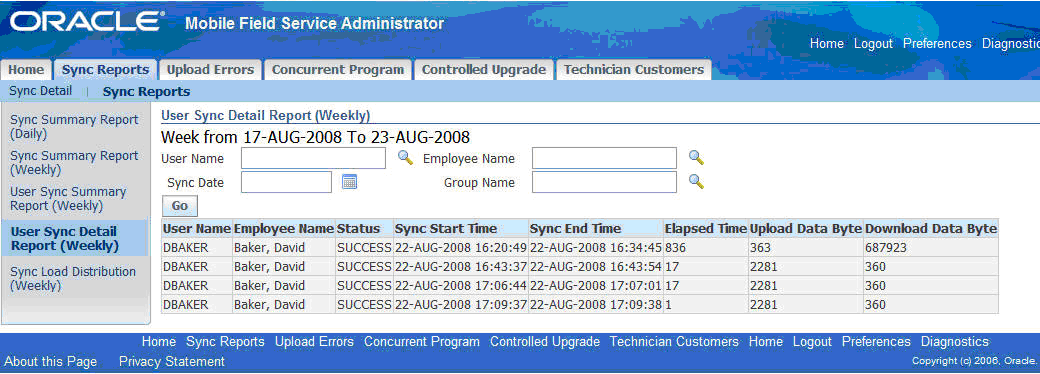
The following report displays the details of all the synchronizations for an engineer for each week. Use this report to view the detailed statistics of all the synchronizations done by the engineer.
User Sync Detail Report (Weekly) page
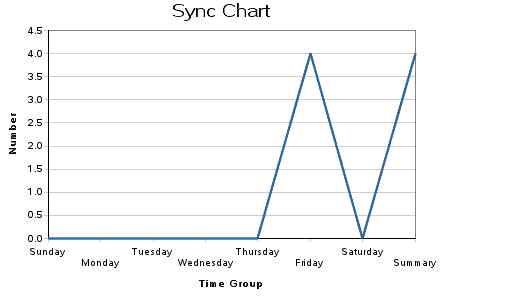
Viewing Load Distribution
The following report displays the load distribution for each hour over a span of days. This report helps you in traffic modelling and estimation of the load on the system.
Sync Load Report (Weekly) page (1 of 2)
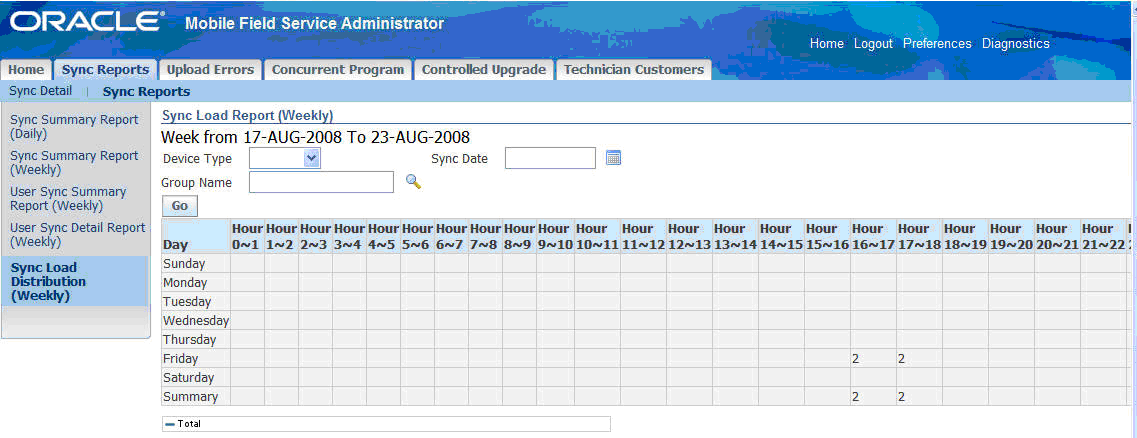
Sync Load Report (Weekly) page (2 of 2)
Working with Upload Errors
This section covers the following tasks:
Understanding Upload Errors
During upload, some of the data that is synchronized might not be applied to the enterprise database.
The following situations might cause upload errors:
-
System Issues: System issues might cause upload errors if the system is on a different mobile patch level than what is required. Administrators should verify the correct patch levels if this situation is suspected.
-
Setup Issues: Setup issues might cause upload errors if the correct business process type or profile setting is not set on the enterprise system. For example, in an expense line, it is necessary that the expense type is set correctly. If the expense type is set as "lunch" on the enterprise system while on the mobile device the expense line is set as "dinner," then this issue might cause an upload error.
-
Faulty Data or Data Conflicts: Faulty data or data conflicts can also cause upload errors. For example, multiple people attempting to update the same record can cause data conflicts where the server and the client to go out of sync.
The Mobile Application Foundation maintains a log of all errors that occur during the upload process. In the Upload Error pages, you can view and reapply these errors. In the case of a system or setup issue, you only need to fix the system or setup issue and then reapply the error. In the case of faulty data or data conflicts, you need to modify the data and then apply the error.
You can change data or system elements as needed and then reapply errors to the enterprise database. If they are successful, then you can delete them from the error tables. If they continue to fail, then you can choose to either modify them once more and try again, or to discard the failed errors and delete them from the error tables.
The Mobile Application Foundation logs every user synchronization session that has errors during upload, as well as the actual errors. For example, a user synchronization session could consist of uploading two service requests and three debrief lines. In this session, suppose two of the debrief lines failed to be applied to the enterprise system. This session would have two upload errors. You can choose to discard one or both of these errors. However, when you reapply even one of the errors, all the errors in the user session will be reapplied. Therefore, it is recommended that you make changes to all the errors in a synchronization session before reapplying the session.
Depending on how they are handled by the administrator, upload errors can be classified as follows:
-
Deferred: These transactions did not go through to the main database tables. Either they have never been reapplied, or they have been reapplied multiple times and always failed.
-
Passed: These transactions have been successfully reapplied. Only transactions that originally failed and later were successfully reapplied are shown here. Passed upload errors can be purged (permanently deleted) from the system by an administrator.
-
Discarded: These are transactions that you want to remove from the system because reapplying them has never been successful. Discarded upload errors are analogous to files that are in the "Recycle Bin" or the "Trash." Discarded upload errors can be purged (permanently deleted) from the system by an administrator.
Purging Upload Errors
Administrators should periodically purge all stored upload errors, because the table in the enterprise system which holds them will grow infinitely large unless its contents are occasionally removed.
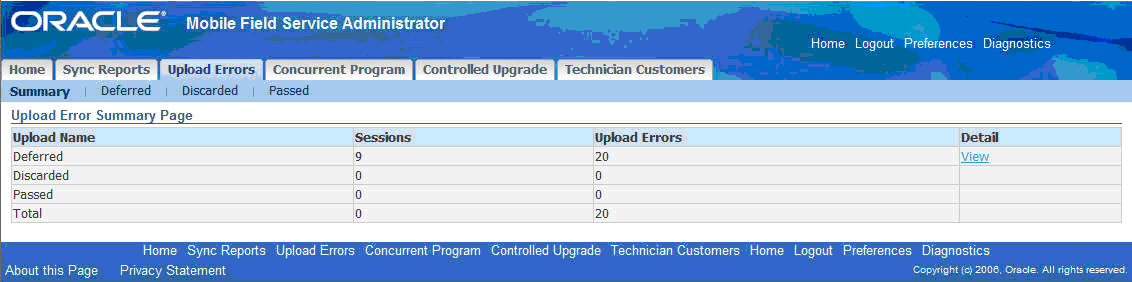
Viewing the Upload Errors Summary
Use this procedure to view the upload errors summary.
Steps
-
In the Mobile Field Service Administrator Console, select the Upload Errors tab.
The Upload Error Summary page appears providing summary information for deferred, discarded, and passed upload errors.
-
To view further information about the errors, click the appropriate View link in the Detail column.
Alternatively, you can click a sub tab to navigate to the respective detail page for that error type.
Screenshot
An image of the Upload Error Summary page is provided below:
Upload Error Summary page
Managing Deferred Upload Errors
Upload errors are generated during the upload process when some of the data fails to be applied to the enterprise database. Upload errors can be caused by the following:
-
System issues.
It is possible that the system is on a different mobile patch level than what is required.
-
Setup issues.
The correct business process type or the correct profile setting is not set on the enterprise system. For example, it is necessary that the expense type for an expense line is set correctly.
-
Faulty data or conflicts.
Oracle Mobile Application Foundation maintains a log of all upload errors. You can use the Mobile Field Service Administrator Console to view and manage these errors.
Deferred upload errors are transactions that did not go through to the main database tables. Either they have never been reapplied, or they have been reapplied multiple times and always failed.
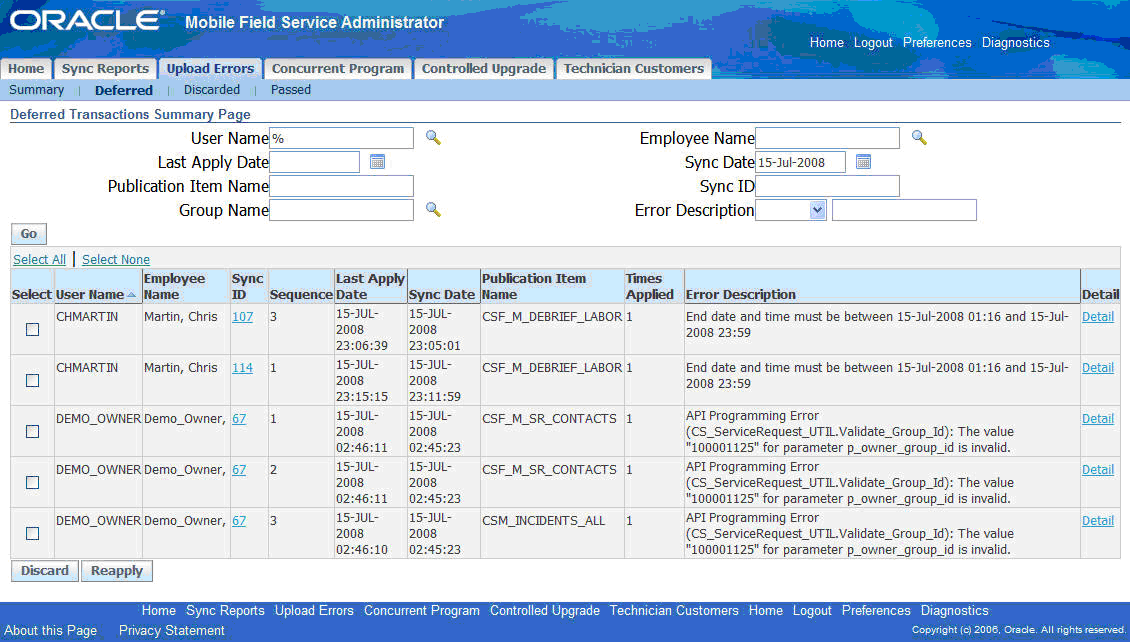
To Manage Deferred Upload Errors
Use this procedure to manage deferred upload errors:
-
In the Mobile Field Service Administrator Console, select the Upload Errors tab and then the Deferred sub tab to navigate to the Deferred Transactions Summary page.
Deferred Transactions Summary page
-
If desired, you can search for errors by one or more of the provided parameters: user name, synchronization date, publication item name, or the error description that failed. The default result set displays all user synchronization sessions that failed. To perform a search, enter values into the appropriate fields, and then click Go. You can use the percent sign (%) as a wildcard character.
-
Review the Deferred Transactions Summary table, which displays a summary of user synchronization session errors. The table contains the following columns:
-
User Name: The name of the mobile user whose data had errors.
-
Synch ID: The ID of the synchronization session.
-
Last Apply Date: The date and time at which the user last synchronized the data.
-
Error Count: The number of errors that have occurred.
-
Times Applied: This displays the number of times the transaction was reapplied unsuccessfully, after it was deferred. For a new upload error, the value is "1."
-
Select: In this column you can select a check box to work with a particular error (you can reapply it, discard it, or view its details).
-
-
To view further details about a particular user synchronization session, click the Sync ID link located in that row in the table.
The Deferred Transaction Detail page appears.
-
To edit transactions details, click the Details link located in that row in the table.
The Transaction Edit page appears.
-
To discard errors, select the appropriate check box(es), then click the Discard button.
-
To reapply errors, select the appropriate check box(es), then click the Reapply button.
To Work with the Deferred Upload Errors of a Particular User Synchronization Session
Use this procedure to work with the deferred upload errors of a particular user synchronization session:
-
To reach the Deferred Transactions Detail page, follow this navigation path in the Mobile Field Service Administrator Console:
-
Select the Upload Errors tab.
-
Select the Deferred sub tab.
-
Click a Sync ID link.
Deferred Transactions Detail page
The Deferred Transactions Detail page appears displaying information about the user synchronization session and the errors that occurred in that session. The error information displayed includes the following:
-
Sequence Number: A synchronization session includes all the records updated by the mobile user. The sequence number indicates the order of this record among the records that were applied to the enterprise database.
-
Publication Name: Publication name refers to a group of mobile tables which comprise the data store for the mobile application in the mobile device. A mobile application is composed of Publications (data) and a mobile application (code).
-
Publication Item Name: Publication item names are the names of the mobile tables in Oracle Mobile Field Service Store and Forward application. A publication item is part of a publication.
-
Publication Wrapper Package Name: The wrapper name is the name of the PL/SQL packaged procedure which is responsible for applying the client changes to the enterprise database.
-
Last Apply Date: The date when the error was last applied.
-
Error Detail
-
-
To access the page where you can view and edit the details of a particular error, click the appropriate Detail link.
The Transaction Edit page appears.
To Edit the Details of Deferred Upload Errors
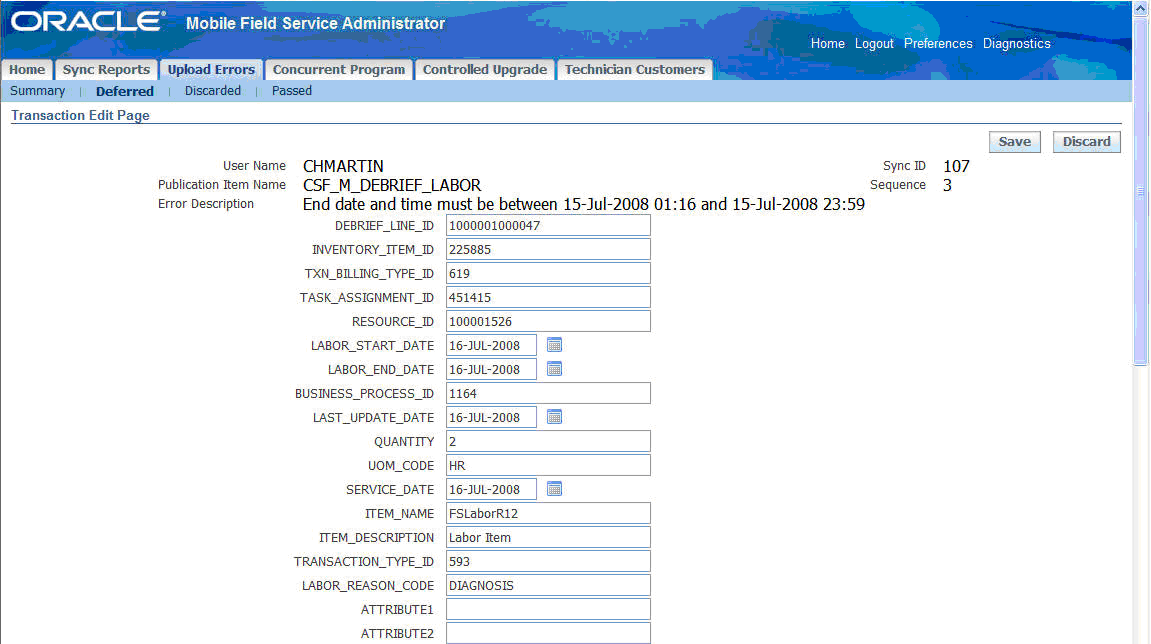
Use this procedure to edit the details of a particular deferred upload error:
-
To reach the Transaction Edit page where you can edit the details of deferred upload errors, follow one of these two navigation paths in the Mobile Field Service Administrator Console:
-
Select the Upload Errors tab.
-
Select the Deferred sub tab.
-
Click a Detail link in the table, opening the Transaction Edit page.
Alternative method.
-
Select the Upload Errors tab.
-
Select the Deferred sub tab.
-
Click the Sync ID link in the table, opening the Deferred Transactions Detail page.
-
Click the Detail link in the table, opening the Transaction Edit page.
Transaction Edit page
-
-
The Transaction Edit Page displays details about a particular deferred upload error. On this page, you can do one of the following:
-
Discard this error: Click Discard.
-
Change the values of this error: If faulty values are causing the upload error, you can edit values as desired in the fields provided, and then click Save to apply changes.
-
Managing Discarded Upload Errors
Discarded upload errors are transactions that you want to remove from the system. Reasons for discarding transactions include the following:
-
Reapplying them has never been successful.
-
The mobile user entered an incorrect value and wants to undo the transaction.
-
The transaction has become old due to multiple failures and the user has created more recent transactions.
Discarded errors are analogous to files in the "Recycle Bin" or the "Trash." Use this procedure to manage discarded upload errors.
To Manage Discarded Upload Errors
-
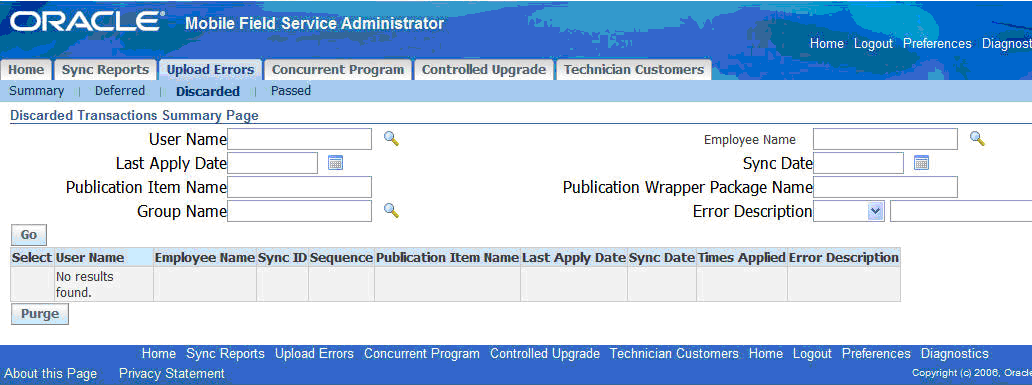
In the Mobile Field Service Administrator Console, select the Upload Errors tab and then the Discarded sub tab to navigate to the Discarded Transactions Summary page.
Discarded Transactions Summary page
-
If desired, you can search for errors by one or more of the provided parameters: user name, synchronization date, publication item name, or the name of the wrapper that failed. The default result set displays all user synchronization sessions that have been discarded. To perform a search, enter values into the appropriate fields and then click Go. You can use the percent sign (%) as a wildcard character.
-
Review the Discarded Transactions Summary table, which lists discarded user synchronization session errors. The table contains the following columns:
-
User Name: The name of the mobile user whose data had errors.
-
Synch ID: The ID of the synchronization session.
-
Last Apply Date: The date and time at which the user last synchronized the data.
-
Error Count: The number of errors that have occurred.
-
Times Applied: This column displays the number of times the transaction was reapplied unsuccessfully, after it was deferred. For a new upload error, the value is "1."
-
Select: In this column, you can select which errors you want to purge.
-
-
To purge discarded errors, ensure that the errors that you want to purge are selected in the table. Alternatively, you can purge all errors by clicking Select All and then Purge.
Note: Purging will permanently delete the discarded errors from the system.
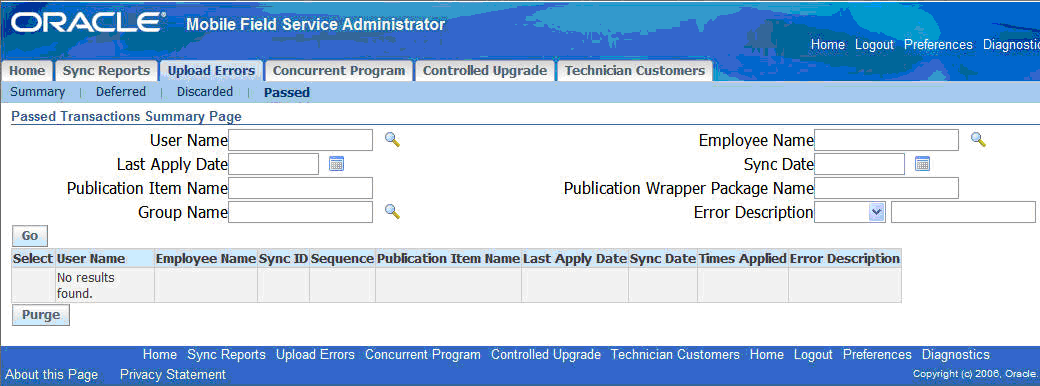
Managing Passed Upload Errors
Passed upload errors are transactions have been successfully reapplied. Please note that only transactions that originally failed and later were successfully reapplied are shown in the Upload Errors tab. Use this procedure to manage passed upload errors.
To Manage Passed Upload Errors
-
In the Mobile Field Service Administrator Console, select the Upload Errors tab and then the Passed sub tab to navigate to the Passed Transactions Summary page.
Passed Transactions Summary page
-
If desired, you can search for errors by one or more of the provided parameters: user name, synchronization date, publication item name, or the name of the wrapper that failed. The default result set displays all passed errors. To perform a search, enter values into the appropriate fields, then click Go. You can use the percent sign (%) as a wildcard character.
-
Review the Passed Transactions Summary table, which lists passed user synchronization session errors. The table contains the following columns:
-
User Name: The name of the mobile user whose data had errors.
-
Sync ID: The ID of the synchronization session.
-
Last Apply Date: The date and time at which the user last synchronized the data.
-
Error Count: The number of errors that have occurred.
-
Times Applied: This column displays the number of times the transaction was re-applied unsuccessfully, after it was deferred. For a new upload error, the value is "1."
-
Select: In this column, you can select which errors you want to purge.
-
-
To purge passed errors, confirm that the errors you want to purge are checked off in the table. Alternatively, you can purge all errors by clicking Select All and then Purge.
Note: Purging will permanently delete the discarded errors from the system.
Defining and Editing Mobile Queries
You can create and update mobile queries and then download them to technicians' mobile devices. When defining these queries, you give the query a name, assign it to a responsibility, and then specify its retention policy, input variables, output format, and the name of the work flow or BPEL Process that runs the query.
-
Log in as Mobile Field Service Administrator.
-
Select the Mobile Query tab and then the Create Mobile Query subtab.
-
Fill out the upper region of the Create Mobile Query page and use the following list that further explains certain fields in the region:
-
Query Type: LOV that consists of SQL, PL/SQL, and Workflow.
-
Workflow Name: Displays all valid workflow names that include a few seeded workflows. This is applicable only if you select the query type as Workflow.
-
Query Text: Supply a SQL statement that uses the table name defined the profile CSM: Mobile Query Schema Name. The specified schema must be a non-EBS, custom schema. It is null by default. All valid table names defined in the custom schema are possible. The default table is ASG_USER.
-
Enable for Email: In this LOV, select Yes if you want to run this query from e-mail as well as from a Mobile Field Service device.. Select No if you want to run the query only from a Mobile Field Service device. For more steps for e-mail mobile queries, see Setting Up Mobile Queries Based on E-Mail.
-
Access Restricted by Responsibility: In this LOV, select Yes or No.
The mobile query access is controlled by responsibility if the flag is set to Yes. This means that this mobile query can be accessed only by users with the responsibility associated with this mobile query. In this case, you must set up this user as a FND_USER in E-Business Suite. If you want to provide access to this mobile query to users who do not have an FND_USER ID, such as non-employees or third party engineers, then set this flag to No. Doing so allows any user to run this mobile query.
Caution: Take extreme care when setting this flag to No. It is your responsibility to define any and all security logic as part of implementing this mobile query.
-
Output Format:
-
Select Form if the output contains only one record.
-
Select Table if the output contains multiple records.
-
Select As an Attachment for output such as Word or Excel.
-
-
Execution Mode: Mode values may be Synchronous or Asynchronous, and Asynchronous is the default. With the synchronous mode, technicians are able to submit a query and receive the query response in a single sync session. With the asynchronous mode, technicians submit the query and synchronization with server. They will receive the Query response after the next synchronization.
-
-
Fill out the Query Variables region of the Create Mobile Query page and use the following list that further explains certain fields in the region:
-
In the Query Variable region of the page, enter the variable name from the table whose value you want to query. Provide any desired default value for the variable name.
-
Click Add Another Row to supply an additional row for another variable.
-
Select the check boxes for the variables that you want to retain in the query template or click Delete to delete selected rows.
-
Click save to save your named query template.
-
Click Test to run the query for accuracy.
To Search for and Edit a Mobile Query
-
Log in as Mobile Field Service Administrator.
-
Select the Mobile Query tab and then the Search Mobile Query subtab.
-
In the upper part of the page, enter the desired elements of the query description for your search criteria and click Go.
The result of the search appears in the lower part of the page.
-
Select a mobile query for subsequent actions as defined by the following list:
-
Click Update to edit the query in the Update Mobile Query page.
-
Click Delete to remove a query from the list.
-
Click Clone to create a copy of an existing mobile query.
-
Click Run to execute the query.
-
Click Create to save the query.
-
Setting Up Mobile Queries Based on E-Mail
Mobile queries are not limited to the synchronization process using store and forward client devices. Technicians can make such queries independent of these devices by using an e-mail client. For this method, as implementers and administrators you define and test queries much as you do for store and forward devices but now must perform additional steps unique to the requirements of e-mail processing.
To Define a Mobile Query for E-Mail
-
Perform the steps to define a mobile query in Defining and Editing Mobile Queries and make sure that you select Yes in the Enable for Email LOV.
To Set Server Profiles for E-Mail Mobile Queries
Because these mobile queries are based on e-mail, you must define the target outgoing, SMTP, server and the retrieving, IMAP, server.
-
Log in as Mobile Field Service Administrator.
-
In the Oracle Mobile Field Service Administrator console, select the Mobile Query tab and then the Email Profiles Setup subtab.
-
Enter values for the following profiles. Refer as needed to their detailed descriptions in the list of profiles common to store and forward devices.
-
CSM: Email IMAP Host Name
-
CSM: Email IMAP User Name
-
CSM: Email IMAP User Password
-
CSM: Email SMTP Host Name
-
CSM: Email SSL Enabled
-
CSM: Inbox for Email Interface
-
-
Click Save.
-
Someone with system administrator responsibility must set the profile CSM: Notify on Email Mobile Query Exceptions.
To Set Status Environmental Profiles
For the application to resolve status query commands, several other profiles must be set.
-
Verify and if necessary, reset the following profiles:
-
CSF: Default “In Planning” task status
-
CSF: Default “Accepted” task status
-
CSF: Default “Cancelled” task status
-
CSF: Planned Task Status for Planned Task
-
CSF: Default Rejected Task Status
-
CSF: Default Task Type for Personal Tasks
-
CSF: Default Working task status
-