Using the Mass Update Facility
This chapter covers the following topics:
- Introduction
- About Mass Update Batch Types
- Overview of the Mass Update Batch Creation Process
- Overview of Mass Update Stage Operations
- Managing Mass Update Batches
- Searching for Existing Mass Update Batches
- Creating Mass Update Batches
- Selecting Item Instances
- Creating a New Batch
- Adding Item Instances to a Batch
- Entering New Values for Transfer Owner Batches
- Entering New Value Fields
- Entering New Values for Move Batches
- Entering New Values for General Batches
- Entering New Values for Terminate Batches
- Updating Associations
- Entering and Viewing Contract Options
- Scheduling Mass Update Batches
- Viewing Mass Update Batch Details
- Updating Mass Update Batches
- Removing Item Instances from Mass Update Batches
- Viewing Output of a Failed Mass Update Batch
- Deleting Mass Update Batches
- Creating and Managing Mass Update Batches Using Web ADI
Introduction
You can perform mass updates on sets of item instances, by changing different attributes, including party associations.
The main topics in this chapter are as follows:
About Mass Update Batch Types
Oracle Installed Base mass updates are grouped to cater to specific business objects and transactions. The five types of mass update and the main operations allowed for each update type, are as follows:
Transfer Owner
-
Transfer item instances from one owner to another one
-
Update the current, install, bill-to and ship-to locations, associations, and other instance attributes
-
Specify the contract options for transferring service contracts associated with the instances
Terminate
-
Terminate a set of item instances in a batch.
Move
-
Move item instances from one location to another
The location that is being changed can be the current or install location or both.
You may be required to modify the bill-to and ship-to location and some other instance attributes.
Web ADI
Download a Microsoft Excel template with selected item instances. Create or update the item instances, and then upload the revised spreadsheet. After the upload is complete, the modified data is uploaded to interface tables and is automatically processed by the asynchronous Initiate Mass Edit concurrent program.
General
This mass update type is for sets of item instances that do not fall into any of the other mass update categories.
-
Change installation date, additional attributes, associations, contacts and some other instance attributes.
Overview of the Mass Update Batch Creation Process
You can create one or more mass update batches. Each batch contains the parameters required to perform the mass update of a set of item instances.
You must run the Initiate Mass Edit concurrent program to perform the mass updates. The program can be scheduled to run at regular intervals or can be run as a single execution after you have created a mass update batch.
Important: You do not have to run or schedule the Initiate Mass Edit concurrent program if you are using the Web ADI option. See Creating and Managing Mass Update Batches Using Web ADI.
For more information regarding running the Initiate Mass Edit concurrent program, see Run the Initiate Mass Edit Program, Oracle Installed Base Implementation Guide.
The creation of a batch is a process with several stages:
-
Using the Mass Update page, select the update batch type.
Options are Transfer Owner, Terminate, Move, Web ADI, and General.
-
Then for each mass update type, you follow a series of stages:
The main stages required for the creation of a mass update batch depend on, and vary with, the batch type. Only the relevant pages for that batch type are presented to the user. The diagram that follows shows these stages for each of the mass update batch types:
Note: This diagram does not include the creating mass update batches using the Web ADI feature.
See Creating and Managing Mass Update Batches Using Web ADI.
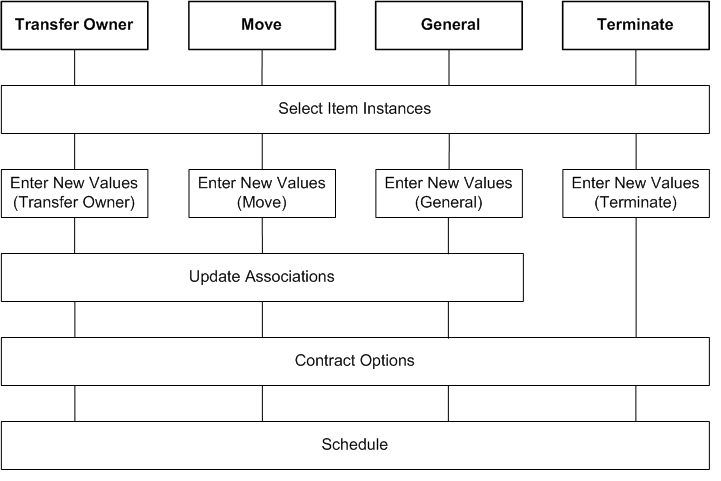
For more information about the mass update stages, see Overview of Mass Update Stage Operations.
Related Topics
Overview of Mass Update Stage Operations
The main stages of the mass update process are as follows:
When you create or update a mass update batch, the stages are represented by a left-to-right "train" of steps, which appears at the top of each page.
When you create a batch, you may perform each of the steps in sequence, or you may break out of the sequence, and complete the steps by updating the batch later. When you update a batch, you can select any step that appears as a clickable link in the train of steps.
For all batch types, you must go through the first two stages, Select Item Instances and Enter New Values. The Update Associations and the Contract Options stages are both optional.
To submit a batch for execution, you must perform the Schedule stage. After you have scheduled the batch for execution, you must run the Initiate Mass Edit concurrent program to execute the batch changes.
1. Select Item Instances
This stage is required for all batch types.
This stage is required for all batch update types. At the Select Item Instances stage, you create a new batch and then add item instances to the batch, either during the batch creation process or later when you update the batch.
For details, see Selecting Item Instances.
2. Enter New Values
This stage is required for all batch types.
You enter new values for your selected item instances. The fields for which you can enter new values differ for each batch type.
For details, select the appropriate topic from the following:
3. Update Associations
The Update Associations stage is not available for Terminate batches.
This stage is optional. For the selected item instances, you can expire existing associations and add new associations. For the new associations, you can also add contacts and accounts.
For details, see Updating Associations.
4. Contract Options
This stage is optional. For Transfer Owner and Terminate batches, you can enter contract options for the selected item instances; for the other batch types, you can only view the existing contract options associated with item instances.
For details, see Entering and Viewing Contract Options.
5. Schedule
After you have specified all the new values for your selected item instances, you can schedule the Initiate Mass Edit concurrent program to perform the updates.
You can schedule the request to run as soon as possible or you can provide a specific date and time for run execution.
Note: If the mass update run fails to successfully update all the selected item instances, you can view details of the failed item instances.
For details, see Scheduling Mass Update Batches.
Mass Update Batch Statuses
One of the attributes of a mass update batch is its status. The valid statuses of a mass update batch are as follows
-
Created
This applies to batches that have not yet been submitted, or have been updated after batch submission but not resubmitted.
-
Scheduled
This applies to batches that have been submitted, but not yet executed. You can unschedule a batch execution by updating or deleting the batch.
-
In Progress
You cannot update a batch that is currently being executed.
-
Successful
All item instances in the batch were successfully updated.
You cannot update a batch that completed successfully
-
Failed
One or more item instances in the batch were not successfully updated. You can see the error details in the output of the run where the batch was processed.
You cannot update a failed batch.
Managing Mass Update Batches
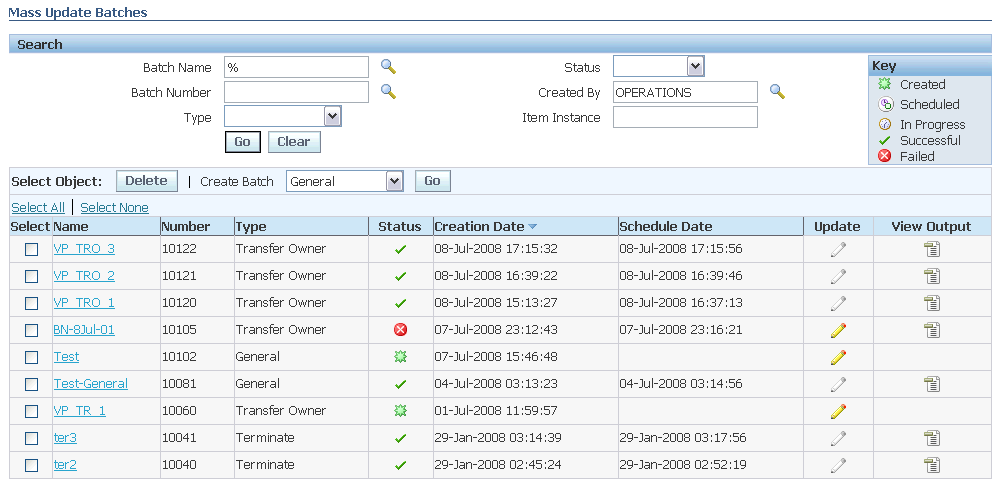
You can perform the following batch management functions from the Mass Update Batches page:
See Also
Automatic Validation
Throughout the process of creating or updating a batch, Oracle Installed Base performs automatic validation of the data, particularly when you explicitly save the data or submit the batch. Validation detects situations such as when you initially select item instances to be updated by the batch, but by the time that you submit the batch, those item instances have been expired.
When it detects an error, Oracle Installed Base displays a summary error message on the page, with a link that enables you to see more error details.
Searching for Existing Mass Update Batches
You can search for existing Mass Update batches using the following search parameters:
-
Batch Number
-
Batch Name
-
Type
Either All Types or one of the existing mass update batch types
-
Status
Either Any Status or one of the values Created, Scheduled, In Progress, Successful, Failed
-
Created By
-
Item Instance
Steps
-
Click the Mass Update tab.
-
In the Search area of the Mass Update Batches page, enter one of more search parameters, and click Go.
The batches that satisfy the search criteria appear in the lower part of the page.
Comments
From the Mass Update Batches page, you can perform the following operations:
See Also
Creating Mass Update Batches
When you create a mass update batch, you go through a series of steps to enter the information required to perform the mass update.
For an overview of the complete process, see Overview of Mass Update Stage Operations.
If you are familiar with the stages of the mass update process, select the appropriate stage. If you are creating a completely new batch, start at the first stage.
Related Topics
Entering New Values for Transfer Owner Batches
Entering New Values for Move Batches
Entering New Values for General Batches
Entering New Values for Terminate Batches
Updating Associations
Entering and Viewing Contract Options
Scheduling Mass Update Batches
Overview of Mass Update Stage Operations
Selecting Item Instances
This is the first stage in the batch creation process, and is also available when you update a batch.
What you can do at this stage depends on whether you are creating a new batch, or updating an existing one.
When creating a new batch, you specify general batch information, such as a batch name. Then, both during batch creation or subsequent updates to the batch, you can add item instances to the batch, before you submit the batch.
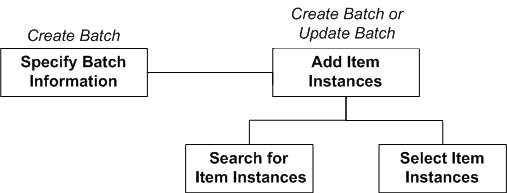
This section includes the following topics:
See Also
Creating a New Batch
When you create a new mass update batch, you must first choose the batch type and give the batch a name.
If the batch type is Transfer Owner, you must also select the owner name and owner account.
You can also enter a Note for the batch. This note will be automatically added to all the item instances of the batch if the batch mass update completes successfully.
Steps
-
Click the Mass Update tab.
-
In the Create Batch field, select the batch type from the list of values, and click Go.
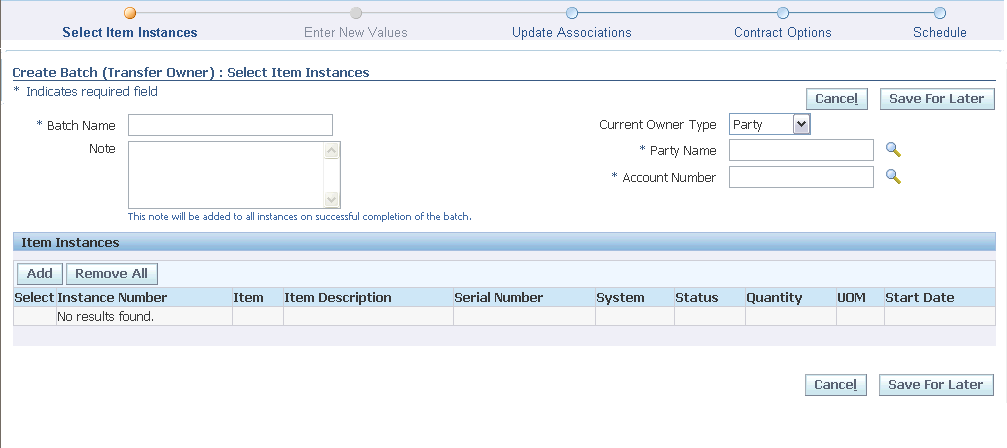
The Create Batch page for your selected batch type appears.
-
Enter a Batch Name for your batch.
-
For Transfer Owner batches only, select a Current Owner Name and an Owner Account Number.
-
Optionally, enter Note information.
The Note information is added to each item instance of the batch if the batch executes successfully.
-
You may proceed in either of the following ways:
-
Save the batch details you have entered so far, and add more details later.
Adding Item Instances to a Batch
To add item instances to a mass update batch, you must be in the process of either creating or updating the batch, and in the Select Item Instances stage.
You search for item instances, then you select the item instances to add to the batch.
Note: The Mass Update process automatically includes the parent instance if a child component-of instance is selected.
Use the Show Root Item Instances Only check box on the Item Instance Search page to search only the parent/root item instances based on the search fields. For given search criteria, child item instances will not appear in the search result.
Steps
To add an item instance to a batch
-
In the Select Item Instances page, click Add.
The Add Item Instances page appears.
-
Perform either a simple or an advanced search for item instances in the top part of the page.
The results of the search appear in the lower part of the page.
Note: For Transfer Owner batches, the current owner party number and owner account number are automatically added to the search criteria. You cannot select different values for these fields using the advanced search options.
-
In the results area, you can perform the following actions:
-
Click an item instance hyperlink to see the item instance details.
-
Select the item instances to be added to the mass update batch, then click Apply.
-
Click Cancel - to add no item instances to the batch.
-
Related Topics
Entering New Values for Transfer Batches
Entering New Values for Move Batches
Entering New Values for General Batches
Entering New Values for Terminate Batches
Entering New Values for Transfer Owner Batches
In this page, you enter new attribute values for mass update batches of type Transfer Owner. The page identifies the batch name, the current owner, and the current owner account number selected for transfer.
Steps
-
You must select values for the following attributes of the new owner:
-
Owner Party Name or Owner Party Number (selecting one of the values causes the other to be automatically filled in)
-
Owner Account Number.
-
-
You may also specify a new Transfer Date, which must be before the batch scheduled date.
-
In addition, you can enter new values for the following fields:
-
Save your changes.
See Also
-
Updating Associations
Entering New Value Fields
Depending on the mass update batch, there are different groups of new value fields that you can enter.
This section consists of the following topics:
Entering New General Fields
For all mass update batch types, you can enter new values for the following fields:
-
Status
For Terminate mass update batches, you can enter only a terminable status; for the other batch types, you can enter only a non-terminable status.
-
Version Label
In addition, for all mass update batch types except Terminate, you can enter new values for the following fields:
-
External Reference
-
Version Label
-
System
You can only change the System Name to a system that belongs to the owner with the current owner account number.
Entering New Current and Install Location Fields
New Current Location Fields
These fields specify a new current location for all item instances being transferred or moved.
For Transfer Owner batches, you can enter values for the current location fields; for Move batches, you must enter new values for either these fields or the new install location fields.
New Install Location Fields
These fields specify a new install location for all item instances being transferred or moved.
For Transfer Owner batches, you can enter values for the install location fields; for Move batches, you must enter new values for either these fields or the new current location fields.
You can select the check box "Same as current" to select the install location to be the same as the current location; if you select this check box, the other fields in this page area are hidden.
Steps (for both Current and Install Location Fields)
-
Select a Type.
-
If, for the Type, you selected HZ Location, Vendor Site, or Internal, you must select a value for the Address 1 field - the list of values shows all the Address1 fields in the HZ locations table.
-
If, for the Type, you selected Party Site, you can select values for the following fields:
-
Party Name and Party Number
If the Install parameter "Show all parties" is set to No, you can only select related parties from the active parties in the HZ Parties table. Selecting a value for one of the fields Party Name or Party Number causes the other field to be automatically filled in.
-
Party Site Number
Select from all the valid location numbers for the selected party.
-
Address 1
Select from all the valid Address1 values for the selected party.
-
Entering New Bill To and Ship To Location Fields
These fields specify new Bill To locations and new Ship To locations for all item instances being transferred or moved.
For both Bill To and Ship To locations, you can select values for the following fields:
-
Party Name and Party Number
If the Install parameter "Show all parties" is set to No, you can only select related parties from the active parties in the HZ Parties table. Selecting a value for one of the fields Party Name or Party Number causes the other field to be automatically filled in.
-
Party Site Number
Select from all the valid location numbers for the selected party.
-
Address 1
Select from all the valid Address1 values for the selected party.
Entering New Additional Attribute Fields
The user-defined additional attributes appear that are common to the item instances selected. You can enter new values for the additional attributes that you want to apply to all the item instances in the batch.
Entering New Values for Move Batches
In this page, you enter new attribute values for mass update batches of type Move.
Steps
-
You must select at least one new value in either the New Current Location or the New Install To Location Fields.
-
In addition, you can enter new values for the following fields:
-
Save your changes.
See Also
-
Updating Associations
Entering New Values for General Batches
In this page, you enter new attribute values for mass update batches of type General.
Steps
-
You can enter new values for the following fields:
-
Note: You must enter at least one value for update.
-
Save your changes.
See Also
-
Updating Associations
Entering New Values for Terminate Batches
In this page, you enter new attribute values for mass update batches of type Terminate.
Steps
-
You must enter an end date to expire all the item instances in the batch.
-
You can optionally enter a new terminable status for the item instances in the batch.
-
In addition, you can enter new values for the following fields:
-
Save your changes.
See Also
-
Updating Associations
Updating Associations
In the Update Associations page, you can expire existing associations and add associations. For the new associations, you can also add contact and account information.
The page contains the following screen areas:
-
Current Associations
-
New Associations
Current Associations
The Current Associations area shows a list of all the distinct associations - apart from Owner - that belong to the item instances in the batch. For each distinct association, the list also displays, as a link, the number of affected item instances that have that association.
In the Current Associations area, the main operation to perform is to select item instances whose associations you want to expire.
You can also update contacts for a current association. For more information, see Updating Contacts for Current Associations.
Updating Contacts for Current Associations
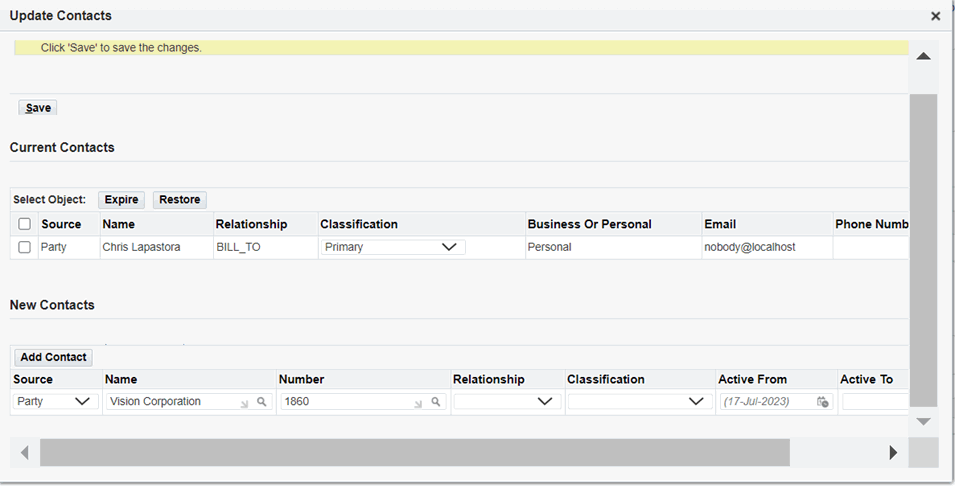
Use the Update Contacts page to change the contacts for a current association. You can access this page through one of the following navigations:
-
View Batch page (Install Base Agent User > Mass Update > Search for a batch > Click the Batch number link > Click the Update Contacts button).
-
Update Batch page (Install Base Agent User > Mass Update > Search for a batch > Click the Update icon in the Update column).
Create Batch (General): Update Associations

To update contacts for a current association:
-
Navigate to the Update Contacts page.
-
Click the Add Contact button.
-
Select the contacts to add.
-
Click Save.
-
Note the updated list of contacts on the page.

-
Click Next.
-
Click Next.
-
Select a Schedule option:
-
As soon as possible
-
Start at a specific date and time: Select a date.
-
-
Click Submit.
Steps to Expire Current Associations
Use the Update Associations page to expire item instances.
-
To expire all associations of all item instances in the batch, click Expire All.
-
To expire the associations of all item instances with a particular association, select the association and click Expire.
-
To expire individual item instances of a particular association:
-
Click the Affected Item Instances link for the association.
The page that appears displays details of all the item instances with that association. For a particular item instance, you can also view the contacts and accounts for the association.
-
Select one or more individual item instances to expire their associations as part of the mass update batch.
-
-
You can undo your selections for expiration as follows:
-
Click Restore All to deselect all selected item instances for all associations.
-
Select an association, and click Restore.
-
-
Save your changes.
New Associations Area
In the New Associations area, you can add new associations to all the item instances in the batch. After the association is added, the user can add contacts and accounts for the new association.
Steps to Add New Associations
-
To add a new association, click Add Association, and enter values for the new association.
-
If you want to add a contact for the new association, select the association, click Add Contact, and enter values for the contact.
-
If you want to add an account for the new association, select the association, click Add Account, and enter values for the account.
-
You can undo your additions, by clicking the Remove icon of each association, contact, or account that you do not want to be included in the mass update batch.
-
Save your changes.
See Also
Entering and Viewing Contract Options
The Contracts Options page shows contracts impacted by the selected item instances, and provides you with a number of options for indicating how the instance transfer should affect associated services.
Note: If the item instances selected in a Transfer Owner batch result in contracts from multiple operating units being selected for transfer, a warning appears on the Contracts Options page, and advises that Bill To and Ship To addresses for the new service contracts will be defaulted from customer setup.
For Transfer Owner batches, and, to a lesser extent, for Terminate batches, you must specify one or more contract rules.
Contract Rules
For Terminate and Transfer Owner batches, you must provide some contract transfer rule information.
For Terminate batches, you must provide a termination reason; you can also select a credit option.
For Transfer Owner batches, you must first choose a Transfer Option from the following:
-
Transfer and Terminate
-
Terminate
-
Use Coverage Terms
-
No Updates to Contracts
Contract Rule Fields

The amount of information available for viewing and updating depends on your choice of Transfer Option.
If Transfer Option=Transfer and Terminate or Use Coverage Terms, all the fields described subsequently in this section apply and are available.
For Transfer Option=Terminate, the only fields available are Termination Reason and Credit Option.
For Transfer Option=No Updates to Contracts, no fields are available.
Note: Unless stated otherwise, all fields are optional.
Termination Reason
Mandatory field when Transfer Option=Terminate, otherwise optional.
Credit Option
Mandatory field when Transfer Option=Terminate, otherwise optional.
There are three options for issuing a credit on the original service contract:
-
Calculated - Issue a calculated credit for the prorated value of services transferred.
-
Full - Issue a full credit for the services transferred.
-
None - Issue no credit for services transferred.
Billing Profile
The list of values contains all billing profiles created for the new owner as well as generic billing profiles. Selecting the billing profile sets the billing schedule, invoicing rule and accounting rule for the transferred lines. Leaving the billing profile blank results in a billing schedule with one-time billing, an invoicing rule of Advanced and an accounting rule of Immediate.
Keep Existing Contract Number
Selecting this check box results in new contracts retaining the same contract number as the source contracts for the transferred services.
Modifier
You can enter a modifier that will apply to all contracts created for transferred services. If no value is entered, the modifier will be the value for the profile option OKS: Transferred Contract Identifier concatenated with a datestamp.
Contract Status
Mandatory field, default value is Entered. The list of values contains all statuses that map to status types Entered and Active.
Bill Transferred Services
There are three possible values: Yes, No, and At Renewal.
If you select At Renewal, billing behavior of transferred services will be as follows:
-
Service transferred from Active or Signed contracts
The Bill Services flag on the new contract is set to At Renewal. The contract will not bill unless you manually override the flag in the service contracts authoring form.
-
Service transferred from Entered contracts
The Bill Services flag on the new contract is set to Yes.
Transfer Notes
Select the check box to transfer header notes; line coverage notes always transfer.
Transfer Attachments
Select the check box to transfer attachments. When selected, all attachments on the original contract are transferred to the new contract.
Bill To Customer
Defaults from the new Bill To customer entered for the item instances, provided the Bill To customer is related to the new owner account. If not related, the Bill To customer field has no default value and you can enter a customer.
You can optionally override the defaulted value with a different Bill To customer for transferred services.
If the Bill To customer is different from the new owner, the contract Bill To customer will also be added to the contract as a third party.
If no contract Bill To customer is specified in the batch, the contract Bill To customer will be derived from the new owner entered for the Transfer Owner batch.
The Bill To customer entered is used for all contracts created for the Transfer Owner batch.
Bill To Account
Follows same rules as Bill To Customer.
Bill To Address
You can only select a contract Bill To address if all of the impacted contracts map to the same operating unit. The list of values only contains addresses that are associated with that operating unit. If no value is entered, the Bill To address will be defaulted from TCA - the primary Bill To address for the Bill To account specified for the new contract.
If the impacted contracts are from multiple operating units, you will not be able to enter an address for the new Bill To customer. In such cases, the Bill To address will be derived from the primary Bill To address defined for the Bill To account for each operating unit.
Bill To Contact
Follows the same rules as Bill To Customer.
Ship To Customer
Follows the same rules as Bill To Customer.
Ship To Account
Follows the same rules as Bill To Customer.
Ship To Address
Follows the same rules as Bill To Address.
Impacted Contracts
For all batch types, you can view the contracts to be impacted by the batch updates. You can select the type of display for the contracts:
-
Contract
Contract-level information appears in a "master" table. Service line details of the contract selected in the master table appear in the "details" table underneath.

-
Service Line
Contract and service line information appears in a "master" table. Subline details of the service line selected in the master table appear in the "details" table underneath.

-
Covered Levels
Contract, subline, and covered level information appears in a table. You can optionally view item instance details for the covered products.

Key fields in the contract, service line and subline tables are Transfer Amount and Credit Amount. The latter is the amount that results from a termination.
Steps (for Transfer and Terminate batches)
-
Select and enter the contract transfer rule values that you require for the current batch.
-
Save your changes.
Comments
-
If you save a batch with Bill To and Ship To details, then later try to change the New Owner for the batch, you will receive an error message indicating that dependent data (Bill To and Ship To details) have been entered for the existing customer in the Contract Options page. You must remove the Bill To and Ship To details in the Contracts Options page before you can change the new owner.
-
If you save a batch, and subsequently the results set of the Impacted Contracts has changed to include contracts from multiple operating units, the Contract Options page will display a warning message and the Bill To and Ship To addresses and contacts will be greyed out.
-
The consequences of executing the mass update batch are as follows:
-
If the services in the impacted contracts are to be terminated, then the values entered in the Contract Options page for Termination Reason and Credit Option are applied to the terminated services.
-
If the services in the impacted contracts are to be transferred, then all the contract transfer rules entered in the Contract Options page are applied to the new contracts created for the transferred services.
-
See Also
-
Updating Associations
Scheduling Mass Update Batches
After entering all the details for the mass update batch, you can submit the batch for execution. You must run the Initiate Mass Edit concurrent program to perform the mass updates. The Initiate Mass Edit concurrent request executes all the mass update batches that are available for processing at the time, and generates a single output file.
For more information regarding this concurrent program, see Run the Initiate Mass Edit Program, Oracle Installed Base Implementation Guide.
Steps
-
Select your Submit option, either to submit as soon as possible, or to submit at a specified date and time.
Note: For Transfer Owner batches, if you specified the transfer date, the batch submission date must be after the transfer date.
-
Click Submit.
The status of the batch changes to Scheduled. For more information on batch statuses, and the operations that you can perform on a batch after scheduling, see Mass Update Batch Statuses and Viewing Output of a Failed Mass Update Batch.
See Also
Viewing Mass Update Batch Details
The View Batch page displays all the following batch details:
-
General batch information, including the ability to:
-
View the existing associations to the party and their corresponding contacts.
-
Delete or update the contact information of the existing association.
-
Add new contacts to the existing association or to the new associations.
-
-
Selected item instances
-
New values, with location and association details
-
Contract information, showing contract transfer rules, and impacted contracts
See Also
Updating Mass Update Batches
You can update a mass update batch any time before you submit the batch. Typically, after you have created the batch, you complete the information required for the mass update in one or more "update" sessions, before you submit the batch for execution.
Steps
-
Click the Update icon for the batch that you want to update.
-
You can change batch details in any of the stages allowed for your mass update batch type.
See Also
Removing Item Instances from Mass Update Batches
You can remove selected item instances from a mass update batch before you submit the batch.
Steps
-
In the Item Instances area, either click Remove All or select the item instances individually and click Remove.
See Also
Viewing Output of a Failed Mass Update Batch
When a mass update run finishes, it produces an output file of the results of the processing for each of the batches executed during that run.
If a batch that was executed as part of the run had any errors, the batch status is set to Failed. You can view the output of the run that included the batch execution, to see details of the item instance update failures.
Steps
-
Click the View Output icon of a batch to see if the batch was included.
-
For the error records, make corrections to the associated item instances, and resubmit the batch.
See Also
Deleting Mass Update Batches
You can delete any batch that is not is progress. When you delete a batch that has not yet been executed, any contract options that you selected for the batch are backed out, that is, not implemented.
Steps
-
In the Item Instances area, select one or more batches, and click Delete.
See Also
Creating and Managing Mass Update Batches Using Web ADI
You can use the Oracle Web Applications Desktop Integrator (Web ADI) to create and manage mass item instances. Web ADI integrates with Microsoft Excel and enables you to bring mass update batch data to a spreadsheet where familiar data entry and modeling techniques can be used to complete mass updates.
See Oracle Web Applications Desktop Integrator Implementation and Administration Guide.
Steps
-
Click the Mass Update tab.
-
In the Create Batch field, select the Web ADI type, and click the Go button.
-
Enter Batch Name and Batch Description.
-
Select one of these values from the Action drop-down list:
-
Manage Extended Attributes: Select this option to download the template that contain attributes at the item instance level to an Excel spreadsheet.
View and modify the attribute values, and then upload them back to Installed Base. Attributes downloaded against the item instance can be from different access levels such as Global, Item, Category, and Instance.
-
Manage Item Instances: Select this option to create new instances or update existing instances by copying data from a different version of Excel.
You can then copy the row into the empty template and upload to make changes.
-
Search and Manage Instances: Select this option to search for and manage existing item instances.
-
-
Click the Manage Item Instances: option, and then click the Go button.
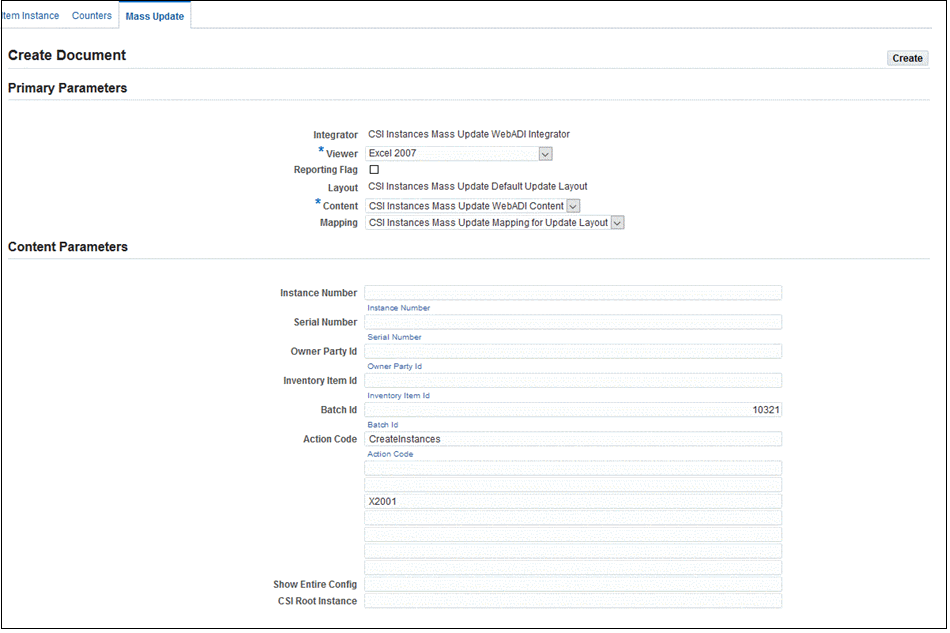
The Create Document page appears.
-
Select the Viewer that you want to use (required).
-
Enter values in other fields on the page such as:
-
Instance Number - you can enter multiple instance numbers separated by commas
-
Serial Number - you can enter multiple serial numbers separated by commas
-
Owner Party ID
-
Inventory Item ID
-
Batch ID
-
-
The default value for the Action Code appears.
-
The Show Entire Configuration and CSI Root Instance fields work in conjunction with the value in the Instance Number field.
-
Click the Create button.
The following Information message appears:

-
Click Open or Save to download the file.
The system creates the template (Excel spreadsheet).
-
Open the file.
Click the Enable Macros button.
-
Update the spreadsheet and save your changes.
-
Select Oracle, Upload from the Microsoft Excel toolbar to upload the new instance.
-
This process synchronizes the data in the Excel spreadsheet with the live data in Web ADI. See Oracle Web Applications Desktop Integrator Implementation and Administration Guide.
The Initiate Mass Edit asynchronous concurrent program is automatically triggered when the Upload option is selected. The program processes the records interface table to create or update the item instances. You can check the status of the process, and view a log that provides all information related to created instances and updated instances. It also gives error details if something cannot be created or updated.
Searching for and Managing Item Instances Using Web ADI
-
Click the Mass Update Batches tab, the Mass Batch Updates page appears.
-
In the Create Batch field, select the Web ADI type.
-
Click Go, and the Create Batch (WebADI). The Choose Action page appears.
-
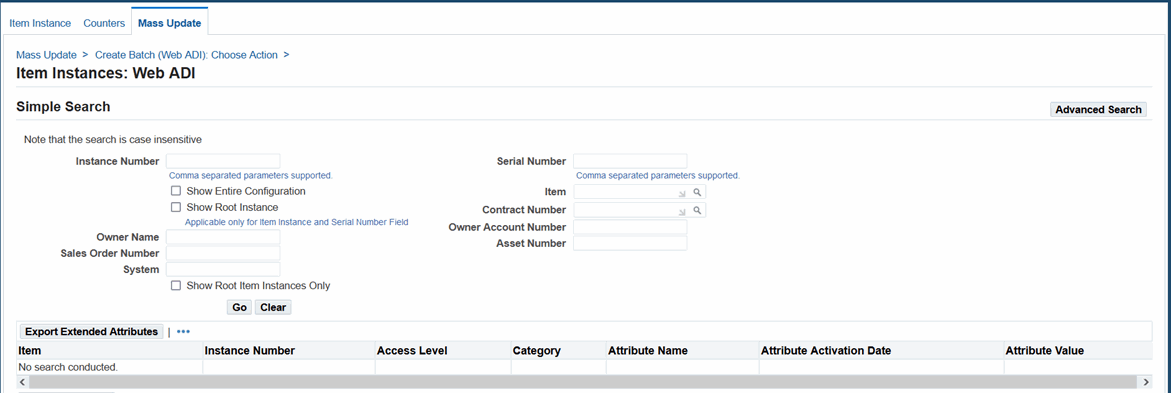
Click Simple Search to perform a simple search.
Item Instances: Web ADI - Simple Search
-
Enter values in any of the fields on the page including Instance Number, Serial Number, Item, Contract Number, Owner Account Number, Owner Name, Asset Number, Sales Order Number, and System.
-
You have the option to select the Show Entire Configuration and Show Root Instance check boxes. These fields work in conjunction with the Instance Number field for item instance number searches only.
-
Use the Show Root Item Instances Only check box to specify to search only the parent/root item instances based on the search fields. For given search criteria, child item instances will not appear in the search result.
-
To perform an advanced search, click Advanced Search.
You can select parameters such as Asset Number, Contract Number, Installed Date, Item, Item Instance, Item Instance Type, Item Type, Operating Unit, Owner Account Number, Owner Party Name, Party Account Number, Purchase Order Number, Return By Date, Sales Order Number, Serial Number, Shipped On Date, Status, and System. You can search or update the item instances, download them to an Microsoft Excel sheet and upload it after modification using WebADI.
-
View the search results on the page.
-
Optionally click Export External Attributes to export item instances based upon the search criteria. See Managing Extended Attributes.
-
Select the Viewer that you want to use.
-
Select or enter values in other fields on the page.
-
Click the Create button.
The file is downloaded to your desktop.
-
Click Open or Save to download the file.
-
Open the file, and click the Enable Macros button.
-
Update the file, and save your work.
-
Select Oracle, Upload from the Microsoft Excel toolbar to upload the updated instance.
An asynchronous concurrent program is triggered when the Upload option is selected. The program processes the records interface table to create or update the item instances.
Columns in the Web ADI Template
| Column | List of Values (LOV)? | Client Validation | Comments |
|---|---|---|---|
| ITEM_INSTANCE_ID | - | None | READ_ONLY column. Would be present for only queried instances. Column will be empty in new instances. |
| CONTRACT_NUMBER | Yes | - | Value can be chosen from LOV |
| INSTANCE_NUMBER | - | - | - |
| ITEM_ORGANIZATION | - | - | - |
| ITEM_NAME | Yes | Check that the valid item is chosen from LOV | - |
| ITEM_DESCRIPTION | Yes | - | Default value will appear |
| ITEM_REVISION | Yes | Check if revision is valid for item ID | - |
| UNIT_OF_MEASURE | Yes | - | Default value appears and is read-only |
| QUANTITY | - | - | - |
| SERIAL_NUMBER | Yes | - | Free Text and can be chosen from LOV |
| LOT_NUMBER | - | Yes | Can be chosen from LOV |
| INSTANCE_STATUS | Yes | Check that valid status code is entered | Default value appears |
| INSTANCE_DESCRIPTION | - | - | - |
| EXTERNAL_REFERENCE | - | - | - |
| OPERATIONAL_STATUS | Yes | Check that valid operational status is entered | Default value appears as 'NOT USED' |
| INTERNALLY_OWNED | - | - | Y/N (default N) |
| OWNER_PARTY_TYPE | Yes | - | - |
| OWNER_PARTY_NUMBER | Yes | - | - |
| OWNER_ACCOUNT_NUMBER | Yes | - | - |
| CURRENT_LOCATION_TYPE | Yes | - | - |
| CURRENT_LOCATION | Yes | - | - |
| CURRENT_LOCATION_PARTY | Yes | - | - |
| INSTALL_LOCATION_TYPE | Yes | - | - |
| INSTALL_LOCATION | Yes | - | - |
| INSTALL_LOCATION_PARTY | Yes | - | - |
| BILLTO_PARTY_TYPE | - | - | - |
| BILLTO_PARTY_NUMBER | - | - | - |
| BILLTO_ACCOUNT_NUMBER | - | - | - |
| SHIPTO_PARTY_TYPE | - | - | - |
| SHIPTO_PARTY_NUMBER | Yes | - | - |
| SHIPTO_ACCOUNT_NUMBER | Yes | - | - |
| INSTANCE_TYPE | Yes | - | - |
| VERSION_LABEL | - | - | - |
| INSTALL_DATE | Yes | Date Picker | - |
| CREATION_DATE | Yes | Date Picker | - |
| EXPIRATION_DATE | Yes | Date Picker | - |
| CREATE_DEFAULT_CONTRACT | - | - | Y/N (Default is N) |
| PARENT_INSTANCE | Yes | Valid item instance number | Enter the parent instance for the child instance. |
| SPLIT_QUANTITY | - | - | Only applicable when update and non-serialized item instance. Enter this value to split and create a new instance of the entered quantity. |
| MERGE_INSTANCE | Yes | Valid item instance number | Only applicable when update and non-serialized item instance. Choose the item instance with which this instance needs to be merged. |
| FLEX_FIELDS | - | - | - |
Managing Extended Attributes
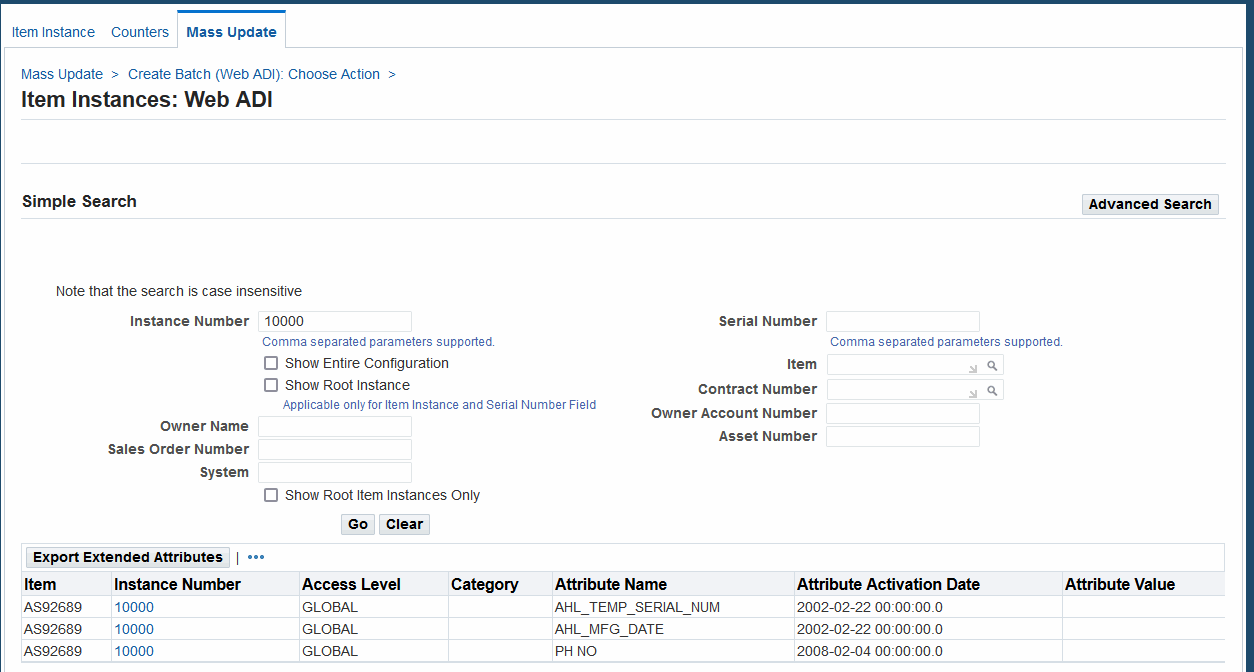
Use the Manage Extended Attributes action to update multiple extended attribute values for multiple item instances. You can view the extended attributes before exporting them in the Web ADI template. You can download the template that contains the extended attributes, modify the values, and then upload them back into the system.
The fields for extended attributes in the template are:
-
Item
-
Instance Number
-
Access Level
-
Category
-
Attribute Name
-
Attribute Activation Date
-
Attribute Value
To download extended attributes
-
Navigate to the Mass Update Batches page (Installed Base User > Mass Update > Mass Update).
-
In the Create Batch field, select the Web ADI type, and click the Go button.
The Create Batch (Web ADI): Choose Action page appears.
-
Enter values for the Batch Name (required).
-
Select the Manage Extended Attributes value in the Action field.
-
Click Go, and the Item Instances: Web ADI page appears.
-
Enter selection criteria using the Simple Search or Advanced Search.
-
View the search results on the page.
-
Click the Export Extended Attributes button to download the attribute template.
View the extended attribute values that will be included in the Web ADI template.
-
Click Create.
The file is downloaded to your desktop.
-
Click Open or Save to download the file.
-
Open the file, and click the Enable Macros button.
-
Update the file, and save your work.
-
Select Oracle, Upload from the Microsoft Excel toolbar to upload the updated attributes.
