Managing Outside Processing
This chapter covers the following topics:
- Overview
- Working With Outside Processing Work Orders
- Inventory Service Order Outside Processing
- Creating an OSP Order
- Reviewing Purchase Orders
- Synchronizing Outside Processing Work Orders with Purchase Orders
- Updating and Approving Purchase Orders
- Shipping and Receiving
- Working with Exchange Orders
- Creating an Exchange Order
- Editing Exchange Orders
- Converting Service/Exchange OSP to Exchange/Service OSP
Overview
In the maintenance, repair, and overhaul industry, there will be occasions when a part must be serviced outside of the organization. This may be due to the lack of resources, skilled or certified personnel or cost considerations. The planner needs the flexibility of determining when, where and how the service will be performed in the most cost effective manner. In addition, a planner must have the ability to borrow parts from third parties when the same is not available in inventory, as well as loan parts to a third party when it is requested.
This chapter discusses the key functions supported by the Oracle CMRO Outside Processing module and covers the key Outside Processing (OSP) functions supported by the Oracle CMRO Production Planning module. The processes for creating and maintaining OSP work orders are explained. See:
Key Business Processes
The Outside Processing module supports the following business processes:
Assign Production Jobs for a Third-Party Service
After it is determined that the job will be performed by a third-party organization, you can assign the production job to any department with a class of Vendor. This assignment to a outside department can be done either in the Planning or Production Planning modules. The job must be assigned to a department with a department class of 'Vendor' to be included in an OSP work order.
Assign Production Jobs to an OSP Work Order
After assigning a job to an outside department, create an OSP work order and add to it the jobs that the third-party organization will perform. You can include jobs with multiple parts or for a single instance. An OSP work order can be issued for one supplier and can have multiple jobs associated with it.
Determine the Supplier for Outside Processing
Determine which supplier should perform the service based on the service history of the part, warranties that may be applicable and then pick a supplier from a specified approved vendor list.
Add or Remove Production Jobs to an Existing OSP Work Order
You can add production jobs to an existing OSP work order if the order has not yet been submitted for purchase order creation. If a job is not necessary you can remove it, if the order has not been submitted. Once an OSP work order is submitted to create a purchase order in Oracle Purchasing, any additions or deletions must be performed in the Oracle Purchasing Module.
Determine Shipping and Receiving Logistics
Determine how and when the parts will be shipped to the supplier by creating a shipping order against the OSP work order. You define the shipment date, receipt date, freight terms and carrier. The shipment of the parts do not occur until the OSP work order has been submitted to create a purchase order in Oracle Purchasing and the buyer has approved the purchase order.
Create and Approve Purchase Orders
After required services from a supplier are finalized, submit them to create a purchase order. The buyer completes the purchase order by providing shipping and accounting distribution details. When the purchase order is ready to be shared with the supplier, the buyer approves it in Oracle Purchasing. Upon approval, the shipment order is marked as ready for the shipping clerk to pick, pack, and ship the parts. Any deletion or cancellation of purchase order line items are reflected in the corresponding OSP work order, meaning the production job is no longer associated with the OSP work order. The planner makes the decision regarding the disposition of the production job. If the buyer adds line items to a purchase order, the planner must decide if those items have to be included in the OSP work order. The planner also must use a manual process to associate the new purchase order line items to existing eligible production jobs.
Shipping and Receiving of Parts
Once the purchase order is approved, the shipping clerk can pick, pack and ship the parts. The shipping clerk receives a notification of the shipment order number that indicates that the parts are ready to be shipped. The shipping order provides shipping details such as ship to organization and location, part number, quantity, serial numbers, the location from which to pick the part, and any shipping or packing instructions. Each time the part is shipped and received, the current location of the part and ownership is automatically reflected in the Oracle Installed Base module. Shipping is handled in Oracle Shipping. Receipt of parts after servicing is accomplished with Oracle Purchasing.
Inspect Parts After Service
After receipt of the part that has been serviced by a supplier and received into inventory, the production planner will reassign to the same production job that initiated the outside processing to an internal department.
The designated technician assigned to this job uses the Production module to complete and document the quality process. This ensures that the service has been performed correctly according to the maintenance requirement and the part is in good condition.
Acknowledge Supplier Service
In order to pay the supplier for the service provided, the purchase order line may specify that the service has to be accepted (received) without any quality assurance or the service has to be accepted and approved by quality assurance team (inspected). If the purchase order line specifies that Receipt is required, then the technician must receive the service in Oracle Purchasing module (three-way matching). If the purchase order line has Inspection required specified, then the technician has to receive the service and enter the quality assurance code (four-way matching). The buyer may indicate in the Purchase Order line that the services need not be received, in which case the supplier is paid upon the approval of the purchase order.
Close OSP Work Order
You can close the OSP work order provided that all shipped parts have been received, the serviced parts are in good condition, all of the production jobs associated with the OSP work order are closed, and the purchase order is closed. All these conditions must be met, or the OSP work order cannot be closed.
Perform Item Exchange
Replace an item or part with another part from a supplier. Item exchange is an integral part of the production process in most service industries. Most service stations send out specialized components to be repaired at outside repair facilities. The item exchange process speeds up the production process by allowing like parts to be sent and received without waiting for the repair of the originals.
OSP Work Orders
An OSP work order is an order that contains the information required to service parts by a third-party organization. It contains information about the supplier, the parts that need to be serviced, what services will be performed, and when and where the part will be shipped and received. If parts have to be shipped out to a third party there is a shipment order associated with the OSP work order.
Exchange Orders
An exchange order is used to replace an item or part with another similar or dissimilar part from a supplier. The exchange can be of two types; Simple Exchange or Advanced Exchange. In a Simple Exchange, the servicing organization sends out the item for repair to a supplier and receives an item of similar kind. In Advanced Exchange, the supplier sends the replacement item ahead of time. An exchange order is created for an existing job scheduled to a vendor class department. Outside Processing work orders that require an item exchange are identified at the work order header. These exchange orders contain information about the parts that will be shipped out and received back from the supplier, including: the inbound and outbound part number and serial numbers, the shipment and return dates, and the costs of item exchange through an interface to the procurement system.
Working With Outside Processing Work Orders
An OSP work order enables you to group together production jobs that have been earmarked for outside servicing. You can base the creation of purchase orders, which describe the services ordered from the supplier and ship orders, which describe the shipping and receiving logistics of the serviceable parts on OSP work orders.
Related Topics
Inventory Service Order Outside Processing
Defective parts are often removed and put in an inventory location before the work order is created. Inventory service orders enable you to create orders for items directly from an inventory location, without creating a visit and work order. This process is automated using default data.
The service item is an inventory master item with specific attributes such as non transactable and non stockable. It is derived from the setup of the item and vendor association. Service items are set up primarily to track costs, outside processing orders can then be created for shipment purposes. The features of inventory service orders for outside processing include:
-
Automatic service order creation.
-
Vendor sourcing and shipping rules are defined based on the item and location.
-
Attachments can be defined and maintained.
-
Ability to convert the service order into an exchange order.
Inventory service order creation is comprised of defining vendors, creating associations of parts at specific locations, creating vendor and customer connections, and submitting the information for purchase order creation.
Prerequisites
- Define profile options to default information to automate the creation of service orders. This includes:
-
AHL:Service Order Default Shipment Priority
-
AHL:OM Tax Exempt Reason
-
AHL:Vendor Service Duration
-
AHL:OM Shipment Priority
-
AHL:OM Line Return Reason
-
AHL:OM Mixed Order Type ID
-
AHL:OM Ship Only Line Type ID
-
AHL:OM Return Line Type ID
-
AHL:Service Order Ship IB Transaction SubType
-
AHL:Service Order Return IB Transaction SubType
-
AHL:Exchange Order Ship IB Transaction SubType
-
AHL:Exchange Order Return IB Transaction SubType
-
AHL:Overwrite PO line description with Item/Serial Number
-
AHL: PO line description Item number prefix
-
AHL: PO line description Serial number prefix
-
AHL:PO Line Type ID
-
AHL:OSP Default PO Distribution Creation
For more information, see Setting Up Inventory Service Order Outside Processing, Oracle Complex Maintenance, Repair, and Overhaul Implementation Guide.
To search and add vendors for inventory service orders
-
Navigate to the Vendors page.
-
In the Search Vendor region, you can select search criteria using the Vendor Name, Vendor Location, and Primary Contact.
Select Go to display the results of your search.
-
Enter information in the appropriate field to add vendors for outside processing and inventory service orders.
-
Select the Warranty check box to identify a vendor as providing warranty. This vendor can now be selected in the Vendor Service Item Relationships page as providing warranty service.
Note: Supplier Warranty begins with the Warranty Administrator defining the warranty capability for a vendor and identifying which service items will have warranty applicability.
-
Save your work.
To query and edit existing vendor and item associations
-
Navigate to the Item Service Relationships page.
-
Enter values in the fields to search for existing associations.
-
Click the Go button.
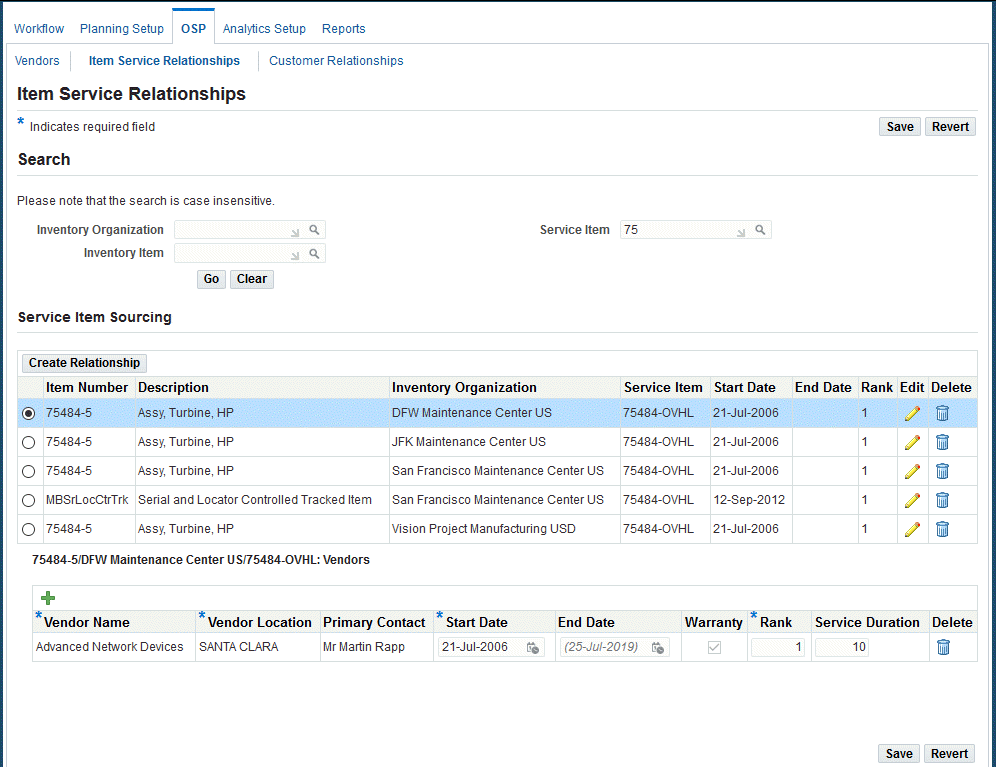
The selected Warranty field in the Service Item Sourcing region validates a Warranty Service Item and an applicable Warranty Vendor.
-
Click the Edit button to change information in the End Date or Rank fields. The Edit Relationship page appears.
-
Save your work.
To create a new vendor and item association
-
Navigate to the Item Service Relationships page, and select Create Relationship to display the Create Relationship page.
-
Select values in the Inventory Organization, Inventory Item, and Service Item fields.
-
Enter a start date, end date, and a rank.
Vendors are ranked using item, inventory organization, and service item relationships. The priority is calculated with the lowest number being the highest in rank.
-
Click the Apply button to save your work, and refresh the Item Service Relationships page.
-
Select the item to which you want to associate the vendor and location.
-
In the Vendor region, select values in the following fields:
-
Vendor Name
-
Vendor Location
-
Start and End Date
-
Rank
-
Service Duration
-
-
Save your work.
To view and define vendor and customer associations
-
Navigate to the Customer Relationships page.
-
You can search for existing relationships by selecting criteria in the Search region, and choosing Go.
-
Click the Add Another Row button to add a vendor and customer association.
-
Save your work.
To create an inventory service order
-
Navigate to the Inventory Items page.
-
You can search for records using the following criteria: Inventory Organization, Sub Inventory, Item Number, or Serial Number. Select Go to display the results of your query.
-
In the results region, select items for this service order. Choose a different Service Item using the LOV if necessary.
Ensure that the Ship check box is selected to use default shipping information to create this order. This includes shipping method, freight terms, FOB, and payment terms.
The Warranty column displays a Warranty flag if at least one Active warranty contract is defined for the Instance. You must use the Warranty flag to appropriately choose the Service Item for warranty service.
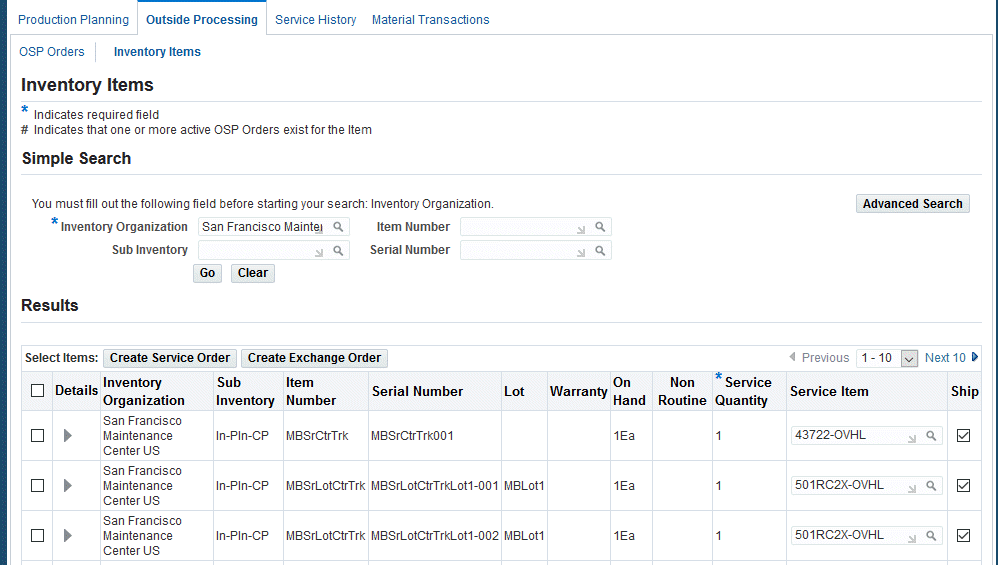
-
Choose Create Service Order to create your inventory service order record.
To create a purchase order for the associated inventory service order record
-
Navigate to the Edit OSP Order page for your inventory service order record.
-
Choose Submit OSP.
To convert an inventory service order into an exchange order
-
Navigate to the Edit OSP Order page for your inventory service order record.
-
Delete the return shipment lines for this order.
-
Convert the inventory service order to an exchange order.
See: Converting Service/Exchange OSP to Exchange/Service OSP
-
Create new return shipment lines.
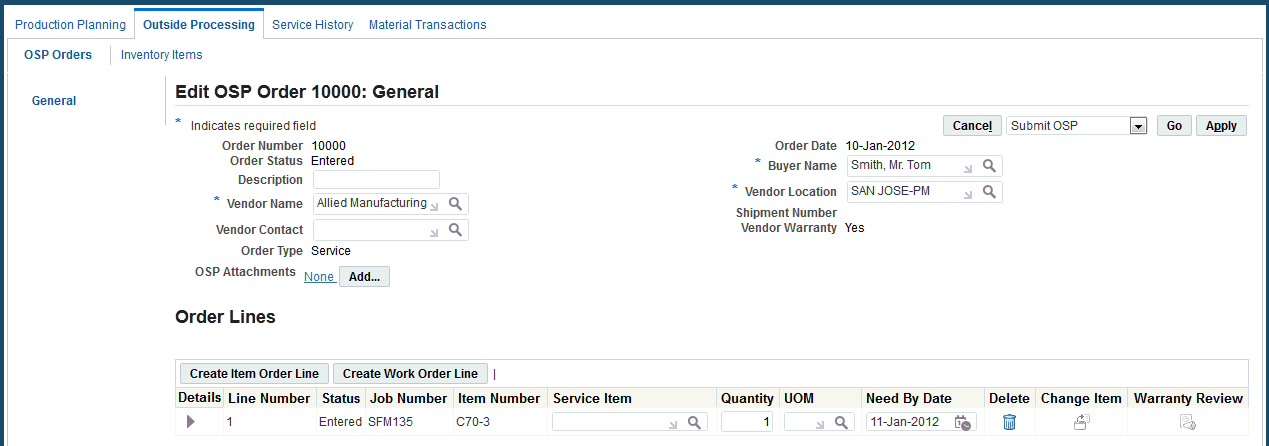
Creating an OSP Order
To create an outside processing work order
-
Navigate to the Search Jobs page, and select each job to include in the outside processing work order.
-
Select Create to display the Edit OSP Order pages.
-
Select values in the Vendor, Vendor Name, and Buyer Name fields.
-
For each line item displayed in OSP Order Lines region, select information in the applicable fields for Job Number, Item, Line Status, Instance Number, Service Item Quantity.
-
Select Apply to save your work.
To find an OSP work order
-
Navigate to the Outside Processing Orders page.
-
Select search criteria in the applicable fields, and click the Go button to display the results. You can select information in the following fields:
-
Order Number
-
Order type
-
Order Status
-
Description
-
Requisition Number
-
PO Number
-
Shipment Number
-
Vendor Name
-
Has New PO Lines
-
Work Order Number
-
Project Name
-
Task Name
-
Item
-
Serial Number
-
Department
-
Ready for Receipt
-
-
You can perform the following transactions:
-
Close: To close the outside processing work order.
-
Submit: To create a purchase requisition or a purchase order using the outside processing order.
-
Delete Shipment: To delete the associated ship order.
-
To edit an OSP work order
-
Select the OSP Order on the OSP Search page, and choose the Update icon.
-
Use the Warranty Details region to manage warranty for the OSP order.
This region displays the following information:
-
Task Warranty flag is Yes if there is a warranty template associated to the originating work order. If the instance was from inventory, this flag will always be set to No.
-
The Instance Warranty flag is Yes if there is at least one active warranty contract for the unit.
-
The Warranty Contract LOV contains only active contracts available for selection.
If the Warranty Contract field is blank, you can add a new contract at any time and the system changes the Warranty Status from Not Applicable to Approved when you click Apply.
-
The Warranty Contract can be changed and the status can remain as Approved.
-
If you set the Warranty Contract field to null, the system sets the Warranty Status to Not Applicable.
-
-
If the Instance Warranty flag is No, you cannot edit the Warranty Contract LOV.
-
Warranty Claim default value comes from the warranty claim identifier and is used for historical purposes.
-
Claim Status default value comes from the current status of the claim and is used for historical purposes.
Make the required changes, and select Apply to save your work.
-
-
Select the appropriate value in the drop-down box to navigate to these pages:
-
Convert to Service
-
Create Shipment
-
Close OSP
-
-
Click Create Item Order Line or Create Work Order Line to create a new order line. The Create OSP Line page appears.
-
Search for the required items or jobs.
-
Click the Create Order Lines button.
Note: If you want to ship the part associated with the newly created line, then you must create a new ship order line.
To create a purchase requisition using an OSP order
You can create a purchase requisition from an OSP order, in addition to the ability to create a purchase order. Upon submission of an OSP order, the system initiates the creation of a purchase requisition.
Set the profile option, AHL: Initialize Purchase Requisition to Yes to create purchase requisitions rather than purchase orders.
-
Create an OSP order and submit.
Alternatively, navigate to the OSP Search page to retrieve the OSP order that you want to submit.
-
Select the OSP order, and click Submit OSP Order.
This will trigger the creation of a purchase requisition in Oracle Purchasing if the AHL: Initialize Purchase Requisition profile value is set toYes.
-
Click the Synchronize POs button; this updates the OSP order status and its association with the newly created requisition (if any).
-
If a requisition was created successfully, the status of OSP order changes to Requisition Created.
-
Click the Update icon to navigate to the Edit OSP Order page.
-
Click the Requisition Details link.
The Requisition Details page displays the details of the purchase requisition.
-
You create a purchase order from existing requisition using the Oracle Purchasing module.
-
If a PO was created for the OSP requisition, you can drill down to navigate to the Purchase Order Details page by clicking the link in the PO Number column.
The PO header information and purchase order lines appear.
You can select any PO line to view shipments and receipts.
-
You can close the OSP order after its completion.
Additional Information: When you update the purchase requisitions in Oracle Purchasing, it results in the following:
-
If you delete the requisition lines using Oracle Purchasing, and trigger the PO Sync process in CMRO, the associated OSP order lines shows a status of Requisition Deleted.
-
If you delete the requisition lines and requisition header from Oracle Purchasing, and trigger the PO Sync process in CMRO, the associated OSP order lines are deleted.
-
To submit an OSP work order
-
Retrieve the OSP work order that you want to submit.
-
Select the OSP work order, and click Submit. This will create a purchase order or a requisition in Oracle Purchasing.
To close an OSP work order
If no further activity occurs on an OSP work order, you can close it. You cannot work on the order again once it is closed. All shipped parts must be received from the supplier. All parts must be in good condition and the inspector has approved the performed service. The associated purchase order and all associated jobs must be closed.
-
Retrieve the OSP work order that you want to close.
-
Select Close.
If all prerequisites are met, the OSP work order will be closed.
Reviewing Purchase Orders
-
Retrieve the OSP work order that you want to review.
-
Navigate to the Edit OSP Work Order page for the selected work order.
-
Select PO Details to display the Purchase Order Details page. It shows summary information about the related OSP work order and the line item details.
-
Select a line item to view associated shipping or receiving details for that item.
Note: A list of errors will appear if the purchase order was not successfully created. Edit the relevant OSP work order to fix any errors, then submit the purchase order again.
-
Click the View PO Shipments button to view the purchase order shipments.
-
Select a shipment number and click Accounting Distributions to view accounting distributions associated with the shipment.
-
Click Receipts in the Purchase Order Details page to view receipts associated with the purchase order line item. To view quality results for the receipt, select a receipt and click QA Result.
Note: There may be a delay between the submission and actual creation of a purchase order in Oracle Purchasing. If you notice that the submission request has a Pending status for a long time, notify your system administrator. Review submission status on the Concurrent Requests page.
Synchronizing Outside Processing Work Orders with Purchase Orders
A buyer may add purchase order lines manually after a purchase order has been created in Oracle Purchasing through a Submit action on OSP Work Order page. If you decide that the newly added purchase order lines should be reflected in the source OSP work order, then you must assign the new purchase order lines to existing production jobs.
To synchronize an OSP work order with a purchase order
-
Retrieve the OSP work order that you want to synchronize and navigate to the Edit OSP Work Order page.
-
Select PO Details.
The Purchase Order Details page appears, displaying summary information about the related OSP work order and the line item details.
If there are line items without job numbers, the items must be added to the current OSP work order.
-
Select a job number and click the Apply button.
A list of jobs appear with the following conditions:
-
If the purchase order line has a service item number:
-
List of jobs that have same service item number associated with the route.
-
List of jobs that have no service item number associated with the route.
-
-
If the purchase order line does not have a service item number, then you will see a list of jobs that have no service item number associated with the route.
-
-
Click the Apply button to save your work.
Note: The Synchronize POs process synchronizes the purchase orders with OSP orders that exist in the operating unit for the user.
Updating and Approving Purchase Orders
To update or approve a purchase order
-
Switch to the Oracle Purchasing responsibility.
-
Query the purchase order number. The window displays purchase order details.
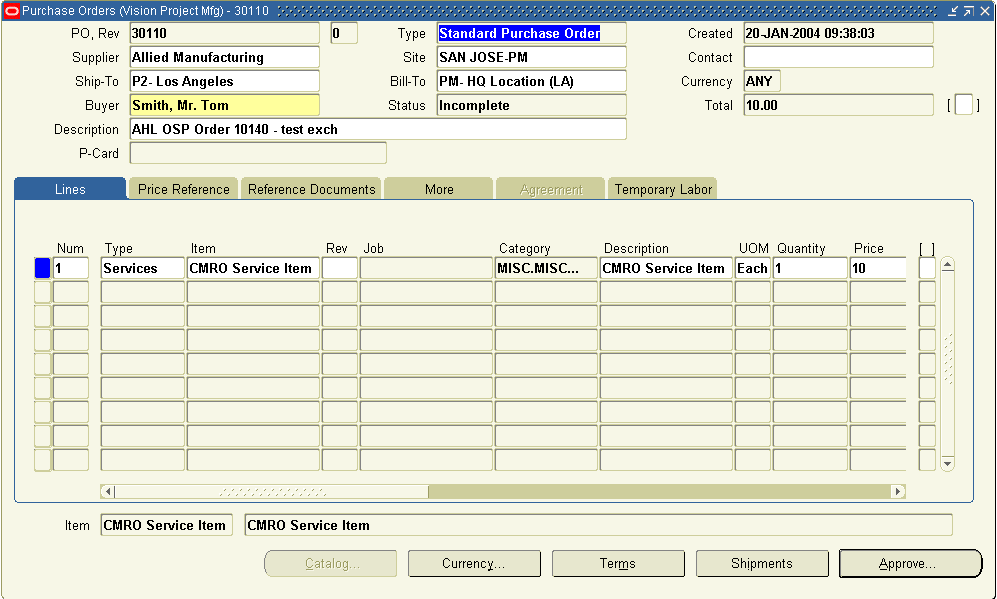
-
Select Approve to initiate the order approval process. The Approve Document page appears.
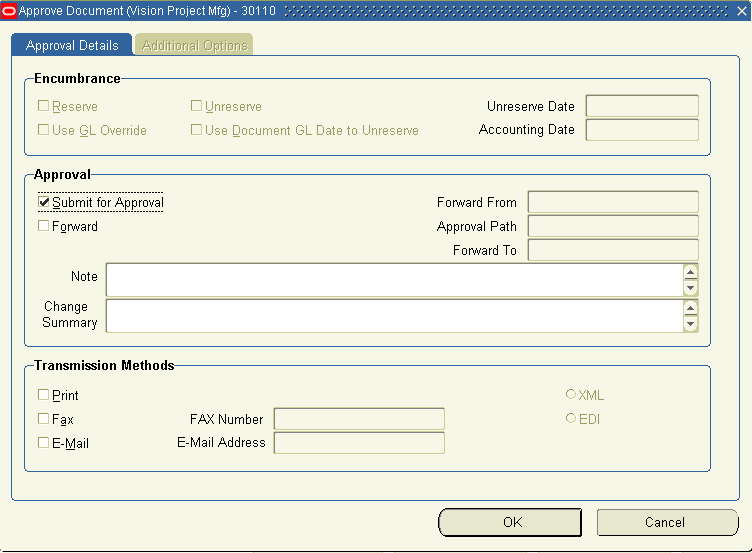
-
Choose OK to submit the purchase order for approval.
Shipping and Receiving
Outside processing work orders and purchase orders are shipped to your locations, and received into your plant. These tasks consists of Shipping Parts, and Receiving Parts
Shipping Parts
You can create a ship order for OSP work orders involving parts that need to be shipped for an outside service. An OSP work order can have only one associated ship order.
To create a ship order:
-
Retrieve the OSP work order and navigate to the Edit OSP Order page.
-
Click the Shipments link to access the Edit OSP Order: Shipment page.
-
Enter the required information and select Apply to save your work.
-
Select the Warranty icon to navigate to the Warranty Workbench for the Item Instance. You can review current contacts, edit current contracts, define new contracts, or terminate existing contracts.
-
Select the Delete link in the Shipment Lines region to delete a ship order.
This action cannot be undone. All associated ship line items will be deleted with the ship order. You cannot delete a ship order if parts related to the order have already shipped.
To create a ship order line:
-
Select a shipment and navigate to the Edit OSP Order: Shipment page.
-
Choose Create Shipment Line. The Shipment Line page appears.
-
In the Line Type field, select the appropriate line type.
-
Select the warehouse from where the part will be shipped.
-
Select the Sub-Inventory from where the part will be shipped or received.
-
Select the Item Number that you want to ship.
-
Select the Lot and Serial number of the item.
-
Enter the quantity to be shipped.
-
Specify the UOM.
-
Enter the Schedule Shipment Date: this is a required field.
-
Select values in the Shipment Priority, Shipment Method, Freight On Board terms, and Freight Terms fields.
-
You have the option to enter information for the shipping clerk in the Packing and Shipping Instructions field.
-
Choose Apply to save your work.
To edit or delete a ship order line:
-
Retrieve the OSP order associated to the ship order you want to edit or delete.
-
Navigate to the Edit OSP Order page. Select Shipments.
-
In the Shipment Lines region, select a shipment and click Update. The Shipment Line page opens.
-
Make changes to the shipment line as required, and choose Apply.
-
To delete a shipment line, choose Delete corresponding to the line number.
Note: The delete action cannot be reversed.
-
Select Apply to save your work.
Receiving Parts
Receiving redesign for Outside Processing feature handles return of items or equipment that have been shipped out of an operation for service. The OSP receiving clerk will record the physical receipt, the receipt of the purchase order items, and update the necessary attributes on the item record in the system.
OSP Receiving enables you to receive items into the organization referenced in the RMA. You must change the RMA line information if you want to receive items into a different organization.
To find an OSP order related to received items:
-
Navigate to the Advance Search page.
-
Enter any of the following search criteria:
-
Order Number
-
Order Type
-
Order Status
-
Description
-
Requisition Number
-
PO Number
-
Shipment Number
-
Vendor Number
-
Work Order Number
-
Project Name
-
Task Name
-
Item
-
Serial Number
-
Department
-
-
Select the Ready for Receipt check box to filter the OSP orders that have shipped out and have not yet been received.
-
Click Go. The result page displays OSP orders related to the search criteria.
To receive an OSP item:
-
Navigate to the Outside Processing Orders page.
-
Select the appropriate order from the Results region.
-
After clicking the Update icon in the search page, you must click on the Shipment side navigation menu option.
-
Identify the RMA line to receive against and click the Receive Item icon and navigate to the Receive Shipment page.
-
To receive an item enter the following information:
-
Receiving Organization name defaults
-
Location
-
Condition
-
Subinventory
-
Locator
-
Receiving Quantity
-
UOM
-
Receiving Date
-
-
To receive an unexpected item, enter the following information in the Perform Item Change/Exchange region:
-
Exchange Item Number
-
Exchange Serial Number
-
Exchange Lot Number
-
-
To receive an item with a new item or serial number, enter the following information in the Perform Item Change/Exchange region:
-
New Item Number
-
New Serial Number
-
New Lot Number
-
New Revision
-
New Serial Tag
-
-
Click Apply. You will receive an item to the appropriate subinventory and locator with new item details.
Working with Exchange Orders
During the production planning or execution process, the planner may decide to replace an item or part with another similar or dissimilar part from a supplier. The servicing organization may ship out the item first (simple exchange) and then receive the exchange item or may receive the exchange item from the supplier first (advanced exchange) and then ship the item out. Exchange orders are created for each item being shipped, and contains information about the parts that will be shipped out and received back from the supplier, the shipment and return dates, and the costs of item exchange through an interface to the procurement system.
An exchange instance must be created in Installed Base, and associated to an order line before an item can be received in exchange.
An exchange order can be converted into a service order and vice versa if the return shipment has not occurred.
Creating an Exchange Order
-
On the Oracle Complex Maintenance, Repair, and Overhaul Home page, select Execution. The Job Overview page of the Production Planning module appears.
-
Select the Outside Processing tab. The Search OSP Order page appears.
-
Click Create under the OSP Order Search Results header. The Search Work Order page appears.
-
Enter your search criteria in the fields and click Go. The production jobs matching your search criteria are displayed. Click Clear if you want to clear all fields and perform a new search.
-
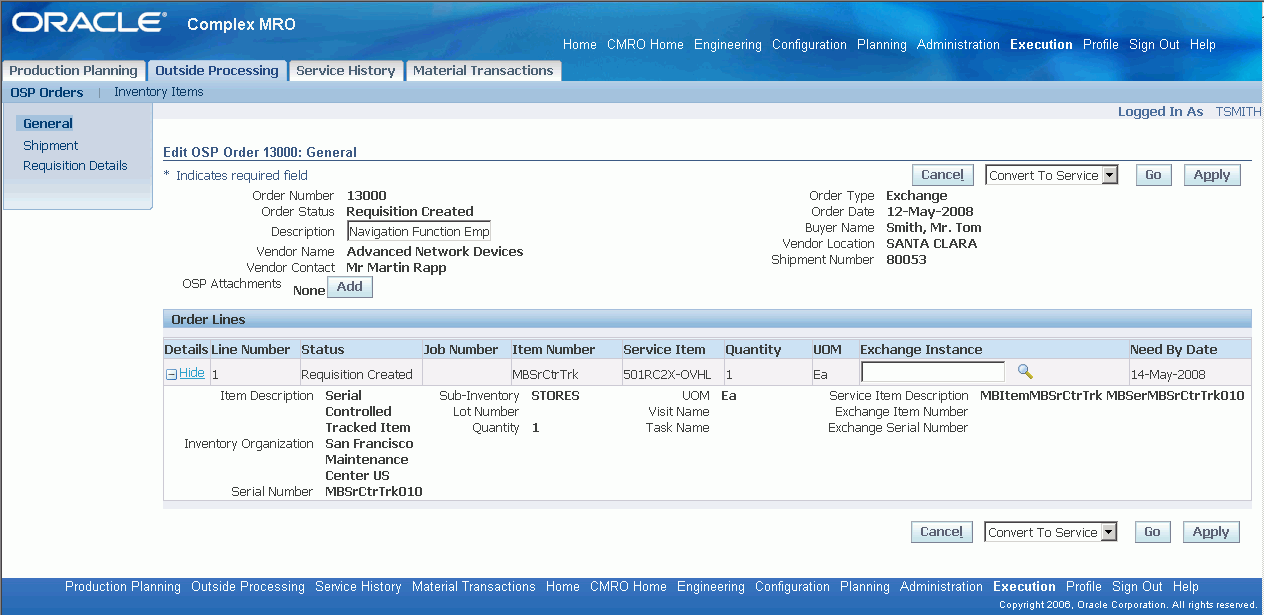
Under Work Order Search Results, select the work order you want to include in the exchange order. Click the Exchange button. The Edit OSP Order page opens.
Enter details in the fields on the Edit OSP Order page.
Field Description Order Number Displays the order number. Order Type Displays the order type of exchange for the Exchange work orders. Vendor Name Select a vendor name from the list of vendors that will perform the service. Vendor Location Select the location from the list. This will be the ship to location of the supplier. Buyer Name Name of the buyer. Order Status Display-only information about the order status. Possible values are: -
Entered - the OSP work order is still in processing mode; you can edit the OSP work order.
-
Submitted -the OSP work order has created a purchase order in Oracle Purchasing; no edits allowed. Further edits should be done in Oracle Purchasing.
-
Submit Failed -the OSP work order has failed to successfully create a purchase order in Oracle Purchasing. Edits to OSP work order are allowed. Re-submit the OSP work order when all edits are completed.
-
Closed -the OSP work order has been closed and no further activity will be allowed.
Order Date Enter the date of ship order. Defaults to the current date. Job Number The number generated for a job. Item The tracked item for which the job has been created against. Line Status The current status for each delivery line. Instance Number The Installed Base Instance Number of the tracked item. Exchange Instance Instance of the item that will be received as part of the exchange. Service Item Quantity Quantity of the service item required. -
-
To create a new order line, select Create Item Order Line or Create Work Order Line. The Create OSP Line page appears.
-
Search for the OSP order number, and select the required items or jobs from the search results.
-
Enter the following information:
-
Need by date
-
Service Item Details: You can select the service item to be exchanged and its corresponding quantity and unit of measure.
-
Exchange Instance: Select an exchange instance that the supplier sends in place of the job's existing instance. For an exchange order, you will select an exchange instance before the supplier creates a return shipment line.
Note: Multiple items may be exchanged with a supplier using a single exchange order with multiple lines.
-
-
Click the Apply button to save the record.
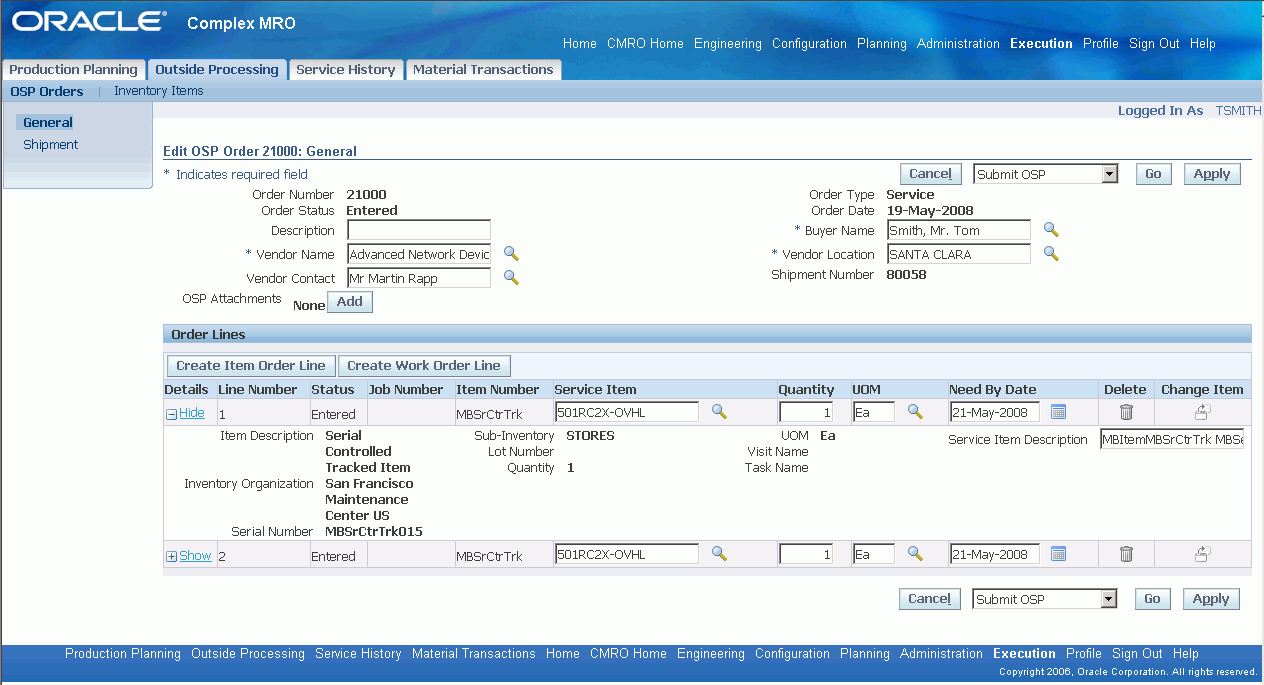
Editing Exchange Orders
-
Navigate to the Outside Processing Orders page.
-
Enter information in the fields. The Order type should be Exchange. Click Go. The exchange orders matching your search criteria appear in the OSP Order Search Results table.
-
Click the Update icon for the order that you want to edit. The Edit OSP Order page appears.
Edit OSP Order
-
Make the necessary changes and click Apply to save the record. Click Cancel to discard any changes and return to the Search OSP order page.
-
Select the work order and click Submit to create a related purchase order in Oracle Purchasing. You can view the PO details by clicking the link on the side navigation menu option.
-
Click Delete Shipment to remove the shipping order associated with the current OSP work order.
-
Click Close to permanently close the current OSP Work Order. This will be successful if all the following conditions are met:
-
The item requested in exchange has been received.
-
All listed production jobs are closed.
-
The associated purchase order is closed.
-
Converting Service/Exchange OSP to Exchange/Service OSP
You can change an exchange order to a service order and vice versa if the return shipment has not occurred.
Prerequisites
- If the exchange order is in the Closed state, conversion will not occur.
- If there is a return shipment line with the received quantity greater then zero, conversion cannot occur.
To convert an OSP order
-
On the Oracle Complex Maintenance, Repair, and Overhaul Home page, select Execution. The Job Overview page of the Production Planning module appears.
-
Select the Outside Processing tab. The Search OSP Order page appears.
-
Enter information in the fields. The OSP orders matching your search criteria are displayed.
-
Click the Update icon for the order that you want to convert.
Edit OSP Order
-
Select the Convert to Exchange option from the list of values. Click the Go button. A notification appears that the order had been converted.