Working With Unit Configurations
This chapter covers the following topics:
- Overview
- Unit Configurations
- Creating Unit Configurations
- Assigning Items to Unit Configuration Positions
- Migrating Unit Configurations
- Editing Unit Configuration Records
- Approving Unit Configurations
- Viewing Alternate Items Utilization
- Assigning Alternate Items to Unit Configuration Positions
- Creating and Updating Item Information
- Configuration Access Control Management
Overview
In the maintenance, repair, and overhaul industry, the “as-constructed” configuration of an assembly determines the specific maintenance program required to ensure the operational readiness of that asset. Even if two units have the same part number, or belong to the same product family, the as-constructed configurations may be different due to optional subsystems selected by fleet operators, and due to the asset's operational and service history. Ultimately, maintenance organizations must manage maintenance activities for each unit in the fleet. For maintenance purposes, an aircraft, for example, might consist of a thousand items that you must monitor. As you remove, overhaul, or replace items, you must associate the monitored items that have unique model and serial numbers with a fleet unit, and retain the maintenance history of those items. Many systems, such as aircraft flight management computers, contain software that is revised during their service lives. The Oracle Complex Maintenance, Repair, and Overhaul Unit Configuration module describes the configuration for each unit, and enables maintenance organizations to define and monitor items in a fleet unit.
Key functions provide process-oriented, task based procedures for managing maintenance activities of fleet units. See:
Unit Configurations
The Unit Configuration feature is a subsystem that describes the structure of an assembled electromechanical system. The Unit Configuration feature also monitors components modeling to support the management of a single part of interest, or a complex assembly that consists of a hierarchy of monitored items.
The Unit Configuration feature manages information about the service readiness of any component, and implements Closed Loop Asset Tracking techniques that result in the instantaneous online intelligence about the location and the state of the components. The Unit Configuration module also enables users to precisely record the utilization of as many items or subassemblies in a fleet unit as required. Oracle Complex Maintenance, Repair, and Overhaul (CMRO) enables you to represent the part lifetime using industry-standard units of measure, such as operating hours, flight cycles, elapsed time, and calendar time. CMRO Unit Configuration also enables you to define and maintain the maintenance requirements for a subassembly or subsystem. Maintenance requirements for each fleet unit support detailed maintenance planning for the fleet as a whole.
Key Business Processes
Managing Equipment As-Installed Configurations
When a product is in service, some components may require replacement for maintenance, modification or upgrade purposes. Knowing the current configuration is critical to plan the required maintenance actions. The Unit Configuration module enables you to track the as-installed configuration of a complex assembly, component installation and removal history, and the software installed in a unit.
Managing Configuration Changes
When a current equipment configuration does not meet the future needs, operators modify the existing equipment, instead of replacing it. Organizations also maintain multi-purpose equipment that require a configuration change between different modes of operation. Oracle CMRO enables you to compare the unit (current) configuration with its master configuration to derive the effort required for the modification. CMRO Unit Configuration also enables you to validate allowable installation, and whether a configuration is complete.
Tracking Utilization of a Unit
Utilization is a major factor determining the maintenance required to preserve an equipment's operational utility. When an assembly is comprised of different components that may require different parameters to measure utilization and aging, the resulting maintenance forecast process can be complicated. CMRO Unit Configuration will precisely track the utilization of each individual component within an assembly by tracking current utilization of units, such as age, odometer reading, and flight hours since overhaul. The Unit Configuration module applies the appropriate unit of measure to suit different types of utilization or aging.
Tracking Maintenance Requirements of a Unit
The key functions of maintenance planning include identifying the maintenance requirements of a unit, and calculating the service life before the next maintenance event. The CMRO Fleet Maintenance Program module provides this functionality. CMRO Unit Configuration enables you to model the maintenance requirement applicable to individual units, by providing a tracking mechanism for maintenance requirements.
Closed Loop Asset Management
Maintenance organizations track information about a unit using multiple systems throughout the service life of the unit. Building a continuous “cradle-to-grave” event history of a unit, may require great efforts. The Unit Configuration module identifies all the transactions required to build the full history of a unit. It tracks all transactions associated to unit location and status changes.
Tracking Unit Specific Business Information
Some critical business information resides at the individual unit level, and will require special attention and tracking. CMRO Unit Configuration provides a platform to track unit-specific information such as ownership.
Creating Unit Configurations
Master configurations provide a template for the structure of an electromechanical system with rules for component location and component selection, and applicable maintenance operations. An instance of a master configuration models the general characteristics of a fleet unit. You can derive a unit configuration modeling the structure of an as-operated electromechanical system from a master configuration.
After retrieving a master configuration template from the database, you can create a unit configuration that represents an individual fleet unit, and shares attributes in common with other fleet units derived from the same master configuration template. To create a unit configuration, enter a name for the unit configuration, and select the item instance for the top position.
When searching for a master configuration record that will serve as the unit configuration template, you can search using the master configuration template name, or the hierarchical position reference where a master configuration is connected.
To create a unit configuration
-
Navigate to the Search Master Configuration page, and search for a master configuration.
-
Click the Go button to view the configuration records based on your search.
-
Select radiobutton for the master configuration, and then click the Create Unit Configuration button.
-
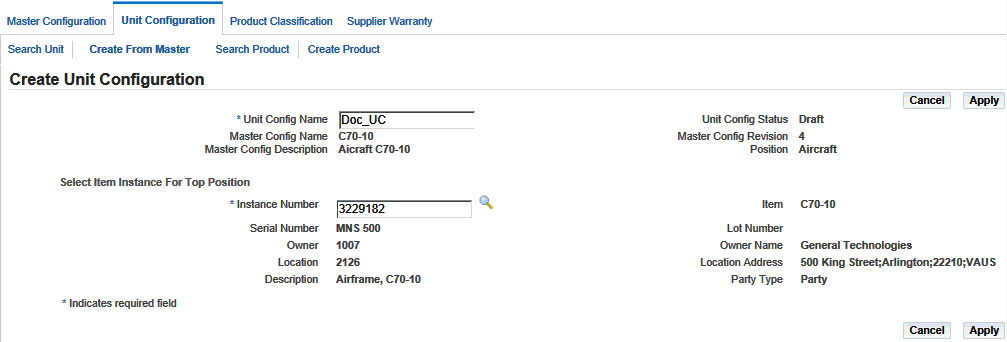
Click the Go button, and the Create Unit Configuration page appears.
The details for the master configuration populate this page including name, description, status, revision, and position.
-
Enter a value in the Unit Config Name field.
-
Select an instance number which is the Installed Base instance number of the tracked item.
-
Click the Apply button to save your work.
The page is populated with information such as the description, serial number, owner, owner name, location, and location address of the fleet unit.
-
The Edit Configuration page appears, displaying the position details and the item association for the top node of the unit configuration tree.
You can now assign item instances to position references.
Related Topics
Assigning Items to Unit Configuration Positions
Migrating Unit Configuration Records
Editing Unit Configuration Records
Assigning Items to Unit Configuration Positions
Creating a unit configuration logical record from a master configuration results in the connection of a unit configuration record with at least one item in the inventory catalog, and with an actual part or assembly in the inventory database. A unit configuration cannot exist without an item definition and a position definition. After you create a unit configuration header in the database, you can add item instances to all the positions that were defined in the master configuration template. All the item instances that you assign must exist in a group created using the Master Configuration module.
To assign items to a unit configuration position
-
In the Edit Configuration page, select the position reference that you want to associate with the item.
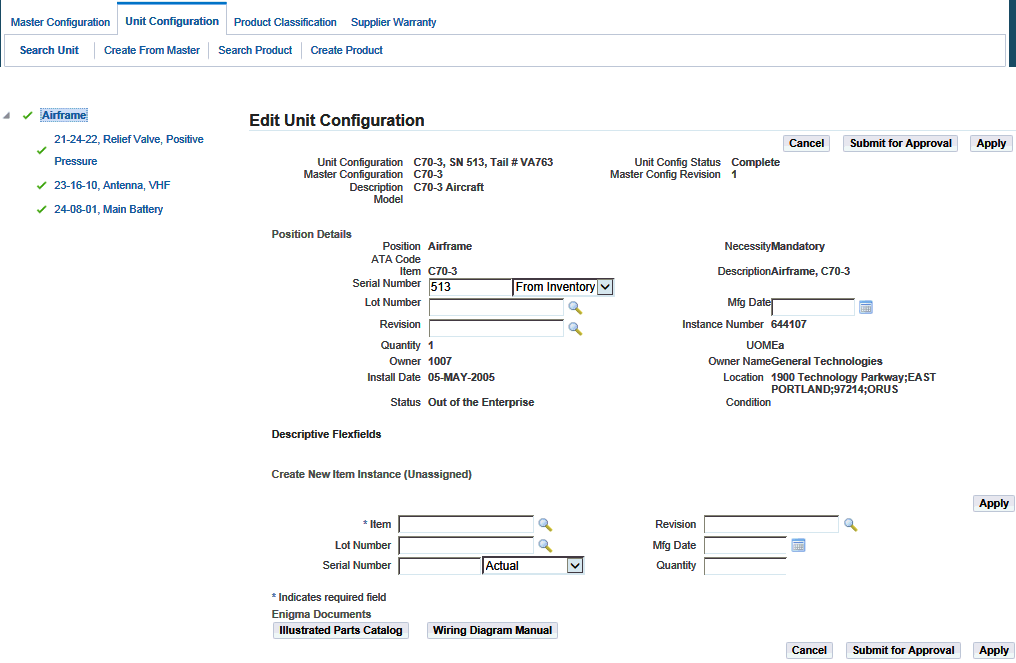
The Create and Assign New Item Instances page appears.
This page has two regions:
-
Create and Assign New Item Instance enables you to create an item instance, and associate it with the position reference.
-
Assign Item enables you to assign applicable existing item instances.
-
-
Select the item in the Create and Assign New Item Instance region to create a new record.
-
Optionally, you can enter the following additional information for the item instance:
-
Lot Number for lot controlled items
-
Serial Number for serial controlled items
-
Revision
-
Mfg. Date
A master configuration (on which the unit configuration is based) may have sub-configurations assigned to its position reference. In the unit configuration, you must assign subunits based on that sub-configuration to the position reference. The status of available subunits must be consistent with the status of the parent unit.
-
-
Select the subassembly, and click the Assign button.
-
You can also create subunits for the master configuration by clicking the Create button from the Master Configuration tab. See Creating Unit Configurations.
Note: The sub-units must be in Draft status to be assigned to the unit configuration.
-
Save your work.
-
Select an item to associate an existing item instance, and then click the Assign button.
-
Click the View Utilization button to view the utilization for an item instance, and the View Item Instance Utilization page appears.
The Unit Configuration module records the utilization of each component within an assembled hierarchy by monitoring current utilization of units and component hierarchies. CMRO Unit Configuration uses appropriate units of measurement including Time Since New, Time Since Overhaul, Time Since Repair, utilization cycles, Hobbs meter time, and many others. The Unit Configuration module also records utilization history of a revenue fleet unit, serialized part, or component hierarchy.
Note: You can assign alternate items to the unit configuration positions after viewing the utilization gained by each allowable part listed for a position.
If the instance from an extra node can be installed into a missing node, then this instance will be displayed in the item instance table list together with other applicable instances. You can then select and assign it to a missing node.
You can also add a node in a unit configuration without its parent. You can do this by adding the known part numbers and serial numbers as extra positions, part numbers, and serial numbers in the unit configuration tree. Once you have modified the parent, the extras will be assigned to the correct position.
To find unit configuration records
-
Navigate to the Search Unit Configuration page.
-
You can search for records by entering search criteria including:
-
Unit Config Name
-
Item
-
Instance Number
-
Lot Number
-
Unit Config Status
-
Master Config Name
-
Master Config Revision
-
Master Config Status
-
-
Click the Go button to view the results of your search.
You can validate a unit against the master configuration structure, allowed items and sub-configurations, and the applicable configuration rule. You can independently validate the completeness of a unit. You can also validate a unit after migrating it to a new master configuration, or to a revision of an existing master configuration.
To validate a unit
-
Navigate to the Search Unit Configuration page, and select the radiobutton for the unit configuration record.
-
Select Validate.
The Unit Configuration Validation Results page appears displaying the any errors for structure and rule violations.

Migrating Unit Configurations
Master configurations may be revised over a period of time. Often these changes can be implemented immediately across the fleet. However at times, it is necessary to transition the units throughout a given period or to a completely different master configuration. In the Unit Configuration module, the modification process is broken into steps enabling the user to choose when to migrate and to which configuration to migrate to, allowing a staged lifecycle change. A unit configuration can migrate to a new master configuration or to another revision of the existing master configuration when needed throughout the lifecycle of the unit.
In addition, part changes through a work order are still permitted.
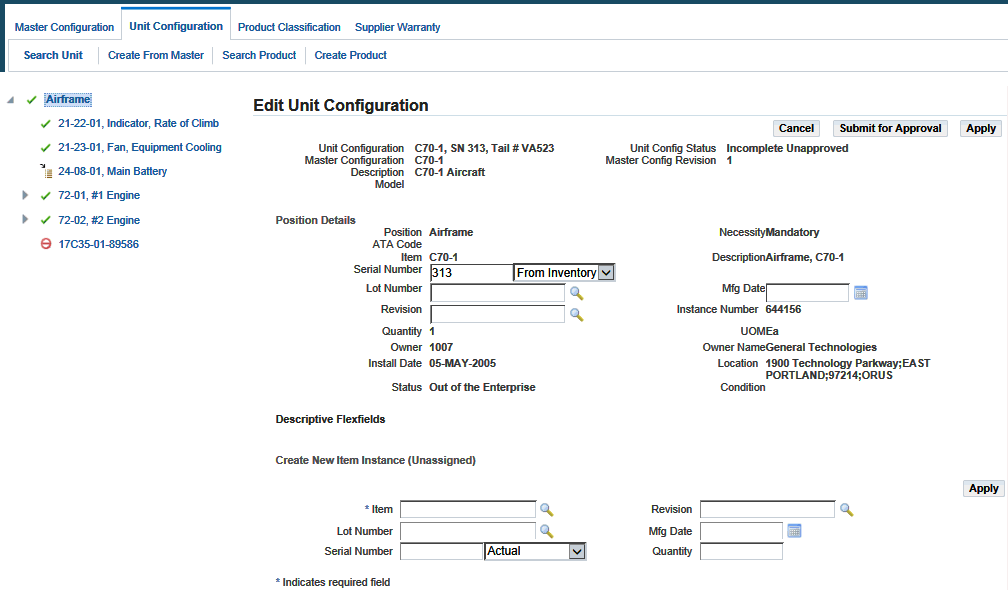
When a master configuration is revised, certain part positions may be added or removed from the existing configuration. When a part or sub-assembly exists that is not defined in the master configuration, it will appear as an extra part in the unit configuration tree. You can unassociate these position references. Master configuration positions that do not have item associations, and are identified by the missing items icon in the configuration tree.
The alternate items and sub-assemblies appear in the Assign Items Table for sibling positions which are empty. You can assign these items to the empty position. You can then validate the completeness as needed. Optionally, you can create item instances and sub-units, and then assign position references.
To migrate a unit configuration
-
Select the unit configuration and navigate to the Migrate Unit Configuration page.
-
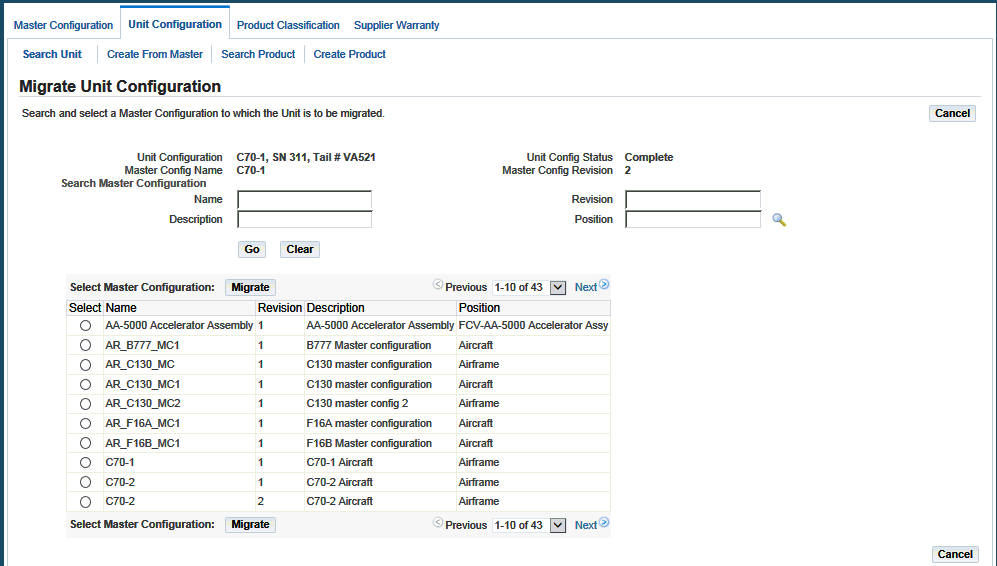
Search for the master configuration record by selecting criteria such as Name, Description, Revision, and Position.
-
Click the Go button to view the search results in the Master Configuration list.
-
Select the master configuration that you want to migrate, and click the Migrate button.
The Edit Unit Configuration page appears, displaying the unit hierarchy and the position details for the top node.
Important: Whether you can migrate the UC depends upon the setting for the AHL: Allow Unit Configuration Migration in Production profile option. See Setting Up Visit Work Package, Oracle Complex Maintenance, Repair and Overhaul Implementation Guide.
-
The following mapping is finished when you migrate a unit configuration:
-
If the node in the unit configuration is a sub-unit and it matches one of the sub-configurations defined in that node of the new master configuration, no further mapping is required.
-
If the node in the unit is a sub-unit but it does not match any sub-configurations defined in that node of the new master, the sub-unit is treated as an extra node and its tree structure is retained.
-
If the node in the unit is not a sub-unit and it matches one of the nodes in the same level of the new master, further mapping is required.
-
If the node in the unit is not a sub-unit and it does not match any node in the same level of the new master, then the node and all its decedents in the unit are treated as extra nodes.
Additional Information: Migration is not possible if the top nodes of the templates do not match.
-
-
Select the node that you want to delete, and then click the Remove button.
-
Select the item instance that you want to assign to a position, and then click the Assign button.
The extra items will be displayed in the unit hierarchy corresponding to the empty sibling position.
-
Optionally, you can assign a new item instance. To associate this item, you can select it from the Assign Item table and select Assign.
Editing Unit Configuration Records
Maintenance organizations alter fleet unit configurations to suit different modes of operation, or to comply with changes in business rules. These alterations may also result from component replacements with allowable items at certain hierarchical positions.
The AHL: Allow Unit Configuration Edit in Production profile option setting determines if updates can be made to the UC while it is in production. See Setting Up Visit Work Package, Oracle Complex Maintenance, Repair and Overhaul Implementation Guide for more information.
In addition, part changes through a work order are still permitted.
To edit unit configuration records
-
Navigate to the Edit Unit Configuration page.
Note: You cannot add or update position references in the unit configuration after changing the status to Complete.
Use the tree structure to edit a position in the unit configuration hierarchy.
-
Enter values in the fields that you want to change.

-
Click the position reference that you want to remove, and click the Remove button.
You can reuse the item represented by the position reference that you remove from the unit configuration.
Note: You cannot remove a position reference that is defined as Mandatory in the master configuration. This information in the Necessity field under Unit Configuration structure.
-
Select the position reference to unassociate the item position without removing the nodes from the unit configuration tree.
Click the Unassociate button. This enables you to map the positions manually, when the correct installation cannot be automatically determined.
-
Select the position reference in the unit configuration to which you want to assign a part.
Item instances for the position appear in the Assign Item region of the page. Optionally, you can create and assign a new item instance. See Assigning Items to Unit Configuration Positions.
-
View the associated document content.
The Enigma integration enables you to search configuration information in Enigma's 3C application and associate it to the Oracle master configuration. The Enigma Documents region enables you to view the associated documents on the position and part, based on the association in master configuration. The Enigma Documents region is displayed if the profile option, CMRO Enigma Integration URL, is set to Yes.
The region displays buttons to view the Wiring Diagram Manual (WDM) and Illustrated Parts Catalog (IPC) as applicable.
Click the Illustrated Parts Catalog and Wiring Diagram Manual buttons to view the associated documents.
-
Click the Submit for Approval to route the revised unit configuration for approval.
-
Click the Apply button to save your work.
Approving Unit Configurations
Creating or updating unit configurations is supported with an approval workflow.
You can set up an approval hierarchy to review and approve the unit creation. You can also submit a unit configuration for approval when you make a manual change to a complete unit configuration. Manual changes are necessary to record a discrepancy; all the other unit configuration changes should be performed through the proper production flow with work order sign off, and so on. Both the creation and the manual update of a unit configuration are critical tasks and must be controlled.
After the unit configurations have been created or edited, the unit is submitted for approval. When approved, if the unit is not complete, it will be set to the status of Incomplete Approved, and if it is complete, it will be assigned the Complete Approved status.
Prerequisites
- The unit configuration records that you want to submit for approval must exist in the database.
To approve unit configurations
-
Retrieve the unit configuration record that you want to submit for approval. See Finding Unit Configuration Records.
-
Select the unit configuration record that you want to approve, and click the Submit for Approval button.
When a unit with a Draft status is submitted for approval, the status changes to Approval Pending. If the changes are approved, the status changes to Complete. If the changes are not approved, the status changes to Approval Rejected.
Viewing Alternate Items Utilization
CMRO the Unit Configuration records the utilization of each component within an assembled hierarchy by monitoring the current utilization of units and component hierarchies. The Unit Configuration module uses appropriate units of measure including Time Since New, Time Since Overhaul, Time Since Repair, utilization cycles, Hobbs meter time, and many others. The Unit Configuration module also records utilization history of a revenue fleet unit, serialized part, or component hierarchy.
After you have viewed the item utilization, you can assign alternate items to unit configuration positions.
Prerequisites
- An assigned item must exist for the pertinent position in the unit configuration, and the unit configuration record must be in the Draft status.
To view alternate item utilization
-
Retrieve the unit configuration record that you want to edit. See Finding Unit Configuration Records.
-
Click the Edit button for the record for which you want to view alternate items, and the Edit Unit Configuration page appears.
-
Click the node on the tree structure that you want to edit.
-
Select the position to which you want to assign alternate items, and the alternate items will be displayed in the Assign Item table.
-
Select the item for which you want to view utilization.
-
Click the View Utilization button and view the utilization details for the alternate item.
Assigning Alternate Items to Unit Configuration Positions
When a fleet unit is in operation providing a transport service, eventually some components will require replacement to preserve the operational readiness of that unit. A unit configuration inherits the alternate items list for each component position in the hierarchy, from its master configuration template. Use this procedure to assign alternate items to a component position in an assembly. This will enable you to manage the as-installed configuration details of any fleet unit.
Prerequisites
- An assigned item must exist for the pertinent position in the unit configuration, and the Unit Configuration record status must be Complete.
To assign an alternate item to a unit configuration position
-
Retrieve the unit configuration record that you want to edit. See Finding Unit Configuration Records.
-
Select the unit configuration record that you want to remove and click the Remove button.
-
Select the unit configuration position to which you want to assign alternate items, and then click the Edit button.
The Edit Unit Configuration page appears.
-
Click the topmost node in the unit configuration.
The position references under the selected node appear with the corresponding part information.
-
Select the position to which you want to assign alternate items.
-
Click the Alternates button, and the Alternate Items List page appears.
-
Select the alternate item that you want to assign to the position.
-
Click the Assign button.
The selected alternate item is assigned to the position, and the item previously assigned to the selected position is marked Out-of-Service and returned to the Alternate Items List.
Creating and Updating Item Information
Oracle CMRO uses Oracle Installed Base, part of the Oracle e-Business Suite, to create and update item information.
-
Click the Create Product tab in the Unit Configuration module to access the Create Item Instance page.
-
Click the Search Product tab in the Unit Configuration module to access the Search Item Instances page.
For instructions on using these pages to create, find, and update item information using Oracle Installed Base, see the Oracle Installed Base User's Guide.
Configuration Access Control Management
In certain circumstances, access to a unit configuration must be restricted. This functionality is used in aircraft incident investigations where is it required that all data for the plane is preserved in its current state. Access to change anything on this configuration is stopped to avoid tampering with data. A quarantine can be requested for a unit configuration to prevent any transactions from being performed.
Configuration management enables that access to a specific unit to be locked or terminated to prevent viewing or updating. A locked configuration prevents any transactions to be performed. This functionality includes:
-
Activate Quarantine of a unit configuration, including transactional consequences to the unit maintenance plan, visit work packages, and production and execution
-
Deactivate Quarantine of a unit configuration
Access Control for a Unit Configuration
To quarantine a unit configuration
-
Retrieve the unit configuration that you want to quarantine.
The Edit Unit Configuration page appears.
-
Click the Quarantine button.
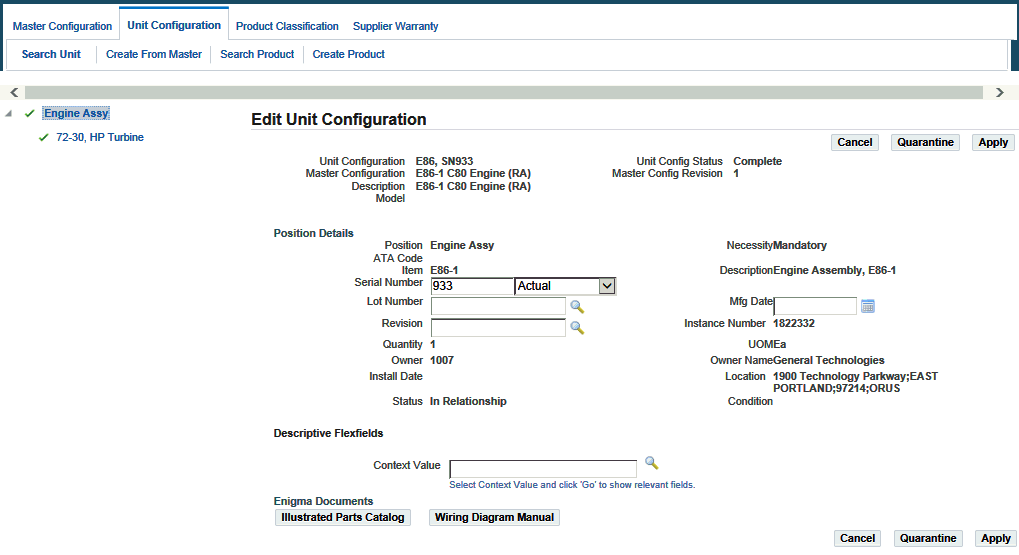
When the unit configuration is quarantined, all transactions are stopped including:
-
Initializing maintenance requirements.
-
Push to production.
-
Position update, installation, or removal.
-
Work order updates.
-
To deactivate a quarantined unit configuration