Managing Maintenance Routes
This chapter covers the following topics:
- Overview
- Route Management
- Creating Operation Records
- Creating Maintenance Route Records
- Creating an Item Composition List
- Editing Item Compositions
- Viewing Item Compositions
- Creating Disposition Lists
- Editing Disposition Lists
- Approving Disposition Lists
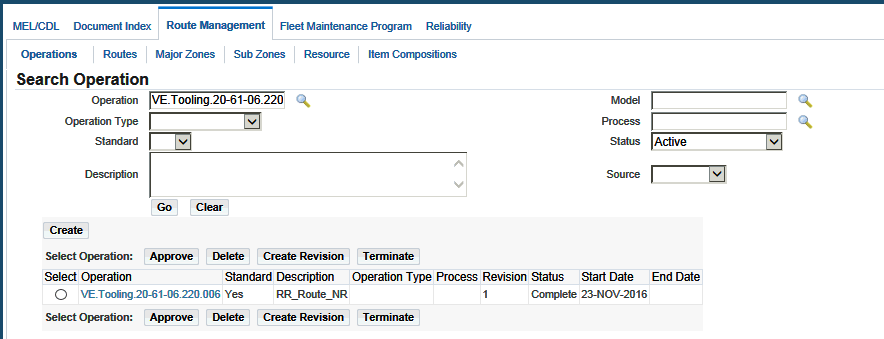
- Finding Operation Records
- Updating Maintenance Route Records
- Defining Reference Documents
- Defining Reference Documents for an Operation
- Defining Reference Documents for a Maintenance Route
- Defining Resource Requirements
- Defining Resource Requirements for an Operation
- Defining Resource Requirements for a Maintenance Route
- Defining Costing Parameters
- Defining Costing Parameters for an Operation Resource Requirement
- Defining Costing Parameters for a Route Resource Requirement
- Defining Material Requirements
- Defining Material Requirements for an Operation
- Defining Material Requirements for a Maintenance Route
- Associating Operations with a Maintenance Route
- Defining Access Panels
- Defining Access Panels for an Operation
- Defining Access Panels for a Maintenance Route
- Editing Operation Records
- Editing Maintenance Route Records
- Defining Component Locations in Fleet Units
- Associating Major Zones to Item Types
- Associating Sub Zones to Item Types
- Finding Oracle Complex Maintenance, Repair, and Overhaul Resources
- Creating Oracle Complex Maintenance, Repair, and Overhaul Resources
- Editing Oracle Complex Maintenance, Repair, and Overhaul Resources
- Associating BOM Resources
- Generate Workcards
Overview
A maintenance route describes a series of maintenance, repair, or overhaul tasks on a fleet unit, subassembly, or subsystem. Maintenance routes are effectively work cards, modeling the printed work cards typically provided by the manufacturer of the fleet unit. Work cards are often associated with a zone in a fleet unit, such as the power plant of a commercial aircraft. Other attributes of maintenance routes include work location (engine overhaul shop, machine shop, painting facility), supporting process types inspection, cleaning), skill types (electronics technician, airframe technician, power plant technician), and supporting significant maintenance tasks (ship in dry-dock with all cargo and engines removed). Oracle CMRO includes the Route Management module that manages work cards and resource requirements.
This chapter discusses the key functions supported by the Oracle CMRO Route Management module. The chapter provides process-oriented, task-based procedures for using Oracle CMRO to perform essential route management tasks in maintenance organizations.
See:
-
Finding Oracle Complex Maintenance, Repair, and Overhaul Resources
-
Creating Oracle Complex Maintenance, Repair, and Overhaul Resources
-
Editing Oracle Complex Maintenance, Repair, and Overhaul Resources
Route Management
The Route Management module is a subsystem that manages the work definition of scheduled and unscheduled maintenance tasks. It enables maintenance organizations to create work cards specifying the zone, work location, supporting process types, skill types, and significant maintenance tasks associated with the work card.
The Route Management module also supports the management of resource requirements for a maintenance route including labor estimate, materials estimate, tooling required, and reference documents. For some fleets, especially aircraft, regulatory compliance requires that maintenance operations be inspected before completion is formally recorded. Route Management supports the definition of inspection signature attributes for work card records. also supports the check point definitions for labor cost collection, and progress reporting.
The Route Management module uses data managed by the other modules comprising Oracle CMRO. For example, airlines may create work cards in response to an Airworthiness Directive by the Federal Aviation Administration, but only for a subset of the aircraft in the operational fleet. Using the Fleet Maintenance Program, the route management routes (work cards) can be associated with those fleet units.
Key Business Processes
Route Management supports the following business processes:
Work Card or Route Authoring
Work cards or routes are fundamental in accomplishing maintenance requirements. Work cards consist of step-by-step work instructions containing functional and operational data needed to perform specific job tasks. Oracle CMRO supports the authoring of routes. Each work card is comprised of one or several operations. The route authoring process enables maintenance personnel to select predefined operations, and associate them to a maintenance route.
Production Planning Information
Operational data is essential to the grouping work cards and planning maintenance requirements. The more the information in the work card, the easier it is for the production planner to schedule and group work cards. Oracle CMRO enables organizations to define production planning information for an operation, including work zone, work center, operation category, operation type, process, and significant tasks.
Resource Requirements Information
Functional data is essential to accomplish maintenance requirements, and to a lesser extent, the grouping of maintenance tasks. The more the information in the work card, the easier it is for the production planner to schedule and group work cards. This enables the material planner to schedule and forecast material needs. Oracle CMRO enables organizations to define the resource requirements for an operation including estimated labor man hours, material required, tools required, and reference documents.
Sign-Off Requirements
A work card changes to a work order when issued to Production. In the maintenance, repair, and overhaul industry, all work orders require to be signed off when completed, and also at certain step levels. Oracle CMRO enables maintenance facilities to define sign-off requirements for each work card. You can set up all sign-off requirements at the time the work card or route is created. The actual sign-off, however, occurs on the work order and not on the work card.
Resource Collection Check Points
Maintenance organizations may be required to collect actual labor expended, material usage, and other job cost data at the completion of different operations during a maintenance job. Oracle CMRO enables you to collect this data by creating check points that group successive operations together.
Composition Lists Creation
Composition lists serve as the base definition for a component or assembly. They enable the creation of disposition lists and forecast models, based on the type of service to be performed, and also enable more accurate prediction of material requirements. It is a complete listing of the non-tracked items or item groups contained in an item or assembly.
Disposition List Creation
Disposition lists act as checklists for the Production user. Disposition listing is defined in the Route Management module, as the subset of a composition list, to complement material requirements. Depending on the need, maintenance personnel may use the item composition or the composition of the master configuration to create the listing that is used when the item or master configuration is being planned in a maintenance requirement.
Creating Operation Records
The Route Management module leads you through the steps to create an operation record. The initial step creates a record of the operation in the database. Subsequent steps define operation attributes such as document references, labor, machine and tooling requirements, and material requirements. The following process initiates the creation of an operation. The Create Operation page permits saving the record in the database before proceeding to define the attributes in the following pages.
To create operation records
-
Navigate to the Create Operation page.
-
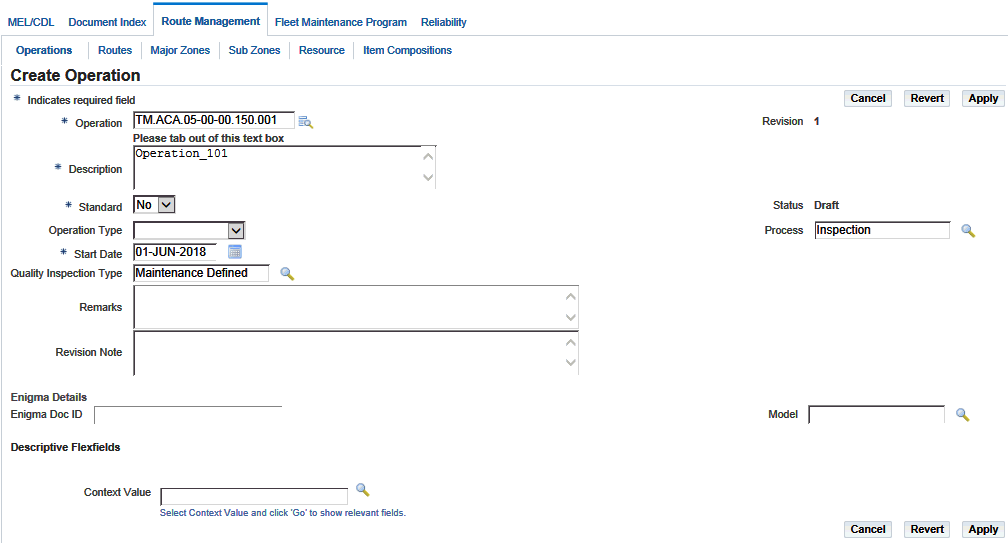
Use the information in the following table to create an operation record.
Field Description Operation Contains the operation code, which describes the order of the operation within the route. Operation Type Refers to the kind of operation being performed, and is used to organize operations. Process Refers to the kind of maintenance process, such as cleaning or inspection. Status Indicates whether the operation record is current, or in the draft stage. Start Date Refers to the date of the first day of effectivity of this operation. Description Refers to a text description of the maintenance operation. Remarks Refers to any additional information that the maintenance personnel should know regarding the operation. Revision Represents the document revision identifier. Revision Note Describes why the revision is made. Quality Inspection Type Associates a plan in Oracle Quality with quality elements for recording the necessary accomplishments and sign-off criteria of an operation. Standard Indicates if it is a standard (Yes) or non-standard (No) job. Model Identifies the type of aircraft (precisely the document associated to a type of aircraft). Note: The Model field is displayed on Create Operation page if you use the Enigma Integration. The Model field is used to identify the type of aircraft (precisely the document associated to a type of aircraft). For example, if the model is PW4000, then this corresponds to Engine Maintenance Manual in Enigma.
-
Click the Apply button to record the operation in the database.
The Edit Operation page appears where you can update information and define reference documents, resource requirements, and material requirements for the operation.
Edit Operation
-
After it is completely defined, the operation must be approved. To do this, click the Approve button on the Edit Operation page. This will launch the approval workflow and, depending on the outcome of the approval, change the status of the operation.
Note: During the approval workflow, the status is Approval pending for the creation of a operation or Termination pending for the deletion of an operation. The outcome status of the approval workflow can either be Complete or Approval Rejected. When an operation record in the Approval Rejected status is modified, the status reverts to Draft and the record can be resubmitted for approval after editing.
Note: You can also approve a draft operation from the result list in the operation search screen. The approval workflow is defined by your organization at the time of setting up Oracle CMRO. For more information about setting up approval workflow, see the Oracle Complex Maintenance, Repair, and Overhaul Implementation Guide.
Related Topics
Defining Reference Documents for an Operation
Defining Resource Requirements for an Operation
Defining Material Requirements for an Operation
Creating Maintenance Route Records
The Route Management module requires steps to create a maintenance route record:
-
Create a record of the route in the database.
-
Define the attributes of the route including sign-off requirement, document references.
-
Define requirements for labor, material, machine and tools.
-
Associate existing operations with the maintenance route.
The following process initiates the creation of a route. The Create Route page enables you to save the record in the database, before defining the attributes.
Prerequisites - Create Route
- While it is helpful to know the Route Type, System, Process, Major and Sub Zone, Quality Collection Plan, and the Accounting class of the system to which the maintenance route applies, but these fields are all optional.
If you define the route as a work card for a different operator on whose equipment you perform maintenance, you can specify that operator on the route. If the route is a work card for an outside processing job, you can define the Service Item that is applicable when the outside processing work order and the purchase order gets created. If Route Management is used in the Preventive Maintenance module, you can also define the JTF Task Template Group which should be used when integrating with Oracle's Field Service module through Preventive Maintenance.
To create a route record
-
Navigate to the Search Route page (Engineering > Route Management).
-
Click the Create button, and the Create Route page appears.
-
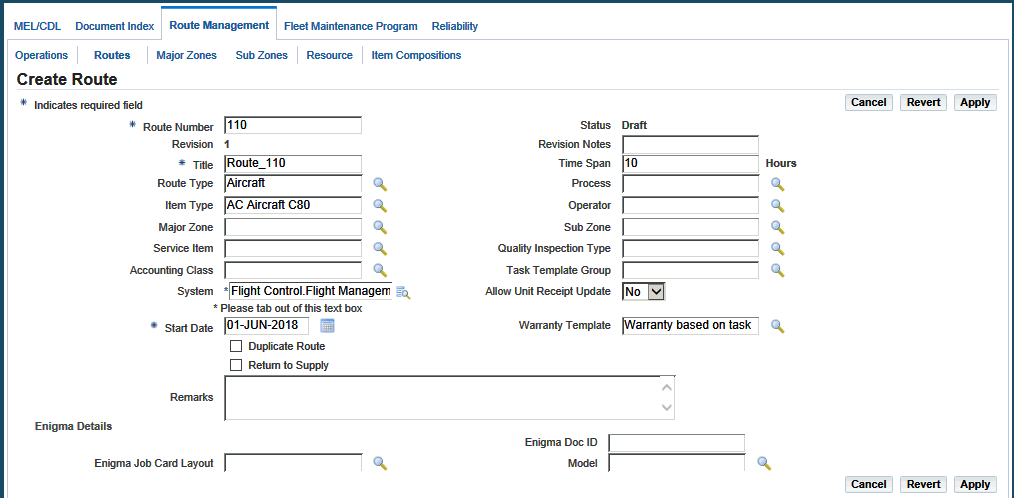
Use the information in this table to create maintenance route records.
Field Description Route Number User-defined identifier for a maintenance route (required). Title The text description of the maintenance route (required). Route Type The type of route, for example, whether the route applies to an entire aircraft or to a subsystem in the aircraft. Item Type The classification by category, of the electromechanical system. If you do not know the value, enter the generic substitution metacharacter %, and click the Go button to access the Select Item Type page. This page displays all item type records in the database. Select the pertinent record to return the value to the field. Service Item The service item of this route for outside processing. This service item is used in production planning when creating the outside processing work order and the purchase order. Accounting Class The accounting class is used when the route becomes a WIP job in Production. It supports the costing procedure in on the shop floor. System The electromechanical system on which you perform the maintenance activity (required).
This system field is a segmented flexfield. The segmentation is defined by your organization at set up time. .Start Date The date of the first day of effectivity for this maintenance route (required).
Enter a date, or click the icon beside the Date field to access the calendar.Status The current stage of the route record, and can Completed or Draft. Time Span The total duration of a route in hours. It will be used when calculating the visit structure in the Visit Work Package. Operator The organization operating the item.
If you do not know the value, enter the generic substitution metacharacter %, and click the Go button to access the Select Operator page.Major Zone and Sub Zone The user-defined zones used as a method for identifying locations in the electromechanical system being maintained.
If you do not know the value, enter the generic substitution metacharacter%, and click Go to launch the Select Major Zone (or Sub Zone) page.Process The type of the maintenance route such as cleaning or inspection. Quality Inspection Type The association to a plan in Oracle Quality with quality elements for recording the necessary accomplishments and sign-off criteria of an operation. Quality collection plans are used at the time of maintenance completion, and are set up as part of Oracle Quality. Task Template Group A template group used by Oracle Service. Task template groups should be defined if your organization uses Oracle's Preventive Maintenance module. Allow Unit Receipt Update This field Indicates if the unit can be updated upon receipt. Options are Yes or No (the default value is No). It cannot be modified once a route is approved. Revision The user-assigned document revision identifier. Warranty Template Optionally, you can select a Warranty Template to add to a route. This template is superseded if the maintenance requirement in which the route is associated also has a warranty template defined. Model The type of aircraft. This field identifies the specific document associated to a type of aircraft. Model field is displayed on Create Route page if you integrate with Enigma. For example, if the model is PW4000, then this corresponds to Engine Maintenance Manual in Enigma. -
Click the Apply button to record the route in the database.
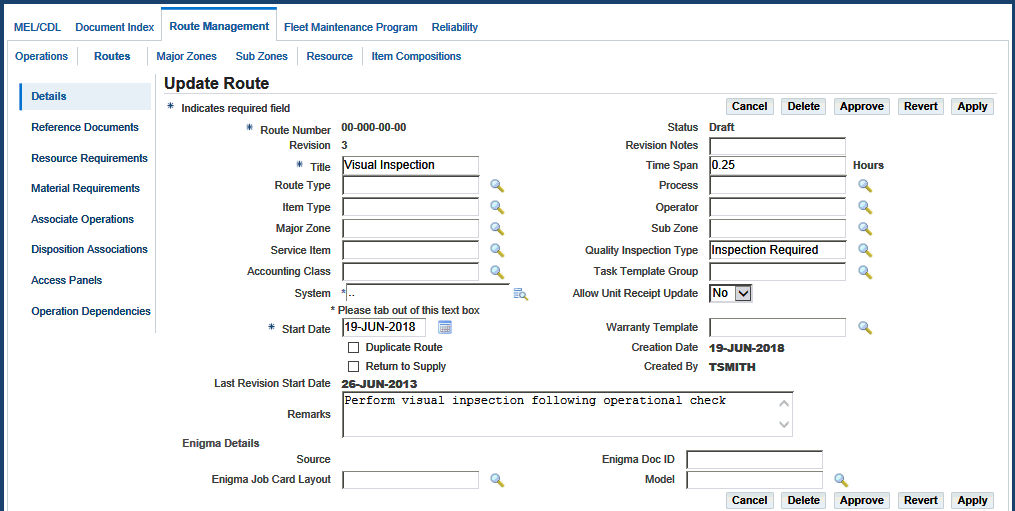
The Update Route page appears where you can update information and define reference documents, resource requirements, and material requirements for the operation.
After it is completely defined, the route must be approved.
Update Route
-
Click the Approve button on the Update Route page.
This will launch the approval workflow and, depending on the outcome of the approval, change the status of the operation.
Note: The status to which the route gets updated depends on the approval workflow setup. You may set up the workflow so that the route passes from Draft to the Approval Pending status. Optionally, the status may directly change to Complete when the route is approved. The outcome status of the approval workflow can either be Complete or Approval Rejected. When a route in the Approval Rejected status is modified, the status reverts to Draft and the record can be resubmitted for approval after editing.
You can also approve a draft operation from the result list in the operation search screen. The approval workflow is defined by your organization during the setup of Oracle CMRO. For more information about setting up approval workflow, see the Oracle Complex Maintenance, Repair, and Overhaul Implementation Guide.
For routes created from Enigma, a file shortcut icon is displayed against the route ID. This icon either shows a PDF document if the revision is complete or a window opens to the Enigma AMM section associated to the route.
-
To define the attributes of the route such as reference documents, labor requirement, resource requirement (material, tool, machine, and so on), and associated operations, see:
Related Topics
Defining Reference Documents for a Route
Defining Resource Requirements for a Route
Defining Material Requirements for a Route
Associating Operations to a Maintenance Route
Creating an Item Composition List
A composition list is a flat listing of the non-tracked parts, items or item groups, that are contained in, and can be used in maintaining an Oracle Installed Base tracked item. Composition lists are revision-controlled, allowing for changes to be tracked and approved through an approval workflow, automatically replacing the older revision when approved. Composition lists serve as the base definition for a component or assembly enabling the creation of disposition lists. Disposition lists provide a listing of items, item groups, and positions which may be impacted during the performance of a route. Production planners refer to the composition list during the course of maintenance as a complete listing of the items contained in an item or assembly.
Important: You can create item composition lists and associations for Installed Base tracked items only.
To create a composition list, the user must select the Installed Base tracked item or the master configuration for which the composition is to be created. A hierarchy is then created using either position codes or items, or a combination of both. After defining the composition list, you can create the details of the Disposition List by:
-
Associating the Installed Base tracked item with a route.
-
Associating a master configuration with a route.
Compositions are inherited in the Master Configuration module through the tracked item's association with the item groups for each position and sub-configuration position.
Composition lists reduce the amount of time required to research, create, and maintain routes. When a composition is revised, the changes are automatically reflected in the routes disposition, thus keeping the route up to date.
See also:
Prerequisites
-
Installed Base tracked items, non-tracked items and item groups must have been defined.
-
The Approval workflow must be set up.
To create a composition list for an Installed Base tracked item
-
Navigate to the Search Item Composition page (Engineering > Route Management > Item Compositions).
The Search Item Composition page appears.
Note: You can also create composition lists from the Master Configuration module also. Navigate to the Master Configuration module, and select the Composition List sub-tab. The Search Item Composition page appears.
-
Click the Create button, and the Create Composition List page appears.
-
Select an organization (required).
This represents the master organization to which an item belongs.
-
Select an item (required).
Note: Draft is the status when creating a composition list.
-
Tab or click out of the field.
The following table describes the fields related to item compositions.
Field Description Organization The organization in which you are creating the item composition (required). Item Group The alternate item group defined in the Master Configuration module. If your material requirement for this task is not a specific item type but a group of alternate items, you can define the complete alternate item group as a material requirement.
This definition specifically applies for a replacement material requirement. You can only define an item group or a part number for only one material requirement. If you do not know the value, enter a partial search string using the generic substitution metacharacter%, and click the Search button to retrieve the list of alternate item groups.Item The Installed Base tracked item for the header item and a non-Installed Base tracked item in the details. Description The description of the item group or the part (item) number. The description is automatically populated when selecting an item group or item number. Quantity The quantity necessary for the item or item group and is not required for the item group association. UOM The unit of measure for the item or item group and is not required for the item group association. -
Tab or click out of the field.
-
Click the Add More Rows button. You can add the following to the composition list:
-
Non-Tracked Item Groups
-
Non-Tracked Items associated with at least one Oracle Inventory organization
Create Composition List
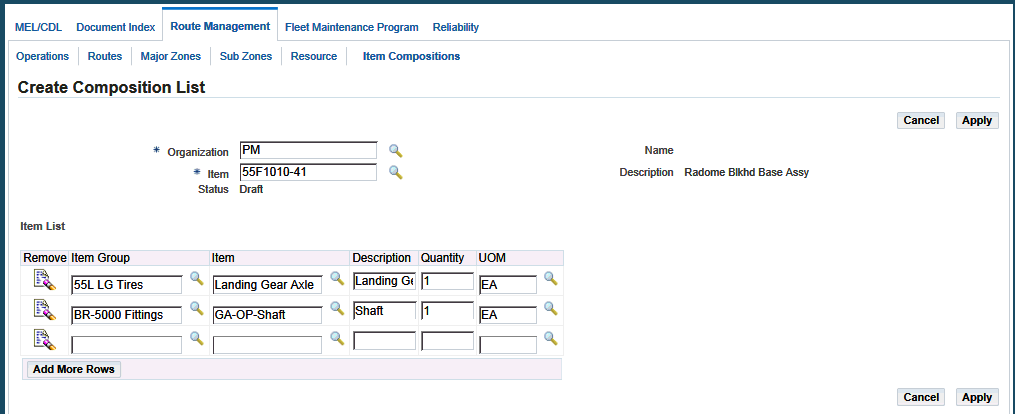
Note: You can copy composition details from one item composition into another Composition List if records exist in the database. In the Update Composition List page, click the Copy Compositions button. The Search Item Composition page appears, and select the item composition, from which you want to copy the details.
-
-
Enter the quantity and unit of measure for the non-tracked items, and click the Apply button.
The Update Composition page appears, displaying the item composition details.
-
Click the Submit for Approval button to submit the item composition for approval.
An approval workflow is implemented to allow the user to obtain approval from engineering, planning, materials, or other supervisory authorities. This ensures that the materials are properly planned and approved for use.
Editing Item Compositions
- The item composition that you want to edit must exist in the database, and must have a status of Draft.
To edit item compositions
-
Navigate to the Search Item Compositions page. For information, see Creating an Item Composition List
-
Search for the item composition that you want to edit. The results appear in the Item Composition List table.
-
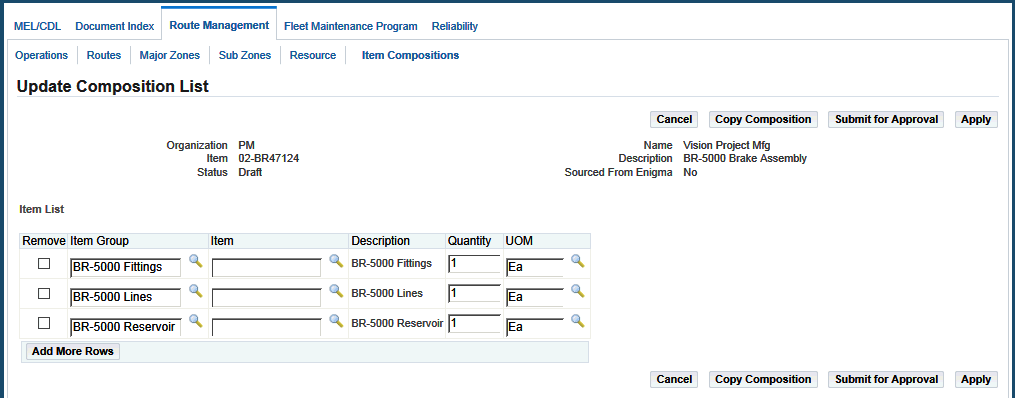
Select the item composition, and click the corresponding Edit icon. The Update Composition List page appears.
Update Composition List
-
Select the Remove check box for the item or item group that you want to remove from the composition list.
-
Click the Apply button.
-
Click the Add More Rows button to add more items or item groups.
-
Click the Apply button to save the changes.
-
Click the Copy Compositions button to copy the item composition from an existing composition list.
-
Enter the item composition from which you want to copy the composition list, and the View Composition List page appears.
-
Select the items that you want to include, and click the Copy Compositions button. The items are added to the item list of the composition that you are editing.
-
Click the Submit for Approval button to initiate the approval workflow. The item composition is submitted for approval, and the View Composition List page appears.
-
Click the Create New Revision button to make changes to the item composition that you have defined, and the Update Composition List page appears.
You can create revisions for all item compositions with a status of Complete.
The Create Revision button is also available in the results table in the Search Item composition list page. Disposition lists, which have been created utilizing the item compositions, automatically inherit all revisions made to the item composition.
-
Make the necessary changes, and click the Apply button.
After approval, a new revision appears as the active revision.
Viewing Item Compositions
-
Navigate to the Search Item Compositions page (Engineering > Route Management > Item Compositions).
The Search Item Composition page appears.
-
Search for the composition list that you want to view.
-
Click the Go button, and the results appear at the bottom of the page.
-
Select an item and click the Item link.
The View Composition List page appears, displaying the list of non-tracked items and item groups.
-
Optionally, you can view and edit the item composition from the Configuration > Master Configuration menu.
-
Click the Master Configuration tab, then select the Composition List link.
The Search Item Composition page appears.
-
Enter your search criteria and click the Go button.
You can view the associated disposition lists, create a revision for the composition list, or submit it for approval.
-
Creating Disposition Lists
Disposition lists are defined as a subset of a composition list or master configuration to complement material requirements. A disposition list is a list of the items, item groups, and positions, that may be impacted when a route is performed. A route can be set up to contain multiple disposition lists. A disposition list can also be a subset if additional materials are defined for the item or configuration.
Disposition lists are created though the association of an item or master configuration to a route.
-
Route-Item Association: For a route and item association, you can choose the disposition items from the composition list of the associated item.
Additionally, you can pick items from the item master not related to the composition list. The item must be set up as a Tracked Item. For each item defined in the disposition list, you can assign a percentage value that indicates the possibility of a replacement or tracked percentage of rework when this maintenance route is executed. The material planner uses the percentage figure to make an accurate planning decision. You can also select non-tracked items or item groups from the composition list. The percentage of rework cannot be defined for a non-tracked item.
-
Route-Master Configuration Association: For a route and master configuration association, you can select the positions to associate from the master configuration.
This position path can be revision specific or revision independent. You can also select the alternate item and the composition items and item groups for a position. The association is at the position level instead of the item level, indicating that every alternate item is dispositioned the same way. You can also pick items from the item master not related to the composition list. You can then assign to each position, a percentage of rework or replacement. The association with a master configuration can be revision specific or independent.
A disposition list is approved when the route is approved.
Materials are forecast, planned, and scheduled based on the percentile of expected replacement or rework from the disposition list combined with the mandatory replacement items on the material requirements list. Only the items, item groups, or positions that are set as a 100% replacement are auto-planned. Disposition lists provide the ability to create material requirements that are item or master configuration specific. Disposition lists are also used by maintenance or inspection personnel to set up items or parts to be dispositioned and to create material transactions. Maintenance or inspection personnel use the listing to disposition parts for rework; scrap; use as is; identify parts not received; identify as BFS (bad from stock), not applicable, return to vendor, return to customer, hold, or not removed.
Disposition lists are created and utilized differently based on the maintenance needs. Following are some examples:
-
Component overhaul - The disposition list is defined based on a route-item association.
-
Assembly breakdown - For assembly breakdowns, such as module disassembly in an engine shop, the items for disposition are typically the sub-assembly modules.
Thus, when defining the disposition list for an assembly breakdown, the route is associated with a master configuration. The highest assembly is associated with the route, and the sub-assembly positions are included in the disposition list.
-
Assembly piece part breakdown - Disposition lists for assembly piece part breakdown are based on both the route-item and the route-master configuration association.
When a master configuration has been associated, you can also define a disposition list, which not only uses the master configuration hierarchy, but also the item composition. You can select positions, and the compositions of the items assigned to the various positions. You can include the position's path if the disposition applies to the specific position only.
Prerequisites
- The following must have been defined:
-
Tracked and Non-tracked items and item groups.
-
Composition lists for all tracked items.
-
Master configurations and their position associations.
To create disposition lists
-
Select the route for which you want to create the disposition list, and the Update Route page appears.
Update Route

-
Select the Disposition Associations link, and the Define Disposition Associations page appears.
Define Disposition Associations

-
Use the information in the following table to define disposition associations.
Field Description Master Configuration Name of the master configuration that you want to associate with the route. The items can be tracked or non-tracked. Revision The part revision identifier. Organization Code The code for the inventory organization. Item The non-tracked item. %Replace The percent of replacement. %Rework The percent of rework. -
Click the Apply button to save your work.
To create a route-item association
-
Select an organization.
-
Select an item.
-
Click the Disposition Details button to view the disposition details.
The Disposition List Details page appears.
-
Click the Select from Composition button to add the non-tracked items or item groups in the item composition.
The Composition Selection page appears, displaying the composition list.
-
Select the items include, and the items are added to the disposition list.
The disposition list definition should not include the 100% replacement parts defined in the material requirements. If such an item is included, the disposition list definition will supersede the material requirements list on the route. The disposition list will contain the same item as a material requirement if it varies by the configuration or composition.
-
Optionally, you can add one item or item group at a time.
In the Disposition List Details page, choose the item/item-group using the corresponding list of values in the Material List.
-
Select the Remove check box to remove an item or item group from the Disposition List.
-
Click the Apply button.
The item is not removed from the item composition. You can include it again, by clicking the Select from Composition button, and then selecting the item from the Composition list.
-
Enter a Replace or Rework percentage.
Items with percentage of 100% for replace or rework percentage are automatically planned by the planning engine during material demand planning and scheduling. Items with percentages less than 100 can be manually planned and scheduled in the Scheduled Materials page in the Planning Workbench. For details, see Material Demand Planning and Scheduling, Oracle Complex Maintenance, Repair, and Overhaul User's Guide.
-
Select the Exclude check box if you do not want these items to appear in the Production Disposition view when selecting items to disposition.
For details on item disposition, see Item Disposition, Oracle Complex Maintenance, Repair, and Overhaul User's Guide.
-
Optionally, you can add items that may be required, and the items will be impacted during the route execution.
Click the Add More Rows button and select the item or item group that you want to add.
-
Click the Apply button to save the record.
To create a route-master configuration association
-
Access the Disposition Association page, and select the master configuration that you want to associate with the route.
-
Optionally, you can choose a specific revision of this master configuration.
-
Click the Apply button.
-
Click the Disposition Details button to view the disposition details. You can now add position references to the Disposition list.
-
Click the Position Reference search icon to select the position references defined for the master configuration, which you associated with the route.
The Search Master Configuration Revision page appears displaying all versions of the master configuration record.
-
Optionally, you can enter a version number in the Revision field to select the position from a specific version of the master configuration.
-
Click the Tree icon corresponding to the master configuration version to select a position reference. The Select Position page appears, displaying the configuration tree.
-
Select a position in the configuration tree, and the position reference details appear.
-
Select Yes from the Version Specific drop-down list to make the position path revision-specific.
The position reference that is considered is based on the selected master configuration version.
Select Position

-
Click the Apply button, and the position reference is added to the disposition list.
-
Enter a Replace and Rework percentage.
-
Enter a value in the Quantity and UOM fields.
-
Click the Apply button.
Disposition lists, created for part piece assembly breakdown, are based on a route-master configuration association. These lists also require a non-tracked parts listing, which is derived from the composition of the item assigned to a position reference.
Note: If a composition or master configuration is revised by removing positions, items, or item groups, and a disposition list has been created that uses them, the disposition list will automatically reflect the changes.
To create disposition lists, with both configuration and composition selections
-
Select a route, and associate a configuration with it.
-
Select the position references to add to the disposition list.
-
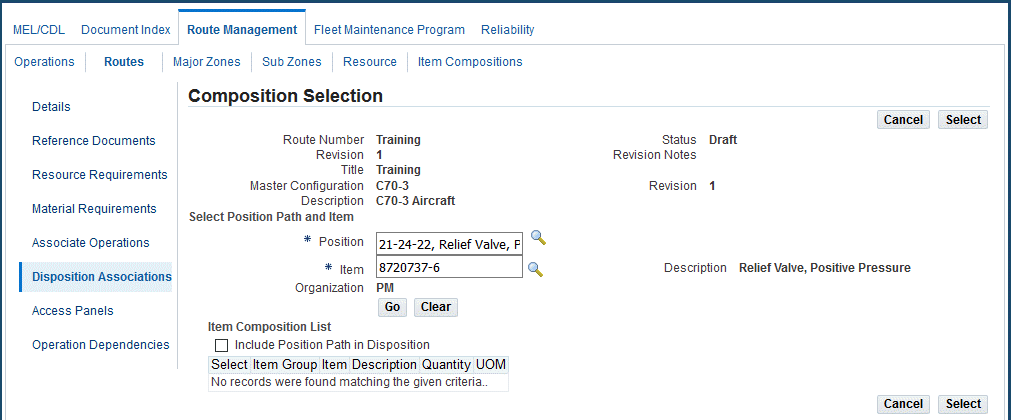
Click the Select Compositions button to select items from the item compositions.
The Composition Selection page appears.
Composition Selection
-
Select the Position and Item from the list of values.
-
Click the Go button.
The non-tracked items and item groups included in the item composition appear.
-
Select the items to include in the Disposition list.
-
Optionally, select the Include Position Path in Disposition check box to add the position to the disposition list.
-
Click the Apply button.
The Disposition List Details page appears, displaying the item and position details.
Note: If a item or item group is removed from a composition, it will be automatically removed from the disposition list.
Disposition Planning
The disposition listing and rework and replace percentages enable the maintenance planner to schedule materials when scheduling a maintenance visit. The items from the routing material requirements and from the disposition list, which have a 100% replacement percentage, are planned through Advanced Supply Chain Planning. The replace or rework items that have less than 100% percent included in a route's disposition list are from a route's disposition lists are scheduled by the planner from the Scheduled Materials page in the Planning Workbench.
If the percentile is in the position code, then the planning engine considers the requirement based on the first highest priority item for the position alternates.
Related Topics
Editing Disposition Lists
-
Navigate to the Update Route page, and select the route whose disposition list you want to edit. For information, see Editing Maintenance Route Records.
-
Click the Disposition Associations link. The Define Disposition Association page appears.
-
Make the required item changes.
For information, see Creating Disposition Lists.
-
Click Apply.
Approving Disposition Lists
A disposition list is approved when the associated route is approved. For information on route approval, see Creating Maintenance Route Records.
When the route is approved, you can view the disposition association. Use the Update Route page and select the Disposition Associations link. The View Disposition Associations page displays the disposition list details.
Note: Disposition lists, which apply to the master configuration and item being planned, are transferred to Planning when the route for a maintenance requirement is being planned. Planners use the replace and rework percentiles to determine which materials to consider. The replacement percentile and the actual item instance are used to plan the material requirements. The rework percentile and the items average duration are used to forecast the need for a replacement part.
Finding Operation Records
Maintenance organizations refer to the existing operation records while defining solutions for similar maintenance requirements. Oracle CMRO also enables organizations to associate existing operations to a maintenance route. This necessitates the efficient retrieval of operation records.
Oracle CMRO enables the use of metacharacters when you type a word, or part of a word, to use as a search argument. Use % to represent any string of zero or more characters. Use _ to represent any single character. For example, if the database contains a record with the value “ENGINE” in a field, typing “E%” will return all records where the field value begins with “E”.
Prerequisites
- The operation record you want to retrieve must exist in the database.
To find an operation record
-
Navigate to the Search Operation page (Engineering > Route Management > Routes > Operations).
The Search Operation page appears.
Note: You can also activate the Search Operation page in a query-only mode by running a specific function. This function restricts you from creating a new operation using the Search Operation page.
-
Enter the information in the fields.
-
Click the Go button, and the operation records list appears.
-
Click the Clear button to restart a search.
All the search fields on the page will clear. However, if you have retrieved records, these records will display in the lower part of the page.
-
Enter the new search criteria, and click the Go button.
-
Select an operation record to edit.
-
Click the Operation link, and the Edit Operation page appears.
-
Make the necessary changes.
-
Click the Apply button.
-
Select the draft operation that you want to approve, and then click the Approve button.
-
Select the draft operation that you want to delete, and then click the Delete button.
-
Select the active operation that you want to terminate, and then click the Terminate button.
-
Select the active operation for which you want to create a revision, and then click Create Revision.
Note: The Approve, Delete, Terminate, and Create Revision functions can also be performed from the Edit Operations page.
Updating Maintenance Route Records
Use this process to retrieve maintenance route records from your database.
Oracle CMRO enables the use of metacharacters when you type a word, or part of a word, to use as a search argument. Use % to represent any string of zero or more characters. Use _ to represent any single character. For example, if the database contains a record with the value ENGINE in a field, entering E% will return all records where the field value begins with E.
Prerequisites
- The maintenance route that you want to retrieve must exist in the database.
To update maintenance route records
-
Navigate to the Search Route page.
-
Enter the information in the fields for the route.
-
Click the Go button to retrieve the records based on the search criteria.
-
Select the radiobutton for the route.
-
Select a value from the Select From drop-down list:
Note: The list of available values depends on the status of the route.
-
Approve: Select the Draft route that you want to approve.
-
Create Revision: Select the Active route to create a revision.
Note: The Approve, Terminate, Delete, and Create Revision functions can also be performed from the Update Route page.
-
Terminate: Select the Active route that you want to terminate.
You can terminate only those routes which are not associated with any maintenance requirements or those routes in which the Effective To date have passed.
-
Delete: Select a Draft route that you want to delete.
-
Associate Operations: Use this option to associate operations.
-
View Maintenance Requirements: Use this option to view the maintenance requirements that have been associated with the route in the Fleet Maintenance Program.
The Search Maintenance Requirements page appears. Enter the search criteria and view the maintenance requirements. You can view maintenance requirements only for routes with a status of Complete or Termination Pending.
-
-
Click the Go button, and the Update Route page appears.
Update Route

-
Make the necessary changes.
-
Click the Apply button.
Defining Reference Documents
Oracle CMRO enables you to define the reference documents related to a maintenance activity while creating the work card. This provides a ready reference that can improve the operational efficiency of the personnel involved in the maintenance job.
Related Topics
Defining Reference Documents for an Operation
Defining Reference Documents for a Maintenance Route
Defining Reference Documents for an Operation
- The document references and the operation record to which you want to associate must exist in the database.
To define reference documents for an operation
-
Navigate to the Search Operation page (Engineering > Route Management > Routes > Operations).
The Search Operation page appears.
-
Click the Create button to launch the Create Operation page, or search for an existing operation from the Search Operation page.
-
Click the Create button to create a new operation and enter information in the fields.
Information in fields marked with an asterisk is mandatory.
-
Click the Apply button to save the operation.
The Edit Operation page appears.
-
Enter the operation and click the Go button.
-
Click the corresponding link to access the Edit Operation page.
-
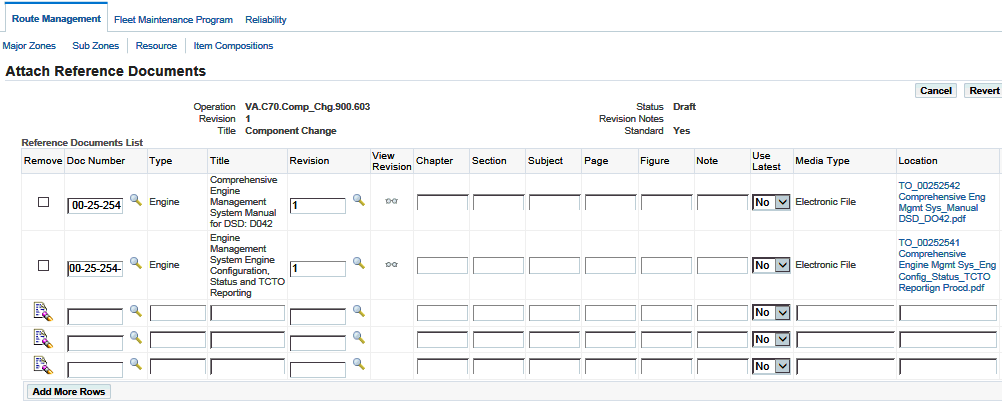
Click the Reference Documents link to access the Attach Reference Documents page.
Use the information in the following table to define a reference document.
Field Description Document Number A unique identifier, generated by the organization to identify a maintenance document. If you do not know the document number, enter the generic substitution metacharacter% in the field, and click the Go button to access the Select Doc Number page to view all the document references in the database. Type The major topic such as power plant, fleet unit, and ground support equipment that is described in the document. This field value is populated when you enter the Document Number. Title The title of the maintenance document. The default field value appears when you enter the Document Number. Sub Type The more detailed, lower level topic; works with the Type field. Category Document category for documents (user defined). Issuing Authority The entity that issued the document. Revision A user-assigned document revision identifier. Chapter A specific chapter in the associated document. The value is defined by the user when the association is created. Section A specific section in the associated document. The value is defined by the user when the association is created. Subject A specific subject in the associated document. The value is defined by the user when the association is created. Page A specific page in the associated document. The value is defined by the user when the association is created. Figure A specific figure in the associated document. The value is defined by the user when the association is created. Note A specific note in the associated document. The value is defined by the user when the association is created. Attach Reference Documents
-
Click the Remove check box for the document definition that you want to remove.
-
Click the Apply button to save the changes.
Defining Reference Documents for a Maintenance Route
- The document references and the maintenance route record to which you want to associate them must exist in the database.
To define reference documents for a maintenance route
-
Navigate to the Search Route page (Engineering > Route Management > Routes).
-
Click the Create button to access the Create Route page, or search for an existing route using the Search Route page.
-
If you are creating a new route, enter the information in the fields provided.
-
Click the Apply button to save the route. The Update Route page appears.
-
If associating documents to an existing route, retrieve the route, and then click the Route link to navigate to the Update Route page.
-
Click the Reference Document button to access the Attach Reference Documents page.
-
Enter the information in the fields such as Doc Number, Type, Title, Sub Type, Category, Issue Authority, Revision, and so on.
Attach Reference Documents

-
Click the Apply button to add the reference document information to the maintenance route record.
-
Select the Remove button for the document definition that you want to remove, and then click the Apply button.
Defining Resource Requirements
Oracle CMRO enables you to compile labor requirements related to a maintenance task. This information is necessary for pre-planning activities. Resource requirements can be defined as Labor, Tooling or Machinery.
Resource requirements are defined at either the operation or the route level. If the requirements are defined at both levels, only the route definitions are used for planning and production processes.
Related Topics
Defining Resource Requirements for an Operation
Defining Resource Requirements for a Maintenance Route
Defining Resource Requirements for an Operation
To define resource requirements for an operation
-
Select an operation and navigate to the Edit Operation page.
-
Click the Resource Requirements link to access the Define Resource Requirements page.
-
Use the information in the following table to enter the resource requirements.
Field Description Resource Type The type of resource requirement. Primary Resource The resource required to perform the route or operation. Quantity The number of resources required to perform the route or operation. Duration The number of hours required of each resource to perform the route or operation. Costing Parameters Field used to calculate job costs during execution of the route or operation on the shop floor. The costing parameter values are defined when implementing Oracle's Work in Process (WIP) and Costing applications. Alternate Resources Resources that the user can select as an alternative to the primary resource defined. Total Duration The sum of all the required durations for each unit represented in the Quantity field for the resource requirement. Schedule Sequence Field used to sequence resources on the route or operation. Sequencing resources are required for a long operation when the resource is not needed for the entire duration. 
-
Select the Apply button to save your work.
-
Enter a Costing Parameters value to specify costing parameters for this resource requirement. The Update Costing Parameters page appears.
Important: The Costing Parameters field is available if you have installed Oracle WIP and Oracle Cost Management.
Defining Resource Requirements for a Maintenance Route
- The maintenance route record for which you want to define labor requirements must exist in the database. The resources required to complete the route must be set up in the database. Refer to the Oracle Complex Maintenance, Repair, and Overhaul Implementation Guide.
To define resource requirements for a maintenance route
-
Navigate to the Search Route page (Engineering > Route Management > Routes).
The Search Route page appears.
-
Click the Create button to access the Create Route page, or search for an existing route using the Search Route page.
-
If you are creating a new route, enter the information in the fields.
Information in the fields marked with an asterisk is mandatory.
-
Click the Apply button to save the route.
The Update Route page appears.
-
If you are defining resources for an existing route, retrieve the route, and click the corresponding Route link in the search result list to navigate to the Update Route page.
-
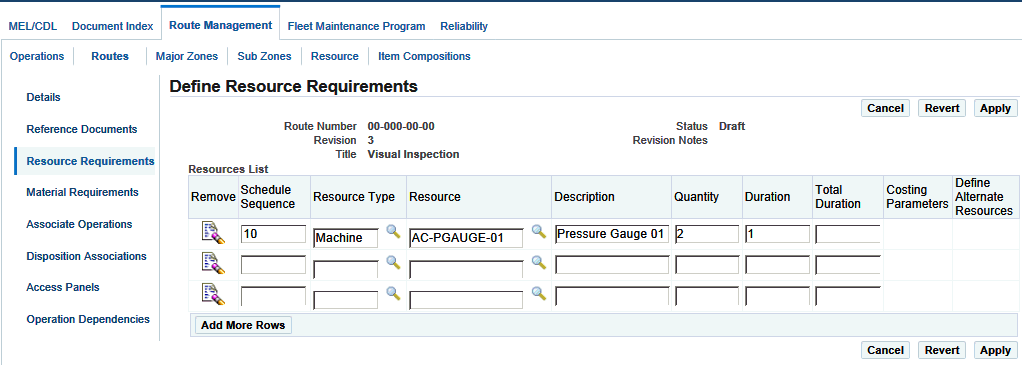
Click the Resource Requirements and, and the Define Resource Requirements page appears.
-
Click the Add More Rows button to enter resource requirements.
Enter the information in the fields.
Define Resource Requirements
-
Click the Apply button to add the resource requirement information to the operation record.
-
Click the Costing Parameters button to specify the costing parameters for this resource requirement. See Defining Costing Parameters.
-
Click the Remove button for the resource requirement that you want to remove.
-
Click the Apply button to save your work.
Defining Costing Parameters
Oracle CMRO enables you to define the costing parameters for resource requirements. These parameters are used to calculate the job costs during the execution of the route or operation on the shop floor. The costing parameter values are defined when implementing Oracle Work in Process (WIP) and Costing modules. The definition of the costing parameters at the route or operation level is optional. If you do not define any cost parameter values when you create a job in WIP for this route or operation, the system selects a default from the Bill of Materials resources connected to the Oracle CMRO resource.
Related Topics
Defining Costing Parameters for an Operation Resource Requirement
Defining Costing Parameters for a Route Resource Requirement
Defining Costing Parameters for an Operation Resource Requirement
- The operation record and the material requirements for which you want to define costing parameters must exist in the database.
- The costing parameters must exist in the database.
To define the costing parameters for an operation requirement
-
Navigate to the Search Operation page (Engineering > Route Management > Operations).
The Search Operation page appears.
-
Click the Create button to access the Create Operation page, or search for an existing operation from the Search Operation page.
-
If you are creating a new operation, enter the information in the fields.
-
Click the Apply button to add the operation, and the Edit Operation page appears.
-
If you are defining parameters for an existing operation, retrieve the operation.
Click the corresponding link in the search result list to navigate to the Edit Operation page.
-
Click the Resource Requirements link to access the Resource Requirements page.
-
Enter the information in the fields.
-
Click the Apply button to add the resource requirement information to the operation record.
-
Click the Costing Parameters button to navigate to the Update Costing Parameters page.
-
Enter the information in the fields.
For information regarding the field descriptions, see Fields on the Costing Parameter Page.

-
Click the Apply button to save your costing parameter definition.
-
Select the Null (blank) value in each drop-down list to remove the costing parameters.
-
Click the Apply button.
To view costing parameters for an operation
-
Navigate to the Search Operation page (Engineering > Route Management > Operations).
The Search Operation page appears.
-
Search for an existing operation, and then click the Go button.
-
Click the Resource Requirements link, and the View Resource Requirements page appears.
-
Click the Costing Parameters button for the operation, and the View Costing Parameters appears.
-
View the costing parameters.
Defining Costing Parameters for a Route Resource Requirement
- The route record and the material requirements for which you want to define costing parameters must exist in the database.
- The costing parameters must exist in the database.
To define costing parameters for route resource requirements
-
Navigate to the Search Route page (Engineering > Route Management > Routes).
The Search Route page appears.
-
Click the Create button to launch the Create Route page, or search for an existing route from the Search Route page.
-
If you are creating a new route, enter the information in the mandatory (asterisk) fields.
-
Click the Apply button to add the route.
The Update Route page appears.
-
If you are defining parameters for an existing route, retrieve the route, and click the Route Number link to access the Update Route page.
-
Click the Resource Requirements link to access the Resource Requirements page.
-
Enter the information in the fields.
-
Click the Apply button to add the resource requirement information to the route.
-
Click the Costing Parameters button to access the Update Costing Parameters page.
-
Use the information in the following table to enter costing details.
Field Description Cost Basis The Cost Basis ID. The value is selected from a drop-down list. The values are defined during the resource definition for the bill of material (BOM). Scheduled The Schedule Type ID. The value is selected from a drop-down list. The valid schedule types are defined during the resource definition of the BOM. Autocharge Type A method of charging a discrete job or repetitive schedule for the resources consumed at an operation. The value is selected from a drop-down list. The autocharge types are defined during the resource definition of the BOM. Standard Rate The frozen standard unit cost for a resource. The value is selected from a drop-down list and can be either Yes or No. -
Click the Apply button to save your costing parameter definition.

-
Remove the costing parameters, select the null (blank) value from the drop-down list of each field you want to remove.
-
Click the Apply button to save your work.
Defining Material Requirements
Oracle CMRO enables you to compile material requirements related to a maintenance task. This information is necessary for pre-planning activities.
The material requirements are defined at either the operation or the route level. If requirements are defined at both levels, only the route definitions are used for the planning and production processes.
Related Topics
Defining Material Requirements for an Operation
Defining Material Requirements for a Maintenance Route
Defining Material Requirements for an Operation
- The operation record for which you want to define resource requirements should exist in the database.
- The material required to complete the operation must exist in the database.
To define material requirements for an operation
-
Navigate to the Search Operation page (Engineering > Route Management > Operations), and the Search Operation page appears.
-
Click the Create button to launch the Create Operation page, or search for an existing operation from the Search Operation page.
-
If you are creating a new operation, enter the information in the fields.
Click the Apply button to add the operation, and the Edit Operation page appears.
-
If you are defining material requirements for an existing operation, retrieve the operation and click operation link to access the Edit Operation page.
-
Click the Material Requirements link, and the Define Material Requirement page appears.
-
Click the Add More Rows button to enter material requirements.
Use the information in the following table to enter material requirements.
Field Description Item Group The Alternate Item Group defined in Master Configuration. If your material requirement for this task is not a specific item type but a group of alternate items, you can define the complete alternate item group as a material requirement.
This definition specifically applies to a replacement material requirement. You can only define an item group or a part number for only one material requirement. If you do not know the value, enter a partial search string using the generic substitution metacharacter%, and click the Search icon and select the item group.Part Number An item number that is required to perform the task.You can only define an item group or a part number for one material requirement. If you do not know the value, enter the search criteria metacharacter%, and click the Search icon. Only the eAM enabled inventory items are available for selection. Quantity The number of parts required to perform the task. UOM The unit of measure of the quantity required to perform the task. Repair Item A material requirement that is fulfilled by repairing an item in a visit and is not planned for in Oracle Advanced Supply Planning. Exact Item This check box indicates if the material requirement requires an exact item as the installed item. Important: This check box cannot be used for positions that have Service Bulletin rules defined.
As Required This check box is used for material planning purposes only. Define Material Requirements

-
Click the Apply button to add the material requirement information to the operation record.
-
Click the Remove button for the material requirement that you want to remove from the operation.
-
Click the Apply button to save your work.
Defining Material Requirements for a Maintenance Route
- The maintenance route record for which you want to define material requirements must exist in the database.
- The item type and part number must exist in the database.
To define material requirements for a maintenance route
-
Navigate to the Search Route page (Engineering > Route Management > Routes).
The Search Route page appears.
-
Click the Create button to launch the Create Route page, or search for an existing route using the Search Route page.
-
If you are creating a new route, enter the information in the fields.
Click the Apply button to add the route. The Update Route page appears.
-
If you are defining material requirements for an existing route, retrieve the route, and click the Route Number link to access the Update Route page.
-
Click the Material Requirements link, and the Define Material Requirement page appears.
-
Click the Add More Rows button, and enter the required information.
-
Select the Include check box to indicate if the material requirement should be viewed in the disposition list.
A disposition list is defined as a subset of a composition list to complement material requirements.
Items defined as material requirements are expected to be 100% replacement requirements. If you want to have the item as a predominately 100% replacement but occasionally use a different percentage, you must define the requirement in the disposition list and set the percentile for replacement and repair. Material requirements are superseded by the disposition requirements where applicable, based on the master configuration or the item being planned.
-
Optionally select the Repair Item check box that identifies a material requirement that is fulfilled by repairing an item in a visit and is not planned for in Oracle Advanced Planning.
Additional Information: The items from the route material requirements and from the disposition list, which are set to 100% replacement, are planned by default through Advanced Supply Chain Planning.
-
Optionally select the Exact Item check box to indicate if the material requirement requires an exact item as the installed item.
Important: If the position has service bulletin rules defined, then the Exact Item option cannot be used.
-
Optionally select the As Required check box which is used for material planning purposes.
For information, see Description of fields in the Material Requirement page.
-
Click the Apply button to add the material requirement information to the maintenance route.
Define Material Requirements

Additional Information: When material requirements change on a route that has been planned for, an approval workflow is started to notify the user to replan for the material requirements.
-
Click the Remove icon to remove a material requirement associated to the operation.
-
Click the Apply button.
Associating Operations with a Maintenance Route
Use the Associate Operation to a Route page to associate operations to a selected maintenance route. The application simplifies the creation of maintenance routes by enabling you to use related operation records existing in the database. You can search for a required operation, and copy the operation record to associate it with the route.
Prerequisites
- Operation records that apply to the route must exist in the database.
To associate operations with maintenance routes
-
Retrieve the route record for which you want to associate operations (see Finding Maintenance Route Records).
-
Select the route record on the Search Route page.
-
Click the Associate Operations link, and the Associate Operations page appears.
-
Enter the information in the fields.
-
The Step field refers to the serial order of the operation in the maintenance route. This field value is user assigned.
Note: A step number cannot be defined as a single digit because of Oracle Enterprise Asset Management restrictions. For example, steps should be defined with at least two digits, such as 10, 20, 30, and so on.
-
The Operation field contains the predefined operation that you want to associate with the maintenance route.
-
-
Click the Operation search icon to launch the Select Operation page.
-
Query for operation records, and click the link to select the operation.
The Associate Operations page appears.
-
Click the Apply button to save the records.
-
You can also associate multiple operations to a maintenance record.
-
Using the Select Operations page, click the Attach button and then enter the maintenance route information.
-
Click the Go button to retrieve the operations based on your search criteria.
-
-
Select the multiple operations that you want to add and click the Associate button.
Note that the values in the Operation fields do not appear in the same line as the step operation, but on the next empty line.
-
Enter the values in the fields.
-
Click the Apply button to associate the operations to the maintenance route record.
Defining Access Panels
Oracle CMRO enables you to associate access panels to a route or an operation in engineering. When planning a maintenance visit, you can schedule tasks and work orders based on the applicable access panel.
Related Topics
Defining Access Panels for an Operation
Defining Access Panels for a Maintenance Route
Defining Access Panels for an Operation
- The operation for which you want to define access panels must exist in the database.
To define access panels for an operation
-
Navigate to the Search Operation page in the Route Management tab.
-
Click the Create button to launch the Create Operation page.
-
Optionally, you can search for an existing operation to which you want to associate access panels.
-
Click the appropriate operation number to navigate to the Edit Operation page.
-
Click the Access Panels link, and the Edit Access Panels page appears.
-
Click the Add More Rows button to enter access panel types.
-
Add the appropriate Access Panel Type and description in the Access Panels List region.
-
Click the Apply button to add the access panels to the operation record.
-
Click the Remove icon for the access panel that you want to remove, and then click the Apply button.
Defining Access Panels for a Maintenance Route
- The maintenance route for which you want to define access panels must exist in the database.
To define access panels for a maintenance route
-
Navigate to the Search Route page in the Route Management tab.
-
Click the Create button to launch the Create Route page.
-
Optionally, you can search for an existing route to which you want to associate access panels.
-
Click the appropriate Route Number to navigate to the Update Route page.
-
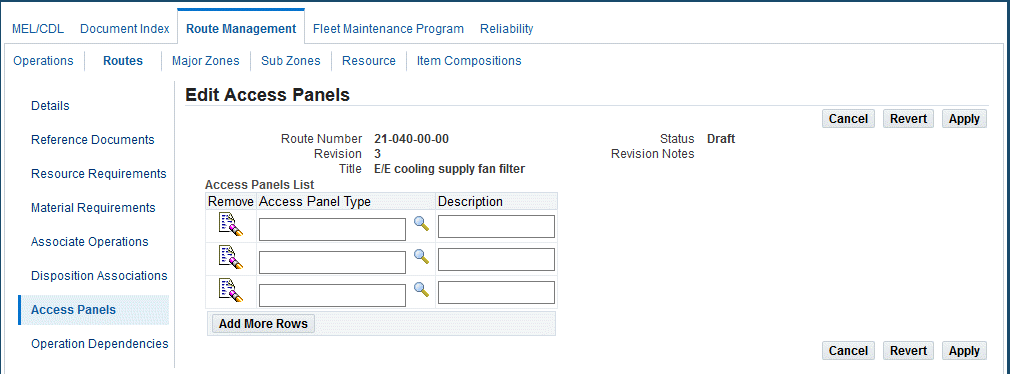
Click the Access Panels link on the Route Management tab. The Edit Access Panels page opens.
-
Click the Add More Rows button to enter access panel types.
-
Add the appropriate Access Panel Type and description in the Access Panels List region.
-
Click the Apply button to add the access panels to the route record.
-
Click the Remove button to remove an access panel, and then click the Apply button.
Editing Operation Records
Oracle CMRO enables you to retrieve existing operation records and edit the information associated with the operation including the signoff, material, machine, and tool requirements. You can also edit document reference and phase code definitions associated with the operation.
The first step enables you to edit the basic operation record information.
Prerequisites
- The operation must exist in the database and must have a status of Draft or Approval Rejected.
- To edit an approved operation, you must first create a revision of that operation.
To edit operation records
-
Retrieve the operation records that match your requirement (see Finding Operation Records).
-
Select an operation, and click the Operation link to access the Edit Operation page.
Edit Operation

-
Make the necessary changes to the information in the fields.
-
Click the approve button to save your changes.
-
You can also edit reference document resources, material requirements, or associated operations by clicking the appropriate link on the Route Management tab.
Related Topics
Defining Reference Documents for an Operation
Defining Resource Requirements for an Operation
Defining Material Requirements for an Operation
Editing Maintenance Route Records
Oracle CMRO enables you to retrieve existing maintenance routes and edit the information associated with the route, including the signoff, material, machine, and tool requirements. You can also edit document reference and phase code definitions associated with the operation.
Prerequisites
- A maintenance route with a status of Draft or Approval Rejected must exist in the database.
- To edit an approved route, you must first create a revision of that route.
To edit maintenance route records
-
Retrieve the maintenance route records that match your requirement (see Finding Maintenance Route Records).
-
Click the Route Number link to access the Update Route page.
-
Make the necessary changes to the information in the fields.
-
Click the Approve button to save the changes.
-
You can also edit reference document resources, material requirements, or associated operations by clicking the appropriate link on the Route Management tab.
Related Topics
Defining Reference Documents for a Route
Defining Resource Requirements for a Route
Defining Material Requirements for a Route
Associating Operations to a Maintenance Route
Defining Component Locations in Fleet Units
Maintenance organizations define zones to identify component locations in an electromechanical system. Oracle CMRO enables you to associate major zones and sub zones in electromechanical systems to product types. Product type refer to the classification by category of electromechanical systems such as Ground Support and Engine for aircraft. This enables you to closely monitor maintenance activities and component location on any fleet unit belonging to a product type.
Related Topics
Associating Major Zones to Product Types
Associating Sub Zones to Product Types
Associating Major Zones to Item Types
- The Item Type and Major Zone values must exist in the database.
To associate major zones to an item type
-
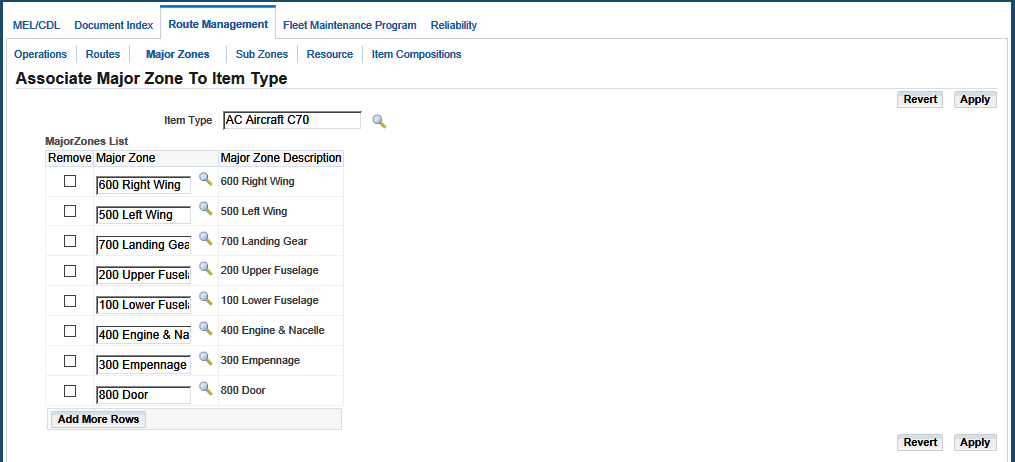
Navigate to the Associate Major Zone To Item Type page (Oracle Complex Maintenance, Repair, and Overhaul Home page > Engineering < Route Management > Major Zones).
-
Select the item and click the Go button.
The Associate Major Zone to Item Type page appears.
-
Select a value for the Major Zone.
-
These user-defined zones are used as a method to identify the locations of the item in the electromechanical system being maintained.
-
If you do not know the value, enter a partial search string with the generic substitution metacharacter%, and click the Go button.
The Select Major Zone page appears and displays all the matching records in the database.
Click the appropriate item.
-
-
Click the Apply button.
Associating Sub Zones to Item Types
- Item types, major zones, and sub zones must exist in the database.
- Associate the major zone and sub zone to the appropriate Item type.
To associate sub zones to item types
-
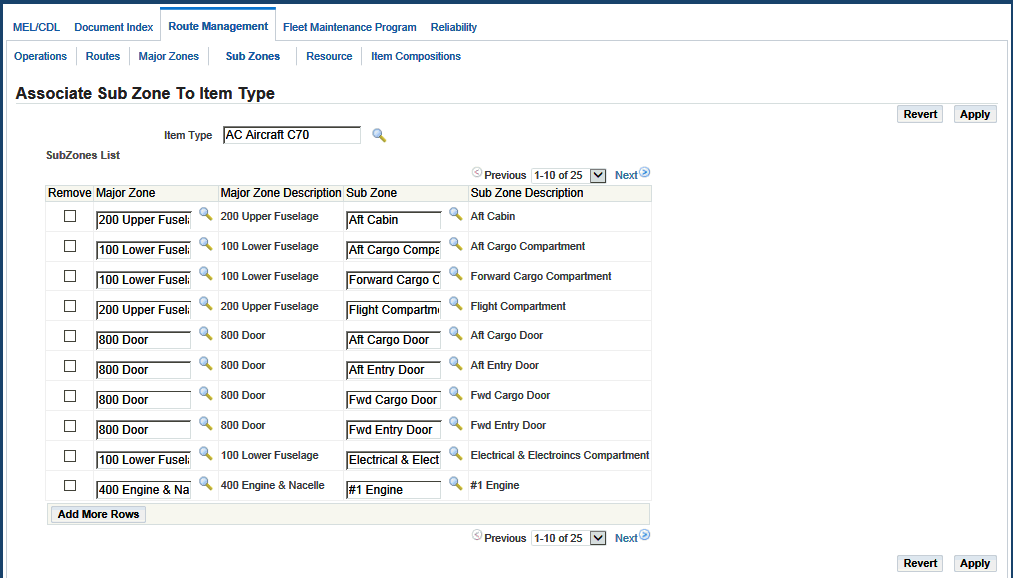
Navigate to the Associate Sub Zone To Item Type page (Oracle Complex Maintenance, Repair, and Overhaul Home page > Engineering < Route Management > Sub Zones).
The Associate Sub Zone to Item Type page appears.
-
Enter the information in the fields.
You can remove existing sub zones by selecting the check box for the row to be deleted.
Click the Add More Rows button to add sub zones to the item type.
-
Click the Apply button to record the sub zones associated to the item type.
Finding Oracle Complex Maintenance, Repair, and Overhaul Resources
Use this process to retrieve Oracle CMRO resource records from your database.
Oracle CMRO enables the use of metacharacters when you type a word, or part of a word, to use as a search argument. Use % to represent any string of zero or more characters. Use _ to represent any single character. For example, if the database contains a record with the value “ENGINE” in a field, typing “E%” will return all records where the field value begins with “E”.
Prerequisites
- The resource that you want to retrieve must exist in the database.
To find Oracle CMRO resources
-
Navigate to the Search Resources page (Oracle Complex Maintenance, Repair, and Overhaul Home page > Engineering < Route Management > Resource).
The Search Resources page appears.
-
Enter the information in the fields, and click the Go button.
-
Click the Clear button to restart a search.
If you have retrieved records being displayed in the lower half of the screen, these records will remain.
-
Click the Go button to retrieve the records based on your new search criteria.
-
Click the Resource link to view resource details such as:
-
Name and Description
-
Organization
-
Resource Type
-
Creating Oracle Complex Maintenance, Repair, and Overhaul Resources
The following process initiates the creation of a resource. You can save the record in the database before defining the attributes.
To create an Oracle CMRO resource
-
Navigate to the Create Resources page (Engineering > Route Management > Routes).
The Search Resource page appears.
-
Click the Create button, and the Create Resources page appears.
-
Enter the information in the fields.
Create Resources

-
Use the Associated BOM Resources List on the lower half of the page to associate BOM resources to the Oracle CMRO resource. Click the Add More Rows button, and enter the information in the fields.
You must associate at least one BOM resource with the Oracle CMRO resource that you are creating.
If appropriate, select the One BOM Resource per Org check box
Name Select a name of the resource from the drop-down list. Description Default value associated with the name. Organization Default value associated with the name. Resource Type Default value that comes from the resource type entered. Department Select a department from the drop-down list. The Department field enables department level resource definitions for operation and route resource requirements. The department specified will appear as the default value for the CMRO work order operation (default operation) department.
If the Department field is blank, the visit task department will appear as the default work order and operation department.
-
Alternatively, click the Attach button to find and associate a specific BOM resource.
-
Click the Apply button to create the resource.
The Update Resources page appears and displays the resource that you just created.
-
Click the Cancel button to stop the process and return to the previous page.
-
Click the Remove button for the BOM resource that you want to remove.
Editing Oracle Complex Maintenance, Repair, and Overhaul Resources
Oracle CMRO enables you to retrieve and edit existing resources.
Prerequisites
- The Oracle CMRO resource must exist in the database.
To edit resource records
-
Retrieve the Oracle CMRO resource records that match your requirement (see Finding Oracle Complex Maintenance, Repair, and Overhaul Resources).
-
Select a resource, and click the Resource link to access the Update Resources page.
-
Make the necessary changes to the information in the fields. For more information on attaching BOM resources to an Oracle CMRO resource, see Creating Oracle Complex Maintenance, Repair, and Overhaul Resources.
-
Click the Apply button to save the changes.
Associating BOM Resources
Use this process to retrieve BOM resource records.
Oracle CMRO enables the use of metacharacters when you type a word, or part of a word, to use as a search argument. Use % to represent any string of zero or more characters. Use _ to represent any single character. For example, if the database contains a record with the value “ENGINE” in a field, typing “E%” will return all records where the field value begins with “E”.
Prerequisites
- The resource that you want to retrieve must exist in the database.
To associate BOM resources
-
Retrieve the Oracle Complex Maintenance, Repair, and Overhaul resource records that match your requirement (see Finding Oracle Complex Maintenance, Repair, and Overhaul Resources).
-
Select a resource, and click the Resource link to access the Update Resources page.
-
Click the Attach button, and the Search BOM Resources page appears.
-
Enter the information in the fields and click the Go button.
-
Click the Select button for the resource, and then click the Associate button. The Update Resources page appears.
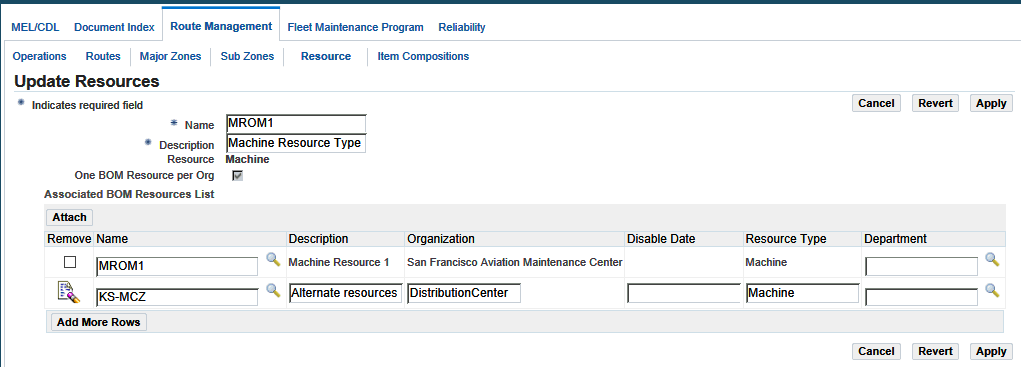
Update Resources
-
You can click the Revert button to restore the fields to the last saved position.
-
You can click the Cancel button to return to the Update Resources page.
-
Click the Apply button to save the changes.
Generate Workcards
The Generate Workcards concurrent process is used to generate a work card (Jobsheet) for a specific employee, a scheduled date range, a specific visit, a specific stage of a job, or a work order range.
To run the Generate Workcards program
-
Navigate to the Submit Requests window.
-
In the program Name field, select Generate Workcards.
-
In the Parameter field, select the following:
-
Visit number if want to print for a specific visit.
-
Stage number if want to print for a specific stage of job or task.
-
Work order number from and to are for the work order range you want to print.
-
Schedule Start Date and Schedule End Date for the Schedule Date range you want to print.
-
Enter an employee number if you want to print for a specific Employee or Technician for all scheduled jobs.
-
-
Select any other information needed to generate this program.
-
Click the Submit button to generate this concurrent request.