Working with Supplier Warranty
This chapter covers the following topics:
- Overview
- Key Business Processes
- Searching Warranty Template Records
- Creating Warranty Templates
- Searching for Warranty Contracts
- Associating Supplier Warranties to Item Instances
- Using the Warranty Workbench
- Managing Warranty Entitlements
- Managing Warranty Claims
Overview
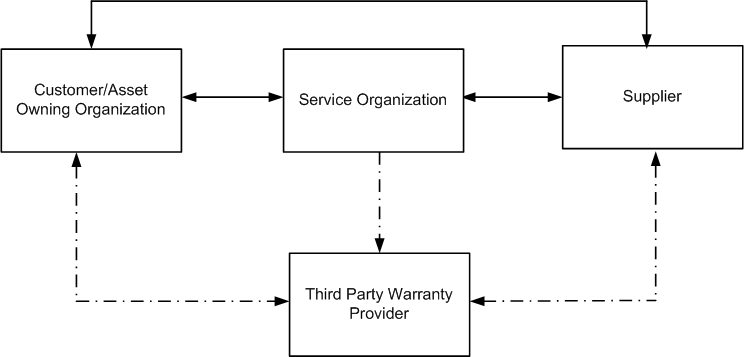
Organizations acquire and deploy assets that are required to support their core business processes. When the assets are used, hey eventually break down. Organizations have service facilities that repair the assets or send them for outside servicing. The servicing of an asset can be periodic (preventive maintenance) or ad hoc (on demand).
Suppliers provide a performance or reliability guarantee that allows a customer to recover any unplanned maintenance repair costs that are incurred during a specified period of ownership for an asset. It is the responsibility of the customer to track the performance or reliability of an asset, capture any unplanned service activity, verify the activity against the warranty terms and conditions, and follow the supplier's process for claiming warranty reimbursement.
When an asset needs to be repaired and is covered by a supplier warranty, the servicing organization determines that the supplier must rectify the defects free of cost or at some negotiated price. The servicing organization makes a warranty claim if there is a link between the assets in question and established warranty terms and conditions. Supplier warranty terms and conditions cover a wide array of activities performed on an asset during its lifetime. Sometimes it is tied to an as-delivered condition upon induction to a customer. These conditions include new purchases, used purchases, repair services, non-routines, configuration changes, reliability programs and service bulletin and air worthiness directives.
Key Business Processes
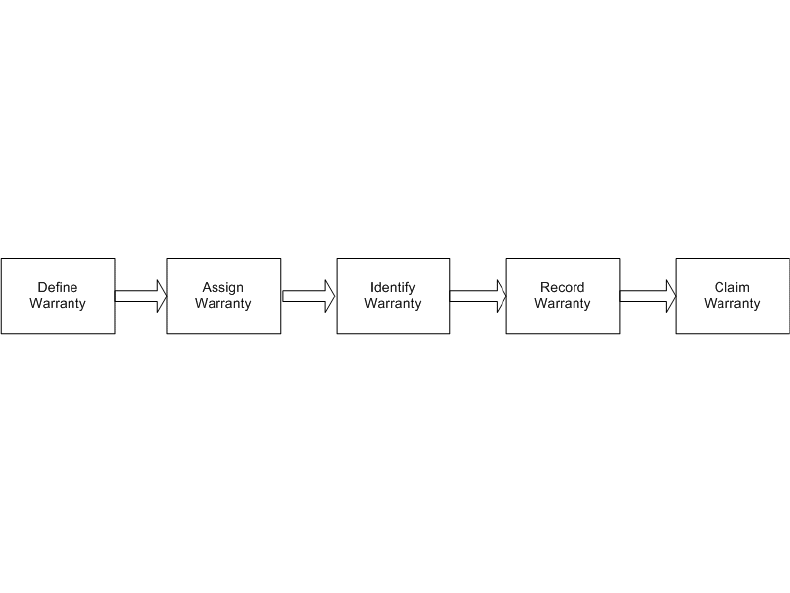
Define Warranty
Supplier warranty begins with the Warranty Administrator defining the warranty capability for a vendor and identifying the service items that have warranty applicability.
Assign Warranty
The assign warranty phase includes the following actions:
-
Assigning warranty to Oracle Installed Base assets.
-
Tracking warranty on Oracle Installed Base assets.
-
Monitoring effectivity and expiration.
-
Assigning warranty to specific maintenance requirements.
Identify Warranty
The identifying warranty phase encompasses identifying and evaluating the impact during maintenance planning. It also covers warranty applicability and terms during execution and warranty coverage for internal or external repair services.
Record Warranty
The supplier warranty feature enables you to:
-
Record accomplished maintenance tasks.
-
Record labor and material costs.
-
Record internal or external repair service costs
Claim Warranty
When a visit task, work order, non-routine or an OSP line is flagged as warranty, the system associates them to a Warranty Claim, that is a part of claim submittal process. For these orders, the system uses the Warranty Workbench to create, update and manage warranty claims, as well as reimbursement information related to warranty recovery.
Searching Warranty Template Records
You can use the Search Warranty Template page to search, view and edit an existing warranty template as well as to view associated contracts. This page also enables you to create a new template or copy an existing template.
To search warranty template records
-
Navigate to the Search Warranty Template page.
-
Enter any one of the following search criteria:
-
Template Name: Select the template from the list of all warranty templates.
-
Vendor Name: Shows a list of warranty vendors according to the warranty vendor setup.
The Warranty Flag must be checked in the Vendor record.
-
Template Status: Options are All, Enabled, and Not Enabled.
-
Warranty Type: Select the appropriate warranty type.
-
Item Number: Select the required item number.
-
Item Description: Description of the selected item displays.
-
Item Status: Options are All, Enabled, and Not Enabled.
-
-
Click the Go button, and the warranty template records appear.
You can also edit a template, create a copy, and view contracts if they are available.
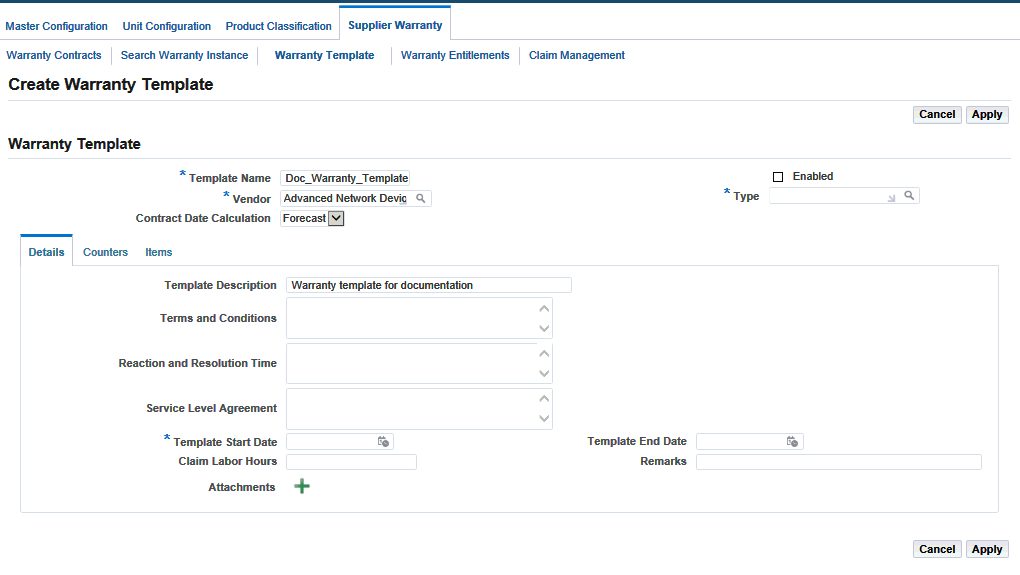
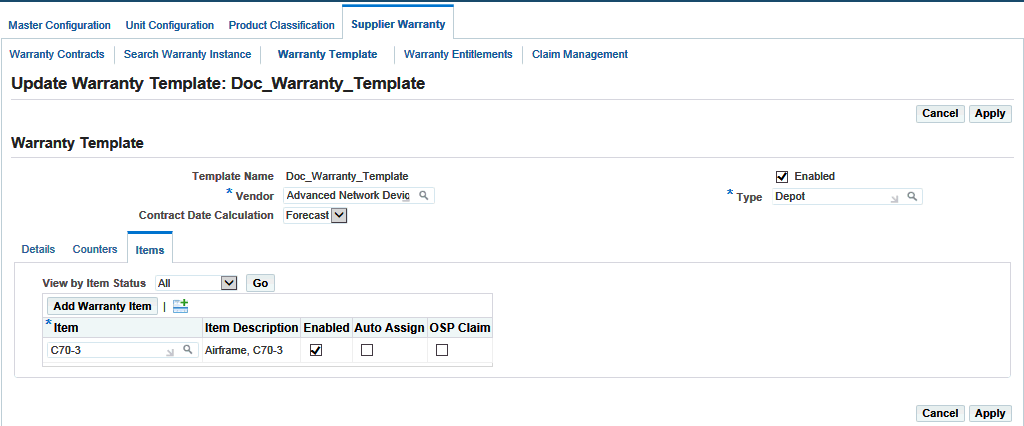
Creating Warranty Templates
The Warranty Administrator defines a warranty template for a supplier's warranty terms and conditions, setting applicable tracking counters and associating items to the template. The Administrator then selects an item in Oracle Installed Base and assigns a specific warranty contract. The item can be serialized or lot-controlled.
To create a warranty template
-
Navigate to the Search Warranty Template page.
-
Click the Create button to navigate to the Create Warranty Template page.
-
Enter the following information in the header region:
-
Template Name: Enter a unique name for the warranty template.
-
Vendor: Select the appropriate vendor.
-
Contract Date Calculation: Select from the following three options:
-
Date: This option renders the Start Date and End Date fields.
During warranty contract creation, you are automatically presented with a predefined start date and end date for the contract.
-
Forecast: If you select this option, the template relies only on counters to determine the expiration of a warranty contract and no contract end date is defined during warranty contract instantiation.
The expiration date for the warranty contract is calculated using the Forecasted Utilization.
-
Period: If you select this option, the template relies on a period of time or a combination of period of time and counters to determine the expiration of a warranty contract.
This option renders the Period and UOM fields and enables you to optionally define counters. During the warranty contract creation, you select options that determine the start date. This start date is used with the Period and UOM values to calculate the end date of the contract. The Start Date value is based on a user-defined date or it is calculated based on a historical counter value. If counters are defined in the warranty template, the contract calculates expiration dates for each counter row based on the user-defined start date. The system then evaluates the expiration dates from the counters and contract end date in order and considers the earliest date as the contract expiration date.
-
-
Enabled: Select the check box to enable this template. Templates must be enabled to be used as a basis to create new contracts.
-
Type: Customer-defined attributes created during system setup that can be used to differentiate templates.
-
-
Click the Details tab.
-
Enter the following information on the Details tab:
-
Template Description: Add a description of the template.
-
Terms and Conditions: Enter the terms and conditions of the warranty template.
-
Reaction and Resolution Time: Additional description relating to the terms and conditions.
-
Service Level Agreement: Further description relating to the terms and conditions.
-
Template Start Date: Defaults to the system date during Template creation.
This value is used for reference and in conjunction with the Template End Date value in order to change the template status to Not Enabled.
-
Template End Date: This field is optional, and is used for reference and in conjunction with Template Start Date value in order to change the template status to Not Enabled.
-
Claim Labor Hours: Add the standard number of hours that can be claimed for contracts created from this template. This will be reflected in the contract and can be used for reporting.
-
Remarks: Optional field that can be used capture miscellaneous information.
-
Attachments: Select standard attachments; these attachments can be viewed on each contract when they are created.
-
-
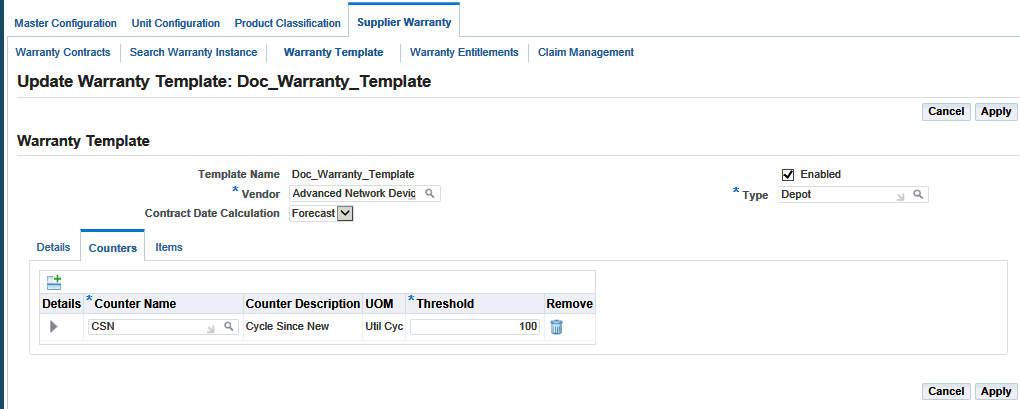
Click the Apply button and the Update Warranty Template page appears.
-
Click the Counters tab to define the warranty expiration based on counter values.
-
Click Add Row to define new counters.
-
Enter the information in the following fields:
-
Counter Name: Select a counter.
-
Counter Description: Defaults from the counter that you select.
-
UOM: Defaults from the counter that you select.
-
Threshold: Refers to the value used to generate the Stop counter values when a warranty contract is instantiated. This field is required.
-
-
Click the Items tab to define the items to which the template can be associated and a warranty contract to be instantiated.
All items that have been associated to a template appear. Items can be associated to one or many templates.
-
To associate items to the template, click the Add Rows button, and enter the following item details:
-
Item: Select the item that you want to associate to the template.
-
Item Description: Default value comes from the item that you select.
-
Enabled: Click the check box to allow additional item instances to be instantiated by generating a warranty contract.
Clear the check box to restrict the use of the warranty template to instantiate a contract for this item.
-
Auto Assign: This option is used by a concurrent program to automatically generate new contracts, in pending status, for all enabled items as their corresponding item instances are introduced into Oracle Installed Base.
This function automates the search and creation of contracts for newly introduced item instances.
-
OSP Claim: Select this check box to include it on the warranty contract during instantiation.
-
-
Click the Apply button.
-
Click the Add Warranty Items button, and the Add Warranty Items page appears.
Use this page to search and add items to the warranty template.
-
In the Simple Search region, enter any of the following search criteria:
-
Master Configuration Name
-
Master Configuration Description
-
Master Configuration Position
-
Item
-
Group Name
-
-
Click the Go button to view the results.
-
Select an item, and click the Add To Warranty Template button.
The confirmation page indicates that the new item has been added to the warranty template.
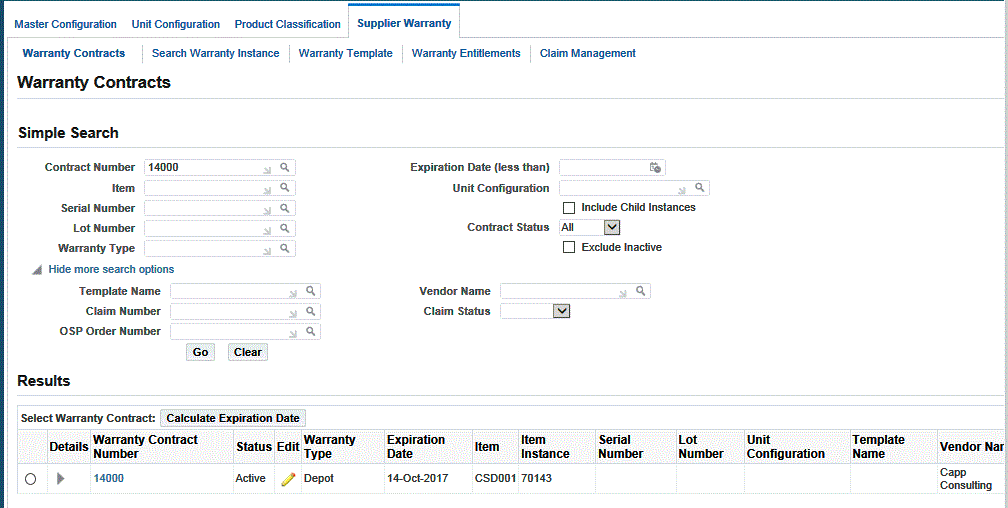
Searching for Warranty Contracts
The warranty system displays the supplier warranty contracts for an item. It enables you to search for warranty contracts and also instantiate contracts if a valid template is available. You can perform the search using warranty contracts or an asset. The search results display the warranty contracts, and you can drill down to the details of the contract.
To search for a warranty contract
-
Navigate to the Warranty Contracts page.
-
In the Simple Search region, enter any one of the following search criteria:
-
Contract Number: Displays a list of existing warranty contracts.
-
Item: Displays a list of all items.
-
Serial Number: Displays a list of all serial numbers filtered by the item if defined.
-
Lot Number: Displays all available lots in inventory.
-
Warranty Type: Displays a list of all warranty types defined.
-
Expiration Date: Refers to the earliest expiration date taken from either the warranty end date or the earliest calculated end date for counter expiration.
-
Unit Configuration: Displays a list of all unit configurations with a status of Approve.
-
Contract Status: Options are All, Active, Pending or Inactive.
-
-
Click the Show more search options to display additional search criteria:
-
Template Name
-
Claim Number
-
OSP Order Number
-
Vendor Name
-
Claim Status
-
-
Click the Go button. The Results region displays all the contracts defined in the warranty contracts, according to the search criteria.
-
Select a warranty contract and click the Calculate Expiration button to recalculate the expiration due date for a selected warranty contract.
-
Click the Show/Hide drill down to view warranty claim history for the contract row.
-
Click the Warranty Contract Number link to navigate to the View Warranty Contract page.
-
In the Results region, select a warranty contract and click the Edit button to navigate to the Update Warranty Contract page.
-
Make the required changes to the contract and click the Apply button to update the warranty contract.
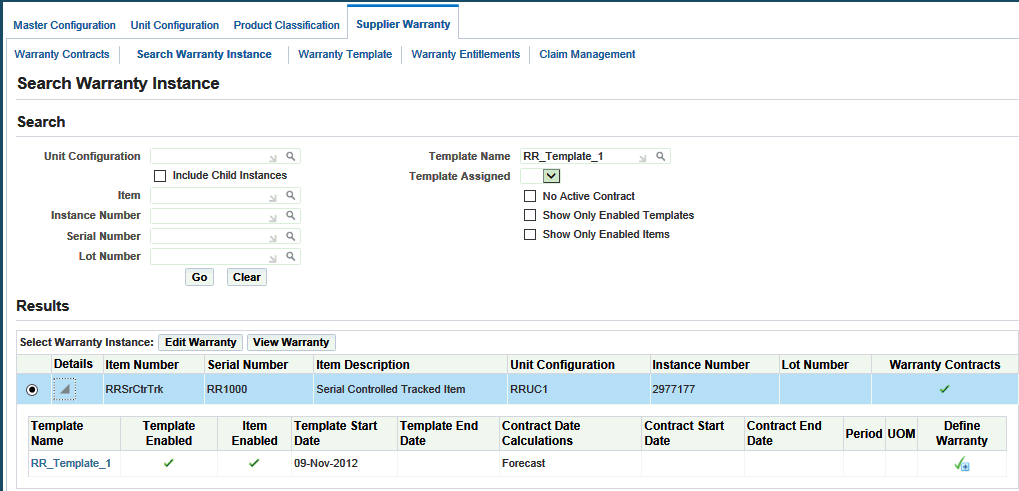
Associating Supplier Warranties to Item Instances
When a company buys an item or receives an item back from service, a supplier warranty usually covers it. Being able to define a Supplier Warranty and associate to an item allows a company to determine effectively whether an item is under warranty and what types of service are eligible for warranty recovery. It is financially beneficial for a company to use and maintain its items according to the warranty terms and conditions, with effective tracking being a critical part of warranty recovery efforts.
To link supplier warranties to item instances
-
Navigate to the Search Warranty Instance page.
This page enables you to search for the item instance to view or define a warranty contract from a warranty template.
-
Enter any of the following search criteria:
-
Unit Configuration
-
Item
-
Instance Number
-
Serial Number
-
Lot Number
-
Template Name
-
Template Assigned
-
No Active Contract
-
Show Only Enabled Templates
-
Show Only Enabled Items
-
-
Click the Go button. The Results region displays all item instances defined in Installed Base, according to the search criteria.

-
Select the item instance and click the Edit Warranty button to access the Warranty Workbench page. For more information on the Warranty Workbench, see Using the Warranty Workbench.
-
Click the Show/Hide drill down to view all the associated warranty templates for the item.
-
Select an item instance, and the Warranty Workbench appears.
-
Click the Define Warranty button to navigate to the Create Warranty Contract page.
All the predefined definitions are copied to the contract instance. A new contract number is generated by default.
Note: The Warranty Template Enabled and Warranty Item Enabled both must set to Yes so that the Define Warranty button appears.
-
Edit the new warranty contract.
-
Click Apply to save your work.
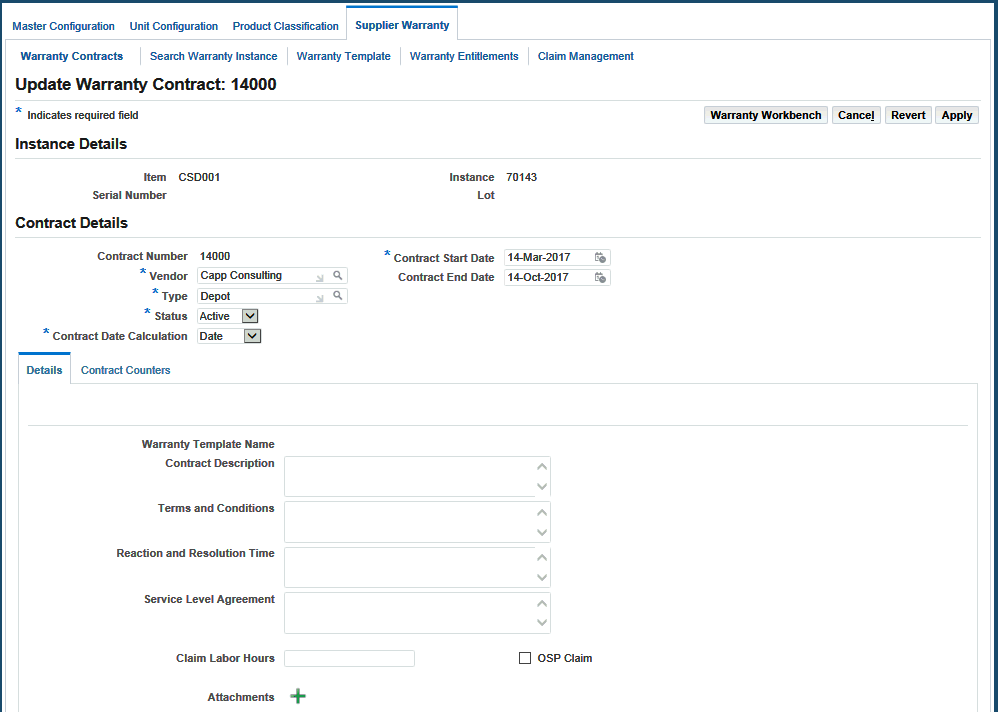
Using the Warranty Workbench
The Warranty Workbench displays all the warranty information for an asset. Using this workbench, you can view or edit existing contracts, create new warranty contracts using warranty templates, create warranty contracts manually, view utilization asset counter values, view asset warranty vendors, and view asset warranty claims.
To use the Warranty Workbench
-
Navigate to the Warranty Workbench (Supplier Warranty > Warranty Contracts > Update Warranty Contract > Warranty Workbench).
The Warranty Workbench Header displays item instance details.
-
Click the Warranty Contracts tab. This tab displays one row for each warranty contract, sorted by status, with active contracts being displayed first.
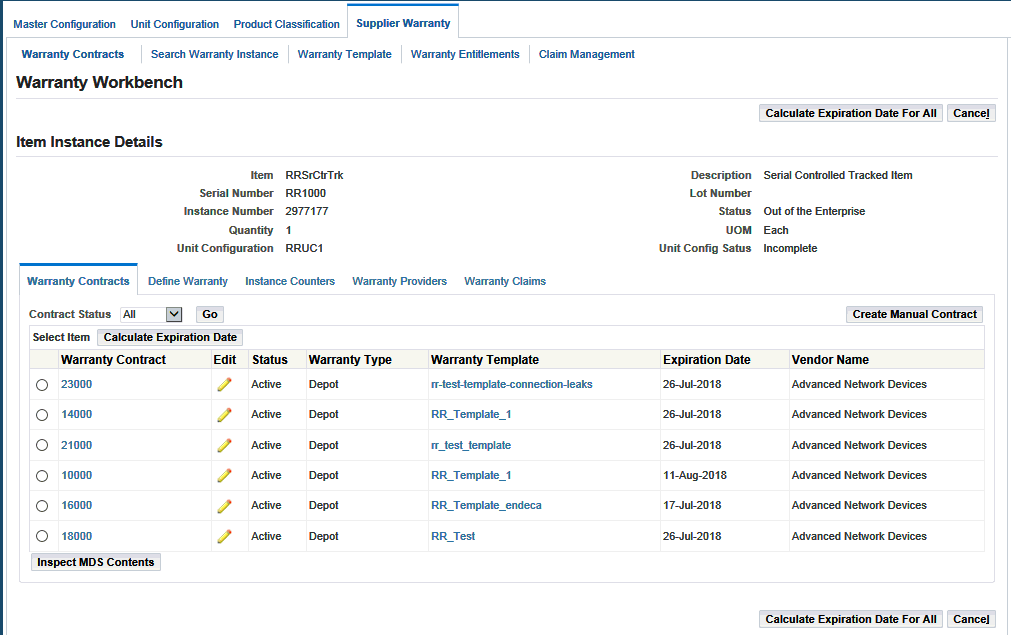
-
To manually create a contract, click the Create Manual Contract button.
The Create Warranty Contract page appears.
-
On the Create Warranty Contract page, a new Contract Number is generated by default.
-
Enter the following information on the Contract Details region:
-
Vendor
-
Type
-
Status
-
Contract Start Date
-
Contract End Date
If you select Date as the Contract Date Calculation, you can enter the Contract End Date.
If you select Forecast as the Contract Date Calculation, you can select a Start From value.
-
If you select a Start From value of Date, the Contract Start date is used by the system as the basis for evaluating Utilization.
-
If you select a Start From value of Counter, you are not required to enter a Contract Start Date. You can optionally a Counter value of:
-
Current Reading: The system selects a Contract Start Date equal to the system date.
-
Zero: The system selects a Contract Start Date equal to the date in which the asset entered the installed base.
-
-
If you select Period as the Contract Date Calculation, the Period and UOM must be entered and the system calculates the Contract End Date.
-
Add counters that are used to calculate expiration dates.
These counters normally default from a Warranty Template.
-
-
Click the Details tab and enter the required information.
-
Click the Contract Counters tab.
-
Click Add Rows to define new counters for the contract.
-
Enter the following information:
-
Counter Name
-
Start
-
Threshold
Note: If you select Forecast as the Contract Date Calculation, the system uses the Contract Start date to derive the counter Start Value. This value can be manually updated and the system recalculates the Stop value and Expiration Date, based on the asset utilization.
-
-
Click the Apply button.
-
Click the Warranty Workbench button.
The Warranty Contracts tab now displays the newly created warranty contract.
-
Click the Define Warranty tab to define the warranty contract based on a Warranty Template.

-
Click the Define Warranty icon to navigate to the Create Warranty Contract page.
All the predefined definitions are copied to the contract instance. A new Contract Number is automatically generated.
Note: The Warranty Template Enabled and Warranty Item Enabled both must be equal to Yes for the Define Warranty Icon to appear.
-
Enter the Contract Start Date.
There are various scenarios associated with this step:
-
If the Warranty Template is defined based on the Date as the Contract Date Calculation, you can enter the Contract End Date.
-
If the Warranty Template is defined based on the Forecast as the Contract Date Calculation, you can select a Start From value.
-
If you select a Start From value of Date, the system uses the Contract Start date as the basis for evaluating the utilization.
-
If you select a Start From value of Counter, you are not required to enter a Contract Start Date. You can select a Counter value of Current Reading or Zero.
Note: If you select the value of Current Reading, the system selects a Contract Start Date equal to the system date. If you select a value of Zero, the system selects a Contract Start Date equal to the date in which the asset was entered into Oracle Installed Base.
-
You can validate the counters that are used to calculate expiration dates.
These default values come from the Warranty Template. When you click the Apply button, the system populates the Start, Stop and Expiration Date values.
You can manually update the Start and Threshold values and click the Apply button to recalculate the Stop and Expiration values.
-
-
If the Warranty Template is defined based on the Period as the Contract Date Calculation, you must enter the Period and UOM values; the system calculates the Contract End Date.
You can also the Warranty Template to define counters. These default values come from the warranty template.
When you click the Apply button, the Start, Stop and Expiration Date values are populated by the system. You can manually update the Start and Threshold values and click Apply to recalculate the Stop and Expiration values.
-
-
Click the Apply button to create the contract.
-
Click the Warranty Workbench button to navigate to the Warranty Workbench.
The Warranty Contracts tab now displays the newly created warranty contract.
-
Click the Instance Counters tab and view all the current counters for the item instance.

-
Click the Warranty Providers tab to view the vendor and item and service relationships for Warranty Flagged vendors.
-
Click the Warranty Claim tab.
This tab displays one row for each warranty claim record that is associated with the item instance.
Managing Warranty Entitlements
The system uses warranty entitlements to record and manage work order activity identified for an asset that is under a supplier warranty. These entitlements are initially validated during planning, updated during execution, and then used as the basis for warranty claims.
Warranty Entitlements in Planning
-
When a visit task is created for an asset, the system automatically indicates through flags whether the Task and Asset are Warranty eligible.
-
The Task Warranty is defined as a task in which a warranty template is associated with the maintenance requirement or route.
-
The Instance Warranty is defined as an asset having one or move active warranty contracts.
-
You must validate the activity on the asset for the Task, select a warranty contract if applicable and update the Task Warranty Status.
Note: The system may automatically set the warranty contract and status values if a match is validated between the task and asset warranty contract, if the warranty templates match. You can also select another contract or set the Task Warranty Status to Not Applicable.
-
Warranty entitlement records are created during the push to production action for all visit tasks that are identified as having a Instance Warranty, regardless of the warranty status.
Warranty Entitlements in Execution
-
Execution planners can update warranty eligibility for a work order without any approval process. The entitlement record is automatically updated through these actions.
-
Technicians can also update the warranty eligibility for a work order that requires a review and approval process.
-
Technicians can also request a general review of the warranty eligibility without making any changes to the entitlement record for a work order.
Warranty Entitlements for Claims
-
Warranty administrators update entitlement records as needed before associating them to a warranty claim.
To manage warranty entitlements
-
Navigate to the Search Entitlements page.
-
Enter any of the following search criteria to query for the required claims:
-
Work Order Number
-
Work Order Status
-
Visit Number
-
Non Routine
-
Warranty Contract
-
Warranty Status
-
Warranty Vendor Name
-
Visit Name
-
Work Order Description
-
OSP Order Number
-
Item
-
Serial Number
-
Unit
-
-
Click the Go button.
The Results region displays the entitlement records based on the search criteria.
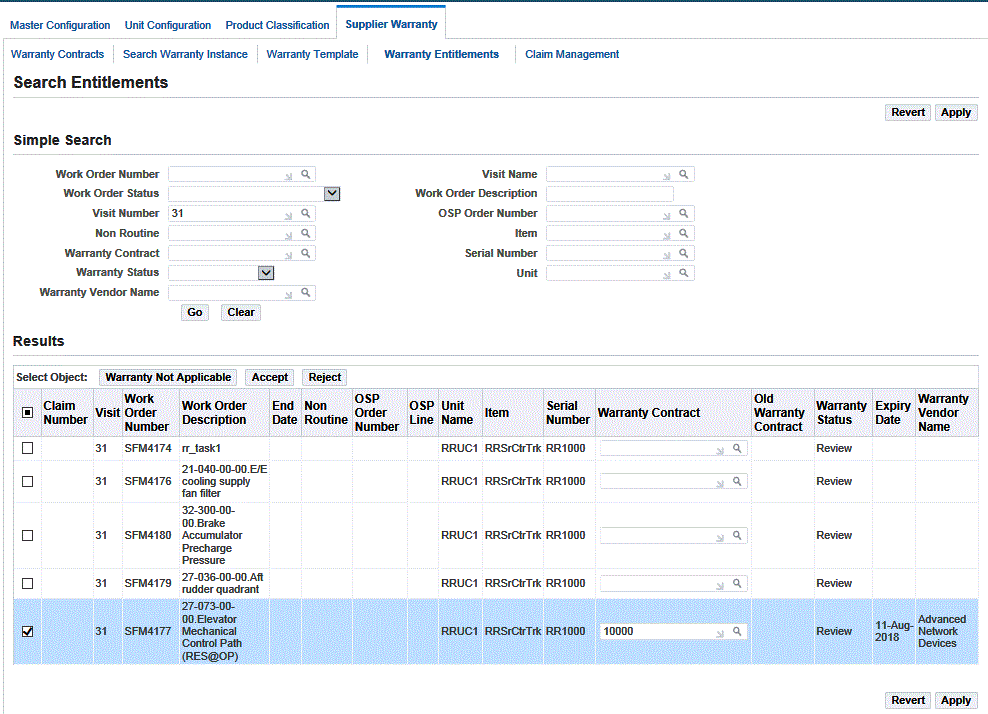
-
You can select an appropriate entitlement record and perform the following actions:
-
If the warranty status is Approval Pending, you can approve or deny the request for changes from the Technician through one of three actions:
-
Click the Warranty Not Applicable button to decline the changes to the entitlement record.
The Warranty Contract field changes to a null value.
-
Click the Accept button to accept the changes to the entitlement record and the validation for the entitlement record proceeds.
The Warranty Contract field retains the newly approved value. The Old Warranty Contract field retains the previous value for historical reference.
-
Click the Reject button to decline the changes to the entitlement record.
The Warranty Contract field reverts to value in the Old Warranty Contract field, thus restoring the original value.
-
-
If the warranty status is Review, you can select the record and click the Warranty Not Applicable button to change the warranty status to Not Applicable.
You can also select a valid warranty contract and click the Apply button.
The warranty status is set to Approved.
-
If the warranty status is Warranty Not Applicable, you can update the warranty contract by choosing a valid contract.
Click the Apply button, and the warranty status is set to Approved.
-
If the warranty status is Approved, you can select the record and click Warranty Not Applicable to change the Warranty Status to Not Applicable.
The warranty Contract field becomes null (if already null, it continues to be null).
-
-
Click the Revert button to discard any changes to the entitlement records; this refreshes the table results.
-
Click the Apply button to save changes to the entitlement records.
Note: Any changes made to the warranty entitlement records updates the warranty information on the Work Order Operations page for the specific visit number.
Managing Warranty Claims
-
After identifying warranty entitlements in a visit work or service order, the Warranty Administrator confirms the entitlements and adds them to a warranty claim. The warranty claim process is flexible and allows multiple visits, work or service orders, and OSP orders to be included in a single claim.
-
The warranty claim process is tracked by changes in claim status values, enabling you to follow the creation, submittal, editing and resolution of a claim. You can track status changes through an automated capture in the Turnover Notes section of the claim. You can also add manual notes in the Turnover Notes section to capture key activity during the claim process. This function enables you to generate a Warranty Claim Report with order information and claim ID.
-
The warranty administrator can update, resubmit, and even cancel a claim if required.
-
The warranty administrator can enter claim reimbursement information regarding the acceptance and recovery of costs incurred by the service organization.
-
Navigate to the Search Warranty Claim page.
Use this page to search for existing warranty claims and also create new ones.
-
Enter any of the following search criteria to query warranty claims:
-
Claim Number
-
Claim Name
-
Claim Status
-
Claim Vendor
-
Start Date
-
End Date
-
-
Click the Go button, and the results region displays the warranty claims matching the search criteria.
-
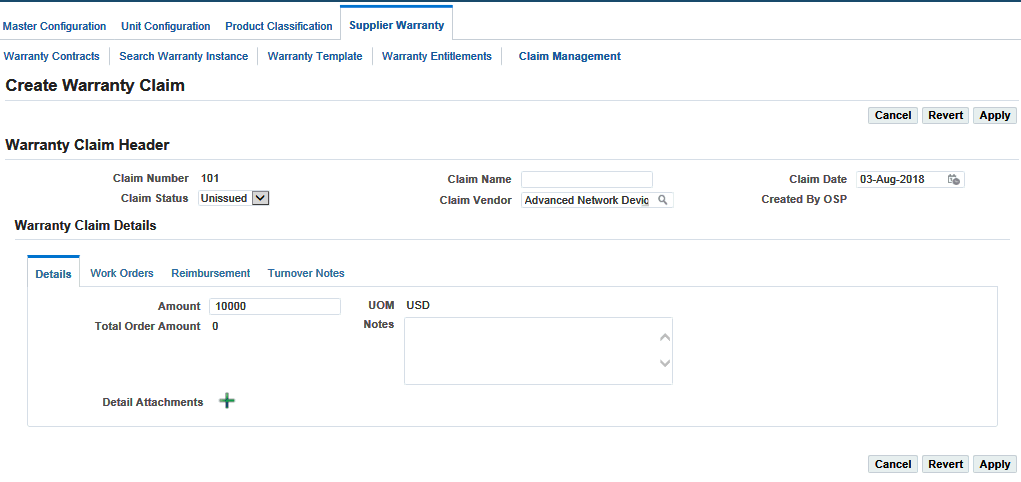
Click the Create button to navigate to the Create Warranty Claim page.
-
Enter the following details on the Create Warranty Claim header:
-
Claim Number: Defaults from the system.
-
Claim Status: The default value is Unissued.
When the status is Approved, the claim becomes read only. You must change the status to make any updates.
-
Claim Name: Enter a unique name for your claim.
-
Claim Vendor: Select the vendor from the list of values.
-
Claim Date: Refers to the date the claim is entered, and defaults to the system date.
-
-
Click the Details tab and enter the following information:
-
Amount: This reflects the amount being filed as a claim.
-
Total Order Amount: This is system-calculated that totals all the Order Claim Amount fields for each row of the Work Orders tab.
When orders are added or deleted, the Details tab refreshes this value.
-
UOM: This is system generated based on the organization.
-
Notes: Enter any additional notes if any.
-
Attachments: Add attachments if any.
-
-
Click the Apply button to save the information.
-
Click the Work Orders tab.
-
Click Add Orders to access the Search Orders page to search for warranty entitlements.
-
Enter search criteria on the Simple Search region and click the Go button.
-
Select an entitlement and click Add to Warranty Claim.
The system returns you to the Work Orders tab. The Warranty Claim field in the Entitlement Confirmations table is populated with the Claim Number when it is added to the claim.
-
Click the Apply button to save the changes.
-
Click the Reimbursement tab and enter information in the following fields:
-
Reimbursement Type
-
Amount
-
Reference Document
-
Reimbursement Attachment
-
Date
-
UOM
-
Notes
-
-
Click the Apply button.
-
Click the Turnover Notes tab.
Use this tab to capture all status changes to the claim by a turnover log entry.
-
Click Add Row and enter information in the Notes field.
-
Click the Apply button.