Setting Up
Overview
This chapter discusses setting up Oracle Complex Maintenance, Repair and Overhaul (CMRO). It includes the following topics:
Getting Started
Before setting up CMRO, you must identify all your implementation users, and the access privileges that they require. You can create additional implementation responsibilities if you want to restrict access.
Important: After you install or upgrade Oracle E-Business Suite, access to Oracle Complex Maintenance, Repair and Overhaul JavaServer Pages (JSPs) may be restricted by default. To enable access, add the Oracle Complex Maintenance, Repair and Overhaul JSPs to the allowed JSPs configuration files. See: Allowed JSPs, Oracle E-Business Suite Security Guide.
You must use the System Administrator responsibility to create the required Oracle Applications users. Implementation users need access to one or more of the following responsibilities:
-
System Administrator
-
AHL Super User
-
Foundation Administrator
-
Support Administrator
Use the Users window to define Oracle Applications users. An Oracle Application user is uniquely identified by an application user name.
For detailed instructions on creating application users, refer to Oracle E-Business Suite Setup Guide
Oracle E-Business Suite Maintenance Guide
Oracle E-Business Suite Security Guide
Oracle CMRO Implementation Checklist
This section contains a checklist that includes the steps that you must follow to implement Oracle CMRO. They include setup steps for data that is shared with other Oracle Applications, but is required by Oracle CMRO.
You must set up other related Oracle applications prior to setting up CMRO.
| Description | Reference |
|---|---|
| Step 1 - Set Up an Operating Unit Step 2 - Create an Organization Step 3 - Set Up an Inventory Organization |
Oracle Human Resources User's Guide |
| Description | Reference |
|---|---|
| Step 1 - Set Up Master Items Step 2 - Set Up Subinventory |
Oracle Inventory User's Guide |
| Description | Reference |
|---|---|
| Step 1 - Set Up Departments and Resources | Oracle Bills of Material User's Guide |
| Description | Reference |
|---|---|
| Step 1 - Associate Departments with Subinventories Step 2 - Set Up Material Status Step 3 - Associate Material Status with Subinventories Step 4 - Set Up Profile Options |
Oracle Warehouse Management User's Guide |
| Description | Reference |
|---|---|
| Step 1 - Set Up Buyers Step 2 - Set Up Approvals Step 3 - Set Up Purchasing Options Step 4 - Set Up Receiving Options Step 5 - Set Up Financial Options Step 6 - Set Up Open Accounting Periods |
Oracle Purchasing User's Guide |
| Description | Reference |
| Step 1 - Set up Oracle Advanced Supply Chain Planning Step 2 - Set up Oracle Demantra Demand Planning Step 3 - Set up Available to Promise |
Oracle Advanced Planning Implementation and User's Guide Oracle Demantra Demand Planning Implementation and User's Guide Oracle Global Order Promising Implementation and User's Guide |
| Description | Reference |
|---|---|
| Step 1 - Set Up Security Processing Constraints Step 2 - Set Up Customers |
Oracle Order Management User's Guide Oracle Shipping Execution User's Guide |
| Description | Reference |
|---|---|
| Step 1 - Create a Project Template Step 2 - Assign a Project Template Name to User Profile |
Oracle Projects User's Guide |
| Description | Reference |
|---|---|
| Step 1 - Set Up WIP Accounting Classes Step 2 - Set Up EAM Parameters Step 3 - Set Up Asset Category Codes Step 4 - Verify the WIP_EAM_Activity_Priority Lookup |
Oracle Enterprise Asset Management User's Guide |
| Description | Reference |
|---|---|
| Step 1 - Define Service Request Statuses Step 2 - Define Service Request Types Step 3 - Define Service Request Severities Step 4 - Set Up Profile Options |
Oracle Customer Support Implementation Guide |
| Description | Reference |
|---|---|
| Step 1 - Set Up Buyers Step 2 - Set Up Suppliers Step 3 - Set Up Standard Articles Step 4 - Set Up Categories and Sources Step 5 - Set Up Contract Groups Step 6 - Set Up Contract Events |
Oracle Contracts Core Concepts and Procedures Guide |
| Description | Reference |
|---|---|
| Step 1 - Set Up Install Parameters Step 2 - Set Up Instance Statuses Step 3 - Set Up Asset Locations |
Oracle Installed Base Implementation Guide |
| Description | Reference |
|---|---|
| Step 1 - Define Counter Groups | Oracle Installed Base User's Guide |
| Description | Reference |
|---|---|
| Step 1 - Set Up Oracle G-Invoicing | Oracle® E-Business Suite G-Invoicing Process Guide |
| Step 2 - Enable the AHL: Allow G-Invoicing Orders profile option |
|
| Description | Reference |
|---|---|
| Step 1 - Set Up Route and Operation Quality Plans Step 2 - Set Up Deferral, MRB Disposition Quality, Non-Routine Job Inspection and Non-Routine Operation Inspection Plans Step 3 - Create Counter Readings Quality Plan |
Oracle Quality User's Guide |
| Description | Reference |
|---|---|
| Step 1 - Set Up Profile Options | Oracle Complex Maintenance, Repair and Overhaul Implementation Guide |
| Description | Reference |
|---|---|
| Step 1 - Set Up Profile Options Step 2 - Create Approval User(s) and Role |
Oracle Complex Maintenance, Repair and Overhaul Implementation Guide |
| Description | Reference |
|---|---|
| Step 1 - Set Up Document Index Step 2 - Set Up Route Management Step 3 - Set Up Master Configuration Step 4 - Set Up Unit Configuration Step 5 - Set Up Fleet Maintenance Program Step 6 - Set Up Unit Maintenance Plan Step 7 - Set Up Visit Work Package Step 8 - Set Up Planning Step 9 - Set Up Production Step 10 - Administrative Setup |
Oracle Complex Maintenance, Repair and Overhaul Implementation Guide |
Setting Up Oracle CMRO
This section includes the following topics:
Setting Up Other Related Oracle Applications
Oracle CMRO is integrated with other Oracle eBusiness suite applications. This integration lends additional functionality to Oracle CMRO and enables it to fully support the maintenance, repair and overhaul needs of operators, third-party maintenance, and original equipment manufacturers. You must first set up an organization and then install and implement the Oracle applications or components.
This section covers the following topics:
Setting Up an Organization
In general, an organization can be a company, department, division, cost center, or virtually any other organizational unit within a business. The organizational setup includes these steps:
Setting Up an Operating Unit
An operating unit is the organization unit through which you create, process, report, and secure financial applications data.
To set up an operating unit, you must:
-
Develop an organization structure.
-
Define the primary ledger.
-
Define locations.
-
Define business groups (optional).
-
Associate responsibilities with business group (optional).
-
Define organizations.
-
Define organization relationships.
-
Define responsibilities.
-
Set the MO: Operating unit profile option.
-
Convert to the Multiorg Architecture (required only if current set up is not multiorg enabled).
-
Verify Order Management System parameters.
-
Set the profile options that are specific to the operating unit.
-
Define the Inventory organization security (optional).
-
Implement the application products.
Creating an Organization
Perform the following steps to create an organization.
To create an organization:
-
Select the Manufacturing and Distribution Manager responsibility. From the Navigator, select Inventory > Setup > Organizations > Organizations. The Find Organization window appears.
-
Click the New (A) button.
-
Enter an organization Name.
-
Select the following values from the Organization Classification list of values:
-
Business Group
-
HR Organization
-
GRE/Legal Entity
-
MRP Organization
-
Operating Unit
-
Project Expenditure
-
Project Manufacturing Organization
-
Project Task Owning Organization
Organization
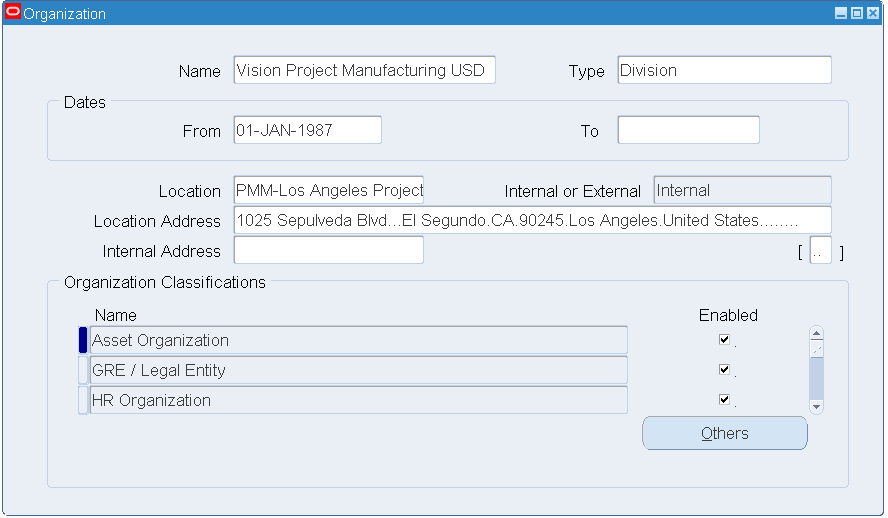
-
-
Select the Enable check box for all the Organization Classification parameters.
-
Save your work.
Organization Classifications
Business Group: The purpose of the business group is to partition human resource information. The business group is the highest level in an organization structure hierarchy in the E-Business Suite. You can use the business group to model the consolidated enterprise or a major division of a company that is an employer.
HR Organization: The HR Organization classification is applied to the organizations to which the user assigns employees.
Government Reporting Entities (GRE): The GRE in the Oracle Human Resources products is the same organization as the legal entity that appears in the Oracle Financials products. The GRE represents the real-world legal entity that pays employees, withholds their taxes, and provides reports on various matters to government agencies.
Setting Up an Inventory Organization
The Inventory Organization is an organization for which you track inventory transactions and balances.
To set up an Inventory Organization:
-
From the Navigator, select Inventory > Setup > Organizations > Organizations. The Find Organization window appears.
-
Click the New (A) button. The Organization window appears.
-
Enter an organization name in the Name field.
-
Within the Organization Classification block, select the following values from the Name list of values (LOV):
-
HR Organization
-
Inventory
-
MRP
-
Project Expenditure
-
Project Manufacturing Organization
-
Project Task Owning Organization
-
WIP Organization
Inventory Organization Setup
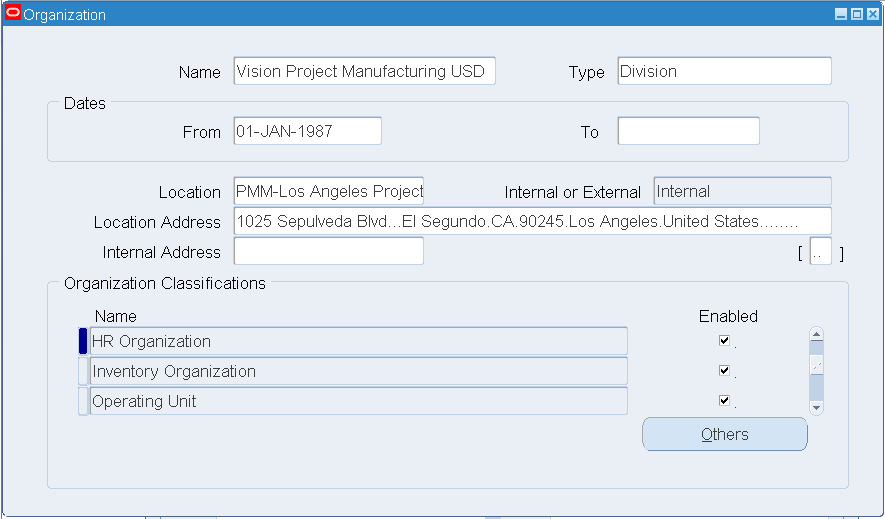
-
-
Select the Enable check box for each of the organization classifications that you selected.
-
Save your work.
-
Now you will set up the parameters for each of the above mentioned organization classifications.
To set up HR Organization parameters:
-
In the Organizations window, select the HR Organization value. Click the Others button. The Additional Organization Information window appears.
-
Select Costing Information from the list. Enter a value in the Costing Information field.
-
Save your work.
-
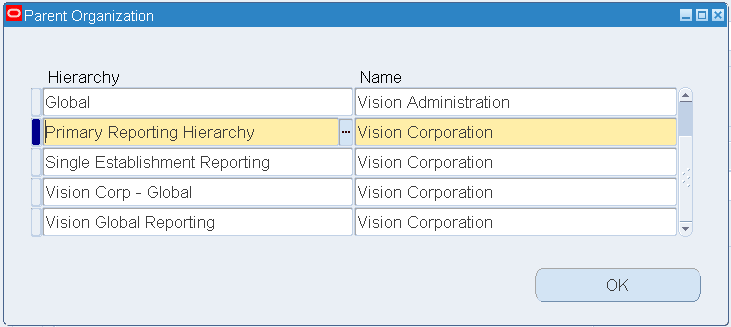
Navigate to the Additional Organization Information window and select the Parent Organization value. Select Primary Reporting Hierarchy from the Hierarchy LOV.
-
From the Name LOV, select the organization that you have defined and enabled as a business group.
-
Save your work.
Parent Organization
To set up Inventory Organization parameters:
-
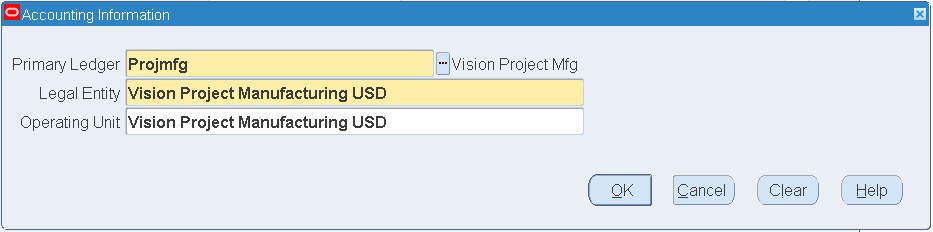
Select Inventory Organization in the Organizations window. Click the Others button. Select the Accounting Information value from the list of values.
-
Click in the Accounting Information field. The Accounting Information descriptive flexfields window opens.
-
Select the Primary Ledger, Legal Entity and Operating Unit values. Click OK.
-
Save your work.
Accounting Information
-
Navigate to the Additional Organization Information window and select Inventory Information. The Organization Parameters window opens.
-
Click the Inventory Parameters tab. Enter an organization code.
-
Select the Item Master Organization and Calendar values.
-
Select the EAM Enabled check box.
-
Save your work.
Organization Parameters - Inventory Parameters

-
Click the Revision, Lot, Serial parameters tab. Enter the following information:
Field Value Lot Control Uniqueness None Lot Control Generation At Organization Level Serial Control Uniqueness Within Inventory Items Serial Control Generation At Item Level Organization Parameters - Revision, Lot, Serial
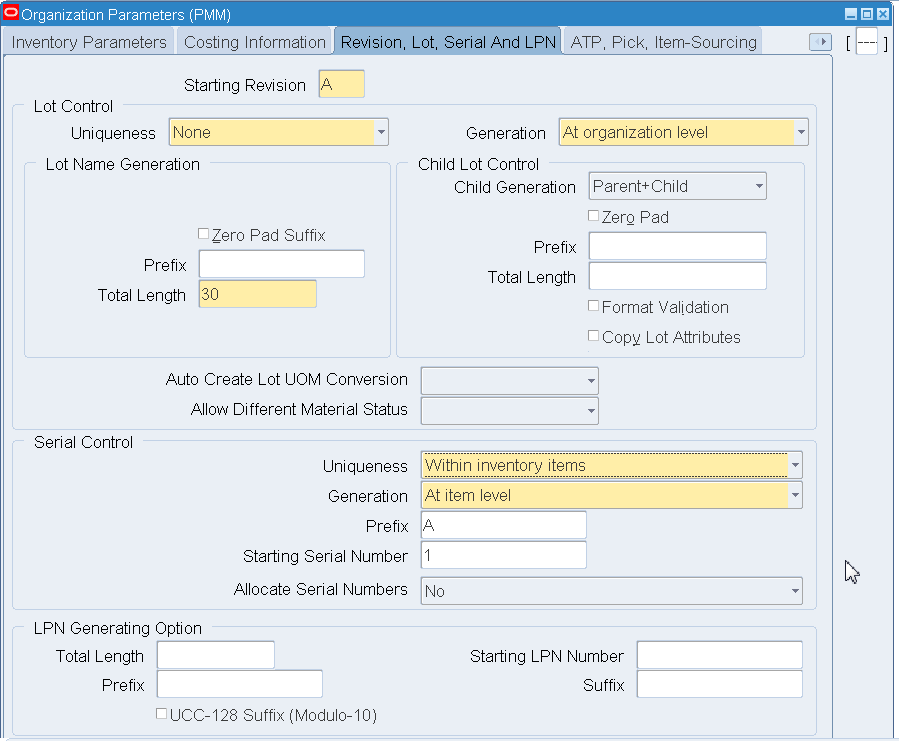
-
Save your work.
-
Click the Costing Information tab. Select the Costing Method that is applicable to your organization.
-
Select the Enable Project Cost Collection check box.
-
Enter the required information in the Valuable Accounts block.
Organization Parameters - Costing Information
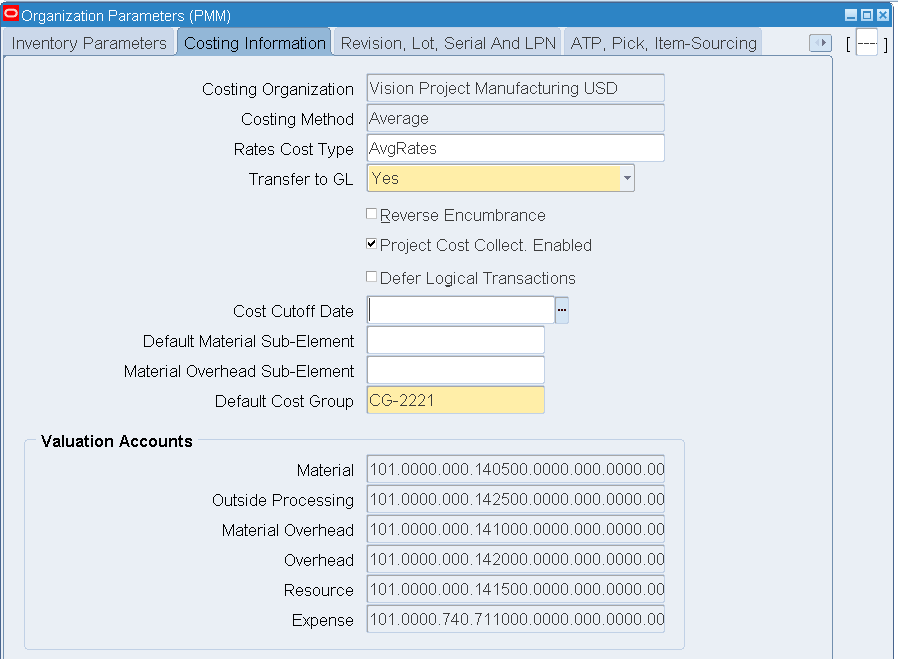
-
Save your work.
-
Click the ATP, Pick, Item-Sourcing parameters tab. Select an ATP Defaults Rule from the Rule LOV.
Organization Parameters - ATP, Pick, Item-Sourcing
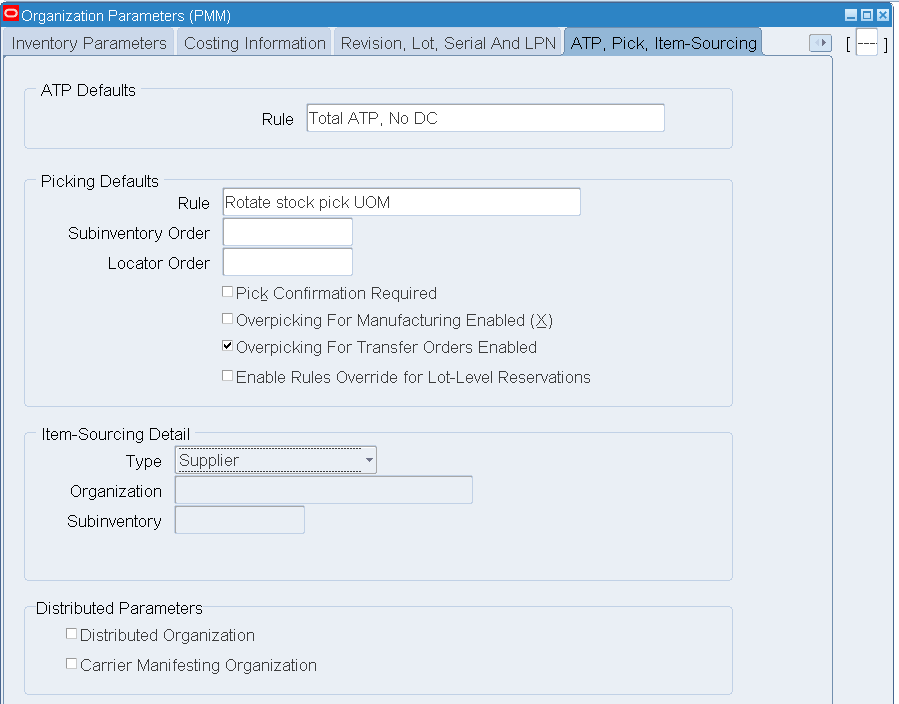
-
Save your work.
To set up MRP Organization parameters:
-
In the Organization window, select the MRP Organization.
-
Click the Others button.
The Planning Parameters window opens.
-
Select the Net WIP and Net Reservations check boxes.
Planning Parameters
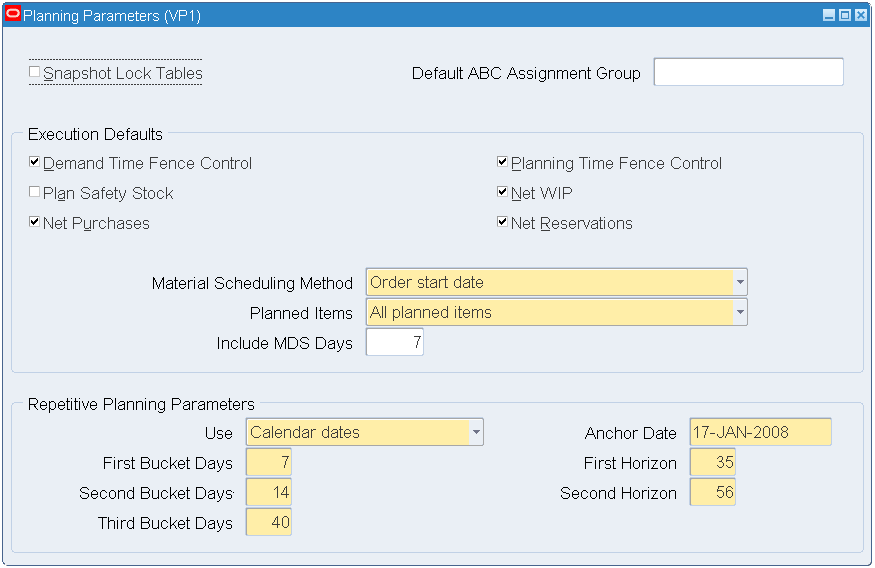
-
Save your work.
To set up Work in Process (WIP) Organization parameters:
-
Select the WIP Organization value in the Organization window.
-
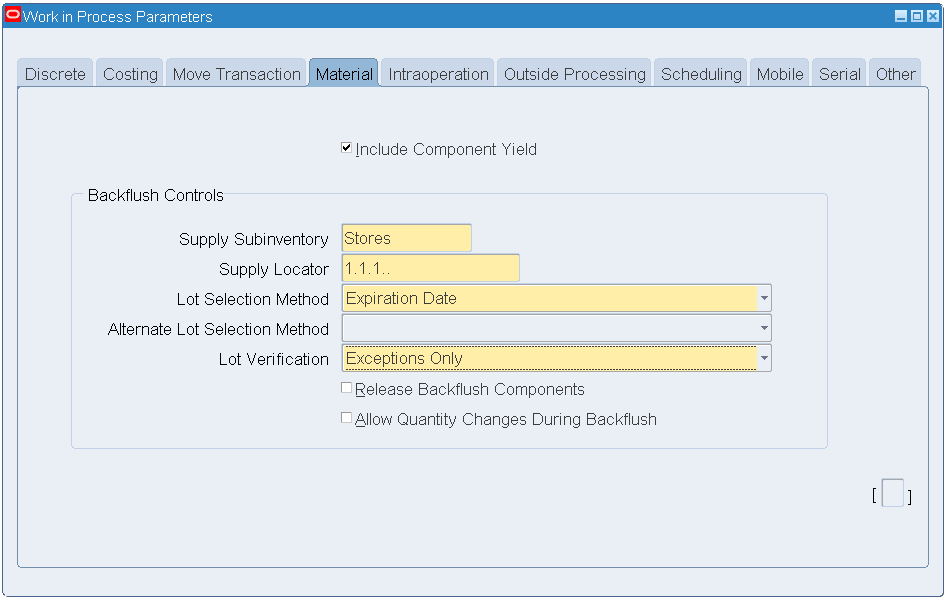
Click the Others button, and click the Backflush Defaults tab.
-
Select Supply subinventory from the LOV.
Enter a Supply Locator (if required).
Work In Process Parameters - Backflush Defaults
-
Click the Move Transaction tab. Select the Allow Creation of New Operations and the Allow Moves Over No Move Shop Floor Statuses check boxes.
Work in Process Parameters - Move Transaction

-
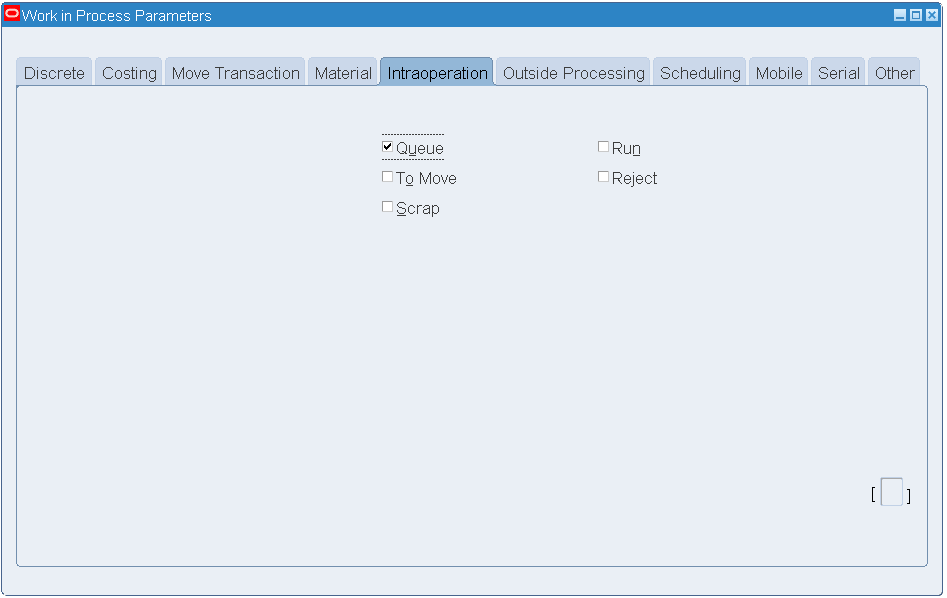
Click the Intraoperation tab. Enable the Queue check box. Clear the other check boxes.
Work In Process Parameters - Intraoperation
-
Save your work.
-
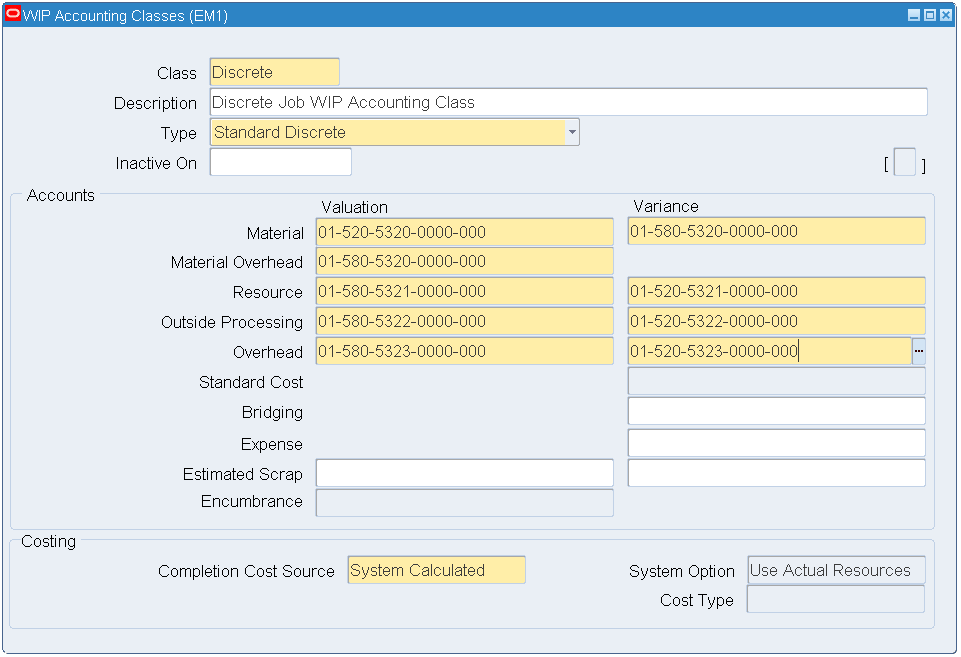
From the Navigator, select WIP > Setup > WIP Accounting Class.
-
Enter a value in the Class and Description fields.
-
Select Standard Discrete from the Type drop-down list. Enter Accounts information.
WIP Accounting Classes
-
Save your work.
-
You must also create Expense Non-Standard, Maintenance, and Asset Non-Standard Accounting Classes. For more information about setting up accounting classes, see the Oracle Work in Process User's Guide.
-
Save your work.
-
From the Navigator, select Inventory > Setup >Organizations >Organizations. Query for your organization.
-
Select the WIP Organization value within the Organization Classifications block. Click the Others button. The Work in Process parameters window appears.
-
Click the Discrete tab. Select a default value from the Discrete Class drop-down list.
-
Save your work.
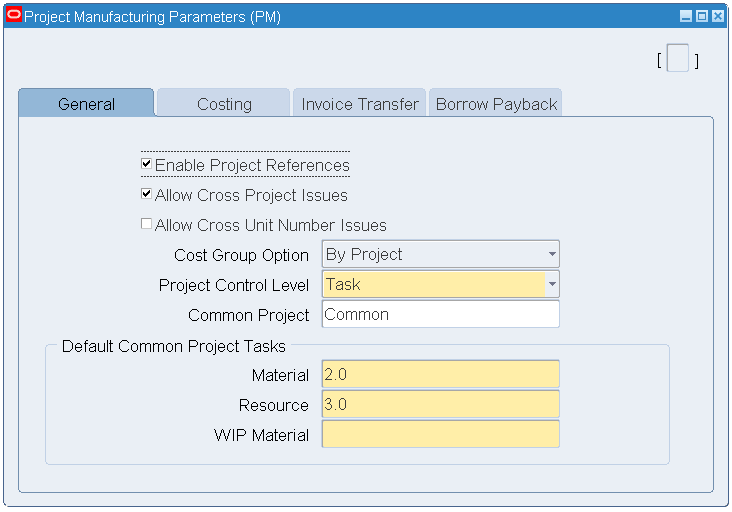
To set up Project Manufacturing parameters:
-
In the Organizations window, select the Project Manufacturing Organization value.
-
Click the Others button.
The Project Manufacturing Parameters window opens.
-
Click the General tab.
-
Select the Enable Project Reference check box.
-
Select Task from the Project Control Level drop-down list.
Project Manufacturing Parameters
-
Click the Invoice Transfer tab.
Select the IPV check box to enable IPV.
-
Select Material from the Expenditure Type LOV.
-
Save your work.
To set up Project Task Owning Organization parameters:
-
In the Organizations window, select the Project Task Owning Organization value.
Click the Others button, and the Additional Organization Information window opens.
-
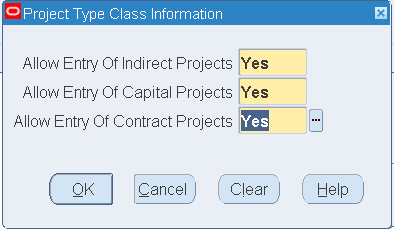
Click in the Project Type Class Information field. In the Project Type Class Information window, select Yes for all the following parameters:
-
Allow Entry of Indirect Projects
-
Allow Entry of Capital Projects
-
Allow Entry of Contract Projects
Project Type Class Information
-
-
Click OK. Save your work.
To set up Project Expenditure/Event Organization parameters:
-
In the Organizations window, select the Project Expenditure/Event Organization value. Click the Others button.
-
Click in the Exp Org Defaults field. The Exp Org Defaults sub-window appears.
-
Enter or select an operating unit (the same as the item master organization).
-
Save your work.
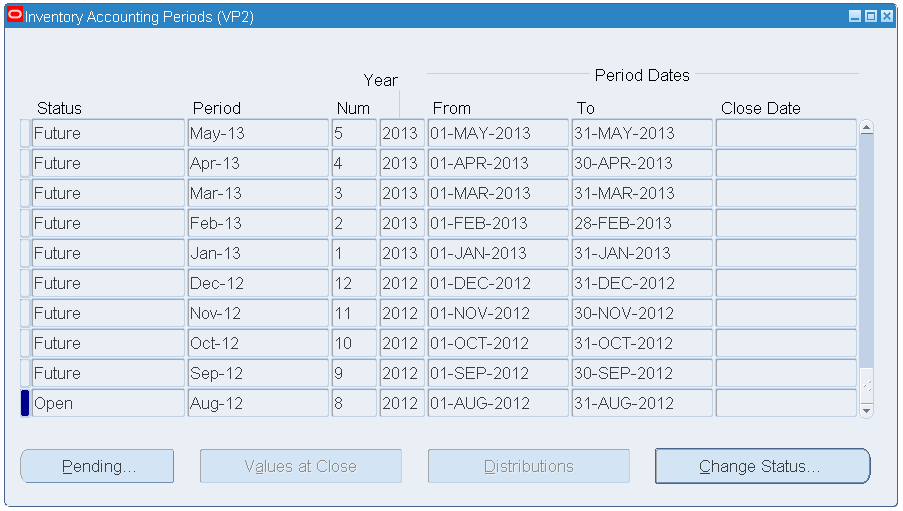
Additional Setup
-
From the Navigator, select Inventory, Accounting Close Cycle, Inventory Accounting Periods.
-
Select an Inventory Accounting Period value, and change the status to Open.
-
Save your work.
Inventory Accounting Periods
Setting Up Oracle Inventory
In Oracle CMRO, you use instances of Oracle Inventory when defining the allowable parts in a master configuration, and when describing the components in a unit configuration. Oracle CMRO invokes Oracle Inventory methods to populate the database with information on allowable components in a configuration, and the components actually available to create a unit configuration. The Production module uses predefined inventory items as references when invoking the inventory methods that issue and return parts, or when defining the material requirements for an organization job. The Route Management module uses the predefined inventory items as material and tool requirements used to perform a route or an operation.
Setting up Oracle Inventory includes the following steps:
-
Creating component items.
-
Creating service items.
-
Setting up Subinventories.
You must define items and set up at least one subinventory for each Inventory organization.
Creating Component Items
-
Select the Manufacturing and Distribution Manager responsibility. From the Navigator, select Inventory > Items > Master Items.
Note: All items must be set up at the Master Inventory Organization level and then assigned to specific Inventory Organizations. Oracle recommends that you define an item template for each type of item that will be used in your organization.
-
Enter a name in the Item field.
-
Enter a description.
-
Click the Main tab. The default value for the Item Status field is Active, however, you can select a different status from the drop-down menu.
Master Item - Main

-
Click the Inventory tab. Select the following check boxes:
-
Inventory Item
-
Stockable
-
Reservable
-
Transactable
-
-
Select the No Control option in the Lot Expiration and Lot regions.
-
Select the Serial Control: At Receipt option) in the Serial Generation field if items are serial number trackable. If they are not, then select the Non-Serialized option.
-
Select the No Control option from the Locator Control drop-down menu.
Master Item - Inventory
-
Click the Bills of Material tab. Select the BOM Allowed check box.
-
Click the Asset Management tab. Select the Rebuildable option from the Asset Item Type drop- down menu.
Note: You can select a value in the Asset Item Type field only if the Oracle Enterprise Asset Management (eAM) setup is complete. Set up at least one item with an asset group of Rebuildable in eAM.
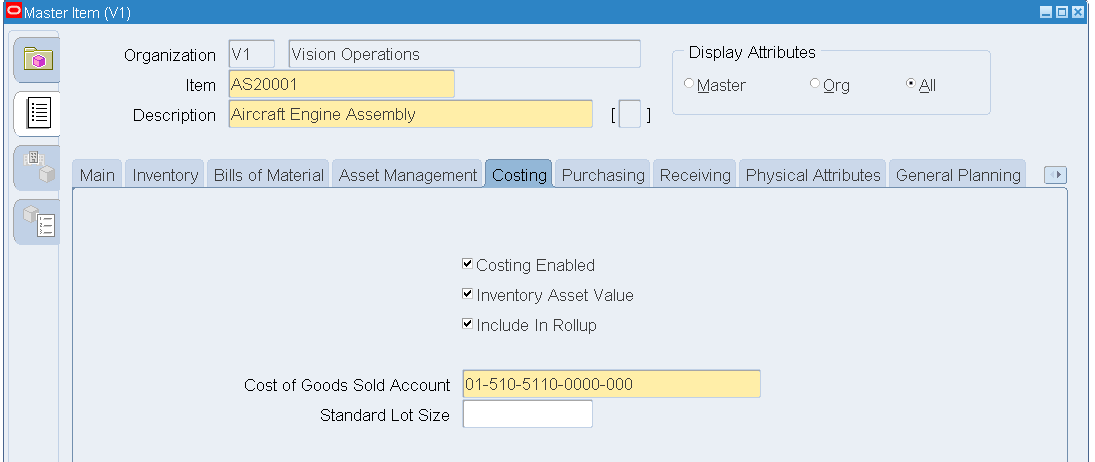
-
Click the Costing tab. Select the following check boxes:
-
Costing Enabled
-
Inventory Asset Value
-
Include in Rollup
-
-
Enter a value in the Cost of Goods Sold Account field.
Master Item - Costing
-
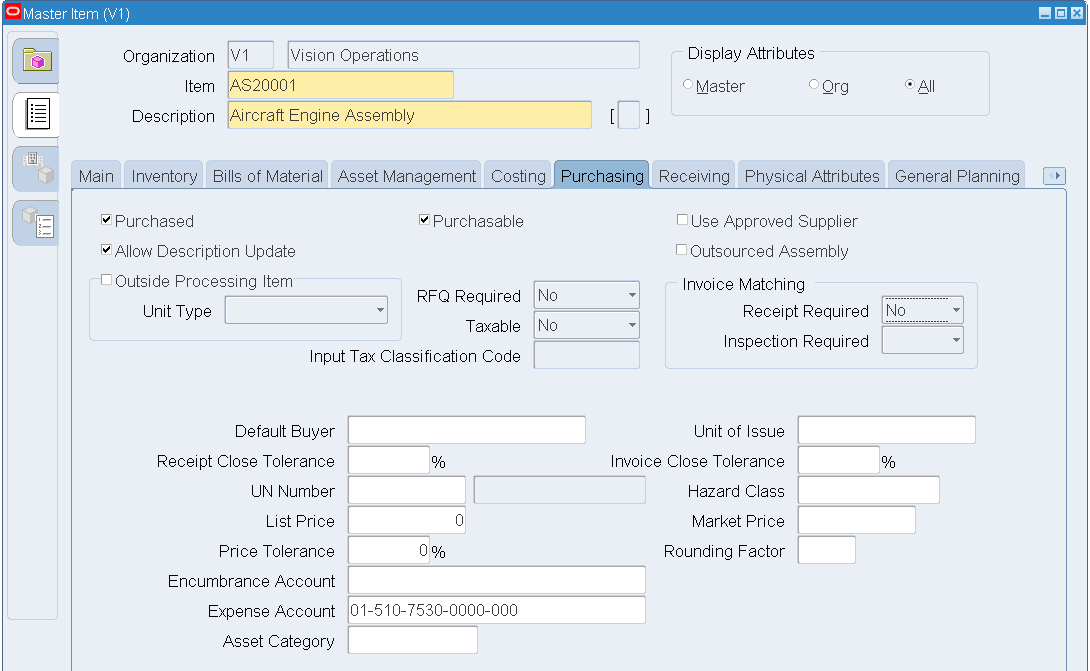
Click the Purchasing tab. Select the following check boxes:
-
Purchased
-
Purchasable
-
Allow Description Update
-
-
In the Invoice Matching group box, select No in the Receipt Required field.
Master Item - Purchasing
-
Click the Physical Attributes tab.
Note: When you enter values for the Weight, Volume, and Dimensions fields, you must select the Container check box to ensure that the shipment flow works properly.
-
Click the General Planning tab.
Select the Min-Max option from the Inventory Planning Method drop-down list.
-
Click the MSP/MRP Planning tab.
-
Select the MRP Planning option from the Planning Method drop-down menu.
-
Select the Hard Pegging option from the Pegging drop-down list.
Master Item - MSP/MRP Planning

-
-
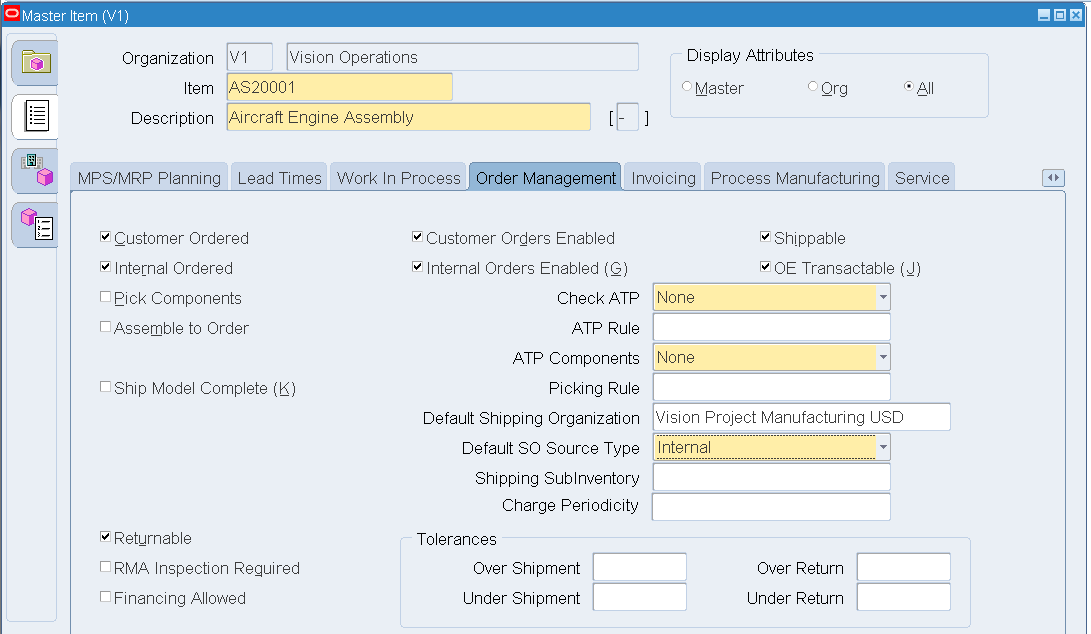
Click the Order Management tab. Select the following check boxes:
-
Customer Ordered
-
Internal Ordered
-
Customer Orders Enabled
-
Internal Orders Enabled
-
Shippable
-
The Check ATP attribute should be set to Material Only and the applicable ATP rule should be defined.
-
OE Transactable
-
Returnable
Master Item - Order Management
-
-
Click the Work in Process tab.
-
Select the Build in WIP check box.
-
Select the Push option from the Supply Type drop-down list.
-
-
Click the Invoicing tab.
Select the Invoiceable Item and Invoice Enabled check boxes.
Master Item - Invoicing

-
Click the Service tab.
Select the Track in Installed Base check box.
-
Save your work.
Setting Up Service items
Use the Master Item page to set up service items.
-
Set up a new service item with attributes as follows:
Attribute Value Item Status Active Inventory Item Disabled Stockable Disabled Reservable Disabled Purchased Selected Purchasable Selected Allow Description Update Selected Receipt Required Yes OSP Disabled Master Item - Purchasing (Service Item Setup)
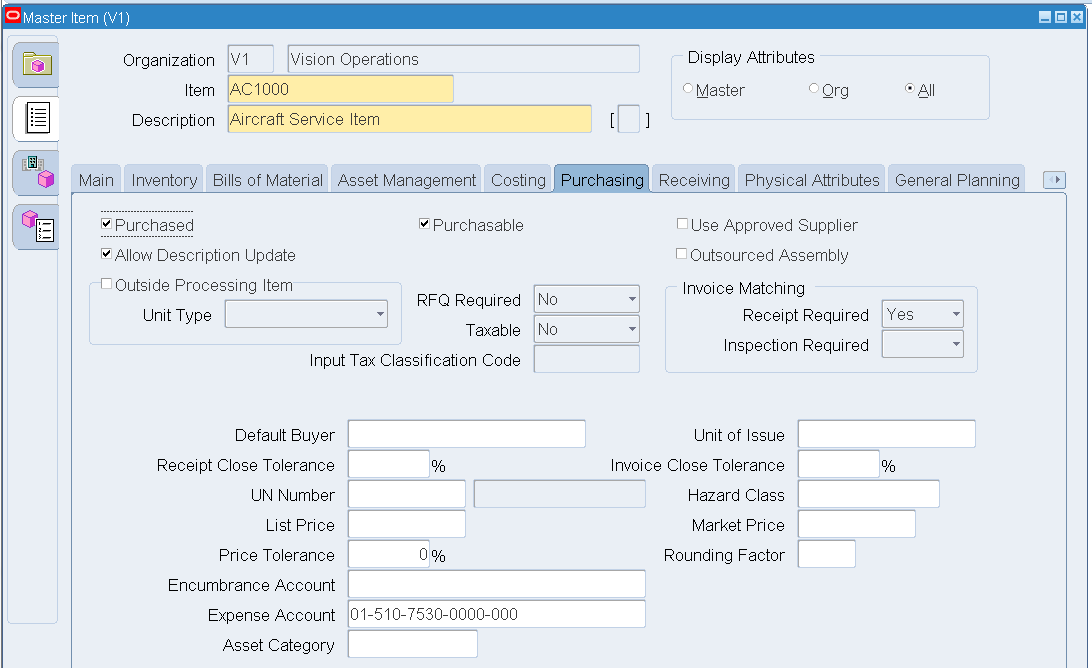
-
Save your work.
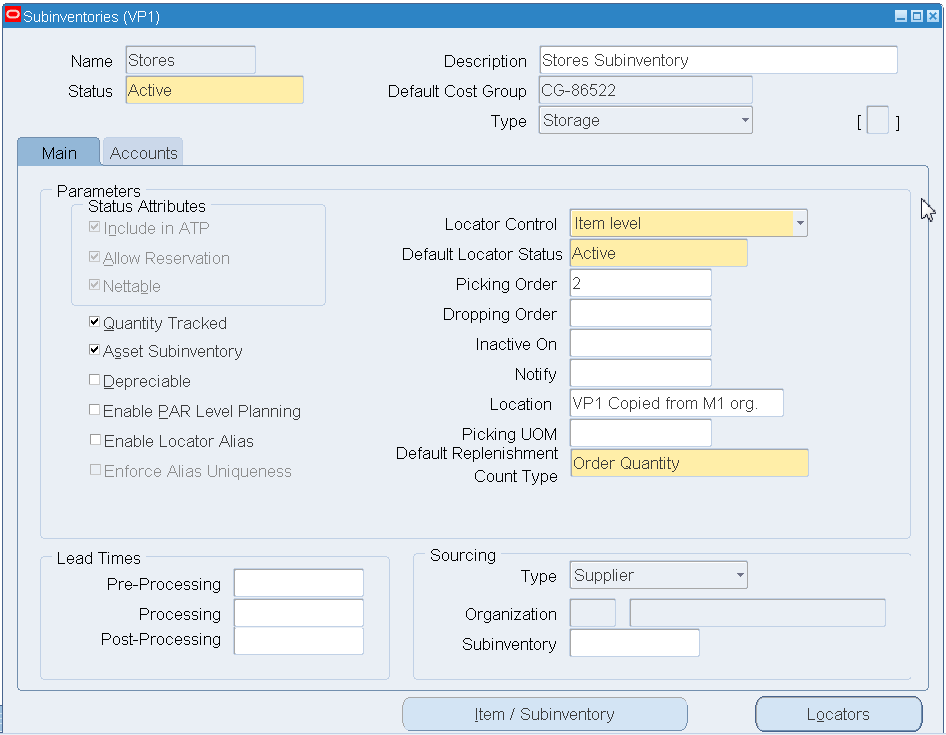
Setting Up a Subinventory:
-
Select Inventory > Setup > Organizations > Subinventories.
The Subinventories window appears.
-
Define the Stores, MRB, and Consumable subinventories.
Note: Cost group and locators must be set up before defining subinventories.
-
Stores in the Name field to define the Stores subinventory.
-
Select Active from the Status list of values.
-
Select the following check boxes:
-
Quantity Tracked
-
Asset Subinventory
Note: The Include in ATP, Allow Reservations, and Nettable default values are selected and cannot be changed. These values are defined on the Material status Definition page (Inventory > Setup > Material Status). See the Oracle Inventory User's Guide for more information.
Subinventories
-
-
Click the Accounts tab and enter the appropriate accounting values.
Subinventories - Accounts
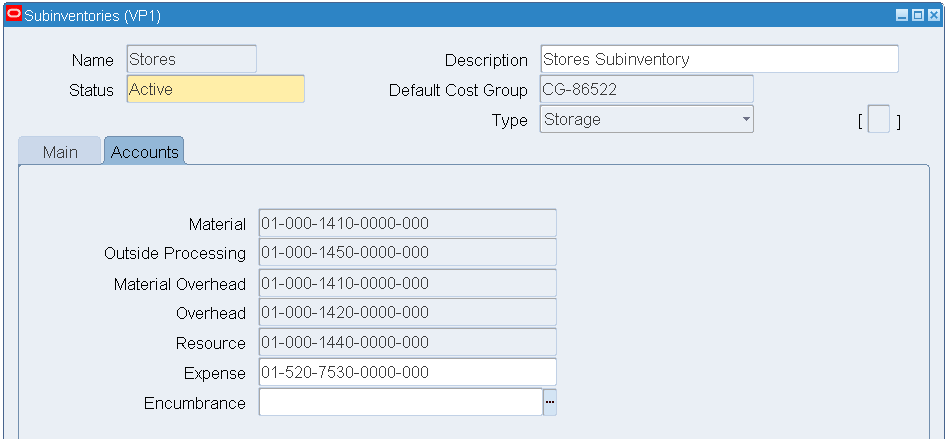
-
Save your work.
-
Click the New icon to create a new subinventory.
-
Enter MRB in the Name field.
Note: The status must be set to MRB Review. You must install Oracle Warehouse Management (WMS) to use this status. You can set the status to Active initially, install Warehouse Management, create additional Transaction Types in WMS and then change subinventory status to 'MRB Review'.
-
Select Active from the Status list of values.
-
-
Select the following check boxes:
-
Quantity Tracked
-
Asset Subinventory
-
-
Click the Accounts tab and enter the appropriate values.
-
Save your work.
-
Click the New icon to create a new subinventory.
-
Enter Consumable in the Name field.
-
Select Active from the Status list of values.
-
-
Select the Quantity Tracked check box.
-
Clear all other attributes.
-
Click the Accounts tab and enter the appropriate accounting values.
-
Save your work.
-
Click the New button to define a new subinventory.
-
Enter Scrap in the Name field.
-
Select the Unserviceable option form the Status list of values.
-
Select the Quantity Tracked check box.
-
Clear all other attributes.
-
-
Click the Accounts tab and enter the appropriate accounting values.
-
Save your work.
For more information regarding subinventories, see Oracle Inventory User's Guide.
Setting Up Oracle Bills of Material (BOM)
Oracle CMRO uses the resources and departments that are set up in Oracle Bills of Material as the basis for the production job resource requirements.
Before setting up Oracle Bills of Material, you must ensure that:
-
Calendars and Exception templates are set up.
-
Employees have been set up.
Setting up Oracle Bills of Material includes setting up departments and resources.
To set up departments and resources:
-
Select the Manufacturing and Distribution Manager responsibility.
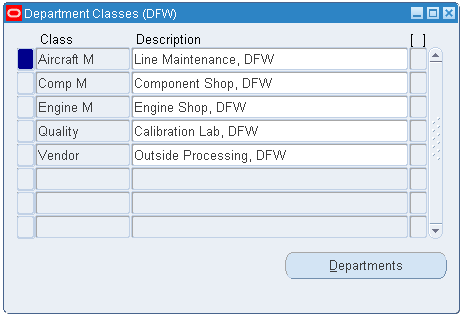
From the Navigator, select Bills of Material > Setup > Department Classes.
-
Set up department classes.
For Outside Processing purposes, you must set up at least one department class called Vendor.
Department Classes
-
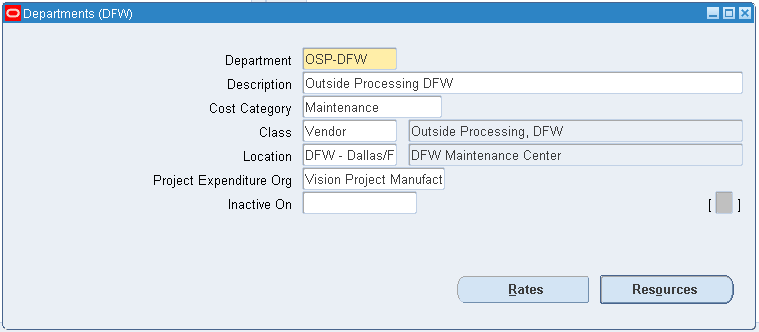
To set up a department, navigate to Bills of Material > Routings > Department, and the Departments window appears.
-
Set up at least one department that will be associated with the department class Vendor (case sensitive). It is recommended that you set up a department that the users can easily identify as an outside department, for example, Outside Service (OSV).
Departments
-
Associate all the departments with a location.
-
Set up Resources and associate with Employees. To set up resources navigate to Routings > Resources.
-
Define a resource type of Machine.
Resources
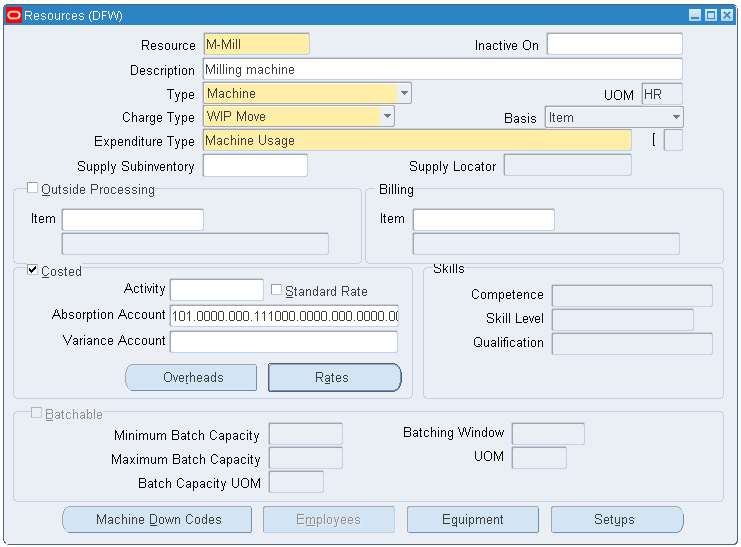
Note: In the item master, you must select the Equipment option (Physical attributes) to see valid values.
-
Set up standard operations.
-
Save your work.
Note: You must set up departments and resources at the operating unit, as well as at the Inventory Organization level. Routes are set up at the operating unit level. Visits (Visit Work Package - CMRO) are set at the Inventory Organization level.
See Also:
Oracle Bills of Material User's Guide
Setting Up Oracle Warehouse Management
Oracle Warehouse Management provides maintenance organizations the functionality to control their inventory by status or condition and associate subinventories with a department. Before setting up Oracle Warehouse Management, you must ensure that:
-
Oracle Inventory setup is complete.
-
Supply subinventories are setup.
-
Departments have been set up in Oracle BOM.
Setting up Oracle Warehouse Management includes:
-
Associating departments with subinventories.
-
Defining material status.
-
Associating material status with subinventories.
-
Setting up profile options.
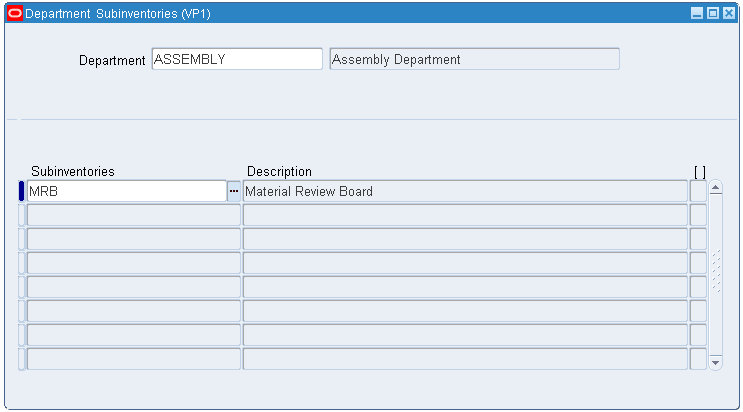
To associate departments with subinventories:
-
Change the responsibility to Warehouse Management Super User.
From the Navigator, select Setup > Warehouse Configuration > Resources > Associate Departments & Subinventories. The Department Subinventories window appears.
-
Select a value from the Department list of values and associate it with a subinventory.
-
Save your work.
Department Subinventories Window
To set up Material Status:
-
Navigate to Setup > Transaction Setup > Inventory Transactions > Material Status. The Material Status Definition window appears.
-
Set up the following statuses:
-
MRB
-
Unserviceable
-
Serviceable
Material Status Definition Window
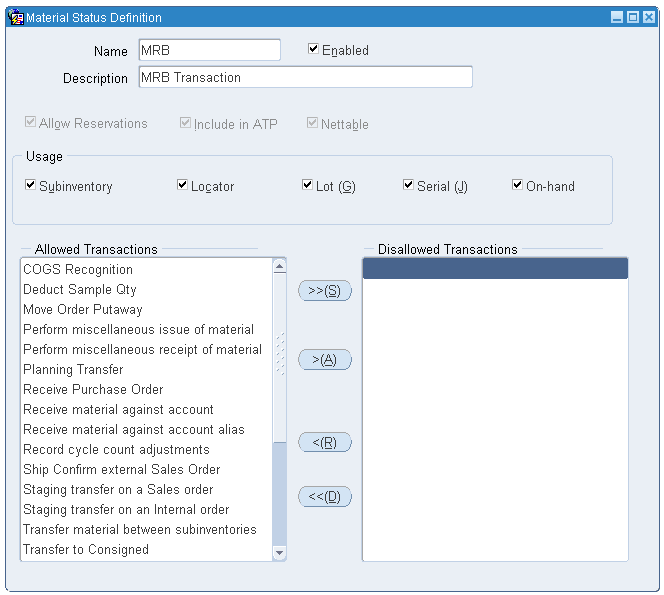
-
-
Save your work.
To associate Material Status with Subinventories:
-
Navigate to Setup > Warehouse Configuration > Warehouses > Subinventories. The Subinventories Summary window appears.
-
Select a subinventory and associate a material status with it.
Subinventories Summary Window
To set up Profile Options:
-
Change the responsibility to Application Developer. Navigate to Other > Profile. The Personal Profile Values window appears.
-
Set up profile options as indicated in the table below.
Profile Name User Value AHL: Material Status - Serviceable
AHL: Material Status - Unserviceable
AHL: Material Status - MRBServiceable
Un-Serviceable
MRBPersonal Profile Values Window
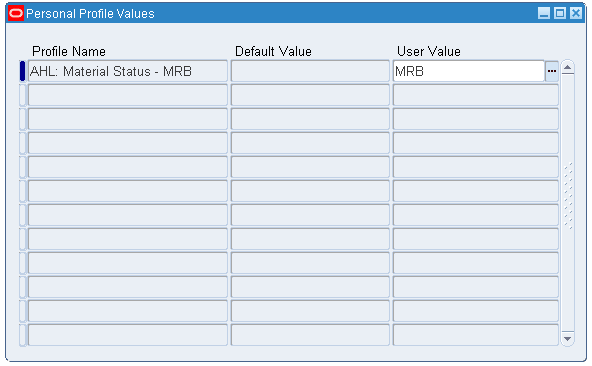
-
Save your work.
See Also:
Oracle Warehouse Management User's Guide
Setting Up Oracle Purchasing
Before setting up Oracle Purchasing, you must ensure that:
-
Oracle Inventory setup is complete.
-
Supply subinventories have been set up.
-
Oracle Human Resources setup is complete.
To set up Oracle Purchasing:
-
Change the responsibility to Manufacturing and Distribution Manager. From the Navigator, select Purchasing.
-
Set up the following in Oracle Purchasing:
-
Approvals
-
Buyers
-
Purchasing Options
-
Receiving Options
-
Financial Options
-
Open Accounting Periods
Approval Groups

Open and Close Periods
-
-
Save your work.
See alsoOracle Purchasing User's Guide
Setting Up Oracle Advanced Planning and Scheduling
Oracle CMRO integrates with Oracle's Advanced Planning and Scheduling (APS) applications for supply chain management. Advanced Supply Chain Planning (ASCP) is used to schedule required materials from maintenance visits. Available to Promise (ATP) is used for material availability inquiries and scheduling through ASCP. Oracle Demantra Demand Planning is used for creating material demand from three sources: global demand from forecasted requirements in Unit Maintenance Plan, scheduled demand from requirements scheduled to maintenance visits, and historical non-routine (and routine) demand from maintenance accomplished at specific faculties. Additionally, Oracle APS's Inventory Optimization (IO) application is required for complete supply chain planning.
The following sections discuss the required setup.
Advanced Supply Chain Planning
-
The APS applications employ a component architecture in which transaction processing and planning can occur in separate database instances. The correct instances to collect and query from must be defined. Collections from ASCP, DP, and ATP queries from the CMRO instance must be directed to the correct instance. For information, refer to the Oracle Advanced Planning Implementation and User's Guide.
-
The user must create an ASCP plan to process the collected material requirements. The applicable organizations, demand and supply schedules must be defined. Additionally, the Include Sales Orders check box must be selected in the Plan Options window. For information on defining plans, refer to the Oracle Advanced Planning Implementation and User's Guide.
Plan Options
Oracle Demantra Demand Planning
-
Oracle Demantra Demand Planning collections must be set up. For information on setting up data collections, refer to the Oracle Demantra Demand Planning Implementation and User Guide.
-
The correct application instance must be defined and the applicable organizations for that instance must be enabled. All organizations that have CMRO material requirements must be checked.
-
Users must define a demand plan.
To capture the data collected from CMRO, the plan must include the following input parameters:
Material Requirements - Scheduled Visits (collections for all requirements in a maintenance visit)
Material Requirements - Planned Maintenance (collections for all forecasted requirements in the Unit Maintenance Plan)
Material Usage History - Unplanned Maintenance (collections for all non-routine requirements created during the production process, per organization)
Material Usage History - Planned Maintenance (an optional stream for all historical planned requirements, essentially collections for the Unit Maintenance Plan's history)
For information on creating demand plans, refer to the Oracle Demantra Demand Planning Implementation and User Guide.
Available to Promise
The source and destination instance must be defined. For information, refer to the Oracle Global Order Promising Implementation and User's Guide.
Setting Up Oracle Order Management
Before setting up Oracle Order Management (OM), you must ensure that:
-
Oracle Inventory setup is complete.
-
Supply subinventories have been set up.
-
Oracle Purchasing setup is complete.
Setting up Oracle Order management includes:
-
Setting up processing constraints.
-
Creating customers.
To set up processing constraints:
-
From the Manufacturing and Distribution Manager responsibility, navigate to Order Management > Set Up > Rules > Security > Processing Constraints. The Processing Constraints window appears.
-
Click the Find button to search for the Order Sales Credit entity.
-
In the Constraints field, clear the Create, Update, Delete, and Cancel Operations options.
-
Click the Applicable To tab. Select the Authorized Responsibilities Radio Button and provide a list of Responsibilities that can perform the above listed actions.
-
Save your work.
-
Query for the Order Line entity.
-
Select the Create, Update, Delete, and Cancel operations for the same.
-
Click the Applicable To tab. Click the Authorized Responsibilities radio button and provide a list of responsibilities that can perform the selected actions. Save your work.
Note: Setting up processing constraints ensures that Order Management users are not able to update any sales orders created within CMRO.
To define Customers:
-
Navigate to Customers > Standard. The Find/Enter Customers window opens.
-
Define your customers.
Note: For outside order processing, you must set up customers in Order Management identical to the suppliers that you created in Oracle Purchasing. You must do this step for only those suppliers to whom you will be shipping out the parts for service. Oracle recommends that you create customer names to be exactly the same as your supplier name.
See Also:
Oracle Order Management User's Guide
Setting Up Oracle Projects
CMRO uses Oracle Projects as part of its maintenance planning and production flows. A project is created for each visit work package and project tasks are created for each visit work package. The project tasks are used in the maintenance planning flow to allow the required materials to be pegged to the corresponding visit tasks through Oracle's MRP application. A visit's corresponding project is used in the maintenance execution flow to collect costs associated to resource and material transactions performed in CMRO's Production module. Use the standard billing functionality in Oracle Project Manufacturing to generate the required reports for the corresponding visit work packages.
Setting up Oracle Projects includes the following steps:
-
Defining service types.
-
Creating a project template.
-
Assigning the project template name to a user profile.
To define service types:
-
Navigate to the Service Type Lookups page (Projects > Setup > Service Types).
-
Define the service types to be used in Oracle CMRO.
-
Save your work.
For more information about defining service types, refer to the Oracle Projects Implementation Guide.
To create a project template:
-
Navigate to the Projects Super User responsibility. From the Navigator, select Setup > Projects > Project Templates.
-
Click the Create Template button.
-
Enter the required information.
Note: You must enter values in all required fields or the project template cannot be approved.
-
Save the project template.
Note: This template should be created for the applicable inventory master organization. All projects created for the maintenance visits use this project template.
-
The project status changes to Submitted. For more information about the creation of project templates and the manner in which you use them to create projects and submit for approval, refer to the Oracle Projects User's Guide.
To assign the project template name to a user profile:
-
Navigate to the System Administrator responsibility. From the Navigator, select Profile > System. The Find System Profile Values window appears.
-
In the Profile field, search for the AHL: Default Project Template ID value. Click the Find button.
-
Select the project template that you created from the Site LOV.
-
Save your work.
Note: You can change most of your user profile options; values that you enter in the User Value field override the values preset by the System Administrator. Some profile options cannot be changed, but are displayed for informational purposes only. To change the user profile options, access the Application Developer responsibility and navigate to Other > Profiles. Enter the required values in the Personal Profile Values window.
For more information on System profile options and the procedures for setting them up, refer to the Oracle E-Business Suite Setup Guide.
To assign visit pricing to a user profile:
-
Navigate to the Find System Profile Values window (System Administrator > Profile > System).
-
In the Profile field, search for the AHL: Visit Pricing Flag value, and click the Find button.
-
Select Yes in the User Value field.

-
Save your work.
Verifying and Updating the Project Created in the CMRO Visit Work Package
The maintenance planner must manually define the project parameters for the project created in the CMRO Visit Work Package.
To verify and update the project created in the CMRO Visit Work Package:
-
Navigate to the Manufacturing and Distribution Manager responsibility. Select Bills of Material > Project > Project Definitions > Project Parameters. The Project Parameters window appears.
-
Enter the Visit Number in the Project Number field to search for the project created in Visit Work Package.
-
Verify the Organization name. It should be the same as the Visit Work Package organization.
-
Optionally, change the Cost Group.
-
Optionally, change the Default WIP class.
-
Click the Invoice Transfer tab. Optionally, change the IPV.
-
Make other changes if required.
Related Topics
Oracle Projects User Guide
Setting Up Oracle Enterprise Asset Management
Oracle CMRO uses the same work order system as Oracle Enterprise Asset Management (eAM). It also uses the Oracle eAM functionality to complete operations. Oracle CMRO benefits from Oracle eAM's enhanced integration with Oracle Costing.
Before setting up Oracle eAM, you must ensure that the following setups are complete:
-
Oracle Inventory
-
Oracle WIP
-
Oracle Bills of Material
-
Oracle Purchasing
To set up Oracle Enterprise Asset Management:
-
Navigate to Enterprise Asset Management > Setup > WIP > WIP Accounting Classes.
-
Set up the following WIP accounting classes:
-
Standard
-
Expense
-
Maintenance
-
Asset Non-Standard
WIP Accounting Classes Window
-
-
Set up the eAM parameters.
Enterprise Asset Management Parameters Window
-
Set up a category code for the Asset Management structure. Navigate to Setup > Category > Category Codes. Search for the Asset Management structure name. For more information on setting up category codes, see the Oracle Enterprise Asset Management User's Guide.
-
Define the default asset category. Navigate to Setup > Category > Category Sets. The Category Sets page appears.
-
Query for Enterprise Asset Management in the Name field. Select the category code that you created from the Default Category list of values.
-
Save your work.
-
Navigate to Setup > Lookup. The Oracle Manufacturing Lookups window appears.
Query for WIP_EAM_ACTIVITY_PRIORITY lookup in the Type field. Verify that the following values are set up:
Code Meaning 1 High 2 Medium 3 Low Oracle Manufacturing Lookups Window
See Also:
Oracle Enterprise Asset Management User's Guide
Setting Up Oracle Service
Oracle Service provides Oracle CMRO with the functionality to create and update service requirements in a maintenance organization. The association of a service request to a visit task and production job enables the maintenance organization to track the service difficulty (non-routine) to the associated progress or resolution performed by the maintenance personnel.
Setting up Oracle Service includes:
-
Verifying and defining service request types, statuses, and their severity.
-
Setting up the profile options.
To verify and define Service Request Type, Status, and Severities:
-
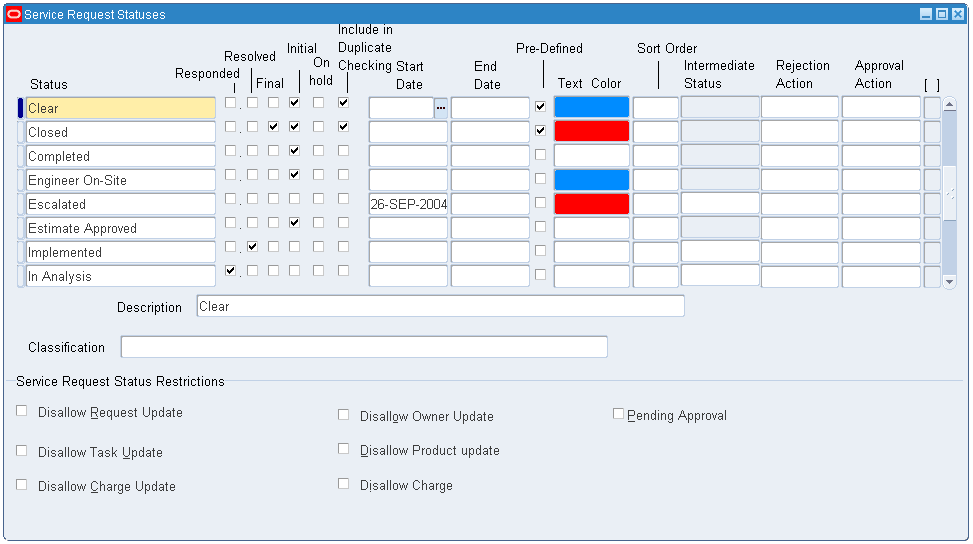
Navigate to the Service Request Statuses page (Customer Support > Setup > Definitions > Service Request Statuses). The Service Request Statuses window appears.
-
You can define the following statuses:
-
New
-
Open
-
Working
-
Assigned
-
Closed
Service Request Statuses
-
-
Navigate to the Service Request Types page (Customer Support > Setup > Definitions > Service Request Types). The Service Request Type page appears.
Note: You define service request types to categorize your service requests. For each service request type, you can set up related service request statuses that correspond with each service request type.
-
You can define the following request types:
-
Pilot Log
-
Cabin Log
-
Mechanic Log
-
Inspection Log
-
Technical Problem
Service Request Types

-
-
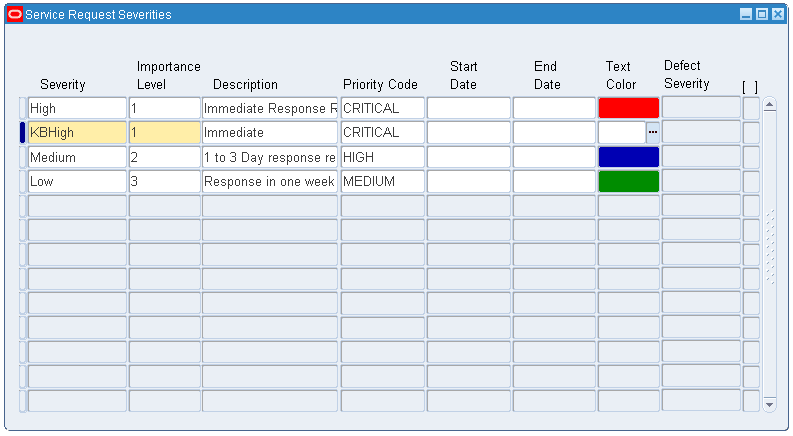
Navigate to the Service Request Severities page (Customer Support > Setup > Definitions > Service Request Severities). The Service Request Severities page appears.
-
Select the Complex Maintenance check box.
-
Verify that the following request severities are defined:
-
High
-
Low
-
Medium
Service Request Severities
-
Select values in the Type, Status, and Severity fields, if they are different than the default values. Default values in these fields come from the profiles setup. For more information on profiles, see Setting Up Oracle Support Profiles in the Oracle Support Implementation Guide.
You can override these defaults if necessary by changing the appropriate profile options. For more information, see Setting Up Support Related Profile Options in the Oracle Support Implementation Guide.
To set up the profile options:
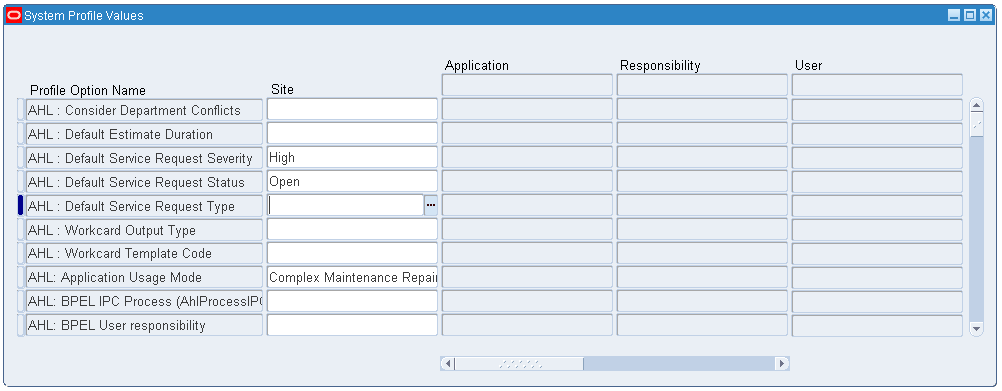
-
Navigate to the System Administrator responsibility, and then select Profile > System. The Find System Profile Values window appears.
-
Search for the AHL: Default SR Customer Name value in the Customer Name field. Click the Find button.
-
Save your work.
-
Find System profile value - AHL: Default SR Severity. Select the default Severity Value from the Site LOV.
-
Find System profile value - AHL: Default SR Status. Select a default Status Value.
-
Find System profile value - AHL: Default SR Type. Select the default SR Type.
-
Save your work.
System Profile Values
Note: You can change most of your user profile options; values you enter in the User Value field override values preset by the System Administrator. A few profile options are set for informational purposes only, and cannot be changed.
See Oracle Customer Support Implementation Guide for additional information.
Setting Up Objects for Disposition
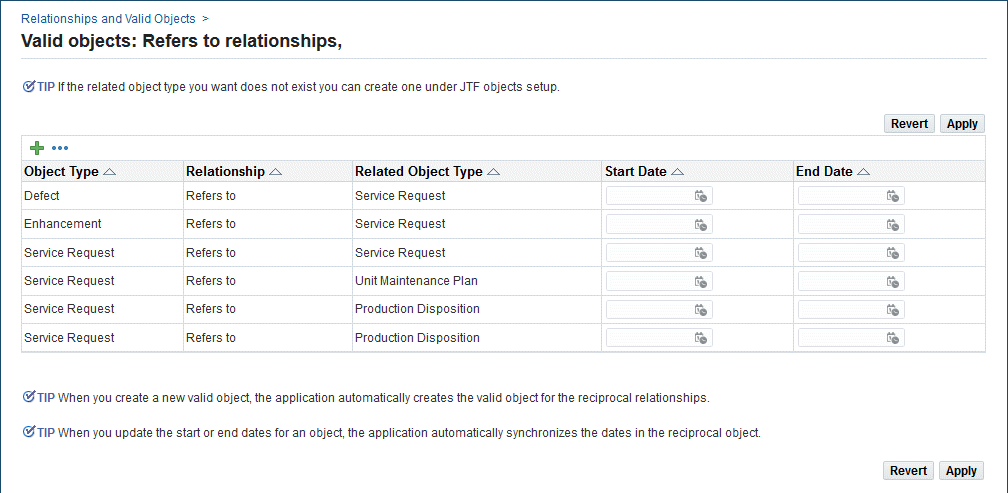
Maintenance or inspection personnel use the disposition details defined in the Route Management module to transact the material (serviceable/non-serviceable) and initiate overhaul, repair or scrap requirements accordingly. The JTF object for disposition is seeded as belonging to the Oracle Service application. After installation, you must create a relationship between a disposition and an object type of Service Request.
To create a relationship between a Disposition and the Service Request object type:
-
Navigate to the Relationships and Valid Objects page (Customer Support > Setup > Definitions > Relationships and Valid Objects).
Click the Update button for the Refers to relationship. The Valid Objects: Refers to Relationships page appears.
-
Click Add Another Row. Add a new relationship as Service Request (Object Type) – Refers to (Relationship) - Production Disposition (Related Object Type).
-
Save the record.
Valid Objects: Refers to Relationships
Setting Up Oracle Contracts
The Outside Processing module uses the functionality supporting the Loan and Borrow Transaction in Oracle Contracts.
Before you set up Oracle Contracts, you must ensure that:
-
Oracle Inventory setup is complete.
-
Oracle Receivables setup is complete.
-
Oracle Order Management setup is complete.
-
Oracle Purchasing setup is complete.
Setting up Oracle Contracts includes:
-
Setting up buyers.
-
Setting up suppliers.
-
Other setups.
To set up buyers:
-
From the Navigator, select Contract Manager > Setup > Others > Buyer > Buyer. The Find Buyer window appears.
-
Click the New Buyer button.
-
Select a Buyer Name from the list of values.
-
Enter other required data.
-
Save your work.
Note: The buyers set up in Oracle Contracts will be displayed in the CMRO Select Buyer Name list for the user to select as the OSP Buyer.
To set up suppliers:
-
Navigate to Contract Manager > Setup > Others > Supplier > Entry, and the Suppliers page appears.
-
Click the Purchasing link.
-
Enter required purchasing information.
Note: These setup suppliers will be available in CMRO OSP Vendor Name list.
Other setups:
-
Navigate to Contract Manager > Setup > Contract. Verify the contract setup.
-
Set up the standard articles, categories, and sources.
-
Optionally, set up the customers.
-
Set up the contract groups and contract events.
Note: To find the approver of the contracts, you must review the profile value: OKC: Contract Approver.
See Also:
Oracle Contracts Core Concepts and Procedure Guide
Setting Up Oracle Installed Base
After you define the master configuration, a framework exists that describes the general characteristics of the system, including the engineering rules for assembly. The user can then create a unit configuration. Oracle CMRO uses the uses the methods in Oracle Installed Base to populate the database with transactions representing the as operated configuration of the system.
Before you set up Oracle Installed Base, ensure that these setups are complete:
-
Oracle Inventory.
-
Oracle Counters.
-
Supplier and supplier sites (Purchasing).
-
Customer and customer sites (Receivables).
To set up Oracle Installed Base:
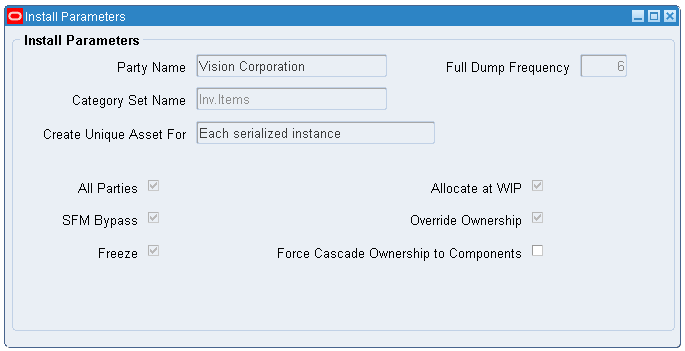
-
Navigate to Installed Base Administrator > Setups > Install Parameters.
-
Set up the Installed Base parameters.
Install Parameters
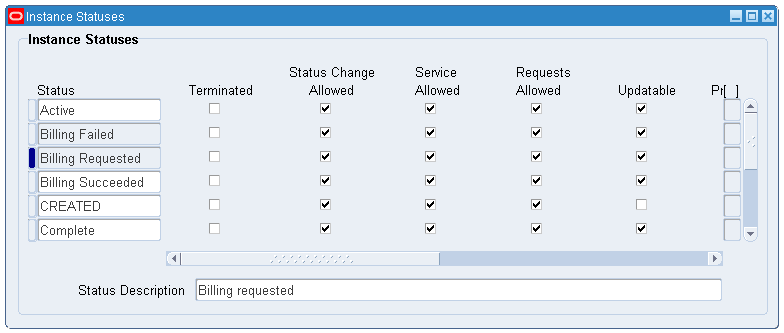
-
Set up the instance statuses.
Instance Statuses
-
Optionally, set up the Maintain Locations values.
-
Set up the asset locations.
See Oracle Installed Base Implementation Guide for additional information.
Setting Up Oracle Counters
This section contains the following topics:
Overview of Counter Setups for CMRO Items
Counters are used to track the usage of an item or service. Counters are set up in different ways dependent upon their intended use.
Counter templates are set up as guidelines to create counters at the Master Item level. An item can have counters based on one or more templates.
However, the item and counter group relationship is one-to-one, so an item can be associated to one active counter group only.
When setting up counter templates for an item in CMRO, it is important to review the following main attributes:
Counter Type
Used to differentiate between a counter that is manually entered and those that are system (automatically) generated:
-
Standard Regular Counter: The only type of counters that a customer takes and then records readings. These are typically entered manually, through an integration using Oracle Installed Base APIs, or by using the Counter Update page.
-
Time-based Regular Counter: Measures time units that are calculated when the Time Based Counters Engine concurrent program is run. Examples are minutes, hours, days.
-
Formula Counter: Derived from one or more standard regular counters for an associated item by a formula that can use SQL functions. For example, a formula such as 1:3 to calculate the counter value based on a regular counter.
Reading Type
Used to indicate if a reading is the latest (total) value or an incremental (delta) value since the last recording:
-
Absolute (meter): Used to capture the present or as-recorded value. Typically used to capture a reading as recorded by a service meter such as an odometer (miles, kilometers) or the total operating hours.
-
Change (usage): Used to capture the incremental value between the last recorded value and the current value. For example, number of cycles, landings, starts, and so on since the last recorded event.
Important: Only counters with the Reading Type of Change can be corrected.
Direction
Used to indicate if a reading can increase, decrease, or increate and decrease the counter's net reading value:
-
Ascending: Value will only increase over time. Examples are odometers and hour meters. New counter readings can only be positive values.
-
Descending: Value will only decrease over time, such as a countdown of the life of a component. New counter readings can only be positive values.
-
Fluctuating: Value may increase or decrease over time. New counter readings can be positive or negative values. The net value will increase up and down depending on the nature of the reading.
See Setting Up Counters in the Oracle Installed Base User's Guide for more information regarding counter setup.
Recommended Counters to be Set Up
The following prime and secondary counters are recommended at the implementation of CMRO:
-
Prime: These counters are typically updated on defined intervals:
-
TSN - Time since new
-
CSN - Cycles sine new
-
DSN - Days since new
-
-
Secondary: These counters are typically manually updated at key milestones in the life of an asset:
-
TSO - Time since overhaul
-
CSO - Cycles since overhaul
-
DSO - Days since overhaul
-
Setting Up Oracle Counters for CMRO Items
-
From the Navigator, select Field Service Manager > Field Service Set Up > Counters > Define Counters.
-
Click the New button to define counters.
-
Set up the counter groups.
-
Associate the counter groups with the Oracle Installed Base items.
-
Optionally, associate the counter groups with maintain locations.
See Also:
Oracle Installed Base User's Guide
Resetting Counters
Counters can be reset through work accomplishment or manually. This section outlines considerations related to resetting counters.
Work Accomplishment Resets
-
Evaluate counter setups for those counters which will be reset through the accomplishment of an MR or after a maintenance event. Examples are overhaul counters which are reset after a major rebuild.
-
Typically set up with a different UOM from the top node to prevent the Cascade API program from updating them.
-
Only Change - Ascending and Change - Fluctuating counters can be reset through work accomplishment.
Manual Resets
It should be noted that when a counter is manually set using Oracle Installed Base, the reset should be performed in context of the age and maintenance history of an item instance.
In this scenario, there is the potential to disconnect or disassociate the accomplishment or recording of maintenance history for a CMRO item instance if the manual reset was done in Oracle Installed Base.
Oracle recommends that counter resets by performed by the accomplishment of a CMRO maintenance requirement.
Setting Up Oracle G-Invoicing with CMRO
To use Oracle G-Invoicing with visits and repair batches, you must set up Oracle G-Invoicing. For details, see Oracle E-Business Suite G-Invoicing Process Guide.
After you have performed the G-Invoicing setup, you must enable the AHL: Allow G-Invoicing Order Visits profile option.
To enable the G-Invoicing profile option:
-
Navigate to System Administrator, Profile, System, and the Find System Profile Values window appears.
-
Enable the profile option, AHL: Allow G-Invoicing Order Visits. This profile option can be set at the Site, Application, Responsibility, and User levels.
This value applies to both Standard and Component type visits.
-
Set the value to Yes. The default value is null which behaves as No.
-
Save your work.

For more information regarding Oracle G-Invoicing and CMRO, see Using Oracle G-Invoicing with CMRO, Oracle Complex Maintenance, Repair and Overhaul User's Guide.
Setting Up Oracle Quality
Oracle CMRO uses the setup from Route Management and the system profile options in Oracle Quality to enable maintenance organizations to capture quality elements for operations, jobs, deferrals, scrap management, and counter value snapshots. This gives maintenance facility the flexible integration required to maintain reliable products.
Oracle CMRO provides seeded plan templates for routes, operations, job deferrals, MRB dispositions and counter reading capturing. These templates can be used as-is or adjusted with additional quality elements. However, the counter reading template is used by CMRO in the background, and cannot be changed.
Setting up Oracle Quality includes:
-
Setting up route and operation quality plans.
-
Setting up Job Deferral, MRB Disposition Quality, Non-Routine Job Inspection and Non-Routine Operation Inspection Plans.
-
Setting up Counter Readings Quality Plans.
Setting Up Route and Operation Quality Plans
Creating Inspection Types
You can create the different inspection types for route and operation quality recording. The inspection types are maintained in a seeded collection element known as an Inspection Type. Creating collection elements, collection element types and collection plan types have no specific CMRO setup requirements.
To create Inspection Types:
-
Change responsibility to Manufacturing and Distribution Manager. From the Navigator, select Quality > Setup > Collection Elements.
-
Select the organization for which you want to create a quality plan. The Collection Elements page appears.
-
Click the Inspection Type field and search for the Collection Element value.
-
Click the Values button.
-
Define the inspection types.
Collection Elements
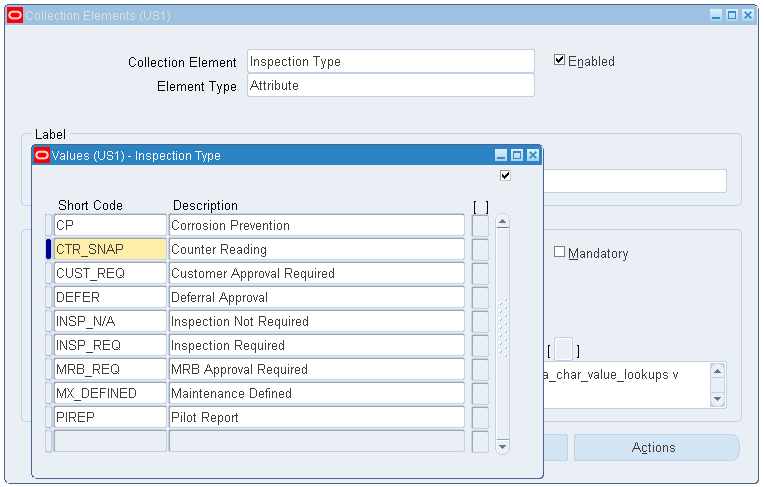
Note: The defined inspection types are the values that appear in the list of values for the quality inspection type attribute in routes and operations.
Creating Quality Plans
CMRO provides plan templates with seeded quality elements. Oracle recommends that you use these templates and adjust them for the specific needs rather than creating a new plan, because the template contains collection elements that are automatically populated by CMRO when quality is recorded in production. Should these elements be missing, the procedure would still work, but these attributes would not be recorded. The background attributes contain information about the job, maintenance requirement, item and item instance and so on, which provides convenient quality reporting and analysis. The templates also contain seeded displayed items that are either mandatory or optional, and those properties can be changed. This approach enables the user to take full advantage of CMRO's out-of-the-box quality functionality together with the flexibility to create completely customized quality plans. Creating and using plan types have no specific CMRO setup requirements.
To create Quality Plans:
-
Navigate to Quality > Setup > Collection Plans. The Collection Plans window opens.
-
Select the plan type.
-
Click the Copy Elements button. The Copy From Plan window appears.
-
Select the Plan template from which you want to copy. Select one of these options:
-
Advanced Service Online Operation Completion Plan
-
Advanced Service Online Route Completion Plan
Collection Plans
-
-
Click the Transactions button. The Collection Transaction window appears.
-
Select the seeded transaction for route or operation. Select one of these options:
-
Maintenance Route Completion (Advanced Service Online)
-
Maintenance Operation Completion (Advanced Service Online)
-
-
Define the trigger. Select Inspection Type from the Trigger name list of values. The trigger value is selected from the setup in the Inspection Type collection element.
-
Save your work.
Collection Transactions
Note: The Inspection Types created can be associated with a route or operation in route management. When the route or operation is going to be instantiated in production, the user will have the derived quality plan available for collecting the quality results.
Setting Up Job Deferral, MRB Disposition Quality, Non-Routine Job Inspection and Non-Routine Operation Inspection Plans
Creating Inspection types
An inspection type for a deferral, MRP, non-routine job, and non-routine operation is defined in a system profile option. The inspection type will derive the existing plan in the organization where a job is deferred and an MRB disposition is initiated and a non-routine job or operation is created. You can create the different inspection types for job deferral, MRB disposition, and non-routine quality recording.
To create Inspection Types:
-
Navigate to the Collection Elements window. Click in the Collection Element field, and select the Inspection Type value.
-
Click the Values button. Define the inspection types for job deferral, MRB disposition, and non-routine quality recording.
Note: The defined inspection types appear in the list of values for the system profile option for job deferral and MRB disposition.
To create Quality Plans:
-
Navigate to the Collection Plans window.
-
Define collection plans for job deferral, MRB disposition and non-routine job or operation using the following plan templates:
-
Advanced Service Online MRB Disposition Plan
-
Advanced Service Online Route Completion Plan
-
Advanced Service Online Operation Completion Plan
-
Advanced Service Online Job Deferral Plan
-
-
Add or change quality elements if necessary.
-
Click the Transactions button. Select the following seeded transaction descriptions for job deferral, MRB disposition and non-routine job or operation:
-
Maintenance Job Deferral (Advanced Service Online)
-
MRB Disposition (Advanced Service Online)
-
Maintenance Route Completion (Advanced Service Online)
-
Maintenance Operation Completion (Advanced Service Online)
-
-
Define the trigger. Select Inspection Type from the Trigger drop-down list. The trigger value is selected from the setup in the Inspection Type collection element.
-
Save your work.
System Profile Options Setup
Set up the following options for a job deferral, MRB disposition and non-routine job or operation quality definition:
-
AHL: Job Deferral Inspection Type
-
AHL: MRB Disposition Inspection Type
-
AHL: Non-routine Job Inspection Type
-
AHL: Non-routine Operation Inspection Type
Setting Up Counter Readings Quality Plans
Whenever a maintenance requirement is completed in production, CMRO stores the current counter values of the maintained item instance in a Counter Reading Quality Plan. The plan will adjust itself based on the counters defined on the item instance. This procedure is completely transparent to the user. The user must create a Counter Reading Quality Plan in Quality and set up the system profile option to enable counter reading capturing.
Creating Quality Plans
The Counter Readings Quality Plan is created using the template and cannot be adjusted, because the user has no influence over the recording of the counter values.
Note: You need to create only one counter reading plan because the same counter reading plan is used across all organizations.
To create Quality Plans:
-
Navigate to the Collection Plans window.
-
Select a value in the Plan Type field.
-
Click the Copy Elements button. Select the Advanced Service Online Counter Readings Plan template.
Note: Do not adjust collection elements.
-
Do not define any transactions.
System Profile Options Setup
For the Counter Reading Quality Plan definition, set up the System Profile Option -AHL: Counter Reading Plan.
See Oracle Quality User's Guide.
CMRO Specific Setups
Oracle CMRO is an integrated, web-enabled software application suite designed to empower complex equipment maintenance organizations. Oracle CMRO supports maintenance processes such as scheduled and unscheduled maintenance visits, component monitoring, job scheduling and routing, labor time collection, cost collection, inventory management, and maintenance document management. CMRO provides models for electromechanical systems and defines rules for assembling units. CMRO also records unit-specific information, enabling quick access to the maintenance history of a product component.
Oracle CMRO is organized as follows:
-
Engineering
-
Fleet Maintenance Program (maintenance requirements)
-
Route Management (work card authoring)
-
Document Index (technical document management)
-
-
Configuration Management
-
Master Configuration (allowable installations)
-
Unit Configuration (as installed maintenance tracking)
-
Product Classification (logical grouping)
-
-
Planning
-
Unit Maintenance Plan (active maintenance requirements)
-
Visit Work Package (work scope and resource)
-
Long Term Plan (hangar and visit plan)
-
-
Execution
-
Production
-
Production Planning
-
Outside Processing
-
This section includes the following topics:
Oracle Complex Maintenance, Repair, and Overhaul Standard Setup
The CMRO standard setup involves assigning roles to AHL Super User, and setting up advanced properties and system profile options.
To assign roles and set up advanced properties:
-
Login to the Administration Console (CRM HTML Administration > Home).
-
Click the Users link on the Home page.
-
Click the User Maintenance link.
-
In the Users page, query for the user that has the AHL Super User responsibility.
-
Click the Go button.
-
Click the user name to navigate to the User Details page.

-
Optionally enter a New Password, and then click the Reset Password button.
-
Click the Roles button.
The User-Role Mapping page appears.
-
From the Available Roles column, select the following roles and move them to the Assigned Roles column:
-
AHL_ADMIN_ROLE
-
AHL_OSP_ROLE
-
AHL_USER_ROLE
-
CSI_ADMIN_USER
-
CSI_NORMAL_USER
User-Role Mapping
-
-
Click the Settings tab to set up the advanced properties.
-
Select the Properties folder, and then click the Advanced link.
The Advanced - Properties page appears.
-
Select AHL from the View list.
-
Click the branding.default value, and verify that the value is Oracle Complex MRO.
To set up the system profile options:
-
Navigate to the System Profile Values window (System Administrator > System Profiles).
-
Set up the system profile options as indicated in the table below.
System Profiles Profile Site (Value) Descriptions AHL: Application Usage Mode Complex Maintenance Repair and Overhaul, Depot Repair, Preventive Maintenance Set up the application usage mode. AHL: Turn On Development Debug Yes/No Enable/disable debug session. AHL: Turn on File Debug Yes/No Enable/disable file debugging. Additional Information: The Fleet Maintenance Program and Route Management modules enable users to define maintenance requirements and routes for both CMRO and Preventive Maintenance applications. Setting up the profile option AHL: Application Usage Mode determines the user responsibility. Users can view only the routes, maintenance requirements, or unit effectivities associated with the selected application usage mode. Users can also define routes having the same number or maintenance requirements having the same title across different application usage modes.
Oracle CMRO Approval Workflow Setup
You can set up an Approval Workflow to approve maintenance programs, activities and routes. You can use the built-in Approval Workflow or you can create your own workflow, define a specific approval rule and create a list of approvers for each CMRO object. After setting up the profile options, if you do not specify an approval rule, the application uses the default approval rule.
The CMRO Approval Workflow setup includes:
-
Setting up profile options.
-
Creating approval users and roles.
Setting Up Profile Options
When you click the Advanced button, the maintenance programs, activities, and routes are automatically approved at creation. To set up an approval process, you must set up the system profile options as indicated in this table.
| Profile | Value | Description |
|---|---|---|
| AHL: Enable approval workflow for Routes | Yes | This enables the approval workflow for the routes. |
| AHL: Enable approval workflow for Maintenance Requirement | Yes | This enables the approval workflow for maintenance programs and activities. |
| AHL: Workflow Loop Counter | Requires a numeric value that defines how many times the notification will be re-sent if the user does not respond. | - |
| AHL: Workflow Timeout Minutes | Requires a numeric value that defines the period after which a workflow times out when its progress is halted. | - |
Creating Approval Users and Roles
To activate the enabled workflow, you must set up employees in Oracle Human Resources, create application users and define approval roles for these employees, and create approval rules for the different CMRO objects.
The following setup steps are dependent upon the use of the seeded approval workflow. If you decide to create your own workflow, you must adjust these steps to the functionality of this workflow.
Define Approval Employees in Oracle Human Resources
All approval users must be defined as employees in Oracle Human Resources.
Note: If you want to notify the approval user using email, then in addition to the application work list notification, you must also set up the email address for the employee in the Office Details window.
For more information on how to set up employees, refer to the Oracle Human Resources Implementation guide.
Create Application User for Approval Employees
All approval employees must have an Oracle Applications login. When defining an application users you must associate the approval employee, employee (set up in Oracle HR) to that application user.
Create Approval Roles
Associating the approval employees to a role is an optional step. If you have set up the employees in Oracle HR and created application users for them, you can associate the employees directly with an approval rule. You can set up the following two types of approval roles:
Create Default Approval Role
CMRO provides a seeded default approval rule that is used when no object specific approval rule is set up. The default approval rule should be used when the same people in the same hierarchy will approve all CMRO objects. In this case, you only have to set up one rule with one approval sequence. The default approval rule has also one approval hierarchy with a seeded role defined.
To set up the role for the default approval rule:
-
Navigate to the CRM Resource Manager responsibility, and then select Setup > Roles.
-
Click the Role Type field, and search for the JTF_RS_ROLE_TYPE value.
-
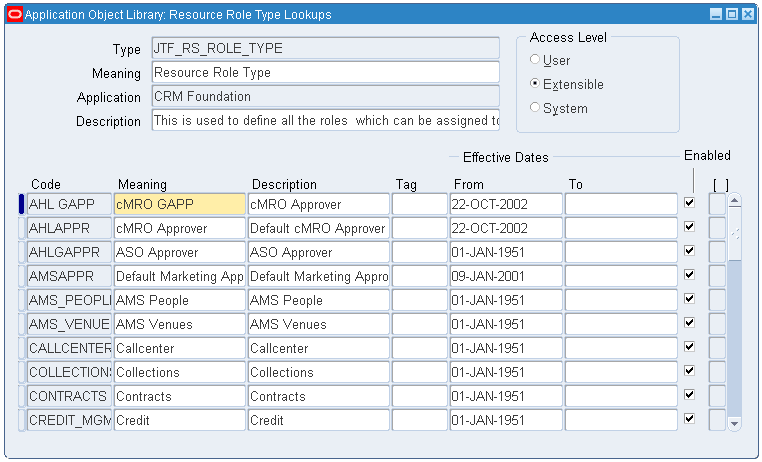
Create a role type code for the default approval role.
Application Object Library
-
Navigate to Setup > Roles.
-
Create a role with the code AHL_DEFAULT_APPROVER.
Note: The code must be defined as described or the default rule will not recognize this role. The role name can be user defined.
-
Associate the default approval role type code to this role.
Roles

-
Create additional roles if you need more than one level of approval. The role codes can be user defined for the additional roles used for the default approval rule.
Note: For CMRO approval, only one user can be associated with a role, otherwise the approval workflow will fail. Therefore, you must create as many roles as you have approvers. The sequence of notification will be defined in the approval rule setup.
Create General Approval Role
Perform the following setup steps if you have specific approval rules for the different CMRO objects:
-
Navigate to the CRM Resource Manager responsibility, and then select Setup > Roles.
-
Query for the JTF_RS_ROLE_TYPE value.
-
Create role type codes for the General Approval roles.
Note: You can create multiple role type codes for grouping the roles together, but you must create at least one role type code.
-
Navigate to Setup > Roles. Create a role for every possible approver.
-
Associate the appropriate approval role type code to the roles.
Import Resources
After you have created the employees and the roles, you must map the two together.
Note: As previously mentioned, only one employee can be assigned as a workflow approver. However, the same employee can be the designated approver for multiple roles.
To import resources:
-
From the CRM Resource Manager responsibility, navigate to Maintain Resources > Import Resources.
-
Select the approval employee. Click the Search button.
-
Click Create Resource. Select the appropriate role.
-
Click OK. Click Save Resource.
Selection Criterion
-
Click the Details button to associate this employee with an additional role.
-
Repeat these steps for all approval employees.
Create Approval Rules in CMRO
You can use the seeded default approval rule, or specify an object-specific approval rule for the different CMRO objects. In the approval details, you can pick a role that you have set up, or a user that has been created as an employee in HR and associated with an application login. The sequence in the approval details defines the approval hierarchy.
To adjust the default approval rules:
-
Login to the JTF environment of CMRO.
-
Click the Administration link.
-
Click the Go button.
-
Click the Default AHL Rule link.
-
Add any additional roles or users to the approval details in sequence that you want the objects to be approved.
Note: The first role is seeded. You can change the hierarchy or delete the seeded role if necessary.
-
Click the Apply button.
Note: Do not add any values to the operating unit attribute. Custom values are currently not supported by CMRO and would cause the workflow to fail. Also, you cannot change the status of the default rule once it is set to Obsolete.
To define object specific approval rules:
-
Login to CMRO.
-
Click the Administration link.
-
Click the Workflow tab.
-
Click the Approval Rules link.
-
Click the Create button, and the Create Approval Rule page appears.
Create Approval Rule
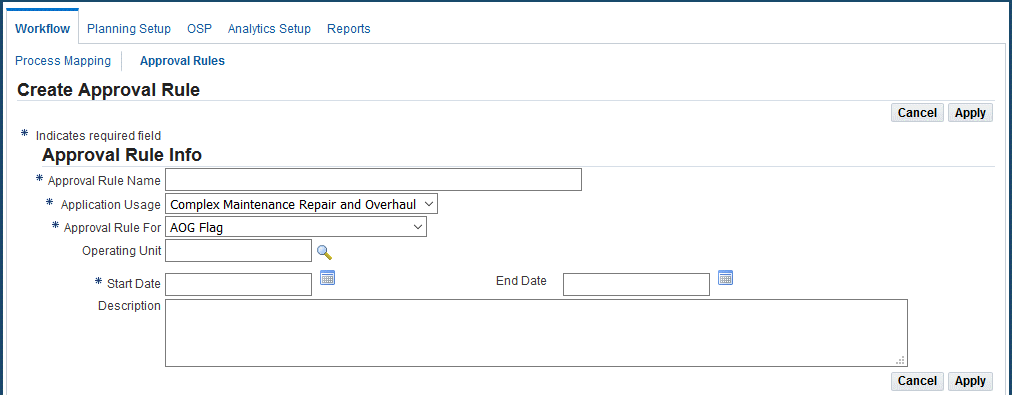
-
Enter the Approval Rule Name (required).
-
Select Complex Maintenance, Repair, and Overhaul in the Application Usage field (required).
-
Select the required value from the Approval Rule For drop-down list.
-
(Optional) Select an Operating Unit.
-
Enter the Start Date (required).
-
(Optional) Enter a Description.
-
Click the Apply button.
-
Add roles or users to the approval details in the sequence in which you want your objects to be approved.
-
Select Active from the Status drop-down list.
-
Click the Apply button.
Map Workflow Process
The final step in the approval workflow setup is to map the object with a workflow. Oracle recommends that you use seeded workflow that is delivered with CMRO. If you invoke a customized workflow, it may interfere with the CMRO Deferral workflow. The CMRO Deferral may be performing several background processes or integration required for the standard functionality. If you try to replace this workflow with a customized one, the deferral functionality is affected.
To map the workflow with the CMRO object:
-
Login to CMRO Super User.
-
Click the Administration link.
-
Click the Workflow tab.
-
Click the Process Mapping link.
-
If you want to use the same workflow for all of your objects, leave the object field empty; otherwise, select the object that you want to add from the drop-down list.
-
Define the desired workflow in the Process Name field.
The CMRO default workflow is called ASO Generic Approval Process.
-
Select Complex Maintenance, Repair, and Overhaul from the Application Usage drop-down list box.
-
Select Yes or No from the Active list box.
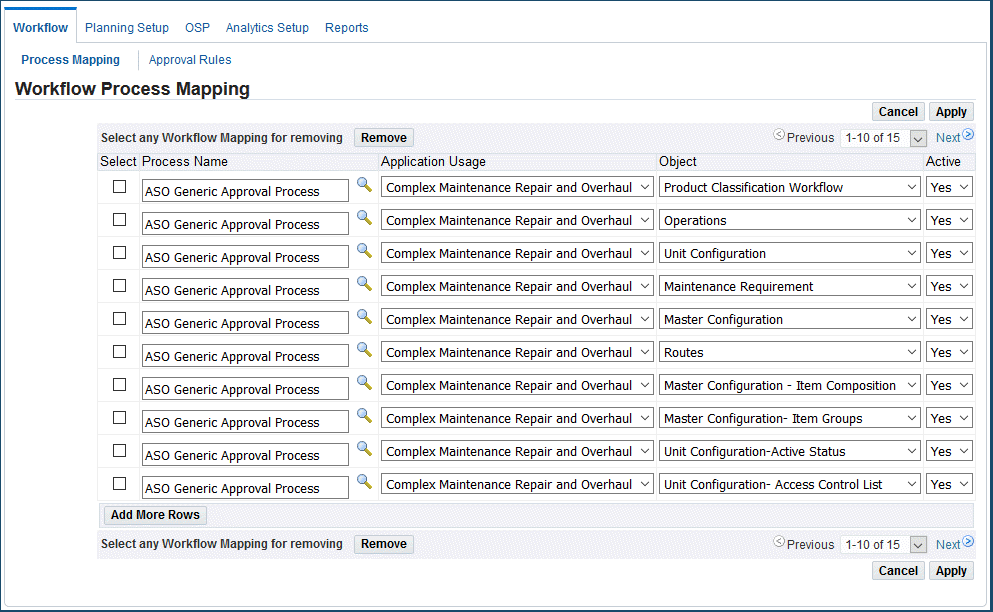
-
Click the Apply button.
Create the Approval Workflow
When a maintenance program, activity or route is sent for approval, the user defined in the approval role is notified by email, if it has been set up at employee creation, or with an entry in the Worklist in Oracle Applications.
From the notification, the user can navigate to the notification details and approve the program, activity or route. The workflow moves sequentially through all of the roles defined in the approval rules details until the last user has sent his approval. After the last approval has been sent, the status of the approved object will be changed from Approval Pending to Complete.
Create the Workflow for Software Configuration Updates
Before you can use software configuration tracking and auditing in CMRO, you must set up the Loadable Software Audit Approval workflow for software audits.
-
Define the approval rule for the workflow.
-
Navigate to the Approval Rules page (Administration > Workflow > Approval Rules > Search Approval Rules).
-
Click the Create button.
-
Enter values in the following fields:
-
Approval Rule Name
-
Application Usage
-
Loadable Software Audit Approval
-
Start Date

-
-
Click Apply.
-
-
Update the approval rule with the approver details.
-
Navigate to the Approval Rules page (Administration > Workflow > Approval Rules), and the Search Approval Rule page appears.
-
Select values for the following fields:
-
Order: This field indicates the steps in the workflow process.
-
Type: Select Role or User.
-
User Role: Select an individual or a role name.
-
-
Click Apply.
-
-
Define the process role mapping for the approval workflow.
-
Navigate to the Process Role Mapping page (Administration > Workflow > Process Mapping).
-
Click the Add More Rows button.
-
Enter ASO Generic Approval Process in the Process Name field.
-
Select Complex Maintenance Repair and Overhaul in the Application Usage field.
-
Select Loadable Software Audit Approval in the Object field.
-
Select Yes in the Action drop-down list.
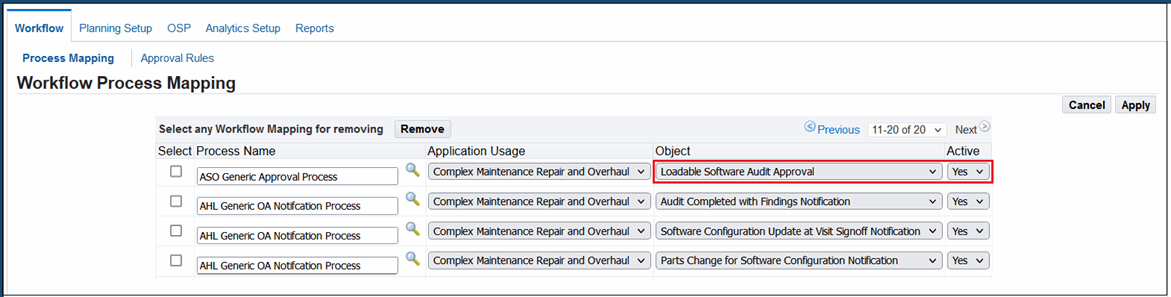
-
-
Click Apply.
The system will generate email notifications during the software configuration update approval process.
Related Topics
Managing Software Configurations, Oracle Complex Maintenance, Repair and Overhaul User's Guide
Oracle CMRO Module Setup
Oracle Complex Maintenance, Repair, and Overhaul enables maintenance organizations to meet customer expectations, and draw maximum benefit by improving the operational readiness of equipment.
Oracle CMRO Module setup includes:
Setting Up Automatic Visit Scheduling and Auto-Packaging
The automated visit forecasting process is a tool for the maintenance planners to group maintenance requirements together to support both a rough-cut visit plan as well as an operational maintenance plan (Primary Plan), based on a maintenance organization. This enables the planner to approach the plan and focus on the exceptions for both short and long term planning. This feature is used primarily for heavy maintenance such as letter checks and modifications. It is typically used to forecast 12-18 months into the future.
There are two components to the Auto Visit Planning process:
-
Process Flight Visit Schedules API (Short Term Planning)
-
Create Primary Visits (Long Term Planning)
Important: Only visits with a status of Planning can be used with this feature.
This functionality will improve the creation and scheduling of visits for both line and base maintenance.
For base maintenance, there is a new Autovisit Planning Workbench where users can define a processing hierarchy by master configuration, program type, subtype and a date range. The user can then launch and monitor concurrent programs which will:
-
Create new visits based on Primary Visit MRs.
-
Cancel existing visits.
-
Add UMP MRs to existing visits.
For line maintenance, users can define parameters for creating operational visits based off the flight schedule and maintenance capability of arriving and departing stations. The user can define both generic and specific parameters for flights which will:
-
Create pre and post-flight visits.
-
Create transit checks which will span an aircraft's downtime duration.
-
Adjust visits based on flight changes.
-
Cancel visits based on flight cancellations and re-routes.
-
Notify users of changes to specific visits and flight associations.
This section includes the following topics:
Defining Service Categories
You must define service categories that will be used with the Autovisit creation and fleet forecasting processes. The service category is the highest level of service that the department can perform. Therefore, the department can accomplish this level of service as well as any lower valued service. The service category lookups must use a numerical value: 1 is the highest.
Note: If the service category is not defined for the maintenance requirement, then the system will assume that the MR can be accomplished at any department.
There are 6 seeded values that are extensible which can be edited for your use:
-
1: Category 1
-
2: Category 2
-
3: Category 3
-
4: Category 4
-
5: Category 5
-
6: Category 6
Relationship of Department Service Categories and Maintenance Requirements
If a Department is assigned 2: Category 2, then it will have a ranking of 2. This means that a department can provide service for category 2 and below.
However, there is an inverse relationship with the department's service category and the department's capability to perform maintenance.
For example, an MR has been defined with a Service Category of 2. This MR requires that the department must have a service category of at least 2 to perform this level of work. Therefore, any department that has a category of 2 or 1 can accomplish this MR.
Examples
-
Category 3 MR: Can be accomplished in departments with a service category of 3, 2, or 1.
-
Category 1 MR: Can be accomplished in departments with a service category of 1 only (highest value).
-
Category 6 MR: Can be accomplished in departments with a service category of 6, 5, 4, 3, 2, or 1.
Defining Flight Categories
You must set up the Flight Category attribute that is used in the Flight API. This attribute will be used in the Create Operational Visits page.
-
Navigate to the Application Object Library Lookups page (Application Developer > Application > Application Object Library).
-
Search for the AHL_FLIGHT_CAT_CODES value in the Type field.
Verify that the seeded ETOPS code exists. This flight category code is used with the AutoVisit Planning feature.
-
If the ETOPS code does not exist, add it using the following values:
-
Code: ETOPS
-
Meaning: Extended Operations
-
Description: Allows extended flight operations of 120 minutes or greater
-
-
Save your work.
Defining Visit Type Lookups
Visit type lookups can be created for specific master configurations and should be created in such a way that the defined stage and unplanned estimates apply to all relevant maintenance requirements.
Visit types are often created for the primary heavy maintenance requirements, which determine the basic duration and structure of the visit, and are used as scheduling opportunities for many other smaller requirements. Visit types may also be created to represent other maintenance events such as transit visits or overnight repairs.
To define visit type lookups:
-
Navigate to the Application Object Library Lookups page (Application Developer > Application > Application Object Library).
-
Search for the AHL_PLANNING_VISIT_TYPE type.
-
Click the Add button to add new visit types.
Define each visit type to include:
-
Code
-
Meaning
-
Description
-
From Effective Date (required)
-
To Effective Date (optional)
-
-
Save your work.
Defining Visit Type Profiles
Visit types profiles are used to build maintenance visit templates during the planning process and identify default the visit duration, the stages in which the maintenance will be accomplished, and any unplanned requirement estimates.
Visit types are created for specific master configurations, representing a known type of maintenance event with a rough idea about expected work scope, visit duration and visit structure. Use the Create Visit Types page to define visit type profiles; use the Edit Visit Types page to edit existing visit type profiles.
-
Navigate to the Create Visit Types page (Administration > Visit Types > Visit Types).
-
Click the Create button, and the Create Visit Types page appears.
-
Select or enter values for these fields:
-
Visit Type (required)
-
Description (optional)
-
Transit Type - select if the visit type is for transit (optional)
Important: Do not select the Component Type check box for the Auto Visit Planning process.
-
Master Configuration (required for non transit and component types)
-
-
(Optional) Enter a stage number.
-
Enter a stage name.
-
(Optional) Enter the duration of each stage (in hours).
The total hours for the stages will be reflected in the Duration field on the page.
-
Save your work.
See Visit Work Packages for more information regarding stages.
Defining Primary Maintenance Requirements
Define the primary maintenance requirements.
-
Use the Create Maintenance Requirements page (Engineering > Fleet Maintenance Program > Overview > Create) to create primary MRs that will be used by the Autocreate Visit process to automatically create maintenance visits.
-
Enter or select values for the following required fields:
-
Title
-
Category
-
Program Type: This field will be used by the Autovisit process to create primary visits.
-
Implement Status: Select Mandatory. Only MRs with an Implement Status of Mandatory are used during the Autovisit create process.
-
Repetitive
-
Whichever comes
-
Effective from
-
Program Subtype: This field will be used by the Autovisit process.
-
On Wing
-
Service Category: This field is used by the Autovisit UE assignment process to evaluate if a visit department is capable of performing the MR.
-
Defining Maintenance Organizations Used in Auto Visit Planning
The Create Primary Visits process will create new visits based on Unit Effectivity records that originate from Primary MRs. The maintenance organizations where an MR can be accomplished are defined in the MR definition. These definitions will be used in the Auto Visit creation process to set the maintenance organization and department in the visit header.
Important: The maintenance organization must be defined to create a visit using the Auto Visit process.
Use the Update Maintenance Requirement page (Engineering > Fleet Maintenance Program > Overview) to define the maintenance organization for the MR that will be used during the Autovisit create process.
The maintenance organizations in an MR can be defined in one of these two ways:
-
Based on the Operating Organization: The appropriate maintenance organization and maintenance department can be defined during fleet creation.
Note: There can be only one maintenance organization and maintenance department defined per operating organization.
-
Not Based on the Operating Organization: The maintenance organization and maintenance department are defined regardless of the operating organization.
Defining a maintenance organization:
-
Navigate to the Update Maintenance Requirement page (Engineering > Fleet Maintenance Program > Overview) to define the maintenance organization for the MR that will be used during the Auto Visit create process.
-
Select or enter values in one of these fields:
-
Organization
-
Master Configuration
-
Visit Type
-
-
You can also optionally select a Flight Category to further narrow your search.
-
Click the Go button to retrieve the MRs that meet the search criteria.
The following conditions apply to maintenance organization definitions:
-
There can only be one maintenance organization and department defined per operating organization. However, multiple operating organizations can be set up for different regions of operations.
-
There can be a single row created that defines a maintenance organization and department, regardless of the Operating Organization for the UE.
Important: Only one maintenance organization row will display.
Defining Maintenance Departments
The Department capabilities can be defined for a maintenance department and will be applied to a visit as the Service Category attribute. These capabilities can then be used by the Auto Visit process to evaluate if an MR can be scheduled to an existing visit.
-
Navigate to the Search Department Locations page (Administration > Planning Setup > Department Location > Search for the department).
The Search Department Location page appears.
-
Click the Edit button for the department that you want to update, and the Update Department Location page appears.
-
(Optional) Select or enter new values for these fields:
-
Calendar
-
Sub Inventory and Physical Locator
-
Shift Number
-
Work Days (pattern - associated to the Shift Number)
-
-
(Optional) Select a value in the Max Service Category field.
The Max Service Category is the highest level of service that the department can perform. Therefore, the department can accomplish this level of service as well as any lower valued service. The service category lookups must use a numerical value: 1 is the highest.
The seeded values are:
-
1: Category 1
-
2: Category 2
-
3: Category 3
-
4: Category 4
-
5: Category 5
-
6: Category 6
Note: If a Max Service Category is not defined for a department, then the department will be able to accomplish all levels of maintenance, and will be assigned to MRs of any service category.
See Defining Service Categories, Oracle Complex Maintenance, Repair, and Overhaul Process Guide to select the correct user-defined value.
-
-
If you do not select a Max Service Category, the system will deem that the department can accomplish all levels of maintenance, and will assign MRs with any service category.
-
Click the Apply button to save your work.
Setting Up Complex Assembly Maintenance
This section contains the setup tasks required to use the complex assembly maintenance feature.
Prerequisites for Complex Assembly Maintenance
Perform the following setup tasks to use the complex assembly maintenance feature.
| Prerequisite Setup Task | Role Performing Task | Navigation |
|---|---|---|
1. Define AHL lookups for:
|
Engineering | Application Developer > Application > Lookups > Application Object Library |
2. Define Visit Type profiles.
|
Engineering | Administration > Planning Setup > Visit Types |
| 3. Define the maintenance organization. | Engineering | Engineering > Fleet Maintenance Program > Overview > Update Maintenance Requirement > Maintenance Organizations |
4. Define maintenance department and space capabilities.
|
Engineering | Administration > Planning Setup > Department Location > Create (B) Administration > Planning Setup > Department Location > Edit Department Location Administration > Planning Setup > Spaces |
| 5. Create master configurations, unit configurations, and product classifications. | Engineering | Configuration > Master Configuration > Overview > Search Master Configuration > Create (B) Configuration > Unit Configuration > Search Unit > Search Unit Configuration > Create (B) Configuration > Product Classification > Overview > Search Product Classification > Create (B) |
| 6. Define primary fleets, unit composition and utilization. | Engineering | Planning > Fleet Forecasting |
7. Define department spaces.
|
Engineering | Administration > Planning Setup > Spaces > Search Spaces > Create (B) |
8. Create the fleet maintenance program and define maintenance requirements.
|
Engineering | Engineering > Fleet Maintenance Program > Overview > Search Maintenance Requirement > Create (B) |
9. Create the maintenance forecast.
|
Engineering | - |
| 10. Analyze the maintenance history using Demantra to generate non-routine estimates. | Reliability Engineer | - |
| 11. Update MR NR Profile using the latest non-routine estimates. | Reliability Engineer | Planning > Unit Maintenance Plan > Non-routines > Search Non-routine > Update (icon) Update Non-Routine |
| 12. Update the BOM calculations in ASCP to include the latest non-routine estimates. | Reliability Engineer | - |
| 13. Generate non-routine removal rates (Mean Time Between Unscheduled Removal [MTBUR]) for complex assemblies. | Reliability Engineer | - |
| 14. Consider customer non-routine removal analysis and planned removal forecast as input. | Customer | Planning > Unit Maintenance Plan > Non-routines > Search Non-routine > Update (icon) Update Non-Routine |
Setting Up Document Index
The Document Index module in Oracle Complex Maintenance, Repair, and Overhaul is the central repository for managing all maintenance documents.
Maintenance personnel can:
-
Access an online catalog of documents used in maintenance, repair, and overhaul operations.
-
Receive, distribute, and control revisions in technical documentation.
-
Search the database to quickly refer to a document.
-
Create new documents or document revisions.
-
Associate subtypes to document types for easy identification.
-
Upload electronic documents.
Maintenance document management involves tracking documents and their revisions, validating document references from multiple levels of maintenance operations, and making them easily accessible to the maintenance personnel.
Setting up Document Index includes defining the lookup values as indicated.
Note: Lookup codes fall within three categories: extensible, user defined, and system defined. If a lookup code is extensible, the existing lookup codes cannot be modified, but new codes can be added to the table. If lookup codes are user defined, all codes can be modified. If lookup codes are system defined, the existing codes cannot be modified, and new codes cannot be added to the table.
To define lookups for Document Index:
-
Select Application > Lookups > Application Object Library. The Application Object Library Lookups page appears.
-
Define the lookups as outlined in this table.
Attribute Lookup Suggested Values Access Level Operator AHL_OPERATOR_TYPE Operator, Owner (User defined) User Document Type AHL_DOC_TYPE Aircraft, Engine (User defined) Extensible Media Type AHL_MEDIA_TYPE E-File, CD-ROM, On-line, Paper Extensible Status AHL_SUBSCRIBE_STATUS_TYPE Active, Not available User Sub-Type AHL_DOC_SUB_TYPE Airworthiness Directives, Service Bulletin User Revision Type AHL_REVISION_TYPE Temporary Revision, Full Revision User Frequency Type AHL_FREQUENCY_TYPE Quarterly, Weekly, Yearly User Category AHL_DOC_CATEGORY User defined User Issuing Authority AHL_DOC_ISSUE_AUTH User defined User Application Object Library Lookups Window
Setting Up Route Management
The Route Management module in Oracle CMRO provides a single interface to manage all maintenance tasks.
Maintenance personnel can:
-
Prepare and maintain work instructions.
-
Search the database for a specific operation to view or edit.
-
Search for tasks to be performed based on the Maintenance Technician role of Heavy Maintenance and Engine-Shop Technician, Line and Transit Maintenance Technician, and Data Clerk.
For more information regarding the Maintenance Technician role, Oracle Complex Maintenance, Repair, and Overhaul User's Guide.
-
Create an operation or define instructions to perform a maintenance task.
-
Search for maintenance routes to view or edit routing information.
-
Create a maintenance route.
-
Associate major and sub zones in a system to a product type to facilitate tracking of maintenance operations on complex electromechanical systems.
The intuitive user interface of Oracle CMRO is designed to enable maintenance personnel to handle operational needs as effortlessly and quickly as possible.
Before setting up route management, you must ensure that:
-
ASO Resource is set up.
-
BOM Resource is set up.
Setting up route management includes:
-
Defining lookup values.
-
Setting up key flexfields.
-
Setting up descriptive flexfields.
To define lookups for route management
-
Access the Application Developer responsibility.
-
Select Application > Lookups > Application Object Library. The Application Object Library Lookups page appears.
-
Define the lookups as outlined in this table.
Attribute Lookup Suggested Values Access Level Operation Type AHL_ROUTE_TYPE Aircraft, Engine, Ground support User Major Zone AHL_ZONE Cargo Compartment, Cockpit User Sub Zone AHL_SUB_ZONE AFT Fuselage, Cabin User Status Type AHL_SUBSCRIBE_STATUS_TYPE Active, Available User Sub-Type AHL_DOC_SUB_TYPE AD, SB User Revision Type AHL_REVISION_TYPE Temporary, Full Version User Process AHL_PROCESS_CODE Access, Cleaning, Close User
To set up key flexfields
To enable route management, you must set up a key flexfield to define the System attribute.
Validate Existence of Route Flexfield
-
Access the Application Developer responsibility.
-
Navigate to Flexfield > Key > Segments.
-
Query for the AHL Route in the Flexfield Title field.
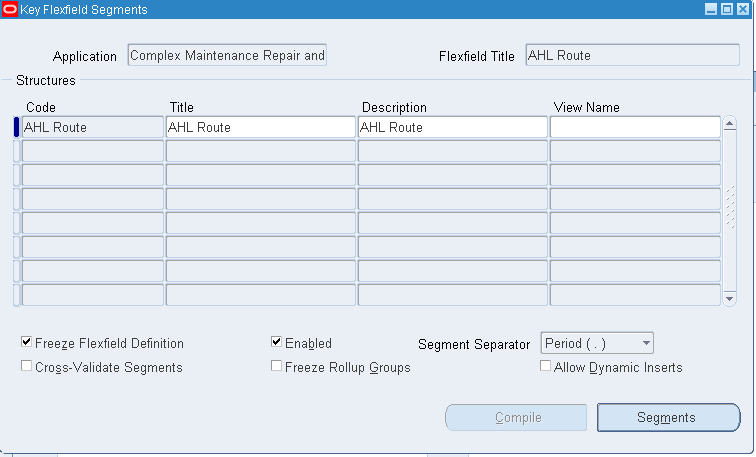
Add segments to this flexfield
-
Click the Segments button to add segments to this flexfield.
-
Enter information for the System flexfield segment.
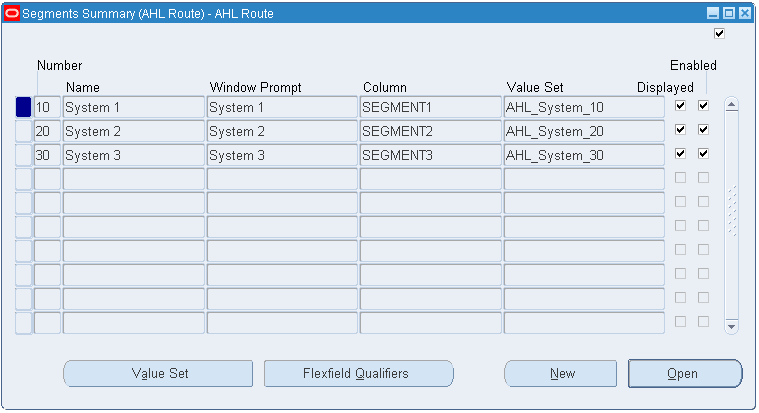
Create Value Sets to be used by Flexfield Segments
-
Click the Value Set button.
-
Define a value set name.
-
Select List of values from the List Type drop-down list.
-
Select No Security in the Security Type drop-down list.
-
Select Char in the Format Type drop-down list.
-
Select Independent in the Validation Type drop-down list.
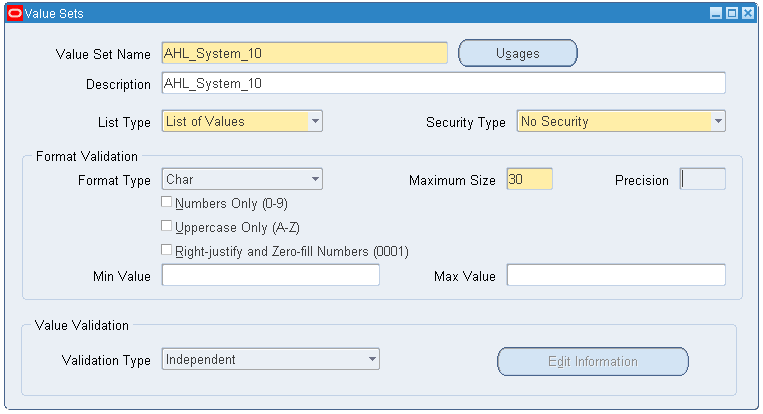
-
Update the flexfield segments with the value sets.
Create values for Value Sets
-
Navigate to Flexfield > Key > Values.
-
Find the value sets for the system flexfield.
Segment Values
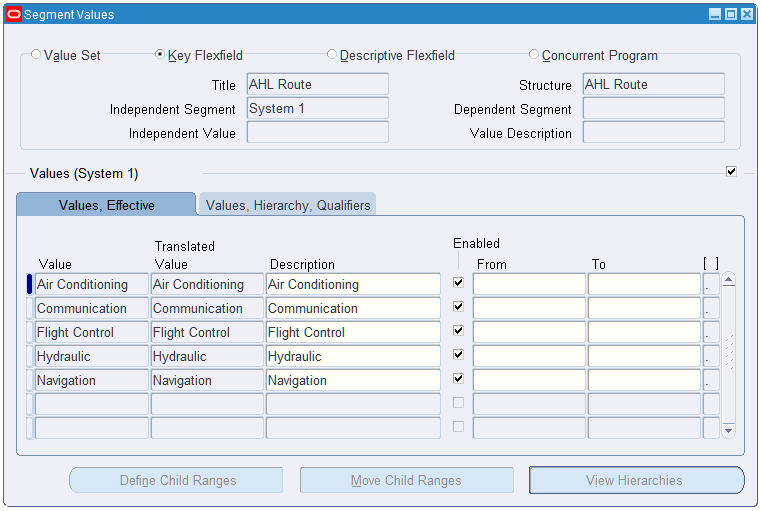
-
Add the desired values to the value set.
To set up descriptive flexfields
Validate existence of Route Flexfield
-
Access the Application Developer responsibility.
-
Navigate to Flexfield > Descriptive > Segments.
-
Query for Flexfield Title AHL_ROUTES_B. Query should return the record.
Add segments to this flexfield
-
Click the Segments button.
-
Enter the records for the System flexfield segment.
-
Select the Enable check box.
Perform the following steps only if a relevant value set is not defined.
Create Value Sets to be used by Flexfield Segments
-
Click the Value Set button.
-
Enter the value set name.
-
Select List of Values as the list type.
-
Select No Security as the security type.
-
Select one of these options in the Format Type field:
-
Char
-
Number
-
Date
-
-
Select Independent in the Validation Type drop-down list.
-
Update the flexfield sets with the value sets.
Create values for Value Sets
-
Navigate to Flexfield > Descriptive > Values.
-
Find the value sets for the system flexfield.
-
Add the desired values to the value set.
Compile the Flexfields
-
Click the Compile button to compile the flexfields.
-
Select the Freeze check box, if it is not checked. (This check box is also used for editing flexfields. To edit, clear this check box and then proceed.)
Setting Up Master Configurations
The Master Configuration module in Oracle CMRO provides models of electromechanical system assemblies. A master configuration model will form the basis of a unit in combination with business rules that specify the systems and subsystems that may be included in the assembled unit.
Maintenance personnel can:
-
Search the database for master configurations of electromechanical system assemblies.
-
Create system assembly master configurations.
-
Create a Minimum Equipment List (MEL) and a Configuration Deviation List (CDL) for equipment.
-
Search for alternate parts that may be used in place of specified components in an assembly.
Before setting up the Master Configuration module, you must ensure that:
-
Inventory (Item Master) setup is complete.
-
Approval Workflow is set up (This step is optional if the user selects the default approval workflow).
Setting up the Master Configuration includes defining the lookup values.
To define lookups for the master configuration module:
-
Access the Application Developer responsibility.
-
Select Application > Lookups > Application Object Library. The Application Object Library Lookups page appears.
-
Define the following lookups.
Attribute Lookup Suggested Values Access Level Rule code (Position ratio list) AHL_COUNTER_RULE_TYPE Bird Strike, Heavy Landing User Alternate Part Interchangeability Type AHL_INTERCHANGE_ITEM_TYPE 1-Way, 2-Way, No Interchange, Superseded By Extensible Position reference AHL_POSITION_REFERENCE Forward, Inboard
, Left, Lower, Outboard, Position 1, Position 2, Position 3, Right, and UpperUser Application Object Library Lookups

Setting Up Unit Configurations
The Unit Configuration module in Oracle CMRO enables organizations to describe the structure of an assembled electromechanical system. The as-constructed configuration of an assembly will determine the specific maintenance program required to ensure the operational readiness of that unit.
This module also enables CMRO personnel with super user security to quarantine a unit configuration after an aircraft accident.
Maintenance personnel can:
-
Initiate proper maintenance activities to resolve issues.
-
Create unit configurations from existing master configurations.
-
Create an MEL or CDL for affected unit configurations.
-
Search for unit configuration records that exist in the database.
-
Add new part information to the database.
-
View and update existing part information.
The Unit Configuration module in Oracle CMRO is a key feature that enables maintenance organizations to determine services required. Even if two units have the same part number, or belong to the same product family, their configurations are normally different due to the operation and maintenance history of each unit. The Unit Configuration provides models of individual tracked parts to support unit-specific information.
Before setting up the Unit Configuration module, you must ensure that the Master Configuration module is set up and products are available for association at the unit level.
Setting up the Unit Configuration includes setting up attributes as indicated below.
To set up attributes
-
Change responsibility to Oracle Install Base Administrator.
-
Click Setups > Extended Attribute Template. The Extended Attributes window appears.
-
Set up the attributes as indicated in the table below.
Extended Attributes Window Attribute Code Attribute Name Description AHL_MFG_DATE AHL_MFG_DATE AHL_MFG_DATE AHL_TEMP_SERIAL_NUM AHL_TEMP_SERIAL_NUM AHL_TEMP_SERIAL_NUM -
Save your work.
Defining Priority Values to be Used with the Maintenance Planning Workbench
You may want to create priority values to be used with the Maintenance Planning Workbench. The priority can be set for a UE row in the workbench.
To define Priority values used with the Maintenance Planning Workbench:
-
Change the responsibility to Oracle Application Developer.
-
Navigate to the Application Object Library Lookups page (Application Developer > Application > Lookups > Application Object Library).
-
Click the Add button.
-
Enter values for the following fields:
-
Code
-
Meaning
-
Description
-
Tag (optional): Use to categorize lookup values. This field is for informational purposes.
-
Effective Dates:
-
From (required): Start effective date
-
To (optional): End effective date
-
-
Select the Enabled check box so that the values are available for use.
-
Save your work.
-
See Using the Maintenance Planning Workbench, Oracle Complex Maintenance, Repair and Overhaul User's Guide for more information.
Overview of Minimum Equipment Lists (MEL) and Configuration Deviation Lists (CDL)
The MEL and CDL functionality identifies equipment, as opposed to structural items, that can be inoperative or missing on aircraft—but still enable the aircraft to maintain airworthiness. This includes items such as radios, seats, lights, air conditioning, heaters, and indicators—but not structural items such as engines or controls. These items are called provisos, and under certain conditions, can be inoperative. Limitations may be required as to how the aircraft is operated regarding ice conditions, night flights, or altitude limits. MEL addresses defective equipment, and CDL addresses missing parts in an aircraft.
The MEL is based on the Master Minimum Equipment List (MMEL) which is a list of equipment that the National Airworthiness Authority (such as the FAA or CASA) has determined that may be inoperable under certain operation conditions, but still provides an acceptable level of safety. The MMEL contains the conditions, limitations, and procedures required to operate the aircraft with these items inoperable.
The CDL is developed by the aircraft manufacturer, and identifies secondary airframe and engine parts on an aircraft that may, under certain conditions, be missing from the aircraft and still allows the aircraft to maintain its airworthiness with certain limitations. The aircraft manufacturer submits the CDL to the Aircraft Certification Office for approval.
MEL and CDL instructions can be added to the CMRO planning process to enable you to defer non-routine maintenance. Maintenance and Operation (M and O) procedures are created to ensure that the correct steps and restrictions are followed when a requirement is deferred.
Important: MELs are maintained at the unit configuration level.
The following diagram outlines the setup required to use the MEL and CDL feature:
MEL/CDL Setup Process

Setting Up a MEL/CDL
To set up a MEL and CDL, follow these prerequisite steps:
-
Define the profile option of AHL:Service Request Type. This profile is used to create the Maintenance and Operation (M and O) procedures.
-
Define the required ATA codes for relevant configuration positions. These lookups can be found in the Application Object Library for type AHL_ATA_CODE.
-
Define applicable ATA codes for each position when creating a master configuration.
-
Navigate to M and O Procedures. These procedures contain the non-routine maintenance requirements to be deferred per the MEL and CDL guidelines affecting the production process.
Setting Up Configuration Access Control
In case of an aircraft accident, a user with super user security can quarantine a unit configuration. This quarantine enables the freezing of the unit configuration and will not allow changes to the made to the configuration which could impact the investigation.
There are some prerequisites that must exist before this feature can be used:
-
The CMRO system administrator edits the configuration access control workflow using the Approvals page.
-
The CMRO system administrator creates a super user role to be used for configuration access control.
The system administrator assigns the AHL_UC_QUARANTINE_ROLE to the appropriate super user.
-
The CMRO system administrator creates the super user role using the User Maintenance page.
Using Configuration Access Control
This diagram illustrates the process flow for the activation and deactivation steps for quarantining a unit configuration:
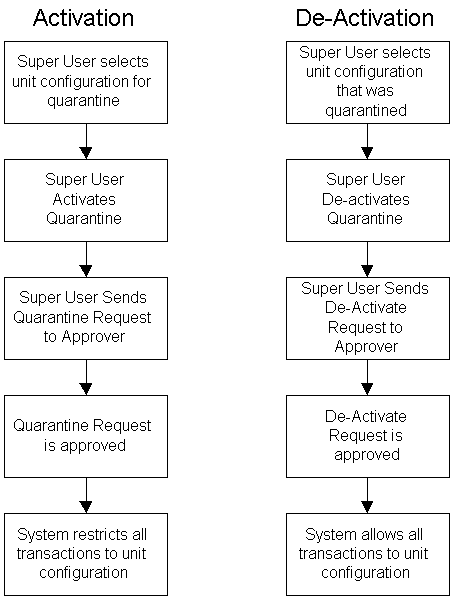
Once the quarantine request has been approved, the status changes to Quarantine.
Transactions That Are Allowed on a Quarantined Unit Configuration
The following lists the types of transactions that are allowed when a unit configuration has been quarantined:
-
Unit Maintenance Visit Association
-
Issue material transaction from production
-
Return material transaction from production
Important: All other transactions are denied while the unit configuration is quarantined.
Deactivating the Quarantine Status
Once the super user has deactivated the quarantine for the unit configuration, all restrictions are removed and all transactions are allowed. The status of the unit configuration returns to the status prior to the quarantine.
Setting Up Fleet Maintenance Program
The Fleet Maintenance Program module in Oracle CMRO enables maintenance organizations to record, organize, and plan maintenance requirements. Maintenance planners can create maintenance requirement records and attach attributes to these records. The attributes attached to the record enables maintenance planning and increased operational efficiency while accomplishing a requirement.
Maintenance planners can:
-
Search the database for a specific maintenance requirement for reference, or for editing purposes.
-
Create a maintenance requirement record in the database.
-
Attach documents, maintenance routes, actions, effectivities, and maintenance requirement relationships to the record.
-
Create revisions for maintenance requirements that are complete.
-
View items that are affected by a maintenance requirement.
The Oracle CMRO Fleet Maintenance Program module serves as a repository for scheduled maintenance and associated information.
Before setting up the Fleet Maintenance Program, you must ensure that the following has been set up:
-
Lookup values.
-
System profile options in Oracle Application: Profile system value.
-
Route Management.
-
Product Classification.
-
Master Configuration.
-
Unit Configuration.
-
ASO Visit Work Package.
Setting up the Fleet Maintenance Program includes defining the lookup values.
To define lookups for the Fleet Maintenance Program:
-
Access the Application Developer responsibility.
-
Select Application > Lookups > Application Object Library. The Application Object Library Lookups page appears.
-
Define the lookups as outlined in this table. Optionally, you can add values to these lookups as required.
Attribute Lookup Suggested Values Access Level Program Type AHL_FMP_MR_PROGRAM_TYPE Corrosion Prevention, Progressive Maintenance, Company Test, Phase Check, and so on. Extensible Category AHL_FMP_MR_CATEGORY Power plant, airframe, component, ground equipment, and so on. Extensible Program Subtype AHL_FMP_MR_PROGRAM_SUBTYPE A, B, C Extensible Action AHL_FMP_MR_ACTION Email Test Results, Reset Overhaul Counter, Test Extensible Service Location AHL_FMP_SERVICE_LOCATION Line, Base Extensible Application Object Library Lookups
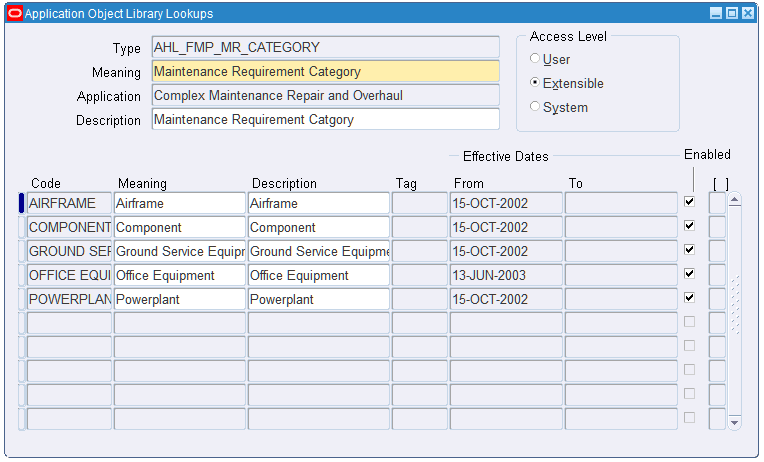
Service Locations
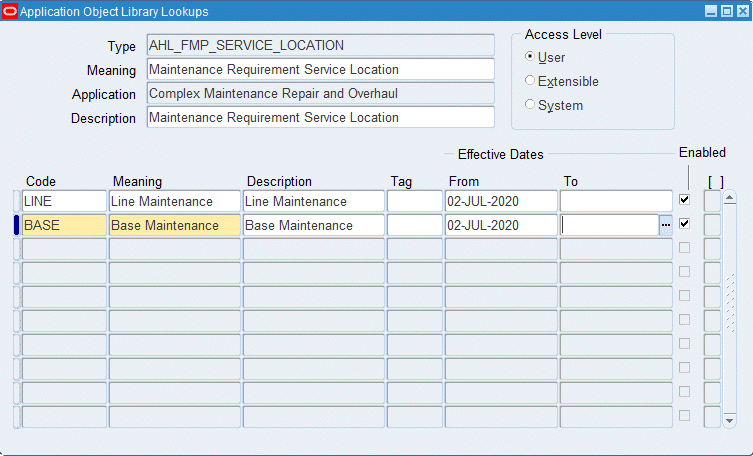
Setting Up the Unit Maintenance Plan
The Unit Maintenance Plan module in Oracle CMRO ensures that all maintenance requirements are met on or prior to their due date. It also provides demand estimates over a planning time window by forecasting the due date of maintenance requirements associated with a unit. It searches and displays maintenance requirements that are due for an equipment unit and provides maintenance personnel instant access to maintenance requirements, due date estimation, accomplishment history, and planning information for a unit configuration.
Maintenance personnel can:
-
Maintain utilization forecasts.
-
View the serviceable time remaining of a unit.
-
Model repetitive maintenance requirements over a specified time period.
-
Calculate the due dates of maintenance requirements.
-
Associate maintenance requirements to a visit.
The Unit Maintenance Plan serves as a repository of the maintenance requirements related to units and any related subassemblies or components. It also enables the forecasting of usage to determine due dates for fleet maintenance activities.
Before setting up the Unit Maintenance Plan, you must ensure that the following have been set up:
-
Lookup values in Oracle Application, including source types for non-routines
-
System profiles in Oracle Application: Profile system value
-
Product Classification
-
Master Configuration
-
Unit Configuration
-
ARO Visit Work Package
Viewing Source Types Used for Non-Routine Maintenance Requirements
CMRO tracks the total man hours for Person type resources for non-routine MRs. The following displays the seeded (system access) Source type lookups, and these values cannot be changed.
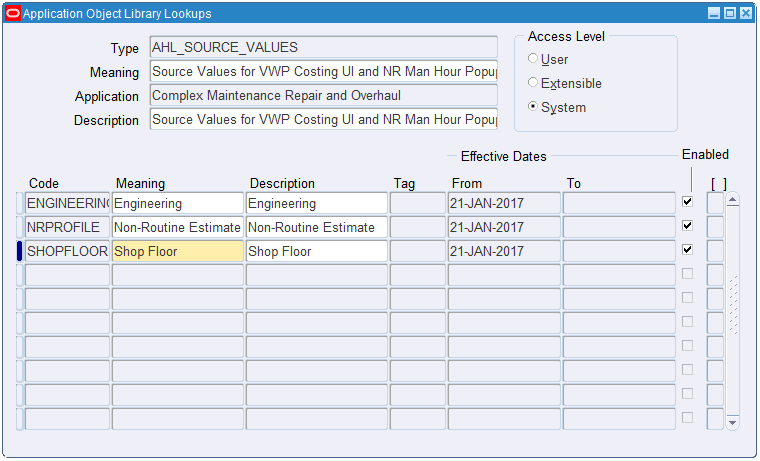
The Man-Hours (person) source type used for the non-routine is as follows:
-
Engineering: Used for non-routines with a status of Open: MRs that have not been associated with an NR or have not been associated to a visit.
-
Non-Routine Estimate: Used for non-routine estimates which have been defined for an MR.
-
Shop Floor: Used for non-routines that have been associated to Partially Implemented or Implemented visits with Released work orders.
To set up the system profile options:
-
Navigate to System Administrator > System Profile Values. The System Profile Values page appears.
-
Set up the following system profiles:
-
AHL: Maximum Planning Window (Number)
-
AHL: Maximum Planning Window (UOM)
-
AHL: Minimum maintenance opportunity duration in minutes required for scheduling a visit
-
AHL: Consider Department Conflicts
-
These profile options determine the period that is taken into account when calculating the due date and repetitive MR in the Unit Maintenance Plan (UMP). For example, the user may set the following values for the profile options:
AHL: Maximum Planning Window (Number) = 2
AHL: Maximum Planning Window (UOM) = Years
This means that the rolling planning windows in the UMP is two years. The concurrent program used to calculate the due date and repetitive MR will calculate all due dates within two years starting from the calculation date (current date).
Status Groups and Transitions for Handling Non Routine Transactions
You can define a status group and attach to it all the Service Request statuses that you plan to use in the CMRO Application. The application setup allows you to define status transitions, but these can be left empty. Transitions define the permitted changes from one service request status to another.
Only filtered statuses should display in the drop-down menu in the Non-routine Details region of the Update Non-routine page. Only those statuses which belong to a particular status group which is attached to a particular SR type display. Otherwise, all the statuses should be shown.
For more information on status groups, transitions and setups, see Basic Service Request Setups in the Oracle TeleService Implementation and User Guide.
Concurrent Program Setup
Program: Building Unit Effectivities
Short Name: AHLUEFF
Application: Oracle Complex MRO
Description: Building Unit Effectivities
Setting Up Visit Work Package
The Visit Work Package (VWP) module provides planning capabilities including creation, organization, and scheduling of maintenance visits based on maintenance requirements. It enables the creation and management of visit templates based on equipment types enabling efficient visit package creation for equipment units of a type. The Visit Work Package permits the association of tasks with visits and visit templates, and the definition of the task hierarchy and cost structure.
Maintenance planners can:
-
Manually create maintenance visit records or create from a template.
-
View and update existing visit records.
-
Associate tasks with visits: planned tasks, tasks that are required but not scheduled, and ad hoc tasks that are not associated with maintenance routes.
-
View and update tasks associated with a visit.
-
Create visit templates or create from an existing visit record.
-
View and update existing visit templates.
-
View and update visit template tasks.
-
Create shift schedules for department workers based on planned visits.
-
View existing department shifts.
The Visit Work Package enables maintenance planners to organize and execute a maintenance visit for an equipment unit.
Before setting up the VWP, you must:
-
Verify that Oracle Projects has been set up. VWP exports objects such as visit pricing to Oracle Projects.
-
Verify that Oracle HRMS has been set up. VWP uses the organization information contained in Oracle HRMS.
-
Verify that Oracle Installed Base has been set up. VWP uses the item instance information maintained by Installed Base.
-
Verify that Oracle Inventory has been set up. VWP uses the inventory information to describe maintainable asset types.
-
Verify that Oracle Customer Support has been set up. VWP associates service requests with maintenance visit tasks.
-
Verify that the Unit Maintenance Plan module has been set up. VWP associates a unit maintenance plan maintenance request to VWP.
-
Verify that the Fleet Maintenance Program module has been set up.
-
Create project templates.
Setting up the VWP includes:
-
Setting up system profile options.
-
Defining lookups.
To set up System profile options:
-
Navigate to System Administrator > Profile > System> System Profile Values. The System Profile Values page appears.
-
Set up the following system profile options:
-
AHL: Default Project Template ID (AHL_DEFAULT_PA_TEMPLATE_ID): The name of the project template that will be used as the default template.
-
AHL: Visit Stage Number (AHL_NUMBER_OF_STAGES): To store the maximum number of stages for a visit.
This value is used in both engineering and planning related to the visits and the routes in a maintenance requirement.
-
AHL: Visit Pricing Flag (AHL_VST_PRICE_DEF_E_FLG): To control the visibility of the Visit Pricing feature in the Create Visit and Update Visit UIs.
Can be controlled at the User level. Set site level at Yes.
-
AHL: Default Overwrite Workorder Completion Dates (AHL_DEFAULT_OVERWRITE_WO_COMPLETION_DATES): To control the default value of the Overwrite Workorder Completion Dates check box in the Visit and MR Signoff UIs. The default value is No.
Can be controlled at the User level. Set site level at Yes.
-
Yes: The Overwrite Workorder Completion Date check box appears as selected in the MR signoff and Close Visit UIs.
This enables users to sign off and overwrite the completion dates for the maintenance requirement.
-
No (default value): The Overwrite Workorder Completion Date check box appears as cleared in the MR signoff and Close Visit UIs.
However, the option can be selected and the user can sign off and overwrite the completion dates for the maintenance requirement.
-
-
AHL: Enable Visit Creation Automation (AHL_VISIT_CREATE_AUTO): To control if unplanned maintenance requirements for child or dependent components are added during automatic or manual visit creation.
Create visits through automatic and manual flows including Auto Visit, Transit Visit, Operational Autovisit, and Manually Created with the profile set to one of these values:
-
If Yes, then the system will turn on the auto association function for the child and dependent components during visit creation, and maintenance requirements can be added during visit creation.
-
If No, then the system will turn off the auto association function for the child and dependent components during visit creation, and maintenance requirements will not be added during visit creation. The default is No.
Can be controlled at the User level. Set site level at Yes.
-
-
AHL: Visit Close Warning for Open POs (AHL_VALIDATE_OPEN_PO_FOR_VISIT): To indicate that there are any purchase orders with an unfulfilled quantity related to a visit task.
A warning will be shown on the Visit Close UI. Can be controlled at the User level. Set site level at Yes.
-
AHL: Allow Unit Configuration Edit in Production (AHL_ALLOW_UNIT_EDIT_IN_PROD): To control general edits to unit configurations which are concurrently in an open production visit.
If the option is set to Yes, then updates are allowed. When set to No, then the update is not allowed for the same UC associated to a visit with an Open status.
Can be controlled at the User level. Set site level at Yes.
-
AHL: Allow Unit Configuration Migration in Production (AHL_ALLOW_UNIT_MIG_IN_PROD): To control the migration of unit configurations in an open production visit.
If the option is set to Yes, then all updates and UC part changes are allowed. When set to No, then an update is not allowed for the same UC associated to a visit with an Open status. Part changes through a work order are still permitted.
Can be controlled at the User level. Set site level at Yes.
-
AHL: Override Counter Correction Updates during Parts Change (AHL_OVERRIDE_PART_CHG_CC): To control the normally required sequential part change check and related errors when the counter correction logic finds two installations or two removals in a row in a unit's history.
If the option is set to Yes, the system ignores non-sequential part installs and removals when running counter correction logic. If set to No, the system displays a hard error when a non-sequential condition is found.
Can be controlled at the User level. Set site level at Yes.
-
AHL: Completion restricted to logged in Work Order or Operation.
If set to No (default), then users can continue to work across work orders.
If set to Yes, then a user can only complete operations, work orders, and sign off an MR in the same work order in which they are "logged-in" on an operation.
-
AHL: Enforce bottom up completions for maintenance requirement sign off.
If set to No (default), then users can continue to work across work orders.
If set to Yes, then a user may not be able to sign off an MR until all work orders and operations have been explicitly completed.
-
To define lookups for Visit Work Package:
-
Access the Application Developer responsibility.
-
Select Application > Lookups > Application Object Library. The Application Object Library Lookups page appears.
-
Define the lookups as outlined in this table.
Attribute Lookup Suggested Values Access Level Visit Type AHL_PLANNING_VISIT_TYPE A-Check, B-Check, C-Check User Category AHL_LTP_SPACE_CATEGORY Category 1, Category 2… Extensible Hour List AHL_VWP_HOURS 00, 01… User Visit Priority AHL_VWP_VISIT_PRIORITY 1,2,3,4... User Application Object Library Lookups
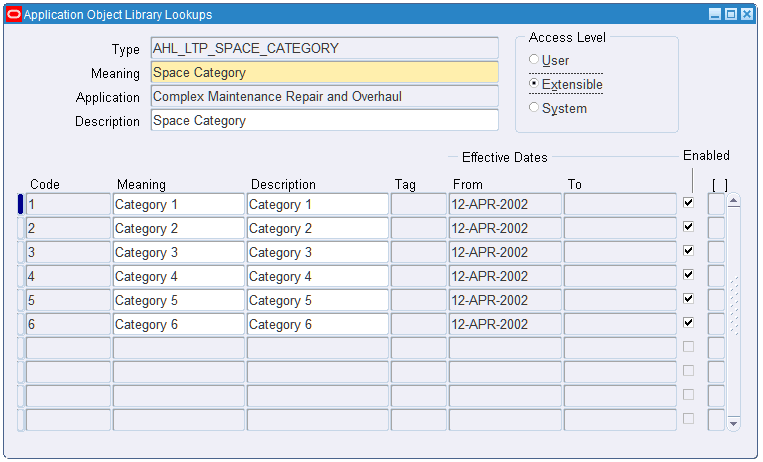
Setting Up Planning Module
The Planning module is used by the maintenance planner to schedule maintenance requirements in maintenance visits, based on the optimal use of resources and facility capabilities and capacities, and to schedule required materials.
Maintenance personnel can:
-
Assess the maintenance workload capacity by analyzing the available labor based on skill, level and certification, available tools, materials, and location capabilities balanced against known workloads.
-
Create a visit to group events together for long and short term capacity planning, and to facilitate scheduling to a maintenance base.
-
Select serialized items and reserve them for a specific task in a visit.
-
Define the visit resource requirements to enable accurate scheduling and capacity planning.
-
Analyze capacity versus workload requirements.
-
Run simulations to evaluate different scheduling scenarios before implementing actual plan changes.
Planning maximizes maintenance scheduling by balancing the maintenance requirements with available maintenance capacity. The maintenance planner can balance the forecasted maintenance requirement information from the unit maintenance plan against projected maintenance capacity.
By using serial number reservations, the maintenance planner can provide a global view of material requirements that identifies material availability at the required location and date for items associated on counter values. This reduces aircraft down times and increase the life expectancy of subcomponents. Serial number reservations are set up in Oracle Inventory.
For more information regarding the Planning module, refer to the Oracle Complex Maintenance, Repair and Overhaul User's Guide and Oracle Planning.
Setting up the Planning module includes defining the lookup values as indicated below.
To define lookups for Planning
-
Access the Application Developer responsibility.
-
Select Application > Lookups > Application Object Library. The Application Object Library Lookups page appears.
-
Define the lookups as outlined in this table.
Attribute Lookup Suggested Values Access Level Category AHL_LTP_SPACE_CATEGORY Category 1, Category 2… Extensible Display Only AHL_LTP_VISITS_DISPLAY_ONLY Scheduled, Unscheduled Extensible Status AHL_LTP_SPACE_STATUS Inactive, Active Extensible Visit Type AHL_PLANNING_VISIT_TYPE A-Check, B-Check, C-Check User Application Object Library Lookups
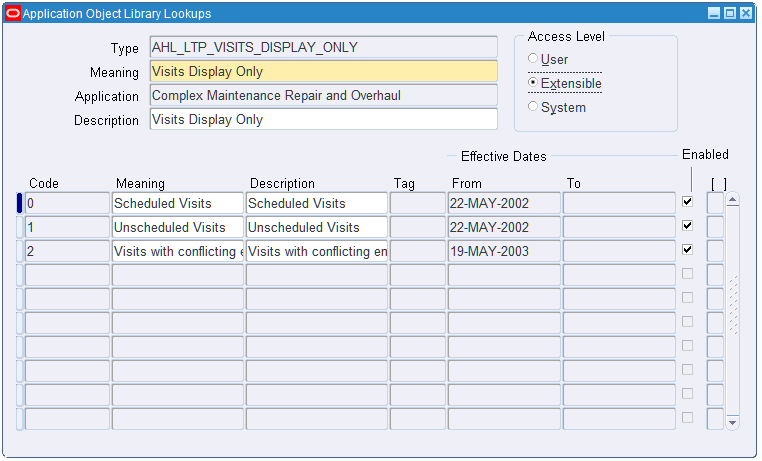
Setting Up Production
The Production module enables the execution of routine and non-routine tasks associated with a visit. It also supports the execution of tasks against an Installed Base Tracked Item.
Maintenance personnel can:
-
Search for routine and non-routine jobs using filtered search elements.
-
Create jobs from visit tasks for Scheduled, Unscheduled, and Convenience maintenance.
-
Create service requests to track reported problems when an item has a service difficulty.
-
Create operations to non-routine jobs for work definition and tracking.
-
Maintain jobs by adjusting the schedule, the status, completing, deferring, and selecting the actual start and end for a job.
-
Maintain operations by updating the operations, adding, removing, or updating the material and resource requirements.
-
Maintain Quality using the route setup from Route Management for job and operation compliance.
Maintenance scheduler can create jobs, initiate service for material and parts change transactions, and perform job operation maintenance.
Setting up the Production module includes:
-
Setting up system profile options.
-
Defining lookups.
To set up System Profile Options:
-
Navigate to the System Profile Values page (System Administrator > Profile > System> System Profile Values).
-
Set up the system profile options as described in this table.
Profile Site (Value) Description AHL: Job Deferral Inspection Type Deferral Approval The Quality plan inspection type used for Production Job deferrals. AHL: MRB Disposition Inspection MRB Approval Required The Quality plan inspection type used when a tracked item is returned an MRB subinventory. AHL: Material Status - MRB Active/Non-Active The status that triggers the Quality inspection requirement for MRB and a service request creation, when an tracked item is being returned in the condition associated with this status to a subinventory with the status associated. AHL: Material Status - Serviceable Active The status indicating a serviceable item. This status is used to ensure that installed items meet the condition associated with this status and are issued from a subinventory with this status associated. AHL: Material Status - Unserviceable Active The status that triggers the Service Request creation, when a tracked item is being returned in the condition associated with this status to a subinventory with the status associated. AHL: Non-Routine Operation Inspection - Used to determine if non-routine operation required inspection. AHL: OE Mixed Order Type ID P -Mixed Order type to create a OSP order. AHL: OE Return Line ID P- Return Line type to create a OSP order. AHL: OE Ship Only Line Type ID P- Standard Line type to create a OSP standard only ship line. AHL: Validate Alternate Items Yes/No Enabled/disable organization validation on alternate items for UC. System Profile Values
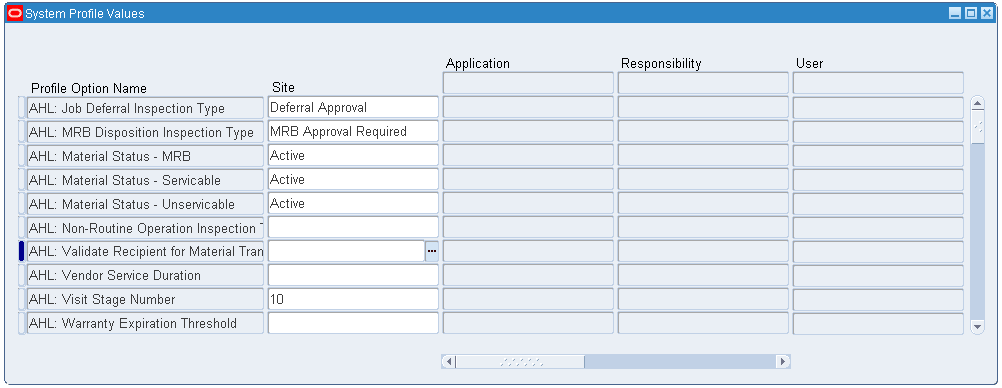
To define lookups for Production:
-
Access the Application Developer responsibility.
-
Select Application > Lookups > Application Object Library. The Application Object Library Lookups page appears.
-
Define the lookups as outlined in this table.
Attribute Lookup Suggested Values Access Level Display Only AHL_LTP_VISITS_DISPLAY_ONLY Scheduled, Unscheduled Extensible Status AHL_LTP_SPACE_STATUS Inactive, Active Extensible Visit Type AHL_PLANNING_VISIT_TYPE A-Check, B-Check, C-Check User Application Object Library Lookups

Setting Up Inventory Service Order Outside Processing
In the airline industry, defective parts are often removed, and put in an unserviceable inventory location, before the work order is created. Oracle Inventory service orders enable you to create orders for items directly from an inventory location, without creating a visit and a work order. This process is automated using default data. The features of inventory service orders for outside processing:
-
Automatic service orders are created with shipping information for selected items.
-
Vendor and service sourcing rules are defined based on the item and item location.
-
Relationship between the vendor information and the customer information is defined.
-
Vendors can be identified as providing warranty service.
-
Service orders can include warranty contracts, terms and conditions.
-
Both serialized and non-serialized items in inventory can be selected for the creation of a service order.
-
Create and maintain attachments.
-
Ability to convert service order into an exchange order.
Setup and Process Flow for Inventory Service Order Outside Processing
This diagram illustrates the setup steps and process flow for the Inventory Service Order Outside Processing feature:
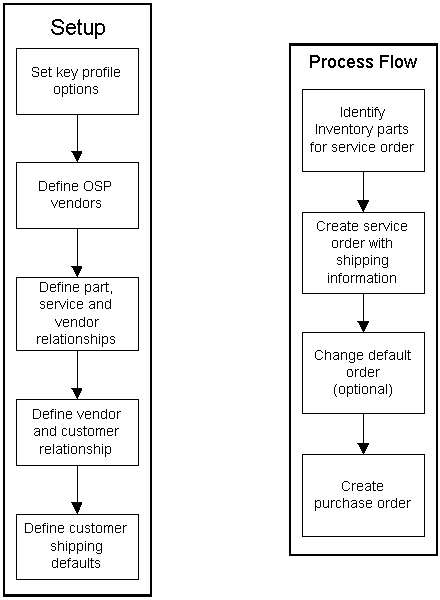
Prerequisites
These are the prerequisites required in order to use the Inventory service order outside processing functionality:
-
Set up profile options to create default information to automate the creation of service orders.
-
Define outside processing service (OSP) vendors.
-
Define part, service and vendor relationships.
-
Define vendors and customer relationships.
-
Define customer shipping defaults.
Profile Options Setup
The profile options setup includes:
| Profile | Description |
|---|---|
| AHL:Service Order Default Shipment Priority | The default shipment priority used to create the shipping information for a service order in outside processing. The value is selected from available shipment priorities defined. If this profile option is not set, the value must be selected manually. |
| AHL:OM Tax Exempt Reason | The tax exempt reason used to create a tax exempt sales order and is used for shipping purposes. This value is required for creating shipping information. |
| AHL:Vendor Service Duration | The service duration used to calculate the turnaround time for a part sent out for a service. This profile option defines a default service duration used in the calculation if no specific duration has been defined. The unit of measure is days. |
| AHL:OM Shipment Priority | The default value for the shipment priority used to create an inventory service order with shipping information. |
| AHL:OM Line Return Reason | The default value for the return reason of a shipment return line used to create an inventory service order with shipping information. |
| AHL:OM Mixed Order Type ID | The Order Management order type for the shipping information. Used to automatically create the order in the background. |
| AHL:OM Ship Only Line Type ID | The Order Management line type for the shipment line. It is used to automatically create the order in the background. |
| AHL:OM Return Line Type ID | The Order Management line type for the return line. It is used to automatically create the order in the background. |
| AHL:Service Order Ship IB Transaction SubType | The type used by Oracle Installed Base customers providing the ability to define customer specific transaction subtypes for shipping transactions. |
| AHL:Service Order Return IB Transaction SubType | The transaction subtype used by Oracle Installed Base customers providing the ability to define customer specific transaction subtypes for return transactions. |
| AHL:Exchange Order Ship IB Transaction SubType | The transaction subtype used by Oracle Installed Base customers providing the ability to define customer specific transaction subtypes for exchange orders. |
| AHL:Exchange Order Return IB Transaction SubType | The transaction subtype used by Oracle Installed Base customers providing the ability to define customer specific transaction subtypes for exchange order returns. |
| AHL:Overwrite PO line description with Item/Serial Number | The part number and serial number of the service item on the purchase order. |
| AHL:PO line description Item number prefix | The item number in the description of the service item on the purchase order. |
| AHL:PO line description Serial number prefix | The serial number in the description of the service item on the purchase order. |
| AHL:PO Line Type ID | The default PO Line Type created when a purchase order is created. |
| AHL:OSP Default PO Distribution Creation | Indicates whether the PO creation process creates the default accounting distribution when submitting a purchase order from OSP. |
Related Topics
Managing Outside Processing, Oracle Complex Maintenance, Repair and Overhaul User's Guide
Administrative Setup
Using the Administration link, you can manage administrative functions related to the Visit Work Package and Planning modules.
Users can:
-
Create department shifts.
-
Define maintenance spaces and determine space unavailability.
-
Use the Reliability Planning feature to reduce inventory levels at maintenance facilities and transient stations.
The Reliability Planning functionality is set up in Oracle Inventory and Oracle Planning.
Department shifts are created to define the working hours of a maintenance department. These shifts are used to calculate the start time of the tasks in a scheduled visit.
To set up department shifts:
-
From the Manufacturing and Distribution Manager responsibility, navigate to Oracle Bills of Material >Setup > Calendars. The Workday Calendar window appears. Define a BOM calendar.
Workday Calendar

-
Click the Shifts button to define shifts for the calendar.
Shifts
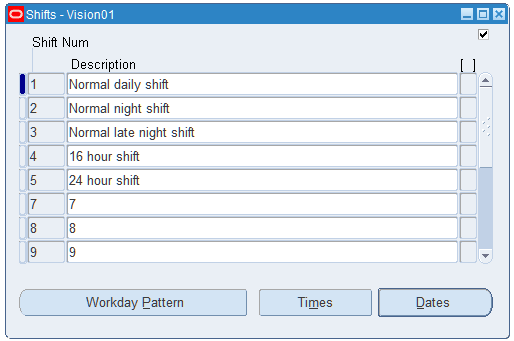
-
Click Workday Pattern to navigate to the Shift Workday Patterns window. Enter the workdays for the shift.
Defining Workday Patterns
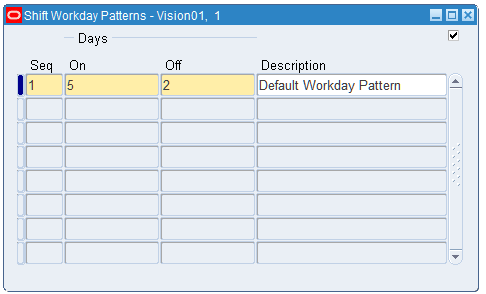
The Calendar, Shift Number and Workdays values defined will be available in the corresponding list of values when creating department shifts in the Oracle CMRO application. For information on creating department shift records, refer to the Oracle Complex Maintenance, Repair, and Overhaul User's Guide.
Setting Up Enigma Integration
Oracle CMRO delivers the total functionality for maintenance organizations to successfully manage all the maintenance operations from configuration management and engineering to maintenance planning and execution.
Enigma 3C ® delivers a dynamic service index of maintenance, parts and diagnostic information that captures operational expertise and connects to vital corporate systems to manage and optimize the service and support workflow.
The integration between Oracle CMRO and Enigma 3C provides maintenance service providers with a set of tools that connects the configuration management, engineering and maintenance planning functionality contained in CMRO with the Enigma documentation centric maintenance execution system in a wireless environment.
The Enigma integration performs the following:
-
Associate Aircraft Maintenance Manual (AMM) Tasks to Route Management
-
Associate Enigma Configuration Information to Master Configuration
-
Associate Enigma Configuration Information to Unit Configuration
-
View and Print Enigma Content in CMRO Execution Module
Profile Options Setup
The setup profiles include:
| Profile | Description |
| AHL: Enigma AMM Documents associated | The AMM (Aircraft Maintenance Manual) task cards are associated with a route in CMRO. If the profile is set to No, you cannot associate documents from Enigma. |
| AHL: Enigma WDM Documents associated | A maintenance technician can view associated Enigma documents related to a maintenance work order. If this profile is set to No, the associated Enigma documents cannot be viewed. |
| AHL: Enigma IPC Documents associated | A maintenance technician can view associated Enigma documents related to a maintenance work order. If this profile is set to No, the associated Enigma documents cannot be viewed. |
| AHL: Enigma EM Documents associated | A maintenance technician can view associated Enigma documents related to a maintenance work order. If this profile is set to No, the associated Enigma documents cannot be viewed. |
| CMRO Enigma Integration URL | A configuration manager can retrieve, view and associate Enigma 3C content at a master configuration header level. If the profile is set to No, the Enigma Documents region will not appear. |
Overview of Associating Aircraft Maintenance Manual (AMM) Tasks to Route Management
The AMM (Aircraft Maintenance Manual) task cards are associated with a route in CMRO. These task cards include the content from AMM, IPC, and WDM manuals. CMRO will maintain the revision of the tasks and will also store a PDF file as an attachment to the route. Oracle CMRO performs the following setup steps for this functionality:
-
Provides a concurrent program to create draft route templates and associate a PDF file to route templates based on the Enigma content.
-
Provides a concurrent program to create notifications based on the Enigma XML file with revised task content.
-
Calls the Enigma URL and passes the AMM key parameters to Enigma.
-
Provides a web service to accept the document parameters from Enigma and create a document association within CMRO.
-
Builds the functionality to store the Enigma document as a PDF file.
-
Builds a user interface to view the Enigma AMM task association and calls the Enigma URL to view document content.
Overview of Associating Enigma Configuration Information to Master and Unit Configurations
You can look up configuration information in the Enigma 3C application and associate it to a CMRO master configuration. Use this association to view the document content in the Unit Configuration and Production modules. Oracle CMRO performs the following setup steps for this functionality:
-
Calls Enigma URL and passes the AIPC, EM, or WDM key parameters to Enigma.
-
Provides a web service to accept the document parameters.
-
Builds the functionality to store the Enigma document association as a PDF file.
-
Builds a user interface to view the Enigma AIPC association and calls the URL for document content viewing.
-
Provides the user interface to view associated documents in the Unit Configuration module.
Overview of Viewing and Printing Enigma Content in CMRO Execution Module
A maintenance technician can view and print the associated Enigma documentation for a specific work order in CMRO. When detecting a defect, the maintenance technician can view the Fault Identification Manual (FIM) troubleshooting. Oracle CMRO performs the following setup steps for this functionality:
-
Provides the user interface to view and print the Enigma documents associated with work orders.
Setting Up Supplier Warranty
Oracle CMRO delivers functionality for maintenance organizations to successfully manage warranty on traceable items throughout their lifecycle through the use of Warranty Templates and their associated Warranty Contracts.
Setting up Supplier Warranty includes:
-
Defining a Warranty Type lookup value. This value is a required value in a Warranty Template and Warranty Contract record and provides a helpful method for filtering Warranty Templates and Contracts in several search pages.
-
Identifying Vendors who can provide warranty service. A flag is set on the Vendor record, controlling visibility in the Vendor list of value lookups in several Warranty pages. Vendor is also a required attribute in a Warranty Template and Warranty Contract record.
-
Creating contracts for existing traceable inventory items.
-
Setting up Notifications. Notifications are used to alert you to changes in warranty status, completion of warranty work, expiring warranty contracts and the automatic creation of new contracts.
-
Scheduling concurrent programs. Warranty expirations and auto-creation of warranty contracts must be setup and scheduled in order to assist the Warranty Administration user.
To define lookups for supplier warranty
-
Login using the Application Developer Responsibility.
-
Navigate to the Lookups window and define the lookups as indicated in the following table.
| Attribute | Lookup | Suggested Values | Access Level |
| Warranty Type | AHL_WARRANTY_TYPE | Aircraft OEM, Engine OEM, Component OEM, Aircraft MRO, Engine MRO, Component MRO, 3rd Party | User |
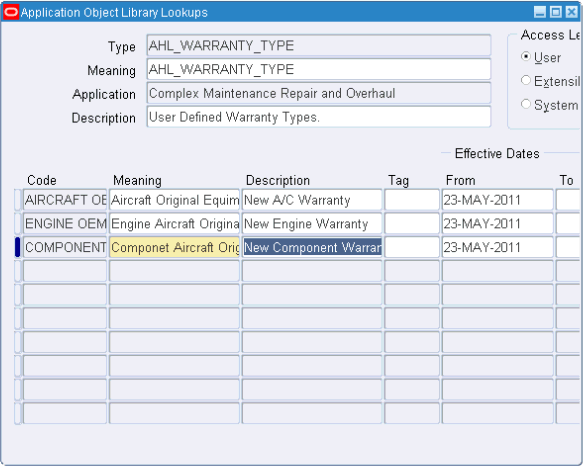
To define vendors for warranty service
-
Login using the Super User or equivalent responsibility.
-
Navigate to the Administration Module, Vendor Sourcing Tab, and Vendors Sub-Tab.
-
For each Vendor, check the Warranty Flag to indicate they have the ability to provide Warranty Service.
-
Click Apply to save the record.
Overview of Warranty Notifications
Oracle CMRO provides several notifications for managing Supplier Warranty.
-
Change to Warranty Entitlement Acceptance/Rejection - When a Technician makes changes to a Warranty Entitlement record on a work order, the Warranty Administrator receives a notification of the changes.
The Administrator can accept or reject the changes using the Warranty Entitlements pages.
-
Warranty Review - When a Technician requests review of the Warranty Entitlement on a work order, the Warranty Administrator receives a notification.
The Administrator manages the review by using the Warranty Entitlements page.
-
Warranty Expirations - A scheduled concurrent program generates a report of all warranty contracts that are expiring in a user-defined time period (such as within 60 days from system date).
This report is sent via notification to selected users.
-
Autocreation of Warranty Contracts - A scheduled concurrent program generates warranty contracts for any applicable item instances that are introduced into CMRO.
An accompanying report is sent via notification to selected users.
Overview of Creating Contracts for Existing Traceable Inventory Items
Existing inventory must be assigned warranty contracts if they are still covered by applicable warranty terms and conditions from a supplier. It is recommended that you setup warranty templates for each supplier, terms and conditions statement and associated item(s). You can either manually define warranty contracts for each item instance or run the autocreate concurrent program to generate contracts in a pending status. Each of these contracts can be manually reviewed and the status updated as applicable.
For warranty contracts to be accurately generated, you must establish the following in the relationships between a warranty template and an item instance:
-
Item must match and be correctly enabled in the Warranty Template.
-
If counter controlled, the corresponding counter must be added to the Warranty Template.
Overview of Warranty Related Concurrent Programs
Oracle CMRO provides several concurrent programs for assistance:
-
Warranty Expiration: This program must be run daily or weekly to recalculate the expiration dates of each warranty contracts.
This program also generates a report and corresponding notification of the expiring contracts during the user-defined period, such as 60 days. The program can be manually run for an item instance to provide the most current expiration calculation.
-
Warranty Contract Autocreate: This program should be run weekly to create new contracts for applicable item instances that are created in Oracle Installed Base.
This process creates new contacts, based on items that have an enabled warranty template, in a pending status. A report of each new contract is viewed via a notification to you, allowing you to be manually reviewed and enabled.