Dispensing
This chapter covers the following topics:
- Requirement
- Understanding Dispensing
- Clearing Dispense Areas
- Reserving Material
- Searching for Reserved Material to Dispense
- Executing Dispense Instructions
- Dispensing Reserved Material
- Searching for Dispensed Material
- Viewing the Dispensed Material Activity Details
- Viewing Reverse Dispense Instructions
- Performing Reverse Dispensing
- Viewing the Reverse Dispensed Material Activity Details
- Running Reports for Dispensing Operations
Requirement
Following is a requirement that customers have for supporting dispensing room operations:
Does the application support dispensing room operations?
Yes. Dispensing functionality is a key requirement in the life sciences industry. Dispensing appropriate materials to the right batches prior to the manufacturing process is a key activity in the pharmaceutical and life sciences Industries.
Full Dispensing Room Support
Oracle Manufacturing Execution System (MES) for Process Manufacturing assists the dispensing operator with the in the formulation process by tracking quantities of critical materials used in the manufacturing process. For example, drugs require critical quantities of materials to be added in the manufacturing process. Each material has specific quality parameters and ingredient addition quantities. Oracle Manufacturing Execution System (MES) for Process Manufacturing provides full dispensing room support that is integrated with weigh scale operations to avoid costly manufacturing errors. Drug formulation requires sterile cleanroom environments that must which must be maintained and cleaned according to documented standard operating procedures (SOPs). Weighing equipment must be calibrated and verified. Therefore full dispensing room support for both the environmental conditions and equipment used is essential to accurate drug manufacture.
Understanding Dispensing
Dispensing the right materials to the right batches prior to the manufacturing process is a key activity in life sciences and other process industries. The process is critical when working with potent active pharmaceutical ingredients (APIs) in drug manufacturing. Decimal errors in API calculations can be life threatening. Companies preweigh materials to avoid these errors and to ensure rapid delivery at the critical stages of the drug formulation process.
OPM MES Dispensing lets you deliver material in several modes of operation with full label-printing capabilities. The following functionality is supported:
-
Dispensing modes
-
Tolerances
-
Label printing
-
Scale reading
-
Reverse dispensing
-
Integration to instructions, e-records, and e-signatures
-
Dispense Dispatch and Dispense History reports
Oracle Manufacturing Execution System (MES) for Process Manufacturing manages dispensing and preweigh processes to control the labeling, containerization, and delivery of precise quantities of specific materials to their appropriate batch steps. All delivery stages are tracked, including material identification from the point of issue in inventory to point of delivery in the batch manufacturing process. Tracking is critical when working with active pharmaceutical ingredients in drug formulation. Dispensing must meet the guidelines set forth by the U.S. Food and Drug Administration (FDA) regulations (Title 21 Part 211.101). Dispensing is also critical when using ingredients that have hazardous properties, such as the volatile organic compounds (VOCs) used in paint and plastics manufacturing. Control over the precise delivery of material is essential to ensure a safe manufacturing process and consistent quality product. Standard weighing scale integration into the dispensing process provides a precise, safe, effective delivery of material, while also accounting for any material loss during the transfer of material from one container to another. Material loss may occur due to unavoidable reasons, such as evaporation or material sticking to the container. Oracle Manufacturing Execution System (MES) for Process Manufacturing minimizes the risk of data entry errors by removing error prone manual steps from the batch manufacturing process. Dispense material automatically or manually to labeled pallets in the holding cage. The application generates labels for full traceability throughout the manufacturing process. Oracle Manufacturing Execution System (MES) for Process Manufacturing provides online access to standard operating procedures (SOPs), detailed acknowledgeable work instructions, and simplified e-signature processing. This seamless integration streamlines signoff processes for even the most complex batch operations. Operator and supervisor approvals are orchestrated with a complete audit trail that follows current guidelines for good manufacturing practices.
The dispensing functionality displays dispense pending detail reservations based on the parameters used for query and supports acknowledgement of all instructions defined for dispensing.
The functionality also supports partial dispense. Partial dispense is when the full quantity required is not achieved in one dispense, possibly because of the size of the containers into which you are dispensing. When there is a partial dispense, another dispense is required to complete the allocation of the raw material. For example, the amount required is 112.5 kg, but the minimum number of dispenses to achieve that amount is three: two of 50 kg and one of 12.5 kg. A check is performed on the reserved material before selecting the raw material so that the actual quantity required is displayed in the window.
Approve dispense operations individually using e-records and e-signatures.
Dispensing Process Flow
The overall process to dispense material is the following:
-
Create a batch.
-
Create detailed reservation for material that must be dispensed.
-
Acknowledge the defined instructions.
-
Weigh materials.
-
Perform dispensing.
-
Obtain electronic signatures.
-
Print labels.
Dispensing Features
Following presents the dispensing features provided:
Material Identification
Specify the item to dispense at either the item, item and organization, or item, organization, and recipe level. Identify the material or lots to dispense to the target batch by creating reservations.
Multiple Dispensing Modes
The following dispensing modes are available:
-
Full Container Dispense mode is used to deliver the total quantity of material present in the source container. The source container is released to the production batch for consumption.
-
Source Container Dispense mode is used to deliver material from a source container. The whole source container is released to the production batch. Required material is dispensed and consumed by the batch. Any remaining material is physically transferred to a new target container, and returned to the warehouse.
For example, a formula requires 45 kilograms (kg) of material. The source container quantity is 50 kg, and 5 kg is removed to a new container in the dispensing process for return to stock. The remaining 45 kg in the source container is dispensed to the batch.
-
Target Container Dispense mode is used to deliver material from a target container. Required material is dispensed from a source container to a target container in the dispensing process. The target container material is consumed by the batch. Material remaining in the source container is returned to the warehouse.
Tare Weights
Tare weight is the weight of the actual container when it is empty. The tare weight function lets you:
-
Capture tare weight data.
-
Store the average tare weight for a container in the item master.
-
Use tare weight to calculate the quantity to dispense.
The tare weight of the target container defaults from the entry made in the Oracle Inventory item master. You can enter this value manually.
Note: To set up the container item, navigate to the Item Master Physical Attributes tab. Select Container Item. The UOM must be the dispense UOM for items dispensed into a container. The weight = TARE Wt.
Tolerance
Tolerance is the permitted variation between requested or planned dispense quantity and the actual dispensed quantity.
-
The dispensing tolerance is stored in the dispensing setup.
-
The dispensing tolerance is applied both during dispensing and after confirmation that the dispense is complete. If a batch is only partially dispensed, then the lower tolerance applies only to the total quantity and not to the partial quantity dispensed.
-
It is possible to maintain the tolerance either as a percentage or as a quantity.
Label Printing
The label printer automatically prints bar code labels at a specified dispensing location. You can reprint labels. If a label is reprinted, then the print count indicator clearly marks it as a reprint by showing the number of times the label was printed. Printable label types are:
-
Dispense Pallet: This label identifes a pallet of dispensed material for a single production batch.
-
Process Dispense Material: This label identifies the material dispensed.
-
Process Material: This label identifies material left over from a dispensing operation. The label assists in returning the excess material to stores.
You can specify the label to print when you are operating in manual mode. In automatic operation, labels are preselected for printing.
Note: You can select which printer to use and the number of label copies to print when you dispense or reverse dispense material from the Touchscreen Dispensable Material and Touchscreen Dispensed Material Activity menu options. When you dispense or reverse dispense material from an Oracle Applications Framework page (a non-touchscreen page), one copy of each selected label prints from the default printer.
Reverse Dispensing
A dispensed container can be reverse dispensed in the event of batch cancellation, or when you need to adjust the dispensed material quantity. Reverse dispense either the individual raw material or all the materials for a production batch.
Integration to Instructions
Dispense areas, as well as the dispensing and reverse dispensing pages, are integrated with instructions. Acknowledge instructions associated with a dispense area on the Dispense Clearance page. When dispensing or reverse dispensing, acknowledge instructions as you navigate through the Dispense Instructions page.
Device or Scale Integration
Dispensing and reverse dispensing windows are integrated with external devices to read weights directly from scales.
E-Record and E-Signature
Dispensing and reverse dispensing windows are integrated with Oracle E-Records to capture e-signatures for dispensing, reverse dispensing, and label printing operations.
Reporting
Generate the following XML-Publisher-based reports to list all the pending dispense operations.
-
Pending Dispense Activity List
-
Dispense Dispatch
Generate the following XML-Publisher-based report to list all completed dispense operations.
-
Completed Dispense
-
Dispense History
Clearing Dispense Areas
Your production process may require that you clear the dispense area before starting the dispense process for a batch. Examples of tasks associated with clearing a dispense area include:
-
Cleaning
-
Calibrating equipment
-
Recording dispense booth temperature and humidity conditions
Create dispense clearance instructions for a dispense area to require acknowledgement of these tasks.
To create a dispense clearance instruction set
-
Navigate to the Dispense Area page. Search for an existing dispense area.
Optional Action: Alternatively, you can create a new dispense area with a dispense clearance instruction set. See: Setting up a Dispense Area and Dispensing Booths.
-
Click Update.
-
On the Update Dispense Area page, in the Instructions region, click Manage Instructions.
-
On the Instruction Set: Dispense Area page, click Create.
-
On the Create Instruction Set page, enter values for the following fields:
-
Instruction Set: Enter the name of the set.
-
Instruction Type: Accept the default value, which is Dispense Clearance.
-
SOP: (Optional) Select the More link to select a standard operating procedure.
-
Description: (Optional) Enter a description of the instruction set.
-
-
Click Apply.
A confirmation message appears: "Instruction Set created successfully."
To create dispense clearance instructions
-
On the Instruction Set: Dispense Area page, click the instruction set name link to create instructions for the set.
-
On the Instructions page, click Create.
Optional Action: Alternatively, to add an existing instruction to the instruction set, click Add Existing.
-
On the Create Instructions page, enter values for the following fields:
-
Instruction Num: Enter a unique value. Instructions are listed in numerical order.
-
Instruction Text: Provide instruction details.
-
Acknowledgement: Select one of the following values:
-
Optional: Indicates that the acknowledgement is optional for this instruction.
-
Mandatory - Able to Proceed: Indicates that the acknowledgement is mandatory for this instruction. You can proceed to the next instruction and acknowledge it. However, you must return to this instruction to complete it prior to closing the batch or batch step.
-
Mandatory: Indicates that the acknowledgement is mandatory for this instruction. You cannot proceed to the next instruction without acknowledging the current instruction.
-
-
-
(Optional) To add the related standard operating procedures, select More.
-
(Optional) To require signatures for the instructions:
-
On the Signers tab, click Add Another Row: Signatures.
-
Specify the number of signatures required for validating this instruction and the role of the signer.
Note: A role can be a user name or a responsibility. When a responsibility is used, specify the number of signers who must sign the transaction. When a user name is used, then the number of signers is not valid.
-
-
(Optional) To add instruction attributes:
-
Click Add Another Row: Additional Attributes.
-
In the Attribute Sequence field, enter an attribute sequence number.
-
In the Attribute field, search for and select an instruction attribute.
-
Click Apply or click Apply and Create Another to save the changes and proceed to create another instruction.
-
To view a dispense clearance instruction set and instructions for a dispense area
-
Navigate to the Dispense Area page. Search for an existing dispense area.
-
In the Dispense Area search results table, select the Detail icon for a dispense area.
-
On the Dispense Area: (Name) page, in the Instructions region, view the associated instruction sets and instructions.
To update a dispense clearance instruction set and instructions
-
Navigate to the Dispense Area page. Search for an existing dispense area.
To update the instruction set
-
In the row for the dispense area, click Update.
-
On the Update Dispense Area page, in the Instructions region, select the instruction set and then click Manage Instructions.
-
Click Update in the instruction set row.
-
Change the values of the following fields as needed:
-
Instruction Set
-
SOP
-
Description
-
-
Click Apply.
To update one or more instructions
-
On the Instruction Set page for the dispense area, click the instruction set name link.
-
On the Instructions page, select an instruction and then click Update.
-
Change the values of the following fields as needed:
-
Instruction Num
-
Instruction Text
-
Acknowledgement
-
SOP
-
-
On the Signers tab, add, change, or delete the number of signatures and roles as needed.
-
On the Additional Attributes tab, add, change, or delete the attribute sequences and attribute names as needed.
-
Click Apply.
To execute dispense clearance instructions
-
Navigate to the Dispense Material page.
-
Select the organization and dispense area for the batch, and then click Go.
-
Enter search criteria for batches that need items dispensed in the selected dispense area, then click Go.
The batches requiring items that meet the search criteria appear in the table below.
-
Select a pending dispense item, and then click Dispense Clearance.
The Dispense Clearance Instructions page for the item opens.
-
After completing the instructions, select Instruction Completed.
-
Click Continue, if this is an option. Otherwise, click Finish.
Clicking Continue displays the next instruction to complete. Click Finish once all clearance instructions are complete.
A message informs you that all clearance instructions are complete and you are returned to the Dispensable Material page.
Related Topics
Overview of Instruction Sets and Instructions
Setting up a Dispense Area and Dispensing Booths
Clearing a Dispense Area Using the Touch Screen Interface
Reserving Material
You must detail reserve material before dispensing it. Refer to the Oracle Process Manufacturing Process Execution User's Guide for details on reserving the material.
Refer to "Dispensing Reserved Material" in this guide for detailed information on dispensing the reserved material.
Searching for Reserved Material to Dispense
Following is the procedure to search for reserved material to dispense.
To search for reserved material to dispense
-
Navigate to the Dispensable Material window.
-
Enter any of the following to narrow your search for reserved material.
-
Select an Organization. Required. The list displays only the process-enabled organizations.
-
Search and select a Dispense Area by the Description.
-
Search and select a Batch. The list displays only the pending and work in process (WIP) batches in the selected organization.
-
Select a Batch Step number.
-
Search and select an Ingredient by Name or Description.
-
Search and select a Product by Name or Description.
-
Select a From Date and To Date from the calendar to refine the search to the batch material requirement date.
-
-
Deselect the Show Partially Dispensed indicator to display all dispenses where the total dispensed quantity is below the lower tolerance. This is the default. Select this indicator to display all dispenses less than target quantity.
-
Click Go.
Executing Dispense Instructions
Use the following procedure to execute material dispense instructions.
To execute material dispense instructions
-
Search for a reserved material from the Dispensable Material window. Refer to Searching for Reserved Material to Dispense for detailed information.
-
Select an item to dispense.
-
Click Dispense.
-
Perform tasks as defined in the instructions. Refer to Acting on Instructions for detailed information.
-
Click Finish to navigate to the Dispense Material window.
Dispensing Reserved Material
Following is the procedure to dispense reserved material for each of the listed modes of operation.
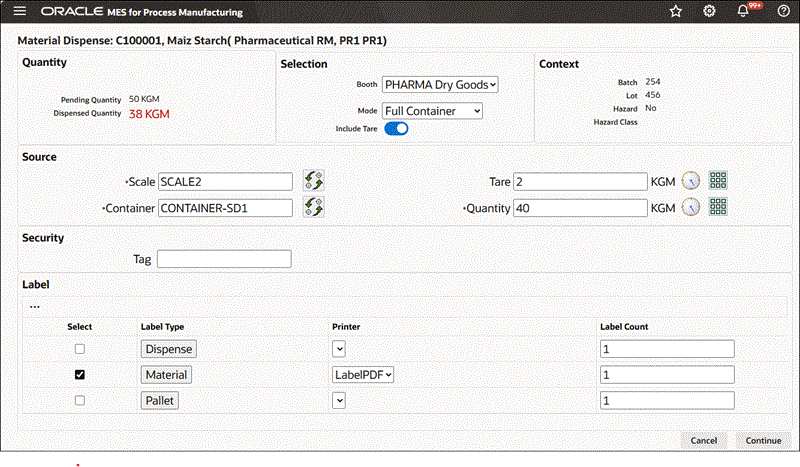
To dispense reserved material using the Full Container mode
-
Navigate to the Material Dispense window.
-
Enter the Dispense Number. This is the dispense document number. It is valid only if you have configured manual document number entry. Required.
-
Select Booth for the chosen Dispense Area.
-
Select dispensing Mode as Full Container.
-
Search for and select the Source Scale.
A box opens, displaying the available scales. Use the Filter By option to narrow the list of scales by:
-
Dispense Area
-
Booth. Select Booth to view only the scales linked to the booth selected in the preceding step.
-
-
Search for and select the Source Container by Container Name or Description.
Additional Information: Container information is set up in the Oracle Inventory Item Master.
-
Click Read Device to measure the container weight. The application calculates the full container quantity.
-
Enter a Security Tag number.
-
Select Dispense Label and Material Label to indicate label formats for printing.
Material Dispense Page Using the Full Container Mode
-
View the dispense instructions.
-
Obtain e-signatures.
-
Print the labels.
To dispense reserved material using the Source Container mode
-
Navigate to the Dispense Material window.
-
Enter the Dispense Number. This is the dispense document number. It is valid only if you have configured manual document number entry. Required.
-
Select Booth for the chosen Dispense Area.
-
Select dispensing Mode as Source Container.
-
Search for and select the Source Scale.
A box opens, displaying the available scales. Use the Filter By option to narrow the list of scales by:
-
Dispense Area
-
Booth. Select Booth to view only the scales linked to the booth selected in the preceding step.
-
-
Search and select the Source Container by Container Name or Description.
-
Search for and select the Target Scale, similarly to how you selected the source scale, using the same filtering method.
-
Search and select the Target Container by Container Name or Description.
Note: Click Read Device to capture readings directly from an integrated device.
-
The empty target container weight defaults. Modify this weight if required.
-
Measure or enter the source container weight.
-
Transfer the excess material into target container.
-
Measure the target container weight with the material transferred. The dispensed quantity is calculated and displayed. This quantity is the tare adjusted source container weight minus the tare adjusted target container weight.
-
Re-measure Source Container weight to verify the dispensed quantity.
Additional Information: If the source container weighs less than expected due to unavoidable loss of material, the quantity discrepancy displays in Material Loss. A Miscellaneous Issue transaction is automatically created to account for the material loss. The dispensed quantity is recalculated as the tare adjusted Re-Measure Source Container weight.
-
Enter a Security Tag number.
-
Select Dispense Label and Material Label to print labels.
Material Dispense Page Using the Source Container Mode
-
View the dispense instructions.
-
Obtain e-signatures.
-
Print the labels.
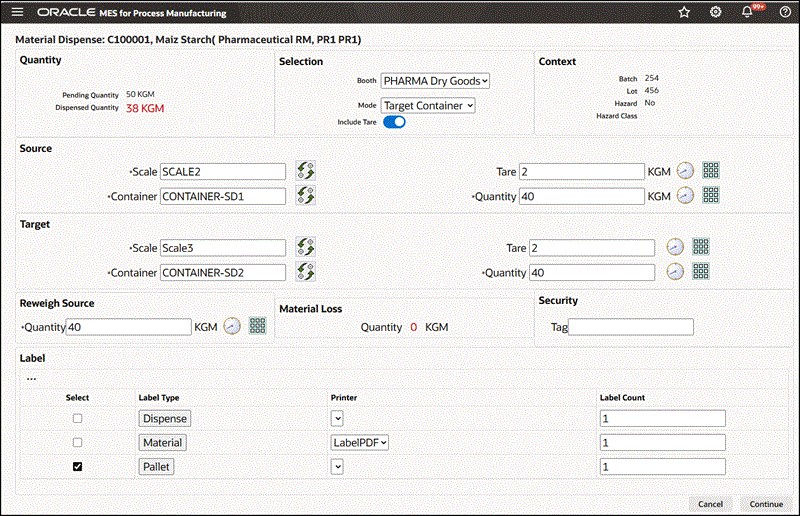
To dispense reserved material using the Target Container mode
-
Navigate to the Dispense Material window.
-
Enter the Dispense Number. This is the dispense document number. It is valid only if you have configured manual document number entry. Required.
-
Select Booth for the chosen Dispense Area.
-
Select dispensing Mode as Target Container.
-
Search for and select the Source Scale.
A box opens, displaying the available scales. Use the Filter By option to narrow the list of scales by:
-
Dispense Area
-
Booth. Select Booth to view only the scales linked to the booth selected in the preceding step.
-
-
Search and select the Source Container by Container Name or Description.
-
Search for and select the Target Scale, similarly to how you selected the source scale, using the same filtering method.
-
Search and select the Target Container by Container Name or Description.
Note: Click Read Device to capture readings directly from an integrated device.
-
The empty target container weight defaults. Modify this weight if required.
-
Measure or enter the source container weight.
-
Transfer the required material into target container.
-
Measure the target container weight with the material transferred. The dispensed quantity is calculated and displayed as the tare adjusted target container weight.
-
Re-measure Source Container weight to verify the dispensed quantity.
Additional Information: If the source container weighs less than expected due to unavoidable loss of material, the quantity discrepancy displays in Material Loss. A Miscellaneous Issue transaction is automatically created to account for the material loss.
-
Enter a Security Tag number.
-
Select Dispense Label and Material Label to print labels.
Material Dispense Page Using the Target Container Mode
-
View the dispense instructions.
-
Obtain e-signatures.
-
Print the labels.
Searching for Dispensed Material
Use the Dispensed Material Activity window to find dispensed materials and print labels for them. You can reverse dispense from this window. Following is the procedure to search for dispensed material.
Prerequisites
-
Dispense material.
-
Optionally, identify the requirement to print labels for dispensed material.
To search for dispensed material
-
Navigate to the Dispensed Material Activity window.
-
Enter as many parameters as needed to complete the search:
-
Select an Organization from the list. Required.
-
Search and select a Dispense Area from the list by Dispense Area name or Description.
-
Search and select a Batch from the list. The list displays only the pending and work in process (WIP) batches in the selected organization.
-
Select a Batch Step number.
-
Search and select an Ingredient by Name or Description.
-
Search and select a Product from the list by Name or Description.
-
Narrow your search by selecting the material dispense date as, From Date, To Date.
-
Narrow your search using the Dispense Number. This is the dispense document number. It is valid only if you have configured manual document number entry.
-
-
Select the reservation Status. The available options include All, Deleted Reservations, and Reverse Dispense Only.
-
Select Show Zero Net Dispensed Quantity Rows to display all items not yet dispensed.
Additional Information: Deselect this option for reverse dispensing operations.
-
Click Go.
Viewing the Dispensed Material Activity Details
Run any pending instructions, print labels, and reverse dispense from the Dispensed Material Activity Details window. Following is the procedure to view the dispensed material activity details. Use this window to:
-
Determine if all instructions were performed.
-
View the Reverse Dispense History.
-
Associate scanned labels to their corresponding label history record. This record becomes part of the Control Batch Record (CBR) when you select the GMO Label category before you upload the scanned label images.
Prerequisites
-
Create dispensable material.
-
Optionally, run pending instructions, print labels, or scan labels for upload to the dispensed material record.
To view the dispensed material activity details
-
Search for dispensed material from the Dispensed Material Activity window.
Refer to "Searching for Dispensed Material" for detailed information.
-
Click Details. The Dispensed Material Activity Details window displays for the selected material:
-
Organization is the abbreviated name of the context organization.
-
Organization Name is a brief description of the organization.
-
Dispense Area is the code that identifies the subinventory where the batch consumes the dispensed material.
-
Ingredient Description is a brief description of the material dispensed.
-
Dispense UOM is the unit of measure for the dispensing equipment.
-
Lot is the code used to identify the
-
Hazardous Material (Yes or No)
-
Hazard Class is the classification for a hazardous material.
-
Material Status is Dispensed or Reverse Dispensed.
-
Batch is the batch document number.
-
Batch Step is the batch step identified with this dispense operation.
-
Operation is the code used to identify the dispense operation.
-
Line Num is the batch sequence line number for the operation.
-
Product is the code used to identify the product.
-
Description is a brief description of the product.
-
Source Device is code assigned to the source dispensing device.
-
Description is a brief description of the source device.
-
Dispense
-
Dispense Number is the document number assigned to the dispense operation.
-
Mode is the dispense mode used. Options are Full Container, Source Container, or Target Container.
-
Source Device or Target Device is the name of the device used for the dispensing operation.
-
Description is a brief description of the source or target device.
-
Requested Quantity is the total quantity needed for the dispensing operation in the selected dispense mode.
-
Material Loss is the quantity of material lost due to a problem other than the actual dispensing operations, such as spillage or equipment failure.
-
Reverse Dispensed Quantity is the quantity of material removed from the container holding the dispensed material for adjustment purposes.
-
Net Dispensed Quantity is the actual quantity of material dispensed in the selected mode.
-
E-record is the e-record associated to the dispensing operation.
-
-
Containers
-
Source Container or Target Container is the item code associated to the container.
-
Description is a description of the container.
-
Source Container Tare or Target Container Tare is the tare weight of the source container or target container.
-
-
Measures
-
Measure of Source Container is the number of times the source container was measured.
-
Quantity Dispensed is total quantity dispensed from the source container.
-
Measure of Target Container is total quantity dispensed from the source container.
-
Quantity Dispensed is total quantity dispensed from the source container.
-
-
Labels
-
Security Tag is the alphanumeric tag used to label the dispensed material.
-
Dispense Label indicator is used to select the dispense label for printing.
-
Material Label indicator is used to select the material label for printing.
-
Pallet Label indicator is used to select the pallet label for printing.
Additional Information: Select the labels to print and click Print Labels.
-
-
Dispense Instructions
-
Instruction Set is the name of the instruction set for the dispensed material activity.
-
Description is a brief description of the instruction set.
-
SOP is the standard operating procedure associated to this dispensed material activity.
-
-
Instruction
-
Click Details to display complete instruction information.
-
Status is the instruction status.
-
Instruction Num is the instruction number. This number is assigned when you set up the application numbering.
-
Instruction Type is the instruction type.
-
Instruction Text is the instruction text entered.
-
-
Label Printing History
-
Label Type is the type of label printed. Seeded label types include: Material Label for Raw Materials, Product Label Sample Label, Dispensed Ingredient Label, and Pallet Label.
-
Print Count is the total number of labels printed for the label type associated to this dispensing operation.
-
Print Date is date this label type was printed.
-
Printed By is the name of the resource that printed the labels.
-
Status is the print status for this label type.
-
E-record is the e-record associated to printing this label type.
-
Attachments are the graphical representations of this label.
-
-
Reverse Dispense History
-
Item is the material dispensed as it appears on the inventory Item Master.
-
Description is a brief description of the material.
-
Reverse Dispense Number is the reverse dispense document number. It is valid only if you have configured manual document number entry.
-
Lot is the item lot associated to this reverse dispense action.
-
Batch is batch associated to this reverse dispense action.
-
Batch Step is the batch step associated to this reverse dispense action.
-
Operation is the operation in the listed batch step that is associated to the performance of this reverse dispense action.
-
Quantity is the quantity of material reverse dispensed.
-
UOM is unit of measure of the quantity.
-
Reverse Dispensed Date is date and time stamp of the reverse dispense action.
-
Click Details for detailed information on this reverse dispense number.
-
-
Viewing Reverse Dispense Instructions
Following is the procedure to view reverse dispensing instructions.
Prerequisites
-
Enter reverse dispense instructions.
-
Dispense material.
To view reverse dispense instructions for the dispensed material
-
Search for a dispensed material from the Dispensed Material Activity window.
Refer to "Searching for Dispensed Material" for detailed information.
-
Select an item for reverse dispensing.
-
Click Reverse Dispense.
-
Perform tasks as defined in the instructions.
-
Click Finish.
Performing Reverse Dispensing
There are several reasons to perform reverse dispensing in production operations. Some typical reasons are:
-
A parent batch is cancelled or scaled down after material is dispensed.
-
To perform quality testing on material subjected to adverse conditions during transit to the shop floor.
Following is the reverse dispensing procedure.
Prerequisites
-
Dispense material.
-
Optionally, run pending instructions, print labels, or scan labels for upload to the dispensed material record.
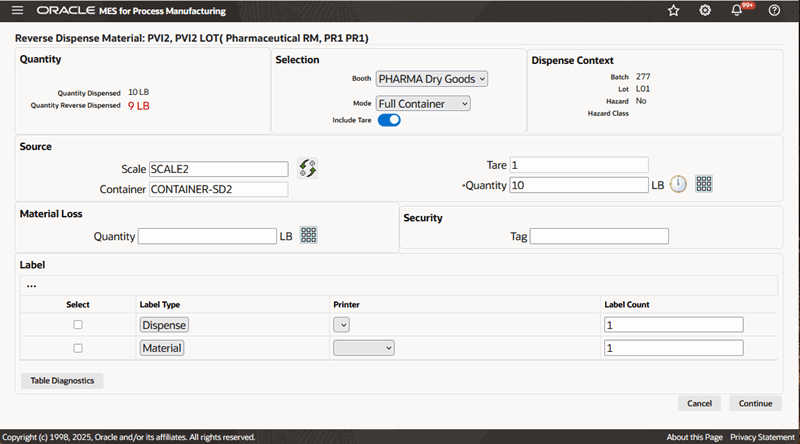
To reverse dispense reserved material using the Full Container mode
-
Navigate to the Reverse Dispense Material window
-
Enter the Dispense Number. This is the dispense document number. It is valid only if you have configured manual document number entry. Required.
-
Select Booth for the chosen Dispense Area.
-
Select dispensing Mode as Full Container.
-
Search for and select the Source Scale.
A box opens, displaying the available scales. Use the Filter By option to narrow the list of scales by:
-
Dispense Area
-
Booth. Select Booth to view only the scales linked to the booth selected in the preceding step.
-
-
Search and select the Source Container by Container Name or Description.
Additional Information: Container information is set up in the Oracle Inventory Item Master.
-
Click Read Measure to measure the source container weight. The reverse dispense weight is calculated.
-
Enter a Security Tag number.
-
Select Dispense Label and Material Label to indicate label formats for printing.
Reverse Dispense Material Page Using the Full Container Mode
-
View the reverse dispense instructions.
-
Obtain e-signatures.
-
Print the labels.
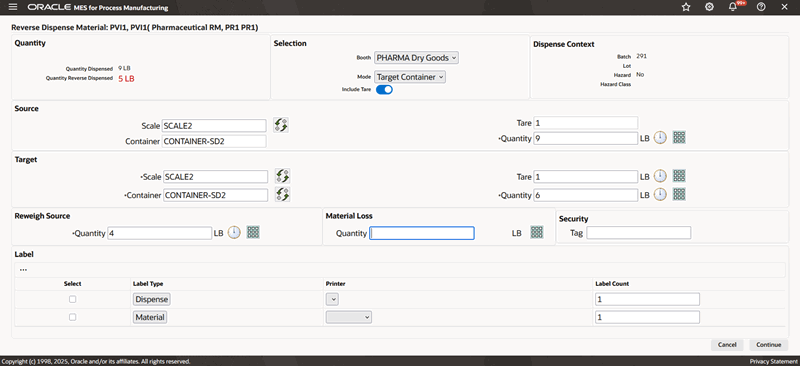
To reverse dispense reserved material using the Target Container mode
-
Navigate to the Reverse Dispense Material window.
-
Enter the Dispense Number. It is valid only if you have configured manual document number entry. Required.
-
Select Booth for the chosen Dispense Area.
-
Select dispensing Mode as Target Container.
-
Search for and select the Source Scale.
A box opens, displaying the available scales. Use the Filter By option to narrow the list of scales by:
-
Dispense Area
-
Booth. Select Booth to view only the scales linked to the booth selected in the preceding step.
-
-
Click Read Measure to capture readings directly from an integrated device.
-
Search and select the Target Container by Container Name or Description.
-
Measure the target container weight with the material transferred. The reverse dispensed quantity is calculated and displayed.
-
Re-measure Source Container weight to verify the reverse dispensed quantity.
Additional Information: If the source container weighs less than expected due to unavoidable loss of material, you must manually enter the quantity discrepancy in Material Loss.
-
Enter a Security Tag number.
-
Select Dispense Label and Material Label to print labels.
Reverse Dispense Material Page Using the Target Container Mode
-
View the dispense instructions.
-
View the Partial Dispense History report.
-
Obtain e-signatures.
-
Print the labels.
Viewing the Reverse Dispensed Material Activity Details
Run any pending instructions, or reprint the reverse dispense labels. Following is the procedure to view the reverse dispensed material activity details.
Prerequisites:
-
Reverse dispense material.
To view the reverse dispensed material activity details
-
Navigate to the Dispensed Material Activity Details window.
-
View the Reverse Dispense History of an item.
-
Click Details to display the material activity details.
Note: Refer to "Viewing the Dispensed Material Activity Details" for explanations of the fields displayed on the Reverse Dispensed Material Activity Details window.
Running Reports for Dispensing Operations
The Dispense Dispatch report lists all the pending dispenses. The Dispense History report lists all the completed dispense operations.
To run and print the Dispense Dispatch report
-
Navigate to the Submit a New Request window:
Select MES for Process Manufacturing Administrator: Request : Run.
-
Select the request type as Single Request.
-
Select OK.
-
Enter Dispense Dispatch Report as the request Name.
If you are submitting a request set, then enter the Request Set name in the Submit Request Set window.
-
Complete the other fields on the window. See: Overview of Standard Request Submission, Oracle E-Business Suite User's Guide
-
Select the various parameters such as Plant, Dispense Area, Batch, From and To dates.
-
Select Submit Request.
Following is the output of the Dispense Dispatch report:
-
Organization
-
Search Criteria
-
Batch is the batch document number.
-
Plant is the name of the production facility where the material is dispensed.
-
Dispense Area is the inventory source for the dispensed material.
-
From Date is the start date for this report.
-
To Date is the end date for this report.
-
-
Dispensable Material
-
Item is the material dispensed as it appears on the inventory Item Master.
-
Description is a brief description of the material.
-
Lot is the item lot associated to this dispense action.
-
Batch No is the batch document number.
-
Batch Step is the batch step associated to this dispense action.
-
Operation is the operation in the listed batch step that is associated to the performance of this dispense action.
-
Required Quantity is the prescribed quantity for the dispense operation.
-
UOM is the unit of measure for the dispensing equipment.
-
Required Date is the date and time the dispense operation is required.
-
-
To run and print the Dispense History report
-
Navigate to the Submit a New Request window:
Select MES for Process Manufacturing Administrator: Request : Run.
-
Select the request type as Single Request.
-
Select OK.
-
Enter Dispense History Report as the request Name.
-
Complete the other fields on the window. See: Overview of Standard Request Submission, Oracle E-Business Suite User's Guide.
-
Select the appropriate parameters for the report such as Plant, Dispense Area, Batch, From and To dates.
-
Select Submit Request.
To submit another request, select Yes.
-
Following is the output of the Dispense History report:
-
Organization is the abbreviated name of the context organization.
-
Dispense Area is the code that identifies the subinventory where the batch consumes the dispensed material.
-
Search Criteria
-
Batch is the batch document number.
-
Plant is the name of the production facility where the material is dispensed.
-
Dispense Area is the inventory source for the dispensed material.
-
From Date is the start date for this report.
-
To Date is the end date for this report.
-
Operator is the name of the person who performed the dispensing operation.
-
-
Dispensed Material
-
Item is the material dispensed as it appears on the inventory Item Master.
-
Description is a brief description of the material.
-
Dispense Number is the dispense document number. It is valid only if you have configured manual document number entry.
-
Lot is the item lot associated to this dispense action.
-
Batch is the batch document number.
-
Batch Step is the batch step associated to this dispense action.
-
Operation is the operation in the listed batch step that is associated to the performance of this dispense action.
-
Line Number is the batch sequence line number for the operation.
-
Net Dispensed Quantity is the actual quantity of material dispensed in the selected mode.
-
Dispensed Date is the date and time stamp of the dispense action.
-
-
Required Quantity is the prescribed quantity for the dispense operation.
-
Dispense Mode is the dispense mode used. Options are Full Container, Source Container, or Target Container.
-
Dispense UOM is the unit of measure for the dispensing equipment.
-
E-record ID is the e-record associated to this dispense operation.
-
Quantity Reverse Dispensed is the quantity of material reverse dispensed using the dispense mode indicated.
-
Material Loss is the quantity of material lost due to a problem other than the actual dispensing operations, such as spillage or equipment failure.
-
Operator is the name of the person who performed the dispensing operation.
-