Using the Touch Screen User Interface
Overview: Touch Screen User Interface
Oracle Process Manufacturing provides support for touch screen devices. A touch screen is an input device that enables you to touch the display screen. Shop floor personnel often need a user interface that requires minimal training and can be used in an environment where keyboards and pointing devices are not available.
You can use the touchscreen interface as a front end to the Operator Workbench to perform batch transactions, execute clearance and process instructions, or to perform dispensing and reverse dispensing operations. The touch screen application supports use of Dispense Areas and Dispensing Booths.
Related Topics
Creating Touch Screen Preferences
Creating Touch Screen Preferences
You create preferences from the Touchscreen Preferences page. This page lets you create, update, delete, or duplicate existing Touchscreen Preferences. You can define preferences at the following levels:
-
User
-
Responsibility
-
Site
Preferences defined for a unique user and organization combination take precedence over preferences defined for a site or responsibility. So, if touchscreen preferences exist for a user and organization, then any preferences that exist for a responsibility or site and the same organization are ignored for that user. Although every touchscreen preference must have an organization, only one preference at each unique level name and level value combination can have an assigned default organization.
To view and update touch screen preferences
-
Navigate to the Touchscreen Preferences page.
-
Select Responsibility, Organization, User, or Site—and choose Go.
A summary of the preference records appear in a table per level, site, and organization.
Search Touch Screen Preferences Page
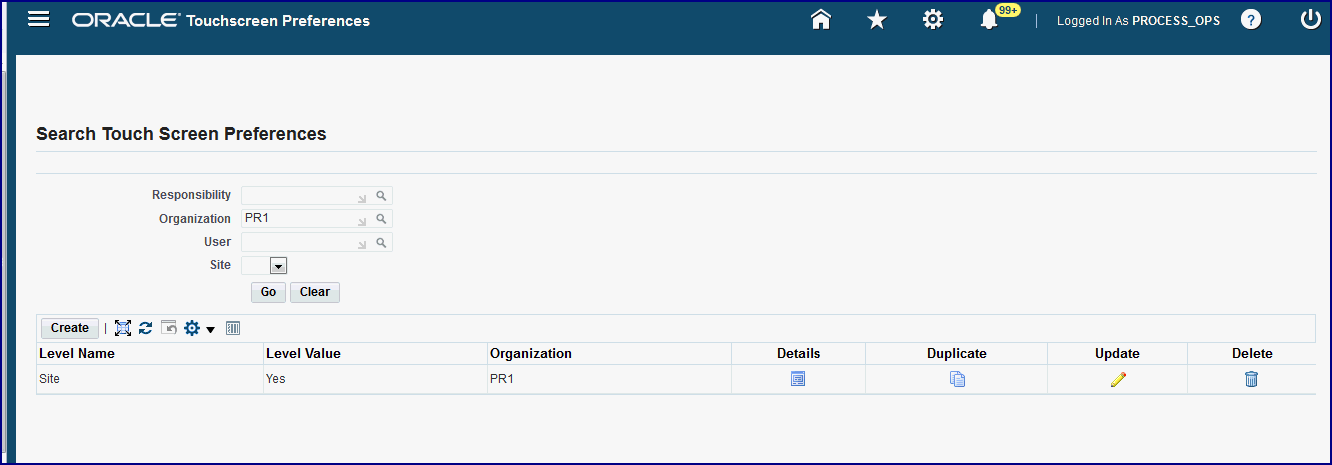
The following information appears:
-
Level Name. Responsibility, Site, or User.
-
Level Value. Displays Yes for Responsibility or Site. Displays the User Display Name when the User level is selected.
-
Organization. Required.
-
Default. Only one preference for each level name and level value combination can have a default organization selected.
-
Details icon
-
-
Select Details to view information created for a specific preference. The details appear in the following regions:
-
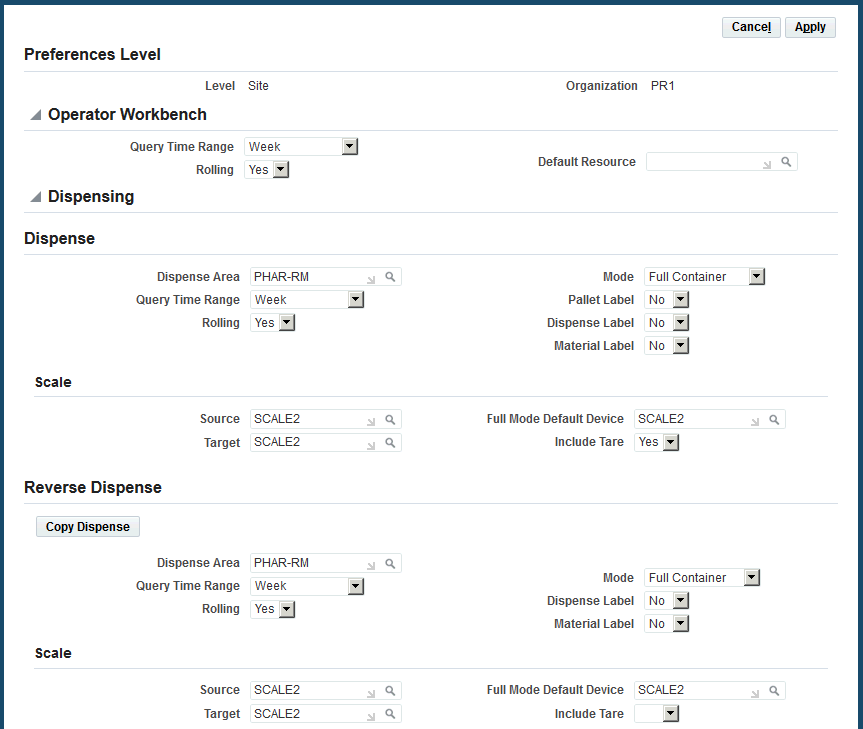
Preferences Level for Site, Responsibility, or User
-
Operator Workbench
-
Dispensing
-
-
Select a record and choose Update to change or update values in a particular preference.
Touchscreen Preferences Page
To create touch screen preferences
-
Navigate to the Touch Screen Preferences page and select Create.
-
In the Level field, select one of the following touch screen preference levels:
-
User
-
Responsibility
-
Site
-
-
Conditional. If you selected the Responsibility level, search for and select a responsibility. If you selected the User level, search for and select a user.
-
In the Organization field, search for and select an organization.
-
Optional. Select Default Organization. By selecting this option, you choose to use this organization as your default organization in the following pages:
-
Touchscreen Workbench
-
Touchscreen Dispensed Material Activity
-
Touchscreen Dispensable Material
-
Touchscreen Dispense Clearance
-
Touchscreen Print Labels
Additional Information: You can create many combinations of preferences. Individual user preferences override any applicable Responsibility preferences and Responsibility preferences override applicable Site preferences. Although many preferences at different levels may be valid for a user and organization combination, only one preference can be applied.
Only one preference at each unique level name and level value combination can have an assigned default organization.
-
-
In the Operator Workbench region, select the following time and resource values:
-
Query Time Range: Month, Number of Days, Week, or Today
-
Rolling: Yes or No
-
Default Resource
-
-
In the Dispensing region set preferences for Dispense and Reverse Dispense, as required. In the Dispense section, select the following values:
-
Dispense Area
-
Query Time Range: Month, Number of Days, Week, or Today
-
Rolling: Yes or No
-
Mode: Full Container, Source Container, or Target Container
-
Pallet Label: Yes or No
-
Dispense Label: Yes or No
-
Material Label: Yes or No
-
-
In the Scale area, select the following:
-
Source
-
Target
-
Full Mode Default Device
-
Include Tare: Yes, No, or null
-
Yes: Includes the tare weight in the quantity dispensed calculation (Quantity Dispensed = Quantity - Tare) by default. The Include Tare button is displayed in the Material Dispense: (item) page.
-
No: Excludes the tare weight by default in the quantity dispensed calculation (Quantity Dispensed = Quantity)
The Exclude Tare button is displayed in the Material Dispense: (item) page.
-
Null: Same as No.
Use the Include/Exclude Tare buttons to switch between the two types of quantity dispensed calculations.
-
-
-
In the Reverse Dispense region, you can copy the data you entered in the Dispense region, or enter new values in the following fields:
-
Dispense Area
-
Query Time Range: Month, Number of Days, Week, or Today
-
Rolling: Yes or No
-
Mode: Full Container, Source Container, or Target Container
-
Pallet Label: Yes or No
-
Dispense Label: Yes or No
-
Material Label: Yes or No
-
-
In the Scale area, select the following:
-
Source
-
Target
-
Full Mode Default Device
-
Include Tare: Yes, No, or null
-
Yes: Includes the tare weight in the quantity reverse dispensed calculation (Quantity Reverse Dispensed = Quantity - Tare) by default. The Include Tare button is displayed in the Reverse Dispense Material: (item) page.
-
No: Excludes the tare weight by default in the quantity reverse dispensed calculation (Quantity Reverse Dispensed = Quantity)
The Exclude Tare button is displayed in the Reverse Dispense Material: (item) page.
-
Null: Same as No.
Use the Include/Exclude Tare buttons to switch between the two types of quantity reverse dispensed calculations.
-
-
-
Select Apply to save your work.
-
You also have the option to create a new record by selecting a record on the Search Touch Screen Preferences table and choosing Duplicate.
A copy of this record opens in the Touch Screen Preference Details page. You then change the Level Name, Level Value, or Organization values—and any other values before saving the record.