Using OPM Supply Chain Planner
This chapter covers the following topics:
- Implementing Planning Suggestions
- Fully Automatic Release and Implementation of Production Planning Suggestions
- Running the Schedule Process Batches Concurrent Program
- Viewing the Scheduling Exceptions
- Defining Generic Resources
- Defining Plant Resource Parameters
- Defining Resource Devices
- Integrating with Enterprise Asset Management
- Linking Each Resource Instance to a Serial Numbered Asset
- Defining Alternate Resources
- Regenerating Targeted Resource Availability
- Viewing Resource Availability
- Defining Resource Exceptions
- Defining Resource Unavailability
- Setting Up Resource Classes
- Viewing Resource Instance Available Time
- Running the Generate Resource Availability Concurrent Program
- Resource Availability
- Setting Up Process Parameters
- Defining Process Parameters Set
- Setting Up Generic Resource Parameters
- Editing Plant Resource Parameters
- Setting Up Sequence Dependencies
- Viewing Sequence Dependent Items
Implementing Planning Suggestions
Sending feedback from Advanced Supply Chain Planning (ASCP) to OPM includes implementing ASCP suggestions in OPM. ASCP calculates the following types of planning suggestions based on the data collected from OPM: create production and purchase orders; reschedule production orders; and cancel production and purchase orders.
You can release individual ASCP suggestions or release them in mass.
Manual Release and Implementation of Planning Suggestions
You can manually release ASCP suggestions in Advanced Planning Scheduling (APS) and manually accept some, all, or none of the ASCP suggestions in OPM.
The manual release of the ASCP planning suggestions in APS is accomplished by releasing the planning suggestion from the workbench. Upon release, purchase orders are sent to Oracle Purchasing and production orders related to OPM organizations are sent to OPM.
The manual acceptance of ASCP planning suggestions in OPM is accomplished by accessing the following windows and entering the details required for the creation, rescheduling, or cancellation of the production or planned order suggestion:
-
Create new productions orders through the APS New Batch window
-
Reschedule existing productions orders through the Reschedule Update window
-
Cancel existing productions orders through the Batch Cancellations window
To manually accept an ASCP planning suggestion and reschedule an existing batch or firm planned order
-
Navigate to the Reschedule Update window.
-
Enter the Group ID. The Group ID is associated with the suggestions to approve. The Group ID displays originally on the ASCP workbench and identifies the group of suggestions that you select for release to OPM.
-
Corresponding Creation Date displays the date that the Group ID was generated from the ASCP Planner Workbench run.
Order Details
All of the suggestions applicable to the Group ID that are not accepted or rejected display in the Order Details section.
-
Click Select for the planning suggestions that you want to approve and reschedule.
The following table lists and describes each field in the Order Details section
Field Name Description Batch/FPO Numbe Displays the batch or firm planned order document number. Old Plan Start Time Displays the original planned start time. New Plan End Time Displays the new planned end time of the soon-top-be-rescheduled batch or firm planned order. Old Plan End Time Displays the planned end time of the soon-to-be-rescheduled batch or firm planned order. New Plan End Time Displays the new planned end time of the soon-top-be-rescheduled batch or firm planned order. -
Click the Update Offset.
Master Batch
The following table lists and describes each field in the Master Batch section
| Field Name | Description |
|---|---|
| Recipe | Displays the recipe used for the product. |
| Formula | Displays the formula used for the product. |
| Routing | Displays the routing code of the primary product produced by the formula. |
| Product | Displays the primary product of the batch or firm planned order. |
| Planned Quantity | Displays the planned quantity of the primary product of the batch or firm planned order |
| Doc Type | Displays the type of document, either batch or firm planned order, to cancel. |
| Required Completion | Displays date for the rescheduled order. |
-
Click Reschedule to approve and reschedule the existing OPM production batches or firm planned orders.
Click Reject to reject the reschedule suggestions thereby maintaining the existing planned start and end dates for the batches or firm planned orders.
Click Cancel to exit the window without taking any action.
To manually accept an ASCP planning suggestion and create a new batch or firm planned order:
-
Navigate to the APS New Batch window.
-
Select Group ID. The Group ID is associated with the suggestions to approve. The group ID displays on the ASCP workbench and identifies the group of suggestions that you selected for release to OPM.
-
Creation Date displays when you select the Group ID. It represents the date that the Group ID was generated from the ASCP Planner Workbench run.
-
Select Approve As. The options include: Batch, Firmed Planned Order, Reject.
Order Details
All of the suggestions applicable to the Group ID that are not accepted or rejected display in the Order Details section.
-
Click Select for the planning suggestions to approve and convert to a batch or firm planned order.
The following table lists and describes each field in the Order Details section
Field Name Description Product Displays the primary product of the batch or firm planned order, which is to be approved and converted from the planning suggestion. Batch/FPO Number Displays the automatic document ordering. For manual document ordering, enter the number that is assigned to the batch or firm planned order. Planned Qty Displays the planned quantity of the primary product of the soon-to-be-converted batch or firm planned order. UOM Displays the units of measure in which the primary product is produced. Start Date Displays the start date of the soon-to-be converted batch or firm planned order. End Date Displays the date by which the product must be produced. Update Offset Displays the specified offset value.
Master Batch
The following table lists and describes each field in the Master Batch section
| Field Name | Description |
|---|---|
| Recipe | Displays the recipe used for the product. |
| Formula | Displays the formula on which the production batch or firm planned order is based. |
| Routing | Displays the routing code of the primary product produced by the formula. |
| Product Description | Displays a description of the product that will be produced by the soon-to-be-converted batch. |
| Required Completion | Displays date for the planned order. |
-
Click Convert to approve and convert the planning suggestions into OPM production batches or firm planned orders. After clicking Convert, the OPM Process Execution APIs are called to create the new batch or firm planned order. You are prompted for more data based on your setup.
Click Reject to reject the planning suggestions for creating new production batches or firm planned orders.
Click Cancel to exit the window without taking any action.
To manually accept an ASCP planning suggestion and cancel an existing batch or firm planned order:
-
Navigate to the Batch Cancellations window.
-
Select Group ID is associated with the suggestions to approve. The Group ID was displayed originally on the ASCP workbench and identified the group of suggestions that you selected for release to OPM.
-
Creation Date displays when you select the Group ID. It represents the date that the Group ID was generated from the ASCP Workbench run.
Update Details
All of the suggestions applicable to the Group ID that are not accepted or rejected display in the Order Details section.
-
Click Select for the planning suggestions that you want to approve and cancel.
The following table lists and describes each field in the Order Details Section
Field Name Description Batch/FPO Number Displays the batch or firm planned order document number. Old Plan Start Time Displays the original planned start time. New Plan Start Time Displays the suggested new start time. Old Plan End Time Displays the original planned end time. New Plan End Time Displays the suggested new end time.
Master Batch
The following table lists and describes each field in the Master Batch Section
| Field Name | Description |
|---|---|
| Recipe | Displays the recipe used for the product. |
| Formula | Displays the formula used for the product. |
| Routing | Displays the routing code of the primary product produced by the formula. |
| Product Description | Displays the primary product of the batch or firm planned order. |
| Planned Quantity | Displays the planned quantity of the primary product of the batch or firm planned order. |
| Doc Type | Displays the type of document, either batch or firm planned order, to cancel. |
-
Click Cancel Batch to approve and cancel the existing OPM production batches or firm planned orders.
Click Reject to reject the cancellation suggestions thereby maintaining the existing planned start and end dates for the batches or firm planned orders.
Click Cancel to exit the window without taking any action.
Fully Automatic Release and Implementation of Production Planning Suggestions
You can automatically release ASCP production order planning suggestions in Advanced Planning Scheduling (APS) and automatically accept all of the ASCP production order planning suggestions in OPM without intervention.
The automatic release of the ASCP planning suggestions in APS is accomplished by selecting the APS Production Flag checkbox on the Supply Chain Plan Names window before launching a plan.
The automatic acceptance of ASCP planning suggestions in OPM is accomplished by enabling the GMP: Auto Implement APS Suggestions profile option.
When the suggestions are brought over to OPM and the GMP profile is enabled, all suggestions that are grouped by the launched plan's group id are input as parameters to the Auto Release of Planning Suggestions for APS concurrent program. While implementing the suggestions, the concurrent program generates a log, which lists the implementation successes and failures.
When electing to use the fully automatic option of releasing and accepting ASCP planning suggestions, the following considerations must be kept in mind:
-
Batch numbering is automatic, not manual.
-
New batches are created using the validity rule selected by the ASCP planning engine. If the validity rule used by the planning engine is not available for use in OPM for batch creation, then the batch is not created and the concurrent program writes the reason for not implementing the suggestion in the log file.
-
Production order planning suggestions are implemented automatically as batches. Planned order planning suggestions are not implemented automatically at this time.
To automatically release and accept all ASCP planning suggestions without intervention
-
Ensure that the GMP: Auto Implement APS Suggestions profile option is set to Yes in OPM.
-
Enable the APS Production Flag before launching an ASCP plan in ASCP.
-
Navigate to the Launch SCP Plan and initiate a supply chain planning process. The generated log file lists all implementation successes and failures.
Running the Schedule Process Batches Concurrent Program
The Schedule Process Batches concurrent program begins the process of scheduling process batches. All scheduled batches are updated, therefore you do not have control over which batches are updated. Use the OPM Production Scheduler Workbench to review all results.
To run the Schedule Process Batches concurrent program
-
Navigate to the Run Scheduler window.
-
Select the parameters for scheduling process batches:
-
Organization is the inventory organization that you are running the Manufacturing Scheduling for. Required.
-
Batches are the jobs that you are running the Manufacturing Scheduling for. Required. You have several options:
-
Use Specific Job to run the Manufacturing Scheduling for one batch. You must provide the Batch Number.
-
Use All Jobs to run the Manufacturing Scheduling for all batches.
-
Use Pending Scheduling Only to run the Manufacturing Scheduling for those batches not yet scheduled. Those batches that have already been scheduled remain the same if this option is used.
-
-
Batch Number is the specific number of the batch to run the Manufacturing Scheduling for. Batch Number is only available if the Specific Job option was chosen in the Batches field.
-
Manufacturing Scheduling schedules batches either forward from the start date or backward from the completion date. This is the Scheduling Direction. Required.
-
The horizon is the number of days that the constraint-based scheduling engine considered in its calculations when it reschedules. This number of days was defined on the Work in Process Parameters window. The Horizon Start date is the date and time when the scheduling begins.
-
Choose Yes if you want alternate resources taken into consideration when running the Manufacturing Scheduling application. Choose No if you do not want alternate resources taken into consideration when running the Manufacturing Scheduling application. Indicate your choice in the Use Alternate Resources field. Required.
-
-
Click OK.
-
Complete the fields on the Run Scheduler window.
-
Click Submit. The Schedule Process Batches concurrent program begins to run.
Use the Scheduling Exceptions window to view the messages.
Viewing the Scheduling Exceptions
The Scheduling Exceptions window is used to view messages generated by the Schedule Process Batches concurrent program. During scheduling, there may be situations encountered referred to as exceptions. These exceptions display in the Scheduling Exceptions window so you can review and act on them. The Schedule Process Batches program can be run for a single batch or the whole inventory organization. If there are no exceptions, then the window is empty.
Prerequisites
-
Run the Schedule Process Batches concurrent program.
To query scheduling exceptions
-
Navigate to the Scheduling Exceptions window.
-
Select an organization.
-
Click OK. The Find Scheduling Exceptions window displays.
-
Make no entries to search all records. Enter any of the following parameters to narrow the search:
-
Batches is the number of the OPM batch that has exceptions.
-
Product is the product name for finished goods of the batch that has exceptions.
-
Priority is the priority on the batch that has exceptions.
-
Batch Status is the status of the batch as WIP, Pending, Canceled, and Closed.
-
Required Completion Dates is the date that the batch is scheduled for. You can indicate a range by entering a from and to completion date.
-
Request Id is the identification number of the Schedule Process Batches concurrent program.
-
Severity:
-
Warning
-
Exception
-
Error
-
-
-
Click Find. The Scheduling Exceptions window displays.
Scheduling exception messages:
A hierarchical navigator provides a display of the objects in a treelike framework known as a workbench. The top-level node in the navigator, in this case is called Jobs, is expanded to display groups of individual database objects, in this case batch numbers. Lower level nodes are indented to indicate that they belong to the higher level node. The navigator displays all the batch numbers that have exception messages associated with them and that fit the filter criteria you indicated in the Find Scheduling Exceptions window. The batch numbers display in groups of 16. Click a + sign to expand a node.
Exceptions:
The following table lists and describes each field in the Exceptions window.
Note: All the fields are display only
Field Name Description Seq Displays the sequence number of the message generated during scheduling. Severity Displays the severity of the message. Message Displays the short description of the message. Marked Indicates the exceptions that you selected. Message Displays the long description containing more details of the message. Properties
This window displays the attributes of the batch. It contains the fields displayed in the batch header region of the batches window.
The following table lists and describes each field in the Properties window.
Field Name Description Batch Displays the number of the job scheduled. Batch Status Displays the status of the batch as WIP, Pending, Canceled, and Closed. Priority Displays the priority on the batch that has exceptions. Request Id Displays the identification number of the Schedule Process Batches concurrent program. Laboratory Batch Displays if the batch is for lab use. Product Displays the product name and description for the finished goods. Recipe Displays the number, version, and description of the validation rule required to prepare the batch. Formula Displays the number, version, and description of the formula used to make the batch. Routing Displays the number, version, and description of the routing definition required for the formula. Dates:
The following table lists and describes each field in the Dates section of the Properties window.
Field Name Description Planned Start Displays the planned start date for the batch. Planned Completion Displays the planned completion date for the batch. Required Completion Displays the required completion date for the batch. Reported Date Displays the reported date for the batch.
Defining Generic Resources
Resources are the assets you use to produce batches, including production equipment and employee labor. You can define each resource generally (for example, OVENS) or specifically (for example, OVEN 1, OVEN 2). For each resource, you must assign a component classification code for costing purposes. You can optionally group resources into resource classifications. For example, Ovens and Stoves may be grouped into Cooking Units.
See: Oracle Process Manufacturing Cost Management User's Guide for details on the Cost Component Classes window.
Capacity Planning illustrates production capacity from a timeframe point of view. Through Capacity Planning, you can setup all capacity related Advanced Planning and Scheduling and Manufacturing Scheduling data. The other menu options are used as OPM setup.
Prerequisites
-
Define resource classes (for example, Cooking, Washup) on the Resource Class window in the OPM Cost Management application.
-
Define cost component classification codes on the Component Classes window available in the OPM Cost Management application.
-
Ensure that the unit of measure of time is established on the Unit of Measure window in the Oracle Inventory application.
To define a resource
-
Navigate to the Resources window.
-
Enter a Resource code to identify this resource. Required.
-
Enter a brief Description of the resource. Required.
-
Enter a Usage UOM (usually in hours) by which you measure the amount of time used for processing this resource. For planning and scheduling, you must define the UOM to be type Time. Required.
-
Enter the Resource Class to which this resource belongs. For example, the resource Chefs may be included in the resource class Labor.
-
Enter a Cost Component Class. A cost component class links this individual resource to a unit of measure and allows you to establish costing parameters for the resource in the Cost Management application. Required.
-
Select the Type of resource. The type of resource defines the organization types that can use the resource:
-
Manufacturing: Limits resource use to manufacturing organizations.
-
Laboratory: Limits resource use to laboratory organizations.
Note: For laboratory resources:
-
The Process Parameters button is disabled.
-
If you select the Outside Processing (OSP) check box, you will receive an error message when you save the record.
-
-
Select the Outside Processing (OSP) check box if you are defining the resource for an outside process. You may select or deselect this check box as long as the resource is not used in any other batch. If you select the check box, then ensure that you save the corresponding plant resource along with the OSP flag set and vice versa in the Resource Information window.
-
Capacity
Enter the Minimum and Maximum amount per vessel capacity for this resource.
-
Enter the Capacity UOM for this resource. This is usually specified in mass or volume not time.
-
Select the Calculate Charges check box if the capacity of an operation is constrained by the resource for the purpose of calculating charges. If another capacity-constrained resource in the same operation has a smaller capacity, then the system uses the smallest capacity-constrained resource to calculate how many times an operation is repeated for the purposes of calculating charges. For example, a capacity-constrained mixer in an operation holds a maximum of 200 gallons. A batch calls for 250 gallons, so the mixer (and the operation) runs twice (incurs two charges) to produce enough quantity for the batch. However, if another capacity-constrained resource holding a maximum of 50 gallons is also part of the operation, then the operation incurs five charges instead of two. If you select the Calculate Charges check box in the Resources window for a resource, then the check box defaults as selected in the Resource Information window for all inventory organization and corresponding resource combinations. You can change the default value for the Calculate Charges check box in the Resource Information window for any inventory organization-resource combination.
-
Enter the Capacity Tolerance used by OPM. If the capacity falls within this specified percentage, then the resource is processed without calculating charges. If the material is over the capacity, then it is planned and scheduled incorporating calculated charges. For example, if a batch calls for 20 gallons and the capacity tolerance is 10%, then there is a single charge for up to 22 gallons. There is an extra charge for 23 gallons and higher.
-
Enter the Utilization. This percentage is used by Planning and Scheduling only.
-
Enter the Efficiency. This percentage is used by Planning and Scheduling only.
-
Save your work.
See Also
Oracle Process Manufacturing Cost Management User's Guide
Oracle Process Manufacturing System Administration User's Guide
Defining Plant Resource Parameters
A resource may operate at a different capacity at one production inventory organization than it does at another.
For scheduling, the resource must be defined at the inventory organization. If the resource is not enabled at the inventory organization, then it is assumed that the resource does not exist there. Use the Resource Information window to enter inventory organization specific information regarding each resource. This information includes costing information, resource usage unit of measure. Capacity Planning references this information to determine the availability of resources in each specific inventory organization (organization). Creating a resource here enables them for scheduling and planning. Also, you can define process parameter values specifically for inventory organizations.
See Editing Plant Resource Parameters for more information.
You can also define batchable resources in the Resource Information window. A batchable resource is a resource that can process many items simultaneously, if they share similar attributes such as, Temperature, Color, or Duration.
Prerequisites
-
Define unit of measure types.
-
Define units of measure.
-
Define organizations, resources, and resource units of measure, and select the appropriate inventory organization where you want to define plant resources.
To define resource parameters in specific inventory organizations
-
Navigate to the Resources Information window.
-
Enter Organization (either a laboratory or a production inventory organization) for which you are defining a resource attribute. You must be able to enter an organization. The cost applies only to this inventory organization and resource combination. You can, however, define the cost of using the resource in more than one inventory organization allowing you to calculate the production costs for the resource across various organizations. Required.
-
Enter the Resource for which you are establishing available capacity parameters and costs when used in the designated organization. Required.
To enter a laboratory type resource, verify that the organization is a quality laboratory organization.
-
Indicate if the resource you are defining for this inventory organization is active or inactive through the Inactive field. Inventory organization and resource flagged as inactive are not used for cost calculations for the resource, nor will resource availability be considered.
-
Enter a Resource Category. You can group the resource that you specified in the previous field into a broader group for reporting purposes. For example, if you specify Blender 1 as the resource in the previous field, you can group that resource into the more generic group Blenders. The Category Resource field defaults to the value in the Resource field if there is no grouping of the resource into a broader category. Required.
-
Enter the Count. This is the number or quantity of the resource used in the specified inventory organization for which you are defining production costs and usage availability. If you consider the resources identical, then you can have a multiple count. The count depends on how broad a resource categorization you are defining. For example, if you defined the resource as Blender 1 (a specific machine), then enter 1. If you use three blenders in the production line and you defined the resource as Blenders (rather than defining each individual machine), then enter 3. Required.
-
Enter the Planning Cost of this resource when used in the specified inventory organization. Used for reporting purposes only. The Planning Cost is used by planning and scheduling. Required.
-
Enter the Schedule Indicator. In addition to being defined at the inventory organization, the resource can be defined at four levels of scheduling.
Note: Schedule Indicator defaults as Do Not Plan for a laboratory type resource.
-
Do Not Schedule - the resource used in the specified inventory organization for which you are defining production costs and usage availability with constraints. This resource is defined as having infinite capacity enabling you to schedule resources without constraints.
-
Schedule - the resource used in the specified inventory organization for which you are defining production costs and usage availability. This resource is defined with a finite schedule enabling you to schedule resource with constraints. As a result, the resource count or assigned quantity is used as a constraint.
-
Scheduling to Instance - the resource used in the specified inventory organization for which you are defining production costs and usage availability. This enables exact sequencing of the resources to be scheduled to particular instances. Ensure that the number of instances and count are the same.
-
Do Not Plan - select this option for a laboratory resource.
The following buttons are disabled: Devices, Equipments, Alternatives, and Process Parameters.
-
-
Enter the Usage UOM by which the resource is measured in time in the specified inventory organization. This is usually specified in hours.
Required.
-
Enter the Calendar. The calendar description displays automatically.
Capacity
-
Enter the Range for the resource's minimum and maximum amount per vessel capacity unit at this inventory organization. Required.
-
Enter the Ideal for the resource's optimum amount per vessel capacity unit at this inventory organization. Required.
-
Enter the UOM by which the resource capacity is measured in this inventory organization. This is usually specified in mass or volume. For example, indicate if the material is produced in gallons or pounds. Required.
-
Select the Calculate Charges check box if the capacity of an operation is constrained by the resource for the purpose of calculating charges.
If another capacity-constrained resource in the same operation has a smaller capacity, the system uses the smallest capacity-constrained resource to calculate how many times an operation is repeated for the purposes of calculating charges. For example, a capacity-constrained mixer in an operation holds a maximum of 200 gallons. A batch calls for 250 gallons, so the mixer (and the operation) runs twice (incurs two charges) to produce enough quantity for the batch. However, if another capacity-constrained resource holding a maximum of 50 gallons is also part of the operation, then the operation incurs five charges instead of two. If you select the Calculate Charges check box in the Resources window for a resource, the box defaults as checked in the Resource Information window for all inventory organization and corresponding resource combinations. You can change the default value in the Calculate Charges check box in the Resource Information window for any inventory organization-resource combination.
-
Enter the Capacity Tolerance used by OPM.
-
Enter the Utilization percent. You can indicate if a resource is not 100% used. For example, due to small breaks or maintenance tasks, a resource may not be available part of the time. If the utilization ratio of a resource is 90%, then the resource is not available for processing 10% of the time. This factor is taken into account during the planning stage.
-
Enter the Efficiency percent. You can indicate if an activity processed on a resource may take a longer time to process. For example, an activity that usually takes 12 hours to process on a resource, if it is 100% efficient, then it takes 24 hours if the resource is 50% efficient. This factor is taken into account during the planning stage.
-
Planning Exception Sets indicates the exception set under which Planning engines log the resource exception.
-
Select the Batchable check box if the resource is a batchable resource.
-
Enter a batching window in number of days, for which you want to batch production orders in the Pull Forward Window field. If the application does not find production orders in the batching window, which is equal to, or more than the minimum batch quantity, it starts a batch with less than minimum quantity and an error displays.
-
If you select the Outside Processing check box in the Resources window for a resource, then the Outside Processing check box defaults as checked in the Resource Information window. This check box is part of OSP document support. It indicates that you have defined this plant resource as an OSP resource in the Resource window. You can associate an OSP item with this OSP resource.
-
Select the Shipping check box to create shipping transactions for ingredients and intermediate products consumed by this outside processing resource. You can only edit this field when you select the Outside Processing check box and there are no open batches using this resource.
-
Enter an OSP item to be associated with the OSP resource. The LOV displays only those OSP items defined in that specific plant/inventory organization.
-
Enter Cost Source for the item. The values can be either Resource Cost or PO Price.
-
Save your work.
Defining Resource Devices
This lets you integrate with Oracle Manufacturing Execution System for Process Manufacturing.
To define resource devices
-
Navigate to the Resource Information window.
-
Click Resource Devices.
Devices
-
Enter the name of the Device.
-
Description of the device displays automatically.
Device Response
-
Enter the device response Parameter.
-
Enter the unit of measure for the parameter.
-
Enter the Response Value.
-
Enter the unit of measure of the response.
Integrating with Enterprise Asset Management
Oracle Enterprise Asset Management (eAM) is a part of Oracle E-Business Suite, providing organizations with the tools to create and implement maintenance procedures for both assets and rebuildable inventory items. eAM integrates with Oracle Process Manufacturing (OPM), enabling your maintenance environment to identify eAM asset relationships with production equipment. This feature associates an asset or many assets to the production equipments located in process manufacturing organization. After establishing, you can view the resource usage (maintenance work orders, batches, or FPOs) emanating from production, associated with a maintainable asset.
You can define your resources as assets by linking your resources to assets defined in eAM. Linking to eAM enables OPM inventory organizations to view the scheduled maintenance for specific resources. You create a work order by using eAM to schedule maintenance on your resources defined as assets.
Refer to Oracle Enterprise Asset Management User's Guide for detailed information.
To link OPM resources with equipment items
-
Navigate to the Resource Information window.
-
Click Equipments.
-
Enter the Equipment Item that corresponds to the resource. You can assign multiple equipment items.
-
The Description of the equipment displays.
-
Save your work
Linking Each Resource Instance to a Serial Numbered Asset
The number of resource instances is defined by the number you entered in the Count field. If you want to link your resources to assets defined in eAM, then link each resource instance to a serial numbered asset.
To link each resource instance to a serial numbered asset
-
Navigate to the Resource Information window.
-
Complete this window. Refer to the Oracle Process Manufacturing Product Development User's Guide for details.
-
Click Instances.
-
Click OK.
-
Enter values that apply to all the instances in the Instance Default Values window.
-
Click Accept.
Resource Instances
-
Indicates the Instance Number of the resource.
-
Enter the Vendor Name. You can select the name of the vendor from whom you purchased the resource instance from the list of values or enter a new name.
-
Enter the Model Number.
-
Enter the Serial Number. Use this field to record equipment information. This is the actual serial number from the machine.
-
Enter the Equipment Item number.
-
Enter the Equipment Serial Number. An equipment item needs to be created in Oracle Inventory. In Oracle Inventory, specify the item which is equal to equipment. The LOV provides the serial number associated with the equipment item. This is how the serial number links to the resource instance to an asset. Required when using eAM.
-
Enter the Tracking Number. This can be any other number you use to track the resource. For example, you could enter the asset number from eAM here or a lot number.
-
Enter the Start Date. This is the date that you plan to begin using the resource instance.
-
Enter the End Date. This is the date that you plan to stop using the resource instance.
-
Enter the Last Maintenance Date. This is the date when you last performed maintenance on the resource instance.
-
Enter the Maintenance Interval. This is the number of days recommended between scheduled maintenance activities. This field is used to provide information only.
-
Select Inactive if the resource instance is not available for use at the present time.
Calibration
-
Indicates the Instance Number of the resource.
-
Enter the Frequency. The frequency indicates how many times in one period the resource instance requires calibrating. For example, a machine requires calibration four times a year. The number four is the frequency and a year is the period. This field is for informational purposes only.
-
Enter the type of Period in which the resource instance requires calibrating. For example, weekly, monthly, or yearly. This field is for informational purposes only.
-
Enter the Item used to calibrate the resource instance. You can select the inventory item with which to calibrate the resource from the list of values.
-
Enter the Date on which you calibrated the resource instance.
-
Enter the Certification Date on which the resource instance was certified.
-
Enter the name of the person who certified the resource instance in the Certified By field.
-
Save your work.
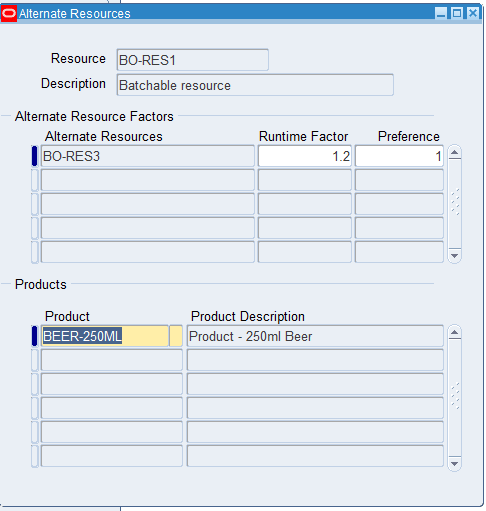
Defining Alternate Resources
An alternate resource is one that can perform the same operation as the primary resource. Alternate resources are used when the selected resource cannot be used in cases such as overload, breakdown, or performance issues.
Note: You cannot delete a resource on the Resources window if it is specified as an alternate on the Alternate Resource window.
To define alternate resources
-
Navigate to the Alternate Resources window.
-
In the Resource field, search for an existing resource record to associate with this alternate resource. The description for the selected resource appears.
-
In the Alternate Resource Factors section of the window, select the resource value to use as an alternate.
Select additional alternate resources on succeeding lines.
-
Enter the Runtime Factor and Preference for this alternate value.
Runtime factor is the rate determining time. For alternate resources, runtime is a factor of the primary resources runtime. Specify the factor for runtime in comparison with primary resource. This is a positive number. If the value is:
-
Greater than 1, this implies the alternate takes longer to complete the task than the original.
-
Equal to 1, this implies that the resources process at the same rate.
-
Less than 1, this implies that the alternate is faster than the original resource. For example:
-
If runtime for the primary resource is four hours, then entry of a runtime factor of .75 indicates that alternate resource runtime is three hours (4 * .75 = 3).
-
If runtime for the primary resource is four hours, then entry of a runtime factor of 1.5 indicates that alternate resource runtime is six hours (4 * 1.5 = 6).
-
-
-
In the Products section of this window, select the product associated with the alternate resource value. The Product description appears on the window:
-
For any product item entered in this section, the alternate records are used for those product items only.
-
If this field is null, the alternate resource is applicable for all the products using the primary resource.
-
-
Save your work.
Regenerating Targeted Resource Availability
Data setup can include entering parameters for targeting resource availability. Through the Generate Resource Availability concurrent program, the resource calendar is calculated automatically by considering resource unavailability and resource availability. Resource unavailability is defined by the unavailability codes associated to the resource. Resource availability is defined as per the workday calendar of the inventory organization that owns the resource. You can use the exception sets to modify the working or non-working days and time in the calendar. The resource calendars calculate the net working time using these exception sets.
-
Unavailability codes allow for the definition of periods of time when resources are not available and for the definition of additional periods of time when resources are available.
-
The From Resource and To Resource parameters input to the Generate Resource Availability concurrent program allows for resource availability determinations based on select resources within an inventory organization. In generating the concurrent program, resource unavailability information is considered in conjunction with resource availability information. Upon program completion, the availability of resources is targeted to those resources within the inventory organization specified in the resource range.
Note: When you try to set up three contiguous shifts within a calendar and that total to 24 hours, all shifts are grouped as a single shift in the OPM Resource Availability window wherein the shift duration is 24 hours. As the same result appears in ASCP, the add or reduce capacity features in the Resource Capacity form are not available and it is not possible to simulate scenarios like opening and closing plant resources.
Prerequisites
-
Define resources and inventory organization resources.
-
Define and associate manufacturing calendar to the inventory organization.
-
Define unavailability codes and their association with the resources.
Unavailability Codes
Through the Unavailability Code window, you can define a set of start and end dates and times and assign them to a resource. As per the field, specify whether the date and time indicates a period of time in which the resource is unavailable. The Type field specifies whether the time period is removed from resource availability or added to resource availability.
To define an unavailability code and assign it to a resource
-
Navigate to the Exception Code window.
-
Enter Exception Code. The exception code can have a maximum of six characters. Required.
-
Enter Description of the unavailability code.
-
Select Inactive Indicator to inactivate the unavailability code.
Unavailable Hours
-
Enter Start Date and End Date. The date and time values specify the time period in which one or more resources is unavailable or available. Required.
-
Enter Reason Code. The reason code value specifies why the resource is unavailable or available during this time period. The reason code Description displays. Required.
-
Enter the Start Date, End Date, and Reason Code for each range of time that one or more resources is unavailable or available.
-
Resources
-
Type Resources. This value specifies the resource within the organization to associate with this exception set. Required.
-
Type Resource Count. If you enter a Resource Count, then you cannot enter an Instance Number.
-
Type Instance Number for the specific instance that is unavailable as per the exception set. If you enter an Instance Number, then you cannot enter a Resource Count.
-
The Resource Description of the resource displays.
-
If you have multiple inventory organization and resource combinations to define, click Associate. Enter the inventory organization, Resource, and Resource Group to which this resource is assigned.
Note: Through the Resource Unavailablity window, you can view the inventory organization and resources for which the unavailable or available date and times are defined on the Exception Code window. You can also manually add unavailable date and times to the Resource Unavailablity window. The same information entered to the Exception Code window is entered to the Resource Unavailability window.
-
Viewing Resource Availability
To execute the Generate Resource Availability concurrent program
-
Navigate to the Generate Resource Availability window. The Parameters dialog box displays.
-
Enter Organization Code.
-
Enter From Resource.
-
Enter To Resource.
-
Enter Process Calendars.
-
Click OK.
-
Complete the fields on the Generate Resource Availability window.
-
Click Submit. The concurrent program is initiated. At program completion, you can view the current resource availability through the Resource Instance Available Time window.
Defining Resource Exceptions
You can view all of the exception codes associated with a resource and the total unavailable time for a resource through the Resource Unavailability window.
To define resource exceptions
-
Navigate to the Resource Exceptions window.
-
Enter the Organization Code where the unavailable resource is located.
-
Enter a Resource that is unavailable. The resource is instance controlled.
Exception Code Assignment
-
If you want to associate additional exception sets with the inventory organization code and resource, click a blank Exception Code field, then select an exception code from the list. Required.
-
A Description of the exception code displays.
-
Enter the resource Count. If you enter a Resource Count, then you cannot enter an Instance Number.
-
Enter the Instance Number for the specific instance that is unavailable because of the exception set. If you enter an Instance Number, then you cannot enter a Resource Count.
-
If you want to view the total unavailable time for the resource, click Details. The Resource Unavailability window displays.
-
Save your work.
See Also:
Defining Resource Unavailability
You can view the total unavailable time for a single resource. The source of each unavailable time period displays. You have the option to manually add additional unavailable time for the resource. You can only delete those unavailable times that were entered manually.
To define resource unavailability
-
Navigate to the Resource Unavailability window.
-
Select the Organization Code and Resource for which you want to view the unavailable time. The list of unavailable time periods for the resource displays.
Unavailability
-
Displays the name of the exception code that causes unavailability. Otherwise, you can enter rows manually. You can change the default from Manual using the GMP: Manual Exception Code profile option.
-
If you want to add an additional unavailable time period, then click Resource Count in the Unavailability region. If you enter a Resource Count, then you cannot enter an Instance Number.
-
Enter the Instance Number. If you enter an Instance Number, then you cannot enter a Resource Count.
-
Enter the unavailable time period into the From Date and To Date range. Required.
-
From the list, select a Reason Code associated with the exception code. To enter a manual exception code, select a reason code from the list for the manual exception. Required.
-
The description of the reason code automatically displays in the Reason Code Description field.
-
Save your work.
See Also:
Setting Up Resource Classes
You can define resource classes using the Resource Classes window. Then assign the resource classes to your resources.
Prerequisites
- Define resources.
To set up resource classes
-
Navigate to the Resource Classes window.
-
Enter the Resource Class name or code.
-
Enter a Description for the resource class.
-
Save your work.
Viewing Resource Instance Available Time
The Resource Instance Available Time window displays the net resource availability. This window shows the available times for a resource for an inventory organization and calendar. After creating the resource availability data by running the Resource Available Time concurrent program, use this window to query for a specific resource or a resource-instance combination to find out its availability. This window shows the availability for an instance controlled resource based on the criteria specified. If you have multiple resource instances, then use this window to view its instances. You are able to treat the instances as individual resources.
Prerequisites
-
Run the Resource Available Time concurrent program.
To view the availability of your resource
-
Navigate to the Resource Instance Available Time window.
-
Use the Find Resource Availability dialog box to search for a resource or a resource-instance combination to find out the availability of it. You can search by inventory organization code, calendar, resources, instance number, start date, and end date.
-
The following fields are display only:
-
Organization Code
-
Calendar
-
Resources
-
Instance Number
Available Times:
The following fields are display only:
-
Instance Number
-
Shift Date
-
Shift Number
-
Start Time
-
End Time
-
Duration
-
Units
-
Running the Generate Resource Availability Concurrent Program
The Resource Available Time concurrent program generates the available time data for the resources owned by an inventory organization. This program can be run as many times as you want to update the availability data. You can specify the calendar and the organization code. The manufacturing calendar is used with the inventory organization from the Organizations window as the default.
To run the Resource Available Time concurrent program
-
Navigate to the Generate Resource Availability window.
-
Select an Organization Code.
-
Enter the range of resources to select in the From and To Resources range.
-
Select the Process Calendars.
-
Click OK.
-
Complete the fields on the Generate Resource Availability window.
-
Click Submit. The Resource Available Time concurrent program begins to run.
Use the Resource Instance Available Time window to view the results.
Resource Availability
Through the OPM Exception Code, Resource Unavailability, and Resource Exceptions windows, you can identify when resources are unavailable. This information is then passed from OPM to APS and Manufacturing Scheduling. Before OPM data is passed to APS and Manufacturing Scheduling, the resource unavailable time is subtracted from the inventory organization's manufacturing calendar. The net available resource time is then passed to the APS and Manufacturing Scheduling. This lets APS and Manufacturing Scheduling issue exception messages when planned production exceeds resource capacity in an unconstrained plan. If you create a resource constrained plan, then daily production is limited by the resource constraint. You can record when each resource is unavailable after you have defined your inventory organization, resources, and reason codes.
See Also
Defining Resource Unavailability
Setting Up Process Parameters
A process parameter details information such as temperature, pressure, or time that is pertinent to the product, but does not fall into the classification of input or output. Process parameters can be used as set points, comparison values, or in conditional logic. Process Manufacturing enables the association of process parameters to a resource, at the resource level within an operation and a recipe, and at the production batch level:
-
Process parameters are defined as independent resource characteristics, and are definable from the Process Planning and Product Development menus.
-
Process parameters can be tied to any resources defined in OPM Process Planning.
-
Multiple resources can be used in an operation (step), and process parameters are resource specific.
-
Batch creation takes the process parameters and their default values found in the recipe. If they exist there; if no definitions exist in the recipe, then the operation is checked for their existence. If no definitions exist in the operation, then the resource is checked for their existence. If none exist in the resource, then you can insert process parameters directly into the batch associated with any resource in the Batch Step Resources window.
-
Process parameters with a numeric range can have a minimum or a maximum value or a range. For example, you can define a parameter with only a maximum value, such as less than or equal to 10.
-
Overrides - certain process parameter fields can be overridden once associated with resources, operations, and recipes. If the parameter is:
-
Numeric Range: The Target field can be defined at the generic resource. The Target, Minimum, and Maximum value fields can be overridden at the recipe resource level. Once a batch is created, the actual value is the only field that can be entered.
-
List of Values: No overrides can be made. The List of Values can only be defined on the Process Parameter window. Once a batch is created, the actual value is the only field that can be entered.
-
Text: The Target value can be defined at the generic resource and overridden at the recipe resource level. Once a batch is created, the actual value is the only field that can be edited.
-
When added directly to a batch, then the Target field can be entered, and the Minimum, and Maximum fields can be entered if it is a Numeric type.
-
To create process parameters
-
Navigate to the Process Parameters window.
-
Enter a unique Process Parameter name.
This field stores the process parameter (speed, temperature, and so forth) and is the first field in a list of values displaying process parameters. Once the record is saved, this field is not updateable.
-
Enter a Description.
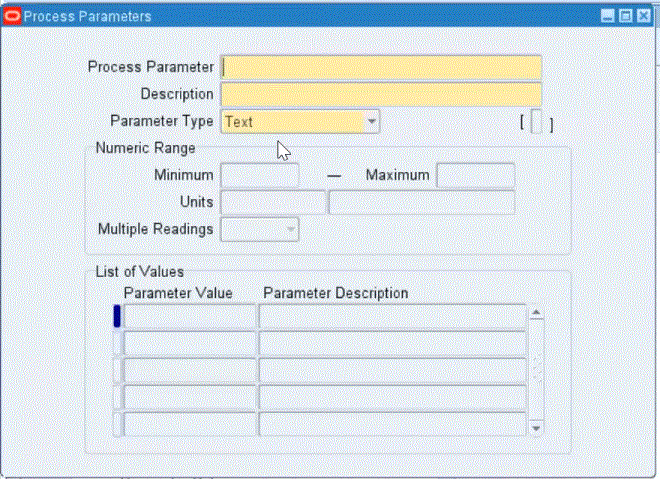
-
Enter Parameter Type, choices are:
-
Text—Enter any alphanumeric free text.
If this value is selected: Numeric Range, Minimum - Maximum, Units, Multiple Readings, and List of Values fields are disabled.
-
Numeric
Once this type is selected, the fields associated with the List of Values is disabled.
-
List Value—You can enter information in the list of values in the detail section, but not the Numeric Range and the Units. This selection indicates that all possible values for this process parameter are defined in a static table of entries. The same can be evaluated in the Target field in the Generic and Plant Resource Parameter window.
-
-
For Text and List Value Parameter Types—list as many values as needed in the Parameter Value and Description fields in the table.
The value in this field must be unique for the process parameter. When process parameters are used in other windows, this table appears in the list of values associated with the value field.
-
If you select the Numeric Type Parameter, enter information in the following fields:
-
Numeric Range
-
Minimum and Maximum range—the lowest and highest acceptable values for the process parameter. If you enter data for one value, the other value is optional.
-
Units—unit of measure
-
Multiple Readings
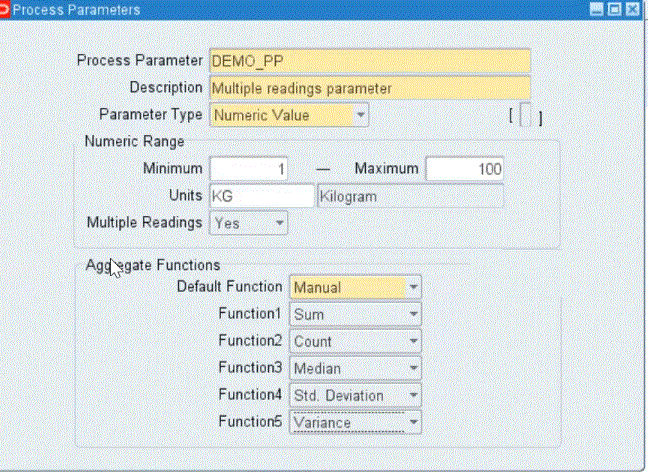
-
-
For Multiple Readings, choices are Yes or No.
-
Yes: The List of Values region turns into the Aggregate Functions region. The fields are Default Function and Function1 through Function6.
-
No or null value: The Aggregate functions table is not available.
-
-
In these drop down boxes you can select the following functions: Minimum, Maximum, Average, Mode, Variance, Standard Deviation, Median, Count, Sum, and Manual.
-
Save your work.
Defining Process Parameters Set
Process parameter sets enable you to establish a group of process parameters that reduce data entry when associating process parameters to resources.
Prerequisites
-
Define process parameters.
To set up process parameter sets
-
Navigate to the Parameter Sets window.
-
Enter the Parameter Set name. Required. The values stored here are used as a lookup in the Resource, Operations, and Recipe windows to load a process parameters list. Once the record is saved, this field is unique and cannot be updated.
-
Enter the Set Description for the parameter set. Required.
Parameters
-
Seq for the process parameter. This field is unique and is automatically populated with the next logical number.
-
Enter the Process Parameter name. Required. This field is used to associate process parameters to the process set defined in the window.
-
The Description of the process parameter displays automatically.
Setting Up Generic Resource Parameters
Once process parameters are defined, you can associate them with Generic Resources. The Generic Resource Parameters window can be invoked from the Generic Resources window or from the Process Planning menu. You can associate process parameters by either:
-
Directly entering the parameter name in the Parameter region and assigning the target values.
-
Associating the parameters contained in a parameter set by clicking Associate Parameters. A list of values with the names of all available parameter sets is displayed. Once a set is selected, all the parameters associated with the set are entered in the window. Assign the Target, Minimum, and Maximum values for those parameters.
Prerequisites
-
Define process parameters.
-
Define parameter sets.
-
Define generic resources.
To set up a generic resource parameter
-
Navigate to the Generic Resource Parameters window.
-
Query the Resources.
Parameters
-
Enter the Seq number for the resource. Required. Click Associate Parameters. This populates the process parameters and the sequences. Adjust the sequence numbering as necessary.
-
Enter the Process Parameter. This field displays the process parameter name (speed, temperature, etc.). This field can be populated through the list of values or by clicking Associated Parameters. The Units field displays the unit of measure for a numeric type process parameter. Required.
-
Enter the Target Value for the process parameter. Target value is the ideal setting for the process being run.
-
Enter the Min Value for the process parameter. The minimum value is the lowest acceptable value for a numeric type process parameter. Do not exceed the range defined for the process parameter.
-
Enter the MaxValue for the process parameter. The maximum value is the highest acceptable value for a numeric type process parameter. Do not exceed the range defined for the process parameter.
-
Enter the units of measure for the process parameter in the Units field.
Editing Plant Resource Parameters
The Plant Resource Parameters window captures the process parameters information specific to a inventory organization. You can enter this window after defining the generic resource parameters. This window inherits the resources and parameters information from the Generic Resources Parameters window and lets you override the Target values.
This window saves the record where the Target value has changed. If you want to change the generic resource parameter after the record is saved, then the Plant Resource Parameter window does not inherit the changed value from the Generic Resource Parameter window. However, by clicking Reset Values, you can default the value from the generic resource or retain the previously overridden value. The cursor must be on the record to do this. You can close the window if you do not want to change any Target values. In addition, the window does not allow you to create or delete the displayed process parameters.
Prerequisites
-
Define process parameters.
-
Define parameter sets.
-
Define generic resources.
-
Define generic resource parameters.
-
Define inventory organization resources.
To change plant resource parameters
-
Navigate to the Plant Resource Parameters window. The following fields are displayed:
-
The Resources for the process parameters set.
Parameters
-
The Seq number for storing the process parameters in a unique sequence.
-
The Process Parameters name.
-
Edit the Target Value for the process parameter. This is the ideal setting for the process being run.
-
Enter the Min Value for the process parameter. The minimum value is the lowest acceptable value for a numeric type process parameter. Do not exceed the range defined for the process parameter.
-
Enter the Max Value for the process parameter. The maximum value is the highest acceptable value for a numeric type process parameter. Do not exceed the range defined for the process parameter.
-
The Units field displays the unit of measure for a numeric type process parameter.
Setting Up Sequence Dependencies
The Sequence Dependent Setup windows lets you indicate the amount of additional setup time required when products are processed through each operation in a specific sequence. OPM retrieves all items that are assigned the sequence dependent classes that you specify on the Sequence Dependent Setup window.
To set up sequence dependencies
-
Navigate to the Sequence Dependent Setup window. The From and To functionality allows transition from one operation to another.
From
-
Enter the first Operation Number for which you are defining sequence specific parameters. This number is the default for the To Operation Number.
-
Displays the Operation Version associated with the operation.
-
Enter the first Item Class code for classification of products that will be first during this operation. For example, if paints are being blended, you may want to blend light shades first, then darker shades. If this is the case, then enter sequence classification code for lighter shades of paint. The From and To Item Class fields cannot be the same. Required.
To
-
Enter the last Operation Number for which you are defining sequence specific parameters. This number is the default from the From Operation Number.
-
Displays the Operation Version associated with the operation.
-
Enter the last Item Class code for classification of products that will be processed second during this operation. For example, if paints are being blended, you may want to mix light shades first, then darker shades. If this is the case, then enter sequence classification code for darker shades of paint. The From and To Item Class fields cannot be the same. Required.
-
Enter the Setup Time. This is the amount of time in hours that will be added to this operation when items are processed in this sequence. For example, when light paints are mixed first, then dark paints. Required.
-
Enter the Penalty Factor. This factor is used by Oracle Manufacturing Scheduling to determine which setup is more expensive. Required. The Penalty Factor value must be consistent with the setup time. For example, the higher the setup time, then the higher the penalty factor.
Viewing Sequence Dependent Items
The Sequence Dependent Items window enables you to view all of the item combinations for the classes.
Prerequisites
-
Set up sequence dependencies.
To view sequence dependent items also referred to as associated items
-
Navigate to the Sequence Dependent Items window. You can navigate to this window using any of the following ways:
-
Click Associated Items from the Sequence Dependent Setup window.
-
Click the drill down indicator associated with the sequence dependent to view from the Sequence Dependent Setup window.
-
-
The following fields are display only:
-
Operation Number From and To
-
Operation Version From and To
-
Seq Dependent Class
-
To Item Class
-
Setup Time
-
Penalty Factor
From Item
-
Number
-
Description
To Item
-
Number
-
Description
-