Quality Command Center
This topic provides information about Oracle Quality Command Center dashboards for Oracle Process Manufacturing.
This chapter covers the following topics:
- Quality Command Center Overview
- Sample Inspection Dashboard
- Sample Analysis Dashboard
- Instrument Calibration Dashboard
Quality Command Center Overview
You can use the Oracle Quality Command Center to manage product testing efficiently, enforce quality standards for products, and reduce cost and business risk. As a quality manager, a lab manager, a quality analyst, or a quality inspector, you can monitor inspections, and manage quality deviations by analyzing data using Key Performance Indicators (KPIs), performance evaluation metrics, charts, graphs, tables, and network diagrams. Based on your role, the Quality Command Center enables you to:
-
Prioritize sample tests and manage the sample load.
-
Analyze sample delays and tests that are due.
-
Identify and resolve quality rejections.
-
Prevent recalls and enhance customer trust.
-
Take quick action and control quality deviations.
-
Analyze quality issues across organizations and sample sources.
-
Track and monitor calibration for laboratory and production equipment.
Before you load data from Oracle E-Business Suite into the Quality Command Center, ensure that your EBS data is accurate and current.
In Oracle Process Manufacturing Quality Management, the following Quality Command Center dashboards enable search functions using Enterprise Command Center integration:
-
Sample Inspection dashboard - Use this dashboard to quickly search for, view and monitor sample inspections that are planned, or are pending analysis and approval. You can also view the number of delayed sample inspections and unassigned tests.
-
Sample Analysis dashboard - Use this dashboard to identify and manage quality deviations. You can identify the quality tests that are out of the specification ranges and take corrective action to resolve the issues.
-
Instrument Calibration dashboard - Use this dashboard to track the complete calibration lifecycle of laboratory or production equipment. You can review various metrics for the instrument calibration process.
Note: You can use the Quality Command Center only after the installation and common configurations are completed as described in My Oracle Support Knowledge Document 2495053.1, Installing Oracle Enterprise Command Center Framework, Release 12.2. For additional ECC Overview information, see Overview of Oracle Enterprise Command Center Framework, Oracle E-Business Suite User's Guide.
Searching Enterprise Command Center Dashboards
Use the dashboard sidebars to refine (filter) the data on each dashboard. You can select a value or record from the Available Refinements component, or use Search to find a keyword, a value, or a specific record. The type-ahead feature suggests matches for your entry that correspond to the available refinements. When you submit a search, the search term is added to the Selected Refinements list, and the dashboard data is refined to include only records that match the search. You can add multiple refinements and remove any of them at any time. Use Saved Search to create and save your search. You can edit, delete, or refer to this saved search.
Use an asterisk (*) or percent sign (%) to perform a partial keyword or record search that matches any string of zero or more characters. You can also use a question mark (?) to perform a partial search that matches any single character.
Additional Information: For more information about searching for and refining data in enterprise command centers, see Search in Highlights of an Enterprise Command Center, Oracle E-Business Suite User's Guide.
Sample Inspection Dashboard
The Sample Inspection dashboard enables quality inspectors, and lab managers to ensure that products are tested on time by efficiently managing resources. Use this dashboard to:
-
Monitor inspection of quality samples.
-
Track delays in the testing and the disposition of samples.
-
Manage resource load of testers and testing kits.
-
Assign resources to samples that are in disposition, pending, and in progress.
-
Navigate to the Process Manufacturing Command Center's Genealogy and Trace dashboard to track and trace lots with quality issues.
Using refinements such as lab organization, samples, sample source, tests, and sample and test result dates, you can search and view sample information. You can view and analyze sample inspection metrics, charts, and results tables. See the Quality Command Center Overview for more information.
Log into the applications as a Process Manufacturing user, and from the Quality Manager responsibility, navigate to the Sample Inspection dashboard:
(N) Quality Manager > Quality Command Center > Sample Inspection (tab)
Sample Inspection Dashboard
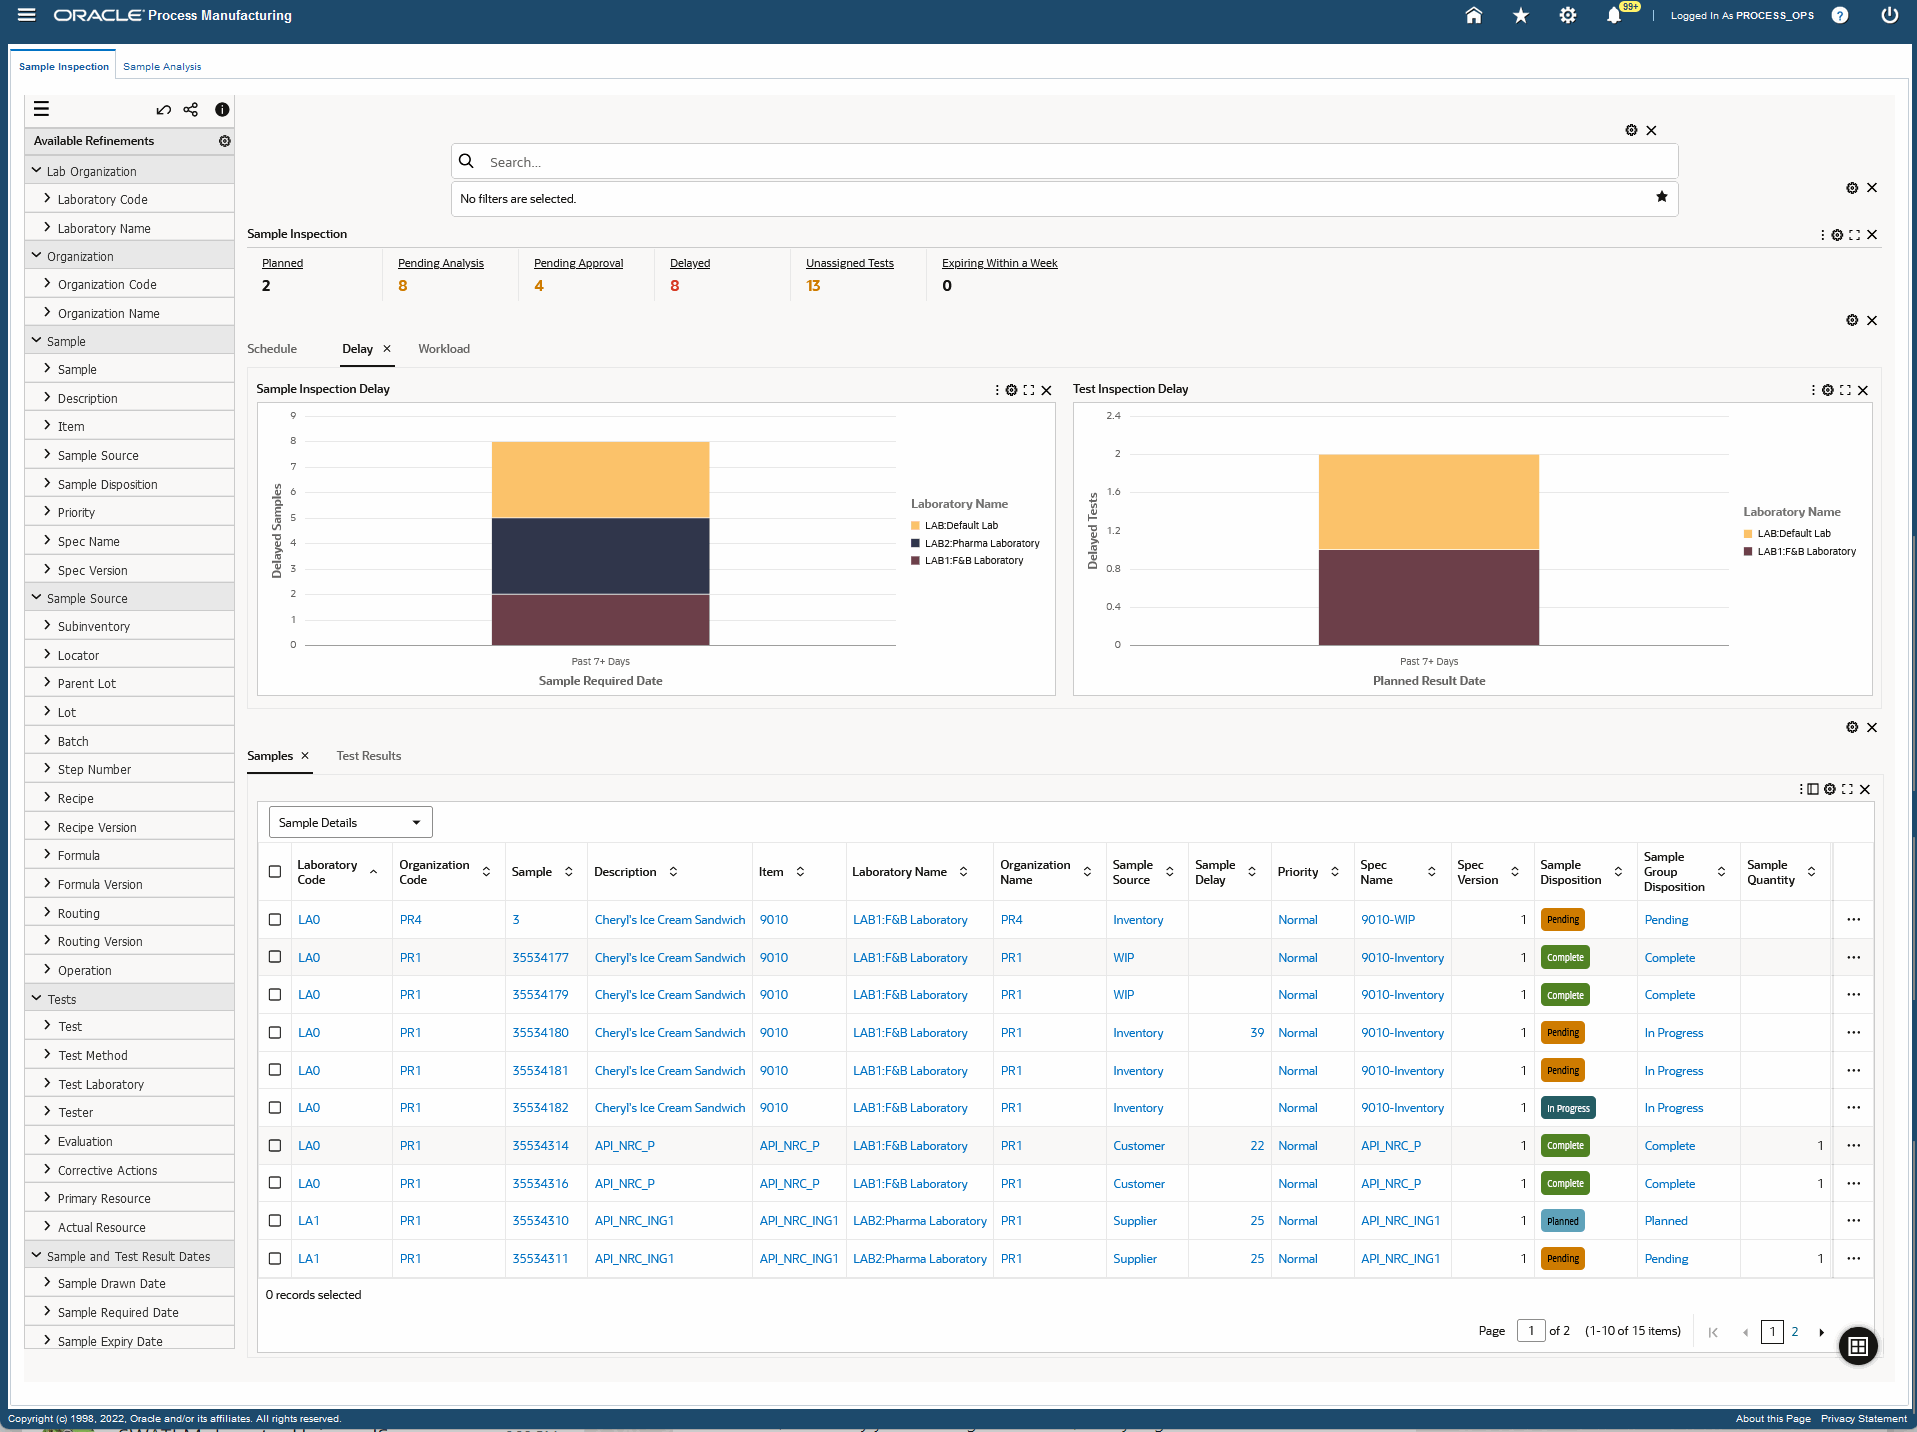
The following table describes the Sample Inspection dashboard components:
| Component | Description |
| Sample Inspections (summary bar) | The Sample Inspections summary bar displays the following metrics:
Click a metric to refine the information in the dashboard. |
| Schedule (tab) | The Schedule tab displays the following charts:
The Sample Disposition dimension in the available charts is color coded to show the following sample dispositions:
You can refine the data that is displayed in the dashboard by clicking data points on the charts and the dimension and metric value for a data point. |
| Delay (tab) | The Delay tab displays the following charts:
The Sample Disposition dimension in the available charts is color coded to show the following sample dispositions:
You can refine the data that is displayed in the dashboard by clicking data points on the charts and the dimension and metric value for a data point. |
| Workload (tab) | The Workload tab displays the following charts:
The Sample Disposition dimension in the available charts is color coded to show the following sample dispositions:
You can refine the data that is displayed in the dashboard by clicking data points on the charts and the dimension and metric value for a data point. |
| Results Tables (tab layout) | The results tables for the Sample Inspections dashboard display sample inspection and test results information under the following tabs:
Click the links in the table columns to refine the information available in the Sample Inspection dashboard. The following actions are available from the Options icon in the tables for the Sample Inspections dashboard:
|
See:
Sample Analysis Dashboard
The Sample Analysis dashboard enables quality analysts and quality managers to monitor and ensure that products meet the prescribed quality standards. Use this dashboard to:
-
Review quality deviations.
-
Review out of specification quality tests and take corrective action.
-
Monitor and engage with the production, inventory, purchasing and shipping departments to take corrective actions.
-
View process quality control charts for specific tests across different samples.
-
Navigate to the Process Manufacturing Command Center's Genealogy and Trace dashboard to track and trace lots with quality issues.
Using refinements such as lab organization, samples, sample source, tests, and sample and test result dates, you can search and view sample information. You can view and analyze sample analysis metrics, charts, and results tables. See the Quality Command Center Overview for more information.
Log into the applications as a Process Manufacturing user, and from the Quality Manager responsibility, navigate to the Sample Analysis dashboard:
(N) Quality Manager > Quality Command Center > Sample Analysis (tab)
Sample Analysis Dashboard
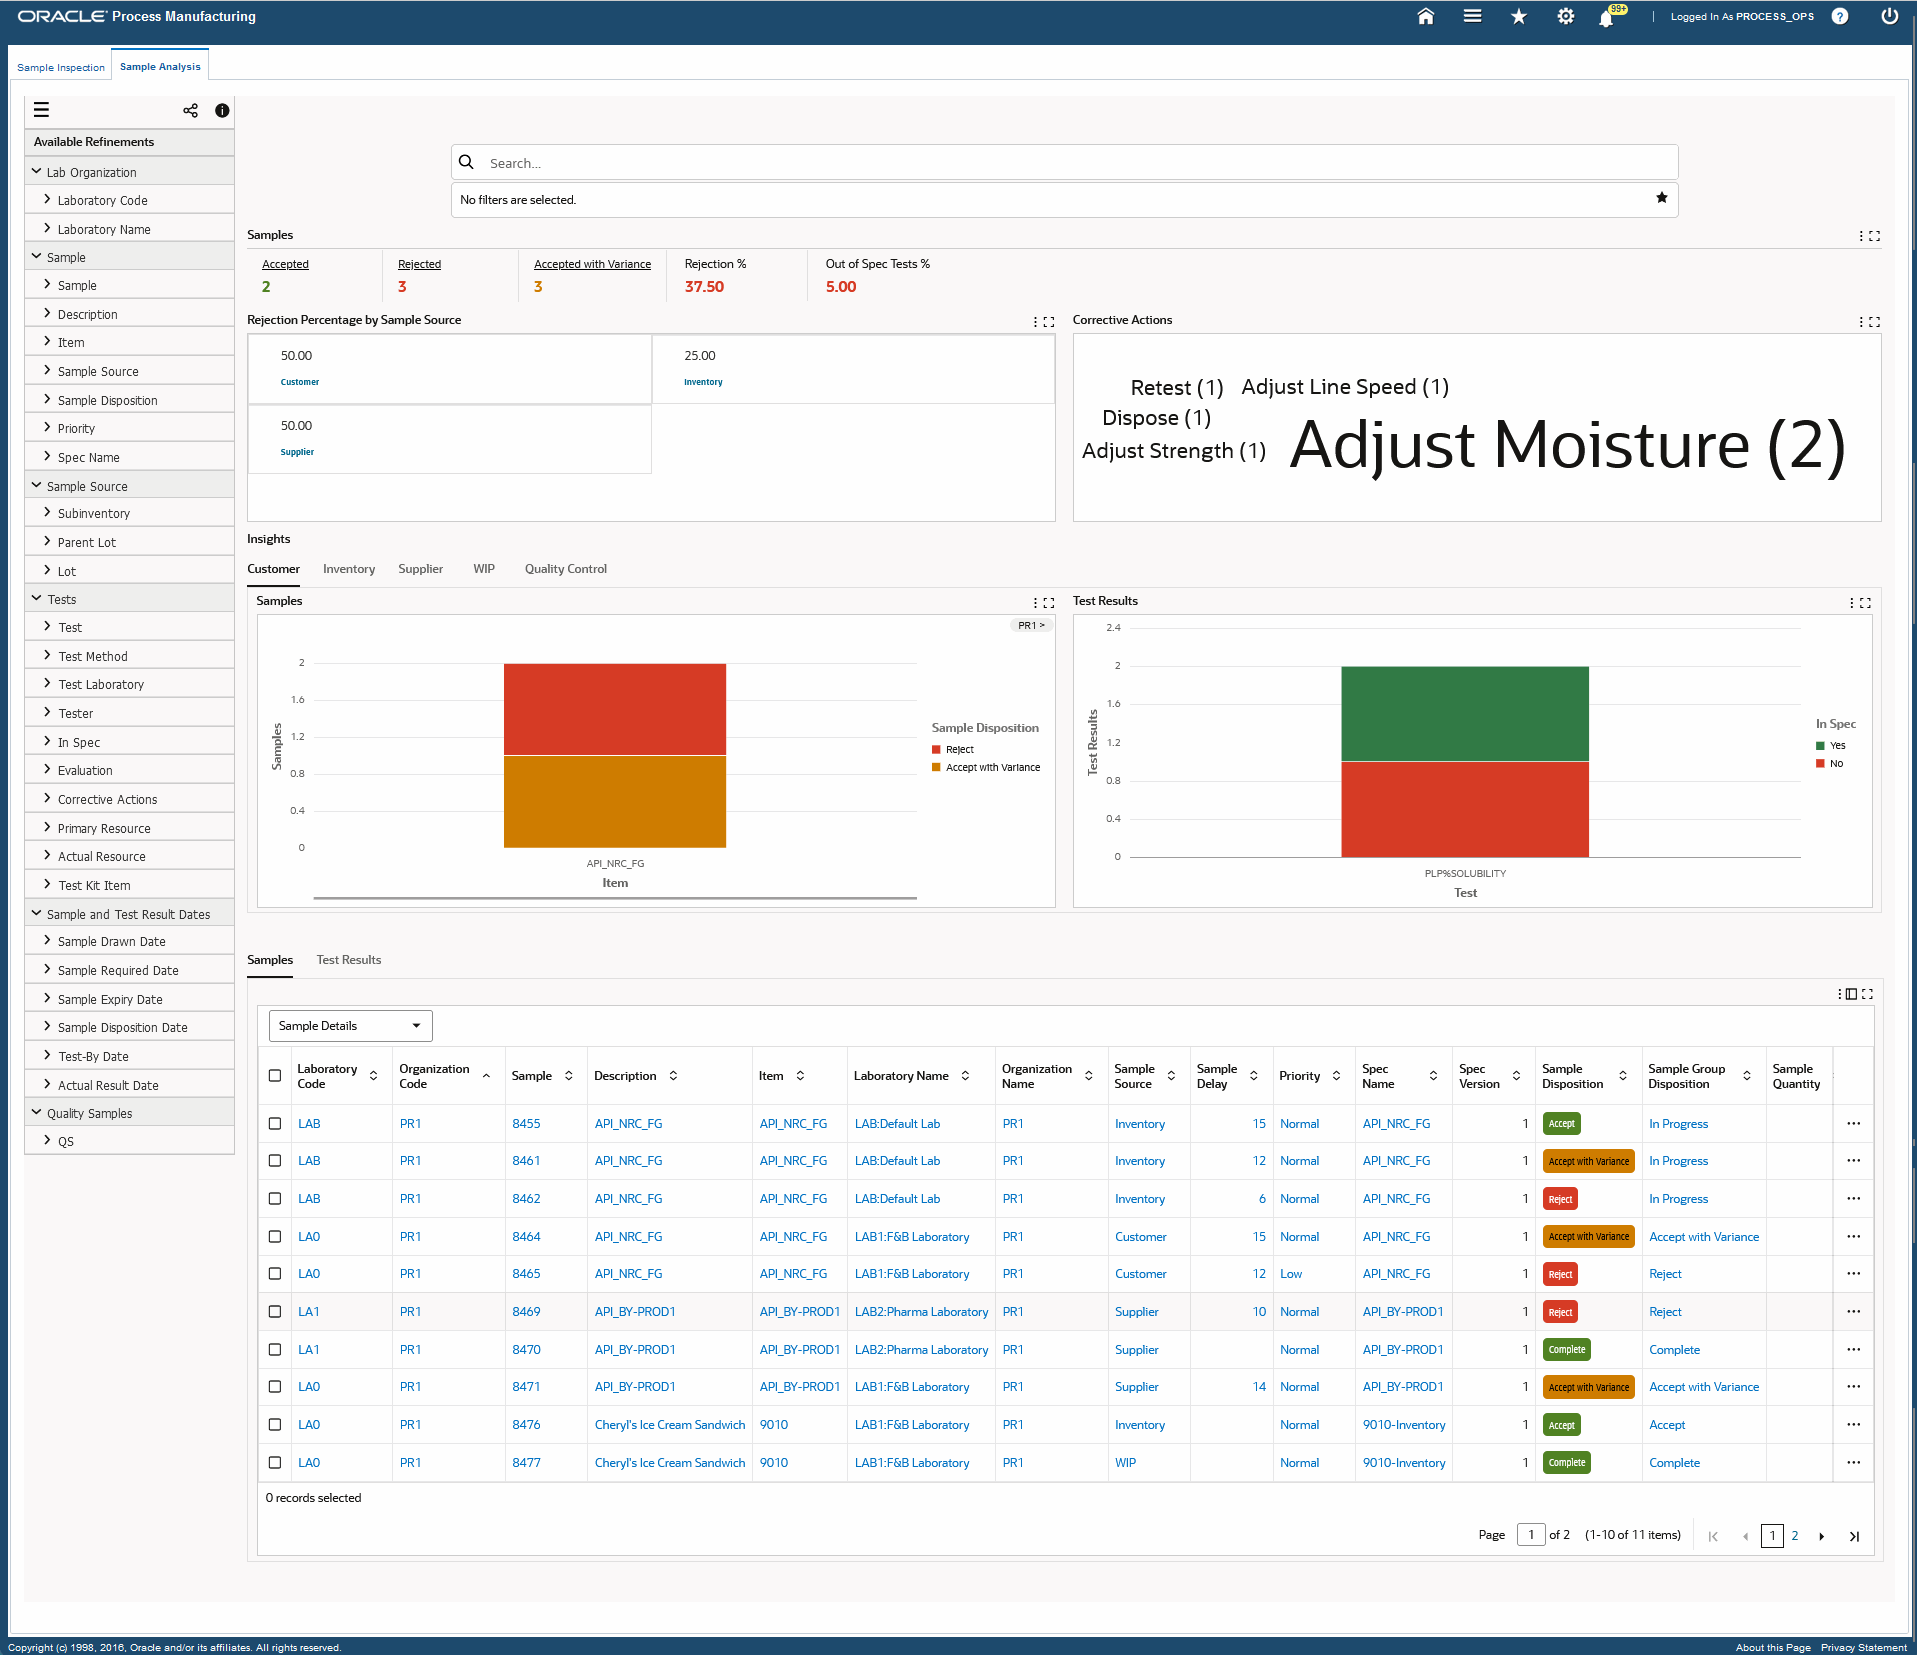
The following table describes the Sample Analysis dashboard components:
| Component | Description |
| Samples (summary bar) | The Samples summary bar displays the following metrics:
Click a metric to refine the information in the dashboard. |
| Rejection Rate Percentage by Sample Source(grid) | The Rejection Percentage by Sample Source grid displays key metrics on the rejected samples according to the following sample sources:
|
| Corrective Actions (tag cloud) | This tag cloud provides the top 10 corrective actions for out-of-specification tests and in-specification tests based on frequency. The entities are displayed in relative sizes by frequency of occurrence. You can click an entity in the tag cloud to filter the data in the dashboard. |
| Insights (tab layout) | The Insights tab layout provides charts that display sample and test result information. You can refine the data displayed on the dashboard by clicking the data point on a chart and the dimension and metric value for a data point. The charts display in the following tabs:
The Sample Disposition dimension in the available charts is color coded to show the following sample dispositions:
|
| Customer (tab) | The Customer tab provides the following charts that display information about customer samples:
|
| Inventory (tab) | The Inventory tab provides the following charts that display information about inventory samples:
|
| Supplier (tab) | The Supplier tab provides the following charts:
|
| WIP (tab) | The WIP tab provides the following charts that display information about work in process samples:
|
| Quality Control (tab) | This tab displays the Quality Control chart which displays information when you select a test defined as part of a single specification. The chart then shows the control chart of the test result value along with the target, minimum, and maximum values across samples.
Note: If a test is associated to multiple specifications, ensure that you select one specification for that test as an additional filter. Also ensure that the target value for a test and specification is not null to avoid errors in the chart display. |
| Results Tables (tab layout) | The Sample Analysis dashboard results tables display information in the following tabs:
Click the links in the table columns to refine the information available in the Sample Analysis dashboard. The following actions are available from the Options icon in the tables for the Sample Analysis dashboard:
|
See:
Instrument Calibration Dashboard
The Instrument Calibration dashboard provides a 360-degree view of calibration details enabling quality supervisors and quality managers to track the instrument calibration lifecycle for laboratory and production equipment. Use this dashboard to:
-
Review metrics to track the calibration status of all devices.
-
Monitor the progress, resources, schedules, and frequency of instrument calibration.
-
Track reminders for upcoming and overdue calibrations.
-
View calibration sample details and test result information in the results tables such as sample dates, resource details, laboratory codes, specifications, and target values.
-
Navigate to the Process Manufacturing Command Center's Batch Status dashboard to view calibration sample details.
Using refinements such as laboratory code, laboratory name, organization code, organization name, sample number, and tester you can search and view instrument calibration information. You can view and analyze instrument calibration analysis metrics, charts, and results tables. See the Quality Command Center Overview for more information.
Log into the applications as a Process Manufacturing user, and from the Quality Manager responsibility, navigate to the Instrument Calibration dashboard:
(N) Quality Manager > Quality Command Center > Instrument Calibration (tab)
Instrument Calibration Dashboard
The following table describes the Instrument Calibration dashboard components:
| Component | Description |
| Calibration Status (summary bar) | The Calibration Status summary bar displays the following metrics:
Click a metric to refine the information in the dashboard. |
| Progress (tab layout) | The Progress tab displays the following charts:
|
| Resources (tab layout) | The Resources tab displays the following charts:
|
| Calibration Details Results Tables (tab layout) | The Calibration Details results tables display information in the following tabs:
Click the links in the table columns to refine the information available in the Instrument Calibration dashboard. The following actions are available from the Options icon in the tables for the Instrument Calibration dashboard:
|
See: