Customer Application Process Flows
This chapter covers the following topics:
- Overview of Customer Application Process Flows Chapter
- Process Flow for Specialty Sites
- Process Flow for Product Search
- Process Flows for Shopping Carts
- Process Flow for Saving Carts
- Process Flow for Cart Sharing and Retrieval
- Process Flow for Shopping Lists
- Carts Page Process Flow
- Quotes Page Process Flow
- Update Quote Process Flow
- High-Level Process Flow for B2B Checkout
- B2B Shipping Information Process Flow
- B2B Billing Information Process Flow
- Process Flow for B2C Checkout
- Process Flow for User Account
- Process Flow for User Profile
- Process Flow for Order Tracker
- Sample User Registration Flows
Overview of Customer Application Process Flows Chapter
This chapter contains process flows for the Customer Application of Oracle iStore.
Note: Many of the flows depicted in this appendix display functionality that is only enabled if B2B users have specific permissions in their user roles. See the appendix, Seeded User Data, for information about the B2B permissions.
Process Flow for Specialty Sites
The flow through your specialty sites must follow a certain path, as shown in the following top-level diagram and related detail diagrams. Oracle iStore provides templates you can use for the pages illustrated in the diagrams. For more information, see the following chapters or appendices.
Process Flow for Specialty Sites
-
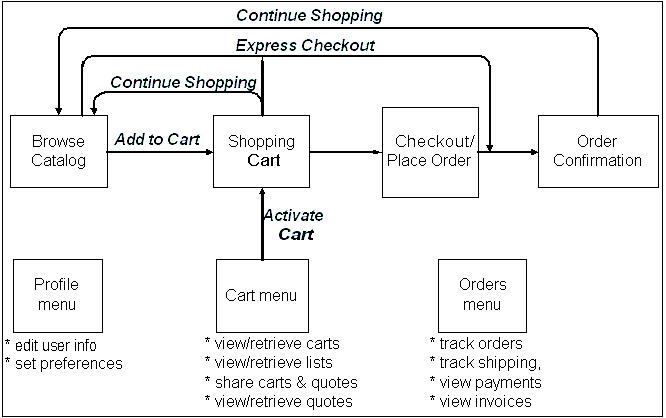
Users enter the site and browse through the catalog, optionally searching for items.
-
Users add items to the shopping cart and then check out with the cart to place an order.
-
Users can also retrieve saved and shared shopping carts and quotes, as well as shopping lists using the Cart menu.
-
From the shopping cart, pressing the Continue Shopping button takes users back to the Site Home Page.
-
Users can select Profile to set their preferences, access their address data, and reset their passwords. B2B users can access company information if the administrator has enabled it.
-
Users can also retrieve their account information --- including orders, invoices, payment information --- by accessing the Orders menu.
-
The checkout process takes users to the confirmation page. For more information, see the "Orders Business Flow" in the chapter, Implementing Carts and Orders.
-
Users can select Express Checkout to omit the shopping cart and checkout process; express checkout orders are picked up by a concurrent program and submitted automatically. For more information, see the "Express Checkout" section in the chapter, Implementing Carts and Orders.
The following graphic depicts this flow.
Process Flow for Specialty Sites
Process Flow for Product Search
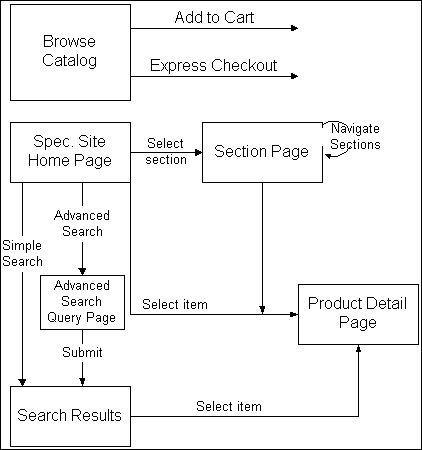
Product search capability from the Site Home Page allows users to locate products by various criteria, if the administrator has enabled this functionality. Users also can browse through sections to locate products.
Process Flow for Product Search
-
Users enter the site at the Site Home Page. Users view groupings of products within sections, and can navigate through the sections to find products.
-
From the Site Home Page, users can conduct a Simple or Advanced search to find products.
-
In the search Results page, users may select a product to review detailed product information.
-
Users can Add to Cart and perform Express Checkout (if enabled) from section and product detail pages.
The following graphic illustrates this flow.
Process Flow for Product Search
Process Flows for Shopping Carts
The diagram and related text in this section show the shopping cart flows for the Actions drop-down menu as well as other flows available from the shopping cart. See the related detail flows for more information:
-
Process Flow for Saving Carts
-
Process Flow for Cart Sharing and Retrieval
-
Process Flow for Shopping Lists
-
My Carts Page Process Flow
-
My Quotes Page Process Flow
High-Level Process Flow for Shopping Cart
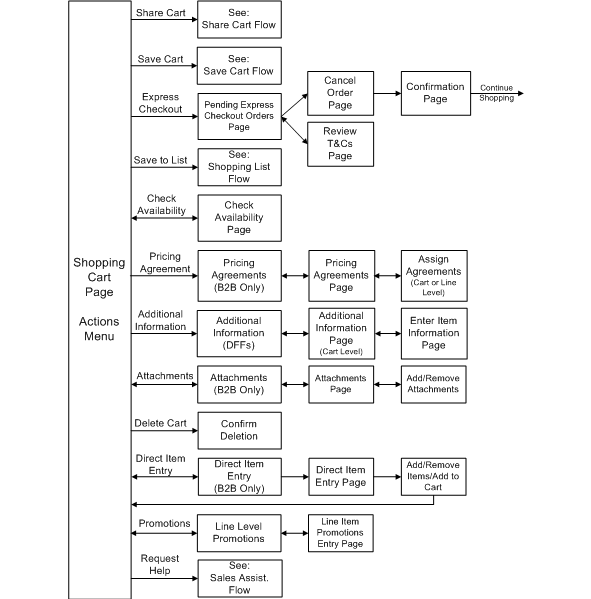
The Shopping Cart page features an Actions LOV that allows customers to perform various cart activities. To engage the action, the customer must press the Go button after selecting it. Following are the actions available from the Shopping Cart page:
-
Save Cart: See "Process Flow for Saving Carts" for this flow.
-
Share Cart: See "Process Flow for Cart Sharing and Retrieval", for this flow.
-
Express Checkout: See the section, "Express Checkout Process Flow", in the chapter, Implementing Carts and Orders, for this flow.
-
Save to List: See "Process Flow for Shopping Lists", for this flow.
-
Check Item Availability: This action only displays if Check Availability functionality is enabled.
-
Pricing Agreement: B2B users can select pricing agreements.
-
Additional Information: This action allowing users to navigate to the Additional Information descriptive flexfield (DFFs) is only available if the Additional Information DFF has been enabled for the shopping cart. See the section, "DFF Process Flows", in the chapter, Advanced Display, for this flow.
-
Attachment: This action, available to B2B and partner users, allows them to add an attachment to the shopping cart.
-
Delete Cart: This action which deletes the cart always displays if the user is viewing an active cart. The user must confirm the delete. Deleted carts are no longer accessible. Note that if the user is working with an active quote, he will not be able to delete it.
-
Direct Item Entry: This functionality is only for (B2B users. See the sections, "Direct Item Entry Process Flow" and "Process Flow for Uploading Comma Separated Values File", in the chapter, Implementing Carts and Orders, for these flows.
-
Line Promotions: This action allows users to enter valid promotional discount codes for line items that are listed in the active shopping cart.
-
Request Help: See the "Sales Assistance Process Flow" in the chapter, Implementing Customer Assistance, for this flow.
The following diagram depicts this flow.
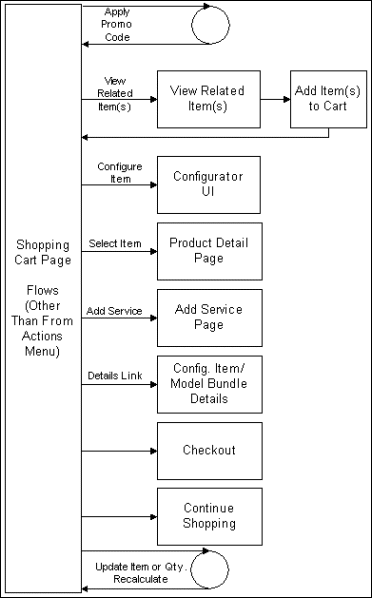
Shopping Cart Flows: Other Than from Actions Menu
From the Shopping Cart page, users can perform several activities in addition to those available from the Actions menu. These other activities include:
-
Enter Promotion Codes: If implemented, customers can enter known promotion codes into the Promotion Codes textbox and apply the changes. This action applies a promotion code to the cart items. For more information, see the "Common Shopping Cart Elements" section in the chapter, Implementing Carts and Orders,
-
View Related Items: If implemented, customers can view items related to those in the cart, adding the items to the active cart if they wish.
-
Reconfigure Items: Customers can select the Reconfigure link underneath an item in the cart to launch Oracle Configurator and reconfigure the item.
-
View Item Details: Customer can select the hyperlink of a product name in the shopping cart to drill-down to item details.
-
Add Services: If implemented, customers can select the Add Service link underneath serviceable items in the cart and add or change existing services for the product.
-
View Configured Item Details: Customers can select the Details link underneath an configured item in the cart to details of the configuration.
-
Checkout: Customers can select the Checkout button to begin the checkout process. See the "Process Flow for B2B Checkout" and "Process Flow for B2C Checkout" in this chapter, for these flows.
-
Continue Shopping: Customers can select the Continue Shopping button to navigate to the catalog pages, where they can shop for additional items.
-
Update Items: Customers can remove items from the cart. They also can enter new quantities for items and then recalculate the cart totals.
The following diagram depicts these activities.
Shopping Cart - Flows Other Than From Actions Menu
Process Flow for Saving Carts
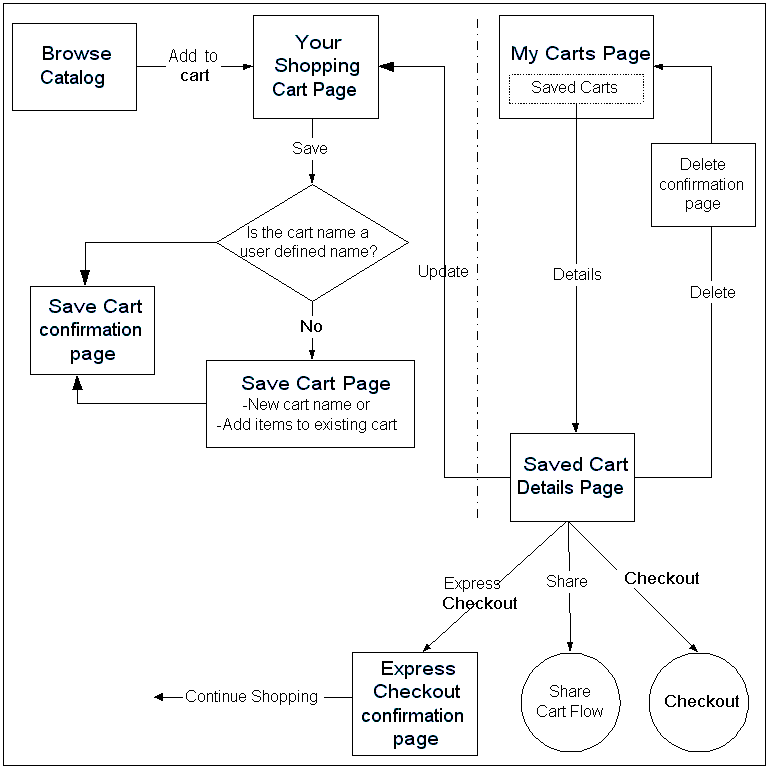
Users can save a shopping cart at any time by selecting Save Cart action from the Shopping Cart page (this is the active cart).
Oracle iStore automatically saves carts with default names, if the user does not explicitly save them. See the chapter, Implementing Carts and Orders, for more information.
-
Users select the Save Cart action in the Shopping Cart page.
-
If the user saves the cart and the cart does not yet have a user-defined name, after selecting Save Cart, the user can either create a new saved cart or add items to an existing cart.
-
Oracle iStore displays a confirmation message when the cart is saved.
-
Users can then press the Continue Shopping button to continue browsing the specialty sites.
-
To retrieve saved carts, users navigate to the Carts page within the Cart menu. In the Saved Carts area of the page, users can select several actions (Update, Express Checkout, Share, Duplicate, Delete) to perform with the cart, or can select the cart name hyperlink to retrieve the Saved Cart Details page.
-
From the Saved Cart Details page, users can select identical actions as are available from the Saved Carts area.
-
To activate and potentially modify the cart, the user must select the Update action. The cart then becomes the active cart, and the page is named Shopping Cart.
For more information on cart actions, see the "Common Shopping Cart Elements" section in the chapter, Implementing Carts and Orders.
The following diagram illustrates this process flow.
Cart Saving Process Flow
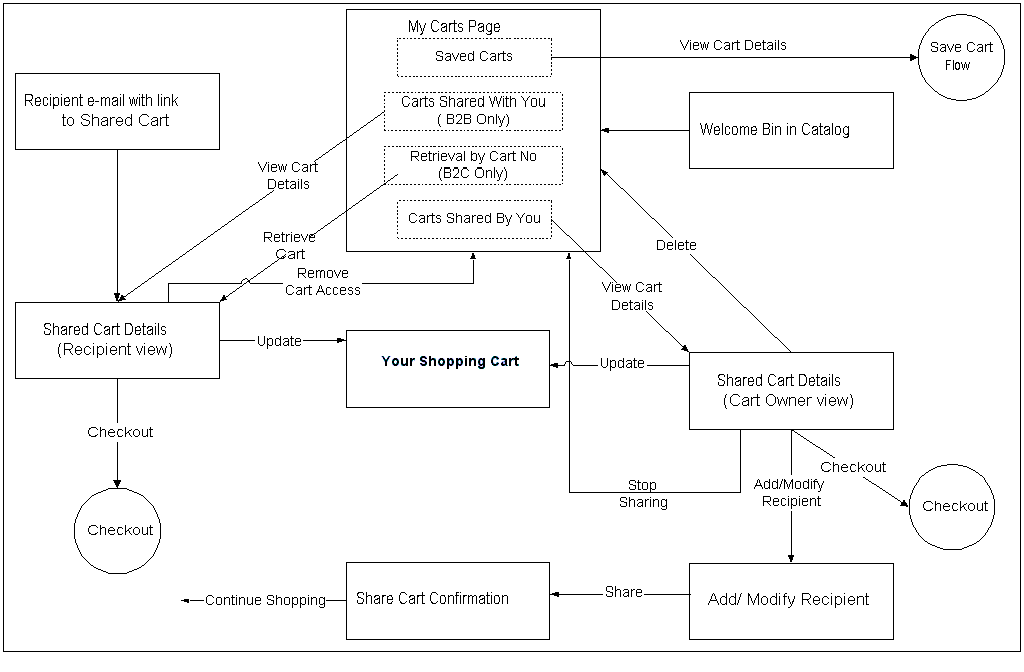
Process Flow for Cart Sharing and Retrieval
Share cart functionality is available for both B2B and B2C users, and can be controlled by setting a profile option.
-
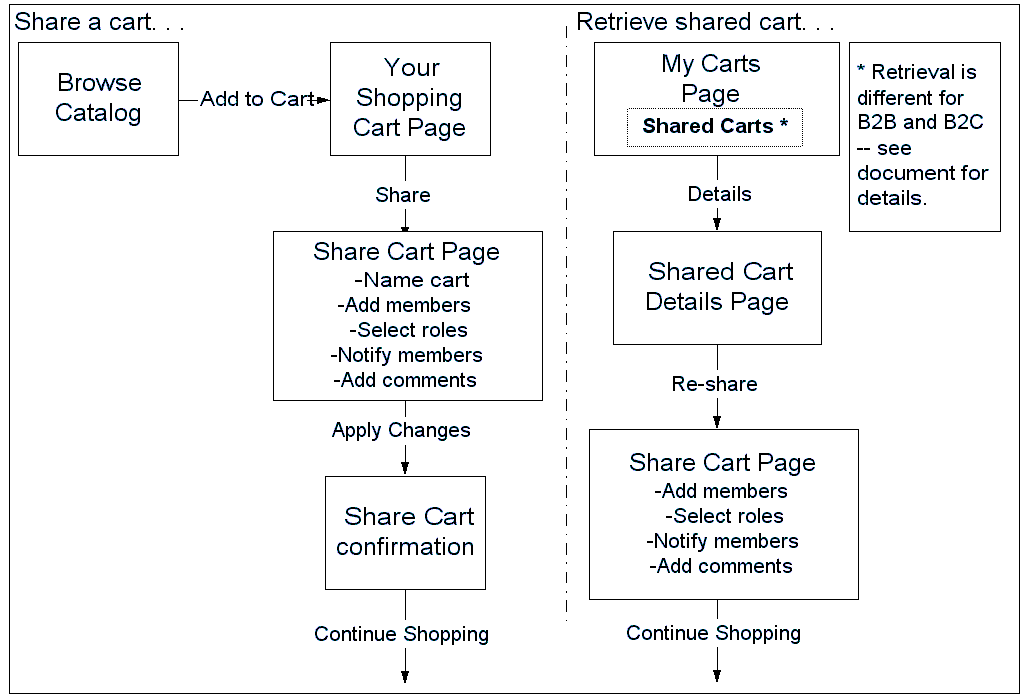
Users can select the Share Cart action in the cart to share the cart with other users at any time.
-
Users then select or enter cart members.
-
Users select roles for the members and apply the selections. Oracle iStore displays a confirmation page.
-
Shared cart members receive an e-mail with instructions detailing how to access the shared cart.
-
To retrieve the shared cart, users can either select the URL hyperlink in the e-mail notification or navigate to the Carts page, where they can select the shared cart name hyperlink (B2B users) or enter the shared cart retrieval number (B2C users).
-
B2B members with specific roles can then re-share the cart with other members. B2C users must be the cart owner to re-share a cart.
The following figure depicts this flow.
Cart Sharing and Retrieval Process Flow
Process Flow for Shopping Lists
Shopping lists enable users to store items that they may wish to purchase or that they purchase repeatedly.
-
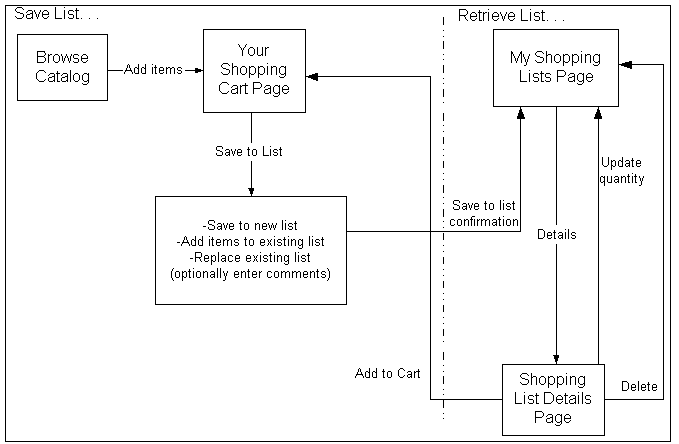
The user selects the Save to List action in the Shopping Cart page.
-
The system prompts the user to enter a new name for the list or to merge the items to an existing list (if one exists).
-
Optionally, the user can enter comments for the list in the Comments textbox.
-
To retrieve a shopping list, the user navigates to the Shopping Lists page within the Cart menu, and selects the hyperlink of the a list name. The Shopping List Details page appears.
-
To add items to the current, active cart, in the Shopping List Details page, the user selects the appropriate items in the shopping list and selects the Add to Cart action.
-
To add items to an existing list, the user selects the appropriate items in the shopping list and selects the Add to List action.
-
Optionally, in the Shopping List Details page, the user can also:
-
Update item quantities by entering the numerical values in the Quantity field and pressing the Update Quantity button.
-
Delete items in the list by activating an item's Select checkbox and pressing the Delete button (not the Delete List button).
-
Drill down to product details by selecting the item name hyperlink. At this point, the user can add item(s) to a new cart and checkout, including Express Checkout.
-
Delete the entire list by selecting the Delete List button.
-
The following diagram illustrates this flow.
Shopping Lists Process Flow
Carts Page Process Flow
The Carts page within the Cart menu is the entry point for most of the actions that users can perform with carts. The following diagram shows the actions from the Carts page.
For the Quotes page flow, see the Quotes Page Process Flow in this chapter.
-
To view a list of saved or shared carts, both B2B and B2C registered users select the Cart icon in the Customer Application, and then select the Carts subtab.
The main sections on the Carts page are:
-
Saved Carts
-
Carts Shared By You
-
Carts Shared With You (B2B only)
-
Cart Retrieval Textbox (B2C only)
-
See the chapter, Implementing Carts and Orders, for additional details.
The following diagram illustrates this flow.
Carts Page Process Flow
Quotes Page Process Flow
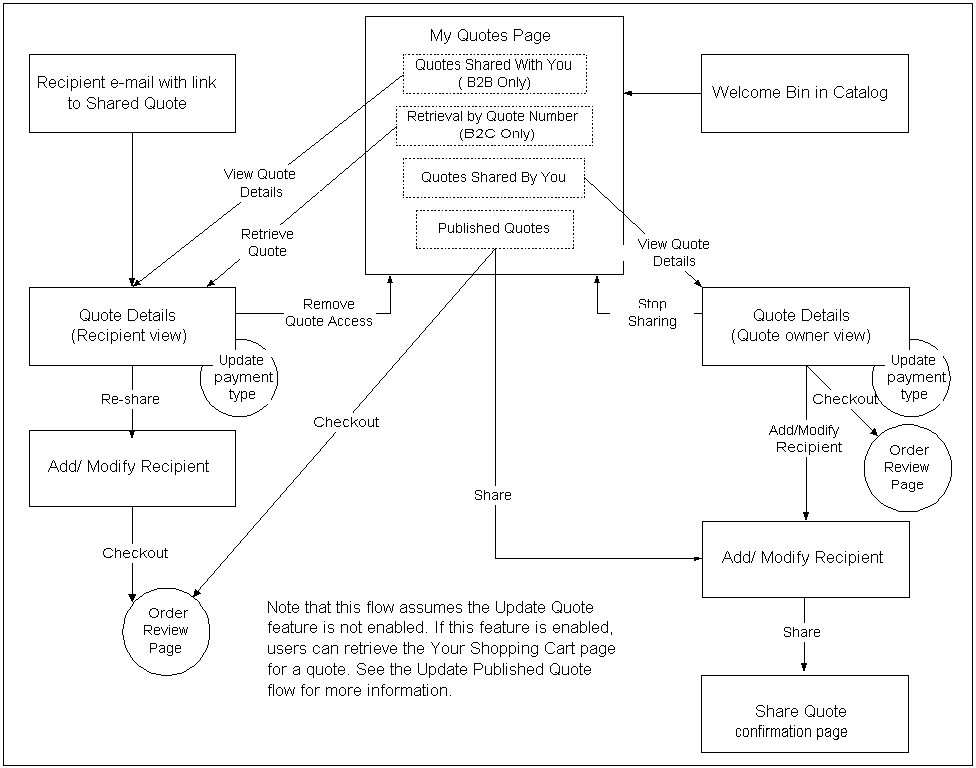
The Quotes page within the Cart menu is the entry point for quote-related activities. Quotes can originate from:
-
Carts that have become quotes in the sales representative assistance flow (see the section, "Sales Assistance Process Flow", in the chapter, Implementing Customer Assistance).
-
Quotes published through the quote publishing feature of Oracle Quoting
-
Carts that have become quotes when a user rejects terms and conditions, thus activating the sales representative assistance flow
-
Quotes shared by users (see the section, "Quote Sharing", in the chapter, Implementing Carts and Orders).
Note that you must integrate with Oracle Quoting to achieve this functionality.
Published quotes and quotes created through the sales representative assistance feature become saved quotes and are shown in the Published Quotes area of the Quotes page. See the chapter, Integrating Oracle iStore with Oracle Quoting, for more information about quote publishing, and the chapter, Implementing Customer Assistance, for more information about the Sales Assistance flows.
Note that this flow assumes the Update Quote feature is not enabled. If this feature is enabled and a quote is in Draft status, users can press Update Quote in the Quote Details page to retrieve the Shopping Cart page. See the Update Quote Process Flow and the shopping carts flows in this chapter for more information.
-
To view a list of published or shared quotes, both B2B and B2C registered users select the Cart icon in the Customer UI, and then select the Quotes subtab.
-
The main sections on the Quotes page are:
-
Published Quotes
-
Shared Quotes
--Quotes Shared By You
--Quotes Shared With You (B2B only)
--Quote Retrieval Textbox (B2C only)
-
-
To access quote details, the user selects a quote name hyperlink.
-
In the Quote Details page, users can view details of a quote and update payment type information for the quote before checking out.
-
In the Quote Details page for a shared quote, the actions the users can perform depend upon their shared cart roles. For more information, see the chapter, Implementing Carts and Orders.
The following diagram shows this flow.
Quotes Page Process Flow
Update Quote Process Flow
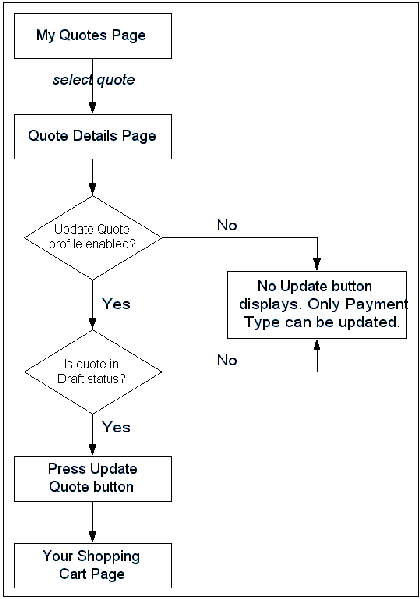
By default, users are only able to update the payment type on a quote published in the Customer Application. Of course, they can always check out with a quote if the quote status allows it. Implementers can allow users to perform normal update cart actions with a published quote when retrieving the Shopping Cart page for a quote. See the chapter, Integrating Oracle iStore with Oracle Quoting, for implementation information.
See also: Implementing Carts and Orders
-
A B2B or B2C registered user selects the Cart icon in the Customer Application, and then selects the Quotes subtab.
-
The user selects a quote name hyperlink to retrieve the Quote Details page. Note that this flow covers shared carts as well.
-
If the update quote feature is enabled, the Update Quote button in the Quote Details page allows access to the Shopping Cart page, where the user can perform normal cart actions.
-
To allow updating, Oracle iStore also requires that a quote be in Draft status in Oracle Quoting.
The following diagram illustrates this flow.
Update Quote Process Flow
High-Level Process Flow for B2B Checkout
B2B customers who are ready to place their orders navigate to the checkout phase, where they enter shipping and payment information.
Additional Information: The flows in this section assume neither Express Checkout nor Smart Checkout are enabled and that there are shippable items in the cart (no shippable items means the shipping information step is eliminated).
In addition to the high-level process flow for B2B customers checkout, also refer to the following flows:
-
B2B Shipping Information Process Flow
-
Ship to Multiple Locations Process Flow
-
B2B Billing Information Process Flow
-
Bill to Multiple Locations Process Flow
-
End Customer Information Process Flow
-
Multiple End Customers Process Flow
-
Commitments and Pricing Agreements Process Flow
The following is the high-level process flow for B2B checkout:
-
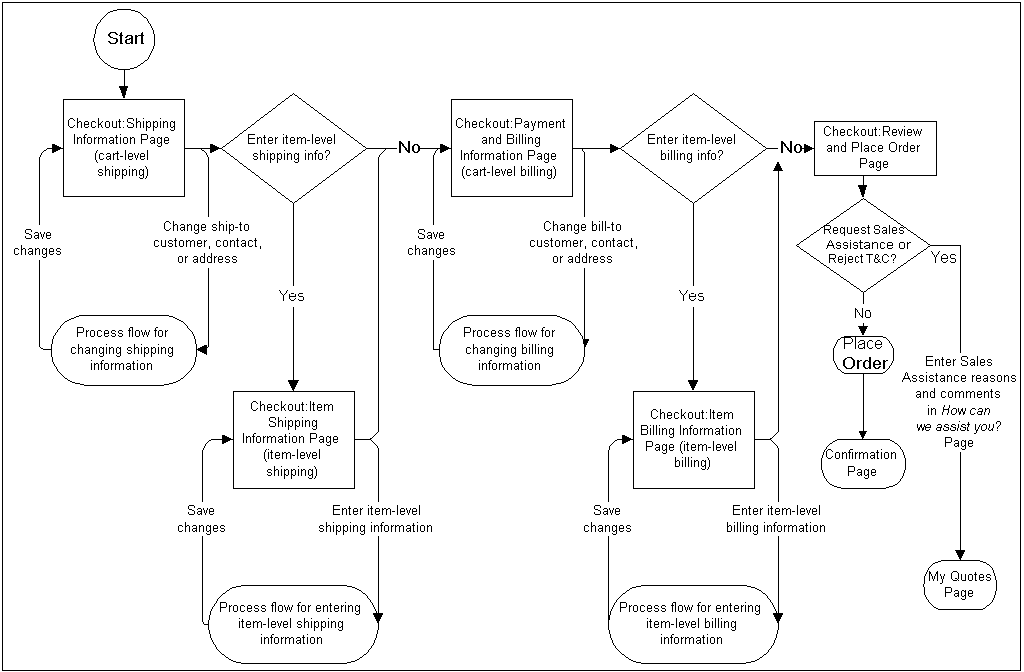
When B2B customers proceed to checkout by pressing the Checkout button, they begin in the Checkout: Shipping Information page, where they enter shipping information. Note that B2B users must have the IBE_CHECKOUT permission to access the Checkout button.
-
Customers then proceed to the Checkout: Billing and Payment Information page, where they enter payment and billing information for the order.
-
Customers then proceed to the Checkout: End Customer Information page (if this feature is enabled), where they enter end customer information.
-
Next, customers proceed to the Checkout: Terms and Conditions page (if this feature is enabled), where they agree to the terms and conditions of the order. Customers can review/reject terms and conditions; for information about rejecting terms and conditions, see the chapter, Implementing Carts and Orders.
-
The final page in the checkout flow is the Checkout: Review and Place Order page, where customers can place the order by selecting the Place Order button. Note that B2B customers must have the IBE_CREATE_ORDER permission in their user role to access the Place Order button.
-
After placing the order, users can select Continue Shopping to browse the specialty sites and potentially add more items to shopping carts.
If customers request sales representative assistance in the checkout flow, they must select a reason for requesting assistance and optionally can enter comments in the How can we assist you in finalizing your order? page. If the cart is unsaved, the user must enter a cart name. After submission, the cart becomes a quote. Note that B2B users must have the IBE_ASK_SALES_ASSISTANCE permission in their user roles to be able to request sales assistance. For more information on Sales Assistance, refer to the chapter, Implementing Customer Assistance.
See also: "Checkout Flow Pages" in the chapter, Implementing Carts and Orders
The following diagram illustrates this flow.
High-Level Process Flow for B2B Checkout
B2B Shipping Information Process Flow
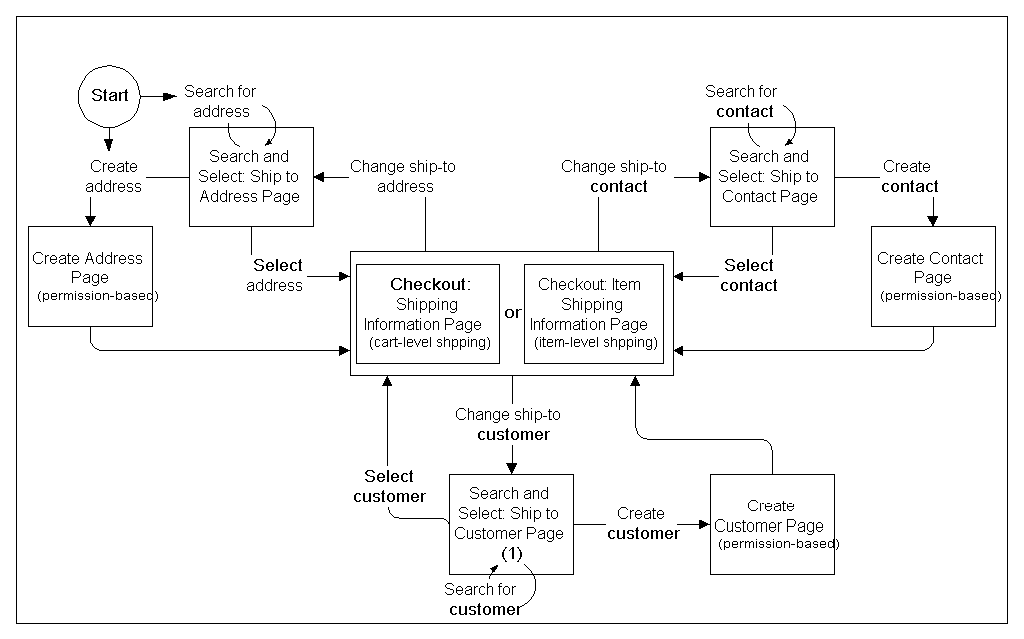
B2B customers can change and create the ship-to customer, contact or address for an order at checkout, if they have the required permissions.
-
From the Checkout: Shipping Information page and the Update Item Shipping Information pages, B2B customers (with the required user role permissions) can change the ship-to customer, contact, or address.
-
If customers choose to change the ship-to customer, the Search and Select: Ship to Customer page is displayed, where customers can search for and select from a list of other ship-to users within their organization. When finished, they return to the Checkout: Shipping Information page.
Customers with the required user permissions can also create a new ship-to customer from the Search and Select: Ship to Customer page. In this case, the Create Customer page is displayed, where customers enter information to create the ship-to user. When finished, they return to the Checkout: Shipping Information page.
-
If customers choose to change the ship-to contact, the Search and Select: Ship to Contact page is displayed. In the Search and Select: Ship to Contact page, users can search for and select another ship-to contact from within their organization. When finished, they return to the Checkout: Shipping Information page.
-
Customers with the required user permissions can also create a new ship-to contact from the Search and Select: Ship to Contact page. In this case, the Create Contact page is displayed, where users enter information to create the ship-to contact. When finished, they return to the Checkout: Shipping Information page.
-
If customers choose to change the ship-to address, the Search and Select: Ship to Address page is displayed. In the Search and Select: Ship to Address page, customers can search for and select a ship-to address. When finished, they return to the Checkout: Shipping Information page.
-
Customers with the required customers permissions can also create a new ship-to address from the Search and Select: Ship to Address page. In this case, the Create Address page is displayed, where customers enter ship-to address information. When finished, they return to the Checkout: Shipping Information page.
-
When finished with the shipping information entry, customers continue to the Checkout: Billing and Payment Information page.
For permissions details, see the chapter, Implementing Carts and Orders, and the appendix, Seeded User Data.
The following diagram depicts this flow.
Process Flow for Changing B2B Shipping Information
Ship to Multiple Locations Process Flow
During checkout, customers can enter separate shipping information for different items in their shopping carts, if the administrator has enabled this ability (see the section, "Allowing Item-Level Shipping", in the chapter, Implementing Payment Types and Shipping Methods).
-
From the Checkout: Shipping Information page, B2B customers can enter separate shipping information for different items in their shopping carts by accessing the Ship to Multiple Locations area of the Checkout: Shipping Information page.
-
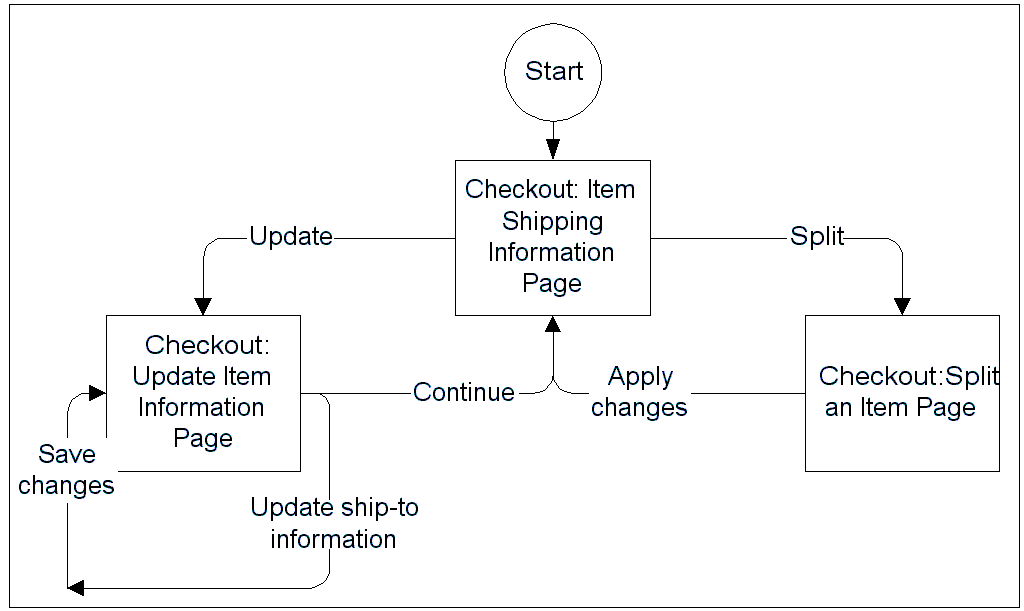
If a customer has ordered more than one quantity of a single item, the items can be split to specify different shipping information for each duplicate item. From the Ship to Multiple Locations area of the Checkout: Shipping Information page, customers select the Split Quantity icon to retrieve the Split Quantity page. In the Split Quantity page, customers separate the quantities onto separate lines. When they finish splitting the line items, they return to the Checkout: Shipping Information page, with the items split into different rows in the Ship to Multiple Locations area of the page. From this area, customers select items to modify, as described below.
-
To update the shipping details of a specific item, customers select the item and press the Update Shipping Information button; this retrieves the Update Item Shipping Information page for the selected item. From the update page, users can:
-
View shipping details for each selected item by accessing the Item Shipping Details pop-up page
-
Change/create ship-to customer, contact, and address (assuming the update/create ship-to permissions are in their user roles)
-
Enter shipping details (Shipping Method, Shipment Priority, Requested Delivery Date, Shipping Instructions, Packing Instructions)
-
-
When finished changing item-level shipping information, the customer returns to the Checkout: Shipping Information page.
-
The customer proceeds to the billing information phase.
The following diagram shows the flow.
Process Flow for Item-Level Shipping Information
B2B Billing Information Process Flow
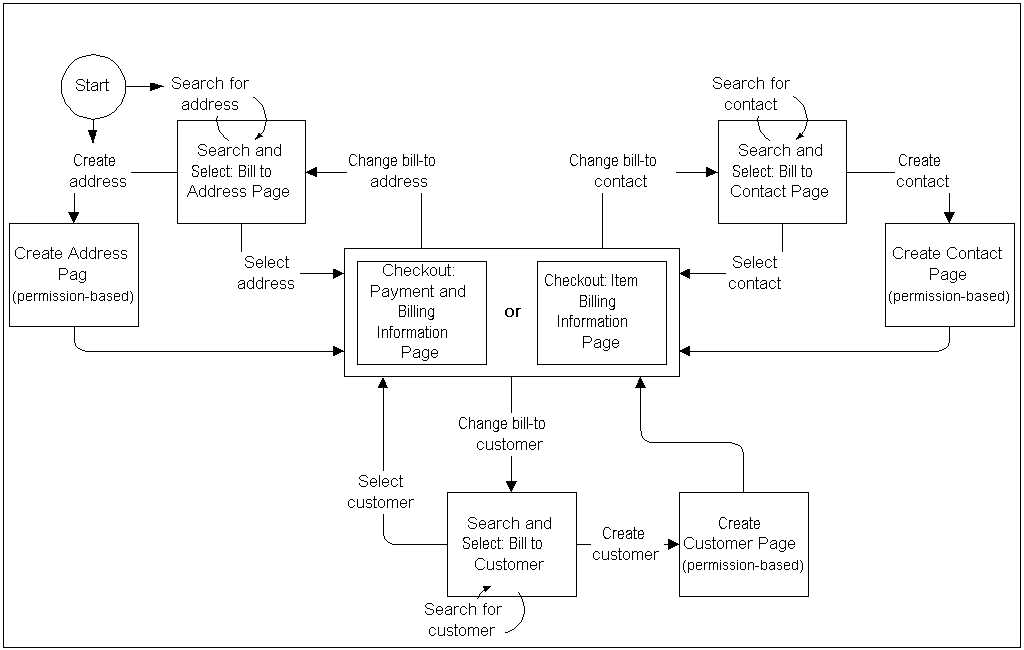
B2B customers can change and create the bill-to user, contact, and address at checkout if they have the required permissions.
-
From the Checkout: Billing and Payment Information page and the Update Item Billing and Payment Information page, customers can choose to change the bill-to customer, contact, or address (assuming they have the appropriate role permissions).
-
If customers choose to change the bill-to customer, the Search and Select: Bill to Customer page is displayed, where they can search for and select a new bill-to customer.
Customers with the required user permissions can also create a new bill-to customer from the Search and Select: Bill to Customer page. In this case, the Create Customer page is displayed, where customers enter information to create the bill-to user. When finished, they return to the Checkout: Billing and Payment Information page or the Update Item Billing and Payment Information page.
-
If customers choose to change the bill-to contact, the Search and Select: Bill to Contact page is displayed, where they can search for and select a new bill-to contact.
Customers with the required user permissions can also create a bill-to contact from the Search and Select: Bill to Contact page. In this case, the Create Contact page is displayed. When finished, they return to the Checkout: Billing and Payment Information page or the Update Item Billing and Payment Information page.
-
If customers choose to change the bill-to address, the Search and Select: Bill to Address page is displayed, where they can search for and select a new bill-to address.
If customers choose to create a bill-to address from the Search and Select: Bill to Address page, the Create Address page is displayed. When finished, they return to the Checkout: Billing and Payment Information page or the Update Item Billing and Payment Information page.
If customers do not have the IBE_CHANGE_BILLTO_CUSTOMER_ADDRESS permission, the primary bill-to address is displayed. Customers cannot select an alternate bill-to address.
-
Customers continue to the next page in the checkout flow. See the "High-Level Process Flow for B2B Checkout" above, for the options available within the checkout flow.
For permissions details, see the chapter, Implementing Carts and Orders, and the appendix, Seeded User Data.
The following diagram illustrates this flow.
Process Flow for B2B Billing Information
Bill to Multiple Locations Process Flow
During checkout, B2B customers can enter separate billing information for different items in their shopping carts, if this functionality has been enabled (see the section, "Setting up Item-Level Billing", in the chapter, Implementing Payment Types and Shipping Methods).
Note: Payment type must be Cash or Invoice to use item-level billing. Also, when using line level billing, Purchase Order is not supported.
-
B2B customers can enter separate billing information for different items in their shopping carts by accessing the Bill to Multiple Locations area of the Checkout: Billing and Payment Information page, B2B customers can enter separate billing information for different items in their shopping carts, if this functionality has been enabled.
-
If a customer has ordered more than one quantity of a single item, the items can be split to specify different billing information for each duplicate item. From the Bill to Multiple Locations area of the Checkout: Billing and Payment Information page, customers select the Split Quantity icon to retrieve the Split Quantity page. In the Split Quantity page, customers separate the quantities onto separate lines. When they finish splitting the line items, they return to the Checkout: Billing and Payment Information page, with the items split into different rows in the Bill to Multiple Locations area of the page. From this area, customers select items to modify, as described below.
-
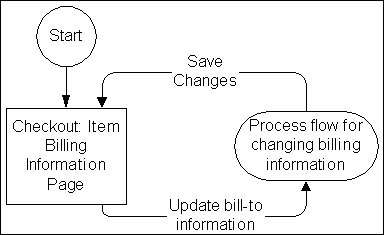
To update the billing details of a specific item, customers select the item and press the Update Billing Information button; this retrieves the Update Billing and Payment Information page for the selected item. From the update page, users can change/create bill-to customer, contact, and address (assuming the update/create bill-to permissions are in their user roles).
-
When finished changing item-level billing information, the customer returns to the Checkout: Billing and Payment Information page, where they continue with checkout.
If the user does not have the IBE_CHANGE_BILLTO_CUSTOMER_ADDRESS permission, the primary bill to address is displayed. The user cannot select an alternate bill to address.
The following diagram shows the flow.
Bill to Multiple Locations Process Flow
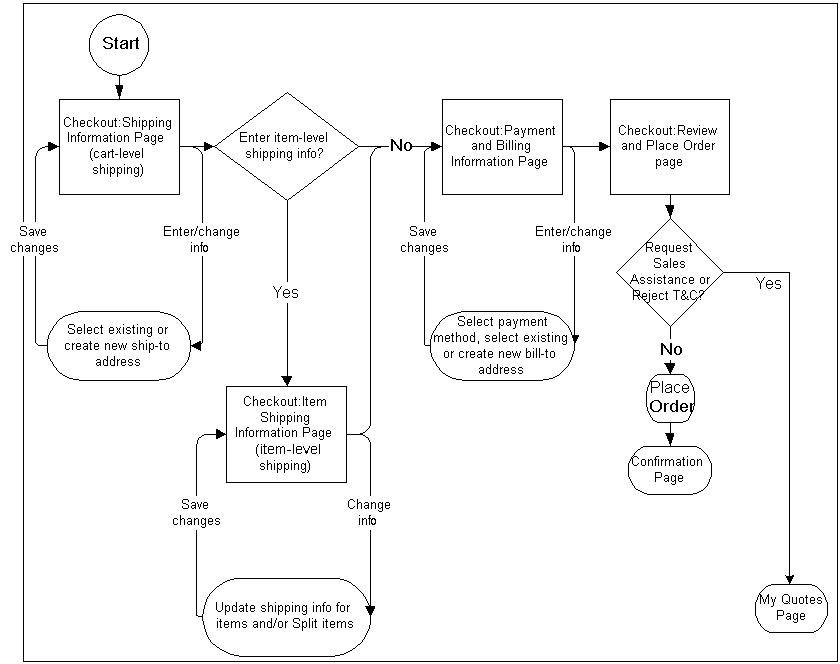
Process Flow for B2C Checkout
B2C customers who are ready to place their orders go to the checkout area of the site, where they enter shipping and payment information.
-
When a B2C customer chooses to check out, the Checkout: Shipping and Billing page is the first checkout page displayed. The customer chooses a shipping method, and can either select an existing shipping address or add a new address. Users also can enter shipping instructions, if this functionality has been enabled (see the section, "Allowing Users to Enter Shipping Information", in the chapter, Implementing Payment Types and Shipping Methods).
-
Customers can choose separate shipping details for different items in their carts after selecting the Need to ship to multiple addresses? link. If they choose to use item-level shipping, the Ship to Multiple Addresses page is displayed.
-
In the Ship to Multiple Addresses page, customers can update an item's shipping details by selecting the item and pressing the Update Shipping Details button. This retrieves the Update Item Shipping Information page for the selected item. From this page they can enter different shipping information for the cart items.
-
If customers have entered more than one quantity for a single item in their carts, they can split the quantities to enter different shipping information for each one. They do this by pressing the Split Quantity icon from the Update Item Shipping Information page.
-
Once finished entering shipping information, customers return to the Checkout: Shipping and Billing page.
-
In the billing area of the Checkout: Shipping and Billing page, customers select a billing address and select a payment method.
-
Next, customers proceed to the Checkout: Terms and Conditions page (if this feature is enabled), where they agree to the terms and conditions of the order. Customers can reject terms and conditions as well; for information about rejecting terms and conditions, see the chapter, Implementing Carts and Orders.
-
After customers agree with the terms and conditions, the Checkout: Review and Place Order page displays. From the review page, customers can update quantities, as well as change payment and shipping information.
-
In the Checkout: Review and Place Order page, customers place the order by selecting the Place Order button.
-
After placing the order, customers can select Continue Shopping to browse the specialty sites and potentially add more items to shopping carts.
From the cart or checkout pages, customers can request Sales Assistance, if implemented. If customers request sales representative assistance, they must select a reason for requesting assistance and optionally enter comments in the How can we assist you in finalizing your order? page. If the cart is unsaved, the user must enter a cart name. After submission, the cart becomes a quote on the My Quotes page.
See also: "Checkout Flow Pages" in the chapter, Implementing Carts and Orders
The following diagram shows this flow.
Process Flow for B2C Checkout
Process Flow for User Account
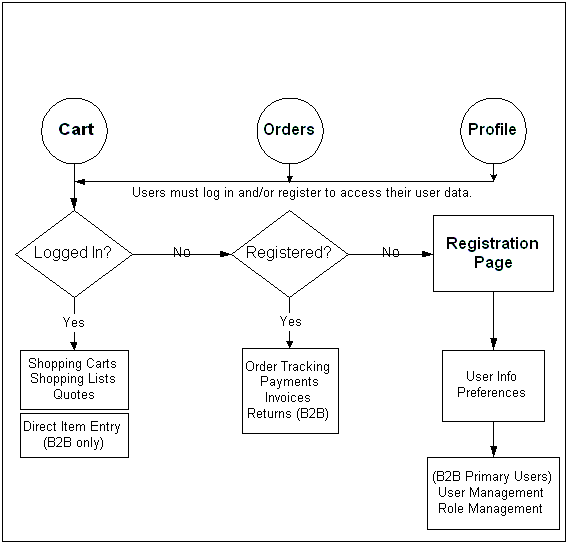
Customers can select the Profile, Orders, or Cart icons from any page to update their information, check on orders and invoices, work with shopping carts and shopping lists, or directly enter an item to purchase.
-
Within the account menu, users can select the Cart icon to view their shopping carts and quotes; B2B users can use Direct Item Entry.
-
Users can select the Orders icon to view information about their orders, such as payment information and shipment tracking. See Process Flow for Order Tracker to view the expanded diagram.
-
Selecting the Profile icon takes users to user information and the personal information page. See Process Flow for User Profile to view the expanded diagram.
-
B2B primary users can access the Administration menu where they can create and maintain other users for their organizations.
The following diagram shows the flow.
Process Flow for User Account
Process Flow for User Profile
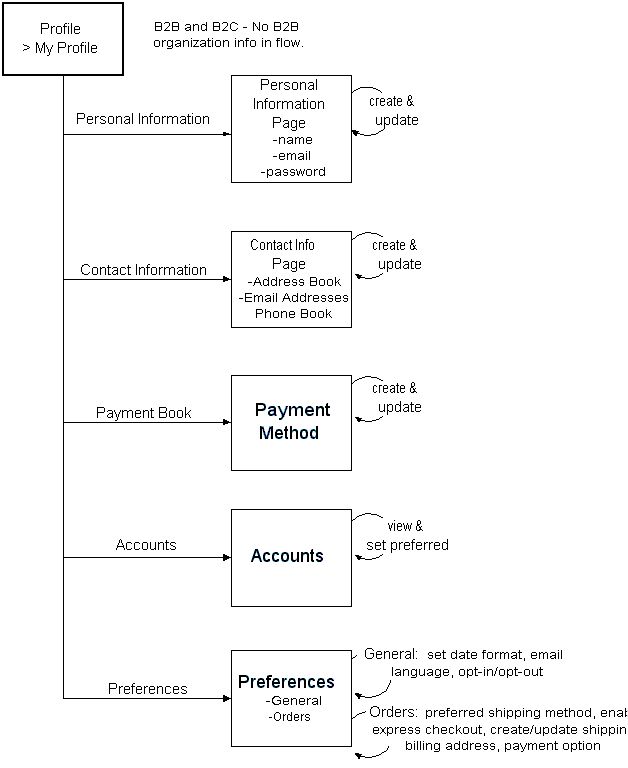
B2B and B2C customers manage their own personal, address, and payment information using the Profile menu in the Customer Application. Note that the following flow covers the non-administrative user flow and assumes no other application integrations. No organization information is included in the B2B flow.
When customers select the Profile icon to edit their information, the My Profile subtab provides links to the following:
-
Personal Information Page: Customers can enter/change their personal information, such as name, default e-mail address, and password.
-
Address Book Page: Customers can enter/change their addresses (Address Book link) to be used during checkout, and set an address as the primary address to use when shopping. They also can store e-mail addresses (Email Addresses link) and phone numbers (Phone Book link).
-
Customers can enter/change their addresses (Address Book link), e-mail addresses (Email Addresses link), and phone numbers (Phone Book link).
-
Payment Book Page: Users can store credit cards to be used when ordering, and can mark a single credit card as the preferred one.
-
Accounts Page: Users can view available accounts and set the preferred account.
-
Preferences Page: In the General page, users can set preferred date format, preferred e-mail delivery language, and opt-in/opt-out of marketing communications. In the Orders page, users can: set preferred shipping method for order; enable their accounts for Express Checkout (if Express Checkout is enabled by the administrator); and set up shipping, billing, and payment information for their Express Checkout orders.
The following diagram shows the flow.
Process Flow for User Profile
Process Flow for Order Tracker
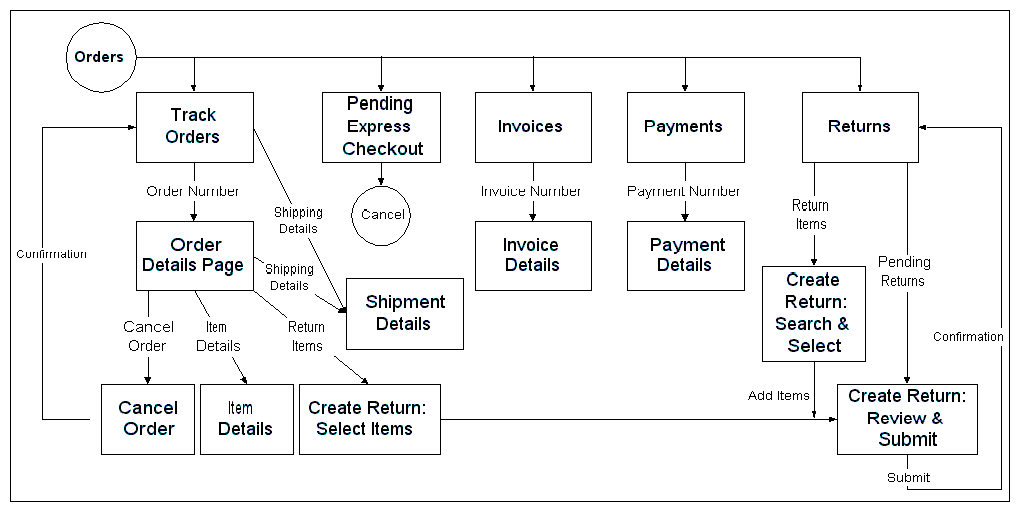
Customers can select the Orders icon to review their orders, invoices, payments, and returns.
-
Customers choose the Orders icon, and the Orders page displays summarized information about their orders. From the Orders page, customers can select an order number hyperlink to access the Order Details page. Customers also can select the Shipping Details icon to view the Shipment Details page.
-
If Express Checkout is enabled, customers select Pending Orders to view a list of Express Checkout orders that have not yet been submitted. From the Pending Express Checkout Orders page, customers can select the Item Details icon to view details of the items in the queue, including shipping and billing information for the items. If the orders have not yet been submitted, the user can press Cancel Order to cancel an order.
-
Customers choose Invoices to view a list of their invoices, with payment and order information. Customers can select an invoice number hyperlink to view details of a particular invoice. Customers can select the Payment Details icon to access the Payment Details page.
-
Customers choose Payments to view a summary of recent payments, or a payment number hyperlink to view details of a particular payment in the Payment Details page.
-
Customers select Returns to view a list of their submitted returns. From the Returns page, customers can access the Pending Returns page or create a new return.
For more information about the activities that can be performed from these pages, see "Orders and Related Pages" in the chapter, Implementing Carts and Orders.
The following diagram illustrates the flow.
Process Flow for Order Tracker
Sample User Registration Flows
This section contains the following user registration flows:
-
Individual User Registration
-
Business User Registration - New Organization
-
Business User Registration - Existing Organization
-
Registration in Combined Store-Support-Partner Implementation
Also see the sample registration flows in the "Integrating Oracle iStore with Oracle iSupport" and "Integrating Oracle iStore with Oracle Partner Management chapters.
Note: The registration pages are not displayed in a specific site context, since the target page of the registration depends on the selected user type and related responsibilities.
Individual User Registration
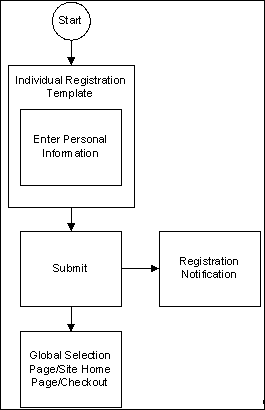
Following is a sample registration flow for individual users (B2C users). This flow assumes B2C users are automatically approved.
In the case of Oracle iSupport integration, the flow is the same, except that new users should be awarded Oracle iStore and Oracle iSupport individual user roles and responsibility.
-
From the Registration page, user selects the hyperlink to register as an individual user.
-
The user enters required information.
-
The user selects Send me marketing communications checkbox or not.
-
The user submits the registration form.
-
The user receives an e-mail notification with username and password information.
The following diagram depicts the flow.
Individual (B2C) User Registration Flow
Business User Registration - New Organization
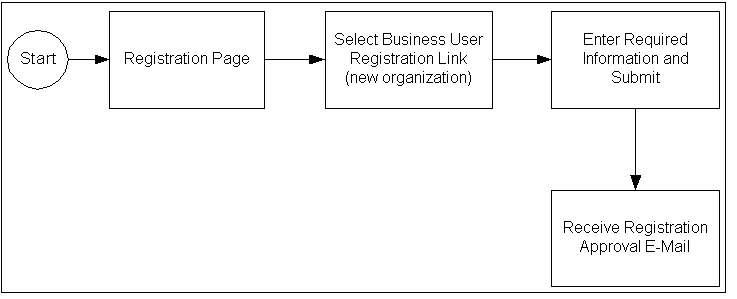
Following is a sample registration flow for business users (B2B users) whose organizations have not yet been registered. Typically, the first person to register his organization is considered the primary user and is charged with user management for business users within his organization. This flow assumes that the user will be automatically approved.
In the case of Oracle iSupport integration, the flow is the same, except that new users should be awarded Oracle iStore and Oracle iSupport primary business user roles and responsibility.
In case of Oracle Partner Management integration, the user would select the Oracle Partner Management link, Register as a partner.
-
The user accesses the Registration page and selects the link to register as the first user of an organization.
-
The user enters required information.
-
The user submits the registration.
-
The user receives an e-mail notification that his registration has been approved. He can access the Profile > Organization Information area of the Customer UI to view his Organization ID/Registry ID and communicate it to other users.
The following diagram depicts the flow.
Business User (B2B) Registration Flow - New Organization
Business User Registration - Existing Organization
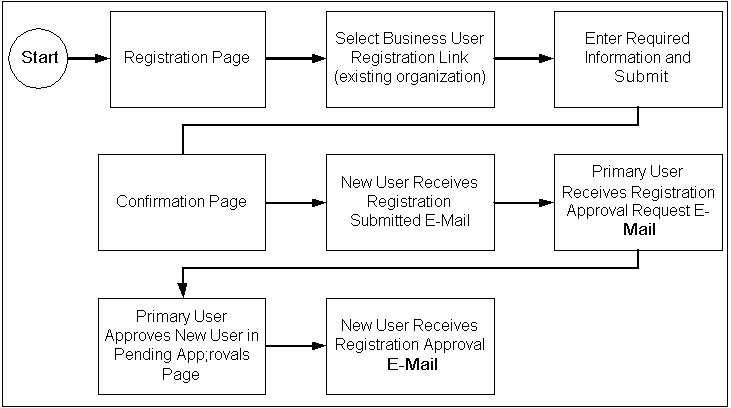
Following is the registration flow for business users (B2B users) whose organization has already been registered. This flow assumes that a primary user must approve the B2B user's registration.
In the case of Oracle iSupport integration, the flow is the same, except that new users should be awarded Oracle iStore and Oracle iSupport business user roles and responsibility.
In case of Oracle Partner Management integration, the user would select the Oracle Partner Management link, Register as a user of an existing partner.
-
The non-primary user accesses the Registration page and selects the link to register as user of an existing organization. The user should know his Organization ID/Registry ID before beginning registration.
-
The user enters required information, including Organization ID/Registry ID.
-
The user submits the registration.
-
The user receives an e-mail notification that his registration request has been submitted.
-
The primary user receives an e-mail notification that a self-registered user asked for approval.
-
The primary user approves the registration.
-
The non-primary user receives a notification that his registration is approved.
The following diagram depicts the flow.
Business User (B2B) Registration Flow - Existing Organization
Registration in Combined Store-Support-Partner Implementation
Following is a sample registration flow a common implementation of Oracle iStore, Oracle iSupport, and Oracle Partner Management using Oracle iStore framework.
-
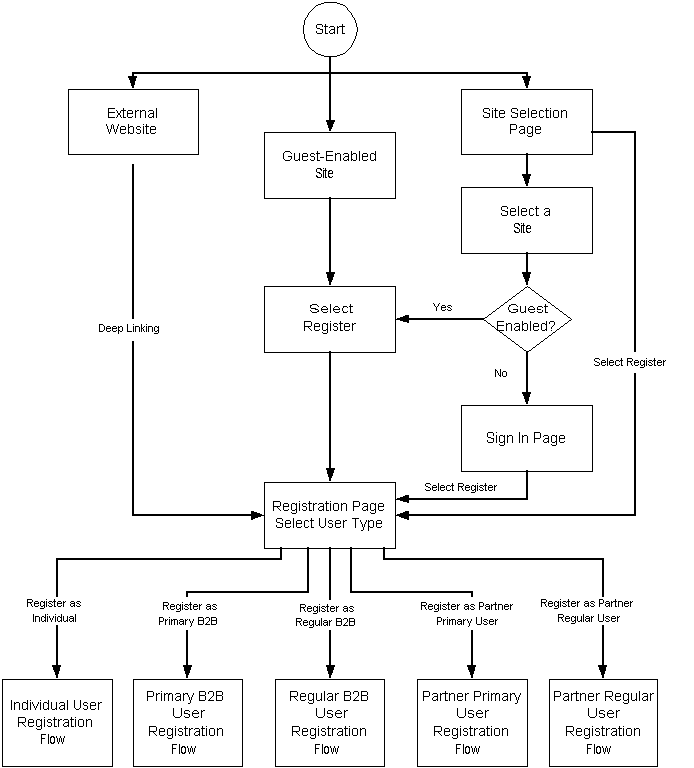
The user arrives at the registration page through one of the following paths:
-
From an external website, the user selects a deep link to the registration page.
-
The user navigates to the Site Selection Page and selects a site. If the site allows guest users, he is taken to the Site Home Page and can select the Register icon. If the site does not allow guest users, he is taken to the login page, and from there can select the Register icon.
-
The user navigates to the Site Selection Page and selects the Register icon.
-
The user accesses a site which allows guest users and selects the Register icon.
-
-
From the Registration page, the user selects the appropriate user type for which he is registering. Depending upon his user type selection, he follows one of the following registration flows:
-
Individual user
-
Primary business user
-
Non-primary business user
-
Partner primary business user
-
Partner non-primary business user
-
The following diagram depicts the flow.
Registration in Implementation of Oracle iStore-iSupport-Partner Management
