Implementing Carts and Orders
This chapter covers the following topics:
- Overview of Implementing Carts and Orders Chapter
- Shopping Carts
- Direct Item Entry
- Shopping Cart Sharing
- Checkout and Order Placement
- Capture End Customer Data During Checkout
- Order Tracking
- Order Cancellation
- Order Returns
- Oracle iStore and Party/Account Merge
- Shopping Cart Purge
Overview of Implementing Carts and Orders Chapter
This chapter contains information on implementing and configuring Oracle iStore shopping carts and lists, order placement, order tracking, returns, and customer contact information functionality.
Shopping Carts
Oracle iStore Customer Application shopping carts enable customers to store products for purchase and then ultimately to purchase the items using the carts. The ability to create and save shopping carts is automatically enabled in your specialty sites. Several other cart features are controlled by profile options whose setups are discussed in this chapter.
Shopping Carts Overview
For both B2B and B2C users, Oracle iStore shopping carts are characterized by the following:
-
Users can add items to the active cart at any time.
-
Users can maintain any number of carts.
-
Users can save carts for retrieval up until the expiration date, which is specified in a profile option discussed later in this chapter, in the section, "Shopping Cart Expiration Values".
-
Under various conditions, the system saves carts for users. This functionality is described in the section below, "System-Saved and Default-Named Shopping Carts".
-
A full Cart menu enables self-service management of carts.
-
The shared cart feature allows users to participate in collaborative shopping and purchasing. This feature can be turned on or off by setting a profile option. Oracle iStore can send e-mail messages to users involved in sharing carts.
-
Carts can be saved as shopping lists and then re-utilized as carts; this functionality is controlled by a profile option.
-
If integrating with Oracle Quoting, sales-representative-assisted carts become quotes that can be altered by sales representatives. These quotes appear in the Quotes Page for the user. Quotes created in Oracle Quoting can also be published to the iStore customer. See the chapter, Integrating Oracle iStore with Oracle Quoting, for details.
-
Published quotes can be shared with other users. See the section, "Quote Sharing", within this chapter, for details.
-
As with all Customer Application pages, the pages that display shopping cart functionality use seeded Display Templates, allowing a wide range of display possibilities. A complete list of Display Templates is contained in the appendix, Seeded Display Data. For an introduction to Display Templates, see the "Display Templates Overview" section in the chapter, Implementing the Catalog. Information on configuring shopping cart bins can be found in the chapter, Advanced Display.
-
Note that cart versioning does not occur in Oracle iStore.
-
You can utilize several B2B user role permissions to control access to specific functionality -- see the appendix, Seeded User Data, for more information on these permissions.
-
Shopping carts are tied to the operating unit associated with the site where they are created. Therefore, if a customer creates a shopping cart and then navigates to a site mapped to a different operating unit, the cart he had previously will have disappeared and he will need to create a new cart.
Types of Shopping Carts
In Oracle iStore, shopping carts are categorized as follows:
-
Active Shopping Carts: In a user session in the Customer Application, an active cart is the cart currently being updated by the user. See the "Working with the Active Cart" section, within this chapter, for more information.
-
Saved Shopping Carts: A saved cart is a cart which has been saved for later use. For more information, see the following sections within this chapter: "Active/Saved Carts Process Flow", "Accessing Saved Carts", and "System-Saved and Default-Named Shopping Carts".
-
Quotes: Quotes are either sales representative-published quotes or carts for which users have requested sales assistance. Quotes can be shared. This functionality requires integration with Oracle Quoting. See the sections, "Quote Sharing" and "Requesting Sales Assistance During Checkout", within this chapter, and the chapter, Integrating Oracle iStore with Oracle Quoting, for more information.
-
Shared Shopping Carts: A shared cart is a shopping cart shared with other users. See the section, "Shopping Cart Sharing", within this chapter, for more information.
Shopping Cart Menu
The Cart menu in the Customer Application allows users to manage their shopping carts. Users select the Cart icon in the Customer Application screen to access this menu. The following subtabs are available within the Cart menu:
-
Shopping Cart: This page always shows the user's active cart. See the "Working with the Active Cart" section, within this chapter, for more information.
-
Shopping Lists: This page contains a user's saved shopping lists, if this functionality is enabled. See the "Shopping Lists" section, within this chapter, for details.
-
Carts: The Carts page lists all of a user's shopping carts, including shared carts. See the section, "Accessing Cart Lists in the Carts Page", within this chapter, for more details.
-
Quotes: The Quotes page lists all of a user's quotes, including shared quotes, if Oracle Quoting integration has been implemented. See the section, "Quote Sharing", within this chapter, and the chapter, Integrating Oracle iStore with Oracle Quoting, for more information.
Note that the user interface of the above pages is designed with an Actions drop-list which allows users quick access to a variety of allowable actions. See the "Common Shopping Cart Elements" section, below, for more information about the actions.
Active/Saved Carts Process Flow
The following is a high-level process flow for active and saved shopping carts in Oracle iStore's Customer Application pages.
Note: Carts must be active to be modified by the user. To add an item to an active cart, the user can be a guest or a signed-in user. The user will be required to sign in when he attempts to save the cart.
-
A user enters a specialty site and adds one or more items to the shopping cart by selecting the Add to Cart button. When the user selects the Add to Cart button, if the user already has an active cart (whether an unsaved cart or a saved cart), Oracle iStore will add the items to the existing active cart.
-
The active cart appears within the Shopping Cart subtab in the Cart menu, with the page title, Shopping Cart.
-
Special scenario with logged-out user having an active shared cart/quote: If a logged-out user has a shared cart or quote as his active cart --- and then signs-in and presses Add to Cart --- Oracle iStore places the shared cart/shared quote into a de-active, saved state, and at the same time, adds the items to the active cart, making the guest cart the active cart. This scenario can occur if the user had been logged in, was viewing the active shared cart/shared quote, and then logged out. The user can retrieve the de-activated cart in the Carts or Quotes pages.
-
-
The user can select the Save Cart action and press Go in the Shopping Cart page to save the active cart. This de-activates the cart. The user can then create a new active cart and access the saved cart at a later time.
In addition, please note the following:
-
The user can verify that the cart has been saved by viewing the cart name at the top of the cart.
-
A shopping cart can be saved at any time, until the order is placed with the cart. After order placement, the cart will no longer be available to the user, whether he has saved it or not.
-
The user does not need to save the cart to place an order with it.
-
-
If the user attempts to save the cart and the cart does not yet have a user-defined name (it may already have a system-saved name), after selecting the option to save the cart, the user is given the following choices in the Save Cart page:
-
Create a new saved cart --- To create a new cart, the user selects the Cart Name radio button. The user must then enter a name for the cart. The name does not have to be unique.
-
Add items to an existing cart --- This option is only available if the user has at least one saved cart. To add items to an existing cart, the user selects the Add to Existing Cart radio button and selects an existing saved cart from the existing carts drop-list. If this option is chosen, all items added to the cart inherit cart-level information of the target cart.
-
-
-
If the cart already has been saved/named by the user, then the cart is simply re-saved when the user saves the cart. Performing an action that saves a cart de-activates the cart, and a new, active cart becomes available.
-
To complete the save process, the user selects the Apply button, and a confirmation message is displayed.
The expiration date for the cart is set to the value determined by the cart expiration profile value. The expiration date can be seen by the user in the Carts and Shopping Cart pages. See the "Shopping Cart Expiration Values" section, within this chapter, for more information.
The user can access the saved cart at any time. See the "Accessing Saved Carts" section. The user must log in to access a saved cart.
The following diagram shows the active/saved cart process.
Active/Saved Cart Process Flow
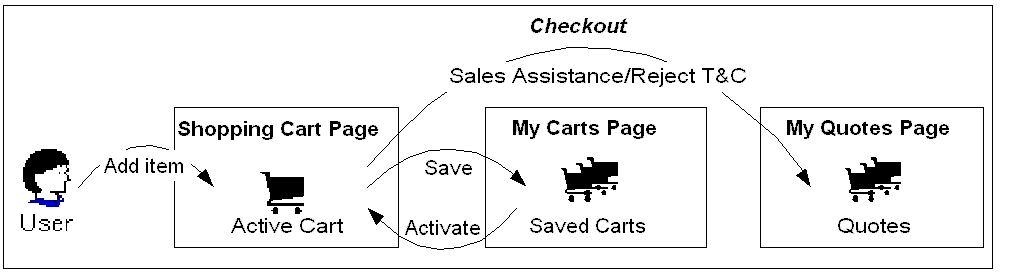
Note that the above flow does not cover the quote updates. See the "Update Quote Process Flow" in the chapter, Customer Application Process Flows, for this flow.
Common Shopping Cart Elements
Following are common shopping cart elements and related behavior:
-
Actions list of values (LOV): Shopping cart pages (including active carts, saved carts, shared carts, published quotes, and shared quotes) have an Actions LOV that allows users to perform cart activities. To engage the action, the user must press the Go button after selecting it. Not all of the actions appear on all of the pages -- this information is contained within the sections that describe the individual pages. Following are the actions:
-
Update Cart: This action, which activates the cart, only displays if the cart is not active. Its usage is described in the "Accessing Saved Carts" section within this chapter.
-
Express Checkout: This action, which adds cart items to the customer's express checkout queue, only displays if Express Checkout functionality is enabled.
-
Save Cart: This action always displays. If the cart has already been saved, selecting this action deactivates the cart.
-
Share Cart/Share Quote: This action displays only if Cart Sharing is enabled.
-
Save to List: This action displays only if Shopping Lists are enabled.
-
Check Availability: This action displays only if Check Availability functionality is enabled.
-
Pricing Agreement: This action allowing users to navigate to pricing agreements and commitments, assign pricing agreements at cart and item levels and return to the cart, is available only if pricing agreements have been set up and the user is a logged-in B2B or partner user. In addition to any required merchant setups, B2B users must have the IBE_USE_PRICING_AGREEMENT and IBE_VIEW_NET_PRICE permissions in their user roles to access pricing agreement functionality.
-
Additional Information: This action allowing users to navigate to the Additional Information descriptive flexfield (DFFs) is available only if the Additional Information DFF has been enabled for the shopping cart.
-
Attachment: This action, available to B2B and partner users, allows them to add an attachment to the shopping cart. The profile option IBE: Attachment Document Category must be enabled at the site level to enable this action.
-
Delete Cart: This action, which deletes the cart, always displays if the user is viewing an active cart. The user must confirm the deletion. Deleted carts are no longer accessible. Note: if the user is working with an active quote, the user will not be able to delete it.
-
Duplicate Cart/Copy to Cart (for quotes): This action creates a copy of the cart or quote. The user is prompted to enter a name for the copied cart or quote and to save it. Once saved, the cart or quote behaves as any other saved cart and quote.
-
Direct Item Entry: This action displays only if Direct Item Entry functionality is enabled and the user is a B2B or partner user. The profile option IBE: Use Direct Item Entry must be enabled at the site level to enable this action.
-
Request Help: This action displays only when integration with Oracle Quoting is enabled. A guest user selecting this action will be required to sign in before proceeding to the next step.
Note: If there is no active cart, then the only action available in the Shopping Cart page is Direct Item Entry.
The setup information for most of the optional features listed above is contained within this chapter. Other chapters to reference within this guide include: Integrating Oracle iStore with Oracle Quoting, Integrating Oracle iStore with Oracle Advanced Supply Chain Planning (for Check Availability), Advanced Display, and Implementing Pricing.
-
-
Checkout button: Checkout is a standard button on the cart. When the customer presses the Checkout button, the cart enters the checkout phase, allowing the user to place an order with the cart. Once the order is placed, the cart is no longer available to the user. Note that B2B users must have the appropriate permissions in their user roles to check out (IBE_CHECKOUT) and place orders (IBE_CREATE_ORDER).
-
Continue Shopping button: The other standard button on the cart is the Continue Shopping button; this button takes the user back to the catalog.
-
Recalculate button: The user can press the Recalculate button to recalculate the cart totals.
-
Item information: Shopping carts display the following information about items: Part number, item name, unit of measure, quantity, and price (as a hyperlink; see next bullet point). For B2B users, the pricing details hyperlink is displayed only if the user is assigned the permission, IBE_VIEW_NET_PRICE; otherwise, the price displayed in the shopping cart will be the List Price.
-
Pricing Details pop-up window: By default, only net price is displayed in the cart. Clicking on a price link retrieves the Pricing Details page, where the user can see: List Price and Pricing Adjustment Name of all discounts and surcharges applied at line and order level (values will be displayed in brackets if negative, and the corresponding percentage will be displayed in parentheses), Total Adjustment, and Net Price. These values will be displayed for unit and total quantities. The Pricing Details page also shows Part Number, Item Name, Quantity, and UOM of the item queried.
-
Pricing Details for configured items/models: For configured items and models, the pricing link is shown at the parent model level. The Part Number, Item Name, ordered Quantity and UOM shown are those related to the parent model. If a model does not contain any recurring lines, prices are rolled up to the parent item. In this case, the pop-up displays the rolled-up price of the model in the same format as for a regular item, as well as the rolled-up values of all discounts and surcharges at child and parent levels. Users can select the configuration details to view the pricing details for each child of the model. The pricing pop-up for each child is displayed with the same format used for standard items. No roll up is performed at the parent model level for telecommunications service ordering (TSO) items. If the price of the model or sub-model is null, then no price is displayed, and thus no pop-up is available.
-
Item link: Each item name is a hyperlink leading to details about the item, as defined in inventory.
-
Promotion Code field: The Promotion Code field allows customers to enter promotion codes. To enable the Promotion Code field in the Shopping Cart page, set the profile option, IBE: Use Promotion Code. See the appendix, Profile Options, for more information on the profile. Note that in addition to any required merchant setups, B2B users must have the IBE_VIEW_NET_PRICE permission in their user roles to access promotion code functionality.
To apply a new promotion to an item, enter a promotion code in the Promotion Code field and click the Apply button. The Promotion Codes table displays the promotion codes that have been applied. To remove a promotion code from the table, click the trash bin icon in the Remove column.
-
Remove icon: The customer can click the Remove icon to remove items from the cart.
-
Quantity field: The customer can enter new quantities in the Quantity fields.
-
Tax information: Tax rates display at item or cart level, depending upon setup. B2B users must have the IBE_VIEW_NET_PRICE permission in their user role to see tax rates.
-
Add Service link: If Service Items functionality is enabled, the customer can click the Add Service link to add services to items in the cart, where applicable. Only serviceable items with associated services display this link.
-
Model Item Details link: A Details link in the cart takes users to details of configured items. Note: option classes are displayed only if the profile option IBE: Display Option Classes in the Shopping Cart and Order Tracker, is set to Yes.
-
Reconfigure link: If the merchant has enabled configured items, the user can click the Reconfigure link to begin reconfiguring these items. This retrieves the Configuration Details page for the item.
Accessing Cart Lists in the Carts Page
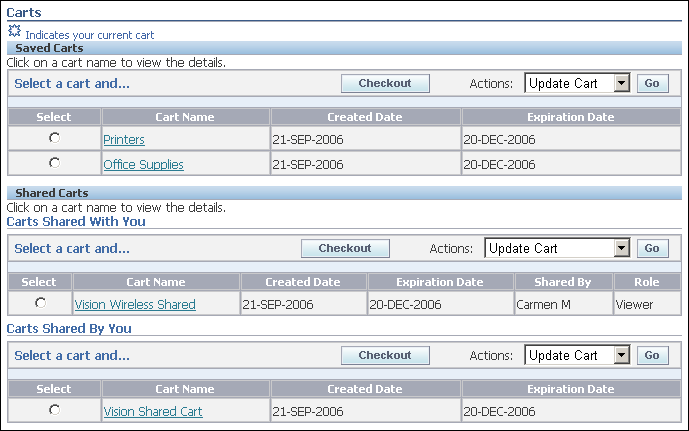
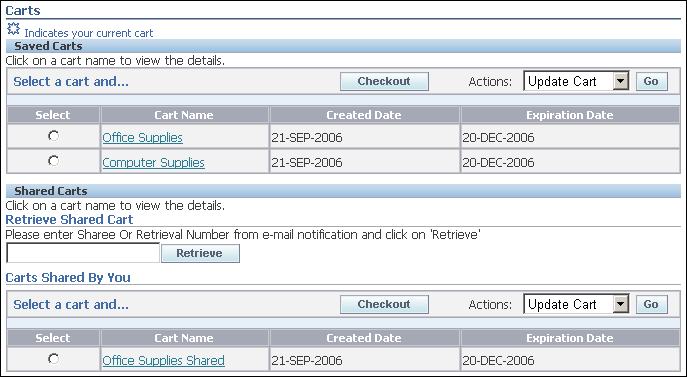
To view a list of saved or shared carts, both B2B and B2C registered users select the Cart icon in the Customer UI, and then select the Carts subtab. In the Carts page, carts are organized by type, with the most recently created cart appearing first in its section. Shopping cart expiration dates also display. Cart names are hyperlinks which lead to the details page for the cart. Alternatively, customers can select several actions from a drop-list and then press Go to perform the action.
See also: "Working with the Active Cart" section, within this chapter
The main sections on the Carts page are:
-
Saved Carts: This section contains a customer's saved carts. Both B2C and B2B users will see this section.
-
Shared Carts: If the merchant has implemented this functionality, the Shared Carts section shows a user's shared carts, separated by type (note that the Shared Carts section is different for B2C and B2B users):
-
Carts Shared By You: This section lists carts the customer is currently sharing with other users. Both B2C and B2B users will see this section.
-
Carts Shared With You --- A section with this label exists only for B2B customers. It lists carts that another user is sharing with the user. In this section, users will also see carts they have re-shared. For example, if User A shares with User B and User B shares with User C: For User B, the cart will still show Carts Shared With You, even though he has re-shared the cart.
-
Cart Retrieval Textbox --- Instead of a Carts Shared With You section, B2C users will see a cart retrieval textbox. By entering in the box the unique cart retrieval number, B2C users can retrieve a shared cart. See the section, "Retrieving Shared Carts", within this chapter, for more information. For B2B backward compatibility options relating to Sharee Number of previous releases, see the section, "Implementing Shared Carts", within this chapter.
-
Additional Carts Page Behavior
Following are some additional points regarding Carts page behavior.
-
Quotes never appear on this page; quotes always appear on the Quotes Page.
-
If the user's active cart is a saved or shared cart, then the cart will have a graphic icon (star) next to it, to visually represent the cart. You can see an example of this icon in the Carts page figures on the following pages. All saved or shared carts show up on this page.
-
Once an order is placed with a cart (whether active, saved, or shared) it no longer appears here.
-
If a cart owner stops sharing a cart, it disappears from the list of shared carts on this page. It will then show up under saved carts.
-
If a recipient removes access to a shared cart, the shared cart disappears from the recipient's lists of carts.
The following figure shows a typical Carts page for B2B users.
Carts Page - B2B Users
The following figure shows a typical Carts page for B2C customers.
Carts Page - B2C Users
For more information, see the following sections within this chapter:
-
"Accessing Saved Carts"
-
"Retrieving Shared Carts"
Accessing Saved Carts
From the Carts page, customers select a saved cart name hyperlink to retrieve the Saved Cart Details page. This page shows all items in the cart, as well as item prices, sold-to customer information, and shipping/billing information. Note that users without the IBE_VIEW_NET_PRICE permission will not see discount and net prices.
Saved Cart Details Page Activities
From the Saved Cart Details page, the user can perform the following actions:
-
Update Cart: Selecting the Update Cart action or Checkout buttons activates the cart. When the customer activates the cart, the following occurs:
-
If the customer already is working with an unsaved, active cart with at least one item in it, Oracle iStore automatically system-saves and de-activates this cart. (A system-saved cart displays on the Carts page, in the Saved Carts area, just as an explicitly-named cart.)
-
If the customer is working on another saved cart or shared cart, Oracle iStore saves these as well.
-
The Pricing Engine verifies item prices.
-
-
Share Cart
-
Checkout
-
Express Checkout
-
Delete Cart
-
Duplicate Cart
-
View Pricing Details
-
View Item Details
See the "Common Shopping Cart Elements" section, above, for more information about these actions.
Accessing Saved Quotes
From the Quotes page, customers select a saved quote name hyperlink to retrieve the Saved Quotes Details page. This page shows all items in the quotes/cart, as well as item prices, sold-to customer information, and shipping/billing information.
Important: This functionality requires integration with Oracle Quoting. Refer to the chapter, Integrating Oracle iStore with Oracle Quoting, for more information.
Saved Quote Details Page Activities
From the Saved Quote Details page, the user can perform the following actions:
-
Checkout
-
Express Checkout
-
Share Quote
-
Copy to Cart
-
Update Quote
Note: Updating quotes is only allowed when the profile option, IBE: Allow Update for Draft Quotes, is Yes.
See the "Common Shopping Cart Elements" section, above, for more information about these actions.
Working with the Active Cart
The active cart is the cart currently being updated by the user. It always appears under the Shopping Cart subtab within the Cart menu, and has the page title, Shopping Cart. Only one cart can be active for a user at a time. To activate a saved or shared cart, the user must either update the cart or start the checkout process.
The shopping cart displays the following columns with item information: part number, item name, UOM, quantity and price (net total price). The total price hyperlink launches a pop-up window that displays list price, net price, and all discounts and price adjustments for that unit and the total quantities of the item.
Active Cart Activities
In the active cart, the user can perform the following actions:
Note: When an active cart contains no items, the user will only have the following actions available: Continue Shopping, Save Cart, Share Cart (if implemented), Delete Cart, and Direct Item Entry (B2B only).
-
Continue Shopping
-
Express Checkout
-
Checkout
-
Enter additional information
-
Access pricing agreements
-
Use promotion codes
-
Add attachments
-
Check item availability
-
Save the cart
-
Save the cart as a list
-
Share the cart
-
Delete items
-
View item details
-
Change item quantities
-
View item prices
-
View tax information
-
Add services to items
-
Reconfigure items
-
View configured item/model bundle details
-
Delete the cart.
-
Recalculate the cart
See the "Common Shopping Cart Elements" section, above, for more information about these actions.
Identification of Active Carts for Users
The following behavior exists with active carts and user identification:
-
For returning and guest users for whom there is a cookie, the active cart is identified from the cookie.
-
For logged-in users -- when there is no cookie for the user -- the active cart is identified from the database. Otherwise, the active cart is identified from the cookie.
-
For guest users who do not have an associated cookie, a new cart is created. The cart creation happens in the background and is transparent to the guest user.
System-Saved and Default-Named Shopping Carts
When a new cart is created by the system --- for example, when a user adds an item to a cart for the first time --- it is given a default name, which can be defined by the merchant. When this default-named cart gets saved while activating another cart, it becomes a system-saved cart and is given the system-saved name, as set up by the merchant.
Example:
-
A user with no active cart selects the Add to Cart button. A cart is immediately created for the user, which is now the user's active cart (Cart A).
At this point, the system has named Cart A, "
Store" (this name can be specified by the merchant). -
The user leaves this active cart (Cart A) and navigates to the Carts page. He selects a previously saved cart (Cart B) and updates/activates it (by pressing Update or Checkout button).
At this point, the system gives Cart A the default system-saved name, "
Store Saved"(this name can be specified by the merchant). -
At any point in this process, the user can explicitly save the cart by selecting the Save Cart button.
See the section, "Naming Behavior for System-Saved and Default-Named Carts", below, for more information.
Naming Behavior for System-Saved and Default-Named Carts
The default name given to default-named and system-saved carts can be controlled by mapping a source file to the message-class media objects associated with these carts, or by updating the FND message text in Oracle Forms.
Note: It is not required that you change the names of system-saved and default-named carts. By default, their names will be Store (default-named) and Store Saved (system-saved).
Out-of-the-box, these media objects have no site/language mapping. Oracle iStore uses the DisplayManager.getTextMediaOrFndMsg API to get the cart name, and this API returns a custom prompt (media object site/language mapping), if defined; otherwise, it returns the FND message text.
A cart name can be mapped to all sites and all languages, or can be mapped by site/language, using standard Oracle iStore media object site mapping functionality. For more information, see the chapter, Implementing Content.
To change the name of the carts using Oracle Applications text messages, you can update the FND message text. See the chapter, Implementing Messages and Prompts, for steps.
Following are the values for the two message-class media objects for default-named and system-saved carts:
-
iStore Default-Named Cart Name media object:
Programmatic access name: IBE_PRMT_SC_UNNAMED
Default FND message text:
Store -
iStore System-Saved Cart Name media object:
Programmatic access name: IBE_PRMT_SC_DEFAULTNAMED
Default FND message text:
Store Saved
Duplicating Shopping Carts
Customers can duplicate shopping carts and quotes (including shared carts and quotes) from several cart-related areas of the Customer Application. When a cart or quote is duplicated, customers are prompted to name the cart/quote. Once named and saved, duplicated carts or quotes behave as any other saved cart (or saved shared cart or quote).
Duplicating Carts
Customers can duplicate shopping carts from the following pages: Carts page, Saved Cart Details page, and Shared Cart Details page.
Duplicating Quotes
Customers can duplicate quotes from the following pages: Quotes page, Quote Details page, and Shared Quote Details page. In the Actions LOV, the quote duplication action is labelled Copy to Cart. Duplication of quotes follows the same rules of standard shopping cart duplication. Once a quote is duplicated, it is stored under Saved Carts.
Rules and Guidelines of Cart Duplication Feature
Specific rules and guidelines exist for duplicated carts and quotes, as described below.
-
If the user copying a cart is the owner of the cart, and the cart has never been shared, all attributes are copied during duplication.
-
If the user is the owner of the cart and the cart has been shared at least once (even if it is not shared anymore), or if the user is an administrator, viewer or participant of a shared cart, at duplication time the user is set as sold-to contact and owner of the cart. Attributes related to recipients, and attributes the user does not have access to, are not duplicated.
When duplicating shared carts, only following information is copied: items, agreements (if the user has the requisite permission), and commitments (if applicable). Oracle iStore does not copy the following data: payment information (credit card number, check number, P.O. number); billing information (bill-to customer, contact and address); shipping information (ship-to customer, contact, address); flexfield data; and attachments.
-
For quotes, both regular and shared, not all the attributes will be copied. Only items, agreements, and commitments will be copied, if applicable.
-
Duplicated carts have the same expiration duration of non-copied carts.
-
If the duplicated cart is copied from a shared cart and sensitive information is not copied, then hard-coded defaulting rules are initiated to populate empty fields with the appropriate data.
Implementing Cart Duplication Feature
The cart duplication feature is implemented by default for both B2B and B2C users.
Shopping Cart Items Pricing
This section contains information about the pricing of items in shopping carts.
Automatic Re-pricing of Cart Items
Items in shopping carts get re-priced any time a user updates the cart. This includes, for example, adding items to the cart or changing shipping/billing information. Assuming IBE: Use Price list Associated with Specialty Site profile is Yes (meaning that the site where the user is shopping is using a site-based, assigned price list), if an item has been re-priced on the assigned price list, the pricing engine finds and displays the correct, updated price. In the case where an item in the user's cart has been removed from the price list, then an error message will display in the cart.
If IBE: Use Price list Associated with Specialty Site profile is No, Oracle iStore will be retrieving "best prices" dynamically from the pricing engine, and will not be retrieving prices from a static price list (except for guest users). In this case, if an item has been deleted from available price lists, an error will occur when the user updates the cart. See the chapter, Implementing Pricing, for more information on pricing.
Using Pricing Agreements in Shopping Carts
A B2B user with the IBE_USE_PRICING_AGREEMENT and IBE_VIEW_NET_PRICE permissions in his user role will see the Pricing Agreement action in the Shopping Cart page. Pricing Agreements must first be implemented before they can be selected by a user. See the chapter, Implementing Pricing, for more information.
Cart-level and item-level scenarios are possible with pricing agreements:
-
Cart-Level Agreements: When the user selects the Pricing Agreement action, the page displays the Cart Agreement page which shows any previously assigned agreements. To select a new agreement, the user selects the Assign button to select from a list of agreements that have been implemented.
-
Item-Level Agreements: If the profile option, IBE: Use Line Agreements, has been enabled, the user also sees a section entitled, "Item Pricing Agreements". In this section, the user can add item-level agreements in the shopping cart. Note that service items and promotional items are not shown.
Using Promotion Codes in Shopping Carts
The Promotion Codes field in the Shopping Cart page allows both B2C and B2B users to enter promotion codes. Promotion codes are modifiers set up through the Oracle Order Management Pricing module.
To enable the Promotion Code field in the Shopping Cart page, set the profile option, IBE: Use Promotion Code. See the appendix, Profile Options, for more information on the profile option. Note that in addition to any required merchant setups, B2B users must have the IBE_VIEW_NET_PRICE permission in their user roles to access promotion code functionality.
To apply a new promotion to an item, enter a promotion code in the Promotion Code field and click the Apply button. The Promotion Codes table displays the promotion codes that have been applied. To remove a promotion code from the table, click the trash bin icon in the Remove column.
To selectively apply or remove promotion codes at the line level, select Line Promotions from the Actions drop-down list on the Shopping Cart page. The Line Promotions page appears with a list of line items. Users can enter valid promotion codes on the selected line items and click Apply.
See the Oracle Order Management Implementation Manual for additional information.
Using Additional Information (DFFs) in Shopping Carts
Oracle iStore allows you to set up cart- and item-level descriptive flexfields (DFFs) in the shopping cart to capture customer information. The Additional Information menu entry is enabled in the shopping cart actions menu. See the chapter, Advanced Display, for setup details.
Using Attachments in Shopping Carts
A B2B user with the IBE_USE_ATTACHMENT permission in his user role will see the Attachments menu entry in the Shopping Cart Actions menu. The Attachments functionality is not available for B2C users.
To use the Attachments functionality, set the profile option, IBE: Attachment Document Category. See the appendix, Profile Options, for more information on the profile option.
The size of a file to be uploaded with a shopping cart can be controlled by setting the maximum file size value in the Oracle Applications (FND) profile option, Upload File Size Limit. The value should be an integer representing kilobytes (KB). For example, if the value is 100, then files up to 100 KB can be uploaded as attachments. The default value for this profile is 15,000 KB, unless implementers set a different number. If the user attaches multiple files, or one single file that exceeds the maximum size, an error message displays. (This feature requires Oracle Technology Foundation (JTF) 11.5.10.2CU patch as prerequisite.)
After the user selects Attachments and presses Go, the Attachments page shows any previously selected attachments associated with the cart. To add an attachment from the file system, the user selects the Add Attachment button. In the file retrieval page that displays, the user selects the Browse button to select the attachment from the file system. The user also can enter a description for the file in the Description textbox. The user selects the Apply button to save the file selection.
In the Attachments page, users also can remove attachments from the cart. After attaching or removing files and applying the changes, the user selects the Back to Shopping Cart button to return to the cart.
Checking Item Availability in Shopping Carts
Both B2B and B2C users can select the Check Availability menu item from the Actions list in the Shopping Cart page to check whether items in their carts will be available for shipping by a specified date. You must first set up Available to Promise functionality (ATP) before it will be available in the shopping cart. See the chapters, Implementing Products, and Integrating Oracle iStore with Oracle Advanced Supply Chain Planning, for more information.
After the user selects Check Availability and presses Go, the Check Availability page displays a list of cart items, along with a calendar icon to select the date for which the customer would like to check availability. The user selects the date(s), then presses the Check Availability button to display the availability information in the table column labelled, "Availability Information". When finished viewing availability information, the user selects the Back to Shopping Cart button to return to the cart.
Shopping Lists
Shopping lists allow users to save items in shopping carts to lists and then copy the items from these lists into their active carts. Shopping lists have the following main features:
-
Shopping lists never expire.
-
Users cannot check out with a shopping list.
-
Shopping lists are accessible in the Shopping Lists subtab in the Cart menu in the Customer UI. The most recently saved list appears first in the table.
-
Users can update a shopping list at any time by selecting the hyperlink of the list name.
-
See the section, "Shopping List Process Flow", below, for more information on the actions that can be performed in the shopping list details page.
-
Express Checkout is not allowed from a shopping list, but can be accessed after the user drills down into the item details (assuming Express Checkout is enabled).
-
Service items and promotional items are not candidates for shopping lists.
-
The IBE: Use Shopping Lists profile option controls whether the shopping list functionality is available to users. See the appendix, Profile Options, for more information on the profile.
-
The IBE: Enable Shopping List Management profile option enables the Add to Cart button with the shopping list drop-down menu to create a shopping list, view shopping lists, manage shopping lists, and add an item to a shopping list. See the appendix, Profile Options, for more information on this profile.
Shopping List Management
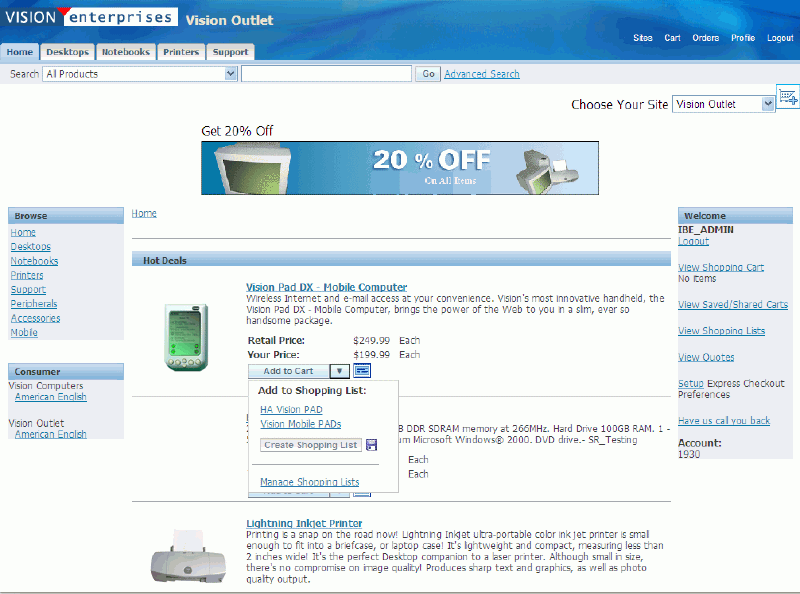
Shopping list management enables the iStore user to create a new shopping list, view existing shopping lists, and add an item or product directly to an existing shopping list. The drop-down menu is associated to the Add to Cart button.
-
The Add to Cart with the drop-down menu is controlled by the IBE: Enable Shopping List Management profile option. See the appendix, Profile Options for more information. If this profile option value is set to No or Null, then the standard Add to Cart button with no drop-down menu is displayed.
-
The following iStore templates include the drop-down Shopping List Management feature:
-
Single Selection Template: ibeCCtdFSubSctI.jsp
-
Multiple Selection Templates: ibeCCtdFSuStMs2I.jsp and ibeCCtdFSuStMs3I.jsp
-
Item Details Templates: ibeCCtdAddItemBin.jsp, ibeCndSvaSvcList.jsp, ibeCCtdItemDetail.jsp, ibeCCtdItemDtlNoImg.jsp, ibeCCtdSvaItmDtl.jsp, and ibeCCtdSvcItmList.jsp
-
Shopping Cart Page: ibeCScdViewA.jsp
-
Save Shopping List: ibeCSlpOCSave.jsp
-
The iStore user can click on the Add to Cart button with drop-down menu for a product to create and manage shopping lists without navigating to the Shopping List page. The iStore user must log in to the iStore customer application to view the complete list of drop-down menu options.
Note: The iStore user remains on the Product Catalog page or navigates to the Shopping Cart page based on the IBE: Add To Cart Navigation profile option setting. See the appendix, Profile Options for more information.
The Add to Cart button with drop-down menu enables the iStore user to perform the following actions:
-
Click on the Add to Cart button to view the shopping list controls. Guest users can view the following menu options:
-
View Shopping List
-
Create Shopping List field and Save icon
-
Manage Shopping Lists

Note: When the guest user clicks on the View Shopping Lists link or the Manage Shopping List link, then the guest user is directed to the Login page. Similarly, when the guest user enters a name in the Create Shopping List field and clicks on the Save icon, then the user is directed to the Login page.
-
-
The following drop-down menu options are available after log in:
-
List of shopping lists existing for the user account
-
Create Shopping List field with Save icon
-
Manage Shopping Lists
-
-
Select the Create Shopping List field and enter a name for the shopping list.
-
Click on the Save icon. The shopping list is created and listed in the drop-down menu.
-
Clicking on an existing shopping list link in the drop-down menu will add the item to that particular shopping list.
-
Click on the Manage Shopping Lists link to manage the shopping lists. The Shopping Lists page appears. See the section, Shopping List for more information.
Shopping List Process Flow
Following is the process flow for shopping lists:
-
A user selects the Save to List action in the Shopping Cart page.
-
In the Save to Shopping List page, the system prompts the user to:
-
Enter a new, unique list name and some brief comments to associate with the list (comments cannot be updated after saving the list).
-
Merge the items to an existing list (if one exists)
-
Replace the items in an existing list (if one exists)
The user's current active cart -- including the items in it -- remains the active cart when a shopping list is saved.
-
-
The user presses Apply to complete the save operation, and the Shopping Lists page displays, showing the user's saved lists.
-
To retrieve a shopping list, the user navigates to the Shopping Lists page within the Cart menu, and selects the hyperlink of the desired list name. The Shopping List Details page appears.
-
To add items to a cart, in the Shopping List Details page, the user selects the appropriate items in the shopping list and presses Add to Cart.
Note that if the active cart already contains items identical to those added from the list, and the profile option, IBE: Merge Shopping Cart Lines, is enabled, the cart item quantities are added accordingly, not replaced. For example, if the active cart contains 1 quantity of Item A and the list also contains 1 quantity of Item A, when the user adds the list Item A to the cart, the cart quantity for Item A changes to 2 (assuming the merge shopping cart lines profile is on). For more information on the profile option, see the appendix, Profile Options. See also: "Merging Duplicate Items in Cart" within this chapter.
-
Optionally, in the Shopping List Details page, the user also can:
-
Merge additional items from other lists.
-
Update quantities for items in the list by entering the numerical values in the Quantity field and pressing the Update Quantity button.
-
Delete items in the list by activating an item's Select checkbox and pressing the Delete button (not the Delete List button).
-
Drill down to product details by selecting the hyperlink of an item name. At this point, the user can add the item to a new cart and checkout, including Express Checkout.
-
Delete the entire list by selecting the Delete List button.
-
-
Once the user presses Add to Cart from the Shopping List Details page:
-
If an active cart with items is in use by the user, the selected items are added to the existing active cart, the Shopping Cart page. Duplicate items are merged if the profile option, IBE: Merge Shopping Cart Lines, is enabled.
Note that there are exceptions to the above for specific types of products -- see the section, "Merging Duplicate Items in Cart", within this chapter, for additional details.
-
If no active cart exists, a new cart is created which is the user's active cart.
-
The shopping list still will continue to appear in the Shopping Lists page, with the original items in it.
-
-
After the list items are transferred to a cart, the user can perform normal activities with the active cart. For more information on these flows, see the "Working with the Active Cart" section.
Shopping Carts and Shopping Lists Serve Different Purposes
Shopping carts and shopping lists serve different purposes for Customer UI users. The following two sections note some differences and similarities between the use of shopping carts and shopping lists.
Shopping Carts
Shopping carts are transactional entities used to check out with and purchase products from the Customer UI.
-
Shopping carts are associated with the organization specified in the MO: Operating Unit profile option. In this way, the same shopping cart can potentially be accessed across different sites.
-
The user creates a shopping cart by pressing the Add to Cart button in the catalog pages.
-
The merchant can set an expiration time period for carts.
-
Shopping carts can be shared with other users, if this functionality is enabled.
-
Shopping carts contain transactional data (item prices, shipping/handling, tax, and total amounts) and customer information (addresses, billing, and shipping preferences).
Shopping Lists
Shopping lists are non-transactional entities that store products the user may wish to purchase. They help to enable future repeated purchases.
-
The user creates a shopping list by selecting the Save to List action from active cart (Shopping Cart page).
-
The merchant can turn shopping list functionality on/off with a profile option.
-
Users can add comments to shopping lists.
-
A shopping list must have a unique name when saved.
-
A shopping list never expires.
-
Shopping lists do not contain any transactional information, such as item prices; they also do not show customer address, billing, or shipping data.
-
A shopping list cannot be shared with other users.
Shopping Cart Security
Oracle iStore uses security authentication to keep different users from accessing each others' shopping carts and shopping lists by manipulating the URL. When a user attempts to retrieve a cart, Oracle iStore verifies that the user is actually the owner of the shopping cart or a user to whom the cart has been shared; if the user is found to be neither the owner nor a recipient of the cart, then access is denied.
Tax Display in Shopping Carts
Oracle iStore supports both cart-level and item-level tax display in the shopping carts.
Tax information is set up in Oracle E-Business Tax. See the Oracle E-Business Tax Implementation Guide for information on how to set up taxes.
Cart-Level Tax Display
Out-of-the-box, Oracle iStore displays cart-level tax only. Cart-level tax display includes the following, applicable to a specific cart:
-
Tax codes (tax printable name)
-
Tax rate
-
Tax amounts
Item-Level Tax Display
If enabled, item-level taxes applicable to the item are displayed below every item in the shopping cart.
To display item-level taxes, map the logical template, STORE_CART_LINE_TAX, to the JSP page, ibeCScdShowCartLineTax.jsp, appended with the parameter, ibeDisplayLineTax=Y. Map the template for the sites in which you wish to display item-level taxes. Following is the complete syntax that the source file field must contain in order for the mapping to be successful:
ibeCScdShowCartLineTax.jsp?ibeDisplayLineTax=Y
Notice the question mark (?) between the JSP name and the parameter.
Remember that B2B users must have the IBE_VIEW_NET_PRICE permission in their user role to see tax rates.
For information on how to map the template, see the chapter, Implementing the Catalog.
Displaying Amounts for More than One Tax Code
Some countries charge more than one tax (for example: VAT, local tax, provincial tax). In such cases, Oracle iStore will display the applicable amounts for each tax code at the cart level. If item-level tax display is enabled, the applicable amounts for each tax code for the item are displayed.
Shopping Cart Expiration Values
Two profile options control the number of days that active and saved carts are available to users before they expire. Carts expire at the end of the day on the day they are scheduled to expire. Expired carts are no longer accessible to users. The expiration date gets reset every time the cart is updated by the user. Note that when you change the value of the expiration profile options, existing saved carts are not affected. Shopping cart expiration dates are shown on the Shopping Cart and Carts pages.
-
To set the expiration for active carts, set the profile option, IBE: Active Cart Expiration Duration (# days).
-
To set the expiration for saved carts, set the profile option, IBE: Saved Cart Expiration Duration.
See the appendix, Profile Options, for more information on these profile options.
Merging Duplicate Items in Cart
You can enable Oracle iStore to merge lines on an order if the items are identical. In this case, Oracle iStore increases the quantity by one for each identical item merged.
This ability is controlled by setting the profile option, IBE: Merge Shopping Cart Lines. See the appendix, Profile Options, for more information on the profile option.
Important: If you set this profile option to Yes, you must set the profile option, IBE: Use Line Level Shipping, to No. You cannot enable shopping cart item merging and item splitting simultaneously. For more information on item level shipping, see the chapter, Implementing Payment Types and Shipping Methods.
Exceptions to and Rules for Merging for Specific Setups
Note the following exceptions and rules for specific setups:
-
Duplicate serviceable items --- If IBE: Use Item Level Service is enabled for Service Items Support functionality, no merging takes place. In this case, the items are added to the cart as a unique entry.
-
Any line in a cart with promotional goods (PRGs) will never be merged.
-
Duplicate configured items are never merged.
-
When site as pricing qualifier is in effect for a site, Oracle iStore uses the price list associated with most-recently accessed site for the price of merged items. If the merge profile is off, Oracle iStore uses the price list associated with the site where the items were added to the cart.
Decimal Quantities for Cart Items
When adding an item or updating quantity in the Oracle iStore shopping cart, the customer can enter a decimal quantity if the item is divisible. Oracle iStore calls the same API used by Oracle Order Management for validating quantity. If an item is marked OM Indivisible, decimal quantities are not allowed for its primary unit of measure (UOM).
To prevent the customer from selecting a decimal quantity of an item, log into Oracle Forms with Inventory responsibility for the master inventory organization, and mark the OM Indivisible flag. See the Oracle Inventory User's Guide for more information.
Direct Item Entry
Oracle iStore's Direct Item Entry functionality allows users to quickly add multiple items to a shopping cart without the need for browsing for items, adding them to cart, and then checking out with them. This functionality is available for B2B users only.
Direct Item Entry Benefits
Direct Item Entry enables users to:
-
Enter data quickly without having to add items one at a time from the catalog.
-
Enter customer part number and Inventory part number to find items in iStore and check out with these items in the cart.
-
Place orders with the company's internal part numbers if merchant-to-customer part number mapping in Oracle Inventory is set up.
-
Specify a cross reference part number and cross reference type (optional) combination.
-
Place orders with the company's cross reference part numbers if merchant-to-customer part number mapping in Oracle Inventory is set up.
-
Upload comma separated values (.csv) files containing relevant values for customer part number, cross reference type, cross reference part number, inventory part number, unit of measure (UOM) and quantity.
Note: Model bundles, configured items, and serviceable items can be entered through the form; however, after adding to cart, these must be configured separately from the cart. For example, if you add a serviceable item to the form and then add to cart, you must add the service separately from the cart.
In the case where multiple Inventory part numbers are mapped against a single customer part number, only the highest ranked Inventory part number will be displayed.
Additional Information: If there is no active cart, then the only action available in the Shopping Cart page is Direct Item Entry.
Direct Item Entry Process Flow
The process flow for Direct Item Entry is as follows:
-
A registered B2B user logs into a specialty site, selects the Direct Item Entry action from the Shopping Cart page and clicks Go. The Direct Entry Form appears.
-
The user enters the following and selects Fill Details:
-
Cross Reference Type: A cross reference type is defined within Oracle Inventory as a group name for classifying the inventory item number. An Oracle Inventory installation (merchant) can define a cross reference type as Industry Standard Item that references the merchant's internal inventory item number with a higher level grouping. This allows the merchant to define a relationship between their own internal item numbers with a cross reference grouping. This functionality requires item mapping in Oracle Inventory. See the Oracle Inventory User's Guide for more information.
-
Cross Reference Part Number:A cross reference part number is defined within Oracle Inventory as an alternate way of referencing the internal inventory item number. This functionality requires item mapping in Oracle Inventory. See the Oracle Inventory User's Guide for more information.
Note: A customer or a cross reference part number or an Oracle Inventory part number is required at minimum.
-
Customer Part Number: This functionality requires item mapping in Oracle Inventory. See the Oracle Inventory User's Guide for more information.
-
Oracle Inventory Part Number: If only Inventory part number is entered, Oracle iStore does not automatically enter the customer part number.
Note that either a customer or an Oracle Inventory part number is required at minimum. If the user provides both the customer and Inventory part numbers in a line, customer number takes precedence. If the user enters an invalid part number, the invalid customer or Inventory part number is preserved in the field.
-
Quantity: If no input value is found for the item quantity, the default value of 1 is assumed.
The following table summarizes the processing rules when the user enters values in the Direct Item Entry page and clicks the Fill Details button.
Customer Part Number Cross Reference Type Cross Reference Part Number Inventory Part Number Processing Rule Entered Searches for customer part number and displays the inventory part number and item name if the customer part number is found. Entered Entered Searches for customer part number, ignores other entries and displays the inventory part number and item name if the customer part number is found. Entered Entered Entered Search for customer part number, ignores other entries and displays the inventory part number and item name if the customer part number is found. Entered Entered Entered Entered Searches for customer part number, ignores other entries and displays the inventory part number and item name if the customer part number is found. Entered Displays an error message indicating that the cross reference part number must also be entered. Entered Entered Displays an error message indicating that the cross reference part number must also be entered. Entered Entered Searches for cross reference part number within the context of the cross reference type, and if found, displays the inventory part number and item name. Entered Entered Entered Searches for cross reference part number within the context of the cross reference type and ignores inventory part number. If found, displays the inventory part number and item name. Entered Entered Searches for cross reference part number and ignores inventory part number. If found, displays the inventory part number and item name. Entered Searches for the inventory part number. If found, displays the inventory part number and item name. -
-
Oracle iStore populates the primary UOMs and item names into the form. (If the user clicks Add to Cart before pressing Fill Details, the primary UOM is defaulted for items.) If the profile option, IBE: Retrieve all Units of Measure for an Item, is set to Yes, the user can select different values for UOMs.
Note: To increase the default number of rows in the form, set the profile options, IBE: Additional Table Rows and JTF_PROFILE_DEFAULT_NUM_ROWS. See the "Implementing Direct Item Entry" section, below, for details.
-
For each item to be added to the shopping cart, the user selects the appropriate item check box and clicks Add to Cart. All items selected are added to the user's active cart. Items not selected are not saved into the form. However, if the add-to-cart action fails, the user is returned to the Direct Item Entry form with values intact.
-
The user proceeds with checkout.
-
The customer item number or the cross reference part number entered in the Direct Item Entry page is passed to Oracle Order Management.
Process Flow for Uploading Comma Separated Values File
To populate the Direct Item Entry form, users can upload a comma separated values (.csv) file containing relevant values for customer part number, Oracle Inventory part number, UOM, and quantity. The .csv file must contain a customer part number, a cross reference part number, or an inventory part number. If the file contains neither UOM nor quantity, Oracle iStore defaults these values to primary UOM and 1 (for quantity), respectively. If neither the customer part number nor Inventory part number for an item are specified in the file, the Direct Item Entry form ignores the item, and does not upload any data for it.
The process flow for Direct Item Entry using a .csv file is as follows:
-
A registered B2B user logs into a specialty site, selects the Direct Item Entry action from the Shopping Cart page and clicks Go. The Direct Entry Form appears.
-
The user clicks Upload to retrieve the Upload Items page. From this page, the user selects the appropriate .csv file from the file system.
Note: The number of items that can be uploaded at a single given time is determined by the profile option, IBE: Maximum Direct Entry Rows.
-
The user clicks Apply to upload the file and validate the item information. Oracle iStore addresses common file errors as follows:
-
If the file is corrupted, Oracle iStore displays an error message in the Upload Items page, and the file will not be uploaded.
-
If invalid part numbers are found, Oracle iStore displays an error message in the Direct Item Entry page.
-
If the user specifies an invalid UOM in the .csv upload file, the primary UOM is selected.
-
-
For each item to be added to the shopping cart, the user selects the appropriate item checkbox and clicks Add to Cart. Items are added to the user's active cart. Items not selected are not saved into the form. However, if the add-to-cart action fails, the user is returned to the Direct Item Entry form with values intact.
-
The user proceeds with checkout.
See also: "Set up Comma Separated Values File" section, below
Implementing Direct Item Entry
To set up Direct Item Entry, follow the steps below. These steps assume a site has been implemented and contains valid products -- only items that can be purchased via the site catalog are considered valid items. The steps are:
-
Step 1 - Set Mandatory Profile Option
-
Step 2 - Set Optional Profile Options
-
Step 3 - Set up Item Mapping
-
Step 4 - Set up Comma Separated Values File
Step 1 - Set Mandatory Profile Option
Set the following mandatory profile option: IBE: Use Direct Item Entry --- Set to Yes. See the appendix, Profile Options, for more information on the profile option.
Step 2 - Set Optional Profile Options
Set the following profile options according to your business requirements:
-
IBE: Additional Table Rows: Determines the number of rows to add when a user selects Add More Rows. Set to a reasonable integer.
-
IBE: Maximum Direct Entry Rows: Sets the row limit for the form; also sets the maximum items that can be uploaded via .csv file.
-
IBE: Retrieve all Units of Measure for an Item: Allows multiple UOM value retrieval. Set to Yes, so that all UOMs can be retrieved for items. For more information, refer to the table below, "Using Profile Options to Display UOMs".
-
JTF_PROFILE_DEFAULT_NUM_ROWS: Determines the default number of rows displayed in the Direct Item Entry form. Set at site level to a reasonable integer.
Note: The profile option, IBE: Use Price List Associated with Specialty Site, also affects the display of UOMs in the Direct Item Entry. The following table details the behavior.
| If IBE: Retrieve All UOMs for an Item is set to... | And if IBE: Use Price List Associated with Specialty Site is set to... | UOM Display Behavior |
|---|---|---|
| Yes | No | Oracle iStore displays all UOMs defined in Inventory for the item. These UOMs are displayed irrespective of whether they have valid prices or not. |
| Yes | Yes | Oracle iStore displays all UOMs defined in Inventory for the item. It verifies whether each UOM has a valid price. |
| No | Yes | Oracle iStore displays only primary UOM defined in the price list for the item. It does not check whether UOM has valid price. |
| No | No | Oracle iStore displays only primary UOM defined in price list for the item. It does not check whether UOM has valid price. |
Caution: Performance issues (slow loading of catalog pages) can occur if IBE: Retrieve All Units of Measure for an Item is Yes. The performance issues can happen because, when the profile is Yes, a pricing call is made for each UOM of each item in the price list.
Step 3 - Set up Item Mapping
Optionally, set up Item Mapping in Oracle Inventory. Before B2B customers can use their companies' internal part numbers for Direct Item Entry, mappings must be established between the customer items and the merchant items in Oracle Inventory. For directions, refer to the Oracle Inventory User's Guide.
Step 4 - Set up Comma Separated Values File
This section contains information regarding the use of the .csv file upload utility.
The format of the .csv file can be defined in two ways:
-
Create Header Containing Pre-Defined Codes (see below)
-
Utilize Pre-Defined Fixed Format (see below)
See also: "Rules for Using Either Format" section, below
Create Header Containing Pre-Defined Codes
When using a header containing pre-defined codes to identify columns, the codes map to the following meanings, as shown in the following table.
| Code | Description |
|---|---|
| CUST_NUM | Customer part number |
| CROSS_REFERENCE_TYPE | Cross reference type |
| CROSS_REFERENCE_PART_NUM | Cross reference part number |
| INV_NUM | Inventory part number |
| UOM | Unit of Measure |
| QTY | Quantity |
The user can create a header row using the codes in the order desired. The codes are case sensitive. If using this method, the header row must contain at least INV_NUM, CROSS_REFERENCE_PART_NUM, or CUST_NUM. The following table shows an example of how these codes could be used in practice in a .csv to populate the Direct Item Entry Form.
| CUST_NUM | CROSS_REFERENCE_TYPE | CROSS_REFERENCE_PART_NUM | INV_NUM | UOM | QTY |
|---|---|---|---|---|---|
| Corner_desk | Ea | 1 | |||
| CHAIR-STD | Ea | 2 | |||
| iStore XRef | Kitchen_Hutch | Ea | 3 | ||
| RT50104 | Ea | 4 |
Note: The .csv file can be created using Microsoft Excel and saving the file in .csv format.
Utilize Pre-Defined Fixed Format
To utilize the fixed format, the .csv file cannot contain a header row. When using this method, the fixed format must be in the following order:
-
Customer part number
-
Cross reference type
-
Cross reference part number
-
Inventory part number
-
UOM code
-
Quantity
Rules for Using Either Format
For either format, the following rules apply:
-
UOM code and quantity are optional values in the .csv file for each line entry.
-
If the UOM code is not specified, then the valid UOM list for that part number is displayed with primary UOM selected.
-
If the customer number is not specified, the Inventory number must be provided, or else the line is ignored.
-
If the Quantity is not specified, a default quantity of 1 is used.
Processing Rules for the Pre-Defined fixed Format .csv File:
-
The header for the first column must be “CUST_NUM”.
-
The header for the second column must be “CROSS_REFERENCE_TYPE”.
-
The header for the third column must be “CROSS_REFERENCE_PART_NUM”.
-
If the .csv upload file contains data for the cross reference part number, then data for the cross reference type is optional.
-
If the .csv upload file does not contain a value for the cross reference type and the cross reference part number is specified, then a search is done to find multiple occurrences of a cross reference part number. If multiple occurrences of a cross reference part number are found, an error message is displayed and rows containing the error are flagged on the Direct Item Entry Page.
-
With older versions of the .csv files, the Direct Item Entry .csv file upload facility ignores the columns for the CROSS_REFERENCE_TYPE and CROSS_REFERENCE_PART_NUM if they do not exist in the .csv upload file.
-
The user must upload the old format .csv file with headers. The old format .csv file without headers (pre-defined format containing 4 columns) is no longer supported.
Shopping Cart Sharing
This section contains topics related to shopping cart sharing for Oracle iStore's Customer UI.
Cart Sharing Overview
Oracle iStore's shopping cart sharing functionality allows multiple users to shop and purchase products collaboratively, utilizing the same shopping cart. Cart sharing has the following main features:
-
Collaborative purchasing: All Customer UI registered users -- both B2B and B2C users -- can share shopping carts with any number of other iStore users. This enables multiple users to make changes to a shopping cart (depending upon their share cart roles). The updates can be seen in real-time by other users sharing the cart. Cart members with appropriate permissions can then place an order with the cart.
-
Available to B2B and B2C users: - The functionality is available to both B2B and B2C users, with the following rules:
-
B2B users are only allowed to share carts with other registered users within their organization who use the same account number; and, the search utility will only retrieve users matching this criteria.
-
B2C users can share carts with any other user who has a valid e-mail address. Recipients must be registered Oracle iStore users, however, to update the shared cart.
-
-
E-mails keep members informed of activity: Several Oracle iStore notification event e-mails keep members informed about shared cart actions. For example, when the administrator stops sharing a cart or an order is placed with a shared cart, all recipients are notified by e-mail that the cart is no longer available. The e-mails are sent automatically to the member (provided the sharing member selects the Notify checkbox in the screen), through integration with Oracle Workflow. See the chapter, Integrating Oracle iStore with Oracle Workflow, for a list of and details about these notification events.
-
Shared cart roles: The user who initiates a shared-cart action is the cart owner, usually with administrator privileges. Only members with cart administrator role can stop sharing a cart or set roles for the other members. Users who are receiving the shared carts are called cart participants or viewers, depending upon their roles. See the "Shared Cart Roles" section, for more information.
-
Available for all cart types and statuses: Carts can be in active or saved status to be shared. A cart can be shared in the shipping/billing, end customer, and order review pages as well.
-
Flexibility: At any time, a cart administrator can delete the cart, add/remove recipients, or place the order. Members are automatically notified when a shared cart is deleted or when the administrator has stopped sharing the cart (provided the administrator has elected to notify the members by selecting the Notify checkbox next to the member's name in the UI).
-
Ability to re-share carts: B2B users can re-share shopping carts with other Oracle iStore users. Owners of shared carts can update cart members and member roles at any time.
See the "Shared Cart Behavior" section for additional information.
Shared Cart Behavior
The following points describe shared cart behavior:
-
Cart members perform cart activities after selecting an action from the Actions drop-list (available in the Carts and Shared Cart Details pages) and pressing Go. If a member selects an action for which he does not have permission, an error message will be displayed.
-
If a user has a cart with items in it before signing in, and after sign-in -- if the last active cart was a shared cart -- then the shared cart will become de-activated (i.e., saved), and the user will continue to have the unsaved cart as the active cart.
-
For B2B users, only other site users within their organization and using the same account can be the recipients of a shared cart.
-
B2C users can share with anyone who has a valid e-mail address. These users do not need to be registered Oracle iStore users to receive the notification e-mail and view the cart, but will need to register to update the cart in any way.
-
In order to update a shared cart, a user must be a registered Oracle iStore user.
-
Where a B2B user does not have an e-mail address in the system, the member sharing the cart can specify an ad hoc e-mail address for the user. This e-mail address will be used to send an e-mail to the user, but it will not be entered into the personal information section. This allows the member to know that a cart has been shared with him, and lets him add the desired e-mail address for his recorded contact information.
-
Field-level validations are done on e-mail addresses entered. When entering e-mail addresses, users should use standard e-mail format.
-
When searching for members, there is no need for users to utilize a wildcard in the search textbox -- they can simply enter text and select Go. There is no search mechanism for B2C users.
-
Cart retrieval by B2C users is always done using the URL in the e-mail notification message, or by entering the unique cart retrieval number in the Carts page within the Cart menu. For B2C users, the cart retrieval textbox always appears in this page.
-
Cart retrieval by B2B users is always done via the URL in the e-mail notification message, or by accessing the Carts Shared With You area of the Carts page within the Cart menu.
-
For backward compatibility with the Sharee Number of previous Oracle iStore releases, a profile option can be set to enable B2B users of previous releases to use a Sharee Number. This allows the B2B recipient to enter the Sharee Number from a notification and retrieve the cart. See the section, "Setting the B2B Shared Cart/Quote Backward Compatibility Profile Option", within this chapter, for details.
-
Only specific users can request sales representative assistance or reject Terms and Conditions -- see the section, "Requesting Assistance or Rejecting T&Cs with Shared Carts", within this chapter, for details.
-
All members get e-mail messages with details of the shared cart, if the user sharing the cart elects to notify them by selecting the Notify checkbox next to the member's name in the UI. The e-mail notifications leverage Oracle iStore's integration with Oracle Workflow. See the chapter, Integrating Oracle iStore with Oracle Workflow, for more information.
-
In a B2B scenario, recipients with the Administrator role can delete carts shared with them. In a B2C scenario, administrators cannot delete carts shared with them. Note that if the user is working with an active quote, he will not be able to delete it.
-
Cart pricing is done based on the sold-to customer who is the owner of the cart.
-
Shared cart expiration behaves the same way as any saved cart. See the section, "Shopping Cart Expiration Values", for more information.
-
If a shared cart is active, user can select Save Cart, and the shared cart will be de-activated. A new cart will be created for the user when an item is added. The de-activated cart will still be available in the list of shared carts.
-
Multiple members can activate and work on a shared cart simultaneously. Changes made to the shared cart are immediately visible to the owner and all members.
-
Members of a shared cart have access to attachments added to the cart by the owner.
-
Shared carts can be duplicated, as with non-shared carts. See the section, "Duplicating Shopping Carts", within this chapter, for more information.
Shared Cart Roles
The following are the B2B and B2C share cart roles:
-
Administrator
-
Participant
-
Viewer
The names and descriptions of these seeded values can be changed. See the chapter, Implementing Messages and Prompts, for details.
Important: Actions that B2B cart administrators can perform in most cases do not apply to B2C cart administrators. For B2C users, only the cart owner has full permissions to perform actions with a shared cart. B2C cart administrators have lesser permissions than B2B cart administrators.
The following table discusses roles and the actions the users can perform.
| Role | Permissions |
|---|---|
| Administrator |
|
| Participant |
|
| Viewer |
|
| * B2B admins only; B2C must be cart owner |
Note that cart owners (the user who initiates the cart sharing) always has at least administrator permissions.
Sharing Carts
The process flow for sharing carts is as follows.
-
A customer visits a site and adds items to the shopping cart.
-
The customer selects the Share Cart action to begin the sharing process. This retrieves the Share Cart page. The Share Cart page shows all cart items, customer name and address, and shipping and billing information. In this page, the customer must enter a cart name.
-
Selecting members and setting member roles is different for B2B and B2C cart owners:
-
B2B Users --- In the Share Cart page, a B2B user selects the Add Member button. Using the Search and Select: Members page, he searches for users within his organization using the same financial account. Oracle iStore automatically adds a wildcard to the end of any criteria entered, and searches on the first name field of Contact Name.
From the search results, he selects the applicable members, and is returned to the Share Cart page, where he selects roles for each member.
Important: Other B2B members on the cart also must have access to the same financial account as the owner's session account when he initially shared the cart -- if they do not, they will not be able to update the cart.
-
B2C Users --- The B2C customer will see a different version of the Share Cart page. For the B2C customer, there is no Add Member button -- instead, B2C customers simply enter in textboxes the names and valid e-mail addresses of the members in the Share Cart page, and then select the appropriate roles for the members.
-
-
Once the members have been chosen and their roles set, in the Notify column of the Share Cart page, the owner can choose to notify all members on the cart or only specific members. A mark in the Notify checkbox means that the member will receive an e-mail informing him about the shared cart.
-
E-mail notifications leverage Oracle iStore's integration with Oracle Workflow. See the chapter, Integrating Oracle iStore with Oracle Workflow, for details.
-
-
In the Comments field of the Share Cart page, the owner can enter comments to include with the e-mail notification. Only members who have had their Notify checkbox marked will receive the e-mail and the comments.
-
The owner selects the Apply button to complete the share process, and Oracle iStore displays a confirmation message.
All B2B administrators on the cart can subsequently re-share this cart. See the section, "Re-sharing Carts", for more information.
See the section, "Shared Cart Roles", within this chapter, for information about shared cart roles and the permissions allowed by each role.
Re-sharing Carts
After a cart has been shared, B2B members with the administrator role can re-share the cart. Only B2C cart owners can perform this type of action with a shared cart.
The process flow for re-sharing carts is as follows.
-
An administrator accesses the Edit Member page for a shared cart. This page can be accessed as outlined in the section, "Retrieving Shared Carts", within this chapter.
-
In the Edit Member page, the administrator selects the Add Member button to access the search screen for users within his organization.
-
From this point, the flow is identical to sharing a cart for B2B users. See the section, "Sharing Carts", within this chapter.
Retrieving Shared Carts
Following is the shared cart retrieval flow for recipients -- notice that the process is somewhat different for B2C members:
-
Using the e-mail notification: The shared cart e-mail notification message supplies a hyperlink which retrieves the Shared Cart Details page for a specific cart. For B2C users, the cart details appear without requiring the user to log in. For B2B users, the user must log in to view the cart. To update, re-share, or check out with the cart, both B2B and B2C users must log in. This method can be used by both B2C and B2B users.
-
Using the Carts page: Users can access the Carts Shared With You area of the Carts page to retrieve shared carts.
-
B2B users select a cart name hyperlink, and then log in, to view the Shared Cart Details page. Note that from the Carts page, B2B users also can access several cart actions for shared carts; it is not required to view the Shared Cart Details page to perform the following actions (providing their shared cart role allows it and the related functionality has been implemented):
-
Express Checkout
-
Update Cart
-
Duplicate Cart
-
Edit Member
-
Stop Sharing
-
Remove Cart Access
-
Delete Cart
-
-
B2C users enter a cart retrieval number provided in the e-mail notification. (When a user shares a cart, a unique cart retrieval number is generated for each recipient. The owner can see the cart retrieval number in the Share Cart Confirmation page and in the Carts page.)
-
-
Using the Welcome Bin: Customers also can select the Retrieve Saved/Shared Carts link in the Welcome Bin; this retrieves the Carts page.
To see examples of the Carts page for B2B and B2C users, see the following figures: "Carts Page - B2B Users" and "Carts Page - B2C Users".
See also:
-
"Additional Rules and Guidelines for Shared Cart Members" within this chapter
-
"Process Flow for Cart Sharing and Retrieval" within the chapter, Customer Application Process Flows
Shared Cart Details Page Activities
Customers can access the Shared Cart Details page via one of the methods described above. Following are the activities users can perform from these pages (providing their shared cart role allows it and the related functionality has been implemented):
-
Express Checkout
-
Update Cart
-
Duplicate Cart
-
Edit Member --- This action allows the owner to modify user roles and re-share the cart.
-
Stop Sharing --- This action removes access to the cart by all but the person stopping the sharing.
-
Remove Cart Access --- This action allowing a recipient to cancel his participation in the shared cart activity is not displayed in the Carts Shared by You case.
-
Delete Cart
Refer to the "Common Shopping Cart Elements" section earlier in this chapter for more information on the above actions not explained here.
Requesting Assistance or Rejecting T&Cs with Shared Carts
Sales representative assistance is available for shared carts, providing the functionality has been implemented -- see the chapter, Implementing Customer Assistance.
The following points describe the application behavior with this functionality:
-
All members can review Terms and Conditions (T&Cs) on a shared cart, but only shared cart administrators (both B2B and B2C) can request sales assistance or reject T&Cs.
-
When a member requests sales assistance, an e-mail notification is sent to the sales representative, following standard sales assistance functionality. The notification includes the contact information (phone number and e-mail) of the requestor.
-
Any comments entered by the requestor are sent to the sales representative, but are not seen by the cart owner (unless the owner is the requestor).
-
After a member requests sales assistance, all members are assigned the Viewer role except the requestor and the owner (who could be the same user); these users keep their current role. Further:
-
Any member whose role was changed to Viewer receives an e-mail notification telling him his access level was changed.
-
Any member who was already a viewer will get a generic shared cart e-mail notification, saying something to the effect, User X has suggested that you review the cart.
-
If the sales assistance request comes from a user who is not the cart owner, the owner also receives this generic e-mail notification.
-
-
When an administrator who is not the cart owner requests sales assistance or rejects T&Cs, other members on the cart can no longer update it --- at this point, only the cart owner and the administrator who requested assistance/rejected T&Cs can update the cart.
Note: Updateable portions of quotes depend on the profile option, IBE: Allow Update for Draft Quotes. See the chapter, Integrating Oracle iStore with Oracle Quoting, for more information.
See also: The section, "Terms and Conditions" in the chapter, Integrating Oracle iStore with Oracle Sales Contracts.
Additional Rules and Guidelines for Cart Sharing
This section contains information about rules and guidelines related to share cart members.
Rules and Guidelines for Recipients
Following are some additional guidelines regarding recipients:
-
Even if a B2B user has the appropriate shared cart role to checkout or place an order with a shared cart, he also must have the appropriate permissions in his user role to checkout or place an order. These permissions are: IBE_CHECKOUT and IBE_CREATE_ORDER.
-
When a B2B recipient retrieves a cart by selecting the link in the e-mail notification, and then logs in to update the cart, the system will check that his current account number matches the one that the owner used when initially sharing the cart -- if these do not match, an error occurs.
-
For B2C users, only the owner of the cart can track the order from Order Tracker. B2C recipients cannot track orders from shared carts.
Rules and Guidelines for Administrators
Following are some additional guidelines regarding administrators:
-
Actions that B2B cart administrators can perform in most cases do not apply to B2C cart administrators. For B2C users, only the cart owner has full permissions to perform actions with a shared cart. B2C cart administrators have lesser permissions than B2B cart administrators. See the table, "Share Cart: Roles and Permissions", within this chapter, for more information.
-
If a recipient administrator places an order with the cart, both he and the cart owner receive the order confirmation e-mail notification. All other recipients receive notification that they cannot access the cart any longer.
-
If a B2B recipient administrator places an order with the cart, he will be able to track the order. The B2B owner also will be able to track the order, provided:
-
The profile option, IBE: Use Auth Permissions in Order Tracker, is off; or
-
The profile option is on and the owner has the IBE_VIEW_ORDER permission in his user role.
-
-
For B2C users, only the owner can track the order from Order Tracker. B2C recipients cannot track orders from shared carts.
See the section, "Requesting Assistance or Rejecting T&Cs with Shared Carts", within this chapter, for information on this functionality for cart administrators.
Pricing and Payment Rules for All Shared Cart Users
The following table describes pricing/payment modification activities and behavior for all users with shared carts.
| Cart Attribute | Modification Rule - B2B Users | Modification Rule - B2C Users |
|---|---|---|
| Sold-to customer and contact | Since a cart can only be shared within the organization, the sold-to customer will never change. The sold-to contact for a shared cart will always be the cart owner, even if a recipient places a shared cart as order. | Sold-to customer and contact is always the owner, even if a recipient places a shared cart as an order. |
| Cart pricing | Prices are based on the sold-to customer | Cart prices are based on sold-to customer. |
| Promotion codes | During checkout, promotion codes are validated against the sold-to customer. | Promotion codes are validated against the sold-to customer. |
| Pricing agreements | During checkout, pricing agreements are validated against the sold-to customer. | n/a |
| Payment information | During checkout, recipients can specify payment information from the payment book available to them. Payment information entered by recipients will not be linked to the cart owner | Recipients and owners can specify payment information from the payment book available to them. Payment information entered by recipients will not be linked/copied to the cart owner. |
Quote Sharing
Quotes are available in the Customer Application under the Quotes subtab within the Cart menu. The Quotes summary page lists all of a user's quotes, including shared quotes. Quotes can originate from shopping carts that become quotes when a customer requests sales assistance or rejects T&Cs. Quotes also can be published to a customer through the quote publishing feature of Oracle Quoting.
Also refer to the chapter, Integrating Oracle iStore with Oracle Quoting.
Shared Quote Behavior
Following are rules and guidelines for shared quotes:
-
Quotes have the same behavior as shopping carts in terms of member rules. However, quotes cannot be deleted.
-
If the profile option, IBE: Allow Update for Draft Quotes, is Yes, quotes can be updated and utilized in the same manner as carts. If the profile is off, only payment type information can be changed. Event if the update quote feature is enabled, the quote must follow certain rules for users to be able to update it.
-
In the Quotes page, quotes are organized by type, with the most recently created quote appearing first in its section.
-
Just as with the Carts page, the Quotes page is different for B2C and B2B users.
-
Other rules apply to quotes as well. See the chapter, Integrating Oracle iStore with Oracle Quoting, for more information.
Sharing a Quote
To share a quote, both B2B and B2C users select the Share Quote action from the Quotes or Quote Details pages. After this action, the quote sharing process is identical to cart sharing. Remember, however, that updating quotes is only allowed when the profile option, IBE: Allow Update for Draft Quotes, is Yes.
Retrieving a Shared Quote
Retrieving a shared quote is identical to retrieving a shared cart, except that the Quotes page is used to access the quotes. Quotes also can be retrieved via the Shared Quote e-mail notification.
Shared Quote Details Page Activities
The Shared Quote Details page can be accessed by selecting the hyperlink of a shared quote in the Quotes page, or through access to a Shared Quote e-mail notification, which contains a link to the Shared Quote Details page. Following are the activities the user can perform in this page:
-
Copy to Cart
-
Express Checkout
-
Update Quote
-
Edit Member --- This action allows the user to re-share the quote and/or change member access rules.
-
Stop Sharing
-
Remove Quote Access --- This action allowing a user to end his participation in the shared quote activity is not displayed in case of Quotes Shared By You.
-
Delete Quote
Implementing Shared Carts
Two profile options affect the shared cart functionality, as discussed in the following sections.
Setting the Cart Sharing Profile Option
To enable shopping cart sharing, set the following profile option: IBE: Use Sharecart Functionality. This profile option specifies whether cart sharing is enabled in your specialty sites. Set to Yes to enable the functionality. Set to No to disable the functionality.
Setting the B2B Shared Cart/Quote Backward Compatibility Profile Option
For backward compatibility with the Sharee Number of previous Oracle iStore releases, you can set the following profile option to Yes to enable the Cart Retrieval Number textbox in the Carts and Quotes pages: IBE: Cart Retrieval By Number For B2B. For B2B users, this profile option enables a textbox (labelled Cart Retrieval Number) in the Carts and Quotes pages. B2B users can enter a Sharee Number from previous iStore releases to access carts previously shared.
Note that this profile does not control the cart retrieval textbox for B2C users.
Checkout and Order Placement
The following sections discuss features and functionality related to checkout and order placement.
Checkout and Order Placement Overview
Oracle iStore ships with full checkout and order placement capabilities in the Customer Application. Following are some of the major features of the Customer Application checkout and order placement:
-
Each step of the checkout flow is identified using a breadcrumb train. The train lets the user know where he is in the checkout process.
-
If Smart Checkout is enabled and all of the required customer information is correctly pre-populated, customers can navigate directly to the order review page and skip shipping and billing information.
-
If Express Checkout is enabled and the customer has a valid credit card stored in his payment book, he can select orders that are later submitted as a batch job using a concurrent program.
-
Implementers have the option of mandating that B2B customers enter their contact information during the checkout flow.
-
From the order review page, customers can change shipping, billing, end customer and additional information. In the case of B2B users, this functionality depends upon the permissions assigned to the user's role, giving implementers flexibility in the functionality allowed these users.
-
Integration with Oracle Sales Contracts and Oracle Quoting allow implementers to set up Terms and Conditions and sales representative assistance during the checkout flow.
-
Oracle iStore automatically defaults shipping and billing information into the cart during the checkout phase.
-
If the shopping cart contains only non-shippable items, the shipping page is skipped. The shipping information might be defaulted through defaulting rules, so the shipping information will still be displayed in the order review page. If at least one item is shippable, or one ATO/PTO model is added to the cart, then the shipping page will be displayed.
-
Shipping, billing and end customer information is defaulted based on hard-coded defaulting rules. The user interface provides mechanisms (e.g., drop-lists and checkboxes) to allow the user to set additional billing, shipping, and end customer information based on values already entered in the order.
-
Users can perform the following shopping cart actions: Request Help, Save Cart, and Share Cart, at any step of the checkout flow, not only from the shopping cart page.
-
The order review page shows additional attributes of the shopping cart and checkout pages, such as additional information at cart and item levels, if populated, and end customer at cart and item levels, if enabled.
-
Customers can set shipment priority, ship items to different addresses, and enter different billing information for different items, if this functionality is enabled.
Note: Some of the functionality in this section discussed requires integration with Oracle iStore dependencies and assumes you have performed the required setup tasks.
For business process flows related to checkout and order placement, see the Customer Application Process Flows, chapter.
Checkout Flow Trail
Each step of the checkout flow is identified using a breadcrumb trail. The trail lets the user know where he is in the checkout process. The possible trail steps (depending upon the functionality implemented) are:
-
Shipping
-
Billing and Payment
-
End Customer
-
Terms and Conditions
-
Review and Place Order
If Terms and Conditions and End Customer information (B2B only) are not enabled, the corresponding trail steps are not displayed. The trail steps are not clickable; instead, customers can navigate between the checkout flow pages using the Back/Next buttons in the UI. Each time the user selects a Back or Next button, the information in the page is saved, unless it is sensitive information (credit card numbers are scrambled, except for the last four digits). When the user selects Cancel he is returned to the Shopping Cart page, except in the case of a quote that is not updateable. In this case, the Cancel button takes the user back to the Quote Details page. When the user performs an action that takes him one or more steps off the trail, the step the user is currently in is highlighted, while all the other steps are grayed out.
Whether or not the shipping page is skipped depends on the item type:
-
Standard items: Assuming the Shippable flag is checked in Inventory, the user will go through the shipping page.
-
Configured and model items: If there are any standard configured items/model bundles (non-network containers) in the cart, the user will always go through the shipping page.
-
Network containers: Network containers refer to telecommunications service ordering (TSO) items; see the Oracle Telecommunications Service Ordering Process Guide for more information. When the cart lines are displayed in the various pages (e.g., Shopping Cart, Saved Cart Details, Shared Cart Details, Saved Quote Details, etc.), the system will check the shippable attribute for the children of the network containers. If one of the items under the network container is shippable, then the user will go through the shipping page. When the cart lines are not displayed (e.g., as in Carts and Quotes pages) the system will not check the Shippable attribute for a network container's child items. In this case, the user will always go through the shipping page.
Note: The display of Terms and Conditions (T&Cs) content can depend on system variables. Thus, if user changes shipping, billing, end customer, and quantity information in the order review page, the T&Cs can be affected. Users are able to branch out of the checkout flow in the order review page to review and accept T&Cs after they have changed. If the profile option, IBE: Enforce Terms and Conditions Review by User, is Yes and the user branches out from the order review page, the place order button is disabled and the user needs to accept the T&Cs again before he is allowed to place the order.
Shopping Cart Defaulting During Checkout
In the Oracle iStore Customer UI, as the user goes through the checkout process, Oracle iStore defaults certain information into the users' checkout pages. This information includes shipping and billing information related to the user.
Shopping cart defaulting both improves the performance of the checkout flow, and improves the defaulting capabilities of Oracle iStore. The feature defaults in the shipping addresses, billing addresses, primary credit card, and preferred shipping method of the user when the user adds the first item to the cart.
The following are the triggers that activate cart defaulting:
-
A signed-in user creates a cart by adding an item to it
-
A guest user has items in an active cart and then signs in
Defaulting for Shipping Data
The following shipping fields are populated when shipping information defaulting occurs:
-
Shipping Method: If the user has a preferred shipping method and has a primary shipping address, then the preferred shipping method is defaulted into the cart. If the user does not have a preferred shipping method, then it can be set by the user within the Profile menu. The preferred shipping method also is set when a user who does not have a preferred shipping method checks out with his first cart and chooses a shipping method. This shipping method then becomes the user's preferred shipping method. In all cases, the existing validation of shipping methods per site, and those applicable for the current organization, will be done. When a cart is created and the shipping method is not defaulted to the cart, the first available shipping method is defaulted to the cart. This behavior occurs only if the user's preferred shipping method is not set and the profile option, IBE: Preferred Shipping Method, is not set.
-
Ship to Customer: In a B2C case, the logged in person is always the default ship-to customer. In a B2B case, the organization of the logged-in user is the default ship-to customer.
-
Ship to Contact: In both B2C and B2B cases, the logged in user is the default ship to contact.
-
Ship to Address: If the user already has a default (preferred) shipping address, Oracle iStore will use that address as the default shipping address for the cart, provided the user also has a preferred shipping method. Otherwise, the user can create a new address in the checkout process. The address used in the first order placed by the user becomes the default ship-to address, and will be defaulted the next time. If the contact does not have a primary shipping address and there is a primary address for the company, the primary company address is defaulted.
Defaulting for Billing Data
The following billing fields are populated when billing information defaulting occurs:
-
Bill to Customer: In a B2C case, the logged in person is always the default bill-to customer. In a B2B case, the organization of the logged-in user is the default bill-to customer.
-
Bill to Contact: In both B2C and B2B cases, the logged in user is the default bill to contact.
-
Bill to Address: If the user already has a default (preferred) billing address in the address book, Oracle iStore will use that address. Otherwise, the user can create a new address during the checkout process. The bill-to address used in the first order placed by the user becomes default bill-to address, and will be defaulted the next time. If the contact does not have a primary billing address and there is a primary address for the company, the primary company address is defaulted.
-
Payment Method: If the user has a default credit card and the merchant has set up that credit card type as a valid form of payment in the specialty site the user is in, then the default credit card is defaulted into the cart as the payment option when the user adds the first item to a new cart.
If this defaulting does not take place, then New Credit Card is displayed as the payment option on the billing and payment checkout page. If credit card is not enabled by the merchant as a payment type, then Invoice, Cash and Check (in this order) will be chosen, depending on which payment types have been enabled by the merchant. If the user does not have a default credit card in his profile and creates a new credit card, the new credit card is used in the checkout process and becomes the default credit card; this card then will be defaulted the next time.
Deleted (Invalidated) Addresses in Shopping Carts
Once a B2B or B2C user places a shipping or billing address into his shopping cart, Oracle iStore will keep these addresses in the cart even if these addresses get deleted (invalidated) before the user checks out with the cart. This ensures that users never are allowed to checkout without addresses in their shopping carts.
This rule applies to:
-
B2C billing and shipping addresses
-
B2B contact person billing and shipping addresses
-
B2B party site addresses
-
Addresses in shared shopping carts
-
Addresses deleted through the user's Address Book (within the Profile menu)
-
Addresses deleted through the Express Checkout preferences menu
-
Addresses invalidated through Oracle Forms
The following shopping cart checkout flow examples illustrate the rule:
Standard Checkout:
-
A user add items to the cart and proceeds to checkout.
-
The user picks a shipping and a billing address to use in the cart.
-
The user switches to the Profile menu's Address Book and deletes the shipping and/or billing address used for the cart.
-
The user returns to checkout with the same cart -- the shipping and/or billing address continue to appear in the shipping and billing section cart-level settings.
Checkout with a Shared Cart:
-
A user adds items to the cart.
-
The user proceeds to checkout and shares the cart with another recipient.
-
The user picks a shipping and a billing address to use in the cart.
-
The user switches to the Profile menu's Address Book and deletes the shipping and/or billing address, and then logs out.
-
Recipient of the shared cart retrieves the cart and checks out with it -- the shipping and/or billing addresses continue to appear in the shipping and billing section cart-level settings.
Express Checkout:
-
A user enters shipping and billing address information in Express Checkout Preferences page.
-
The user places items in his shopping cart for automatic retrieval by the concurrent program.
-
The user goes to the Express Checkout Preferences page and deletes his express checkout billing and/or shipping address.
-
Express Checkout concurrent program submits the order with the previously-deleted shipping and/or billing addresses.
Pricing Calls During Checkout
Because pricing calls to the database are expensive in terms of application performance, during the checkout flow, Oracle iStore only makes calls to the pricing engine under certain conditions. When a user updates some item in a checkout flow page, Oracle iStore always saves the page, but the pricing call is only made under specific conditions, as described in this section. Note that the system makes a distinction between pricing calls occurring at the order (header) level and those occurring at the item (line) level.
Pricing Calls During B2B Checkout
Oracle iStore calls the pricing engine during B2B checkout as follows:
Shipping Information Page
-
Order Level: A pricing call is not made unless next page is the Order Review page. This rule is applicable only if a save operation occurs in the page.
-
Item Level: No pricing call is made.
Billing and Payment Information Page
-
Order Level: A pricing call is not made unless next page is the Terms and Conditions or Order Review page. This rule is applicable only if a save operation occurs in the page. Oracle iStore does make a pricing call in the case when there is no change in the End Customer Information page, but next page is the Terms and Conditions page.
-
Item Level: No pricing call is made.
End Customer Information Page
-
Order Level: A pricing call is not made unless next page is the Terms and Conditions or Order Review page. This rule is applicable only if a save operation occurs in the page. Oracle iStore does make a pricing call in the case when there is no change in the End Customer Information page, but next page is the Terms and Conditions page.
-
Item Level: No pricing call is made.
Pricing Calls During B2C Checkout
Oracle iStore calls the pricing engine during B2C checkout as follows:
Shipping and Billing Information Page
-
Order Level: A pricing call is made is if a save operation occurs in the page.
-
Item Level: (This will be a shipping change). A pricing call is made is if a save operation occurs in the page.
Requesting Sales Assistance During Checkout
If a user requests sales assistance in the checkout phase, the cart becomes a quote and the user's sales representative receives an e-mail notification of the request.
Note that a B2B user must have the IBE_ASK_SALES_ASSISTANCE permission in his user role to be able to request sales assistance.
This functionality requires that both Oracle Quoting and the Sales Assistance feature (IBE: Use Sales Assistance Feature = Yes) have been implemented. For more information, see the chapters, Integrating Oracle iStore with Oracle Quoting, and Implementing Customer Assistance.
For information on who can request sales assistance with a shared cart or quote, see the section, "Shopping Cart Sharing".
Rejecting Terms and Conditions During Checkout
If a customer rejects the standard Terms and Conditions (T&Cs) in the checkout phase, the Sales Assistance flow initiates. The cart becomes a quote in Oracle Quoting and also appears for the customer on the Quotes page, Quotes list.
In order to be able to reject T&Cs, a B2B user must have the IBE_ASK_SALES_ASSISTANCE permission in his user role, and the profile option which controls the sales assistance feature, IBE: Use Sales Assistance Feature, must be set to Yes.
For more information, see the chapters, Integrating Oracle iStore with Oracle Sales Contracts, and Implementing Customer Assistance.
For information on who can reject T&Cs with a shared cart or quote, see the section, "Shopping Cart Sharing", within this chapter.
Mandating B2B Contact Information During Checkout
Merchants have the ability to mandate whether B2B users must enter ship to and bill to contact information during checkout. Oracle iStore APIs validate this information against database tables used by Oracle Receivables.
This functionality is enabled by setting the following profile option at the application level for iStore: IBE: Mandate Contacts For Billing and Shipping --- Enter Yes to mandate that B2B users enter contact information before an order will be submitted. Enter No to disable the mandate.
This profile option defaults to No if not set.
A warning message is displayed if the user attempts to continue without providing the required information. The user cannot continue without providing the required information.
Note: B2B users must have the permission, IBE_CHANGE_BILLTO_CONTACT and IBE_CHANGE_SHIPTO_CONTACT, in their user role in order for them to be able to change ship-to and bill-to contact information.
Selection and Creation of Organization Data During Checkout
Organizations can control which users or groups of users are allowed to create and change customers, contacts and addresses (including bill-to and ship-to address usages) during the checkout flow by assigning or removing certain permissions from the B2B user roles assigned to their business users.
Billing Flow Permissions
Following are the permissions which control creating and changing customers, contacts, and addresses from the Checkout: Billing Information page and associated searching and creating pages:
-
IBE_CREATE_BILLTO_CUSTOMER: This permission controls the Create Customer button in the Search and Select: Bill to Customer page, available from the Checkout: Billing Information page. If the user does not have the IBE_CREATE_BILLTO_CUSTOMER_ADDRESS permission as well, then the search results include only customers who have a bill-to address. When creating a new customer, users can also create contact information for the customer. Once the information is saved, customer name, contact name, and address will automatically be populated. If the user creates a bill-to customer, the bill-to usage for the address is created automatically, before the order is placed. The new customer has a billing relationship to the sold-to customer.
-
IBE_CREATE_BILLTO_CUSTOMER_ADDRESS: This permission controls the display of the Create Address button in the Search and Select: Bill to Customer page (available from the Checkout: Billing Information page) and the appearance of the Customer Address section in the Create Bill to Customer page (Search and Select: Bill to Customer page, Create Address). In the Create Bill To Address page (Billing Information page Address area, Select button, then Create Address), the Customer Name radio button will only display if the user has this permission. The new address associated with the bill-to customer will have a bill-to relationship with the bill-to customer.
-
IBE_CREATE_BILLTO_CONTACT: This permission controls the display of the Create Contact button in the Search and Select: Bill to Contact page, available from the Checkout: Billing Information page. The new contact will have a bill-to relationship with the bill-to customer.
-
IBE_CREATE_BILLTO_CONTACT_ADDRESS: This permission controls the display of the Create Address button in the Search and Select: Bill to Contact screen (available from the Checkout: Billing Information page) and the appearance of the Contact Address section in the Create Bill to Contact page (Search and Select: Bill to Contact screen, Create Contact). In the Create Bill To Address page (Billing Information page Address area, Select, Create Address), the Contact Name radio button will only display if the user has this permission. When a user sets up his Express Checkout addresses, he must have this permission to see the Create Address button in the Preferences (Profile, Preferences, Orders) page. The new address will have a bill-to relationship with the bill-to contact.
-
IBE_CHANGE_BILLTO_CONTACT: This permission controls the display of the Change button on the Checkout: Billing Information page, allowing a user to change the bill-to contact. A user will only be able to View All Contacts in the Search and Select: Ship to Address page (Billing Information page Address area, Select) if he has this permission. Also, when the user views all contacts, only billing addresses of the contacts are displayed. This permission works in tandem with IBE_CHANGE_BILLTO_CUSTOMER.
-
IBE_CHANGE_BILLTO_CUSTOMER: This permission controls the display of the Change button on the Checkout: Billing Information page, allowing a user to change the bill-to customer. When selecting a new customer, the list-of-values displays customer names and account numbers only, not addresses. If you explicitly grant this permission to a user, you should also grant the IBE_CHANGE_BILLTO_CONTACT permission to the user.
-
IBE_BILLTO_ANY_ACCOUNT: Allows a customer to search on and retrieve all existing customers rather than only those with an existing billing relationship with the sold-to customer. Note that "all existing customers" is restricted to customers that have a valid party relationship of type, customer of, with the sold-to customer, as well as any customer that has a billing account relationship with the sold-to customer.
-
If the user has neither the IBE_CREATE_BILLTO_CUSTOMER_ADDRESS permission nor the IBE_CREATE_BILLTO_CONTACT_ADDRESS permission, then the search results lists will only include bill-to addresses for both contacts and customers.
Shipping Flow Permissions
Following are the permissions which control creating and changing customers, contacts, and addresses from the Checkout: Shipping Information page and associated searching and creating pages:
-
IBE_CREATE_SHIPTO_CUSTOMER: This permission controls the Create Customer button in the Search and Select: Ship to Customer page, available from the Checkout: Shipping Information page. If the user creates a ship-to customer, the ship-to usage for the address is created automatically, before the order is placed. When creating a new customer, users can also create contact information for the customer. Once the information is saved, customer name, contact name, and address will automatically be populated. When the user performs query for a customer, the query results will not display addresses because of the performance reason. The new customer will have a shipping relationship with the sold-to customer.
-
IBE_CREATE_SHIPTO_CUSTOMER_ADDRESS: This permission controls the display of the Create Address button in the Search and Select: Ship to Customer screen (available from the Checkout: Shipping Information page) and the appearance of the Customer Address section in the Create Ship to Customer page (Search and Select: Ship to Customer screen, Create Customer). In the Create Ship To Address page (Shipping Information page Address area, Select, Create Address), the Customer Name radio button will only display if the user has this permission. The new address associated with the ship-to customer will have a ship-to relationship with the ship-to customer. If the user has only this permission, then the search results include all the address types for the customer and all the ship-to addresses for contact (based on TCA party site use).
-
IBE_CREATE_SHIPTO_CONTACT: This permission controls the display of the Create Contact button in the Search and Select: Ship to Contact page, available from the Checkout: Shipping Information page. The new contact will have a ship-to relationship with the ship-to customer.
-
IBE_CREATE_SHIPTO_CONTACT_ADDRESS: This permission controls the display of the Create Address button in the Search and Select: Ship to Contact screen (available from the Checkout: Shipping Information page) and the appearance of the Contact Address section in the Create Ship to Contact page (Search and Select: Ship to Contact screen, Create Contact). In the Create Ship To Address page (Shipping Information page Address area, Select, Create Address), the Contact Name radio button will only display if the user has this permission. When a user sets up his Express Checkout addresses, he must have this permission to see the Create Address button in the Preferences (Profile, Preferences, Orders) page. The new address has a ship-to relationship with the ship-to contact. If the user has only this permission, then the search results include all of the address types for the contact and all of the ship-to addresses for the customer (based on TCA party site use).
-
IBE_CHANGE_SHIPTO_CONTACT: This permission controls the display of the Change button from the Checkout: Shipping Information page, allowing a user to change the ship-to contact name. A user will only be able to View All Contacts in the Search and Select: Ship to Address page (Shipping Information page Address area, Select) if he has this permission. Also, when the user views all contacts, only shipping addresses of the contacts are displayed. This permission works in tandem with IBE_CHANGE_SHIPTO_CUSTOMER.
-
IBE_CHANGE_SHIPTO_CUSTOMER: This permission controls the display of the Change button from the Checkout: Shipping Information page, allowing a user to change the ship-to customer. When selecting a new customer, the list-of-values displays customer names and account numbers only, not addresses. If you explicitly grant this permission to a user, you should also grant the IBE_CHANGE_SHIPTO_CONTACT permission to the user.
-
IBE_SHIPTO_ANY_ACCOUNT: In the shipping information pages, this permission allows a user to search on and retrieve all existing customers rather than only those with an existing shipping relationship with the sold-to customer. Note that "all existing customers" is restricted to customers that have a valid party relationship of type, customer of, with the sold-to customer, as well as any customer that has a shipping account relationship with the sold-to customer.
-
If the user has neither the IBE_CREATE_SHIPTO_CUSTOMER_ADDRESS permission nor the IBE_CREATE_SHIPTO_CONTACT_ADDRESS permission, then the search results lists will only include ship-to addresses for both contacts and customers.
For information on the End Customer permissions, refer to the section, "Capture End Customer Data During Checkout", within this chapter.
End Customer Permissions
Following are the permissions which control creating and changing customers, contacts, and addresses from the Checkout: End Customer Information page and associated searching and creating pages:
-
IBE_CREATE_END_CUSTOMER: This permission controls the Create End Customer button in the Search and Select: End Customer page, available from the Checkout: End Customer Information page.
-
IBE_CREATE_END_CUSTOMER_ADDRESS: This permission controls the display of the Create Address button in the Search and Select: End Customer Address screen (available from the Checkout: End Customer Information page).
-
IBE_CREATE_END_CUSTOMER_CONTACT: This permission controls the display of the Create Contact button in the Search and Select: End Customer Contact page, available from the Checkout: End Customer Information page.
-
IBE_CREATE_END_CUSTOMER_CONTACT_ADDRESS: This permission controls the display of the Create Address button in the Search and Select: End Customer Contact screen (available from the Checkout: End Customer Information page) and the appearance of the Contact Address section in the Create End Customer Contact page (Search and Select: End Customer Contact screen, Create Contact).
-
IBE_CHANGE_END_CUSTOMER_CONTACT: This permission controls the display of the Change button from the Checkout: End Customer Information page, allowing a user to change the end customer contact name.
-
IBE_CHANGE_END_CUSTOMER: This permission controls the display of the Change button from the Checkout: End Customer Information page, allowing a user to change the end customer. When selecting a new customer, the list-of-values displays customer names and account numbers only, not addresses. If you explicitly grant this permission to a user, you should also grant the IBE_CHANGE_END_CUSTOMER_CONTACT permission to the user.
How Account Sites Are Generated with Orders
At order creation, Order Capture (iStore's backend API layer) will create a valid account site use for the given party site and account number, if none exists. During this process, if the Oracle Receivables (AR) system parameter auto_site_numbering is No, then the location field when creating an account site use will be concatenated with the site use code, city, and account site use id. If the AR system parameter auto_site_numbering is Yes, then Order Capture APIs (which Oracle iStore uses to pass information to AR) will not populate the field, but instead will let AR generate the value for the Location field (to be the same as the account site use id).
Smart Checkout
Available to B2B and B2C customers, the Smart Checkout feature lets Customer Application users skip the shipping and billing steps in the checkout phase. Instead of entering shipping and billing information during checkout, users navigate directly from the shopping cart to the order review page. The Smart Checkout feature works on basis of shipping and billing information as set up for the sold-to customer in the profile and this information is defaulted into the checkout flow. The customer can set billing preferences in the profile payment page, where only credit card information can be supplied.
Assuming shipping and billing information is set up appropriately for the sold-to customer, this information is defaulted into the checkout flow. If the required information is not populated when the user comes to the Order Review page, an error icon is displayed and the user must enter the required data. If End Customer information is mandated, then end customer data is also required. In a typical flow, the customer reviews the information in the order review page and then places the order; or, the customer can go back to each section and modify the information.
If Terms and Conditions (T&Cs) are enabled with Smart Checkout, the T&Cs page is the first page displayed in the checkout flow (instead of the shipping/billing information page), assuming shipping, billing and end customer information have been populated with default information. When the user agrees with T&Cs, the order review page is displayed.
For newly registered users who likely will not have default address data entered into their profiles, the system will automatically show the shipping or billing page (depending upon which information is lacking), and the user can enter his information into the page before proceeding. Also, the system will pick the first available shipping method (if there is no preferred shipping method for the user) to default into the shipping page.
Smart Checkout is enabled by setting the profile option, IBE: Skip Checkout Steps for Order Placement, to Yes. See the appendix, Profile Options, for more information on the profile option.
Express Checkout
Available for all registered users, Express Checkout allows orders to be submitted as batch jobs by using a concurrent program, iStore - Express Checkout Order Submission. In addition to the concurrent program, the functionality is enabled by setting two profile options.
See the chapter, Concurrent Programs, for more information on the concurrent program.
If the credit card verification number is set up as mandatory, implementers should disable Express Checkout functionality. See the chapter, Implementing Payment Types and Shipping Methods, for more information.
Express Checkout Process Flow
Note that a B2B user must have the IBE_CHECKOUT and IBE_CREATE_ORDER permissions in his user role to use Express Checkout.
Following is the process flow for Express Checkout:
-
In Oracle Forms, an administrator sets the profile options discussed in the section, "Setting Express Checkout Profile Options", below.
-
In the Oracle iStore Customer Application, the Express Checkout preferences link appears in the Welcome Bin, and the Express Checkout Preferences page is available through the Profile menu.
-
Oracle iStore user sets up Express Checkout preferences:
-
The user enters a valid credit card number and contact information in the Express Checkout Preferences page, and saves the data. The Express Checkout Preferences page is available by selecting Profile, Preferences, Orders in the Customer Application. The system checks for valid addresses and credit card information before saving the settings. An error message is returned if the user has entered invalid information.
Important: For B2B users to create addresses, customers, and contacts, they must have the appropriate permissions (e.g., IBE_CREATE_SHIPTO_CUSTOMER, IBE_CREATE_BILLTO_CUSTOMER, IBE_CREATE_BILLTO_CUSTOMER_ADDRESS, IBE_CREATE_BILLTO_CONTACT_ADDRESS, and/or IBE_CREATE_SHIPTO_CONTACT_ADDRESS). The Create button will not show in the Express Checkout Preferences page next to the appropriate areas if the users do not have the applicable permissions.
-
The user enables Express Checkout in the Express Checkout Preferences page.
-
-
Once the user preferences are set up and Express Checkout is enabled, to purchase items through Express Checkout, the user does the following:
-
Selects the Express Checkout button that appears next to products in the catalog pages. This adds the item to the Express Checkout queue.
Note: Express Checkout does not apply to model bundles that have been enabled in Oracle Bills of Material; hence, the Express Checkout button will not appear next to these items.
-
Selects the Express Checkout button in the Shopping Cart page. This adds all items in the cart to the Express Checkout queue.
-
-
The site then forwards the user to the Pending Express Checkout Orders page, where he can cancel the order if desired. If he does nothing, the concurrent program will pick up the order and submit it.
-
The concurrent program, iStore - Express Checkout Order Submission, automatically picks up the Express Checkout queue and submits the orders.
Setting Express Checkout Profile Options
To use Express Checkout in your Web sites, set the following profile options at the iStore application level.
-
IBE: Use Express Checkout: This profile option enables the Express Checkout functionality in all of your sites. Set to Yes to enable Express Checkout, or set to No to disable the functionality. The default value is Yes.
-
IBE: Express Checkout Consolidation Time Interval: This profile option determines the amount of time that an Express Checkout order will remain available to be "added to" before the concurrent program can submit it. The concurrent request, iStore - Express Checkout Order Submission, attempts to submit Express Checkout orders based upon its schedule, e.g., how often the concurrent request is set to be run (every n hours, every day, etc.).
Enter values for this profile option in minutes. The default value for this profile option is 60 (minutes).
Rules and Guidelines for Express Checkout
Keep the following rules and guidelines in mind for Express Checkout functionality.
-
If integrating Oracle iStore with Oracle Application Server Web Cache to cache catalog pages, you should not use Express Checkout in your specialty sites for the following reason:
-
If you set up Oracle Application Server Web Cache to cache your catalog pages and the Express Checkout profile is on at the application level: then, if User 1 has Express Checkout turned on, while User 2 has Express Checkout turned off, User 2 may still be able to see the Express Checkout button in the UI. When User 2 selects the cached Express Checkout button, he will receive an error.
-
-
If you have enabled the Credit Card Verification Number Support feature and made it mandatory, then Express Checkout should not be used.
Checkout Flow Pages
This section describes the pages within the checkout flow. The flow can vary according to the user type and functionality implemented.
Shipping and Billing Information Pages
Oracle iStore displays different shipping and billing pages depending upon whether the user is a B2B or B2C customer:
-
B2B customers see a separate shipping and billing information page for each step (shipping or billing). The Checkout: Shipping Information page is the first page B2B customers access after selecting the Checkout button. The Checkout: Billing Information page is the next page following the shipping page.
-
B2C users have a combined Checkout: Shipping and Billing Information page.
B2B Shipping Information Page
The B2B Checkout: Shipping Information page elements and features include:
-
Default From LOV: Users can use the list-of-values to populate the shipping customer, contact, and address from the address information stored for their company.
-
Ship To Customer Information: The B2B contact's company name displays next to this field. Users can accept the organization defaulted or change or create a new organization
-
Ship To Contact: The B2B contact name displays, along with his telephone number and e-mail address, if available. The user can accept the default contact name or change or create a new one. The profile option, IBE: Mandate Contacts For Billing and Shipping, can be set to mandate an entry in this field; if the profile option is set to Yes, the Clear button does not display.
-
Ship To Address: The default ship-to address displays. The user can accept the default ship-to address or change or create a new one. The user also has the following checkbox options in this field: (1) Use the same for billing, which defaults the same address into the billing page; and (2) Use the same for end customer, which defaults the same address into the end customer page, if Capture End Customer Data functionality is enabled.
Note: If the B2B user does not have the IBE_CHANGE_BILLTO_CUSTOMER_ADDRESS permission, the Use the same for billing check box is not displayed.
-
Shipping Details: This area allows users to enter a variety of shipping details and instructions and is enabled through the profile option, IBE: Use Shipping Instructions. Following are the shipping details fields:
-
Shipping Method --- Users can select from a drop-list of enabled shipping methods or accept the default method (which is the first value in the drop-list). The list is comprised of the shipping methods enabled for the site in the Site Administration Application.
-
Shipping Instructions --- Users can enter shipping instructions into the textbox; these instructions are passed along with the order into the order management system. The shipping instructions textbox only displays if the profile option, IBE: Use Shipping Instructions, is Yes.
-
Shipment Priority --- Users can select a shipping priority (High/Medium/Low), based on their perception of the urgency of the shipment. This information is passed along with the order into the order management system. Values for the list come from the Oracle Order Management quick code, SHIPMENT_PRIORITY.
-
Requested Delivery Date --- Users can select the delivery date by which they would like to have the order delivered. This data is passed along with the order into the order management system.
-
Packing Instructions --- Users can enter packing-related instructions into a textbox. This data is passed along with the order into the order management system.
-
-
Item Level Shipping: Implementers can allow users to enter different shipping information for different items by setting the profile option, IBE: Use Line Level Shipping, to Yes. When item level shipping is enabled, the shipping page shows an expandable section entitled Ship to Multiple Locations, which displays a table showing each cart item, quantity, UOM, ship to customer and address, and shipping method. The items in the table initially use the cart-level default shipping information, and in this case, the Ship To column reads, Same as Cart Level. Splitting multiple quantities of the same item is allowed from the Ship to Multiple Locations area (except for child items in a configuration). To enter shipping details for an item, the user selects the item and presses the Update Shipping Information button to retrieve the Update Shipping Information page. The Update Shipping Information page lets users enter different shipment contacts, addresses, methods, instructions, priorities, delivery dates, and packing instructions for individual items on the order. Though non-shippable items are displayed in the table, these cannot be selected.
-
Cart Actions: From the shipping information page, the following cart actions are available: Save Cart, Share Cart (if implemented), and Request Help (if Sales Assistance functionality is implemented).
B2B Billing Information Page
The B2B Checkout: Billing and Payment Information page features and functionality include:
-
Default From LOV: Users can use the list-of-values to populate the billing customer, contact, address, and payment information from either the information stored for their company or from the information on the shipping information page.
If the B2B user does not have the IBE_CHANGE_BILLTO_CUSTOMER_ADDRESS permission, this drop-down list is not displayed.
-
Bill To Customer Information: The B2B contact's company name displays next to this field. Users can accept the organization defaulted or change or create a new organization
If the B2B user does not have the IBE_CHANGE_BILLTO_CUSTOMER_ADDRESS permission, the default bill to customer information is displayed
-
Bill To Contact: The B2B contact name displays, along with his telephone number and e-mail address, if available. The user can accept the default contact name or change or create a new one. The profile option, IBE: Mandate Contacts For Billing and Shipping, can be set to mandate an entry in this field; if the profile option is set to Yes, the Clear button does not display.
-
Bill To Address: The default bill-to address displays. The user can accept the default bill-to address or change or create a new one. The user also has the following checkbox options in this field: (1) Use the same for shipping, which defaults the same address into the shipping page; and (2) Use the same for end customer, which defaults the same address into the end customer page, if Capture End Customer Data functionality is enabled.
If the B2B user does not have the IBE_CHANGE_BILLTO_CUSTOMER_ADDRESS permission, the primary bill to address is displayed. The user cannot select an alternate bill to address.
-
Bill to Multiple Locations: This area (which features show/hide icon functionality) allows users (B2B and partners only) to enter a variety of billing details and instructions and is enabled through the profile option, ASO: Enable Line Level Billing. Following are the billing details fields in Update Item Billing and Payment Information page available from this area: Bill To Customer, Bill To Contact, and Bill To Address. In addition, multiple quantities of the same item can be split (except for child items in a configuration).
-
Payment Information: This area allows users to select the payment method to be used for the order. It includes all payment types enabled through the Site Administration Application. The primary credit card stored for the organization contact is defaulted; if no primary credit card is stored, the option to create new credit card data is presented; users also can create new credit card data even if a primary credit card is stored and defaulted. If Credit Card Verification Number Support is enabled, the area also includes a field for users to enter the CVV2 number associated with the credit card used in the order. If purchase orders and commitments have been enabled, this area displays the purchase order field and a button enabling users to select commitments. If the IBE: Mandate Purchase Order Number profile option has been set to Yes, the purchase order number field is mandatory.
-
Tax Information: This area allows users to set a flag telling the system that their order should not be taxed. The Reason Code LOV lets users select from a pre-defined list of reasons, and the Tax Certification Number textbox allows entry of their company's tax exempt certification number.
-
Cart Actions: From the billing information page, the following cart actions are available: Save Cart, Share Cart (if implemented), and Request Help (if Sales Assistance functionality is implemented).
B2C Shipping and Billing Information Page
Shipping and billing information for B2C customers is combined in the Checkout: Shipping and Billing page. If no shippable items are in the cart, the page is named simply Billing Information. Very similar to the B2B versions, the B2C Checkout: Shipping and Billing page has the following main features and functionality:
Shipping Portion of the Page:
-
Shipping Address LOV: If the customer has defined one in his address book, the primary shipping address is defaulted. B2C users also may select shipping addresses from a list of values. The list includes all addresses and their usages as set up in Oracle TCA. From the LOV, users also have the option of creating a new address.
-
Shipping Information: This area contains the same fields and functionality as the B2B Shipping Details area (see B2B Shipping Information Page, above).
-
Item Level Shipping: Implementers can allow users to enter different shipping information for different items by setting the profile option, IBE: Use Line Level Shipping, to Yes. When item level shipping is enabled, the shipping page shows a hyperlink in an expandable section entitled, Need to ship to multiple addresses?, which when selected displays the Ship to Multiple Addresses page. This page shows each item in the cart along with the quantity being ordered. Users can select an item and update it to enter item-level shipping information in the Update Shipping Information page. In addition, splitting multiple quantities of the same item is allowed (except for child items in a configuration).
Billing Portion of the Page:
-
Billing Address LOV: If the customer has defined one in his address book, the primary billing address is defaulted, but if not, the shipping address is defaulted. B2C users also may select billing addresses from a list of values, and may choose to default the address from the shipping address. The list includes all addresses and their usages as set up in Oracle TCA. From the LOV, users also have the option of creating a new address.
-
Payment Information: This area contains the same fields and functionality as the B2B Payment Information area (see B2B Billing Information Page, above), with primary credit card being defaulted into the page.
-
Tax Information: This area contains the same fields and functionality as the B2B Payment Information area (see B2B Billing Information Page, above).
Cart Actions:
-
From the Checkout: Shipping and Billing page, the following cart actions are available: Save Cart, Share Cart (if implemented), and Request Help (if Sales Assistance functionality is implemented).
Splitting Configured Items for Shipping
Customers can split shipping lines for configured items in order to ship to multiple locations. Refer to the chapter, Implementing Payment Types and Shipping Methods, for implementation information about line-level shipping. The line-splitting functionality for configured items creates a copy of the top-level model item and its components, and copies all attributes from the original configuration. This behavior is very similar to the existing behavior of splitting lines with standard items. Here is the business flow:
-
A customer configure items from catalog or shopping cart, using Oracle Configurator, and proceeds to checkout.
-
Using the Ship to Multiple Locations area of the shipping page, the user can split configured items that have a quantity greater than one. Following are additional points about the behavior:
-
All service items and line attributes (price list, item-level billing, item-level shipping, item-level flexfields, etc.) are copied as well.
-
When the original item is split, Oracle iStore creates the new line item with following quantity:
-
Model quantity: As input by the user
-
Components quantity: Model quantity times the unit quantity of the component
-
-
When the top-level model item is split, the new model items and their components are exact duplicates of the original top-level model item and its components.
-
The relationships between the original top-level model item and its components are preserved in the newly created model items and their respective components.
-
During the split, the sum of quantities of the split lines cannot exceed the original quantity.
-
-
After selecting the desired split quantities and entering the ship-to details, the customer proceeds through the checkout flow.
B2B End Customer Information Page
The Checkout: End Customer Information page only displays for B2B customers and only if Capture End Customer Data functionality is enabled. See the section, "Capture End Customer Data During Checkout", within this chapter, for more information on the feature.
Following are the main features and functionality of the End Customer Information (note that all information is initially defaulted from the shipping information):
-
Default From LOV: Users can use the list-of-values to populate the end customer, contact, and address from the information stored for their company, or from the billing or shipping information page data.
-
End Customer Information: The end customer company name displays next to this field, defaulted from the ship-to customer. Users can accept the organization defaulted or change or create a new organization. Possible values for this field are customers that are related to the sold-to organization through a "customer of" relationship, or any bill-to or ship-to account relationship.
-
End Customer Contact: The end customer contact name displays, along with his telephone number and e-mail address, if available. The user can accept the default contact name or change or create a new one. The profile option, IBE: Mandate End Customer Contact, can be set to mandate an entry in this field; if this profile is Yes, the Clear button does not appear.
-
End Customer Address: The default end customer address displays. The user can accept the default bill-to address or change or create a new one. The user also has the following checkbox options in this field: (1) Use the same for shipping, which defaults the same address into the shipping page; and (2) Use the same for billing, which defaults the same address into the billing page.
Note: If the B2B user does not have the IBE_CHANGE_BILLTO_CUSTOMER_ADDRESS permission, the Use the same for billing check box is not displayed.
-
Multiple End Customers: This area (which features show/hide icon functionality) allows users (B2B and partners only) to enter a separate end customer for different items in the cart. Following are the fields in Update Item End Customer Information page available from this area: End Customer, End Customer Contact, and End Customer Address. In addition, multiple quantities of the same item can be split (except for child items in a configuration).
-
Cart Actions: From the end customer information page, the following cart actions are available: Save Cart, Share Cart (if implemented), and Request Help (if Sales Assistance functionality is implemented).
B2B Customer Selection and Entry Pages
From the B2B Checkout: Shipping Information, Checkout: Billing and Payment Information, and Checkout: End Customer Information pages customers can select new customer information and enter new customer data to be related to the order at cart or item level. Selecting and creating customer information in these pages is dependent upon whether or not the B2B customer has certain permissions in his user role. These permissions are listed in the section, "Selection and Creation of Organization Data During Checkout", within this chapter.
The company information defaulted from the lists of values on the shipping, billing, and end customer pages maps to the sold-to organization associated to the logged in user. The My company information defaulting option is available only when the user has appropriate "change customer" and "change contact" permissions (e.g., IBE_CHANGE_SHIPTO_CUSTOMER and IBE_CHANGE_SHIPTO_CONTACT in the Shipping page). When selecting this option, the sold-to contact is defaulted based on the logged in user. The address is defaulted based on the defaulting rules (first using the primary ship-to address for the contact, then using the primary ship-to address of the organization). For more information about the defaulting rules in the checkout phase, see the section, "Shopping Cart Defaulting During Checkout", within this chapter.
Select Customer Page
The Search and Select: Ship To Customer, Bill To Customer, and End Customer pages are available from the checkout information pages to users who have the appropriate "change customer" permissions (e.g., IBE_CHANGE_BILLTO_CUSTOMER, IBE_CHANGE_SHIPTO_CUSTOMER) in the role assigned to them. Users who have these permissions can select the Change button to choose a new ship-to, bill-to or end customer in the selection pages. The selection pages have the following features and functionality:
-
Search Utility: The following search options are available.
-
Search For LOV: From this LOV, customers can filter the search by Organization or Person.
-
Account Number Textbox: Customers can enter an account number in the textbox to further filter the search to an individual account number.
-
-
Customer Information Table: The table displays customer name (either person or organization; customers are related to the sold-to with a "customer of" relationship or a "ship-to" or "bill-to account" relationship) and the account number(s) associated with that person or organization.
-
Create Customer Button: If assigned the correct permission, customers can create new customers by selecting this button and entering the required information. See the "Create Customer Page" section below.
Select Contact Page
The Search and Select: Ship To Contact, Bill To Contact, and End Customer Contact pages are available from the checkout information pages to users who have the appropriate "change contact" permissions (e.g., IBE_CHANGE_BILLTO_CONTACT, IBE_CHANGE_SHIPTO_CONTACT) in the role assigned to them. Users who have these permissions can select the Change button to choose a new ship-to, bill-to or end customer contact in the selection page. The selection pages have the following features and functionality:
-
Contact Name Textbox: Customers can enter a customer contact name or partial name in the textbox to filter the search for an individual.
-
Contact Information Table: The table displays contact name the primary phone number associated with the contact, and the primary e-mail address associated with the contact.
-
Create Contact Button: If assigned the correct permission, customers can create new contacts by selecting this button and entering the required information. See the "Create Contact Page" section below.
Select Address Page
The Search and Select: Ship To Address, Bill To Address, and End Customer Address pages are available from the checkout information pages to all B2B users. Users can select the Change button to choose a new ship-to, bill-to or end customer address in the selection pages. The selection pages have the following features and functionality:
-
Search Utility: An auto-search is performed when a user comes to this page for the first time.
Country defaulting is done as follows: If a default territory is set for the operating unit associated with the logged in user, that country will be defaulted. Otherwise, the first country in the list will be defaulted. Following are the search options:
-
Country LOV: Customers can filter the search by country. The Country LOV is populated as follows: If there are some ship-to countries set up for the HR organization, then only those will be listed in the Shipping and End Customer address selection pages. Otherwise, all the countries in the FND_TERRITORIES table will be listed. Similarly in the Billing address selection page, if some bill-to countries are setup for the HR organization, those will be listed. Otherwise, all the countries in the FND_TERRITORIES table will be listed.
-
View by LOV: Customers can filter the search by: (1) Customer addresses; (2) Customer contact's addresses (only displays if a contact has been selected); or (3) All contact's addresses (only displays if the user has IBE_CHANGE_SHIPTO_CONTACT permission in the ship-to or end-to context or IBE_CHANGE_BILLTO_CONTACT permission in bill-to context).
-
-
Address Information Table: The table displays complete address, the address type (usage), and whether it is the primary address stored for the customer or contact.
-
Create Address Button: If assigned the correct permission, customers can create new addresses by selecting this button and entering the required information. See the "Create Address Page" section, below.
In addition to the country filter, customers can search by one or more of the following fields:
-
Site Name
-
Site Number
-
Address Lines
-
City
-
State
-
Postal Code
-
County
-
Province
Customers can specify any combination of these fields for performing a search query against the available customer addresses. The search results display a filtered list of addresses.
-
Create Customer Page
The Create <Ship To/Bill To/End> Customer pages are available from the Search and Select: Customer pages to users who have the appropriate "create customer" permissions (e.g., IBE_CREATE_BILLTO_CUSTOMER, IBE_CREATE_SHIPTO_CUSTOMER) in the role assigned to them. Users who have these permissions can select the Create button in the applicable Search and Select pages and create a new ship-to, bill-to or end customer. The create customer pages have the following features and functionality:
-
Type of Customer LOV: Customers can choose to create an organization or a person type of customer; the data entry fields are different for the two types of customers:
-
Organization Customer: The data entry fields are organized into three main areas: Customer information (company name, phone and fax number), Contact Information (name, e-mail address, and contact numbers), and Address information (address, city, state, zip, country).
-
Person Customer: The data entry fields are organized into two main areas: Customer information (person name, e-mail address, and contact numbers) and Address information (standard address fields).
-
Create Contact Page
The Create <Ship To/Bill To/End Customer> Contact pages are available from the Search and Select pages to users who have the appropriate "create contact" permissions (e.g., IBE_CREATE_BILLTO_CONTACT, IBE_CREATE_SHIPTO_CONTACT) in the role assigned to them. Users who have these permissions can select the Create Contact button in the Search and Select pages to create a new ship-to, bill-to or end customer contact. The create contact pages are organized into two main areas: Contact Information (with company name defaulted and entry fields for contact name, e-mail address, and contact numbers) and Contact Address. The display of the Contact Address section is controlled by the appropriate "create contact" permission (e.g., IBE_CREATE_SHIPTO_CONTACT_ADDRESS). When displayed, the address creation is optional.
Create Address Page
The Create <Ship To/Bill To/End Customer> Address pages are available from the Search and Select Address pages to users who have the appropriate "create address" permissions (e.g., IBE_CREATE_BILLTO_CUSTOMER_ADDRESS, IBE_CREATE_BILLTO_CONTACT_ADDRESS, IBE_CREATE_SHIPTO_CUSTOMER_ADDRESS, IBE_CREATE_SHIPTO_CONTACT_ADDRESS) in the role assigned to them. Users who have these permissions can select the Create Address button in the Search and Select pages to create a new ship-to, bill-to or end customer address. Customers have the option of creating an address associated with the company or associated with the contact (this is controlled by the permissions mentioned in "Create Contact Page", above; for example, if the user only has the IBE_CREATE_BILLTO_CUSTOMER_ADDRESS permission, then he can create the address for the customer). In the create page, the company and contact are defaulted into the page, and the data entry fields are standard address fields.
Terms and Conditions Page
For both B2B and B2C users, Terms and Conditions are displayed in the Checkout: Review Terms and Conditions page, if this functionality has been implemented (see the chapter, Integrating Oracle iStore with Oracle Sales Contracts). Users must agree to the Terms and Conditions on the order before finalizing checkout if the profile option, IBE: Enforce Terms and Conditions Review by User, is Yes. The buttons on this page are:
-
I Agree: This button move the customer to the next stage in the checkout flow, the Checkout: Review and Place Order page.
-
I Disagree: This button engages the sales assistance page flow and only displays if Sales Assistance functionality has been implemented (see the chapter, Integrating Oracle iStore with Oracle Quoting.
-
Cancel: This button takes the customer back the Shopping Cart page with no order committed.
-
Back: This button takes the customer back to the previous step in the checkout flow.
Terms and Conditions are displayed in the Checkout: Review Terms and Conditions page, and can be shown dynamically based on items in the cart, if required. This functionality requires additional setups detailed in the chapter, Integrating Oracle iStore with Oracle Sales Contracts.
Order Review Page
The Checkout: Review and Place Order page is the final page in the checkout/order placement flow (besides the order confirmation page). It displays the following information:
-
Customer information at cart and item levels (customer contact name and company)
-
Shipping and billing address
-
Shipment method, priority requested delivery date, shipping instructions, and packing instructions
-
Billing payment type, payment term, and P.O. number, if applicable
-
Additional Information section (descriptive flexfields, if enabled) at cart and item levels (only if IBE: Use Additional Information is Yes, the required descriptive flexfield setups are done, and information is populated); customers can select the Change button to change the information from this page.
-
Information about items purchased, such as name, quantity, etc.
The order review page allows users to change shipping, billing, and customer data, if the user has the required permissions. If Terms and Conditions (T&Cs) are enforced (IBE: Enforce Terms and Conditions Review by User is Yes) and something about the order has changed that requires a re-review of T&Cs (e.g., quantity, bill-to data, or ship-to data changes), a link to the T&Cs is displayed, allowing user to review them again. In this case the Place Order button is grayed out; only after the user accepts T&Cs will the Place Order button display.
Orders Business Flow
-
An order is placed in an Oracle iStore site when the user selects the Place Order button.
Note that B2B users must have the IBE_CREATE_ORDER permission in their user roles to see the Place Order button.
-
If the order uses standard checkout, Oracle Order Capture APIs send order data to Oracle Order Management. (The Submit_Quote API passes carts to the Create_Order API, which books the order in OM.) The default order state (Booked or Entered) is determined by the profile option, ASO: Default Order State.
-
Booked orders are ready to move to the next stage in the order process (for example, shipping). Booked orders cannot be deleted or modified (although quantity can be changed) by a sales representative. In addition, a sales representative cannot do a line-level return for a Booked order.
-
Entered orders must then move to the Booked stage before completion.
-
-
If the order is placed using Express Checkout, the iStore Express Checkout Order Submission concurrent program loads the order data into the Oracle Order Management tables.
-
The order is then processed through Oracle Order Management, Oracle Shipping, and Oracle Receivables.
-
Users can view the order details --- including shipping, invoice, and payment information --- using the Order Tracker functionality in the Web sites.
For more information, see the following resources:
-
Oracle Order Management Implementation Manual for additional information on how orders are processed in Order Management
-
Oracle Integration Repository for information on APIs that send and retrieve orders information
-
Oracle Financials documentation for more information on Oracle Receivables
Capture End Customer Data During Checkout
The ability to capture end customer data during checkout is described in the sections that follow.
Overview of Capture End Customer Data Feature
Some vendor organizations require their partners to provide end customer information when placing an order. To address this need, Oracle iStore allows implementers to enable the capturing of end customer data during checkout in the Customer Application.
Vendors are interested in capturing the end customer data for different reasons, such as:
-
Post-sales assistance can be more accurate
-
Marketing can have a better understanding of the target market
-
Channel stuffing can be controlled. Sometimes, in order to meet their sales quotas, sales representatives negotiate favorable terms and conditions with a partner, if the partner agrees to register an order before the related deal is closed. By mandating the entry of the end customer information, this situation can be avoided.
-
Validation of special pricing requests: Dealers may be required to provide end customer information when they are requesting special pricing for a specific customer.
Oracle iStore implementers can enable partners and B2B users to capture end customer information at the cart and item levels during checkout. End customer information consists of:
-
Name
-
Address
-
Contact information, including e-mail address and phone number
Capture End Customer Data Key Features
The Capture End Customer Data functionality has the following main features for users in the Customer Application:
-
Ability to select flags to default in end customer data based on it being the same as the ship-to, bill-to, or sold-to.
-
Ability to select different end customers per item in the cart.
-
Ability to create new end customers on the fly (if assigned the appropriate user permission).
The Checkout: End Customer Information page is described in the section, "Checkout Flow Pages" within this chapter.
The ability to capture end customer data functionality has the following main features for implementers of Oracle iStore:
-
Implementers can set Oracle Install Base defaulting rules using the Oracle Order Management defaulting rules engine; in particular, users may write their own defaulting conditions to populate the Order Management-dependent attributes that are passed to Install Base.
Note: Install Base attributes do not display in the iStore Customer Application.
-
Implementers can use profile options to configure whether the Capture End Customer Data feature is present, and whether end customer data is required.
-
Oracle iStore supplies several B2B user permissions that can be added to/removed from user roles to control creating and updating specific end customer information.
Capture End Customer Data High-Level Process Flow
Following is the high-level process flow for Capture End Customer Data functionality:
-
A B2B or partner user accesses an Oracle iStore site to place an order for an end customer. The vendor requires the end customer information to validate that the user is actually buying products for an end user.
-
The user creates a shopping cart with multiple items, which may be shipped to one or multiple end customers. Initially, end customer information is defaulted from the cart-level information stored for the B2B or partner user creating the shopping cart.
-
If purchasing for one end customer, the user proceeds to checkout and selects or creates end customer data (company name, location, and contact name) in the Checkout: End Customer Information page. If purchasing for multiple end customers, the user proceeds to checkout with the cart, and for each item of the shopping cart, the user selects or creates the end customer data.
-
In either case, partners and B2B users can use UI flags to specify whether:
-
End customer information is the same as the ship-to, bill-to, or sold-to customer information at the cart level
-
End customer information is the same as the sold-to customer/cart information at item level
-
To create new end customers, the user must have the proper permissions in his B2B user role, as discussed in the "Rules and Guidelines for Capture End Customer Data Feature" section, below.
Searching for and Selecting End Customer Data
From the Checkout: End Customer Information page, partner and B2B users can select end customer information from the available lists of values (LOVs) in the Search and Select: End Customer Information page. The LOVs display:
-
Customer: The names of end customers related to the partner or B2B user display. The end customers listed in the LOV are related to the partner or B2B organization through a "customer of" relationship, or any bill-to/ship-to relationships between accounts.
-
Contacts: Contact information for the customer displays, including contact name, e-mail address and phone numbers.
-
Addresses: Addresses associated to the company and the contacts displays.
In the LOVs, Oracle iStore provides the ability to search for customers by multiple parameters. All data is sourced through Oracle iStore's relationship with Oracle Trading Community Architecture (TCA) customer model.
Rules and Guidelines for Capture End Customer Data Feature
The following rules and guidelines apply to the feature:
-
When creating a cart, end customer information is defaulted from the value set at the header level. Partner and B2B users can change the end customer information for each line of the order.
-
End customer information can be defined only for products and parent models, but not for services or components of a model.
-
Users can create end customer data in the Customer Application only if assigned the appropriate permissions. The permissions related to this functionality are:
-
IBE_CREATE_END_CUSTOMER
-
IBE_CREATE_END_CUSTOMER_CONTACT
-
IBE_CREATE_END_CUSTOMER_CONTACT_ADDRESS
-
IBE_CREATE_END_CUSTOMER_ADDRESS
-
IBE_CHANGE_END_CUSTOMER_CONTACT
-
IBE_CHANGE_END_CUSTOMER
Note: The Oracle iStore B2B user roles do not contain these permissions by default. Follow the steps in the chapter, Implementing User Management, to assign them.
-
-
Since end customer addresses will be associated to the party site usage 'ship-to', end customer information will also appear in the shipping information page LOVs. Implementers who assign the address creation permissions to users should also assign the related permissions for ship-to addresses. These permissions are:
-
IBE_CREATE_SHIPTO_CUSTOMER
-
IBE_CREATE_SHIPTO_CONTACT
-
IBE_CREATE_SHIPTO_CONTACT_ADDRESS
-
IBE_CREATE_SHIPTO_CUSTOMER_ADDRESS
-
IBE_CHANGE_SHIPTO_CONTACT
-
IBE_CHANGE_SHIPTO_CUSTOMER
-
-
When users search for a customer in the End Customer LOV, all addresses related to the end customer through sold-to, bill-to or ship-to relationships in Oracle TCA are displayed and can be selected by the user. These relationships between sold-to and end customer are defined based on past transactions that link the two entities, or they can be created manually by the implementer. The implementer can set up this relationship manually through Oracle Sales or Oracle Customers Online.
-
End customer data is displayed in the Checkout: Review and Place Order and Order Tracker screens.
-
In Oracle Order Management and Oracle Quoting, sales representative can select any customer available in Oracle TCA. In this case, no relationship is defined between sold-to and end customer. If the sales representative in Oracle Quoting selects an end customer not available in Oracle iStore, the user can still proceed with checkout and place an order for this quote, without any validation on the end customer value. If the user changes the end customer value, the customer selected by the sales representative will not be available in the Oracle iStore LOV.
Creation of End Customer Data
If assigned the appropriate permissions (shown in the above section), B2B and partner users can create the following end customer data:
-
Customer Type of Organization:
-
Company Name
-
Phone Number
-
Fax Number
-
Address
-
Primary Contact
-
-
Customer Type of Person:
-
Name (First, Middle, Last)
-
Email Address
-
Phone (Personal, Business) and Fax Numbers
-
Address
-
-
Contact:
-
Name (First, Middle, Last)
-
Email Address
-
Phone (Personal, Business) and Fax Numbers
-
Address (optional)
-
-
Address:
-
Specify if contact or company address
-
Address (lines 1-4)
-
City, State, Zip/Postal Code, Country
-
If the B2B or partner user is not associated to the appropriate permission, the user can place orders only using customers already existing in the system. In this case, if there is a need to create a new end customer, the process needs to be done using another method (for example, in Oracle Customers Online, Oracle Order Management, or Oracle Quoting). In the LOV, when selecting end customers, the B2B or partner user can access only customers related to his organization. If a customer is associated to multiple organizations, the B2B or partner can only view contacts, accounts, and transactions related to the organization with which he is associated.
Implementing Capture End Customer Data Feature
Implementing the Capture End Customer Data feature involves ensuring that the B2B or partner users have the appropriate permissions in the B2B user roles and setting profile options. Following are the profile options:
-
IBE: Display End Customer Information: Specifies whether the Checkout: End Customer Information page displays in the checkout flow. Set to Yes to enable the page.
-
IBE: Mandate End Customer: Specifies if it is mandatory for the B2B or partner user to select end customer data in the checkout flow. Set to Yes to enable this mandate.
-
IBE: Mandate End Customer Contact: Specifies if it is mandatory for the B2B or partner user to select an end customer contact name in the checkout flow. Set to Yes to enable this mandate.
If IBE: Mandate End Customer is set to Yes, then IBE: Mandate End Customer Contact can be set either Yes or No, based on implementation requirements. If IBE: Mandate End Customer is set to No, then IBE: Mandate End Customer Contact should not be set and will not take effect.
Order Tracking
Once an order is submitted in an Oracle iStore site, customers can log into the site and access their order details (including invoices, payments, shipping, and returns) in Order Tracker, if the administrator has enabled this functionality.
Order Tracker Overview
In the Customer Application, Order Tracker is available to registered users through the Orders icon. The Order Tracker section consists of the following subtabs:
-
Track Orders
-
Pending Orders
-
Invoices
-
Payments
-
Returns
-
My Products
Note that the specific functionality must be implemented for the relevant subtab to appear.
Searching in Order Tracker
In the Order Tracker screens, all customers can search for orders, invoices, payments, and return orders. For orders, both basic and advanced search are available. Advanced search, enabled through a profile option, is available to only B2B and partner users. In addition, the B2B/partner screens in simple search contain additional search parameters not available to B2C customers.
Note: Not all fields and data display to all users -- Be sure to review the topic, “Rules and Guidelines for Order Tracker Search”, within this section.
Order Tracker Basic Search
Basic search includes the following search options:
-
From <Orders, Invoices, Payments, Returns> in last menu, select 7 days or as appropriate
-
In the <Orders, Invoices, Payments, Returns> between field, select the appropriate from and to dates
-
In the Search By field, select appropriate values; different search by fields are available whether the user is searching for orders, invoices, payments, or returns.
The Order Details and Item Details pages display pricing agreement data, end customer information and any additional information defined at order header or line level.
Order Tracker Advanced Search
Using Advanced Search, B2B and partner users can search at order level or item level.
Order Level Advanced Search
When searching at the order level, users can query by:
-
Order Number
-
Order Status
-
Order Date Period
-
Reference Number
-
Pricing Agreement
-
Ship to Customer Name
-
Bill to Customer Name
-
End Customer Name
-
P.O. Number
When a user selects Ship to Customer, Bill to Customer and End Customer, the corresponding Ship to Account, Bill to Account and End Customer Account are displayed as selected values, concatenated to the customer name.
The search results display:
-
Order Number
-
Reference Number
-
Order Date
-
Booked Date
-
Order Status
-
P.O. Number
-
Shipping Details
Users must enter at least one search parameter other than the order status, order dates, and pricing agreement to perform the search. An error message displays when the search is performed without entering the search criteria.
Users can navigate from the orders summary table to the Order Details and to the Shipment Details pages. Ship to, Bill to, End Customer and Pricing Agreement are not available in the summary search results. Users can drill down into the order details to view this information.
Item-Level Advanced Search
When searching by items (order lines), users can query by:
-
Part Number
-
Order Number
-
Pricing Agreement
-
Ship to Customer Name
-
Bill to Customer Name
-
End Customer Name
-
P.O. Number
-
Requested Date Period
-
Line Status (Only those line statuses enabled in iStore display.)
The search results display:
-
Product Information (part number, item name)
-
Quantity Information (ordered and shipped quantities)
-
Unit of Measure
-
Line Status (e.g., open, closed)
-
Order Number
-
Line Details Icon
Users must enter at least one search parameter other than line status, requested delivery dates, and pricing agreement to perform the search. An error message will be displayed when the search is performed without entering the search criteria.
Users can navigate from the lines summary table to the Order Details and Item Details pages. Ship to, Bill to, End Customer and Pricing Agreement will not be available a search result fields. Users can drill down into the order details to view this information.
Implementing Advanced Search
To implement advanced search, set the profile option, IBE: Use Advanced Search in Order Tracker, to Yes. See the appendix, Profile Options, for more information on the profile.
Copy Prior Order
The Order Details page allows users to select one or more items on the order and copy them to the shopping cart. This allows users to re-order items and have them added directly to the shopping cart. Users must select at least one item when clicking on the existing “Add to Cart” button. An error message is displayed when the Add to Cart function is performed without selecting any of the order line items. When the Add to Cart function is performed, users will be navigated to the shopping with the selected items, UOM and ordered quantities populated in the cart.
Additional Information: Service items and Configured items are not supported in the "Copy Prior Order" feature.
Rules and Guidelines for Order Tracker Search
The following rules and guidelines apply to Order Tracker search (both simple and advanced):
-
The values in the Basic Search mechanism are values derived from an Oracle Applications lookup. You can change these values, if desired. For details about the related lookup and default search values, see the chapter, Implementing Messages and Prompts. The default search for the search utility is derived from the first value specified in the Oracle Applications lookup. By default, this first value is 7. You can also customize the search by passing a parameter from the display template. See the section, "Customizing Order Tracker Search", below.
-
Out of the box, users can query orders/lines that are sold to their account. Users also can query the orders billed to their account, depending upon the value of the profile option, IBE: View-by Customer Orders in Order Tracker, and if the permissions, IBE_VIEW_BILL_TO_ORDER and IBE_VIEW_ORDER, are assigned to them.
-
The search results display only orders of Order and Mixed categories, or lines belonging to these order categories. In the case of the implementation not supporting returns, then the search results also will display orders in the Return category. If the implementation supports returns, Oracle iStore uses a specific page to display only returns. If the Returns feature is not implemented, all orders and returns are displayed in the track orders screen.
-
Users can query model components in the order lines search. The order lines summary table displays the components as regular standard items. For example, if a particular order number is searched and it has a model with four children, the five lines of the model item are shown without any indentation or grouping. Users can drill down to the Order Details page and view the complete configuration at the order level.
-
Users can query service items in the order lines search. The order lines summary table will display the services as regular items, and users can drill down to the Order Details page and view the associated serviceable items at the order level.
-
The Pricing Agreement search field and information only display if users have IBE_USE_PRICE_AGREEMENT and IBE_VIEW_NET_PRICE permissions and/or pricing agreements at line level are enabled (IBE: Use Line Agreements is Yes). The list of values displays only pricing agreements associated to the sold-to customer (sold to organization of the logged in user).
-
End customer information, including the End Customer search field, only displays if the profile option, IBE: Display End Customer Information, is Yes. This is independent of the permissions used in the checkout flow. See the "Capture End Customer Data During Checkout" topic in this chapter for more information.
-
End Customer Name: The end customer LOV always displays. The LOV displays customer names with the same criteria as the checkout LOV. The LOV does not display the Create customer button.
-
Ship to Customer Name: The ship-to customer LOV always displays. The LOV displays customer names with the same criteria of the checkout LOV, based on a permission (IBE_SHIPTO_ANY_ACCOUNT). The LOV does not display the Create customer button.
-
Bill to Customer Name: The bill-to customer LOV always displays. The list of values displays customer names with the same criteria of the checkout LOV, based on a permission (IBE_BILLTO_ANY_ACCOUNT). The LOV does not display the Create customer button.
-
For the Order Status field, only those order statuses enabled in Oracle iStore display in the LOV. Order statuses are defined in a lookup described in the chapter, Implementing Messages and Prompts.
-
For the Line Status field, only those line statuses enabled in Oracle iStore display in the LOV. Line statues are defined in a lookup described in the chapter, Implementing Messages and Prompts.
-
The Part Number search field retrieves an LOV based on items defined in the Master Inventory Organization associated to the current operating unit.
Customizing Order Tracker Search
You can customize the default Number of Days value in Order Tracker Basic Search beyond the customization allowed by changing the lookup values. You do this by modifying JSP code to pass the desired default number in the display template parameter, defaultNoOfDays. The value for the defaultNoOfDays parameter is passed from the container page (e.g., ibeCOtdOrdSumMain.jsp) through the PageContext before including the processing page (e.g., ibeCOtpOrdSum.jsp). If passing the parameter in the display template, the default number of days is retrieved based on the following rules:
-
If the value of defaultNoOfDays (N) exists in the lookup, IBE_QUERY_ORDERS_RANGE_LOOKUP, the default query retrieves all orders in the last N days.
-
If the value of defaultNoOfDays (N) does not exist or is disabled in the lookup, the default query runs for the number of days that is the lowest value in the lookup.
If the value for the parameter, defaultNoOfDays, is not passed in the display template, following is the behavior:
-
If the value of 7 is present in the lookup, the default query retrieves all orders in the last 7 days.
-
If the value of 7 is not present or is disabled in the lookup, the default query runs for the number of days that is the lowest value in the lookup.
For details about the related lookup and default search values, see the chapter, Implementing Messages and Prompts.
Customizing the Code
To pass the parameter from the display template, in the container page, include the following line of code just below the include for the processing page:
//pageContext.setAttribute("defaultNoOfDays", "9", PageContext.REQUEST_SCOPE); %>
For example, in ibeCOtdOrdSumMain.jsp, the code might appear as:
//Include
//pageContext.setAttribute("defaultNoOfDays", "9", PageContext.REQUEST_SCOPE); %>
…
<%@include file="ibeCOtpOrdSum.jsp" %>
Similarly, the default query for Invoices, Payments and Returns can be customized by modifying the respective container JSP pages (ibeCOtdInvSumMain.jsp, ibeCOtdPmtSumMain.jsp and ibeCOtdRetSumMain.jsp),
Examples
In these examples, it is assumed that the values present in the lookup are: 3, 7, 14, 30, and 90.
-
Example 1: Let the value passed from the container page be 14. In this example, the default query would be the results in the last 14 days.
-
Example 2: Let the value passed from the container page be 10. In this example, the default query would be the results in the last 3 days.
-
Example 3: The main page is not passing any value. Since 7 is present in the lookup, the default query would be for the last 7 days.
-
Example 4: Disable/remove 7 from the lookup. In this example, the default query would be the results in the last 3 days.
Orders and Related Pages
The Orders page, accessible to customers by selecting the Orders icon and then the Orders subtab, summarizes a customer's submitted orders. Summarized order information includes:
-
Order Number: This is a unique number generated by Oracle Order Management. In the user interface, the number is a hyperlink leading to the Order Details page (see "Order Details Page", below, for more information).
-
Reference Number: This number corresponds to the order headers source document identification number. If the order is created from Oracle iStore, the reference number will contain quote header ID of the quote.
-
Order Date: This is the date the customer placed the order.
-
Booked Date: This is the date booked into Oracle Order Management.
-
Order Status: This will be Entered, Booked, Cancelled, or Closed.
-
Shipment Details icon: This icon is a hyperlink leading to the shipping details page and displays only if shippable items are in the order (see "Shipping Details Page", below, for more information). The icon is enabled only if the order header status is Booked or Closed. This does not validate for any shippable lines in the order.
Note: Customers will be able to see orders billed to their accounts or sold to (default) their accounts, depending upon the setting of the profile option, IBE: View-by Customer Orders in Order Tracker, and if the permissions, IBE_VIEW_BILL_TO_ORDER and IBE_VIEW_ORDER, are associated. For more information, see the section, "IBE_VIEW_BILL_TO_ORDER and IBE_VIEW_ORDER", in the appendix, Seeded User Data, as well as the "IBE: View-By Customer Orders in Order Tracker" section in the appendix, Profile Options.
The Orders page contains search mechanisms which are described in "Searching in Order Tracker", within this chapter.
This section contains descriptions of the Orders page and the sub-pages navigable from it. Unless otherwise specified, information about item types in this section relates to standard items (versus configured items, model bundles, and install base items). See the sections, "Configured Items in Order Tracker" and "Install Base Items in Order Tracker", within this chapter, for details about the display of these types of items in the Order Tracker pages.
The sections that follow describe these pages:
-
Order Details Page
-
Item Details Page
-
Pricing Details Page
-
Shipment Details Page
-
Shipment Number Details Page
Order Details Page
The Order Details page displays a variety of information about a specific order. To access the Order Details page, customers select the hyperlink of an order number in the Orders summary page. The Order Details page displays the follow sections and related information:
-
Return Items Button: This button only displays if Returns functionality is implemented and if the order contains at least one item of the order set up as returnable in Inventory. This button leads to the Create Return: Select Items: page which lets customers begin the process of returning items in the order. See the "Order Returns" section within this chapter for more information.
-
Cancel Order Button: This button only displays if Order Cancellation functionality is implemented. It leads to the Cancel Order page which lets customers begin the process of cancelling the order. See the "Order Cancellation" section within this chapter for more information.
-
Order Information Section:
-
Order Number
-
Order Date
-
Reference Number
-
Booked Date
-
Order Status
-
Order Type
-
-
Customer Information Section:
-
Customer Name
-
Customer Contact Name
-
Customer Contact Phone Number
-
Customer Contact E-Mail Address
-
Agreement Name: This only displays if a pricing agreement was used with the item; the B2B user also must have the IBE_VIEW_NET_PRICE permission. See the chapter, Implementing Pricing, for more information.
-
End Customer Information: This includes company name, contact name, and address.
-
-
Shipping Information Section:
-
Ship-to Customer Information: This includes company name, contact name, and address.
-
Shipping Method: This is the method used to ship the item (e.g., DHL FedEx).
-
Shipment Priority: This is the priority the customer entered while placing the order. Typically, values will be High, Medium, or Low.
-
Requested Delivery Date: This is the date the customer requested delivery of the order.
-
Shipping Instructions: This is the text the customer entered while placing the order.
-
Packing Instructions: This is the text the customer entered while placing the order.
-
Freight Terms: These are the terms for the transportation of the goods.
-
Shipments View Details: This hyperlink leading to shipment details page (see "Shipment Details Page", below) displays only if the order header-level status is Booked or Closed. The link displays regardless of whether there are any shippable items on the order.
-
-
Billing and Payment Information Section:
-
Bill-to Customer: This includes company name, contact name, and address.
-
Payment Type: This is the method of payment for the order.
-
Payment Terms: These are the payment terms for the order.
-
Purchase Order Number: This only displays if a purchase order was used on the order.
-
-
Additional Information Section: This section will contain any cart-level descriptive flexfields set up. See the chapter,Advanced Display, for more information.
-
Ordered Items Information:
-
Part Number
-
Item Name
-
Unit of Measure (UOM)
-
Quantity Ordered
-
Quantity Shipped
-
Item Prices: The prices of items are hyperlinks leading to pricing details page (it is only a hyperlink if the user has the permission, IBE_VIEW_NET_PRICE. The price displayed is the net price if the user has the above permission; otherwise, it is the list price, as in the shopping cart. See "Pricing Details Page", below, for more information.
Note: For configured items/models, the pricing hyperlink is shown at the parent model level. The part number, item name, ordered quantity and UOM shown are those related to the parent model. Users can select the configuration details to view the pricing details for each child of the model. If the price of the model or sub-model is null, then no price is displayed, and thus the Pricing Details page is not available. If the model is not a telecommunications service order (TSO) model, then the model is shown fully expanded, and children prices are not rolled up.
-
Item Details Icon: This icon is a hyperlink leading to details page for the item. See "Item Details Page", below, for more information.
-
-
Total Amounts: This is the display of subtotals, charges (taxes, shipping), recurring charges and pay now/pay later charges (if applicable), and the grand total of the order. The display of this section is affected by the presence of the IBE_VIEW_NET_PRICE permission in the user's role; see the appendix, Seeded User Data, for more information. In addition, the display of this section will be affected by any TSO setups in your implementation. See the Oracle Telecommunications Service Ordering Process Guide for more information.
Note: In Order Tracker, taxes for each item do not display by default. To display taxes at the item level in the Order Tracker pages, modify the JSP associated to the Display Template, STORE_PSI_ORDER_DETAIL_P, to say ibeDisplayLineTax=Y.
Item Details Page
The Item Details page displays details about individual items in an order. Customers access this page by selecting the Item Details icon in applicable pages. The Item Details page includes the following sections and details:
-
Item Information Section:
-
Part Number
-
Item Name
-
Order Number
-
Item Status
-
Quantity Ordered
-
Unit of Measure (UOM)
-
-
Customer Information Section: This section contains the same information as the Customer Information section of the Order Details page, but the information is specific to the item being viewed.
-
Shipping Information Section: This section contains the same information as the Shipping Information section of the Order Details page, except that there is no shipping details link. In addition, this section displays the Scheduled Delivery Date for the item. Scheduled Delivery Date is the date assigned on shipping confirmation by the merchant.
-
Billing and Payment Information Section: This section contains the same information as the Billing and Payment Information section of the Order Details page, minus Payment Type, and showing, in addition, the following:
-
Invoice Number: This is a hyperlinked number leading to details of the invoice.
-
Commitment Name: This is present only if a commitment was used with the item ordered. See the chapter, Implementing Pricing, for more information.
-
-
Additional Information Section: This section will contain any item-level descriptive flexfields set up. See the chapter, Advanced Display, for more information.
-
Tracking Details Section:
-
Shipment Number: This is a hyperlink leading to the shipping details (see the "Shipping Details Page" section for more information). Note that other applications, such as Oracle Order Management, refer to the shipment number field as "delivery".
-
Tracking Number: This is the tracking number for the package. If more than one package was shipped, more than one tracking number will display.
-
Shipped: This is the quantity shipped in the package.
-
Shipping Method: This is the method used to ship the package.
-
Ship Date: This is the date the package shipped.
-
Pricing Details Page
The Pricing Details page is a pop-up page that displays pricing details for individual items in an order. Customers access this page by selecting a hyperlinked item price in applicable pages (e.g., Order Details). The Pricing Details page includes the following sections and details:
-
Item Information Area:
-
Part Number
-
Item Name
-
Quantity
-
Unit of Measure (UOM)
-
-
Pricing Information Area:
-
List Price Line: This is the price before adjustments.
-
Discount Price Line(s): Multiple lines may display if more than one discount is being applied to the price.
-
Total Adjustment Line: This is the total amount of adjustments applied.
-
Net Price Line: This is the price after all adjustments are made.
-
Unit column: For the applicable line, this column displays the appropriate unit price.
-
Total Price column: For the applicable line, this column displays the unit price multiplied by the quantity being displayed.
Additional Guidelines for Pricing Information Section
-
Values will be displayed in brackets if negative, and the corresponding percentage will be displayed in parentheses.
-
For configured items, the Pricing Details page displays the rolled-up price of the model in the same format as for a regular item, as well as all the rolled-up values of all discounts and surcharges at children and parent level.
-
The Pricing Details page for each child is displayed with the same format used for standard items. No roll up is performed at the parent model level for TSO items. If the price of the model or sub-model is null, then no price is displayed, and thus the Pricing Details page is not available.
-
The Pricing Details hyperlink will not be enabled if: (1) The user does not have the IBE_VIEW_NET_PRICE permission; (2) The price of a model is null or zero; and (3) If the current page displaying the item information is a pop-up page (e.g., a configuration details page shown in the create return flow), the prices will not be a hyperlink.
-
-
Shipment Details Page
The Shipment Details page displays details about the shipment of items in the order.
When an order line is booked, a Delivery Line is created for each of the lines in Oracle Shipping, followed by the running of the Pick Release program. Once Pick Release is completed successfully, the order lines in status, Awaiting Shipping, and release statuses, change to Picked/Staged. Later, the items are packaged and put into deliveries. Deliveries are assigned to trips, and finally ship confirm is performed. One order can have multiple deliveries and one delivery can have order lines from different orders. Note only shippable items data is shown. Note that the shipping details link/icon will be disabled if the order is in either Entered or Cancelled status.
The Shipment Details page Oracle iStore displays the following sections and details:
-
Order Information Section:
-
Order Number
-
Reference Number
-
Order Status
-
Order Date
-
Booked Date
-
Order Total
-
-
Shipped Items Information Section:
-
Part Number
-
Item Name
-
Unit of Measure (UOM)
-
Quantity Shipped
-
Shipment Number: This number is a hyperlink leading to the Shipment Number Details page (see below). Note that some other Oracle E-Business Suite applications, such as Oracle Order Management, refer to the shipment number field as "delivery".
-
Shipment Status: In Oracle Shipping, if the order line has been picked and assigned to a delivery, then Oracle iStore displays statuses like Not Shipped, Awaiting Shipping, Shipped, etc. If the order line has not been assigned to a delivery, then Oracle iStore displays Not Shipped for these lines. Values in columns other than Part Number and Item will be blank when the shipment status is Not Shipped. Note that Oracle iStore displays order line status for shipping lines (from OE_ORDER_LINES table), not, delivery status, as Oracle Order Management does (from WSH_DELIVERY_DETAILS table).
-
Shipment Method
-
Tracking Number
-
Customizable Shipping Information Hook
To enable you to extend shipping details (for example, to link to an carrier's Web site), Oracle iStore provides a customizable user hook. See the section, "Order Tracker Hook for Shipping Lines", below, for details.
Shipment Number Details Page
The Shipment Number Details page, which is accessible by selecting a shipment number hyperlink in applicable pages (e.g., the Shipment Details page), displays information about the actual shipment of specific items in the order. Note that some other Oracle E-Business Suite applications, such as Oracle Order Management, refer to the shipment number field as "delivery". The Shipment Number Details page displays the following:
-
Shipment Information Section:
-
Shipment Number
-
FOB: The FOB (free on board) is a lookup code defined in Oracle Receivables. It represents the point or location where the ownership title of goods is transferred from the seller to the buyer.
-
Shipping Method
-
Freight Terms: These are the terms for the transportation of the goods.
-
Ship Date
-
Waybill: This is the number of the waybill document prepared by the carrier of a shipment of goods; the waybill contains details of the shipment, route, and charges.
-
Shipment Status
-
Ship-to Customer: Displayed are contact name and address.
-
Weight: This is the shipping weight of the shipment
-
-
Shipped Items Information Section:
-
Part Number
-
Item Name
-
Unit of Measure (UOM)
-
Quantity Shipped
-
Shipment Status: In Oracle Shipping, if the order line has been picked and assigned to a delivery, then Oracle iStore displays statuses like Not Shipped, Awaiting Shipping, Shipped, etc. If the order line has not been assigned to a delivery, then Oracle iStore displays Not Shipped for these lines. Values in columns other than Part Number and Item will be blank when the shipment status is Not Shipped. Note that Oracle iStore displays order line status for shipping lines (from OE_ORDER_LINES table), not, delivery status, as Oracle Order Management does (from WSH_DELIVERY_DETAILS table).
-
Tracking Number: This is the carrier's tracking number for the shipment.
-
Order Number: This number is a hyperlink leading to the Order Details page.
-
Pending Express Checkout Page
If Express Checkout is enabled, users will see the details of their express checkout orders in the Pending Express Checkout Orders page accessible by selecting the Orders icon, then the Pending Orders subtab in the Customer Application. This page displays the following:
-
Link to Terms and Conditions: If Terms and Conditions are enabled, the sentence, By placing the order, you implicitly accepted the following terms and conditions. displays in the page, with the terms and conditions phrase hyperlinked. The link leads to the Terms and Conditions on the order, where users can review, but not reject or accept, the terms.
-
Cancel Order Button: This button lets users cancel the pending order.
-
Customer Information Section:
-
Customer Name
-
Customer Contact Name
-
Customer Contact Phone Number
-
Customer Contact E-Mail Address
-
Agreement Name: This only displays if a pricing agreement was used with the item; the B2B user also must have the IBE_VIEW_NET_PRICE permission. See the chapter,Implementing Pricing, for more information on pricing agreements.
-
End Customer Information: This includes company name, contact name, and address.
-
-
Shipping Information Section:
-
Ship-to Customer Information: This includes company name, contact name, and address.
-
Shipping Method: This is the method used to ship the item (e.g., DHL FedEx).
-
Shipment Priority: This is the priority the customer entered while placing the order. Typically, values will be High, Medium, or Low.
-
Requested Delivery Date: This is the date the customer requested delivery of the order.
-
Shipping Instructions: This is the text the customer entered while placing the order.
-
Packing Instructions: This is the text the customer entered while placing the order.
-
-
Billing and Payment Information Section:
-
Bill-to Customer: This includes company name, contact name, and address.
-
Payment Type: This is the method of payment for the order.
-
Payment Terms: These are the payment term for the order.
-
Purchase Order Number: This only displays if a purchase order was used on the order.
-
-
Additional Information Section: This section will contain any cart level descriptive flexfields set up. See the chapter, Advanced Display, for more information.
-
Ordered Items Information Section:
-
Part Number
-
Item Name
-
Unit of Measure (UOM)
-
Quantity Ordered
-
Quantity Shipped
-
Item Prices: The prices of items are hyperlinks leading to pricing details page. See "Pricing Details Page", below, for more information. By default, only net price is displayed.
Note: For configured items/models, the pricing hyperlink is shown at the parent model level. The part number, item name, ordered quantity and UOM shown are those related to the parent model. If a model does not contain any recurring lines, prices are rolled up to the parent item. Users can select the configuration details to view the pricing details for each child of the model. If the price of the model or sub model is null, then no price is displayed, and thus the Pricing Details page is not available.
-
Item Details Icon: This icon is a hyperlink leading to details page for the item. See "Item Details Page", below, for more information.
-
-
Total Amounts Section: This is the display of subtotals, charges (taxes, shipping), recurring charges and pay now/pay later charges (if applicable), and the grand total of the order.
-
Other Express Checkout Orders Pending Submission Section: This section displays other pending express checkout orders for the logged-in customer. Displayed in the table is the following information:
-
Reference Number
-
Last Updated: This is the date the pending order was last updated.
-
Total Amount: This is the total amount of the pending order.
-
See the "Express Checkout" section within this chapter for more information on Express Checkout functionality.
Invoices Page
The Invoices page is available by selecting the Orders icon, then the Invoices subtab within the Customer Application. Enabled by default, the display of the Invoices page can be disabled by setting the profile option, IBE: Enable Invoices in Order Tracker, to No. See the appendix, Profile Options, for more information on the profile option settings. The Invoices page displays the following:
-
Search Utility: The search utility includes the following fields:
-
Invoices in last LOV: This list-of-values contains the following predefined values in days: 7, 14, 30, 60, and 90. For example, a customer would select the value, 7, for this field if he wished to find invoices posted within the last seven days.
-
Invoices between: This field consists of two calendar icons, allowing the customer to choose dates between which to search.
-
Search by: This field contains two LOVs and a textbox, all of which work in conjunction with each other. The first LOV contains: Invoice Number, Invoice Date, Type (of invoice), and PO Number. The second LOV contains: is, contains, starts with, less than, is not, greater than, and ends with. For example, to find an invoice that starts with a certain value, a customer would select Invoice Number in the first LOV and contains in the second LOV, and then enter some value in the textbox.
-
-
The Results table includes the following information:
-
Invoice Number: This number is a hyperlink to the Invoice Details page. See the "Invoice Details Page" section, below, for more information.
-
Invoice Date: This is the date the invoice was posted.
-
Type: Invoices will display Invoice in this field.
-
Original Amount: This is the original amount of the invoice.
-
Amount Due: This is the amount currently due on the invoice.
-
Due Date: This is the date payment is due.
-
PO Number: This is the purchase order number used with the order, if applicable.
-
Applied Amount: This is the amount previously applied to the invoice, if applicable.
-
Payment Details Icon: This icon is a hyperlink leading to the Payment Details page. See the "Payment Details Page" section, below, for more information.
-
Note: A B2B user must have the IBE_VIEW_NET_PRICE permission in his user role to see amounts in the Invoices pages.
Invoice Details Page
The Invoice Details page is available by selecting a hyperlinked Invoice Number in applicable pages (e.g., from the Invoices page). The Invoice Details page displays details about a specific invoice and includes the following information:
-
Invoice Information Section:
-
Invoice Number
-
Amount Due
-
Invoice Date
-
Due Date
-
Original Amount
-
PO Number
See the "Invoices Page" section, above, for more information about these fields.
-
-
Invoice Items Section:
-
Line Number: Each line is numbered (e.g., from 1 through 10). Note that an item and its tax amount are numbered with the same number. For example, the item, 17-inch monitor, and its taxable amount display on separate lines, but each line is numbered the same (e.g., with a 1).
-
Description: This field displays the item name.
-
Quantity: This is the quantity invoiced on the line.
-
Unit Price: This is the price of an individual item.
-
Total: This is the unit price multiplied by the quantity invoiced on the line.
-
Type: Item lines display Line and tax lines display Tax.
-
Payments Page
The Payments page is available by selecting the Orders icon, then the Payments subtab within the Customer Application. Enabled by default, the display of the Payments page can be disabled by setting the profile option, IBE: Enable Payments in Order Tracker, to No. See the appendix, Profile Options, for more information on the profile option settings. The Payments page displays the following:
-
Search Utility: The search utility includes the following fields:
-
Payments in last LOV: This list-of-values contains the following predefined values in days: 7, 14, 30, 60, and 90. For example, a customer would select the value, 7, for this field if he wished to find payments posted within the last seven days.
-
Payments between: This field consists of two calendar icons, allowing the customer to choose dates between which to search.
-
Search by: This field contains two LOVs and a textbox, all of which work in conjunction with each other. The first LOV contains: Payment Number, Customer Name, Receipt Date, (Payment) Type, and Payment Amount. The second LOV contains: is, contains, starts with, less than, is not, greater than, and ends with. For example, to find an payment that starts with a certain value, a customer would select Payment Number in the first LOV and contains in the second LOV, and then enter some value in the textbox.
-
-
The Results table includes the following information:
-
Payment Number: This number is a hyperlink to the Payment Details page. See the "Payment Details Page" section, below, for more information.
-
Receipt Date: This is the date the payment was posted.
-
Type: This is the payment type (e.g., Cash, Check, Credit Card)
-
Payment Amount: This is the amount of the payment.
-
Unapplied Amount: Payments are applied against some invoice(s); the part of the amount which is not applied against any invoice is called the Unapplied Amount.
-
Due Date: This is the date payment was due.
-
Note: A B2B user must have the IBE_VIEW_NET_PRICE permission in his user role to see amounts in the Payments page.
Payment Details Page
The Payment Details page is available by selecting a hyperlinked Payment Number in applicable pages (e.g., from the Payments page). The Payment Details page displays details about a specific payment and includes the following information:
-
Payment Information Section:
-
Payment Number
-
Applied Amount
-
Customer Name
-
Receipt Date
-
Payment Amount
-
Due Date
-
Payment Type
-
Unapplied Amount
See the "Payments Page" section, above, for more information about these fields.
-
-
Payment Items Section:
-
Payment Number
-
Type
-
Original Amount
-
Amount Due
-
Amount Applied
-
Date Applied
-
Status
-
Applied against Invoice
-
Install Base Items in Order Tracker
Install base items are items previously purchased by customers and instantiated into the install base database. The My Products subtab within the Orders menu of the Customer Application displays install base items. The My Products subtab appearance is controlled through the profile option, IBE: Use Install Base View.
Important: Allowing customers to order and track telecommunications service orders (TSO) products requires the implementation of Oracle TSO functionality. See the Oracle Telecommunications Service Ordering Process Guide for more information.
Searching in My Products Tab
For B2C customers, the search criteria can be turned on or off by setting the profile option, IBE: Autoquery Install Base for B2C User. For B2B customers, the search criteria always is present, and the user must enter some values to retrieve an item. If the search criteria is turned on for B2C customers, the behavior is the same as for B2B customers.
The search criteria includes the following parameters:
-
Order Number: This is the unique sales order number generated in Oracle Order Management.
-
Serial Number: This is the serial number of the instance.
-
Part Number: This LOV retrieves a window where users can search by part number (inventory item number) and item name.
-
Item Key: This is the instance description of the instance in the install base. For TSO products, instance description will denote the phone number/port number.
For B2B customers: Blind queries are not supported for any search field. For Item Name, the customer must enter at least four characters (then he can use the percent (%) sign as a wildcard). For all other criteria, the customer must enter at least one character (plus the wildcard).
The search results return a table with the following columns:
-
Part Number: This is the Inventory item number.
-
Item Name: This is field is the item short description.
-
UOM: This is the unit of measure in Inventory.
-
Quantity: This is the quantity ordered. For a network container, this will always be 1.
-
Order Number: The order number is a hyperlink taking the user to the Order Details page. The order number displayed is that last order that the instance was a part of. The order number is always displayed in this screen, and is not dependent on whether the customer has permission to see that order number (based on the profile, IBE: View-By Customer Orders in Order Tracker).
-
Serial Number: This is the serial number of the instance.
-
Item Details icon: This is an icon leading to the Item Details page, a new window with information specific to the instance selected (see the "Rules and Guidelines for My Products and Related Pages" section, below, for more information).
-
Reconfigure/Details and Details links: These are hyperlinks underneath items which lead to the Configuration Details page, showing the exploded model along with the connected-to instances (see the "Rules and Guidelines for My Products and Related Pages" section, below, for more information).
In the search results, two types of configurations are represented:
-
Standard Configurations: For standard configurations, the details display the parent and the child of the instance.
-
TSO Configurations: For a TSO configuration, when the user clicks on the Details link, both the parent and children of a configuration (e.g., Product A) are displayed as well. However, along with Product A, any trackable root node connected to Product A, or whose child is connected to Product A, also is displayed. The trackable root node children are not exploded, but a Details link allows the customer to see the children. The Reconfigure link will appear only if all of the following conditions are satisfied:
-
The parent is a network container
-
The network container is Web Published
-
The network container is Web Orderable
-
The network container is published in the site the user is currently in
-
For connected-to instances, only instances that belong to the logged-in user's owner_party_ID and the account_ID (of the individual) are retrieved.
Note that for B2B customers, the search retrieves instance(s) that are at any level of the configuration. For B2C customers, only the top-level instances are retrieved.
See also: Oracle Telecommunication Service Ordering Process Guide and the appendix, Profile Options, within this guide.
Rules and Guidelines for My Products and Related Pages
The following rules and guidelines apply to the My Products page and related pages:
-
As with other Order Tracker pages, customers must log in to view their install base orders.
-
The profile option, IBE: Autoquery Install Base for B2C Users, specifies whether an autoquery is performed when a B2C customer accesses the My Products subtab in Order Tracker. See the appendix, Profile Options, for more information on the profile option.
-
The profile option, IBE: View Only Web Published Items in Install Base, specifies whether only Web Published items are visible in the My Products subtab in Order Tracker. See the appendix, Profile Options, for more information on the profile option.
-
Search results (whether retrieved through auto-query or not) reflect only those items ordered (where the customer is the owner party account) using the account under which the customer is currently logged in. If the Account Switcher Bin is enabled and the customer has more than one account, he can switch accounts and perform additional searches/auto-queries on these additional accounts.
-
If end-customer information is provided on an order, then for these Install Base instances created, the owner party account can be different than the sold-to on the order. If a partner has placed an order for an end customer, he will not be able to see the products, since he will not be the owner of these instances (the owner will be the end customer). When the end customer reviews the install base, he can see the order numbers that were placed by the partner. However, when the end customer clicks on the order number, he will receive an error message saying that this order is not accessible to him.
-
The order number is always shown, except in the case where a customer can see an instance, but cannot see the order associated with it due to lack of a user permission (i.e., IBE_VIEW_BILL_TO_ORDER and IBE_VIEW_ORDER). In the install base view, the profile option, IBE: View-By Customer Orders in Order Tracker, is not checked. See the appendix, Profile Options, for more information on the profile option.
-
Instances retrieved for a given account are retrieved regardless of the operating unit they belong to.
-
Display of children of a kit item: For B2C uses, these are displayed in the configuration details screen. For B2B users, these are searchable and displayed in the configuration details screen.
-
In Order Tracker, when kits are initially ordered they will be exploded (i.e., all components are displayed). On a disconnect order, kits also are exploded. The reason is the following: Explosion of the kit takes place based upon the BOM of the kit when the disconnect line is being created, as opposed to when the original order was created. This means there could be new, included item order lines, which were not in the original order.
-
The number of records for the search results is driven by the profile option, IBE: Search Lines Per Page.
-
The Item Details icon available in the search results table leads to the line details for the customer's install base items. The line details page displays differently depending upon whether the user is a B2C or B2B user:
-
For B2C users, the following information is displayed about an item: Part Number, Item Name (item short description in Inventory), current location, and service location (“Install at” from Install Base).
-
For B2B users, the following information is displayed about an item: Part Number, Item Name (item short description in Inventory), current location, service location (“Install at” from Oracle Install Base), Customer (party name), and Account (account number).
For “current location” and “service location”, only the address is displayed (the party name is not stored in the Install Base schema). The party is not displayed, unless the instance is with the manufacturer, in which case it will say With Manufacturer. If the instance is with the manufacturer, the address does not display.
-
-
The Details link available in the search results table leads to the Configuration Details page, where the user can view details of the configuration.
-
The Details/Reconfigure link available in the search results table leads to the Configuration Details page, where the user can select Reconfigure to launch Oracle Configurator and reconfigure the item.
-
Custom Install Base attributes are not supported in the My Products summary tables and/or configuration details page. However, in the Item Details page, implementers may include a custom JSP page where they can expose any attribute. An empty Display Template is available in the window for this purpose. In the template, the instance ID is passed as a parameter. By using this parameter, custom code can display any Install Base/Order Management data.
Configured Items in Order Tracker
The Order Tracker display of configured items is described in the following sections. (Note that the term configured item is used for any item that has a parent item and subcomponents.)
The following descriptions apply to the display of these items in the Track Orders, Order Details, Shipment Details, and Item Details pages, unless specified otherwise.
General Display of All Configured Items
In the Order Details and Shipment Details pages, parent items are shown without any indentation, while the child items display under the parent, indented slightly. The sections that follow describe additional configured item display characteristics.
Order Details Page
In the Order Details page, non-TSO models show only the top-most parent (root) item, with a Details hyperlink leading to the Configuration Details screen, where in the entire model is exploded. The children items are indented based on their height in the model tree. The price shown is the rolled-up price of the entire model.
Item Details Page
Since the page shows single items, there is no concept of configurations in the Item Details page.
Shipment Details Page
In the Shipment Details page, parent items are shown without any indentation, while the child items display under the parent, indented slightly.
Returns Pages
In the pages that show single order return creation/return review, and in the submit/return confirmation pages, only the parent items are shown, with a Details hyperlink (as in the Order Details page for non-TSO models). Unlike the Order Details page, however, the configuration details display in a new (pop-up) window. In the Return Details page, configured items display similarly to the non-TSO items in the Order Details page.
Assemble-to-Order Items
Oracle iStore shows assemble-to-order (ATO) model items and all components. Following are additional details:
-
After assembly, a new "config" line is created for the ATO. In the Order Details page, this config line displays below the ATO model line, if the config line is created. If the config line is not created in assembly, then only the ATO model is shown.
-
Shipping Information:
-
An ATO model and all its components will have identical requested shipping information, as specified by the customer. The model and its components cannot be shipped individually. Internally, they must be assembled and shipped as a single assembly (config line).
-
In Oracle iStore, requested shipping information is displayed for the ATO model item.
-
Actual shipping information will be available only against the new config line assembly created. Further, the actual shipping information table will be displayed, if the shipment record exists for the config line.
-
-
Billing Information:
-
Requested billing information can be viewed for the ATO model and all its components.
-
The Item Details page does not show billing details for config line items, since the config line is a line generated during assembly.
-
-
Any service item associated with the ATO model and its components will be shown under the serviceable item.
Pick-to-Order and Kit Items
Oracle iStore shows pick-to-order (PTO) model items or kit items with all components. Following are additional details:
-
Each PTO/kit line item can have different billing information.
-
If a PTO item or a component is shippable, then requested and actual shipping information displays for each of the lines.
-
Oracle iStore shows kit items along with included items in the Order Detail page. Included items will be indented, and will show prices as zero, while the top kit item will have the item price.
-
In the Item Details page, a kit item and its included items will show the customer entered billing and shipping data. Since a kit item is always shippable, the shipping record exists, and Oracle iStore shows the actual shipping data, just as it does for standard items.
-
In the Shipment Details page, Oracle iStore shows the kit item, included items, quantity shipped, shipment number, shipment status, ship method, and tracking number, just as it displays for components of configured items. Since a kit item is always shippable, then the above-mentioned columns will also be displayed for the top kit item. If any of the included items are non-shippable, those items are not displayed on this page. However, the kit item will always be shown (same logic as PTO model item).
-
Included items are not displayed in the Invoices and Payments pages; only kit items are displayed.
-
Any service item associated with the model or its components is shown under the serviceable item.
Model Bundles
Oracle iStore displays model bundles similarly to PTO and kit items. Following are additional details:
-
All option classes in the bundle will be displayed.
-
Any service item associated with the model bundle or its components will be shown under the serviceable item.
Telecommunications Service Ordering (TSO) Items
For telecommunications service ordering (TSO) items, the shipped quantity field is populated only for shippable child items in a network container. For non-shippable items, the field is blank. In the Order Details page, TSO models show the entire model exploded. The children are indented like the non-TSO models.
Option Classes
Option classes are displayed in Order Tracker if the profile option, IBE: Display Option Classes in the Shopping Cart and Order Tracker, is set to Yes or is null (default value). See the appendix, Profile Options, for more information on the profile option.
Order Tracker for B2C Users
Oracle iStore provides a limited subset of Order Tracker functionality for B2C users. The following bullet points highlight the differences from the B2B Order Tracker pages.
-
Simple Search: Only simple search is enabled, with parameters the same as in a non-restricted UI. See the "Searching in Order Tracker" section, above, for more information.
-
Search Results: Search results only display Order Number, Order Date, Order Status and Shipping Details. The user can drill down in the Order Details page by selecting an Order Number hyperlink, and can view shipping details page selecting the Shipping Details icon.
-
Order Details: The Order Details page omits the following information available in the non-restricted UI:
-
Order Type
-
Reference Number
-
Order Date (date booked)
-
End Customer Information
-
Agreements
-
Contract Number
-
PO Number
-
Payment Terms
-
Freight Terms
-
Commitments
Also note: If the Additional Information descriptive flexfield is enabled, it will be displayed as in the B2B UI. The Shipment Details link will be displayed only if the order is in booked or closed status as in the summary screen.
-
-
Order Line Details: The Order Line Details page omits the following information available in the B2B UI:
-
Customer (including end customer) information
-
Pricing Agreement
-
PO Number
-
Commitment Name
-
Payment Term
-
Freight Terms
-
B2C Option for View By Orders
By setting a profile option, implementers can specify for B2C customers whether they are viewing orders where they are the sold-to or bill-to account on the order. To use the functionality, set the profile option, IBE: View-by Customer Orders to Bill-to, Sold-to or All (this setting includes all orders for where the customer is either the bill-to or sold-to on the order). See the appendix, Profile Options, for more information on the profile option settings.
Permission Checking in Order Tracker
You can control whether Oracle iStore checks user permissions in the Order Tracker pages by setting the profile option, IBE: Use Auth Permissions in Order Tracker. See the appendix, Profile Options, for more information.
Setting Number of Invoice/Order Lines to Display
The number of rows to display in Order Tracker when users view their orders, invoice, payment, or returns data is controlled by setting the profile option, IBE: Number of Invoice/Order Lines Displayed. See the appendix, Profile Options, for more information.
Order Tracker Hook for Shipping Lines
By implementing a region item in the Shipment Details page within Order Tracker, you can enable an extra column in the page which links to an additional processing page. Both pages are Oracle iStore Display Templates -- one is a detail template and one is a processing template. For an introduction to Display Templates, see the chapter, Implementing the Catalog.
In the processing template, you can insert custom logic to fulfill your organization's business requirements. For example, in the processing page you could provide additional shipment tracking mechanisms, such as a link to a carrier Web site where users could track the shipment of their purchases.
Following are the implementation steps:
-
Step 1 - Enable Region Item in Shipment Details Page
-
Step 2 - Customize Shipping Details Processing JSP
Step 1 - Enable Region Item in Shipment Details Page
The region item, IBE_SD_ADDITIONAL, is disabled by default. After the region is enabled, a column, labelled, "Details", is automatically shown with a icon on the Shipment Details page.
Following are the steps to enable the region item:
Steps
-
Log in to Oracle Forms with System Administrator responsibility.
-
Choose Application Developer Common Modules.
-
From the navigator, choose Define Regions.
-
From the Region ID field, query for IBE_SHP_DTL_R.
-
Go to Region Items.
-
Scroll through the list and locate IBE_SD_ADDITIONAL.
-
Check Node Display to enable the region item. (Uncheck to disable.)
-
Save the changes.
-
Bounce the middle tier server.
Step 2 - Customize Shipping Details Processing JSP
Next, customize the Shipping Details Custom Processing page with your own business logic.
Following are the details about this page and the main Shipping Details page:
Shipping Details Custom Processing Page:
The physical file for this page is an empty page, allowing you to provide your own content. The mapped JSP file and Display Template information for the Shipping Details Custom Processing page are:
-
JSP file --- ibeCOtpShpDtlCustom.jsp
-
Programmatic Access Name --- STORE_SHIP_DETAIL_CUSTOM_P
Shipping Details Page:
The mapped JSP file and Display Template information for the Shipping Details page are:
-
JSP file --- ibeCOtdShpDtl.jsp
-
Programmatic Access Name --- STORE_PSI_SHIPMENT_DETAIL_D
Progammatically, the Shipping Details page table is constructed in a loop iterating through all region items. Each column is essentially a region item. Inside this loop, the URL to the Shipping Details custom processing page template is constructed. You can pass additional information to the destination by appending parameters to the URL (detailsURL). For example, you could provide information such as tracking numbers and shipping carriers. Such information can simply be stored in a variable to be used later.
For example:
else if (itemName.equals("IBE_SD_ADDITIONAL"))
{
String tmplName = "STORE_SHIP_DETAIL_CUSTOM_P";
// You can append parameters to detailsURL to pass additional information // to the processing page.
String detailsURL =
DisplayManager.getTemplate(tmplName).getFileName();
%>
<td class="tableDataCell" valign="top" align="left">
<a href="<%= detailsURL %>">
<img src="/OA_MEDIA/detailsicon_enabled.gif" border="0">
</a>
</td>
<%
}
For sample code, see the Shipping Details Custom Processing page physical file (ibeCOtpShpDtlCustom.jsp). The sample code shows how to retrieve the parameter and process it. At the end of the page, the code simply redirects to Order Tracker; however, you can customize it to redirect to any page you want.
Changing Order Tracker Column Attributes
The columns that display in Order Tracker are retrieved from Oracle Applications AK Region attributes. Oracle iStore supports changing the AK Region Item attributes (for the attributes listed in the following table) for several regions.
Note that region items can have a number of properties associated to them, for example, attribute type, attribute name, sequence, display length, long label, etc. However, Oracle iStore uses only some of these properties (the ones shown in the following table). If a property that is not used by Oracle iStore is changed, there will be no impact to the Order Tracker pages. The following table lists the region item properties used by Oracle iStore. All other properties are not used.
| Property | Purpose |
|---|---|
| Sequence | Used to determine the sequence in which the HTML table columns corresponding to the region items are rendered. This can be changed by the merchant to display the Order Tracker columns in the desired order. |
| Node Display checkbox | Used to find out if a region item is intended for display. If it is not, then the column that maps to the region item is not displayed. This can be used by the merchant to selectively turn off the display of columns. For example, on the order summary page, if the Customer Name column is not required to be shown, the merchant can turn off the node display flag for that region item in the region, IBE_ORD_SUM_R. The Node Display can be programmatically turned on or off as well. Thus, even if the Node Display flag is set in the AK Region, the attribute might not be displayed based on specific business functionality. For example, the attribute corresponding to Order Type in IBE_ORD_HDR_R is enabled to be displayable, but will be hidden from the B2C user programmatically. |
| Queryable checkbox | Used to determine the columns that can be queried on. These columns are then shown in the search drop-down list. For example, on the order summary page, if the Customer Name needs to appear as a field on which the users can query, then this can be accomplished by making the corresponding region item in the region, IBE_ORD_SUM_R, to be queryable. |
| Display Length | Controls the display length for VARCHAR2 fields in the pages. If merchants customize their pages to reduce the Display Length, for example, for Item Description, from 240 to 80 characters, then Order Tracker would truncate the database value to 80 characters and display only 80 characters. |
| Long Label | Used to retrieve the column headings for the columns shown in the HTML table on each Order Tracker page. This can be changed by merchants who have a need to display their own headings. |
The following table shows the changeable regions, along with the page where they appear and the JSP file that presents the page.
| Region ID | Page | JSP |
|---|---|---|
| IBE_INV_DTL_R | Invoice detail page/Invoice to payment details page | ibeCOtpInvDtl.jsp/ibeCOtpInvPmtDtl.jsp |
| IBE_INV_HDR_R | Invoice detail page header section/Invoice to payment detail page header section | ibeCOtpInvDtl.jsp/ibeCOtpInvPmtDtl.jsp |
| IBE_INV_SUM_R | Invoice Summary | ibeCOtpInvSum.jsp |
| IBE_ORD_DTL_R | Order Details | ibeCOtpOrdDtl.jsp |
| IBE_ORD_HDR_R | Order detail page header section | ibeCOtpOrdDtl.jsp |
| IBE_ORD_LINE_DTL_R | Item details page | ibeCOtpOrdLineDtl.jsp |
| IBE_ORD_SRL_HDR_R | Serial number pop-up page | ibeCOtpOrdLineSerialPopup.jsp |
| IBE_ORD_SUM_R | Order Summary | ibeCOtpOrdSum.jsp |
| IBE_PMT_DTL_R | Payment detail page | ibeCOtpPmtDtl.jsp |
| IBE_PMT_HDR_R | Payment detail page | ibeCOtpPmtDtl.jsp |
| IBE_PMT_SUM_R | Payment Summary page | ibeCOtpPmtSum.jsp |
| IBE_REL_RET_DTL_R | Order Detail page Related Return section | ibeCOtpOrdDtl.jsp |
| IBE_RET_CONF_DTL_R | Return confirmation page Detail section | ibeCOtpRetConfirm.jsp |
| IBE_RET_CONF_HDR_R | Return confirmation page header section | ibeCOtpRetConfirm.jsp |
| IBE_RET_CRE_MULT_LINE_DTL_R | Return creation page: Multi order flow, display without serial number search | ibeCOtpRetCreMultiLine.jsp |
| IBE_RET_CRE_MULT_LINE_SRL_R | Return creation page: Multi order flow, page display with serial number search | ibeCOtpRetCreMultiLine.jsp |
| IBE_RET_CRE_SINGLE_LINE_DTL_R | Return creation page: Single order flow | ibeCOtpRetCreSingleLine.jsp |
| IBE_RET_DTL_R | Return detail page/Order Detail page Return item section in case of trade-in lines | ibeCOtpRetDtl.jsp/ibeCOtpOrdDtl.jsp |
| IBE_RET_HDR_R | Return detail page header section | ibeCOtpRetDtl.jsp |
| IBE_RET_PENDING_DTL_R | Pending return section in Create return page (single order flow/multi order flow) | ibeCOtpRetPending.jsp |
| IBE_RET_SUB_AND_REV_DTL_R | Return: Review and Submit page detail section | ibeCOtpRetReview.jsp |
| IBE_RET_SUB_AND_REV_HDR_R | Return: Review and Submit page header section | ibeCOtpRetReview.jsp |
| IBE_RET_SUM_R | Return summary page | ibeCOtpRetSum.jsp |
| IBE_SHP_DTL_R | Ship detail for order number page detail section | ibeCOtpShpDtl.jsp |
| IBE_SHP_HDR_R | Ship detail for order number page header section | ibeCOtpShpDtl.jsp |
| IBE_DLY_HDR_R | Ship detail for shipment number page header section | ibeCOtpDlvyDtl.jsp |
| IBE_DLY_DTL_R | Ship detail for shipment number page detail section | ibeCOtpDlvyDtl.jsp |
| IBE_OL_SHIP_TRACK_R | Item detail page tracking section | ibeCOtpOrdLineDtl.jsp |
Steps to Modify Column Attributes
You may use the following quick-steps to modify column attributes in IBE_ORD_SUM_R region. For more information, see the Oracle Self-Service Web Applications Implementation Manual (Web Applications Dictionary chapter).
Steps
-
Log into Oracle Forms with Application Developer Common Modules responsibility and navigate to Define Regions, Find Regions window.
-
Find IBE_ORD_SUM_R region.
-
Edit the Region Items form for the region.
-
In the list of region items/attributes within IBE_ORD_SUM_R region, find the region item/attribute to be changed.
-
Edit the attributes shown in the table above as desired.
-
Save your changes.
-
Bounce the application server.
Order Cancellation
Oracle iStore allows B2B and B2C users to cancel orders that they have placed in the Customer Application, if the orders are in Booked or Entered status in Oracle Order Management. B2B customers also can cancel orders across organizations.
Order Cancellation Process Flow
The process flow for order cancellation is as follows:
-
A user accesses the Order Summary or Order Details pages, and initiates the order cancellation process by selecting the Cancel Order button.
Note: The Cancel Order button displays in the Customer UI only if the profile option, IBE: Enable Order Cancellation in Order Tracker, has been set to Yes, and the order is cancellable (in Entered or Booked status). In addition, B2B users who do not have the IBE_CANCEL_ORDER permission will be unable to access the button. B2B users with the IBE_CANCEL_ORGANIZATION_ORDER permission can cancel orders across operating units for their organization.
Users who have enabled Express Checkout will be able to cancel Express Checkout orders before they are submitted to Order Management.
-
Once a user initiates the cancellation request, the system checks to see if the order is cancellable. If it is, the user is taken to the Order Cancellation page.
If the order is not cancellable, the cancellation process is aborted and a message is presented to the user which informs him that the order is not cancellable online and to contact his sales representative.
-
In the Order Cancellation page, the user is prompted to select a Cancellation Reason from a drop-list.
-
Once the cancellation request is submitted and accepted, a confirmation message displays on the UI.
-
Oracle iStore sends the Cancel Order e-mail to the user confirming that the order has been cancelled.
Implementing Order Cancellation
The cancel order feature is enabled by setting a profile option and ensuring that your B2B users have the appropriate permissions in their user roles. See the following sections for more information:
-
"Set Cancel Order Profile Option"
-
"Verify B2B User Permissions"
Set Cancel Order Profile Option
To enable the cancel order feature, set the profile option, IBE: Enable Order Cancellation in Order Tracker, to Yes. See the appendix, Profile Options, for additional details about this profile option.
Verify B2B User Permissions
Verify that the B2B users registering in your sites have the permission, IBE_CANCEL_ORDER, in their user roles. Without this, the Cancel Order button will not display.
Oracle iStore also allows B2B users to view and cancel orders for their current session operating unit and other operating units within their organization. To enable this ability, assign their role the permission, IBE_CANCEL_ORGANIZATION_ORDER.
Order Returns
Oracle iStore's Returns feature allows both B2B and B2C users to return items from orders placed.
Note: This section covers returns processes and implementation tasks related directly to Oracle iStore. For information on setting up integrating applications, refer to the appropriate product documentation.
Returns Overview
In today's e-commerce environment, accepting return items in Web stores is standard functionality. Providing returns functionality both reduces the cost of doing business for merchants, and provides a invaluable step toward a complete customer self-service orientation.
To address this business requirement, Oracle iStore provides Returns functionality in the Customer Application. Using the Orders menu in the Customer Application, customers can initiate returns for orders which are in Booked or Closed status in Oracle Order Management. If an approval process is being used, an administrator can use Oracle Order Management to evaluate the returns, and either approve or reject the returns. Merchants can set up returns with or without Oracle Workflow approval mechanisms in place.
The following is a high-level Returns flow:
-
To initiate a return (also known as a Return Material Authorization, or RMA), customers select applicable items, specifying the return quantities and return reasons.
-
After the customer submits the RMA, Oracle iStore automatically sends a confirmation e-mail notification to the customer.
-
Once Oracle Order Management processes the return order, the appropriate e-mail notification is sent to the user, notifying him whether the RMA has been approved or not (if approvals are being used). For approved RMAs, merchants can set up a return location to be sent in the e-mail notification.
-
After an RMA is approved, on the back end, Oracle Purchasing and Oracle Accounts Receivable work to complete the RMA processing, by fulfilling the order lines and generating credit memos.
-
RMAs are then available for the customer to track in Order Tracker.
Returns Functionality With and Without OM Release 11.5.10
This section discusses important differences in the returns functionality provided through Oracle iStore if you are using Oracle Order Management Release 11.5.10 versus earlier releases.
With Oracle Order Management Release 11.5.10
The following functionality exists without Oracle Order Management Release 11.5.10:
-
Merchants can implement pre-booking approval processes for returns.
-
The status of pending returns is User Working (regardless of whether pre-booking approval processes are being used). Return orders in Entered/User Working status are always part of a user's pending returns queue. These cannot be tracked as submitted orders in the Returns pages.
-
When the user submits the return (clicks Submit Return button):
-
If an Approval List has been set up in Order Management:
--Order status moves from User Working to Pending Internal Approval
--User will be able to see the returns in Pending Internal Approval status in the Returns subtab
--Based on the approver's action, the return then moves to Booked or Rejected status.
-
If an Approval List has not been set up in Order Management, then the order status moves to Booked status.
-
-
Any errors from validations being done from Oracle iStore will show up in the Oracle iStore UI after the user adds the items to the return order (in the Create Return: Review and Submit page), prior to submission. See the section, "Validations Performed in Returns Process", for more information.
-
E-mail notifications support --- Since Oracle iStore return orders are created with a transaction type having an order flow of "Order Flow - Return with Submission and Approval", when a return is Booked (irrespective of whether approval is setup or not), Oracle Order Management calls Oracle iStore to send an approval or rejection notification to the customer. Oracle iStore seeds two notifications for this purpose: Return Order Approval and Return Order Rejection. See the chapter, "Integrating Oracle iStore with Oracle Workflow", for details.
Note: If you are using Oracle iStore Release 11.5.10 with Oracle Order Management Release 11.5.10, set the profile option, IBE: Enable Return Pre-booking Approval, to enable the pre-booking approval process in Oracle Order Management.
Without Oracle Order Management Release 11.5.10
The following functionality exists without Oracle Order Management Release 11.5.10:
-
Merchants cannot implement pre-booking approval processes for returns.
-
The status of pending returns is Entered. Return orders in Entered status are always part of a user's pending returns queue. These cannot be tracked as submitted orders in the Returns pages.
-
The status of submitted returns is Booked.
-
Any errors from validations being done from Oracle iStore will show up in the Oracle iStore UI only after the user presses the Submit Return button. Additionally, the error messages that display are less detailed than Release 11.5.10 versions of Oracle Order Management. See the section, "Validations Performed in Returns Process", for more information.
-
E-mail notifications support --- When a customer submits a return, the return is immediately Booked and the user receives a confirmation e-mail from Oracle iStore giving him details of the return-order, with a note, "A return order has been created. You will shortly receive an e-mail confirmation for approval of the return items with the return location."
Merchants can customize the Oracle Order Management workflows to hard-code the return location in the workflow message.
Validations Performed in Returns Process
Oracle iStore performs several validations during the returns process. The stage at which errors display from validation failures and the detail to which error messages display depend upon whether the pre-booking approval feature is enabled and which Oracle Order Management version is installed. See the section, "Returns Functionality With and Without OM Release 11.5.10", for details. Also see the Oracle Order Management product documentation.
See also: The section, "Rules and Guidelines for Returns"
Note: The detailed error messages described here apply to implementations running Release 11.5.10 and later versions of Oracle Order Management, with the pre-booking approval feature enabled.
-
Quantity validations --- Oracle iStore does a validation check for returned quantity, to ensure that the quantity returned does not exceed the quantity ordered. In the submission process, Oracle iStore also checks that a quantity of zero has not been submitted. Lines that fail the quantity validation test show an error icon beside them, and an error message will display.
-
If the quantity validation fails for standard items (i.e., items which are not model bundles or configured items), an error message with part number, order number and returnable quantity is displayed, with an error icon near the Quantity field.
-
If the quantity validation fails for model bundles and configured items, a less detailed error message displays; this message shows no returnable quantity, but does have part number, order number, and an error icon near the Quantity field. Users cannot return components of a model -- only the entire model is returnable.
Note: For a model item, if an individual component has already been returned (allowed through Order Management), the quantity of the returned component is considered in the validations.
-
-
Contact validations --- Oracle iStore confirms contact information of the customer.
-
For B2B users, the lines which fail for contact display an error icon next to the billing icon. If the user selects the icon, Invalid Contact and Address are displayed.
-
For B2C users, Oracle iStore verifies that all of the return lines have the same bill-to address. For errors, the error icon is displayed next to the Address drop-list.
-
-
Organization, currency and account validations --- Before submitting pending returns with the current return, Oracle iStore validates that the pending returns have the same organization, currency, and account number as those retrieved for the current user's session.
-
Item Returnable flag validation --- Oracle iStore checks that items are returnable.
Pending Returns Queue
Pending returns are return items that have been previously selected by a user and added to the pending returns queue by navigating with the items to the Create Return: Review and Submit page. Pending return items have been Entered -- but not yet submitted -- into Oracle Order Management. After submission, the items are no longer part of the pending returns queue.
Return orders in Entered status are always part of a user's pending returns queue. Note that there will always be only one pending return queue per user at a time.
If a pending returns queue doesn't exist, Oracle iStore creates one. If the queue does exist and the user adds an identical item from the same order line, the item is not re-added to the queue. Instead, only the return quantity on the existing return line is incremented by the new return quantity specified by the user. The return reason is retained for the existing return line.
If items are available in the queue, a Pending Returns section will display on the following pages:
-
Create Return: Select Items (single-order flow)
-
Create Return: Search and Select Items (multiple-order flow)
-
Create Return: Review and Submit -- This page is accessible by selecting Next on the above two pages, or by navigating to the Returns tab > Pending Return button. If no pending returns are in the queue, the pending returns button will not display. Users can cancel pending returns by navigating to this page.
Returns Process Flows
Merchants can set up returns with or without Oracle Workflow approval mechanisms. These mechanisms allow -- via automatically generated e-mails and associated processes owned by Oracle Order Management -- one or more people to approve or reject an RMA after the customer submits it, but before it is booked into Oracle Order Management. Functionality provided depends upon the Oracle Order Management version installed.
In addition, the Oracle Order Management version installed determines at what stage Oracle iStore validation errors display, the detail level of the errors, and the status of the returns after submission. See the section, "Returns Functionality With and Without OM Release 11.5.10", for information.
Single-Order Return Flow
The returns process flow for returning a single order is as follows:
-
A customer logs into a site and selects the Orders button to access the Track Orders page.
-
The customer selects an order number to access the Order Details page.
-
The customer selects the Return Items button to access the Create Return: Select Items page. The Return Items button only displays if the profile option, IBE: Use Returns, is set to Yes, and -- for B2B users -- if the user has the IBE_CREATE_RETURN permission in his user role.
The Create Return: Select Items page shows items from the order just selected, with a zero quantity for each returnable item, and any pending returns.
In the Create Return: Select Items page, for each item in the order that the user is returning, he selects a return reason and enters a return quantity. A different reason and quantity can be specified for each item. Items which are not returnable will not have updateable Quantity or Return Reason fields, and the Returnable column will display
No. Note that return reasons can be changed; see the section, "Step 7 - Customize Returns Lookups".Note: If a return policy has been implemented, processing constraints set up in Oracle Order Management will determine whether or not the order line can be returned. See the section, "Step 5 - Set up Returns Policy".
-
The customer selects Next to continue the returns process.
-
The Create Return: Review and Submit page appears. At this point, the items are in the pending returns queue. Items that already existed in the queue also are pulled into the page. See the "Pending Returns Queue" section, for more information.
-
For quantity of each item, Oracle iStore defaults differently in a single-order flow versus a multiple-order flow:
Single-order flow --- The application uses the quantity specified by the user in the previous screen. Oracle iStore will only pick up returnable items with a quantity greater than zero.
Multiple-order flow --- The quantity is defaulted from the original order, and the user can change the quantity.
-
If an identical item from the same order already exists in the Pending Return queue, the quantities are merged, so that the new quantity reflects the additional product(s).
-
-
In the Create Return: Review and Submit page, the customer can:
-
Cancel the return order -- This deletes the return order from the data tables, which is different from canceling an order.
-
Change bill to address -- See the "Customers, Contacts, and Addresses Rules and Guidelines" section, below.
-
Add items to the return order.
-
Remove items from the return order; when the last item from a return order is removed, the return order is deleted.
-
View details of the order in which this item was purchased.
-
Change return reasons. Note that return reasons lookups can be changed; see the section, "Step 7 - Customize Returns Lookups".
-
Change quantities -- In this case, the user should press the Recalculate button to recalculate totals.
-
Recalculate the return total, including line total, taxes, and return fees.
-
View related charges -- If applicable, these are return fees as setup by the merchant to return the goods; value is calculated by the Pricing Engine.
-
Enter a return address (order level for B2C and item level for B2B) where the return goods can be picked by the merchant. Note that the ship-from address will be copied from the original order at the line level. For B2C user, Oracle iStore will show all the valid addresses from the address book in a list, and the address selected by the user will be used for all the line items in the return order. B2B users can specify the ship-from address at the item level. The addresses available to the user are the same as in the checkout process (i.e., the user's own addresses and/or organization addresses). If either a B2C and B2B user does not have a valid address, they can create new addresses in the address book and then use those addresses in the returns flow.
-
Submit the return
-
Navigate to other areas of the Customer UI -- When the customer does this, leaving the Create Return: Review and Submit page, the return becomes part of the pending returns queue. He can return to the Returns tab > Pending Returns button to re-access this page.
-
-
The customer selects Submit Return to submit the return. Several validations are performed at this stage -- see the section, "Validations Performed in Returns Process".
See the section, "Returns Functionality With and Without OM Release 11.5.10", for important information about returns functionality.
-
Oracle iStore displays a confirmation page with the return order number, and sends a confirmation e-mail notification to the user with the relevant return details.
-
If the merchant has set up returns to require approvals:
-
As the return moves into the approvals stage, its status changes to Pending Internal Approval.
-
Approver(s) receive e-mail notification that a return order has been submitted for approval. If a hierarchy of approvers has been implemented, a notification is sent to the first approver. If the first approver rejects the return, its status changes to Rejected; if he approves it, the next approver in the hierarchy receives the e-mail notification.
-
If any approver rejects the return order, its status remains Rejected.
-
If the return order is approved, its status changes to Booked and it is processed into Oracle Order Management.
-
Multiple-Order Return Flow
The returns process flow for returning items from multiple orders is as follows:
-
A customer logs into a site and selects Orders > Returns. The Returns page only displays if the profile option, IBE: Use Returns, is set to Yes. The Returns page displays all existing returns. A B2B user with the IBE_VIEW_RETURN_ORDER permission can see all of his organization's return orders. If he does not have this permission, he can still see his own return orders.
-
The customer selects the Return Items button. For B2B users, the Return Items buttons only displays if the user has the IBE_CREATE_RETURN permission in his user role.
-
The Create Return: Search and Select Items page appears. If applicable, this page displays pending returns in addition to the search utility. See the "Pending Returns Queue" section for more information.
In the Create Return: Search and Select Items page, users can search by serial number, part number, or order number. Only exact matches are allowed, and the search utility does not support wildcard characters. The search utility is case-insensitive.
Serial Number Search:
See also: the section, "Step 9 - Verify Inventory Setup for Items with Serial Numbers"
-
Users must search for serial numbers one at a time.
-
Found serial numbers display in the search results table. Users select an icon in the Serial Number column to view a pop-up window with the details of one or multiple serial numbers.
-
Serial numbers are not displayed in any other areas of the Order Tracker UI; they appear only in the Create Return: Search and Select Items page.
-
Order Number or Part Number Search:
-
To search by order number or part number, users can search for more than one at a time, putting a space between the numbers in the search textbox.
-
Orders or part numbers retrieved that are referenced by serial numbers will display the serial-number pop-up icon in the Serial Number column.
-
-
Items located by the search utility display in the Results table, along with related information, such as part number, order number, quantity ordered, and price. Items which cannot be returned will not be selectable, and the Returnable column will display No instead of Yes.
Note: If a return policy has been implemented, processing constraints set up in Oracle Order Management will determine whether or not the order line can be returned. See the section, "Step 5 - Set up Returns Policy".
-
The user selects the items to be returned and selects Add to Return. Oracle iStore displays the Create Return: Review and Submit page. See the section, "Single-Order Return Flow", beginning with step 6, for remaining steps in the flow.
Tracking Returns
Customers can track return orders by selecting either of the following after logging into the Customer UI:
-
Orders, Returns -- In the Returns page, customers can search for returns, and view summarized or detailed views of returned items, including statuses.
-
Orders, Track Orders -- In the Track Orders page, customers can search for orders and view summaries of orders. After drilling down into the order details, customers can see details about returned items referenced within the orders, if applicable -- If the user has already returned one or more items of the order being viewed, those return order lines will be shown in the Related Returns table. Return order lines from pending or cancelled orders will not be shown.
Returns Profile Setting and UI Display
If the profile option, IBE: Use Returns is Yes:
-
Orders with Order Category Code = ORDER will be displayed in the Track Orders subtab only
-
Orders with Order Category Code = MIXED and at least one line with Line Category Code = ORDER will be displayed in Track Orders subtab
-
Orders with Order Category Code = MIXED and at least one line with Line Category Code = RETURN will be displayed in Returns subtab
-
Return orders with Order Category Code = RETURN will be displayed in Returns subtab only
Thus, a Mixed Order with lines of both Line Category Code as ORDER and RETURN can be queried and displayed in both Track Orders and Returns subtabs.
If IBE: Use Returns is No or not set, all types of orders/returns will be displayed in the Track Orders subtab.
Note that users will see all orders which have at least one order line.
Rules and Guidelines for Returns
Following are rules and guidelines for Returns functionality. For additional details related to Oracle Order Management, see the Oracle Order Management Implementation Manual.
General Rules and Guidelines
Following are some general rules and guidelines for Returns.
-
Although Oracle Order Management supports several return types, Oracle iStore supports only Returns for Credit. Returns for Credit means that the customer is credited the money spent on the item, less any fees imposed by the merchant.
-
Oracle iStore supports only, "At the price of the original order" pricing.
-
In Oracle Order Management, the flow of an RMA order or order lines is determined by Order Type at the header (cart) level and the Line Type at the line (item) level. A return line is indicated in Order Management by its Line Type, negative item quantity, and line total price.
-
Each order type and each line type is associated with a workflow process in Oracle Order Management. Line types can be variations of Return, such as Return with Approval, Return for Credit Only, etc., and have a line type category of RETURN. Out-of-the-box, Oracle iStore uses the default line type as the one defined in the Transaction Type form as the default line type.
-
A return quantity cannot be greater than ordered quantity.
-
An order line can be returned multiple times in multiple return orders, but the combined return quantity cannot be greater then ordered quantity. If the user has already returned some quantity, then he can only return the original ordered quantity minus the retuned quantity. This check is done at the time the return order is booked. If his return order does not comply with these rules, the user will see the error message, Invalid quantity.
-
Returned quantities are shown in negative numbers in Oracle Order Management. Oracle iStore's UI, however, always shows the quantities as positive numbers.
-
Oracle Order Management does not store a return location for a return order. Therefore, merchants must specify the return location in the Oracle Order Management workflow's e-mail notification message.
-
In Order Tracker, you can view orders placed through other Oracle applications, such as Depot Repair, Oracle Order Management, and Oracle Quoting. For this reason, Oracle iStore supports the viewing of mixed orders in the Order Tracker (including Returns) pages. Mixed orders with at least one return line will display. When users view details of a mixed order, there are three sections:
-
Order Items -- This area shows items ordered in the order being viewed.
-
Return Items -- This area shows lines being returned with the order being viewed, whether or not they were part of this order number or another order number.
-
Related Returns -- This area shows return lines for the order number being viewed, which were returned earlier than the order being viewed.
-
-
Security on returns -- Only the user who initiated a pending return can modify it, until he submits it.
-
Re-load return message -- If a sales representative and a user are simultaneously updating a return, the user receives an error message indicating he should re-load the return page.
-
Return charges -- Merchants can setup return fees using modifiers. When setting up charges, merchants can specify special charges to be applied specifically to returns, for example, freight charges, restocking fees, return handling, damages, etc. These fees are subtracted from the total return amount, and the UI display reflects the adjusted amounts.
Rules and Guidelines for Items
Following are rules and guidelines for items.
-
In order for it to be returnable, a product's Returnable flag in Inventory must be active. See the section, "Step 6 - Verify Oracle Inventory Returns Flag".
-
Order lines from orders in Entered or Cancelled status cannot be returned.
-
Customers can return model bundles and configured items, but Oracle iStore does not support returning only components of the model/configured item -- these items are returnable as a whole item and not as individual items.
-
Network container items and their child items are not returnable. If an order has only network container items, the Return Item button in the order detail page does not display. If the order has mixed (returnable and non-returnable) telecommunications service ordering (TSO) items, then the Return Item button is shown. In the Create Return: Select Items, page, network container items will display with Returnable column entry set to No.
-
In Order Tracker, when viewing the details of an order with returns, in the Return Items table, the column named Total Price for non-TSO items is renamed Charges for TSO items.
-
Serviceable items can be returned through Oracle iStore, but service items cannot.
-
Decimal quantities can be allowed for returnable items.
-
"Trade-in Line" lines in Mixed Orders (which have line Category as "RETURN") cannot be returned.
-
An item cannot violate the return policy of the merchant. A return policy can be set up using Processing Constraints and additional checks are possible through the API.
Rules and Guidelines for Returns Page
Following are rules and guidelines for the Returns subtab and pages.
-
The Returns subtab and associated Returns page only display if the profile option, IBE: Use Returns, is set to Yes. In addition, B2B users must have the IBE_CREATE_RETURN permission to see the appropriate functionality on the page. See the "Implementing Returns" section for more information.
-
Return items show quantity as positive and total item price as negative, in parentheses. Sales-representative created quotes containing trade-in line items display the amount as negative as well.
-
User permissions do not apply to B2C users; therefore, these users will always see all returns functionality, as long as IBE: Use Returns is Yes.
-
When a user navigates to the Returns page, all orders submitted in x days will be shown. Note that "submitted" means:
-
Pre-booking feature disabled: Submitted means Booked/Closed/Cancelled return orders
-
Pre-booking feature enabled: Submitted means returns in Pending Internal Approval and Booked/Closed/Cancelled return orders
"Not submitted" means pending returns or returns in Entered/User Working statuses.
-
-
In Oracle iStore's Returns pages, you can modify the LOV that displays the reasons a user is returning an order. See the "Implementing Messages and Prompts" chapter for information on the default values for the Returns lookup.
Rules and Guidelines for Users and Organizations
This section contains Returns rules and guidelines specific to users and organizations.
-
In order for a customer to initiate a return order:
-
An order must exist with at least one returnable product.
-
B2B users must have the IBE_CREATE_RETURN permission in their user roles.
-
For a pending return to be retrieved and submitted, it must have the same party ID, currency code, operating unit, and customer account ID as those retrieved for the logged-in user's current session.
-
-
For B2B customers, returns are allowed within an organization, providing the order has been booked in the same organization, currency, and account, as that of the user creating the return order. If these do not match, a message displays directing the customer to contact his sales representative.
-
A B2B user can view the submitted returns of another user in the same organization, but cannot view the pending returns of another user. Note that B2B users must have the IBE_VIEW_RETURN_ORDER permission to view orders across the organization.
-
For B2C users, if the merchant has enabled returns, all users will see the Return Items button in the Order Details page and the Returns subtab within the Orders menu, regardless of whether they have returnable items -- for B2C users, there is no way to disable the Returns functionality by user or user role.
Customers, Contacts, and Addresses Rules and Guidelines
Following are some rules and guidelines surrounding customer information, contact information, and address information with returns:
See also: the section, "Validations Performed in Returns Process"
Note that order level is also known as header level and cart level. And, line level is interchangeable with item level.
Order-Level Address Behavior:
The following is the behavior for addresses at the order level.
Bill-To Address:
-
A bill-to customer and address are mandatory at order level for a return order.
-
Address defaulting: At header level, logic on how bill-to addresses are selected for B2B and B2C users is as follows:
-
Oracle iStore selects the bill-to primary address from the customer's address book.
-
If this doesn't exist, Oracle iStore selects the first non-primary bill-to address from the address book.
-
If this doesn't exists, Oracle iStore selects the primary ship-to from the address book
-
If this doesn't exists, Oracle iStore selects the non- primary ship-to from the address book
-
If this doesn't exist, Oracle iStore selects the first valid bill-to address from the original order lines.
-
If there is no valid address, Oracle iStore shows an error message directing the user to create a new address.
-
-
B2B users cannot change bill-to addresses at the order level -- only line-level billing data is exposed for B2B users.
-
B2C users cannot change bill-to address at the line level -- only header-level billing data is exposed for B2C users
Ship-To Address:
-
A ship-to customer and address are not mandatory at order level for a return order.
-
Address defaulting: Oracle iStore does not default any value for ship-to address at the header level. Hence, ship-to defaulting occurs per Oracle Order Management's defaulting rules.
-
For both B2B and B2C users, Oracle iStore does not expose ship-to addresses in the Returns pages. Thus, the user cannot modify the ship-to address at the order level.
Item-Level Address Behavior:
The following is the behavior for addresses at the line level.
B2B users, Bill-To:
-
The bill-to address and contact for the return lines in the pending return queue are defaulted from the original order.
-
If any of the bill-to addresses copied from the original order are invalid, Oracle iStore shows an error message when the user submits the return; the user can then modify the address.
-
The customer can modify the bill-to contact and address at the return-line level, by accessing the Line Level Billing page through the Billing icon. Note that in these contact/address pages, the user will not be able to create a new contact/address. When the user changes the bill-to contact, the existing bill-to address is set to null, and the user needs to select an address for the contact or one of the organization contacts.
-
The user can also select View all Contacts to select a different contact and address.
B2B users, Ship-To:
-
The bill-to address and contact for the return lines in the pending return queue are defaulted from the original order.
-
Since Oracle iStore does not expose these addresses in the Returns UI, the user cannot modify the ship-to address at the item level.
B2C users, Bill-To:
-
When a B2C user either updates the header level bill-to address or submits the return order, Oracle iStore propagates the bill-to address chosen at the order level to all the return lines. Thus, for Oracle iStore submitted returns, the bill-to address on the return-lines will be same as the bill-to on the return order.
B2C users, Ship-To:
Behavior is the same as B2B line-level ship-to behavior.
Note: No users can change the bill-to customer.
Implementing Returns
Set up Oracle iStore's returns functionality according to the steps detailed in this section.
For Oracle Order Management setup information, see the Oracle Order Management documentation.
Following are the steps to enable returns in Oracle iStore:
-
Step 1 - Set Profile Options
-
Step 2 - Verify B2B User Permissions
-
Step 3 - Set up Transaction Type
-
Step 4 - Set up Returns with Approval
-
Step 5 - Set up Returns Policy"
-
Step 6 - Verify Oracle Inventory Returns Flag
-
Step 7 - Customize Returns Lookups
-
Step 8 - Set up E-Mail Notification Support
-
Step 9 - Verify Inventory Setup for Items with Serial Numbers
Step 1 - Set Profile Options
Set the following profile options (see the appendix, Profile Options, for more information on the profile options):
-
IBE: Use Returns --- Set to Yes to enable the returns functionality.
-
IBE: Return Orders Transaction Type --- Set to the transaction type you wish returns to be created under (for example, set to the transaction type created in the section, "Step 3 - Set up Transaction Type"). .
-
IBE: Enable Return Pre-booking Approval --- Set to Yes only under certain conditions described in the "Profile Options" appendix. Otherwise, leave the profile option set to No, which is its default value.
-
IBE: Enable Return Policy --- Set to Yes only if implementing additional processing constraints for return policies.
-
Set the Quoting parameter, Default Salesrep, to the default sales representative for sales assistance. See the "Oracle Quoting Integration Parameters" topic in the appendix, Profile Options, for more information.
See the Oracle Order Management Implementation Manual for setup information related to Oracle Order Management.
Step 2 - Verify B2B User Permissions
Verify that the B2B customers who will be submitting returns have the IBE_CREATE_RETURN permission in their user role. Only B2B users with this permission will be able to access the Return Items button in Order Tracker.
To view returns across their organizations, B2B users must have the permission, IBE_VIEW_RETURN_ORDER.
Step 3 - Set up Transaction Type
You may use the following steps as an example setup for Oracle iStore returns transaction type. See the Oracle Order Management Implementation Manual for additional setup information.
Important: For Oracle iStore returns, only set up transaction types using Order Category = Return. Mixed should not be used and will not work.
-
As Order Management Superuser, navigate to the Transaction Types window and set up a new Order Type with following attributes:
-
Name/Description –
iStore RMA(user definable) -
Order Category –
Return -
Transaction Type Code –
Order -
Workflow Fulfillment Flow/Order Flow -- Depends on whether the returns pre-booking feature is enabled:
--If the profile, IBE: Enable Returns Pre-Booking Approval, is set to No, use
Order Flow - Return with Approval. If this workflow is used, you can enable an approval process, after the return is Booked in Order Management and if an Approval List has been set up.--If the profile, IBE: Enable Returns Pre-Booking Approval, is set to Yes, use
Order Flow - Return with Submission and Approval.See the section, "Returns Functionality With and Without OM Release 11.5.10", for more details on the returns pre-booking approval feature.
-
Sales Document Type –
Sales Order -
Default Transaction Phase –
Fulfillment(applicable only if the returns pre-booking feature is enabled)
-
-
Associate a price list with the above transaction type if using return fees, multi-currency price lists, and/or Order Management defaulting rules based on price list.
-
Enter other required/optional information and Save.
-
Set the Default Return Line Type in the Main tab to a required value. This line type will be used as the line type for all return lines in a return created through Oracle iStore. The error, "Line type Id Is missing" is seen if this setup is not done. This is a mandatory setup.
-
For this transaction type, navigate to the Assign Line Flows window. In this window, choose the Line Type selected as Default Line Type in the above step and assign a Process Name to it (for example, "Line Flow - Return for Credit Only"). The error, "No workflow has been assigned to this transaction type" is seen if this setup is not done. This is also a mandatory setup.
-
Document Sequence Assignment --- Assign the RMA Document Sequence on the newly created,
iStore RMA,transaction type.
Step 4 - Set up Returns with Approval
Optionally, merchants can set up returns to use an approval mechanism before they are submitted to Oracle Order Management, if they are using at least Release 11.5.10 of Oracle Order Management (see the section, "Returns Functionality With and Without OM Release 11.5.10").
The approvals use standard Oracle Workflow processes and related e-mail notifications owned by Oracle iStore. The e-mail notifications are: Return Order Approval and Return Order Rejection. See the chapter, Integrating Oracle iStore with Oracle Workflow, for details.
By setting up returns with approval, administrators can approve or reject return orders before they are processed in Oracle Order Management. In addition, merchants can specify a hierarchy of approvers.
To set up returns with approval:
-
Approver List Setup --- Set up a new Approver List with following attributes:
-
List Name/Description –
iStore RMA Approvers/iStore RMA Approvers -
Transaction Type --
iStore RMA -
Transaction Phase –
Fulfillment
-
-
Select one role or responsibility that will be responsible for approvals.
Note that this LOV will display all applicable Oracle Workflow roles or Oracle Applications (FND) responsibilities. Selecting a Workflow role will enable all the people attached to that role to get the e-mail. Similarly, the same behavior will occur with an FND responsibility.
Step 5 - Set up Returns Policy
Optionally, set up a returns policy which utilizes Oracle Order Management processing constraints functionality. Processing constraints allow merchants to control changes to sales orders and returns at all stages of the order or line workflows. Processing constraints provide:
-
The ability to control changes based on user responsibility
-
The ability to call custom PL/SQL code to determine whether a processing constraint condition evaluates to true
-
The ability to constrain operations at any point in the order or line process flow
See the Oracle Order Management Implementation Manual for additional setup information.
Step 6 - Verify Oracle Inventory Returns Flag
Customers can select an order line to return only if the item is returnable. This is enabled by selecting the Returnable checkbox in the Oracle Inventory form (under Order Management tab). For more information, see the Oracle Inventory User's Guide.
Step 7 - Customize Returns Lookups
Return Reasons and Returns search query values exposed in the UI are Oracle Applications lookups which can be customized to fit your business needs. See the chapter, Implementing Messages and Prompts, for details.
Step 8 - Set up E-Mail Notification Support
Depending upon which version of Oracle Order Management you are using, you may need to perform additional setups for e-mail notifications, including optionally specifying a return location in the notification messages. See the chapter, Integrating Oracle iStore with Oracle Workflow, for more information.
Step 9 - Verify Inventory Setup for Items with Serial Numbers
In the Oracle Inventory Master Items form, for each applicable product, set the Serial Controlled property to one of the following values:
-
At Receipt
-
At Sales Order Issue
-
Predefined
If the serial-controlled flag is not set for an item, in the Create Return: Search and Select Items page, users cannot search by serial number, nor will the Serial Number column show the serial number pop-up icon.
Until the order is shipped to the customer, the serial number search does not return a record in Oracle iStore.
In addition to the above conditions, for proper setup, the serial numbers should have been generated for the order line in Oracle Inventory.
For more information, see the Oracle Inventory User's Guide.
Oracle iStore and Party/Account Merge
Party Merge and Account Merge functionalities are part of the Data Quality Management tools provided by Oracle Trading Community Architecture (TCA). They allow you to identify and resolve duplicates present in the Trading Community registry. Different applications throughout the Oracle E-Business Suite have data associated with both Parties and Customer accounts. Any references to Party and Accounts should be updated when Parties or Accounts are merged. This ensures data integrity across the Oracle E-Business Suite.
This section discusses Oracle iStore's behavior with TCA's concurrent programs which effect Party/Account Merge operations.
For more information on the TCA functionality discussed in this section, see the Oracle Trading Community Architecture Administration Guide.
Party/Account Merge Overview
Party Merge and Account Merge are TCA utilities which merge or transfer party and account data in the trading partner database. There are important differences between the two operations, as discussed in the following sections:
-
"Party Merge"
-
"Customer Account Merge"
Party Merge
Party Merge eliminates duplicate data in the registry layer in order to keep the trading partner database accurate and clean. It consolidates duplicate parties after they have been entered in the system. The merging enables users to have a single view of each party.
Party Merge can merge information for:
-
Parties: Merge duplicate parties
-
Party sites: Merge duplicate party sites for a party; for example, merge duplicated manufacturing locations of a party
-
Party relationships: Related child entities are merged, such as party relationships, contact information, party profiles, customer accounts and information obtained from third-party sources
There are two types of operations performed by Party Merge:
-
Merge: Inactivates an entity and transfers its dependent entities
-
Transfer: Moves an entity from one parent to another, if a duplicate does not exist
Example:
ABC Company has implemented the Oracle E-Business Suite
While checking the quality of its data, ABC Company determines that duplicate records exist for a party, Vision Corporation. Data for this party were entered into the database under the names Vision Corp. and Vision Inc. Using the Party Merge utility, ABC Company plans to merge the two Vision parties -- Vision Corp. and Vision Inc.
Party Merge will:
-
Inactivate the Vision Corp. party record
-
Either merge or transfer the details of Vision Corp., e.g., transfer or merge party sites: 500 Oracle Pkwy. and 600 Vision Pkwy.
-
Transfer party site 500 Vision Pkwy. to Vision Inc.
Customer Account Merge
Customer Account Merge is a tool that merges transactions from one customer account to another customer account. The merging or transferring of these duplicate records allows the consolidation of customer account transactions --- such as orders, invoices and payments --- into one customer account relationship.
Oracle iStore's Behavior with Party/Account Merge
Oracle iStore supports and treats Party/Account Merge in various ways, as discussed in this section.
In Party/Account Merge operations, Oracle iStore's access to party data is accomplished through foreign keys on the data. These are summarized in the section, "Oracle iStore Foreign Keys Used in Party/Account Merge", below.
Shopping Lists
Account Merge updates both the party and account IDs of the merge-from party to point to the merge-to party. Thus, merge-to party, after the account merge, will see additional shopping lists from the merge-from party.
In addition, with Party or Account Merge:
-
Merge-to users will have access to the same shopping lists as before the merge.
-
New shopping lists are created during the transfer.
-
If more than one shopping lists exists for a user, these will not be merged into a single list.
The Oracle iStore foreign key to the party and account layer for shopping lists data is IBE_SH_SHP_LISTS_ALL.
Express Checkout Preferences
In a Party Merge, Express Checkout preferences do not change in the merge-to party.
The Oracle iStore foreign key to the party layer for Express Checkout is IBE_ORD_ONECLICK_ALL.
Site Access Restrictions
In a Party Merge, merge-to settings override merge-from settings for access restrictions. The following table, Site Access Restrictions - Expected Behavior After Party Merge, shows the expected behavior of these preferences after Party Merge.
| Preference | Merge-from | Merge-to | Expected Behavior |
|---|---|---|---|
| No restriction | On or Off | On or Off | Merge-to settings take priority and are not changed. |
| Only the following organizations can access the site | On | On | Additional organizations are added to the merge-to list from the merge-from list. |
| Only the following organizations can access the site | Off | On | Merge-to settings take priority and are left On. |
| Only the following organizations can access the site | On or Off | Off | Merge-to settings take priority and are left Off. |
| The following organizations cannot access the site | On | On | Additional organizations are added to the merge-to list from the merge-from list. |
| The following organizations cannot access the site | Off | On | Merge-to settings take priority and are left On. |
| The following organizations cannot access the site | On or Off | Off | Merge-to setting take priority and are left Off. |
The Oracle iStore foreign key to the party layer when dealing with site access is: IBE_MSITE_PRTY_ACCSS.
Shared Carts
In Party Merge, Oracle iStore shared carts have the following rules:
-
Shared carts in the merge-from party are transferred to the merge-to party
-
If parties have the same cart, then the merge-from cart is ignored (i.e., won't be shared twice to the merge-to user)
In Account Merge, Oracle iStore shared carts follow these rules:
-
Account ID and Party ID of the merge-from party will be changed to that of the merge-to party
-
A duplicate row is defined as having identical party_id, account_id and quote_header_id
The Oracle iStore foreign key to the party layer for shared carts is IBE_SH_QUOTE_ACCESS.
Active, Default-Named, and System-Saved Carts
In Party or Account Merge, the following is the behavior for active, default-named, and system-saved carts:
Note: Default-named and system-saved carts are carts that are named by the system. See the section, "System-Saved and Default-Named Shopping Carts", for details, for more information.
-
Active carts --- No changes are made to any active cart items or names in the merge-to party or account.
-
System-saved carts --- System-saved carts, whose default name is "Store Saved", are not altered in any way in the merge-to party or account.
-
Default-named carts --- These carts, whose default name is "Store", are renamed to the default name for system-saved carts ("Store Saved") in the merge-to party or account.
The Oracle iStore foreign key to the party layer for active carts is IBE_ACTIVE_QUOTES_ALL.
Running Party and Account Merge
By running Party Merge without Account Merge there is the possibility for a party to have two accounts. To avoid multiple accounts to one party, it is recommended to run Account Merge after Party Merge.
See the following sections for examples on how the accounts are treated in the two scenarios:
-
"Party Merge Only Scenario"
-
"Run Party Merge Then Account Merge Scenario"
Party Merge Only Scenario
In the scenario where only Party Merge is run, the following table, Account Numbers in Party Merge Only Scenario, shows what should be expected:
| Merge | Party ID | Account ID |
|---|---|---|
| Before Party Merge | ||
| To | 1000 | 2000 |
| From | 1100 | 1800 |
| After Party Merge | ||
| To | 1000 | 2000 |
| 1800 |
Party ID 1000 will have two accounts. At login, the system will pick the account created first. In the example above, account 1800 (from system) will be used at logon.
Run Party Merge Then Account Merge Scenario
In the scenario where Account Merge is run immediately after Party Merge, the following table, Account Numbers in Account Merge After Party Merge Scenario, shows what should be expected:
| Merge | Party ID | Account ID |
|---|---|---|
| Before Party Merge and Account Merge | ||
| To | 1000 | 2000 |
| From | 1000 | 1800 |
| After Party Merge and Account Merge | ||
| To | 1000 | 2000 (1800 merged) |
Oracle iStore Foreign Keys Used in Party/Account Merge
The following table, Oracle iStore Foreign Keys Used in Party/Account Merge, shows the foreign keys used in Party/Account Merge.
| Entity Name | Description |
|---|---|
| IBE_SH_SHP_LISTS_ALL | Shopping lists |
| IBE_ORD_ONECLICK_ALL | Express Checkout preferences |
| IBE_MSITE_PRTY_ACCSS | Store access restrictions |
| IBE_SH_QUOTE_ACCESS | Shared carts |
| IBE_ACTIVE_QUOTES_ALL | Active carts |
For more information on the TCA functionality discussed in this section, see the Oracle Trading Community Architecture Administration Guide.
Shopping Cart Purge
Oracle iStore shopping carts can be purged to free up space in the underlying iStore and Quoting tables and improve performance for active shopping carts and quotes. For information on purging shopping carts, see the Purging Quotes section in the Oracle Quoting Implementation Guide and Oracle Quoting User Guide.